Leaderboard


Popular Content
Showing content with the highest reputation on 05/07/2022 in Posts
-
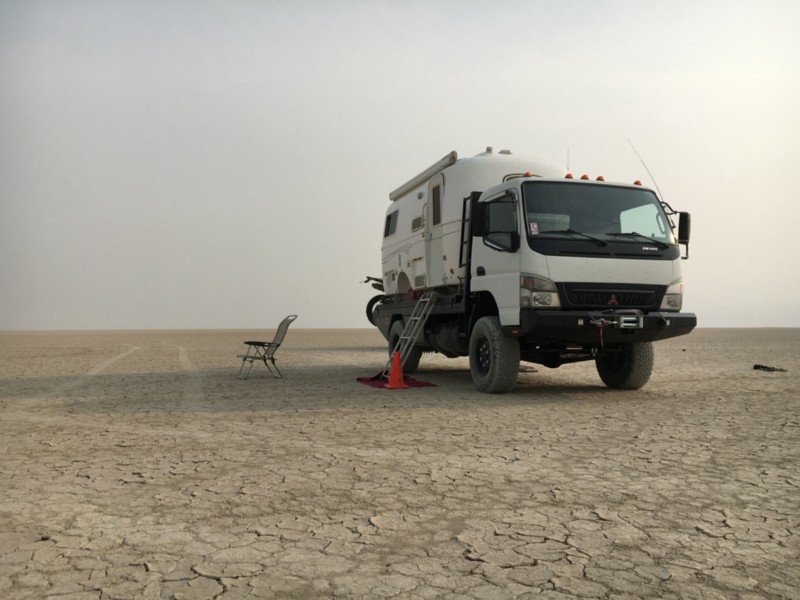
At this point it would appear that you are on the right track in getting to the bottom of your troubles. This tech should be able to tell you fairly quickly if you need to replace - anything. If you have not already done so - turn off your solar panels or put something (a moving blanket or opaque tarp) over the panels so that they will not be generating any power. This is for your protection and would help prevent any "shorts" that could cause a fire. I'd also unplug from shore power unless you have to have power for some reason. The "key" to understanding electricity in your camper is to understand each of the separate and combined systems that potentially provide power to it. Your batteries can be thought of as the heart of the system with BOTH the solar panels and the shore power providing energy that is stored in those batteries. Power (electricity) continues to come into the camper via either and/or both systems unless one or the other or both are disabled in some way. Shore power is the easiest in that if you unplug from a shore power outlet - that stops the electricity from entering the camper/batteries from that source. The solar panels will generate electricity as long as they are getting light - yes, they will produce electricity even when indoors and the building's lights are on. If you have one of the big red solar disconnect switches then it can be used to "turn off" the solar panels - note here that this switch really doesn't turn off the solar panels but only stops the current from proceeding any further down the line (wires) - reread the previous sentence about panels producing electricity. So, shore power provides electricity to your batteries and solar power provides electricity to your batteries and (in most circumstances) your tow vehicle can provide electricity to your batteries. These sources are all "controlled" individually - solar controller adjusts voltage and amount of current from the solar panels, your vehicle has a voltage regulator and your camper has a manager for all of these sources to include shore power - someone (something has to be the "traffic cop") has to manage things so that neither too much nor too little is given to your batteries and/or is used by you such that you potentially overload the wiring in your camper (very much like the circuit breakers in your house). Try to understand one system at a time and it should be easier. And, in any case where you are forced to work with electricity in the camper, be sure to remember that you have at least two if not three sources that will need to be disabled prior to any work or you risk unpleasant things happening. When in doubt - get advice BEFORE proceeding! As you are presently doing with your tech. Bill6 points
-
Congrats to you for taking on something this complex. I try to do most of the repairs and maintenance myself but I couldn't crease wheel bearings. Fortunately I live in North Texas Horse Country with lots of trailer here so there are some good reputable places I can bring my Oliver to for service like this.4 points
-
We camped at COE Obey River Campground on Dale Hollow Lake TN. Nice campground for those that like bicycling, boating, fishing, and Kayaking.4 points
-
Great advice, @topgun2. MAG, do cover the panels until you figure it out. And leave your trailer unplugged. Do you know if you have a breaker to disconnect the panels? In our 2008, it is near the pd charger, down low, and it's not a big red button, it's black and yellow. But, Oliver has made many changes and improvements over the years. @ScubaRx has an Elite II of similar vintage to yours, so he could probably tell you better where to look, and if Oliver installed a switch in those days, or not. I'd pm him with your question, so he gets an alert. He has a thorough understanding of blue sky system, and early Elite II, and is really good at explaining things in a way everyone can understand. If indeed you shorted out the controller, you and your tech will find Ryan Gurin at Blue Sky is extremely helpful. I'm sure he can get you back in business economically and swiftly . Here's his number and email. 760-208-2149 Ryan@blueskyenergyinc.com I've found an email with my phone number is a good way to start, as he's on pacific time. I know you feel overwhelmed right now, but you have lots of help here, and at Blue Sky. Soon, you'll understand how everything works together with all its electron magic. My sister in law delights in saying, "we can eat that elephant, one bite at a time." Best of luck.4 points
-
I actually made a label for my battery door that says "sewer hoses". 😆 John4 points
-
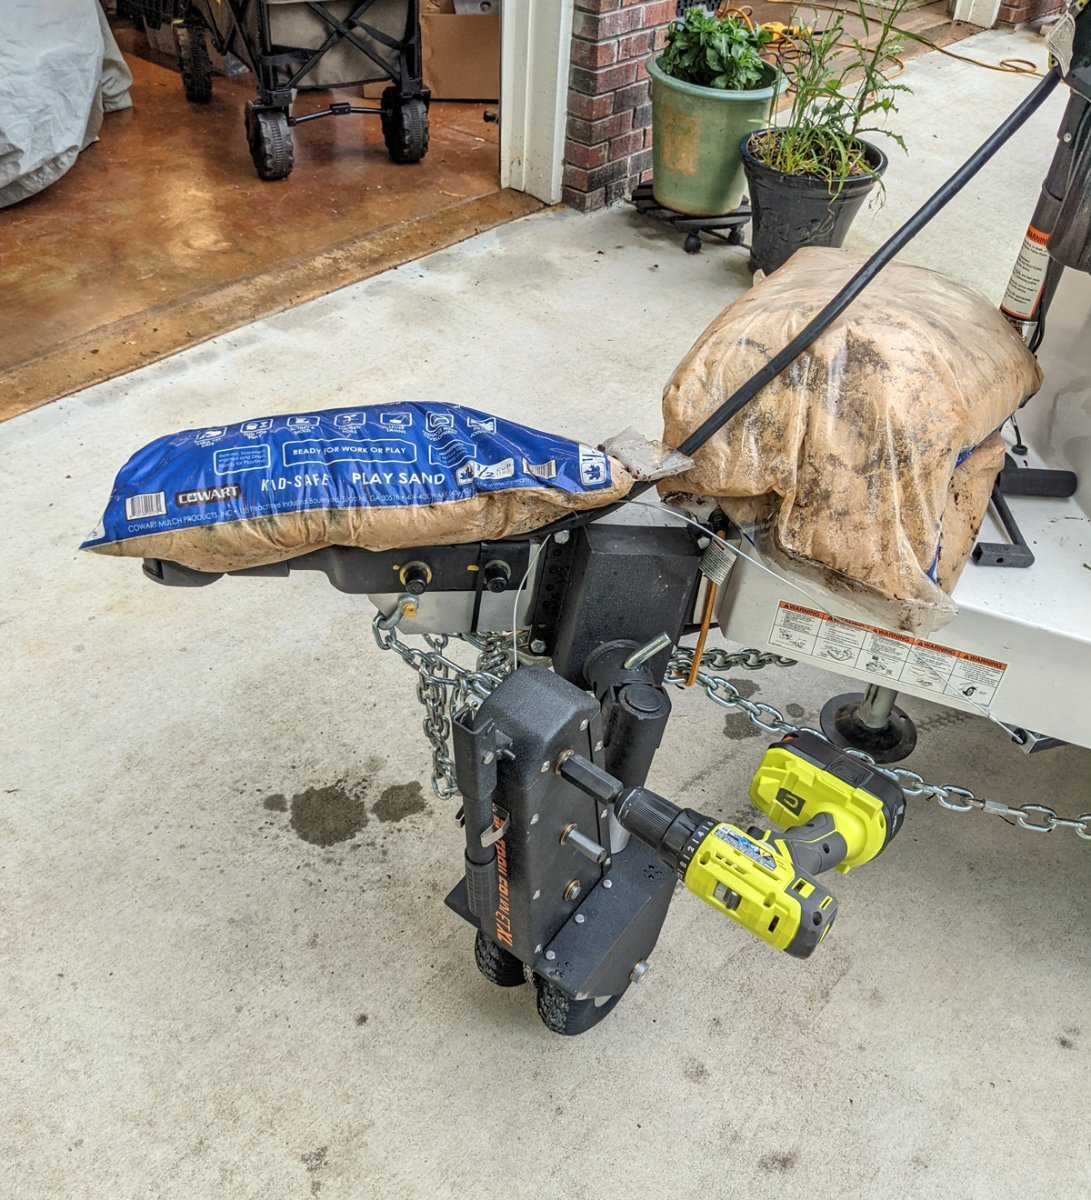
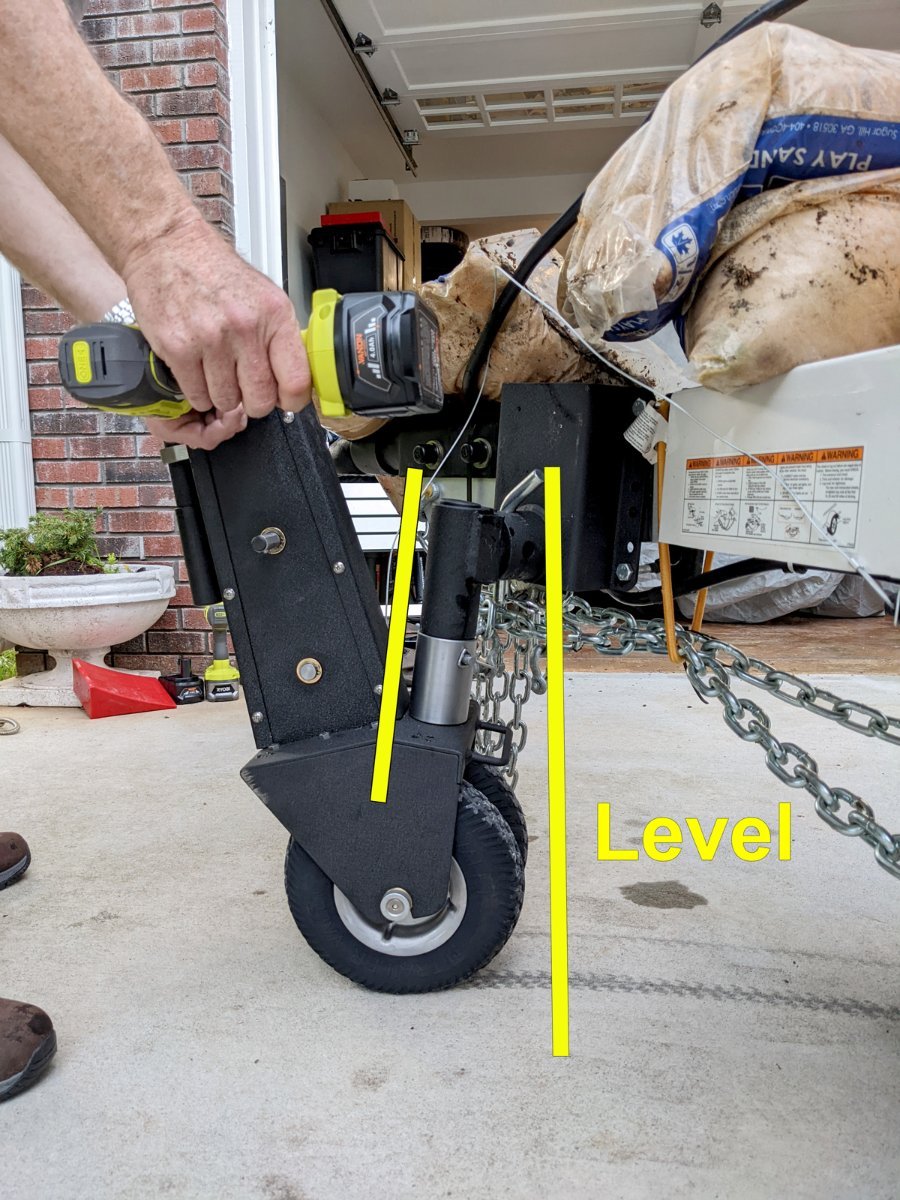
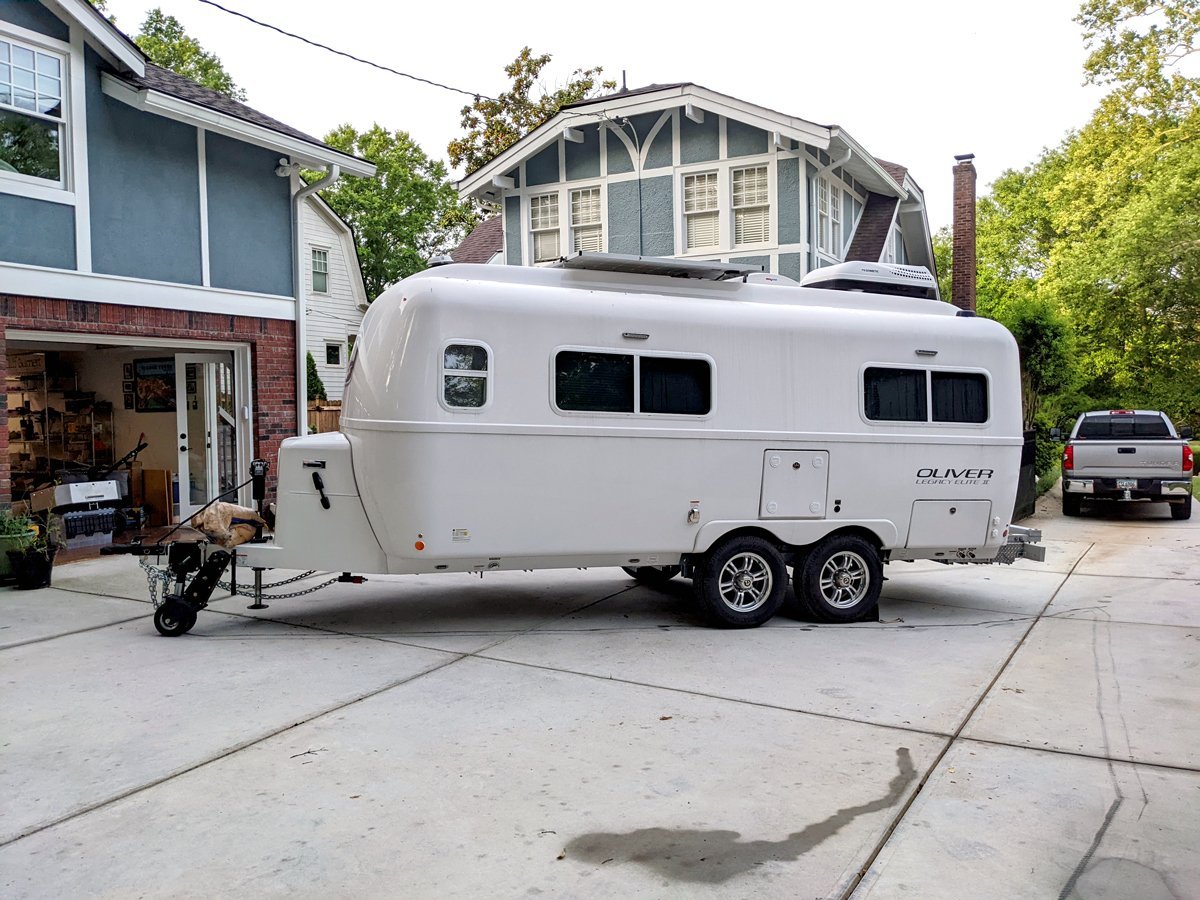
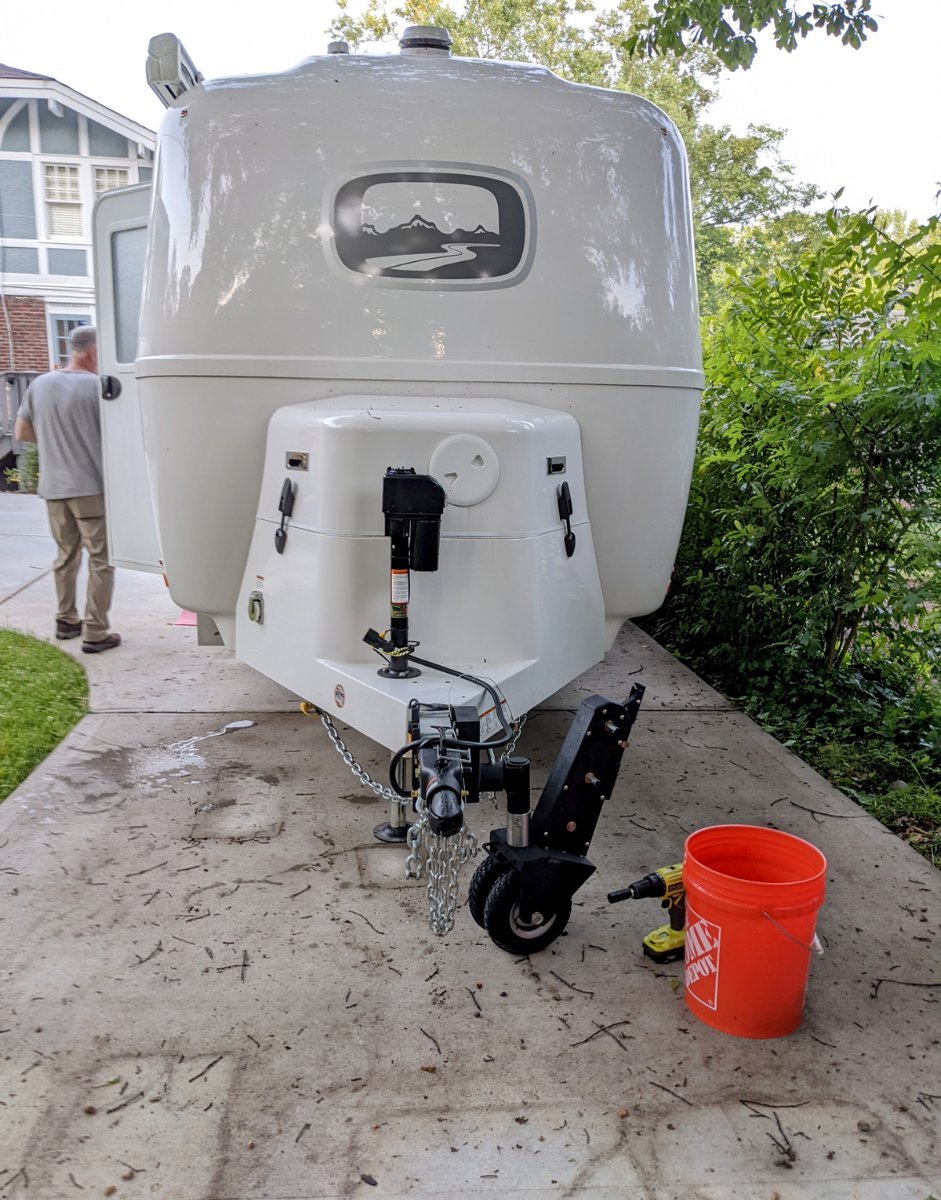
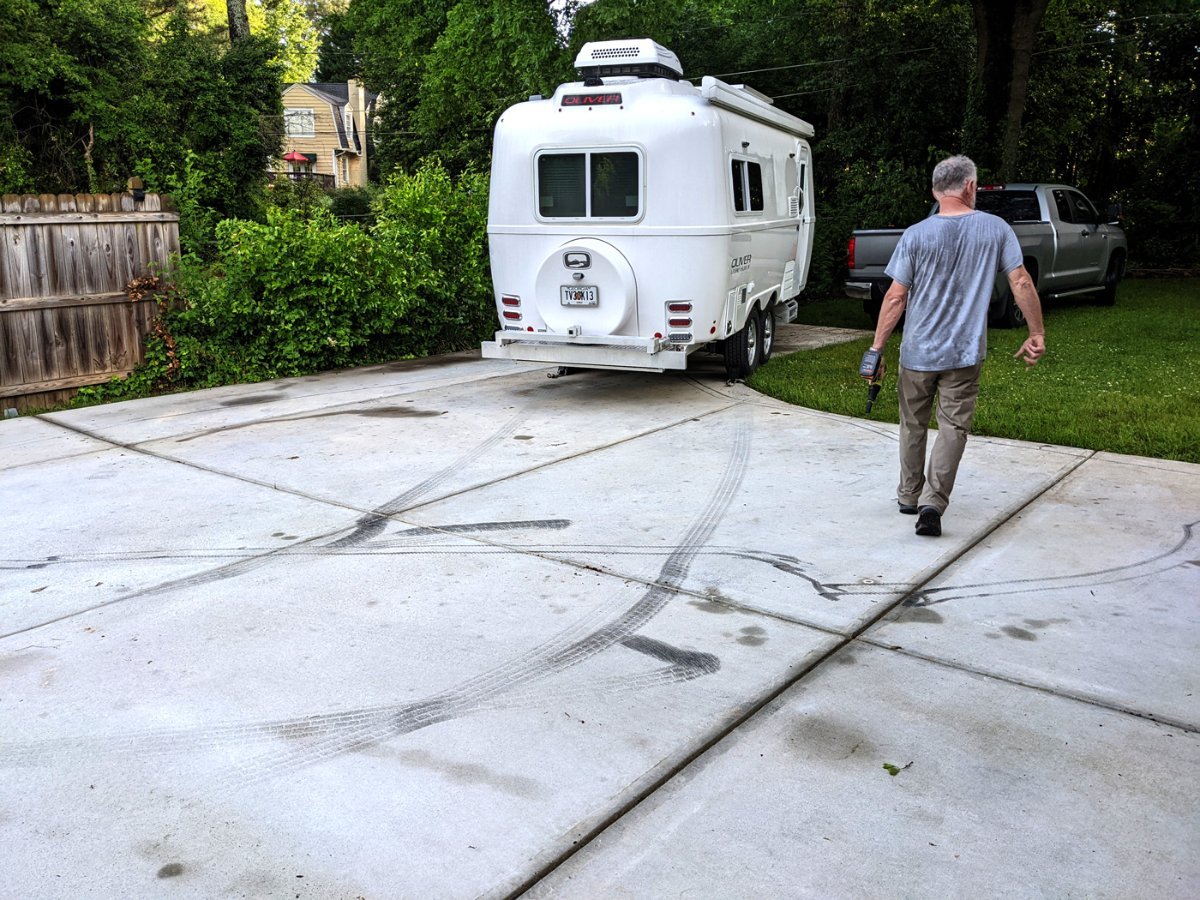
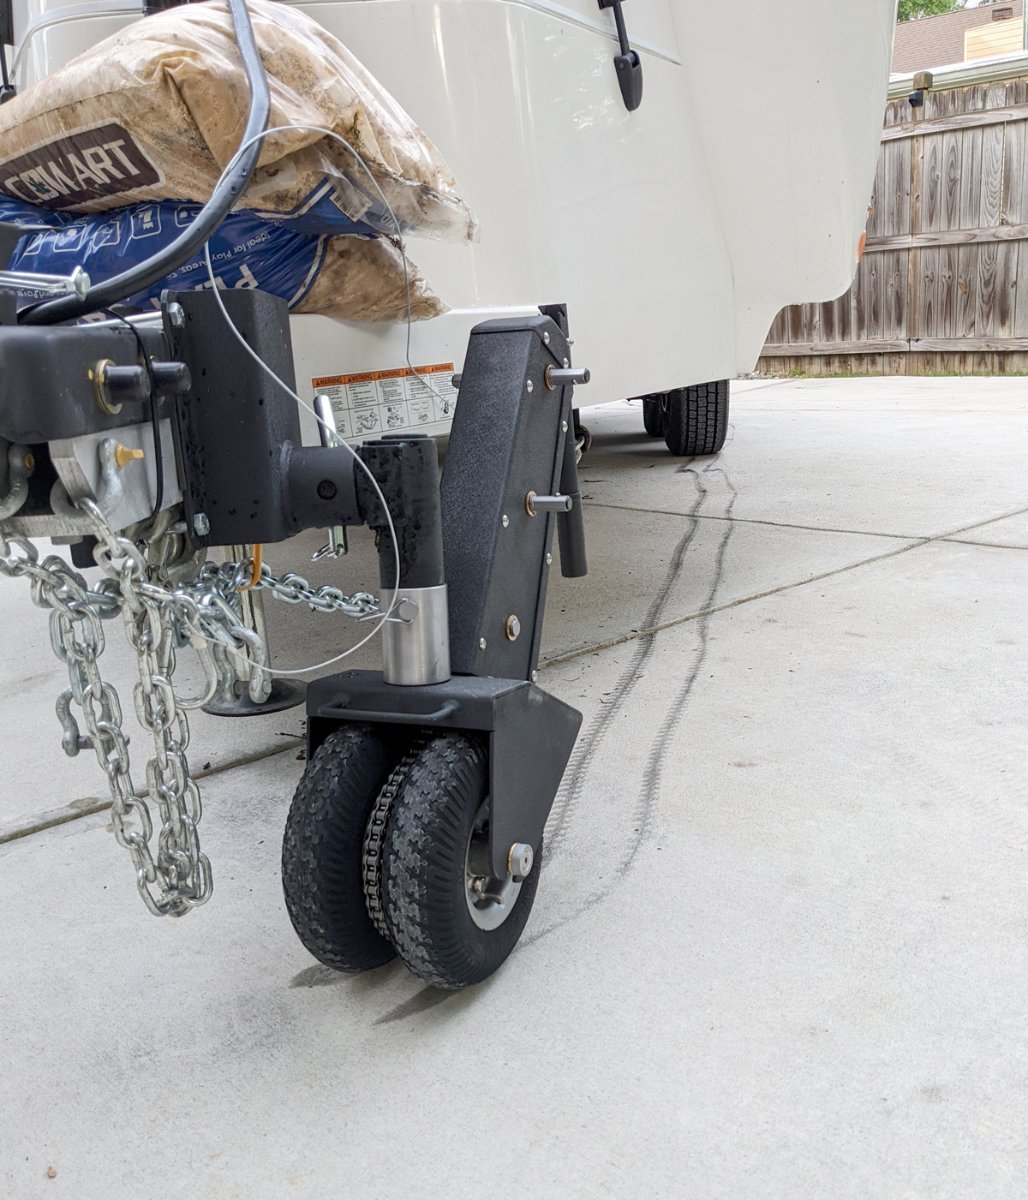
Here is a real-world review of the Trailer Valet XL dolly with the mounting bracket. My plan was to use it move my Ollie on my concrete parking pad, turning it 180 degrees so I could pull it straight out of the driveway instead of backing it out. The pad is very close to level-- a 2.5 percent grade which is minimal—primarily for water drainage. I bought the frame bracket since I didn’t have a lot of faith in using a 2-inch ball connected to the hitch as the only support to move a 5,000 pound trailer. I installed the bracket and torque it according to the instructions. Frankly, it’s a disappointment. It couldn’t move my trailer on a 2.5 percent grade. It’s rated for 10,000 pounds, well under the weight of an LE2. First, the dolly couldn’t get any traction so we put three 50-pound bags of sand on the tongue. The manufacturer recommends using an 18-volt cordless drill. I had two drills on hand; I burned out one of them. The mounting bracket rotated backwards under load. I also have plenty of beautiful skid marks on my concrete. Secondly, this thing is useless on anything other than a perfectly level concrete pad. A 2.5 percent grade isn’t steep. The manufacturer claims that it can handle an incline and it will work on grass or gravel. I have my doubts. Conclusion: I’m sending this one back. Like most things in life, you get what you pay for. There are bigger, more robust trailer dollies on the market. I’m willing to spend the money to get one that actually works. If anyone knows of a good dolly that will handle a 2.5 percent grade then please let me know.
 3 points
 -
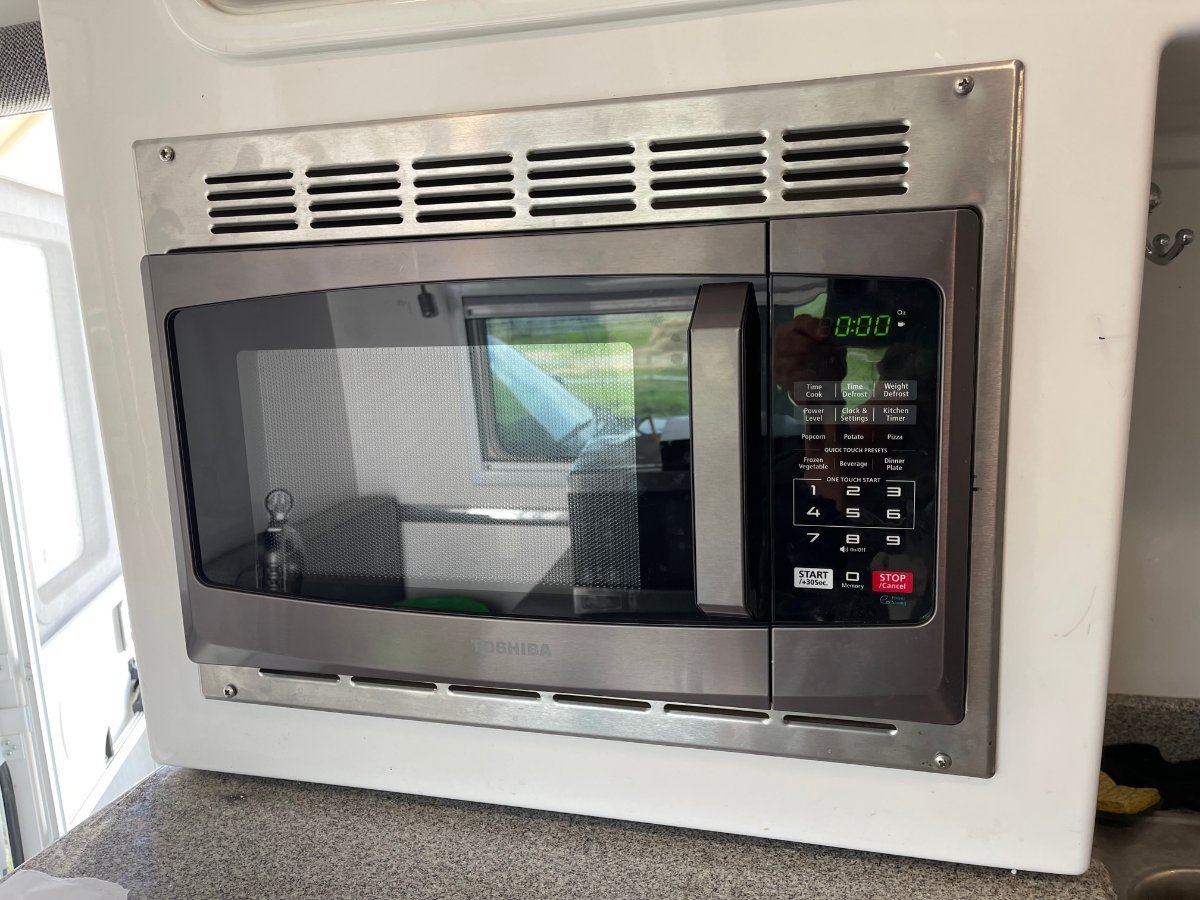
Success, I got the new microwave in. 😃 I replaced the High Point one with a Toshiba EM925A5A-BS That was a lot cheaper than High point. It is the same size and wattage and I was able to use the existing trim, screws etc. from the Non functioning High point.
3 points
-
We have the Parkit360 Force 10K and use it to pull the hitch end of our LE2 into a corner. A front receiver would be no help since we pull the hitch to within about 6 feet from a wall. Speaking of the hitch, the Bulldog doesn't work well with the dolly without the EZ Connect Hitch Adapter. The manufacturer says their dolly doesn't work with the Bulldog hitch, but this guide was published before they made the adapter: Your Guide to Different Hitch Styles: Choosing the Perfect Trailer Dol – Parkit360 The dolly has enough power and grip on pavement to easily move the trailer, but it probably wouldn't work well on gravel. Sometimes the wheels slip on smooth level pavement, usually when pushing the trailer wheels over irregularities like the driveway apron.3 points
-
Thank you Topgun2 and Seadawg, for the advice to get in touch with ScubaRx! Perfect! He thinks there is a good chance no damage was done, and worst case the fix will be inexpensive. Turns out that he helped my husband with Solar system issues 8 years ago when we first got our Ollie. It was like an unexpected meeting up with an old friend! It's amazing to have so much support, I am so grateful.2 points
-
Wow, sounds like a piece of junk and potentially a dangerous piece of junk. Thanks for posting your experience, we can all learn from it. Mike2 points
-
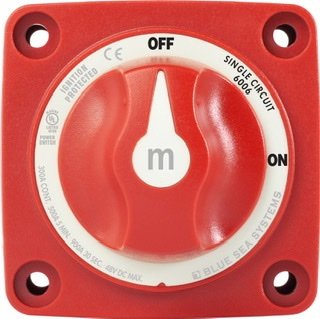
As I mentioned in my post earlier in this thread, a Blue Seas 6006 switch was OTT standard in my 2021 Elite 2. It is a single-pole switch, positive side only. It is installed between the panels and the controller. I will call Zamp Tech Support tomorrow to get their advice on single or dual circuit disconnect and let you all know what they say.
2 points
-
Simply place your cursor on the blue highlighted @ScubaRxand when a new window look for "message". Click on that and start typing and then click on send. Bill2 points
-
We talked about this awhile ago, when calmark was making the change. As I said then, I don't have any personal experience with weathermax, but decades of use of sunbrella in boat and sail covers. If you scroll down, you'll find a link to an old practical sailor test of the two fabrics in one of my posts. Rereading reminded me of two things that i don't think we discussed: Weathermax is much lighter and easier to handle, and more abrasion resistant. For a huge cover, advantage tilts to weathermax. Sunbrella fabrics can be cleaned with a mild bleach and soap and water solution, but weathermax can't. (Understand that even mild bleach can weaken stitching, though, and I don'tknow what thread calmark uses.) So, for cleanability, the win probably tilts to sunbrella. If you Google weathermax vs sunbrella, you'll find a dozen conversations on boating forums, mostly evenly split.2 points
-
Steve, When you said threading a needle this comes to my mind….or me actually trying to tie a fishing knot.2 points
-
A less expensive option is a front hitch on your truck. You can thread a needle in this configuration.2 points
-
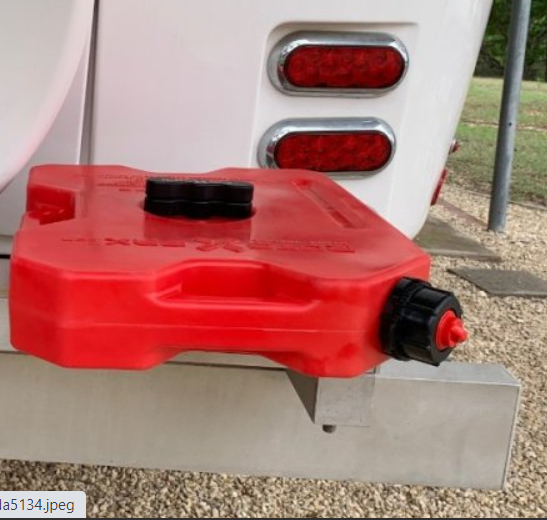
I would not have a problem with this for water storage. But for gasoline, when I saw the below, all I could think of is some jerk with an axe to grind. Giving a perfect opportunity to torch your beautiful trailer. Twist the cap, light it off and go.
2 points
-
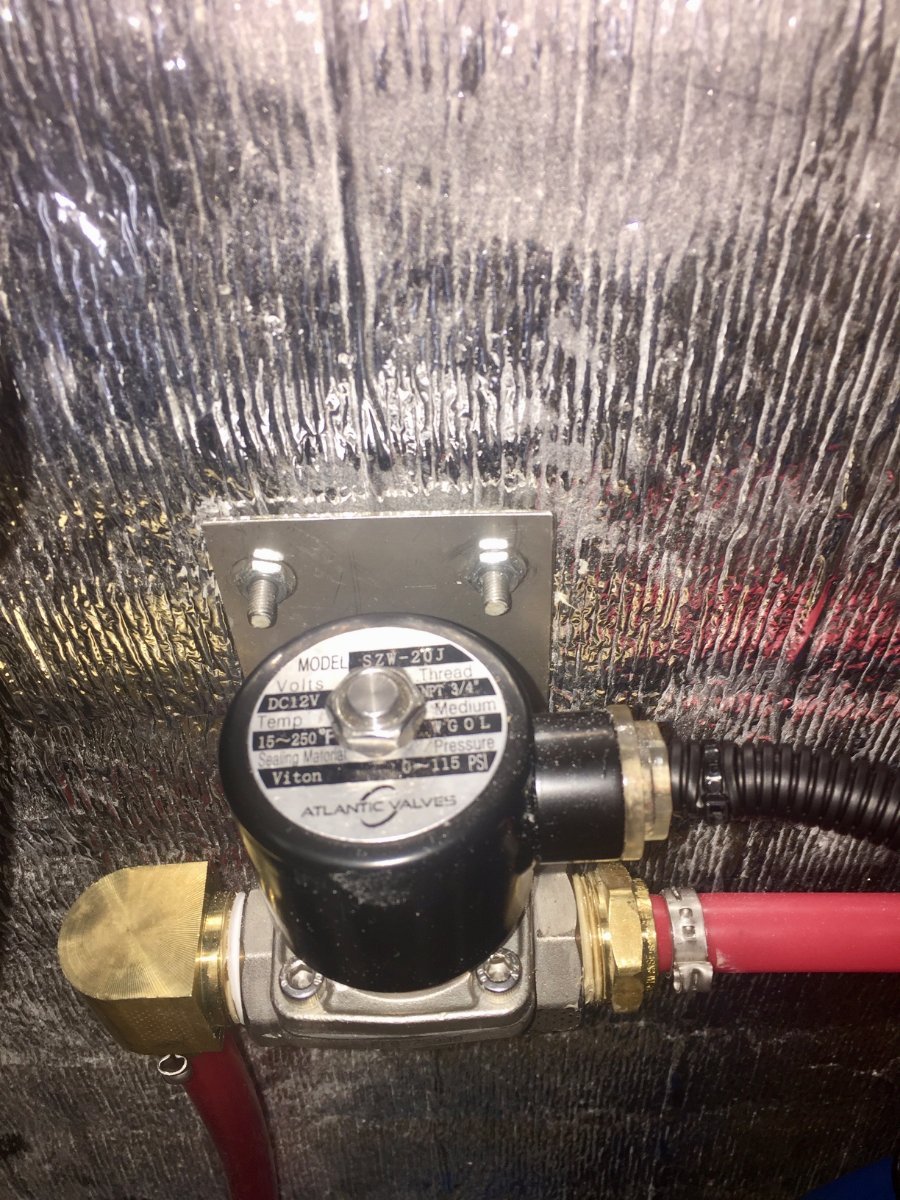
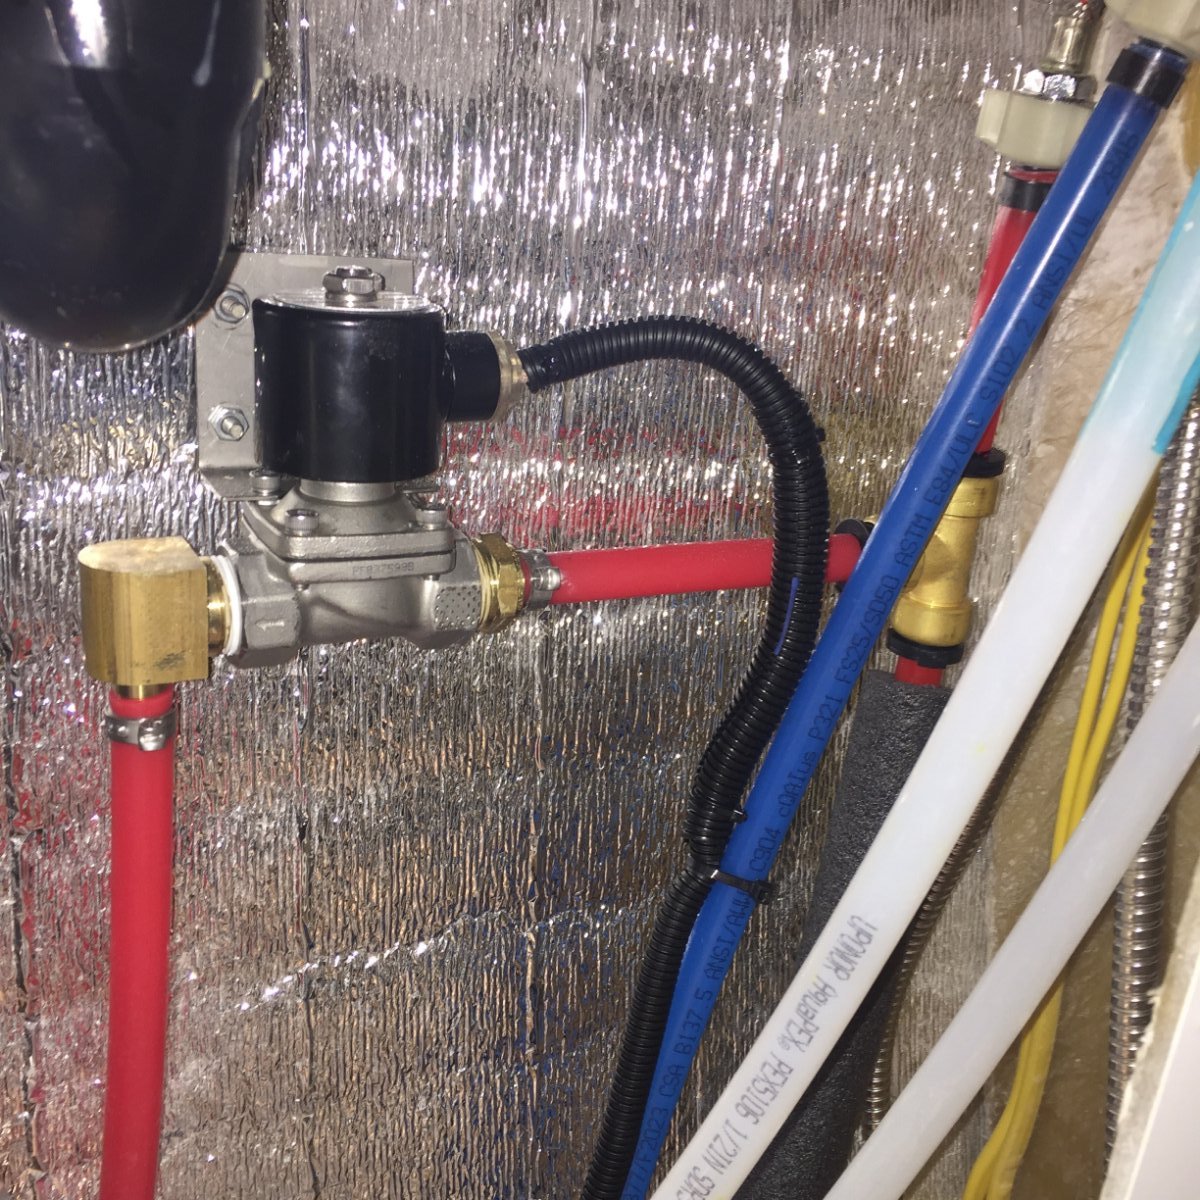
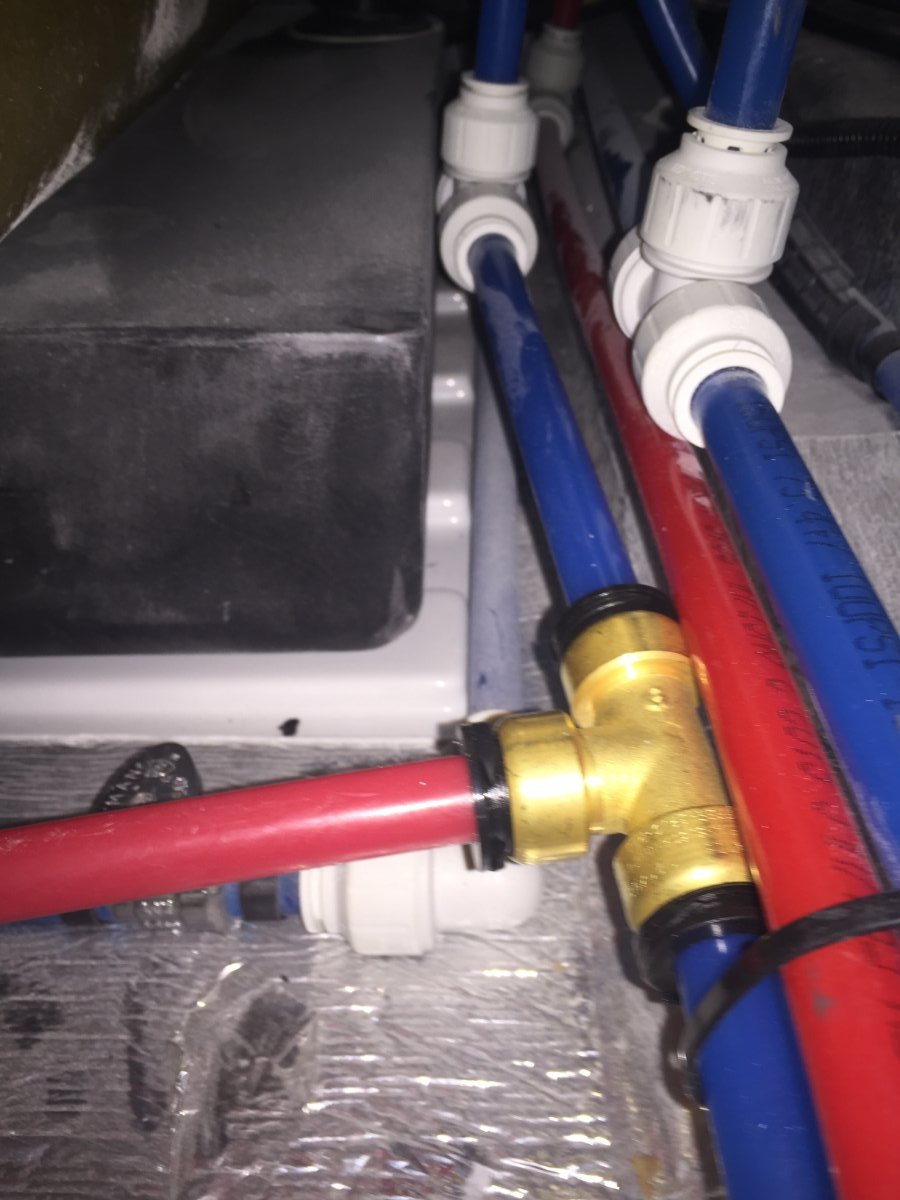
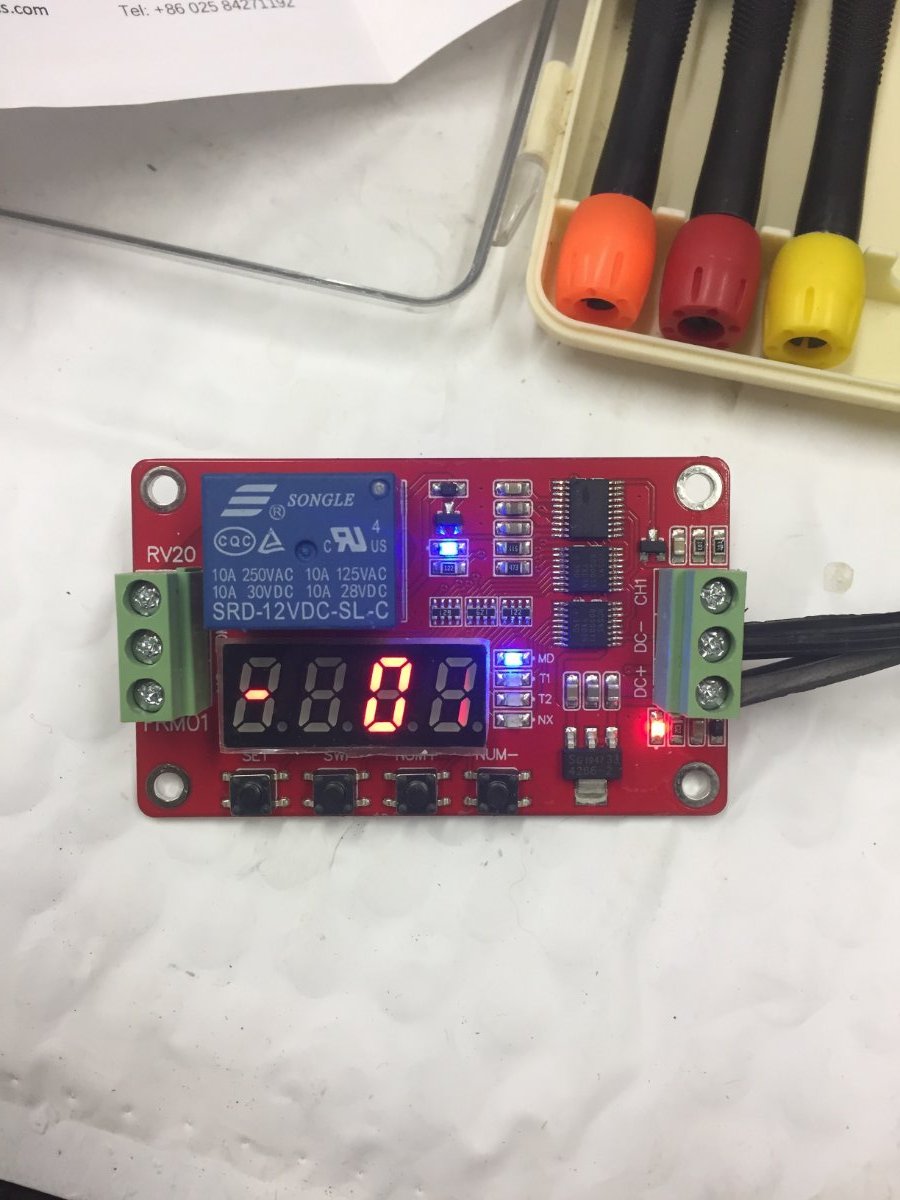
It always bothered me especially when getting ready to use the shower the amount of cold water coming out of the faucet and heading to the grey water tank. So when Overland put up a post back on January 3 titled Truma Comfort Plus via Modification, it got me thinking. I went out to the Oliver and tested actually how long and how much water was being used before getting hot water to the faucet. My results were 14 seconds and a volume of one quart and I thought that's not that bad. But then why does it bother me when I'm standing there waiting and then I think about how I'm just transferring my fresh water to the grey water tank and how many gallons go this way during a camping trip. So for the next week the subject was percolating in my mind and I came up with some ideas and settled on what I thought would be feasible solution. I installed a normally closed solenoid operated stainless steel water valve. I made a bracket out of stainless steel that I attached to the valve and then utilized the four bolts that were protruding through the front of the camper that help secure the cover for the propane tanks. I installed a tee in the hot water supply line just in front of the faucet and run 1/2" pex between it and the valve. Next I ran 1/2" line following the black tank drain pipe towards the back of the trailer and crossing over to the curb side and then teeing in to the line that fills the fresh water tank. Next I planed on putting a switch to operate the valve next to the switch that is mounted on the vanity towel rack that operates the water pump. I wanted to avoid standing there and holding the switch so I found a programmable multi function time delay relay module UCTRONICS model U6030 to allow me to accomplish this. This module is inexpensive about $12.99 but is very flexible ,it has 18 programmable delay modes with two settable timers. The static current is just 5.5 mA. I wanted this module to only be powered up when the water pump was turn on so I brought power from the water pump relay, this way both switches activated the module. This module also needs to have a 12 volt power supply to operate the water valve, so I ran a wire from a unused slot in the fuse box under the dinette, the valve draws 1 1/2 amps. I was a little worried about getting the module programmed for my needs, we all know how Chinese instructions are poor due to the language translations, but it went really well. IMG_1387.MOV I mounted the module in a 4"x4" waterproof box and put that under the front dinette seat,that way I had access to it in case I need to change programming. The last picture is of the vanity and the switches for the water pump and the water diverter valve. I used a waterproof switch I had and I plan on replacing it with a smaller easier to push model. I'm happy with the way it works, flip the water pump on then push the other switch and release, you hear the water pump start and run for 15 seconds, it will shut off and you have hot water at the faucet.
1 point
-
When I took my first camping trip with the new to me Oliver I was thrilled with the experience it gave me, and as I added more trips I started a mental list of things that I could tweak or add to the Oliver that would make that experience even greater. Today's post is addressing one of the items on that list concerning the windows and how they are limited to only being able to be open in fair weather conditions. Because they lean inward at the top of the window they can create problems in rainy conditions whether the window is opened or closed. When closed they have to deal with all the water that runs down from the roof and sidewalls, this can overload the drainage holes in the window frames which can result in getting the bedding wet. Many Oliver owners have installed rain gutters to help alleviate that problem, but there's still the problem of having the windows open while it's raining to mitigate high humidity or that closed in feeling. What I came up with for a solution I'm calling window eyebrows. I created a list of design parameters or considerations that I wanted to hit for this project. The first one was I did not want to alter the Oliver in anyway, that included the drilling of hole to mount the eyebrow to the windows, this really slowed my project down. I'm the type of guy that builds it in my mind before the prototype is built, I went through many different design ideas before I settled on this one. I designed a mount that clamps into the window frame and to spread the load out over a larger area I utilize three of these mount per window. The mounts are inserted into the window frame and the screw on the bottom is tighten which draws down the 5/16" diameter rod in the tapered slot which then spreads the mount to engage the ribs that are formed into the window frame that hold the rubber molding in place. I inserted a still picture in the following video showing that process. To remove the mount you have to take that screw out with the 5/16" rod and there is a hole on the bottom where that same screw is inserted and when tighten it releases the mount. The eyebrow itself is made of 3/16" thick x 5" wide x 29" long aluminum which has 3/4" of the outer edge turn down. I used a neoprene edging trim bought from McMaster-Carr along the length that mated with the Oliver, my hope was that it could be pushed tight enough to seal the water from coming between the eyebrow and the side of the Oliver making for a easy instillation. When I tested this in the rain it looked like it was going to work but after about ten minutes I noticed each window developed a drop of water by one of the mounts and it would fall and hit against the screen about every couple of minutes. So plan B I was forced to use a 1/4" wide weather strip tape between the neoprene edging and the fiberglass wall of the Oliver. There was one more problem, I had to incorporate a drip edge to the eyebrow to keep the water from following around the edge and falling towards the window. This eyebrow is fastened with two stainless steel 1/4-20 button head hex drive screws to each of the three mounts. This makes for a quick install or removal of the eyebrow, Here in Minnesota we had a warm up and it rained one day so that is all the testing I have been able to do, so time will tell if all is well with the design. As far as the rigidity of the eyebrow I'm extremely pleased you can literally grab onto them and push and pull with no flex of the eyebrow. EYEBROW.mp41 point
-
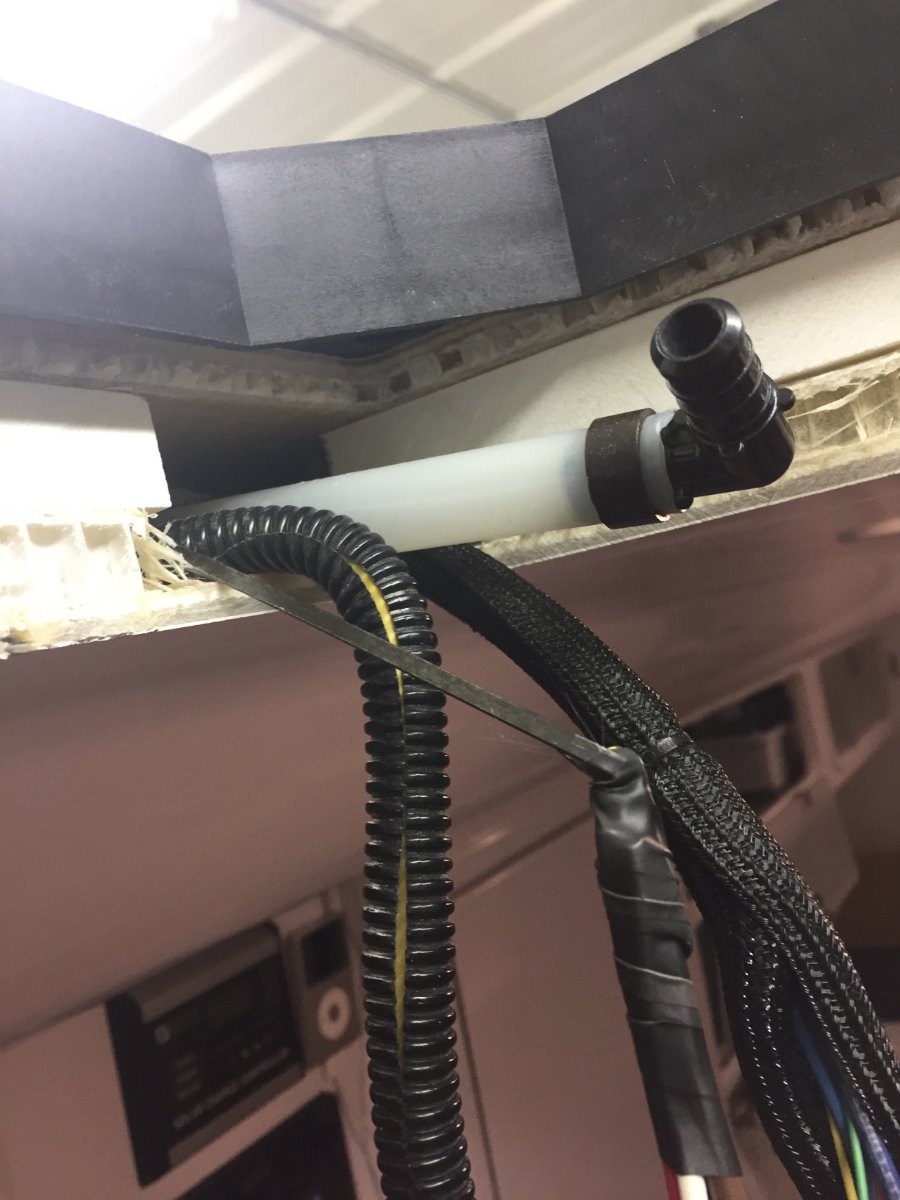
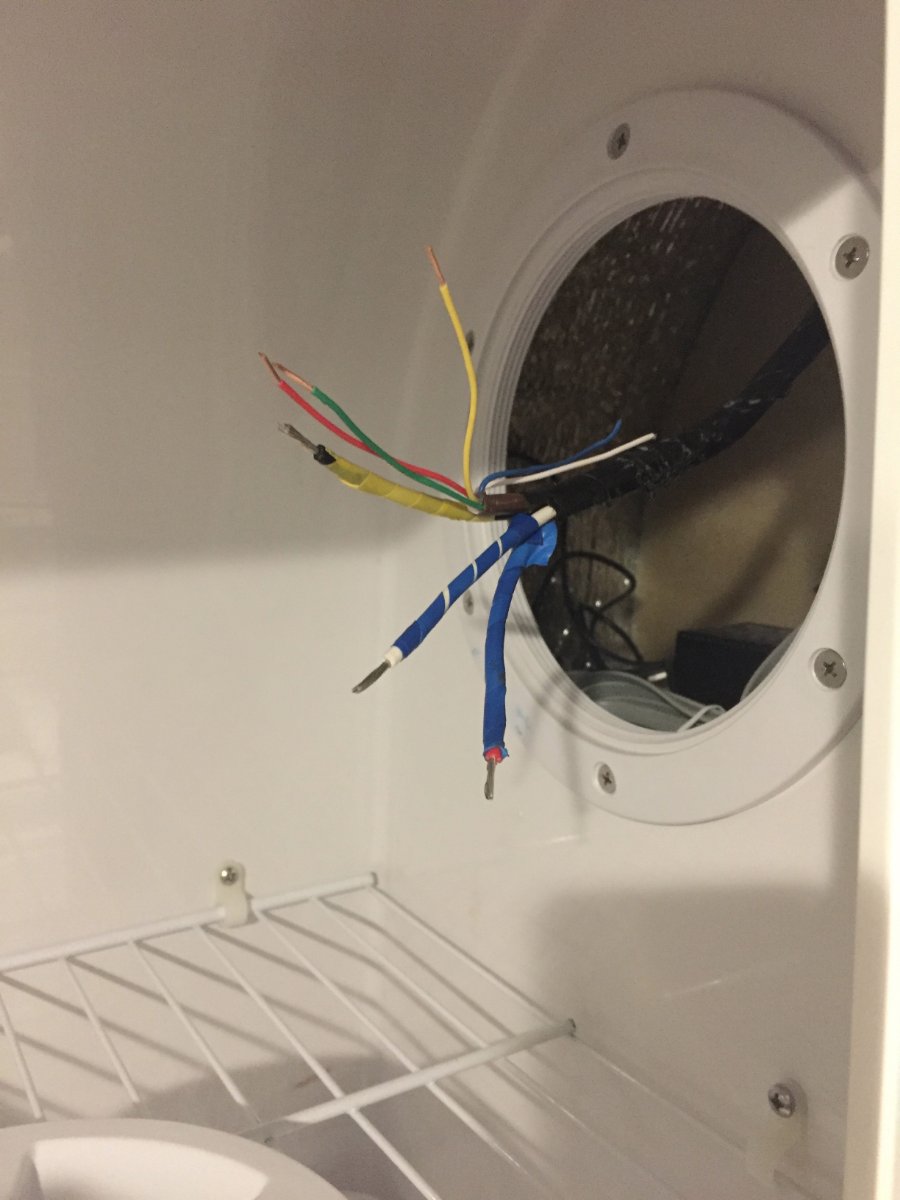
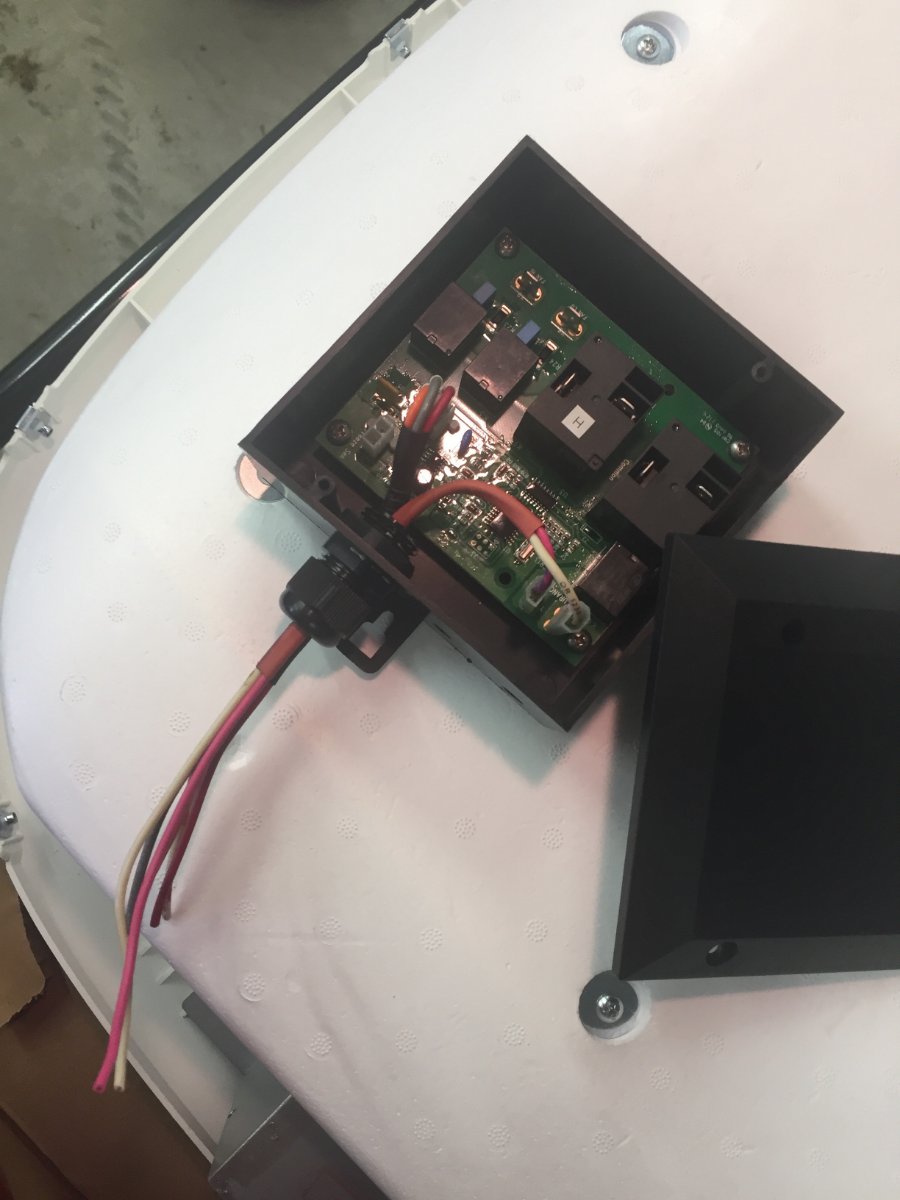
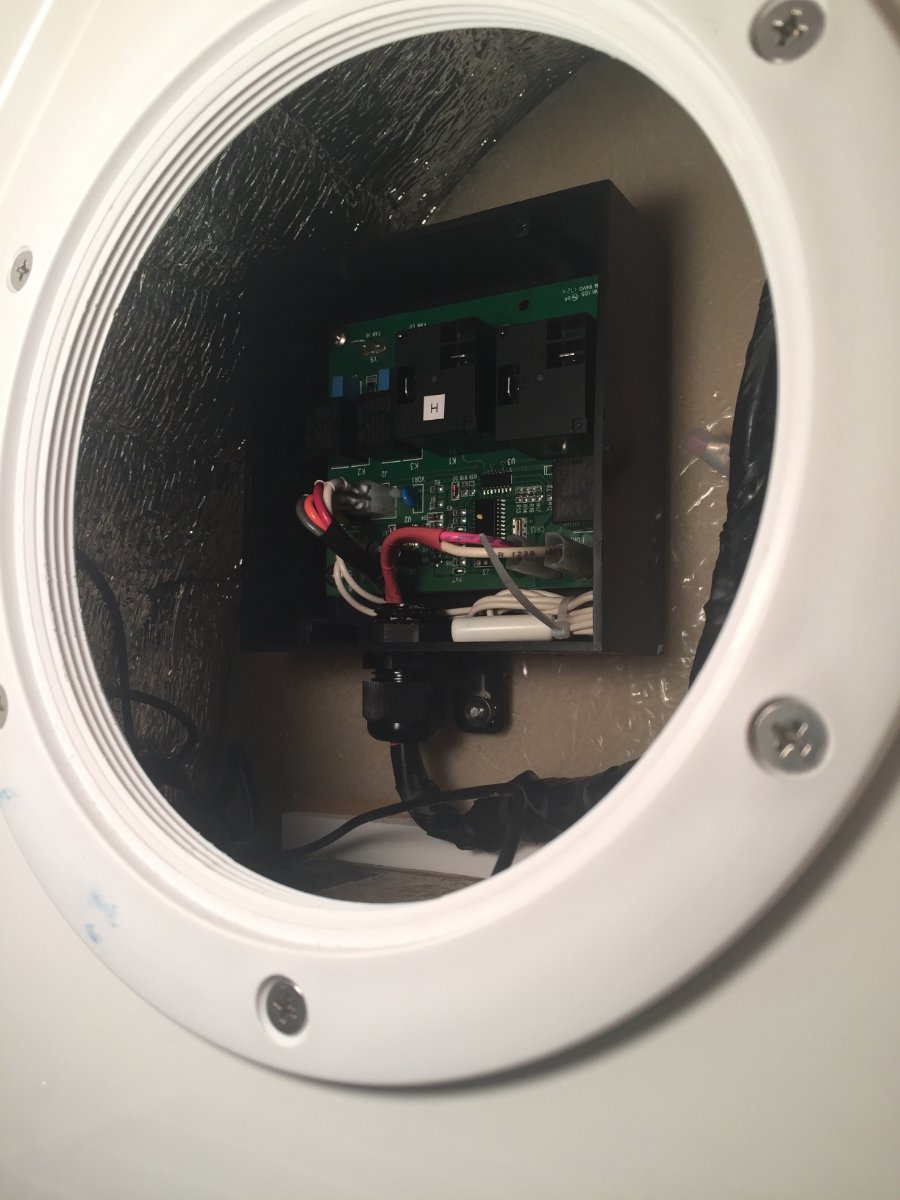
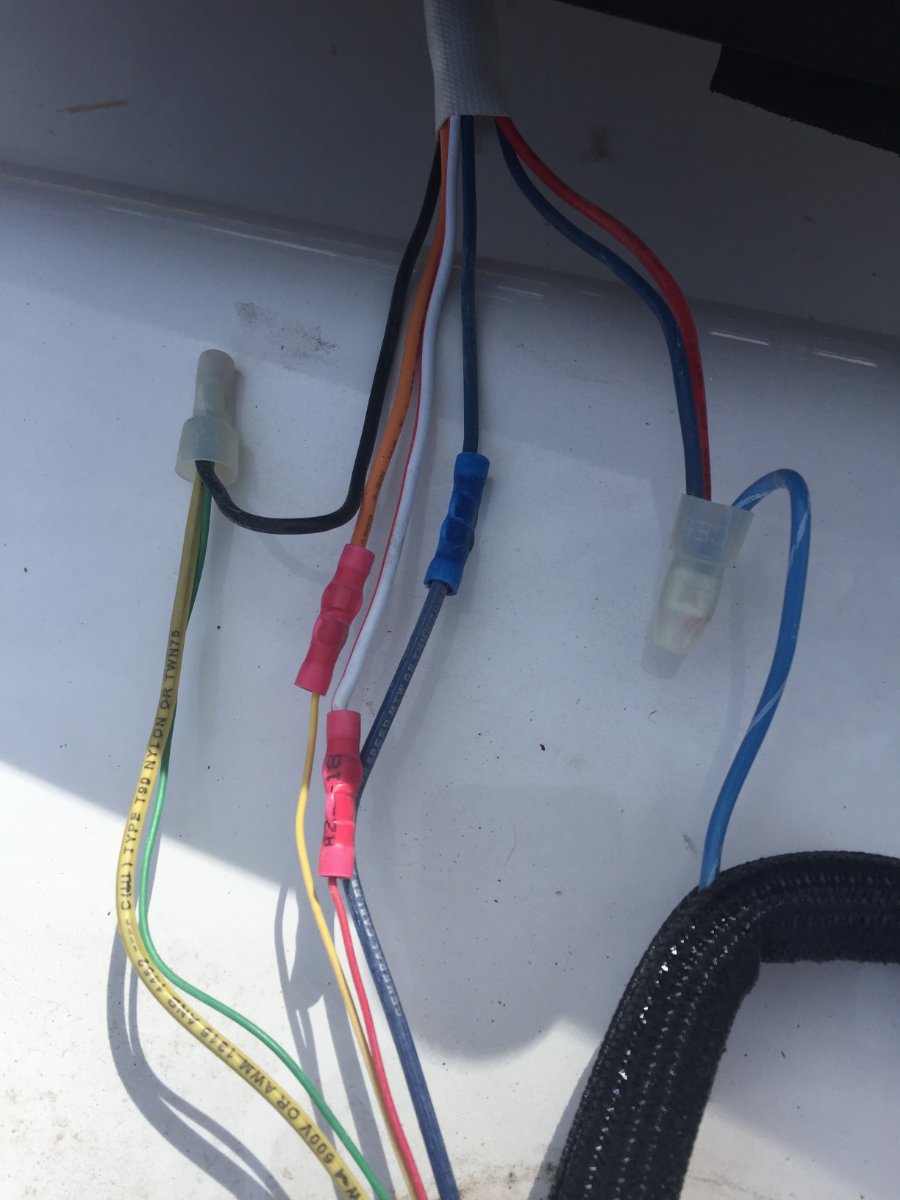
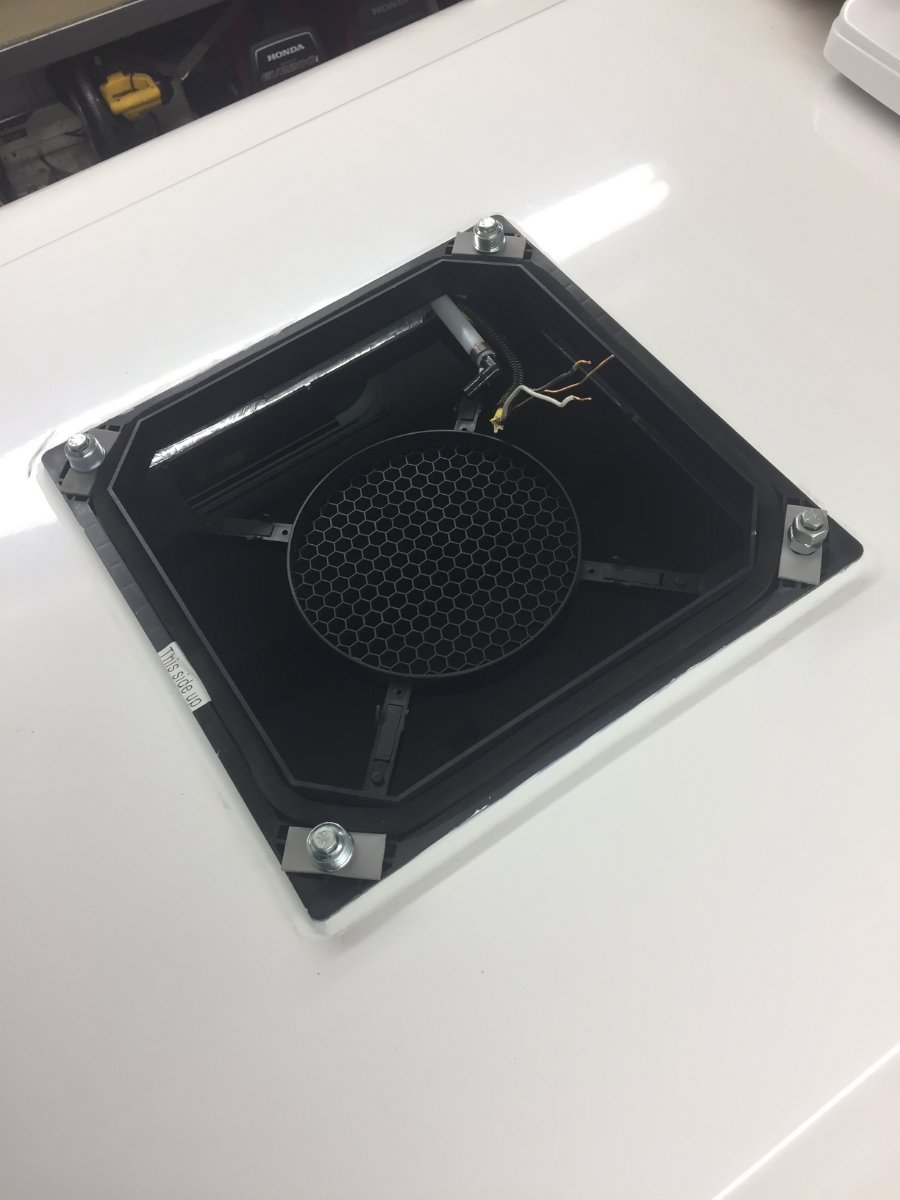
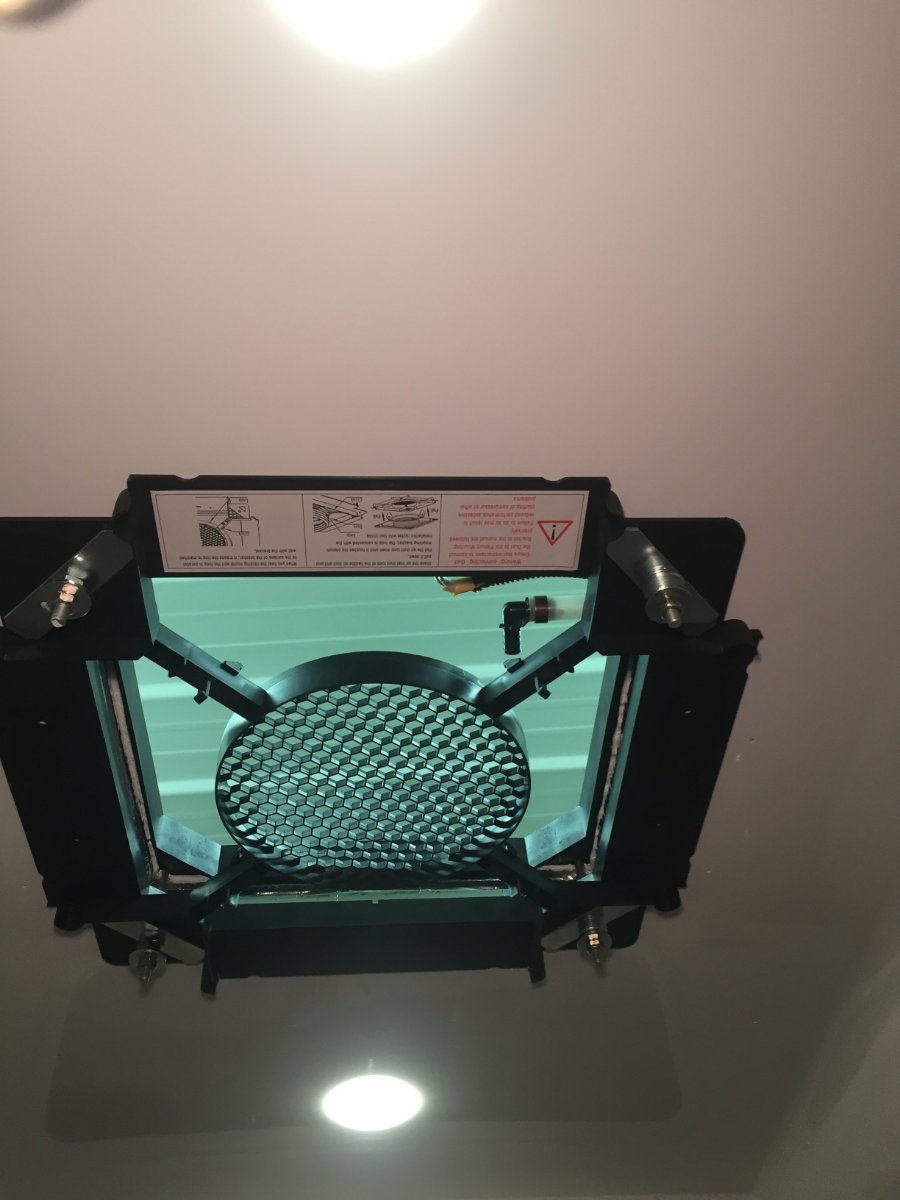
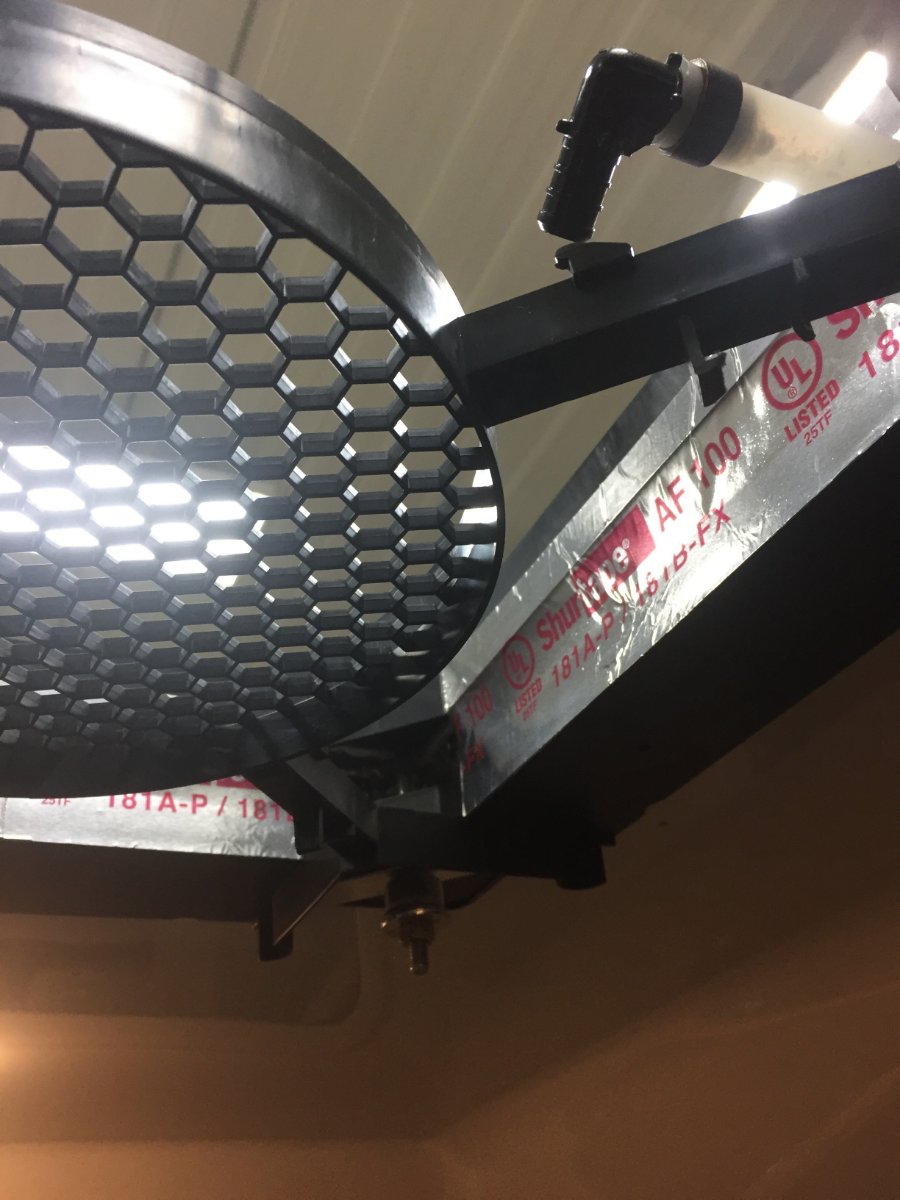
ScubaRx walked us through what we were seeing in the photo ( I understood a small fraction of it.) You and he agree on what is going on. He pointed out that the cable that appeared red on the far right of the photo was not in fact a positive wire. Afterwards I went back and pulled away the black covering and could see that the two exposed wires on the far right are actually yellow. (see photo below)
1 point
-
I guess i can officially say my post was right. They are junk and should not be considered. At least you can return it hope the return costs aren’t too bad.💸1 point
-
It is absolutely a piece of junk--and potentially dangerous. My son would put chocks under the tires whenever we stopped. Don't use this alone. Fortunately, I bought it from Costco; hopefully, I can return it without any hassles.1 point
-
I agree--totally misleading. I would like to see that 98 pound young lady in high heels move a 5,000 pound trailer on artificial turf--like that'll happen! I weigh 182 pounds and it took a good amount of muscle to steer that thing. My adult son was helping me and he was also breaking a sweat.1 point
-
Great review! I use a 15K Airtug to move mine around and lack of traction on any degree of grade is the main problem, particularly when backing up. Power is never an issue but just pushing the trailer up over the 1" curb from apron to garage slab requires a running start. Add in much of a turning angle and tire scrub forces greatly exacerbate the problem.160 pounds of kitty litter ballast in the tongue basket and lowering tug tire pressures helps some, but I'm convinced a front mount TV hitch is a much cheaper, safer, and manageable solution, for those who can use one.1 point
-
Thank you for your personal review. I guess the advertisement picture with the women in platform shoes operating the dolly on a putting green or artificial turf is a little misleading.🤔 And from the looks of your sweaty t-shirt, you did get a workout. Mossey1 point
-
"similar"? Yes, perhaps. But, if you ever have a chance to tour ScubaRx's Ollie - DO IT! I don't think that it is like any other Ollie out there. Bill1 point
-
We really enjoy camping at COE campgrounds with the Geezer card discount. This campground is rural and not very far from Kentucky. A host told us about some good local places to eat, too. One fellow told us we were in the "retirement" section and the kids liked another part of the campground. We were on site 5 that is so low it will flood in the winter when there's heavy continuous rains.1 point
-
Thanks......Sent a PM. Hull 50 and Hull 55 should be pretty similar!1 point
-
I’ll add Obey River COE to my TN list. Looks like a nice campground. Mike1 point
-
Not sure this was really answered...No, there is no Lithium label on the battery door. And I'm stealing John's "sewer hose" label idea!1 point
-
Well - CalMark covers were originally Sunbrella material. This material is relatively heavy but has been in use for a number of years. Within the past couple of years CalMark changed to using Weathermax material. This is lighter in weight as compared to Sunbrella and I would assume that it both wears and protects at least as well. There are a bunch of opinions about which is better on the boating forums - simply "google" "which is better Sunbrella or Weathermax?" Certainly time will give us the real answer. From my experience I can tell you that it will be MUCH easier to place the Weathermax cover on an Elite II. Just getting the Sunbrella cover onto the roof is almost too much for one person. Bill1 point
-
carnivore, That is exactly what I did and although I don’t remember that video specifically, I must have watched it and I’ll have to check my YouTube history. I do believe Nate is a pretty smart guy and his solution is very economical. My breaker and enclosure costs were less than $30. Mossey1 point
-
Mark, I run a Weber Q1200 grill and when needed an LP campfire ring. It beats looking at the ground. 😄Both of those required me to remove the factory regulators and just install quick connects. I simply attach my LP hose to the Oliver quick connect and use the grill or the campfire ring. I also have a Honda eu3000is which I converted to LP using the HutchMountain.com conversion kit. This conversion requires a separate regulator to an independent LP tank so that I can push a button on the regulator and start or prime the LP into the carb. I really like the Hutch Mountain tri conversion and carrying zero gasoline and it burns cleaner. The gen will use three different fuel sources - LP, LNG, or gasoline. I have not tried running the Honda off the Ollie yet as it is newly converted. I hope this helps. Others may chime in with further knowledge. David1 point
-
I’ll add to that lock n lube another expensive tool dewalt battery operated greese gun matching the two on your first use. No more 🤬🤯🥵 worth every penny.1 point
-
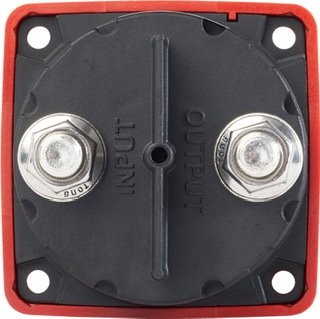
Blue Seas Single Circuit 6006. Click on higher resolution pic if you’d like to confirm. Note this switch disconnects the positive circuit between the panels and the controller. Zamp Tech Service told me they do not recommend a switch between their Zamp controller and batteries.
1 point
-
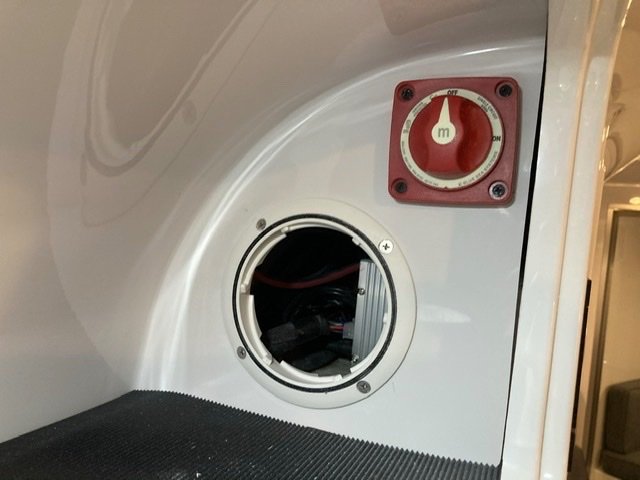
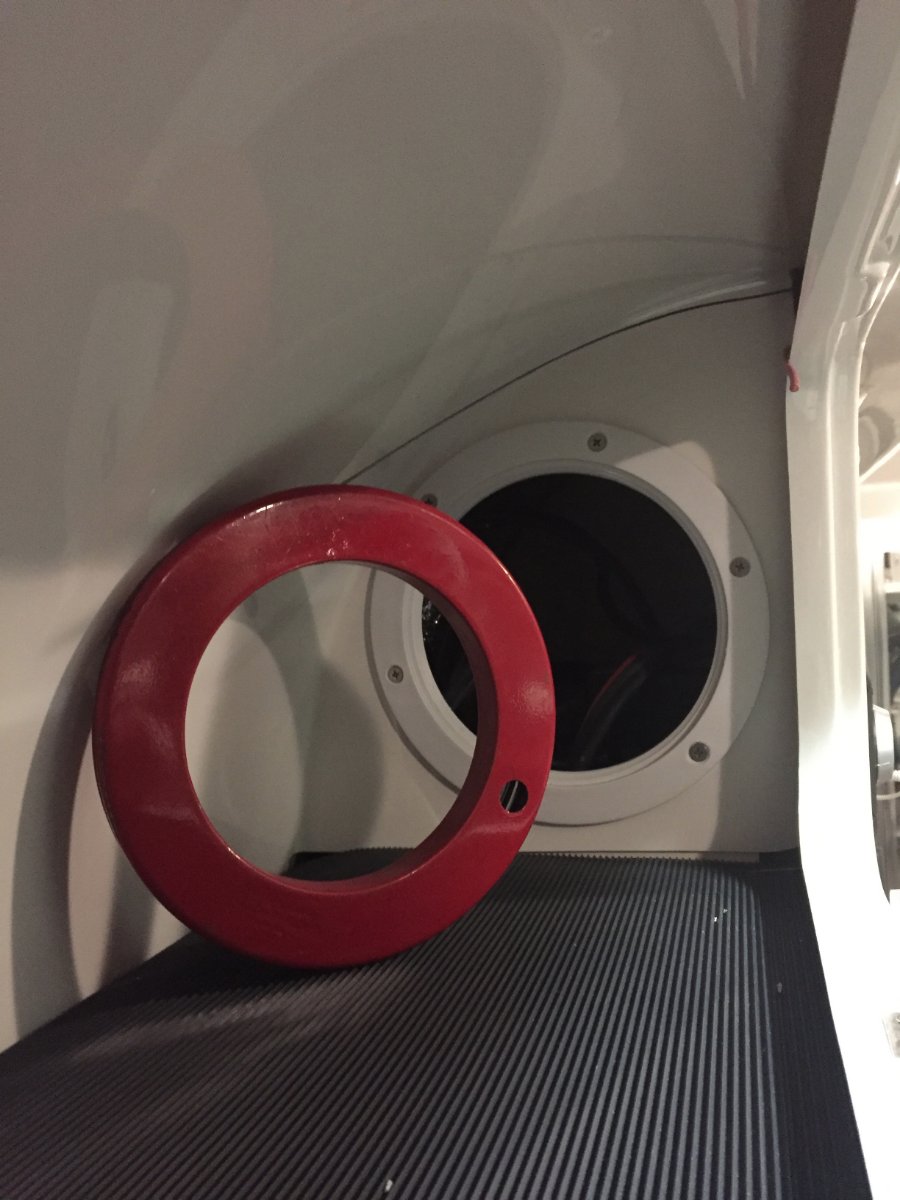
That "red" switch that Mike D pictures above just may not be in that same location. For a long time this switch was placed under the street side bed. Look around - if you see that switch it is your ticket to happiness.🙂 Bill1 point
-
By using the word "hot" in this context it means that the wires have current flowing through them. Yes, you are correct - but - there STILL could be current flowing through them. In the event that the leads to the batteries are possibly handled incorrectly then they could cause a shock or could cause a short that possibly could start a fire.1 point
-
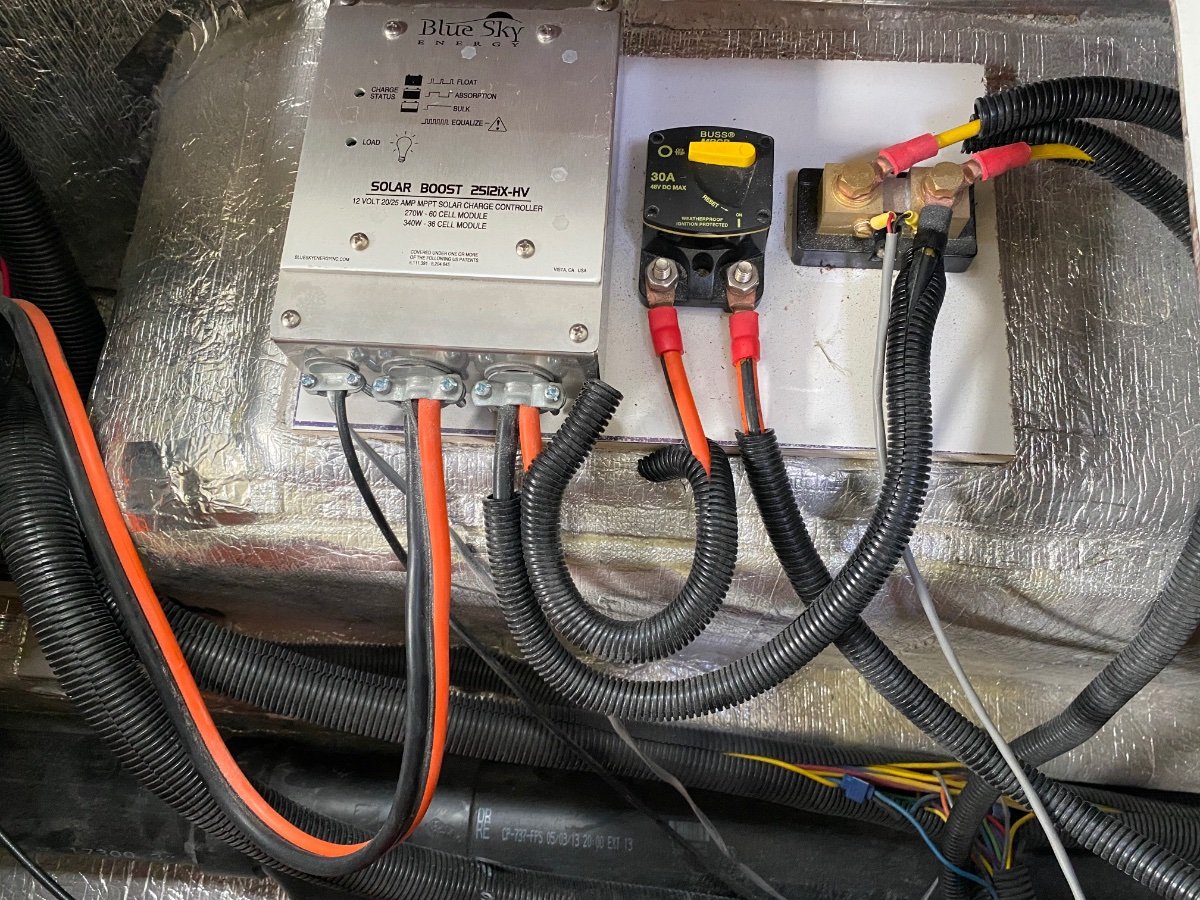
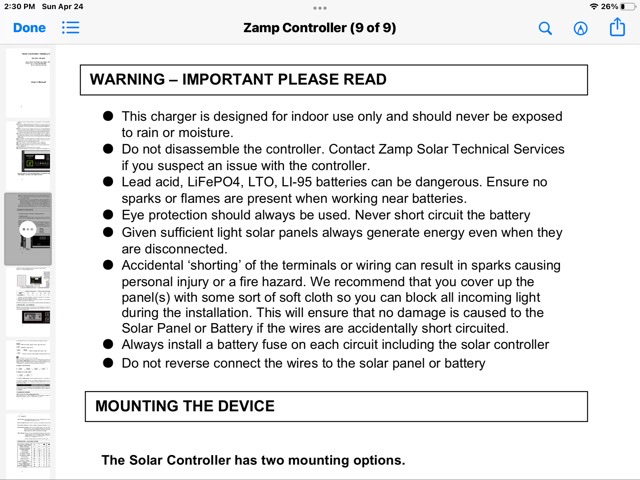
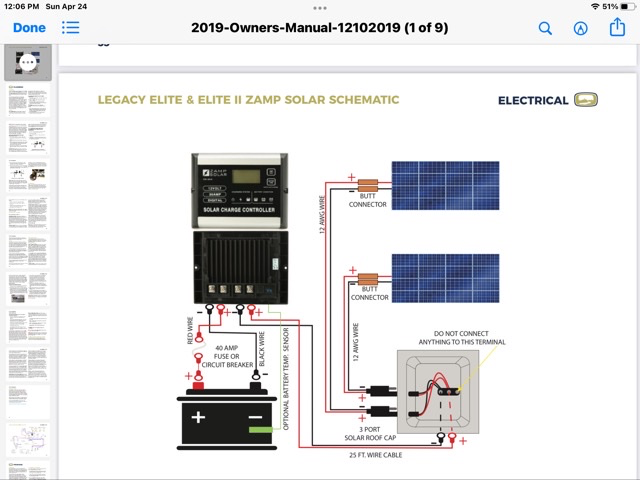
I believe you have a potentially unsafe situation, the solar circuit is energized, even in the garage. I don’t know if the live circuit is harmful to the controller, but I would not take a chance. . There should be two blade fuses on the roof under the solar panels, one for each panel. If you pull those, you won’t have any current flow. You could also place a tarp over the panels. See screenshot below from the Zamp Controller manual. If your trailer is parked in a garage that can get to periodically, why not just leave the batteries connected? You will still have some small parasitic draw. Flip the AC charger breaker on occasionally and charge the batteries, then turn off.
1 point
-
I assume OTT installing them on all solar packages now. Might be useful if you ever have to disconnect batteries. The solar circuit can be turned off so the circuit is not energized when sun is shining.1 point
-
Do you have a red battery disconnect switch in the upper cabinet above street side bunk? That’s the solar cutoff. See pic of the one in my 2021. Not sure if 2020 had that or not. If you don’t have that switch, see pic of 2019 solar electrical diagram. You should disconnect at the batteries. Caution, the circuit will be energized if the solar panels are exposed to light. This could lead to accidental short circuit and fire. You can turn the solar panel current “off” by removing the two blade fuses on the roof, or putting tarps over the panels. See topgun2 post from April 6 above . Depending on the answers to his questions, disconnecting the batteries for just a few months might not be necessary.
1 point
-
I used a 2 to 1 flat terminal adapter on the protection device. That way the original wire terminations can be left in tact and it will be easy to backout the easystart installation In the event of a failure.1 point
-
Others may disagree but we have stored our Elite II with 4 lead acid batteries over long Montana winter months with no issues for 7 years now. All I have done is to make sure they are fully charged, then turn off solar, and all parasitic battery drains. Once I bring the camper out of storage they still maintain a charge of 12.8 volts ± a fraction. If you leaved them plugged in and continually charging you will most like boil the water out of them doing more damage in the long run than disconnecting. Note this includes solar charging as well. After over 7 years our 4 batteries are just now starting to diminish a slight amount as of this past winter. Hope this helps.1 point
-
Charlie - Are these four batteries regular lead acid, AGM or Lithium? Will you be storing the Ollie covered - inside a building or having a camper cover (CalMark or the like)? Do you have household current available to you that is reliable? Will you be reasonably near the Ollie so that you can check on it every 6 to 8 weeks or so? Since you have 4 batteries I assume that you have an Elite II - do you have solar on the roof or portable or both? Bill1 point
-
We have a 2015 LE2 and do not know if the plumbing is the same on the Elite. Made these pages and added to my operators manual:1 point
-
John These are made from 6061 aluminum and have been glass bead blasted to help break all the sharp edges from machining, so it gives it a even texture. The leading edge of the eyebrow does have the radius to help deflect any object that would strike it. It could of been a longer taper but I was limited to sheet stock drop I had on hand. I think they are tucked in close enough that the benefit of having them outweighs the risk. The eyebrow with out the mounts weigh in at about 2-1/2 pounds. But this is just the prototype and there is always a better mouse trap. Thanks for the complement and I appreciate your comments. Paul1 point
-
Very impressive piece of engineering to address a complex problem. Do you have plans to produce these for sale to other OTT LEII owners? I am interested.1 point
-
I think it was John Davies who first posted this peculiarity... Cool. Also weird, but in a good way. I've always wondered what the deal was with this thing. Then this morning, in an unrelated forum search, this post from 2015 popped up... http://olivertraveltrailers.com/topic/i-have-a-dream/#post-12837 Whoa! Could this guy have realized his dream? The answer is yes. Yes he did... https://medium.com/overland-exploration Someone needs to get this guy back on the forum to explain himself. Come back @mjfreshyfresh - I want to know more!
1 point
-
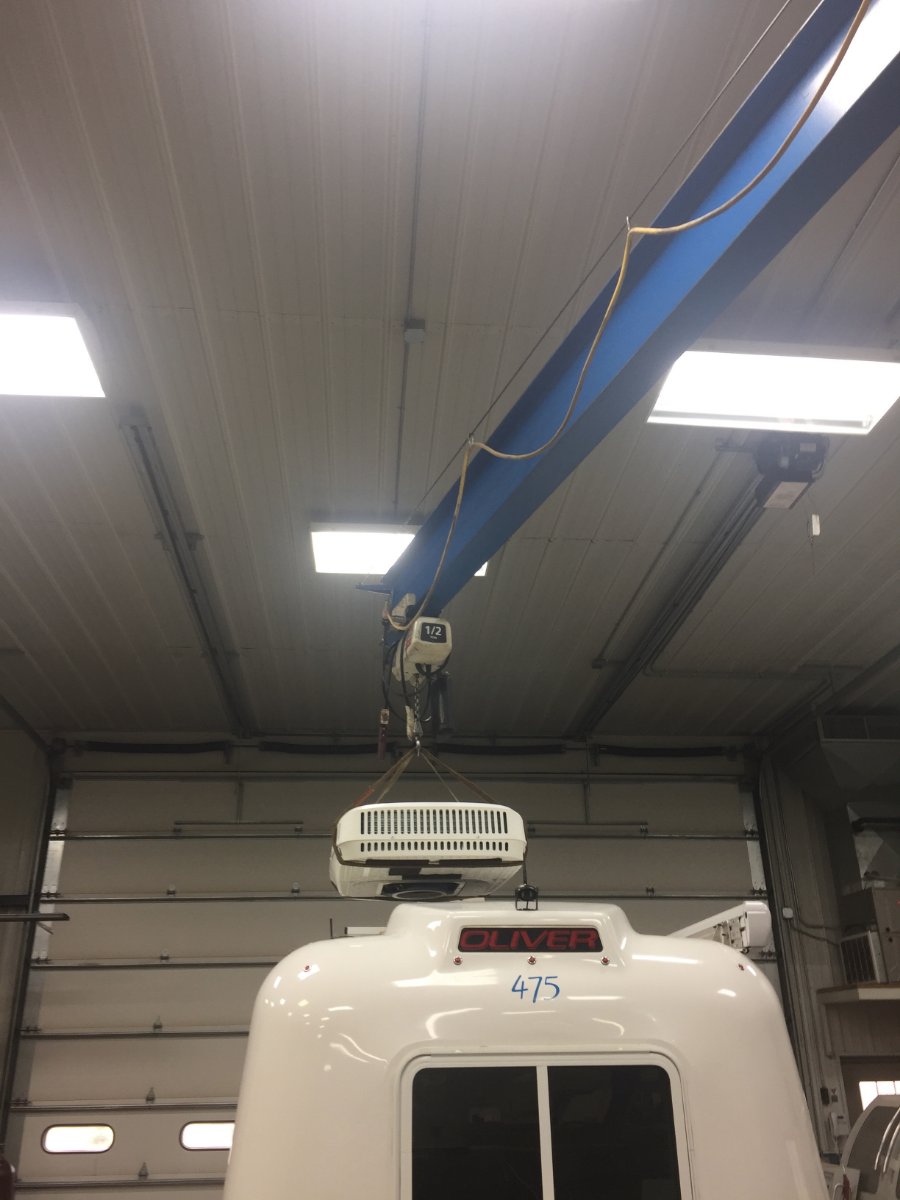
We have an Elite II on order for delivery in 2022. I emailed our sales rep, Anita, asking if Oliver would install a Houghton/Rec Pro AC unit in our new Elite II if I purchased it from Rec Pro and had it shipped to Oliver. I noted that this would save Oliver the cost of the Dometic unit, which could be installed in a different Elite II. This is Anita's response received today: That is apparently something done after the units were picked up. Th guidelines we go by would not allow us to install something that hasn’t been approved. So, this is something that the owners are doing themselves. I will send the email to upper management to see and send research and development on engineering side can look into it. So, the answer is "NO," but Anita did copy me when she forwarded my message to "Rodney," apparently with Oliver's R&D team: Hi Rodney, I know that this is something that we can’t do, however advised the new owner that I would refer it to you. That maybe research can be done. So, the AC upgrade request has been delivered to Oliver's R&D folks. I expect time will tell if Oliver presently has the inclination and the resources to adapt to customer requests for product improvement while struggling to make trailers for a lot more buyers, like us. Many thanks to Katanapilot, NcEagle, Minnesota Oli and others who "blazed the trail" enabling this upgrade with your informative posts on this thread. Whether this upgrade will ultimately be done by Oliver, or by us after we bring our Elite II home next year, remains to be seen.1 point
-
Minnesota Oli I am in the process of changing from a Dometic A/C to the same unit you just installed. I see you also installed the easy start for your unit. Can you maybe provide a wiring diagram on your install? It looks like you may have made brackets to hang the easy start on? I see a junction box for the wires. Did you add that? I installed the easy start on my last a/c but it had a diagram to follow. I don’t want to screw up a new a/c so I would appreciate your expertise. Thanks. Thermostat issues for heat can be resolved using a Honeywell Pro TH 1100DV1000 thermostat. Intercept two wires that come from the furnace to the Dometic a/c control box and use two of the wires that go to the current Dometic digital unit and attach them to the Honeywell unit. The Honeywell uses double A battery that you change once a year. The thermostat just makes and breaks the connection when you call for heat and the Honeywell unit is not very expensive.1 point
-
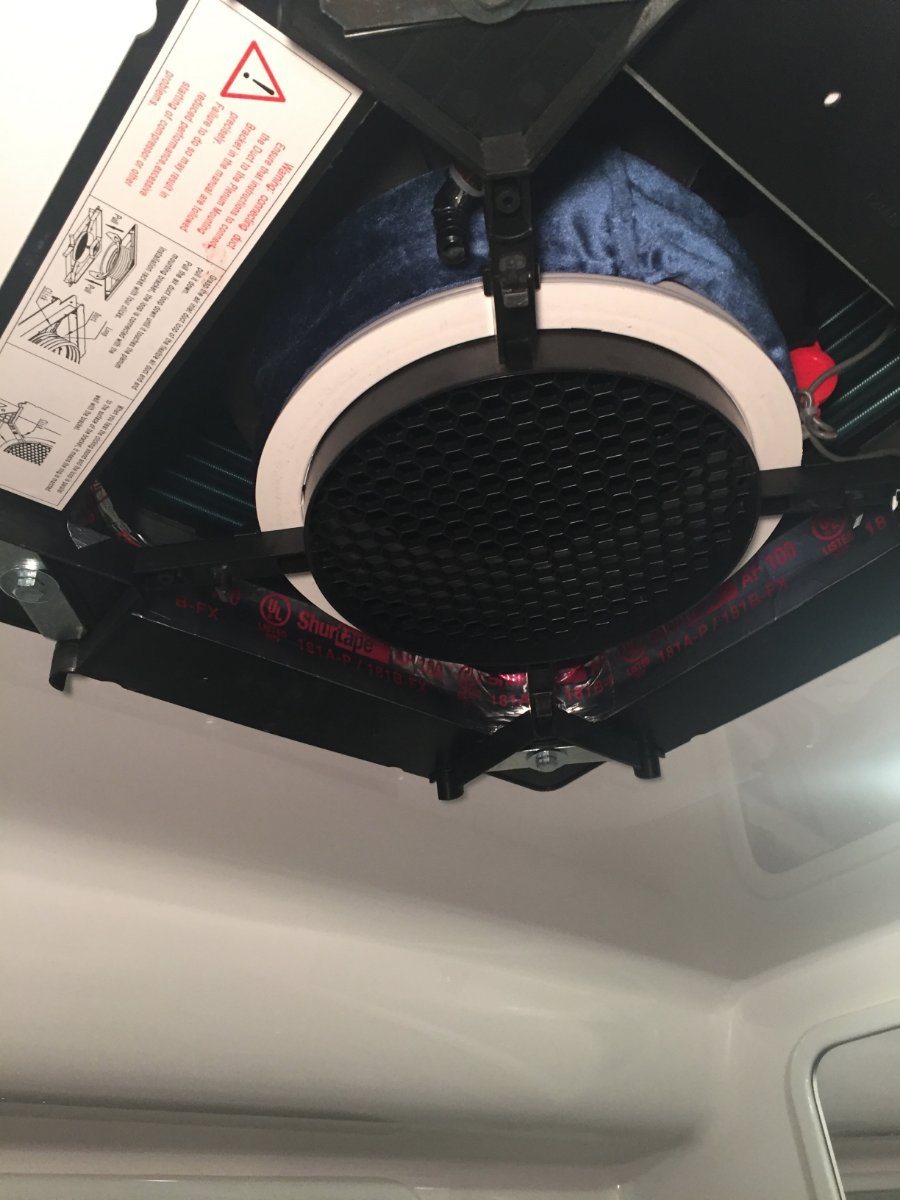
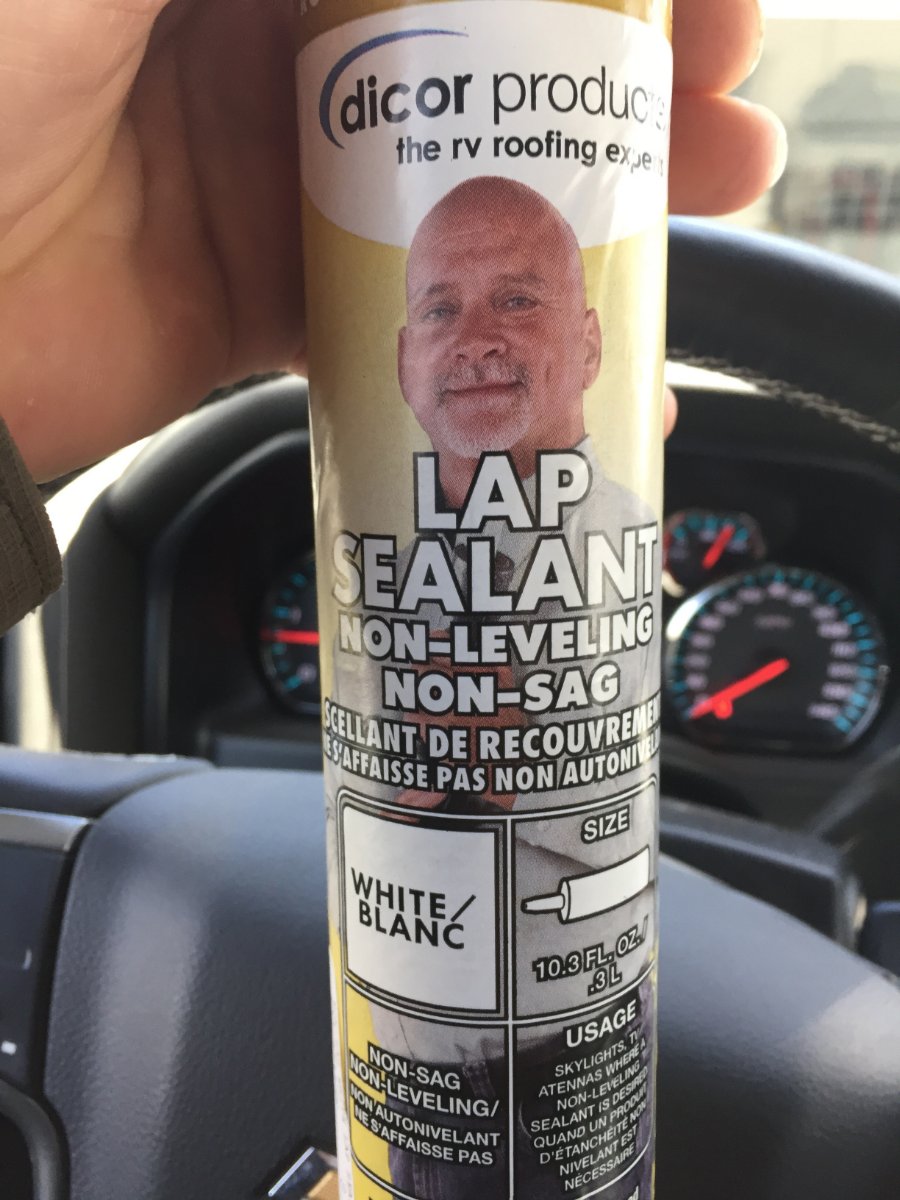
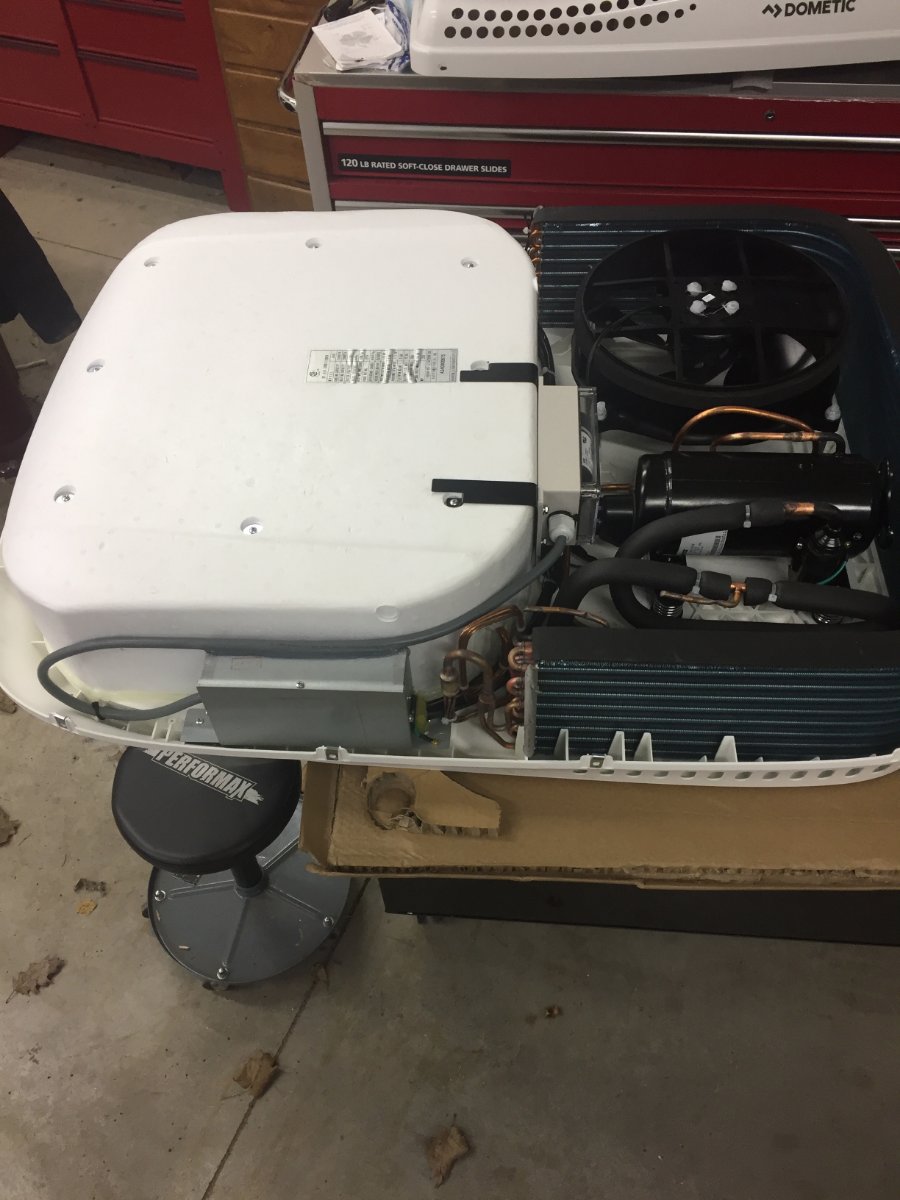
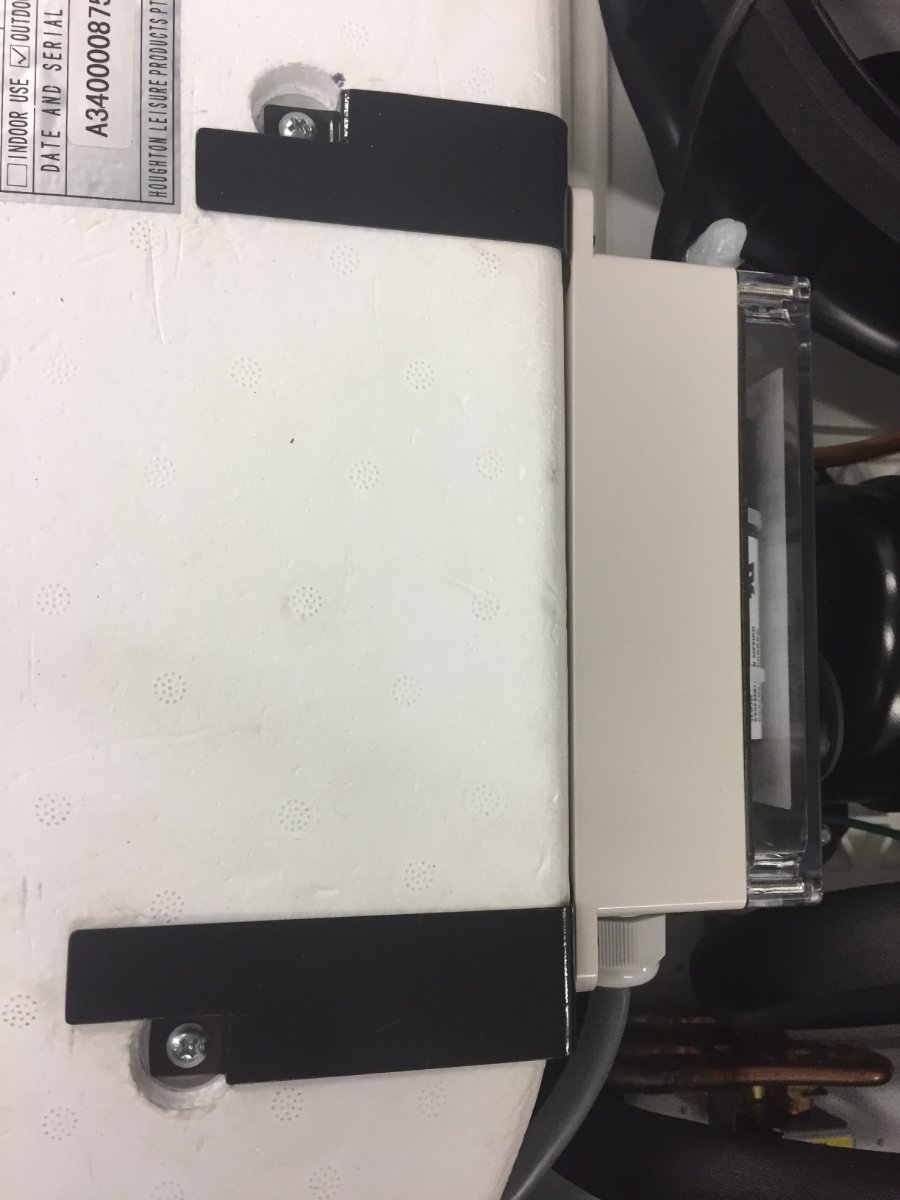
My version of Houghton AC install. Start out by cutting 120 volt power to AC and 12 volt power to furnace. Next remove the plenum of the Dometic Penguin II on the inside of the Oliver. This will expose a group of wires that are in a black sheath, these are the control side of the wiring for the AC. These go to a LCD relay board that controls Cool/Furnace/Heat Strip that is mounted up in the AC. You will also see a metal electrical 4" x 2" Handy Box that will have the 120 volt power supply for the AC. Both sets of wires can then be disconnected and the four bolts holding the AC on can be removed, this allows you to remove the AC from the roof of Oliver. The Houghton AC will not be using the Dometic thermostat that's mounted on the wall because it comes with a remote but your furnace still needs the wall thermostat which works with the LCD Relay Board. I wanted to preserve my old AC with the LCD relay board intact for resale, so I purchased a replacement board mounted it in a plastic box. I installed it in the area where my tank monitor is with the access through pantry. Where I disconnected the control side of the wiring harness from the AC I then connected wires long enough to be routed back to the new LCD relay board that is mounted next to the pantry. I then connected those wires to the relay board. One other item is the relay board has a freeze sensor that needs to be hook up or you will get a error message. That sensor is mounted in the cooling fins on the AC, so I had a temp sensor left over from a refrigerator repair I did a while back and that worked as a replacement. The Houghton comes with a roof mount frame, this gets a sealant applied to the under side of it and that is set in the opening in the roof, I used Dicor Lap Sealant. The roof has a slight radius built in to it to help shed water so the flat roof mount frame will tend to teeter in the opening. I applied the sealant to the under side of the outside mount frame and put it in the opening with four bolts in place. Then I put the inside mount frame in place and hand tightened the nuts with very little force. This assured me the all was lined up properly. I smooth out what squeezed out by dipping my finger in water and forming a bead around the frame. I let this sit for 24 hours before installing the ac. When I torqued the bolt to 9 ft lbs I looked up on top and saw a couple spots where my formed bead had some small bulges but I'm satisfied that I have a good seal. I made the 120 volt connection to the AC with waterproof connectors and discarded 4" x 2" Handy Box so I would have less obstructions in the air passageways. I also used aluminum foil tape to smooth the transition between the two mount frames. As a sidenote halfway through the install I thought of a different way of doing the wiring for the thermostat. If a person replaced the LCD thermostat with a older manual style you could do away with the LCD relay board. If you look at the first picture that shows a group of wires that are in a black sheath, these are the control side of the wiring for the AC. In that group of wires there are two blue wires one with a white stripe. The one with the white stripe is hot 12 volts DC and the solid blue is the wire that goes to the furnace relay board. So re-allocate the existing thermostat wires by doubling them up ,two of them hooked to the solid blue and the other two hook to the blue with the white stripe. Then at the wall hook the two thermostat wires that are hooked to blue with white stripe to the power in on the new manual thermostat and the other two to the power out. The reason I would double them up is because of they're small gauge. This would do away with having to pull wires and using the LCD relay board. Also save you having to toggle through the unusable modes (heat strip, cool) on the LCD thermostat to get to the furnace mode. I am very pleased with the sound levels of this AC, you can easily have a conversation between two people without any difficulty of hearing each other. Plus it also has heat mode and dry mode. I should have done this write up sooner when it was fresh in my mind. Oh well. Paul PS I also installed the Micro Air EasyStart. I wanted to ensure that my Honda 2200 would be able to start the AC from eco- mode. You can see from the pictures it was very tight space to mount the unit. The captured inrush amps before installation was 67.1 and 48.9 after install.
1 point
-
We spend a lot of time on the Pacific Coast where rainforests abound :) We camp in severe rain like the 1/2" drops coming down for days on end in the winter and set the awning out to keep dry. Unfortunately, with the seal gone, you will no longer have a dry spot outside unless you have a Clam or another tent. We can use the awning as a dry entry and keep totally dry with the seal. But without the seal, depending on where you are... sand and water will blow and pour off the roof, splash off of the door seal, the fridge and window seals and there will be no clean dry place to sit without that seal in place. Wet blowing sand is the worst... One of the reasons that we sold our Casita was because it was only sealed by me half way across. Seals are simple to add back on if you ever find the need. I sit outside under the awning with the fire going with it raining all around and keep dry and comfortable with no leaks behind me dripping down my neck... If you don't camp in the rain then the seal is not a big deal.1 point


.jpg.abf6c21f021b036ef41968cc19b9f78a.jpg)


-
Recent Achievements
-


")


")


")
