Leaderboard


Popular Content
Showing content with the highest reputation on 06/10/2022 in all areas
-
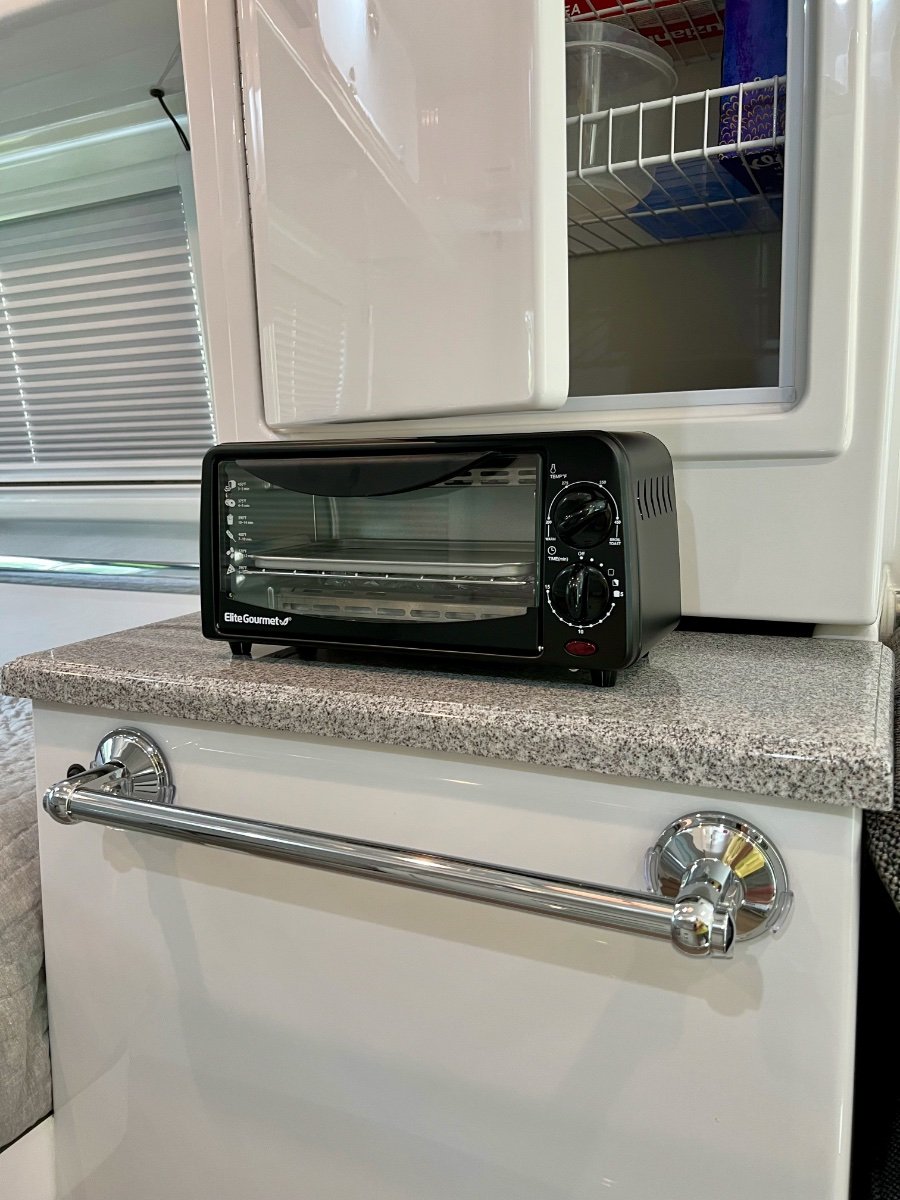
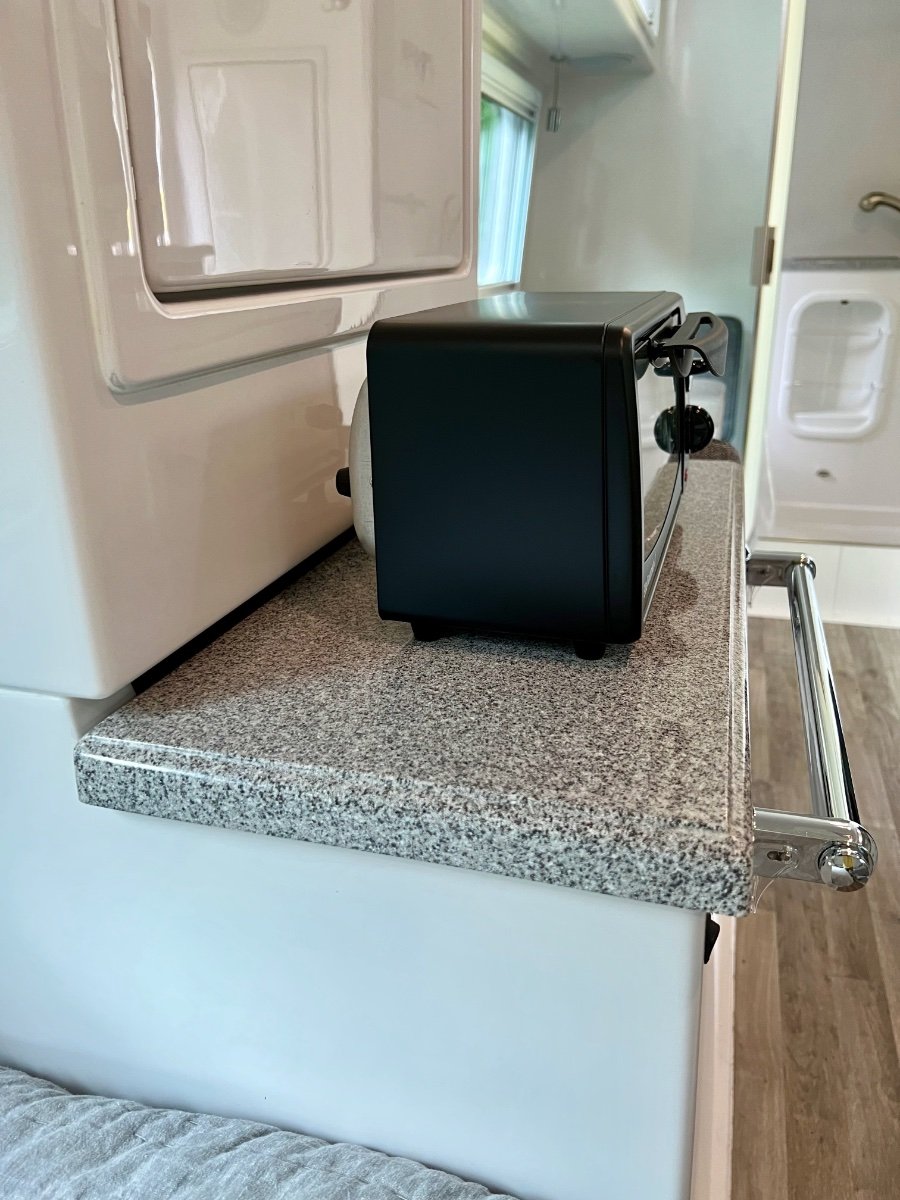
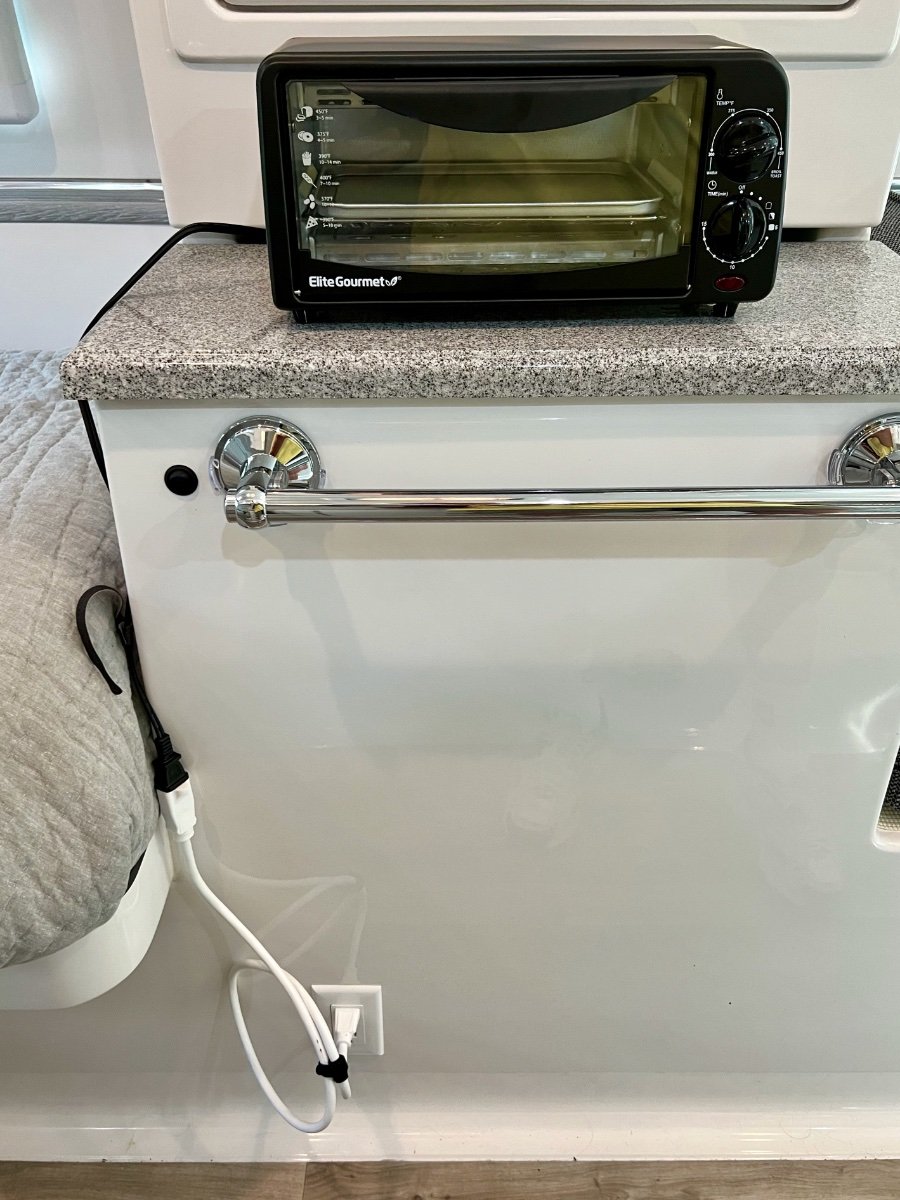
We are big fans of our Breville BOV450XL Mini Smart Oven at home. However, the size of this toaster oven precludes use in our 2022 LEII, Hull 990. We have the HighPointe EC028KD7 Convection Microwave in our LEII, which we have used a number of times since pickup in February, 2022. The convection feature works well as an alternative to a conventional oven, however, it cannot match a toaster oven for toasting bagels, bread and English muffins. Thus, I began the hunt for a small/compact toaster oven which would be used in the LEII. I searched reviews of toaster ovens recommended for RVs, on Google as well as Amazon, but all were too large, claiming capacity for 4 pieces of toast or 9 inch pizzas. Finally, I searched Amazon for a 2 slice toaster oven and the few results included this Elite Gourmet ETO236 Personal 2 Slice Countertop Toaster Oven. I ordered one which arrived a few days ago. We tested it by making several slices of toast and it did a commendable job. We have not yet tested it in our LEII, but I am confident it will provide the desired toaster oven functions. I may need to provide some heat protection for the fibergranite counters in our trailer. Below are photos showing how the Elite Gourmet toaster oven fits in an LEII. The first photo shows the toaster oven on the counter in front of the pantry, with clearance to open the pantry door. Side view on pantry counter Plugged into electrical outlet with 3 foot extension cord We purchased a pair of these 3 foot extension cords rated for 1625 watts, to power our coffee maker and other appliances with very short cords. Stored in the curb side overhead compartment The Elite Gourmet ETO236 is rated at 650 watts power consumption. I expect we can easily power this toaster oven from our lithium batteries for the 4-5 minutes required to prepare toast. Most toaster ovens require 1200-1500 watts. For $35 is looks like a good solution. Regards, Don
 8 points
 -
To sort of close the loop on this thread I started...Oliver has shipped me a new radio. Haven't received it yet but fingers crossed it works as it should. Even after a hard shut down - as John Davies recently commented on which is holding the power button for like 5 seconds - my "old" radio would still come on randomly. And it was not an alarm that I or ScubaRx set that was causing it to come on...A mystery for sure. I tried multiple resets and it still would also not load a movie when we actually wanted the unit on. Separately but somewhat related, Oliver shipped me a new bathroom light and a long piece of bulb weather seal for the lower section of the doghouse. Pretty happy with that level of service. They shipped things quickly and without me needing to negotiate to get them to replace the defective items.6 points
-
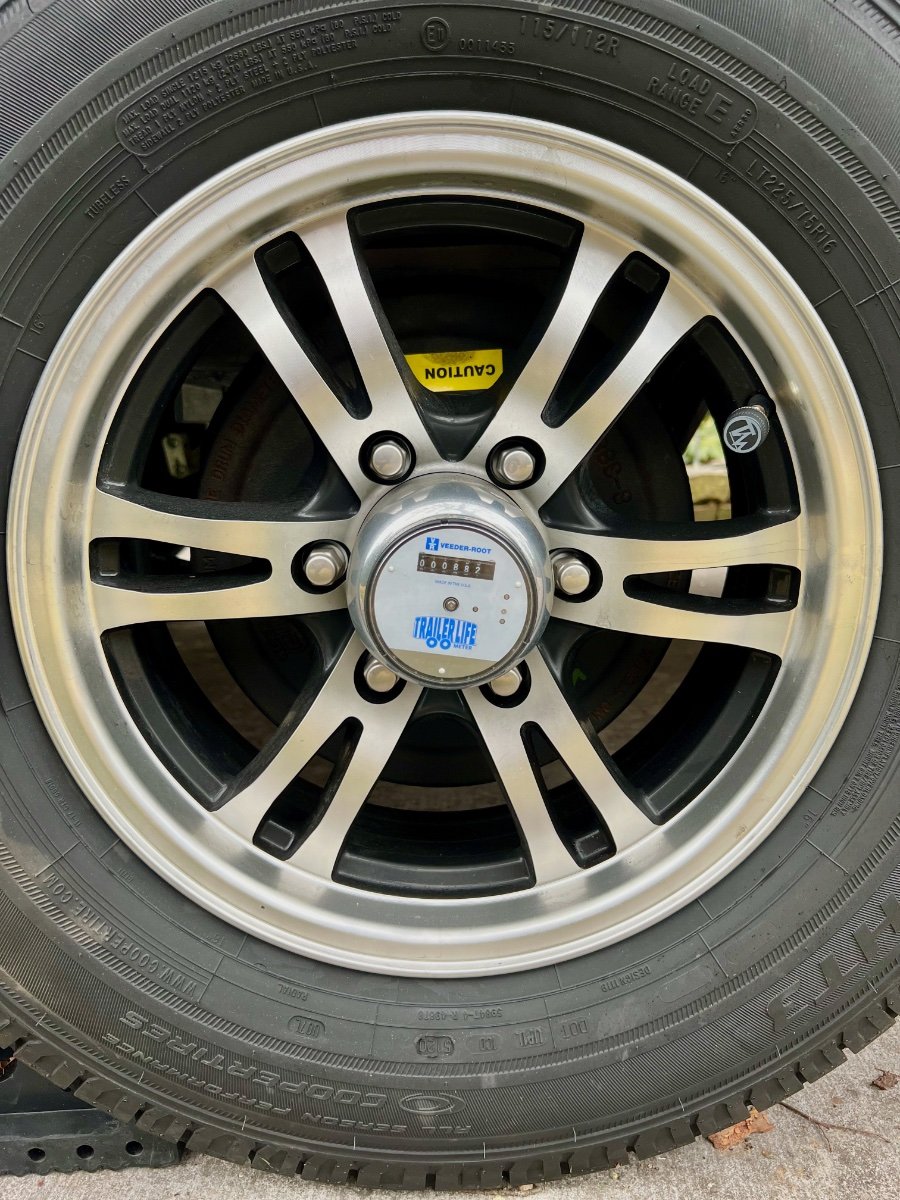
Prior to delivery of our 2022 LEII in mid-February, I posed a question on the OTTO forum asking how many owners had installed odometers on their trailers, and if they had, what brand they had selected. I was surprised to learn almost no one had installed a hub odometer, with most relying on manual logs for mileage tracking I did not want to be bothered with keeping a manual log, knowing I would inevitably forget to enter tow vehicle mileage when towing our LEII. Undaunted, I began to search for a suitable hub odometer. I found few offerings for travel trailers, but did come across the TrailerLife Odometer line. On their website is a Ratio Selection Guide for determining which model odometer best matches the outside circumference of the tires on the trailer. I checked with Oliver Travel Trailers to confirm the tires to be installed on our LEII were 225/75R16 Cooper Discoverer HT3. On the Cooper Tire website I found these tires have a diameter of 29.21", a width of 8.5", mount on a 16" rim and make 710 revolutions per mile. The calculated rolling circumference= 29.21" x 3.1416= 91.73" I contacted Veeder-Root, the manufacturer of the TrailerLife odometer product line, where their tech support recommended using Model 714. They also recommended using one of their wheel center caps for a 4.25" wheel center hole for a 6 lug wheel. Otherwise, a hole must be drilled in the center of the standard Oliver hub cap to accept the mounting stud of the odometer, I placed an order for the Model 714 odometer, $84.99, and the wheel center cap, $15.99. The total was $104.56, including $3.58 for shipping. Front View Profile View The TrailerLife odometer and wheel center cap were delivered one month after I placed the order. A week or 10 days after placing the order, I called to inquire of the expected delivery date. Only then was I told the item was backordered and could be six weeks for delivery. Fortunately, I received the odometer and hubcap in time to take it with us for the LEII delivery date. On our LEII delivery date, the weather in Hohenwald was miserable, with pouring rain and cold, with temperatures in the low 20s at night. I asked Oliver to install the hub odometer, which they did during the delivery process for $20. I thought this was reasonable and was glad to have the odometer installed at the time of delivery. I asked to have the odometer installed on the street side rear wheel, since this is closest to the primary service connections and storage.. I don't believe it matters which wheel the odometer is installed on. The hub odometer now shows we have covered over 3,000 miles since delivery. I am sure the miles reported by the hub odometer are far more accurate than I would have manually recorded. Being a first time RV owner, I was (and still am) focused on learning the systems on our trailer and the procedures for using it safely. Manually recording the mileage traveled was not high on my list of priorities. I am keeping a log of our travel destinations, maintenance, modifications, etc. Don
5 points
-
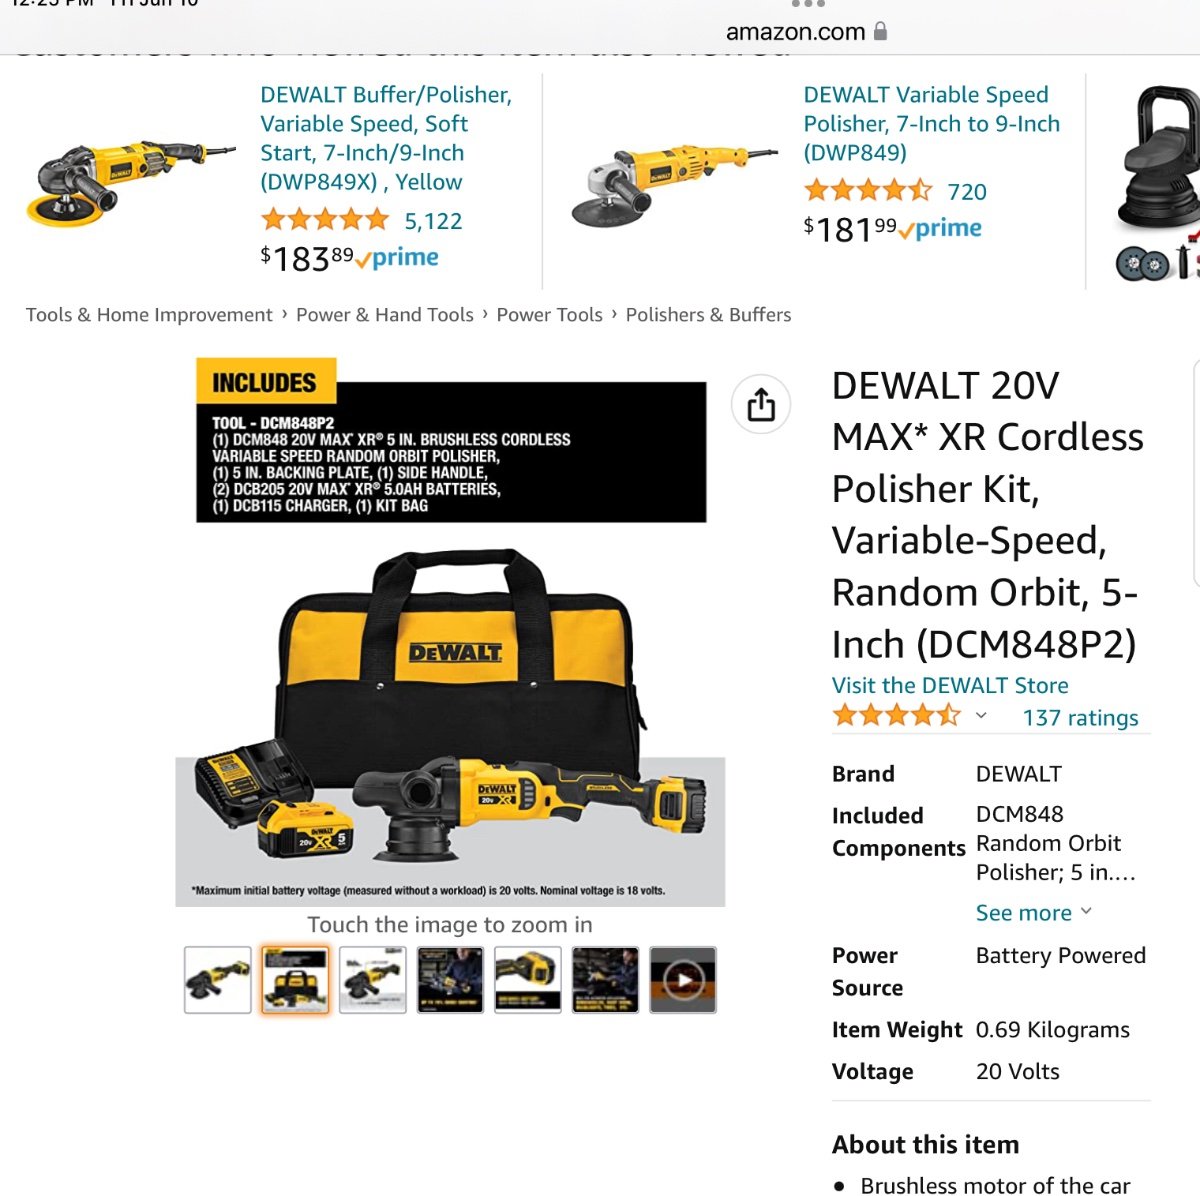
I just bought a Dewalt polisher, mainly because I used to have a nice Porter Cable one with cord, and I just hated dealing with that; tripping over it, pulling the plug out of the socket, and dragging it across my freshly polished paint (!) And I have about six other Dewalt tools and lots of batteries. I haven’t used it yet, but I need to do my truck since the sides are all brush striped from fire roads. I got a killer deal on an open box one on eBay for $375, free shipping. It was in perfect condition. Griots Garage sells great care products, I bought a bunch of pads, polishes and tools from them for the Dewalt. It doesn’t come with any. https://www.griotsgarage.com/buffers-pads/ John Davies Spokane WA
4 points
-
Yep, had the same experience with tires on a 87 Toyota pickup. Find myself looking at SOB trailers to see what kind of tires they come with new. When we first saw an Oliver during 2010, we loved how the Ollie looked, but it goes much deeper, tires are just one area that makes our Ollies great campers!3 points
-
Having answered that question hundreds of times to people I delivered boats to over 20 years, I always said buy the one offered by Shur Hold marine products, They are light, do a great job for the weekend buffer. If you want to step up and work your arm use what the pros use Dewalt or Makota . If your hull looks good try Buff Magic by the company or 3M finesse.3 points
-
I tried aerosol film paint protector spray for two years in a row - I wouldn't waste my time on it again. In order to get the thickness you need to provide even marginal protection you will need numerous coats. With the time that takes plus the masking of areas where you do not want this spray, the entire process will take at least two days. I had as many as seven coats on and it still wasn't as thick as even 8mm protection film. Bill3 points
-
What is hard, the idea of punching holes in your Ollie or finding the right tool? If the latter, the Harbor Freight large step drill (up to 1 3/8”) works brilliantly with fiberglass, and adequately with aluminum, though it tends to clog in that material, and you should use a smaller one to get the hole started. https://www.harborfreight.com/2-piece-titanium-nitride-coated-high-speed-steel-step-drills-96275.html Love those Cable Clams! John Davies Spokane WA
3 points
-
We had a very similar issue last year, and took it to Oliver Service and they discovered the condensate drain tube was kinked like mentioned above by Seadawg. Oliver fixed the kinked drain tube and our AC has worked fine since. Hope you get it resolved quickly.3 points
-
Alright Thanks to Mike and SeaDawg they lead me forward and it made it thru my thick head. Thanks guys. Mike3 points
-
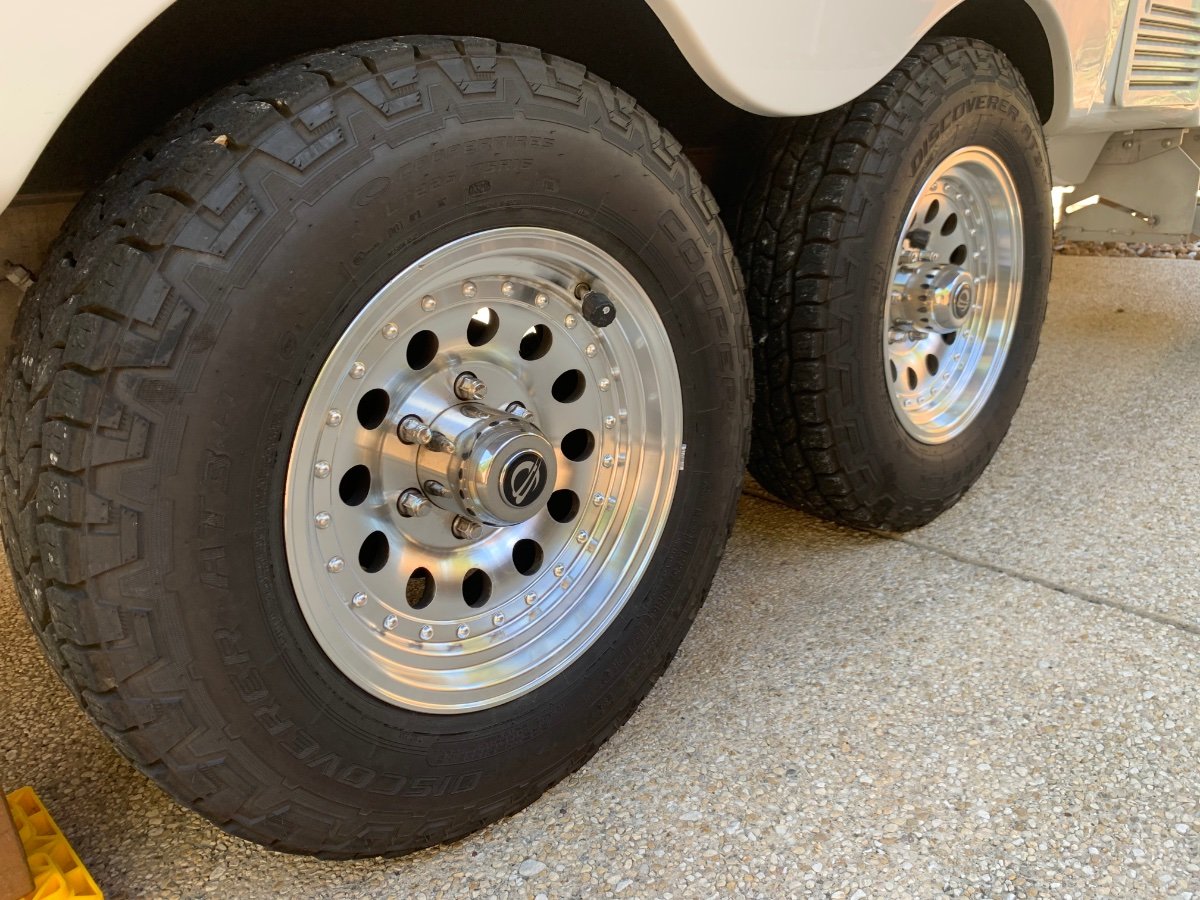
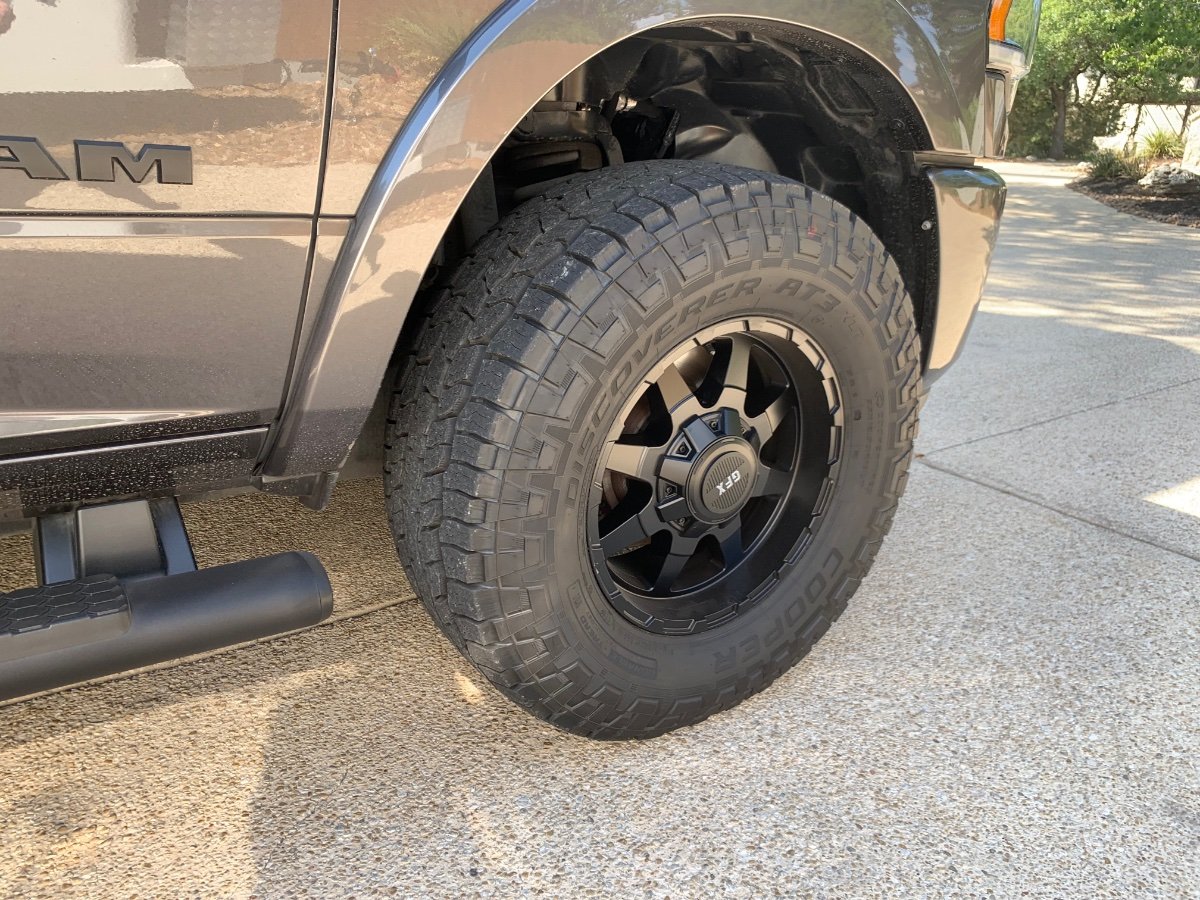
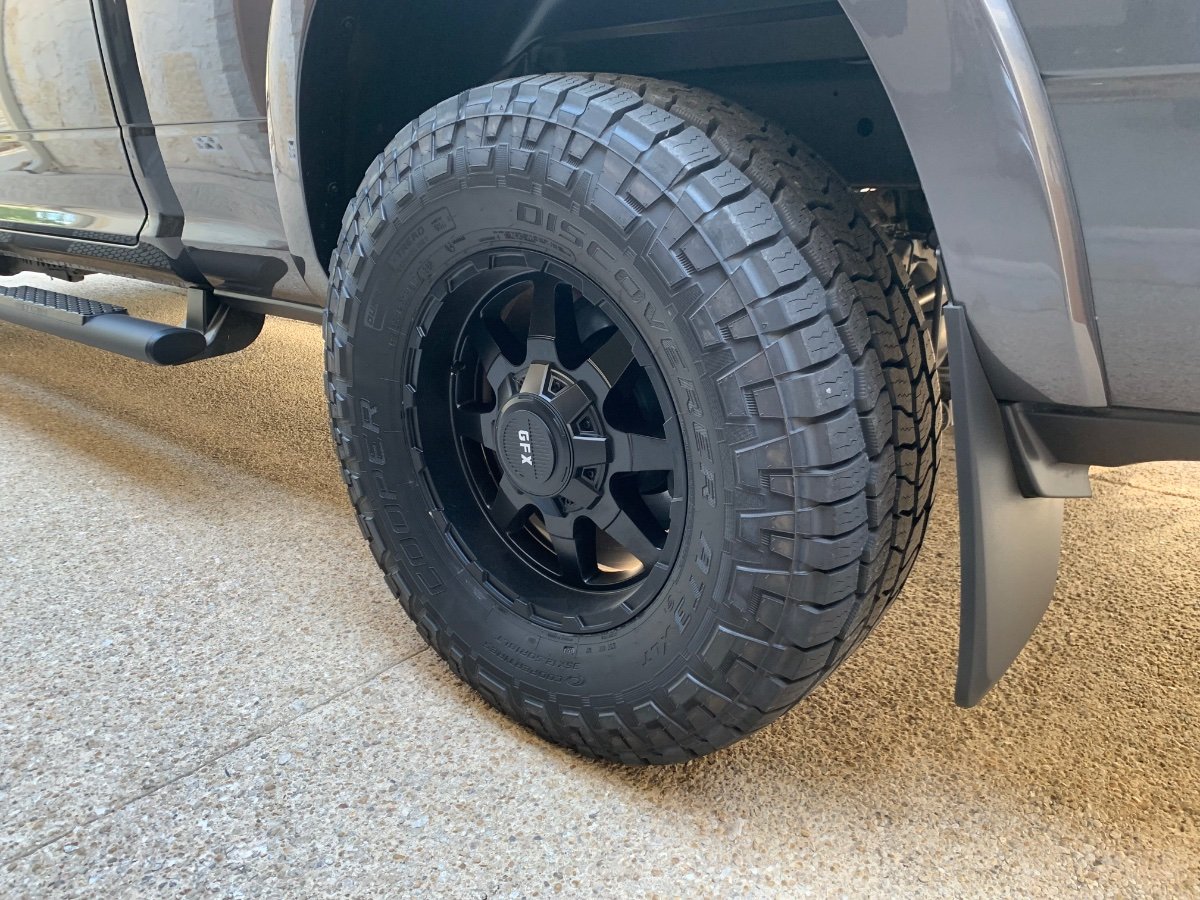
Trailer - Cooper AT3 XLT 225/75-16. Truck - Cooper AT3 XLT 35/12.5-18.
3 points
-
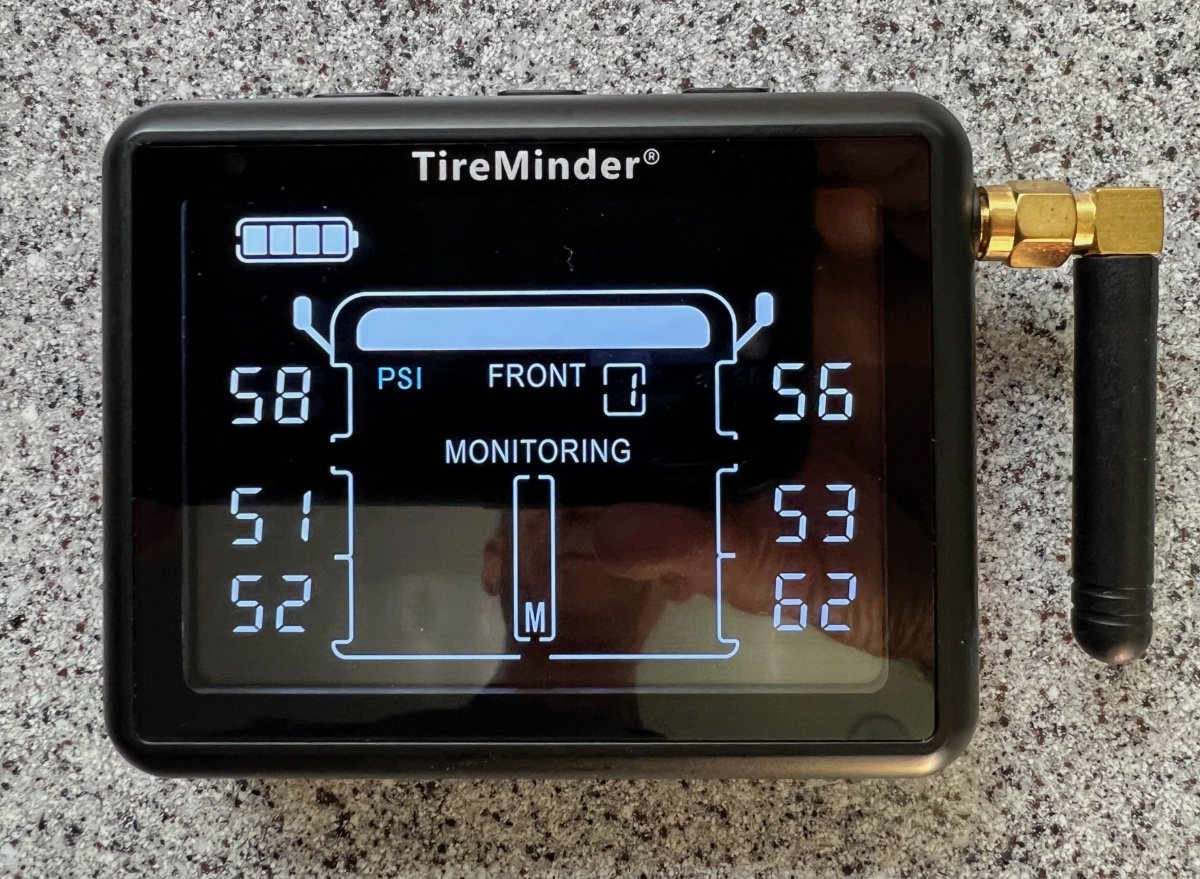
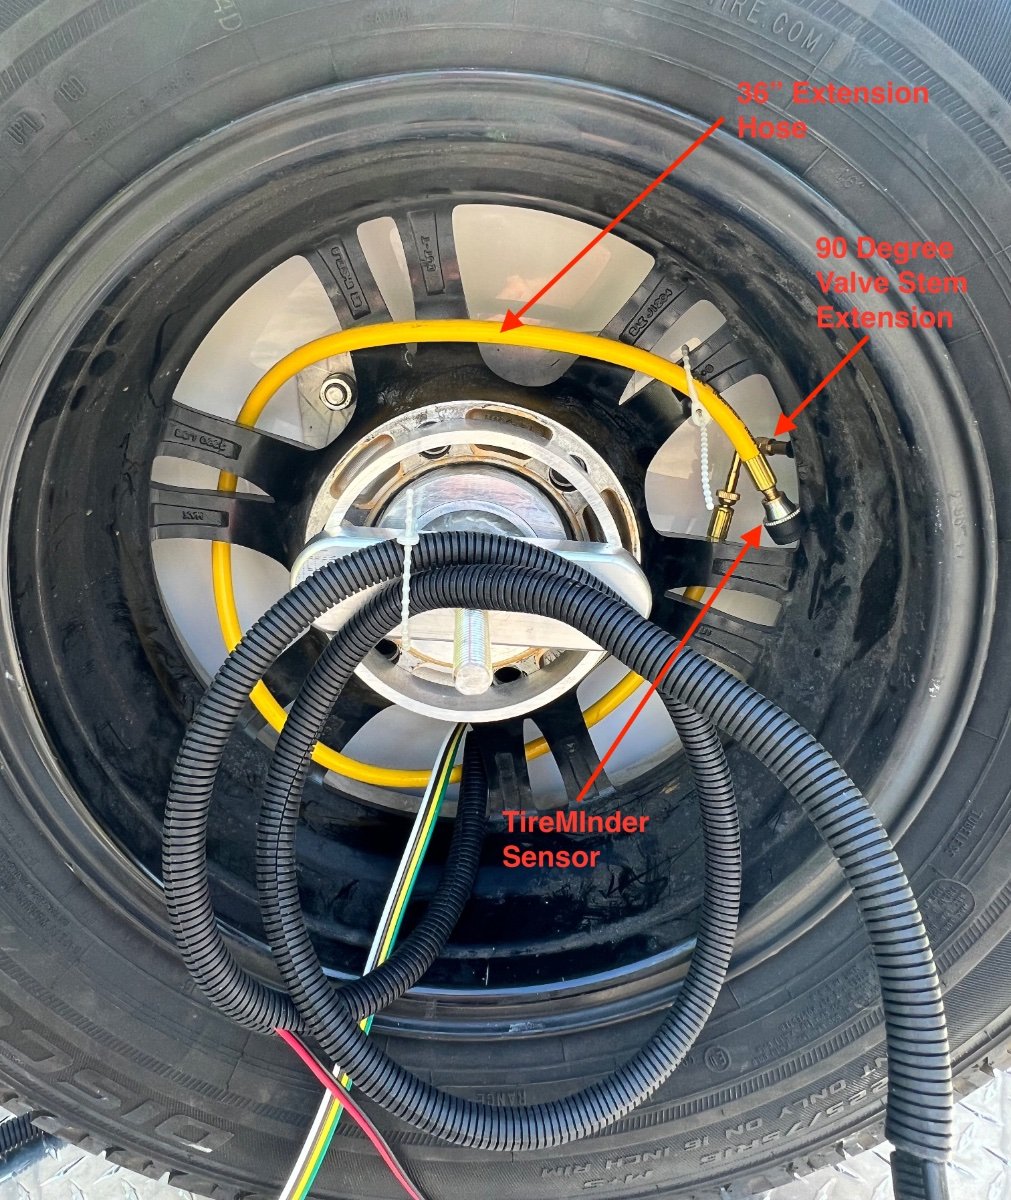
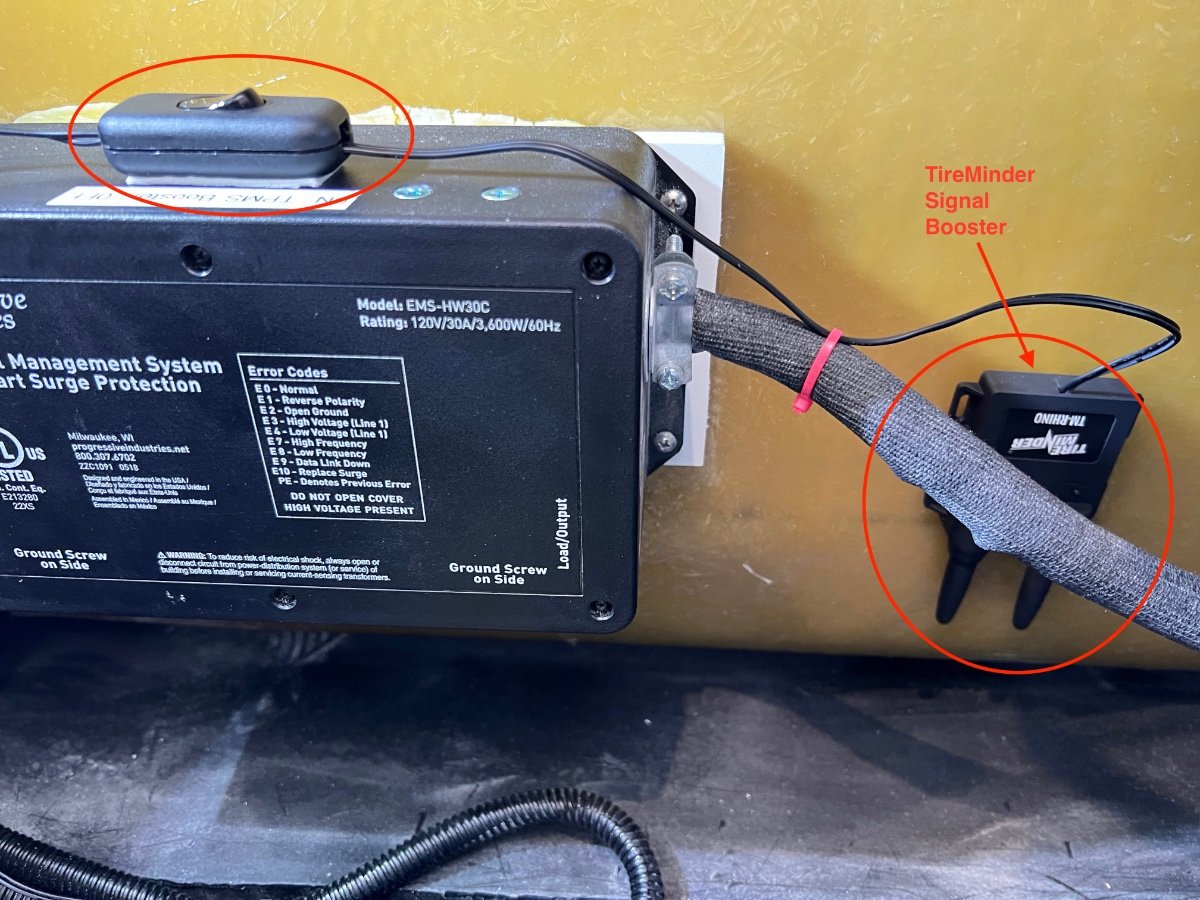
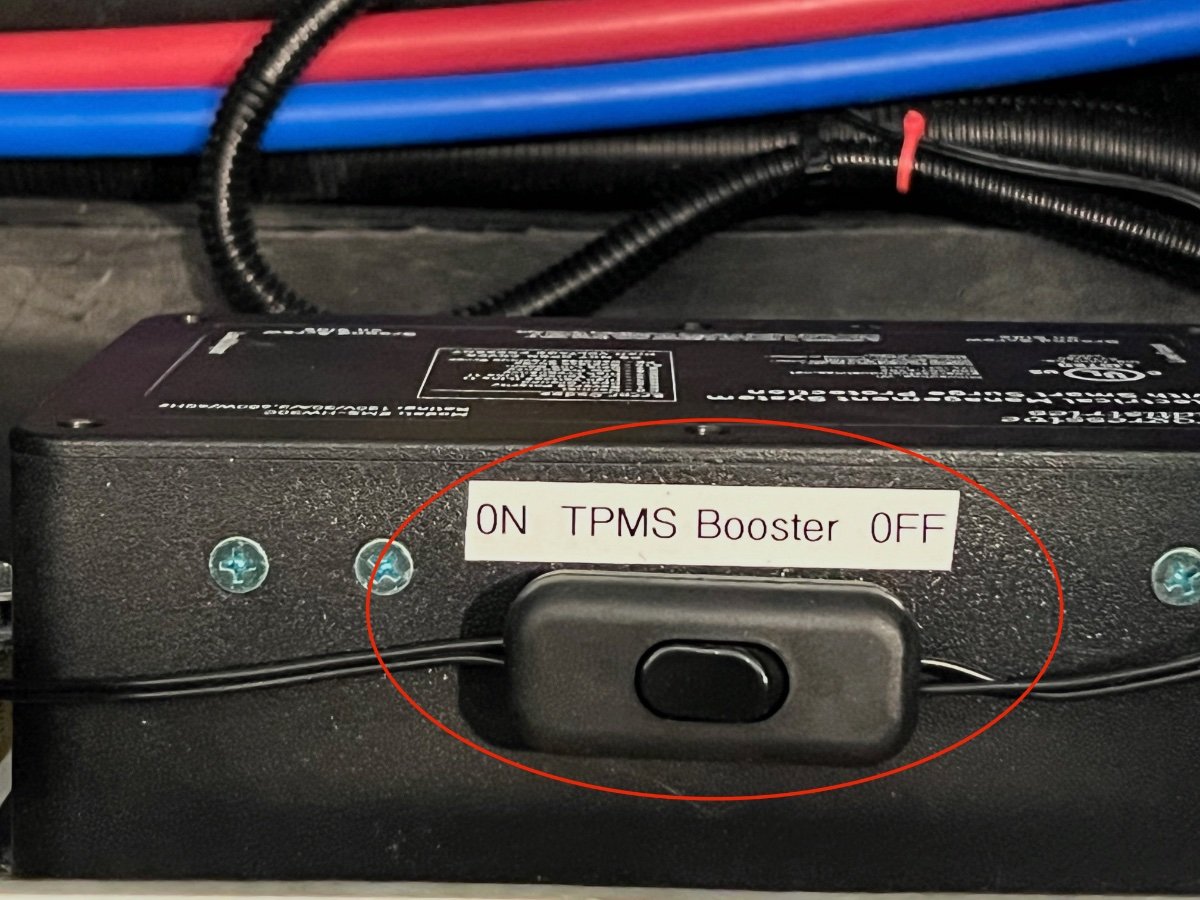
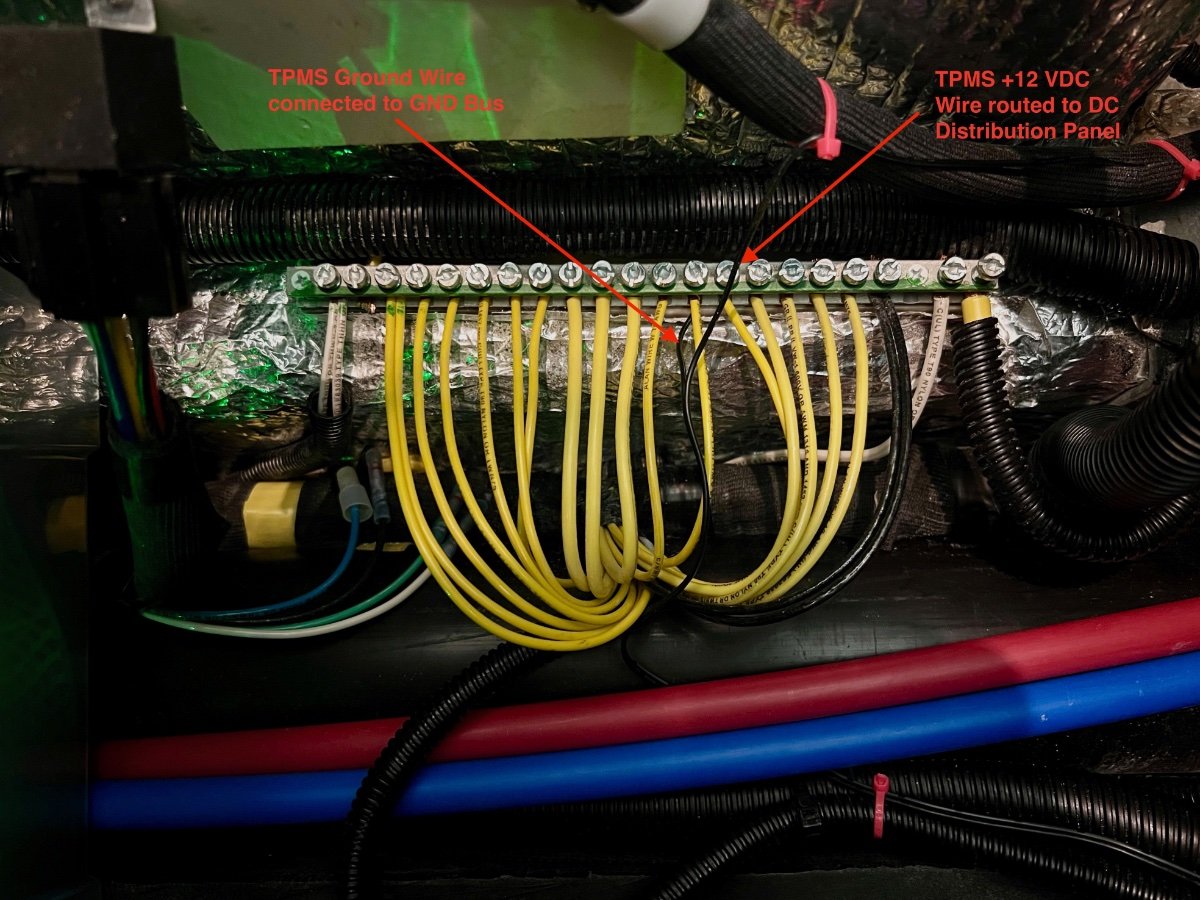
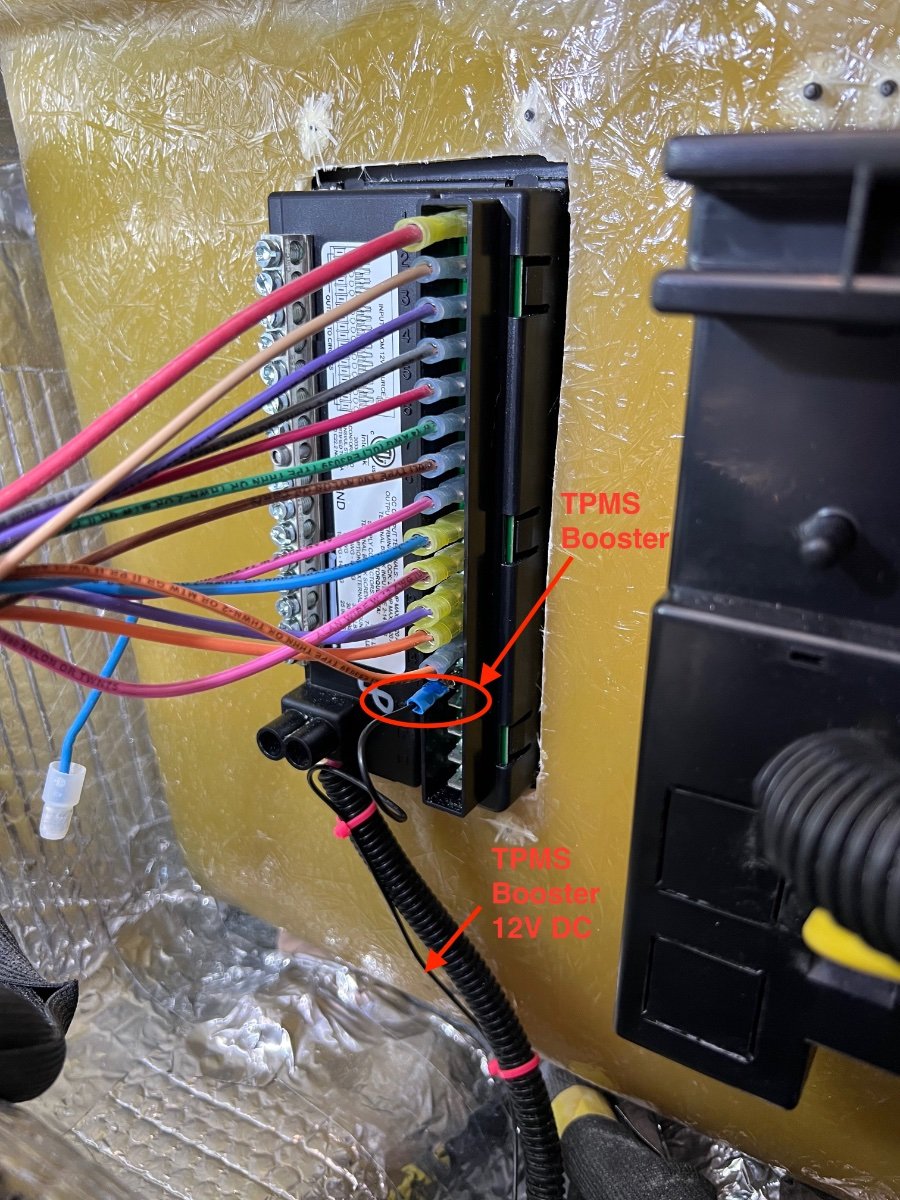
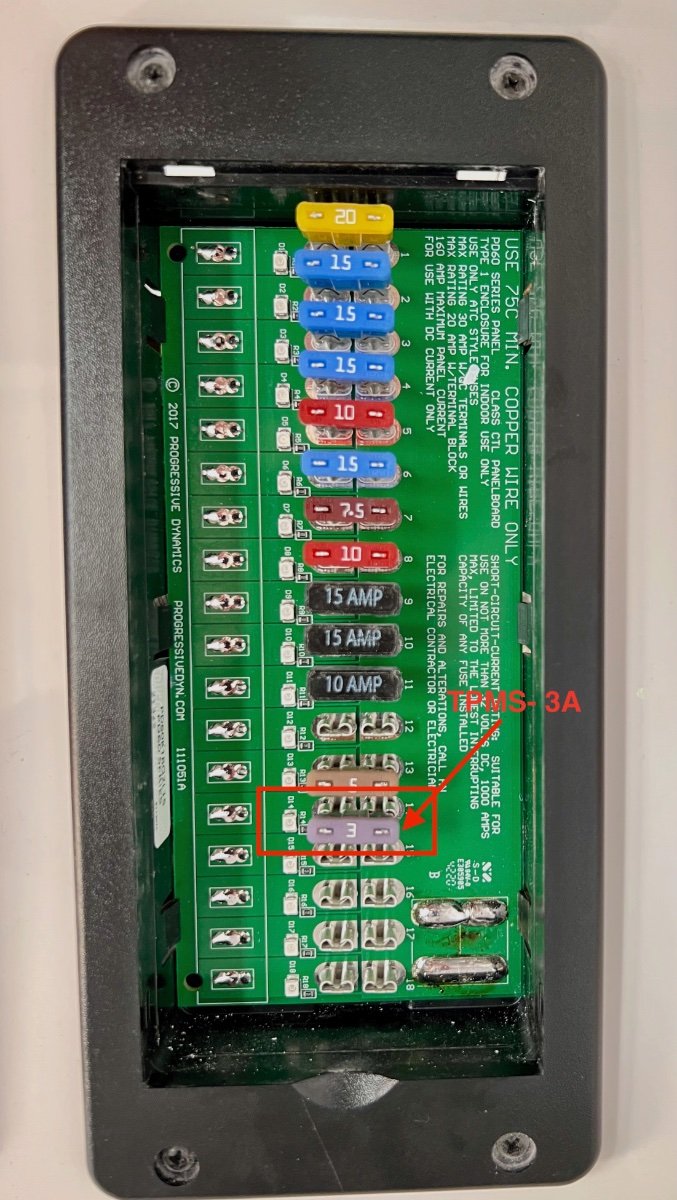
Shortly after arriving home from our delivery trip to Hohenwald, I installed a TireMinder i10 Tire Pressure Management System (TPMS), with six sensors, a monitor and a signal booster (installed later). Four of the sensors were fitted to the valve stems of the four trailer wheels on the ground, one on the trailer spare and one to the tow vehicle spare. The sensors transmit tire pressure and tire temperature status continuously to the small monitor in the tow vehicle. The 433 MHz RF signal booster is to ensure the signals from the sensors reach the monitor. The TPMS is quite configurable and can support up to 10 sensors simultaneously. Thresholds can be user specified and the system is preconfigured to create alerts for slow leaks or catastrophic loss of tire pressure. I first mounted the sensors to all the six wheels. The sensors appeared to have no problem communicating with the monitor in the tow vehicle. I deferred about a month installing the signal booster. Mounting the sensors is quite straightforward, requiring only insertion of provided disc batteries to the sensors, then screwing the sensors onto the valve stems. I like the inclusion of a lock nut to secure the sensors to the valve stems, using a provided small wrench. TireMinder Air Pressure & Temperature Sensor TireMinder i10 Monitor On each spare wheel I added 36" long extension hoses ($11 each) and 90 degree valve stem extensions ($7/pair), based on a recommendation from @John E Davies. The TireMinder sensors are mounted to the end of the extension hoses, which are routed through the wheel spokes to the accessible side of the spares. The valve stem extensions allow the hoses to be attached to the valve stems with no danger of kinking. These accessories eliminate a huge PITA- both spares are stored with their valve stems inaccessible. The trailer spare mounts with the valve stem facing the rear wall of the trailer. The tow vehicle spare is stowed valve stem down in a well under the cargo area at the rear of the vehicle. Now the TPMS reports the tire pressure with no hassle. Even if the spares require addition of air, the access is easy, without removing the spares from their storage positions. I always intended to install the signal booster, but had not settled on the best location. The installation instructions recommend locating the signal booster on the undercarriage, toward the front of travel trailers, with the antennas pointed toward the ground. The signal booster requires 12 volts DC for operation. I searched the OTTO forum seeking information on locations chosen by Oliver LEII owners for mounting such signal boosters. I found references to mounting signal boosters within the doghouse or in one of the upper storage compartments, neither of which appeared to offer ease of connection to a 12 VDC supply. Other owners indicated they had not installed the signal booster, since the monitor seemed to reliably provide tire pressure and temperature information. While vacuuming fiberglass dust from all areas accessible under the interior access hatches, I found what appeared to be an ideal location for the TPMS signal booster. The hatch under the rear dinette seat is the location of the Progressive Industries Surge Protector, mounted to the wall on the aisle side of the compartment. Adjacent to that location is a large area of unobstructed wall. Just below the surge protector is a ground bus and on the forward wall is the rear of the DC distribution panel. I believe this is a very desirable location for the signal booster. It is located low, slightly forward of the axles, in a protected space near the needed power supply. TPMS Signal Booster Location The TireMinder Signal Booster is attached to the fiberglass wall using an Industrial Velcro Coin, which enables easy removal. TPMS 12 VDC Power Switch I chose the top of the Progress Industries Surge Protector to mount a switch to turn the 12 VDC power supply to the TireMinder Signal Booster ON/OFF. The signal booster has a green light to indicate the power is ON. The wires from the signal booster are very thin and are both black (despite the instruction manual indicating one to be red and the other black). I don't believe it matters which is +12 VDC and which is Ground (GND). I routed the wires along cables in the compartment. The pink zip ties appearing in the photos provide clues to the routing. I arbitrarily selected a position on the Ground Bus to mount one of the wires to be Ground. The other wire was routed to the rear of the DC Distribution Panel, mounted on the forward wall of the compartment. Fuse position 14 was unused, so I selected it and connected the second wire from the TireMinder Signal Booster, using a crimp-on connector. Finally, I inserted a 3 amp fuse to the front side of the DC Distribution Panel, position 14. DC Ground Bus DC Distribution Panel (Rear) DC Distribution Panel (Front) Summary Although I had encountered no problems with the communication between the tire pressure/temperature sensors and the TireMinder Monitor, I believe having the signal booster installed reduces the risk of loss of communication between the sensors and the monitor. I have been leaving the signal booster on while traveling and turning power OFF when in storage. The signal booster draws only 75mA (Transmitting) to 14mA (Inactive). I tested the range with the signal booster installed and powered ON. I was able to walk over 300 feet from the trailer with the monitor receiving signals. I have been impressed with the TireMinder TPMS system. I have not mounted the monitor in the tow vehicle, but keep it on the center console, where I can view it as desired, and also hear any alarms which may occur. I purchased the TireMinder i10 and six sensors from TechnoRV (https://www.technorv.com/) for $279.65 (no shipping and no sales tax).
2 points
-
On our third trip after pick up in the summer of 2016 one of my back jacks would not come down. I was pretty green and called ScubaRX (I think he was dining with Tally at a restaurant) and he quickly explained how to use the manual wrench on the jack under the bed. It worked, the jack was not engaging the gear. From that time on I have never run the jacks up until they do the click-click-click. I stop before that point on all three jacks. On the back jacks I have some white pin stripe tape (Amazon) at the point where I want to stop. If raising by myself I do have to stop and look a couple of times. If Carol is helping she tells me when to stop. We’ve never had an issue since. Before we left this morning I checked the bolts on all my jacks and everything was nice and tight. Mike2 points
-
Advice appreciated! My first project to learn on will be our 2003 Toyota Tacoma with fiberglass shell, next will be the Tundra, and last will be Ollie. 🙂2 points
-
😊 you are welcome rideandfly, gotta keep our Ollies gelcoat looking great!2 points
-
Your shiny new Oliver is not the place to learn how to use an orbital polisher, imo. Practice on something else, first. Learn how to handle the speeds and products. Just a cautionary advice. There are some great articles available online from practical sailor, basically the consumer reports of the marine fiberglass world. (BTW, they have recommended the dewalt and shurhold many times.) Just like anything else, it's not just the tool you own, and the products you use, it's the proper application that gets the job done with best results. The gelcoat Oliver uses is marine grade, and a good layer, but it's still gelcoat. Don't abuse it, and it will give you a long lasting, beautiful life. Our motto is, take care of your stuff, and it will take care of you. Our sailboat is 40+ years, powerboat 20+ years, trailer 14+ years. (We do love fiberglass...)2 points
-
Here's what I have as recommended by my body shop detailer. https://www.amazon.com/gp/product/B07343W387/ref=ppx_yo_dt_b_asin_title_o01_s00?ie=UTF8&psc=12 points
-
I have the Makita, it is a beast, and will certainly outlive me. This one is corded, and it super smooth in operation. I’ve used it with Osborn brushes to smooth the logs on my home before refinishing, and it will stand up to heavy, daily use. If there is anything negative, it has to be the weight, although the strength of the motor and obvious durability will make it rather hefty.
2 points
-
Be sure to drill the pilot hole for threaded screws the correct size, it should be a little larger than the minor diameter of the sheet metal screw (the diameter of the part that is not cut for threads). If the screw does not drive in easily, the hole is too small and you need to go up one or two drill sizes and then retry. If the hole is too small you can snap off the smaller sized screws, and that will make you swear, or else it can strip the heads of any sized ones. And you should always make a decent sized countersink around the fresh screw hole to prevent the gelcoat from cracking and chipping. See that pic I posted above your last comment. John Davies Spokane WA2 points
-
I’ve had a cyclo unit for over a decade. It’s nice but heavy. I’d probably go with a smaller unit like the PC…I’ll have to look up the exact model.2 points
-
They are a great start, but also add a set of extended ones on your truck like Mike’s. Think layers of protection. In fact you might want to consider a temporary stone protector aerosol film for the trip back, so you won’t worry so much. Peel it off when you get home. Or tape closed cell foam on the front of the Ollie with gaffers tape, not cheap duct tape. Some folks headed to AK do this and it seems to work pretty well. Stopping the chips is most important, but NO way is your trailer going to stay clean over a 2500+ mile trip in November. In fact, you will probably have to take the longer route across the SW deserts then up on I-5. you will hit snow in the passes otherwise. Bring chains or cables for the truck AND the Ollie. What is your delivery date, and can you have it bumped a little earlier? You still need a few days in TN for the shakedown testing. In your shoes I would be thinking about having the Ollie delivered to Oregon. John Davies Spokane WA2 points
-
Rock tamers, properly installed, do the job for us on slow speed gravel roads. (5 to 25, maybe 35 mph, campground and entrance roads). We only have a very few chip marks. Beyond that, you'll want some frontal protection. Typical campground entances have slow speed limits. If you want to get out there, check out the Alaska threads. That's where it gets interesting.2 points
-
My mud flaps do a marginal job. They aren’t really big enough to provide real protection. I have a little more relaxed attitude than most Oliver owners and so I have some chips on the lower part of the front of the trailer. Not really noticeable unless you’re up close. I keep it clean, waxed and well maintained. After over 6 years and 80,000 miles it still looks pretty good. Mike2 points
-
No, not normal. We run our AC on low almost all the time. There is a noticeable difference between low and high, I wish there was more because low is still pretty loud. Mike2 points
-
On my Hull 218 the AC condensation drain line comes out at the left rear (street side) corner near the cable TV connector, stick a flexible rod of some kind up inside, most likely a bug or mud dawber has taken up residence. Mine is a 1/2” PEX plastic pipe, you won’t hurt it unless you get carried away with something hard and sharp. That line runs up the back side of the cargo area (toward the roof) you can also access it from there. Consider adding some coarse bronze wool to allow the water to come out, but keep the bigger bugs out. I think you can get it way cheaper at Walmart. https://www.amazon.com/Rogue-River-Tools-Bronze-Wool/dp/B079Y1QTY1/ref=sr_1_4?crid=1DFLZT60X80V1&keywords=bronze+wool+coarse&qid=1654821202&sprefix=bronze+wool+coarse%2Caps%2C159&sr=8-4 John Davies Spokane Wa2 points
-
This Link covers my experience with a Dometic air conditioner leak. Mossey2 points
-
I suspect they asked for help with their lithium design and have about 3 different configurations based on some trial and error. I know my Lithionics setup is different from the LifeBlue setup. Both of those options were available for a bit due to supply shortages. Still, you'd think they would have wanted that stuff documented for the future. I was pretty bummed to find out but it is what it is. They also ramped up production quite a bit during that time. Still, no excuse. On a more positive note, we've had no issues with the trailer other than a busted window shade bracket and the silver trim losing adhesion in the rear. I can live with that.2 points
-
@John E Davies, I haven't found the easter eggs. 😐 But here's my "smile photo." I call this tree on our property in NC my t-rex tulip tree. If you squint, you can see the open jaws, and neck outline. This time of the year, the tulip poplars are in bloom, near the top, where the little blooms kind of look like tulips. In the lower branch/bottom jaw, you can see the blossoms. They look like teeth from a distance. These trees are usually kind of cone shaped. T rex is reaching for the sun, obviously.
2 points
-
I replaced my factory original BF Goodrich tires last year with Cooper Discoverer AT3 LTX. It’s a little more aggressive model than what Oliver is using now. I just put them on my truck as well, 35” F rated. Mike2 points
-
I might pay high $$$ so I can say I ceramicked my trailer.2 points
-
This highly depends on where you will be storing your trailer. I have 2 vehicles with Opticoat pro ceramic on them. My truck lives outside and my wires car lives in the garage. If you are storing inside then I would say yes to ceramic on the trailer. If storing outside then I would probably advise against it. The coating I have is supposed to last "5 years". Wife's car still looks immaculate, but the horizontal surfaces on my truck (hood and roof) appear to losing there hydrophobic properties after about 1.5 years. If storing outside I would probably just wax it every 6 months or pay to have it done. With ceramic if it starts to break down you have to remove it with mechanical means to start over which will add to the expense of maintaining your trailers appearance. Wax is just wash/polish/wax again to be good as new. John2 points
-
That's a new feature. The radio uses a combination of microphones and motion sensors, interpreted by A.I., to determine your mood. Based on that evaluation, it automatically picks the appropriate genre of music for your mood (based on an analysis of your past music selections and Google searches related to songs and artists) and powers up. Future revisions will also feature integrated mood lighting along with the audio. To stop the music, remain perfectly quiet and still while breathing slowly and twitching your eyes to simulate REM sleep. This will signal the A.I. to terminate the music. NOTE: Swearing and gesticulating energetically in the direction of the radio will only serve to switch the music to Kenny G. or a similar genre, so caution is advised. Or, it's broken. Good luck either way.2 points
-
While camping in Arkansas in May of 2019, I found a fair amount of water running off the rear curbside roof while the AC was running. I figured out that if the lowest point of the Ollie was the curbside, then the condensate water rain off the curbside roof. If the low point was the street side, the condensate drained through the internal drain tube and out under the Ollie as it should. That allowed us to manage the condensate water drainage as needed. When I finally got around to troubleshooting the actual problem I found out Oliver had installed a Dometic accessory drain kit which consisted of 2 white plastic cups and vinyl tubing and 4 screws and 3 or 4 hose clamps. There is an accessory cup on both sides off the AC unit that receive the condensate from the steel drain pan built into the the base of the AC. The drain kit tubing connects the accessory drain cups to Oliver’s internal drain tubing. I could see the internal drain pan after pulling the AC shroud and a few other parts off. Without the accessory drain kit the condensate would exit the drain pan and onto the roof through a drain hole on each side. So RV's with the Dometic AC but without the accessory drain kit would experience water running off the roof under normal conditions while running the AC. Some Oliver owners on the forum have replaced their Dometic AC's and report that the condensate runs off the roof and down the low side of the trailer because there wasn’t a option to connect the new AC to the internal Oliver drain system. After an initial inspection of the drain system, I leveled the Ollie side to side and front to back and began adding water to the condensate drain pan. The result was that some water ran off the roof on the curbside and some drained through the Oliver internal drain on the street side. That result caused me to consider that perhaps there was a blockage in the curbside drain tube, so I disconnected the curbside tubing at the tee fitting that separates the accessory cups and used a can of compressed air to verify the tube was clear and it was. Then I lowered the curbside side and plugged that tube and then added water to the main drain which resulted in water leaking onto the roof. The accessory drain cup and tubing connection is not really visible with the AC unit mounted but it did seem to me the water was leaking from that connection. So I ordered this kit and a second AC mounting gasket because the kit comes with one and two are required to raise the AC unit high enough to allow clearance for the drain cups. I then sat on the repair parts for months waiting for an opportunity to obtain access to an air conditioned shop a friend has access to. That happened this month and the repair is complete and the drains work as they should. It did require removing the AC and flipping it onto it’s back to remove and replace the old gaskets and drain cups and that did make the broken cup connector visible. Here are few pictures for everyone that stayed awake during this dissertation. This last picture makes the original break visible by the discoloration on the bottom and sides of the connector. The lighter portion of the break was on top and still connected when we flipped it over and snapped it off completely. Mossey
1 point
-
@Mike and Carol, we painted stripes on our jacks back in 2008. Great advice!1 point
-
I’ll be interested in how it works out long term. It is much more accurate than doing it manually! I still keep a spreadsheet with mileage, name of where we stop and number of nights. There was a time when spreadsheets were cutting edge, now I guess they are old school! If anything describes me it’s “old school”. 🤪1 point
-
Isn't that kind of like asking someone if they have stopped beating their wife yet?🙄 Bill1 point
-
Oliver has never installed junk tires, like some other sob trailer manufacturers. Our first tires (st) were duros, if I remember correctly, in 2008. Some of the very best st tires available, at the time when goodyear marathons (nicknamed explodathons) were on pretty much every other trailer. We got five years and full life out of those tires. Just a few years ago, my sister was looking at an sob teardrop, a year or two old. It had load range c cheap Chinese tires. I told her to ask for new tires, at least load range d, before even considering signing. Many sob trailers leave the factory with the bare minimum tires, often unsafe at normal highway speed. But, not Olivers. @John Welte asked a valid question, considering the general market..1 point
-
My A&P has one, it’s really nice looking and he reported 28 ish mpg. I absolutely would get that engine over the gas option which I’ve been told is gutless with a trailer. Carefully check the payload as I think the oil burner is only available on the higher (heavier) trims.1 point
-
Been thinking about the ceramic coating process for Ollie, but decided to follow Bradger's advice in the following thread and purchase a dual action orbital polisher. We have always hand waxed our vehicles, boats, and Ollie. Going to practice on our 2003 Toyota Tacoma with the orbital polisher first, if that works out, the 2022 Tundra is next, and last will be Ollie. Been watching several Youtube videos by Drakes Detailing.1 point
-
So, all, what can one expect a detailer to charge for say a wax or a ceramic service? I live in California, so I'll double yoir figure and tax myself to death.1 point
-
I think you're in an appropriate spot. Let us know what you find.1 point
-
I think we were able to access the plug from the inside. Paul and I were talking about it. We "think" we stuck a long tie wrap (24") through the drain tube , and cleared it. We so seldom use ac, and that was at least ten years ago. Maybe more.1 point
-
I got both sets at Discount Tire. Maybe they’ve discontinued the trailer size. I didn’t include the spare, still have the smaller size BF Goodrich. Not optimal, I am considering a spare that matches the installed tires and leaving the cover off. I was a little concerned that my speedometer would not be accurate with the larger diameter tires. With the Firestones (285/60 20) actual speed was generally about 1mph below GPS and various roadside radar. These tires, almost 1.5” taller, show the same speed on my speedometer and GPS. I haven’t encountered one of those roadside radar displays yet, but right now it seems my speedometer is more accurate. So far, I’m happy. They look good, fill out the wheel well better and have a quiet, smooth ride. We leave for Colorado in the morning, so I’ll be able to see what the gas mileage difference is. Mike1 point
-
Congratulations on your new Ollie! We just picked ours up in May... so understand your excitement! Just a suggestion: go camping for a while to figure out how you use it... what style of camping works for you, etc.. I spent 10 months making lists of things I thought we would want to buy or modify when the time came. Fortunately we were able to travel for 3 or 4 weeks and now in real use...quickly we discovered some things we hadn't thought of as well as some things that fell off the list. This will help you prioritize projects based on time and money. The Oliver is so nice... nothing is "urgent".1 point
-
Last I heard Oliver was installing Cooper Light Truck tires. Perfectly fine tires. Most other trailers come with ST (Special Trailer) tires, often of dubious quality. Google "RV China Bombs" and you'll see lots of horror stories. With our 3 previous rigs, the first thing I did was put quality tires on them. I won't be changing out the Oliver's Coopers.1 point
-
Clay bars don’t really buff anything. They do the serious cleaning. After you wash and dry, you spray on a solution (I use a spray quick detailer) for lubrication then rub with the clay and it picks up everything that isn’t supposed to be there leaving a very smooth surface. Wax is after.1 point
-
We've never used a clay bar. We used to use 3m ultra paste wax. Now we use collinite marine paste wax, (#885, Fleetwood, blue and white can) since 3m discontinued the ultra. West marine boat soap, the pink one .1 point
-
@Mike and CarolIs “ceramiced” even a word?1 point
-
When did you have the ceramic applied? 10 years ago or recently? If it was recently then it will obviously look as good or better than new ones. All fiberglass (Gelcoat) can be made to look new (within reason). The prepping process assures that the gelcoat will look like new before the coating is applied. I am talking about the longevity of the coating. If storing outside in the elements the life of the coating will be drastically reduced as opposed to storing indoors or under cover. My point was that the value (lifetime) of the coating will be dependent on your storage conditions. If storing outside uncovered like I do then I personally don't believe it is worth the price. John1 point
-
Whenever I'm inside someone else's trailer, I try to quickly set the alarm on their radio to go of at 0300 hours. Just for poops and giggles. 😉1 point


-
Recent Achievements
-


")


