Leaderboard


Popular Content
Showing content with the highest reputation on 09/22/2022 in all areas
-
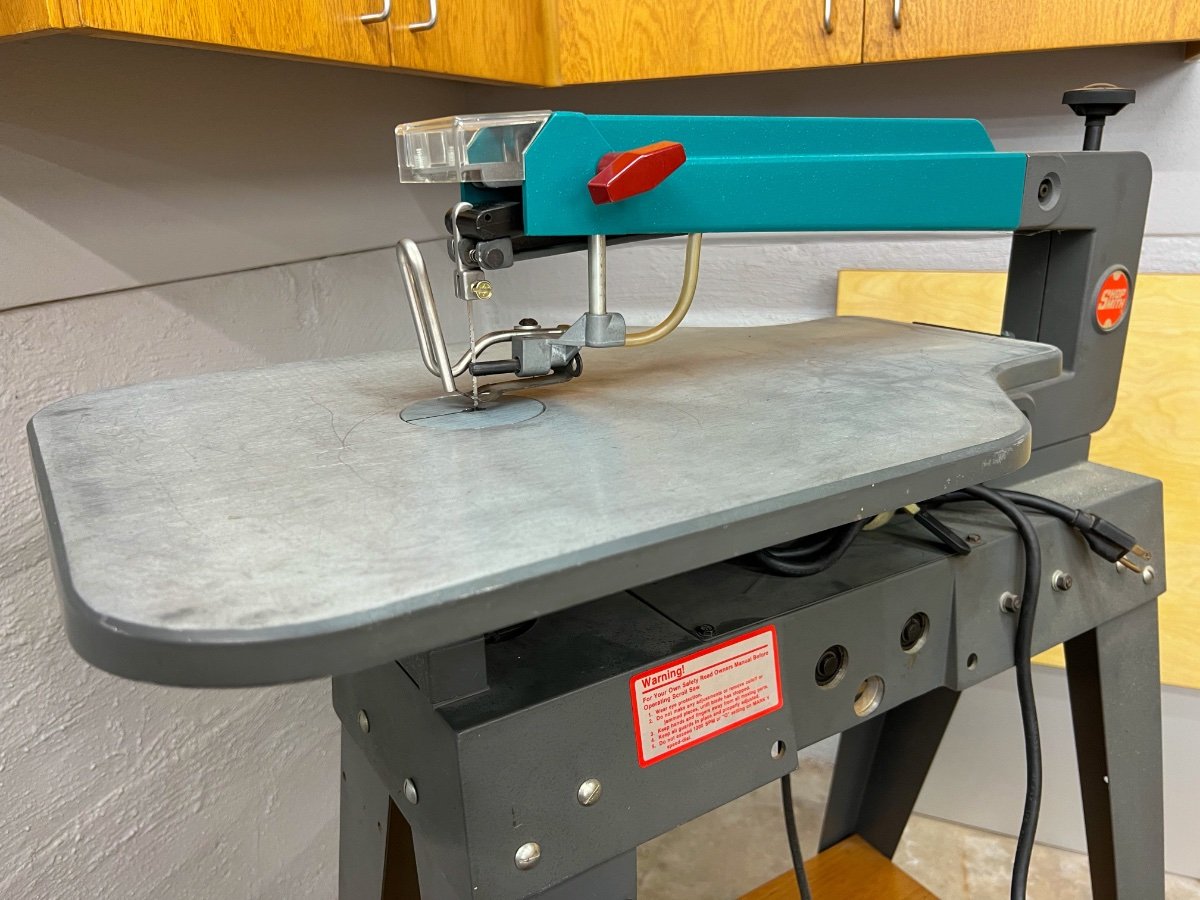
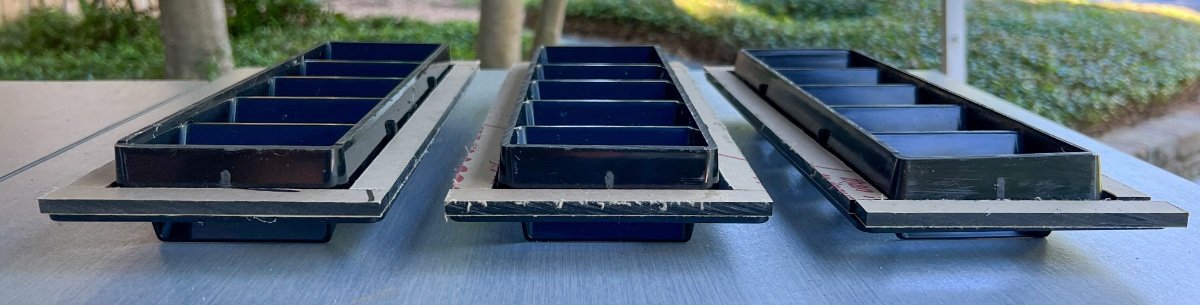
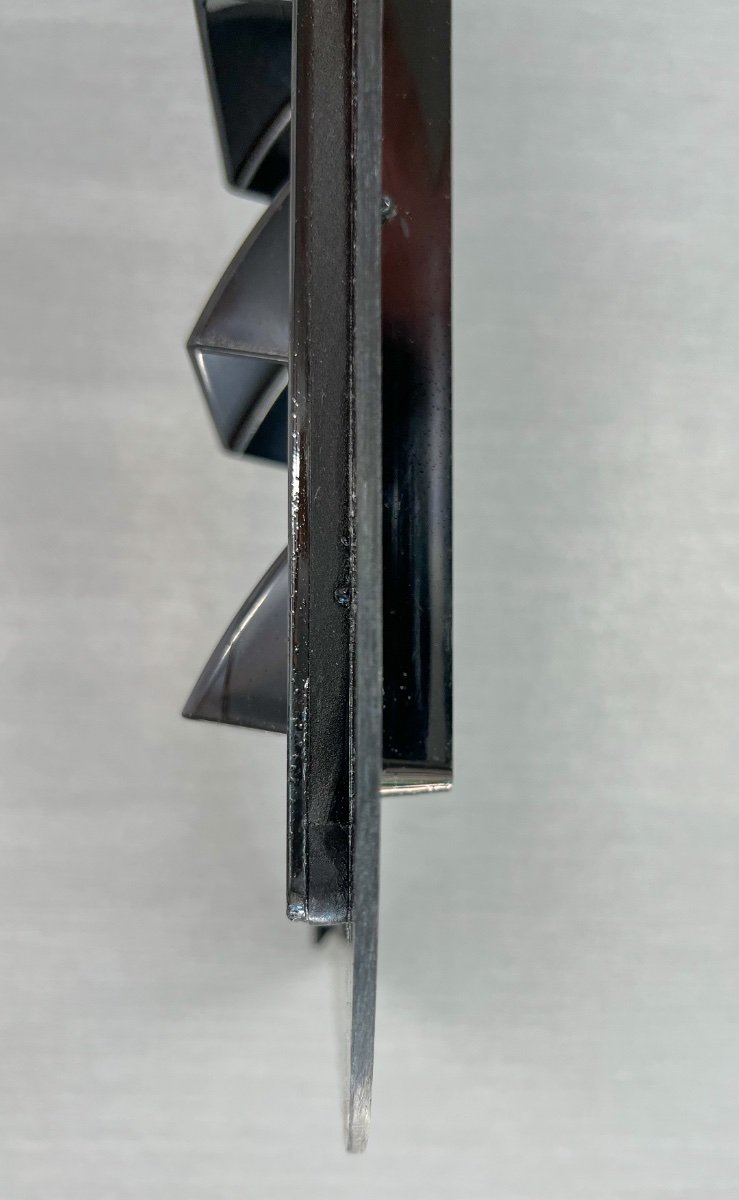
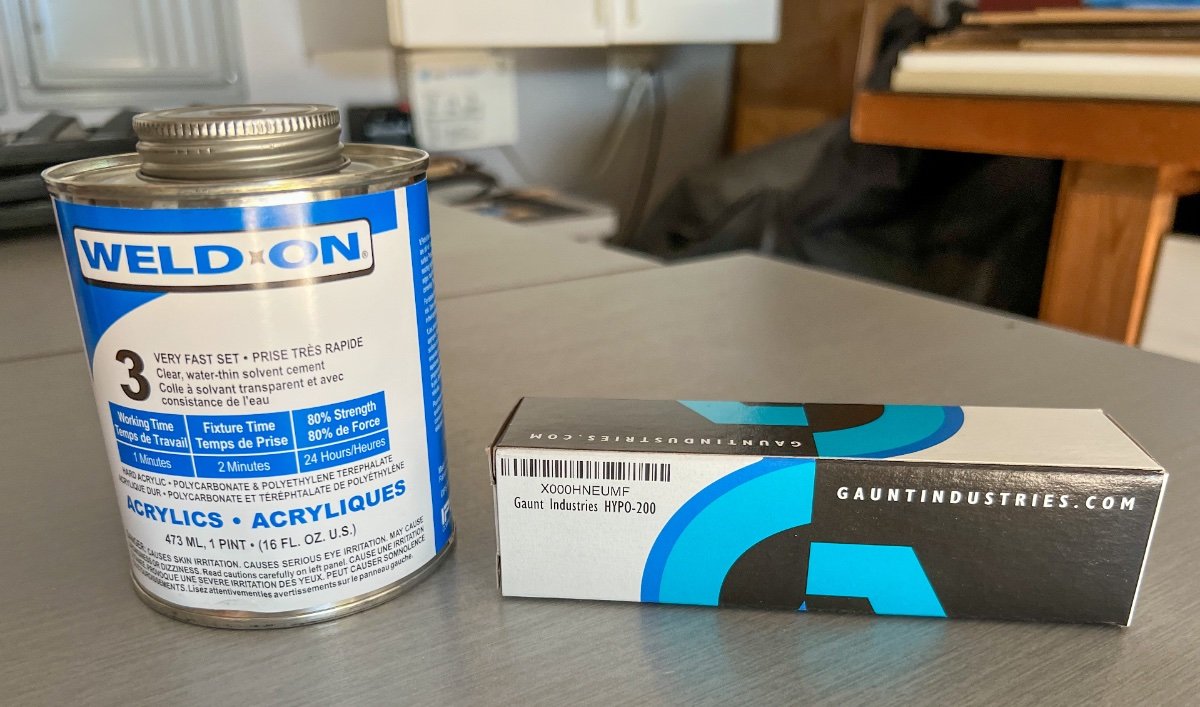
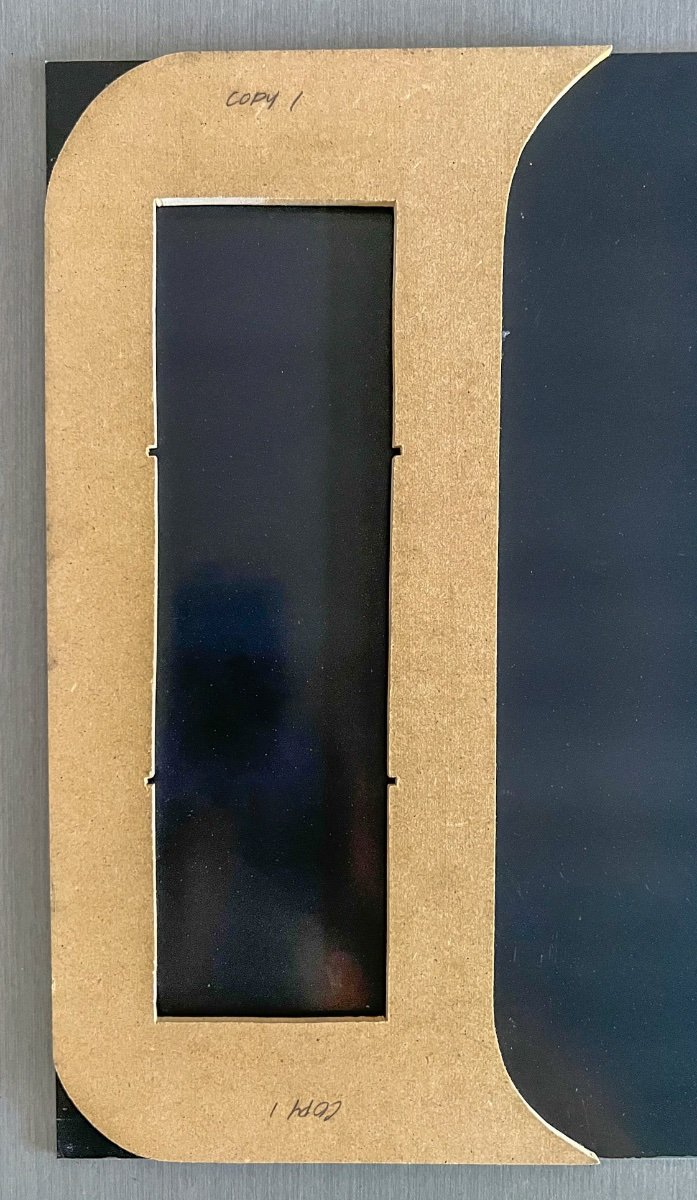
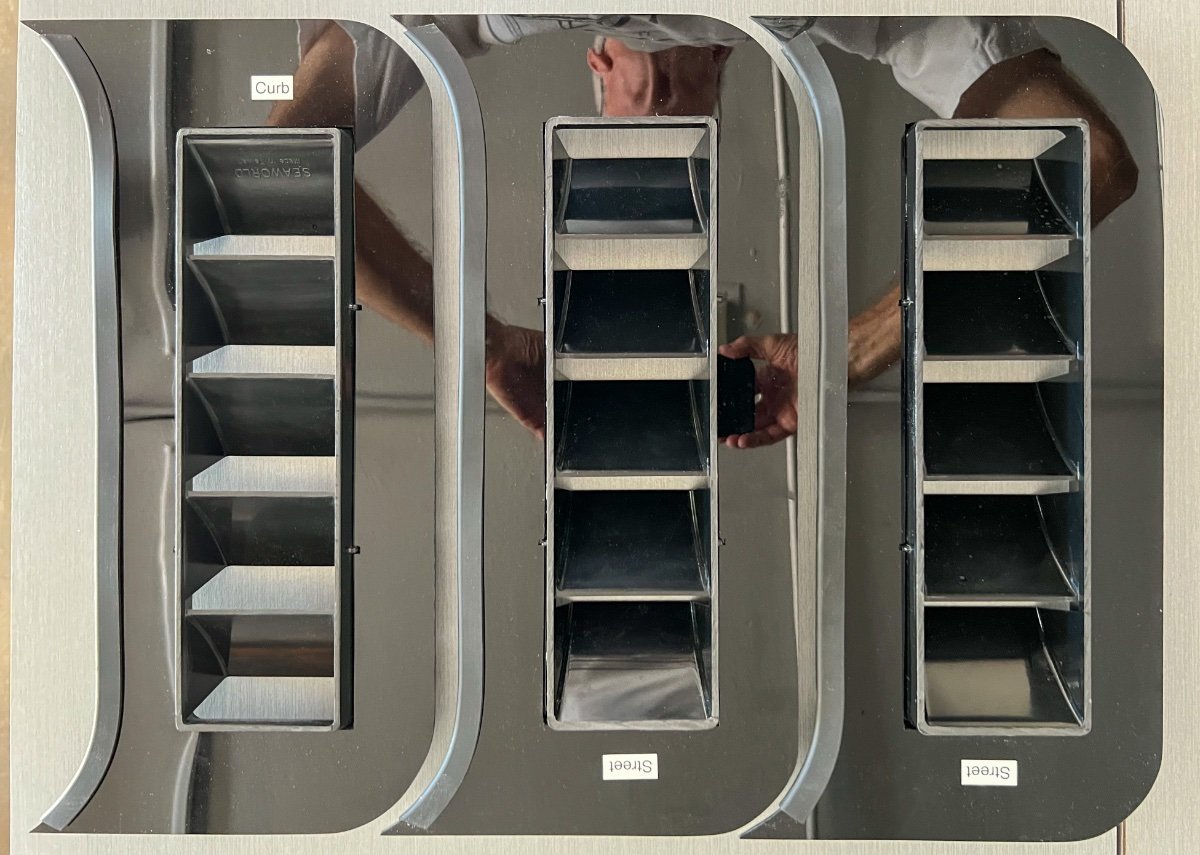
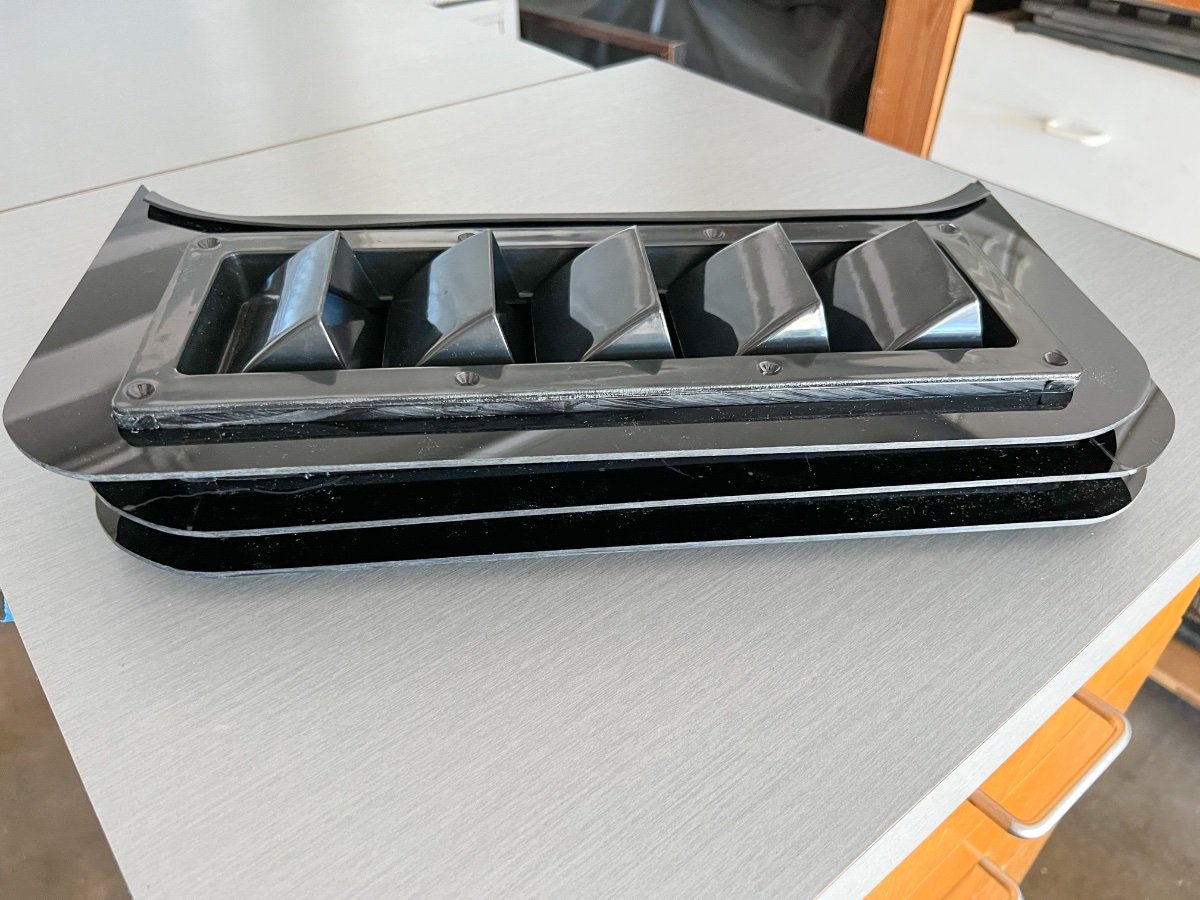
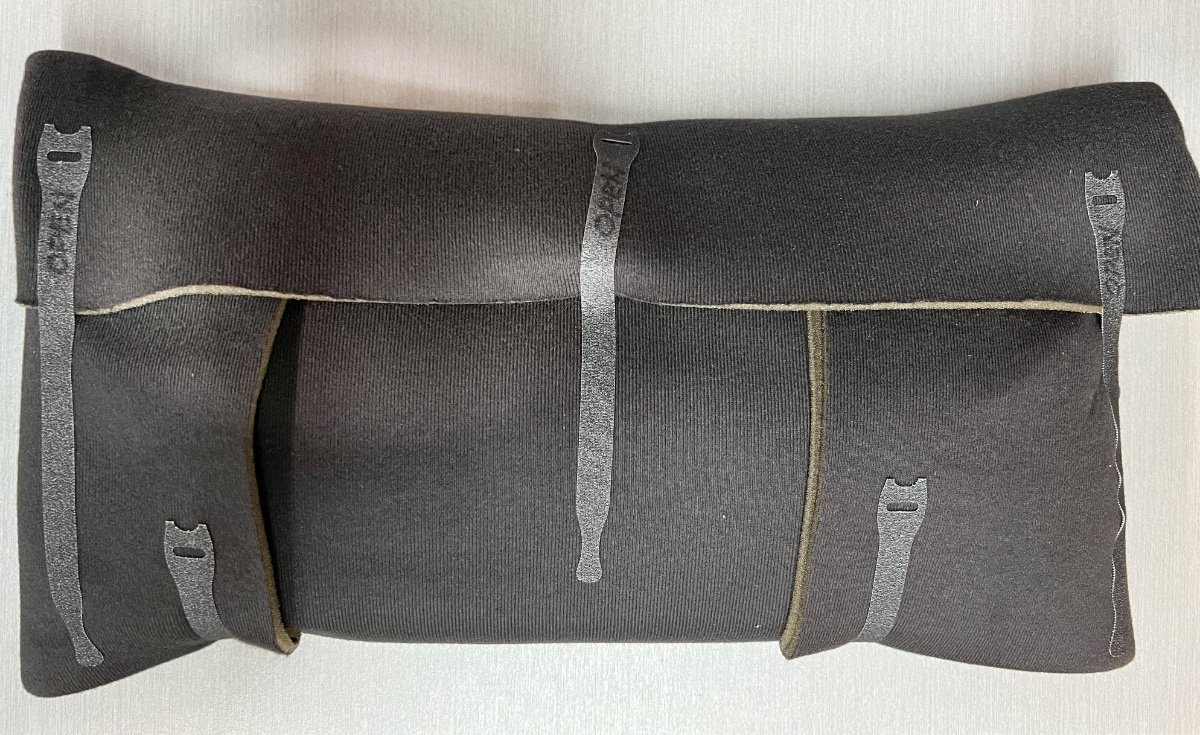
I recently undertook fabrication of a set of louvered ventilators for the three side windows of our LEII, following the excellent design posted by @csevel. I want to share some lessons learned for others who may want to fabricate a set for their Ollies. The window vent consists of two main parts, a purchased louver ventilator and a custom made acrylic mounting plate, shaped to fit a partial window opening, into which the louver is mounted. I executed the fabrication a bit differently from @csevel. Since I wanted to produce a set of three louvered ventilators, I made a template using 1/4" medium density fiberboard (MDF) for the mounting plate. I, too, used one of the window screens as a guide for the edge contours of the template to match the sliding windows and frames. The final mounting plate template is 16-3/8" tall and 6-5/8" wide at the midpoint. The rectangular opening is 3-½" wide x 12-1/16" tall. After tracing the screen contour for the vertical edges of the template, I clamped the window screen to the MDF and used the screen as a template for my router to follow, to cut the shape. Cutting external edges of MDF template I had purchased the White Water Plastic 5-Slotted Louvered Ventilators from Amazon, although they are now shown as unavailable. I recommend searching for other sources, such as West Marine. It appears the same product is sold under multiple brand names. I used one of the purchased louvered ventilators to determine the size of the rectangular opening required in my MDF template and centered the outline for the opening. Note the rear of the louvered ventilator is tapered, so the opening needs to be large enough to accept the entire rear projection through the MDF mounting plate template, with the flange of the louver meeting the mounting plate. The rear projection also has two reinforcing ribs on each of the long sides and one each on top and bottom, which require notching the sides of the opening for clearance. To cut out the rectangular opening in the MDF template, I first tried to use my router, but found it very difficult to control the router and tried various guides, unsuccessfully. Achieving accurate cuts freehand with the router was also very difficult. In retrospect, using a router table to cut the opening rectangle would not be too difficult if done with straight outer edges, prior to cutting the outer edge curves. Frustrated by my lack of skill with the router, I switched to using a scroll saw to cut the rectangular opening in the mounting plate. This requires drilling a starter hole inside the rectangle, then inserting the scroll saw blade. The scroll saw proved very useful in making accurate cuts to make the MDF template. I tried to cut the rectangular opening as accurately as possible, which was relatively easy to do. If a scroll saw is not available, I recommend using a high quality hand held jigsaw as another option. After cutting the outer curved edges and rectangular opening in the template, I sanded the edges smooth and inserted one of the louvers into the template to test for fit. I used blue painter's tape to hold the louver in the template while testing the fit in the window opening. Test fitting the MDF template and louver I inserted the MDF template and louver into the window opening to verify the curved side abutting the window fit closely, with as small a gap as possible. I made slight adjustments to the template with a belt sander mounted upside down on a work table. I also verified the template could be inserted into the window track while inside the trailer, without requiring removal of the window shades or screen. While inside the trailer, position the mounting plate and louver through the window opening and tilt the top topward the upper screen track. The mounting plate is first inserted into the upper track of the screen, then placing the bottom of the plate into the lower window track, then moving the top of the mounting plate from the screen track into the window track. Sounds confusing, but works easily after a few tries. When the mounting plate template is inserted into the window track and pressed against the window edge, there is space above and below the plate and the window track. Once the mounting plate template is in the window track, it should be lifted slightly as the window is moved to shut against the plate. This should result in the curved edges of the mounting plate mating closely with the curved outer edge of the window, top and bottom. Closing the window against the mounting plate secures it in place, seated against the vertical edge of the track and the edge of the window. After several trial fittings and minor adjustments to the template, I was satisfied the template mounting plate would fit snugly to minimize the chance of water leaking in at the junction with the window. I did all of the trial fittings on the street side window above the bed. Only then did I test the template in the other two similar windows, which is when noticed the edges of the three windows are not uniform. The street side aft window had some black sealant projecting from between the two panes of glass. On the other windows, the sealant material does not extend from the edge of the two panes of glass. When fitted against the outer pane of glass in each of the three windows, the mounting plate template proved to be a snug fit, when carefully inserted. As a final test of the fitment of the mounting plate template, I tested to verify each of the window screens would close. Initially, they would not. The rear of the louver ventilator projects one inch from the rear of the front flange, causing interference with the screen and preventing its closure. Since the louvers do not have any screen built in to prevent entry of insects, operation of the standard window screens is essential. @csevel indicated her screens would close with the louver in place. I suspect my louvers and hers may not be exactly the same depth. Or, since our trailers are five model years apart, there may be differences in our windows. My solution to resolve the screen interference issue was to reduce the rear projection of the louver ventilator 3/8" by: Removing 1/8" off the rear projection of the louver ventilators using a table saw; Fabricating spacers from 1/4" thick acrylic sheet to insert between the mounting plate and the front flange of the louver ventilators. Removal of 1/8" of depth from louver ventilator 1/4" Spacers dry fitted to rear of front flange of louvered ventilators In the photo above, all three louvered ventilators have had their depth reduced by 1/8" and 1/4" spacers dry fitted prior to cementing in place. The spacers are 9/16" wide, surrounding the rear projection of the louver ventilators. (The protective paper coating is still in place on the spacers in the photo.) Side view of spacers bonded to rear of the flange of a louver ventilator The spacers were bonded to the rear of the flange using acrylic cement applied using a small application bottle with a needle applicator (from small box in photo below). After dry fitting, I cemented the spacers to the louvers, starting with the top and bottom, while the side spacers were in place loose, without cement. After the top and bottom spacers were firmly cemented, I cemented the side pieces. I found using spring clamps to hold the spacer pieces in place worked well while the cement set. I test fitted the louver ventilators inserted into the template mounting plate to verify the interference problem with the screen was resolved. The screens cleared with very little space to spare. Fabrication of Mounting Plates Having completed the mounting plate template, I next made a copy of the template, also from 1/4" MDF, as a backup in the event I damaged the master template. Making a copy also served as a dry run for routing the acrylic sheet. Using double sided woodworking tape. I fastened the template copy to a sheet of 1/8" black acrylic sheet, in preparation for cutting the first mounting plate. (Use the woodworking tape sparingly- 6 pieces 1 inch in length is sufficient. Otherwise, it can be difficult to remove, with adhesive left behind.) MDF template on acrylic for routing From experimentation cutting scrap acrylic sheet with the router, I had found the router bit would quickly melt the acrylic sheet. To avoid melting the acrylic sheet, I removed the excess acrylic material from around the template and the rectangular cutout, leaving only 1/16" to 1/8" of material to be removed by the router bit. I was then able to obtain smooth edges following the template for final trimming with the router. With the template attached by woodworkers tape to the 1/8" acrylic sheet, I used the scroll saw to cut the acrylic, keeping the saw kerf 1/16" to 1/8" away from the template. This freed the first piece of acrylic from the larger sheet and removed excess acrylic material from around the template. I mounted my router, with a 1/2" flush trimming bit, to a small router table. I then proceeded to trim the remaining acrylic sheet from around the template, both the outside edges and the rectangular cutout. After routing the first mounting plate, I repeated the same steps two more times, attaching the template to the acrylic sheet, trimming away the excess material using the scroll saw, then making the finish trimming using the router mounting in the table. When I had routed all three mounting plates, I lightly sanded the edges of the acrylic mounting plates to remove the sharp edges. Assembly of louver ventilators to mounting plates The louver ventilators with spacers attached are dry fitted to the mounting plates. Once satisfactory fit is verified, the parts are ready to be cemented using the acrylic cement. NOTE: The louver ventilators for the Street side windows are oriented opposite those for use on the Curb side. Position the mounting plates properly to abut the windows and insert the louver ventilators with their louvers on the outside and the louver openings facing down. I found it easiest to start by cementing one of the short ends of the louver ventilators to the mounting plate, using a couple of spring clamps to hold the parts together until the cement formed a firm bond, which takes about 5 minutes. Proceed to cement successive sides of the louver ventilator to the mounting plate, one side at a time, applying spring clamps until the cement cures. Use the needle applicator to apply cement at the intersections of the parts. Allow the cemented parts to cure overnight. The acrylic cement is very effective at welding the acrylic parts together, producing a very rigid assembly. Completed set of louvered ventilators and mounting plates After assembly, I added the same rubber edge trim recommended by @csevel to the edge of the mounting plate which meets the window edge. This trim seems to conform well to close any gaps between the windows and the mounting plates. The completed units are quite rigid and nest reasonably well. I set the width at 6-5/8" for two reasons: To yield three mounting plates from a 24" x 24" sheet of acrylic To keep the mounting plates and louvers as small as possible to facilitate storage in the trailer. I made a pouch to contain the louver ventilators to make it easier to store them without concern for damage to them or to other parts of the trailer. I had leftover car headliner material, which is relatively thin, with a foam backing, to which Velcro straps readily attach. Summary This project, which I first thought rather simple, provided several challenges. I spent much more time than expected to achieve an acceptable result. Given the extended drought and high temperatures in Texas, I have not had an opportunity to test the effectiveness of the vents, nor how well they keep rain out. In a week we depart for a two and a half week trip to Colorado to photograph fall color. I expect we will encounter some test conditions in the mountains. I hope this information is useful. Please feel free to contact me with questions. Regards, Don
 11 points
 -
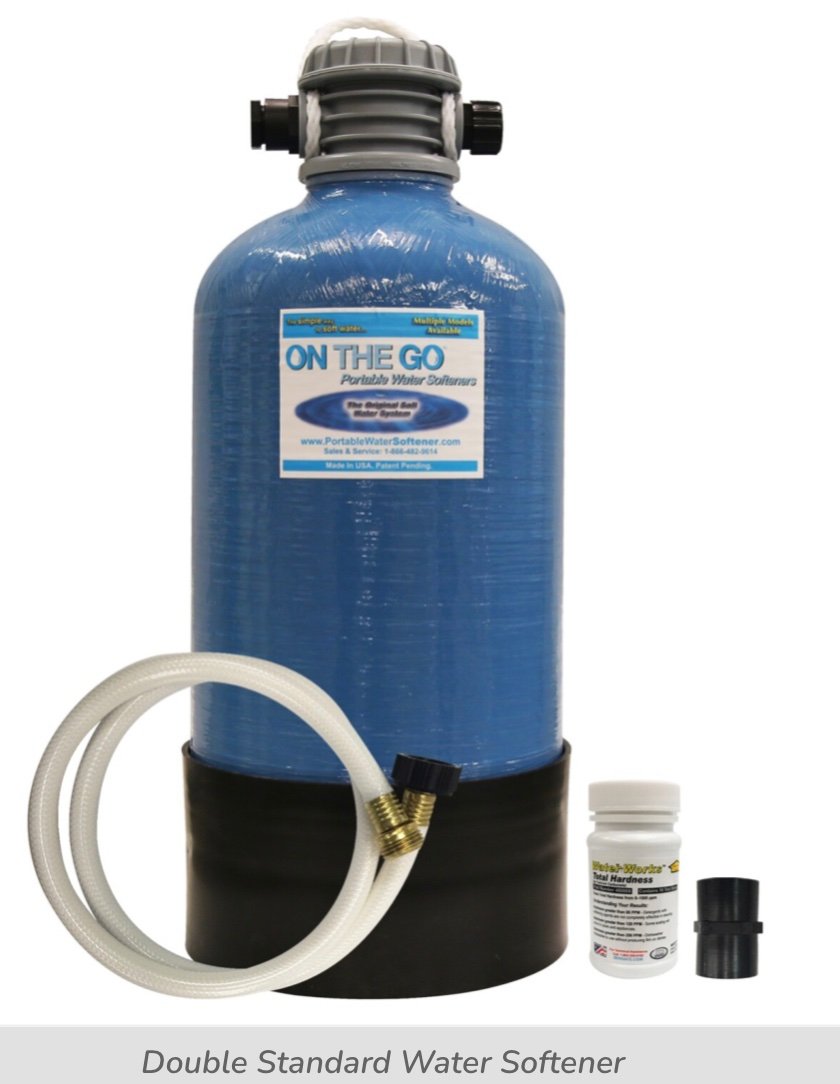
@John E Davies John - I use one when we travel, especially out west. After a week in Yuma, my hose connectors were showing calcium build up and a friend in Lake Havasu referred me to the one he uses. It works great though it is not small. Uses standard table salt and it is easy to flush and recharge. Here is the link to the one I have. I plan to have it ready to go when my LE II gets delivered. Brian
4 points
-
It’s not an issue. We have the maxxfan open almost always as well as the bath fan. That provides ventilation. Sometimes during really hard rains we shut the bath fan because some of the rain bouncing off the roof can make the bath floor damp. If it isn’t a hard rain, keeping a window cracked is something else we do. Mike4 points
-
Sewer hoses store in the back bumper (one of the nice Oliver design features that you don’t find on other trailers), and that’s where the drain connection is. Most owners just leave the hose connected to the drain inside the bumper, and cap the end of the hose. I see a lot of other trailer brands with the sewer pipes and valves hanging way down below the frame, unprotected from road hazards.
4 points
-
I talked to the tech who worked on our Ollie. He disassembled all 4 wheel assemblies down to the spindles and rebuilt them. One theory of his, maybe the spindle nuts were too tight (shouldn't be, I watched his boss torque them last time), so he re-torqued. He couldn't find anything else. Going on a short trip tomorrow. We'll see.3 points
-
@Brian and Brandelyne As you have likely seen in the comments, ventilation during rain is an issue to some owners and not to others. I offer the follow comments based on our experience owning our LEII since mid-February. Since I have expended my time and about $50 on the louvered ventilators, you can count me among the owners who want better ventilation capabilities. The week we took delivery there was constant, heavy rain in Hohenwald and surround areas. We also encountered heavy rains between Hohenwald and Dallas during our 10 day return trip. Anytime there is more than light rain water can readily enter partially open sliding windows. There were several nights when we had opened the windows slightly open (3-4 inches) for ventilation and were awakened by heavy rain and water entering the cabin through the open windows. This is especially noticeable when the open window is above the bed where one is sleeping. We have only a curb side awning, which I have tried extending 1-½ to 2 feet when rain is falling (or expected) to shelter the partially open curb side window. When the awning is extended this short distance it generally prevents rain from entering the partially open window. However, a large quantity of water accumulates in the awning. I had expected the rainwater to run off the ends of the awning, but this was not so. I was alarmed to see how much water was held by the awning and became concerned it would damage the awning. Our awning also has a motion sensor, which will automatically retract the awning if winds are moving it. We have had the awning retract during thunderstorms. During another trip, we were camping in western NC, near the Blue Ridge Parkway. We had left our dog in the trailer while we went hiking, as she was not permitted on the trails. Rain was not expected and temperatures were mild, so we left windows partially open on both sides of the trailer. About 2 hours later an intense thunderstorm appeared. We had small umbrellas with us, but still got rather wet. Upon returning to the trailer, we found wet beds from rain entering the windows. On the same trip, we were camping at Paris Mountain SP, near Greenville, SC. We received heavy rain a couple of nights we were there. So we have become cautious about having windows left partially open. I had read many comments on the forum about the need for ventilation to prevent condensation. We have used the Maxx fan and the bathroom fan to help circulate air in the trailer. When operating these fans, fresh air must enter from somewhere and the trailer has few places to admit any significant volume of outside air, hence opening windows becomes necessary. Consequently, not being a keen on sleeping in a wet bed, I was very happy to see the forum post by @csevel with her clever solution for providing ventilation, especially during rainfall. Thus, I decided to follow the louver ventilator design to have a solution available for a problem I expect to encounter regularly. The cost was relatively low and the solution appears likely to improve ventilation, with lower risk of rain water entering the cabin.. I agree that the sliding windows on our Oliver are more likely to admit rain water when opened than are awning type windows, which tilt out from the bottom. The tilt of our sliding windows further aggravates the problem, as there is no protection from rain falling directly on the lower part of the windows. Also, I have read many forum posts about the need to keep the weep holes along the lower window track clear to prevent water accumulating in the window tracks and spilling into the cabin. I have also read more than a few forum posts about various over window awning/hood designs by Oliver owners. I suspect many of these designs result from experiences similar to ours. There are also many forum posts about Oliver owners installing EZ Gutters over the window, as I also recently installed. I can think of no reason to install these gutters over the windows than to reduce the amount of rain flowing over the windows. I was aware of the vulnerability of the Oliver sliding windows to water entry prior to placing our order. The risk seemed manageable. I was also aware through my due diligence research before our Oliver purchase of very significant water leakage problems common to most RVs due to structural integrity issues. The Oliver construction, with no major seams on the roof appeared to me likely to prevent most of the water leakage issues experience with other brands. I have found reports of water leaks in Oliver trailers to be quite rare. If Oliver offered a choice of window styles, sliding or awning, I would likely choose awning, assuming that option was also double pane insulated glass, which I understand most are not. I am not aware of any Oliver trailers ever having awning windows. This was not a deterrent to our ordering an Oliver trailer. We are happy with our purchase. Regards, Don3 points
-
According to Toyota, the 2023 Sequoia (in 2WD) will have a maximum tow rating of 9,520 pounds. A 4WD version of this third-row SUV will only be able to tow about 9,100 pounds. The full-size, truck-based SUV with the highest tow rating is Stellantis' Wagoneer/Grand Wagoneer. The 2022 and earlier models were limited to 7000 pounds and maybe a bit more. That’s cutting it close on safety and capability.3 points
-
For anyone following this, I just got a response from Dexter. If the drum temp goes over 200 degrees F in normal driving conditions it should be investigated. Something solid to hang your hat on.3 points
-
I haven’t found it to be but: In 2018 when I ordered, the awnings were manual and, having the additional “street-side” awning, my sop is to extend both 12-16 inches. This is enough to provide both rain protection and midday shade. Wind damage has not been an issue and I’m typically where much of the “agriculture” theses days has three-blades.3 points
-
The local shop just finished inspecting my running gear. "No problem found." He said, "I'd be concerned about 600 degrees, but not 60." I'm still concerned because I've never had trailer drums run that hot, or have such a discrepancy, before - even my last self adjusting ones. Not many choices now except continue to monitor. Can't even inspect the bearings directly, because they're NevRLube sealed units. If the wheels burst into flames, or fall off, I'll find the problem. 🙄3 points
-
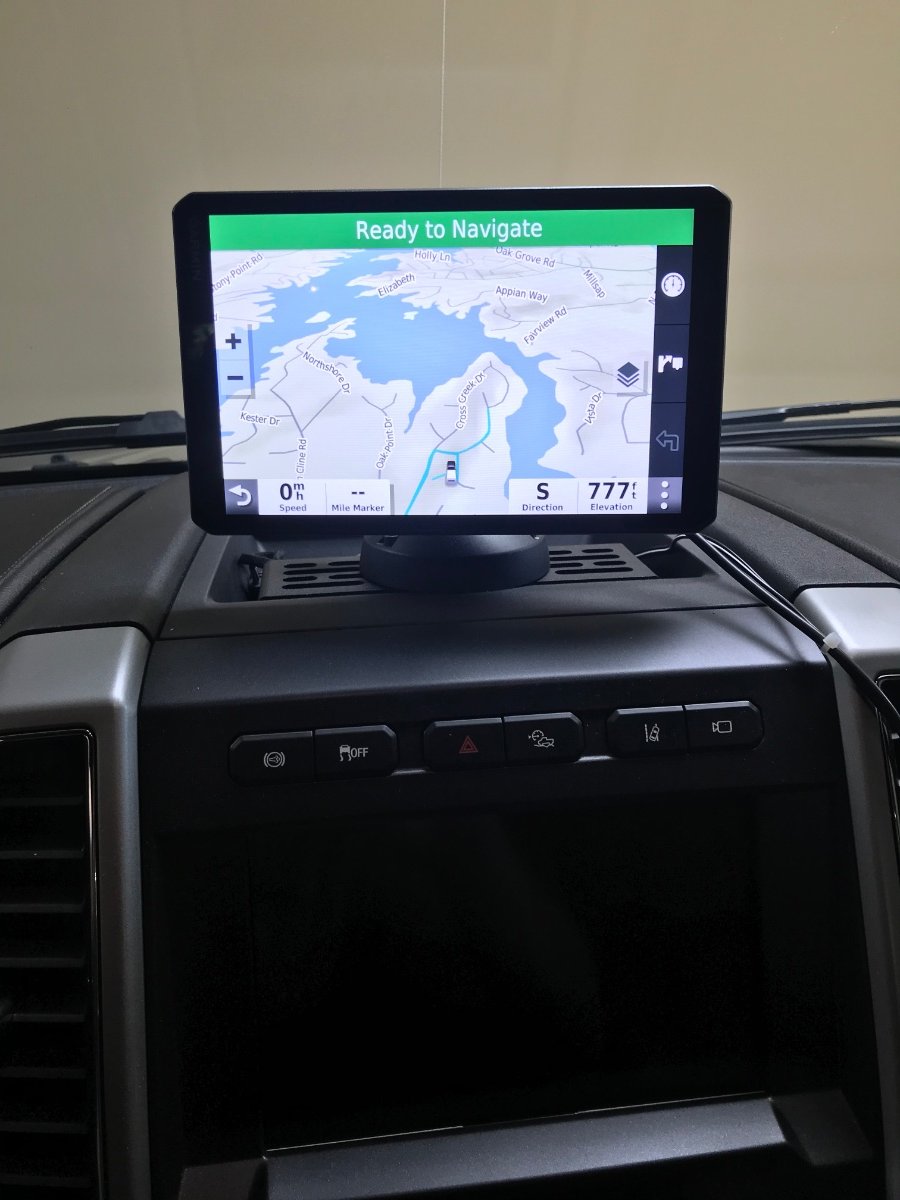
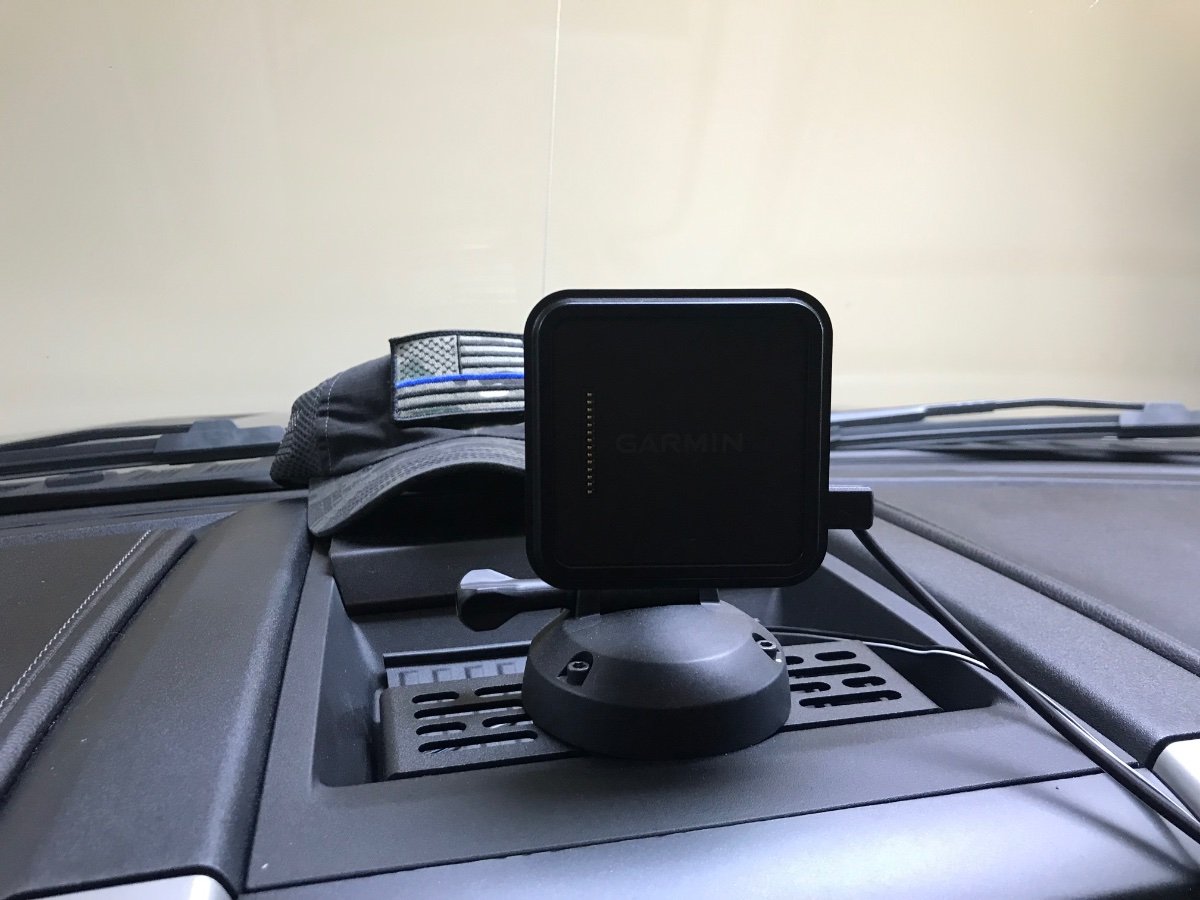
Note the "Builtright" shelf in Patriot's pictures above as can be seen right below the 890 GPS and its magnetic mount. In my case with a non-lifted F150 I attached a RAM mount to the shelf and brought the 890 closer to the driver's position also without obscuring any of the view out the windshield nor any of the controls or view of anything on the dash. Bill3 points
-
Just came back with an Elite II from Hohenwald to the West Coast (took the long way). Had a few issues with the trailer but nada with our 2008 Tundra with 5.7 V-8 and tow package. I’ve owned and towed with bigger trucks but the reliability of a Toyota is so good that I was very happy that it towed the trailer so easily. If I buy another truck it will be a Tundra.2 points
-
Talked to this Ford dealer in Iowa before buying the Tundra and he will order a F150 or Ranger or Maverick for 3% under MSRP. He will also order a F250 for 2% under MSRP. Last time I talked to him was late 2021. Granger Ford https://www.grangerford.com/ Contact Zach 1 - Our documentation fee is $180. 2 - There are NO mandatory add ons. 3 - There is a Non-Refundable $1000 deposit due at order. 4 - We will get you an electronic signature document with options, pricing, and details for your signature before placing the order. 5 - We do not participate in courtesy deliveries to other dealerships. 6 - We do accept trades! Because of the volatile trade market we can give you a trade value 30 days from delivery. Found this information on the Ford Ranger Forum last year: https://www.ranger5g.com/forum/threads/3-under-invoice-2022-ford-ranger-order.16068/2 points
-
I'd like to be able to keep the windows open on humid, rainy days but we do OK by keeping the main cabin fan open and running and opening the bathroom vent. Often we can open the rear window because it is straight, not slanted, so the rain doesn't come in as much as the side windows. Paula2 points
-
Well, that is easy enough to test, just spit on the drum and if it sizzles and steams, it is too hot. I have intentionally overworked the brakes going half a mile down a 8% grade with the trailer brakes fully operating (manual mode) without letting up. I saw temps up near 200 on one drum only, and I could smell the brake linings. NOTE if you smell "hot brakes" never ever stick a finger on the drum or rotor. Ouch. FYI: Some folks may not know, when going down long grades, use your lower GEARS and brake hard to slow down then let up and coast a while to allow them to cool. Do not ride them all the way down.... So what is your next step with your brakes? You sound pretty unhappy to me. ;( John Davies Spokane WA2 points
-
Friends from Texas found the same type of mark-up on a Ford F-150 in Texas. They were temporarily working in Maine and bought the same Ford F-150 for the MSRP at a dealer in Maine.2 points
-
We manually open the Maxx Fan vent hood slightly (without running the fan) so there is some venting during rain storms. Seems to work for us but I must say that we have never been at the Ollie during rain storms that last all day.2 points
-
We keep it fairly simple when storing our water hoses, water filters, LP quick connect hose, (2) 30 amp cords and other miscellaneous items in the basement of our Ollie. We ordered a three pack of these milk crates. Two fit nicely into the basement and a third holds 6 gallons of fresh drinking water in our TV bed. We like the crates as they quickly air dry should any residual water drip out of the fresh water hoses after storing them. Our twin bed Ollie allows for quick easy access to the open top crate contents from the interior night stand (optional) basement access door if you want to store footwear or other items. Happy Camping! -Patriot
2 points
-
Sorry about your Little Guy. The Elite 2 has an exterior "basement" compartment in the back, accessible from the street side. It'll hold 1 long milk crate and 1 regular milk crate with a little room to spare for a few other things. That's where we keep our hoses, cables, electrical adapters, and a box of disposable gloves. I also keep a couple pairs of shoes in there, accessible from the optional interior hatch. We keep all the chocks and leveling blocks in the front basket. Super convenient.2 points
-
As topgun2 said there are many mounting options. My bride aka “navigator” likes being able to remove the 890 on the fly and type in directions while holding the 890 in her lap. The magnet works great quickly allowing her to place it back on the dash mount. We used the 890 all last summer visiting 16 states and 22 CGs. The location of our 890 does not obstruct my view will driving our factory lifted F350 has a tall stance, so no issues. Thank you Bill for recommending this gps! The RV890 is a game changer! 😊 This large magnet mount works great. It allows us to store the unit in our console vault when ever we exit the vehicle for an extended period of time.
2 points
-
Today was the day I got to do the fun messy job of replacing the China Bomb wheel bearings/seals on the ILOVHER on over to USA made Timkens. This was quite the all day project as we also changed out the shocks and lubed the EZ Flex suspension. We beat the rain by a mere ten minutes! My only experience prior to this, was replacing entire preloaded hubs and manual brakes on my Casita which was easy compared to this. After figuring out the best way to jack the side of the trailer up. (Yes, we used multiple floor jacks, and safety jacks stands, chocks and wood cribbing all while being attached to my truck) All I can say is, Thank God my son was here to teach me and to remove the seals in those hubs! (His father owns an excavating company so he knows a bit about trailers/brakes) There is no way on Gods green earth I would have been able to remove them by myself. We had a puller and they would not budge. I think they were permatex'd in there. He somehow was able to use his strength, ingenuity and multiple tools to get them out without scoring. Here are some observations and or questions we had: 1. My son thinks that the shocks look too large for the application. We used the exact replacement that Oliver uses (Monroe 555025) He says they're nearly all the way compressed with the way the suspension sits and that is why potentially two of them were blown. His opinion is that they'd do more if they were just a bit smaller. I have no idea or opinion but it was the one job I was able to complete by myself so I'm good with it. 2. It was quite the surprise to see that the axle spindle did not have the Dexter EZ lube feature. My understanding is that this was not an option on an LE2 in 2017? I did not know this and bought new grease caps with the rubber insert. As much as I learned today, this was sort of disconcerting. Even my Casita had EZ lube axle and it was a 2007. I greased my bearings every year and it made it easy. All those great suspension features like shocks and a EZ Flex but no way to easily grease bearings?? What gives? I sort of dread doing this again. 3. What's with grease guns? OMG..I wanted to throw and shoot them with a real rifle like skeet. I used two separate guns and they both were being unruly and messy. I could have bought stock today in rubber gloves and shop towels! LOL 4. Bearing grease packer seemed like a great idea. Who knew you'd have to use all 200# of human body weight to press down in order for the thing to squeeze grease into the bearings? 4. I took the advice on the forum and replaced a few zerks with 90s and 45s and used plastic cap covers but OMG.. crawling under the trailer is not for the faint of heart or my elderly bones! I think I want/need a creeper. 5. Thank God for Harbor Freight! I now have all kinds of fun new cheap tools, like impact driver and a torque wrench which I properly learned how to use! I now can afford to go to the Rally. 6. The Nev-r-Adjust Brakes looked good but I think I'm going to go with manual brakes next time. I don't feel confident about what I learned about them today and how they actually DO need adjustment. We greased the important parts with a good brake grease. At least we didn't find any loose parts. springs or worn pads floating about. 7. Found four cracked lug nuts. Son says the sheath on the outside is cracked and I should consider solid replacements. Any recommendations? 8. Beer never tasted so good. Thank you for all of the forum help I've received, without you guys, I'd be dead in the water. See y'all safely at the Rally !
1 point
-
Hi all, We have a Little Guy Max trailer that unfortunately was rear ended by a tractor trailer and more than likely is totaled. So, we are considering an Ollie. The Max had storage area that I call the basement that made it convenient to store items like wheel chocks, exterior rug, leveling blocks, water hoses, sewer hoses, power cables, etc. In looking at the Ollie, I don't see an external storage area but it might be hiding from me. Where do y'all store items like this? Thanks for any information, Ed1 point
-
Sorry to hear about your Tundra's transmission troubles. I'm not sure about the 2019 Tundra, but the 2020 and 2021 did not have transmission oil coolers from what I read. Some techs gave you terrible advice to ignore the warning indicators. Hope the F150 works out for you! 👍 Our 2016 SR5 5.7L Gen2 Tundra (no SC) had a transmission oil cooler and did not have any cooling issues towing our LE2 from NC to many states out west including CO. The new Gen3 2022 Tundra has a transmission oil cooler for the 10 speed transmission with the 3.5L twin turbo V6. Really like this TV towing our LE2. We have been getting 15 1/2MPG in NC & TN. Got our best MPG last week in hilly and flat terrain of 17MPG towing Ollie on 4 lane highways. Found the Tundra is happy towing in 7th gear in hilly terrain & flat terrain on interstates with cruise set @ 61MPH and engine around 2200RPM. Best fuel economy so far not towing is 24.5MPG on a round trip from Charlotte NC to Richmond VA, driving mostly interstates at the posted speed limit.1 point
-
It depends on whether your Sequoia has the big engine and the tow package. Lots of Elite II owners tow with Tundras and Sequoias. We plan to tow our Elite II with a 2019 Tundra, with the 5.7LV8 and the tow package. If your Sequoia is comparably equipped, you should be o.k. But, you will need an Andersen weight distribution hitch, the only one that works well with Olivers. The most significant limiting factor will likely be your payload capacity, which should be listed on a sticker inside the driver's door. A loaded Elite II will likely have a tongue weight of between 550 and 600 lbs. Tongue weight is added to occupant and cargo weight to determine total payload. Don't exceed the payload capacity listed on your sticker.1 point
-
I installed a Rheem Preferred Platinum 42,000 Grain Water Softener with Wi-Fi Technology last spring, and after a few months the spots and scale in the house plumbing are gone. The shower and inside of the dishwasher looks terrific. I had not thought about filling the Ollie tank, but decided to give it a try. Obviously I can’t do this on extended road trips, but for short ones and during the off season this makes great sense. I drained the hot water heater (ran about 6 gallons into a bucket using the outside shower) and flushed all the inside lines with soft water. I hope that keeping them treated for months at a time will be enough to clean out the existing scale so I don’t have to do a regular vinegar flush. https://rayneofsantamaria.com/blog/how-do-water-softeners-affect-mineral-deposits/ BTW I also teed it into my garden hose bibb that I use to wash cars, I can flip a couple of ball valves and finish the wash with soft water. It greatly reduces water spots and the cars look better too. Comments? How common are water softeners in small trailers? John Davies Spokane WA1 point
-
Coming from a Little Guy Max, are you looking at the Elite I or the Elite II? As noted above, the Elite II has a basement storage area. As I recall, the Elite I does not. I recommend you view the excellent 2021 model walkthrough videos available on the Oliver website.1 point
-
We’ll done! Thanks for the detailed post. Mike1 point
-
So sorry about your LGM. The Ollie does have a garage and the option to access it both from outside and inside. Here is a video that shows the garage storage.1 point
-
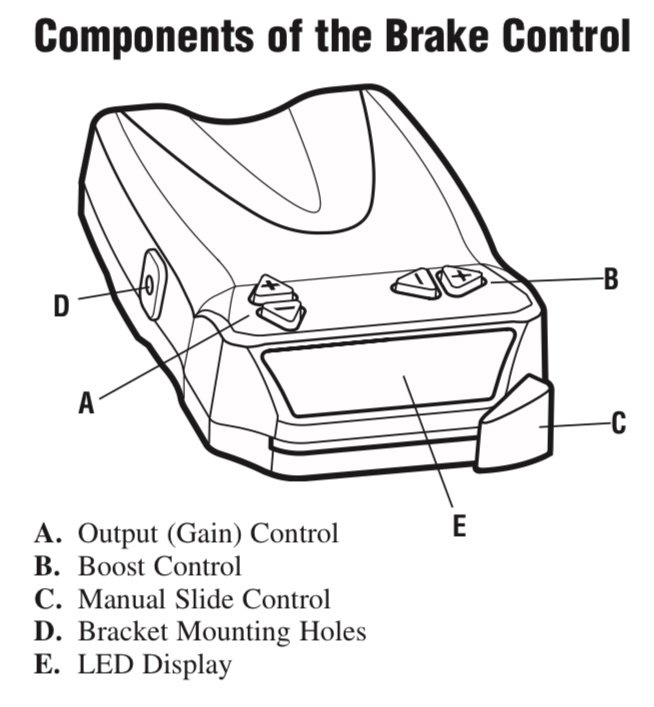
“C” in the diagram below is your manual brake control. It lets you apply just the trailer brakes without stepping on the brake pedal in your tow vehicle. And you should study the instruction guide for your trailer brake controller. Your skidding problem could be either a gain setting issue or a boost setting issue.
1 point
-
I agree with Frank. If you’re getting a skid when braking back it off a bit. Whenever we start out towing I check mine. Usually before we get up to 5mph I take my foot off the gas and activate the trailer brakes. Depending the resistance I get whether on pavement or gravel I can then bump the setting up or down. Mike1 point
-
It’s not a set & forget kind of thing, you have to adjust it based on conditions. Mine is usually somewhere between 4.0 and 6.0, depending on road conditions (wet or dry, paved or gravel) and how the trailer is loaded (full tanks or empty, etc.). A number that works on dry roads will likely cause lock-up on wet roads. The little manual squeeze paddles on the brake controller are there to use to get a feel for how hard the trailer brakes are being applied. Plenty of YouTube videos showing how to set the gain.1 point
-
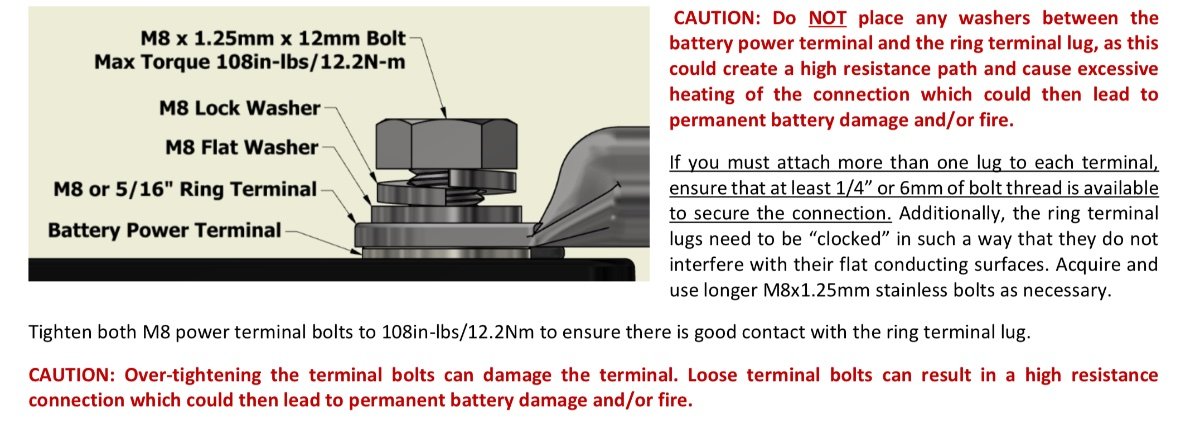
From the Lithionics Manual… Brian PS - it should be on the battery label as well.
1 point
-
Carmax can be a good option. I bought one car from them, a 2006 MINI Cooper S that was four years old. Low mileage and fair price. The day I picked it up I went straight to the BMW/MINI dealer and paid $120 for a complete bumper to bumper inspection resulting in a page of issues, mostly worn out seals and gaskets and a few other things. The next day I drove it back to Carmax and showed them the inspection results. They honored their 30 day warranty and fixed everything, about $2,300 of repairs. Unless you buy something that is only a year or two old or has very few miles I would recommend a good inspection and a possible return visit to Carmax. Mike1 point
-
We’ve had a water softener in our current house since we built it 17 years ago. Last year we replaced the original softener with a new model. We’ve also been using a portable softener in the trailer since 2018. I originally bought a 16K grain softener. While it works well, it was very heavy. A couple of years ago I got a 3.2K grain softener, much small and lighter, fits in the basement and will last about a month before needing a recharge. They make a 8K grain that is probably the best solution. All on Amazon. I kept the 16K grain and use it for car/truck/trailer washing. They both recharge easily with plain table salt. Mike1 point
-
I think this is a clever idea. We are considering a water softener for our home presently. We have very hard water and it’s a constant battle with the calcium build up. I’m sure running softener water in the camper would have the same helpful effect to reduce build up.1 point
-
Lately, I've seen several posts from new or prospective owners contemplating purchasing a Weigh Safe Adjustable Trailer Hitch Ball Mount (WS) to tow their Oliver with. These are good looking hitches that have plenty of capability. They have HEAVY-DUTY TOWING CAPACITY: Made of 17 lbs of Aircraft Grade Aluminum & Stainless steel, with an industry leading towing capacity (GTW) of 12,500 lbs. The one I've referenced in the link above is the least expensive and has a four inch drop (6" 8" and 10" drops are also available.) I bought one for the Outlaw Oliver about 5 years ago and, after a while, I was satisfied with it. It took me about a year to finally get one that would consistently work. The first two I bought were returned and replaced (Other than my time and having to use an alternate hitch while waiting on their return there was no real cost to me). The reason that I'm sharing this info with the group is to provide you with food for thought. The WS's singular claim to fame (after it's good looking cool factor) is that it measures the tongue weight of the trailer. I'd guess it's accurate to 10 pounds or so. This is very useful information for safety. And, if you own a half dozen different cargo trailers this is the hitch for you. With this hitch you can instantly know what any particular trailer's tongue weighs and you can adjust its load accordingly. But, if you are only ever towing your Oliver, very little will ever change as to the way you will load it and the tongue weight will essentially stay the same every time. Don't expect that tiny little gauge to last forever. The WS from Amazon is listed for $308.99 + tax for your state. Not cheap. On the other hand there's this Sherline Trailer Tongue Weight Scale. Again, on Amazon, for $130.00. There are three models available; 1000, 2000 and 5000 pound capacities. They are all the same price because there is actually no difference between them other that the gauge. The 1000 pound model is all you will ever need for the Oliver. If you ever found yourself needing the bigger ones all you have to do is swap out the gauge. Either of these two options will accomplish the same end. One is somewhat cheaper and is more accurate. The other still has that cool factor that is important to a lot of us. Since I own both, maybe that makes me cool minus about $310.00. But, all is not lost. After we got the bigger trucks, I moved the WS to Tali's GMC Canyon Diesel so it still sees some use with our other two cargo trailers.1 point
-
I like our Weigh Safe hitch. I do glance at the scale occasionally but it's the rest of the hitch I really like: the aluminum construction, the locking pin system, the interchangable balls. Just really nice design and quality. Did I pay too much? Probably, but in this case I don't mind.1 point
-
“Love the one you’re with…”1 point
-
So an update to my problem on no clearance to get the street side jack head off. I finally broke down and cut a 1/2 inch of the fiberglass using a rotary cutter so I could get the head off. see pic below. I had no problem with getting the curb side jack head off. I wonder if anyone else has had to do this? All jacks are now greased.
1 point
-
My 2002 1500 is rusting to pieces…however I still use it to bash snow piles during the winter months. I just can’t kill it and prefer to take the abuse out on it vs the 2021 one ton that replaced it. I have to say in your shoes I’d sell the 2018 and let the dodge pull the Oliver full time.1 point
-
Catching this thread late but… Had a 2019 Platinum CrewMax, 5.7, Magnusen Supercharger, 3/1” level with Bilsteins and FS Airbags, 35’s on Method 18x9” rims. Loved the truck. Plenty of power and torque. 2019 Elite II (hull 536) lightly loaded with close to max in the Tundra cargo bed. Andersen WDH. No issues towing regardless of terrain (other than 9mpg avg). But…on a longish loop from NC out to Denver and back we kept throwing the “transmission temperature is high” fault. Happened maybe 6 times. Several Toyota techs along the way said “just ignore it”. Finally, after 6 weeks traveling, the entire dash lit up. All kinds of faults with trailer brake control the most annoying. Stopped for 30 minutes hoping for an ECU reset but no luck. Drove the last 150 miles with manual trailer brake and lots of yellow icons on the dash. Next day at the Toyota dealer they said the code required a transmission replacement. 45k miles. And…no warranty coverage as it was modified. The SC was installed at the same dealership and at the time (19k miles) the service reps said it would not affect the 5 year/50k drivetrain warranty. Silly me. I traded for a 2021 F150 Powerboost the next day. Still love the looks of the Tundra but think they lost the thread when they took the transmission cooler off the Gen3’s. And you can argue that they are engineered so that in the unusual case they throw a fault code, its replace only…no repair. Not sure on the latest V6 but if it performs like the Ford’s eco boost it should be a hit. Love the engine, like having the battery and generator on the powerboost. Don’t need to travel with the Honda 2200, 11-12mpg on the way out (again) to Denver from NC. And the 10speed transmission is much smoother than the ‘19 Tundra’s 6 speed. I’m sure the next gen 10 speed on the Tundra is great as well. Still early days on the Ford and towing but so far the hottest the transmission fluid has gotten is 212degrees. I’m guessing the Tundra was flashing a warning at 250 or so.0 points


-
Recent Achievements
-


.thumb.jpeg.19a2ee06e40d1f70b5e0e04afb37fd83.jpeg)

.thumb.jpeg.c4da7a09590258381ec85ffc7e32b265.jpeg)


