Leaderboard


Popular Content
Showing content with the highest reputation on 10/09/2022 in Posts
-
I think what we really need are EV’s pulling travel trailers that are self-powered. If the EV’s were also self-driving, equipped with 360 degree 8K cameras and connected to the internet via satellite uplinks we could preprogram our route into the nav system and just stay home and watch the trip on our phones.5 points
-
After a Saturday of yard work and car washing, I have found myself with the need of a liquid pain reliever on Sunday afternoon. A Maple Cinnamon Old Fashioned, a rocking chair, and a perfect 70 degree South Carolina afternoon. A great way to ease away the achy muscles and enjoy the taste of fall in a glass. Obligatory Oliver content….We’re heading back to Mt. Pisgah on the Blue Ridge Parkway Oct. 19-23rd. We met Mr. & Mrs. Hokieman when we were there on the first weekend of fall.
 2 points
 -
We’re well prepared for the aches and pains when our Oliver arrives in March. Deb dipped four bottles of Maker’s Mark from “her” ambassador barrel, on our way to Hohenwald when we placed our order. And I picked up a couple rye for variety. 😁 Untitled.m4v EDIT: Wow! I had no idea that was such a huge video file!! It wouldn't even load for me. I just replaced with a 4.x MB file, but I don't know how to make it smaller...2 points
-
Look underneath at the end of the axle where the brake assembly attachments. If you see a flange with four nuts in a square pattern, they are 3500# axles. If there are five round stud heads, in a circular pattern around the flange, they are 5200#. Dexter Axle stamps the axle serial number into the steel tube. They should be visible from the rear, just left of center. Email Dexter customer service with this number and they'll provide the axle build sheet with all component part numbers.2 points
-
We towed our 2008 Elite 60-70K miles. We always ran our tires at 80 psi because that’s what Jim Oliver told me to do. I now know a hell of a lot more about towing. The tires on our Elite II are 12 ply all steel belted and have a maximum tire inflation rating of 95 psi to 110 psi and that would be fine if our Oliver weighed 12,000 pounds. Fortunately, despite the fact that she’s a big ole gal, at “only” about 7000 pounds I can safely run them at 60-65psi, which I do. Now, that’s for highway use. Only. If you head up something like a rough forest service road or, heaven forbid, decide to drive the 70 miles of washboard into Chaco Canyon or the 27 miles of very bad road out to the Racetrack Playa in Death Valley then please stop and air down. Obviously, you’ll need the ability to re-inflate when you get back to the pavement, so a good compressor and tire gauge is imperative. If you are unable or unwilling to do this, then just don’t go. Ignore this at your own peril. If you do, you’ll be tightening, repairing and replacing plumbing, electrical and mechanical stuff for a while. And some of this will be before you even get home. I’ll leave it to your imagination to figure out why I mention these things.2 points
-
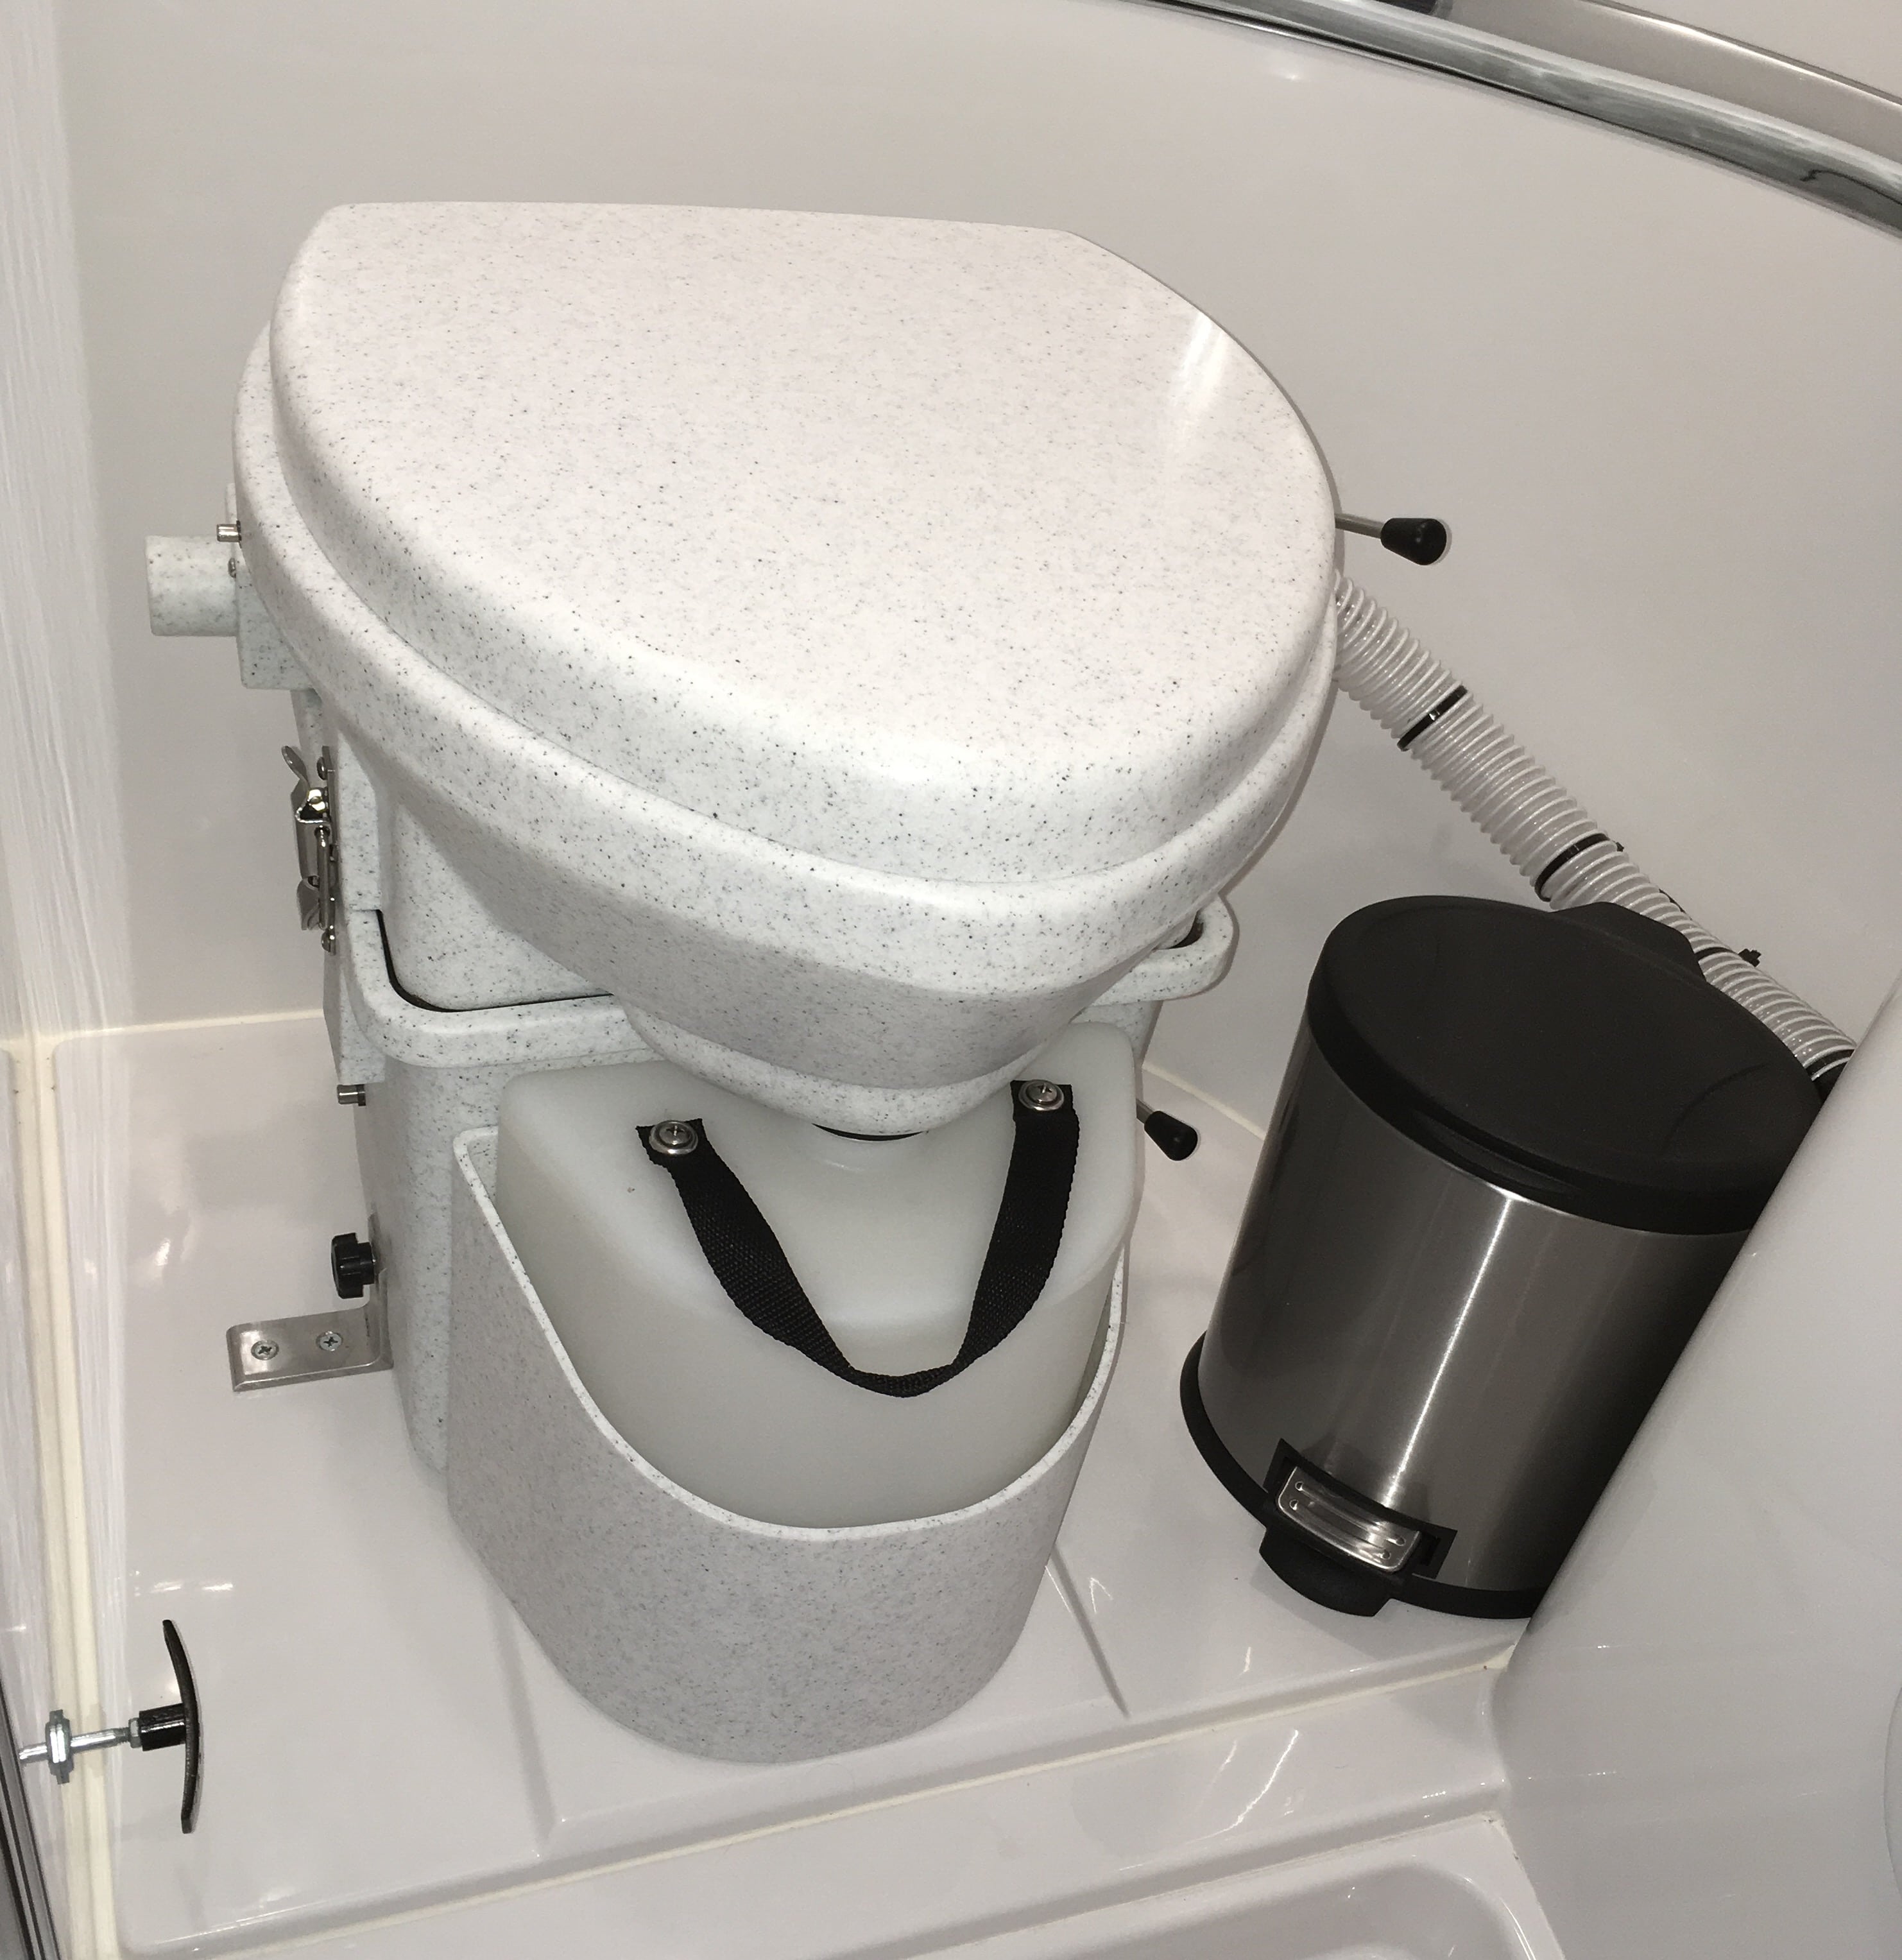
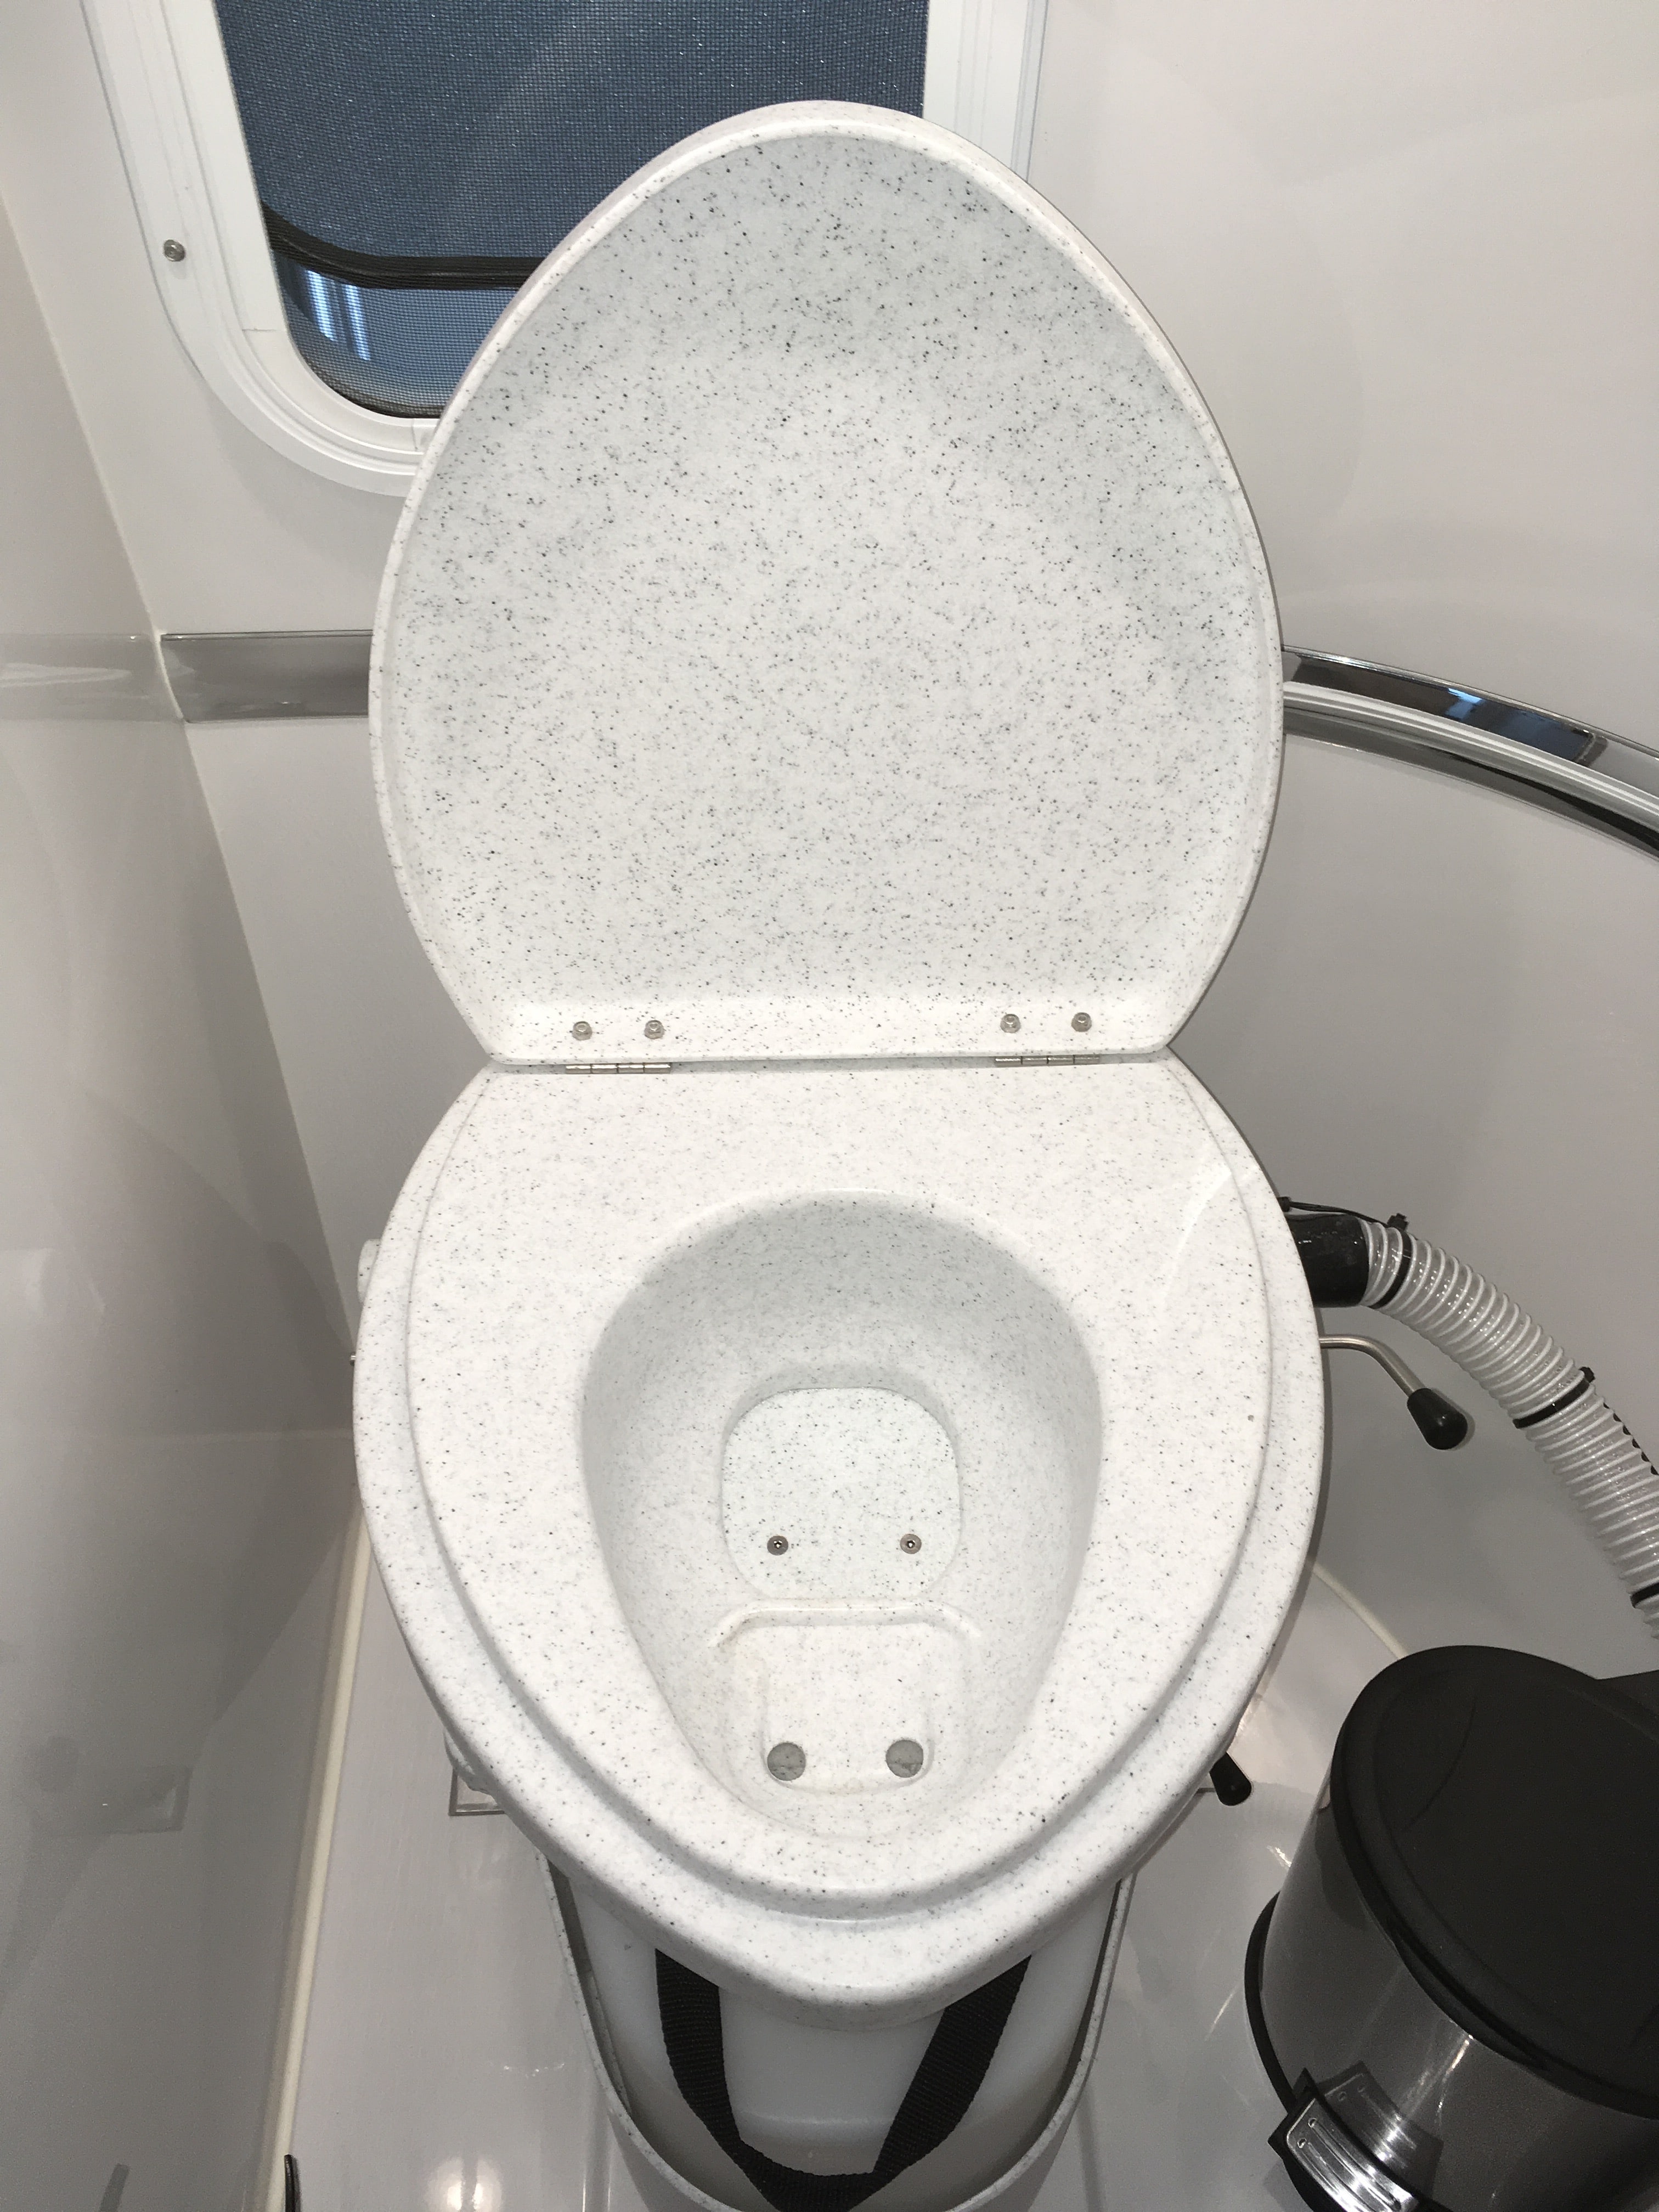
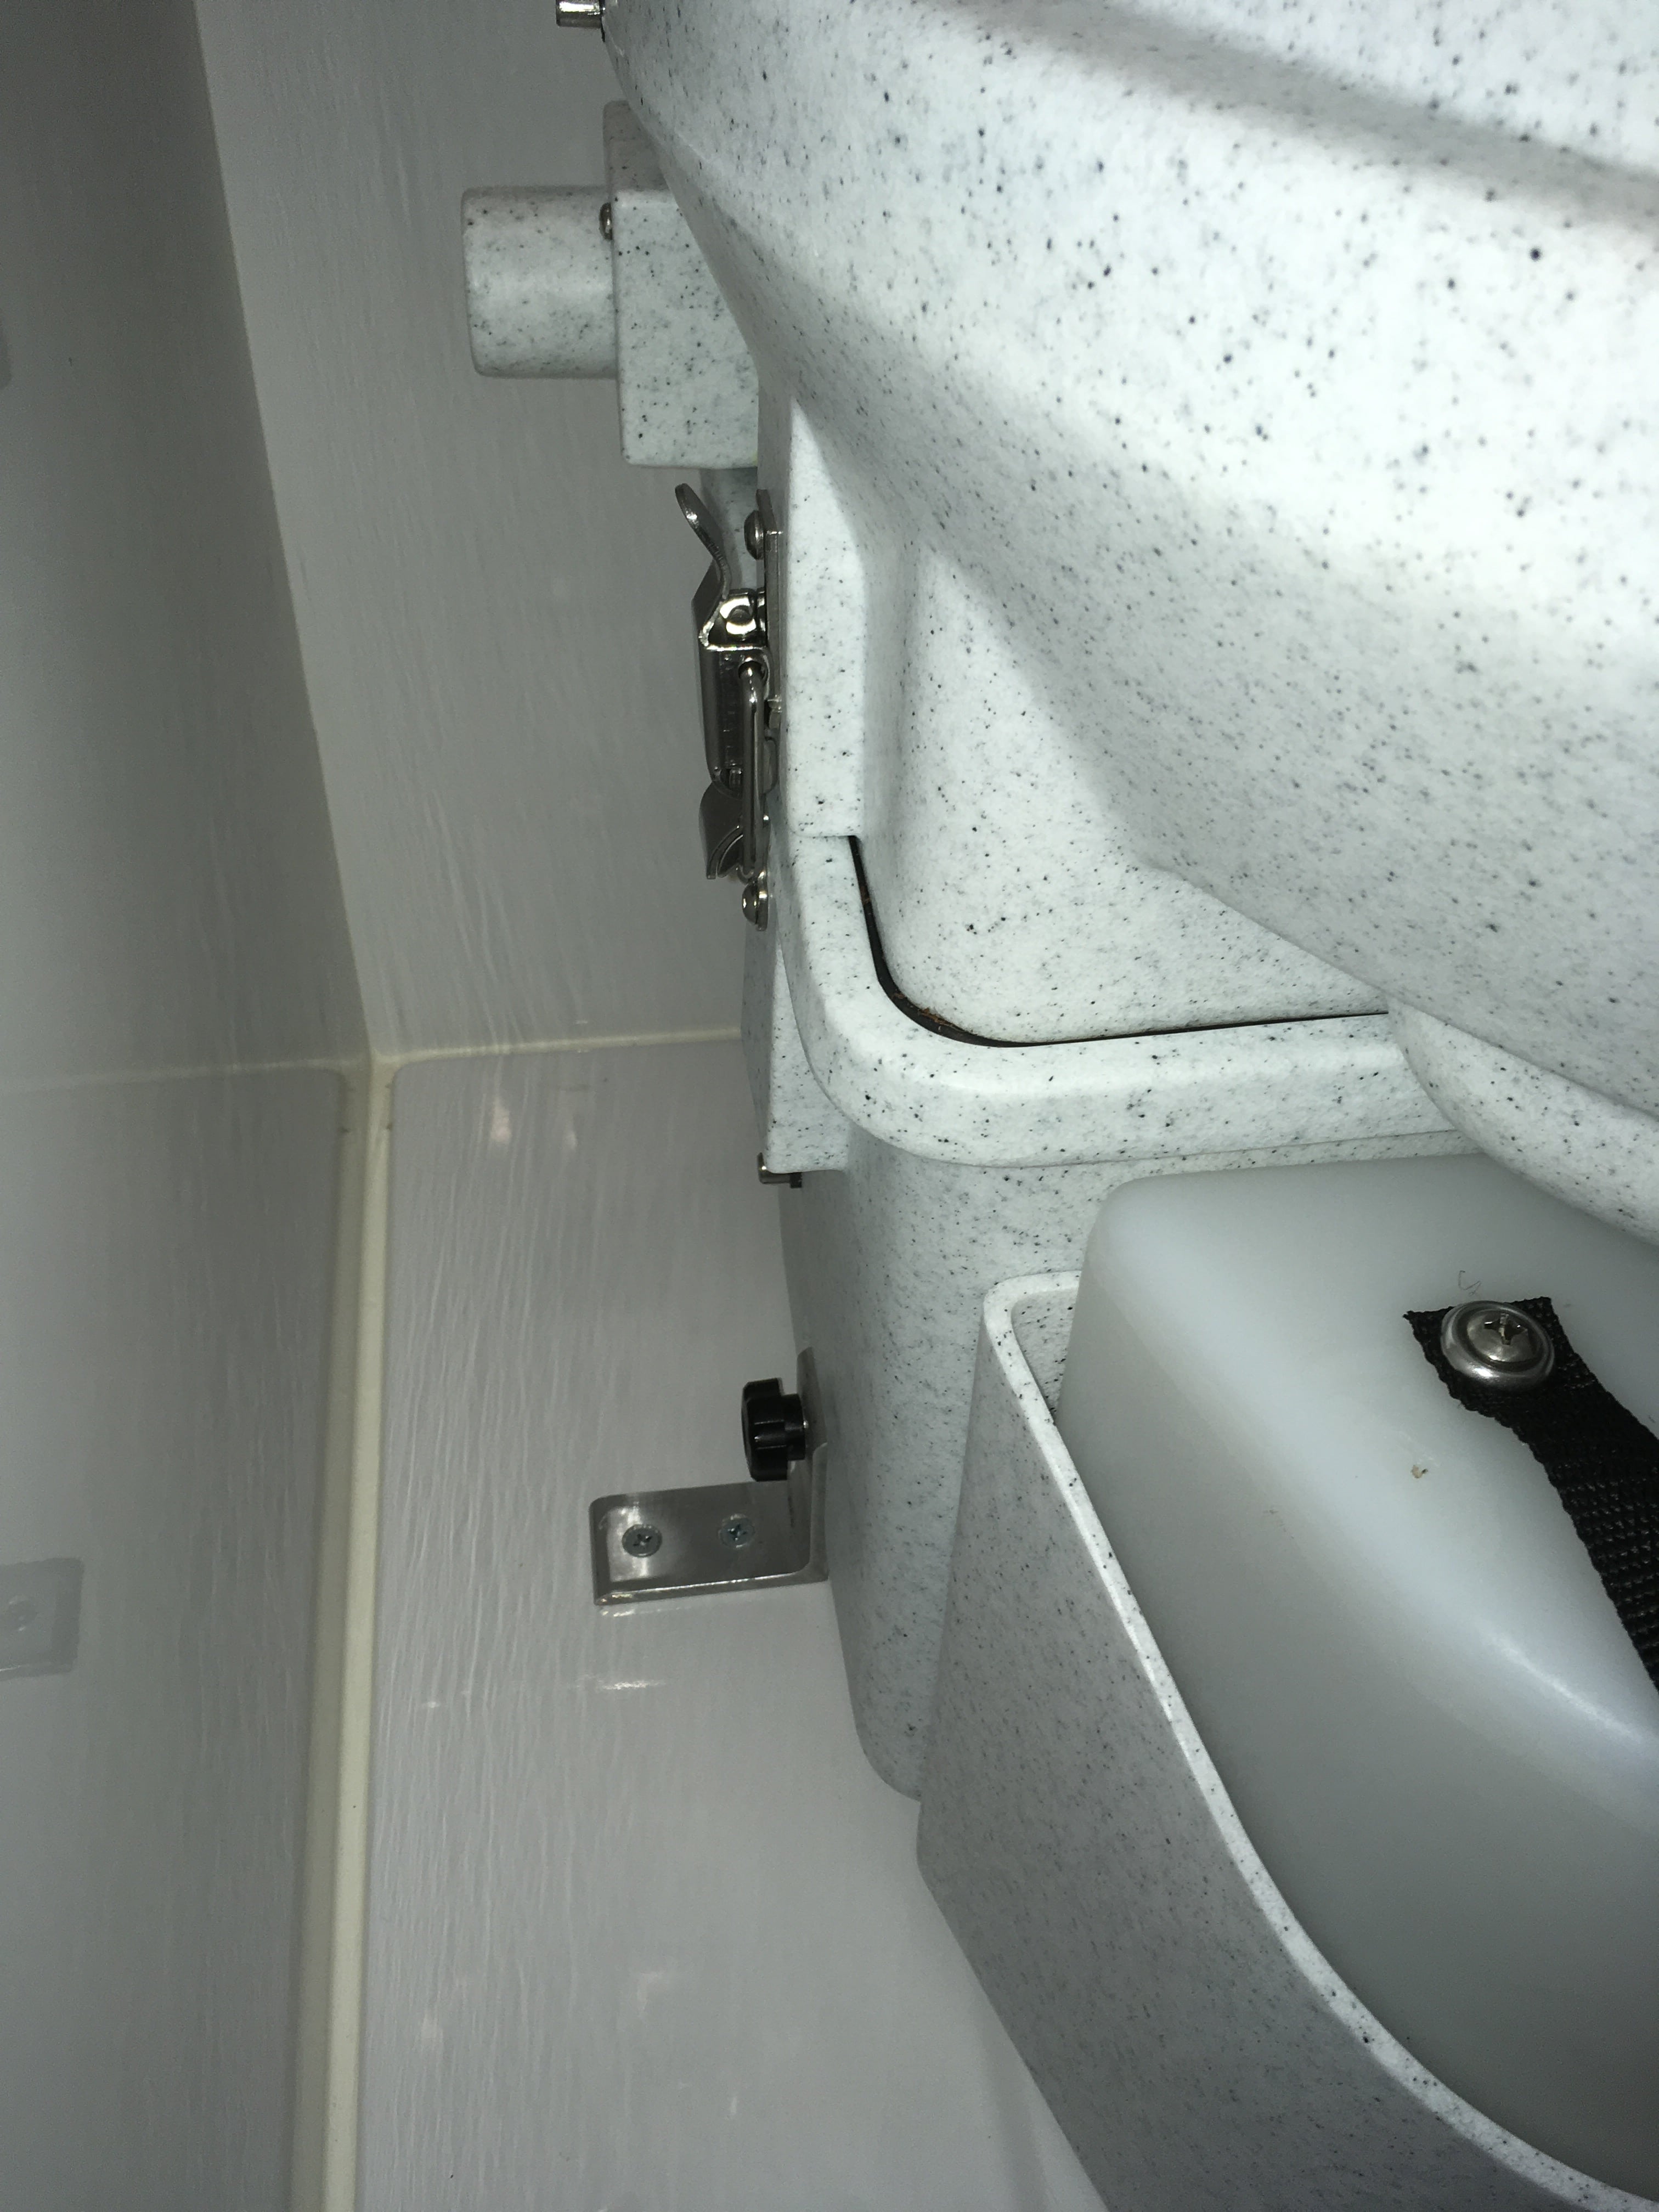
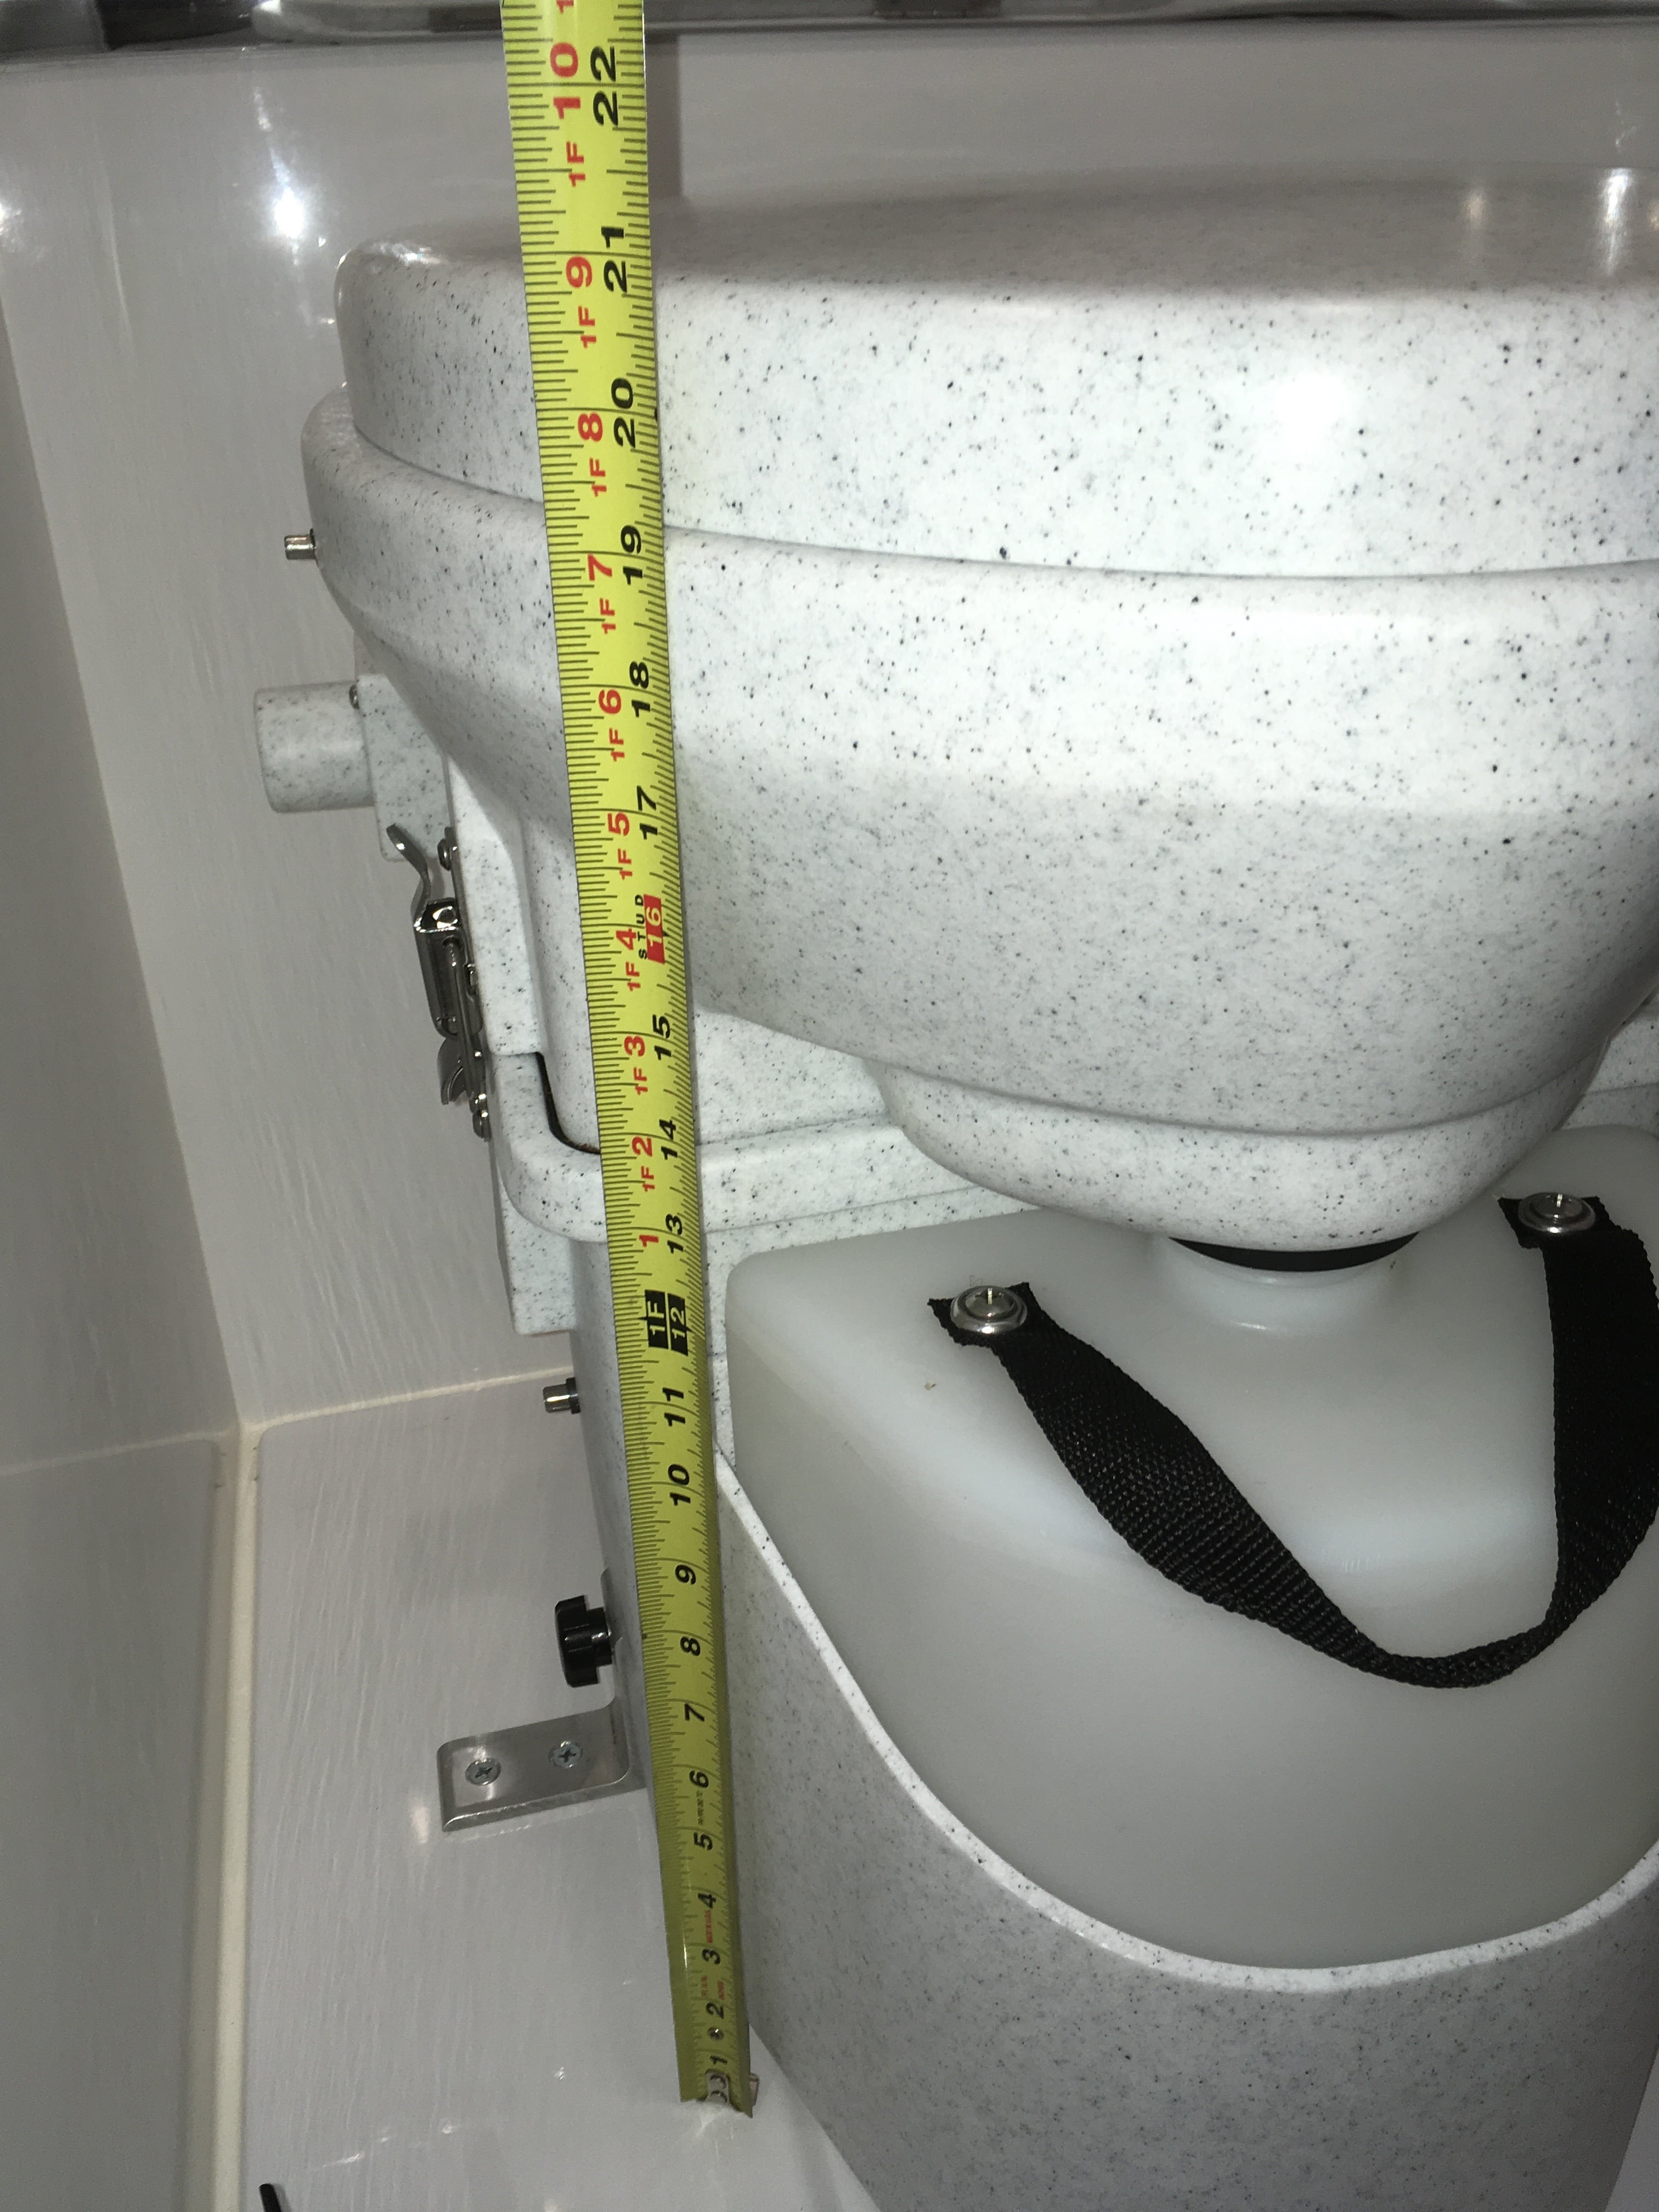
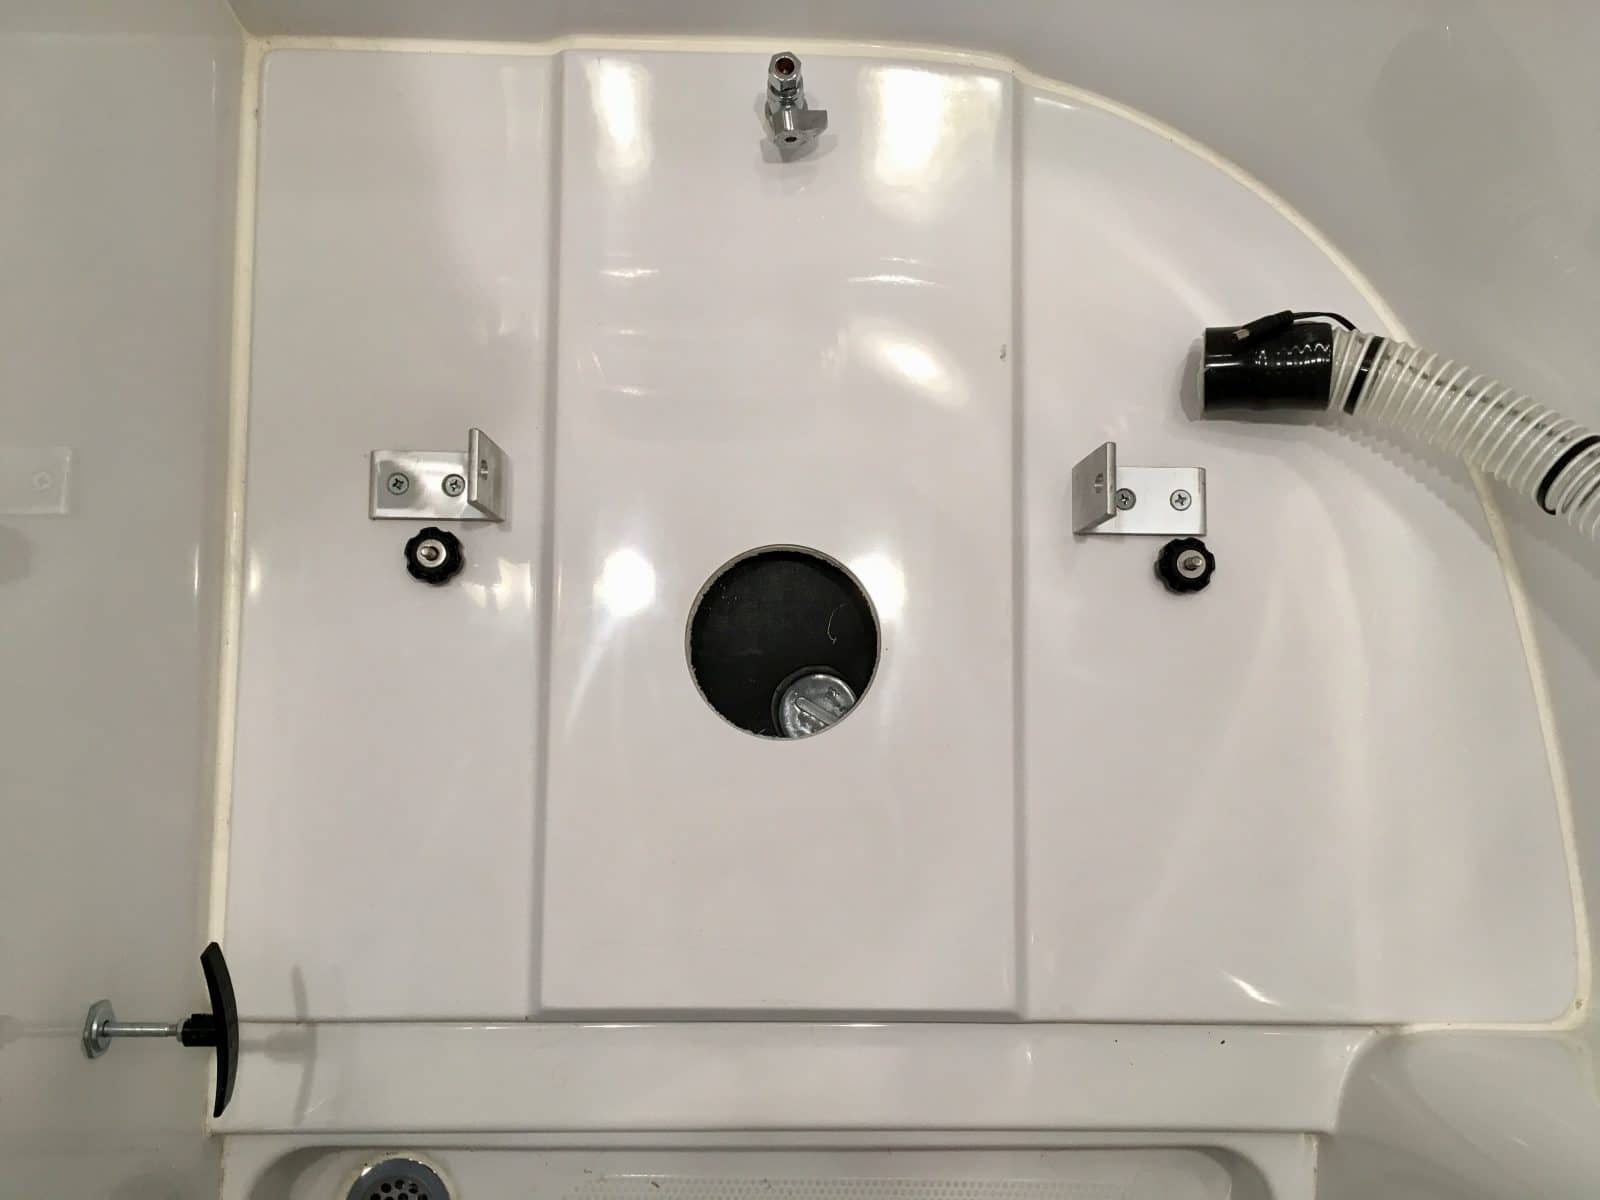
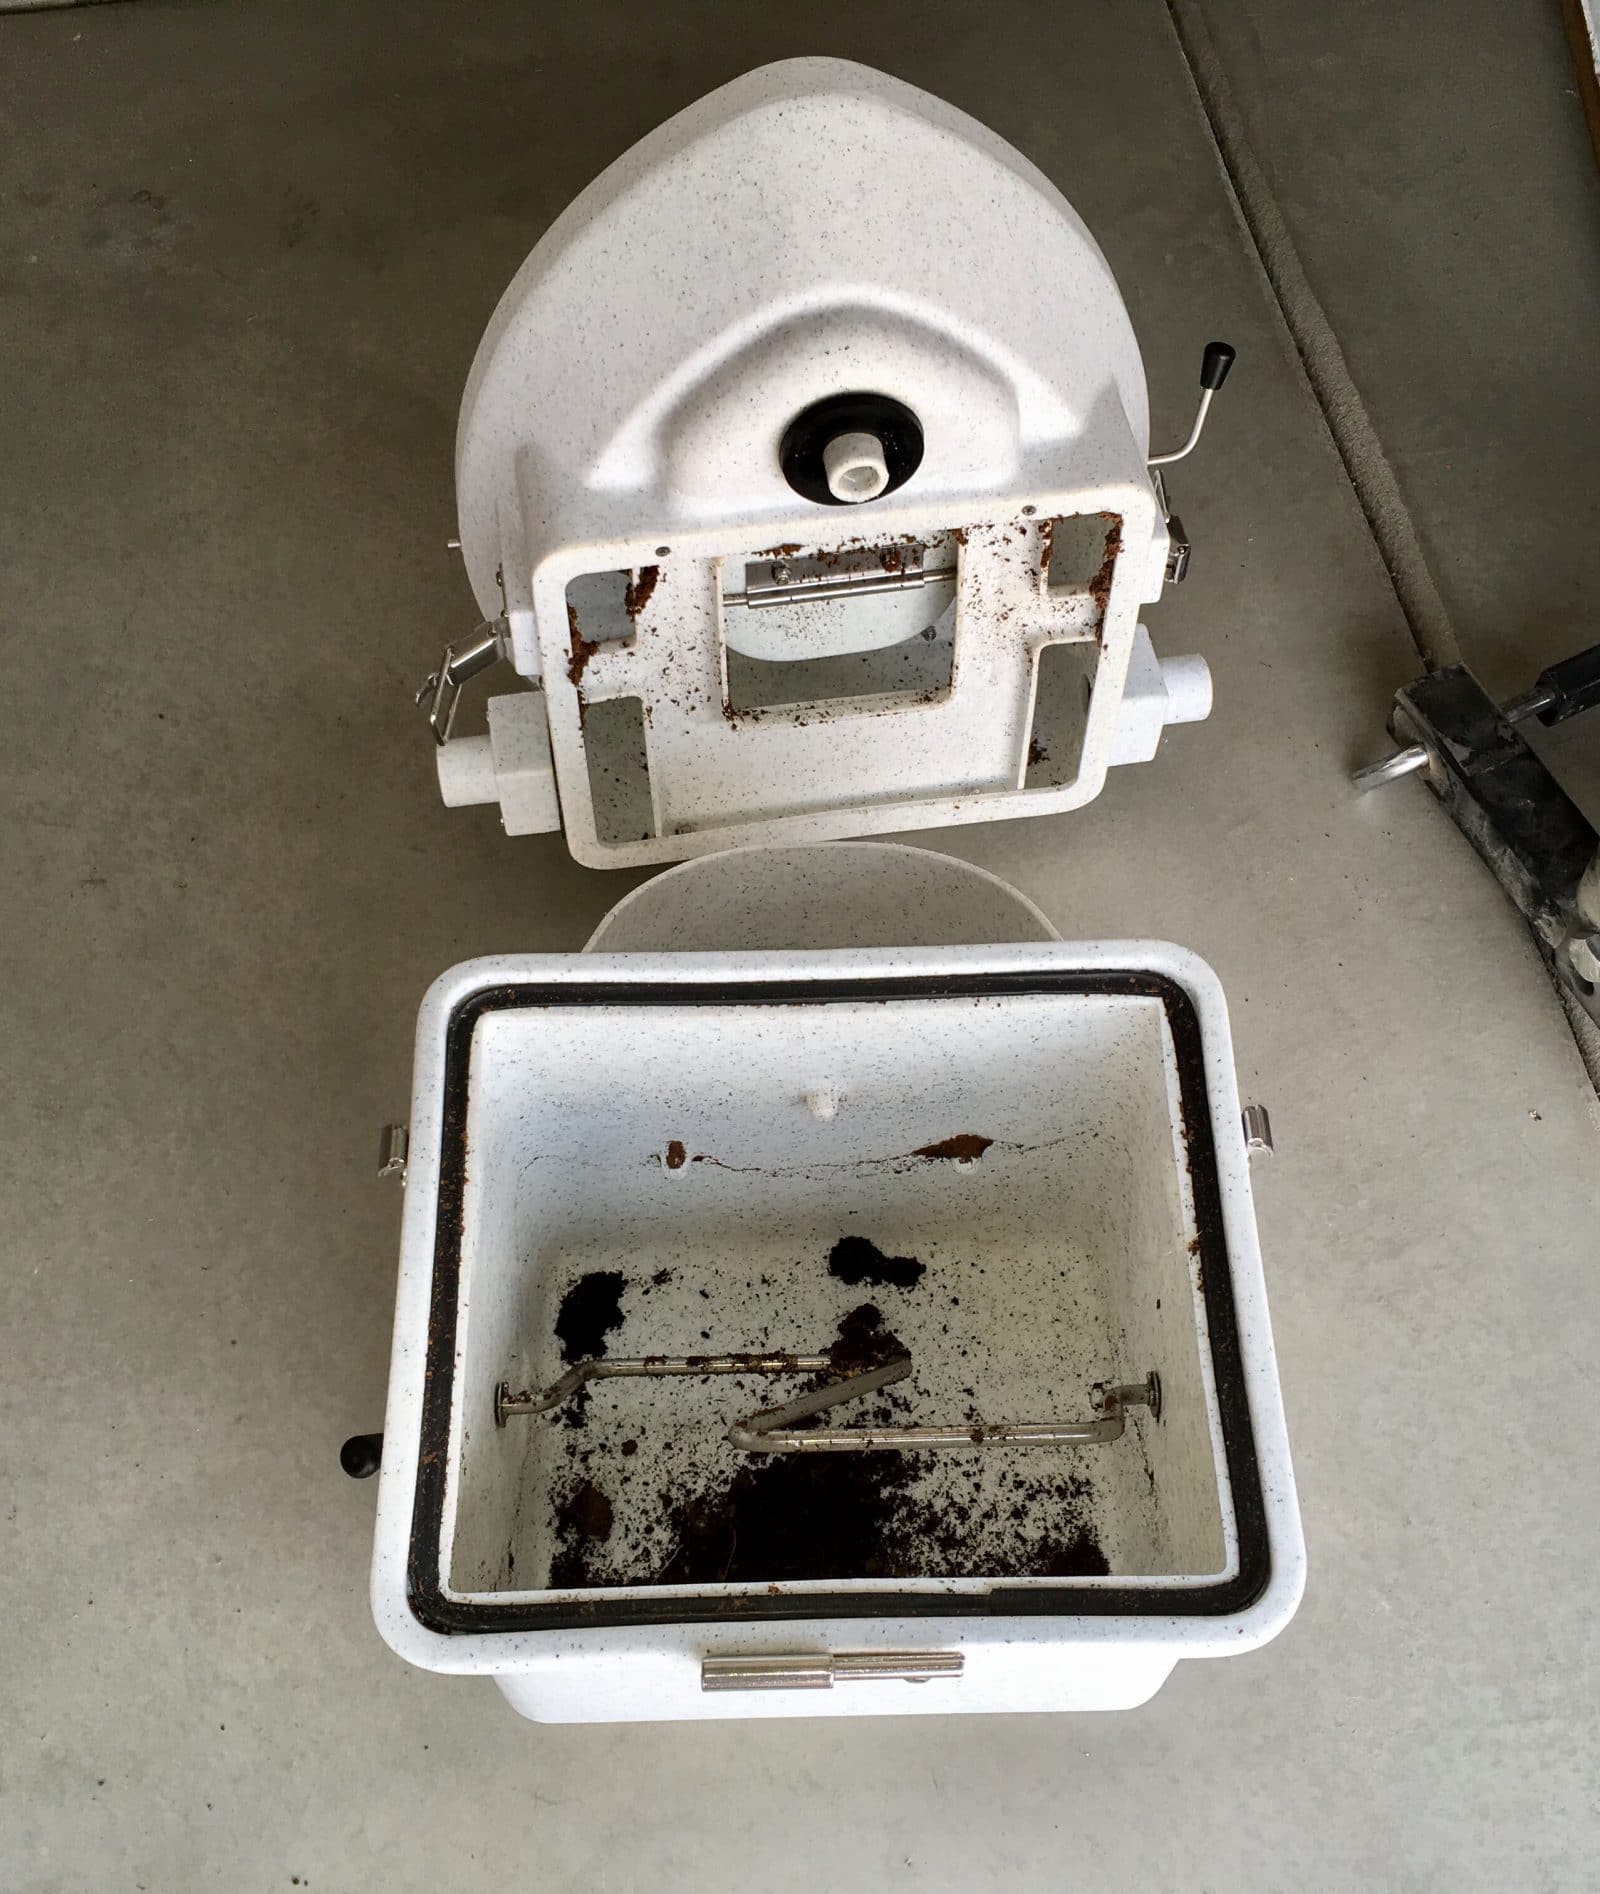
EDIT 12/10/23. Useful link: https://olivertraveltrailers.com/forums/topic/6720-natures-head-compost-toilet-troubleshooting-user-guide/ EDIT 06/06/23. This is an Oliver factory installation, not mine. One member has assumed that I did this. There are a number of threads asking about this toilet. I hope we can gather up a lot of the talk here in one place. I think there has been one other installation in an Ollie but there have been NO published pictures of any kind, that I have been able to find, even from the factory. This is baffling to me. I really wanted to cut the dump station umbilical. We routinely dry camp and finding an open station during a busy holiday weekend or off season is not something I want to face. With the NH toilet we can get rid of our grey water with a 3/4 inch garden hose. In many western states it is legal and encouraged to run a hose out to a nearby shrub and let your water trickle into the ground. The black tank, drain plumbing and vent system are all completely retained. The factory folks are extremely reluctant to delete these parts, since they are part of their certification. If you wanted to reinstall a regular toilet, it would be a very minor job. The fresh water line is even in place, next to the wall. You could sell the used NH for $400 and that would pay for the replacement conventional RV toilet, with a lot left over. An RV toilet is less than $200.... I chose to charge the base with coconut coir rather than peat moss, since it is a renewable resource and doesn't damage the environment. https://smile.amazon.com/s/ref=nb_sb_noss_1?url=search-alias%3Daps&field-keywords=coconut+coir I made the mistake of just dropping a dry 2 pound brick into the bottom, adding water and then letting it hydrate. I ended up with WAY too much material. You need to do this in a bucket, outside, and then transfer the expanded stuff into the base, and the leftovers into gallon zip bags. The correct height is even with the internal agitator centerline. Any higher and it becomes difficult to turn with the handle. It takes about two gallons, I did not measure. There are many online sources with info. To summarize: Sit to pee, everybody, so there is no splashing. The trapdoor stays closed and your pee goes forward, and then down into the reservoir. Which you pre-treated with a half cup of vinegar, to kill the odor. That part is easy. To poop, open the trapdoor, finish the job, wipe and close the door. Give the agitator handle two or three turns. The poop and paper will decompose rapidly once the natural process gets going, which may take a few days. The fan keeps a steady flow of fresh air into the reservoir and out of the trailer through the existing roof vent. I never noticed any bad odors except the first days, before I figured out that Oliver had installed the wrong fuse, a 1 amp, which had blown. Once I installed the correct fuse (2 to 5 specified, I used 3 amp), the fan worked as designed. The fuse is located in the main distribution panel under the dinette table, right row, bottom position (UN-labeled!). It is best to put only the absolute minimum amount of RV toilet paper into the base. If you put a lot in, it wraps around the agitator and makes it harder to turn. Only stinky paper goes down - the rest (damp with pee) goes into the small covered waste can to be disposed of weekly. The can came from Walmart, $10 I think. Cleaning is simple: spritz the area lightly with a dilute vinegar spray and wipe down with a disposable baby wipe, toss in can. Done. The residual vinegar and wipes control any odor from the can. The pee tank is big but it will fill up faster than you can believe if you have four people using it! Empty when it gets to within an inch or two from the top: Flip the two side latches, carefully rotate the top off the base, remove the pee bottle and cap it. Dump it in any approved location - a pit toilet or a rest stop restroom. Rinse with fresh water a couple of times and recharge with half a cup of vinegar. Reinstall into the toilet and close and latch the top. The pee will eventually form crusty yellow deposits. The fix, I have read, is to add gravel and water and shake it hard, then rinse several times. In two weeks of use I never noticed any significant deposits. The longer you let the poop decompose the better. If you can leave it over the winter, dump it out in the spring and it will be totally benign. If you need to empty it mid-season, remove the pee bottle and vent hose, unscrew the two hold down knobs and lift out the entire unit. Carry it outside and put a 13 gallon or larger trash bag on top, flip it over and empty the compost. Refill with clean coir to the centerline. There is NO need to clean it out. Any residual material will just help the next batch get started. The organic waste you can double bag and put in the trash, or if fully decomposed, it can be spread out in the woods, but not near a potable water supply or garden. The way to keep the smell in control is to keep the pee out of the main reservoir. It's the urine that makes a pit toilet smell so bad.... If you throw up or have a messy poop, you can add a little more fresh coir to help absorb the extra fluids. I keep a gallon bag of the hydrated stuff in the overheard cabinet (along with a quart of vinegar) and haven't had to add any extra. The fan has a dust filter that is supposed to be checked every few weeks, by removing two Philips screws. I think that is way too often in the clean environment of a fiberglass trailer, unless you have a dog that sheds. You can put your hand over the left (inlet) opening and feel a light suction. If that isn't present, you need to clean the filter. The pee bottle sits in a sealed cavity to catch overflows, This is a problem since when you take a shower, a bunch of fresh water gets trapped there. I intend to drill a couple of small drain holes in the bottom. I don't care if the pee bottle overflows onto the floor of the head, at least that way I will notice it! unless it is dark, and I am barefooted.... that would be bad 😉 This is why you want to empty the tank before it gets too close to the top. Agitator handle: ours fell off right away, the shaft has a set screw with lock nut. It is very easy to tighten correctly. I am not sure why the factory guy couldn't do it successfully. Spares: I intend to purchase a spare pee tank ($40), spare lids, and a fan.I already have extra 3 amp fuses. ... http://store.natureshead.net I intend to wire in a small LED in the wire harness to show that the fan has power. You can probably hear it running, faintly, if you are in a very quiet area and don't have bad tinnitus, as I do. The Nature's Head is a cool device, but it is really just a fancy bucket. A solidly built, very expensive bucket. I wish the price were about $250 instead of $800. That seems about right for what you get. OTH it is very rugged, and long time users seem to love it. My wife still has some reservations about using it, and we need to get a short step stool since it sits so much higher than even a tall toilet. This one might work well, and it might fit in close to the base with a bungee cord around it for travel: .... https://www.squattypotty.com/shop/poop-better/classic-ecco I am still learning, but I have no regrets at this time. Questions? John Davies Spokane WA
1 point
-
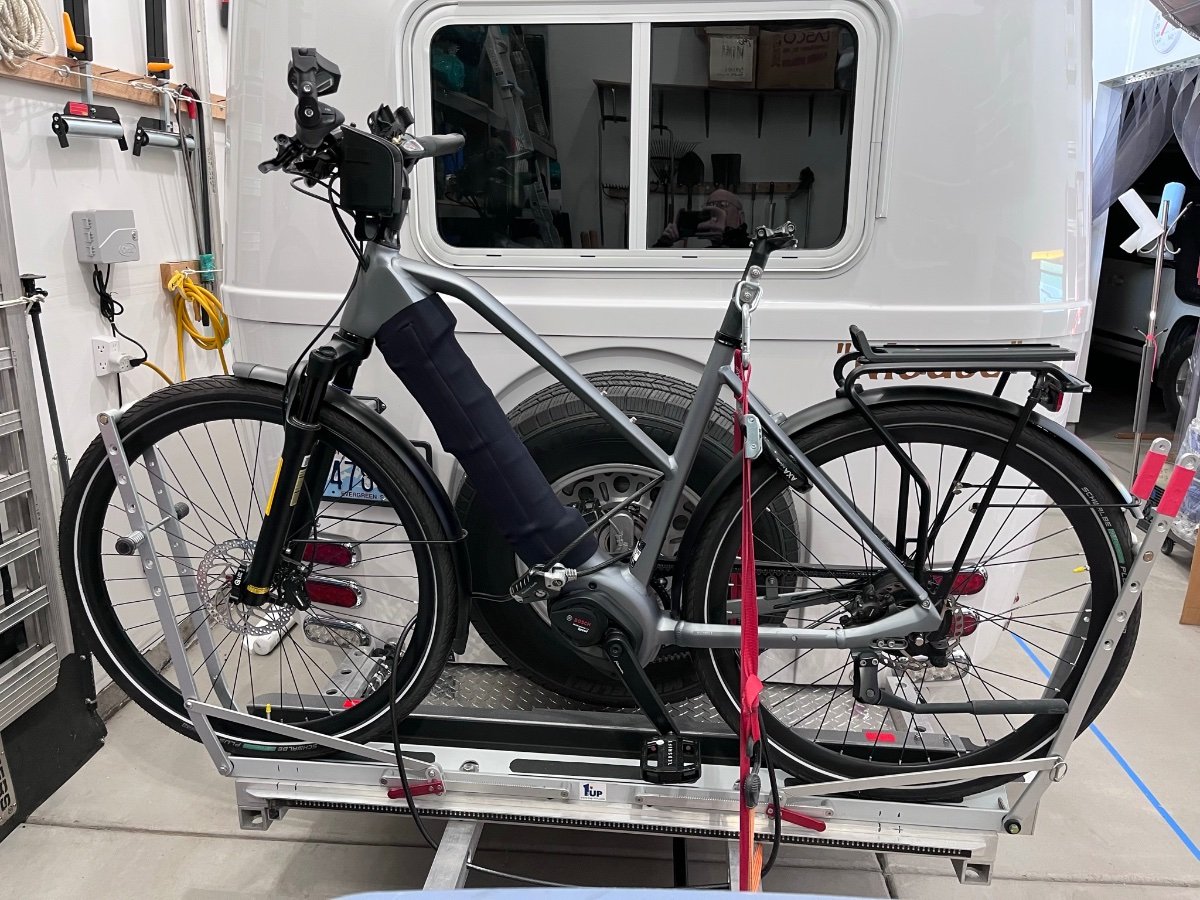
Class 3 (28 mph pedal assist), big battery for serious hill climbing and good range, big dual piston brakes for going back down, belt drive, internal wide ratio gearless hub. Built in the Netherlands. This bike is beautifully engineered and an absolute delight. It’s hers but she lets me ride it sometimes. 😬 I have peripheral neuropathy, so this lets me ride when a regular bike is just too difficult. https://www.gazellebikes.com/en-us/gazelle-ultimate-c380plus-hmb The rack is custom, with a 1-Up Super Duty single tray. The bike is loaded as I type, and ready to go, I am headed to Heyburn State Park ID to ride parts of the Trail of the Coeur d’Alenes, which is dead flat, paved and has stunning scenery. John Davies Spokane WA
1 point
-
Unless someone here has the specific details as to which hulls got which axles at which time - there are a few Ollies that received axles other than the 3,500 pound ones that are the norm - I'd suggest a call to the Service Department. They can look up your specific build and tell you what you have. Bill1 point
-
try ceramic coating on front end of ollie washes off with a hose. so easy bugs do not stick.. took me a whole day washing, wiping off with alcohol and doing 2'squares at a time. lasts a year. incredible shine and so easy to clean1 point
-
So beautiful! My dad was a wood model maker and built beautiful items including our fireplace mantle. He would have really appreciated your fine craftsmanship. I’m looking forward to seeing what you come up with for the closet.1 point
-
While there are situations like a cold damp basement where only a dehumidifier will work to remove excessive moisture, that's not what's happening in the video from the original post. Their issue is undoubtedly due to short cycling of an oversized unit. They have a 13.5k unit in a 10 1/2 long insulated truck camper which will never run long enough under the conditions they're in to keep humidity in check. Eventually, VRF (variable refrigerant flow) systems like those used in residential mini splits will be available for RV's and will virtually eliminate these humidity issues. There are currently wall mounted units available that are rated for 13k that have the ability to throttle down to 2.5k automatically based on temp/humidity settings.1 point
-
Foy, you know I'm such a big fan of your work. Every tabletop I see is so beautifully crafted, optimizing the amazing grain. I know you and my dad would have been good friends. He had your eye, and amazing skills, like you. We're so lucky to have you in our group.1 point
-
Marty, In addition to what was said above, we had two 100AH AGM batteries weighing in at 67 pounds each replacing them with one 100AH Battleborn lithium weighing in at 31 pounds to do the same job as the previous batteries. This change reduced battery weight with improved battery performance with faster charging and can discharge the Battleborn well below 50% as discussed above. https://www.batteriesplus.com/product-details/marine_rv/battery/duracell-ultra/sli27magmdc https://battlebornbatteries.com/product/12v-lifepo4-deep-cycle-battery/ Very pleased with the Battleborn 100AH battery performance.1 point
-
Now - that's what I call a "short-timer". It will be great to have you as a full fledged, card carrying member of the Family. Bill1 point
-
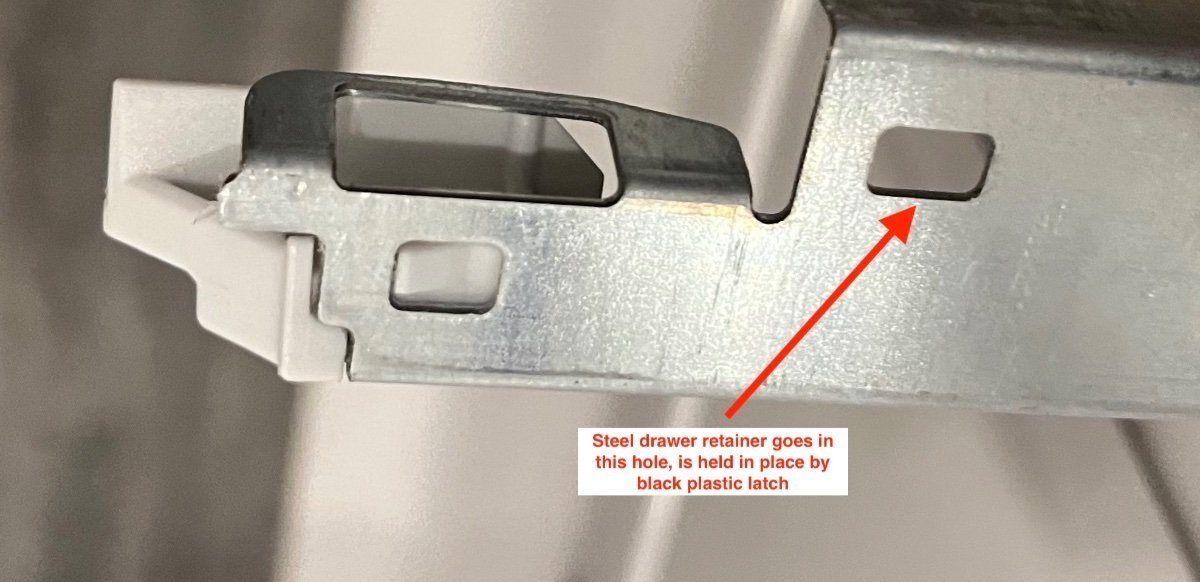
I am fairly sure that is a piece of a cabin drawer slide. It is the same gauge and color.... . I don't know if Oliver trims any material off one end. I wouldn't worry about it, unless you just want to be reassured, in that case you can open a service ticket and ask. https://olivertraveltrailers.com/forums/topic/6734-how-to-drawers-remove-and-reinstall-your-galley-and-end-table-drawers-fix-loose-or-stripped-screws-and-glue-the-bottoms-for-extra-strength/ I hope you did not step on it with bare feet.... John Davies Spokane WA
1 point
-
I have struggled with that, too. Our mpg drops, with the trailer in tow. Offsets? At home, our ac and/or heat in our larger home runs less than when we're home. Though we are very careful with water and power at home, we're even more conscious of our use, with the trailer. We run our trailer primarily on solar. (But that's also true of our home, and our sail boat .) We do some long runs, driving, and typically stay a bit. Sometimes days. Sometimes weeks, or longer. During that time, we rarely "go to town," so those short runs eliminate some of the daily drives we would do at home. Both our current tow vehicles are over 14 years old, and our trailer is now in its 15th season. Boat is 45 years old. Durability/longevity is also part of eco economy. We try very hard to leave a small footprint. We all have to live within our conscience confines. I'm pretty much ok with ours, though I'm sure we could also do better.1 point
-
I also use "The Collar" hitched and unhitched. I secure the collar with an Abus pick resistant disc lock. On the advice of @John E Davies I put a 2" stainless steel ball bearing in the bulldog while unhitched to prevent someone from simply dropping it on a smaller ball and driving away. I am of the same opinion as others who consider a locking mechanism to be nothing more than a deterrent. With the wide variety of battery operated power tools available these days, if they want it; they will get it. However, they are going to look for quick and easy targets. I would also imagine that it would be far more difficult to fence an Oliver than SOB because of their limited numbers. Of all the hitch locks available on the market today, I would agree that the Proven Industries system appears to be the most difficult to defeat.1 point
-
There are a lot of unnecessary parts listed in that kit, some you can't even use. All you need are the bearing cones and races and a grease seal. Everything else can be reused unless you damage or lose something. The bearing sets are available for $5-6 and a seal is around $3-4. Those bearing part numbers listed are correct for your axles but they are also industry standard numbers that every bearing manufacturer uses. Timken specific numbers to search for a cone and race set are: SET17 (for the inner), SET4 (for the outer), and then 473336 for the seal, which may be in either a National or Timken box.. Sometimes pricing will vary between buying a SET part number and the individual numbers. For instance: SET4 versus L44649 and L44610.1 point
-
You drive out the rear seal and bearing to service it (clean, inspect, and grease it) and replace the seal with a new one every time. If either bearing is bad, you drive out the races and install two new bearings and races. Never change just a bearing or race, they are matched sets. Never change only one bearing set if it is bad, the metal particles have already damaged the other set. You can carry a complete spare hub assembly with bearings, it would be very awkward and heavy. When you install a new drum, the worn shoes will not match the curve of the new drum, so that brake will never work right. If you replace a drum, both drums on that axle should be replaced AND both brake assemblies. $$$$ This is why disk brakes make so much more sense.... they have none of these “mismatched” wear pattern issues, and are super easy and inexpensive to service. John Davies Spokane WA1 point
-
John, Thank you immensely for sharing your knowledge about the NH toilet. My wife and I have ordered our Ollie and are planning on the NH toilet, but we are concerned about keeping the compost dry while taking a shower. You describe that water getting in under the toilet seat isn't a problem, but what about water getting in at the interface between the upper section and the lower section of the toilet? I am talking about the interface that is near the latch brackets that allow you to remove the upper section of the toilet. Do I need to worry about water seeping in through this interface? I am very interested in your guidance because Oliver has impressed on us the importance of getting the shower curtain option with our NH toilet, but we both dislike the curtain option and would rather not order it if we can do without it. Thanks in advance for your help. George Gonzalez1 point
-
I don’t, let me poke around in my records to see where I got it. It wasn’t Amazon. It is similar to this one, maybe an earlier version. I have had it for four years. https://www.walmart.com/ip/Home-Zone-5L-Small-Trash-Can-With-Lid-And-Foot-Pedal-Removable-Bin-Stainless-Steel-Garbage-Can-Oval-Waste-Basket/666807586 It works fine, you can operate the lid with your left heel when sitting, or while standing you can use your right toe or reach behind with your hand and lightly push down on the rear hinge. All these will pop it open. EDIT: I can't find a purchase record, that is weird because I keep everything.... Sorry, I came up empty. John Davies Spokane WA1 point
-
The Collar has worked very well for me, I like it. I do caution about disc locks. Many are garbage and most crooks know it from watching the YouTube picking videos. It is certainly better than a clevis pin, but only marginally. The German made Abus disc locks are good. If it came from U-haul or a storage facility, toss it! You can spend a fortune on a high quality lock, I settled on this hardened pick resistant Stanley. It is very heavy duty and looks intimidating. Bolt cutters won’t touch it. Cost is reasonable for what you get. https://www.amazon.com/gp/product/B001V5IYT2/ref=as_li_ss_tl?ie=UTF8&linkCode=ll1&tag=unitedlocks20-20&linkId=25f7d0bcd04bdade42aacad06c0419ad John Davies Spokane WA1 point
-
Yes, if there is a thief wandering around with a spare hitch that fits the Ollie frame/bolt pattern, mounting hardware and tools, then yes, they could unbolt your hitch and bolt on a new one, but that means they are probably specifically targeting your Ollie trailer and would need to make the investment in the new hitch and tools to do it. No system is completely theft-proof. The point is to slow the thief down or make it so much trouble that they find an easier target. But at least the Proven lock used on the Bulldog can't be defeated by a simple pair of bolt cutters that most thieves carry. Other cheaper hitch locks are 10 seconds or less to defeat with bolt cutters.1 point
-
A great source for questions on the Nature's Head is below. It answered a lot of questions that I had regarding the Nature's Head. There are other resources that compare the different composting toilets if you are on the fence about which ones are better than the others. Nature's Head FAQs1 point
-
Neither did we (one reason we went with the Nature's Head). Here is something you may want to consider. Since we wanted to dump the gray water (responsibly) when boon docking and at an RV park so that we wouldn't be limited on our water usage (sometimes we decide even shower at an RV park in the Ollie), we bought a gray (colored) garden hose and used these two adapters: Camco Durable Sewer Cap with Hose Connection Camco 3" & 4" Easy Slip Gray Water Sewer Hose Seal1 point
-
Dump it in a campground toilet for sure and flush a couple of times. Don’t ever pour it down a sink there or in your Ollie! That would make for very noxious grey water. I do have to comment, if you are in the habit of staying with full hookups for long periods, it might be better to remove the Natures Head, sterilize it, sell it on eBay for $400 and install a regular flush toilet, so you can just stay hooked up to the sewer connection all the time. I love the NH but I try very hard to never stay where there are hookups,... and it works very well for that scenario. I still have to dump the pee bottle in a toilet or outhouse, but it is less embarrassing to be carrying it around a more primitive camping area. LOL. John Davies Spokane WA1 point
-
It doesn't seem like any of the vent kits they offer are meant to be direct replacements for an RV stack vent. The only one that looks like it might work, seems to be designed for houses and so I doubt it's designed with high speed winds in mind. Might be worth calling them to see. I think Oliver should probably screen the vent at the factory just as a precaution, even though it's a fairly easy mod for an owner.1 point
-
John EXCELLENT description, with pictures! I intend to purchase the composting on my April 2019 Oliver so this maintenance info is very helpful (as long as I can remember how to find this post when comes time to check the fan). Is there a way to "bookmark" these more helpful posts? I suspect by searching composting toilet I can stumble my way back to this post next year.1 point
-
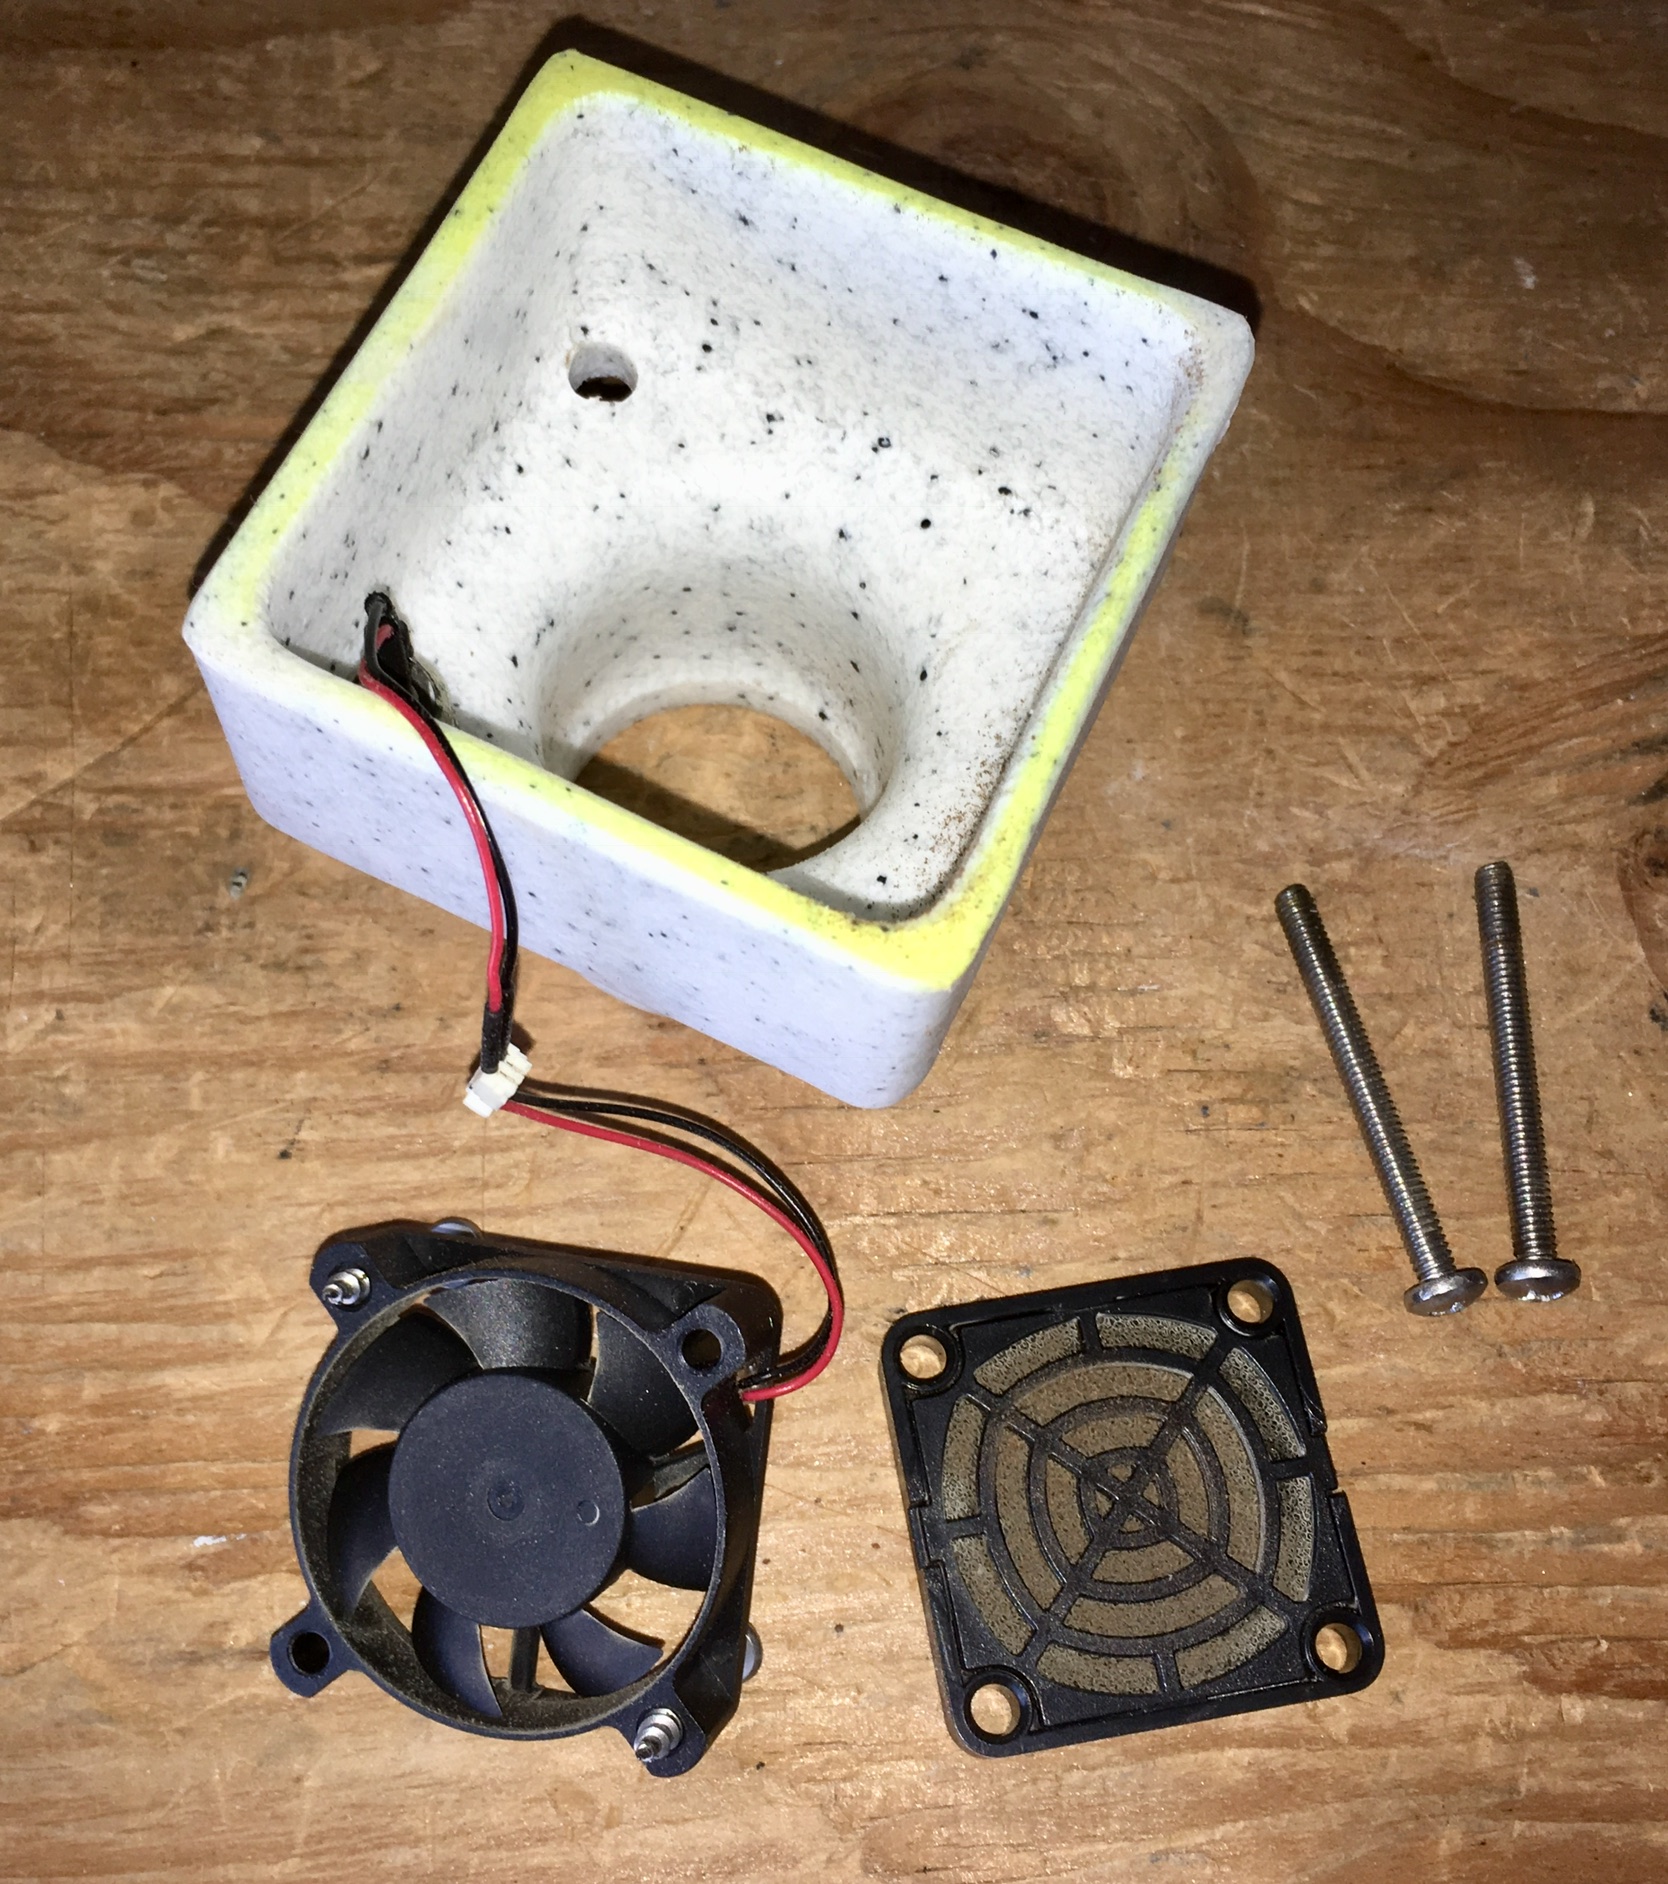
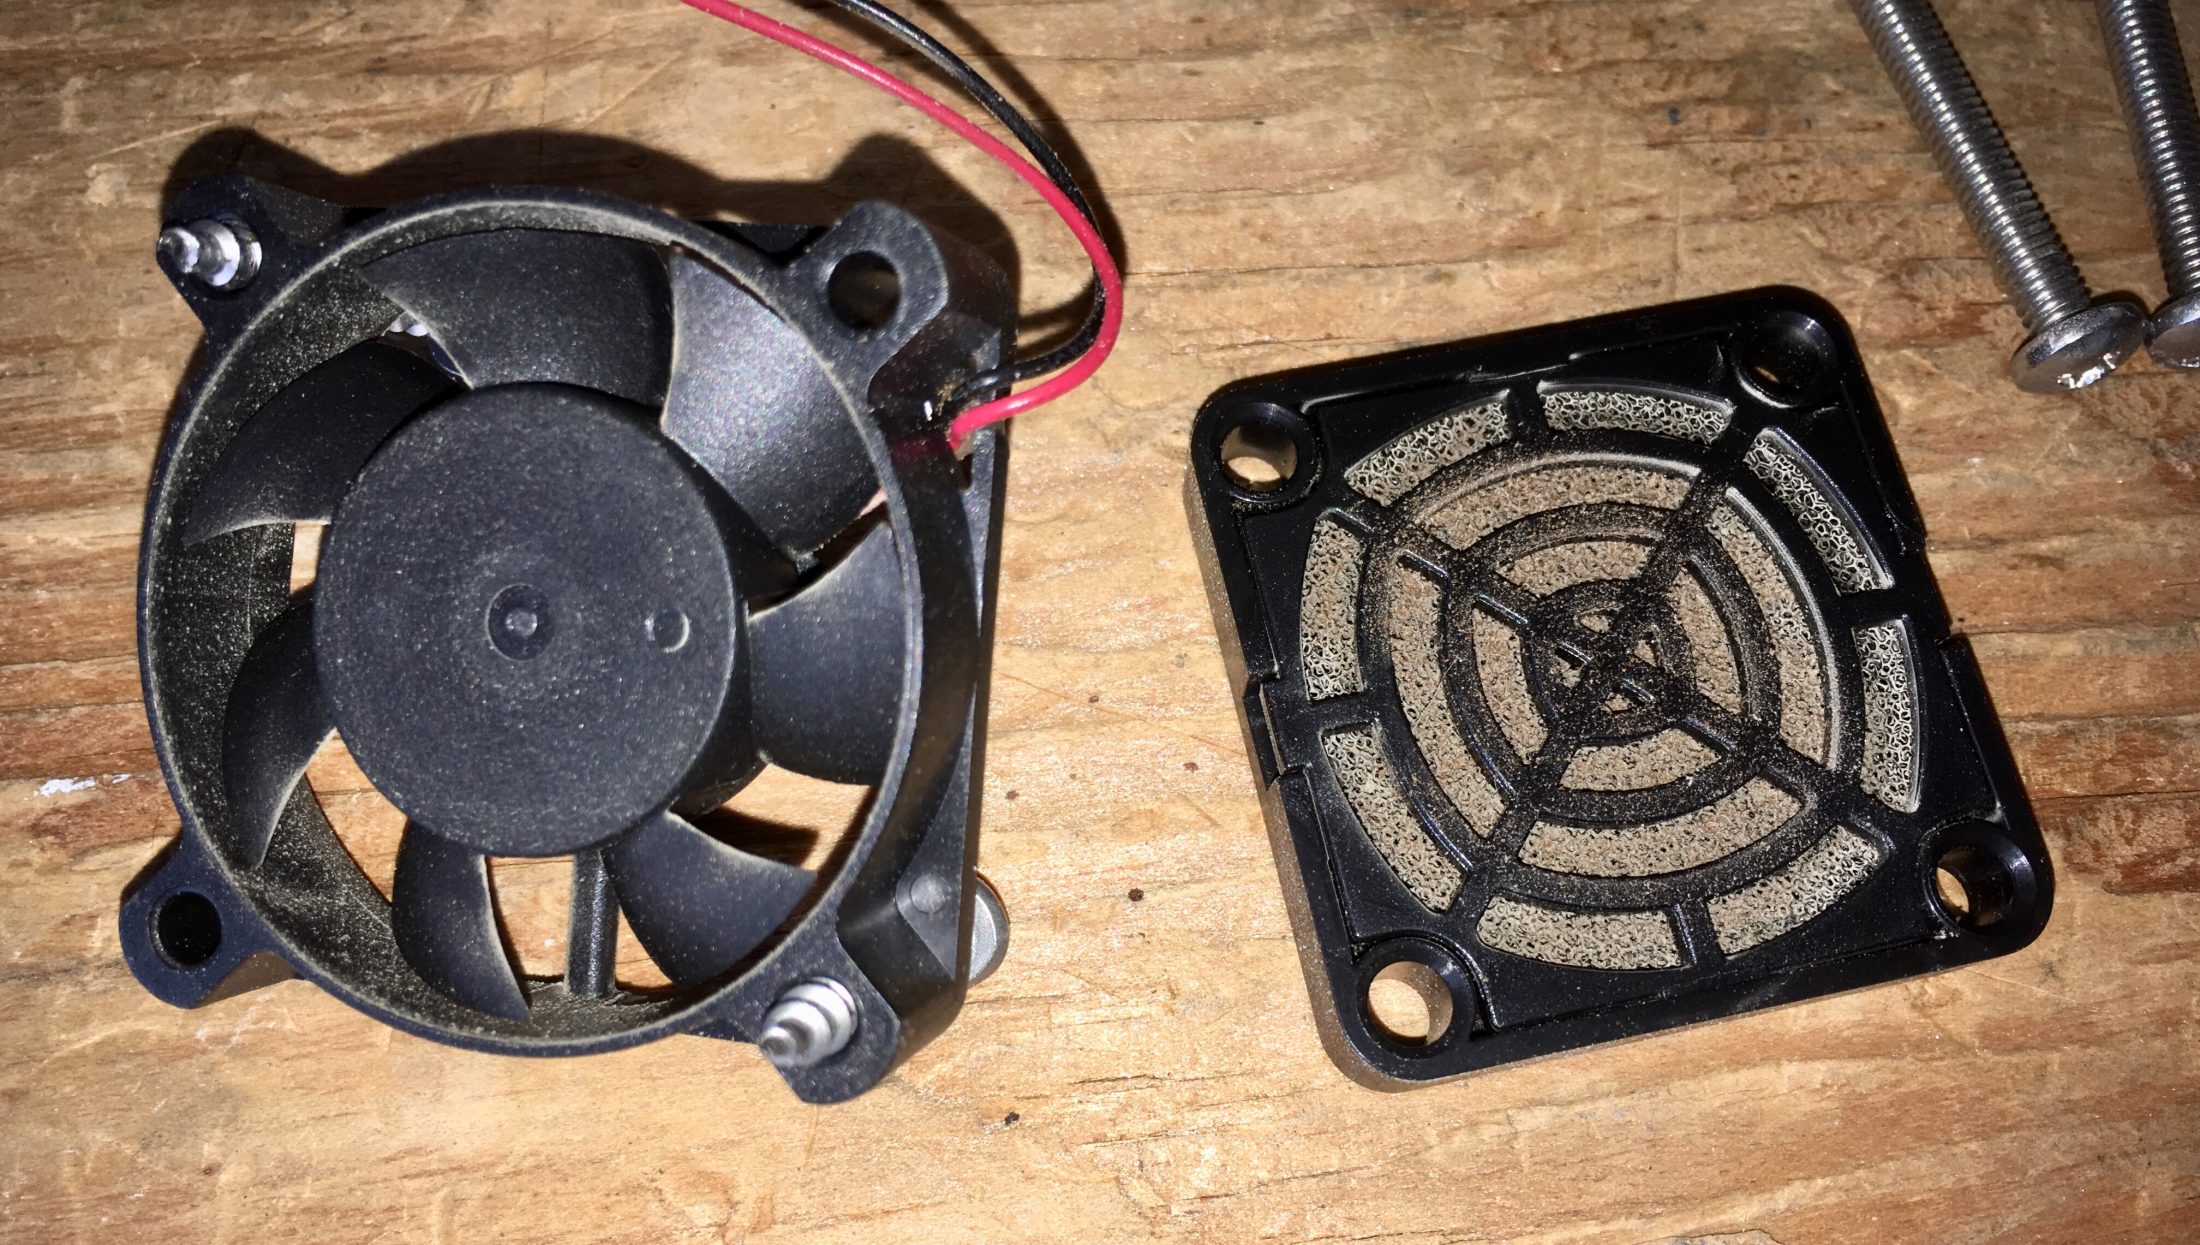
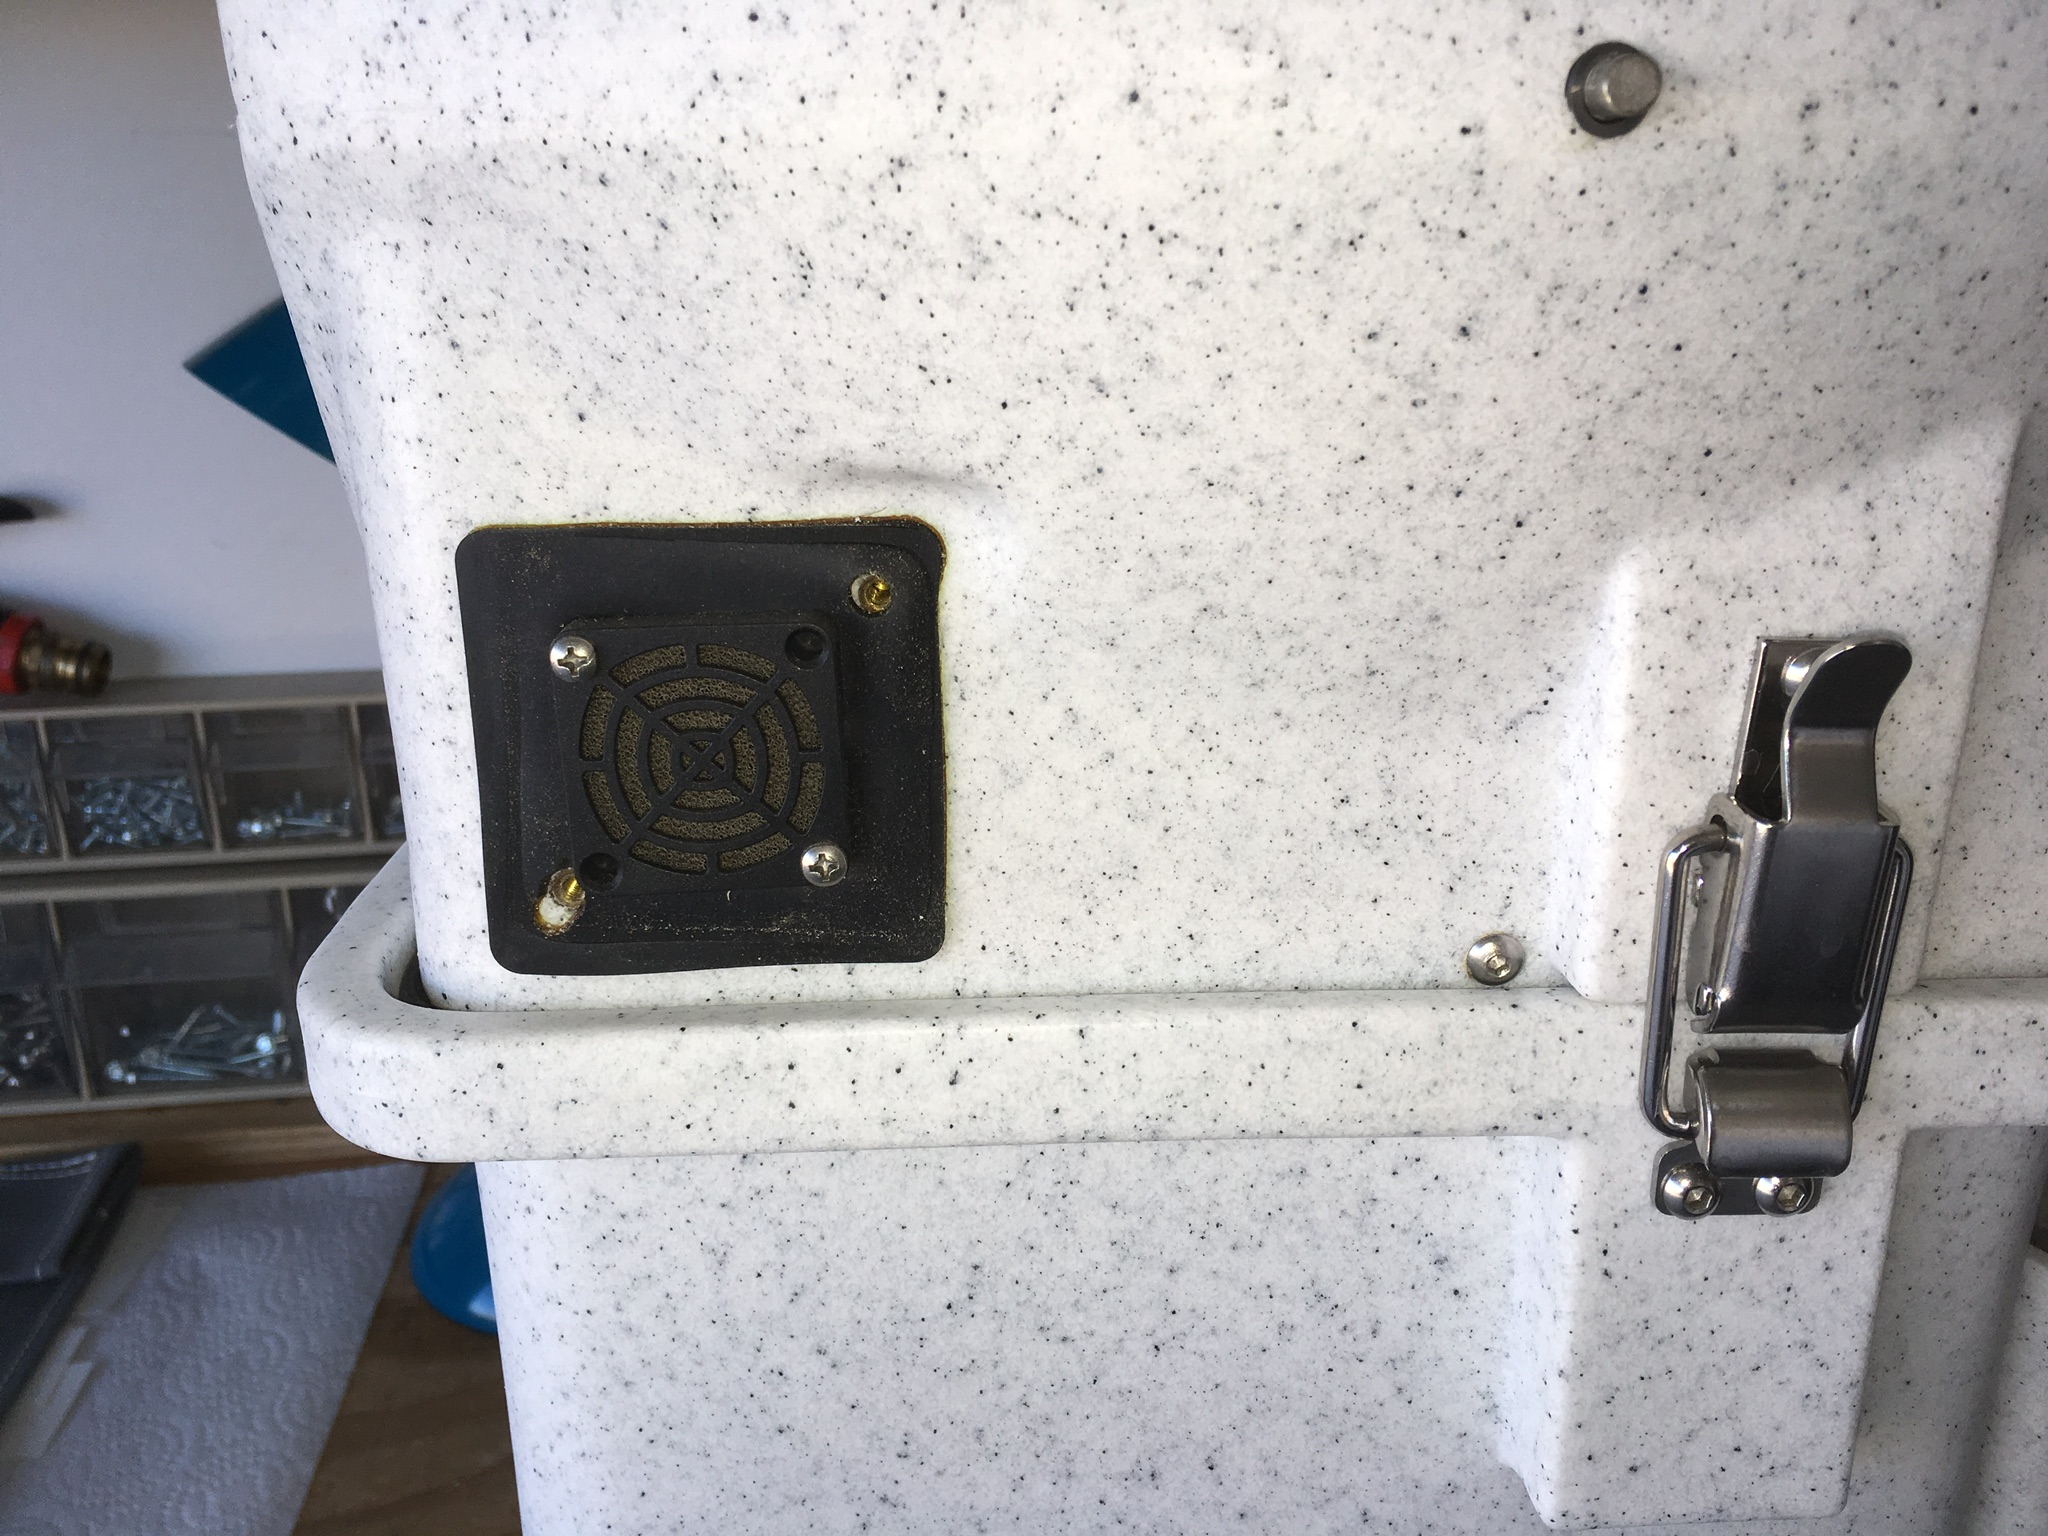
How to inspect and clean the TWO vent air filters. Yes, there are two, one at each side opening. It is really easy if you do this when the toilet is removed for servicing and cleaning. I set mine on a workbench for easy viewing. Front exhaust filter. Remove the two housing machine screws and lower the unit onto the nearest star wheel arm to support the delicate fan wires. Remove the two fan screws and carefully pry the fan and filter away from the rubber gasket. Leave the gasket undisturbed. Seperate the fan from the filter. Blow off the accumulated dust from the filter and the fan blades (hold the fan with a finger so it does not spin). Reassemble. My filter was visually clogged with fine coconut coir dust but it was still pulling air. Note: if you keep the coir moist with fresh water from the sink sprayer, it reduces the amount of fine particles that might get sucked into the exhaust fan when the wheel is rotated. If it is allowed to dry out (turns a very light brown color on top) it will send lots of dust into the filter. Rear inlet filter. Remove the housing and then the filter, clean and reinstall. This filter was barely dirty. This was the first time I have cleaned these in 18 months. The manufacturer recommends to check them every two weeks. LOL.... I think annually is fine, unless you have really fluffy dogs that shed. After cleaning the fan did move more air. It is really important to keep positive flow of air through the toilet for it to function well. John Davies Spokane WA
1 point
-
#359, delivered July 19, 2018. The Natures Head was fused at 2 amps. The fuse panel , however listed it as 1 amp. No issues so far. Will do the vent screen mod soon.1 point
-
I decided better safe than sorry on the bug thing. I had the ladder out yesterday to install the easy start on my AC, so why not add a screen to the plumbing vent while I was up there. Taking off the vent cap is just one screw and it pops off. Once uncovered, the PVC vent sticks up a half inch or so from the roof, making it a simple task to add some screen. I had a pack of these in the trailer for repairs, and they fit perfectly with just enough overlap to zip tie one on the vent. (Those particular patches come with tape around the edge, but it didn't want to stick so I took the tape off and used a zip.) Took all of five minutes, if that. Just be sure that if you go through the trouble of adding a screen that you use a finer mesh like a tent screen. I think standard screen that you'd get at the hardware store is probably not fine enough to keep out the sort of gnats that would infest your toilet.
1 point
-
We have a working fan now!! It was the fuse. What is the deal with them using the wrong fuse? Seriously ?. I’m telling you the sound of the fan running is one I’ve never heard since we picked the trailer up in December. It was blown from day one and all this time I’ve been trying to figure out what I’ve been doing wrong. I wanted this composting toilet to work so badly. Now maybe it will!! Yay! I might still submit a ticket to alert them. Or just call and ask them why they used the wrong fuse. The last ticket I submitted for another issue never got a response. Thanks John!! Now to check the screen issue and make sure nothing else is wrong.1 point
-
I am picking up my new LEII in April 2019 and have decided (I think) to get the composting toilet. These bug and fuse issues seem easy fixes by Oliver - are they aware and will they fix for 2019 models? Should I ask about these things when I visit the factory in October? Does Oliver monitor this forum and implement these adjustments (I hope so).1 point
-
Ditto to what John Davies said - ours (delivered in Feb this year) had the wrong fuse and it blew during the first week/trip out. Other challenges (in addition to changing the fuse) and lessons learned for us are: Storage when not in use - we initially stored the trailer with the fan running and the compost material (not emptied) was drying out too much and moisture is a requirement. We now unplug the fan when it is stored and I will check and add water every other week or so (as required) in an attempt to keep the compost at the proper consistency - working better. Bugs - another problem with the drying out compost is it attracts bugs (like gnats & a lot of them). In addition to that problem I learned that the exhaust vent on the Oliver does not have an insect screen that Nature's Head recommends. This allowed the bugs to enter the toilet via the exhaust hose. After getting rid of the bugs by emptying and cleaning, I took the exhaust hose off at the toilet and covered the opening with a layer of panty hose in order to form a screen and then reattached the hose. No problems with bugs since the screen and keeping the moisture level right with the composting material. Good luck!1 point
-
The blade type fuse is locateed in the fuse box under the dinette table. Mine was the only one there that was NOT labelled, all the other ones were labelled. It was originally 1 amp and was blown after the first day. I changed it to a 2.5 amp one, as specified by Natures Head, and it has been fine ever since. Make sure the metal ears are grabbing the fuse prongs hard, or there may be an intermittent connection. This is a VERY common problem with this cheap, poorly designed fuse box. You can check your fan by removing it, there are two philips screws at the hose outlet, and make sure it is spinning and clear of debris. If the fan is not operating, the toilet will never operate better than a five gallon bucket. It has to ventilate to convert the bacteria from anaerobic (stinky) to aerobic (not stinky). Good luck, this is not rocket science. Ask a friend to help if you can’t figure it out. Get that fan running! Even with mild tinnutus I can hear mine running if there are no other noises. I put my hand over the inlet opening once daily as I enter the bathroom, to feel the airflow. It is very small, but you can feel it. If your fuse is the wrong size, please file a service request so the factory will be alerted and hopefully change their ways.... there really is no excuse for installing the wrong one. John Davies Spokane WA1 point
-
I usually just spritz water using the shower function, washing dust, lady hair and debris from around the toilet and out onto the pan, then I lift it off with a paper towel and rinse the really small stuff down the drain. Wipe dry with a small microfiber towel. So far that is working fine. The more I use the Nature’s head the more I like it, and I am so glad to have the extra fresh water and not have to stop at dump stations, other than for an occasional quick gray water dump when I cannot drain that tank on site. John Davies Spokane WA1 point
-
John, you might be interested to know that Oliver is still installing 1 amp fuses for the fan, and they're still blowing. Our toilet wasn't working optimally, and fortunately I remembered your post and checked the fuse. Works well now. Because of my awful delivery experience, I had to use the trailer and shower for a few days in the Oliver parking lot. When I returned home and had a chance to fill the toilet I did notice that a fair amount of shower water had found it's way into the bin. I don't know where it's coming from since the rubber gasket seems to seal well. Regardless, I think with that experience that a shower curtain should be recommended, since you don't want to add moisture into the bin. I also find it a pain to clean around the toilet and a curtain should help keep that area cleaner. We tried the vinegar spray, but didn't care for it. I later found it was easy to just rinse the bowl with the sink sprayer - with a little care it's easy to do without getting any water where it shouldn't be. We also tried the coconut coir but I think my wife mixed it a bit too wet, which combined with the fan not working to make us decide to just restart the system a week into our trip. We used peat moss that time and the toilet has performed to expectations since. I think the only advantage to the coco coir is that it's compact for travel, should you need to dump the bin while on the road, but we can carry along a few gallon zip locks of peat just as easily.1 point
-
You can dump your gray water easy enough almost anywhere as long as it's clean shower water and not contaminated with food. We rarely fill our gray tank because we use a tub to wash dishes outside and dump the water outside also, so the shower water is all that goes into the gray tank when boondocking. I would say, don't bother in the Oliver.1 point
-
Mark, that is a really long and rambling video, can you highlight their main points? I did see the part about bugs - how unsettling - and that was definitely user error since they tore the filter. I am thinking about installing a washable pleated filter at the inlet (K&N or similar) that will have way more surface area than the little bug screen, yet be unaffected by splashing water during a shower. I have never noted any smells, but it is imperative that the Natures Head fan operates continuously.. John Davies Spokane WA1 point
-
That is so funny, that poor woman has no business using either that head or hand tools. When operated properly this simply will not happen. If you abuse a regular RV black system it will also give you serious problems, different ones surely, but just as gross. With a composting toilet you NEVER EVER pee in the poo section. They tell you that in the manual and it isn’t rocket science.... don’t every let a guy use it while standing up! LOL. What a gross looking toilet. John Davies Spokane WA1 point
-
I guess I wouldn't recommend watching Robin Williams' "RV", then.???? Any system can go wrong. Especially if it's not managed or maintained. Composting toilets work for a lot of boaters, where pumpout stations are a big hassle... Sherry1 point
-
John, I read with great interest about the rv composting toilet wondering if I should update Revilo with one. I have a stand alone composting toilet that I used on a piece of property that had no electricity or running water. When I have time, I love to read about the different topics even if it doesn't apply to me currently. There are so many wonderful educational topics and comments on this forum. I did start a new mod topic concerning the vent. Thanks for all the information that is shared here.1 point
-
Start a new thread, I suspect most owners that have conventional black water toilets do not read this thread. John Davies Spokane WA1 point
-
John, Thanks for the additional information. I agree that putting absolutely no toilet paper in the head is best for decomposition, but I'm not ready to do that. Instead, I'm using a very small amount of TP that goes in the head and baby wipes that go in a small ziplock bag with a paper towel liner. I toss the ziplock every day. I plan to call Natures Head tomorrow to talk to them about the fine coir I have on hand and to ask whether I can store the camper for months in the winter without emptying the composting material. I have indoor storage without any electricity available. I disconnect the batteries to avoid any drain during storage, so the toilet fan won't run. I assume the composting process will continue and that the purpose of the fan is to dissipate odors. Do you agree? I started using the composting toilet Wednesday evening and returned home late Saturday afternoon. I was the only user and the liquid tank was about 3/4 full when I arrived home. I camp alone most of the time so I think I'll be able to get by with one tank, but time will tell. I'll order an extra cap but hold off on a spare tank. I failed to answer your question about the water supply valve for the old toilet. Oliver left the valve in place. On some earlier conversions, they removed it and capped the line. Some people have returned and asked to switch back to the regular toilet and the cost to do so was higher because they had capped the line. Now they leave it in place in case you or a subsequent purchaser wants to switch back. Richie advised me to open the valve and pour antifreeze in the valve using a small funnel. This is now part of my winterization routine. Don1 point
-
I have been interested in this conversion for some time. Currently our travel habits have made it possible to use toilets (pit and other), peeing only in the Oliver, and showers when available and when not the Oliver shower. But our time on the road is increasing and making free and dry camping options more the norm. As this happens, my interest becomes more and more acute. I really appreciate the information you have provided John and have had similar questions that others have expressed. Directing pee to black tank would be the primary one. By doing so you would have a system that not only used the equipment provided (black tank) but also one that only required the activity of dumping something once a month at most. Thank you for this interesting and informative thread.1 point
-
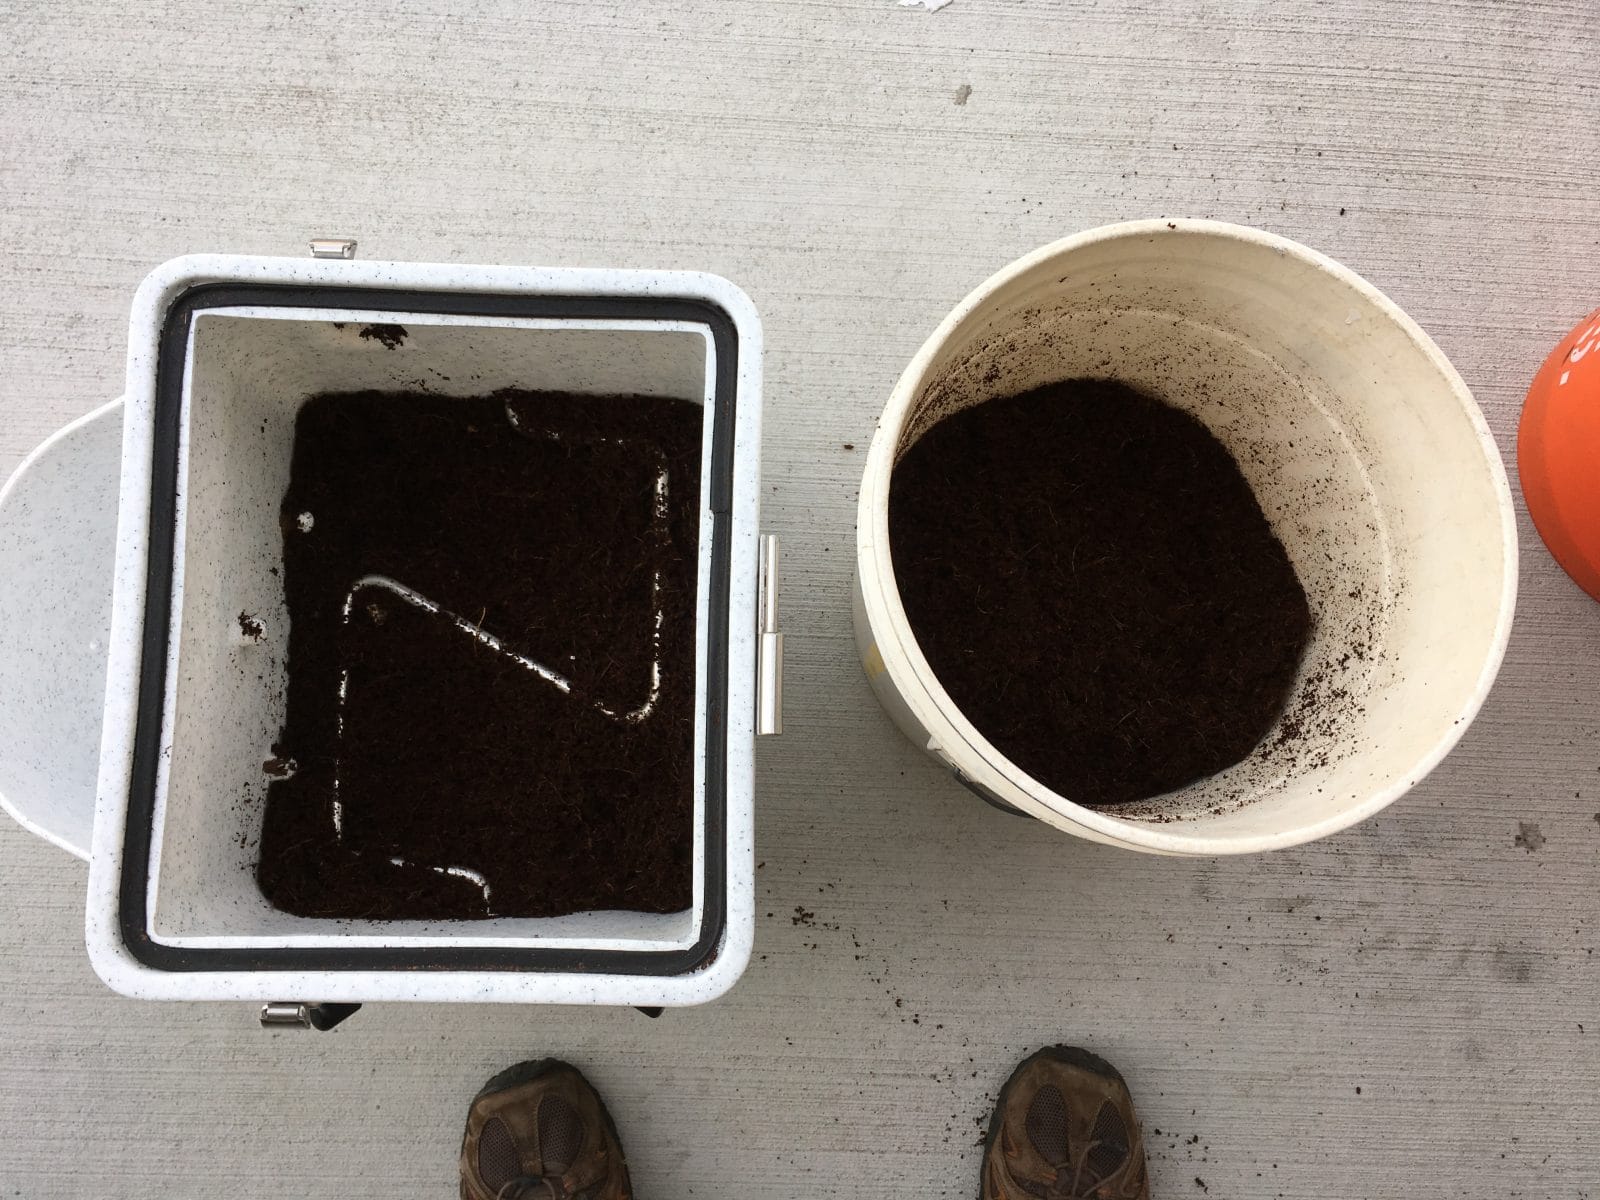
Some more pics! This is the floor under the toilet, after cleaning the area. It gets a little dirty under there since it isn't sealed in any way. You can see the black tank, which has no hole or flange for the regular toilet. I am surprised at that, all it has is a small hole to one side, capped with a translucent pvc plug...???? You can also clearly see the unused fresh water tap that needs to bypassed by blocking the hose to it, for winterizing. The toilet emptied of its, uhmmm, contents and stuff, ready to be refilled. The old stuff was very benign and did not smell at all, I just secured it in a heavy leaf bag and added it to the trash. You are NOT supposed to clean out this area, leave the remnants behind to help kick start the new batch of good bacteria.: A fresh batch of coconut coir hydrated for about 45 minutes. The toilet is filled just to the agitator center line (no higher or it gets hard to turn!), and there is enough left for another fill. I bagged and labelled that extra material and set it on a garage shelf with my other RV supplies, so my wife would not pot a plant with it: Not shown is the pee tank receptacle. I drilled three 1/4 inch holes right at the bottom facing the center of the bathroom, so any accumulated shower water would naturally drain out instead of getting trapped there. We are both liking the toilet. It does take a little regular maintenance but it's in no way hard, just different from a black tank system. We like being free from dump stations, tho we still have to deal with the gray water. But that is not a big deal out West. John Davies Spokane WA
1 point
-
This would work, but IMHO it adds unnecessary complication. If you were full timing, it might be beneficial. but it isn't hard to empty the tank manually. There might be problems with hard crusty deposits forming in the drain line. I am not sure if you could chemically remove those periodically. The deposits that form in the tank require some hard scrubbing, using a handful of gravel, some water, and shaking vigorously is a common method. You can't do that with a small drain hose. A composting toilet is definitely a different kind of system compared to a regular RV toilet and tank... John Davies Spokane WA1 point
-
Thanks for the kind words. See the second picture down from the top of Page 1. There is a significant lip around the seat part, under the lid, that keeps shower water out. You are correct, you want to keep the compost damp, but not drippy wet. Unfortunately, as I noted, there is nothing to keep shower water out of the hollow that the pee tank sits in. So when you are done washing, you can either leave that water sitting there, lift out the tank and dry the parts, or drill a couple of holes in the bottom of the receptacle .... NOT the pee tank itself, LOL. I plan to do the latter, but I keep forgetting. I suppose that you could fabricate a rubber seal around the top, but that might make removing and reinstalling the tank harder. John Davies Spokane WA1 point
-
My friend Mark was sitting here with me this morning and he's been thinking about installing the Nature's Head as well. Then he was thinking about running a line from the nature's head urinal down into the black tank... This way he could flush the urine out the back with some water added into the black tank and it sounds feasible. You could take that waterline and plumb it into the black tank flush line to add water in the beginning... And you could put some Nature's Miracle or something down the black tank to prime it and get rid of the ammonia smell. Or maybe you could just add some baking soda also... Just some thoughts anyway :)
1 point
-
Looking at the photos, my only initial comment is that the mounting hardware and vent hose aren't the most attractive things in the bathroom. But that's a minor concern. I wonder if one of the teak shower matts from teamworks would raise the floor enough that you don't need the stool. I assume that you'd want the fan running while the trailer is in storage. Maybe it's best to dump the compost prior to storage, in off chance that the fan might go out or if you wanted to disconnect the battery.1 point


.thumb.jpg.e34bf01ef7f7d5e99ad31856d45afbeb.jpg)


-
Recent Achievements
-


")


")


")


