Leaderboard


Popular Content
Showing content with the highest reputation on 10/20/2022 in all areas
-
From the Oliver FB page.
 4 points
 -
The 55 PSI recommendation is found in this 2021 Elite II Walkthrough video at 12:39. It was published November 3, 2021:4 points
-
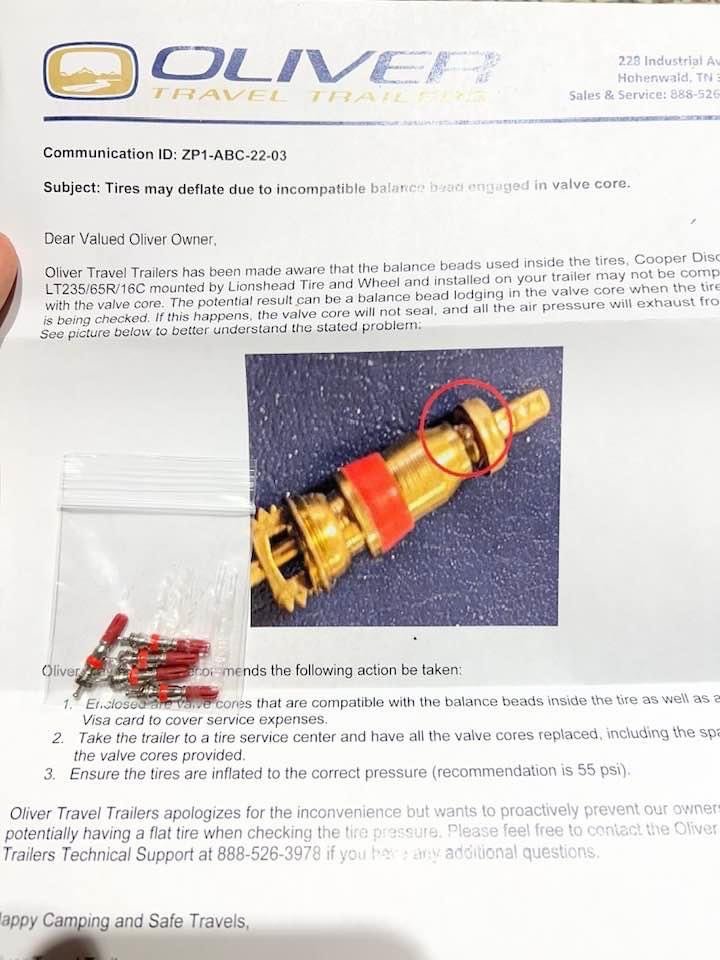
From a conversation I had with them on the subject. When there was a rash of valve core failures, Oliver looked into it and found out their supplier had been putting balance beads in their tires without them knowing it. Some of the smaller beads were getting stuck in the valve cores and holding them open causing rapid deflation. Oliver is contacting all that were affected and sending them new cores with a gift card to cover replacement. I seriously doubt they will make a statement as to how many were impacted. I know I would not release that information if I were them. Just one on one to those who were affected. As for the other questions, they all seem valid. Brian2 points
-
Recently, my inverter stopped working and wouldn't power on. Here is what I found so far (long story, feel free to skip and go to installation section below) The trailer was parked in at my property with shore power and the inverter was working when we were back from camping trip a few weeks ago. Over the weekend we found that the breaker was tripped and narrow it down to problem with the inverter. When on shore power, either the breaker at the shore power or main breaker underneath the dinette seats would trip unless switched the breaker of the inverter to off. The inverter screens didn't show anything for both remote and on the inverter itself located under the street side bed. When not on shore power, inverter didn't power on. Checked the voltage at the DC positive and negative terminal at the inverter using digital multi-meter and confirmed that there's ~13V at the terminal. Tried to reset the inverter by cutting DC power using the 2 red button switches near the inverter and confirmed using digital multi-meter that there was no DC at the terminal. This also didn't work. The inverter wouldn't power on when restoring power to it. I decided to submit a ticket and Jason and I agreed that there's an issue with the inverter itself and I had to contact Xantrex. After submit a ticket to Xantrex, the technician recommended updating firmware and that didn't help. Xantrex agreed to send me a new one because it's still under 2 year warranty. Installation I got most of the information below from Oliver and it's specific to my 2021 LE2, please contact Oliver to confirm if you have a different model year. Disconnect Shore Power from the camper. Flip the 30A Main Breaker to the OFF position (located in the AC Breaker box under the Dinette) Flip the 25A Breaker for the Inverter to the OFF position. Trip the 200 or 300A Inverter Breaker located under the street side bed access panel area. The breaker is located up & under next to the side of the battery box. Remove the inverter cover in order to gain access to the wire connections. The 120V wires on located on the left with the 12V connections on the right, pictured below. Once the cover is removed you will need to disconnect all 4 wiring connections inside the inverter. As a precautionary measure, do not let the wires contact each other. With shore power removed & the Inverter breaker tripped there shouldn't be any power but it is best to be safe just in case you got in a hurry and skipped or missed a step. Make note of the 120V Wires once you disconnect for which one is the AC In and which one is the AC Out Disconnect the ground wire located on the top edge of the inverter. Remove the screws securing the inverter to the white AP1 board. There are two screws located on the bottom and two located on the top. You may see other screws that are securing the wires to the white board but it is not necessary to remove them when replacing the inverter unless you are installing new wires. See screws pictured below as reference. Follow the steps in reverse to install the new inverter. Mount the inverter on the white board & secure with the 4 screws Connect the ground wire Connect the 12V Wires. Red is positive & Black is Negative. Connect the 120V Wires. Be sure to connect the AC In & AC Out wires correctly. Reinstall the cover Reset the Inverter Breaker by pressing the leg by in. Turn inverter on at the inverter itself (not the remote display) and verify 12V to 120V operation through the inverter. Turn the inverter off at the inverter Flip the 30A Main & 25A Inverter breakers back to the ON position. Connect shore power to the camper and verify charge state through the charger to the batteries. It may take a minute or two for it to engage. Once the inverter has been installed you will need to check the settings and set it based on your battery type The only settings that are changed by the Oliver factory are: #02 ,#05, #20, #24 & #28, based on your options, and are in bold font below Xantrex Customer Support: 800-670-0707 Oliver Service Department: 888-526-39781 point
-
Regarding the balance beads and potential issues expressed, smart money is to remove the beads. Given that the tire/wheel supplier, apparently Lionshead, didn't know enough to install the filtered valve cores, and that there are recommendations against even using beads in trailer tires of this size range, I couldn't be assured much of anything was done correctly. Since the metal valve stem installer should only have broken the outer tire beads for access to replace the stems, they could easily have missed detecting the beads. I would expect the balancing machine to produce results so obvious that they would redflag a problem however Inspecting the inner rim areas for an excess amount of weight, and/or unusual distribution of weights, should provide clues but I would be almost certain there were beads added to your tires. Just removing the external weights still leaves the unknown as to whether the beads could or would perform an acceptable balance. It's not implausible that they were incorrectly installed to start with, or that an indeterminable amount could have fallen out during the valve stem installation. And then, there's always going to be their questionable performance. Best to start over with a clean slate and go with a proven solution. The issue of restitution from Oliver should come later. It will be interesting to see if the beads caused enough imbalance to generate your reported heat difference.1 point
-
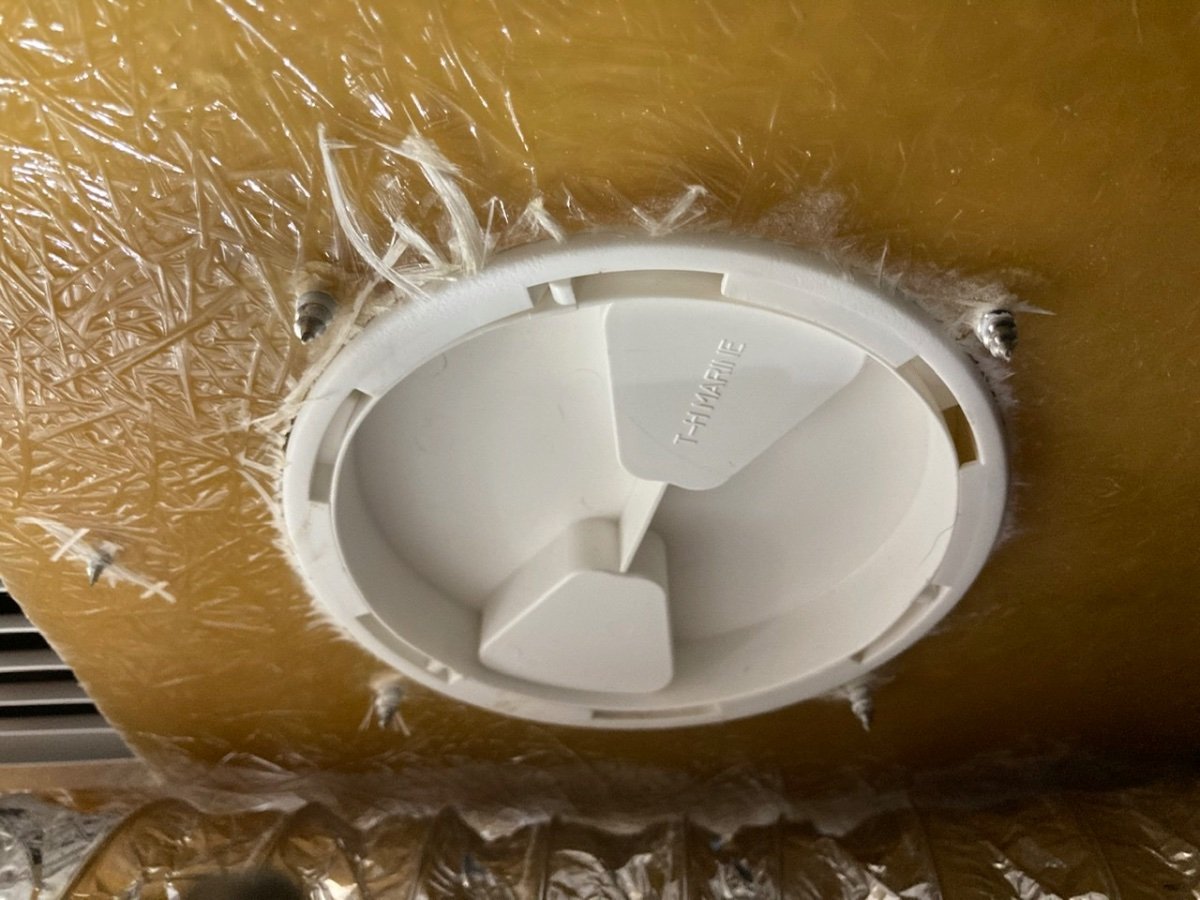
Thanks John, I was dismayed to discover Oliver would attach such a heavy unit with what looks like liquid nails! And thanks for the link to Home Depot. We don't do too much off road camping with the trailer but we do drive on plenty of lousy roads in the west. Sunbaked, washboard, gravel, dusty, wavy, cracked, filled with potholes. Up and down mountain passes, narrow, steep grades, cold and hot weather. I wonder if the unit fell off the wall when we camped out during a recent cold spell and the temp fell to 26 degrees? Anyway, thanks again, and I'm going to send a service ticket as you suggested. It's a total pain to have to re-install this unit because of cheap installation. Doris and Bill Santa Fe, New Mexico1 point
-
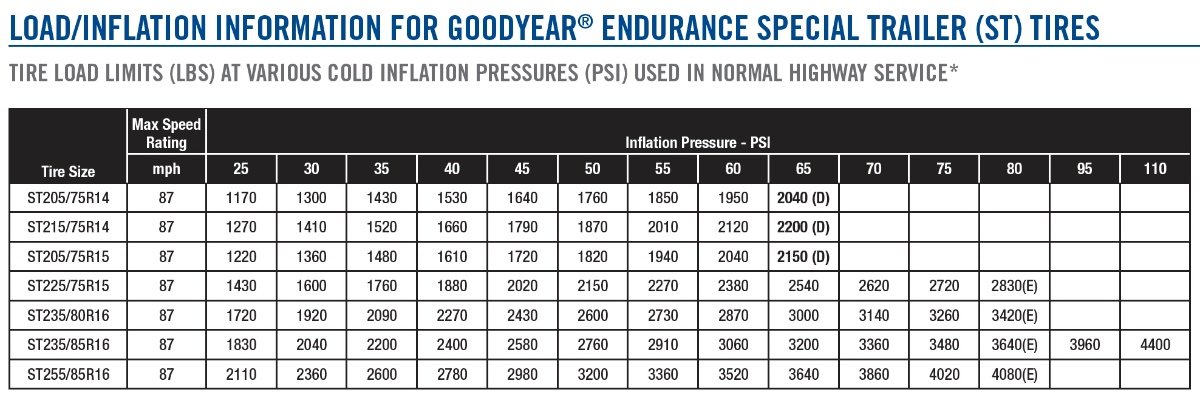
Some "concerned owner" should take the lead and pressure Oliver to provide formal clarification on tire pressure recommendations for both LEs, specific to model years and tires. Based on the Bead Letter and Walkthrough video, it's apparent that there has been a change in tire type and size, beginning with the 2022 models. The 55 psi stated in the letter and video are specific to the 235/65R16C Commercial tire, as stated and shown. Because this tire has a greater carrying capacity at 55 psi than the previous LT225/75R16 LRE Light Truck tire, the LT will require 63 psi In order to match its capacity. It should also be pointed out that the tire designation LT235/65R16C stated in the bead letter is conflicting and incorrect. Whoever is supplying the tire and wheel assemblies should also be providing Oliver with recommendations based on the application. If Oliver is in fact going to change the original placard pressures, across the board without regard for tire type and size as the video implies, they need to put it in a letter and provide placard addendums to every current owner. Otherwise, this topic will never end and some misinformed owner could get in trouble. Then it actually will become a recall. Hopefully this debacle will end with the adoption of ST tires.1 point
-
Correct, and the best way to determine this is to WEIGH your trailer unloaded and fully loaded for travel. When I ran Goodyears on the Airstream I was happy to see they produce a comprehensive chart each year for their RV "Special Trailer" ST tires. I recommend the CAT SCALES app for your phone. When you go to the scales, open the app, put in the number and drive on. Once your weight is taken, you will get a notice on the app and an email with your scale certificate. It will show total trailer weight, rear and front TV weight and combined weight. Compare these to what your tire chart states for your trailer and TV and adjust accordingly. There is NO one-pressure-fits-all answer. 55 psi is probably a very good choice for the current tires given the "likely" loaded trailer weight. GREAT CONVERSATION, this definitely needs to be understood by everyone who tows! Brian rv_inflation.pdf
1 point
-
This ad popped up on my computer after I had done some searches on lithium batteries. The “battery cells” look very familiar 😂. This could be a technical breakthrough since most campgrounds already have plenty of these “cells” 😂 Seriously though, some ad agency needs to do a better job of getting stock photos off of the internet.
1 point
-
Thanks folks for your help. I must have some how sent a message to Oliver and received a reply this morning with the information I needed. Great support from the parts department folks!1 point
-
Unlike other traditional lithium batteries, these new ones work best when stored and used at very cold temperatures. 🙂1 point
-
@Frank C Thanks for your recommendation. Based on your heads-up I bought 3 of those lithium batteries for my rig. Hope I can enjoy them for days. 😁1 point
-
Another option is to disconnect the solar panel current and turn off your batteries. LiFePOH batteries can be stored for relatively long periods if put to sleep. Consult your battery manufacturer to confirm reasonable time periods and temperature extremes. I believe most if not all later trailer models have a solar cutoff switch installed, and Lithionics batteries can be turned off. I’m not sure about LifeBlue batteries. Many of us who have upgraded to Battleborn batteries have installed battery disconnect switches. I stored mine for 4 months last winter with temps dipping into mid 20’s, with no significant battery SOC loss. I discussed with Battleborn Tech Support and they advised this was no problem. The following snip is from current Battleborn owners manual… ”How to Properly Store Batteries We recommend bringing the Battle Born batteries to a 100% state of charge. Then, disconnect the battery from any loads by removing the negative cable from one battery. On average, the batteries lose approximately 2-3% capacity per month. This is subject to increasing if stored in extreme environmental conditions.”1 point
-
Thanks. But it still isn’t in the 2022 Owners Manual or any of the older ones, they say to use the tire pressure placard. which indicated 80 psi for LT tires. John Davies Spokane WA1 point
-
Thanks, just edited it out.1 point
-
This is really helpful information for those of us storing our Ollies with Pro package in cold environments. I was planning to remove my batteries for winter but am relieved that with shore power and the heating pad on, they can be left in place.1 point
-
Oliver will take care of you. Submit a work ticket and follow up with a call. Oliver took excellent care of us regarding a wheel balancing issue I had while under warranty. I have had a stellar experience with Oliver warranty service. A side note, I had steel valve stems installed and was not happy with them at all and went right back to the rubber stem and have had zero issues. The rubber stems are flexible steel is not. Any road debris that hits the steel valve could likely cause a leak in the valve. Just another thought.1 point
-
Thanks to Landrover's recommendation, I used his friend Bob Hardbarger to develop graphics for Li'l Ollie. I emailed him some artwork of the TN flag and some of our East TN/ Western NC mountain scenes and he combined. He was very reasonable, as I have had logos developed and graphics for my previous business. He got the larger graphic to me just before my August 11 delivery and the young lady at Oliver, who applies their graphics, put it on for me during her lunch hour, and showed me how to apply the Hull number that I had him do later. I understand that he is retired but continues to do some work.
1 point
-
Wow, that pic reveals that the recommended tire pressure on an LE2 is 55 psi. Bravo, Oliver finally put it in writing somewhere. Has anyone seen this in an Owners Manual? Thanks for posting that Katjo! John Davies Spokane WA1 point
-
Pardon the minor thread drift, but if you go poking around in the bowels of your trailer, you’ll find lots of sharp things that can get you. For example, I discovered a large tear in my furnace heat supply hose, when I was reaching in to open the the water tank drain valve. I noticed sharp screw heads on the backside of the furnace intake vent and access port, which caused the tears in the hose. I used my Dremel to grind off the sharp screw points and applied RTV sealant. Small tasks that don’t take long to complete, normal trailer fixit stuff.
1 point
-
I have a MacBook also, it’s not a problem. See the text in red on your screen. You need to enable cookies.1 point
-
Glad to see such an easy solution, to an almost non existent problem, was shared. If you have the problem, you now have the solution. You don't have the problem, you don't have a problem. (It was kinda interesting to read some of the comments though).1 point
-
This should be posted under “safety bulletin” We have Cooper tires on our 2021 LE2 but have heard nothing about this.1 point
-
This was the letter posted by Carl Agee on FB.
1 point
-
John, Lionshead is the distributor that supplies the already mounted tires and wheels to Oliver. The wheels had a small removable sticker on each one that stated they were made by the company Sumec.
1 point
-
Thank you for a rational resolution with no drama.1 point
-
That seems odd. It would cost the supplier extra to do this. Not a lot, just a little for the beads and extra step, but still... big companies go to great lengths to save a few pennies like that. Can't believe they'd do it without billing Oliver extra. Unless...... According to the letter, the company is Lionhead. The same company that manufactures the rims. Could there be a flaw in the rims they were trying to mask with the beads? Wildly out of balance or something?1 point
-
I had one quite bad experience decades ago with the balancing powder. So I can’t realistically comment on if the bead type is or isn’t snake oil. However, if somebody put that stuff in any of my tires WITHOUT MY CONSENT OR KNOWLEDGE, I would be absolutely livid. Oliver owes you an explanation. For example how long have they been doing this and how many trailers are affected? Does it in any way affect the tire warranty (internal damage as the beads break down)? Do my 2017 tires, which had no weights at delivery, have them??? John Davies Spokane WA1 point
-
Five minutes; all fine.
1 point
-
I want to give my experience when I went to pick up my Elite I My tow vehicle is a 2020 Honda Ridgeline.. 19 inches to top of inside receiver.. so I brought a 4 inch ball mount (rise) We hooked up .. it was sitting to high, luckily I had a 2 inch rise one.. this worked great. I had full tank of gas the bed of truck was loaded.The 2 week trip out west, 3 National parks and 4500 miles later , the Ollie rode and towed great.. Honda got 14 to 16.5 MPG..1 point
-
Inquiring minds just want to know - what was the actual "problem"? Bill1 point
-
Sak, thanks very much for the detailed instructions and annotated pictures. Those are always most helpful! It is very time consuming to write up this sort of post and edit the pictures. FYI everybody ….. “Remove the screws securing the inverter to the white AP1 board. There are two screws located on the bottom and two located on the top” There have been a number of owners who have found one or more of those screw holes stripped, and some like me have found that white board partially or COMPLETELY pulled away from the mounting surface (failure of the epoxy bond). I do not think that those four dinky little sheet metal screws are strong enough for that much weight, especially when going over rough roads. I drilled completely through mine in four places and installed longer machine screws, flat washers and nylock nuts. This is something to be aware of, keep a close eye on the boards where they are attached, and on the mount screws of all these components. Thanks again, great post! John Davies Spokane WA1 point
-
Agree with John. If you are plugged in to shore power and your inverter is on and still no 120V, you could always run an extension cord to your heater from the outlet your are using in the driveway for heat overnight. Bring the cord through a window, the small amount the window is open shouldn’t be a big deal. We got into the 20s last night with both ceiling vents open and the window next to my bed cracked. Mike1 point
-
If you are concerned about leaving it switch off the microwave circuit breaker, that will remove power from the entire 120 volt circuit. Since you have not been plugged into shore power, I have to ask this….. did you try turning on your inverter? When you are not plugged in, that is the only way to energize those outlets. Sorry if that is a silly question, but we do have a lot of first time owners here. FYI, you can run a space heater for a very short while using the inverter, but it will deplete your batteries VERY quickly. It is far better to use the propane furnace when you are boondocking. It only uses 3 amps when the fan is blowing. John Davies Spokane WA1 point
-
There is no fuse at all. You don’t need to shut off the Zamp controller or any other 12 volt source, but you should disconnect shore power (or turn off the inverter) when actually working directly on the wires. The 120 volt circuit breaker does the same job as a low voltage fuse. You need to buy or borrow an outlet GFCI tester, similar to this. Make sure it has the Test button. Check all your outlets, the GFCI one is the “first in line”, it protects all the others from a short circuit. It is very common for them to fail. If the wires in back appear to be secure, then you may need to replace it. If you are not comfortable changing the outlet, you need to borrow a friend or hire an electrician. If yours is a new trailer, it should be covered by the Oliver warranty. https://www.dfliq.net/blog/what-is-gfci-outlet/ Please add your tow vehicle and trailer model and hull number to your signature, so we know what you have!, John Davies Spokane WA
1 point
-
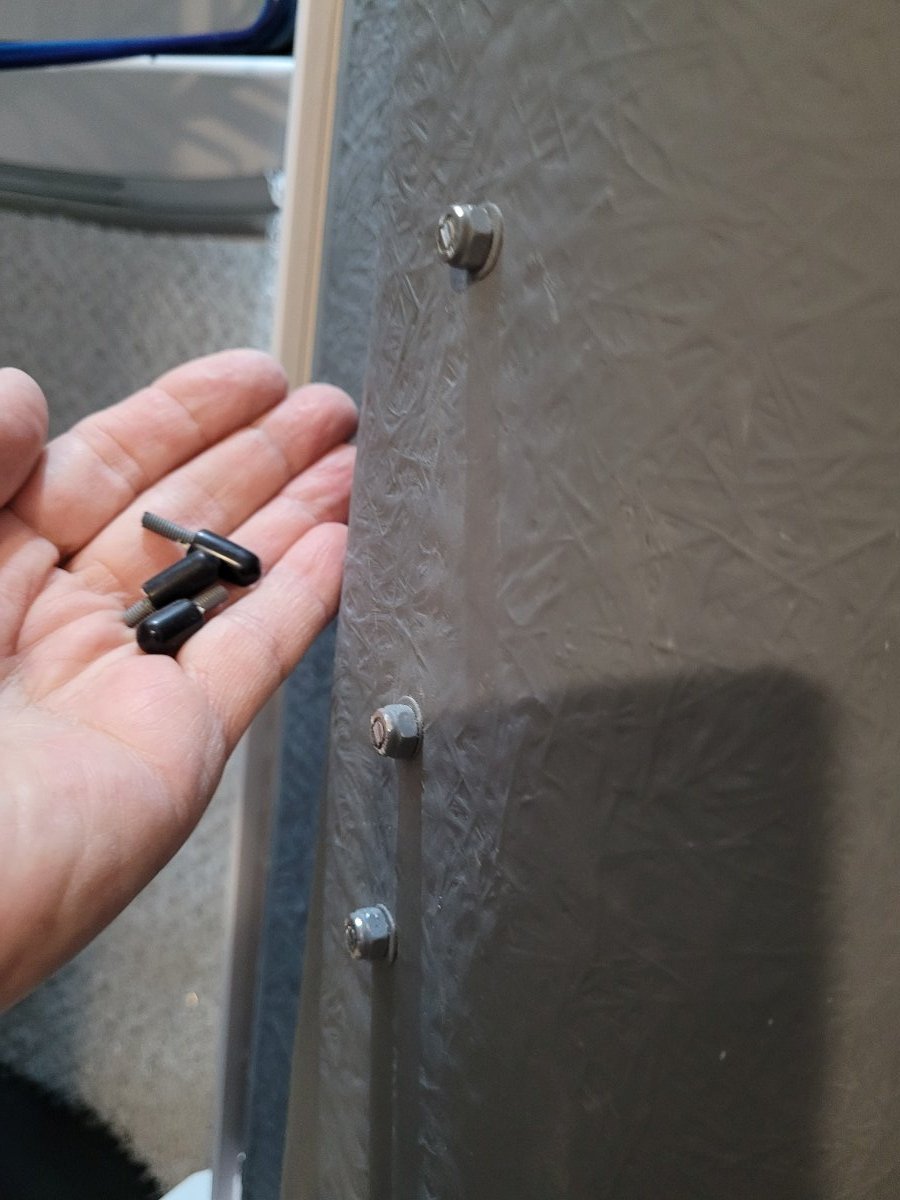
Everybody should know that something always has to be wrong with anything. Since the Ollie is such a fine work, why not make these bolts too long so the owners have something to complain about. Lol (Making light, but my wife cut her arm on one too, when the rubber cap fell off.)1 point
-
We winterized yesterday being risk adverse. I think it took maybe 25 minutes to winterize taking our time. The Truma makes winterizing really easy. In the fall we pack and carry our winterization hose and pump with us along with a few gallons of anti freeze should we take off to a much warmer costal climate.1 point
-
I spoke with Mike from Oliver Service this morning. He advised that, "according to Lithionics," the storage procedure for Lithionics batteries warmed by the external heating pad Oliver installs with the Lithium Pro Package is the same as for Lithionics batteries with internal heaters. So, you CAN leave Lithionics G31 batteries in an Oliver connected to shore power during winter storage, so long as the red toggle switch that controls the external battery heating pad (mounted on top of one of the batteries) is left "On." I recommended that the Oliver Service Department publish a storage procedure for the Lithium Pro Package which addresses this issue. I suggested it could forestall service tickets from folks who have the Lithium Pro Package and live in colder climates. I am pleased that Lithionics has approved the simple procedure of leaving trailers with Oliver-installed external battery heaters connected to shore power during winter storage, without pulling the batteries. But, given the nearly universal recommendation from lithium battery manufacturers to conduct a discharge/recharge cycle at least every 6 months to preserve battery life, I plan to do so once mid-winter, with the batteries still in the battery box, protected by the heating pad. Per the Lithionics Rev. 7 Storage Procedure, I plan to fully discharge the batteries, then fully recharge, then discharge back down to about 50% State of Charge, then reconnect shore power, which will return the batteries to full charge for the balance of the winter. If any of you electrically-savvy engineer types out there recommend a different approach, I would love to hear it.1 point
-
In San Antonio we get into the 20s for a few days several times a year. I’ve never winterized. On those occasions I turn on the hot water tank, set the furnace at 55, open all the hull openings and turn on our electric space heater. No problems coming up on our 7th winter. We’re currently at Cumberland Mountain State Park outside of Crossville and the temps are supposed to get into the mid to low 20s at night starting Monday. All I need to do is disconnect the water hose and we’ll be fine. Mike1 point
-
That is my impression as well, but it may not be that simple. Reuben from Lithionics asked if the external battery heater runs through the inverter. If it runs through the inverter, you would have to leave the inverter on all winter. That could prematurely wear it out, and it's expensive to replace. The right battery charger would be much cheaper in the long run. When I told him I don't know how the the external battery heater is wired, he suggested asking Oliver. I did so by submitting a service ticket. An Oliver service tech left a voice message for me late yesterday, which I plan to return on Monday. I will report what I learn.1 point
-
I’m interested in this as well, we too would prefer not to remove the batteries and just stay connected to shore power with the battery heater on. I don’t understand why you would need an external charger if you can connect to shore power. Why is staying connected to shore power not recommended? If you can plug into shore power you don’t need an external charger. Last winter the previous owner had the Oliver stored outside not connected to shore power with battery heater on, I’m guessing the solar kept the battery heater charged? There has been so many different answers about this including from lithionics I’m not sure what to do. It’s unsettling that the person from lithionics you spoke to didn’t know if keeping it plugged into shore power was ok but then tried to sell you a portable lithium charger! Wouldn’t shore power charge it just the same?1 point
-
I will be keenly interested in the results of your test. My wife and I take delivery of our Elite II with the Lithium Pro Package on November 10. We plan to winterize and store it in an outbuilding when we get back to Idaho in late November. Like you, we have shore power available in the storage shed. I would love to be able to do what the Lithionics Rev. 7 Storage Procedure instructs for their batteries with internal heaters: leave the trailer connected to shore power and walk away for the winter. I do not yet know if that is recommended for Lithionics batteries with external battery heaters. If so, why does Lithionics limit their Rev. 7 winterizing instructions to batteries with internal heaters? For what it's worth, this is what Oliver says about the external battery heater in the Knowledge Base under the topic Electrical Systems: "The heating pad is powered by the on board battery bank in the camper. It is controlled by the lighted switch and an ambient temperature sensor which measures the internal temperature of the battery box, not the batteries. When the switch is turned on and the internal ambient temperature falls to 35 degrees the heating pad will come on and heat up to 135 degrees until the ambient temperature reaches 45 degrees and then the pad will shut off. Once the switch is turned on the light should come on to let you know the system is on. The power passes through the switch and into the temperature sensor that then controls when the heating pad turns on and off." I infer from this language that the external battery heater is 12V, since it is powered by the "on board battery bank." It is my understanding (and someone please correct me if I am wrong), that the Xantrex inverter/charger transforms incoming 120V shore power (or solar power) to the proper voltage to charge the batteries, depending on what the battery "needs" at the time--something in the 13-14+V range. It seems intuitive to me that in cold weather, the shore power connection should keep the batteries charged if they are left on, so the batteries, in turn, can power the external battery heater, which should keep the Lithionics G31 batteries above freezing, enabling them to receive a charge. Logically, that should be how the Lithionics 315 Ah batteries with internal heaters are kept safe, per the Lithionics Rev.7 Storage Procedure. But, I know just enough about electrical systems, particularly the combined 120V/12V systems in an RV, to be dangerous. So, I hope one or more of the electrically-savvy Oliver owners out there will weigh in, and correct what I have said here if I am wrong. I offer one other significant datum. I emailed Lithionics yesterday asking if the external battery heater Oliver installs with the Lithium Pro Package will enable me to safely leave the three G31 batteries in the Elite II battery box connected to shore power over the winter. Reuben, the helpful gentleman from Lithionics who called me in response to my email message, was not sure. But he did advise that one of the KF series chargers Lithionics sells would keep the G31 batteries safe over the winter, in conjunction with the external battery heater installed by Oliver. He recommended the KF12V20DL, which is a 20A, 12V Lithium battery charger. I would really like to avoid removing the batteries from the trailer every year, storing them in a temperature-controlled building and running periodic charge/discharge cycles while the trailer is in winter storage. If just connecting the trailer to shore power is not recommended, then I may buy a KF series charger from Lithionics so I can avoid having to follow the protocol detailed in the Lithionics Rev. 7 Storage Procedure.1 point
-
If it was me, I'd not risk leaving the batteries stored in the Oliver. If those batteries leak it will cause one heck of a mess and expense in getting that cleaned up. With the winter temps you are looking at, hopefully there is a place where you can store the batteries (out of the Oliver) where they will not be hurt by zero degree temps. If there isn't such a place then I'd either give them away or trash them, find a neighbor who would be willing to store them for me, or (if you are driving) take them with you. Good luck! Bill1 point
-
And, as we all know, Steve likes overkill and extra capacity. No problem with thread drift. We haven't had any elite 1 responses, anyway, for lt tires, since I split the topic. We're still running st tires on our elite. With modern st tires, higher speed rating, haven't had the urge to change out to lt tires.1 point
-
Not really. Yes, there are more Elite II’s so the conversation trends that way. Elite I’s are just as important, though fewer in number. There are differences between the two, but there is a lot of commonality. Don’t feel slighted, continue to contribute as an Elite I owner. Our senior members @SeaDawg, @bugeyedriver and @ScubaRx all are/were Elite I owners. You won’t find more knowledge and insight than you will get from them and other Elite I owners here on this forum. Mike1 point
-
Got a letter from OTT today stating that the balance beads in my tires may jam the valve cores, causing a loss of pressure. The envelope contained 5 new cores with screens and a $25 gift card for my troubles. First, I had no idea there were balance beads in my tires. I don't recall ever seeing that in any of the literature. The first thing I did with our trailer after bringing it home was bring it to a tire shop to have metal stems installed and have all the tires balanced. I certainly would have told the shop if I knew there were beads in the tires. Now I wonder if the presence of the beads threw off the spin balance I got from the shop. The FAQs on one of the balancing beads websites says that they should not be used with wheel weights ("they will work against each other") and that they can't be correctly balanced by a spin balance machine. Is this why 2 of my wheels have been running unexplainably hot? Are the bearings being stressed by badly unbalanced wheels? Seems like I have to go back to the tire shop and either have them remove the weights they installed or have them unmount the tires, remove the beads, and rebalance the wheels again. This is definitely something that should have been disclosed by OTT. Service ticket created. I don't think I should have to pay to have this addressed.0 points


-
Recent Achievements
-


")


")


")


