Leaderboard




Popular Content
Showing content with the highest reputation on 01/09/2023 in Posts
-
Isn't this forum great? Everybody 1000 miles away helping you look! I do hope it's there when you look. There's hardly a greater feeling than finding something6 points
-
I don’t think it’s anything to worry about. The cord that came with you trailer is nothing special, there are after market cords that do the same. I got another cord without the locking lug that I carry to extend the reach of my locking cord if needed. We’ve had a few sites where our standard cord didn’t reach and the extension made the difference. Mike5 points
-
Apparently my reply was not clear. I intended that anyone making up another shorter cord should be using the $3/foot 10 awg wire with the displayed ends. My suggestion of a lighter 12 awg extension cord was intended for only light duty (not running the A/C.) Sorry for the miscommunication.4 points
-
We ended up several feet short of a power outlet the first week after leaving OTT with our E2 at a HipCamp. I called Service and they assured me that you can add a 50 foot cord to the 25 footer provided making 75 feet total but not to go any longer than 75 feet since it results in other unintended consequences (power loss and subsequent problems related to that). We've used the 50 footer several times but have never had to put the two together.3 points
-
I agree with Mike. The only thing I would add would be if it were constantly exposed to sunlight the UV (might) damage the outside insulation. I truly don't know. If you are only trying to keep the batteries charged, you could consider buying or making a shorter cord dedicated to that one task. The cord that comes with the trailers is 10 awg. Cords that heavy might cost $3/foot for the wire and then the proper fittings for each end if you wanted to make up a dedicated one. A 12 awg cord can be bought relatively cheap locally and it will handle everything but possibly running the A/C. The proper ends would be like these: Male... Female...3 points
-
My original cartridge is in the top right drawer beneath the kitchen counter along with a bunch of remotes.3 points
-
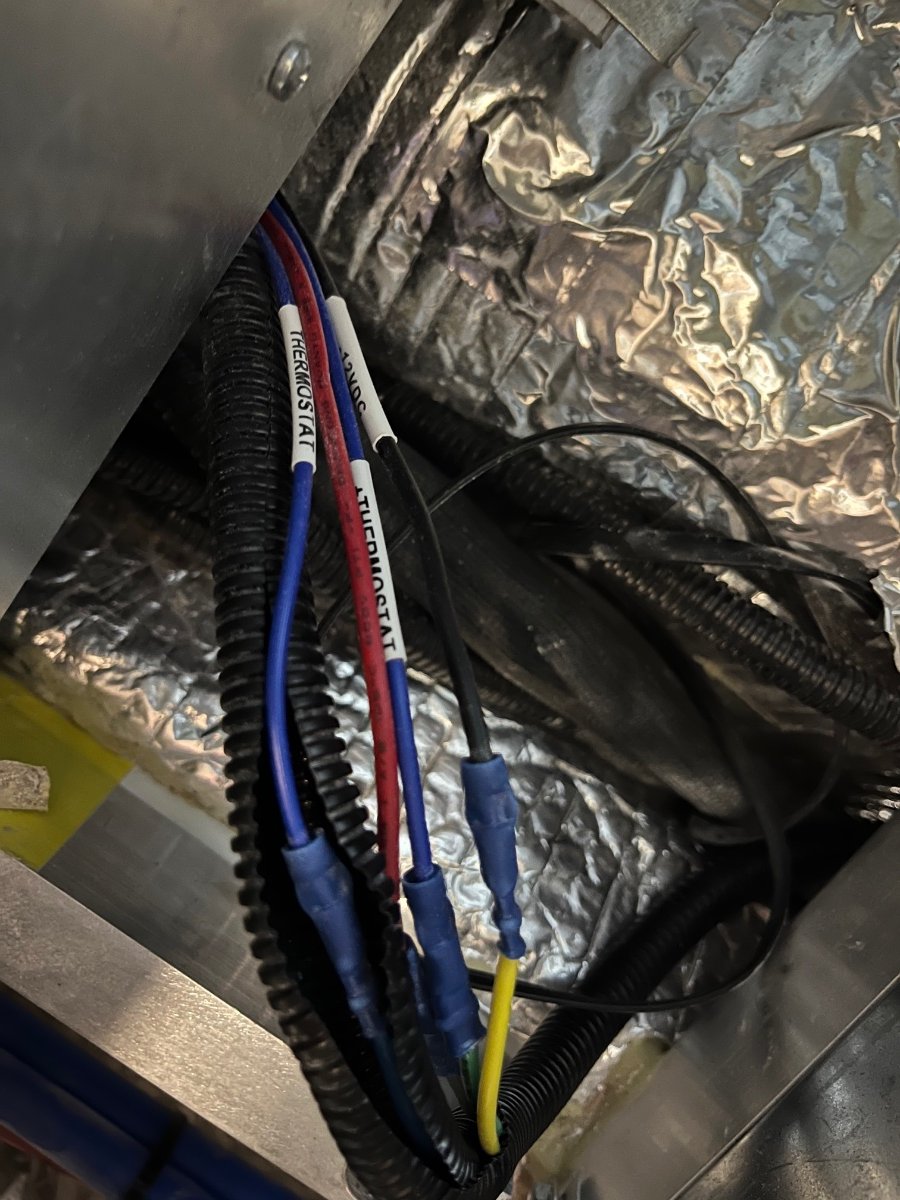
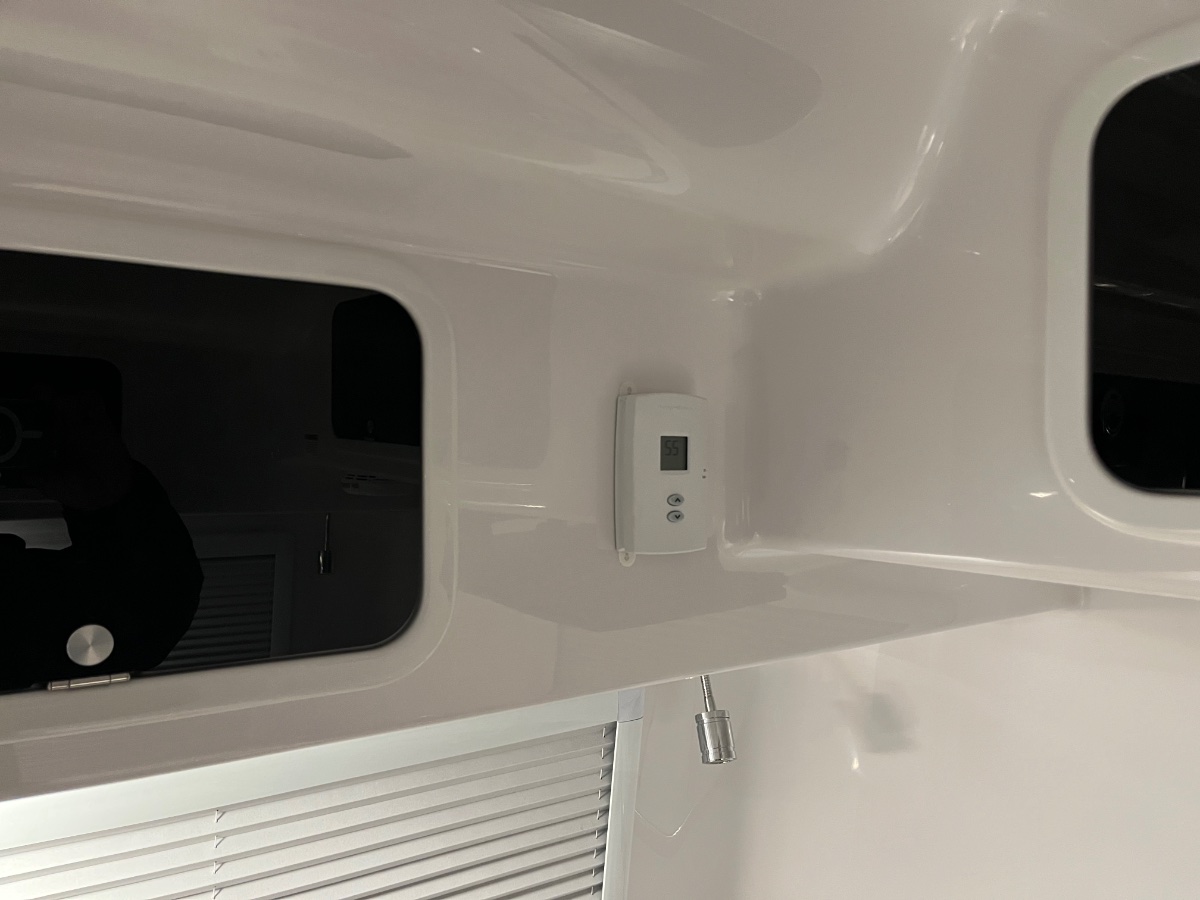
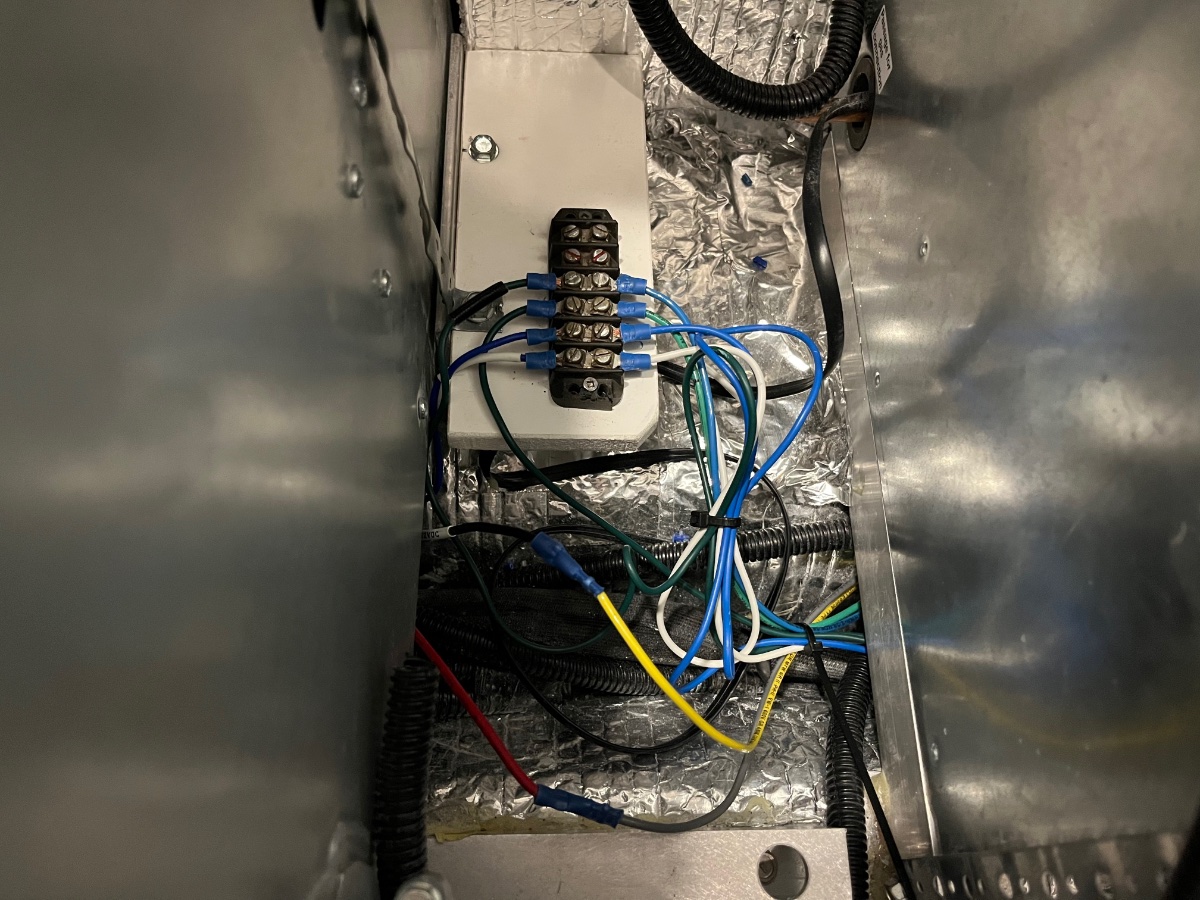
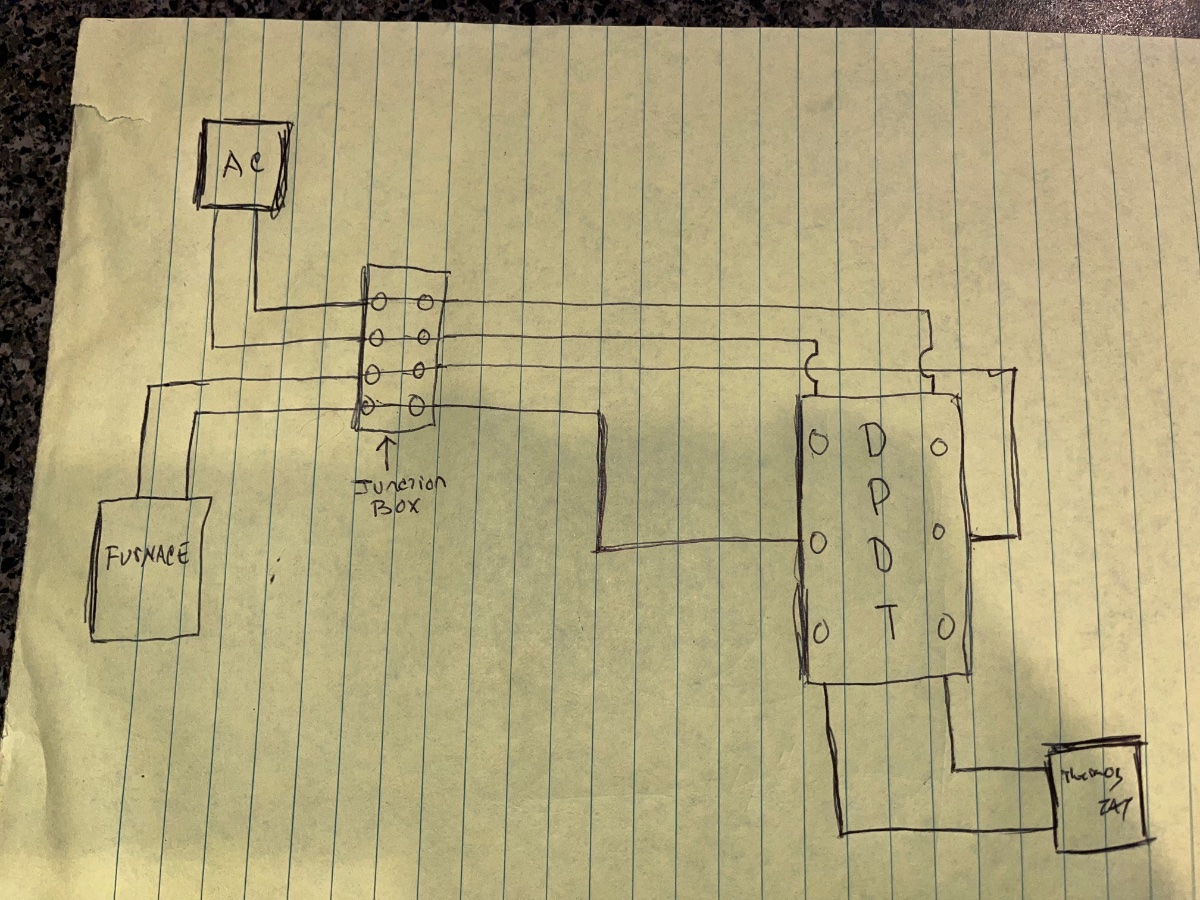
I’m back and I think I resolved my issue I had to wait until after the new year so I had some free time. After many phone calls and web searching I decided to try what I read on some other RV forums. This is not an uncommon problem and it drives not only me crazy but a lot of other people in the RV word. From what I can deduce the actual temperature sensor lives in the AC unit on the ceiling not in the thermostat mounted on the wall. This poses a problem because heat rises into the unit then it cools fast because it is against the roof and not on an interior wall. so I isolated the thermostat wires coming from the furnace and with the use of a DPDT switch I isolated the furnace from the AC altogether. Now the heat in the trailer is controlled from the battery operated thermostat independent from the AC. If I put the switch up I have heat controlled by the remote battery operated thermostat and no more cycling on and off. If I want AC I switch the switch down and now the AC works exactly the way it was wired originally using the Dometic thermostat installed by Oliver. So far it seems to have fixed the problem completely. Now that the cycling has stopped I plan to add a return air vent under the front Dinette along the floor. That should help with the return air flow by taking the return air directly from the floor up front away from the supply air. Sent from my iPad
 3 points
 -
Well... isn't that a surprise! I understood that I needed the original part to do the decalcification process as well. I have looked everywhere for that part and thought that I either never received it... or put somewhere that I wouldn't forget?? I was about to just order a replacement part so that would have it when the time came. (I have the tablets). I can't wait to get the cover off and see if mine has been hiding in plain sight all this time as well! 🙂3 points
-
Bet it was - I am SO looking forward to having a 30 amp cord. I had a 30’ 50 amp cord on the Airstream and I can remember several occasions coming out to disconnect for an early launch in single digit temps. That cord would freeze solid and did not want to curl up, not to mention how heavy it was! It would go in the back of the truck for that leg. Happy to see you put this in writing, I was wondering if I was the only one thinking this. You can either get a longer replacement cord or get an extension cord but they are not interchangeable. Always good discussions here! Brian2 points
-
Hi Bill and Nancy, We live in a parallel universe or at least parallel Olivers. You have pretty much described everything I've experienced with mine from the troubles beginning while driving it home to WY, to being denied service at a couple of Dometic service centers. The random frequency of the clicking drove us to buy electric heaters and just shut off the furnace. We have Hull 1260 and I probably picked it up a couple of weeks before you did yours. However, I didn't do all the data acquisition you did (great Job BTW). I too am frustrated with Olivers response, "just take it to a Dometic service center", which as you said many don't service Olivers. I have a promising lead with an independent repair shop in ID which ONLY does sales and service service on RV equipment and add ons, not an RV dealer. I'm putting him in touch with Ollie service (at his request) and hopefully he will fix it. He diagnosed it over the phone as the control box in the AC unit which clicks frequently and randomly. I will try the other recommendations by Chukarhunter as well as the link to GAP's thread. I would be interested if anyone has put a list together of those places who WILL work on Olivers, or I'd be willing to work with some folks to put a list together. I am a competent DIYer, but warranty work is supposed to be done by "qualified folks, right?2 points
-
I'll bet that 50 footer is one heavy puppy. Since the need for an extension cord is so rare (at least for me its only been one time in 7 years) I bought a 30 foot 10 gauge regular extension cord. Its lighter, smaller and will still allow me to run the a/c if needed. For John's application something smaller would do (as pointed out in a couple of the posts above) as long as the use of the a/c was controlled and monitored. AS far as the original cord being used - I'd make sure that it had UV protection applied to it at least every couple of months. Bill2 points
-
Even though you could attach a smaller gauge cable to 30 amp connectors, I'd be hesitant to do so. Someday down the road someone could grab the wrong cord and fire up the A/C, risking overheating the cable and a fire. I just don't like mismatching amp ratings between wire and connectors (unless the wire capacity is greater than the connectors). And, yes, I understand that's what we're doing when we use something like a 30A to 15A adapter, but I feel like that's a bit different because we can see the adapter and know that the capacity has been derated. How about something like this for use at home: Leisure Cords 90 Degree 15' Power/Extension Cord with 30 AMP Male Standard / 30 AMP Female 90 Degree Locking Adapter (30 Amp - 15 Foot) https://a.co/d/ewDztDt2 points
-
Well, considering how many Oliver owners there are now and the varied expertise of those owners I’d say YES! As we sit here in the Arizona desert I keep learning things from owners everywhere. I’ve had several issues solved by fellow owners through this forum. Mike2 points
-
Thanks everyone, especially Frank C. That sure looks like the tail end of the filter and now you have me seriously doubting myself. I'll give it another look. Unfortunately I just returned it to storage...so maybe next weekend. Thanks again.2 points
-
Good advice... I helped a buddy build a barn years ago. He cautioned me against cutting the boards, saying "If you cut it too short, we can always piece it, but if you cut it too long, I don't know what we'll do!!!???" 😀🤪😉2 points
-
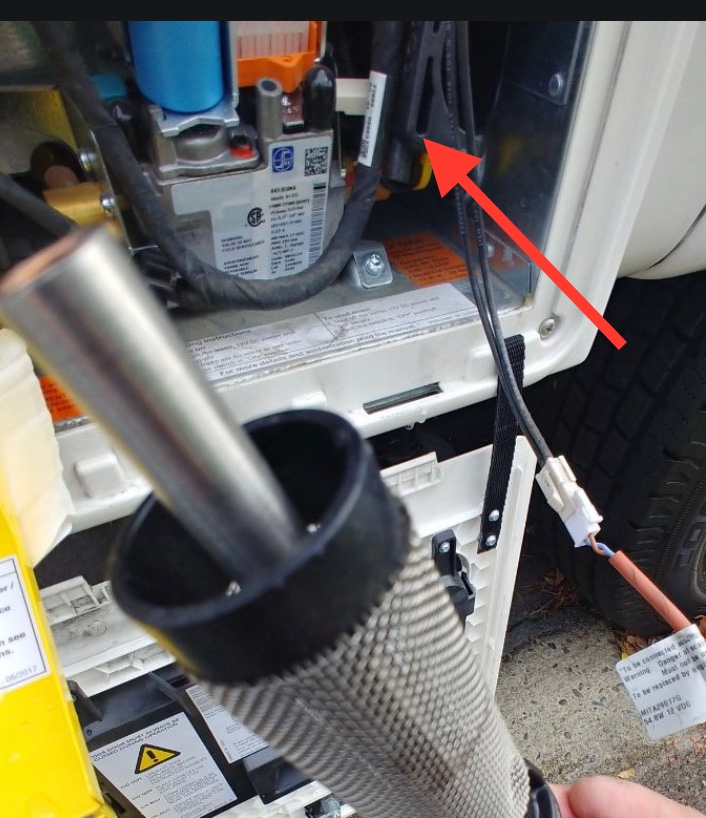
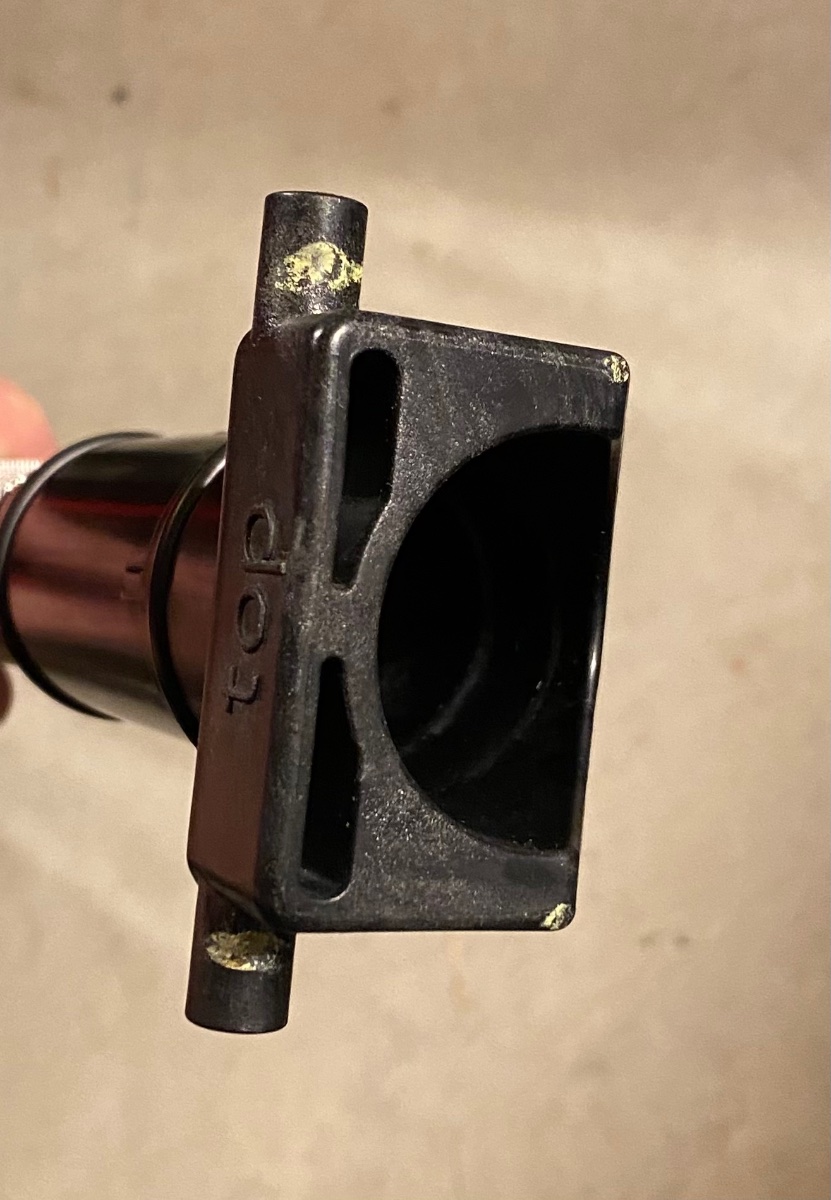
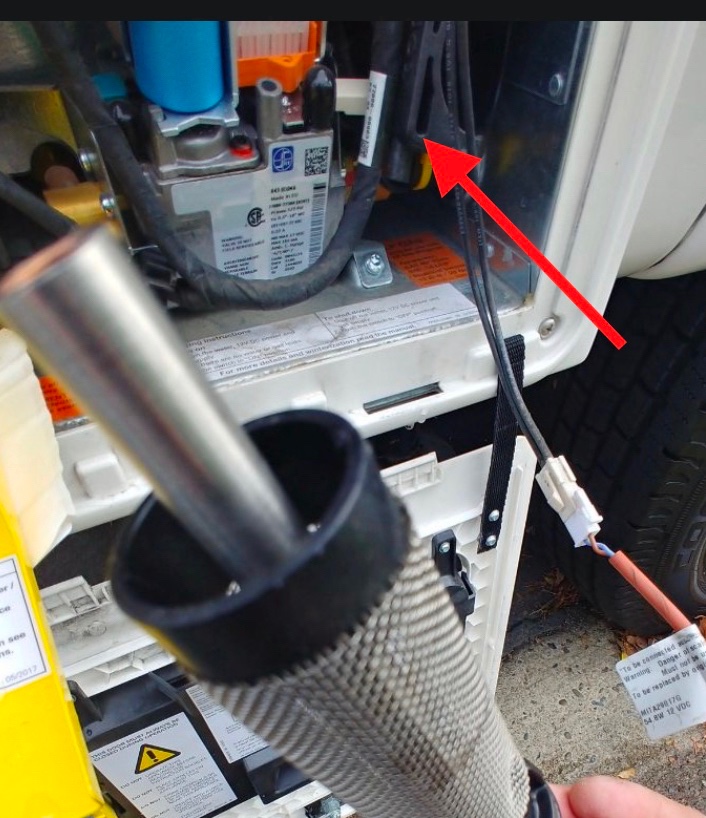
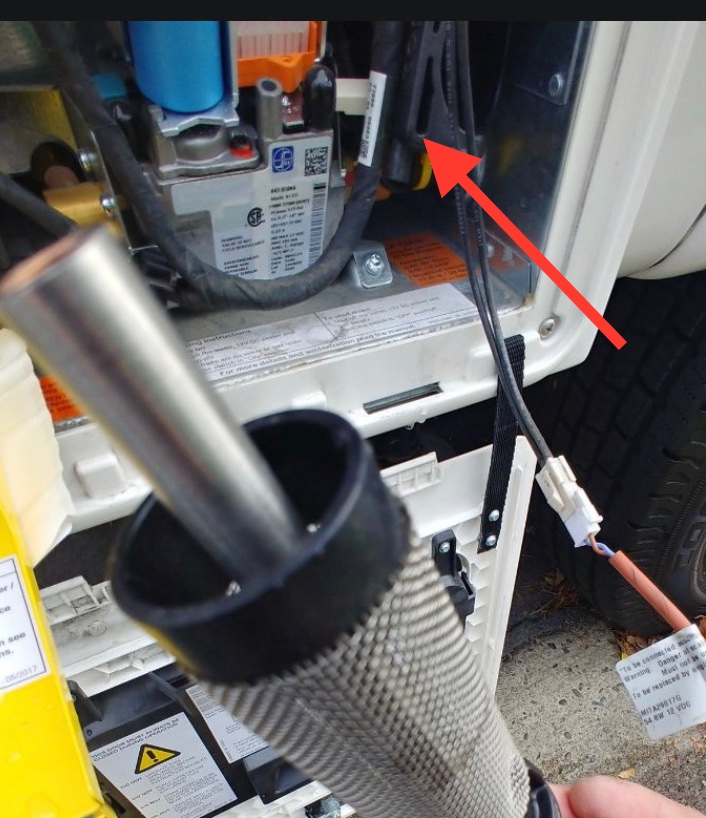
Thanks Steve 🙂. But it’s a pretty easy part to identify for us long term Truma owners. That’s the outer end of the original filter showing on the right tucked inside the Truma in Dave’s original photo that I added the red arrow to. And here’s a photo below that shows what that end of the filter looks like when it’s not hiding inside the Truma.
2 points
-
We are in the process of locating qualified and reputable RV maintenance facilities across the country. The goal is to provide our owner's with outstanding service within reasonable distance. If you have had a good experience with a third-party maintenance shop, please let us know here so we can do additional research and add them to our database. Thanks!1 point
-
1 point
-
We just use the cord that came with the camper. We did the same with our other camper and never have had any issues with it being out in the elements all winter.1 point
-
I decided to fix it my self because I dont trust a lot of the service people. Everyone I spoke to were hours away and i would have to take time off from work, and Im sure it would have been more than one trip. On top of that no one I spoke to would fix it under warrantee they would bill me then I would have to submit the bill to Oliver to try and get compensated. Jason from Oliver got me approved to send me a new thermostat for free but I dont believe it is the problem.When I finally decided to fix the problem my self it only took me a couple of hours to complete. I spent about $50.00 and It not only is working perfectly but I dont have to shut off the heat in order to see what the temperature is. The thermostat from Demetic that was installed by Oliver still controls the AC but the heat its controlled by a separate thermostat that I mounted above the passenger side bed. Its been in the 20's all week and its working perfectly. I also think that its using less propane because its not going on and off like it was before. Bill1 point
-
I was afraid that the season was slipping from me. I'm determined to get out there but will likely be doing more boon-docking than I initially hoped.1 point
-
Actually, no. 30A RV extension cords have a different female end. No twist-lock.1 point
-
That is why, when I winterized our Elite II, I placed the "regular" Truma filter screen in the lower right side of the AquaGo, and our Truma Antifreeze filter in the galley sink. The one in the sink serves as a reminder that the water system is winterized. And, I don't have to remember where I put it! When dewinterizing next spring, the Antifreeze kit will go back in the AquaGo.1 point
-
Yes. But, I recommend carrying a 1-Gallon Ziploc bag in which to enclose the connection between the 30A two cords. Cut a hole in the side opposite the bag opening for one cord, tape up that hole with Goorilla tape, insert the cord connections, and press the other side closed. This helps keep rain water and condensation out of the open connection between the cords.1 point
-
At the beginning of the "season" and again at the end I clean the cord very well and then apply THIS stuff according to directions. Bill p.s. If for some reason the cord gets weathered (think serious rain, sand, mud, dragging through a bunch of wet grass, etc.) during the heavy camping year, I'll apply 303 more often.1 point
-
Good to know that occasionally you need an extension. John1 point
-
Now all you have to do is remember "which" lower right and "which" drawer"!😁1 point
-
I picked up on November 7 and had ordered the electric antifreeze option. They asked me if I planned to winterize before leaving Tennessee, but I chose to wait. They hooked up the antifreeze cartridge and put the original cartridge in the lower right corner. When I did winterize I removed the electric one. Too bad there's not two places to store the cartridges in the water heater. One is in the lower right, and the other is in the trailer in a drawer. John1 point
-
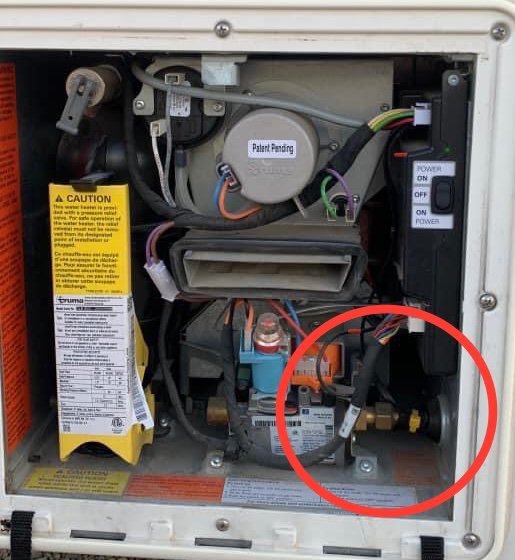
Are you sure it’s not there? It certainly appears to be tucked in there in your photo. The first photo below is your photo with the original filter there (the arrow pointing to it) and the second is my Truma with that area circled.
1 point
-
If that’s it, from here on Frank shall be known as Ole Eagle Eyes.1 point
-
Isn’t that the original filter tucked in there on the right in your picture?
1 point
-
I do not own the truma so I know only a little bit about them. It is my understanding that if the filter is removed it should be stored inside the compartment to the far right between the unit and the wall. That would be where I would expect them to put it after the exchange. Sometimes my expectations are greater than reality.1 point
-
You don't need to shut off the main valves unless you expect to be blown into the surf. Just don't use the fridge, WH or furnace on gas, unless you have to, because the flame could blow out and/ or the draft could go in the wrong direction. All the appliances rely on natural convection (chimney effect) for their proper operation.In other words, normal winds. John Davies Spokane WA1 point
-
Many many thanks to our Moderators and IT Team for dedicating holiday premium time to our forum. You all ROCK! GJ1 point
-
OLIVER HULL #1291 DELIVERY, INSPECTION AND WARRANTY SERVICE EXPERIENCE This very long post details our delivery, inspection and initial warranty service experience with our new Legacy Elite II travel trailer picked up on November 10, 2022. I begin with our overall impressions, for those who want just the “bottom line.” OVERALL IMPRESSIONS The Elite II is a quality trailer worth the price paid. We are glad we waited to get the Truma upgrade package including the AC, the CP Plus Varioheat wall control and the Varioheat furnace. Oliver does not lap seal all screw holes on the roof during production, but does lap seal as part of the first year’s annual maintenance. Oliver’s production staff continues to make some mistakes, but Oliver’s Service Department promptly and effectively addresses flaws for which service tickets are submitted. If you are interested in more detail, including how our delivery process went, the specific issues with our Hull #1291, and how they were resolved, keep reading. DELIVERY Ryan from Service did a generally good job with the delivery process. But, he failed to provide instructions for running the AC on battery power, which is one of the reasons we bought the Lithium Pro package. We had to figure out on our own that the AC remote must first be electronically paired with the CP Plus Varioheat wall control, and that the inverter must be switched on, or the AC unit will not be recognized by the CP Plus Varioheat wall control. Once we completed those steps, the AC worked well on inverted battery power. Our trailer has Goodyear Wrangler Workhorse LT tires mounted on 16” wheels. I was advised by Oliver Operations Manager Rodney Lomax that the ST tires on 15” wheels will not be installed on new trailers until March, 2023. I asked Ryan if the tires contained balance beads. He replied that after the balance bead/valve stem issue, Oliver determined to remove balance beads from all tires going forward, and leave them unbalanced. He asserted that trailer tires don’t need to be balanced. Jason Essary and Oliver Operations Manager Rodney Lomax also advised they are satisfied that trailer tires do not need balancing. Note Added After Towing 2000+ Miles Back to Idaho: I do not feel the need to get the trailer tires balanced. The trailer towed smoothly. SPECIFIC OBSERVATIONS ABOUT THE TRAILER Hull #1291 is the third trailer delivered with the new Truma package including Aventa AC, Varioheat furnace and CP-Plus integrated thermostat/control for heat/AC/water heater. We deferred our delivery from September to November 10 so we could get the Truma package in our 2022. #1291 is also the third trailer to get the Victron MPPT solar charge controller, which is standard with the 2023 solar package. I mistakenly presumed that since the Victron BMV-712 Smart Battery Monitor is mounted in the same place that the Zamp monitor was that it, too, reports solar panel charging data. It does not. It reports only the battery charge status. In trailers with both the solar and lithium packages, it is one of four ways to access battery charge data: (1) by reading the Smart Battery Monitor; (2) through the Lithionics app; (3) through the Victron Connect app and (4) by pressing “Batt” on the Seelevel monitor. Those who order wet cell or AGM batteries without a solar package have one way to check battery charge level: the Seelevel monitor. To check on solar charge data, there is only one option: you must access the Victron Connect App and click not on the Smart Battery Monitor icon, but on the Solar Charge Controller icon. You can then see real time solar charge data (if it’s night the charge data will be 0), and historical data for the past 30 days. The Truma AC is quiet. Although it produces 62 dB on high, the low and night settings logged in at 48 dB. It is easy to carry on a normal conversation at those levels. The Varioheat furnace includes much more substantial ducting than what I have seen in photos of Suburban furnace installs. It is not kinked or twisted, as some have reported with previous furnaces. Hull #1291 also includes a return air vent in the bathroom, which allows cold air to be returned to the furnace through the service area in the bottom of the trailer. This results in a much better balanced forced air heat system. Previous posters with the Suburban furnace noted that the “bilge” area under the street side bed where the external faucet is located stayed about 5 degrees above the outside ambient temperature on cold nights in the teens. We found that, with the Varioheat furnace set to heat the cabin to 70 degrees F, the “bilge” area stayed at 38 degrees F with outside temps at 11 degrees F. We did not then worry that the plumbing and tanks below the floor would freeze. The CP Plus Varioheat thermostat requires a learning curve, as it is not yet covered by any Oliver videos. It controls the Varioheat Furnace and the Aventa AC, as well as the Aquago water heater. AC control appears as an option on shore power, but not on battery power until the inverter is turned on. We were shown how to use it on shore power during the delivery process, but we were grateful that Oliver also provides a notebook containing owners manuals for the Truma products, as we had to study the owner’s manual later to really learn how to operate it, including when testing the AC on inverted battery power. The fit and finish inside and outside the trailer is improved over that reported by some on this forum. The interior caulking, such as in the shower, is nicely done. As an example, the plumbing vent hole in the closet is now sealed with a gasket, rather than just caulked (sometimes incompletely) as noted by earlier posts on this forum. INSPECTION AT DAVID CROCKETT STATE PARK From review of posts on this forum, I had compiled a long list of nearly 100 production defects noted by posters over the past several years. I spent most of the next 3 days at David Crockett State Park inspecting the trailer inside and out to determine if any of those defects were present in our trailer. None of those issues, ranging from improperly installed windows, to missing caulk around stabilizer jacks, to improper grounding of the inverter, were found in our trailer, save two: (1) there were no rubber plugs in the drum brake backing plates and (2) there was a roof leak. We found 5 significant issues, for which we submitted service tickets: 1. A leak appeared onto the standard bed area below the Truma Aventa air conditioner. It rained in Hohenwald the night we took delivery, then we found the leak the next day when we arrived at David Crockett State Park. As we had not used the AC, we suspected something on the roof needed to be resealed to prevent rainwater from penetrating the hull when on the road. This issue was on my list. 2. The Truma Aquago Antifreeze unit we purchased from Oliver did not yet communicate with the Truma CP Plus Varioheat wall control unit, so it could not be used. 3. The grey tank sensor gave erratic readings that did not correlate to water usage. 4. The bath fan vent and plumbing vent screws on the roof were not sealed, providing possible leak points; and 5. The one other item that was on my checklist: The drum brake backing pads do not have rubber plugs to protect the adjustment mechanism from road grit. When dumping the black and grey tanks before heading back to Hohenwald, the grey tank cable pull handle came out in my hand, preventing me from dumping the grey tank. When speaking with Mike Sharpe from Oliver Service, I also advised him of this issue that had come up that morning. RETURN VISIT TO HOHENWALD We delivered Hull #1291 to Oliver Service the late morning of Monday November 14, 2022. Later that afternoon, Jason Essary advised that his techs had verified the water leak and believed its origin was around the ventilation fan. They resealed that area, but then also applied sealant to all of the exposed screws on the roof (at no additional charge), because I had expressed concern that they were potential leak points. Operations and Sales manager Rodney Lomax advised that those screws are not sealed during production, but that the Service Department applies lap seal to them if annual maintenance is scheduled. I suggested that, like the screws that secure metal roofing to sheathing, those screws should be either gasketed or otherwise sealed as part of the manufacturing process. We were asked to leave the trailer overnight, so the sealant could cure before leak testing the next day. Because rain was forecast for that night, and because we asked to be able to sleep in the trailer, Operations Manager Rodney Lomax arranged for the trailer to be placed under a large awning/overhang at the Sales and Service facility to keep the roof dry. We noted when we slept in the trailer that night that all of the service ticket items had already been addressed except the water leak and the plugs for the drum brake backing plate. The grey water tank sensor was now reading consistently and the CP Plus wall unit was recognizing and controlling the antifreeze kit. The grey water tank pull handle had been reattached. [My later inspection suggested that the set screw, which secures the aluminum shaft (to which the grey tank drain handle is attached) to the guillotine valve under the street side bed, had come loose. I expect the handle with shaft simply needed to be reinserted and the set screw properly torqued.] We were advised that the brakes come from Dexter without plugs for the access holes, and Oliver does not supply them. So, I determined to cover the access holes with Gorilla tape until I could buy plugs online at home and install them. We yielded the trailer to the service team the next morning, expecting that after a leak test, we could be on our way home. But, we were advised a few hours later that when leak testing, it was discovered that our windows had not been installed according to a new protocol recently implemented by Oliver, so Jason had instructed his techs to pull and properly reinstall all windows, including re-caulking exterior flanges. That took the balance of the day. Jason and some of his staff stayed until after 6:00 p.m. that evening to complete the work and return the trailer to us, so we could camp another night at the Oliver campsite rather than find a motel. The process of addressing our multiple service tickets required us to hang out in Hohenwald for another two days, and delay our plans to return to Idaho. But, we had planned extra time for this purpose knowing that such a delay was possible. In total, we spent 6 days in Tennessee receiving delivery, inspecting and testing systems, and coordinating repairs. We appreciate Oliver lap sealing all of the screw heads and holes in the roof of our trailer, at no charge to us. We believe all Oliver trailers should have all roof screw holes lap sealed as part of the production process. Had that been done to our trailer before we took delivery, it would have saved us a day in Hohenwald. We also appreciate the Oliver service team for promptly addressing our service tickets right after we arrived back at their facility, and, even though it took an extra day, for ensuring that the windows were properly resealed though we had noted no issues with the windows. It is a concern that Oliver’s production staff overlooked the items for which we submitted service tickets during construction, and failed to follow the new protocol for window installation when building our trailer. But, we left (two days later than we had originally hoped) with what we believe is a high quality trailer that is worth the premium we paid for it. And we left with great respect for the integrity and commitment to quality of the Oliver service and management team. HELPFUL THINGS LEARNED FROM FORUM POSTERS I learned many things from posters on this forum which have made using the trailer much easier and safer. These include: Inserting turnbuckles into the chains of the Andersen WD hitch, with the extra chain links required to fit the Elite II. This has made it easier to attach and detach the Andersen by turning the turnbuckles to create slack. It also makes it much easier to get the “whale tail” back on if it was detached at an angle—just loosen the turnbuckle on the long side even more, and the whale tail can be installed at an angle. Then, of course, tighten the turnbuckles to tension the WD hitch. I use Robogrips to complete the tightening process. This is much easier for an old guy than crawling under the trailer to loosen the nut with the Andersen provided socket. Using a Camco water filter and a brass hose elbow when hooking up city water Installing a dash cam Using a PUR water filter pitcher Installing a Tire Minder TPMS system Using a squeegee to wipe down shower walls Installing X-Chocks between the wheels on the two axles. If you posted about these items, THANK YOU!1 point
-
No filter. But there will be no pet hair in our trailer, because pets are not allowed. One reason we purchased a travel trailer is my severe cat allergy and significant dog allergy. The return air vent in the bath is 2" OD, the same size as the supply vents in the trailer. It just looks big in my photo.1 point
-
Yes two rubber plugs per wheel. So order I ordered 2 boxes.1 point
-
I do love those cheap, but very heavy, harbor freight chocks. My typical "camper warmimg" gift to friends and family as new trailer owners.1 point
-
What do they do and is there a picture of a before and after placement of these plugs? John1 point
-
I just ordered two sets of 4 rubber brake backing plate adjuster plugs from Amazon for a total of $13.50. Link below: https://smile.amazon.com/gp/product/B002EP9U50/ref=ppx_yo_dt_b_asin_title_o00_s00?ie=UTF8&psc=1 Apparently, Oliver's choice to not provide these plugs with the Dexter drum brakes is not unique. I found reviews noting that other folks' RVs did not come with these either. It's a cheap and easy preventive measure.1 point
-
Whether it is a downgrade is a matter of opinion. I would have preferred the 15" wheels with ST tires. Too bad we can't swap! ST ("Special Trailer") tires are designed for trailer use, and have thicker, stronger sidewalls than LT ("light truck") tires, which are designed for "Light Truck" use. ST tires have higher load ratings because of the thicker sidewalls. And, with 15" wheels, you have more rubber and less metal, which provides a softer ride. I believe a softer ride is better for a "tiny house" on wheels, with all of the plumbing, electrical, refrigerator, TV on a hinged bracket, etc.1 point
-
That sucker will come down????? We've always just both lay with our heads under it and look up at the screen. I'll be a.....1 point
-
A friend of mine and former Oliver owner broke a tab on the snap-out return air grill on his Dometic air distribution box (ADB) cover. He had to order the whole ADB cover assembly just to get the return air grill. I broke one of the doors on the side of our ADB and he sent me the rest of the ADB cover that he didn’t need so that I could get the part I needed. I sent him half of what he paid and we both ended up getting the parts we needed for less than the cost of the whole ADB cover. My point is that if someone has to order an assembly from Dometic to get the part they need they might can cut their losses by offering up the rest of the assembly for sale in the Classified section of the forum.1 point
-
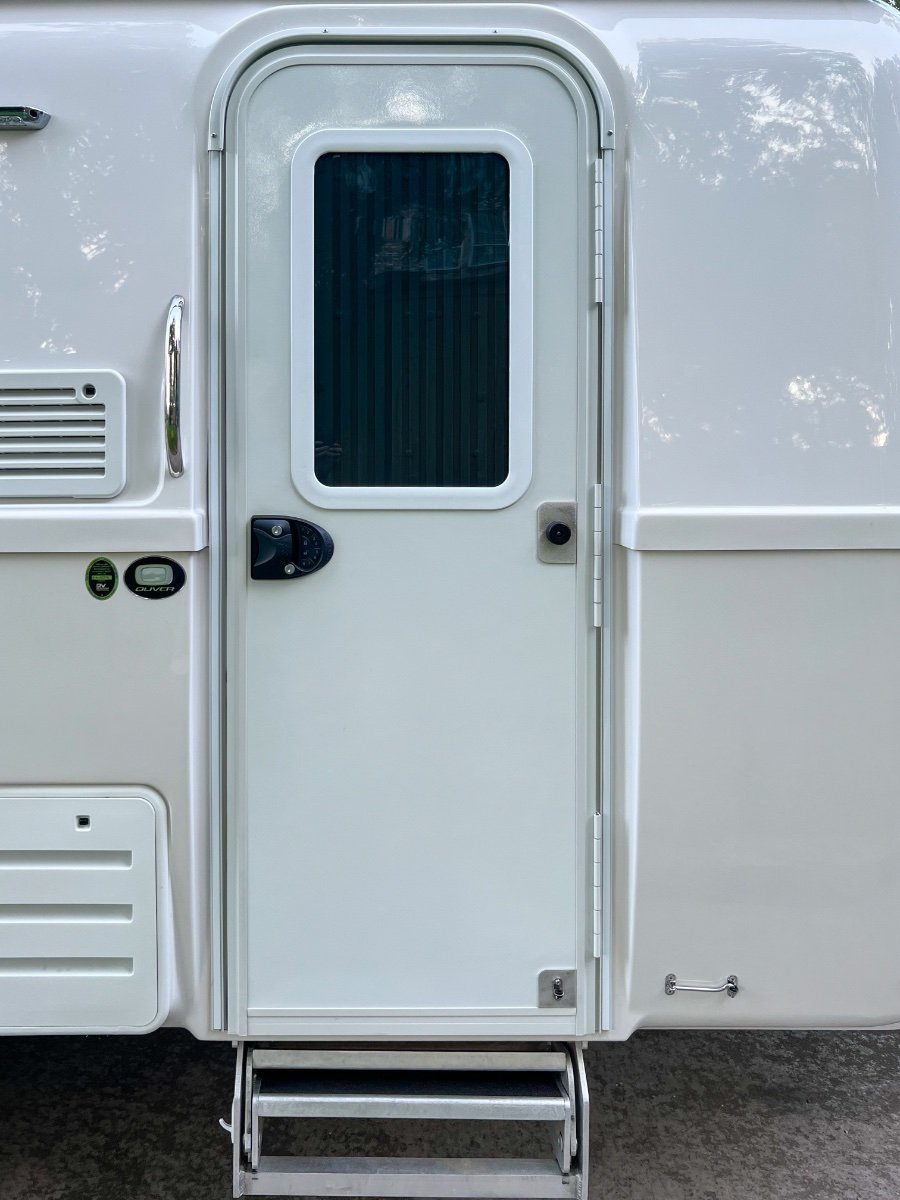
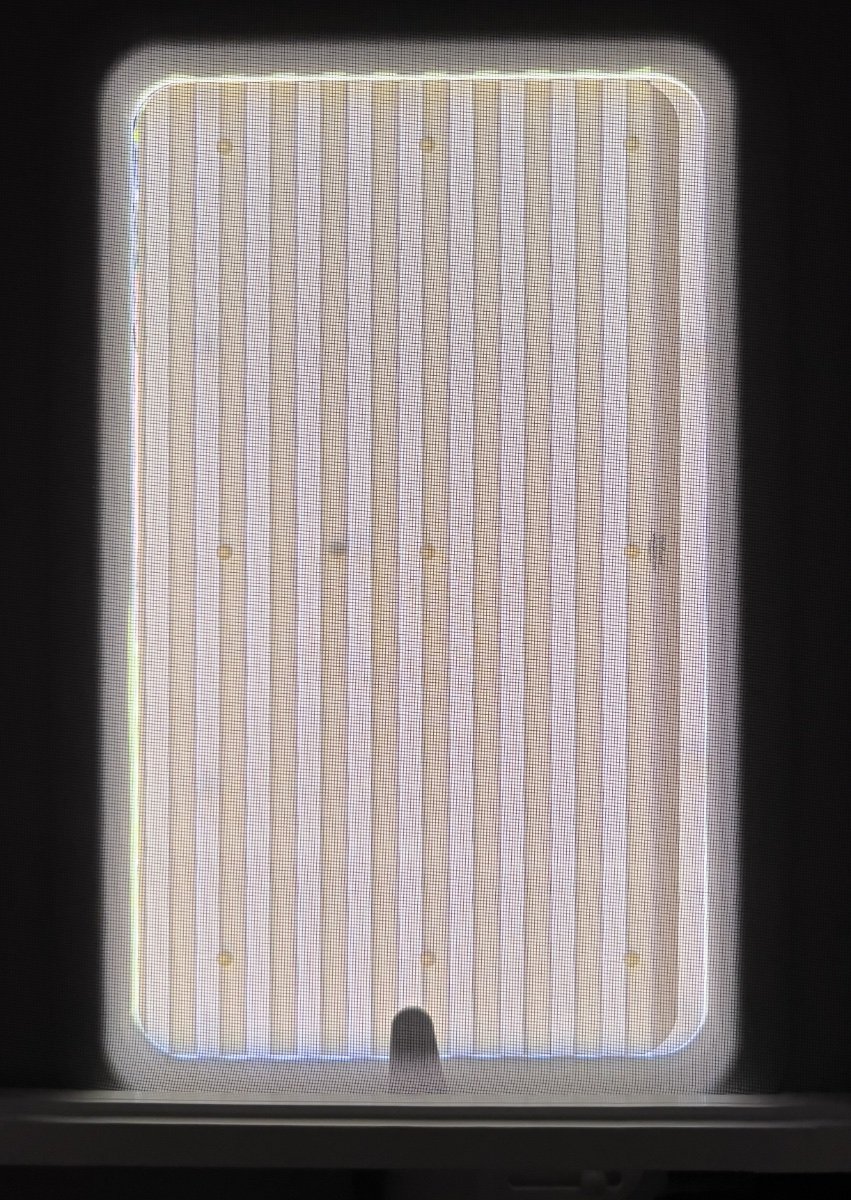
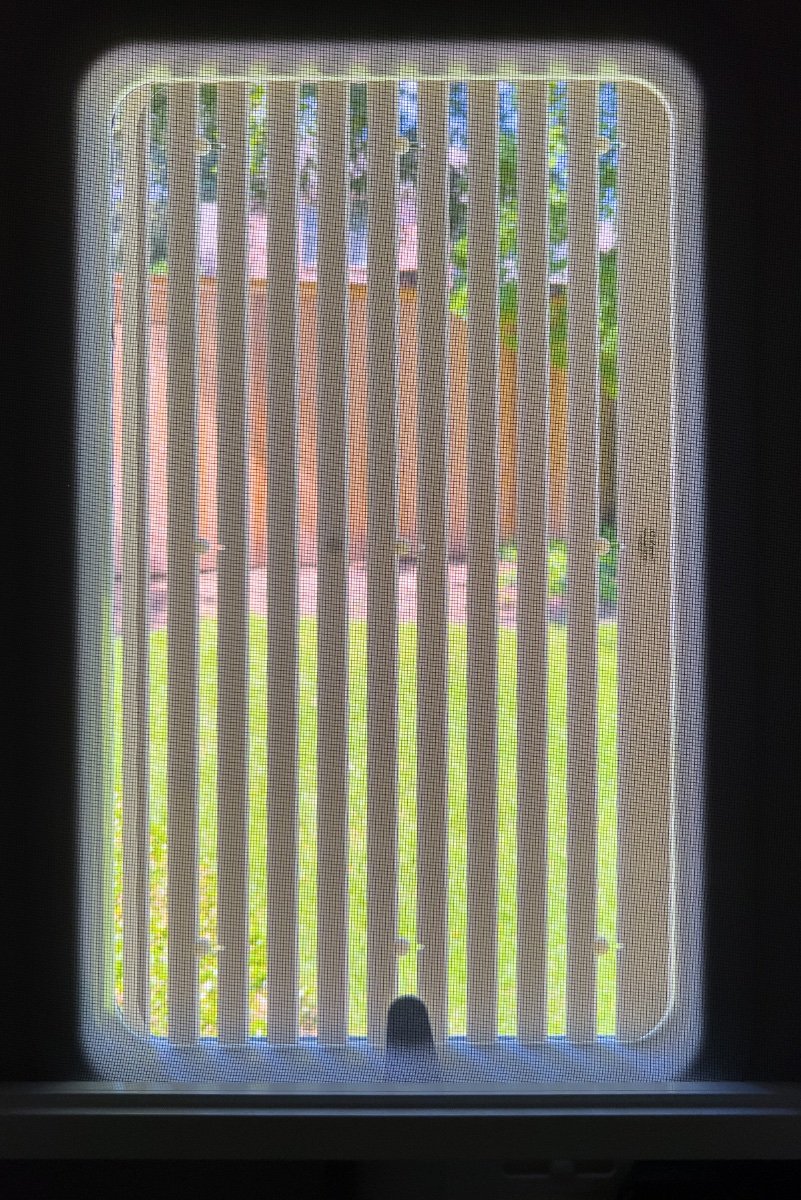
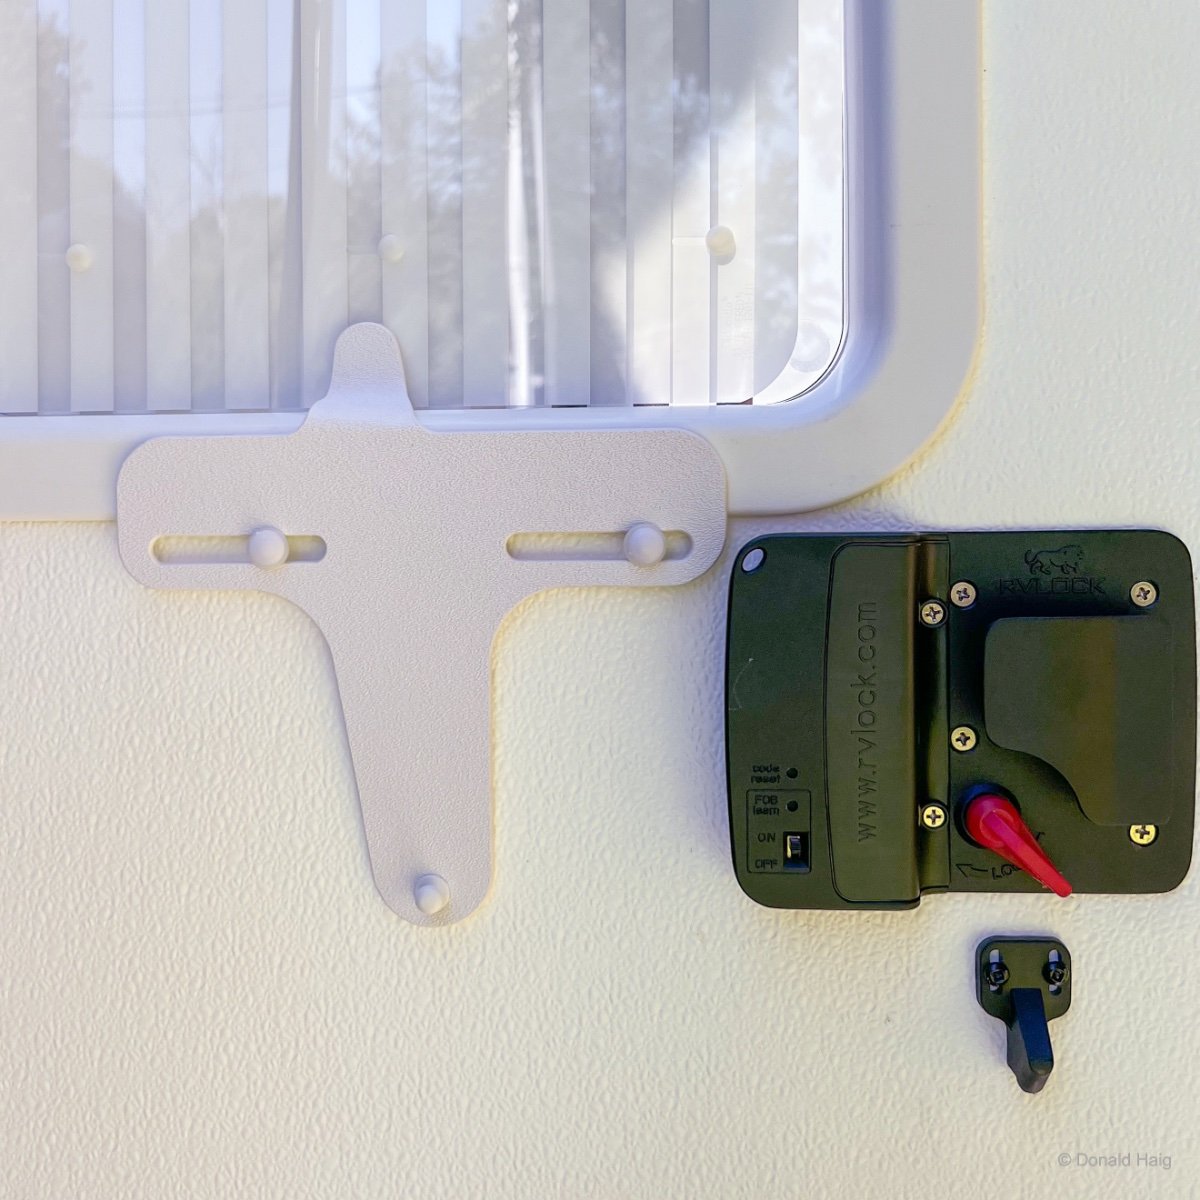
On Friday, I took our LEII to the Zarcor Solutions facility in Addison, TX (a burb north of Dallas) for installation of a tinted window for our entry door and Zarcor's Closures Shutter Blind and the video recording of the installation. John Harder, President of Zarcor, had previously sent me a sales receipt showing the cost of the parts as $149.00 and installation labor of $120.00, for a total of $269.00. The sales receipts also showed a discount of $269.00 for allowing Zarcor to use our trailer to make an installation and sales video. Thus the cost to me was $0.00. John's team demonstrated their experience by carefully removing the inner trim from our entry door to remove the standard textured glass. I had previously seen photos posted on the OTT Forum where the fastener tabs which retain the inner trim had been broken during removal. Javier, the primary installer, carefully inserted the plastic release tabs into the slots around the inner trim. Several fastener locations could not immediately be released. Javier's experience became evident as he continued to work the release tabs until all of the fasteners released, undamaged. The RVLock 4.0 which I had installed post delivery had to be removed to permit access to the slots to free the fasteners on the lower right corner. Once the inner trim was removed, the textured glass was easily removed and the new clear, tinted glass inserted, with new sealing caulk around inside of the frame. The outer window trim was not removed, retaining its factory seal. Once the tinted glass was in place the Clozure Shutter blind, consisting of two sheets of acrylic, was fastened to the inside of the glass with small Velcro disks. Each acrylic sheet is coated with vertical white stripes approximately 3/4" wide, alternating with clear stripes. The acrylic sheet against the glass is fixed, while the other sheet slides approximately 3/4" left/right to open/close the shutter. Moving the acrylic sheet causes its white stripes to cover the clear areas of the fixed acrylic sheet, preventing light from entering. A plastic handle attaches to the movable acrylic sheet and rides on two screw mounted glides to move left and right. The two acrylic sheets which form the shutter are easily removed for cleaning. A minor interference problem was encountered, with the open/close handle not able to move fully due to the position of the RVLock. Zarcor will modify the handle slightly to eliminate the interference issue and provide a replacement handle. The entire installation, with video recording, took approximately one and a half hours. We are pleased with the new window and the operable shutter. We now have visibility through the window in the entry door and a means of controlling entry of light to the cabin. The tinted window closely matches the other windows in the trailer. During the day there is little or no visibility into the cabin through the new tinted glass. At night, with lights on in the cabin, there is some visibility from the outside. With the shutter closed there is no visibility into the trailer and nearly all light is blocked. Although we have owned the trailer a short time, we quickly learned the textured window admitted a lot of light from the early morning sun. It also admitted light at night from nearby campground lighting. These problems are solved by the Clozures Shutter Blind. The Zarcor team indicated the processing of the installation video would take a couple of weeks before it is posted to the Zarcor website. I will post an update when the installation video is available. Below are photos from the completed installation. Exterior view of door with shutter blind open Interior view of closed shutter blind Interior view of open shutter blind Handle to slide shutter blind open/shut (RVLock 4.0 on right) Regards, Don
1 point
-
Hi Sherry, I used to be an ornithologist (biologist who studies birds), and one of my jobs was sage grouse. We had multiple tasks. One of the tasks was just finding, trapping, aging, putting on backpacks that monitored movements. Because we were in a remote location in western CO, we had to live in a low-quality travel trailer that was towed to state-owned property very high up in the mountains. We basically lived on the side of a mountain just above aspen trees. Then we would take ATVS out to do our jobs, riding 45 mph around to get wherever we needed to get, racing the afternoon thunderstorms. As the states don't have much $, especially when it comes to biology, we lived in trailers that didn't work (and only get hired for 6 months at a time that way we stayed temp with no benefits). They would give us a battery and gas, but the only thing that worked was gas for cooking food. We had to bring our own water. It was really cold, I mean really cold. I wore the 7 layers of clothes and was still freezing. I had the clearest skin I ever had because my skin was exposed to the air for literally 5 minutes in a day when I changed my clothes as fast as possible because it was so cold. So essentially I lived in a hard-sided tent. It was hard work. Great to be outside.1 point
-
Trekhard, I'm very interested in your stories of living in a camper on a mountain for six months with no energy sources. More like living in a hardshell tent. So, you'll be fine if everything fails, but you're obviously interested in learning how to prevent that from happening, with a new trailer with multiple systems . I appreciate that you are "cramming." Start with the Oliver University videos on basic systems. If you've never used any systems, it will at least give you a start. Sherry1 point
-
What he said X 10001 point
-
You and a whole bunch of RV newbies have similar questions, it can be daunting because your house is pretty simple by comparison. There are a number of good beginner books that cover EVERYTHING in enough detail to educate you, but not freak you out with information overload. Something like this one: RVs and Campers for dummies Check your public library if you want a free one. Read it in its entirety, then you can ask for clarifications about an Ollie’s systems, which are pretty standard. The only thing remotely unusual is the factory lithium options, but other manufacturers also are beginning to do this. My 70 year old sister bought her first RV ever, a tiny teardrop trailer with rooftop solar, last summer and she has struggled, partly because she is trying to make do with a completely inadequate tow vehicle, and she NEVER towed anything before, but she is now feeling a little more comfortable. But she still can’t back it, so she disconnects and moves it by hand 😳. Knowledge is power. Learn how stuff works. I STRONGLY recommend that if you have no previous towing experience, you should rent a small Uhaul trailer and haul it everywhere over a weekend. That will give you an idea of what it is like. Then rent a cheap “stick and staple” travel trailer for a week and take it camping. Some Ollie owners ignore these initial steps and unfortunately discover that they just can’t deal with their new rig and are forced to sell it after just a few months. John Davies Spokane WA1 point
-
Locally, we've had very little success with independent shops. However, I did have a great experience a few years ago with the new Camping World in New Port Richey, FL, when we had difficulty with our then new Dometic refrigerator. They handled all the warranty issues with dometic without our intervention. This crew did a great job. Very professional communication. We have not had other work done there Sherry1 point
-
Matt, I’ve used Boerne RV Service and was happy with their work. Boerne RV Service, 125 Industrial Drive, Boerne, TX 780061 point




















-
Recent Achievements
-