Leaderboard


Popular Content
Showing content with the highest reputation on 02/05/2023 in all areas
-
Grateful update:)! Well I finally got the generator started and everything went you all said it would! After charging with the generator for 30 minutes the zamp inside read 13.6 Volts and batteries read 92% . We then were able touse the jacks and get the trailer on the hitch and the zamp now reads 13.3V. We will take the trailer home and plug it into our 120V. I believe I am correct that we can do that now that we have adjusted the Xantric to 15amps from 25amps? For a time the blue battery's lights flashed blue. I think maybe the batteries were equalizing. Now they are all three solid blue. Then we are going to try "dry" winter camping for a few days leaving the trailer winterized and using the composting toilet. We are looking forward to meeting you all someday and trying to repay the assistance we received here again. Need some experience first!! Thanks again. Jim and Donna 2022 LEII #998 Ford Expedition Max 2018 4x44 points
-
I don’t want to hijack this thread, but…. A flat tire can be changed using the onboard jack. I have raised my trailer several times at Discount TIre for tire changes and balancing and while on the road when a grease cap came off. Oliver doesn’t recommended it anymore, but it was a selling point when I bought and picked up my trailer. Some even use the onboard jack to level the trailer with the wheels off the ground - not something I would ever do. But, for a temporary tire change on the side of the road I certainly would. Now, back to F150s and sudden loss of power. Mike3 points
-
Your Lithium Pro Package is the same one we have in our 2022 Elite II. The "blue lights" are not internal heaters; they are the "On/Off" switches for the batteries. The rings on the switches glow blue when they are on. The "on/off switch that is connected to a red wire that runs above the batteries" controls the external battery heaters that Oliver installs with the Lithium Pro package. The fact that your Lithionics batteries "did turn on for me just now" suggests that they had turned themselves off when they got to the Low Voltage Cutoff point, but that they had sufficient reserve power available so you could turn them back on. Given that fact, I am puzzled by your report that the Lithionics app lists all three batteries in the 81-83% and 12.1-12.2V range. They should not have turned themselves off until the State of Charge got much lower than 80%. More believable is the 25% state-of-charge report from the Xantrex FXC Control app. Regardless of the wildly different state-of-charge numbers between the two apps, the safest course is to recharge before applying any power draws (like the jacks). With the batteries above 32 F, you should be able to recharge them with your generator, as you report is your plan. Monitor the charge level with the Lithionics app. Once the state of charge gets above 90%, it should be safe to operate the jacks, and move the trailer as needed. Once you have access to shore power, I recommend recharging the batteries to 100% state of charge for a couple of days, so the individual cells within the batteries can rebalance. Then, please report your results. Your experience is very helpful to those of us who have that same Lithium Pro Package.3 points
-
According the the FB group, it looks like this has been solved.
 3 points
 -
Frank - Could you post a picture of those welds? There was a time when two steel plates were welded together forming an "L" bracket. Unfortunately, there apparently were times when only "spot welds" were performed and the full welds were never completed on those brackets. If you suspect that you have any of these brackets you should take a picture of them and send it to Service. Bill3 points
-
I concur. I would check battery voltage with a multimeter first (red lead to positive terminal, black lead to negative). If they are below 12V, the safest method is to charge the batteries with an external charger back up to 12.6V before using them. But, but don't try to recharge your Lithionics batteries if the ambient temperature is below freezing. If you can't wait for above-freezing temps, remove the batteries from the trailer, take them to a warmer place, give them an hour or two to acclimate (to be safe), then attach the external charger and recharge to 12.6V. You will need a charger that has a "lithium" setting, or even a dedicated LiFePO4 charger. If you don't have one, it is time to buy one. Such a charger could be plugged into your generator. Because LiFePO4 batteries require specific charging algorithms, I would not recommend attaching your generator directly to the Lithionics batteries, like you could with lead-acid or AGM batteries. It is much safer to use a lithium-capable charger, plugged into your generator as the 120V power source. It would also be helpful to know which Lithionics package you have. The Platinum Package includes batteries with internal heaters. As noted above, without an external power source, those batteries can self discharge in cold temps trying to keep the batteries above freezing. If you have the Pro Package, Oliver should have installed a 12V external battery heating pad, with a red "on-off' switch mounted on top of the batteries. If that switch was left in the "On" position, and you supplied no external power but left the trailer in a cold environment, then those batteries, too, would have shut down when they ran out of power. Next time you store your Oliver with Lithionics batteries in cold temps, either: (1) supply 120V power so the battery warmers can keep them above freezing without draining the batteries or (2) remove the batteries from the battery box and store them in a temperature controlled place. Any other choice could significantly shorten the life of those expensive Lithionics batteries. Good luck!3 points
-
I took advantage of the solar tax credit on my 2021 taxes. I used the total amount of the solar package option on my build sheet (solar panels, no inverter and standard Lead-acid batteries). I also purchased 3 BattleBorn 100AH batteries, and a 140W Zamp portable suitcase system. All were purchased in 2021, but not at the same time. Rather than use a tax professional, which I guessed might be reluctant to sign off on it, I tried Turbo Tax Deluxe, since my taxes are very simple. TT Deluxe returns are reviewed by a tax expert and they guarantee accuracy and will provide legal assistance if audited. Like John W. and others, I figured worse case, I pay it back. To my surprise, Turbo Tax walked me right through the credit with simple questions, which I answered honestly. I received the credit, and have not been audited. Just throwing this option out there for consideration.3 points
-
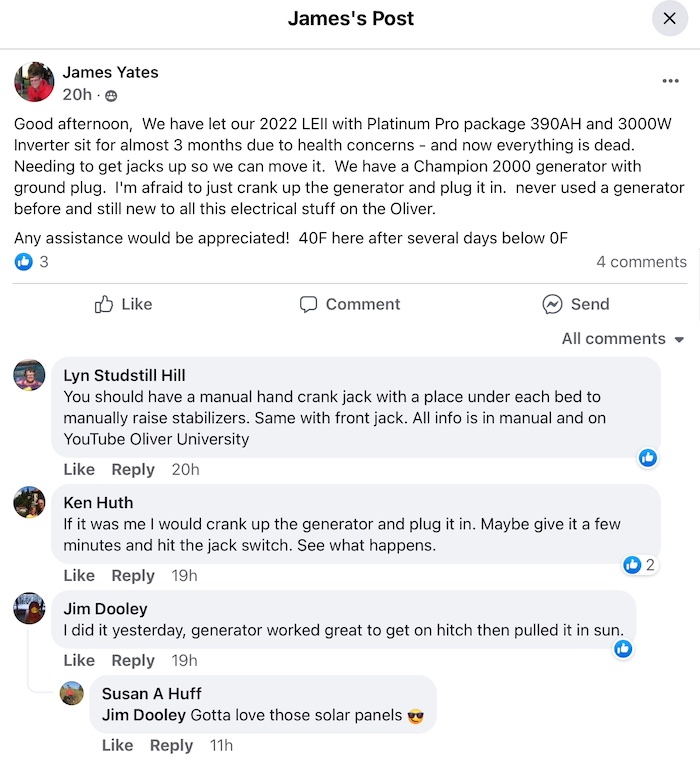
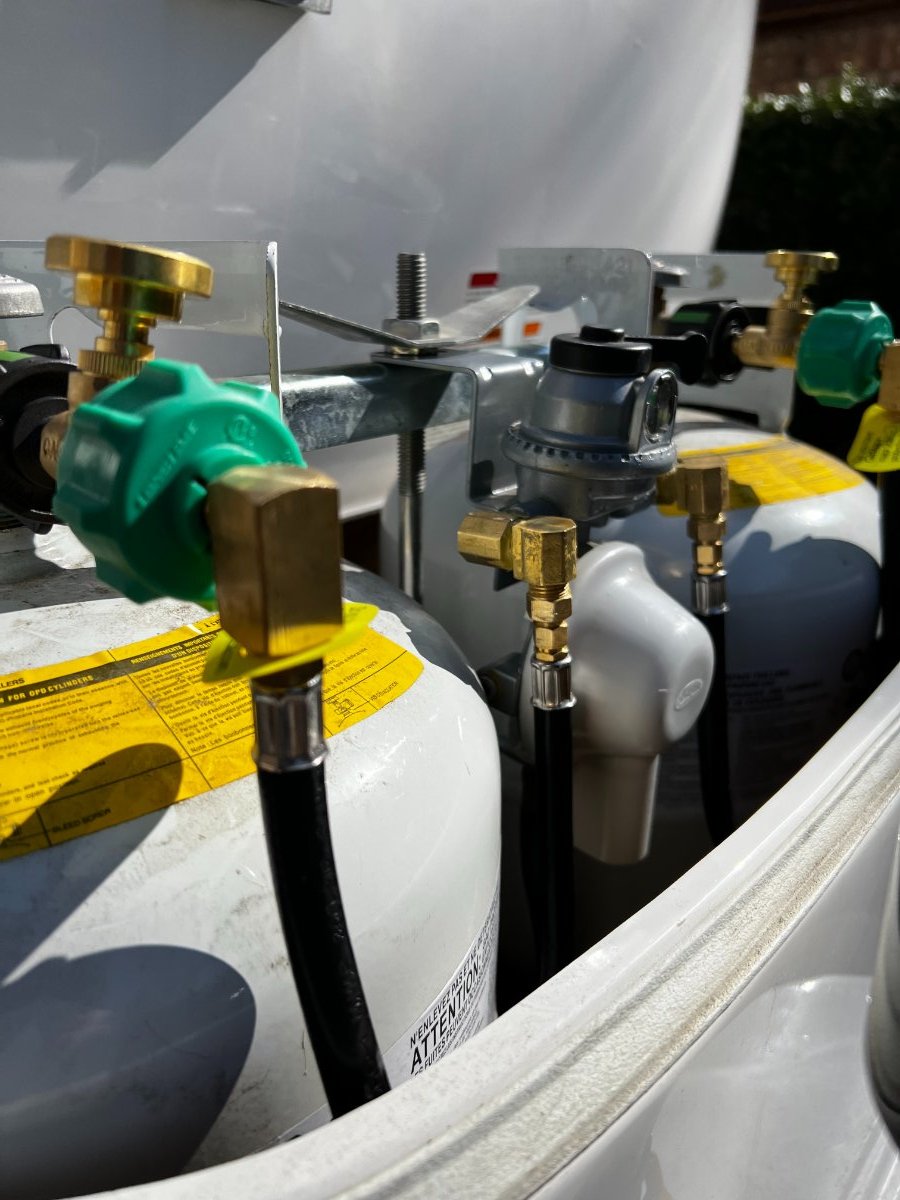
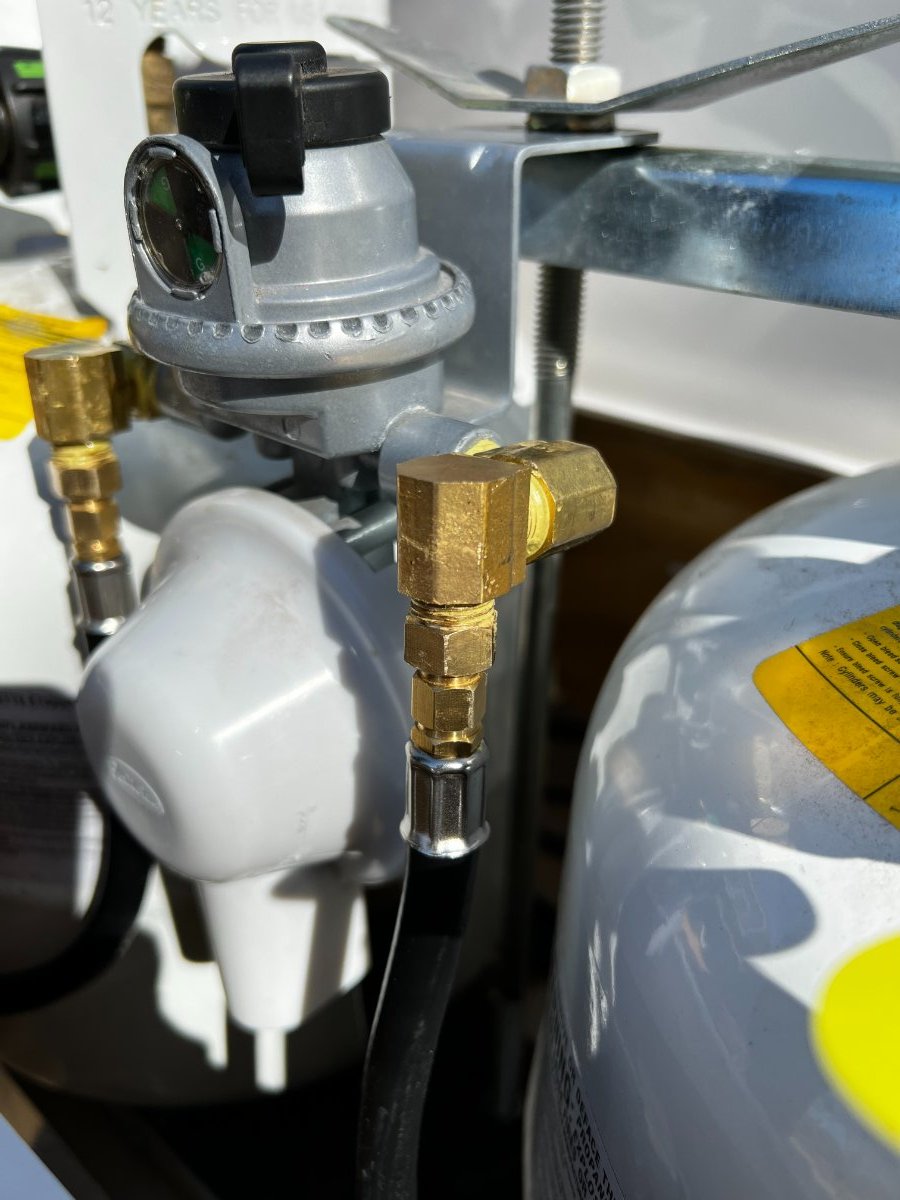
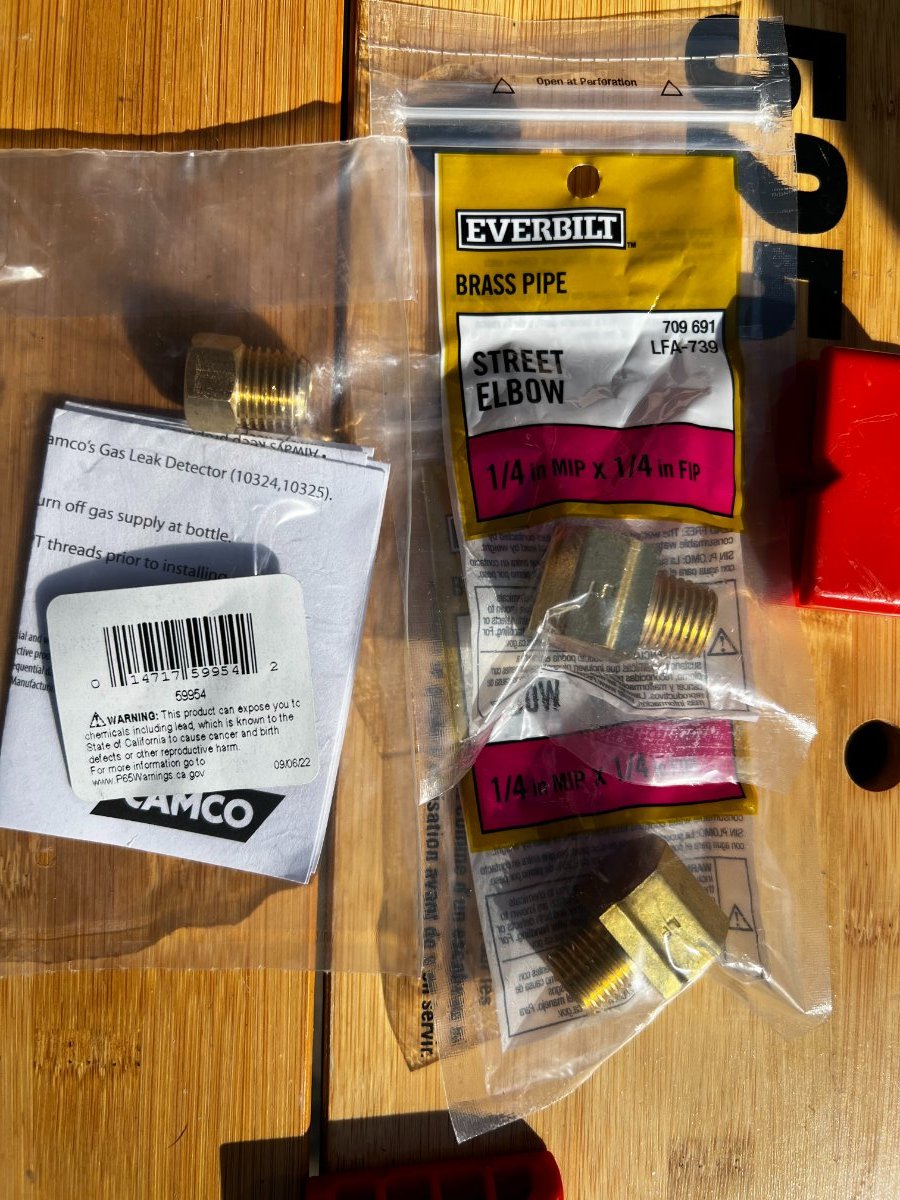
After reading @VBistro's excellent write up ( Propane Tank Mod - Installation of GasStop Valves ) on adding GasStop safety valves to LE II Hull #953 I decided that I wanted to tackle that on "Reset" LE I Hull #1030. However, as LE I owners know on the forum, what working on an LE II may or may not work on an LE I. When I put the gas stops on the LE I it was apparent that the LE I has a shorter propane box than the LE II, making the end of the hoses stick out of the box and preventing the lid from fitting correctly. I had to pull the GasStop valves off and re-evaluate. I really wanted those GasStop units on there. 🙂 Tried re-orienting the tanks, shifting hoses, etc. but nothing worked. So, I started digging around and found hoses with 90-degree heads. That solved the distance to the front problem. However – the replacement hose length was longer than the original hoses and ended up with a second bend in the line that – while technically within spec – did not make me happy for having done the work. So here is the solution that I finally came up with. Be aware that there are a good number of joints here – make sure you are comfortable with (1) gas, (2) wrenches, (3) Sealing cream or tape for gas, and that you test for leaks on each and every joint. Soapy water works great, if you know a home brewer or commercial kitchen operator Star San bubbles like crazy at the smallest leak and is a literal lifesaver in this case. Of specific note: This bit of info from @John E Davies is critical. At least for me, when I removed the old hoses, I could not get the old check valve off. It was so tightly sealed that I initially assumed that it was part of the original hose. I am including the replacement for the check valve in the parts as you will need to be able to remove it and palace it on the new 90-degree hose, or put a replacement on the new hose. Parts List (I have referenced Manufacturer Websites, most are available through Amazon as well) Quantity is for both tanks. 1) 2 GasStop Propane Shut-off Valves - Qty 2 GasStop – Use Gas Safer With GasStop (gasstopusa.com) https://gasstopusa.com/ 2) 90° Propane Pigtail Hose (12″, Rubber) - Qty 2 Product details – GasGear (gas-gear.com) https://gas-gear.com/product-details/#product1 3) ¼” NPT BRASS Street Elbows (double-check the size of your particular fitting) - Qty 4 Everbilt 1/4 in. MIP x 1/4 in. FIP 90-Degree Brass Street Elbow Fitting 802099 - The Home Depot https://www.homedepot.com/p/Everbilt-1-4-in-MIP-x-1-4-in-FIP-90-Degree-Brass-Street-Elbow-Fitting-802099/300095976 4) Pipe Thread Sealant (specifically formulated for gasses) -Qty 1 RectorSeal 1.75 oz. #5 Pipe Thread Sealant 25790 - The Home Depot https://www.homedepot.com/p/RectorSeal-1-75-oz-5-Pipe-Thread-Sealant-25790/100144191 5) Low Pressure Fitting - 1 / 4" M NPT x 1 / 4" F Inverted Flare w / Check Valve - Qty 2 Low Pressure Fitting (camco.net) https://www.camco.net/low-pressure-fitting-1-4-m-npt-x-1-4-f-inverted-flare-w-check-valve-59954 Method (Copied and expanded from original post) Detach propane hose from the ¼” straight NPT fitting at the regulator Remove the straight ¼” fitting at the low pressure regulator Remove the ACME connection at the propane tank Clean as much old pipe thread sealant as you can from both the regulator side and the hose side, being careful not to let any shavings enter the regulator Apply thread sealant to the male end of the new elbow fitting and install it at the low pressure regulator. Tighten to position the female end away from the trailer, toward the hitch. Place a second elbow fitting into the first, applying thread sealant to the male end. Tighten to position the female end pointing downward. This next step represents a preference thing for me. I feel that attaching the check valve to the new 90 degree hose before attaching the hose to the downward facing female elbow works better, as the end of the hose is an odd size for which I did not have a wrench requiring me to use an adjustable crescent wrench. Proper tool may be a small pipe wrench, which was not to hand. As always, apply sealant to the male threads and tighten firmly. Apply thread sealant to the check fitting’s male end and screw it onto the street elbow. You can use a pipe or crescent wrench to snug this connection. This is the connection where I ended up with a leak, as the dangling hose can make you think that you have it connected but in realith the hose is just binding. Re-attach gas stop to propane tank and new 90 degree hose to gas stop. Let sealant cure for 24 hours Pressurize system and leak test! Note – if your tank is full and the gas stop shows “low” this is a good indication of a leak. Here are some photos of the finished project. Again thanks to @VBistro, @MarkV, and @John E Davies for the original post and follow-ups for this great idea. I hope this helps LE I owners in making this modification to their Oliver.
2 points
-
Hello Everyone: Goodness I do have a lot to learn about the elictrical system on this trailer. Sorry I didn't put complete info down about the trailer. We do have a Platinum Pro package with 3 Lithium Batteries hat equal 390 amp hours. They do (I think) have internal heaters with blue lights that glow blue when on. There is also an off/on switch that is connected to a red wire that runs above the batteries that I honstly don't know exactly what it goes to.. Yesterday it did not get above freezing. Today we are above freezing. The Lithionics app says the batteries are 81%, 81% and 83% with 12.21V, 12.2V, 12.22V and the battery temps show 33F 34F 34f. The batteries did turn on for me just now and I have reset the Xantrix to 15 amps from 25 amps. Xantric shows 12.2V on wall and app shows battery 25%. So I am now going to go hook up my generator. I'm also learning how to use this site - so thanks for the messages and I am going to read more about charging lithiums fro John also. More soon. Jim2 points
-
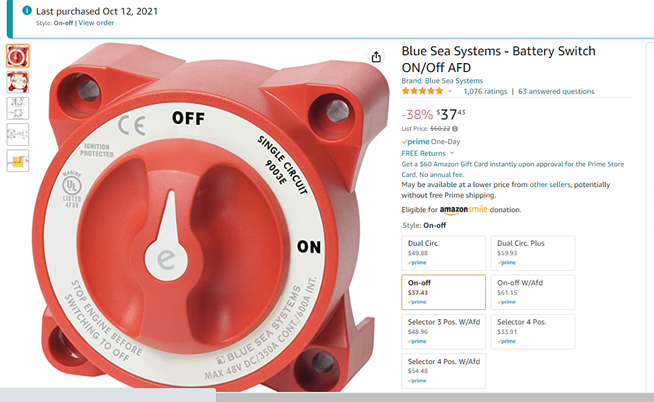
The key word in my post was FED. Fires being fed power from lithiums can transfer a lot of power to the electrical short(s) as compared to the instantaneous power that LA and AGM batteries can generate. I witnessed this at a solar farm where the battery storage building had a short downstream of the Litho's and the fire fighters were in a pickle as the breakers fused and they could not kill the power to the short. What started as a rather large short circuit fed by the litho's ended up turning into a major fire that then involved the batteries themselves. They were there for several days. I absolutely recommend having a Master Shut Off switch that is rated for more amps than the fuse is. In our case many of use 300 amp fuses to power 3000 watt inverters. For this the Blue Seas 350 amp rated switch is a great choice. Best peace of mind I have spent on my Ollie.
2 points
-
I wouldn't even consider mounting flexible panels directly on my Ollie's roof as they can get hot enough to ruin the gelcoat underneath. I've witnessed this happen on a boat where the gelcoat turned brownish with a cracked finish after just one season of use.2 points
-
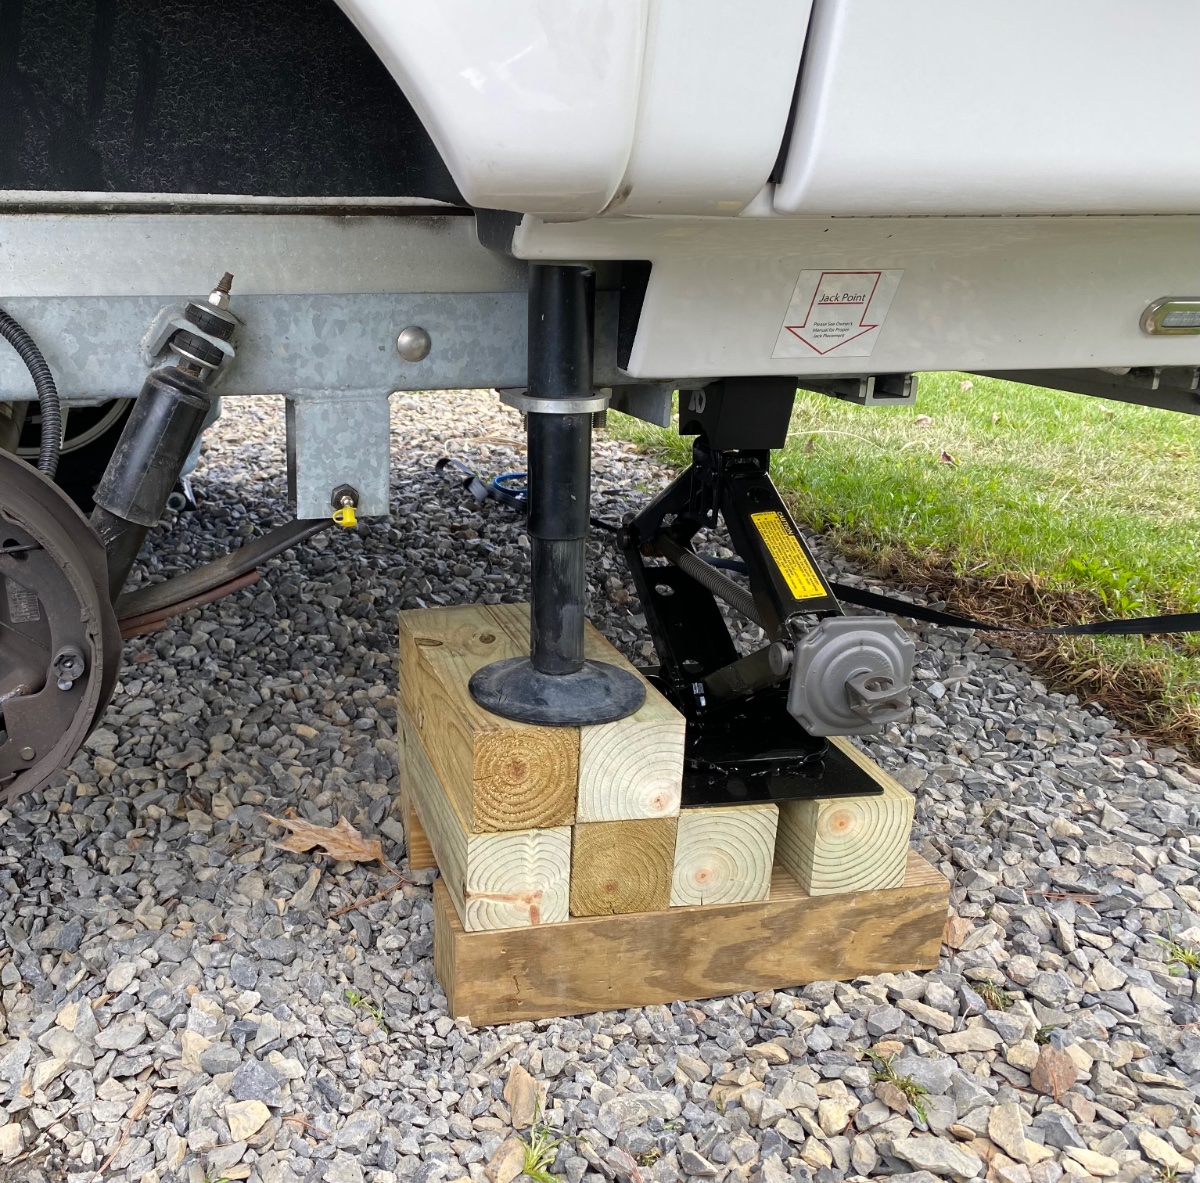
After seeing how tiny the welds are on the rear jack mounting brackets, I don’t trust them for anything other than leveling the trailer at a campsite. I know they are rated for 3,000 lbs each but I still prefer to use a very large heavy duty scissor jack (rated for 3 tons) to raise the trailer for tire and bearing work when I need the trailer completely off the ground. I do use the stabilizer as a backup. Sorry for hijacking the thread again. 🙂
2 points
-
Some final thoughts/tips if someone attempts this: 1. Don't attempt without a borescope. They are pretty cheap on Amazon. 2. Before inserting the plates and tightening down any bolts, casually insert the bolts and confirm with the borescope they aren't too long and hitting the inner hull. 3. You might need remove the mounts a few times if the area you're installing them butts up against a thicker piece of fiberglass like mine did in the rear mounts. I had to trim the rear mounts a few times, cutting off a little piece at a time to ensure it was as long as possible and just barely touched the thicker fiberglass near the original mounting holes. 4. I originally used a non-magnetic stainless steel in my first iteration of the plates, which I'm glad I didn't go through with. Use something magnetic. 5. I used 410 stainless steel, which was expensive and overkill; I was just really afraid of rust but still wanted something magnetic. In retrospect, I could have just used a regular steel plate, which I could have drilled and tapped myself, and then covered it in paint to avoid rust. Also, a full 1/4 inch thick was probably overkill too. 6. Even if your trailer already has plates fiberglassed in, and if you need to add or replace the solar panel mounts (and don't want to go with flexible panels), the method I've described will still allow you to bolt the panels down without cutting into the fiberglass hull. But if I already had the plates fiberglassed in, I would probably have reduced the size of my receiver plate with two threaded holes to around 2 inches wide by 1 inch long. 7. If I need to remove the top mounts, I would remove one bolt and then finger install a long stud or all-thread, and then do the same to the second bolt. If I had all the knowledge I have now, I could have completed this whole project in less than 4 hours. It really only takes a few minutes to get the panel attached using the method I described as you'll see in the video. The hardest part was manuevering a wrench to get the old nuts off. Looking back, I could have just cut them off on top and still used a magnet on the long bar stock to get the remnants out between the hulls. If ever I need to install something else on the rooftop (like an antennae), or convert to a more powerful and aerodynamic panel type, this is how I'll probably do it. Anyway, all in all, for a proof of concept, this was a rewarding project for me. It felt pretty dang good knowing I didn't have to cut up my inner hull, and I couldn't help feeling prideful that I outsmarted the factory in attaching the mounts to the roof.2 points
-
Excuse me, I'm in trailer #3 and need to leave now. TILT....2 points
-
Bummer! I just took delivery of my third F-150 and each one has had the 3.5 twin turbo engine. Absolutely no problems with any of the three. However, I should add that the current one only has 60 miles on it and the maximum mileage that either of the other two had was 45,000. Hope you got the issues out of the way. Many modern vehicles have this "limited" power "feature" built into them. This enables you to still operate the vehicle but supposedly limits any harm that you might do to the engine or transmission until you can get the vehicle to a dealer. Bill2 points
-
DO NOT TRY TO CHARGE THE BATTERIES IF THEY ARE BELOW FREEZING. You will need to change the charge settings in the Xantrex. Specifically, Setting #28. Leave the batteries off. Make sure the Xantrex inverter is off (button out). Start the genny. Connect your generator to the ground plug. Connect the trailer. Change the Xantrex setting #28 to 15 amps (see Xantrex manual). Turn your batteries on. It will take a while. if you leave the Xantrex setting at the factory default it will try to pull 25 amps from your small generator and trip the circuit breaker. It would be better if you could recharge via a 30 amp shoreline connection.2 points
-
Stranded, Grateful for your help. You have a standing invitation to camp at our place on the way Alaska or if you get by this part of state. We live on 8 acres surrounded by big Redwoods. Plenty of room to camp with some 15amp power. Not so good for solar panels here. We like the desert and spent a good portion of 7 weeks in southeast ca and parts of Nv over the holidays. We are headed back to southeast ca and maybe other areas in about 30 days with the hope of some great super blooms. My wife is an artist and paints Plein Air and I'm a wildlife photographer, aspersing to be a better landscape shooter. Doing a few locations for super blooms could be fun but not sure about the crowds. We like to be remote away from all the action. Alaska is on our list. I have read about how bad the roads are for flying rocks and the ways to protect the fiberglass... This has slowed down get to Alaska but that's a different project.1 point
-
As a safety precaution, check your "gas stop" brand pigtail for leaks. Both of mine had small leaks at the 90 degree bend where the chrome fitting goes into the brass elbow. I'm send them back soon and trying a different brand. Probably bad luck but I figured to just try another brand. John1 point
-
As a former USAF Engineer and Fire Marshall, I had quite an internal discussion with myself on that very question. Below is the logic I ended up with to select the location I used. I for sure would like other owners to comment. Wherever you put it, it is better to have it than not to have it. My greatest fear is that it will happen at night when I am not present with family occupants. With these thoughts in mind, my fire plan that all using the trailer are advised of is: If you smell, see, or hear smoke look get others out of the trailer and have them call for help (911 or yell fire if others are about) If you can see the cause, fix it or extinguish it with the closet mounted extinguisher. If for what ever reason you can't, just get out of the trailer immediately. Most importantly, I do not want family members having to hunt for a master switch inside during an emergency. Get out of the trailer. So, my first decision of inside or outside was made. Outside access. Some considerations: You don't want to be running a lot of extra wire length of 4/0 300 amp cable for a lot o reasons. It needs to be protected from weather and be ahead of the Victron Shunt and all other battery Positive feeds. Therefore the location was obvious: the battery box just inside of the access door. For connection, I used a piece of copper buss bar for the connection from the terminal to the switch as other owners have posted. Note: For anyone sleeping in our Ollie, I ensure that the compartment is unlocked and they know how to access the closet fire extinguisher as well. And, just to head off a comment, yes, I am taking a risk that somebody may steal our Litho's while the box is unlocked. A risk I accept. Owners: I really would appreciate hearing the negatives of this decision. Only way to learn is to listen. So fire away.1 point
-
Where did you install your Blue Sea 350A switch in your Oliver?1 point
-
I clicked on their profile and looked at past posts. Looks like they have a 2022 E2 with Lithium Pro package, 390AH Lithionics, 3000W Xantrex inverter.1 point
-
Please re-read the thread title….. ”charge in lithionics” Don’t worry, we all have times like this. 😀 John Davies Spokane WA1 point
-
I would only make the plates smaller if I had larger plates already fiberglassed in (like the factory does now). The roof bracket on top doesn't need to be large because there is no real force pushing the panels down, the real force is from the wind trying to blow the panels off. For that, you want a larger plate underneath to spread the load over as much fiberglass as possible. I don't remember the length of the final set of bolts, but I seem to remember it was possibly 1 1/4 (1.25) inches....? I know the factory bolts I pulled out were different sizes, even on the same mount. The factory really hodge-podged mine together, so I couldn't trust the size of the bolts they used. Before installing any plates, buy a couple of lengths of bolts of 1 inch, 1.25 inches, and 1.5 inches. Then drop them into your hole and view it from a borescope to see which size looks best. I remember I didn't want the threads to stick out too far under the plate, and you really don't want them touching the top of the inner hull. I would have rather had the plates where the fiberglass is a bit thick to give more meat to prevent bending, cracking or breaking the fiberglass, but seeing as how I've had no problems where the factory put the holes, I guess it's working out. As to flexible panels.......the current way the factory does it makes the roof line look dorky; it ruins the aesthetics. But like you mentioned, to get the most output from traditional panels, the panels need to "fly" over the curvatures of the roof. As to the aerodynamics of how the factory does it, the panels are pretty level, and appear to have a zero angle of attack. I used my trailer without the panels after they got damaged and I must have drove a combined 1,000 miles on different camping trips while I worked out how I was going to remove and replace the solar mounts; I didn't see a real difference in fuel mileage, so I don't think the parasitic drag of the panels is costing that much. But then again, I was driving a heavy diesel truck that doesn't know the trailer is even there. Flexible panels look cooler and can conform to a roof line giving better aerodynamics. They wouldn't need to fly over the roof because they should conform to the contours. Granted, with the complex roof contours of an Oliver, I'm not sure how well a flexible panel would contort to match the roof line, and a portion of the panel would be vertical, and thus not getting as much sun as the rest of the panel. Therefore, I have no idea how good they are. In all honesty, I haven't really researched flexible panels in a few years (maybe a decade), and back then the technology wasn't as good as traditional panels. How good it is now, I couldn't tell you. Furthermore, I still had the wire port roof cap on top of my trailer, and I wasn't in a position to re-engineer moving it. So I just stuck with using Zamp traditional panels. I'm in Tehachapi myself. I really like Northern California, I love seeing green landscapes; it's pretty drab out here in the desert. We try to camp either near the coast or in the mountains. It's gotten tougher though since the boys are in school now and want to get into activities like soccer. I bought my trailer because I was hell bent on driving through Alaska. Thanks to Covid restrictions and fuel prices, our big vacation plan has gotten scrapped for 2 years running, and this summer is my wife's big family reunion, so 2023 is a bust. I'm hoping for Alaska in 2024. After that, I'll probably have to sell my trailer because the boys will be too big for it. But we're sure enjoying it while we can all fit in it!1 point
-
I agree, you should use your jacks and blocks. What I am addressing is an owner “stranded on the side of the road” because they don’t have jacks. 😳1 point
-
As promised, here's the little video clips I made when I removed and replaced the solar panel mounts. Please excuse how cluttered my trailer was, it's usually very tidy.1 point
-
You weren't the only one, Jim. Our old Ford 6.0 diesel ate turbos for breakfast. When the high pressure oil sensor popped out of the engine on I-80 in the middle of PA with our fifth wheel in tow, spewing the entire volume of engine oil all over the truck and brand-new trailer in the process, I had enough. That truck was gone a week after we got home. It was a pretty truck, though.1 point
-
I had a 2016 Ford Expedition as our original tow vehicle, with the same 3.5 liter turbo engine, and had the same problem with a failure of the electronic throttle control. Cruising at highway speed (not while towing), the engine suddenly dropped in RPM and was unresponsive to any movement of the throttle pedal. I was able to get to the shoulder of the road and the engine “rebooted” after shutting off and restarting. I had about 50 miles to home and the problem repeated twice more, but rebooted each time after restarting and I was able to make it home and then drop the vehicle off at the local ford dealer. So the problem didn’t leave me stranded but it could have been bad if it happened while towing. Problems do happen now and then. You just have to prepare for the more common problems that can be dealt with on the road like a flat tire. And hope the other rare problems like computer glitches don’t leave you stranded. We’ve seen Oliver owners stranded just from a flat tire because they didn’t have a decent jack to even handle a flat tire on their trailer while on the road. And it is a good reminder of why you should stay in the right hand lane, unless passing, so you can get to the shoulder quickly if a problem happens, especially when towing. I don’t think the problems are widespread. All my recent vehicles are far more reliable, comfortable and better equipped than anything I owned back in the ‘70s, ‘80s and ‘90s. I owned a 1975 Chevy Nova and like clockwork every 30,000 miles it needed a new water pump, starter motor and wiper motor due to failures, and was completely rusted out by 100,000 miles.1 point
-
Which Lithionics do you have? You need to read the Lithionics storage procedures for your type of batteries. The larger (Platinum Package) batteries have internal heaters and will discharge in a few days to a week in cold weather. The smaller Lithionics do not have internal heaters and should not be stored in freezing temperatures. Improper storage and complete discharging will damage your batteries. The manuals are in Oliver University.1 point
-
I would be very careful with completely dead lithiums, most likely they shut down safely, but maybe not. Refer to their manual and take your time. Your generator probably has a set of DC charging cables with big alligator clips, you can hook them to the batteries directly and they will basically bypass everything inside the trailer. Once they take enough charge, they should wake up by themselves to allow you to charge them from the onboard unit. Alternatively remove and transport them elsewhere to be charged individually. The BIG question is, why are they dead? You can raise the jacks manually, you should have received a Zee shaped tool…. John Davies Spokane WA1 point
-
But look how close they all are to each other! John1 point
-
Notice they trailers are nose to tail, so it is a pretty and artificial photo set. And no wear on the decks…. Maybe because they are just resting haphazardly on fresh cut grass and not real. Or is that AstroTurf? I did promise not to say anything negative, so this is as far as I go. I hope everyone is having a great weekend. John Davies spokane WA
1 point
-
AND - Review all of the threads in the "Mods" section here on the Forum. Bill1 point
-
I assume that you have put in a Service ticket? Bill1 point
-
I have just investigated this very point: Can we file for a tax credit in regards to the solar panels, inverter and batteries for a newly purchased Oliver. I was extremely skeptical of the claims (in Oliver Trailer Owners FaceBook group). In the discussion, I think everyone was an Oliver owner. One was a licensed CPA with much experience and had researched the tax codes specific to the very questions that Oliver owners were asking. In addition, there were at least three that had successfully filed (under the advice of professional CPA's) and received their credit for everything (Panels, inverter and batteries) in 2020 and 2021. I (like some of you) found in the code where the batteries could be included only if they were used exclusively to store solar energy. This was the sticking point of the persons like me that felt it might not be possible, because we can also plug into shore power and charge our batteries. The Tax code is always lagging behind new technology and the common sense fact that no solar panel system can work without having a storage system as part of it. Beginning 1/1/2023 the batteries were clarified and can now be included. Tax code is written and when there are conflicts, CPA's and lawyers will argue and then precedent is established as courts make findings. There was much ambiguity from 2020, 2021,2022. There was (in the discussions) numerous persons confirmed that their CPA's were advising Oliver Owners to claim everything (panels, inverter and batteries), and the several that have successfully done so and received their tax credits. In addition, the IRS rules have already clarified this "sticking" point going forward in 2023. In all these discussions there were a least a couple that were going to file their personal taxes this weekend (using their trusted CPA) and I hope to hear back from them if there is any new info that comes out of it. Another point that came out of the discussions is that there is no concern with claiming an Oliver as a "2nd home". Prior years the credit was 26%, in 2022 it is 30% and I think 2023 goes back to 26% also. With a brand new Oliver, where the cost for the solar panels, the inverter and the batteries is very easy to itemize (because Oliver spells it out on your invoice)... capturing the total cost is easy. In our case it is $9,500 for the Lithium Pro package... and the sales tax of 7.25% my total cost was $10,189 times a 30% tax credit should equal $3,058. The form that needs to be filled out is Tax Form 5695 (Residential Energy Credit). I'm going to file an amended tax return (using that form) and the very worse that could happen is it could be refused... but based on common sense (it's still makes a good argument) and with enough persons that have already successfully done so, I don't think our tax credit will be denied.1 point
-
1. I used an Eye bolt so the string wouldn't get smashed against the underside of the outer hull. In my first iteration of the plates, I actually epoxied the Eye bolt to the underside of one of the plates, which came out looking terrible, and I didn't use the plate anyway since I wanted thicker steel, and I wanted magnetic in case I needed to use a magnet to maneuver the plate over any wires. 2. I didn't think to use a slow curing adhesive, and in retrospect I'm glad I didn't. If I keep the trailer a few more years (but at the rate my kids are growing, it'll probably be too small for our family), I assume solar panel technology will get better, and I'll want to get more aerodynamic panels, like the Zamp Obsidian series. With the way the mounts are now, I can easily remove them and relocate them if necessary. When I put these on, I was trying to solve so many issues, I couldn't be bothered to also redesign the panels I'd even use since I wanted to get back to camping. 3. I think the brass bolt was 1.5 inches. 4. I drilled the brass bolt out myself at a buddy's house who has a drill press. The brass drilled out easily. I only used a machine shop to drill and tab the 410 stainless steel plates because 410 is tough to work with. The local machine shop only charged me $5 per drilled and tapped hole, and at $40, that was one less aggravation I didn't have to deal with. 5. The countersink is important because it makes it easier for the bolt to locate the threads. On my first iteration of plates, I didn't have the countersink, and I couldn't find the threads. 6. I just used string from Home Depot. I had to pull one of the plates out with it, and it worked just fine. 7. It wasn't a rod, it was a long metal strip of metal from Home Depot. It's sold in 48 inch length, and about 1/2 wide. I needed thin and flexible to duct tape a wrench to it. I just kept using the same piece of metal for the whole of my experience. I had to wash off the oils from the metal before taking it in the trailer, and I did paint it since the metal rusted easily without the oil. It'll show up in my part 1 video. Again, I was making everything up on the fly as I went along.1 point
-
I have never checked these before in five years, I guess that was a big mistake. My right jack bound up so hard that it would neither raise nor lower under a load. I was able to free it up - see this thread: https://olivertraveltrailers.com/forums/topic/6811-how-to-lengthen-your-emergency-jack-handle-so-it-will-fit-the-rear-jacks-with-the-gearbox-removed/ I discovered that the top of the jack would flop around with no weight in it, I am not sure how I could have missed that, I found the two lower bolts, that go through the frame, to be loose one full turn. Tightening all four (both the left and right jacks) to 43 ft lbs using a 3/4” deep socket removed the movement and both jacks run better now 😳 I started a service ticket, I need to know the specified torque. I used a standard value from a table. The two upper bolts on each side were fine. Does Oliver recommend a periodic inspection for these bolts? I don’t recall seeing one. Is 43 ft lbs OK? The front jack bolts loosen all the time. Thanks. John Davies Spokane WA1 point
-
Changing the tires to LTs will help control the load, those P rated (passenger) tires are comfy but very squirmy. But it won’t alter the numbers, in fact it will decrease them because your unladen weight will increase by 30 pounds. Do you plan to add a canopy? 200 pounds. Steel bumper, bigger tires. Andersen hitch 60 pounds, a generator 40 to 80 pounds..... See where all this is headed? My sister Just ordered a teardrop trailer, she specced it out very light, so she could tow it behind her Forester 2.5 CVT which has a 1500 pound tow rating and max TW of 178 pounds (!!!) She was unable to get any really useful things like plumbing or propane and she has spent a ton of money getting her marginal TV ready, (8 hrs labor to put in a brake control and charging circuit, most shops refused to do it for liability reasons I think) - a very sad situation IMHO, and one that is avoidable. The trucklet has no paddle shifters and she will be completely unable to control her descent speed except with the trailer brakes. Her transmission will be prone to overheating and failure. Trailer forums are full of folks who try to “make do” with a less than ideal combination, spend a lot of money and end up unhappy in the end. Just make sure that you are fully informed and understand your path completely. If you were intending to buy the Elite, we wouldn’t be having this conversation at all, because that would be a perfect match. John Davies Spokane WA1 point
-
Ah ain't real sure my ma' would like fer' me to be a' elucidatin' in public, but here's the story. mountainborn I was already in the Navy when the US became involved increasingly more and more in VietNam. I wasn't writing home and my grand ma was worried about me. She wrote a poem about me. It was called Mountain Born. Here it is:1 point
-
Hey Gang.... Just wanted to put this out there. I have a 2016 F-150 as a TV for my LE2. At 50k miles I had a fault in the module that controlled the louvers for the turbo.... at 93k I had a fault in the hill control descent feature which turn out to be a bad electronic throttle body. Both times I got the flashing error with a bong bong bong warning and a complete loss of power. The power steering and brakes still worked but the only option was to coast to the side of the road and attempt a re-start. The 50k event happened when I was only about a half mile from home and was able to limp it home. The 93k event happened once then it was ok then again until a few thousand miles later... then finally it happened continually and I had it towed to a Ford dealership. Adding insult to injury, both Ford dealerships that I could get to were booked out weeks. So, I was without my truck for a solid month. Plus it was 2k the first time and 1400 just this week. Fortunately, this never happened while I was towing my Oliver. But it got me thinking.... How common is this in modern trucks? They are all controlled by computers. You never know when some module somewhere is going to go on the fritz and strand you. Hopefully never while you are on a trip, or while towing, especially up a mountain road with no shoulder. So why am I telling you all this...? Well, I would like to know if anyone has had a similar event with their TV.. or am I the only unlucky one. But also.... Not a bad idea to keep in mind that this can happen and you may have to get to the shoulder of the road on very short notice. At least if you are aware that this is a possibility, you might react quick enough to prevent getting stuck in the middle of a highway or in some other really bad place. It's fixed for now, and we are planning a spring trip to Canada.... Hopefully no more unpleasant surprises. Thanks for listening, Scotty0 points
-
Lucky you did not get my Dodge Ram. I have had to replace two rear ends, the transmission, shocks, front end linkage parts, wiper motor, cam sensor and numerous other deeply buried enjine parts. Finally gave up and dumped it at a bit over 110K. Even with highly regarded trucks, some of us win the lottery! Only 30K on my 2021 F150 3.5 but no issues so far ... holding my breath.0 points


.thumb.jpg.e34bf01ef7f7d5e99ad31856d45afbeb.jpg)


-
Recent Achievements
-


")


