Leaderboard


Popular Content
Showing content with the highest reputation on 03/08/2023 in all areas
-
I do agree that MANY truck and RV Salespeople are probably not the best examples of integrity, but let's not be unfair and just arbitrarily lump those that work at Oliver in with the general bunch. I spent the past three days at the factory and had the opportunity to speak with the sales team as well as several current owners and potential owners. I had towing discussions with all of them. The sales team DOES advise the potential owners against using undersized trucks or these tiny SUV's to try to tow an Elite II with. Obviously, they can't control or, in my opinion, be held responsible for the ultimate decisions made by those that are just getting by. Don't attempt to use the wrong tow vehicle to pull the right trailer.4 points
-
There are a few owners that have name their Oliver - Olive. I believe that one of them had the "third brake light" decal changed to that. And, of course, there is at least one Oliver named Olivia. Bill p.s. Almost any print shop/sign shop worth its weight can easily make a hull number decal for you and they are fairly easy to apply too.4 points
-
Now that I have inadvertently 'outed' the owners of this LE2 with this post, in the hopes of learning whether they live in the Pacific Northwest, I suspect they might want to remain anonymous because of our discussion of their choice of tow vehicle. If they do see this post, let's hope they search the Forum for the many discussions about this subject and reconsider their choice of tow vehicle before they find themselves in a bad situation.3 points
-
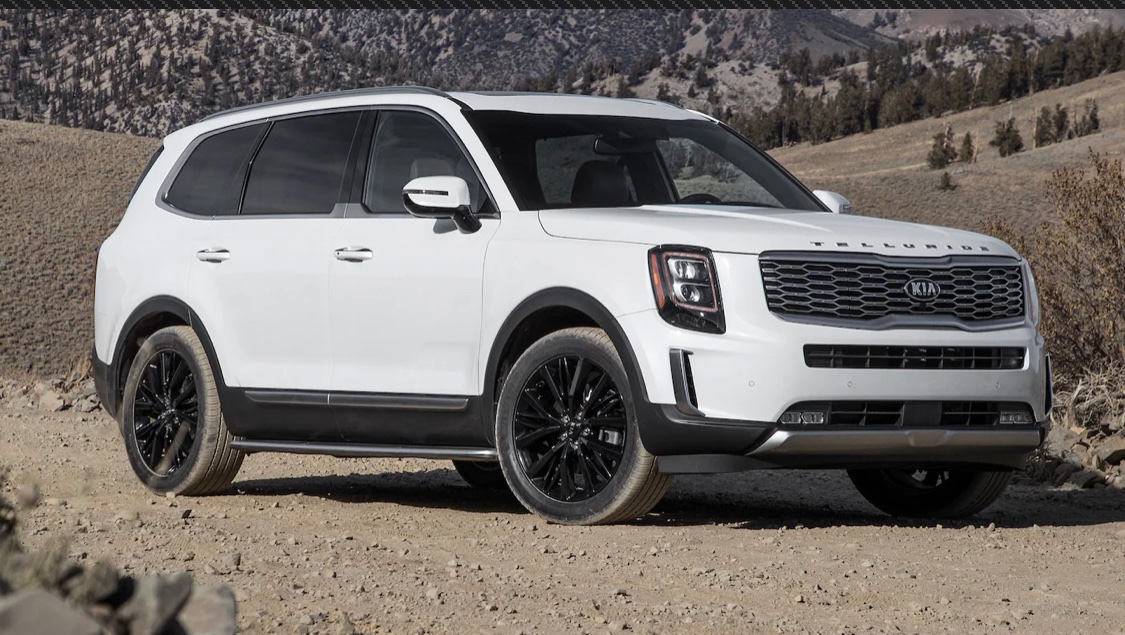
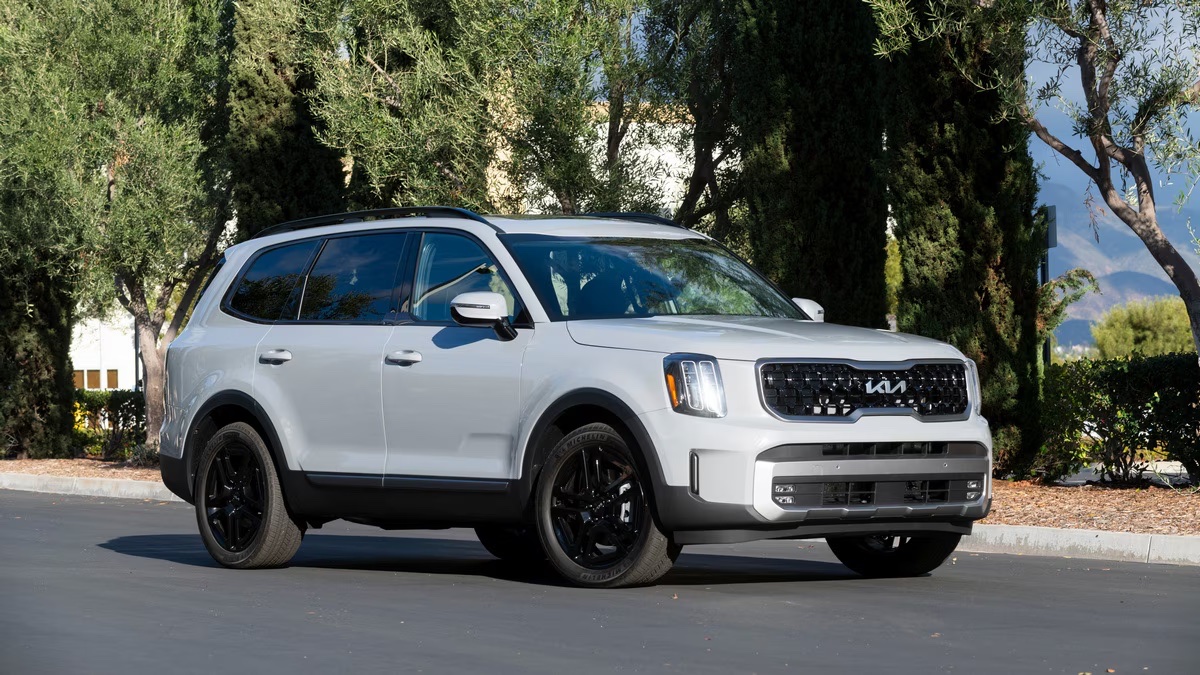
Ding! Ding! Ding! We have a winner. Here’s a pic of the Telluride. Notice the roofline above the windshield, and the chrome trim above the door handle on the B pillar. Based on the published specs for the Telluride, it’s a really bad choice for towing an Elite II considering that the empty dry weight of an Elite II with no options at all is 4,900 lbs.
 3 points
 -
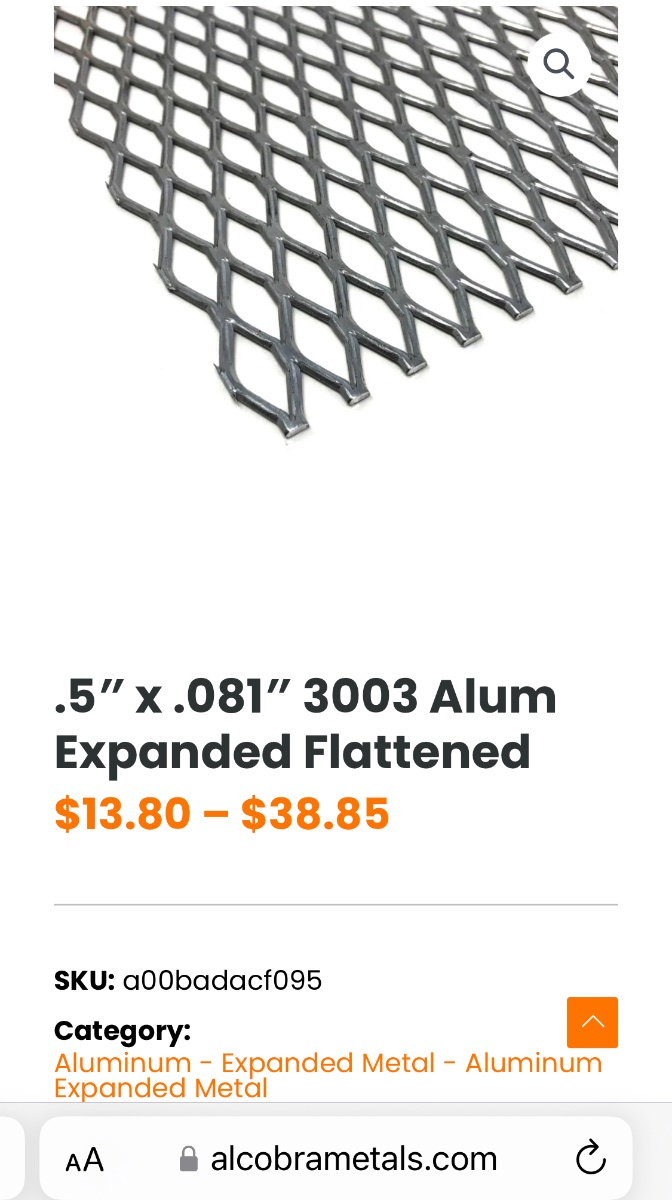
Very nice article, especially for those who lean toward metal fabrication vs wood. One important note: “If using the Nova Kool AC/DC version, both existing AC and DC power feeds MAY be utilized. Check The Manual. Also be sure to check YOUR fuses and adjust them per the Manual.” The fuses installed originally during the build “should” be the right ones, but a previous owner might have messed them up. The purpose of a fuse is not to protect the appliance or device at the far end, rather it is to protect the WIRING from burning up….. So you can install a 7.5 amp fuse in a 15 amp DC circuit, no problem, but never add a larger one than is specced for that gauge of wire! I have ground to a halt in my isotherm install, from a rather nasty cold that won’t go away, but I too noticed that my floor was not built “true” from side to side. So I leveled the trailer carefully in all directions and found that NOTHING about the fridge cavity was either true or straight. Wonky would be the best description…. That is why I decided to remove as much of it as possible and install my own wood framing, so I could get the floor flat and at true right angles to two truly PARALLEL and hell-for- strong side support columns. You haven’t mentioned ventilation requirements. My Isotherm Cruise 130 manual says a 9 cm/ 3.5” diameter round hole (39 sq inches) at top and bottom should be provided. But you must keep in mind the restriction caused by a grill or hvac register, which may be huge. Another Isotherm manual called for 5 cm (2”) vertical clearance everywhere that air flows. I chose to follow the latter and made sure there was that much at top and bottom. Then there is the unforeseen “restriction” of a big dog flopped down in front of that bottom opening, or a Clam tent or duffle bag. I added a secondary lower vent in a different location in case that happens. I will post a thread about my Isotherm install, it will be a while tho. FYI if you want an inexpensive TOUGH high flow option for air vents, that can’t be accidentally broken, cut your own neat openings and add this expanded aluminum behind them. It’s about $14 per square foot. John Davies Spokane WA
3 points
-
Best feeling in the world is accomplishing your goals. Equal to that is encouraging others to do the same!3 points
-
Hi all, we have #1290 and as far as I know, our hull was the first to get the Truma A/C. We picked up on November 7. No leaking until last week. We live in Oregon so we have had rain since pick up. We had about 6-7 inches of snow last week. It's at the RV service center as I had a propane leak on the Truma heater. After the snow melted, the service center went inside to check the propane leak and discovered about a pint to a quart of water that had leaked onto the floor. None on the mattresses. OTT is working on it. The service center said there wasn't a foam seal between the roof and the A/C unit. If you have a Truma A/C, you might want to check your trailer. Hopefully an easy fix. Our camping trip this week won't happen. John2 points
-
I've encountered marker light problems with the OOII several times thru the years. I like the way Mossey described their locations, so I'll be using his nomenclature. First it was the front port upper corner. Now, (several years later) it's the bottom front both corners. The first time turned out to actually be a burned out LED. That was surprising. The second instance is going to be tougher but, since it is both sides, I suspect it will be a loose wire. All these lights have their wiring run before the outer upper hull is installed and can make rewiring a challenge.2 points
-
Are you referring to the round amber dots located on all 8 corners? I say all 8 corners because the dots are both high and low. I understand it is just the curb side, but the round dots do not have a switch. They are powered by the 7 pin connector attached to the tow vehicle. Mossey2 points
-
My representation of salespeople was the usual SOB brands, not Oliver. OTT is indeed more reputable than many others. One of the first questions I was asked when I contacted OTT for information was, "What is your tow vehicle?" OTOH, I have listened to many SOB salesmen saying, "Of course you can tow this (42' fifth wheel) with your F150!"2 points
-
They're already in a bad situation, they just didn't know it until now. You've actually done them and all their potential victims a real favor. Now when their accident happens they will have been warned of it's potential in advance. I hope they do see this and make the prudent choice to dramatically update their choice of a tow or trade the Elite II for something much smaller and lighter.2 points
-
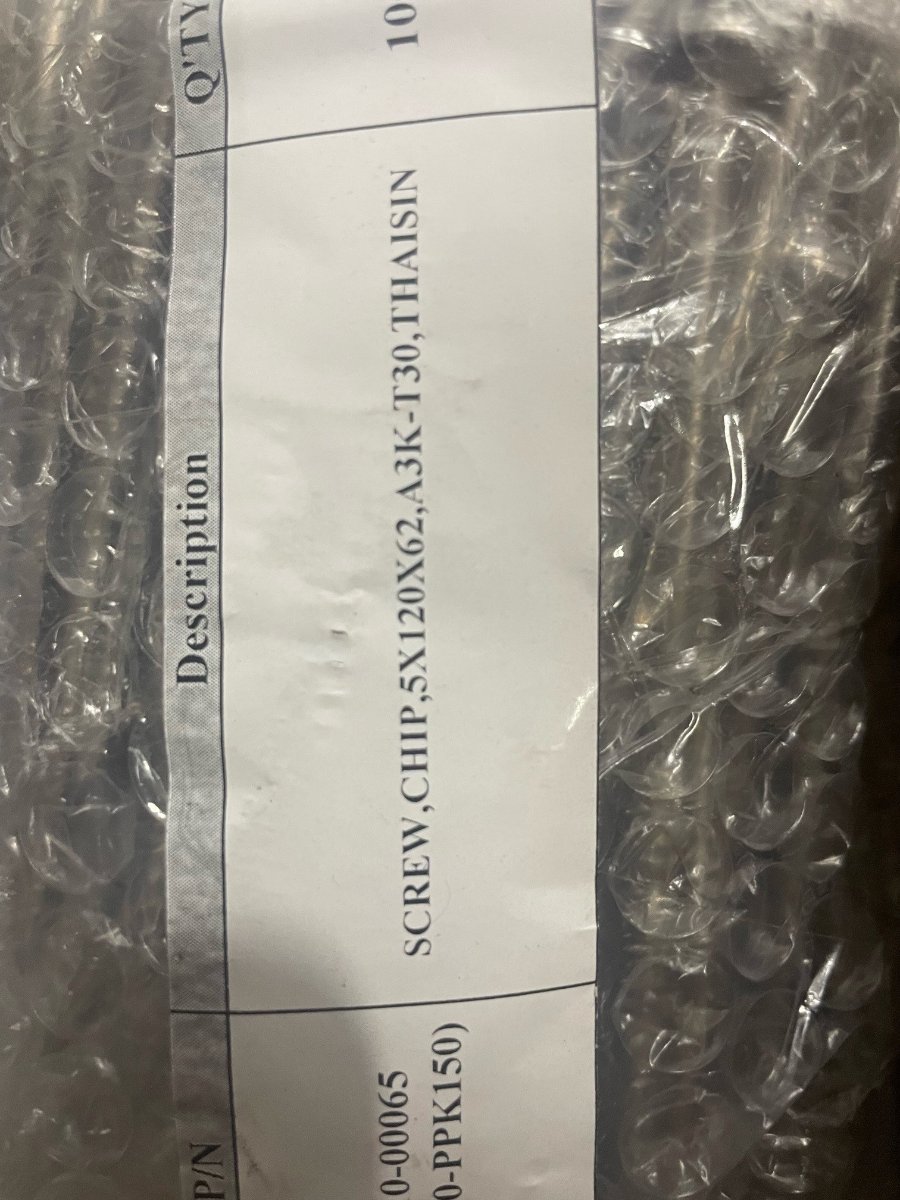
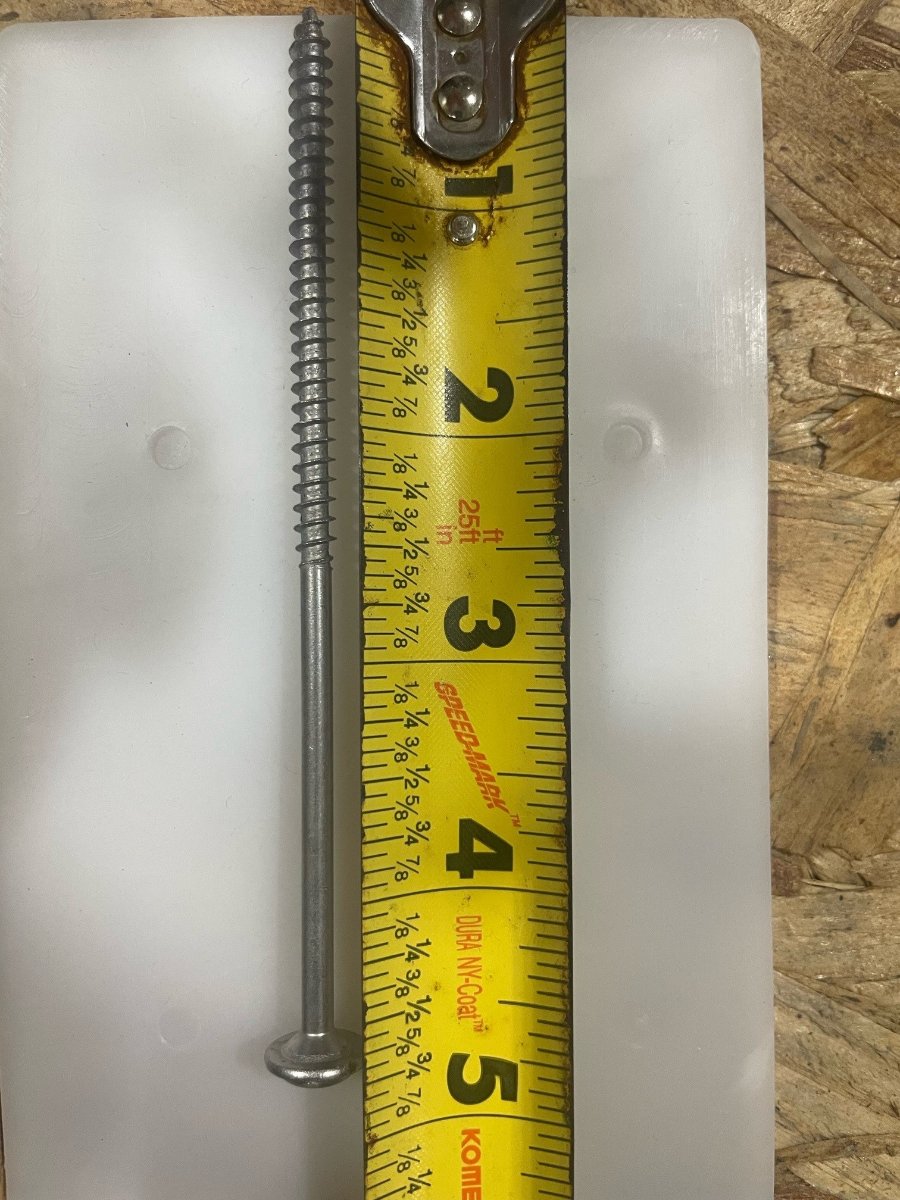
They are 5mmx120mm T30 flathead wood screws. Photo below shows the bag they come in. Next photo shows the length in inches. A Google search so far has revealed no sources for 5mmx120mm wood screws. But, the approximate size in Imperial screws is #10x5". Those are readily available in the USA. I figure if I have to address a leak around my Truma AC unit, I will buy some #10x5" screws and carefully try them. I do wish that Truma would not be so compulsive about providing repair parts only to authorized service centers. I believe I am more capable, and careful, than most "knuckle draggers" employed by RV service centers these days, particularly in consultation with the excellent Oliver service team...
2 points
-
I believe the TV is a KIA Telluride.2 points
-
POST Rewritten for clarity. GJ JD: Good comments all! The Nova Kool requires 30 square inches of cooling vent at both the top and bottom of the compartment. With this install, we have about 46 square inches at both the top and bottom. This of course has to be reduced by the "free air flow" of the vent screens chosen. In my attachment (Page 9) I suggested at least 50% free air which is about what Ken used successfully for his camping environments. This is 7 sq inches short on the top (only). On the bottom we have suggested drilling holes into the aft side wall low for additional in-flow of cooling air. The short fall has not impacted Randy or Ken's installations. However, my Belt and Suspenders are those two fans on top as my starting point due to our consistent HOT weather camping. From a free air perspective, your suggestested flattened expanded screen I believe would have less exit air flow resistance. However, Ken's custom shop built one is "knock my socks off" beautiful. Personally, if I can afford it, I would go with Ken's design for the top vent. And for cost containment a screen as you suggested as it pretty much will not be seen unless I'm scrubbing the huge expanse of flooring in our OE2's. 🙂 Finally, If my HOT weather install keeps the fans running more than about 40% of the time, I'll find the posting about vents that has the great looking vent and install it high in the cabinet on the entrance door side. But frankly, I don't think it will be needed. GJ2 points
-
Level in the cavity isn't a big deal with dc/danfoss/secop fridges. Built for boats. Ventilation is. Btw, I'm not totally sure, but I don't think the Novakool will fit through the "neck" of the early Elite I s.2 points
-
Just a bit of a fun and perhaps motivational story. In 2017, I was going through an incredibly difficult divorce from a man I had only been married to for two years. Turned out that he had some very mean and troublesome issues. I found myself in a very broken state; sad, defeated, embarrassed. So, what did I do? I set my mind to save for a school bus, that I would convert into my home. While in the "saving the cash" phase, I bought a toy school bus that sat on my desk, for a constant reminder as to why I was working so hard. I bought that bus. I converted that bus. I lived in that bus for 3.5 years. I am back in a house for now. That bus? That bus will be sold soon and will be the down payment for my new dream; an Oliver! 🙂 So, I had to buy a new toy. It's definitely not an exact replica, but it is working just fine! Tentative plan is to buy the truck in April and pull the trigger on my Ollie order between June and September. I learned in my school bus journey that best laid plans don't always work out but dreams DO come true when you just don't give up!
2 points
-
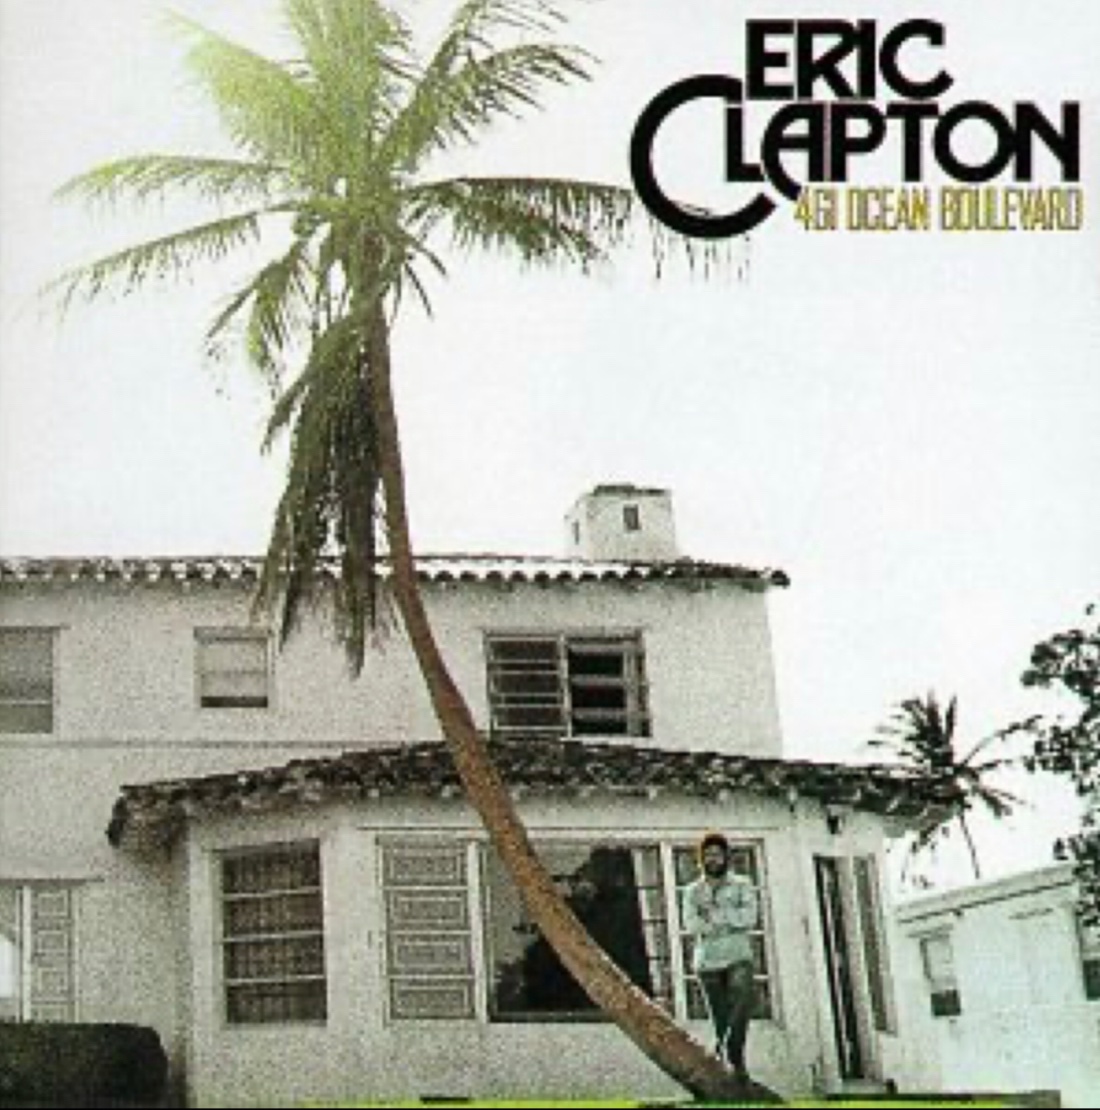
When we were given our Hull #461, the name “Ocean Boulevard” immediately came to mind. Haven’t gotten around to putting a palm tree decal on the trailer yet though. And I don’t want to call the trailer “Eric” 😂.
2 points
-
Thank you sharing. Love your motivation, very inspiring! You go girl!💪🏼2 points
-
Hello. I will work a few more years to finish paying everything off again, or at least way down, and then once I am ready to, I will again hit the road full time in my LE ll. I actually loved driving my bus but it was definitely stressful going over passes, etc. I do have one dog.2 points
-
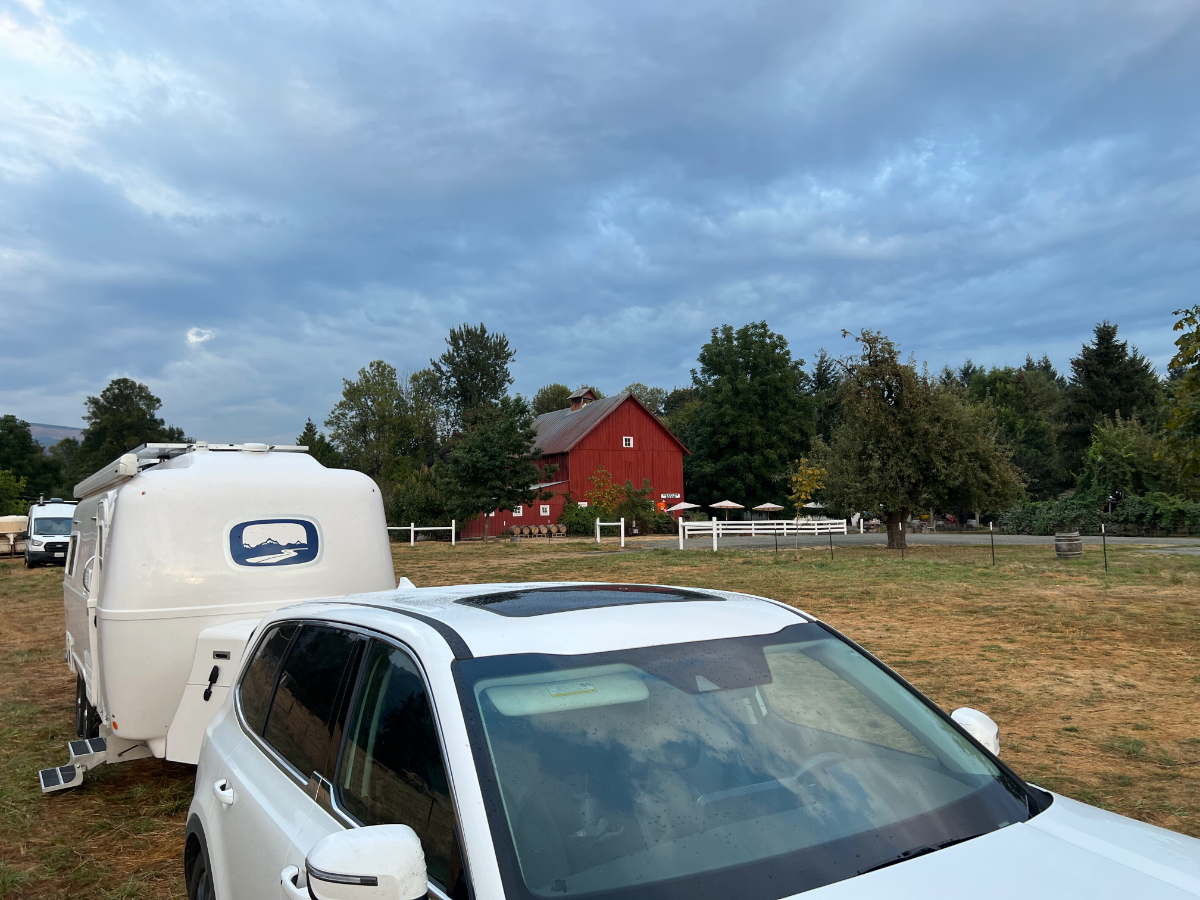
While researching Harvest Host locations to stop enroute from Redding, CA to Salmon Creek, WA, I had the rare experience of seeing an Ollie that had stopped at Saginaw Vineyard in Cottage Grove, OR. Ollies are seldom seen in the Pacific Northwest, as they are a long way from their birthplace, but they do have an amazing ability to migrate.
1 point
-
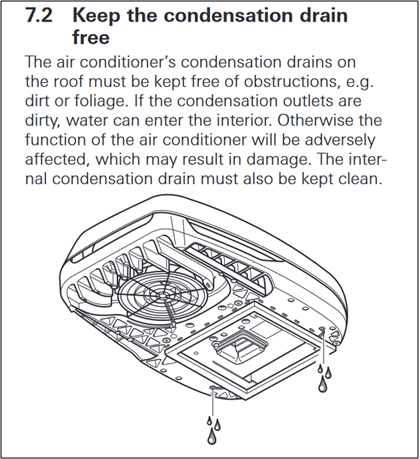
2021 LE2 Below is another thought from the Aventa operation manual. Not sure if iced up condensation drains would allow interior water leakage under certain circumstances. When Truma installed my Aventa at Lakeland Fl, I asked if they would perform a water leak test. The answer was "NO". They relied on their installation practice to insure water tightness and had no reported problems. Since December installation I have not suffered any leak issues. It has not be subject to snow/ice.....just the liquid stuff. I believe a Truma installation manual came with my unit. I'll look for a diagram/parts list and post if found. Steve
1 point
-
I’d check the switch first. Flick it on/off several times. If that doesn’t do it, check to make sure the wires are connected securely to the back of the switch. Mike1 point
-
Great post and a fun read as our family solved the "Who Dune It". Maybe to help the owner a bit, could we change the thread title to indicate the vehicle make and model? That way the owner likely would notice the post, and hopefully read the above sage thoughts. GJ1 point
-
Ah ok great thanks!1 point
-
Yes, since we returned home from Hohenwald last November. It will not be out in the weather until mid-April, when we will be camping on the Oregon coast. That could be a good test for the roof.1 point
-
I have no idea. I have not had a reason to examine the installation of our Truma AC unit because we have had no leaks since the Oliver Service team re-sealed the roof penetrations back in November. I note that Oliver installs many things to the fiberglass hull using wood screws, like the portholes. Maybe the 5mmx120mm wood screws go through the outside housing of the Truma AC, screw into holes in the inside housing, and thus draw the two housings together, sandwiching the hulls between them? I plan to figure out how it works if and when a problem arises. But, if your experience educates you about how it all goes together, please share!1 point
-
rich.dev: FYI, you should not need the longer screws. Your 2023 Elite II scheduled for delivery in mid-May will have the longer screws already installed. The short screws were only used for the first few Truma AC units installed back in 2022.1 point
-
I doubt there's any liability for OTT. The driver is responsible for the safe operation of their vehicle. As long as OTT correctly identifies the "as manufactured" weight, I think they're good. It's like every RV salesperson says: "Sure, you can tow this with your [insert vehicle here]!"1 point
-
Did Oliver email you the info, if yes can you share it with us?1 point
-
You sir are correct! See pic above. 👍🏻1 point
-
pretty sure it is a Kia. The unique body line at bottom of B pillar, unique eyebrow roofl;ine at top of Windshield and mirror turn signal slits match up. From what I have seen, a Telluride has a 5,000 lb tow capacity.1 point
-
Yes, it appears to be a Kia Telluride, not a Volvo. It has different side mirrors and no fuel door on the left rear pass fender well. A tow rating of 5500# 😳.
1 point
-
John: We had a roof leak in the area of the Truma AC unit the night after we took delivery of Hull #1291, the second Elite II to have a Truma AC installed. We found the leak after towing it to David Crockett State Park in Lawrenceburg, TN. We reported the leak to the Oliver Service staff the following Monday, when we returned to Hohenwald for repairs. They resealed all roof penetrations, which seemed to solve the leak issue. We drove through a couple of snow and rain storms on our way home to Idaho, and found no further leakage. It concerns me that there is no reported "foam seal" between the Truma AC unit and the fiberglass roof on your Hull #1290. Notably, I have learned that Truma is now providing longer installation screws for the AC units to Oliver than the ones that were supplied with the early units. I recommend you submit a ticket to Oliver Service requesting that the longer installation screws be sent to your RV service center so your Truma AC unit can be re-installed with those longer screws, and then resealed. I asked Oliver service to send to me a set of the longer installation screws, should I need them if later leaks appear. I was advised that Truma will allow Oliver to send repair parts only to authorized RV service centers. As a workaround, I asked Oliver Service to email to me a photo of the longer screws, with a description of dimensions and thread pitch, so I can source similar screws elsewhere (like Tacoma Screw). I like to be prepared. I look forward to your report on how the leak issue with Hull #1290 gets resolved, including whether a foam or butyl seal gets installed between the Truma AC unit and the roof!1 point
-
That looks like a pretty light tow vehicle for a Elite ll.1 point
-
BLUF: This post has two parts. First, below is a brief summary as to how I became interested in the Nova Kool R5810 as a replacement for our Dometic. The attachment is an installation guide that may serve other OTT LE2 owners as a good starting point should they choose the Nova Kool unit as a DYI upgrade. After reviewing John Davies Dometic “demo” post, I decided I ought to start getting my head around the options to upgrade our Dometic RM2454. My list of requirements for an upgraded refrigerator are: · It must fit into the existing cabinet. · Does not use an absorption design · Has at least the same freezer size as our existing Dometic RM 5424 (11 Liters) · Has more total cooled space than the Dometic’s 4.0 cuft · Will pass through the OE2 entry without full disassembly · Uses the Danfos/Secop vapor-compression compressor for great efficiency NOTE: If you are not familiar with the Danfos/Secop compressors, here are a worthwhile video: https://www.youtube.com/watch?v=jl5IWkGSfJY&t=7s Specifications for our OEM Dometic and two proven replacements are as follows: Model DOMETIC ISOTHERM NOVA KOOL RM2454 CRX1140 R5810 Refrigeration technology Absorption Secop Comp. Secop Comp. US Cubic Feet 4.0 Cu Ft 4.8 Cu Ft 5.8 Cu Ft Freezer (Liters) 11.4 L = .4 Cu Ft. 6.0 L = .21 Cu Ft 11.4 L = .4 Cu Ft. Input frequency 50/60 Hz 50/60 Hz Input voltage (AC) 100-240 V 100-240 V Input voltage (DC) 12/120 V 12/24 V 12/24 V Rated input power 65 W 52 W Both the ISOTHERM and NOVA KOOL are huge improvement over the Dometic. But for our Ollie, we need the freezer space that the Nova unit provides. Having an extra cubic foot of refrigerator space and meeting all of the above requirements…. made the decision easy for us. If you are not familiar with the Nova Kool R5810, here is a review: https://www.campervan-hq.com/blogs/gear-update/campervan-hq-gear-update-nova-kool-refrigerators Next was how to install the Nova Kool. I ran across Ken’s (Mountainoliver) post about his 2019 installation of a Nova Kool R5810. Our forum, then PM’s, lead to conversations that were off the charts beneficial. Ken sent many pictures and our communications filled in the holes. The attached “Nova Kool R5810 Installation” document is based upon and uses info from: · John E. Davies thread “Compressor Fridge Info Thread, for those of us considering switching” posted May 11, 2018 in Ollie Modifications. · Randy’s (Try2Relax) 22 JUNE 2018 follow-up post · Ken’s (MountainOliver) 23 SEPT 2019 follow-up to Randy’s Post and much non-posted documentation Combining their exceptional craftmanship (Far beyond my skills), and a few technical Mechanical Engineering mods, Ken and I believe the attached plan may serve other owners as a good starting point should they choose the Nova Kool unit as a DYI upgrade. Ken and I encourage your thoughts and suggestions for further refinement. GJ Nova Kool R5810 Installation Guide.pdf1 point
-
Roger that. My write-up was for the OE2's. The Elite ones need to triple measure. GJ1 point
-
If you’re asking about my installation, the screws just came from Lowe’s as “stainless”, no mention of what grade or type of stainless. And I don’t recall the length, probably 1/2” or 5/8”. The Husky mud flaps are pretty thick, plus the thickness of large diameter stainless flat washers and lock washers (and I used LocTite as well on the threads. I didn’t want the mud flaps coming loose! 🙂). But you are correct, the right length is important to prevent the screw from bottoming out in the aluminum T slot extrusion before it actually clamps down on the mud flap or the frame cross rail.1 point
-
“Lottie” is what I named my E2, as in, “la di frickin da!” “Down by the river” seemed too long for a name. 🤪1 point
-
Excellent procedural write up! I had forgotten Ken’s Nova Kool installation posting. Thank you both for sharing you experiences. And the thermal switch you are thinking about was part of my refrigerator fan replacement project and has been in service for over 2 years. It’s a winner! Mossey
1 point
-
Good work on this GJ and Ken! This will be a great resource for many. Mike1 point
-
We call ours “the trailer” or “the camper”. We’re so creative…. Mike1 point
-
I'm sure that some of you already know, but, Airstream did (at one time) make fiberglass (laminated) campers. These pictures are of a 1992 model that is currently owned by a couple that are interested in moving up to an Oliver. Interestingly, while this Airstream has laminated fiberglass sides, the roof is aluminum. Bill
1 point
-
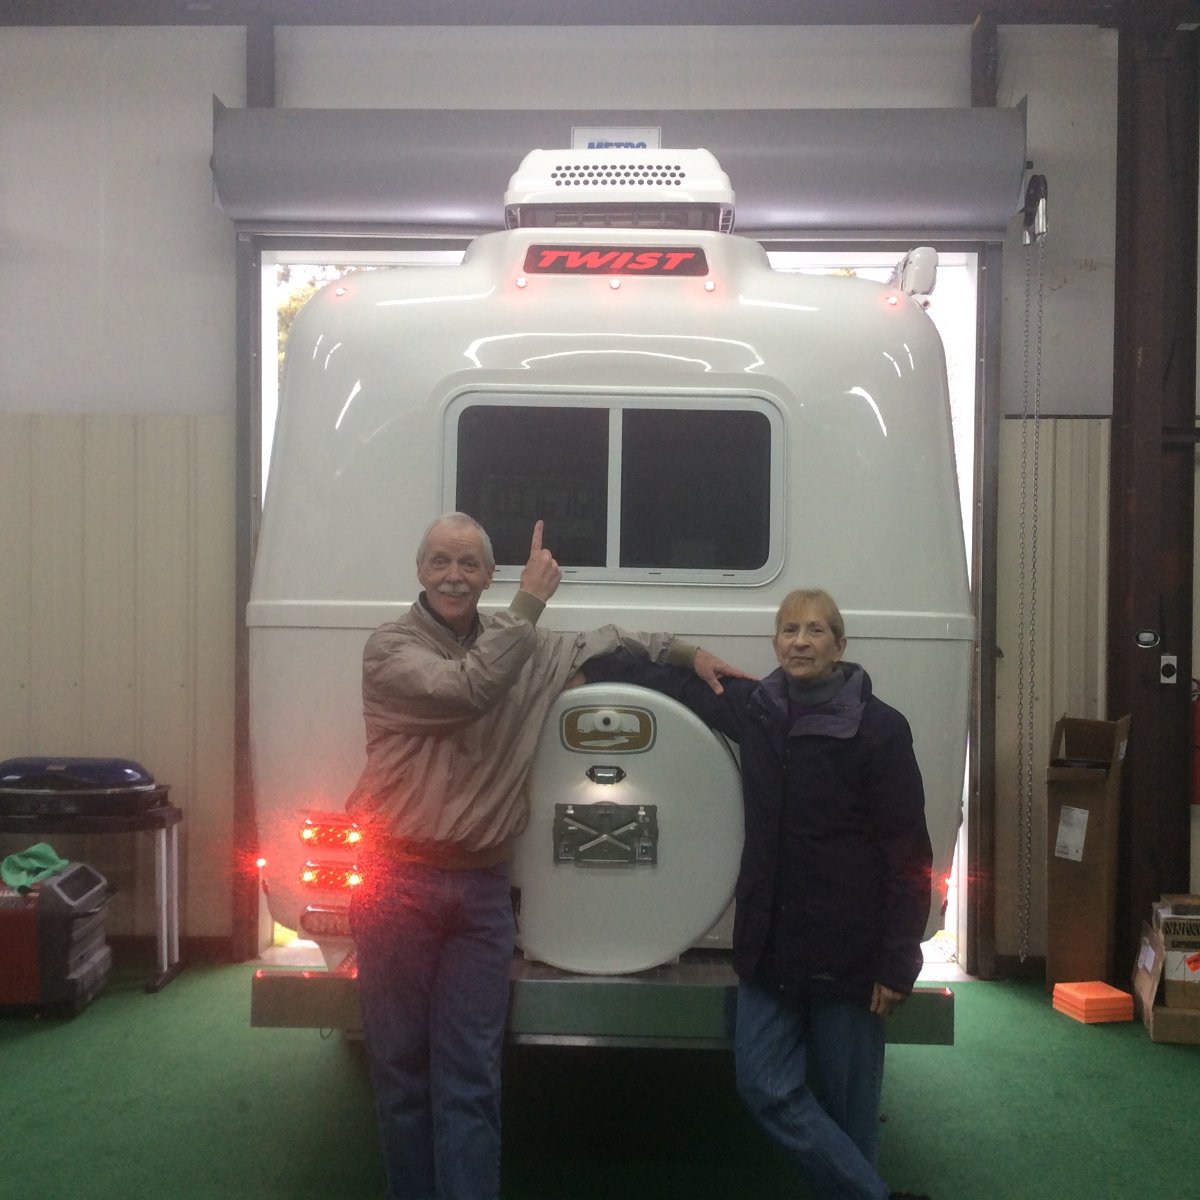
I don't normally name vehicles, campers, motorcycles, etc. But - one morning prior to taking delivery my wife and I were sitting at the breakfast table and she said that I have to name the Oliver. I said "why" and she (three times in a row) said "because". Well, after that third time My "husband alarm bells went off" and I (finally) realized that she was actually trying to tell me something - "duh". So, I said, "OK, what should I name it". She replied, "Twist". Well, it took me about 30 seconds of sitting there with a more than usual dumb look on my face before I figured it out.
1 point
-
Your story is inspiring and I hope your drive and focus is contagious for folks that need help finding a way to fulfill their dreams. Can't wait to read about your delivery day. Looking forward to your progress reports between now and then. 👏👏👏1 point
-
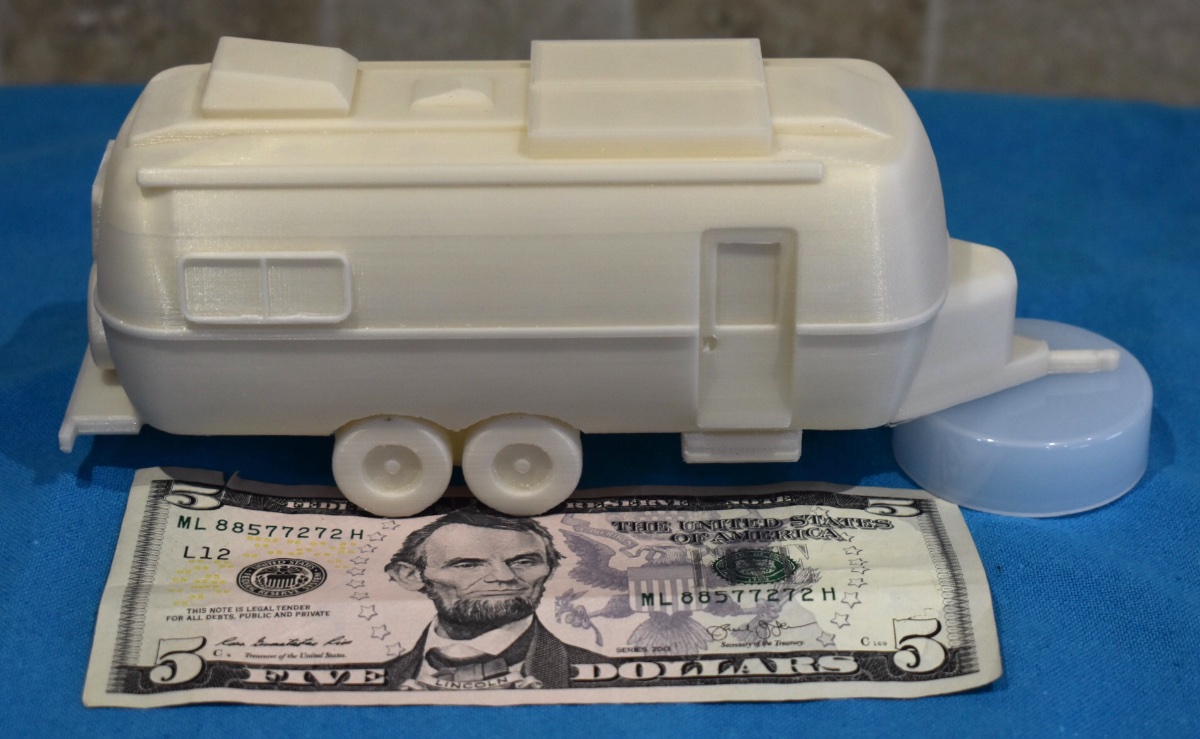
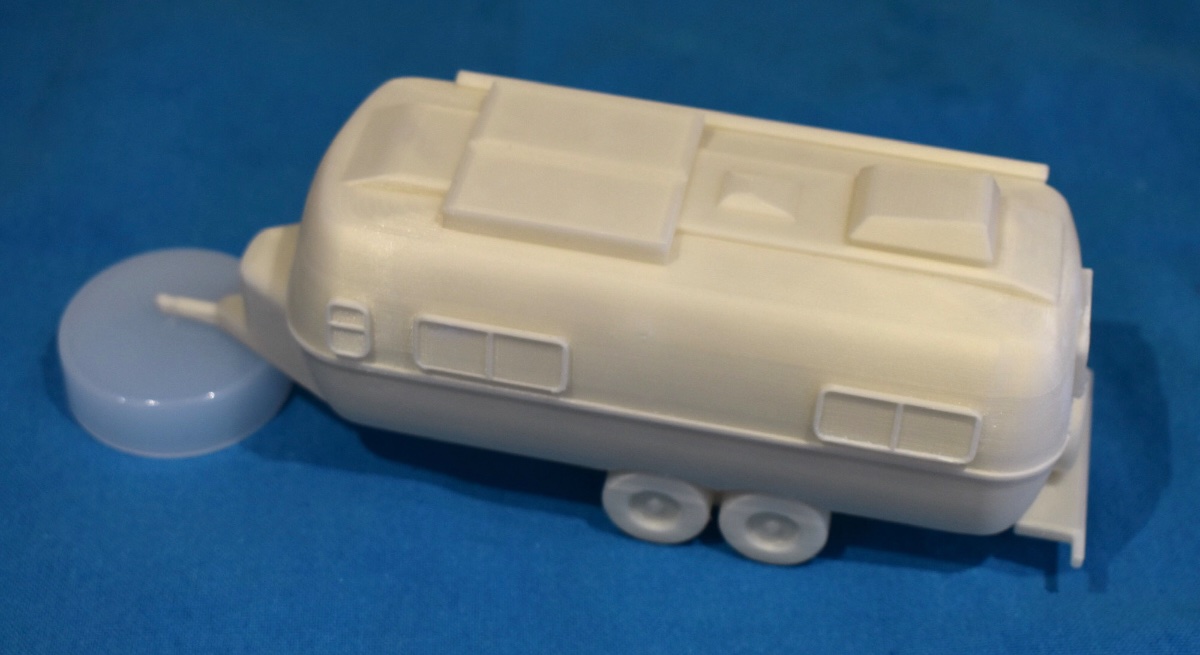
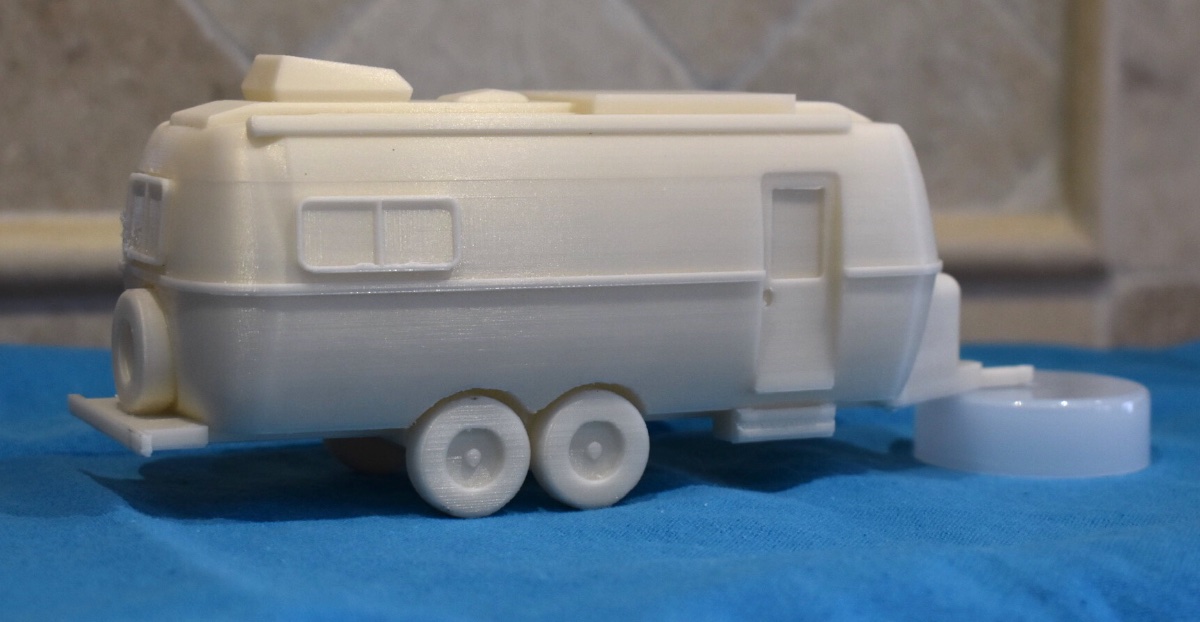
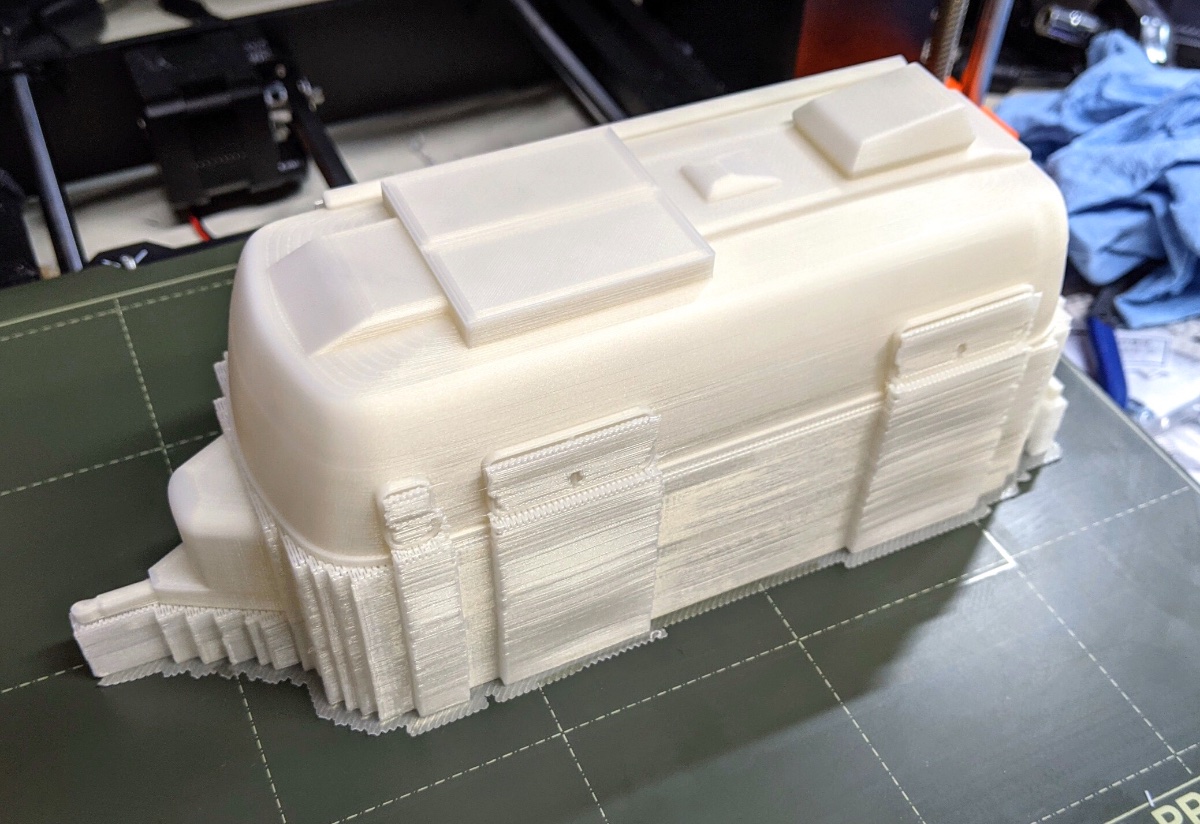
My son is a computer game programmer and they recently got into 3D printing. Here is what arrived for Christmas...... It was a total surprise. The $5 bill is for scale. The hull is exactly 6” long, the LE2 hull is 18’, so this makes the model 1:32 scale. There are lots of truck models in this size, my Land Cruiser 200 would be 5.9” long at this scale. ..... https://www.ebay.com/itm/Toyota-Land-Cruiser-4x4-1-32-Scale-200-VX-Wagon-SUV-Diecast-Model-Mini-4wd-Car-/362667098231 And this is what the model looked like before final trim “processing”, I have NO clue how that is done. They were not able to find an actual data file online, they did this completely from scratch using photos. They are willing to share the print file if somebody wants to try this at home. They are thinking about dividing the build into layers, so you could print the tires, frame and hull in different colors and then join them.... but it would not be too difficult to prime and paint the all white version. And no, they do not want to start mass producing these. That would be something for the much rumored, never seen Ollie Store in Hohenwald. Happy Holidays. John Davies Spokane WA EDIT: FILES AND BASIC 3D PRINT INSTRUCTIONS. NO GUARANTEES, THIS IS NOT PLUG AND PLAY EASY. If you cannot download these files directly from this thread, let me know and I will try another method. Thanks to my son Ian! oliver legacy elite 2 trailer davies.stl oliver legacy elite 2 trailer davies.3mf “Provided as is - this shouldn't be too hard of a print, but you'll probably want to have a basic handle on printing. The print specifics below are what I used to print it. They're not required, but might serve as a starting point. Print specifics: Printer: Original Prusa i3 MK3S, 0.4mm nozzle Slicer: PrusaSlicer 2.2 Filament: 1.75mm Prusament PLA (stock profile in PrusaSlicer) Perimeters: 3 Layer Height: 0.1mm Infill: Gyroid, 5% Supports: On Raft: 2 layers (not necessary, just makes it a bit easier to get the tires round) Model print scale: 850% (~200mm x 66mm x 82mm) Total filament (including supports): 143g/48m If you slice it yourself, you'll probably want to put support blockers in the wheel wells - cleaning supports out of there is a pain. This will require some postprocessing - mostly just removing supports from small gaps. If your printer isn't precise enough, or if you're printing with a larger layer height, you may want to do some sanding to get the curves more fluid.” I. D.
1 point


-
Recent Achievements
-


