Leaderboard


Popular Content
Showing content with the highest reputation on 05/14/2023 in all areas
-
When replacing the black tank valve, used a piece of double sided tape to hold the nut while threading into it:7 points
-
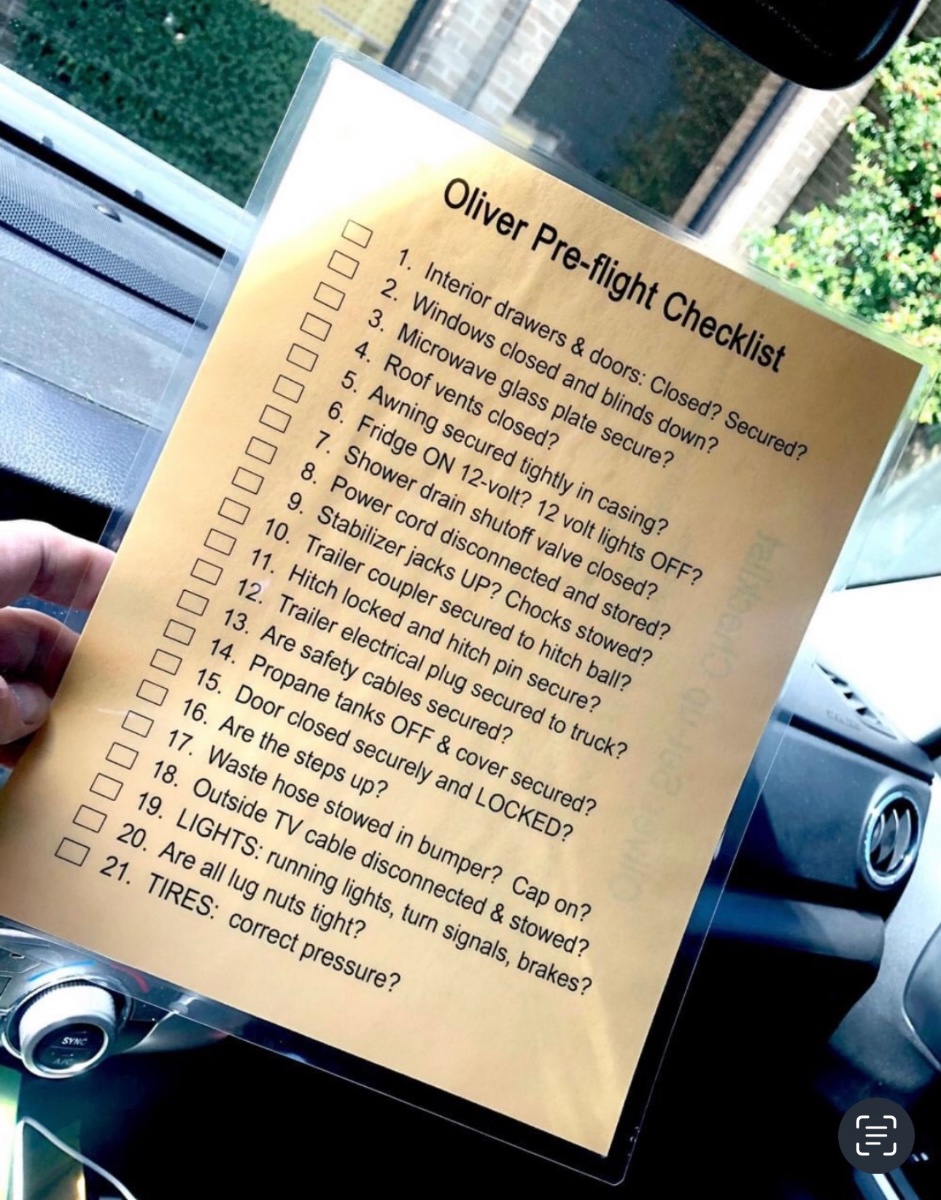
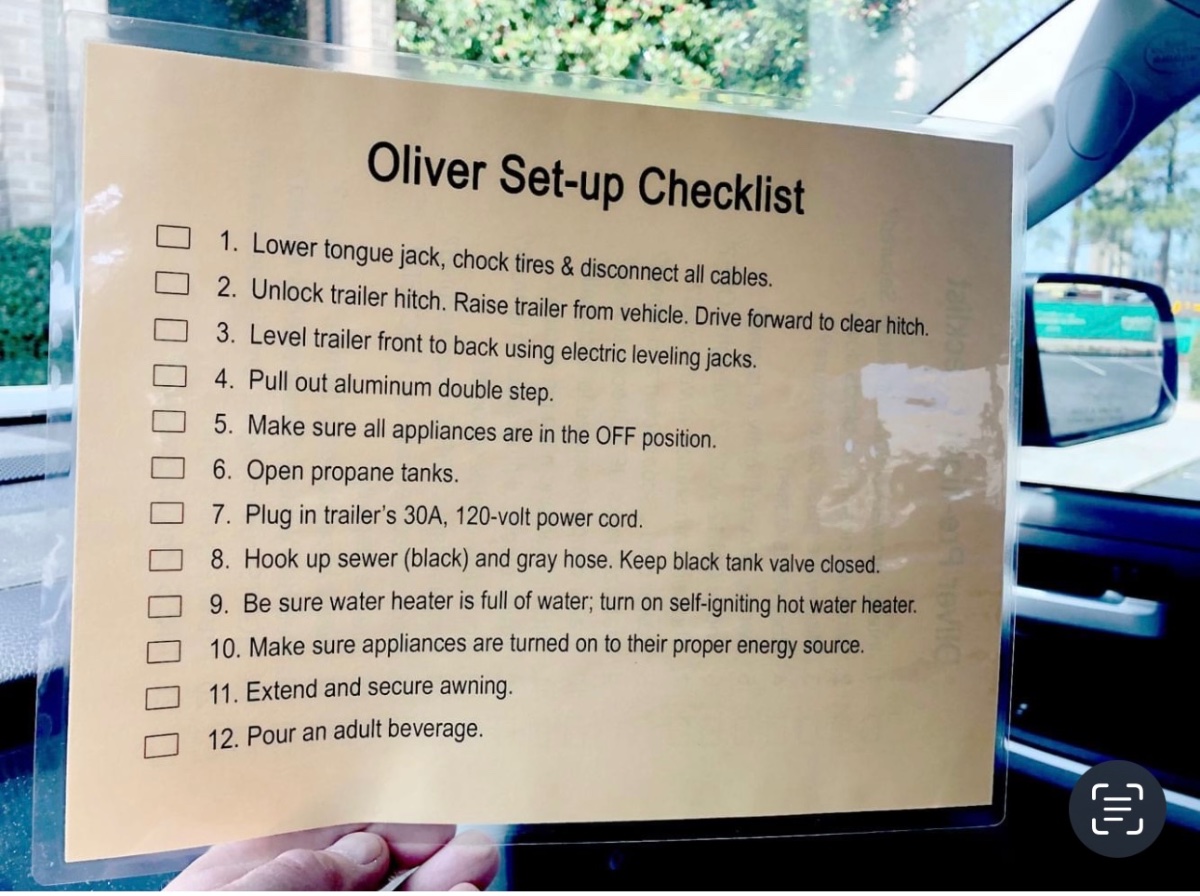
I double sided print two copies. One copy I highlight the text "Inside Trailer Copy". the other one I highlight Outside Trailer Copy. My "Cinc House" copy stays in the kitchen drawer. The outside copy in my truck. She does hers, and I do mine. The highlight trick has eliminated any question as to which copy is missing. 🙂 The check list has evolved each year and lets us fully prepare for departure each and every time. I have attached it as a .docx so you can tailor it to your needs. Enjoy, GJ CHECKLIST 2023 OE2 Pre-Departure Check Lists (25 NOV 2022 Version).docx4 points
-
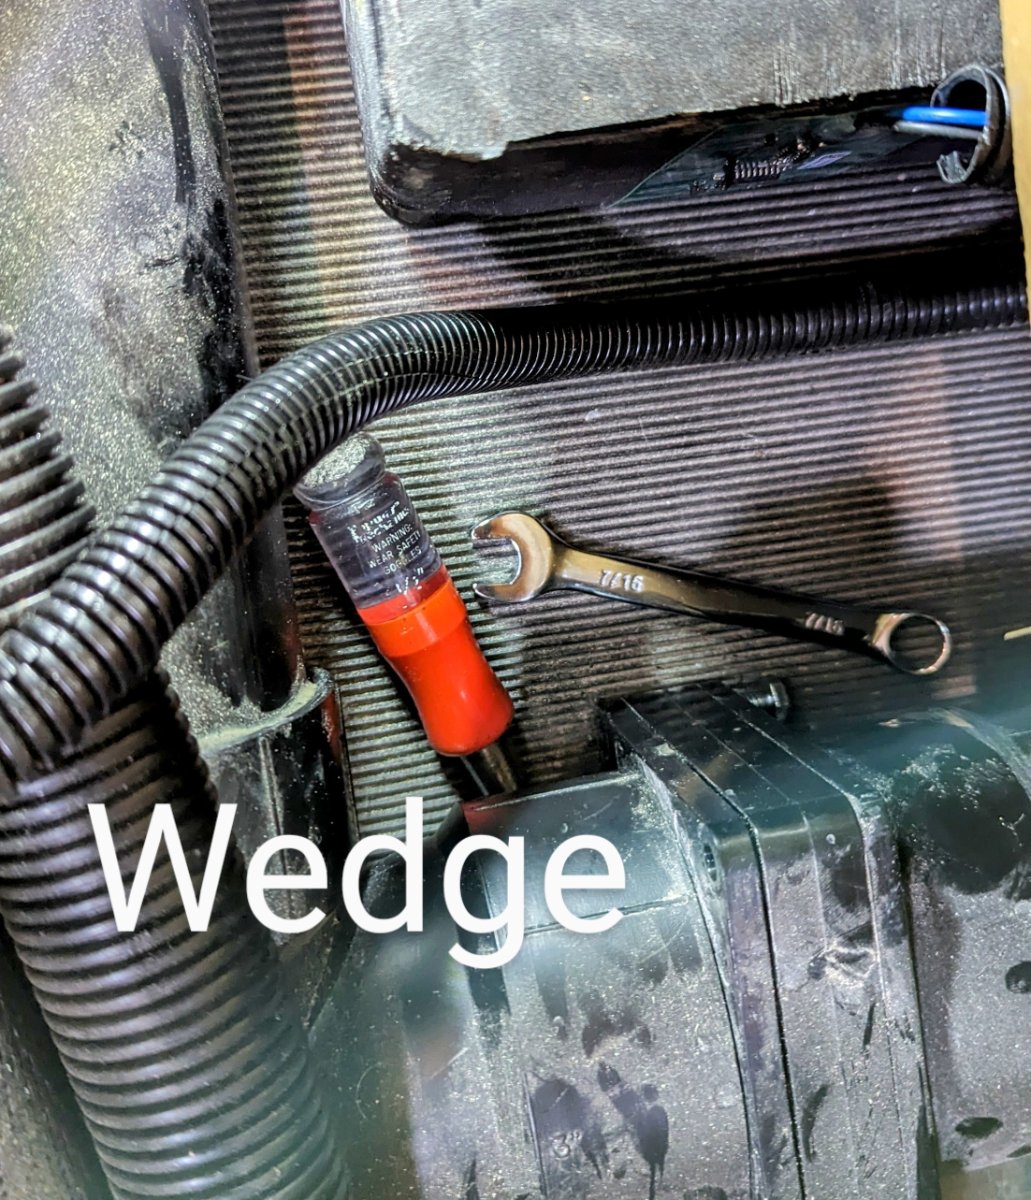
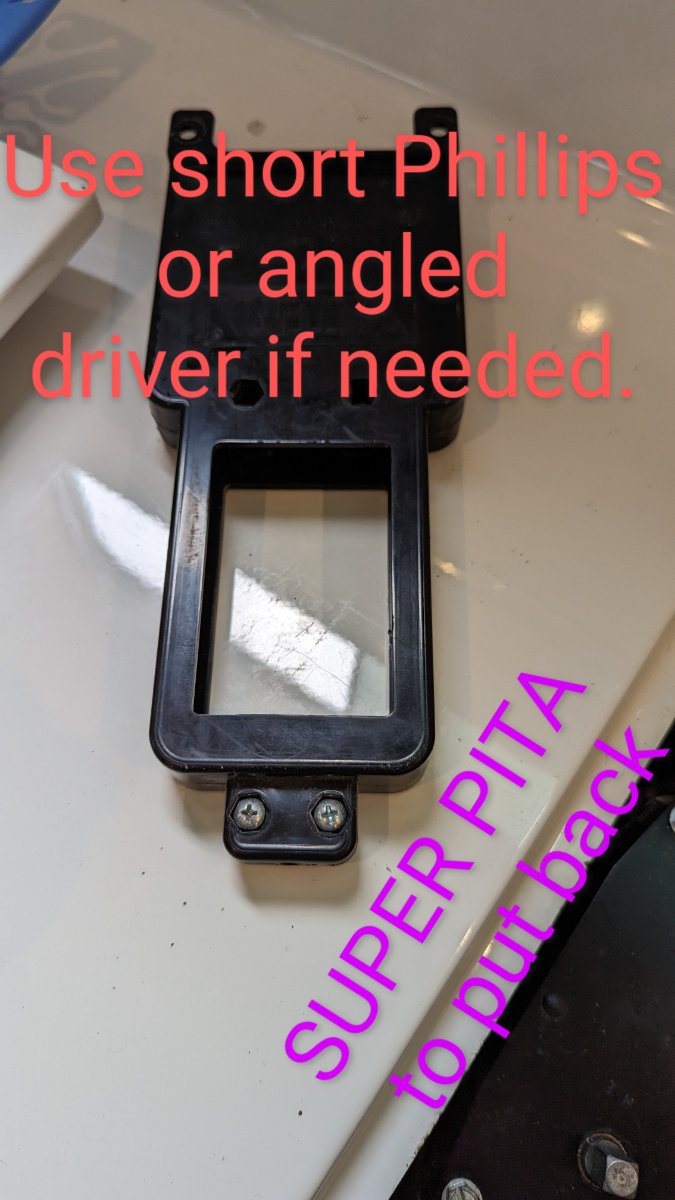
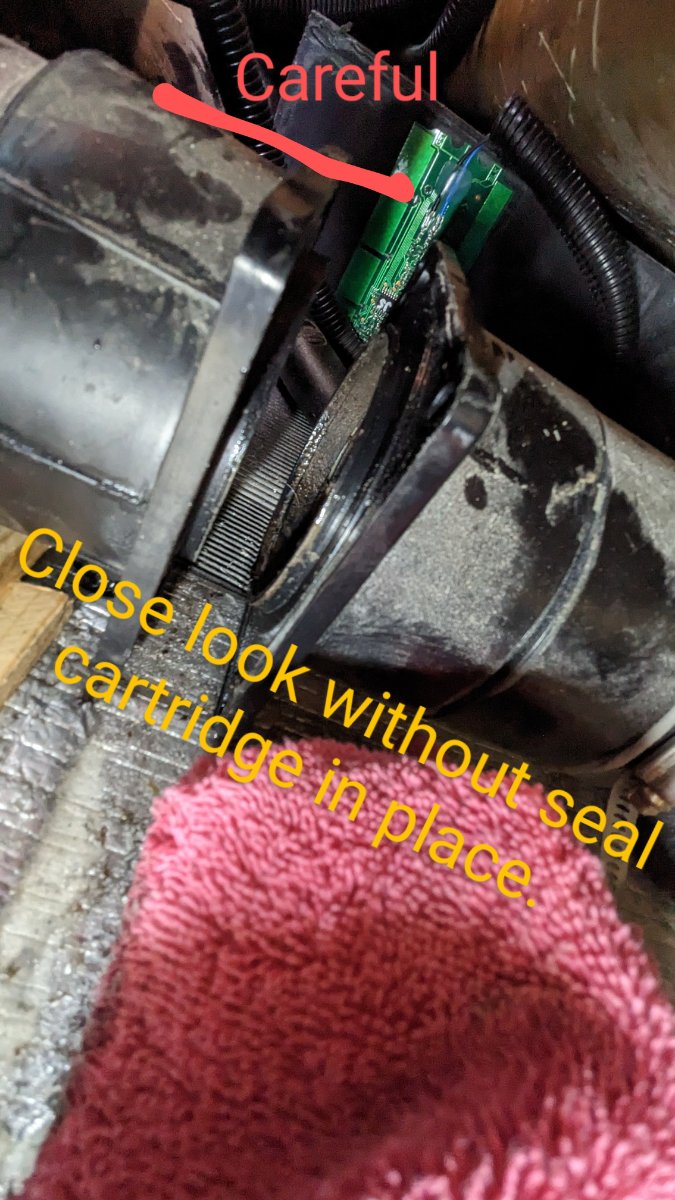
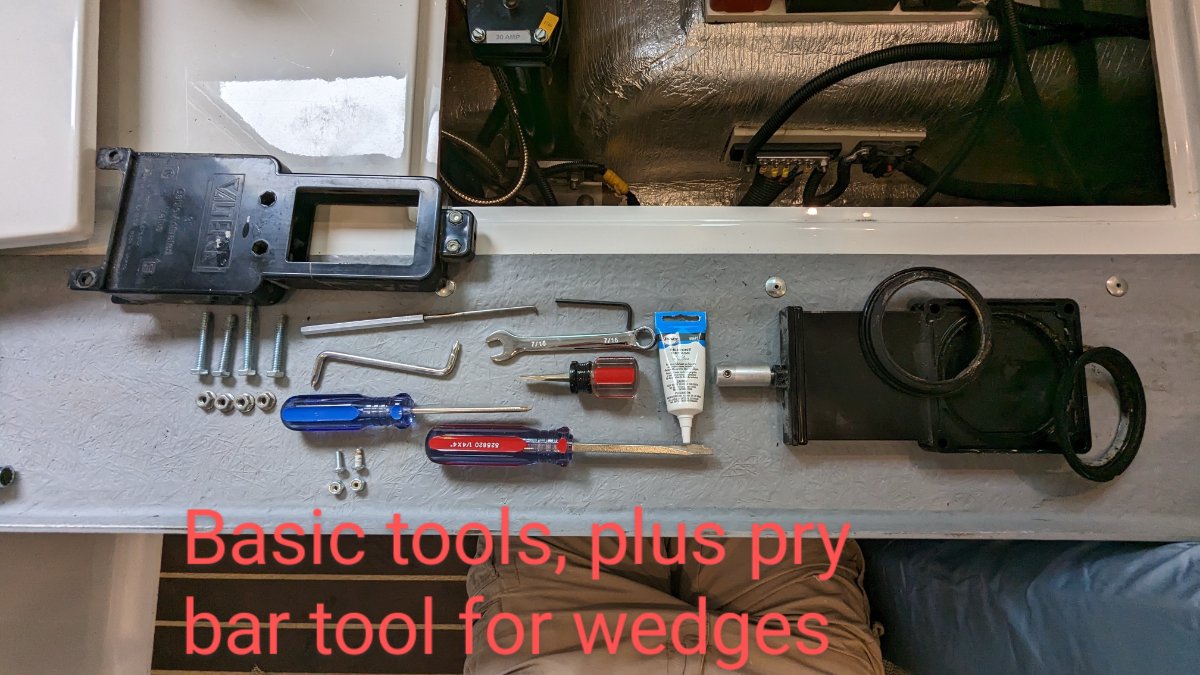
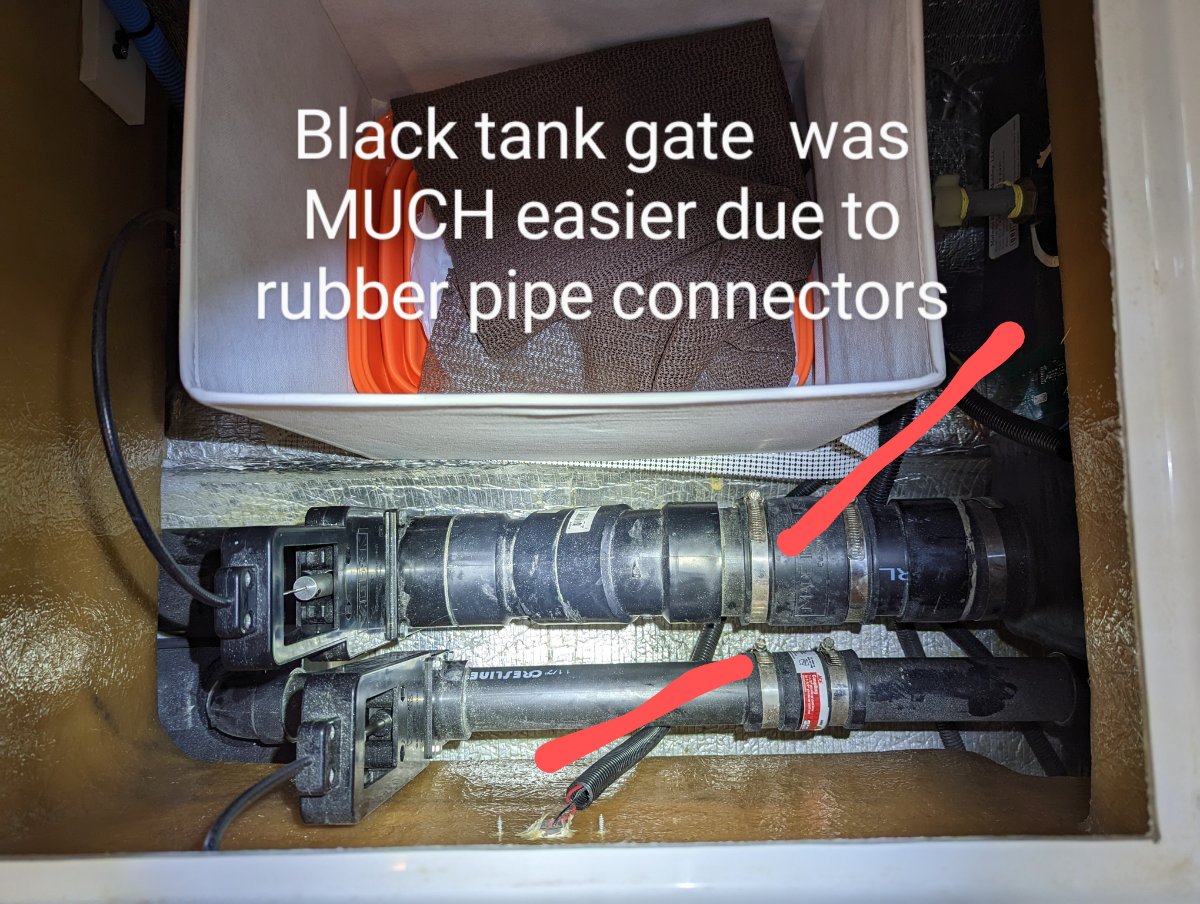
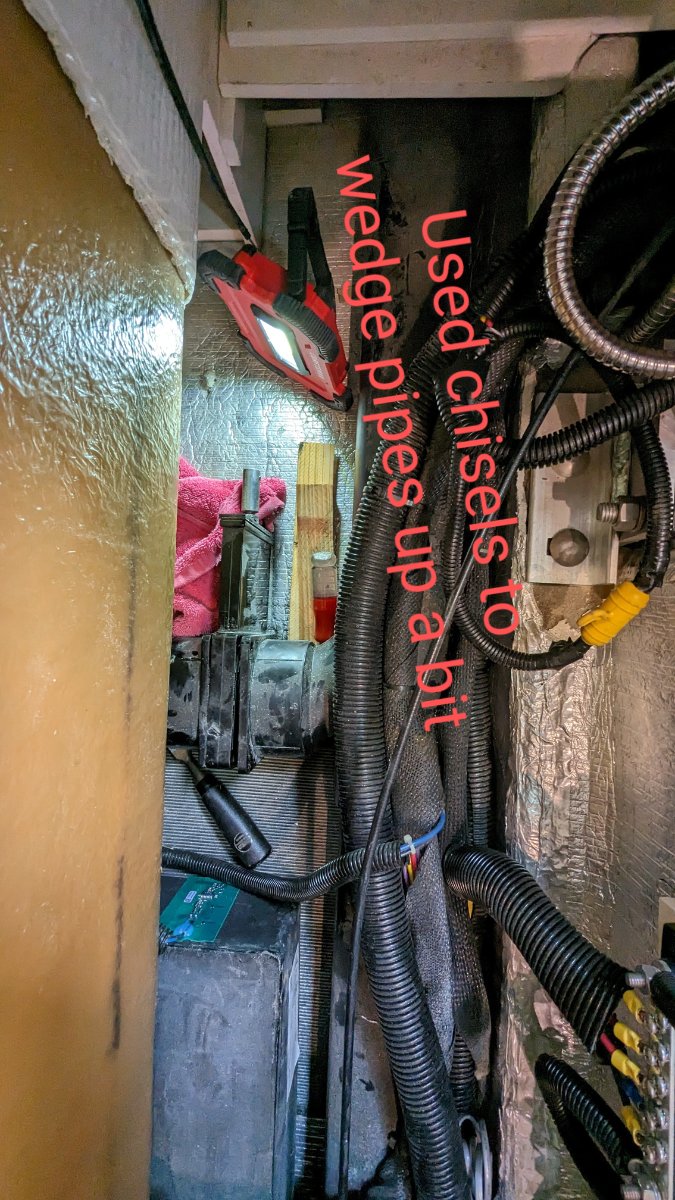
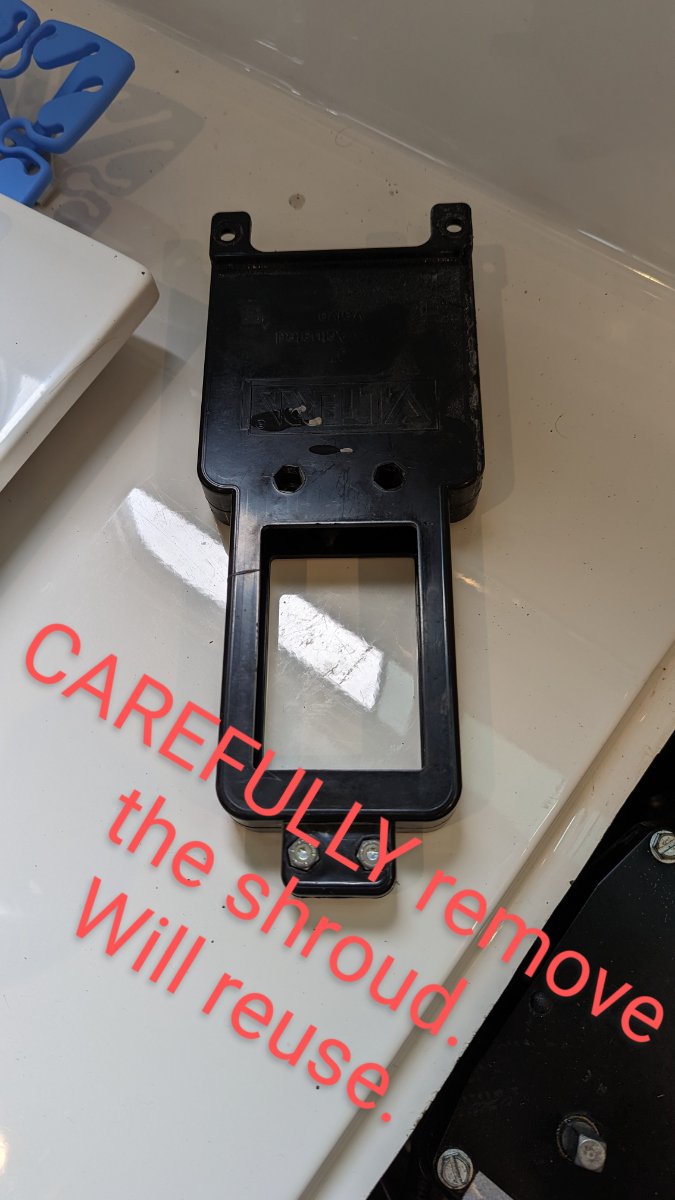
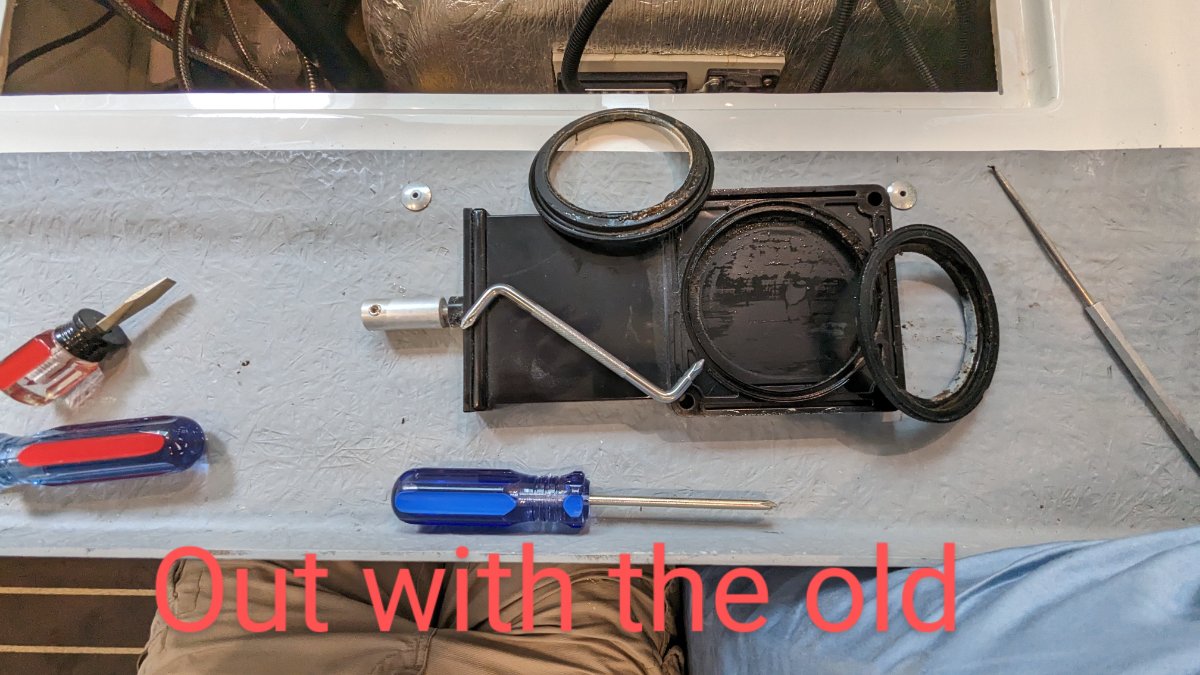
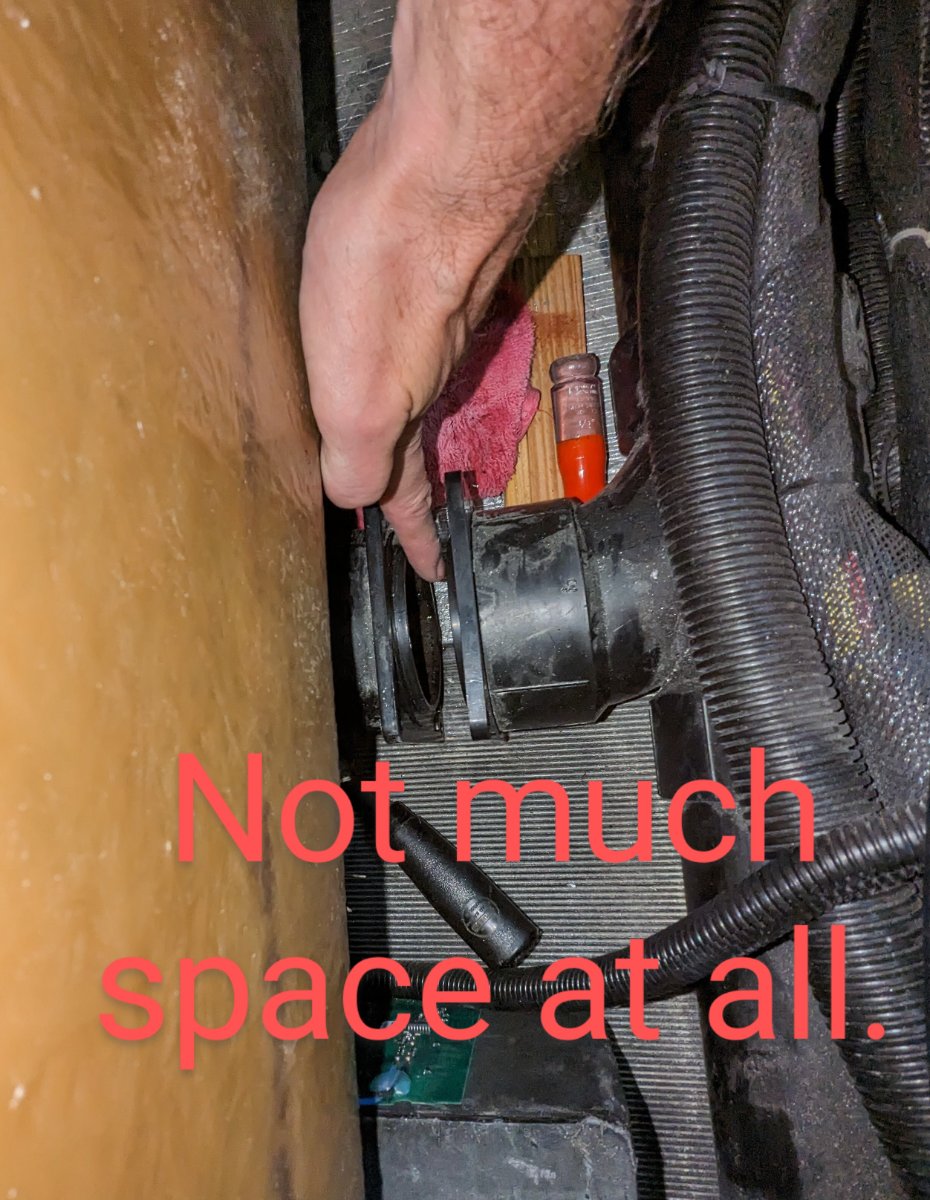
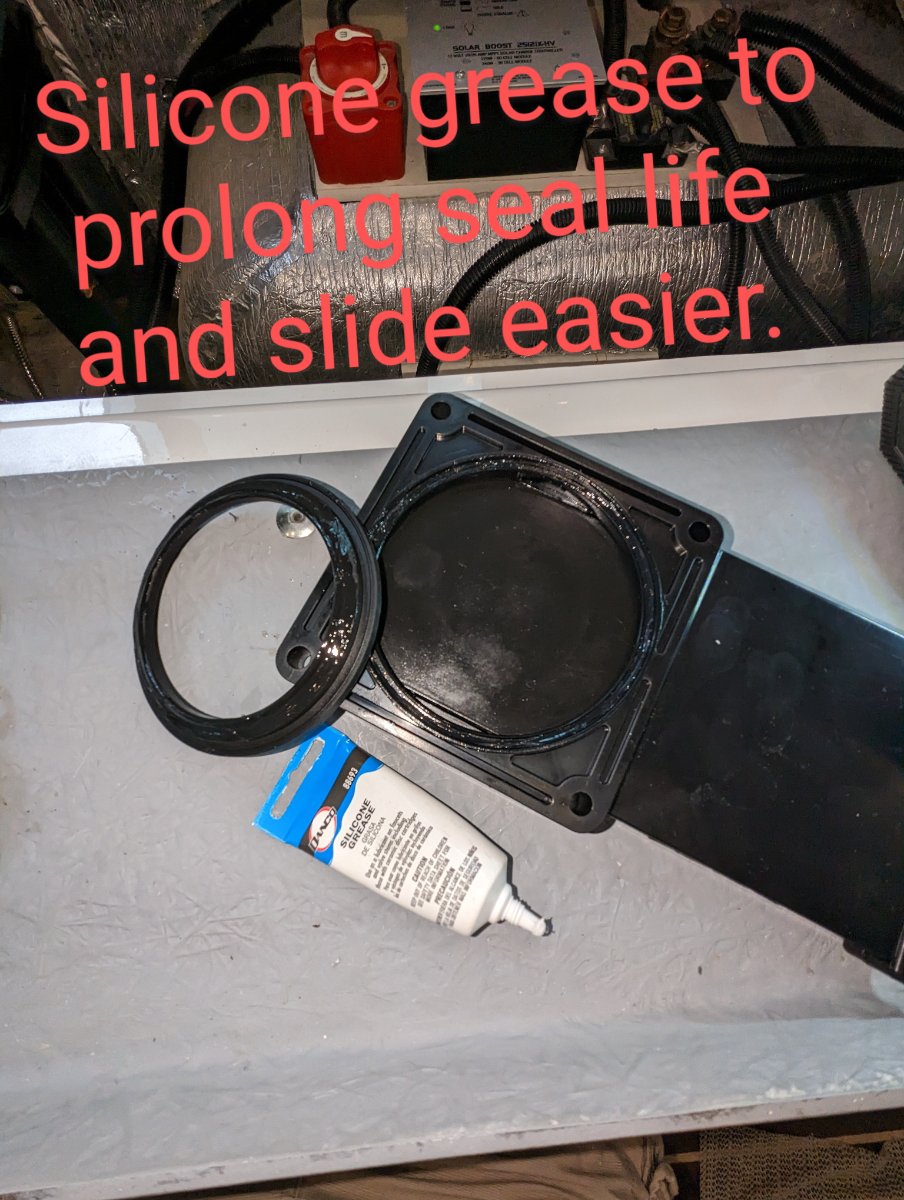
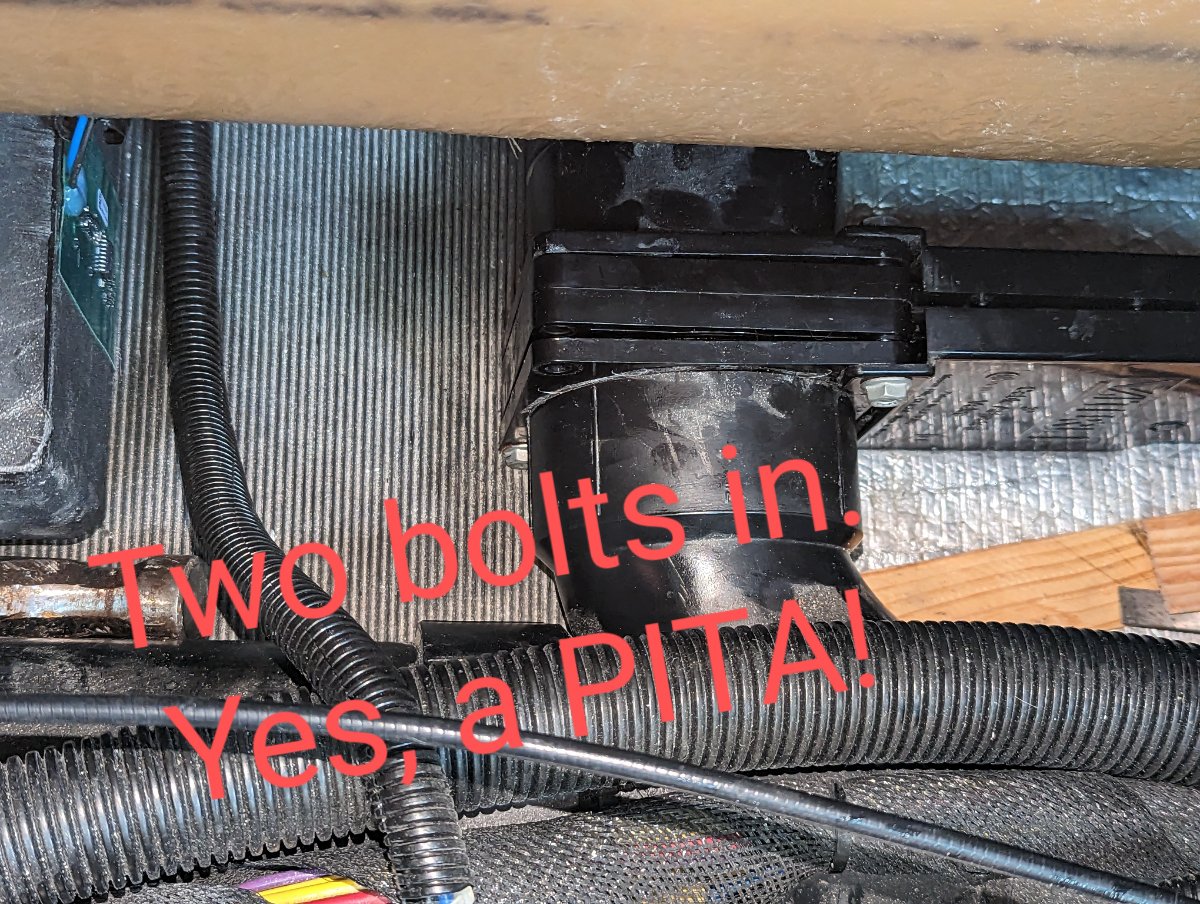
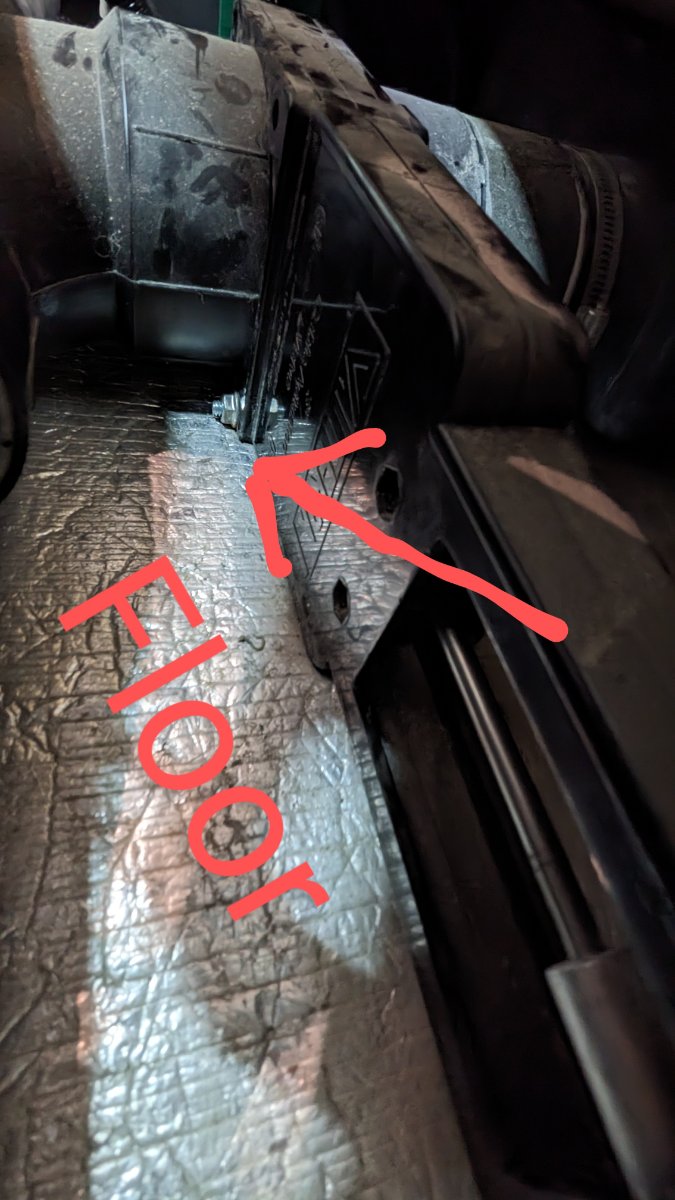
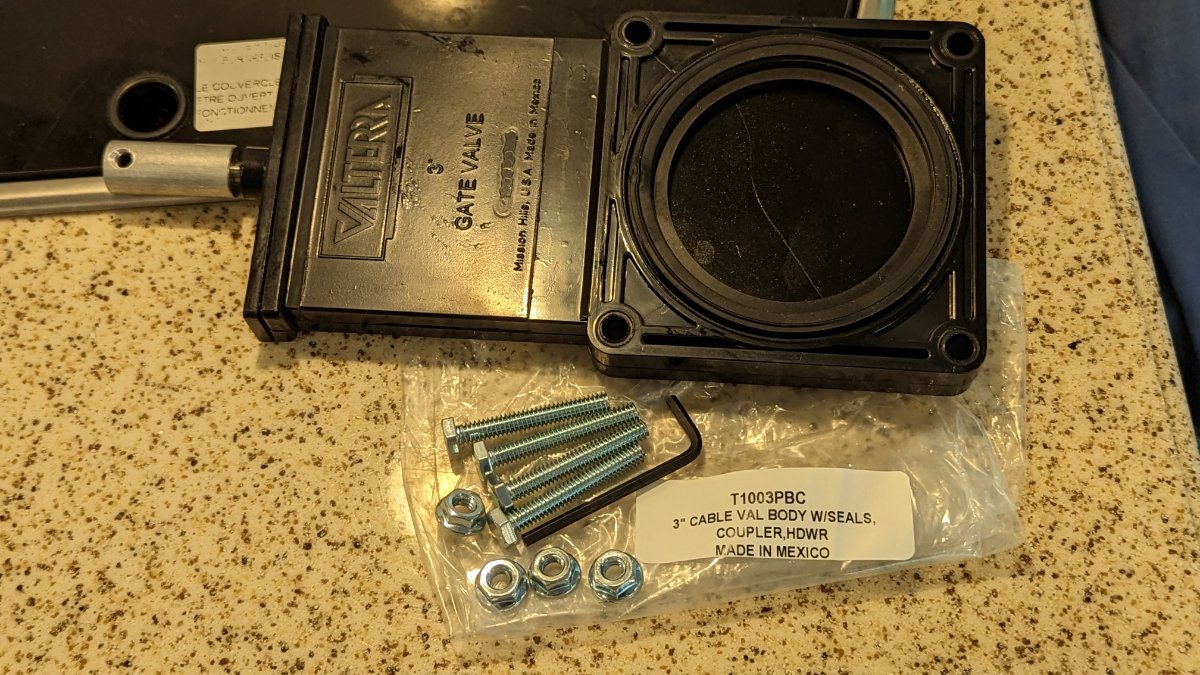
NOOOOOOOO, no it was not easy. LoL OMG that was two hours I'll never get back. It's done and with no leaks. I filled up the grey tank to 100%, and then some. I let it sit for over an hour, checking for leaks very carefully and with a very bright light and white glove test. I also opened and closed the gate valve a few times and checked for leaks. The grey tank valve in this 2016 model is extremely difficult to do. Unlike the black tank valve that has rubber pipe connectors to loosen up for wiggle room. Next time, I drive to Tennessee and let Oliver curse through that grey tank valve. Errrgggggg. If you have a bad back, are over weight, or have arthritis in the hands I would think twice before attempting this. I hope the newer models have improved this part replacement. I had to rest my head on the jack motor several times. Oh, long arms are required. I've annotated some pictures. No certain order. Hopefully the plumbers grease will add an extra two years of life. I think the job could have been substantially easier if the gate valve could have been 1/8 to 1/4 inches off the basement floor. It would have at least saved time getting the two lower nuts off and on again. It's tricky for sure. I'm considering doing a short video with the pics and doing a voice-over to describe the challenges. In some of the pictures you can see what I believe is the grey tank sensor board in the background. Be careful with tools around the sensor, it could be damaged and work even less affective than it already does. I used a hammer as leverage to separate the grey tank side of the valve with the main black tank pipe. On my TT many of the electrical wire bundles were between the hull and the main drain pipe, preventing movement. I was however able to lift the bundles up to relieve some of the pressure on the drain pipe.
 4 points
 -
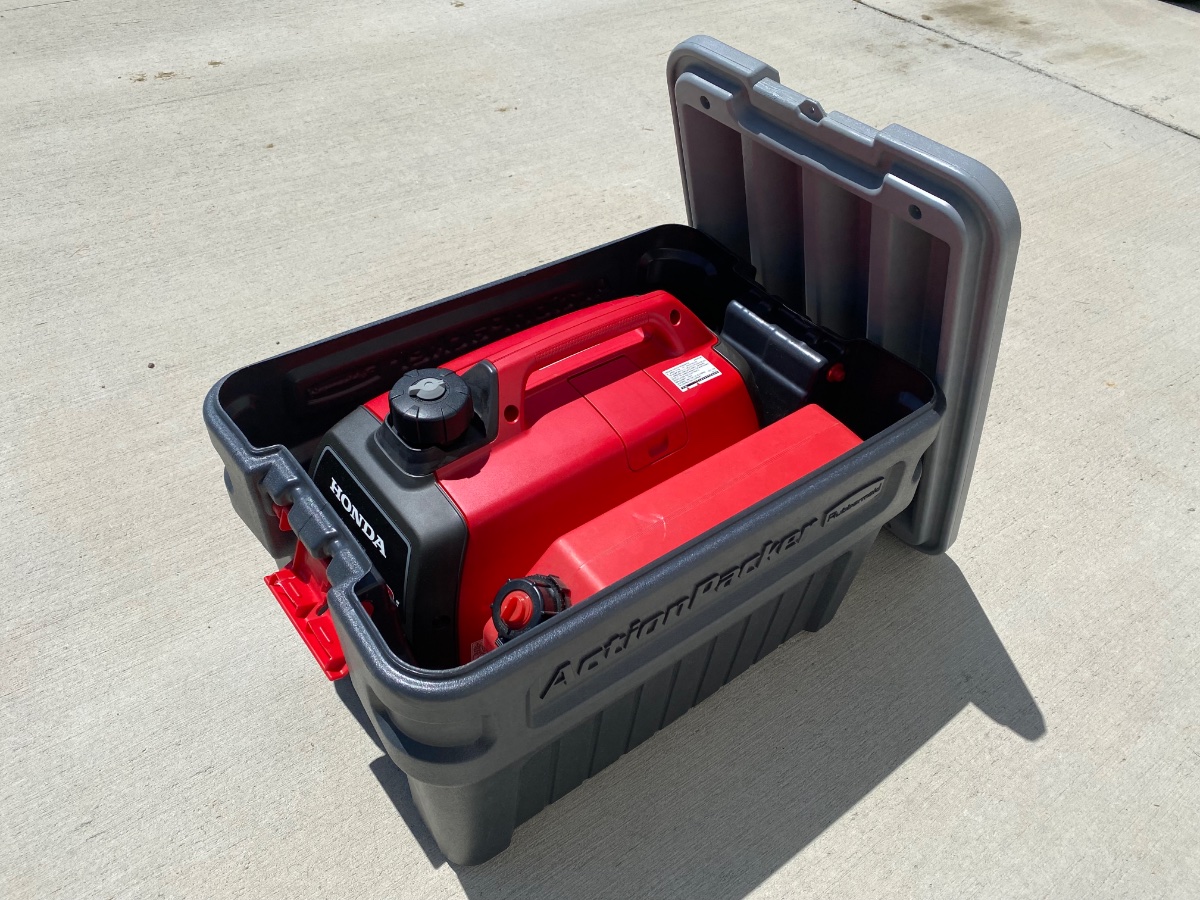
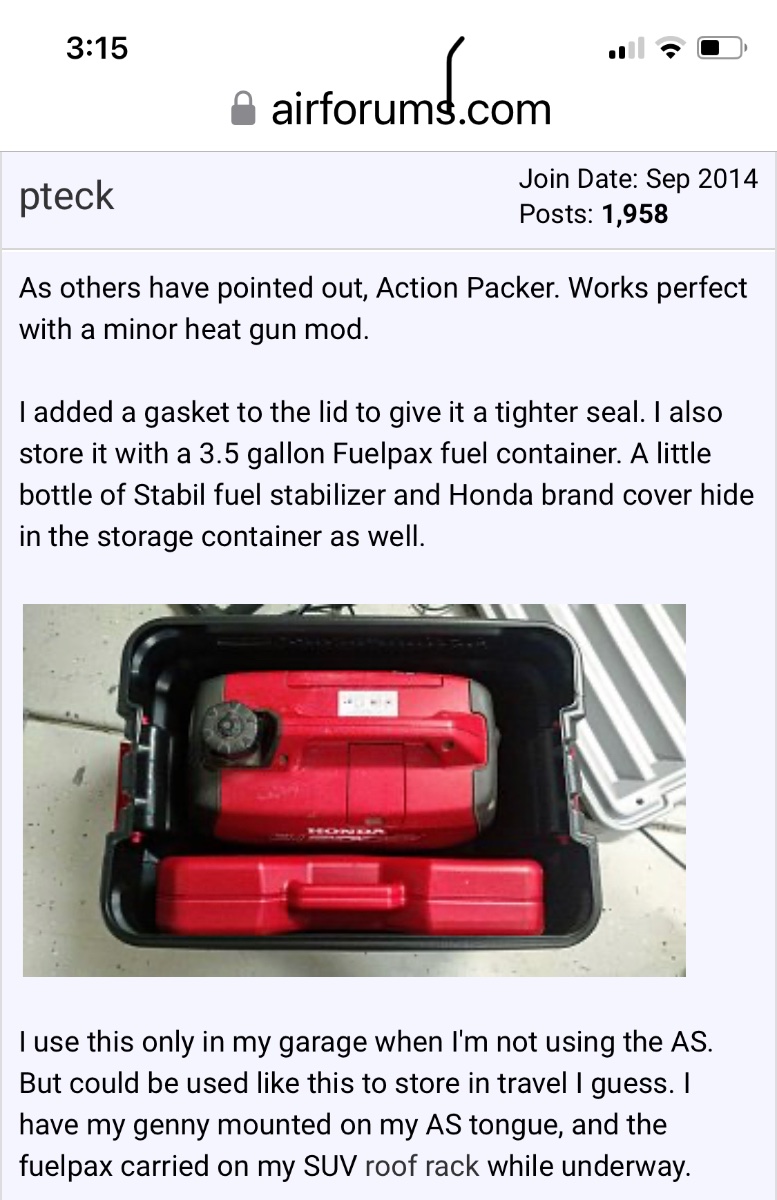
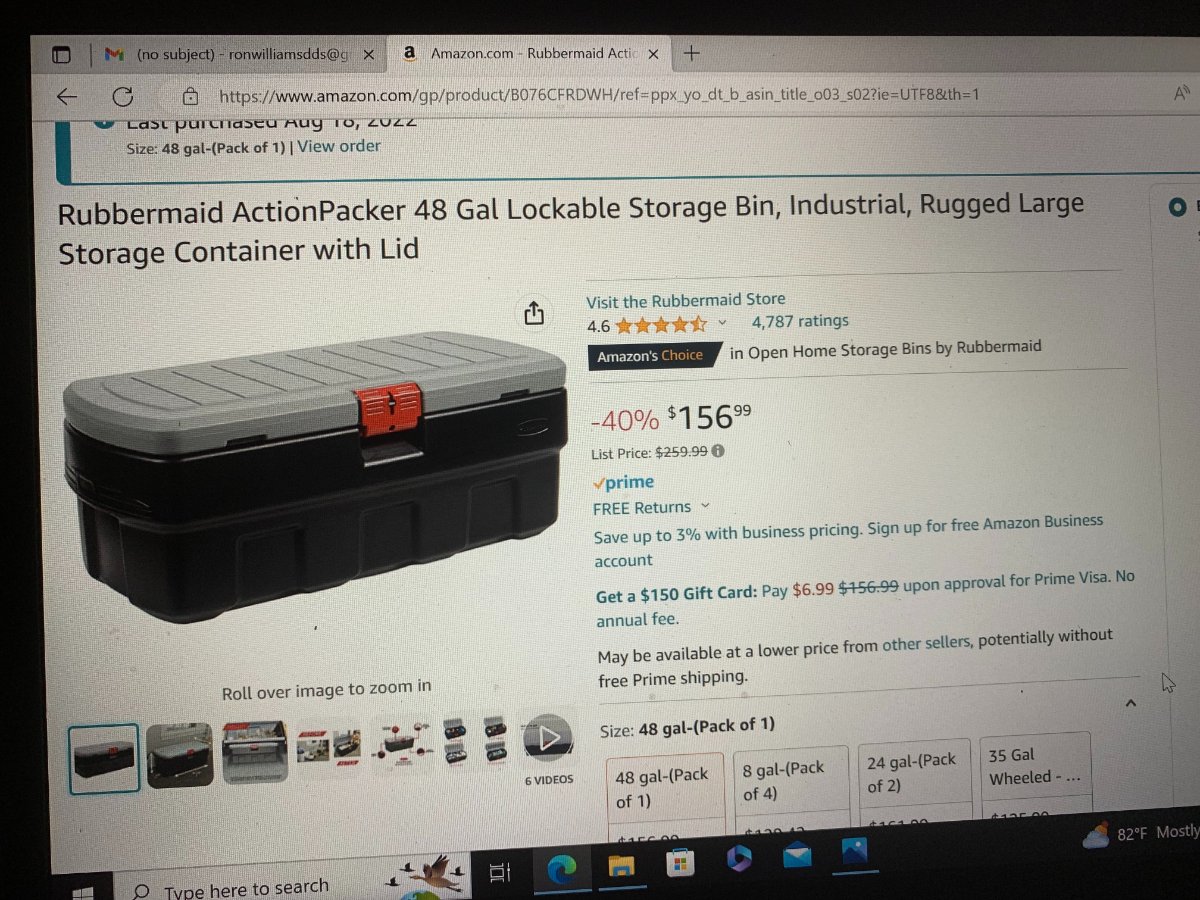
Oh so close. Looking for a good storage bin option for transporting the Honda EU2200i generator in the truck bed (with a bed cover) to keep things clean and organized. I don’t have the front Ollie basket, plus I want to keep the generator under the truck bed cover away from prying eyes. I tried one of my 24 gallon RubberMaid Action Packer bins and it’s ALMOST perfect for the generator, a 2 gallon RotoPax fuel container, and an extra quart of oil, with a PIG Mat in the bottom of the Action Packer to absorb any oil or gas drips (but I doubt the Honda will leak anything). Holds things nice and snug, EXCEPT for the height. The inside ribs on the double walled lid interfere with the generator handle and gas cap. Might be time to get out the knife and modify the lid by cutting away one full rib, and also adding a small vent hole in the lid for fume venting. Of course for running the generator it will be removed from the storage bin, and allowed to cool down before putting it back in the bin.
3 points
-
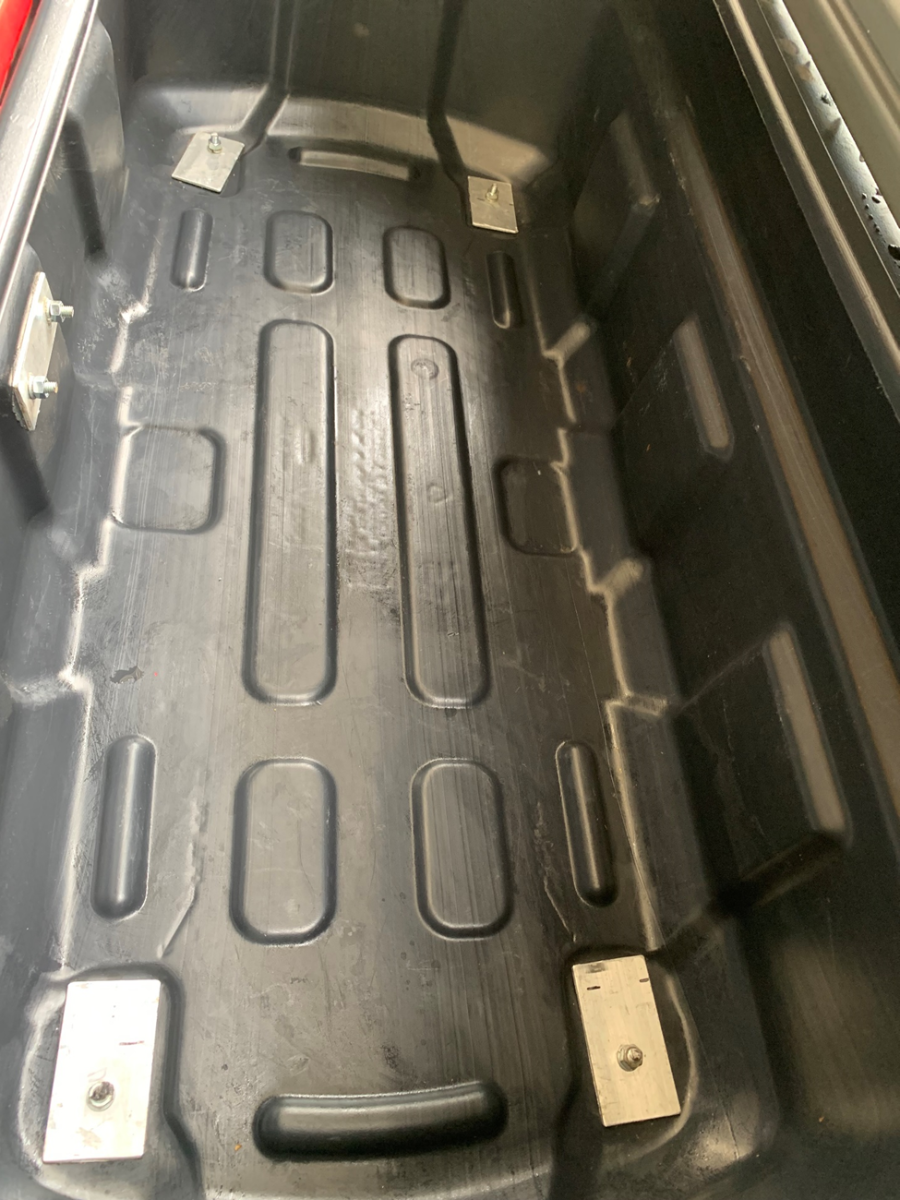
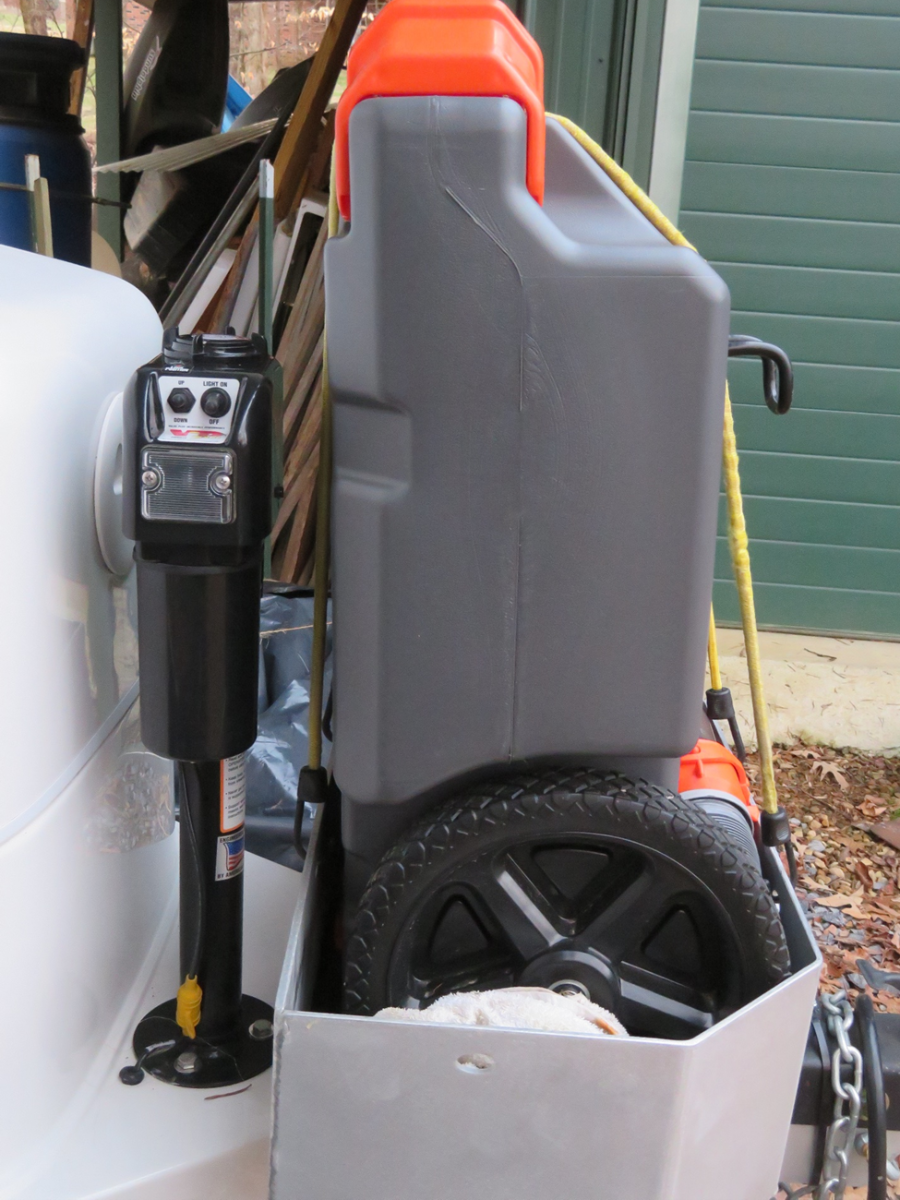
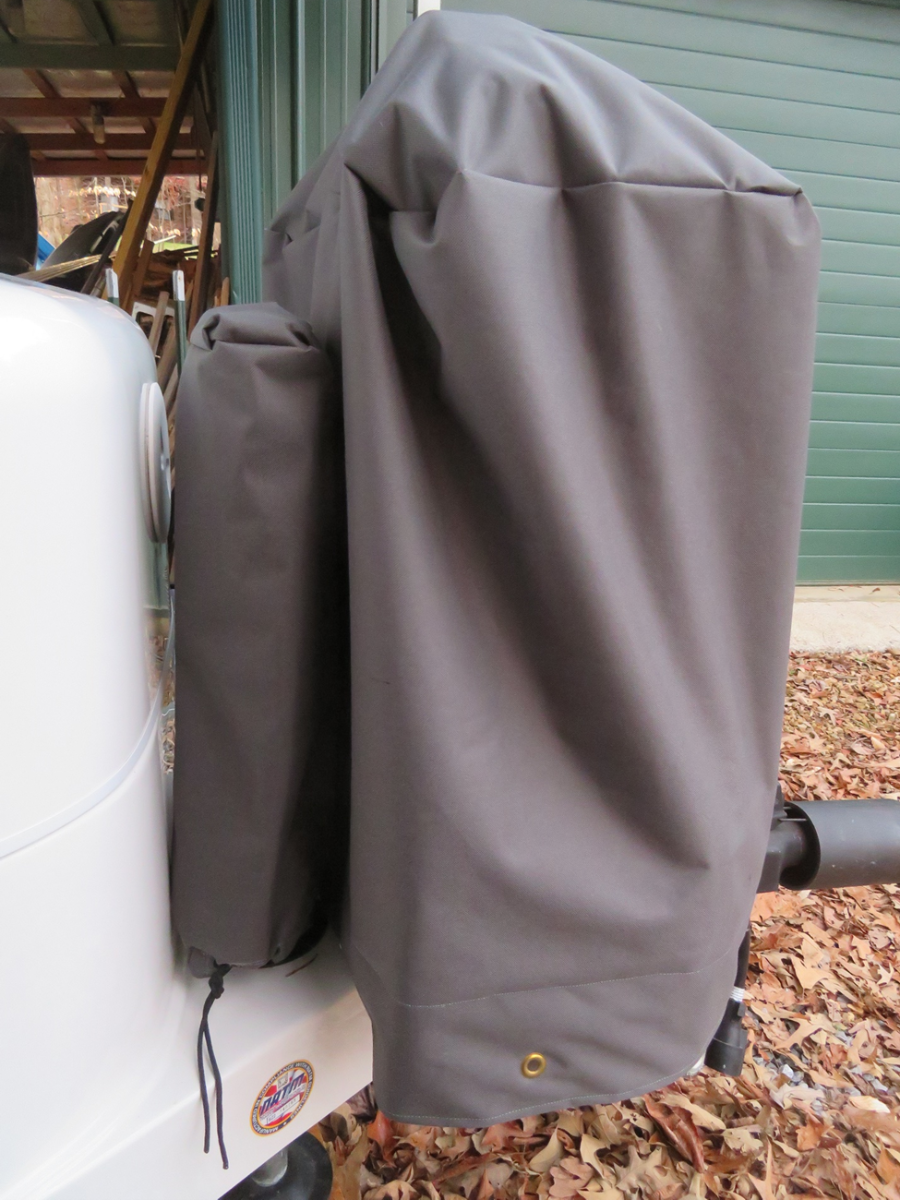
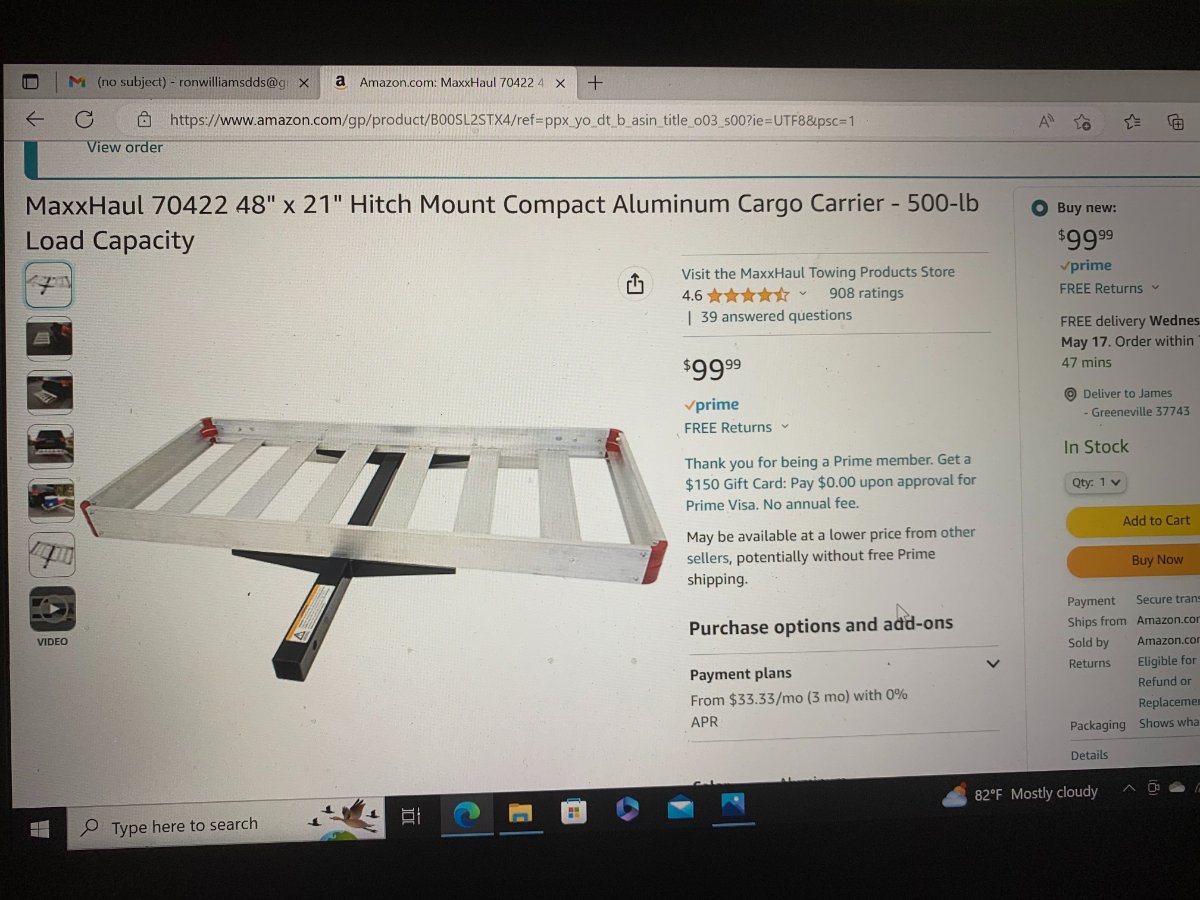
I’m still new to our Elite “Li’l Ollie” #1209. Thanks to all of you for sharing. With all the wise and technical information posted, I feel a little intimidated about posting much of anything. I’m sure I’m not alone. Here’s a few things I’ve done to make things a little easier on our travels so far. Rear Storage Carrier Since storage on the Elite is so limited and since my tow vehicle is a Subaru Ascent, not a truck, I’ve adapted some ideas I’ve seen on the forum that seem to be working well. I mounted a Rubbermaid ActionPacker 48 Gal using aluminum plates in the bottom and bolted it to a MaxxHaul 70422 48”x 21” Hitch Mount Cargo Carrier. Together they weigh a total of 43 lbs allowing me to carry a little over 100 lbs and be under the 150 maximum for the hitch. I also measured how far I could slide out the carrier and get the spare tire out without removing the carrier. I drilled a couple of extra holes in the hitch that allows me to slide in a retention bolt on each side to prevent the slid out assembly from falling in case I have to slide it out on the road. I did have to remount the license plate and a light that required extending the wiring. I also made some water/UV resistant canvas covers to protect the rear cabinet, jack, and front box where I carry my portable tank, mainly to protect the plastic from the UV. Interior Clothes Cabinet: Since I’m a caregiver, I need to make it as easy as possible for me to easily access my wife’s clothes. We have found that the single bed across the back works best for us in our situation, that I can leave up all the time. I set up and take down my side bed. We don’t need the large dinette, so I made a smaller version to support her bed and it frees up floor space. We were storing clothes in bins below the bed having to slide them in and out. I decided to build a small cabinet that would allow us to easily access her clothes. It also serves as an extra countertop. I can pick up the cabinet for travel and set it on the floor. I learned from other posts on this forum, that by setting things on shelf liners on the floor that nothing moves during travel. I’ve found that in the evening I can set up the fiberglass extention Oliver provided and use it like an ottoman. With all the pillows it’s pretty cozy watching TV. This wouldn’t work for tall people, but my wife is tiny and I'm fine sleeping on the side bed. I think most of you tall folks have the Elite II anyway.
3 points
-
In our Hiker squaredrop, we had a 6" queen tri-fold mattress. It was a snug fit in the trailer, leaving no circulation under the mattress, and pushed the bottoms of the doors out slightly. So I used an electric turkey knife and trimmed 4" from one end and 3" from the width. The queen fitted sheet (which are made for today's seemingly 24" thick mattresses) now fit so loose, it might as well not have been fitted. So we ordered a set of Allyson's AB Lifestyle Road Ready RV sheets in a custom size to fit the modified 6" mattress. What a wonderful buying experience and such well fitting comfy sheets! Needless to say, when we ordered the Oliver, we promptly ordered a set of sheets from Allyson as well!3 points
-
That's cheating...3 points
-
We still refer to our checklists…one has to ask what could possibly go wrong? 😄 Patriot🇺🇸3 points
-
@Ollie-Haus Got my panel installed a few weeks before we took delivery. I have a 50A circuit connected to it so I have to "manage" the connections to ensure I don't overload it. Although, it has breakers on the remote panel and the main panel. With a 30A travel trailer it shouldn't be an issue. I do like having the 20A outlet for other tools if I need it. This model is from Connecticut Electric and I can close and lock the door with the trailer plugged in.
3 points
-
We use an app called Check Off for our lists. I exported our preflight list as a CSV file here so it can be opened by other applications: https://drive.google.com/file/d/1nAse-4wJWtPWX7akFvRi8jG1lTG0NWpS/view?usp=drivesdk3 points
-
Hello, I’m sorry I don’t remember who posted/made these lists (please chime in if it’s you) but we love it and use these checklists every trip!
3 points
-
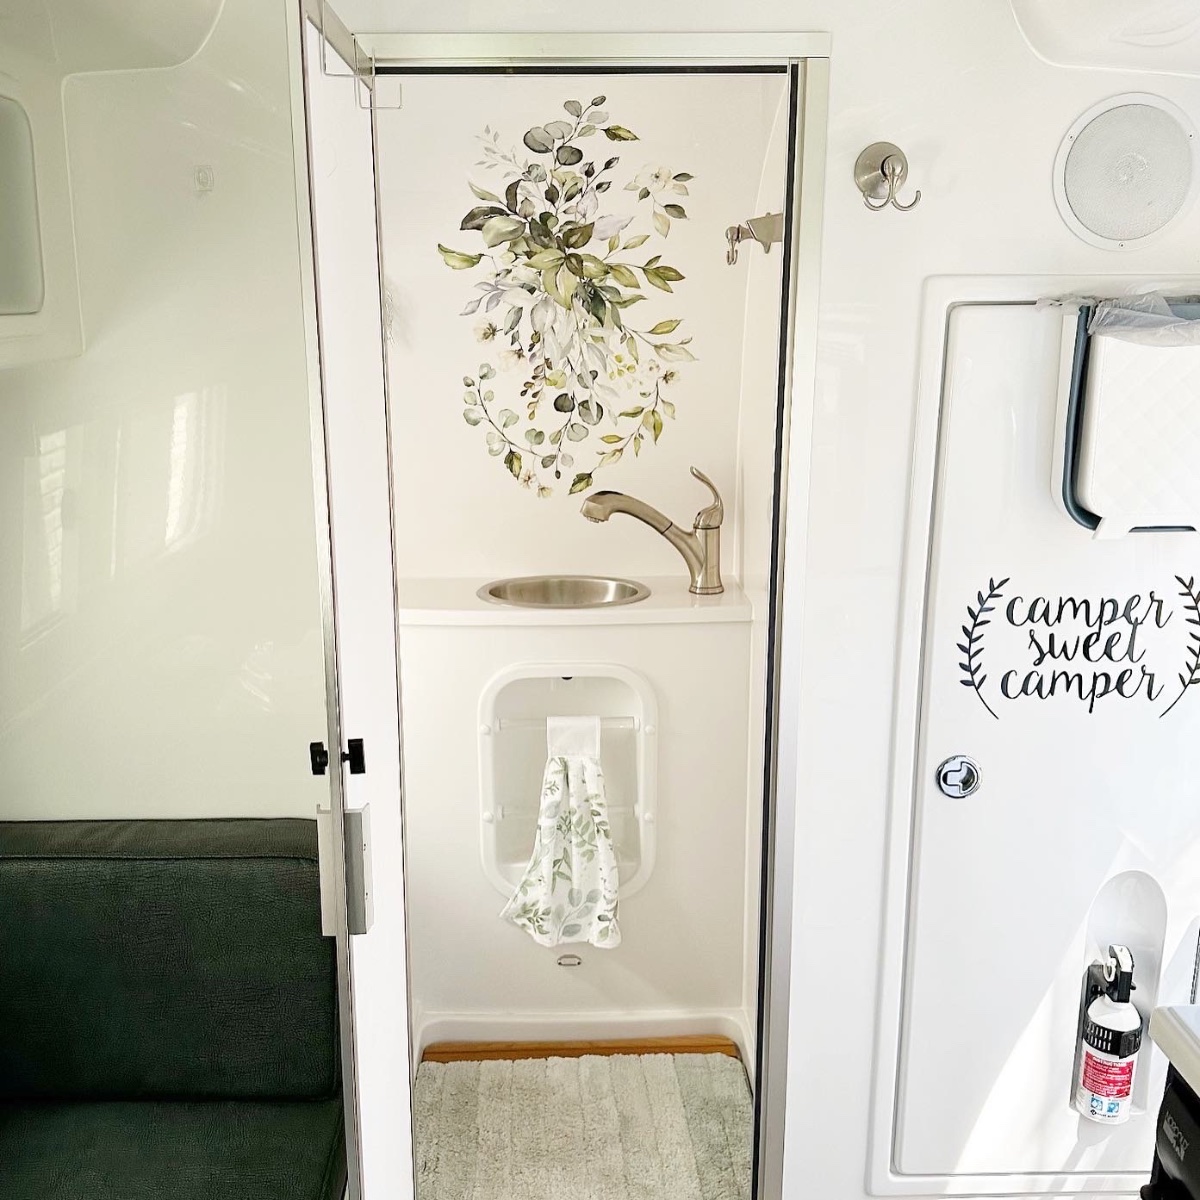
I’am so excited to kick off another camping season! Time to dewinterize our Oliver (yeah) and get it ready for some summertime glamping! I love decorating my camper, I recently added this mural to the bathroom, keeping my botanical theme.🌿🍃🪴😍 I also will be adding some new videos to my Oliver YouTube series starting next month, so many new items, decor, tips and organization hacks to share. Like and subscribe to get notified.😃 Happy camping!
2 points
-
I just want to wish everyone heading out to the Rally this week safe travel. We sure wish we were able to attend. I look forward to seeing all the photos and wish you all the best of times!💗 Happy Camping!2 points
-
That's more than just a little bit of sag...... You may want to check in with the Mother Ship Service Guru (Jason). I suspect he has seen it before. GJ2 points
-
For grins I checked out the Allison's AB Lifestyles Sheets. Pretty cool beans that they have our cot beds specifically designed for OTT! For sure appear to be well made and custom made for just us! Then I saw the price of those sheet sets.... OUCH! For now anyway, it's "Back to Walmart". GJ
2 points
-
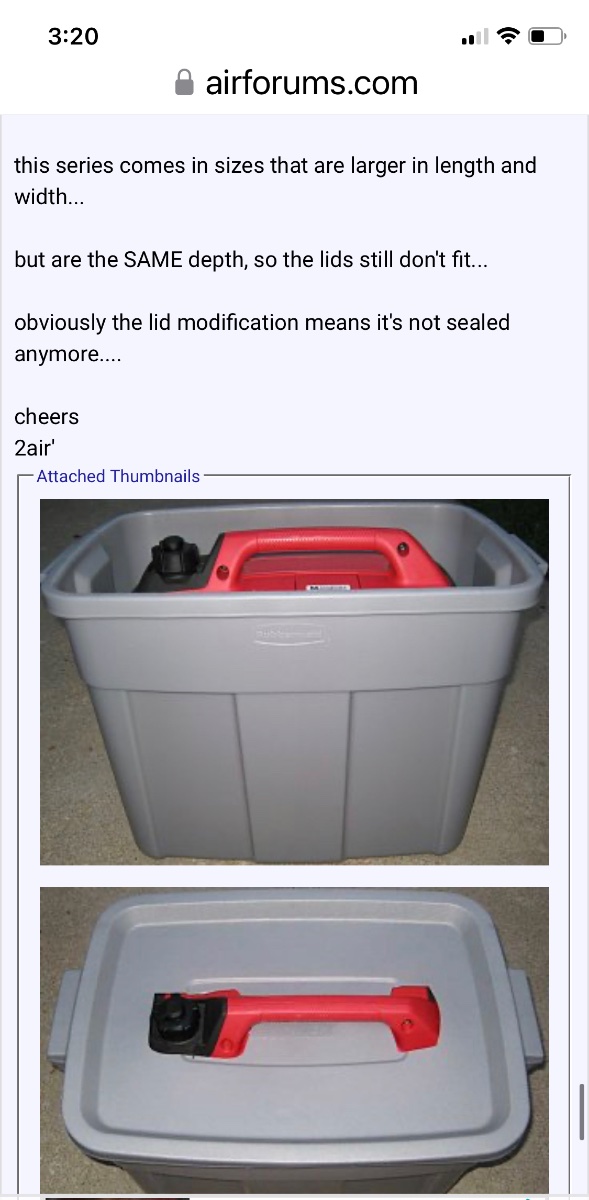
Coincidentally I did search the internet for Honda generator storage box ideas and some ideas did pop up from the AirForum 🙂. Same idea with an Action Packer but this solution used a heat gun to deform the inner lid area of the Action Packer to get rid of the interference. A lot of other similar posts with various large plastic bins, usually with a cutout in the lid for the handle. And the Action Packer doesn’t take up much more space than the generator and Rotopax gas container separately. I have the short bed F-250 and we don’t pack light either 🙂. I already use several of the Action Packers for other gear, they are great for maximizing the use of the storage volume under the bed cover and keeping everything organized and accessible when needed.
2 points
-
I usually just carry mine in the bed wo any container, I usually need every bit of space, we don’t travel light. Lol. I recall that there are a bunch of threads on Airforums regarding this topic and several folks had good options because they carried their genny inside the trailer. You might check out a search there.2 points
-
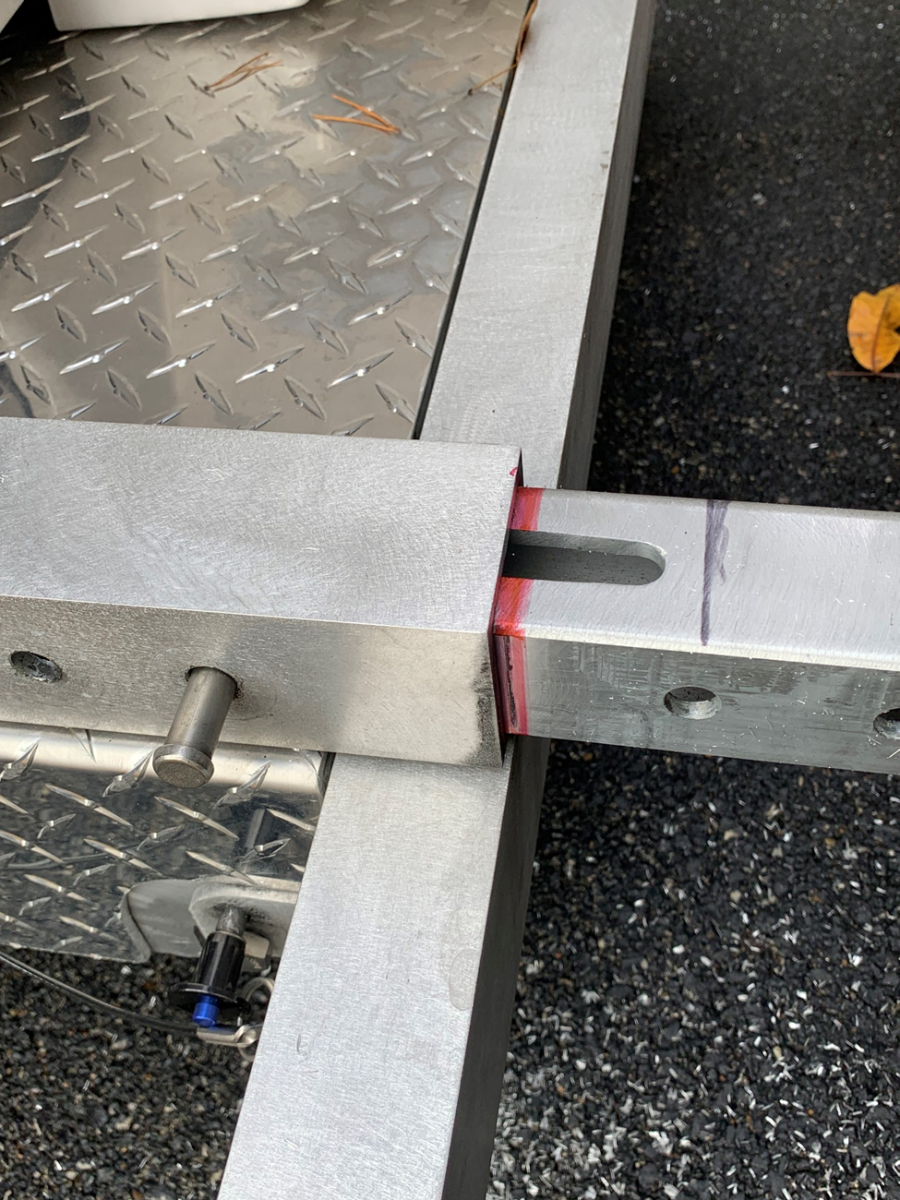
Gladly, If you use the Maxxhaul 70422 Aluminum Cargo Carrier, it looks like the support connector fits a 2" hitch. That's what I see on most of the carriers, so you'll need an adapter for the 1.25 on the Ollie. I happened to have another carrier ( Apex ACC2-4820 Metallic Aluminum Cargo Carrier) that came with two supports for either 2" or 1.25". I used the Apex 1.25" support on the Maxxhaul carrier as it fit perfectly. In a short search I don't see the Apex currently available. The box fits in either. I think it's important to use some very large washers or plates in the floor of box when mounting to prevent cracking. Now that I've used this for several trips, I think I'm going to add a small support chain inside connected to the lid to prevent it from going so far back when it's opened. All the other premade carriers I saw online were too heavy for the Oliver rear hitch or just didn't allow practically any cargo because of their weight. I uploaded screenshots of the box and MaxxHaul and hope you can open as I'm not sure how effectively I navigate around this forum. Hope it's all ok. Ron
2 points
-
When we towed with my Silverado (no bed cover), I used to "camouflage" my Honda 1000 in an old tomato box... Of course, with the price of tomatoes these days, it might just attract more attention. 🙄 😅2 points
-
We also transitioned from the "Beddys" (which zip the sheets and a blanket together -but were too big for the OTT mattresses) to the Allison's AB Lifestyles sheets and they fit perfect and we love them. Great job on your interior decor theme - I'd leave the bathroom door open too! That wall tattoo looks phenomenal!!!2 points
-
We initially created and used checklists (3 different very lengthy multi page checklists for towing, campground arrival and campground departure) for our first few trips but after gaining some experience and familiarity with our Ollie and our specific camping and towing setup (which continually evolves) we’ve abandoned those checklists, and we just got into the habit of a simple one step checklist… “CHECK EVERYTHING!!!”. A complete walkthrough inside and walk around outside (usually more than once) of the trailer and truck checking every switch, valve, latch, jack, connection, hookup connect or disconnect, etc. We’ve learned the trick is to not rush things, especially when packing up and disconnecting to leave a campsite. After a while it just becomes second nature.2 points
-
We had a 2008 Elite with one the very few twin bed setups. We pulled it all over the US, up to Maine and twice to California. You've got a good setup.2 points
-
When we got the LE2 home last evening I plugged in with an adaptor to the standard 115v outlet. Mine are on 15 amp breakers so may not actually answer your question. As soon as the AC kicked on, it popped the 15 amp circuit breaker. Will be installing my 30amp RV plug in the garage today. BTW the Truma did run OK on the 3200 watt generator all night. Just another test I wanted to perform.2 points
-
That is fantastic! We so want to do this with ours. My husband wears hearing aids so the noise doesn’t bother him, but me…..I call it the freight train!😳😬2 points
-
Exactly - the "foot-stomper" is the double-check.... at least for us, that is2 points
-
Same here. I do my thing, Carol does her thing then we check each other.2 points
-
Hi, We do not use the camper during the winter. It’s stored on the side of our house. I have a collapsible storage bin that I store anything loose in while towing. The graphics are from Roommates, purchased on Amazon. They are decals that go on and off very easily leaving no residue. I used them in my previous camper as well. They work great on the fiberglass walls. We do indeed travel with all the pillows. We each sleep with two pillows and the small ones go on the dinette seat against the wall when we go to sleep. I’am incredibly organized (to the point of OCD…lol) and have a place for every single thing that goes in the camper, my camper is very easy to keep clean since everything has its place. I’ll be happy to post a video when we have it fully loaded, our first trip out won’t be until mid June though. In the meantime there are a few videos on my YouTube channel showing some of my organization items I use. lol at the red pull tab! It’s my way of being actually human and not perfect!🤷🏻♀️*It actually drives me crazy that it was sticking out*😬😂 Here is the link to the pantry organization video. The link to the pantry bins are in the drop down menu area of the video.👇🏼2 points
-
Very pretty graphics in the bath. Matching towel, even! If mine looked like that, I wouldn't mind so much leaving the bath door propped open ... 😀2 points
-
Beautiful!2 points
-
It's Sherry, though. Paul is taking a well deserved nap. 😃 Squaring up doors is not fun. As gj said, check the repaired door, first. Get out your little speed square, if you have one. Check both the door, and the opening, with a good tape measure. Check the diagonals,,as well. If the door, as assembled, measures the same on both diagonals, it's likely not the door. If the opening differs on the diagonals, check the levels front to back, and side to side, first, before making mechanical adjustments. Imo.2 points
-
Paul raises a good question. IS your reassembled mirror frame not square, or is the installed mirror and frame not aligning with the OTT door opening? I'm addressing the former, and Paul I think is addressing the latter. GJ2 points
-
Excellent list! 👍🏼1 point
-
For quite some time now there has been a high pitch whine like sound coming from the fuse box under the dinette. Its intermittent, happens randomly and is quite annoying especially at night. Every thing appears to be working fine. Has anyone experienced this? Any thoughts would be appreciated Leigh1 point
-
The checklists get you into the "ball-park" for a standard camping evolution - whether you're departing your driveway or leaving a campsite after 2 weeks on the road. Should go without saying, but - "checklists do not make up for a lack of common sense." Every situation is different - we're never necessarily always "ready" for something to go wrong, but we should always be "prepared" for it, there's a difference, IMO.1 point
-
On the bottom LH side of this converter you can see the LI (Lithium) & LA (Lead Acid) switch like JD said.1 point
-
YUMMY! Brilliant business model - Bfast-to-go B&B...👍1 point
-
We have also stayed there and strongly recommend it.1 point
-
Thank you!💗 It really makes it so cheery, I’m very happy with how it turned out.😃1 point
-
Do you use the trailer while it is parked long term? How do you stow all the small stuff when on the road so it doesn’t rattle to pieces? Are the graphics easily removable? Do you travel with all those huge pillows? It’s indeed very pretty but IMHO it is neither practical nor easy to keep clean when actually camping… Can you please post a link to the pantry bins? And pics of your interior when full of food and clothes? BTW you forgot to tuck the red pull tabs underneath the cushions. They clash, color wise. It might make somebody think that there is an emergency exit hatch underneath. 😉 Thanks. John Davies Spokane WA
1 point
-
You bet I did. Felt very comfortable and secure with a little weather on the outside, dry and warm inside. Love it!1 point
-
Think it through. Read posts. You'll probably realize the best place for a genset is in the truckbed, or on the tongue. The rear bumper of the trailer is exposed, wildly more prone to vibrations, and just not the ideal spot for a genset, imo. Btw, you said you had another use for the front basket. What was that? If we seem negative, I'm sorry. It's just that we've seen some crazy blunders over the years, and we'd like to help you avoid them. None of us mean to be unkind. We seriously just want to help.1 point
-
By that time I was drenched in sweat. Left the house at 46 degrees and it was in the 80s and humid by the end of orientation. A day to remember!1 point
-
You may also need to check level, front to back, side to side. That can be tough to accomplish, in some sites. You will get some flex if not completely level, everywhere. At least, we do.1 point
-
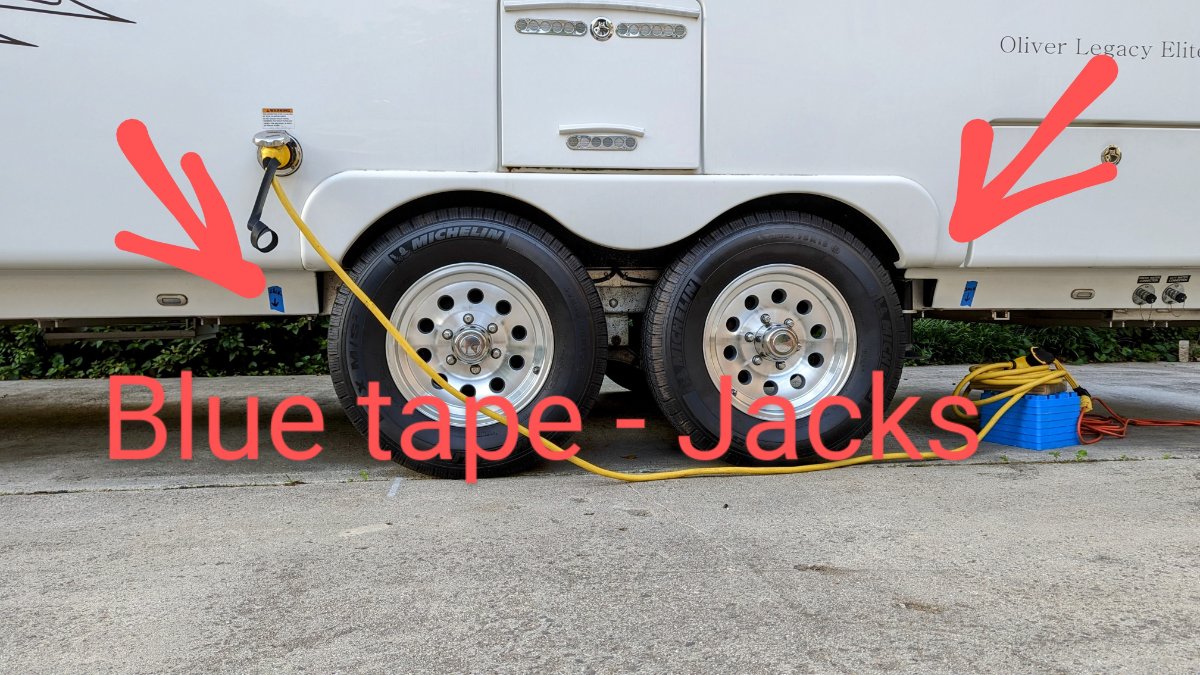
In 1 hour I go to the tire shop to get a new tires have marked what I think is the best place for jack points. Based off of your pictures. My 2016 doesn't appear to have extra metal under the frame, but these points match your descriptions. I've also noted potential damage to propane lines on the passenger side.
1 point
-
Awesome. Keep us posted , as you continue to use it.1 point
-
Thanks Chris, it’s a game changer! Travel safe and we are fired up for you both on your special day tomorrow! David1 point
-
There’s a small cooling fan inside the plastic cover/vent grill of the Progressive Dynamics Power Control Center under the dinette. My bet would be that a motor bearing on that small fan is going bad. You may want to remove the cover and check for dust buildup on the fan, but it’s likely a bad bearing.1 point
-
Woah! How the heck did mouse get into Mouse?1 point
-
Looking forward to your new thread, including your usual helpful narrative, when you are finished.1 point
-
The main issue with the factory install is that they use a sealant around the perimeter, it is easy to break the cubby free with a thin stainless putty knife, but it is a royal PITA to clean all the sealant off and apply new. I haven’t finished there yet, I plan to use exposed screws and no sealant at all, except I am applying liquid electrical tape to the water pump switch and light to seal them. I don’t feel there is a need for a door as some owners have done, unless you want to store stuff in there like paper products… I did have Oliver install a small inspection port in the closet, so I could at least take a peek in there to look for leaks. Any owner could do this pretty easily, mine is a 5 inch port. I just don’t get why the installer felt he had to put sealer around all these small interior parts. Better cosmetics I guess. But why inside the closet? All of mine has yellowed already. John Davies Spokane WA. .
1 point


-
Recent Achievements
-


")


")


