Leaderboard


Popular Content
Showing content with the highest reputation on 08/05/2023 in all areas
-
Yes the museum(s) there are all well worth visiting which I've done a couple of times. If you are only interested in the firearms then a half-day might be enough. But, a very full day if not the better part of two days is required to do the whole place justice. Bill5 points
-
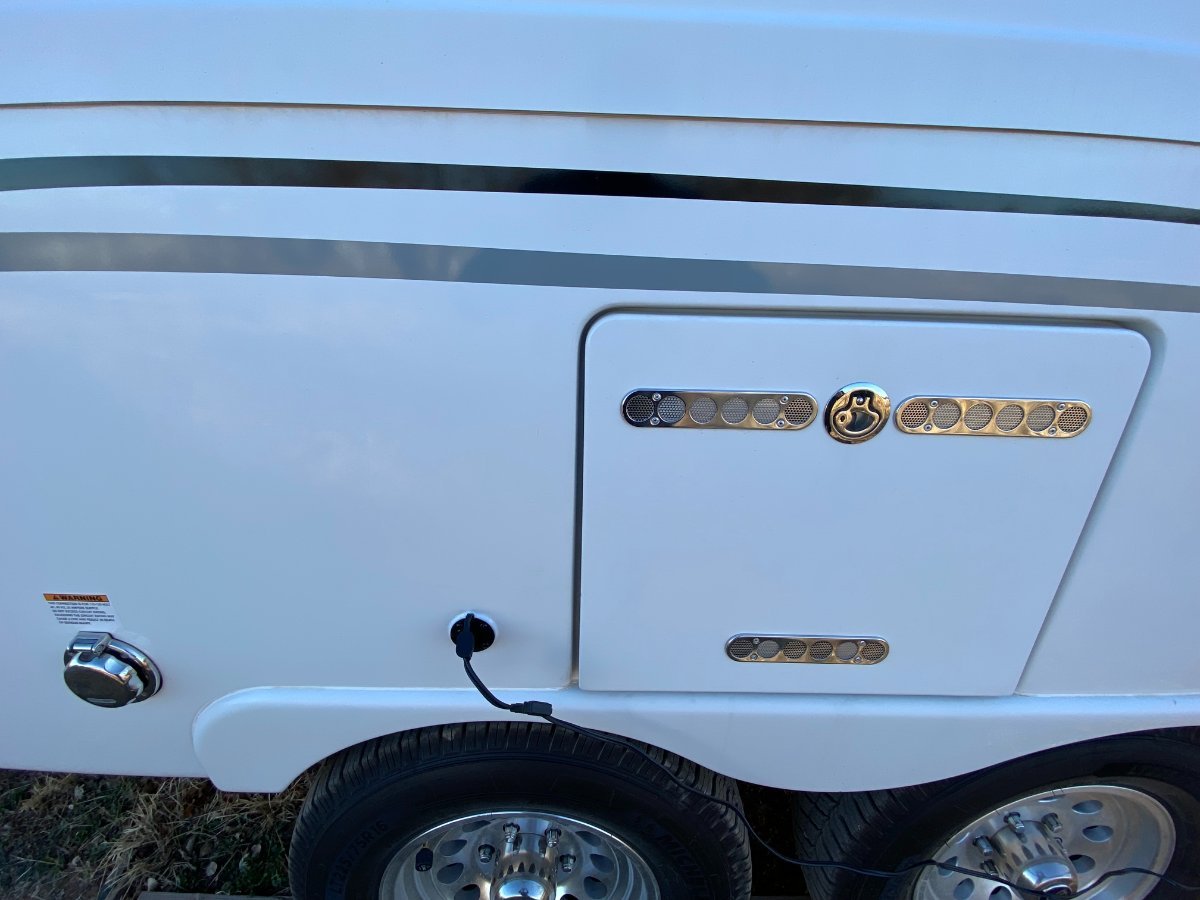
Yes - it is the Lower Sunshine Reservoir. The Lower is easier to get in and out of as compared to the Upper and it is less crowded. No ticks - ever. Yes, I normally leave the Meeteetse area and then head up to Cody. Laundry and re-stocking are my basic activities in Cody since I've done just about all of the tourist stuff in years passed. Bill Lower Sunshine Reservoir GPS - N44.093283 W 108.991420. Also note that there is an RV dump located in Meeteetse at GPS N 44.157200 W108.873819 And, there is a pit toilet right at the water by the boat ramp just outside the upper right side of the picture above.4 points
-
Something that should be mentioned in running the air conditioner on the batteries is that the older inverter is 2,000 watt capacity and according to the manufacturer it will safely handle 1,800 watts continuously. FOLLOW THE MANUFACTURER SPECS! Something else that should be noted here and may have already been mentioned is that the air conditioner should have the easy start module installed and really no other DC loads or AC loads can be running. Especially no other AC loads as the 2,000 watt inverter will be very close to maximum capacity running the original Dometic unit. Additionally, all of the high amperage DC lugs and connections should be checked to make sure that they are tight. I found one factory crimped lug to very warm while running the air conditioner on the batteries so I needed to re-crimp it. My air conditioner draws on average over 100 amps DC and that is dependent on cabin temperature. As the trailer cools down the DC amp draw goes down a bit (less compressor head pressure).4 points
-
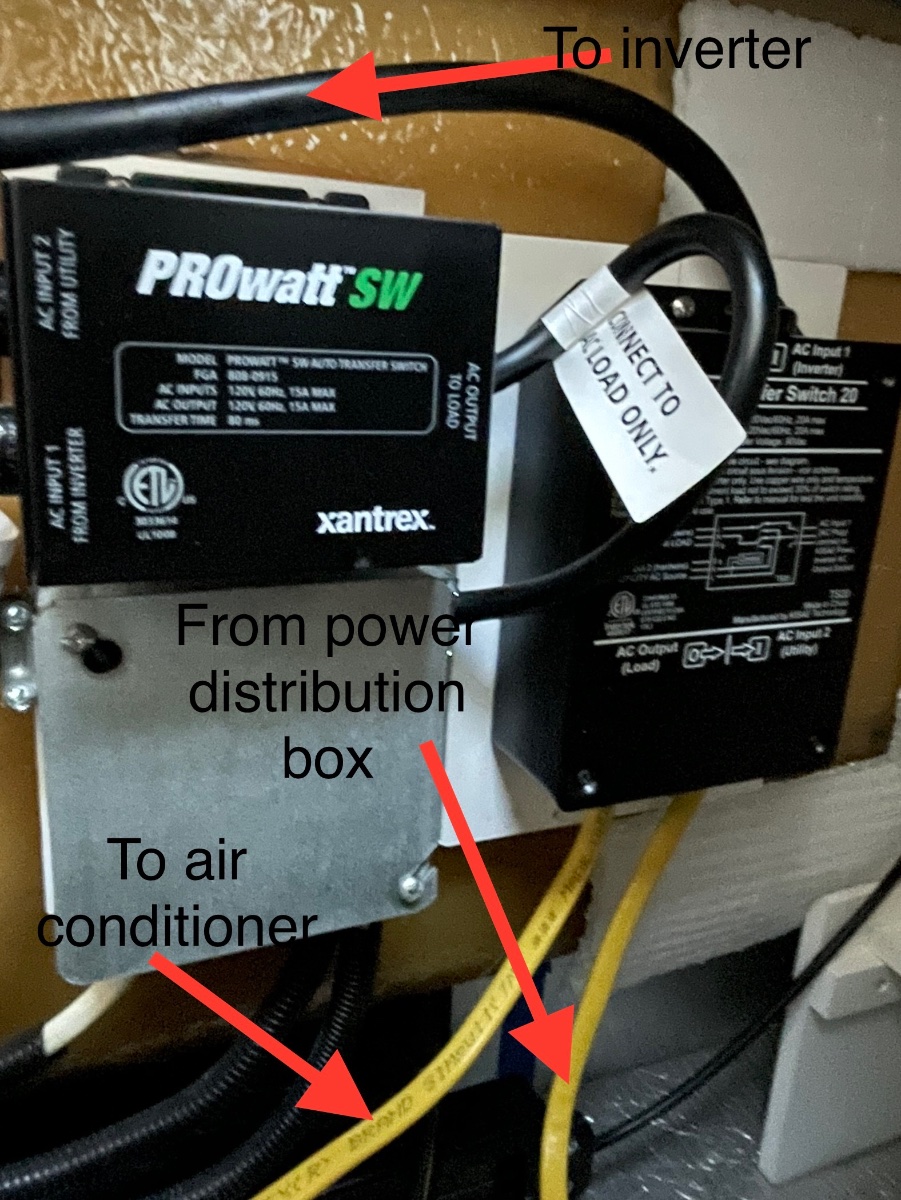
When I upgraded my batteries from flooded cell lead acid batteries to three Battle Born batteries a few years ago, I also made a few electrical upgrades as well. One upgrade was to clean up/simplify the DC wiring and the other was to add a new 20 amp transfer switch to allow me to run the air conditioner on the batteries by way of the inverter. In the photo the new 20 amp Kisae brand transfer switch needed is on the right and the various wires are labeled. The black wire has a 20 amp plug on it and just simply plugs into the inverter. The two yellow wires (12 gauge wires) are the ones that you’ll need to cut. The one on the right comes from the air conditioner breaker in the power distribution panel and the wire on the left goes up to the air conditioner. The correct diagram is printed on the transfer switch cover. I hope this helps.
 4 points
 -
The app is very useful and reasonably easy to use in practice, for monitoring the solar and batteries performance. The settings however are confusing, and you should always, ALWAYS refer to guidance from your battery manufacturer. These settings optimize performance and battery life and should never be altered randomly. For example, for my two 100 AH Battle Borns: The default log in password is “000000” (six zeros) and this shows every time on the initial page when you open the app. Whenever you do a firmware update, you will get a prompt to change it. Or you can change it any time in the Settings menu. I suggest your birthday; eg 082153. If you camp by yourself all the time it won’t really matter, but in crowded commercial campgrounds, it can be potentially hazardous! A nearby clueless coach owner may see your device or network and connect to it. If he sees a bunch of different settings, he could panic, thinking “My system has been hacked!” and start changing them!!! The hackee becomes the hacker 😉 This could possibly be very bad and damaging for your expensive system if it involves charging voltage and battery type! The alarm settings are not as dangerous to your $$$ parts, you can tweek them up or down a little. For example the Low State of Charge buzzer. Change the name of your devices to something logical to YOU, such as Oliver Battery Monitor or Rooftop Solar, this will add a layer of defense against your neighbor’s unwanted advances. As a final note, with this knowledge you could wreak havoc on your neighbors if you were feeling mischievous! Please avoid the temptation! And if you know which rig has the 000000 password, you could tell the owner nicely that their system is at risk. Help them alter it and you might get a free doughnut…. John Davies Spokane WA
4 points
-
Speaking of tire plugs for emergency use, used Mushroom style tire plugs in the past with a neat tool to insert the plugs on other tubeless tire applications without problems. https://www.amazon.com/Stop-Go-1000-Tire-Repair/dp/B0006NE3KE
4 points
-
That's true, and degradation/depletion is extremely minimal, with lithium ion in storage. I'm thinking of people like me (still on agm) who leave the fan on low, and both vents open somewhat, to circulate air. My FanTasic fan uses .5 amps on low, thermostatic regulated, so not constant, and we've narrowed our ghost draw to less than .4 amps, so solar keeps our agms up, just fine. But, agm batteries like being 100 per cent,,and lithium don't. Since we don't have lithium batteries on the boat, either, I've not checked to see if we can adjust charging level for storage. Wete it me, I'd like to be able to leave the minimal draw of a fan, on low, and ghost draw active, and not deplete my lithium batteries. Just my (probably off the wall) thoughts.4 points
-
My "ghost" draw is around 1.7 amps (refrigerator, radio, CO detector, Natures Head fan, ...), so about 40 amp hours per day (10% of my Lithium capacity). I also don't want to turn everything off for storage and I don't want to keep my Lithiums at 100% or even 90% while sitting in my storage garage, so in this scenario I set my Xantrex to "float" my Lithiums at 13.2v which is about 50% SoC. What eventually happens is the battery settles to "standby" with net zero current at 13.2v and the Xantrex uses only the power necessary to keep the batteries at 13.2v - thus passing enough power through the battery to satisfy whatever battery draw is present.3 points
-
A,spare, for me, trailer or truck, is a "get me home," or get me to the nearest repair facility. We also carry a tire repair kit/plug kit (and a tire pump) . We don't carry a bunch of spare parts, but that's important.3 points
-
Our 2015 LE2 # 75 original spare tire is a 215/60R/16. It has a maximum weight capacity of 1521 pounds. After purchasing Ollie used in 2016, removed the spare tire cover finding the smaller tire size. Started asking about it and learned what Steve mentioned earlier in this thread. We keep Ollie’s ready to camp weight slightly lower than 5000 pounds making a 1521 pound load capacity tire OK for emergency use. Out of curiosity will research to see if this tire size comes in a higher capacity. Edit: Found one BF Goodrich All Terrain 215/70R/16 with a 100 load index and C1 load range at Discount Tire. 100 load index is 1764 pounds and C1 load range is 6 ply rating. Several 215/70R/16 tires have a 100 load index of 1764 pounds. I would still look closely at the specs to see be sure a new tire is not larger than the existing tire to be sure it fits in the spare tire storage housing. https://www.discounttire.com/learn/load-range-load-index3 points
-
Thanks for the help. Ollie got new boots. Put on new Cooper HT3's and still have a substandard spare. Don't want to mount License plate and plate light on the back of the trailer to mount an uncovered full size tire.3 points
-
Yes. We move the front at an angle. We probably parked it really close to the house that time to have better access to the roof or the streetside, for a project.2 points
-
I’m feeling kind of primitive with my battery maintenance schedule. My Ollie is plugged into a 20 amp circuit while in storage and I turn the battery charging breaker off when the batteries reaches 100%. Then I wait for Victron's VRM service to send me an email letting me know that the batteries have reached 35% SOC and I trudge 25ˋ up the hill in the snow and turn the breaker back on until the batteries again reach 100%.😂 And then I repeat the sequence. I have thought about incorporating a relay to automatically shutting off the breaker and maybe that’s a future project. We all have to figure out what works for our non camping lifestyle! Mossey2 points
-
It's backin, and it's not really a lot of fun. But, we have it down to a science, manageable with just the two of us. We often use my Silverado to back the trailer as close to, or into the 8 ft gates to the 12 ft side yard, as possible. Then, we use a parkit 360 , and plywood, to get it the "rest of the way." It also means moving lawn gear, and boat trailer, out of the way, before we back in. Driveway has a 6 ft 8" rise, in a short distance, from the street, and a drainage area, maybe 12" deep, at the curb cut. It's definitely a process, but when you've done it a bunch of times, it does get easier. 😀 I've seen worse. And, managed worse. Ps, the big white vertical drain pipes you see are our rainwater collection system. Our neighbors on that side have no windows on that side, save a 20 x 20 in a half bath, and that window looks out at vegetation, only, so we elected to install major piping, etc, where no one would see visual clutter. We love our neighbors, and would not ever want to offend them.2 points
-
I'm thinking that @John E Davies actually upgraded all of his tires to a larger/taller size and wanted the same size for his spare. The size of that tire couldn't fit inside the tire cover - so he wrapped up the tire cover and stored it in his shop, but I could be mistaken - I've slept since I read that thread. HA!2 points
-
Almost 16 years, @Patriot. We brought it home, February, 2008. I'll look for a few more. You can see my trailer in every update post we do. These are from 2020, I think. You can see the yellowed jack head. My bad. We should have covered it.
2 points
-
Sugggest getting three solid concrete blocks and burying them in the floor of the barn so that about an inch extends above the dirt. Place them where you want the jacks to be when stored. This gives you the "perfect" target year after year and keeps mud from rusting out your jack plates. Also, I suggest covering your OTT with a less expensive cover. Mostly to help defend against mud dobbers and hornet nests. Finally install a screen over your heater exhaust. GJ2 points
-
Thanks for sharing what you know on this subject. In my case, my spare that came from the factory is a 16" tire but more narrow and slightly lower profile ratio. As I stated before, my tire guy say the 215 70 16 size tire is not really running On an LEII. A few companies make a C rated tire (max load rating of 1,875 LBS). I will follow up on your recommendation regarding John Davies mounting a full size tire without the tire cover. This will require a way to mouth the license plate and the plate light.2 points
-
Originally, the LEII's came with all 5 wheels and tires in the 15 inch size. But when 15 inch tires started becoming a bit hard to come by, Oliver decided to start putting 4 16 inch tires on but continued having the 15 inch size as a spare due to the costs involved with changing the molds so as to accommodate the larger 16 inch tire size. There is nothing "wrong" with the 15 inch spare in that it is really a "spare" tire and the Ollie may be run with this spare in use until either a new 16 inch is obtained or the original 16 inch tire is repaired. Like Mike, I do not remember when the molds were changed to the 16 inch size (2018 ?), but, for those trailers that have the 15 inch spare it is certain that a 16 inch tire will not fit - heck, the 15 inch barely fits. Since I still have my original spare tire, I've not researched what is available. However, it would seem that now with 16 inch tires becoming less popular the tire manufacturers would produce a suitable tire in the 15 inch size. Bill2 points
-
@topgun2Hey, Bill: If ya'll make over to Cody, be sure to take at least a half-day at the Firearms Museum there! Well worth it! Safe travels! Cheers, A & D
2 points
-
Keep us posted on how it performs! Mike2 points
-
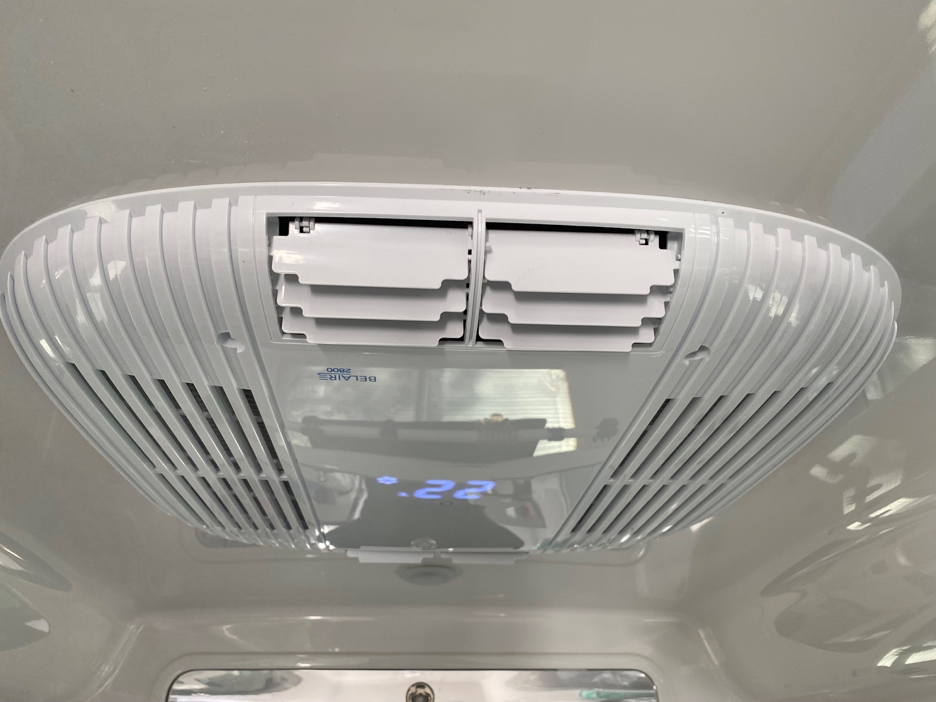
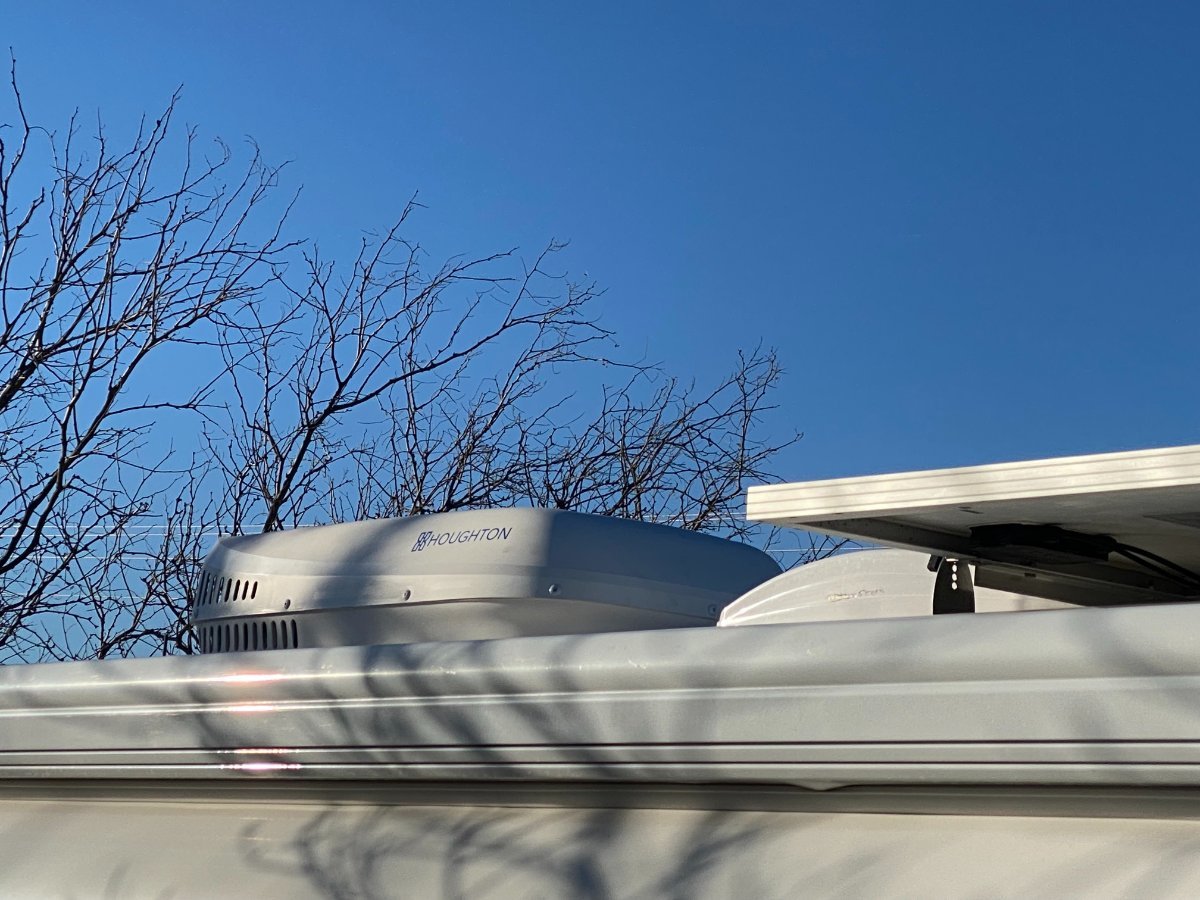
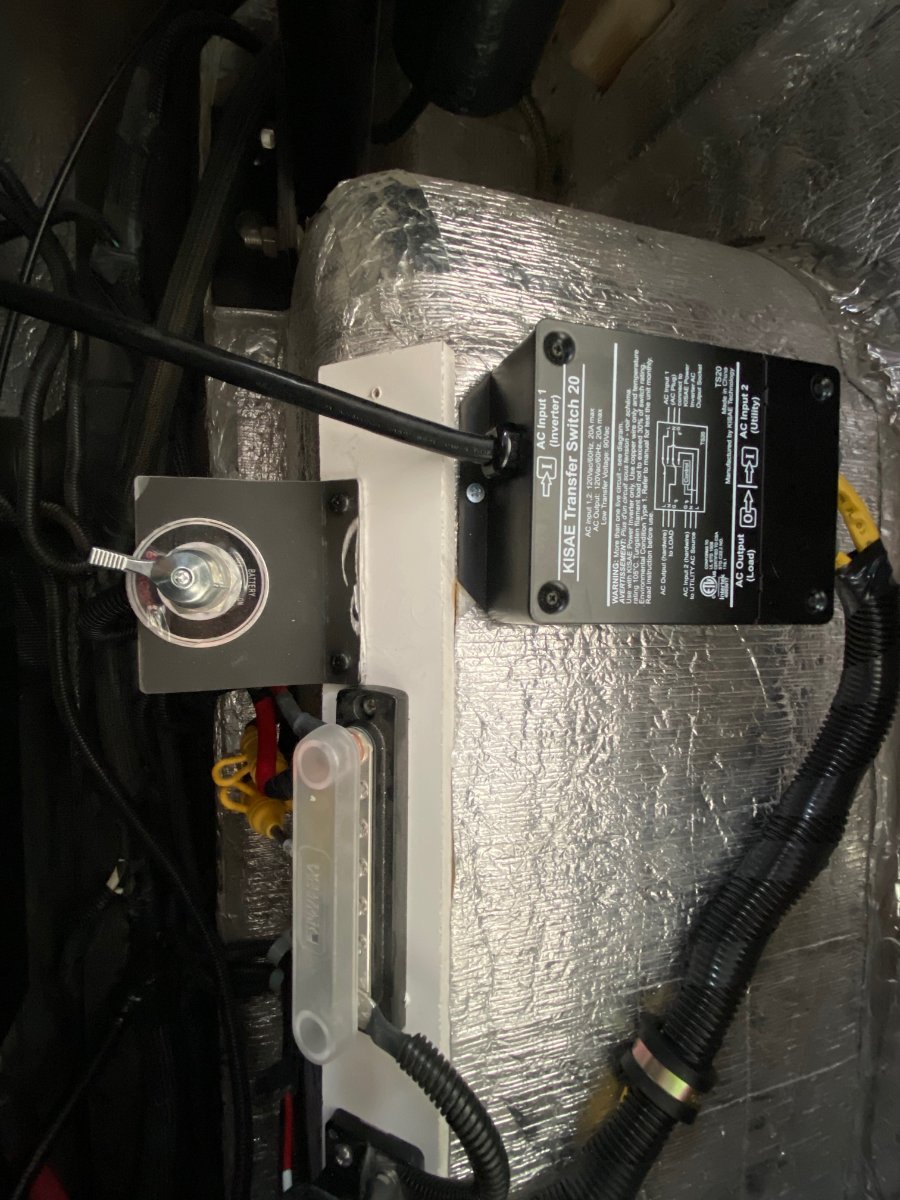
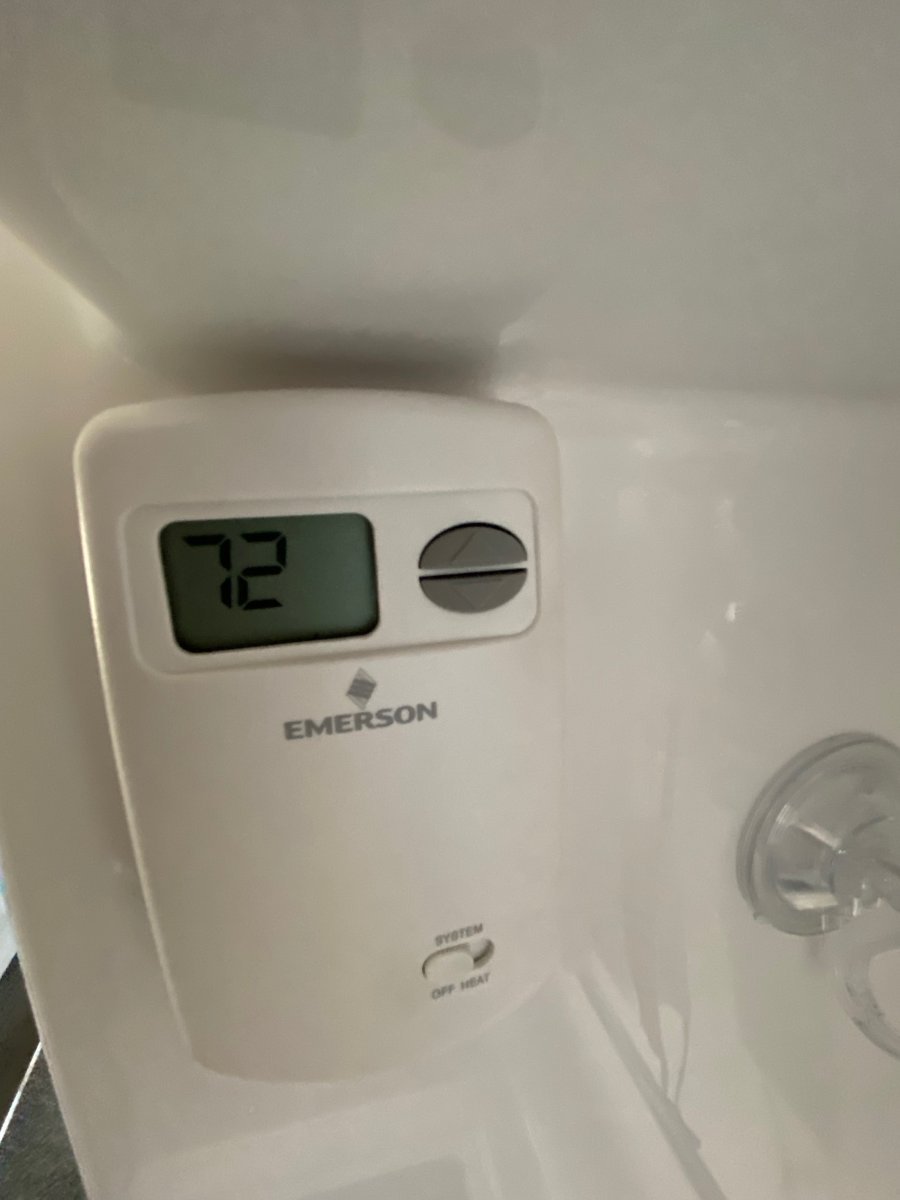
With the help of a number of good folks on this forum and my great RV Tech, Mathew Gonzales, who has worked on my 2017 Elite II since I brought in home to SE AZ, I finally achieved my goal of being able to run my AC off of my 2000-watt inverter and my new battery bank: 4 100ah Battle Born lithium batteries. After asking for, and getting, advice from folks on the forum about a number of issues that Mat and I ran encountered when attempting this upgrade, I made these decisions and Mat did this work: I first made the decision to purchase the Houghton 9.5K Low Profile Air Conditioner from RecPro--due mainly to how much quieter it runs compared to the Dometic Penguin that came with my Ollie, and to its lower amp draw (10 vs. the 16 for the Dometic). I learned that the Houghton could be run off of the 2000-watt inverter that came with my Ollie, using a transfer switch plugged into it running to the AC. I asked Mat to move the Micro-Air soft start previously installed in the Dometic to the Houghton. We discovered that he needed to reprogram the soft start to coordinate with the new AC. Since, unlike the Dometic set-up that came with my 2017 Ollie, the Houghton did not have a way to control the furnace, Mat installed and wired an Emerson non-programable thermostat--once again using information gleaned from folks on this forum--to control the furnace. I figured it was a good idea to supplement the 320-watt solar panels that came with my Ollie with a 180-watt Zamp solar panel kit. I also purchased a Zamp solar port that Mat installed near the shore power input. When my AGM batteries overheated last fall, I found I had no way to easily disconnect the battery bank. (This, I suspect, is something that is an original defect in the electrical system of my Oliver. Is it for all Olivers still?) So, while Mat was doing all of the other work, I had him install a battery disconnect switch near the inverter. I don't want this to appear as a straightforward process. It took a lot of back and forth between Mat and me trying to come up with solutions to problems encountered along the way. This back-and-forth involved a lot of advice from folks on this forum, some of whom I have not thanked by name. I would like to give special mention and thanks, however, to CnC and Minnesota Oli, who spent a good deal of time with me exchanging private messages. Man, were they patient with this technical novice! The outcome is that I now have a much quieter AC that runs off of my solar, batteries, and 2000-watt inverter. One can read elsewhere about the advantages of the Houghton. Mat told me, before I took my camper home, that he ran the Houghton for about four hours, supplementing the roof-top solar with the Zamp portable kit, and the voltage never dropped below 13 volts. I ran it when I brought the camper home, and verified that the system seemed to run the AC flawlessly AND much more quietly than before. I am delighted, as I have been wanting for a long time to be able to boondock in climes needing cooling of the cabin without having to resort to the hassle and noise of a generator. I will follow up with another post if I run into any issues. Disclaimer: I still have very little technical understanding about how this system functions and how the components and wiring fit together, so I will not be the one to answer many, if any, technical questions, but I know that on this forum, if you ask, you receive. There are some good posts on this forum involving the Houghton AC and related issues, so take a look around, and don't hesitate to submit your questions on this forum. Doing so paid off big time for me! Here is the interior view of my newly installed Houghton 9.5K Low Profile Air Conditioner: Here is an exterior view (birds won't be able to nest in this one!): Here is a photo of how Mat secured and wired the transfer switch and battery disconnect switch: Here is a photo of the Emerson non-programable thermostat to control the furnace (thanks go to John Davies who suggested the purchase): Here is a photo of the Zamp solar port with cord leading to the Zamp 180-watt portable solar panel kit: Here is a photo of the charge controller on my Zamp 180-watt portable solar panel kit, showing the voltage just after I plugged it in. (In less than 10 minutes, this controller and the interior Zamp showed the voltage up to 14.6 before dropping back into the floating voltage range.):
1 point
-
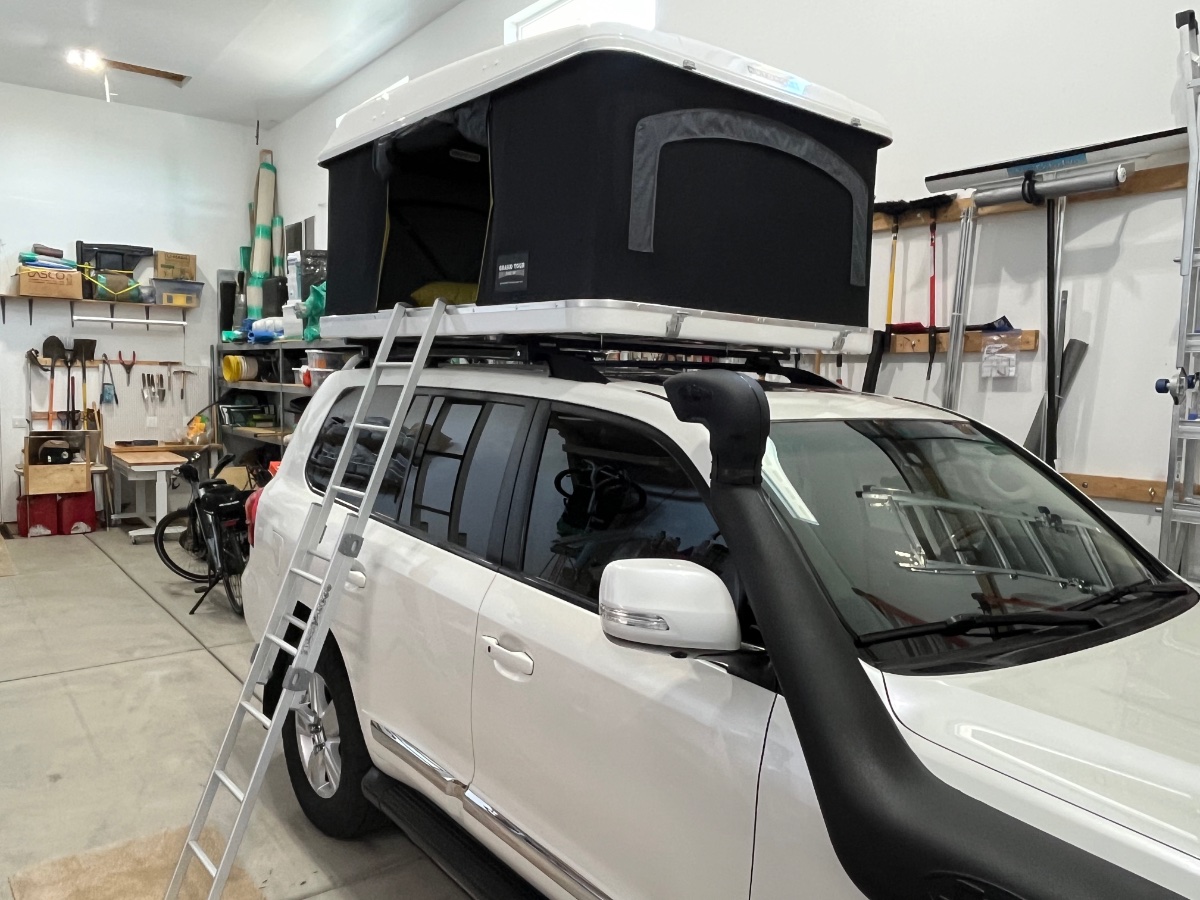
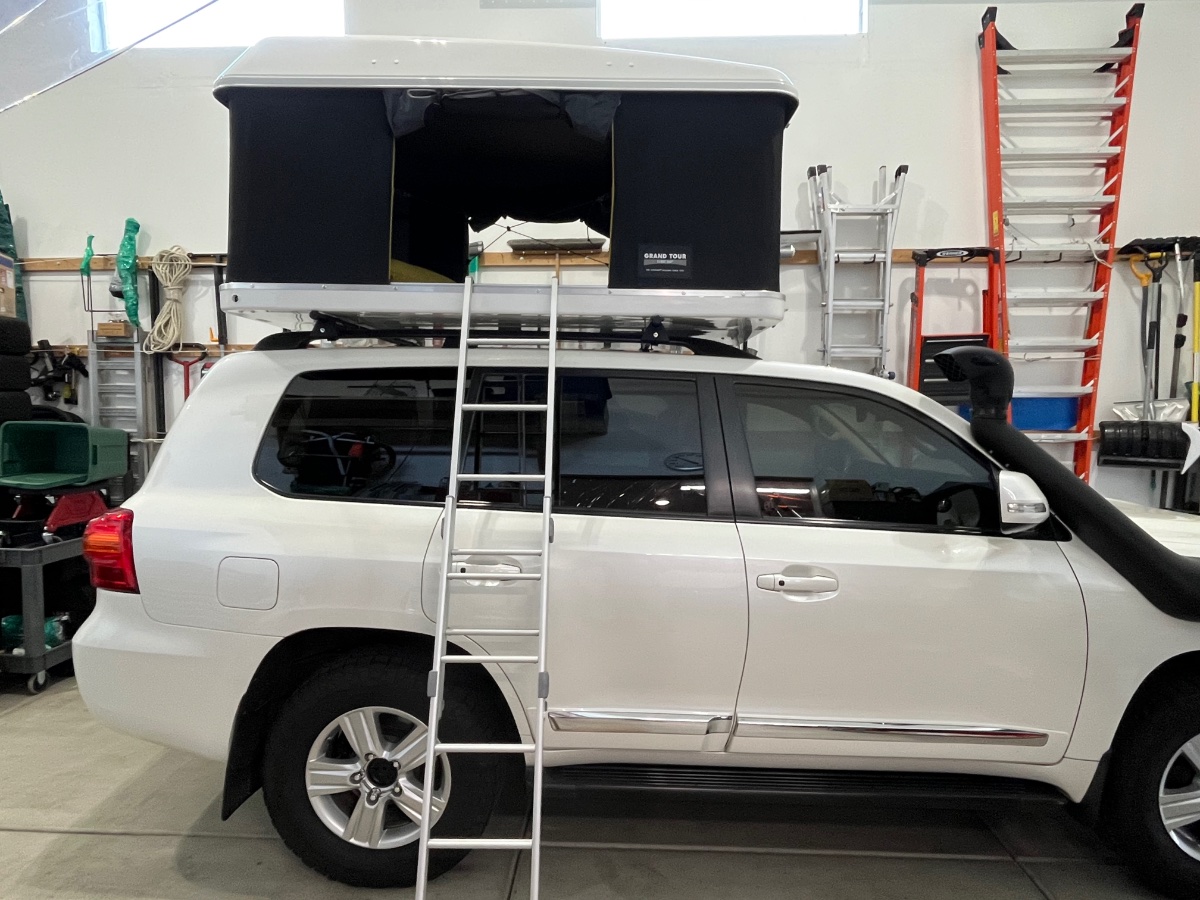
It was quite painful to sell, but this was the correct move at this stage in my life. For privacy I won’t say who bought it, but he is a member and if he wants to announce it, that will be on his dime. I emptied out the RV bay for the first time in six years, washed the floor using a push broom and Dawn detergent, and lots of water, and moved my LC200 over to that spot. I now have a vast area to park a vehicle or do workshop type projects, and my wife now has a big corner dedicated to gardening, with two big workbenches, power, light and pegboard. A happy wife is a happy me… Plus I have even more room for my indoor 10 meter airgun range. We will continue to travel and explore the back country at times, but we will stay primarily in motels or B&Bs. But if we encounter a splendid isolated pull-off overlooking a great vista, we can pop the Maggiolina Grand Tour 360 Carbon and rough it for a few nights. It takes about a minute to crank up, and three minutes to put back down. It is pretty darn crude compared to an Ollie, but it is a simply stunning tent. I was really afraid that there would be a big mpg hit from the tent, like with the Yakima RocketBox Carbonite Low, but I was delighted to discover that I got 16 mpgs going to the dealer with bare round bars, and 17 coming back, and no noise at all at 72 mph. That is good mileage for a Land Cruiser with LT tires, they are gas hogs. It’s way better than the 10-12 I got towing “Mouse” at 62 mph. I may install wimpy Geolander AT G015 tires after our next big trip, they will save 52 (!) pounds of rotating mass and I expect to gain another couple of mpgs. They are great “tweener” tires for an Outback, RAV4 or LC200 that isn’t doing lots of rocky stuff. I have had two sets already on other vehicles and I am impressed. We plan to attend the Total Solar Eclipse rally in Fredericksburg next April, but we will be forced to sleep in the ground due to stupid CG rules. If anyone wants a dirt cheap big heavy Eureka! tent and fly in fine condition, come by and talk to me on Tuesday morning after the crowds have departed. After the eclipse, we will head home via the Utah parks and hopefully spend a few nights on the delightful White Rim Road in Canyonlands NP. I will continue to hang out here on the forum, but my posting will be dramatically reduced. The members here feel very much like family, I can’t just go away. John Davies Spokane WA
1 point
-
Concur, 100%. I'm thinking, as a "Battle Born Guy", that one would achieve the same effect by having a master battery cut-off switch inside the battery compartment, labeled accordingly, specifically for first responders in the case of a fire and the need for securing electrical power to the rig.1 point
-
I was asked about this issue and gave this answer. Unfortunately, a full size tire will NOT fit under the older tire covers. The recess in the back that receives the tire has been redone to be larger in the newer trailers. The tire cover has also been reworked to fit around a standard size tire. Both of these modifications required a major re-working of the plugs and molds. John Davies was not satisfied carrying a small tire as a spare and simply removed the tire cover and replaced the tire with a standard size leaving it uncovered. Not the most pleasing esthetic, but probably the simplest solution for an owner. Now, if you don't mind doing some reasonably extensive fiberglass work......1 point
-
I have the smaller spare too and my understanding is that a regular size spare will not fit. I don’t know when they started making the fiberglass cover big enough for the regular size spare. Some have removed the cover to fit a matching spare (John Davies did and has a thread on what he did). Mike1 point
-
I ended up ordering the exact same replacement part without the light, so hoping it will be very straightforward. I did do some gelcoat drilling for the infamous toilet flange repair, but I guess that's a story for another thread. Thanks for the tips!1 point
-
Perhaps @ScubaRx will chime in. He knows the early elite 2's better than most. Or, send Oliver service a message. Til then, a larger tire may fit, if you have the original smaller spare tire cover, partially deflated, but, who wants to travel with a deflated spare? A smaller tire will, at least, get you to a repair facility.1 point
-
Looks like a nice set-up you have there, @Patriot... Nice place for telling "Fairy Tales" and "Sea Stories" (You know what the difference between the two are, right?)1 point
-
We replace our Ventline bath fan with the Maxxair/LED model as described above. Expecting that the holes weren't going to line up (because of the two different manufacturers) either with the exterior assembly or the interior trim piece, we prepared ourselves to fill the existing holes and make new ones in the gelcoat to make this install happen. It wasn't a big deal drilling into the gelcoat and fiberglass material beneath - we applied blue painter's tape, marked/spring-punched the hole locations, and used the proper bit to drill them. FYI: We definitely used modern gray-colored butyl tape between the exterior pieces and the hull, just as @SeaDawgdescribes. It's a very straight forward mod and gives you a nice additional LED in the head which D really loves a lot... HWHL! Above pic with vent closed/light on. ...vent open/light on. Exterior view of the vent and vent guard. @Steve and Cindy: If you've got any specific questions, you can PM us anytime and we'll try to answer any questions you may have. In any case, good luck with your mod! Best regards, A & D
1 point
-
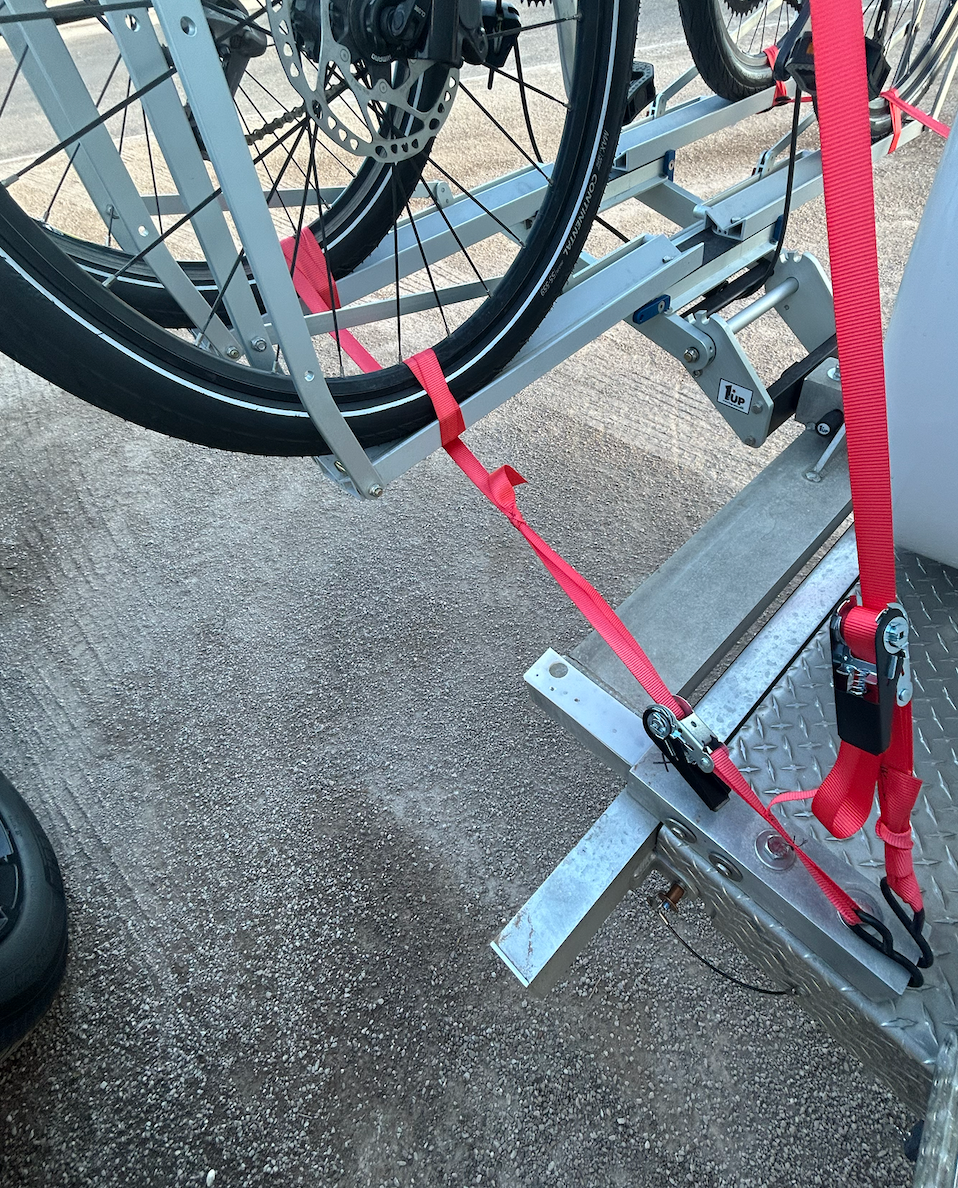
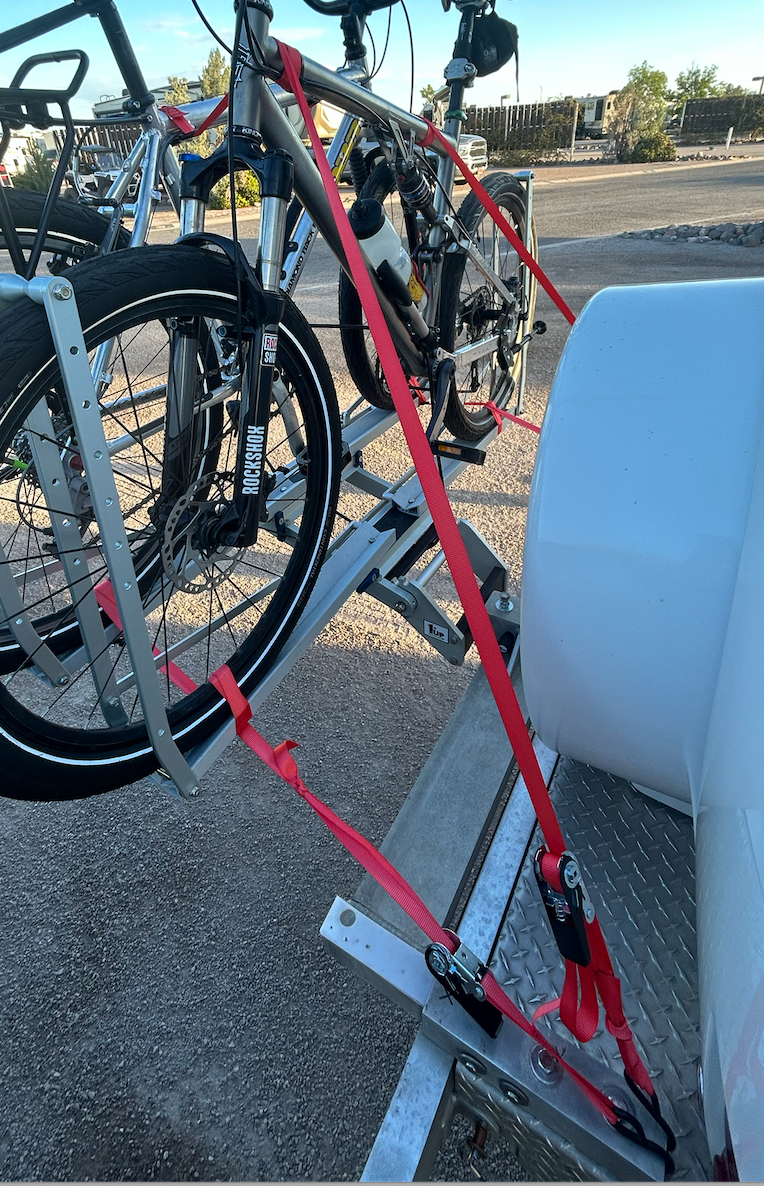
@Steve Morris, @John E Davies: As mentioned in previous thread, same subject - we were not pleased with the jostling around back in the back with the bike rack loaded with two 30#+ bikes. OK... So here's what we did yesterday for a possible solution of reducing the slop in the 1UP/OTT "bike carry" system... After our previous 350-mile trip a couple weekends ago, it was clear that there needed to be some sort of "high" and "low" tie-down hard points from the bikes to the OTT frame in order to reduce the movement of the entire rack/bike arrangement when encountering rough pavement while towing. We applied two 300# rated tie-down straps port/stbd linking both bike's top tubes (triple-wrapped) to the end of the factory OTT accessory hitch, and 2 more straps linking the bottom of the wheels/rails together with the same hard-point at the hitch: Now, there's virtually no observable movement between the bikes themselves and the back of Casablanca while towing. Drawing the straps "snug" (not too tight) to the hard-points has replicated the same rock-solid mount of the 1UP rack when its on the Tundra alone (without straps on the truck). No S**t, this hasty solution may not look pleasing to the eye, but it considerably reduced the jostling (up/down and side/side) movement of the system when towing. The lower straps are triple-wrapped between wheels/rails adding more connectivity and safety as @John E Davies described earlier. We traveled 247 miles with this configuration yesterday, mostly interstate, stopped a couple times to inspect system integrity along the way - no issues. Also, as we described in a previous thread - on our rig, was a noticeable "up/down" slop in the factory installed optional 2" hitch assembly. If you look closely at the last pic, you'll notice where we slid in a wedge of Delrin between the male/female receiver connection near the two through pins. This wedge eliminated any up/down movement - it will be replaced with a lock-nutted 1/2" bolt tapped into where the black "X" is on the female receiver end after we get back (ran out of time before we departed to do this). Again, the tie-downs aren't pretty, but they sure do the job! Good luck, @Steve Morris- looking forward to learning about how you'll solve this issue on your rig, because our's is configured slightly differently. Cheers! A & D
1 point
-
We love our EV and have taken many road trips in it. Just like any vehicle, you have to plan ahead and recognize limitations. But in general, we have found owning an EV to be an excellent experience — maintenance is a breeze, acceleration is other-worldly, and it’s just a hoot to drive. We know it’s not going to tow an Oliver, and that’s OK. Our TV is too large, and too much of a gas-hog, for every-day driving. It, like our EV, has a purpose.1 point
-
Winegard has released a new firmware update for the WiFiranger products. This version fixes security flaws and some UI issues. The version can be updated from the WiFiranger main screen of the Web interface. Version is 7.1.0B14.1 point
-
1 point
-
What's done in Quartzite - stays in Quartzite.... just say'n 😎1 point
-
Scoob - that makes perfect sense and I was aware of the differences between the two. My incorrect assumption was, when I saw the 712 with BT I assumed it was BT to the Shunt, not taking readings from the Shunt and sending out info via BT. I actually like the little display as a quick glance reference along with the ability to get the details via BT. Overall, I am pleased with the selection of hardware and the integrations. BL1 point
-
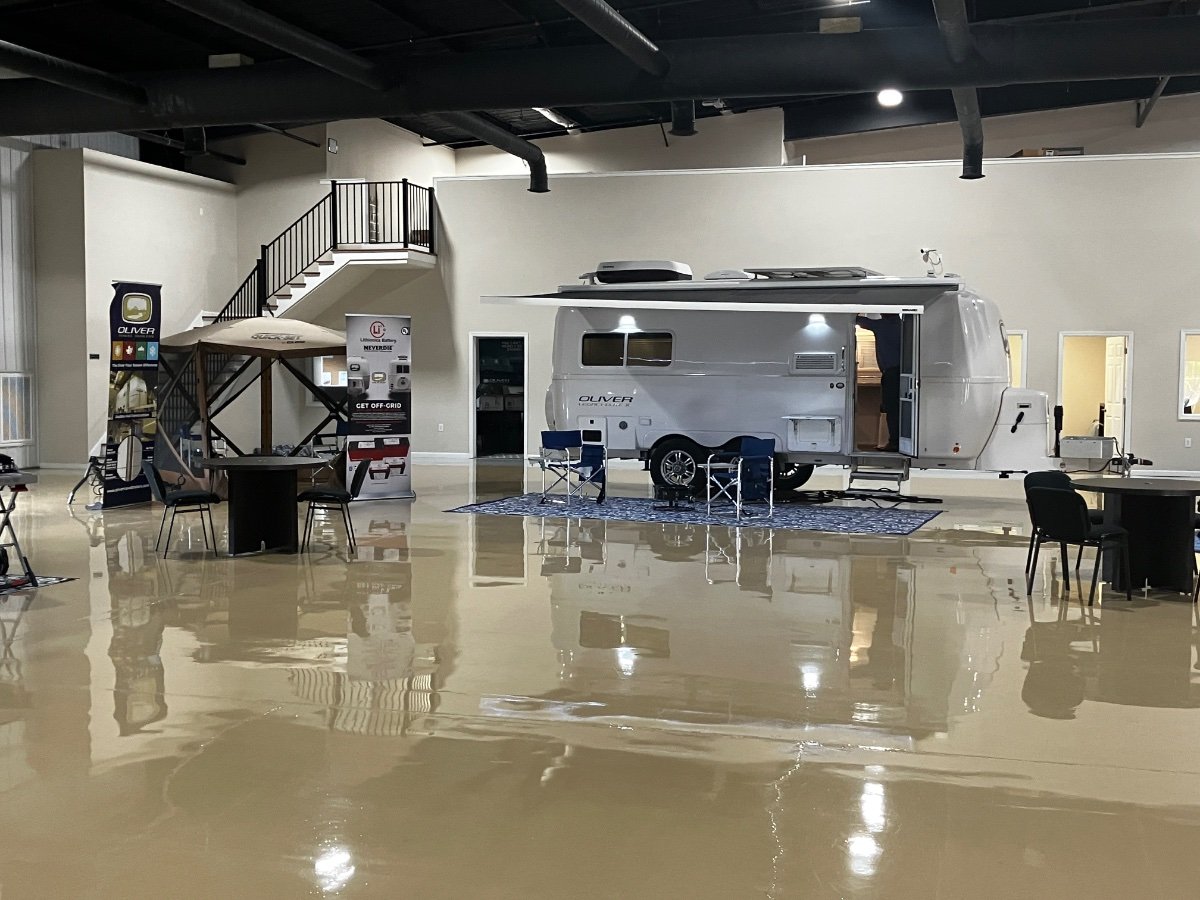
And, for those that have not seen it, the new show room.
1 point
-
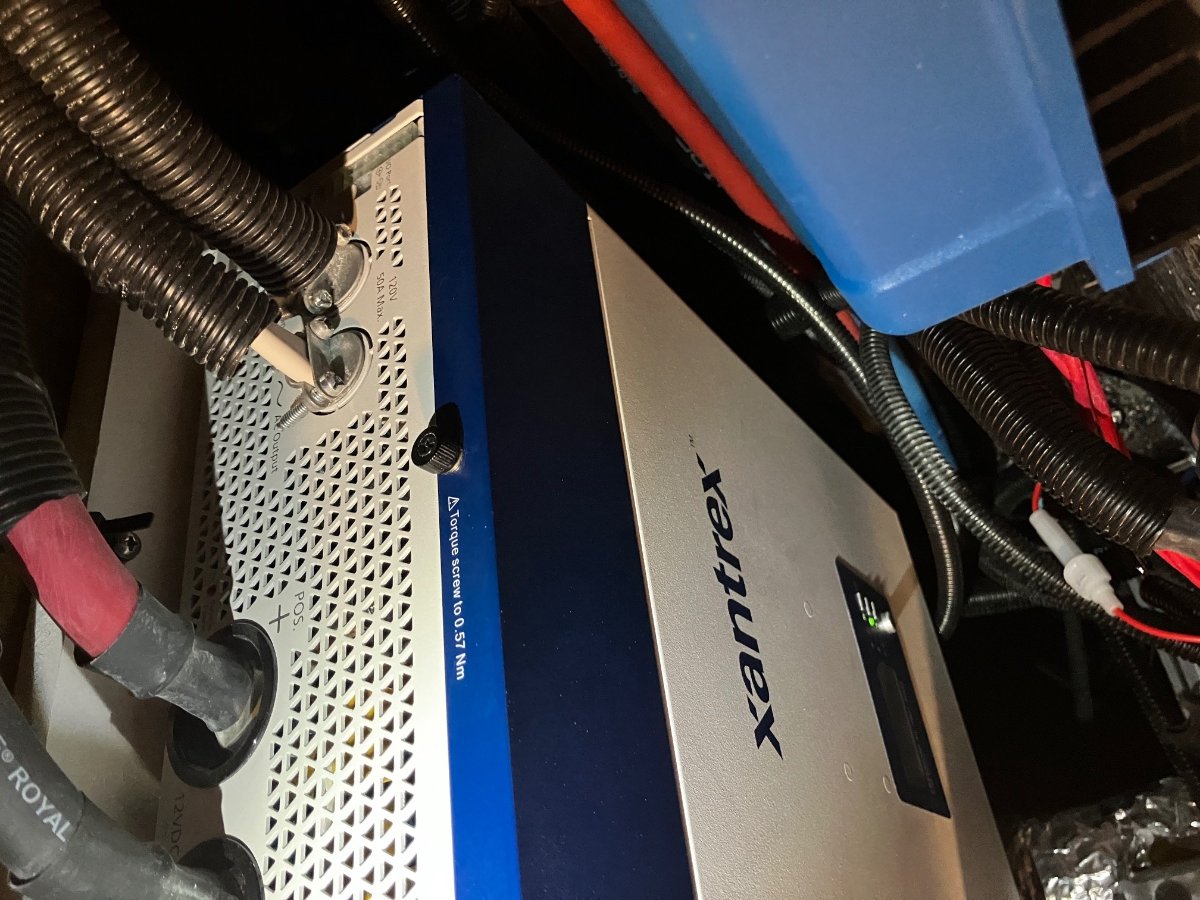
This is the Xantrex Pro 3000 Watt Pure Sine Wave Inverter. You can see the MPPT Charge controller in the shot as well. Brian
1 point
-
Well..you might be right about that. I have actually never studied the difference between the "Smart" and "Dumb" shunts with respect to Victron because I always assumed (you know where that gets you) that they only used Smart Shunts. I will look into that and see what I can dig up. Brian1 point
-
Brian, did you see where they mounted the smart shunt itself (not that remote display)? Did this reduce the clutter inside the battery box? Did you see any sign of vents inside the cabin for the electronic bays? Which they need 😬 More PICS please! Thanks. John Davies Spokane WA1 point
-
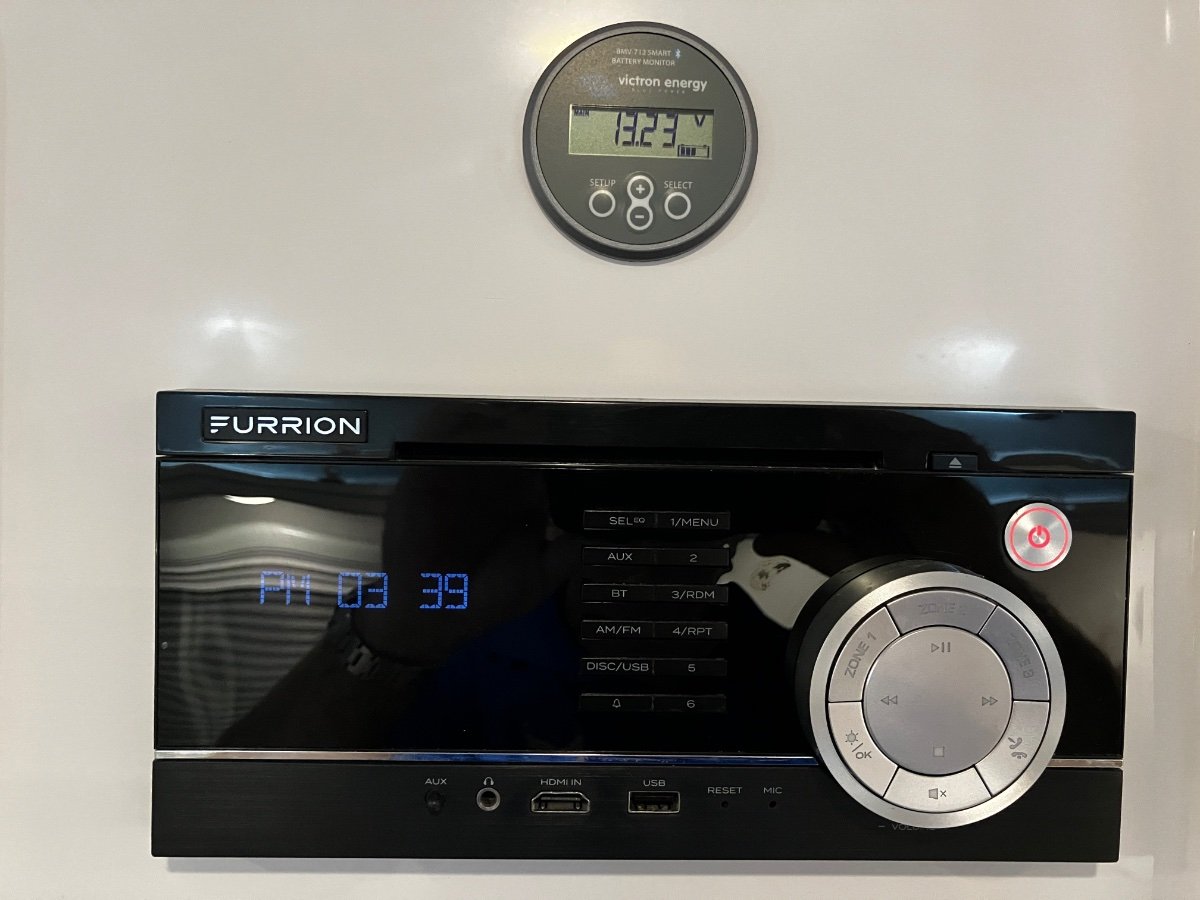
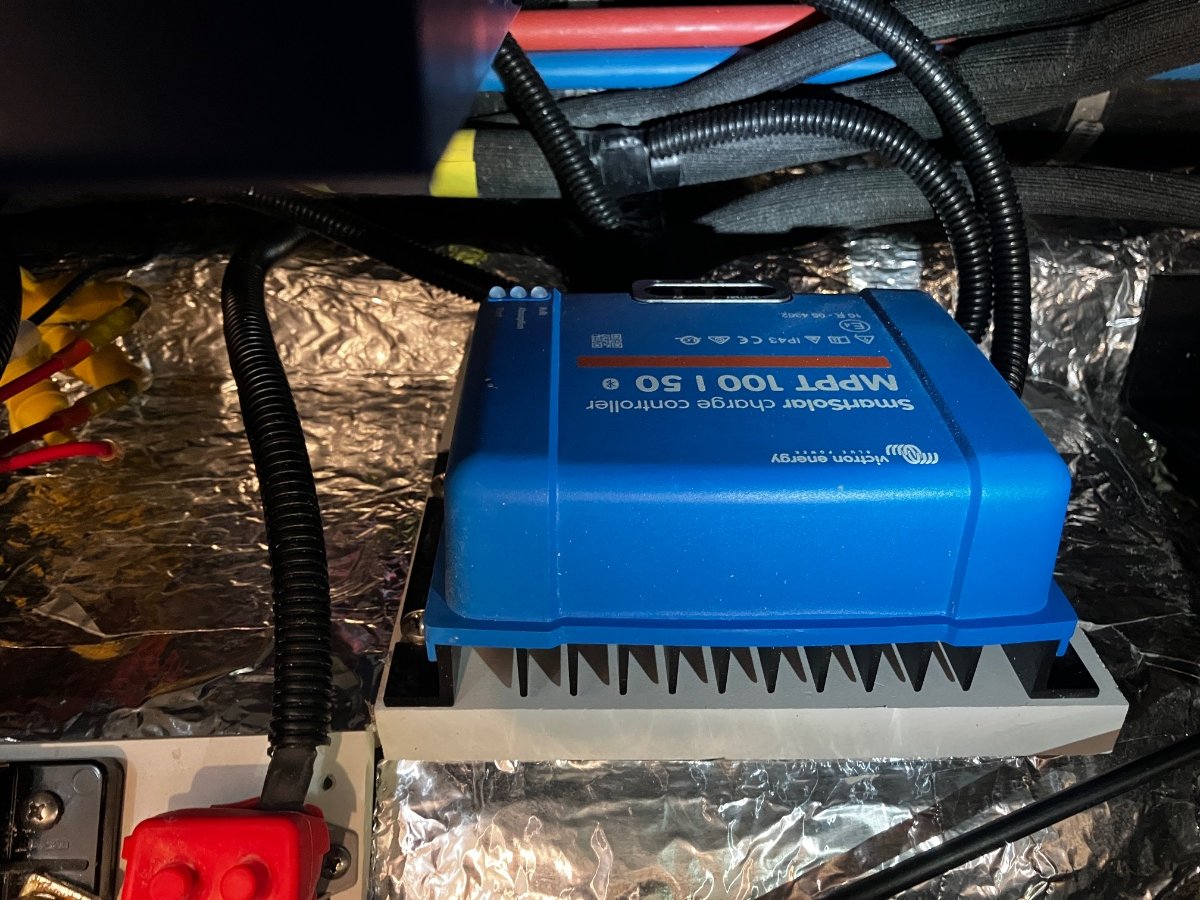
Update since our recent (Second) visit to the Oliver factory. We live less than 2 hours from the Oliver plant. We went back this past Friday to talk and take some more pictures in the showroom. @SeaDawg @John E Davies and others who were talking about the new solar. I learned Oliver WILL have a Smart Shunt on 2023 models! I didn't think it was there because I assumed the Victron display that I briefly saw in the trailer was to replace the ZAMP charge controller display. NOT SO, the Victron Solar Charge controller 100/50 with BT does NOT have a display, you MUST control it from the APP. The Victron display is the BMV 712 Smart Battery Monitor with BT and this display requires the Smart Shunt to provide information to the display and the APP. SO...when you open the APP you will see TWO Victron components, the BMV and the Solar Charge controller. Victron MPPT 100 : 50 with BT BMV-712 BT If something doesn't sound right, let me know. Would love to discuss. Brian
1 point
-
John, I agree, it is not that difficult to install one but, with the current system, I don't know that there would be much added value by doing so. Of course, if I was designing an all-Victron suite, it would include a Smart Shunt, Inverter/Charger, and MPPT Solar Charge Controller. But I'm not... Brian Paris, TN1 point
-
Steve - I don't disagree with anything you have stated here. Right there with you. IMHO FWIW - a move to Victron should have included all components. Brian1 point
-
It is not at all hard to install the Victron smart shunt, which indeed gives the owner excellent info and it also networks with any other Victron parts like solar. It would be nice if they did it at the factory so the cabling issue is not the limiting factor for a DIY installation.. Getting most of the cables out of the battery compartment would certainly improve it visually. John Davies Spokane WA1 point
-
This is a bit disappointing. The switch to Victron for 2023 models was one of the three improvements (depending on your point of view) I was glad to see; the others being the Truma AC and the 12V compressor fridge. After seeing a bunch of Victron/Battleborn conversions the last few years on vans, off-road trailers, etc., I was hoping that part of Oliver's big cost increase for 2023 was the full Victron suite, incuding their smart shunt and inverter/charge controller. I'm sure it will work fine, just not what I was hoping for. I didn't ask during our tour, because I don't think Anita was familiar with what was coming, but also because I was going to order, regardless of the components.1 point
-
SeaDawg - understandable, basically they can work together to provide the end user with information though they don't "work" together in that sense of the term. It also depends on what you mean by "controlling battery functions". The lithionics interface is one of the best I have seen for staying informed about the health and performance of your batteries. The Victron app is going to tell you how your solar system is performing. Keep in mind, when someone says Victron app with respect to an OTT, they are only referring to SOLAR. Victron makes many, many more products that could be used but are not currently going into the OTT. One such product is the Inverter/Charger. OTT uses the XANTREX PRO series, a very good product on its own, but does not show up in the Victron or Lithionics App, it has it's own app. So, if you want to fully understand a 2023 "Electrical System" you should have an App for the Victron Solar, Xantrex Inverter/Charger and Lithionics batteries. And, to be clear, the Victron Solar and Xantrex Inverter/Charger have remotes on the wall so you don't have to have their apps to get the information but if you want to check detailed battery information, you will have to BT into the battery and check it out. Here is a good (the drawing gets a little tedious) video of how the Lithionics battery app works. Here is a video on the Victron system for the 2023 models. Significant point to note, Xantrex used a PWM charging method, Victron uses MPPT. I won't get into those details here but suffice it to say, MPPT is more efficient (and usually costly). I prefer MPPT on all my solar chargers. Cheers, Brian1 point
-
The 2023 EII will have a Victron Solar Charge controller replacing the Zamp controller and it will be Bluetooth capable. That will give you access to your charging parameters and most of the battery information that you would want/need. You can also access the Xantrex Pro 3000 via BT and get inverter and battery information from there. Accessing at the Battery level is good because you can get fault codes and check the individual battery health and temp. This would not be something I would do often but if BT access is there, I want it to be access protected. I have seen many Victron systems that incorporate the "Smart Shunt" where they are very clear that every ground has to be connected to the shunt in order for it to report accurately to the controller. Since some batteries are not close to this shunt, I have seen things like tongue jacks and powered stabilizers wired directly to the battery and not being reported by the smart shunt, even while in use. Oliver doesn't use the Smart Shunt so direct access to the batteries could be helpful in identifying parasitic draws, albeit fairly insignificant. It can also be helpful, since the batteries are in parallel, to see if both batteries are healthy. The bottom line is, most everything will be connected soon and we will have to choose which path we will take when assessing our power reserves. Options are a good thing as long as they don't drive the prices up to where we can no longer afford to have them. Brian1 point
-
I guess that is good, but I am not sure why it is needed for a battery....? My Victron items (solar controller and smart bus) have this feature but I use the default one (all zeros). Am I am leaving myself open to somebody in the next campsite hijacking my system? More importantly, has this ever actually happened, to anybody? Can a hacker access my phone apps through that "back door"? Thanks. John Davies Spokane WA1 point
-
I sometimes use surveyor's tape (flagging tape) to mark areas. It's cheap. Maybe, 2 cents a foot, or less.
1 point


-
Recent Achievements
-
")


")


")


