Leaderboard


Popular Content
Showing content with the highest reputation on 10/15/2023 in all areas
-
U guys are livin the life :)3 points
-
Thought I would share my latest projects… We enjoy boondocking mostly. While we enjoy the utility of our Ollie inverter, I’m trying to convert as many appliances to operate on twelve volt as possible. 12 Volt Television Conversation We sometimes enjoy streaming video or playing a downloaded movie at the end of our day. I looked into 12 volt televisions but good ones like the Jensen are expensive and besides, the Oliver installed Vizio works satisfactorily. So, I found a way to convert the Vizio to operate directly from the Ollie battery. Opening the [TV] case I located a Tiny Whoop 12 volt input. I purchased a Tiny Whoop JST-PH 2.0 male plug for the input. I was concerned about the sensitive electronic [Vizio] components given the variability of the voltage of our batteries. I solved this by integrating a Voltage Stabilizer DC 12 Volt Regulator/12 Volt Surge Protector. This was mounted to the rear of the [TV] case. Finally, I integrated a fused 12 volt charging cable with cigarette lighter type plug. I plug into the outlet in the cabinet above the TV when needed. Works great! TV operates normally. 12 Volt Security System Where we often find ourselves camping in secluded desert or forest we are a bit concerned about security when we’re out hiking or otherwise away from our Ollie. We use many devices to immobilize the trailer but we’re still concerned about someone breaking in. So, I purchased an inexpensive KERUI Alarm System on Amazon. It’s designed to be powered by house current with an adapter. I eliminated the adapter and wired in a 12 volt to 9 volt DC Converter, Voltage Regulator to power the alarm; plugged into a twelve volt outlet. It uses a handheld remote to activate or deactivate and I use the included motion sensors inside. Works great! Alarm is very scary!!! 12 Volt UV LED Water Treatment System To complement our three stage water purification system we installed the Acuva UV LED ArrowMAX 2.0 Water Treatment System at the galley sink. (Okay, so I’m a bit obsessive about our drinking water.) The system comes with a 12 volt adapter to use with shore power. I eliminated this by wiring a 12 volt line to the fuse panel. 12 Volt Portable Freezer We like to store plenty of food for grilling and extended travel and so that we can purchase frozen food in reasonable quantities. Where our Ollie freezer is so limited we use the Dometic CFX3 35 Refrigerator/Freezer for this. I ran a 12 volt line to the basement storage area and installed a marine grade 12 volt outlet. The CFX3 35 runs on 120 volt or 12 volt. So, when we’re traveling, the freezer gets plugged into the 120 volt outlet in the bed of our pickup. When we’re camped, the freezer is positioned just to the rear of the Ollie and plugged into the basement 12 volt outlet. Uses very little power! Next project Adapting the Starlink to run off 12 volt…2 points
-
@John Welte, that's not great. These fridges work by boiling an ammonia solution in a tank at the bottom. The vapor rises up a set of sloped tubing, condenses back into a liquid up top, then flows by gravity back down the tubes to repeat the cycle. When you are more than 3 degrees off level front to back, you exceed the slope of the tubes, so the fluid pools in the tubing instead of returning to the tank. The fluid left in the tank continues to boil, getting more trapped in the tubes. Potentially, the tank runs dry and the remaining solution crystallizes in the tank. This could potentially lead to a fire. The Norcold manual specifies a max incline of 3 degrees front to back of the trailer and 6 degrees side to side. In your situation, sometimes I put the trailer on the ball and do the rest of the hitch up, but I don't close the Bulldog. I raise the trailer nose back to level. Then, in the morning, I just lower onto the ball, close the Bulldog, and drive off.2 points
-
A "Q-tip" to help clean things out and then some dielectric grease - you can put that in the trailer plug with another "Q-tip". Past that - check your fuses. Bill2 points
-
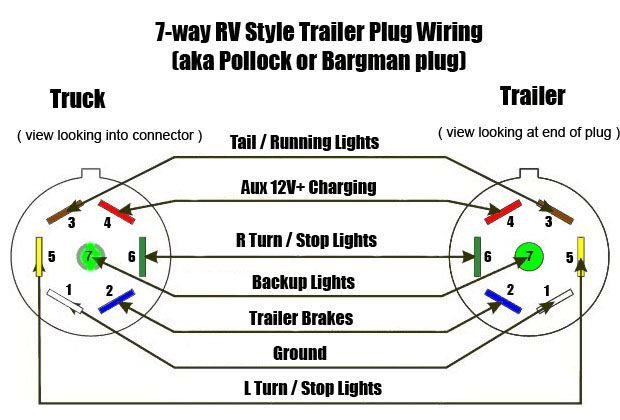
The most common cause of failure is the 7 pin plug and connector between the truck and trailer. Check the contacts on each for bent connectors or corrosion. (I've been able to resurrect a trailer connector in the past by gently bending a prong back into place with a flathead screwdriver, but with a trailer so new yours shouldn't be that worn.) CAUTION: Pin 4 on both truck and trailer may be "hot" (connected to the battery) at all times in some installations, so don't short that one out.
 2 points
 -
We’re right in the path, it was pretty interesting to see. I didn’t get very dark, stood out in the driveway with our neighbors taking turns with the eclipse glasses. Definitely a ring of fire. Mike2 points
-
If your 2019 LE II is the standard bed model (like my 2020), then yes, it is (unfortunately) normal and reflects a design flaw on Oliver's part. I would speculatgethat NCeagle's 2020 LE II has the twin bed option which would explain why NCeagle hasn't observed the same phenomena. In our particular vintage of LE II's, Oliver placed only a single air return duct in the very back on the curbside immediately in front of the furnace. When the standard bed is set up and the furnace is running, most of the hot air blowing out the supply ducts can't escape the cavity under the bed and is immediately pulled back through the return duct and into the furnace. This hotter air into the furnace in turn causes the supply air temperature to become even hotter which in turn causes hotter return air into the furnace which increases the temperature of the supply air, etc. Meanwhile, the air temperature in the cabin takes forever to increase because the hot air from the supply vents is immediately pulled back into the furnace and doesn't mix well in the cabin. As the intake air around the furnace (i.e., water pump) gets hotter, the heat exchanger in the furnace gets hotter and eventually overheats and triggers a safety shut-down of the furnace flame before the cabin actually reaches the temperature set point; referred to as short-cycling. From your pictures, it looks like your furnace started short-cycling badly when you increased the thermostat set-point just before 8 in the morning. It appears that it took over an hour to raise the cabin temperature by 10 degrees quite probably due to the short-cycling. I doubt this is an issue in the twin bed model because the hot air from the supply vents can freely mix into the cabin air and doesn't get trapped under the bed to be fed immediately back into the furnace. The quick fix for standard bed owners is to open another furnace return vent on the street side of the trailer forward of the bed. This helps pull hot air out from under the bed and returns that hot air to the furnace via the street side basement opening and over the water tanks. My 2020 LE II has a nice round access hatch on the streetside below the pantry (to access the Inverter GFCI). In the heating season, I just remove that access cover to that streetside hatch and the short cycling problem is solved, the furnace runs quieter, basement temps are more even throughout, and the furnace/thermostat do a much better job keeping a constant temperature at the set point chosen.2 points
-
During our present trip touring the (4) gorgeous Colorado NP’s and a few Service Parks our Atwood CO/LP detector started alarming and would not reset. Of course it alarmed in the middle of the night. 😄 I removed the detector and saw that it had a manufacture date of 2018. We took delivery of our new OLE2 in June of 2020. So our Atwood detector was actually 5 years old. I called Oliver and asked about purchasing/shipping me a replacement. Mike Sharpe said they are no longer installing the Atwood’s and Oliver is now installing RV Safe model #RVCOLP-2W CO/LP detectors. So not wanting to go a day longer without a detector I opted to just buy local and made a call to a local RV dealer in Montrose CO. They said they had plenty on hand. I swapped out the old Atwood and installed the RV Safe and we are back in business with no alarms. The new RV Safe detector comes with a choice of (2) backing plates. So Pro tip- If you have to replace the old Atwood use the larger backer plate that comes with the RV Safe detector as it will take cover the hole in the hull wall under the dinette that the Atwood required. It’s a pretty straight forward clean install. Onward!! Patriot🇺🇸
1 point
-
1 point
-
My 2018 Elite II has a Atwood CO/Propane detector that has a 2016 date printed on it. Although the Atwood has not been alarming, I am going to replace it any way before that happens and have ordered the new RV Safe detector from Amazon. Hopefully Amazon does not have old detectors in their stock. I will be checking its date when it arrives next week.1 point
-
Here in Western North Carolina we are getting close to the maximum of today's solar eclipse - maximum here is around 1pm and it started at 11:46 am and will end at 2:42pm. Only approximately 44% of the sun will be covered and about 5 minutes ago that made the sun look a bit like "pac-man" Hope that the weather is good for all that are interested in this type of thing! Bill1 point
-
Here in northern Ohio, all I see is rain. I'm hoping for better during April's solar eclipse since I'm right on the path, but being Ohio in the spring, It'll probably be similar. I can at least guarantee that it will be dark for 3 minutes and 52 seconds, whether you can see the eclipse or just a bunch of clouds. 🙂1 point
-
Tell Anita hi from us. Great news!1 point
-
I just spent a day at the Mothership and Anita is back at the office, doing her usual great job helping folks find their forever trailer. It was good to see her again.1 point
-
You can get the type that JD used HERE. But any single pole 12 volt switch will do - I used one like THIS that I bought at WalMart. Bill1 point
-
Yes, there is a fuse on the wire(s) leading away from where the wires come out of the back of the propane detector. The purpose of the switch is that it is a bunch easier to find this switch at "zero dark thirty" than it is to find that fuse and dismantle it when you are still half asleep, the alarm is going off and your significant other is yelling. Bill p.s. It should go without saying that in the event anyone decides to deactivate this alarm via either a switch or via the removal of the fuse, they should first determine that there is no actual leak. And, either the fuse should be replaced in its original position and/or the switch turned back to the "on" position as soon as possible. Failure to do this could be extremely detrimental to your health.1 point
-
Read my posts in this thread for a no-drill install of a new CO/Propane detector.1 point
-
The picture I posted is from under the aft dinette seat between the hulls - there is nothing at all to see from the seating area under the dinette. In the picture I posted - the "white" area that is behind the aluminum switch holder is actually looking through the hole of the propane/co alarm from the inside to the outside area under the dinette. Sorry but I don't have any other pics of the "full" installation which would show the actual switch. However, the switch is simply mounted in that hole you can see in the aluminum mount. Hope this helps. Bill p.s. here is a better pic taken from JD's post on the subject:1 point
-
Bill: This sound like a good idea, but I am not sure if I follow your explaination of where/how the switch is located other than you siad it was next to the detector. Mine detector is 5 years old so I am not sure how much longer the detector will work without premature alarms. Do you have a picture of the detector/switch seen from under the dinette that you could post? Thanks1 point
-
This might be a good place to bring back an older thread concerning the installation of a mod for the purpose of TEMPORILY stopping that noise in the middle of the night from these "false" alarms. At about the same time John Davies and I installed a switch on the back side of the propane/co alarm. This simple on/off switch can be used to turn this alarm off in the middle of the night without having to search for the fuse and can be used while the Ollie is in storage to remove one more parasitic drain off the batteries. John came up with the idea of being sure to place a ribbon (or something) in a very visible spot to remind you that you have turned this detector off - a good idea. Anyway - here is mine and JD's looks very similar. The power wire to the propane detector is cut and placed on a switch that is mounted in the hole in the bracket. I used epoxy to attach the bracket to the interior of the wall below the aft dinette seat - where the detector is already located. Bill 2 inch square bracket for propane switch.jfif1 point
-
That is a great detector. I am sorry to see that exploded Northern Light, I like those campers, but not the stick interior so much. https://olivertraveltrailers.com/forums/topic/6780-how-to-replace-the-propane-co-detector-with-a-gas-only-one-and-a-digital-co-detector/ But the LED is uber bright and needs to be dimmed if you don’t want the underside of your table lit up…. John Davies Spokane WA
1 point
-
Thanks Patriot! Straight to Amazon, then to basket and soon to my door. Bill1 point
-
I had a good conversation with one of the technical support engineers at Lithonics. He told me to keep the trailer plugged in at our unheated storage place and turn on the battery warmer. Plugged in for 3-1/2+ months. Hull #1045, 2022, E-2, Lithium Pro Package, 3 Lithonics batteries.1 point
-
I can attest to the difference (almost always) between the batteries, usually just 4 ~5%. I am certain that what JD says on the balancing out is the culprit. I've actually been letting my batteries get down to the RSV.... just so that I can "reset" the SOC. Most of us in the normal course of usage are simply doing the micro-charging mentioned above.... and likely experiencing some sensor drift over time. (FYI: we've spent 248 nights in ours and today is the first time I've actually let them run down like this to do the reset) Responding to Apreski... I do use the Oliver electrical system to re-charge. Simply plug the Ollie into my garage 20amp outlet to recharge the my three 130AH batteries. I did not take the batteries out last winter (here in Ohio)... but I did make sure that the batteries stayed charged enough for the electric heater to keep things protected.1 point
-
According to my Lithionics manual for the 320 Ah batteries you can also leave the batteries connected to a reliable shoreline connection for the winter (they recommend leaving the solar on, too). The batteries' internal heaters will protect them from the cold while the shoreline connection/solar keeps the heaters from discharging the batteries.1 point
-
Kathy and I called and spoke with Anita last Monday and she is now at home and still recovering. She is busy with PT and is very grateful for everyone’s thoughts and prayers of support. We text with her regularly and check on her. We let her know that everyone is thinking of her and still lifting her up in their prayers. Patriot🇺🇸1 point
-
I spoke to Anita yesterday and passed on everyone's well wishes. For some reason she is unable to access the forum inside the facility so she's not been able to respond here. She is currently in a step-down rehab facility in Columbia, TN. She states she is still in a lot of pain, but she is very appreciative of all our thoughts and prayers. She thinks she may be there several months. I'm hopeful that won't be the case. She did say that she is able to get into a wheelchair for short periods of time. They do not want her sitting up too long at this period of her rehab.1 point
-
Oliver offers a yearly maintenance package for our customers. The maintenance items included in this package are things that need to be performed for typical camper use at least once per year. This does not mean that this is the only time of the year that you will need or have to perform some of the these maintenance items. Some customers may be able to go longer than one year for some of the items as maintenance is based on usage & environment. Many of the items have been added to our yearly maintenance list because so many people do not perform them and we felt it was best to perform it once per year rather than never. A/C Filter Cleaning: We perform this in the yearly maintenance but in dry environments it should be done weekly. A/C Condenser Coil: Recommended with Dometic A/C at least once per year however depending on the environment of use it could need to be cleaned as often as 2-4 times per year. Birds can also make nests inside when left unused for a period which would also require cleaning. Exterior Caulking: We recommend doing this at least once per year. Depending on the use and environment it may need to be done sooner or if you keep the camper stored half of the year inside then you may be able to go two years. If you do not caulk every year, we recommend that you at least inspect the caulk. Furnace Cleaning: Basic cleaning should be done once per year however insects can invade and build nests that would require cleaning as needed. Plumbing Decalcification: We recommend at least once per year but depending on hard water use & gallons used you may find that it is necessary to perform this 3-6 times per year. Some areas are known for extremely hard water content and you may have to decalcify once per month or use a water softener. Water Filtration systems do not soften water. Water Heater Decalcification: We recommend at least once per year but again depending on use you may have to perform this 2-4 times per year. The Truma water heater will flash when decalcification is necessary however once the unit needs to be decalcified you must stop use and perform the steps. The Suburban water heater does not provide a warning and you will need to periodically drain & inspect. Blade Valve Lubrication: We would recommend lubricating valves about every 2-3 months to ensure best results. Repack Bearings: Dexter recommends every 12 months or 12,000 Miles, whichever comes first. If you drive more than 12,000 miles per year we would highly recommend having the bearings repacked by the 12,000 mile point. Failure to repack the bearings in time can result in failure & breakdown. Grease EZ Flex: This should be done every 3 months or 3,000 miles whichever comes first. 7-Pin: The 7-Pin should be inspected every time you connect it. Water intrusion can cause corrosion which will lead to issues. A freshly cleaned 7-Pin that has water intrusion can corrode as quickly as just a few days. Coupler: Lubricating the coupler should be done as often as needed. Lubrication on an exposed part does not last. The coupler does not have to be greased but a good lubricant should be used to ensure the spring & lever operation works smoothly. Some rust buildup is normal on a steel coupler. Bulldog recommends greasing the ball pocket however Andersen does not recommend greasing for the ball. Grease will not prevent wear but it will help with rust. Tire Pressure: This should be checked every time you pull the camper. Air, over time, can escape thru the sidewall of the tires. Improper tire pressure can cause the tires to wear sooner. Window Tracks: Depending on where you camp you may need to clean the window tracks out as often as every week. Tree debris & sap can start to buildup in the tracks on day one. Once the white window glazing is left uncleaned for a period of time it will remain stained with mildew. The design of the window track makes it near impossible to completely clean the entire track as part of it is hidden under the stationary window. Air helps to free any debris on that side of the track & running water through it with the glazing removed. You can take a rag and clean as much of the track as you can but don't fret if some staining is left. The primary objective is to remove as much debris as possible that will block the weep holes. If the weep holes get blocked then water will backup and overflow to the interior. Sanitize Fresh Water System: If you leave the camper sitting for a period of time it is a good idea to sanitize before hand. This will keep algae from growing in your tank when water is left sitting for too long. You should also sanitize before using the camper after it has set for a long period of time (2-3 months). Deodorize/Clean Black & Grey Tanks: This should be done with every fill (Complete tank fill, not a single use). When setting up camp & using the tanks it is best practice to add treatment to the tanks. Black tank treatment helps breakdown waste during use but once the tank is flushed the treatment is gone. The black tank should be allowed to fill up with waste during use and a single waste dump once the tank is near full. This allows time for the waste to breakdown and a better waste dump. *Never connect to a dump station with your black tank valve open as to dump while in use. This will cause the water to flow quicker than the solids leaving the solids behind in the tank. As is with all maintenance, the better you maintain your camper the better performance you will receive. Failure to properly maintain will result in more issues. All the listed items above are recommended maintenance for the best camping experience. The yearly maintenance package is to complete required and recommended maintenances at least once per year but should not be considered the only time you maintain your camper. There are other items that should be done regularly that we do not perform in the yearly maintenance. Some of these items are: Fan Cleaning: Dust & grease from cooking inside the camper can accumulate on the fans. You should clean the fans periodically as needed. Failure to clean the fans can cause unwanted noise & performance issues. Wash & Wax: This is NOT performed during our yearly maintenance package but we do recommend that you wash your camper frequently & wax it at least once per year. Again, waxing once per year is the minimum and it is better to wax twice per year. If you really want to keep the exterior looking its best than it is recommended to wash frequently & use a good spray on wax such as Duragloss Aquawax every time you wash. The spray on wax does not however take place of the old fashioned wax that should be done once or twice per year unless you are washing & spray waxing the camper every week. Black Tank Flush: There is a water inlet dedicated just for flushing the black tank. This is something that is best done every time you drain the tank. Water Pump Filter Check: Inspect the water pump filter before or after every camping trip. The filter's purpose is to catch unwanted debris that may be in the tank from entering the fresh water pipes.1 point
-
Is there any way we can send her flowers and get well wishes? Mossey1 point
-
Here’s a recent example of why you want to have a working CO/propane detector. Exploding Northern Lite In addition to working common sense.0 points


-
Recent Achievements
-


")


")


