Leaderboard


Popular Content
Showing content with the highest reputation on 05/26/2024 in Posts
-
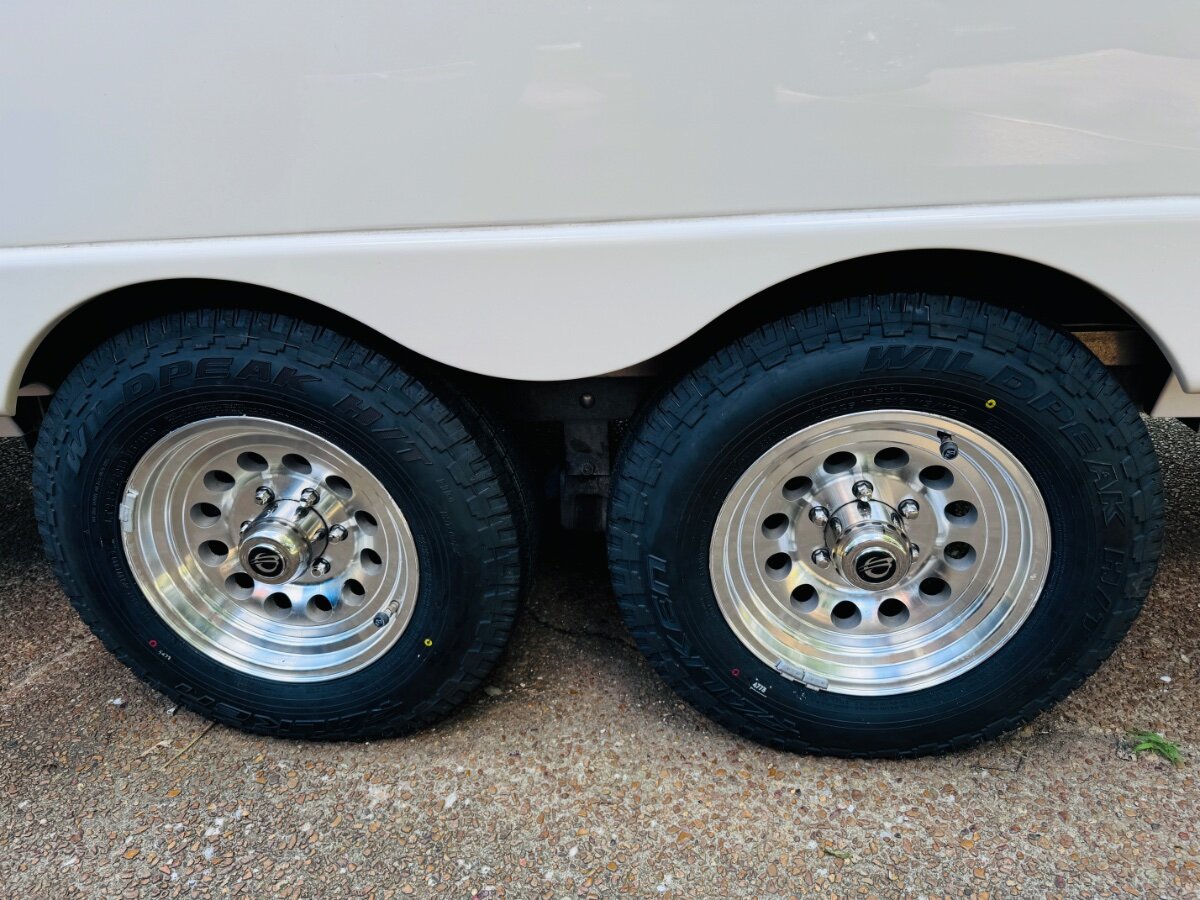
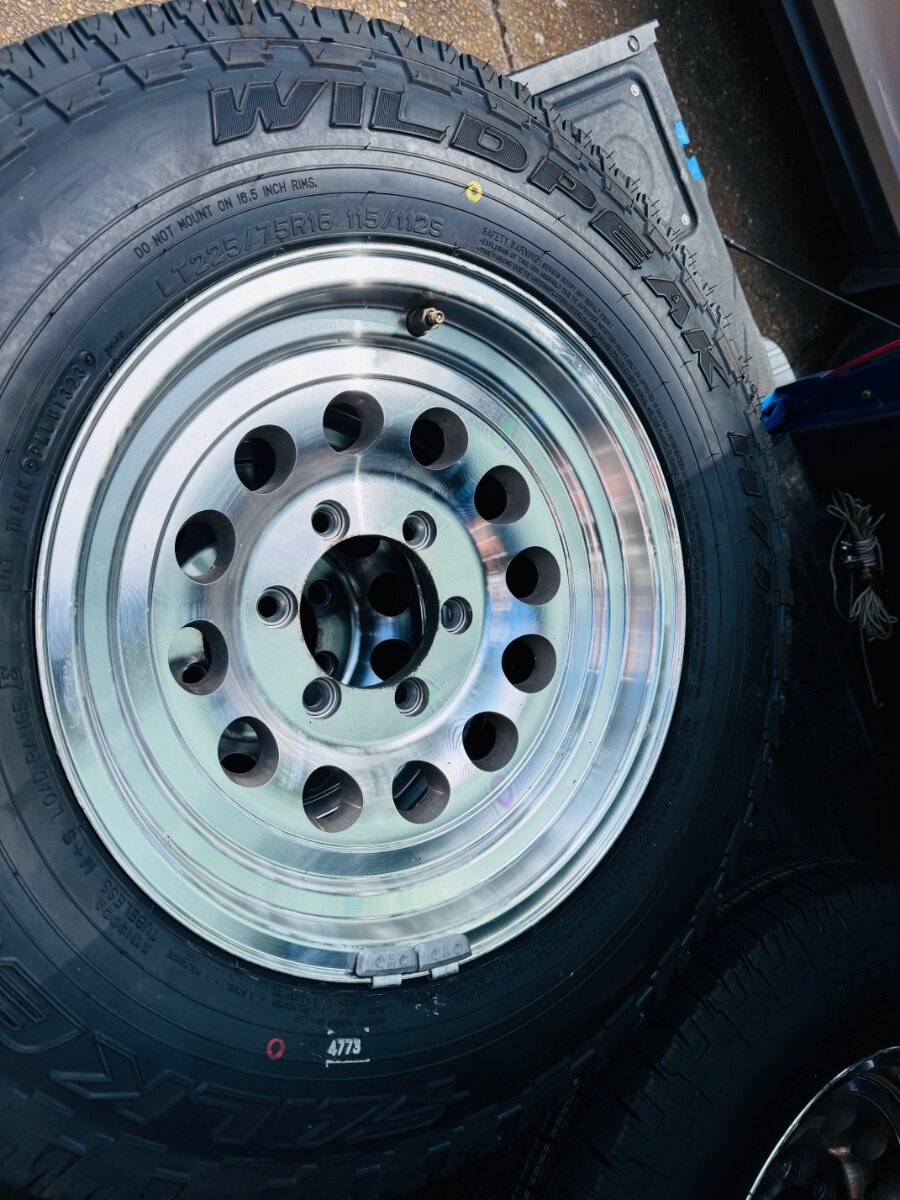
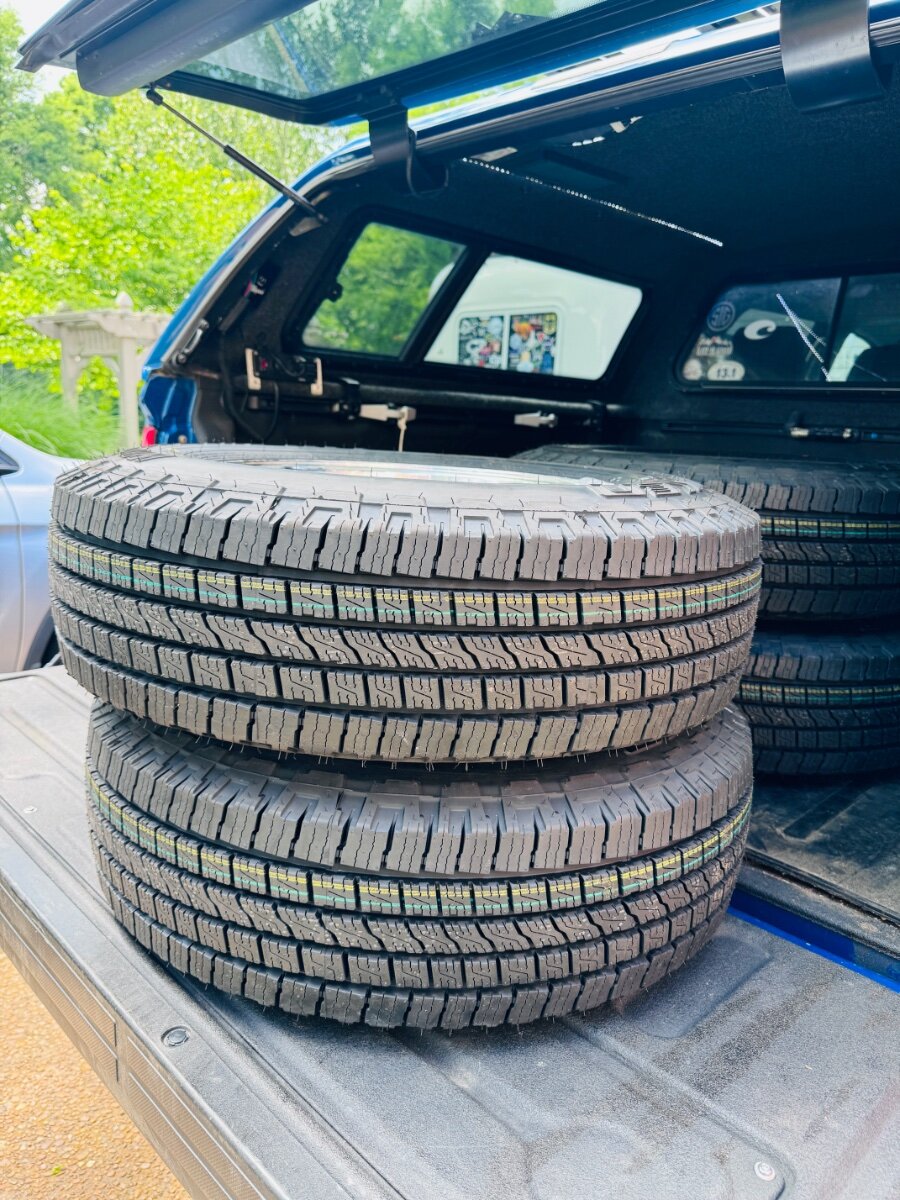
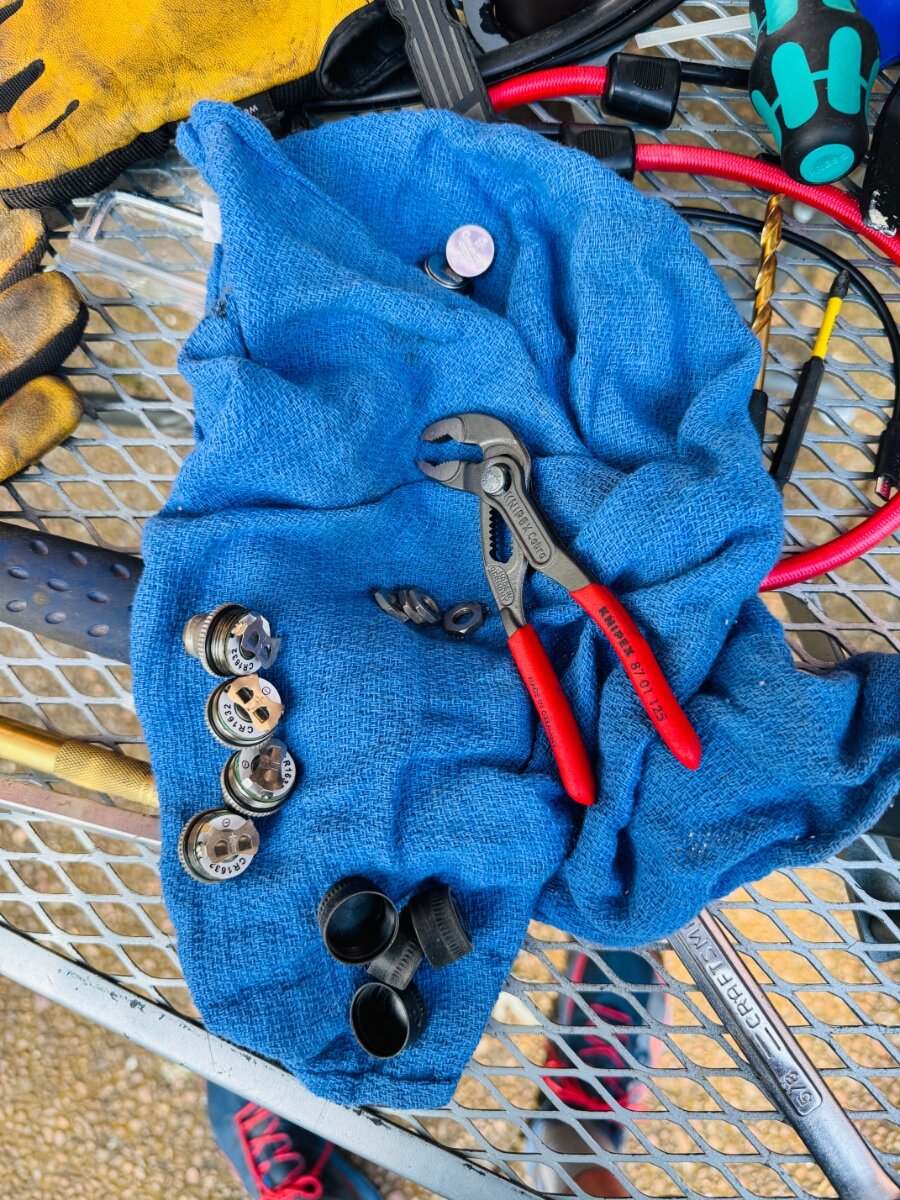
New tires after 6 years with the Michelins. They performed well just had some very small cracks starting to form on the side wall. Changed the TPMS batteries while I was at it.
 8 points
 -
Similar report to Art's.... We're almost back to our home in Maine. Right around 3,200 miles round trip. No new issues to report. Our Oliver has always traveled well behind our 3/4 ton truck with virtually no porpoising but there's even less now that the leaf springs have been changed. Longer drives are less fatiguing. I checked the torque of the u-bolt nuts at 2,000 miles and none of them needed to be tightened so I think they're set. I had to tighten them twice after having the new leaf springs installed. I haven't checked frame welds but will when I get home. I'm not expecting to see anything unusual. I think an important adjustment is to tire pressure. When we picked up our trailer in 2021 the first thing I did - based on helpful feedback from others - was to lower the tire pressure from 80lbs to 60lbs. With the switch to the Alcan's I've lowered the pressure to 48lbs. Based on some of the roads we've traveled on, I think I've found a good number. I'll keep an eye on my new Monroe shocks that were installed at the same time as the leaf springs and Timken bearings. If the bulldogs are noticeably better or they last longer, I'll switch to those when I service my trailer again.8 points
-
Wow!!! is an understatement. Glad you both were able to safely depart that demolition derby. 💯 on point Art with having 360 awareness and both heads on a swivel. We prefer refueling at the large truck stops when we can. When parked to refuel my bride and navigator steps out and does a walk around of our rig every time we stop while I top off the diesel. This is just one of our best practices when we are rolling.7 points
-
We owned a Class-A, then a C and now our Oliver, a progression of down-sizing. Never considered a 5th wheel. They just seem unnatural in some way. Think it's crazy every time I see the HUGE ones on the highway and more so on some narrow country road. The guy Art and D noticed @MAX Burner didn't learn from his first maneuver. Unfortunately, it will likely not be his last. About 10-12 years ago we were on a cross-country move with a cargo trailer. Pulled in for fuel and for a moment I forgot I was towing. Went around the pumps quickly and too closely, then all of a sudden my brain said STOP! If I did not regain my wits, I would have hit the bollard hard and destroyed the trailer. After my heart moved back down out of my throat, whew! I slowly backed up to correct. You know that thing we say about our Olivers? "You hardly know it's back there." This was the case with this trailer. Always remember it's back there. Chris and I say often, "Who is that guy? That's always on our bumper!"6 points
-
Over time, I’ve followed a few topics, and yesterday I realized I didn’t know how to find my list of the topics I’m following. A PM to @topgun2 (thank you, Bill) got me started in the right direction. For all of us with inquiring minds 🤓, if you didn’t already know, here’s the secret. Go to: Activity -> My Activity Streams -> Content I Follow5 points
-
Yeah, what I like about them is they are super durable. Having had my Tundra long enough to use two sets of Michelins and now a second set of Falken Wildpeak A/T tires I have become a big fan of the Falkens Wildpeaks. They are not loud, good traction, and last almost as long as the Michelins. When having had to plug for a screw/nail, no comparison in how difficult it is to get a plug in (thought I was going to have to get the drill out!) The Falken's are incredibly tough. The Wildpeak line has an all season road tire all the way to A/T, M/T and R/T.5 points
-
I can’t help but think of this Jonny Cash song each time I read about and I invest $$$$ into an upgrade for Hull #634 - XPLOR. The next time you’re adding that upgrade you just might start thinking about Ole Johnny’s song. Ha! Glad I had Oliver install the new 5200# axles and all new running gear last Oct. One piece or mod at a time.😅5 points
-
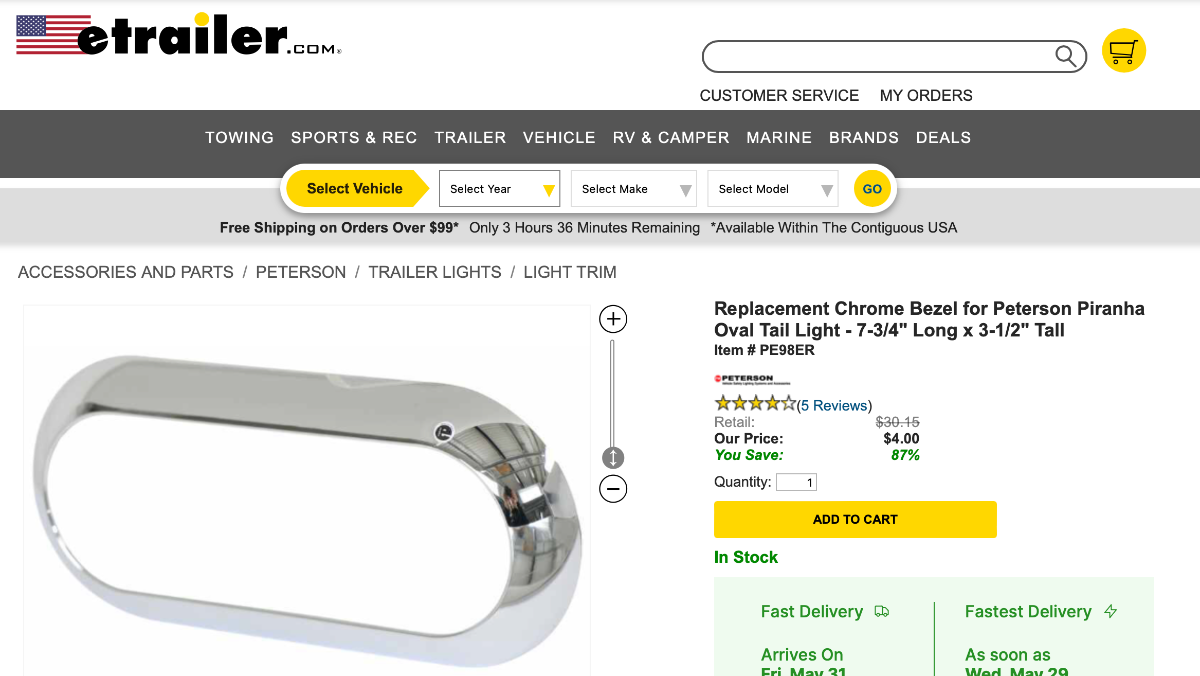
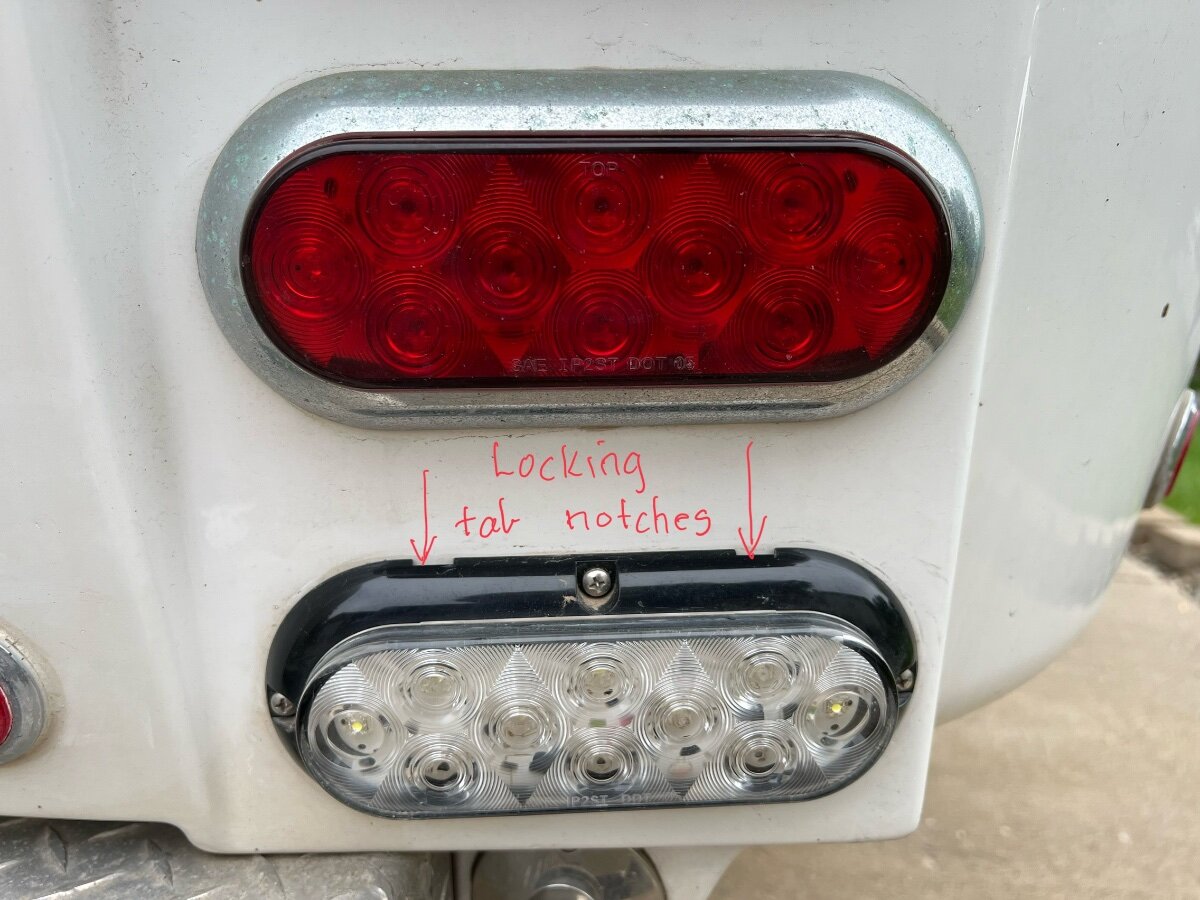
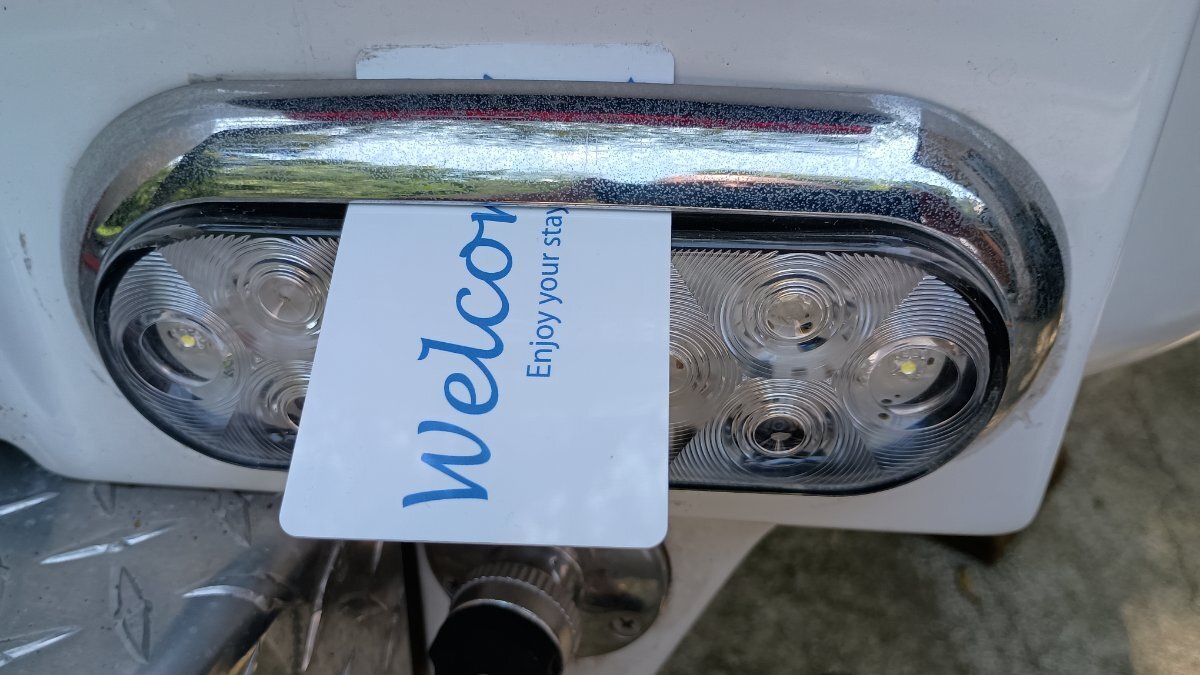
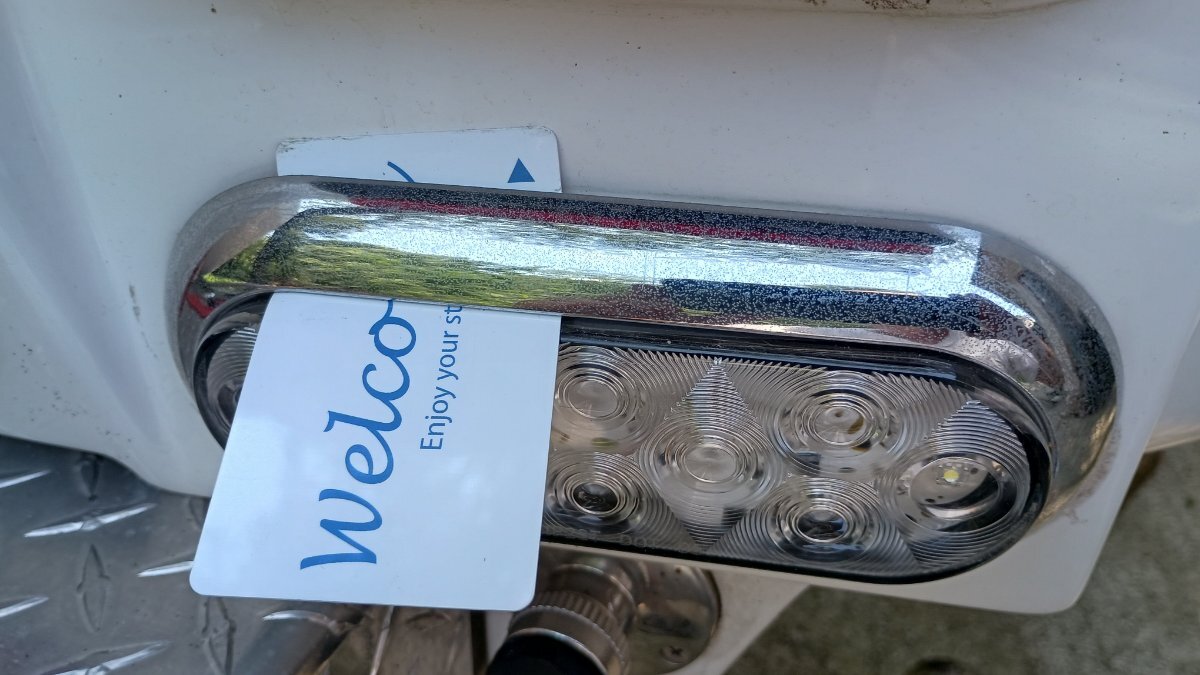
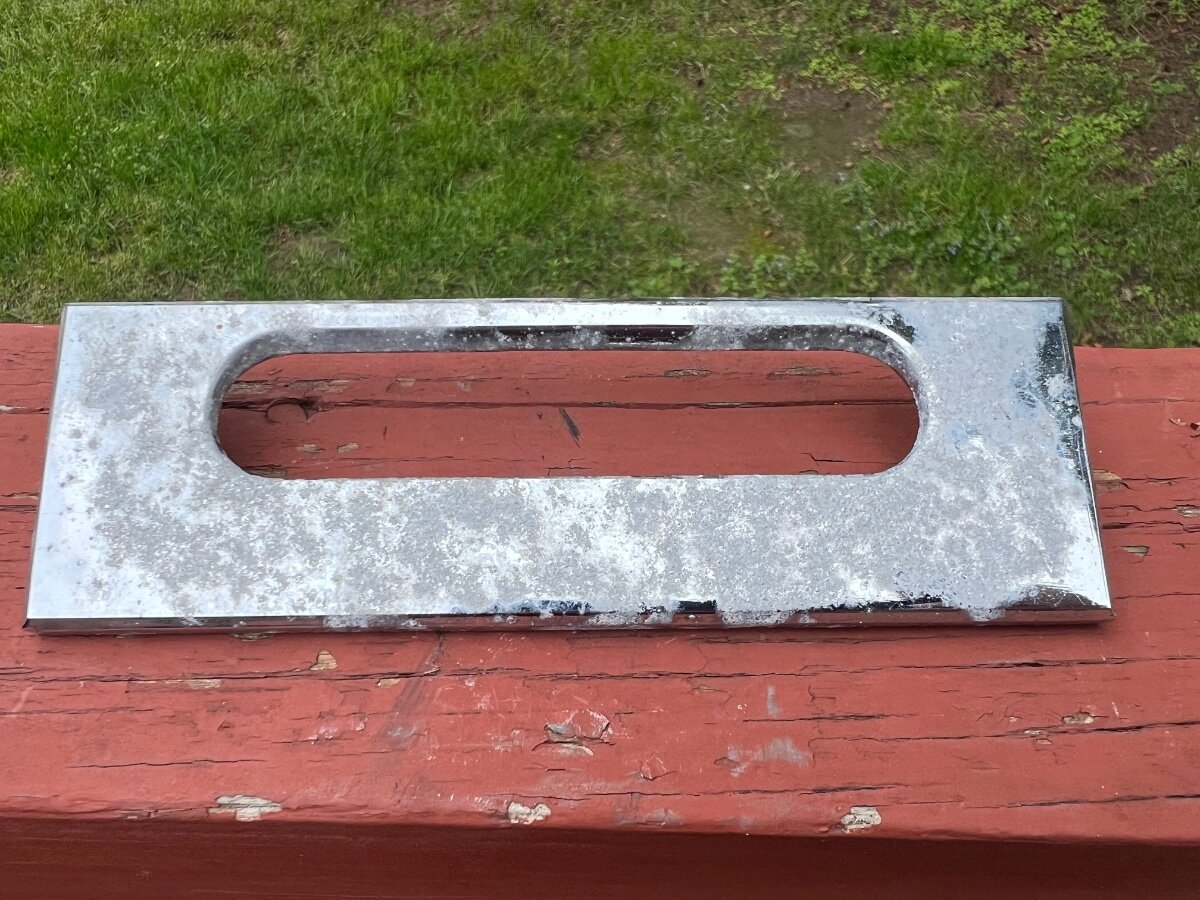
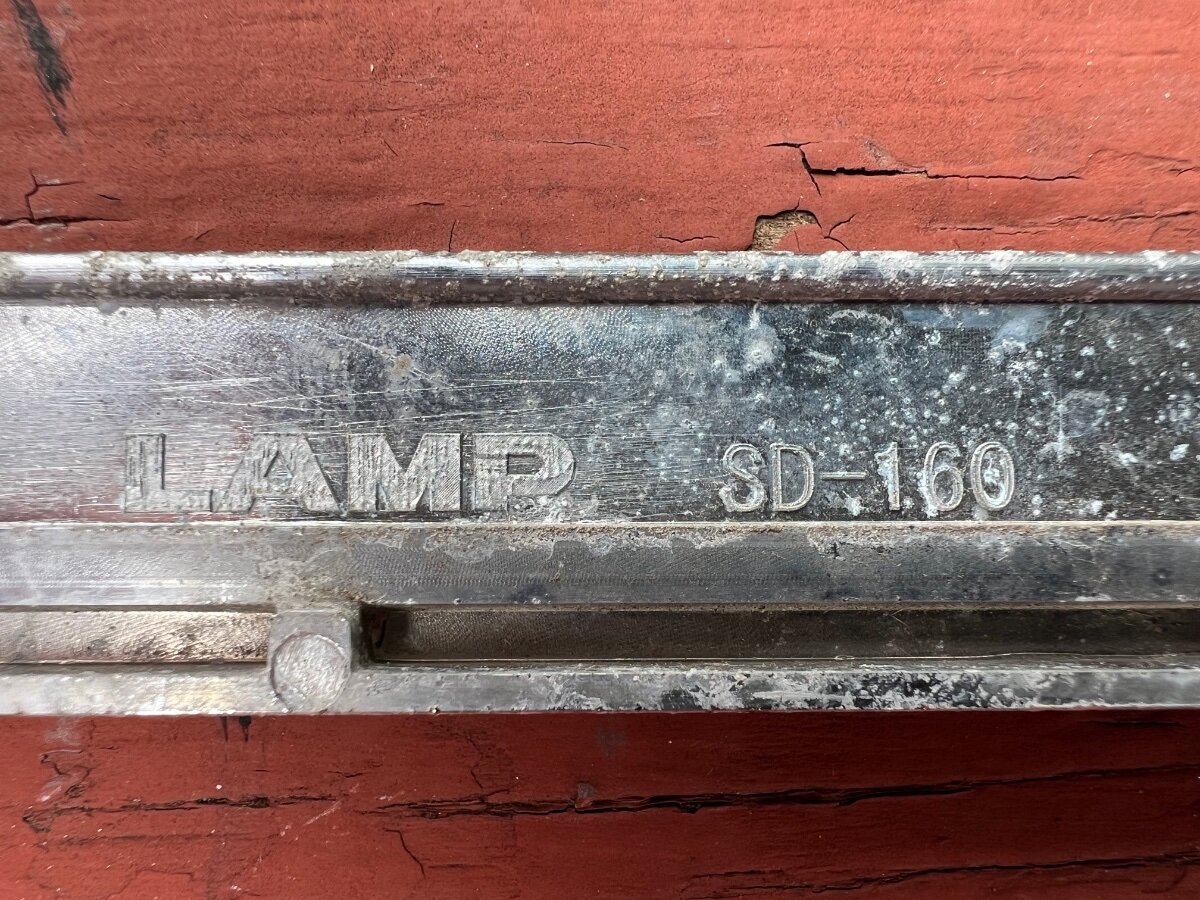
Hello All, I've been reading the forum regularly since 2017 and don't remember anybody mentioning this. The chromed taillight bezels on our 2018 tail lights were turning a gross matte green from winter road chemicals used in Minnesota and maybe a Colorado trip over I70 on my way to Moab in March a few years back. I found that etrailer.com sells just the chrome bezel separately and that I didn't need to buy the whole tail light if I wanted the taillights to look nice again. The replacement bezels are only $4 each, so I bought a set of six. Since they fit and are inexpensive, I may just buy another set and put them away for a rainy day. They are held in place by four tabs on the back of the bezel and old bezel just pops off. I've attached a photo of where the bezel tabs lock in on the light housing. There are four bezel tabs, two on the top and two on the bottom. I used a few thin screwdrivers and an old fillet knife to get them to pop loose. After learning where the tabs are on the first one it made removing the next five much easier. There are many other items on my trailer that are ugly due to unrepairable road chemical corrosion, but at least this one is fixed. Hope this helps someone else with their northern winter use trailer too. Ken
4 points
-
Just some quick feedback after 5,175 miles on the Alcan leaf springs, and 1,500 miles on the D52's and new Monroe shocks: 1. We replaced the leaf springs just prior to the Eclipse Rally in TX last MAR and logged just north of 1,900 miles on that round trip from our home in NM. To baseline the structural frame support integrity, we photographed each of the aluminum welds visible from under Casablanca. The welds were in good order/no visible cracks before and after the Eclipse Rally. Nothing unusual noted in the interior of the camper during this first trip with the new springs. 2. We logged another 1,190 miles on the Alcans on our first leg of the OTT Owner's Rally from NM to Hohenwald arriving there 8MAR. We coordinated with Jason Essary to replace the Dexter D35 axles with the D52s Nev-R-Lubes with 12" drums. Dusten Bowden (18-year veteran of OTT and now owner of Dr RV Mobile RV Repair) and I swapped out the axles and mounted new Monroe's on 9MAR without issue. 3. Performed the U-bolt nut torque tightening protocol recommended by Alcan for the 9/16" U-bolts at 50, 100, and 500-mile increments. Arrived at the Owner's Rally on Tuesday last week after logging 265 miles on the D52s/Monroes. No issues noted after checking the U-bolts for proper torque. 4. Arrived home yesterday. 5,175 miles logged since MAR. The trailer pulls well in all the weather conditions experienced including strong cross winds through Amarillo on I-40 and some of the lousiest interstate sections we've experiences through northern Louisiana on I-20. Integrity of frame welds show no change since before changing springs, FYI. We're pleased with the running gear mods as they 100% meet our style of travel trailering... Cheers, All!4 points
-
Hey, John; The D52's use a massive "bearing pack" which is a sealed unit touted to be "good" for 100k miles. We'll see, for sure. Even though they're called "Nev-R-Lubes", owners still need to inspect the sealed bearing packs at 12k-mile/12-month intervals (whichever occurs first). With our current OTT camping schedule for the rest of this year, we'll likely be digging into the new 52's in NOV prior to our "winter mode." We'll report the details of the process afterwards for those interested. JFTR: We've chosen to run the Cooper Discoverers at 45psi cold. The TPMS shows a consistent warm-up (obviously not including the spare) to 52 - 53psi per tire after about 20 minutes of towing. This pressure seems to be our "sweet spot" for the loads we've been carrying for summer travel. We also replaced the curtain clips with new ones before the axle swap because we were discovering random curtains falling down after normal towing conditions. We haven't had one fall down since replacing the clips, FYI. @Patriot - good call posting the Dexter inspection procedure, thanks brother! Cheers!4 points
-
Did the same thing a few weeks back. Will miss having the original Michelin Defenders as they were not really showing much wear after 50k+ miles. I went with a set of Bridgestone Dullers as Defenders not being produced any more.4 points
-
Finally made it back to Tampa 🙂 73 nights, 13 states, 4 national parks, 3 state parks, a couple of KOAs, 2 siblings' driveways, and one highway rest stop. 5,000 miles on the new truck. 3,400 on hull MDIV. Changed the composting toilet twice. Greased the zerks once. Learned soooo much, saw many beautiful places and met loads of nice folks. Thanks to everyone for all the hand-holding and advice. Ollie gets a very well deserved bath tomorrow. Then we check out the storage facility. He might get to rest there for a few days before we get the energy to head to a beach or some place else close by. 😜4 points
-
My spare tire is 9 years old, so started researching what tire to replace the original 16" spare tire with one that fits in the original spare tire housing. On our 2015 LE2 Ollie the original spare tire is a 215/60R/16 SL load range tire. The other 4 trailer tires are LT225/75R/16 E tires. Understand some other LE2 owners have P215/70R/16 tires. Around 2017 (please correct me if I have this wrong) the spare tire fiberglass cover was modified to accommodate the full size 225/75R/16 tire/wheel assembly. Recently, Oliver started installing 15" wheels on LE2 Olivers mounting Goodyear Endurance ST225/75R/15 E tires. Went back to an old thread here posted by Steve about Oliver's move to LE2 15" ST tires. Started thinking 🙃 (that's trouble for me sometimes) if a 215/70R/16 will fit in the original spare tire housing, will the newer 15" tire, ST225/75R/15 E fit in the original spare tire housing. Contacted Oliver service and they said the ST225/75R/15 E tire will fit inside of my original spare tire housing on my 2015 LE2. Started doing some research and learned the following: Original LT tire: LT225/75R/16E Tire height: 29.28'' Section Width: 8.86'' Maximum load capacity: 2679 pounds New tire used on LE2: Goodyear Endurance ST225/75R/15E: Tire Height: 28.28'' Section Width: 8.86'' Maximum load capacity: 2833 pounds Tire used that fits in 2015/2016 LE2 spare tire housings seen in two different threads: 215/70R/16 Tire Height: 27.86'' Section Width: 8.46'' Maximum load capacity: 1764 pounds The 2015 spare tire fiberglass housing ID (inside diameter) is around 28 7/8" and around 9 1/2" deep. It looks like the ST225/75R/15E will fit if the tire/wheel is centered. Couple days ago ordered a Sendel S20 15"X6", six lug trailer wheel with 5.5" spacing and a Goodyear ST225/75R/15E tire mounted. http://sendelwheel.com/wheels/s20t.html https://www.goodyear.com/en_US/tires/endurance-trailer-tire/24464.html Load range/Load index explained: https://www.discounttire.com/learn/load-range-load-index I normally keep Ollie's spare tire in the TV pickup bed instead of in the spare tire cover, but still want a tire/wheel that fits in the spare tire housing, will see. Plan to experiment with learning how to put a nice finish on the original aluminum spare wheel before eventually polishing all of the original wheels, too.3 points
-
Brought up in Chicago and TG we left there 25 years ago! Also thank goodness when we get snow up here in the Bradshaw Mountains of the Prescott NF, Yavapai county uses a sand mixture without salt. And in the spring, they run the street sweepers right down our street. Nice! And thanks @KenB. I had seen these on Amazon for $6 and when I need another item on eTrailer I'll get a set of these to combine shipping. Ours are pretty good, but #113 is 8 years old now in the AZ sun. Not as shiny as once was When I get around to a professional de-oxidization (is that a word?) and gelcoat of the outer hull, it will be nice to first remove most trim items and do the job right. Other items I will replace at that time: Furrion RV Outdoor Receptacle Cover - 15 Amp - White Furrion Accessories and Parts F15RCSPSAM (etrailer.com) (not sure this is the correct part#) Amazon.com: Sea Dog 337150-1 Screw Out Deck Plate, 5-7/16" / White : Sports & Outdoors (could not find on eTrailer)3 points
-
Last night we hosted a sleepover with the grandbabies. DW had one twin bed. 6 yr old had the other. 8 yr old had the dinette bed (so I got to learn how to set that up: EZPZ). And I got the floor with my old sleeping bag. Had a blast. 😂 We ran the AC a lot yesterday. All on battery. We had several "showings" during the day to interested friends and family. Then the sleepover started with "Finding Nemo at 7:30" and ran till 7 the next morning. (The AC was on for 12 hrs straight.) Battery levels went from about 85% yesterday morning to about 20% this morning. Very nice. Bright sunshine predicted all day today. We will see how they recover.3 points
-
Looks like a great looking tire and I will consider these when it comes time to replace ours. Thanks for the info!3 points
-
I know Wildpeak tires are a favorite brand of the 4Runner/GX offroad crowd. Would not have thought of them for LT trailer tires on the Oliver. The tread has a solid rib pattern for towing though - Nice!3 points
-
Glad to hear that the trip was a success! The first of many to come. And, it sure was nice meeting the two of you in person at the Rally. Wish that we could have spent more time together. Certainly you are no longer "Newbies". However, into my 9th year I'm still learning new things about the Oliver company and the fine product they make. Bill3 points
-
The factory has apparently done a 180 on silicone. That is the product they are using and recommending for all sealing purposes.3 points
-
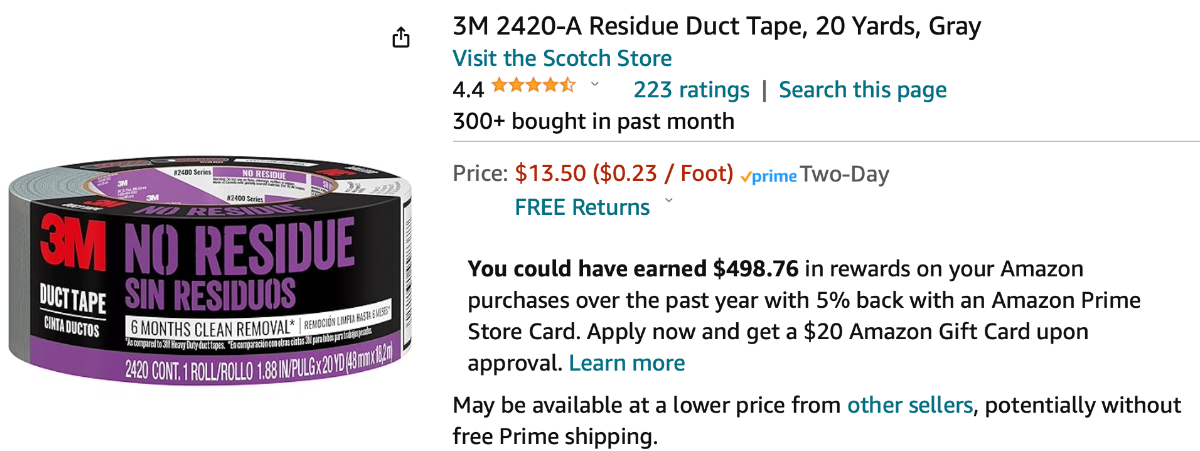
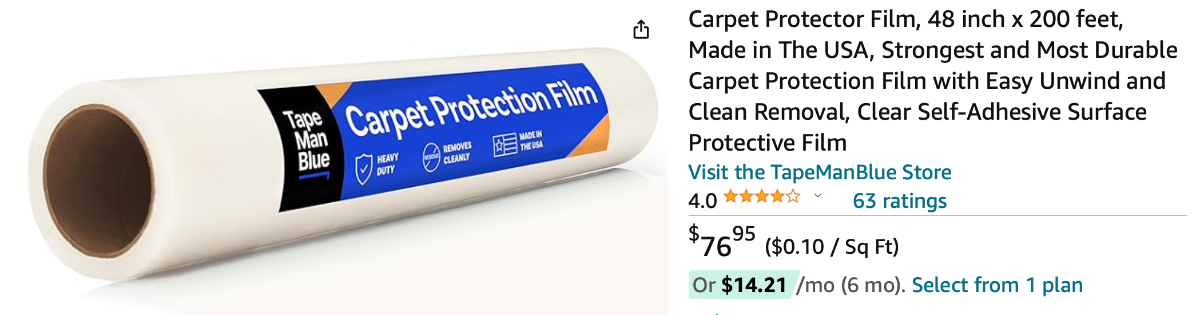
This tape really worked...it left NO residue after 9 weeks of being on the road holding on the yoga mats. This carpet protection film that I had from a remodel was put on top of the the yoga mat and made it more waterproof. If we hadn't covered the yoga mat it would have absorbed a ton of water and likely fallen off.
3 points
-
Every time I read a post, new members introducing themselves, or someone with an issue or question, my first thought is, "where are they located?" We all have interest in location, or we would not be interested in RVing! Those of you with the colored maps in your signature are certainly into this. My semi-retirement job is online learning for PMP certification. During class introductions, I always ask, where are you located? City/state in the US, Canada or where else in the world? Being a member of many forums, I always have Prescott AZ in our signature. For us, Chris & John, it means if you're traveling through the SW, PM me come visit for a few days and stay a while in the greatest small city in Arizona. We would love to meet you! For example, for over 15 years we were members of the Chrysler 300 Club International (I had restored our '59 300E during that time). The club published a member book, with complete contact info. Members could opt out, but rarely did. Members cruising these old cars cross-country could contact others for a visit. We counted on each other when needing help in a breakdown situation. I once delivered a spare part I had on hand to a member in distress, stuck on the shoulder of a nearby highway. Without my help, they would have needed an expensive tow and be stranded for a week or so to acquire such an extremely rare part. We became good friends. Location also matters in our repair topics, sometimes as much as hull #, really. Location determines climate (hot & humid to cold or dry), altitude considerations, east/west or north/south, coastal or inland all has different considerations as much as camping style. We just parked our Oliver for the summer as many of you just pulled yours out of winter storage! All members on our Oliver Forum have a profile page and a signature. Location is a field on the profile but if I was to guess only 10% of you have entered your location. I understand we must be careful in this day, but City/State is not asking your SS# or even your street address. For example, @MAX Burner's signature states, "the Great Southwest." In communication we realized we're just 6-7 hours away, northern NM to Central AZ, a relatively short distance in the west. We now have mutual open invitations. I learn to trust the members here, who put their gut emotions into helping others on our forum. Just a suggestion, but I for one would love to see your location posted on your profile page and signature line! And again, please PM me when traveling across our great state.2 points
-
Thought I would post this in case anyone else was reluctant to remove the bezel with metal tools and risk buggering up the light or gelcoat. This involves using an old credit card, or hotel key. First slide the card between the light and bezel in the center. Next slide the card from side to side to release the clips. Sometimes there’s a click. Now the bezel can be gently pulled off. I didn’t find it necessary to release the clips on both sides but that could be the case at times.
2 points
-
If by Scubarx post it means that Oliver has gone to silicone caulk everywhere, I'm not happy. I hate that stuff, except where in contact with lexan or polycarbonate, imo. Too difficult to remove, and even silicone won't stick to old silicone residue.2 points
-
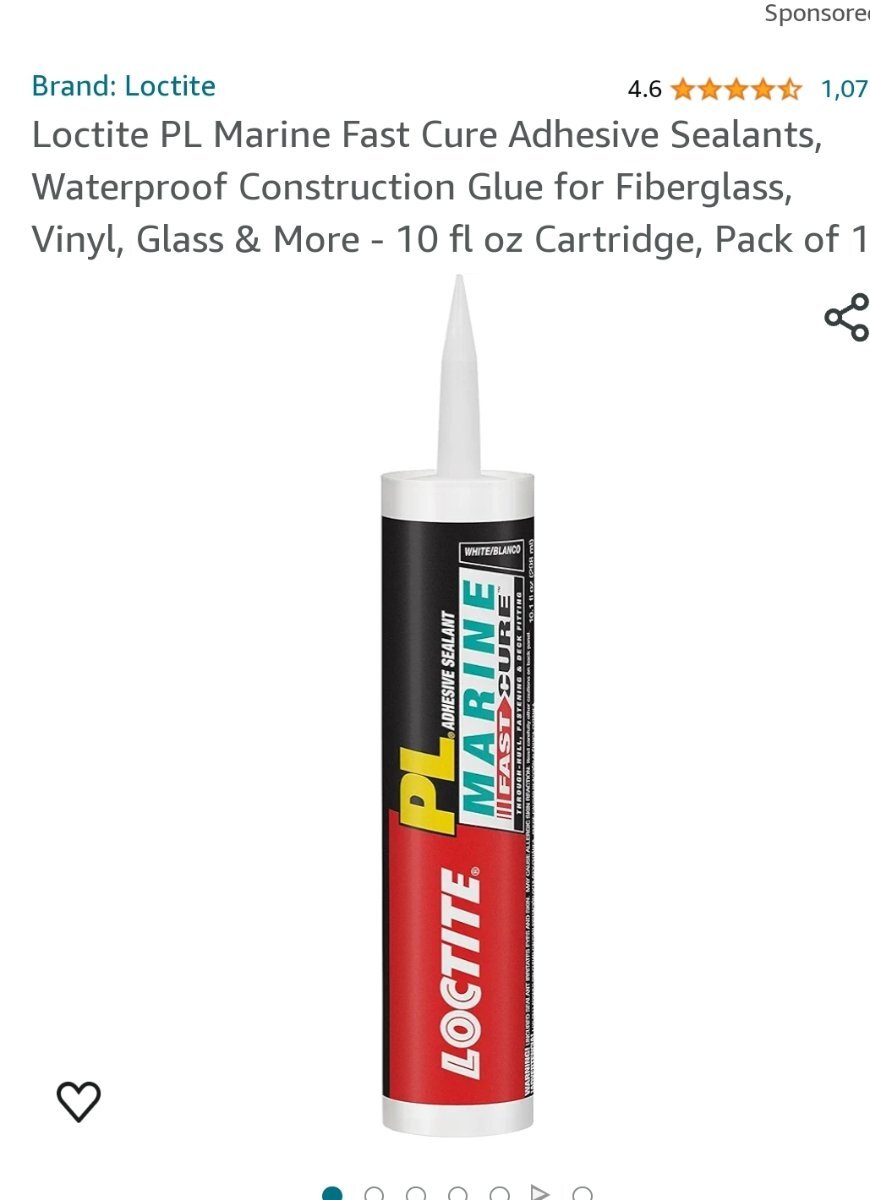
Butyl tapes do indeed have strong adhesive qualities, and Bed-it is no exception. Of course, their sealant properties are their strength and the main reason for their use, but they also create a tenacious bond to whatever they stick to. https://www.generalsealants.com/butyl-tape-the-ultimate-guide/ Now if it is a structural application we're talking about, mechanical fastening would also be needed. But for the Oliver lense, I don't see that as necessary, and possibly a situation is being created where more pathways for water intrusion are being created by adding fasteners. My lense stuck tight to the butyl tape, then it was edge sealed, and several years later, being stored in the open outside in the PNW, not a leak. Everyone will have their system. I am intrigued by the Polyethers though. Unfortunately the tube of PL Marine I bought to try out was just a PITA to tool off (what the heck do you use???), and I threw it out and went back to my tried and true Sika 291. Maybe I had a bad tube. I may try the 3M version next as I like that Polyethers are compatible with more materials than polyurethane. I have had, however, no adverse reactions with the 291 on the Oliver lense, or the other plastic components on the trailer. If I was bedding these components, I would not use 291, but for edge sealing, so far so good. I do think though that the Polyether will be a more versatile and useful sealant going forward. Bummer about Oliver moving exclusively to silicone. They're not doing anyone any favors by going that route. Don't know what kind it is so waiting to hear more about it. Regarding silicone contamination of the gelcoat and future resealing issues. I have had good results wetsanding the afflicted area out with 1200 grit sandpaper and the appropriate solvent. When spritzing the area with water no longer beads up, the silicone oils have been removed. It's a pain but necessary if you want good adhesion, even if you plan to reseal with silicone...but don't do that!! Cheers. Dave2 points
-
If you're going to replace all of those, you might as well replace the handles on the propane cover too. It's just chromed pot metal and while it works fine indoors in the Oliver kitchen, it's very susceptible to corrosion outdoors due to getting blasted by winter road brine if towing during fall or winter. I bought mine from Oliver, but if you type the part number off of the back of the pull into a search engine you'll get a few options for purchase. They are very easy to replace. Just unbolt and bolt the new one on. No sealant or anything. A photo is attached to show how bad my handles had corroded.
2 points
-
From time to time members of the Forum have asked how they can "bookmark" a particular thread for future reference. DavidS did a post several years ago that basically suggested using Apple Notes for this purpose. Another way of doing this basically within the Forum is to "follow" the thread (click on the dark blue box at the upper right of the thread and then click on "Do not send me any notifications" After that all you have to do is follow Wandering Sagebrush's advice posted above and you can see all the "bookmarks" that you have created. Bill Thanks to WS for starting us down this road and another thanks to Jason (W) for basically suggesting this method.2 points
-
@Geronimo John I will chime in according to what I learned at OTT Service last Oct when I had all my running gear replaced. From what I was told, yes they are larger bearings. And naturally never lube does not mean never fail. Jason did tell me that after installing the 5200# never lube axles, Oliver has not had any “never lube” bearings fail with approx 200 trailers now running this axle/bearing combo. He also cautioned that IF a never lube bearing fails it’s a fairly expensive repair unless you choose to carry a replacement drum with a new bearing already pressed in. Replacement drums naturally are heavy bulky and not a cheap spare to carry. Here- See link and scroll down to page 4 - see end play inspection and pressing a failed 42mm NL bearing out to replace. https://www.dexteraxle.com/HDBI https://www.dexteraxle.com/product/2847/69/nev-r-lube-bearing-kit2 points
-
Thanks Bill, for leading by example! 😂2 points
-
Dave, bed-it is advertised as a sealant, not adhesive. I've never used it, so can't comment, but we've always used mechanical fastening with butyl. Their website seems to indicate need for mechanical fasteners. It's not strictly butyl, bit a proprietary synthetic. I'm going to look into it further. https://bed-it.com/?gad_source=1&gclid=Cj0KCQjwmMayBhDuARIsAM9HM8dXGcsPUM4Q1gkegJ1KqTXDP31KkBDpG1tTgV8nhpgRL4YtIdHdlxAaAihcEALw_wcB We've used a number of great sikaflex products, in specific applications. Sikaflex makes amazing products, and a huge array of them, for specific applications. 291 is polyurethane, not polyether, so not recommended for bonding to plexi or polycarbonate. I don't know what the Oliver sign is, but guessing plexi, so I went with a polyether for caulk, (after butyl, for perimeter) compatible with plexi. Just in case. https://usa.sika.com/en/industry/global-industry-content-pages-to-keep/commercial-vessels/elastic-sealing-bonding/watertight-sealingbonding/sikaflex-291.html?_gl=1*1b55yh0*_ga*MTM3NzMwMDk0OC4xNzE2Njc4NzAy*_ga_K04G1QB2XC*MTcxNjY3ODcwMi4xLjAuMTcxNjY3ODgyMi4wLjAuMA.. The loctite marine has been a good "all arounder" for us, for the last few years. None of these adhesive sealants have a long shelf life, so keeping one around for most projects ( fiberglass to wood, metal, plexi, etc.) has worked for us. We'll see how it plays out. Works in progress, avoiding silicon. 🙂2 points
-
Hi, and welcome to two venerable "clubs," the Oliver family, and the Every Day is Saturday Club. We've been lucky enough to enjoy 17 seasons in both. Here's to your adventures! 🍾2 points
-
Welcome to the family! When you have questions, don't hesitate to ask them. Likely several other new owners have the same one. Lots of great owners will for sure give you the benefit of our lessons learned. Geronimo John2 points
-
@rideadeuce - A tip...Last year when we went to Alaska we bought some yoga mats and used some 3M no residue tape to attach them to the lower front of our trailer. They worked like a champ at keeping gravel from the Yukon highways from chipping the body of the trailer. We also used a roll of clear rug protection plastic from Home Depot on top of the Yoga Mats to keep them from absorbing moisture. Below: First week of the trip and the yoga mat's are doing well...tne extra coat of vinyl floor protection film is holding water at bay. F Below: After a full 9 weeks on the road the yoga mat's took the beating, but our trailer was protected. Below - After yoga mat removal and quick wash...
2 points
-
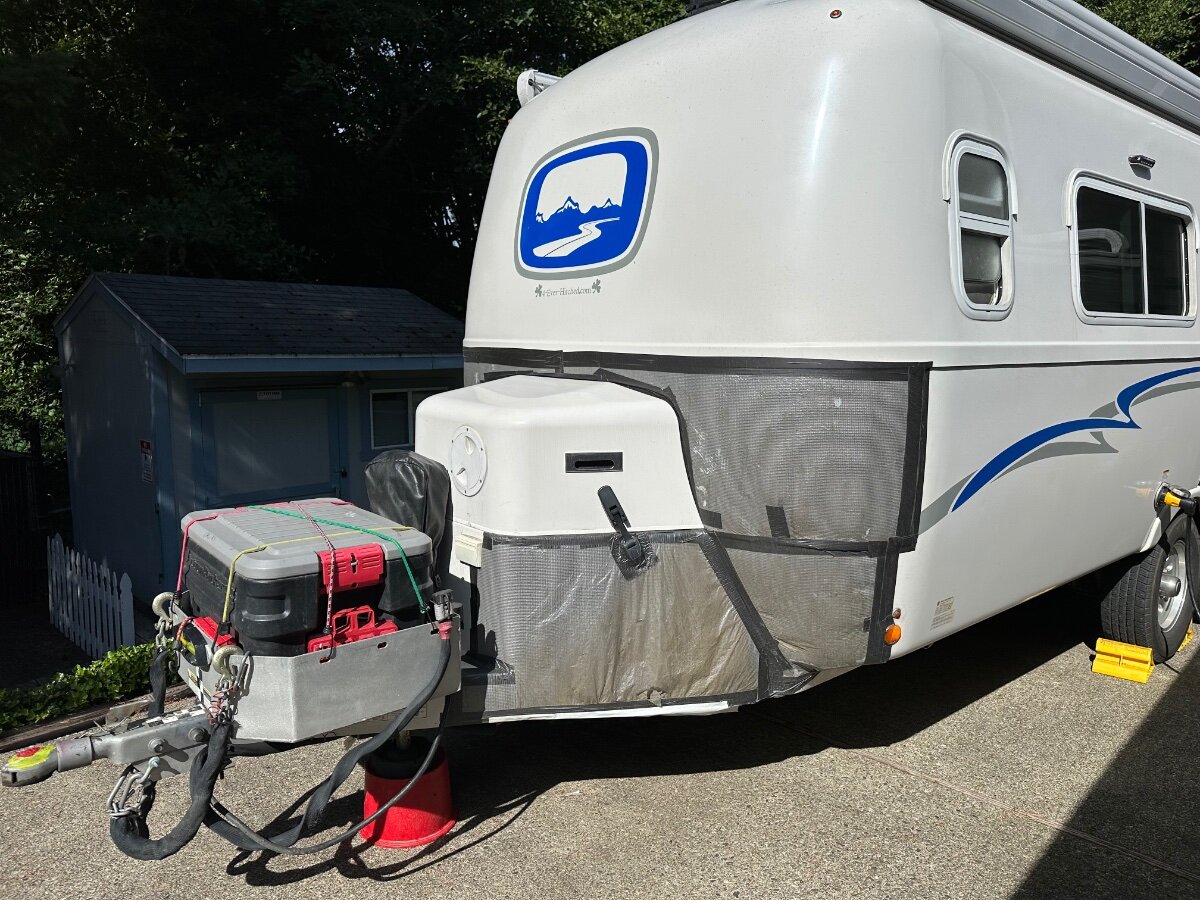
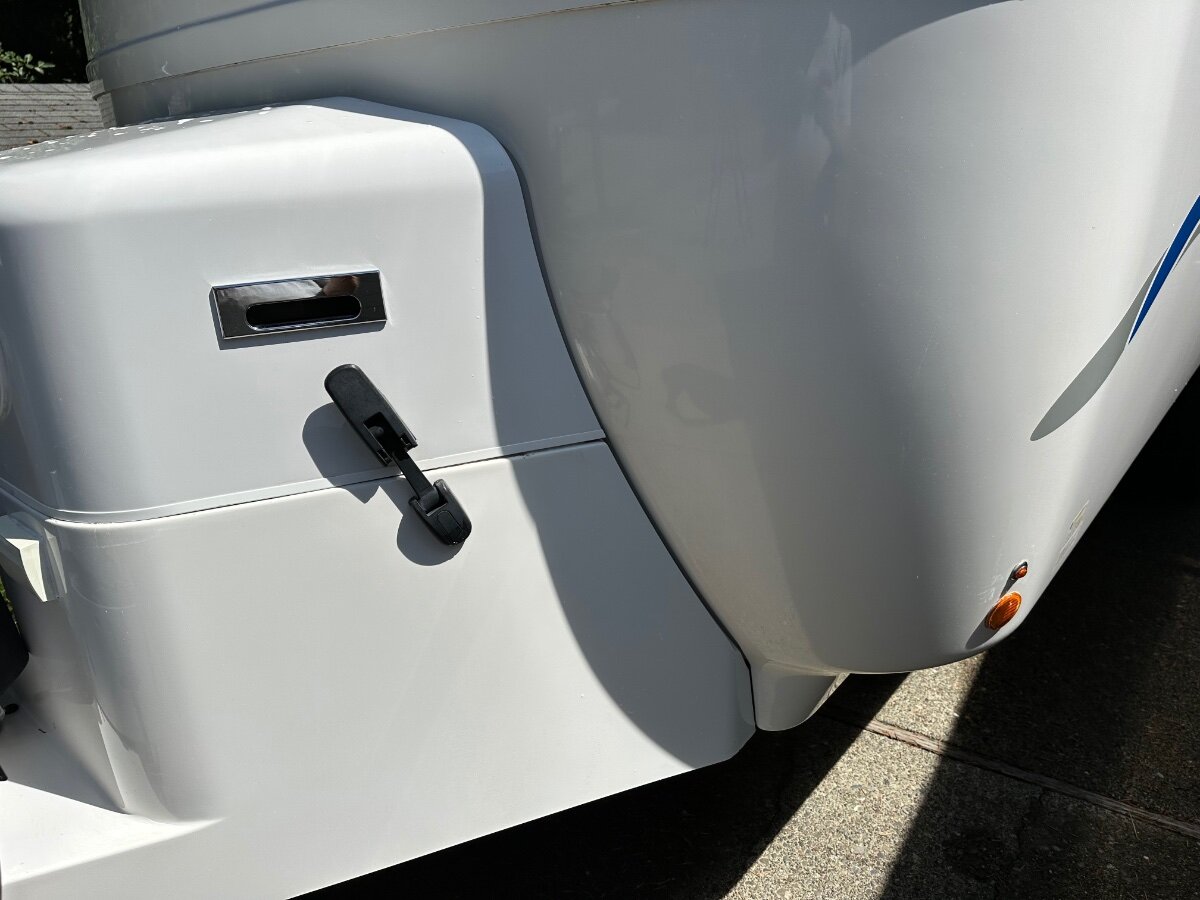
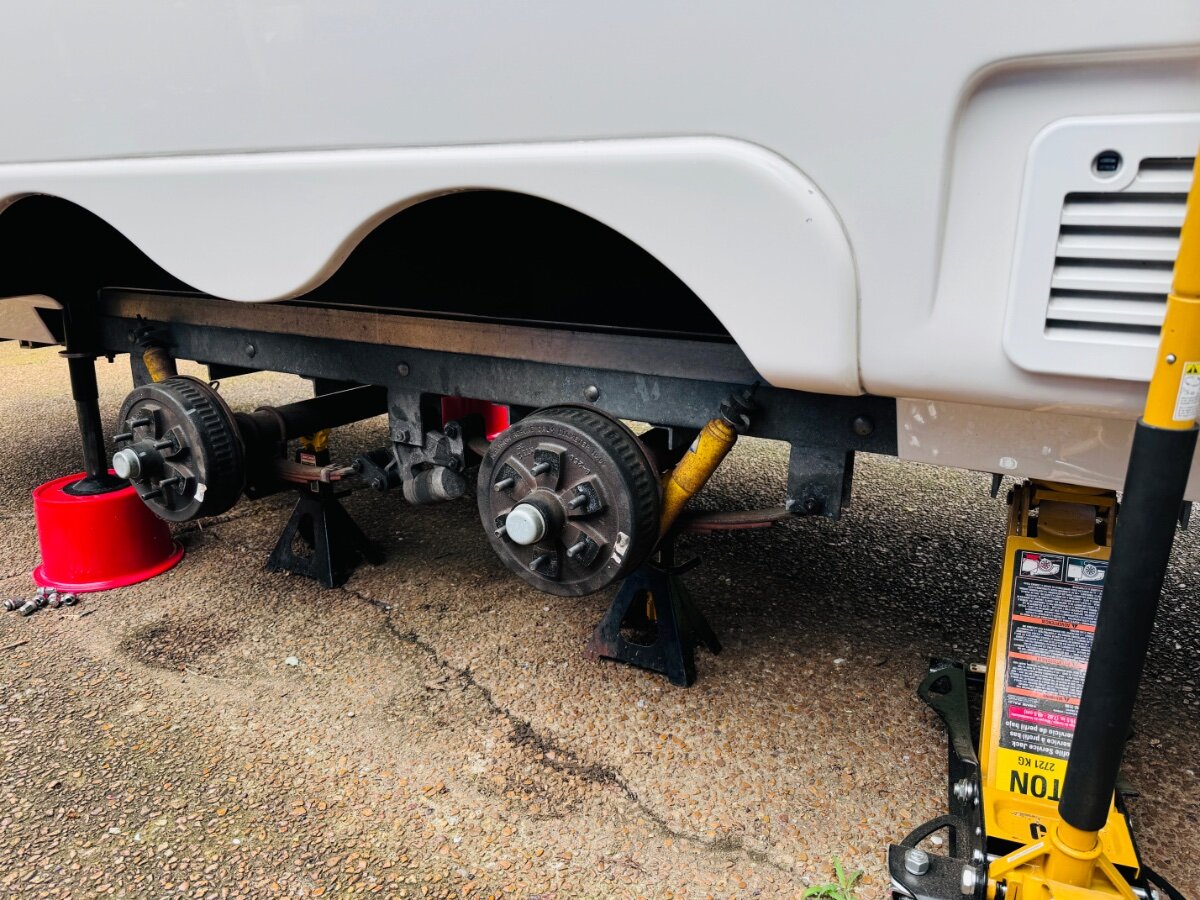
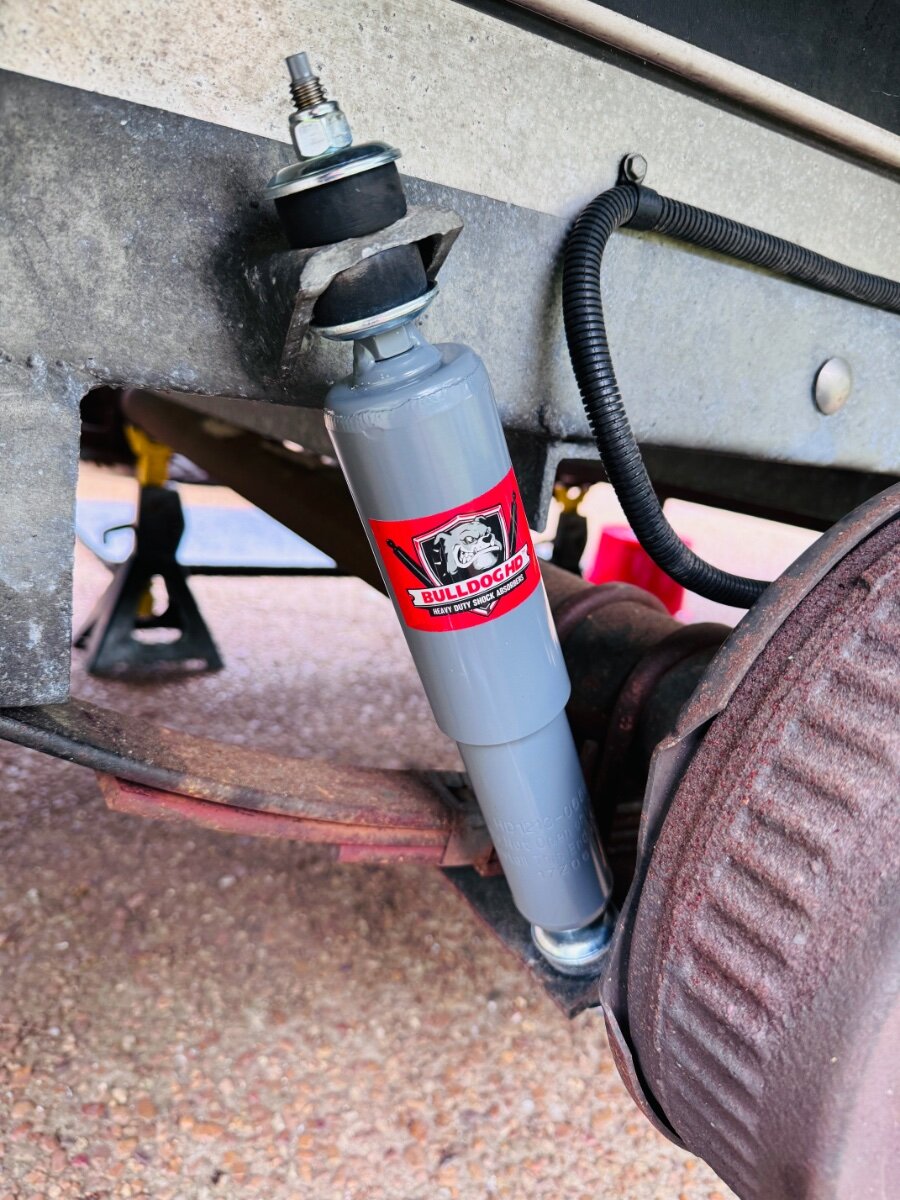
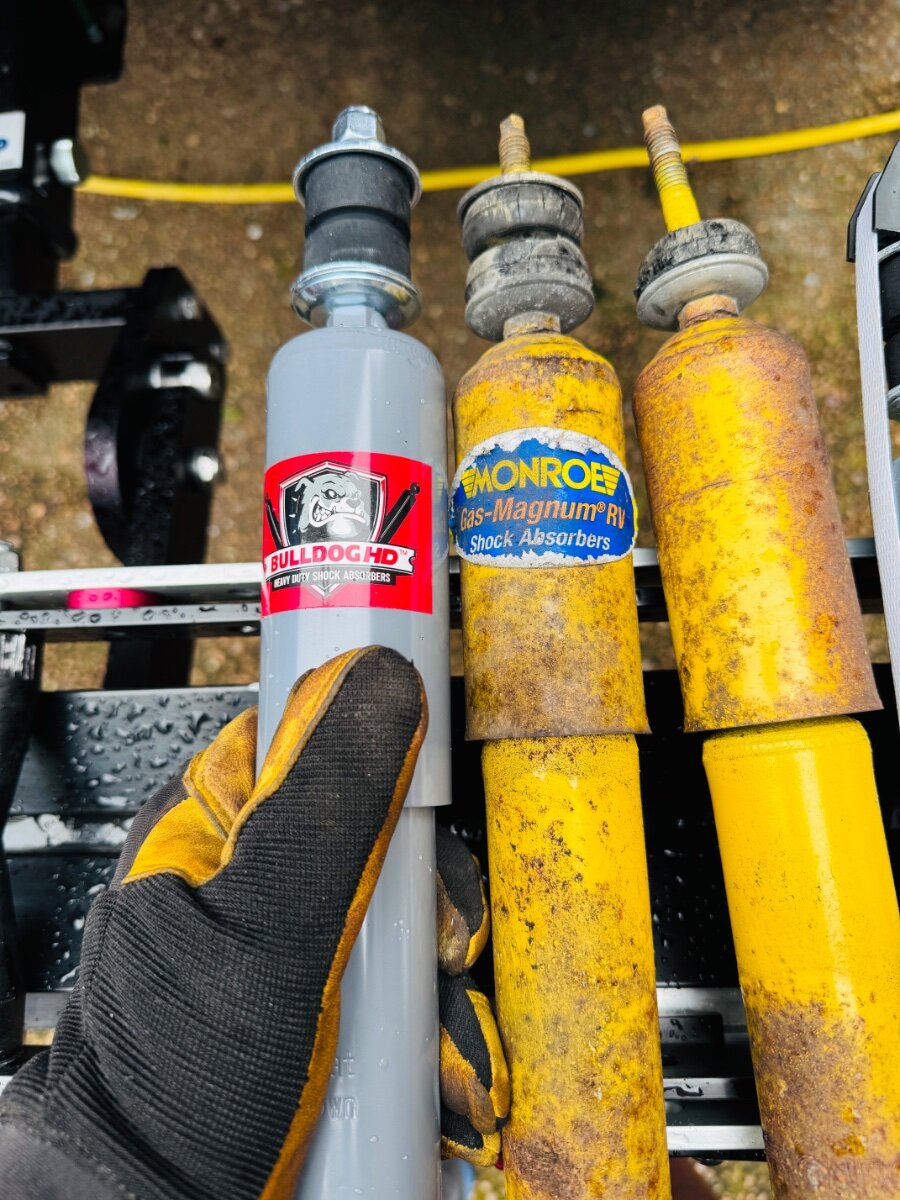
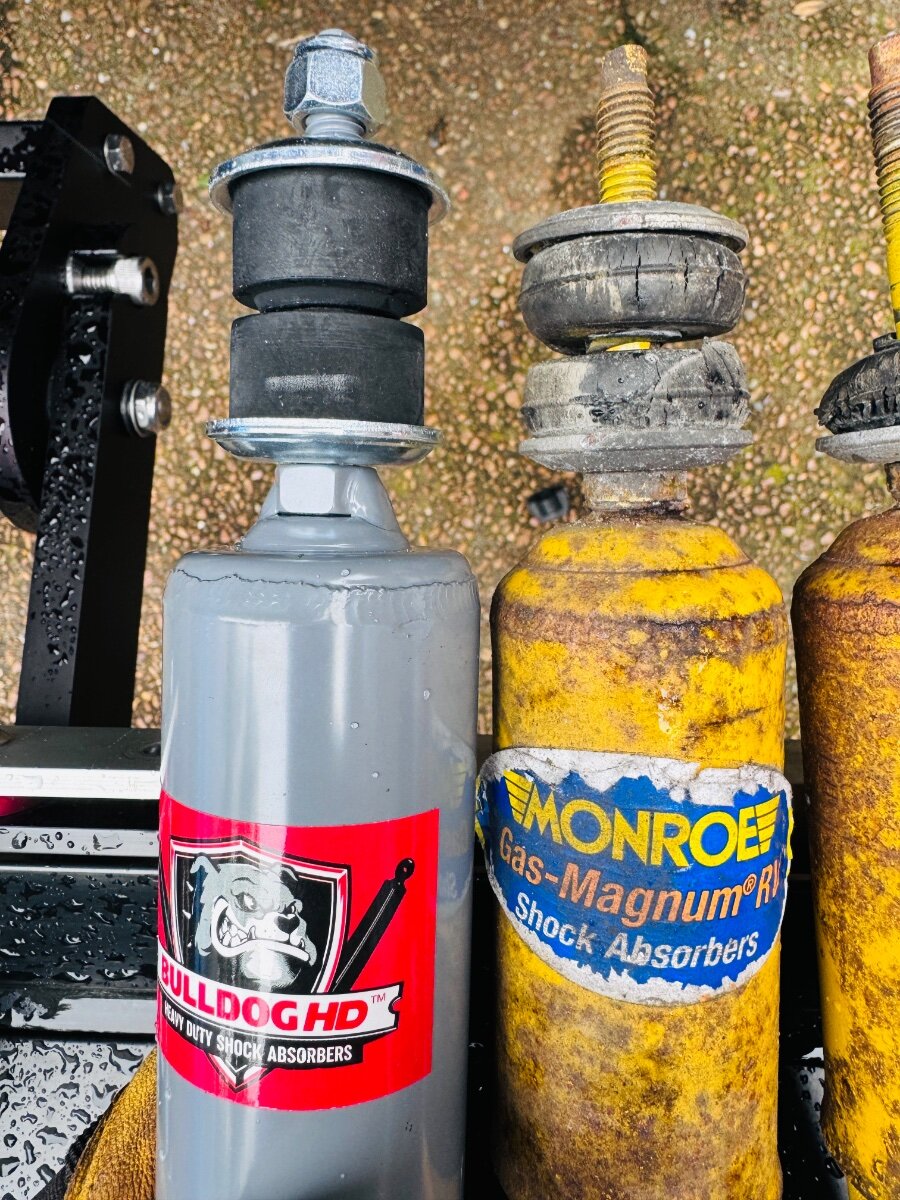
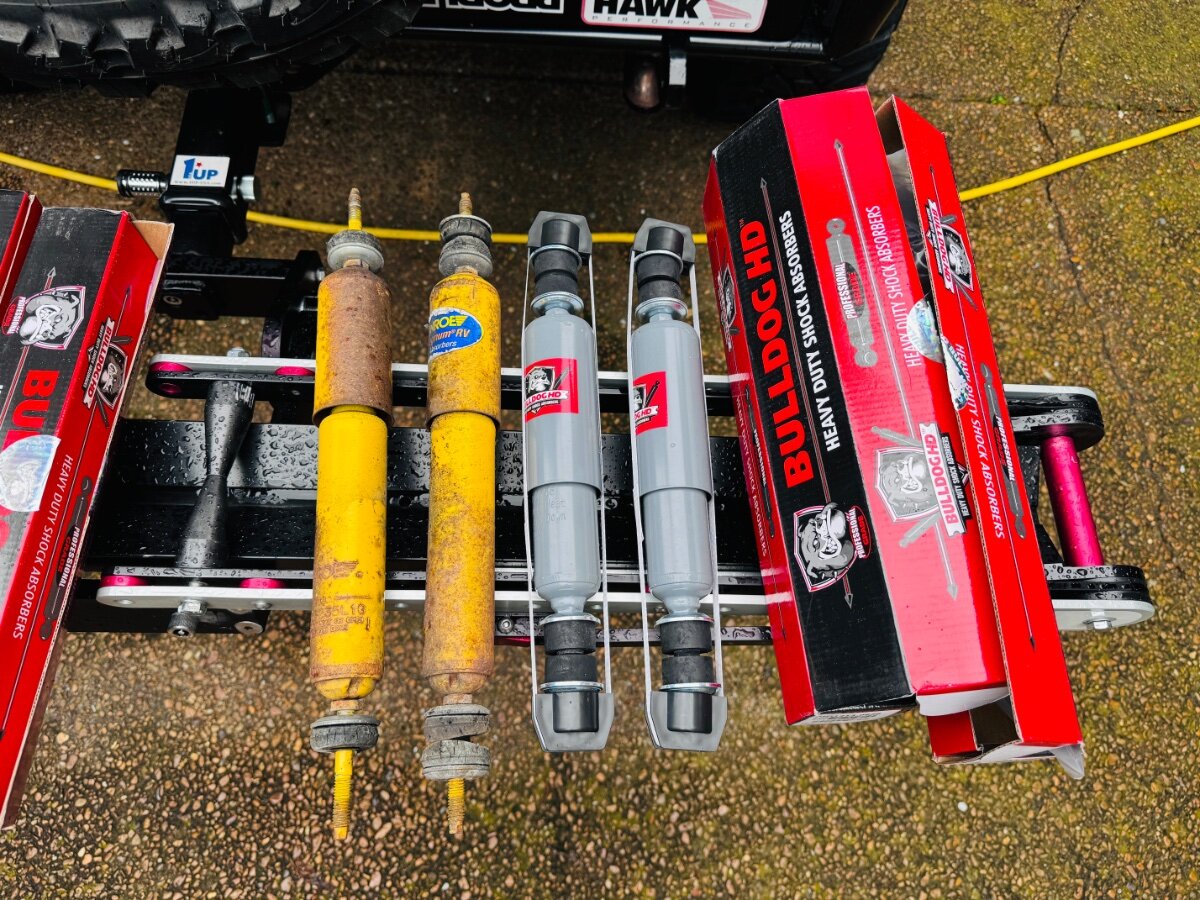
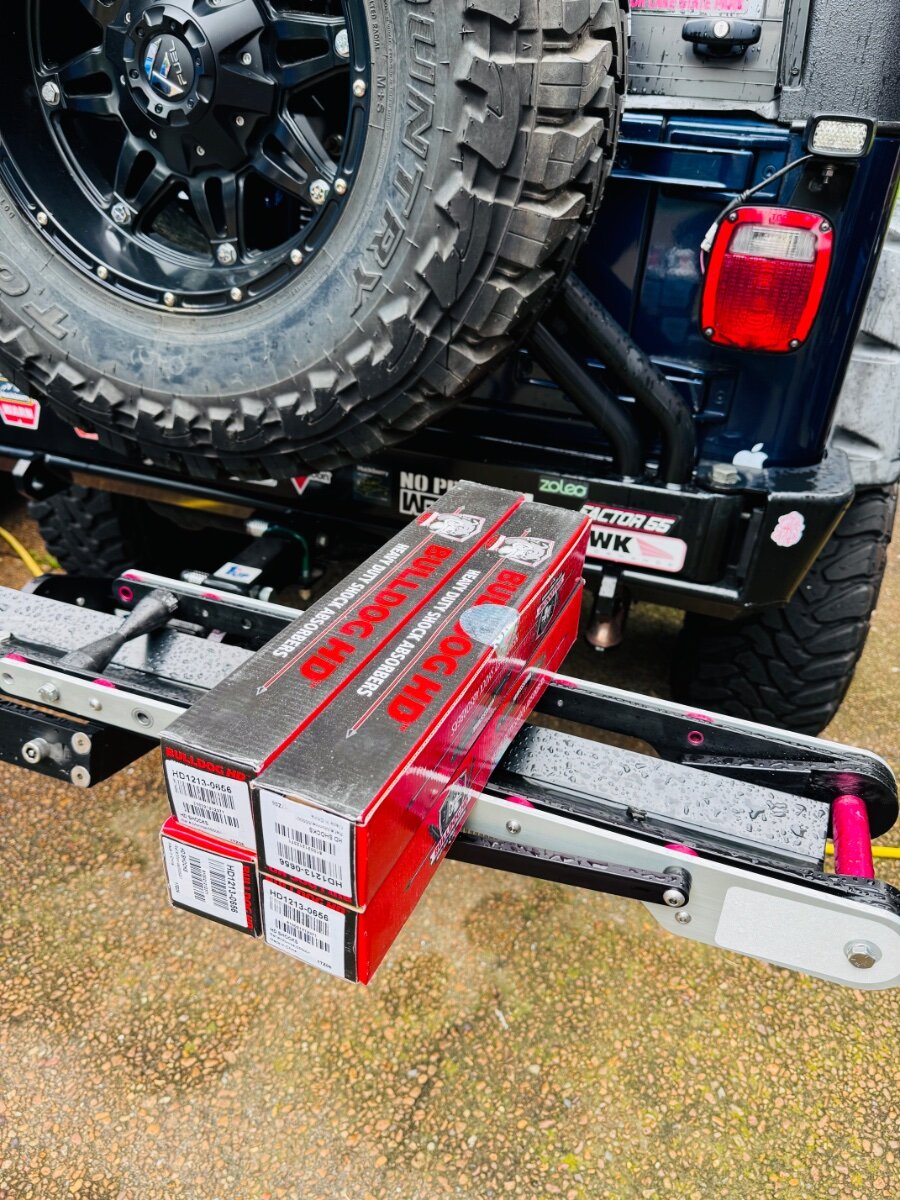
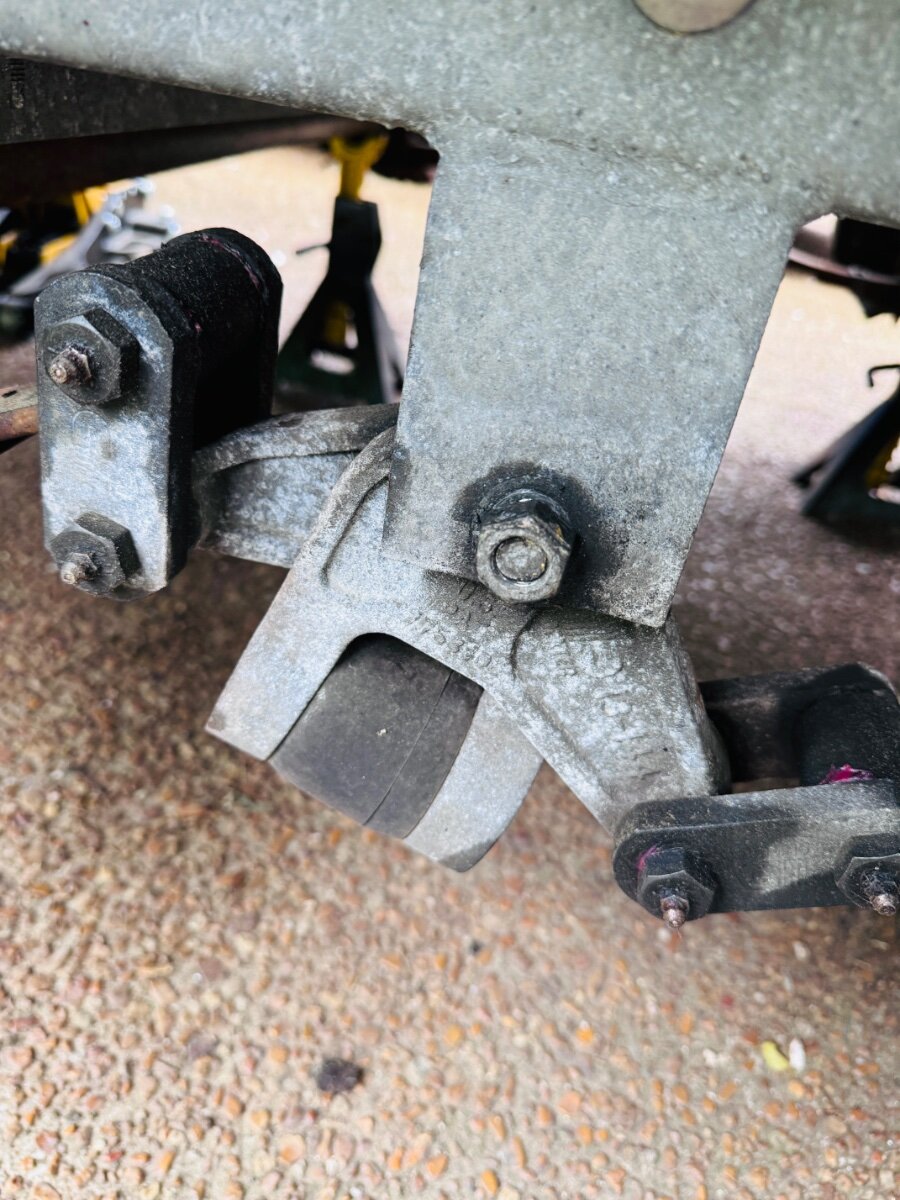
Bulldog shocks are a bit beefier and look like they are well made. Easy swap. Leaf springs look good, still on the fence about upgrading to the Alcan 5 leaf springs. Clips were loose on both springs on the right. Center bolt nut on the left EZ flex was loose and about to fall off. All of the Monroe shocks seemed to be in good working order just rusty. Future plans include the ALCAN highway so trying to get everything done now. New tires in the morning. https://www.4statetrucks.com/bulldog-hd-shock-absorber-replaces-555001-19-050000007 Wildpeak H/T02 LT225/75R16 E/10PLY BSW *** Now back to torquing the shocks so that the cushion is the same diameter as the metal retainer but not larger. ***
1 point
-
I've been a member watching from the sideline since February 21, 2018. Now, retirement is a week away and we pickup unit #1525 June 8th--EXCITED IS AN UNDERSTATEMENT!!! Delivery photos coming soon.1 point
-
If you are in a high density tunnel, yes most places require you to do so. But for 99% of us who are not, I would submit that the vast majority run LP when on the road. One precaution I suggest on low or no wind days, that we turn off the refrigerator when under cover and refueling. Like at COSTCO. GJ1 point
-
Agreed, but personally we are going to remove as much silicone on our Oliver as possible. IMHO, silicone caulk should only be applied to household bathtubs and showers. If I was to order a new Oliver, my first custom request would be DO NOT CAULK anything. I'll put some where needed myself and not silicone. What a mess. Considering our climate and perhaps an annual trip to points humid, I'll just go without. I see y'all had quite a rain-day at the Rally. For us that would be 1-2 days a year. And why do people caulk on top of old caulk. That's just lazy! I'm looking for a silicone remover, that's a gel or something that can sit overnight on the vertical seams. Hit it with my pressure washer the next day. I pressure-washed the Oliver when we got home last time. Blasting every seam and every angle against the windows. As a precaution, Chris was inside with a towel when I hit the windows. Keep in mind the pressure in my high-end tool is intense (near 3000 PSI), 100x a hard rainstorm. We only had a little water when I hit the window glass constantly very hard at all angles. I was glad to see all window weep holes, expelled a bit of dirt at first and then blew clean water. BTW, this is much easier that removing that surround for detailed cleaning. I replaced the rubber last year and I can tell everything is clean again, in working order. Anybody know why OTT caulks the fender flares? OMG, if water was to leak there it will get your tires wet!?! 🤣 How crazy is that? What is the thinking here? Why is our wet bath caulked everywhere? Is it not a formed fiberglass inner hull? Or is there truly a seam between the vanity and the walls? Or is it people think it looks better?
1 point
-
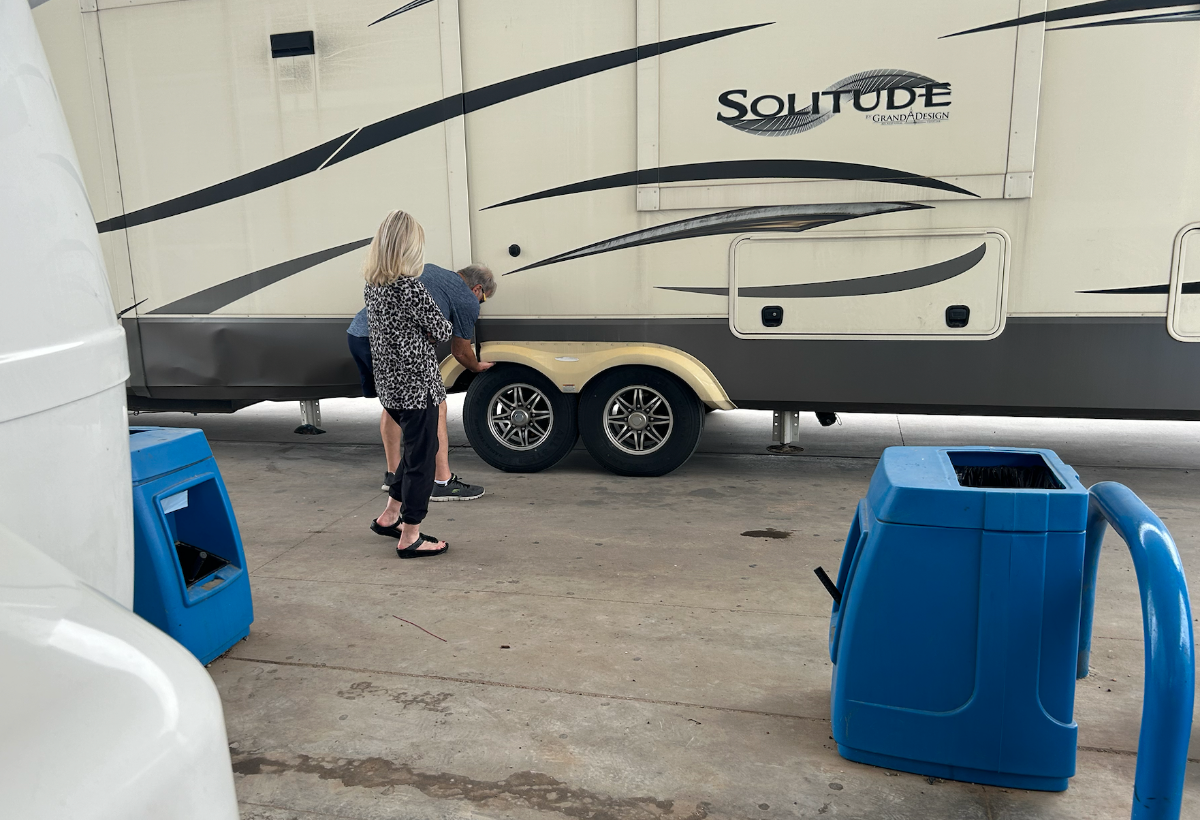
Here's an interesting event we experience on the US287 at a Valero in Childress, TX a couple days ago: We're at a regularly used Valero pumping at island #2 of four aligned left to right. Perfect pull-off/pull-onto the highway option for us. Topping off the Tundra, D's in the right front and I'm inside the store getting some sodas. A couple pulls into island #3 to our right - tons of room as we're in the forward-most pumping station on our island. The dude's TV is a 1-ton dually hauling one of the longest twin-axles 5th wheel we've ever seen. He cuts to the left way too tight and nails the blue bollard protecting the pumps from an errant vehicle or in this case, a 5th wheeler. D observes the entire episode from the passenger's seat - as he is scraping the bollard along the "Solitude" 8 to 10 feet forward of the left-front wheel. He doesn't stop - he continues to drag his RV until impacting the front running gear assembly, bending the axle/spindle to the rear until the front tire is occupying the same space as the rear tire. I'm stepping out of the store at this time finding the wife trying to figure out what to yell at her spouse - I mention to her that her two left wheels are in FULL contact and will not roll correctly in that particular configuration. She says, "NO SH!T" - an appropriate reply to my stupid comment, I'm not realizing what had just happened. At this point, the driver manages to back up and "uncouple" his RV from the blue bollard. I top-off the Tundra and hop in when D explained to me what she just witnessed. Not over yet, it gets better -- (read: worse): The dude pulls forward and attempts a U-turn directly in front of us - way too close, I back up Casablanca allowing him to swing free and miss our grill. The two street side tires aren't smoking but they're squealing loudly and burning rubber is wafting about. Jackknifing his rig in front of us, the Solitude's overhead compartment slams into the TV's left rear cab smashing the rear window, ugh! They come to a stop in the fueling area for island #1 headed 180 degrees from their original direction prior to impacting the bollard. This is the pic of them examining the damage... The wife is not impressed at this time and is using some rather choice words emphasizing her concern... Nothing much we could do but offer an assist to call a tow truck - they just said that they'll handle it. We drove away unscathed and feeling bad for them. Lesson learned? Keep your head on a swivel even if you're not moving!
1 point
-
I want to avoid silicone if possible.1 point
-
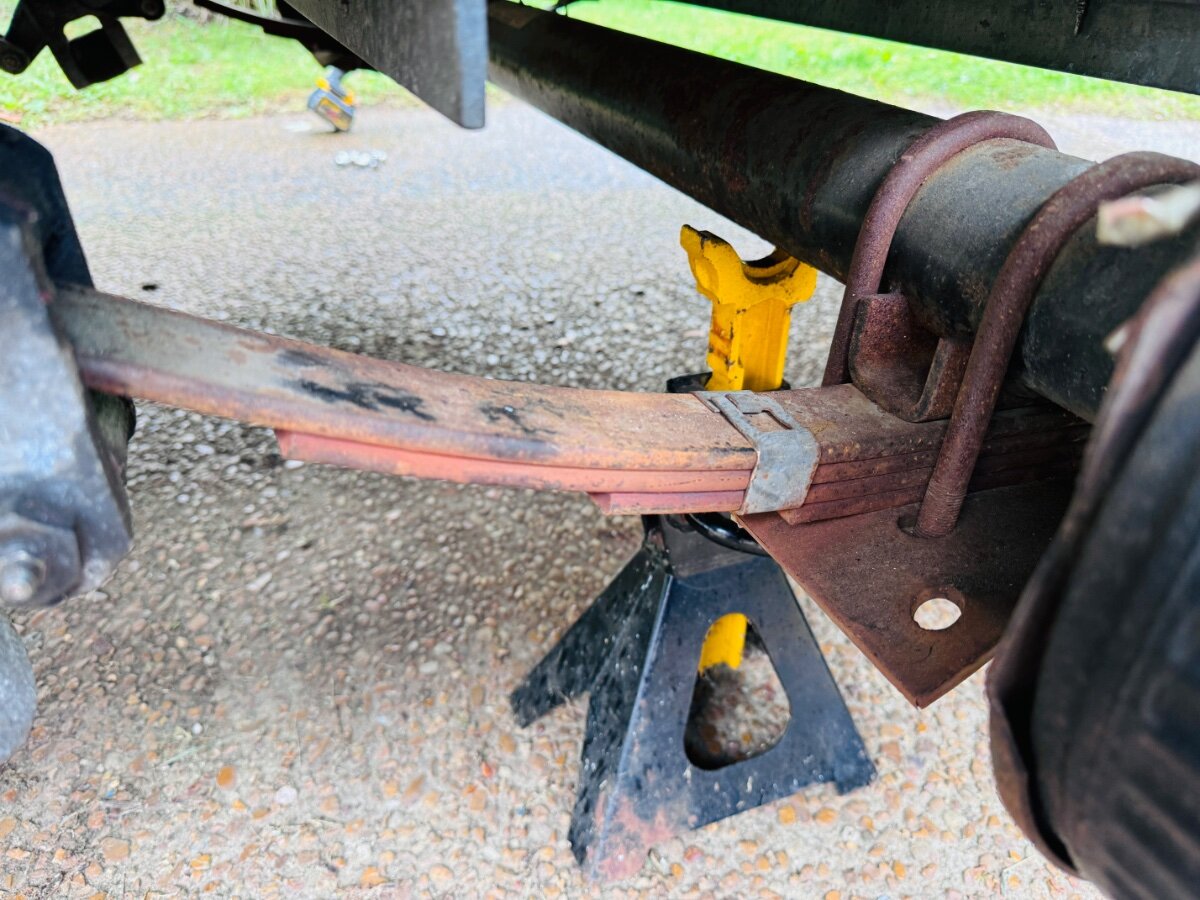
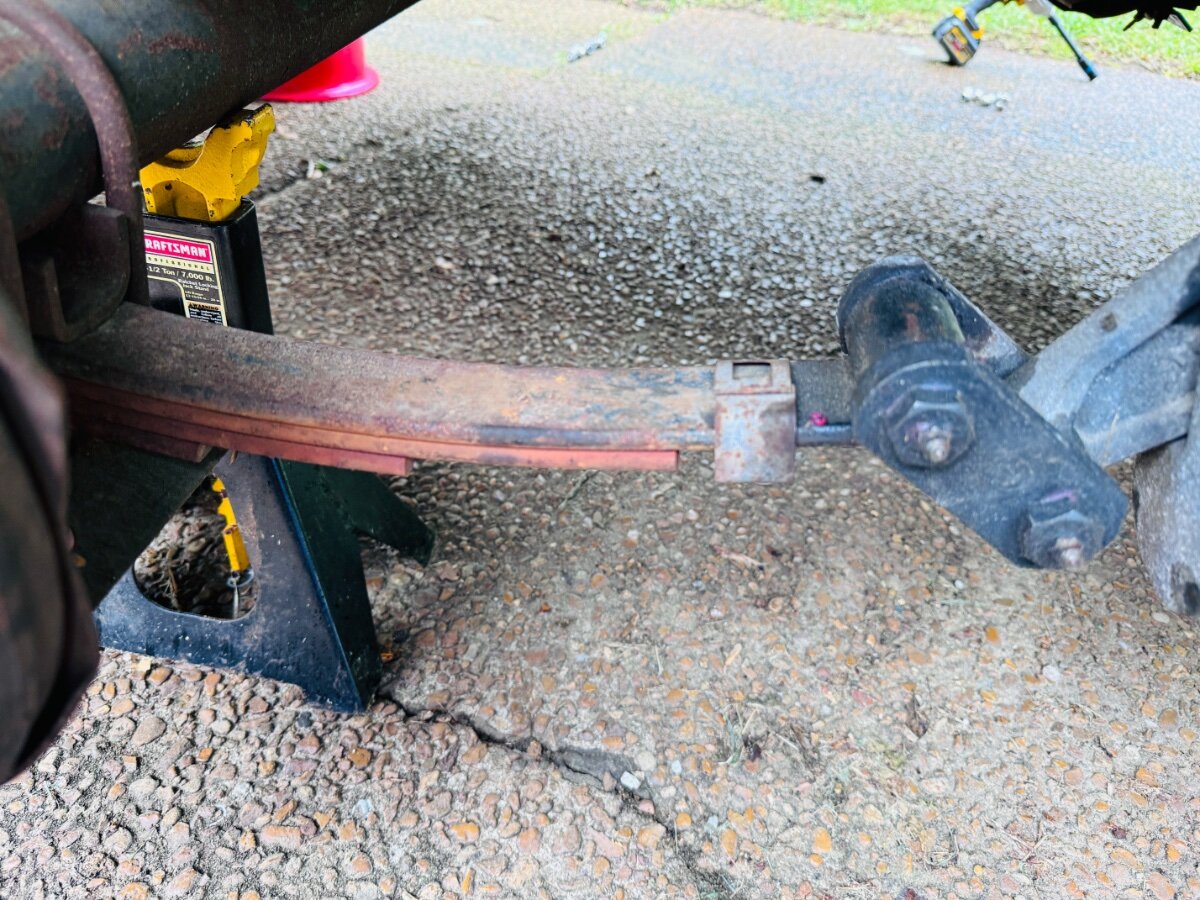
Today's installment of the shackle wet bolt replacement on the rear axles where the spring connects to the EZ-Flex. I supported both front and rear axle with my jack stands. Both wheels are removed to give me easy access to the rear EZ-Flex connection on the rear axle. I used a screw jack to take pressure off the EZ-Flex joint closest to the rear axle. I used a small hydraulic jack placed under the leaf spring to assist in adjusting pressure on the shackle wet bolts. Because I have to replace one bolt because the zerk broke, I will be replacing all the shackle components on that connection. During disassembly, I left the nuts on the existing bolts so they would protect the threads and tapped the wet bolts a little at the time until I had enough space to gently pry out the bolts and link assembly. The nuts were removed and when I pried out the bolts the inside link fell off as expected. I adjusted the screw jack pressure on the EZ-Flex to facilitate removal of the wet bolts link assembly on my side of the spring. After removal, I found that the EZ-Flex didn't have any bronze/brass bushing and the spring eye hole had deteriorated and there looks to be just a small sliver. The wet bolt on the spring was greased last fall before our 6 month long trip. We had 11K towing miles so it was over due for greasing, but I suspect that with the amount of grease in the wet bolt and spring eye that just the mileage wouldn't account for the wear, but I defer to others on that question. The bolts looked fine, but I intend to replace them and the links as long as I have them disassembled.1 point
-
Eeeek! I think Fivers must have some kind of a death wish. We saw something similar with a guy at Joshua Trees NP trying to squeeze a much too big rig, complete with a Harley on a back end lift into a clearly too small site. The camp sites were bordered by boulders, and he tore the living $#!! out of fiver and truck. After screaming at the host for a few minutes, about how everything was her fault, a ranger stopped by and invited him to leave the park.1 point
-
First, I would start with Oliver and find out what they used. You don't want to have a comparability issue. Switching from silicone to say a Polyurethane will result in adhesion problems. Silicone sealants will leave a residue that you really can't remove.1 point
-
Ditto! We like shiny!!! HA!1 point
-
Johnny and Juanita, congratulations on the retirement and welcome to the family! Our Oliver has provided some great memories as will yours. Hope to meet you out on the road or at a rally. Mike1 point
-
with SOB, I had those buggers in places that made no sense. That trailer was stored under shade, but with no cover. If mud dobbers are prevalent where you store your Ollie, you may want to consider at least covering the AC with a form fitting cover or better the whole trailer. ADCO make a "relatively inexpensive one. PM if info desired. GJ1 point
-
Nice, simple video for electric brake inspection while you have hub off for packing the bearings. https://youtu.be/P5J3OFKK4DI1 point
-
You know my feelings on the Oliver light. Permanent solution is remove, rebed with butyl, and add mechanical fasteners/ screws. Butyl is a wonderful, pretty much permanent sealant, but not an adhesive. That said, loctite marine sealant, fast cure is what we've been using as a polyether flexible sealant adhesive for a number of years, ollie and boat. No yellowing in Florida sun (yet.) Polyethers play well with fiberglass, wood, and plastics. Def no to 5200. Either of the 3m 4000 or 4200 are difficult to remove, later, imo, though 4000 has better uv resistance, so I've read. Pick your poison. And, add an eyebrow of rv Eze gutter over the light, as a bonus. The loctite product is "reasonable" at about $17 at lowes or Depot. Do read the date code. It's sometimes out of date at big box stores, and then it's tough to work, and useless.
1 point
-
Our favorite subject....sealants! That darn Oliver light strikes again. You may want to rethink not removing the lense, but I understand why you would not want to. My lense (hull 107) was "bedded" in some open cell foam weatherstripping. It was totally useless as a secondary barrier for the 3M 4200 that I think was applied around the perimeter of the lense. Thankfully it was not silicone. After a thorough cleaning, I used butyl tape to bed the lense, then Sikaflex 291 to seal around the edge. Several years later no leaks at all. There's been talk of the new polyether sealants on the market. I tried a tube and found it not very workable...maybe a bad tube? It was not past the expiration date. They say the polyethers play well with plastics where the polyurethanes do not, but I have not noticed any adverse reactions with my Oliver lense, and I like the 291 for everything else. If you want to give the polyether a try, and don't want to remove the lense, then maybe this is the way to go: https://www.westmarine.com/3m-4000-uv-fast-cure-polyether-adhesive-sealant-white-10-oz.-cartridge-3760196.html?queryID=d26afaac5e5422519ed7e4ec5eec6510&objectID=3760196&indexName=production_na01_westmarine_demandware_net__WestMarine__products__en_US Tape around the outer perimeter on the gelcoat, and you can tape the lense as well to help with getting clean lines. Take your time with the tape, use small pieces to define the radiused corners.Try not to get too much sealant in there! When you tool it off with a little paint thinner on your gloved finger, the sealant edge should just butt into the tape edge. If a lot of the sealant goes over the tape, then when you remove it, you're going to have a mess to deal with. Tool the sealant tight to the edge of the tape! Once the tape is off, a very light swipe with a thinner soaked gloved finger will smooth out the small ridges left from pulling the tape. Those ridges will collect dirt and look bad after a while so I think that last light swipe is important. Good luck. Keep an eye on your marker lights up there. One started to leak and the water ran down the wire to its low point, right over a neutral bussbar. Good luck! Dave1 point
-
I have no idea of how the Truma is constructed, but I've seen the same happen on other brands when the rubber isolation mounts between the compressor and the base of the unit go bad or are missing. When that happens all the compressor vibration travels straight through to the camper. Edit: Also, I've seen where the compressor jumps up off the mounts after hitting a large pothole or rough stretch of road. Definitely not the blower motor if the sound only comes and goes with the compressor engaging.1 point
-
@HDRider I've never even seen a Truma A/C, but you have a bearing noise, in the fan or fan motor, that I'm certain. On our recent trip the blower motor in my truck was doing the same thing. Mine was more of a squeal that would change pitch with the fan speed. I pulled the blower motor the other day and it was making the same noise connected to 12V on my workbench. Good news is that if you can live with it on your trip, yes it will be annoying, but you should be OK for a while (unless going away for months). I see your Oliver is only a year old, so it should have some life in it. The way to get rid of the noise is to change fan speeds or turn off and on as you have done. I read Truma service is impossible, but plan on that in your near future. These are not serviceable bearings. The fan assembly and/or fan motor should be replaced. Yours should be under warranty. Bad time of year for it with summer coming and RV Service shops being booked months out. I would open a ticket on it asap for warranty repair. I hope to upgrade my AC this year or next. Reading too many posts on both Truma products on this forum. One member even changed out his on-demand HWH for the old fashioned 6-gal Suburban! I will upgrade to a unit where I can source replaceable parts and service the unit myself.1 point
-
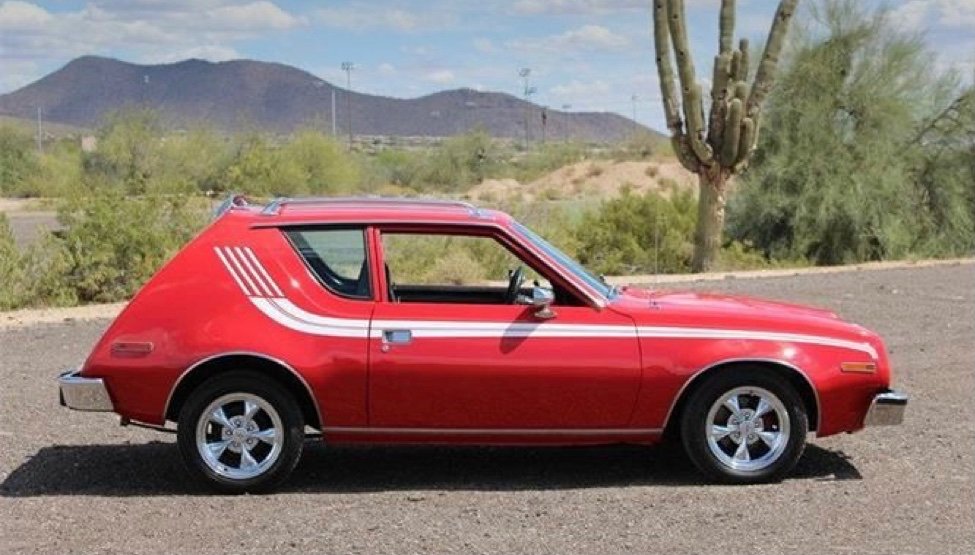
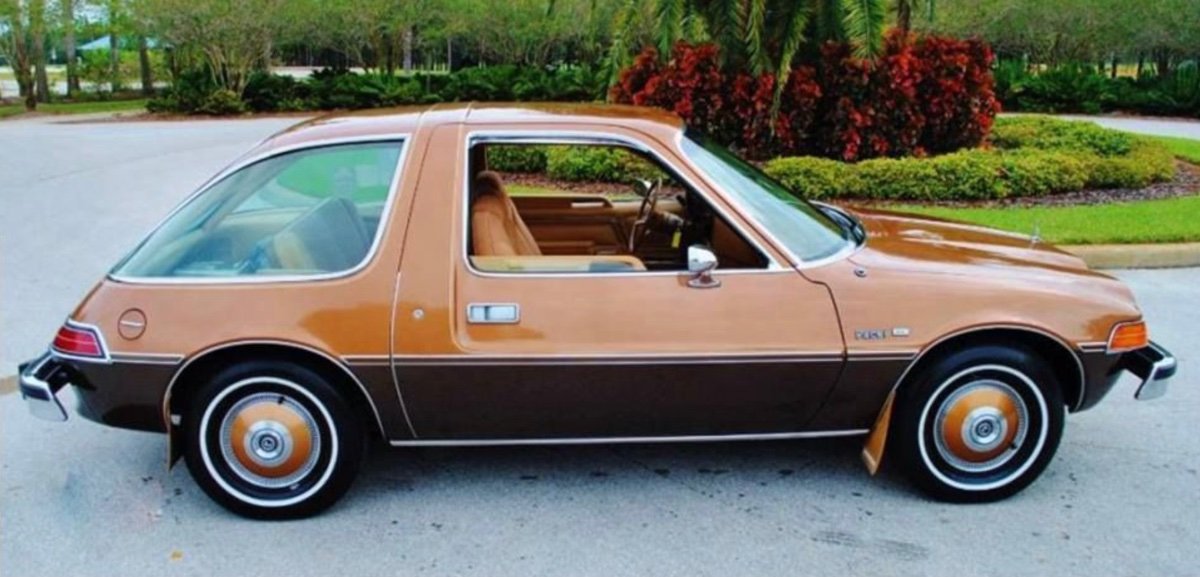
I think I said the same thing about AMC's Gremlin and Pacer! Looking back, they still look weird! Mossey
1 point


.thumb.jpg.e34bf01ef7f7d5e99ad31856d45afbeb.jpg)

-
Recent Achievements
-


")


")


")


