Leaderboard


Popular Content
Showing content with the highest reputation on 06/27/2024 in all areas
-
Just so happens, SDG is only 45 min from my dad's house in MI. So I have made an appt for the Atmos 4.4 to be installed July 17th. I am hoping to get some good pictures of installation since it will be the first install for them in an Oliver. Things I already know: No condensation pump or lines No need to use wall mounted thermostat due to Plenum, remote and app controls. If you keep the suburban propane heater, they will mount a simple thermostat for it under the street side twin or elsewhere that is convenient. May or may not use the propane heater any more since the Atmos has a 12k heat pump. They can re-use my SoftStartRV from the PII. The Atmos is almost the same footprint. 2.5 in longer and an 1 in taller. Much quieter and more efficient. I will update as things progress. Best, Mike4 points
-
Truck/trailer living up to their promises. Here's pics of our mounted bikes (test fitting carriers before paint), the vinyl wrap we dressed our trailer up with and our trailer at...the physical location captured on the wrap!
 4 points
 -
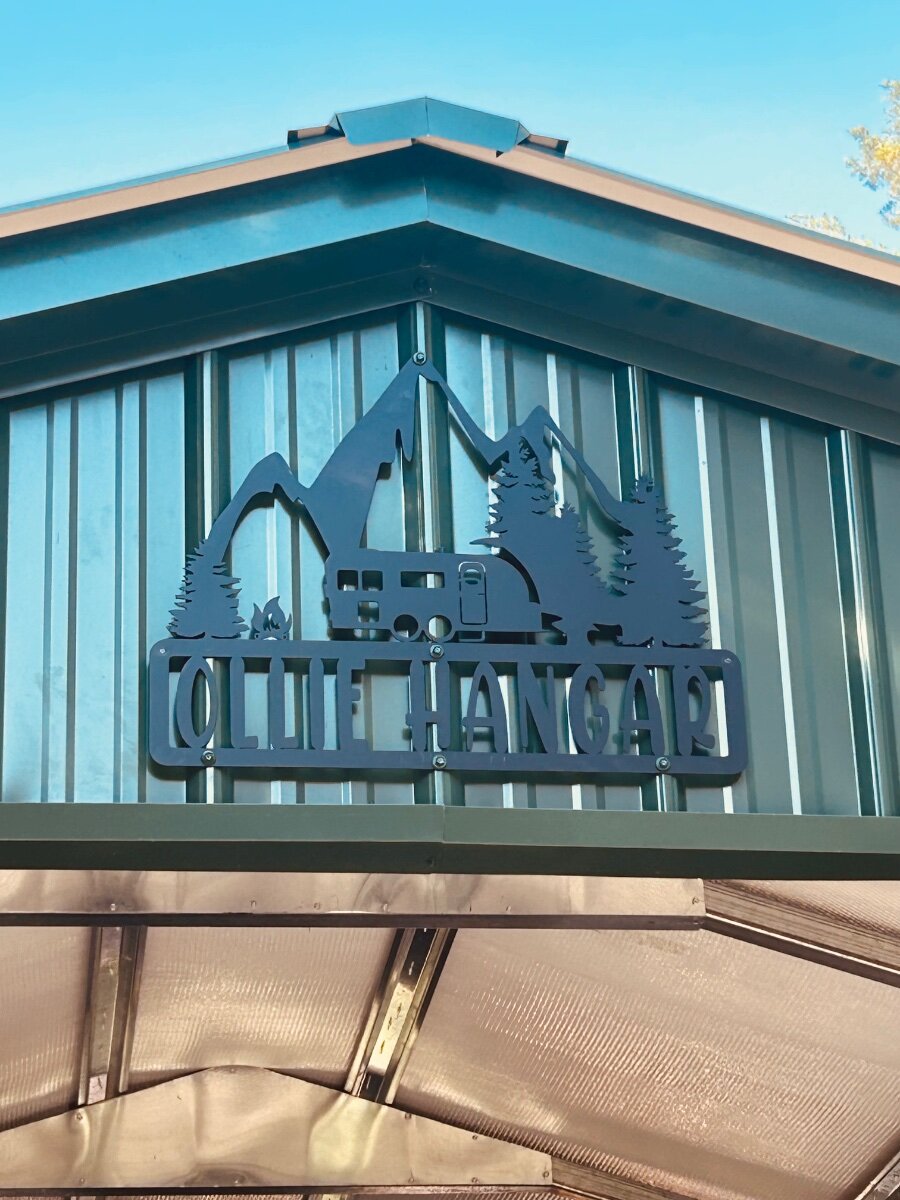
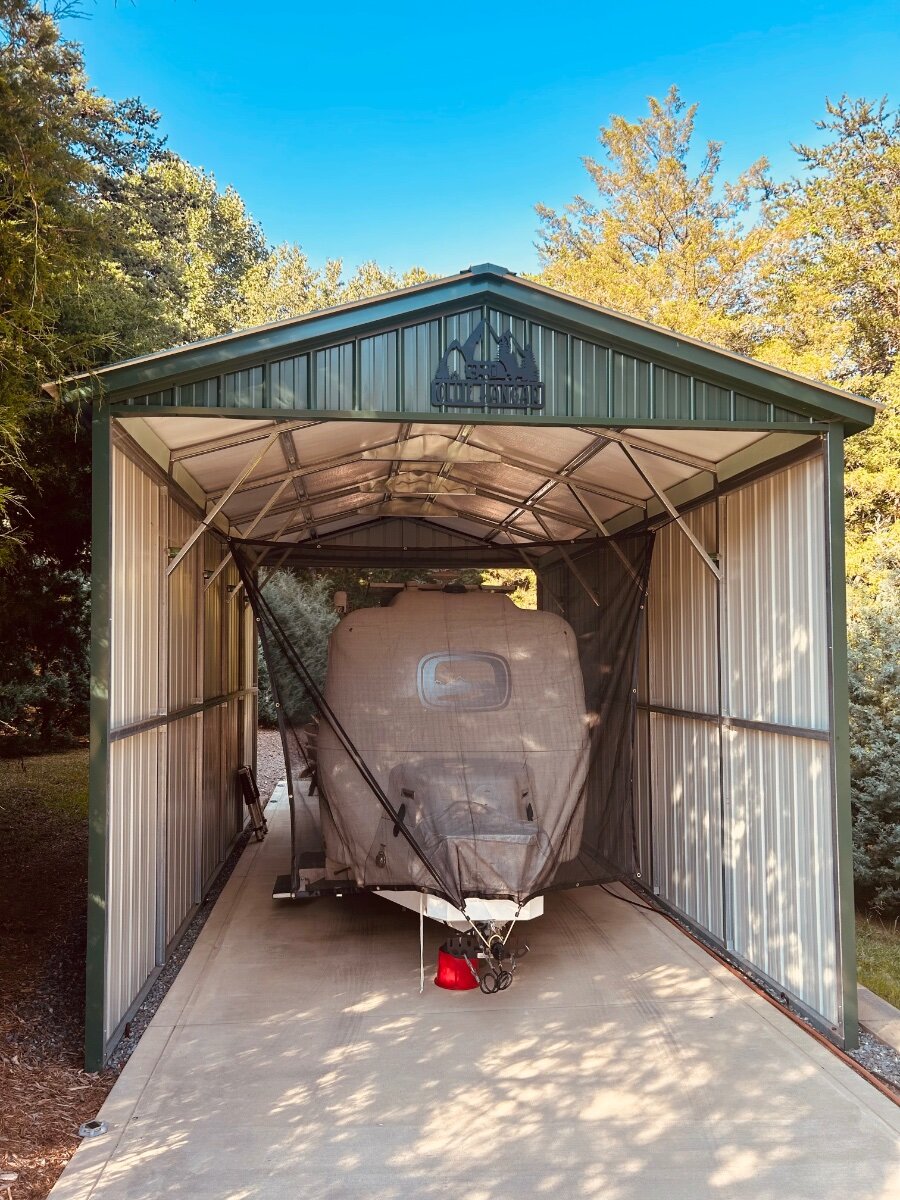
A big shout out and huge thank you to the Sea Biscuit Team, and to owners Kristine Hess & David Hess for our hand crafted “ OLLIE HANGAR” custom S/S sign that we won at this years rally. We also have the Sea Biscuit front cargo box which completes our Oliver storage and we love it! Awesome metal craftsmanship made right here in the USA.
3 points
-
Sher and I purchased our Elite II last Sept. One of our key hobbies are cycling old rails converted to trails... and Molly helps us do this. Using post to test my signature line.2 points
-
Follow up to my inverter issues. Completed the “reset” and reinstalled. All was good until tried to use the microwave again as a test. Inverter immediately failed but this time I was able to catch an error code before it disappeared. Code was E04 (overheat). Contact Xantrex tech support and they asked me to check all trailer connections and if no issues inverter likely needed to be replaced. I checked all wiring and found no issues. In order to eliminate the trailer from the equation I removed the inverter and hooked up to a known good automotive battery. I tried to run one of the wife’s hair dryers and inverter immediately shut down again. Replaced inverter today with new Xantrex pro watt 2000 from Hodges Marine. Lowest price I found and arrived 2 days after ordering. New inverter working great and handled everything I tried to run on it. I did look into replacing with the all in one inverter, converter and charger but could not justify the 2 or 3 times cost difference when I still have no solar and wet cell lead acid batteries. Maybe in the future, for now I have a new inverter with 2 year warranty.2 points
-
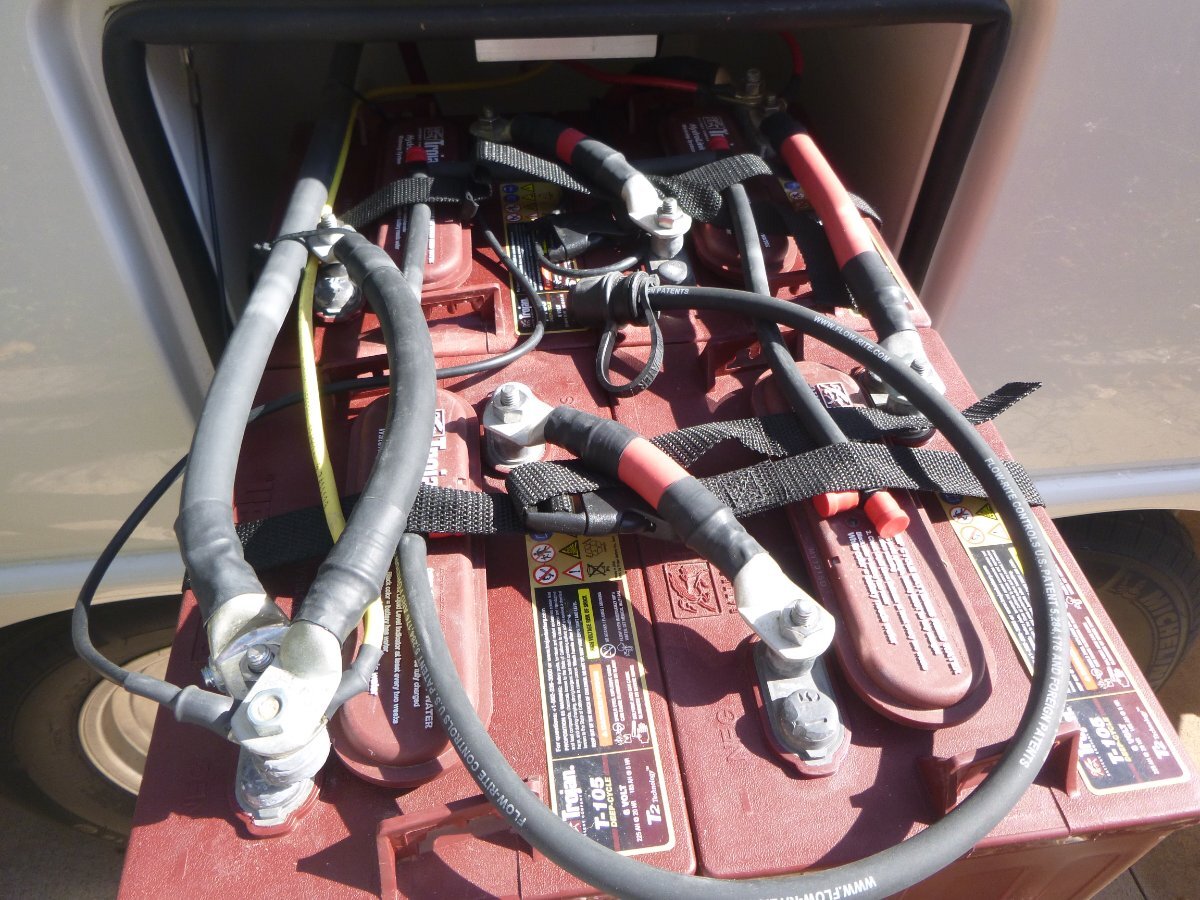
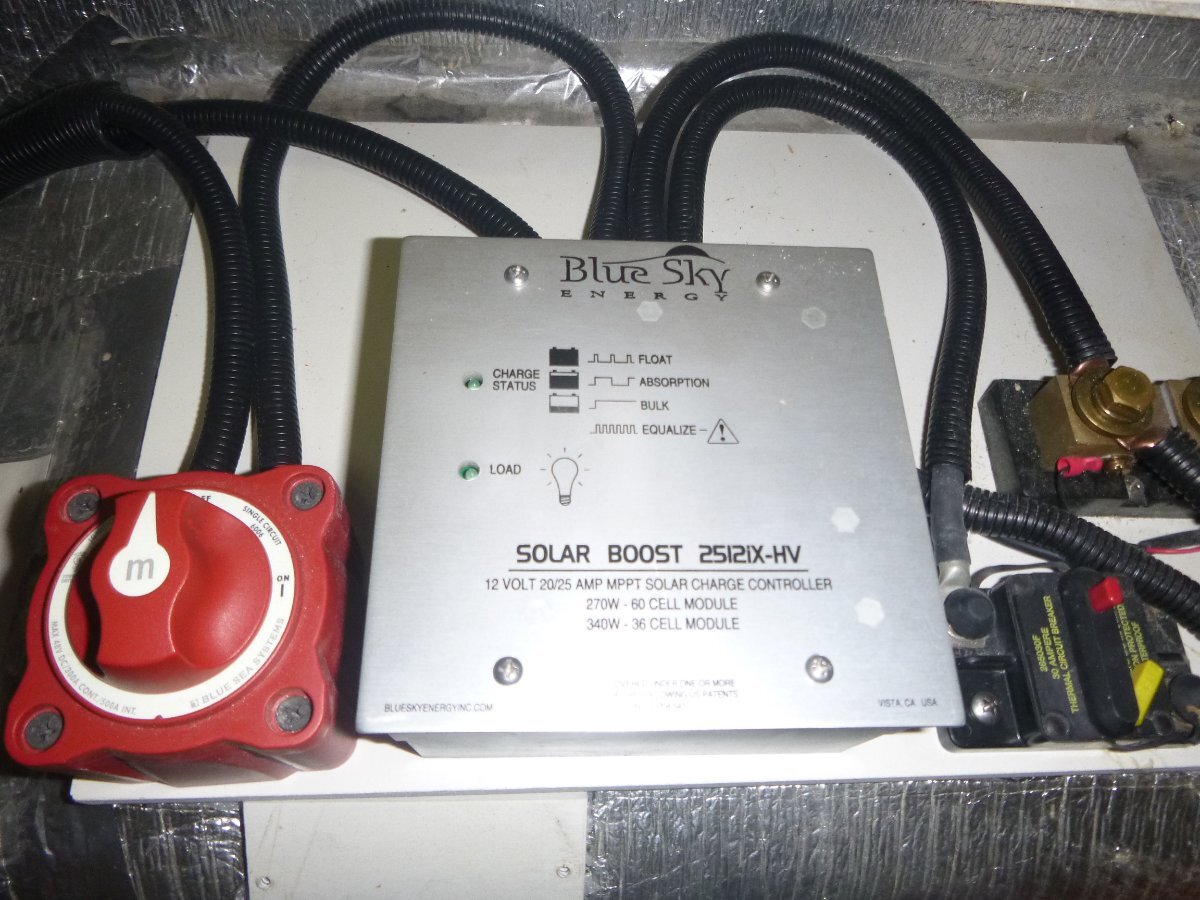
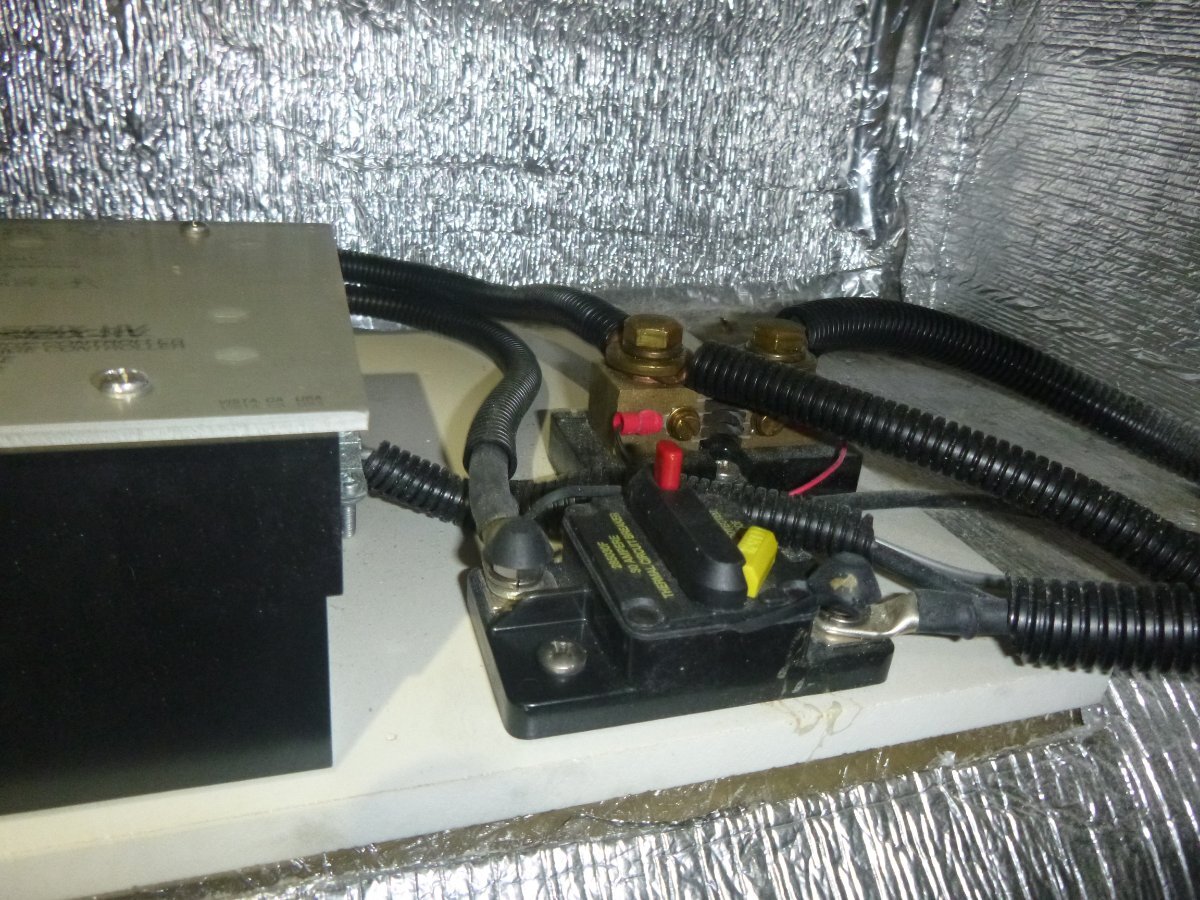
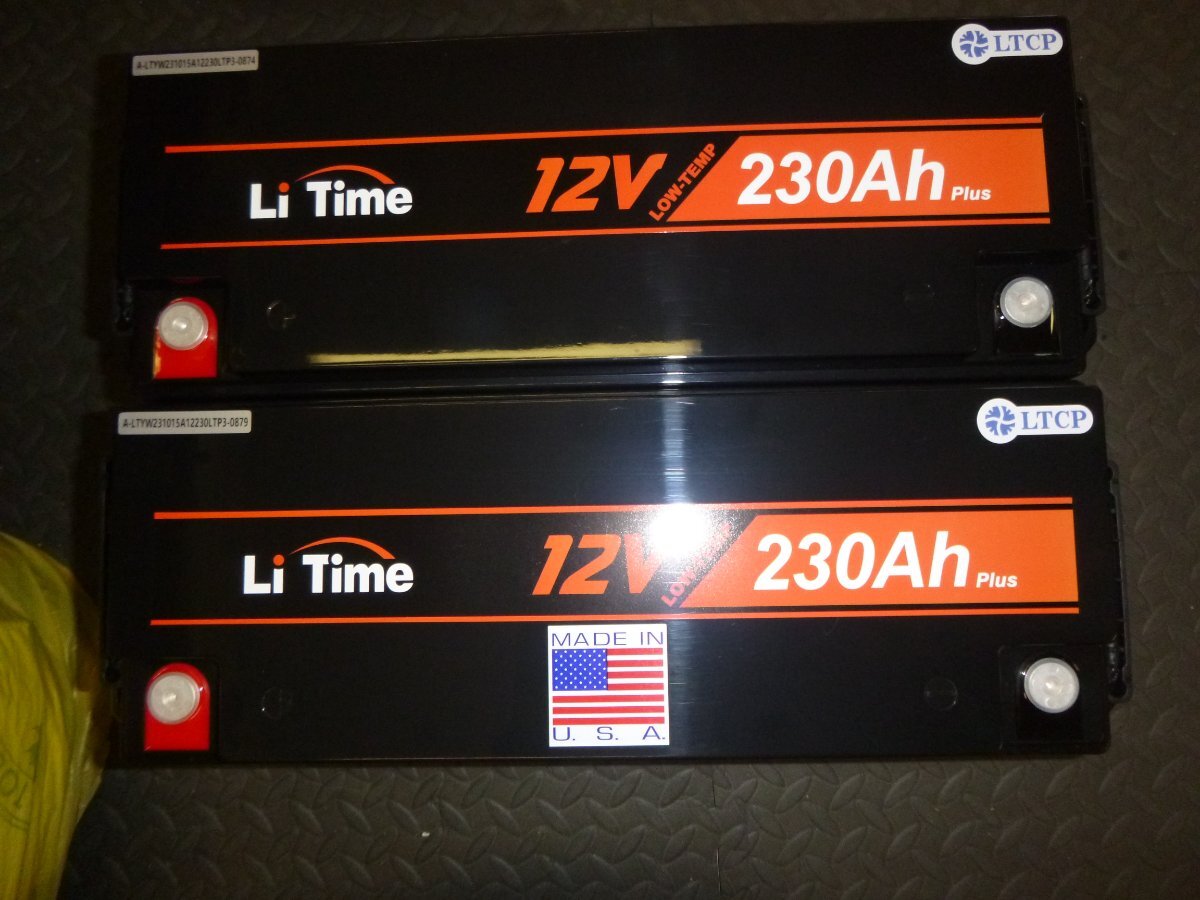
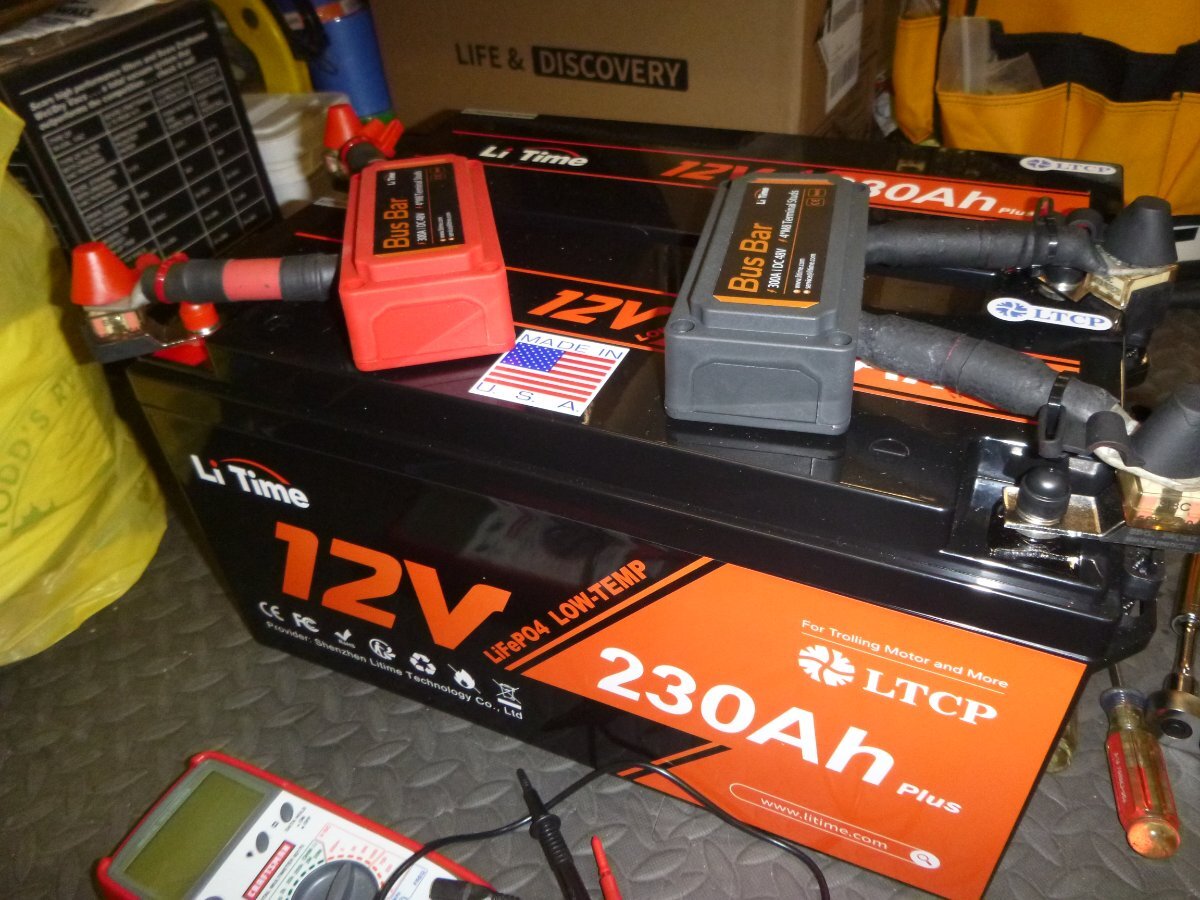
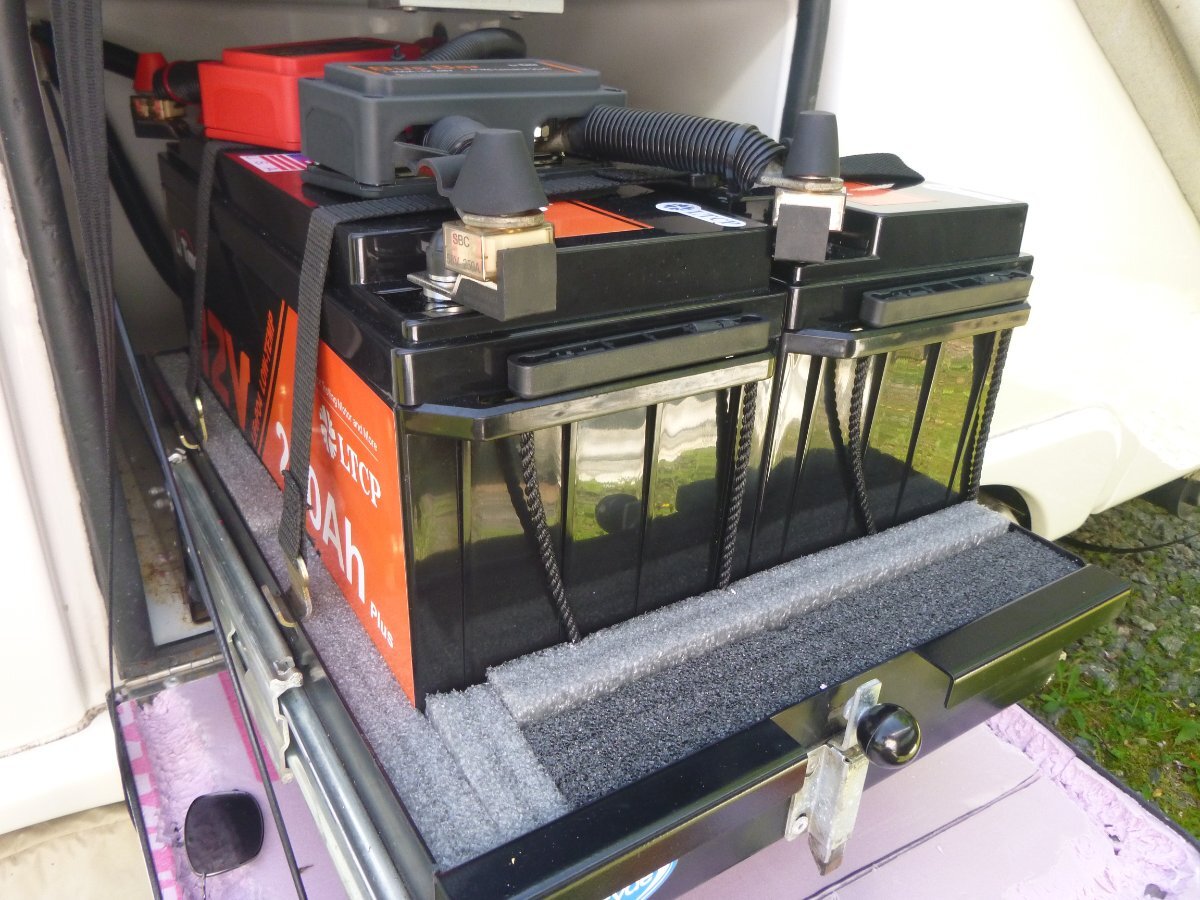
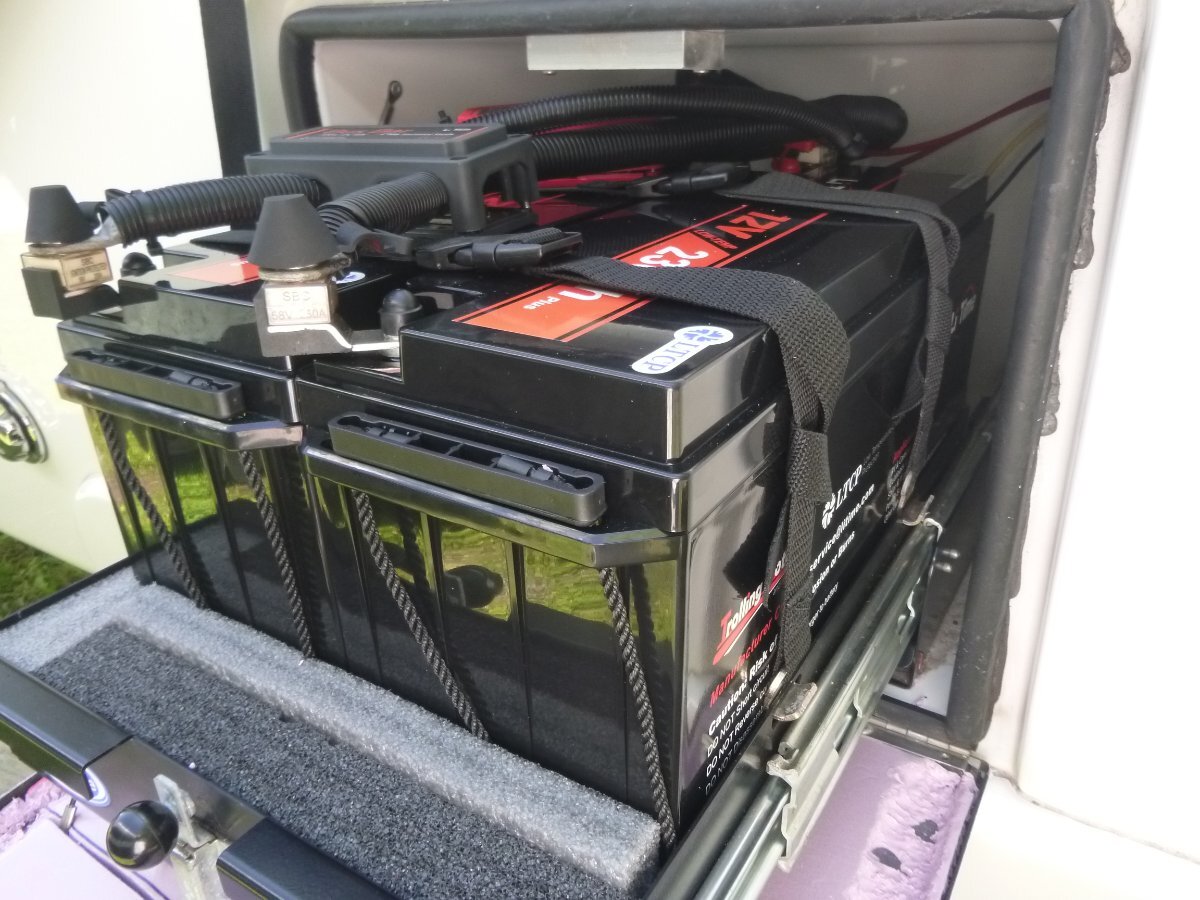
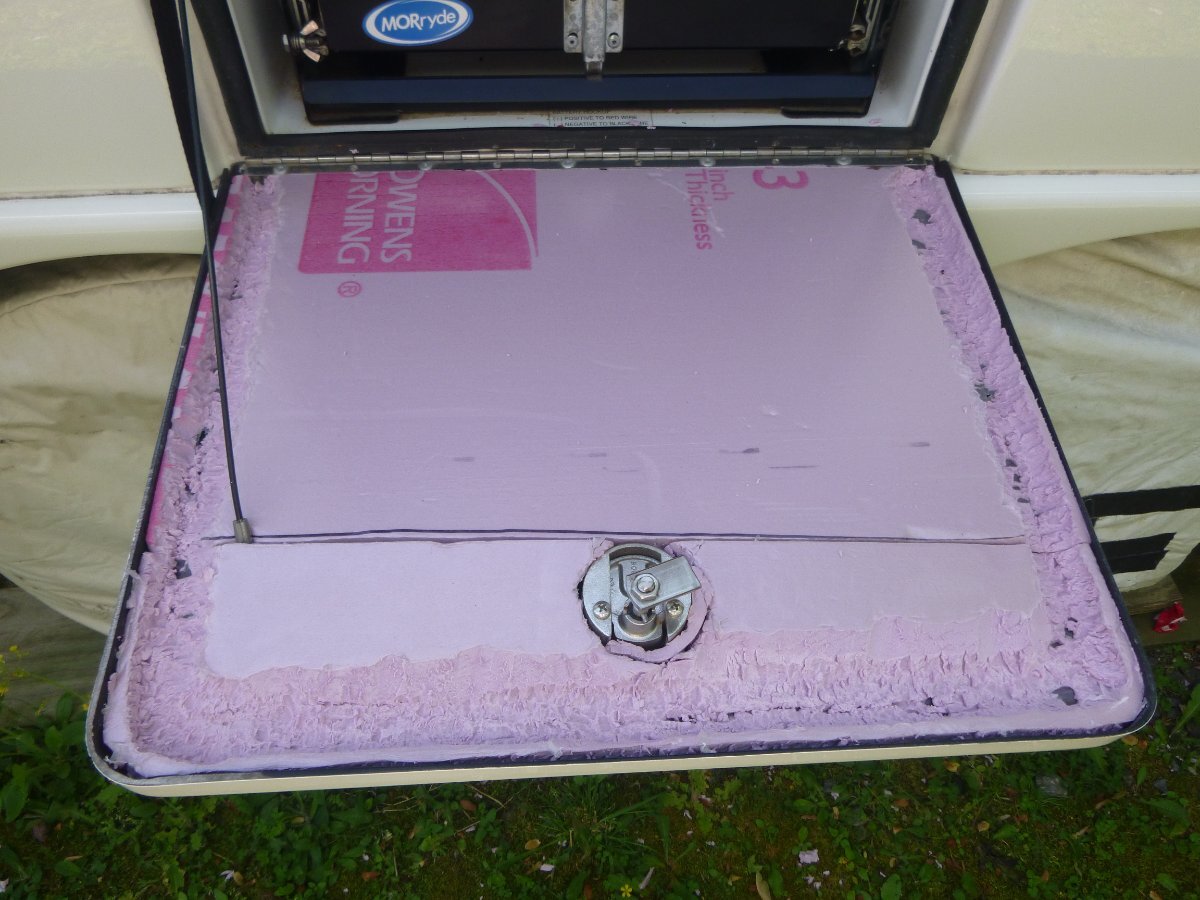
My Oliver Elite II is a 2016 model that I purchased from the factory with factory solar and 4 T-105 Trojan lead acid batteries. Over the 8 years with the lead acid batteries I never saw the charge level of the batteries below 83% full! Mind you that I'm very conservative regarding energy usage to include having only actually run the furnace twice over this time. I also never have the inverter on unless I'm actually using it and even then it was seldom used for more than 6 minutes at a time (a good sized baked potato in the microwave). However, even though the batteries were still performing as they should, I simply thought that as I approached my 9th year, I was simply taking too much of a risk that these batteries would leave me stranded while out in the middle of nowhere. So, in late 2023 I began my search for replacements. Since I do not live under a rock, I was reasonably aware of the "long-term" benefits of switching to lithium batteries. But, in the short-term, the expense of this kind of upgrade was a bit difficult to justify. Note here that I live in the mountains of North Carolina and do most of my camping in the summer at altitude in the Rockies where sleeping at night is usually a question of how many blankets versus will I be cool enough. Yes, the driving trip from NC to the Rockies each year can be a bit warm (think 100 degrees going across TN, IL, MO, KS and the eastern plains of the Rockies) and, yes, it would be nice to power the a/c via the batteries on rare occasion. But, I made the decision that until my current 2000 watt inverter dies, I would not spend the extra money to upgrade which would certainly add to the overall cost of the project. In addition, I'm not a big cell phone user and prefer a simpler life. Given the energy usage noted above plus I do not need to let anyone know that I'm presently on isle #5 at my local WalMart, and, I don't want or see the need to be attached at the hip with a cell phone. So, going into this replacement of the lead acids I simply assumed that I'd purchase something that I could "drop in", use the same wiring that came from the factory along with the same Blue Sky MPPT solar controller, IPN remote (shows typical shunt readings), existing cables, and not change a thing (or at least very little) from what has worked very well over the past 8 years. The price of lithium batteries was/is still coming down but was still too high to justify the extra expense versus the alternatives. OK - this is the base from which I started and certainly I recognize that my situation does not apply to everyone - nor should it. After looking at several alternatives I had almost decided on purchasing 4 VMAX XTR6-235 AGM batteries at $1370. Of course, another possible alternative would have been the Brightway Group EVGC-220A-AGM batteries at 4 for $995.00. But, I saw a YouTube video by Will Prowse that highlighted the LiTime 230 amp hour lithium batteries. Next it was the Christmas holidays and I saw that the LiTimes were discounted plus I could get an additional 8% off my order since I had served in the military. So, with 2 of the 230-amp hour batteries plus 2 bus bars, my total for 460 amp hours was near $1,075* – well within the cost of non-lithium batteries. Yes, I was aware that the LiTimes "only" had a warranty of 5 years versus the 10 years for Battle Borns or the 11 years for the Epoch. But, since most (if not all) of these lithium battery cells are made in China (with some assembled into the batteries we see in the USA) I figured that since the LiTimes are about half the cost, if they died at 5 years I would still break even versus the Battle Born's. The "final straw" was seeing Ronbrink's post** on his install of the LiTimes! Upon receiving the 2 batteries*** (3 days after order) I found that the battery terminals were recessed relative to the tops of the batteries. Therefore, I purchased 4 terminal blocks with 250-amp fuses at a cost of $68 on Amazon. So, I was just about set for the install at a total price of just under $1,150. Next, I took a hard look at the wiring necessary for the install. My original intention was to install the bus bars either inside the Oliver (near the solar controller) or on the wall inside the battery box. But, for the "quick and easy" install that I was hoping for it appeared that I could use the two 4/0 cables (each about 7 inches long - end of lug to end of lug) plus two additional cables of this length that (hopefully) I could get from a fellow Ollie owner. Indeed, Mossemi came to my rescue and supply me with those two cables that he no longer needed after his Lithium conversion. Putting this all together resulted in what appeared to be a nice tight package that I could simply "drop into " the existing space in the battery compartment. I "bench" tested the batteries in my workshop and even performed what is called a "top balance" on the two batteries just to make sure that they were ready to go (i.e. a "top balance" is performed by charging each battery to 100% and then connecting the two batteries together and letting them adjust to each other for 4 to 24 hours). Indeed, the 2 LiTime batteries easily fit into the existing space and I had some foam blocks that I used to make sure that the fit was snug. Also, the original Oliver tie-down straps could be used to hold the new batteries in place. When connecting the cables from the Oliver I found that I needed to slightly alter the openings into the bus bars so that the “tops” of the bus bars would seat nicely onto their bases. This was simply done using a Dremel tool. And, even though the LiTimes have “low temperature charging protection” (lithium batteries should not be charged when they reach a temperature of below approximately 32 degrees) I decided to insulate the battery compartment door with some ½ inch foam board. Finally, my original intent was to keep my original converter which did not have a lithium battery setting. These old converters will charge a lithium battery, but, it would not charge it to 100% full. However, upon resetting the Blue Sky solar controller from the Lead Acid parameters to the Lithium parameters, the solar panels would take care of getting the total charge in the new batteries to 100%. But, I saw a lithium capable converter on Amazon Warehouse for $147 and could not resist****. With a total cost of now just under $1,300 I was in the lithium world with (hopefully) longer lasting batteries and considerably more usable amp hours than the T-105's I started with. In addition, should the inverter decide to fail, I can now replace it with a 3,000 watt inverter and be in a position to run the a/c off the batteries for a short period of time. During the Owner's Rally and in the weeks after the Rally, the batteries, solar, and converter have all been working as they should. I would still prefer to install a battery cut-off switch but that will have to wait until the summer camping season is over. In a nutshell, here is what I did: 1. Disconnected the solar panels via the cutoff switch (street side bed) and opened fuses near the negative bus bar (also street side bed) and do not be connected to shore power. 2. Removed the old Trojan batteries (disconnect negative terminals first and take pics of wiring configuration prior to disconnect). 3. Cleaned all wiring connections. 4. Cleaned battery box and repainted tray. 5. Inserted new LiTime batteries and connected the two battery cables to the first and third bus bar posts, the main negative from the Oliver to the second post and the other negative cables to the fourth post. Performed the same procedure with the positive cables. 6. Closed the two cutoff fuses near the solar controller. 7. Reprogrammed the MPPT controller via the IPN Remote using setting provided by LiTime. 8. Disconnected the charge wire from my tow vehicle – actually I removed fuse #17 in my 2023 F-150. 9. Verified that the dip switch inside the solar charge controller was turned off – you do not want to “equalize” lithium batteries. 10. Verified that the solar system and the new converter were operating correctly and were charging as appropriate. Bill Notes *As of 6-24-2024 the price of 2 LiTime 230 amp hour batteries is $1048. **Part of Ronbrink’s install can be found at: https://olivertraveltrailers.com/forums/topic/3333-battle-born-lithium-ion-12-volt-batteries-in-an-oliver/page/3/#comment-98774 AND https://olivertraveltrailers.com/forums/topic/9395-prime-deals-on-battleborn-and-renogy-suitcase-solar/#comment-99676 *** I wanted 2 batteries to protect myself in the event one of the 2 developed a problem. ****Installation of the lithium capable converter can be found at https://olivertraveltrailers.com/forums/topic/4812-how-to-progressive-dynamics-pd4045-lithium-upgrade/
2 points
-
OK - you asked for it:2 points
-
My plans is/was to use this bulkhead fitting through the roof as a cable guide and into a utility box on the roof. If this fits in the Icotec 90 degree fitting, I’m golden! Just a drilled hole through the outer hull into the attic. https://a.co/d/0anCrU1v2 points
-
I hope you are doing ok. I saw the news on the collapse of one house, near the Rapidan dam. Please stay safe, and keep us posted.2 points
-
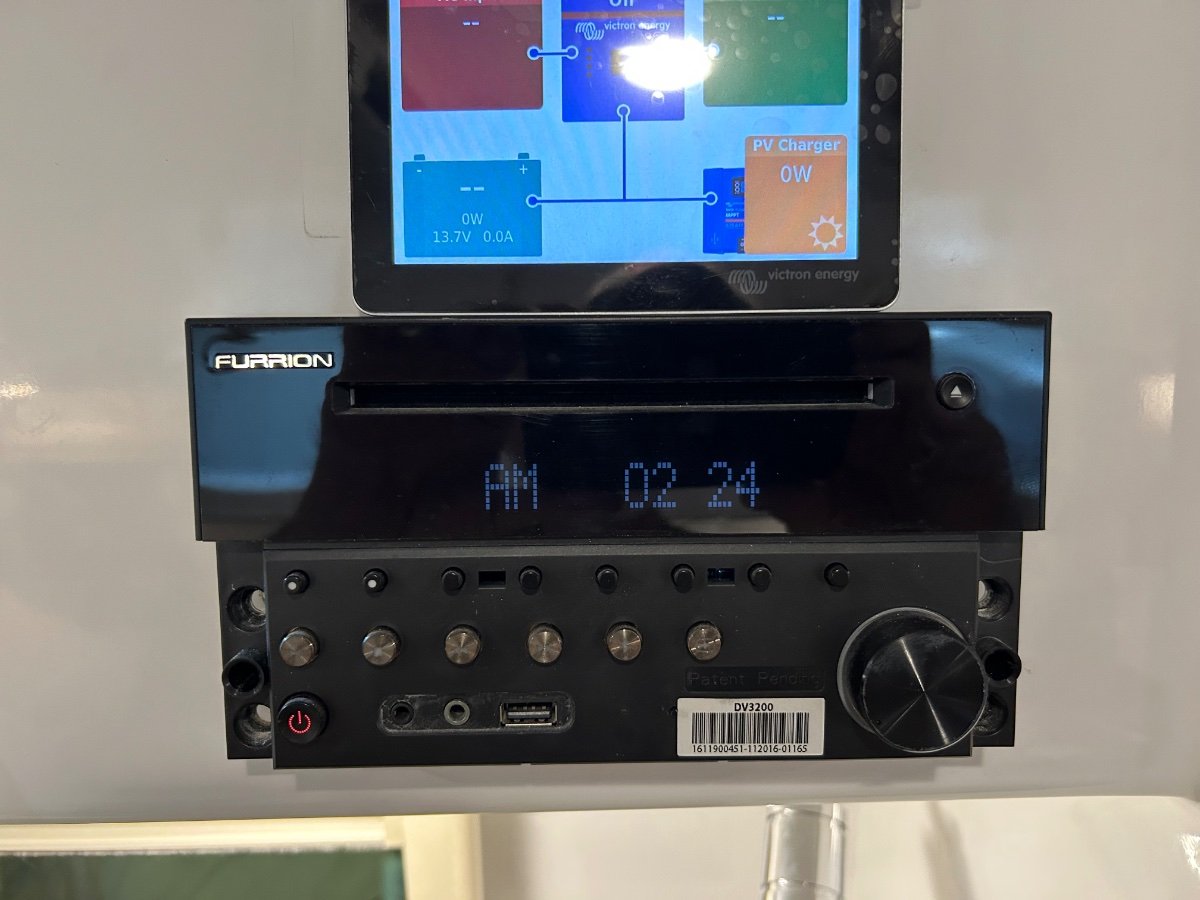
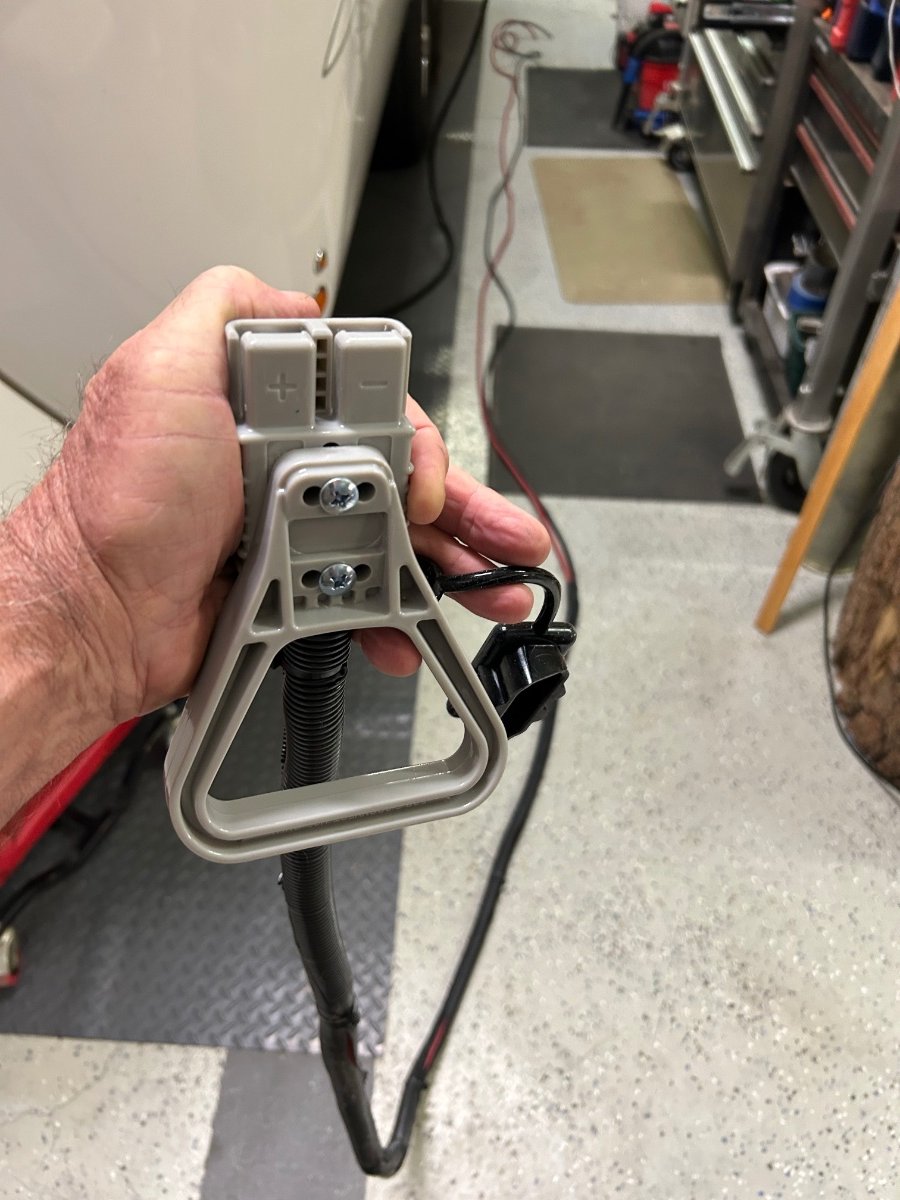
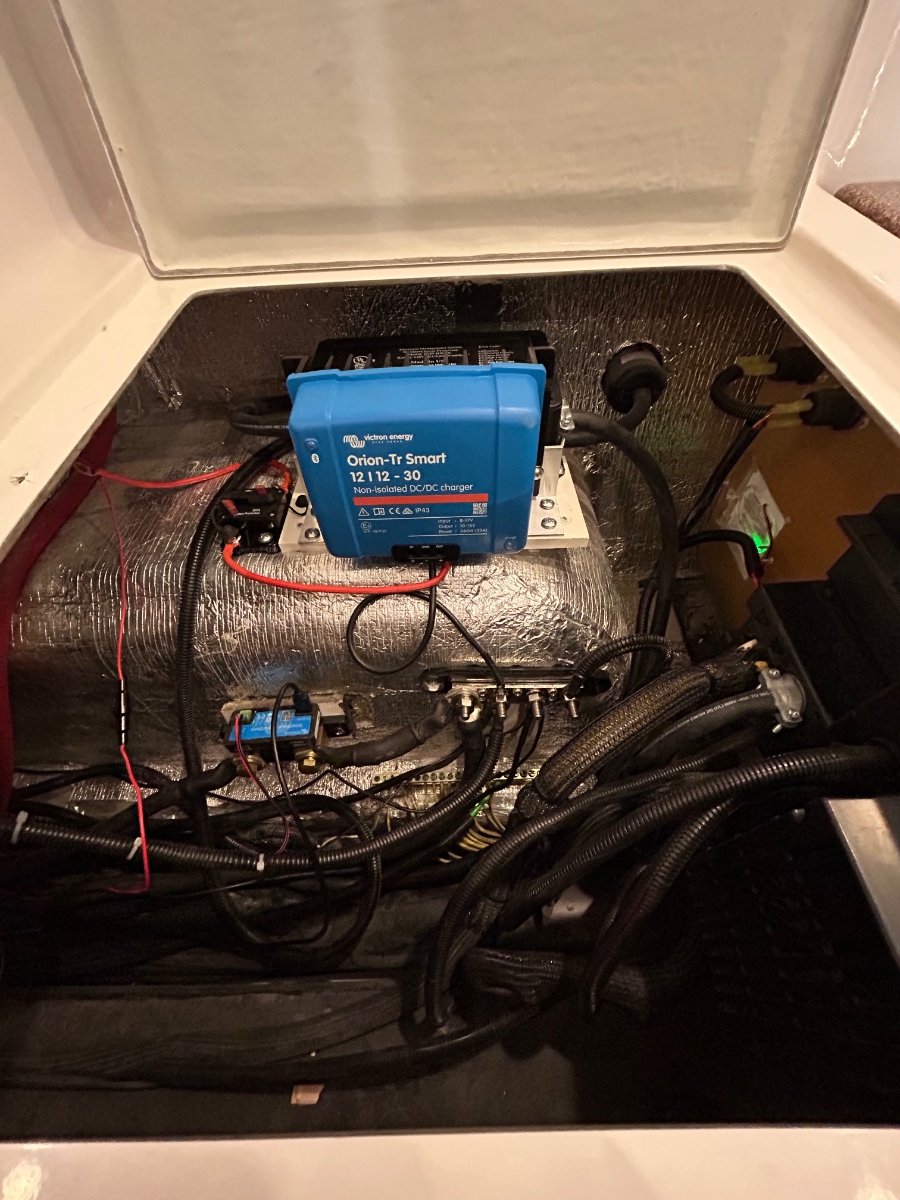
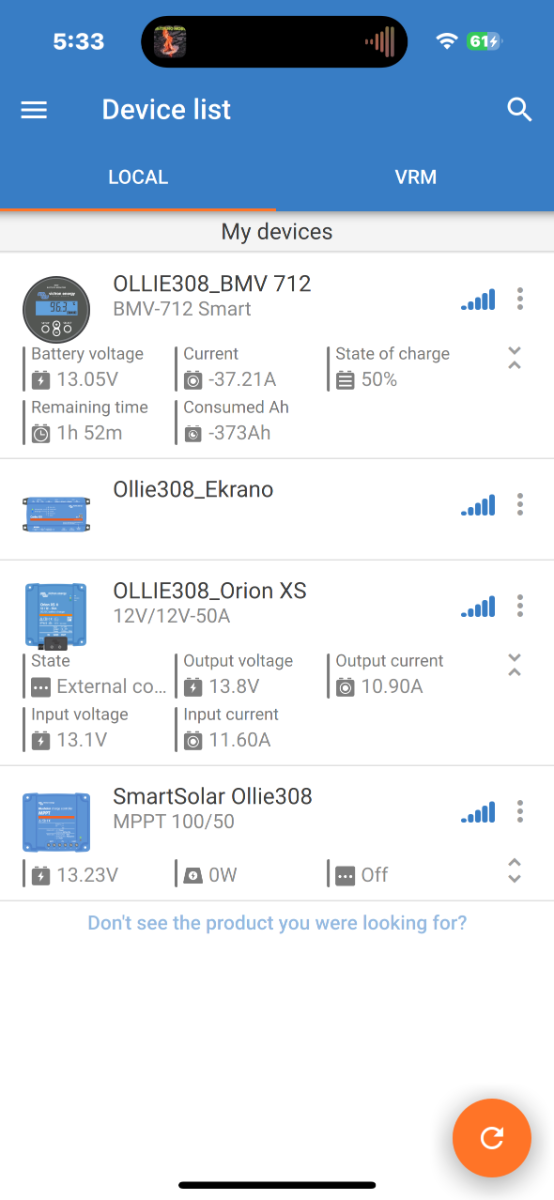
After detailed discussions with @Geronimo John regarding a DC-DC Charger installation, we finally got around to making it happen. There's a ton of posts on this mod/upgrade, so we're not going down the rabbit hole to the end - just saying that it's a worth while mod to consider. Essentially, our concern was the 12AWG DC circuit from the 7-pin connector supplying an inadequate DC current to the OTT while towing, especially during the hours of darkness when there's no solar input to the battery bank. So, we decided to go with the Victron 12/12 30amp Bluetooth unit to be compatible with our other Victron devices (Smart Shunt, MPPT Solar charger, and the Cerbo S-GX multiplexer). We decided to upgrade from the OTT factory PWM solar module controller to the Victron MPPT unit. We also added the 7" Victron Touch to monitor all our AC and DC input/output activity which has been a game changer for us. Here's a series of pix that may satisfy the curiosity of those interested in efficiently charging the battery bank. FYI: We've got 3x BB's and ran 1/0 cables from the TV's smart alternator to an Anderson plug installed at the hitch, then 4 AWG cables from the Anderson through a Blue Sea Cable Clam to the Victron DC-DC charger installed under the aft dinette seat. The cables were snaked from the forward bulkhead under the toilet to the forward dinette seat, under the dinette table, to the aft dinette seat area: Below shows the location for the Victron Cerbo S-GX Touch Screen... This is the location where we mounted the new Victron MPPT Smart Solar Charger, upper street side compartment where the old PWM solar charge controller was mounted: We mounted the Victron remote solar controller monitor to the right of the Touch Screen... Building the Anderson plug for the OTT with 4AWG cables... Below shows the Blue Seas Cable Clam hull penetration adjacent to the 7-pin cable... Victron DC-DC Charger mounted on the street side wheel well/aft dinette seat next to the Progressive surge protector... Note the 50amp breaker between DC-DC Charger and the battery bank. We installed another 50amp breaker between the TV alternator and the Anderson connection: Pulling 4AWG cables from the hull penetration under the head sink thru the front of the toilet and to the aft dinette seat area... Thanks to @ScubaRx - Steve gave a great suggestion for snaking wires through challenging areas using a stiff plastic strap for securing pallet loads... One and done. I'm going for a cold one...
1 point
-
Against The Wind Posted Sunday at 01:44 PM Hello all! Just joined your wonderful forum a few days ago. We are a retired couple from Tennessee who are looking forward to owning a Legacy Elite II someday in the near future. So we’re newbie wannabes right now. We made the mistake, I guess, of first looking on line at the Legacy Elite II and now everything else just seems subpar. So, we’re pretty much sold out of the gate on Oliver’s quality and customer satisfaction. We continue to learn every day, mostly from this forum and other research what it’s like to own a travel trailer and why other brands of rv’s should be avoided. Once again, hello and we look forward to getting to know you all.1 point
-
Sorry for the delayed response, I missed this post somehow... We're seeing 26 - 28.5A (max so far) from the Orion unit with SOCs in the mid-60% range. The 50A model would be nice, we would've probably got one, but they weren't available yet when I dropped the hammer on getting our 30A unit.1 point
-
@rideadeuce looking forward to your follow ups and experience once installed.1 point
-
Interesting solution @Wildbrew for getting the WIFI over and around the Penguin. As @jd1923 stated I do not have great reception in my TV because the PII blocks it. Mine is in the same spot just not elevated. Because of this, I am seriously considering putting the Cradlepoint and the antenna in the front closet since there is a power outlet it would be simple -- just another hole in the roof. Ugh. But what @rich.dev said is the reason I keep everything in the Oliver is to keep it connected to the outside world. No matter where I am in the world I can check the temperature, change heat and air settings, monitor cameras, get alerts if it moves, etc. Best, Mike1 point
-
Reception is great because these 7-way antennas have 4 cellular antennas for receiving signal, one GPS antenna and 2 Wi-Fi antennas to send signal to your devices. The Oliver being mostly fiberglass construction allows radio waves to pass through (will NOT work with a metal-clad Air Stream where they would install a wired access point internal to the TT regardless of antenna location). @rideadeuce Mike is having an issue with coverage in the TV. He has a 5-way Cradlepoint antenna mounted on the rear of the Oliver. Your idea of mounting to the front awning bracket should be the best mounting location on the Oliver, except for taking a lot of headwinds, so mount it securely. Keep in mind the Wi-Fi signal originates in the router, but is broadcasted via the antenna, so mounted inside a closet or wherever does not matter except for it needing some, not a lot, of ventilation. Also, I mounted my router with 3M VHB 4950 tape. The only drilled hole you need in the installation is through the roof for the cables. The Icotek entry solution you were looking at could be installed by drilling two holes with a hole saw vs. cutting a rectangular opening. You only need the double grommet version with four 5mm holes in each and one plug. The cut-out size on this item is 43 × 24 mm. I'd bet 2x a 7/8" hole saw would be perfect! VHB the housing onto the roof and caulk the perimeter. 90 Degree Cable Entry Frame - 2 Socket - 73mm x 53mm – MobileMustHave.com Your last edit sentence finally gave me a reason for mounting the router in the Oliver! Thank you for that. There is one downside though, depending on where you travel. Out here we camp in many canyons without cell service. So, you would not be able to connect the Blink cameras anyway. When this occurs, we run the TV out of the canyon on a day trip and connect, use our laptops, etc. The Pepwave router also has the WAN input to add Starlink or like service. If you were to go this route, you would nearly always be connected. Mike also did a nice Starlink antenna install up front and he ran the cable all the way back on the roof. You could do the same front install and run that cable down the same entry point. If this upgrade may be in your future, buy this Icotek instead and drill 3 holes. Use a grommet plug until you need the 3rd opening: 90 Degree Cable Entry Frame - 3 Socket - 100mm x 53mm – MobileMustHave.com1 point
-
@rich.dev, I was thinking again about running the 12VDC to the closet and knew there was a good example of this. Also, running DC lines from there, you could add a dedicated fuse for the router in the DC fuse panel and eliminate the inline fuse in the wiring. Note the description and pictures on page one, where Art @MAX Burner fishes two large 4AWG cables from the dinette to the bathroom vanity:1 point
-
Molly is one of the very few Ollies that have been "wrapped". Looks great. Bill1 point
-
Welcome to the forum! My wife and I are big fans of rails-to-trails riding too. I ride 10-12k miles per year and the vast majority is done on rails-to-trails and MUP trails.1 point
-
Maybe just a little, Dave! 😜1 point
-
Art, Does the seat stem give it away? 😄1 point
-
Al and Sher, welcome to the group! You’ll find lots of fellow bikers here. Post pictures of your adventures! Mike1 point
-
We’re 1360, so should be the same. Ten minutes later: Yep, I just needed to pull harder. Thanks!1 point
-
Gee.... which bike is Kathy's and which one is Dave's?1 point
-
AI T from Alberta - Welcome (even though a bit late) to the Family! Our Ollies provide so many opportunities to do and see so much of our world. Many here on the Forum are also into biking - in all its forms. Pictures are always welcome! Let us know if we can be of help. Bill1 point
-
Good information,again. Nan, perhaps I didn’t introduce ourselves to you. We are only Oliver owner wannabes right now but are doing our research here on the forum to learn more about Oliver TT. Thank you so much for your kindness, though. And thanks for all the other great information, friends. I’m sure we only have a zillion more questions 🤣1 point
-
Welcome to the forum! My wife and I also ride rail trails and both really enjoy cycling whenever we can. We look forward to hearing about your cycling and camping adventures. Your signature line looks great! Pedal On!! 👍🏻1 point
-
Personally, I believe the utility box install is extreme overkill. We are NOT installing a 5KW inverter with 1800W solar system in a Class-A, not by any means! Are you needing a 1 1/2" conduit for another half-dozen future rooftop additions, NOT! Please think about the simple realities. I installed solar on a previously owned RV, by merely drilling two (2) 1/4" holes through the roof, for the two (+/-) 10 AWG solar panel feeds. No box, no Icotech entry solutions, just two simple 1/4" holes and a drip of Dicor on each, still working today, with no leaks. Or you can mount a big-@ss box. You can imagine what my choice would be! 🤣 It's up to you, do you want to mount a 6x10" box and blow two tubes of Dicor all over the roof of your beautiful Oliver? BTW, a rectangular junction box does not fit nicely on the curved roof of the Oliver! Most professional installers are young and inexperienced and it's up to you to make the best decisions for your assets. When the guy doesn't agree with you, just hire a new guy. Sorry @Wildbrew although your install is yes BEAUTIFUL, a work of art, and you should truly be proud of your exceptional work, it's simply overkill! Could be done with no platform and no large rooftop box. (Still love your work yet hoping to advise many others that less is more). We are to each our own, yet simple is often better. Think hard about your decision. I did my truck mount install in two days, not a single drill hole into our Oliver, just sayin'! I was working my job last week, teaching my online PMP class when Sparklight went down, resulting in no household Internet. While my students were waiting for just a minute or so, I connected to our truck-based Pepwave cellular router Wi-Fi, with T-Mobile 5G cellular service only missing a heartbeat or two. They had no idea I was gone for a minute. My truck-based Internet service is my also my business back-up internet service, without an installation hole in the Oliver! 😂1 point
-
“Golly Shazam” you can, yes you can teach an old dog new tricks! At least some of us ol’ dogs that must be self-taught, and that’s you and me for sure. Happy for you cousin! You gracefully watered-n-nurtured that old set of original batteries for 8 years. My guess is with your conservative touch, you got these for a lifetime. God Bless and Godspeed my friend. 😂1 point
-
I bought my mattresses from Southern Mattress. Very comfortable. Now about the sheets...yes, you can buy them that have the curved edges, but after killing my self changing them every few days, I decided life was too short. So, I just lay a sheet over the bedspread and call it a day. If you will privately e-mail me your address, I will send you two sets of sheets. My e-mail address is: Walliered@aol.com Blessings.1 point
-
I had that question and Tech Support at MobileMustHave replied that Parsec suggests no smaller than a 2" turn radius on their antenna cables. I had to push that number a little tighter on my install since the cable had to come down between the cab and bed and turn 90. The Icotech @rich.dev suggested will just make that 2" radius but installing it on an Oliver is not simple. Think HARD about which cable management device you select. Many are overkill and require a large opening. Models suggested here require square or rectangular openings. It's a whole lot easier, 2 minutes with a hole saw, than drilling four corners of a rectangle and using a jigsaw through two hulls. I had to go with the flat square model in my application, but cutting this square hole with the backseat of the TV removed is more straightforward. And nobody will ever see the couple of scratches made in cutting this, unlike the roof of your Oliver.
1 point
-
I think there’s more than enough room for the 7 wires to make the radius, check this video clip.1 point
-
Don't know - Oliver has always taken care of anything that they had something to do with and the rest of the stuff has always worked as it should. Besides - I never bought the "extended warranty". And, since most professionals advise that these extended warranties are a waste of money I never buy them for just about anything. Bill1 point
-
Thanks for the pic @jd1923 reinforces the information @MAX Burner provided. I got under the street side bed today and the rear dinette. Think I am going to put a NEG bus bar and the smart shunt on the inner wall under pantry. Will keep everything within minimal distance to the rest of the components and allow me to clean up the battery compartment a little bit.1 point
-
We removed the velcro under the pantry countertop and replace it with drawer slides that "soft close" - I'll do the nightstand top the same way after we're back home from this excursion... Now you see it.... DVD storage above Now you don't... Oscar's not impressed at all!
1 point
-
And yes, our hull has check valves and restrictors on the Fresh Tank and City Water lines (see pic). You may not need the following detail for a summer plumbing project, but when I am winterizing, I run air into all four (4) water inlets. First air into the City Water to drain both sinks, the toilet and outdoor shower. Then the Fresh Tank inlet for a few seconds. Then I connect to the rear port, after turning water valves to boondocking position and run air in for a few seconds. Lastly the toilet rinse inlet. Except for the first step that drains all the internal plumbing via the City Water connection, the other 3 just take a few seconds of air to clear those short inlet lines. You can bypass the HWH for a plumbing repair, but when winterizing, I bypass it to clear the hot water plumbing with the air and at the same time I pull the anode plug to drain the 6-gal HWH tank as well.
1 point
-
Note that - like anything else - these warranties are only as good as the company that issues them. If the issuing company is no longer in business 5, 6, 7, etc. years down the road then the warranty means little. As I said in a recent post, most, if not all, of these lithium battery "cells" are actually made in China. The batteries that we see are then either also made in China or assembled in the USA. And, the same can be said relative to the battery management systems that are such an important part of the overall battery. Due to this, in my recent purchase of a set of lithium batteries, I relied on a fairly well known YouTube "professional" who (I hope) knows much more than I do about the construction, operation and overall quality of these things. Hopefully, once this market settles down and a "normal" pricing level is reached all of us can approach purchasing batteries with the same kind of analysis that we presently do with AGM and/or lead acid batteries (i.e. you get what you pay for - in most cases). Bill1 point
-
@topgun2: WELL DONE!1 point
-
Ours (2023 LE II) is held down by Velcro strips. Found this out while preparing for new tops Foy tops. 🙂1 point
-
Thanks! There are so many ways and products that can be used. And, some of these are really slick (I'm thinking of the Victron line here) and once started down that "rabbit hole" the walls are very slippery. If I traveled with pets, lived and camped in a hotter/more humid climate, traveled with my wife more or any number of different situations, I'm sure that my approach would have been different. While I've been happy with both my purchase and install (so far) and the people I've worked with at LiTime have been both helpful and quick to reply, the fact remains that LiTime is located near Hong Kong. This presents an "issue" in that if you need to contact them, you can be certain that you will not receive a reply until the following day. Bill1 point
-
@topgun2: Excellent post, Bill! Very well thought out, for sure. Seriously clean install - those lithiums will last 10+ years. 460AH! You'll never get below a 10% SOC unless you boondock in a cave somewhere. Sweet!1 point
-
Concerning the issue of running the Dometic air conditioner on battery power through the 2,000 watt inverter. I realized that I stated that the inverter could handle 2,000 watts load. (I have gone back to my original post and corrected it) Actually the inverter is very similar to a 2,000 watt generator. The Zantrex inverter will run 1,800 watt loads continuously and 3,000 watts surge not 2,000 watts continuously. The Dometic air conditioner draws about 1,600-1,700 watts. The inverter will be at it’s limits so absolutely no other AC loads while running the air conditioner!1 point
-
And here I was just researching upgrading the converter from an old PD4045 (lead acid only) to the newer lithium-capable PD4045CSV. Since I have tinnitus, it does not bother me to hear those "crickets", but it sounds like, no pun intended, that upgrading the controller in preparation for a Lithium upgrade will kill two birds with one stone. Since I don't trust purchasing the parts like this on Amazon anymore. I'll get it from Etrailer. I've used them before with great success. https://www.etrailer.com/Accessories-and-Parts/Progressive-Dynamics/PD4045CSV.html1 point
-
You all know I'm quite DIY-capable. However, I looked at the value in our older used hull in that it had two solar panels mounted on top, the cabling routed, the Blue Sky solar charger and Xantrex 2KW inverter all integrated and installed in working order. I have not yet had to change a thing there. Someday soon I will add lifepo4 batteries and need to reset the charging curve and perhaps later add another panel and/or a DC-to-DC charger. I did add an EMS that was not standard back in 2016. It's not easy working in the basement area of the Oliver. It's not like working on a truck where you can get it up on a lift to access many repairs. Always leaning into the basement openings is not at all fun. I have sore arms and rib muscles from leaning over that ridge for the mattresses! Think of getting under the pantry and behind the battery bay for this kind of solar/inverter installation, let alone the run to the roof. Buying the right used unit can be very helpful. Recently we had a hairline crack in the LP line to our Atwood furnace. I believe it was due to two frame welds breaking underneath and then pushing them back up to weld (LP lines attached to the frame). I removed the LP T-fitting below, but there was no way to remove the entire line without removing the furnace. My arms would not even fit through the opening behind the furnace. My plan was to cut off 2" of the copper LP line and somehow re-flare it under the body. I had to push the line from above, front side of the furnace and then pull from underneath, repeat that and repeat that until I achieved the required length below. It was amazing that I got my tubing cut-off and flaring tools between bottom hull and the aluminum frame. A whole lot of patience and about 2 1/2" hours later the job was done. (Would have been happy if that was the only thing I accomplished all day yesterday!) Wow, a big to-do is now off my list. 😂 Very happy not to do a solar/inverter install from scratch on our Oliver! I did that in a Bigfoot Class-C in 2020. There I could drill down, standing on a flat roof, down into a wall cabinet, through a race to the battery bank down below. Ran inverter connections under the truck through the chassis frame... Not on an Oliver. You should see how OTT installed the Dish Satellite on our hull. They did not go through the upper hulls front to back (dish up front and TV in the back). They ran the cables down, visible in closet to the basement area below, then runs towards the black tank and follows the drain all the way to the rear basement, then up to the attic. There must be 60 ft of coax with multiple connectors. It's like they added it after the build, not an option integrated to their build process. The Oliver is a great TT that's not real easy to work on for major upgrades (but will keep doing so as needed)!1 point
-
For someone that's not a DIY capable, then there is some reduced value for the wiring that is no longer provided on all newer trailers. Older ones have wiring between the solar entry (Hidden in front of the Max Fan) run between the hulls over the roof to the street side storage area. But I seriously doubt that OTT would have also eliminated the pathway to do so. Why? Service still needs it when an owner wants to add solar. Also, more than a few owners have run electrical wiring between the hulls for varius purposes in several places. I'll be posting on this topic after I do just such a run this summer for a Houghton mod GJ1 point
-
I looked into this as well definitely an option with the LiFePO4 batteries.1 point
-
It was a good idea but unfortunately after testing with MPPT off no difference in results. Battery SOC 50%. I also tried turning off the Epoch BMS and changing some other settings to no avail. I know you had shown some interest in the EPOCH batteries. This link has some helpful insight to their Pros and Cons. I still think they are great but there are some things you need to know about them. I am still using the Victron comms. Link: https://panbo.com/update-epochs-460ah-battery-what-weve-learned/
1 point
-
The BMS can limit, but note your MPPT solar charger is offering 33A, that's 48A total if I'm reading this right. 150A on the truck alternator is good number given it is in good condition, many are rated lower. Try running your test again, with your batteries needing charge (<80% SOC) and your MPPT solar charger turned off. This will show what the Tundra alternator and DC-to-DC is capable.1 point
-
The FreshJet 3 was not discussed by Jason Essary during the service presentation at the rally. I bet if you reached out to Road Lotus with a PM she could provide you with further details on your questions. We had the Truma Aventa retro fit professional installed by Oliver absolutely zero regrets. Cheers!1 point
-
We visited this park June 1996. Our son Adam was born the year before and was only 17 months old! Chris' kids were with us, Joe (age 15) and I carried Adam in a baby backpack everywhere we hiked! The two teenagers in our family hiked to the top of the dunes, up and down and more. We were staying in a cabin top of Monarch Mountain at 10K FT, west of Salida CO. Headaches every night (we lived sea level in the burbs of N IL), go figure. Each day we wanted a hike at 7-9K feet, not higher! 🤣 Per an earlier member comment, sand dunes make more sense between mountain ranges than on the beach, or perhaps the same. I rode the little dunes of Kitty Hawk and Nags Head of the Outer Banks, back in the day (late 70s) on my Honda XL350 Enduro! This is where I learned to handle a dirt bike! Enjoyed many days on the beach in the Indiana/Michigan Dunes, a long drive from Chicago. What a great place, period! GREAT post, we need to get back there again in the Oliver!1 point
-
The Dunes are about a 90-minute drive northeast of our cabin near Mogote, CO; we go there often... Never get tired of that location - very cool. Thanks for posting @Doug S! Cheers!1 point


.thumb.jpg.e34bf01ef7f7d5e99ad31856d45afbeb.jpg)


-
Recent Achievements
-


")


")


")

