Leaderboard


Popular Content
Showing content with the highest reputation on 09/25/2024 in all areas
-
Now 5 weeks into our western trip our Starlink Mini has worked flawlessly with usually 4 devices attached. With our use, the upgrade to the unlimited plan is the way to go and it still has the pause feature when we are not using it. I can’t imagine having to ever deal with WiFi at CGs or cell phone hots spots. As soon as I deploy the mini dish which takes about 5 minutes, it immediately recognizes our devices. I am glad I purchased the aluminum protective case/cradle. The mini is really light weight and could easily be blown around by strong winds if not secured or weighted down. The added weight of the aluminum protective case makes a difference in my field use experience so far. An impressive useful piece of technology. It was a frosty 32d when I took this pic here in Yellowstone two mornings ago. As long as SpaceX keeps those satellites sailing we are in great shape. Ha!
 5 points
 -
Yes - at delivery you will receive an owner's manual for your year Oliver and for all of the optional equipment that you have installed. In addition to this, many owners have downloaded all things pertaining to Oliver's (in general) and specifically anything that has to do with their particular model so that they had that information available to them while on the road. Congrats on your new Oliver! You've got years of enjoyment ahead of you. Bill4 points
-
FYI: I just received this recall notice when I logged into Amazon this morning, concerning this product. Progressive Industries 30 Amp Portable Surge Protector Kit, PSK-30. Follow this link to NHTSA.GOV for additional information. Mossey3 points
-
Several years ago on a trip through CO, we made an overnight stop at a campground near Gunnison. It was dark and since we were in a level site I didn’t unhitch. In the morning, I noticed that the trailer battery was dead. As I looked around I discovered the pin from the BAS had been pulled out. I must have snagged it while getting something out of the truck in the dark. No matter how I tried to reinsert the pin, it wouldn’t go in. Upon reading the installation instructions I found that if the pin is pulled out for an extended period the high current from the battery will weld the contacts together! Needless to say our departure that morning was delayed. So if you pull the pin to test your BAS, be sure you don’t get distracted and end up forgetting about it.3 points
-
Pull on that red cord in order to activate the breakaway switch. You should hear the brakes on the Oliver engage and you should not be able to move the Oliver without the tires sliding on whatever surface you are parked on. Of course - after you have conducted your test (this should only take 30 to 60 seconds) push the pin back into the breakaway switch. This should disengage your brakes and now you should be able to, once again, move the Ollie with the tires rotating normally. I test mine at least twice a year in this manner. Bill3 points
-
Check under the back dinette seat and look at where the gray water pipe from the bathroom enters the gray tank. Ours was not glued just a friction attachment. Bumpy roads caused it to dislodge and not seal tightly. I glued ours in. Mike3 points
-
In addition to gray tank additives we put screens in the sinks to capture any food scraps that we can easily dispose of.3 points
-
@TxMN2020 now is the time to take a deep dive into Oliver University and also the forum. This knowledge will give you somewhat of a leg up on delivery day! Congrats on your choice of a world class Travel Trailer!3 points
-
Let her know that there are several previous Airstream owners on this forum that moved to Oliver to get away from expensive repairs, hail damage, rotten floors, failing cabinets, popped rivets, and more. All you need to do is join an Airstream forum to learn there is a better option. 😉2 points
-
You're going to fit in just fine here. Prior owner of our hull said he was selling it because he wanted more of a project, nothing to work on with the Oliver. 🤣 Since then (June 2023) all we've been doing are minor repairs and major mods! Though it camped fine when first purchased, it should camp much more comfortably this upcoming season. Only major upgrades still on my list is to replace the A/C with something efficient and quiet, likely the Atmos 4.4, and to upgrade the axles with 12" brakes and Alcan leaf springs as soon as our shows signs of needing repair. We purchased an older hull, first because it was listed on Craigslist in our hometown. Told my wife, "Let's go see it, but there's no way we're spending that kind of money on a travel trailer!" Had no idea what an Oliver was. Found out new ones cost twice as much, and we brought her home by the end of the week! I always buy used and enjoy restoration work. Same story re our tow vehicle. Hope you find a good used Oliver to enjoy as we have!2 points
-
@TxMN2020 - Congrats on your new 2025 OTT purchase! You'll meet some of the finest folks around at the factory when your delivery day comes around at Hohenwald. Definitely don't be a stranger with these forums as any questions you'll have will have either been addressed in earlier posts or one of us will have suggestions for you to consider. We look forward to seeing pix of your future adventures with your new rig. OBTW: We're already VERY "jelly" over here of your newly designed bathroom door! Cheers!2 points
-
Oliver recommends leaving the fresh water tank drain open while in storage. I do not follow that advice given that my Ollie is stored over the winter in a non-paved storage lot. I close the drain valve after I've made sure that the tank is as empty as I can get it. I do not use nor would I recommend using antifreeze in the fresh water tank while the Ollie is in storage (or any other time for that matter). Assuming that RV antifreeze would be used by anyone, this should not cause "problems" in that even if that antifreeze were to be ingested it would not harm you. But, there is really no need to have antifreeze in the fresh tank given that there is the "overflow" tube plus the overall size of the tank that would be able to handle any "expansion" of the water due to freezing. Therefore, why waste the money putting antifreeze in that tank in the first place? When I winterize my Ollie I do not empty either the black or the grey tanks after I've winterized the plumbing - of course I've emptied all three tanks and the water heater prior to starting the winterization process. This means that there will be a small amount of antifreeze left in both the grey and black tanks over the winter due to small amount that I pour into each of the sinks and the shower drain. I also pour about two cups of antifreeze into the toilet (and then I cover the rim of the toilet with plastic wrap to help prevent evaporation) in order to help keep the toilet seal from drying out. I've also used the water heater by-pass valve in order to close off the water heater so that antifreeze doesn't get in that that tank. Bill2 points
-
There’s not much difference between the construction of new and old Oliver’s. The main difference will be the added components. There has been some updating of appliances, faucets, sinks, etc. Solar switched from Blue Sky to Zamp. Different fridge, AC, inverter and other items. The trailer and suspension are essentially the same. A lot of It depends on what the owner has updated or changed. We have our original Dometic fridge and AC but some owners of our vintage have changed those out. I just replaced our springs, shocks, brakes and bearings, so underneath we’re good as new. It just depends on what you want. If you find a used trailer ask about what they’ve done to change and update. It’s hard to give a year by year description of the differences. Mike2 points
-
Olivers have made quite a few improvements over the years and continue to do so. I suggest you continue to read and research here on this forum and come to your own conclusion. If I were in the market right now I would really consider a newer 2020 and up preowned Oliver with Solar and Lithium batteries. Then again it all depends on how you plan to camp and use your Oliver. Better yet call Oliver Sales and ask to speak with a sales rep, they will be able give you some really great information on the progress Oliver has made over the last several years. If you’re considering a used Oliver do your due diligence. I suggest you take a look at Oliver University and the owners manuals for different YM are located there. Better yet, if you are seriously considering an Oliver take the factory tour.2 points
-
Hopefully, these will be available in the US one of these days, or the shipping from the UK is reasonable. These would come in really handy for cleaning up some of the sloppy wiring we've all found. https://quickfixjb.co.uk/2 points
-
While you are "in there" - Put some foam insulation around those 1/2 inch water pipes and add another layer of insulation wherever possible. Bill2 points
-
Just to follow up on this post... I finally scraped away the caulking from the towel bar in front of the bath vanity to investigate whether I had a detached vent pipe. It wasn't nearly as much a chore as I anticipated...took all of 15 minutes! To my dismay there isn't any loose pipes or fittings. There is a faint black tank smell in that area but I was unaware that the space around the black tank is contiguous with the space under the dinette seat...so any smell I have there would also be inside the vanity. I'm still perplexed as to why there is a smell at all but I'm assuming my sniffer is just overly sensitive. I'm happy that I tackled this as I'm going to use a gasket around the towel bar (thanks Steve Morris) to prevent water intrusion and keep it accessible for the future in case I purchase a new faucet. I'm just going to use the original screws and snap caps to secure it down since I don't anticipate going in there very often.2 points
-
Along with everything else that has been suggested, recheck the toilet flange to make sure that it isn’t cracked. Mine started to smell on occasion and a little at a time then gradually became worse. I found out that the cheesy plastic flange was cracked, allowing sewer gas to escape and eventually liquid as well. I replaced mine with a stainless steel flange and fastened it down using all six available mounting holes with #14 stainless screws.2 points
-
Before you rip the vanity apart - it is worth the shot to tap on that under the kitchen sink valve. Just sayin'. Bill2 points
-
That is a good idea. I agree with @jd1923 and @Mike and Carol the vent pipe connection could very well be your culprit. Persevere!2 points
-
Looks like you’re going to have to open it. I put mine back with 4 screws, drill 5/32” holes, rubber washers and a white rubber seal, no caulk. https://a.co/d/5G5pVZd
2 points
-
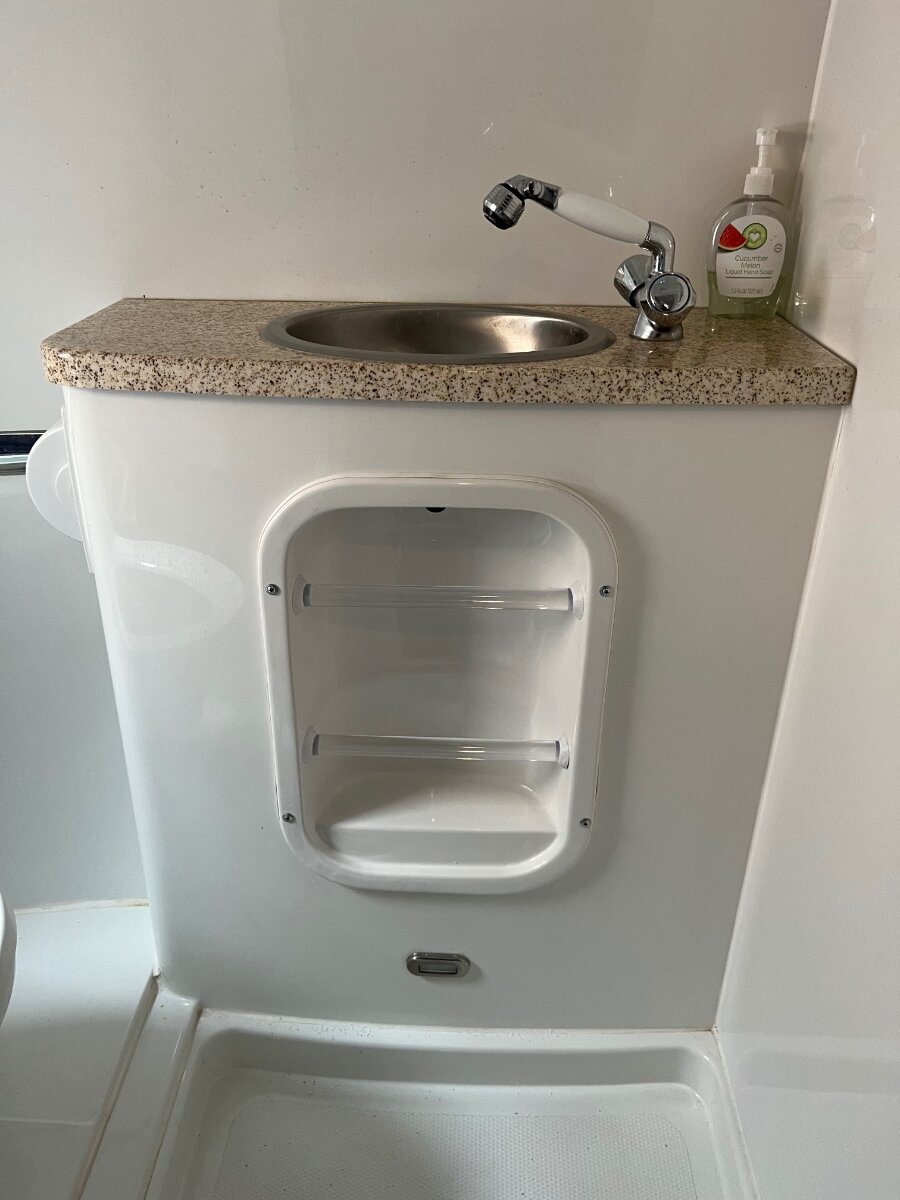
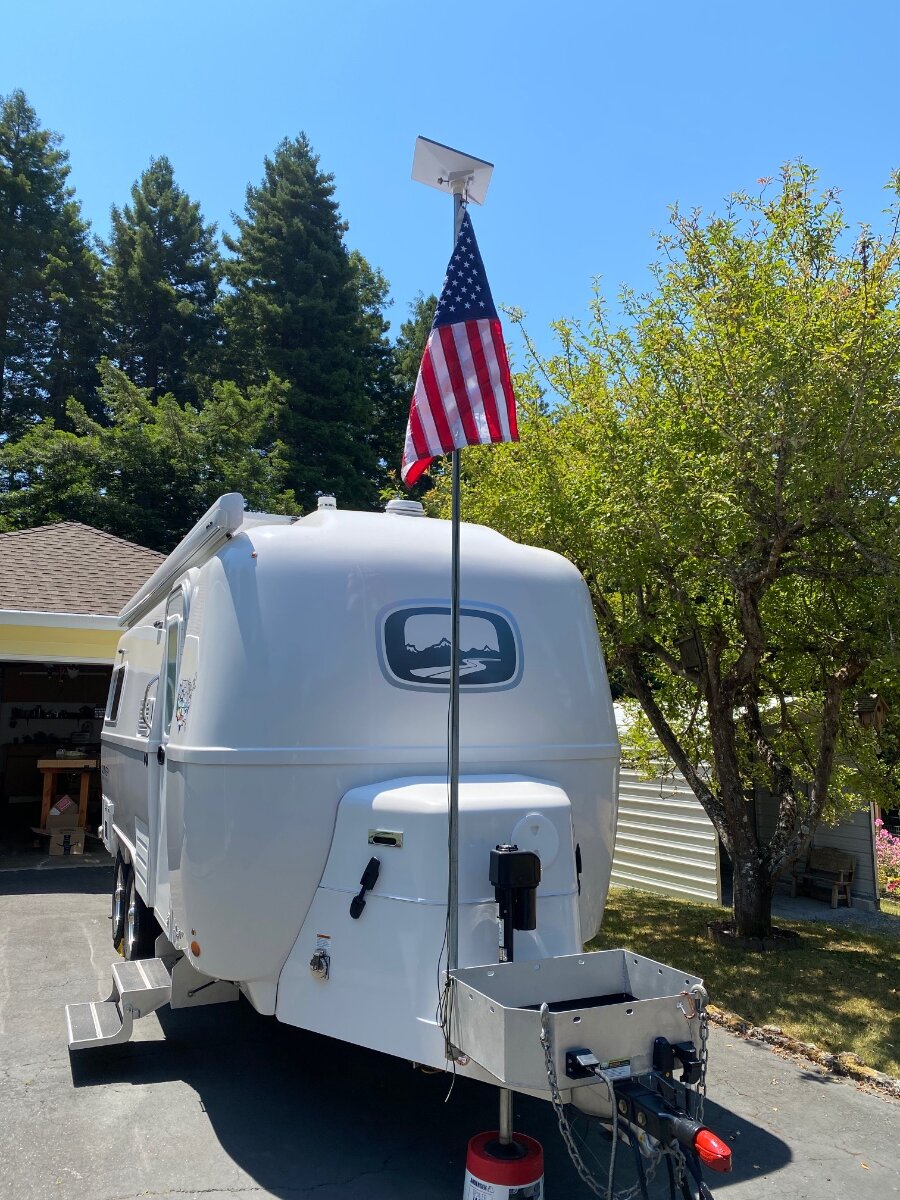
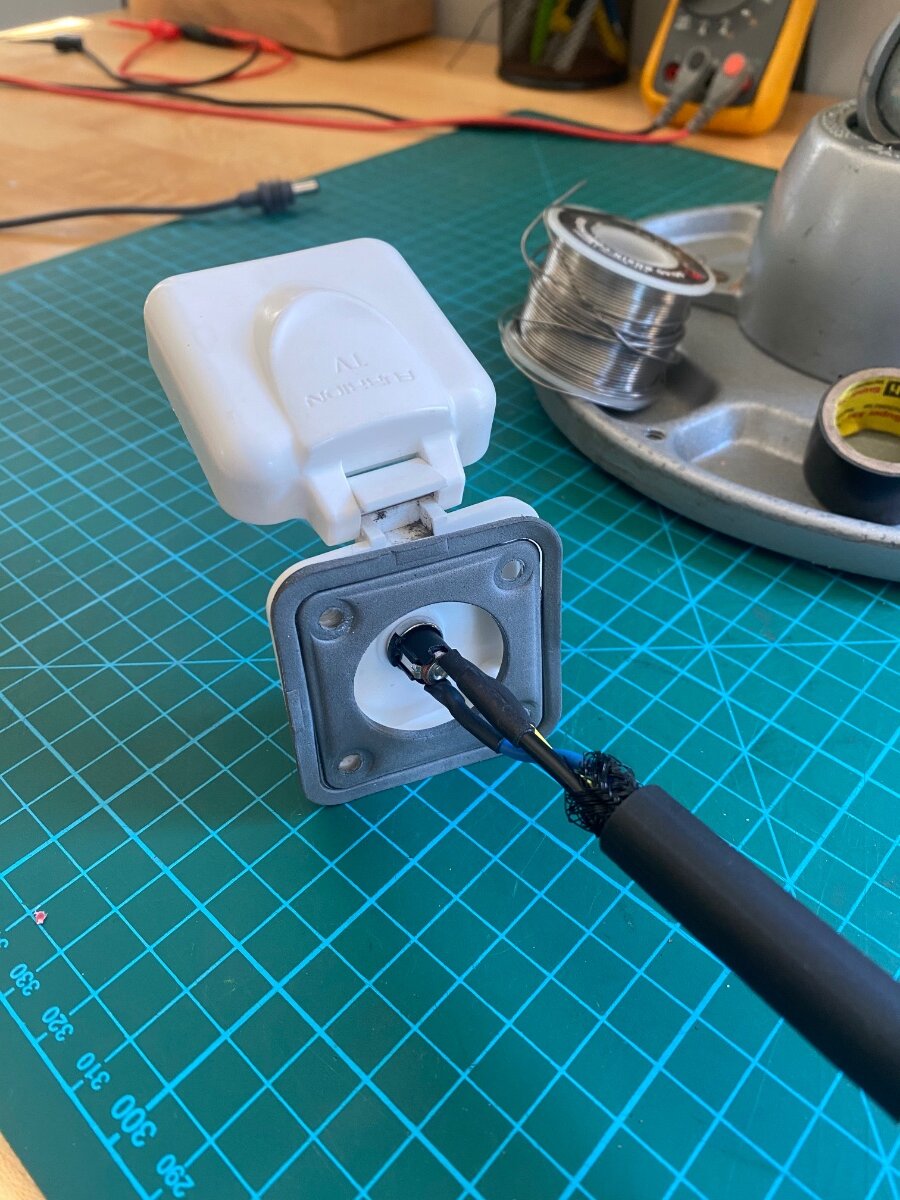
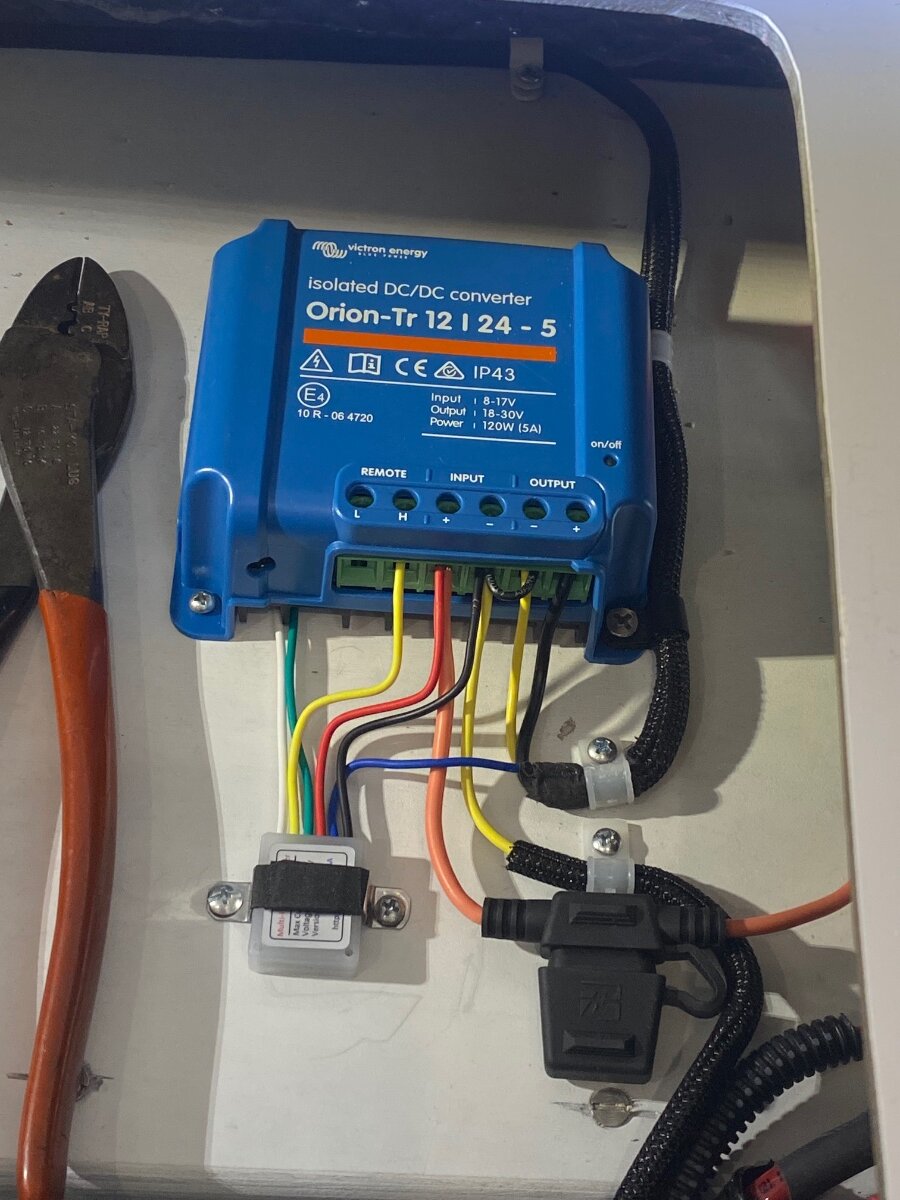
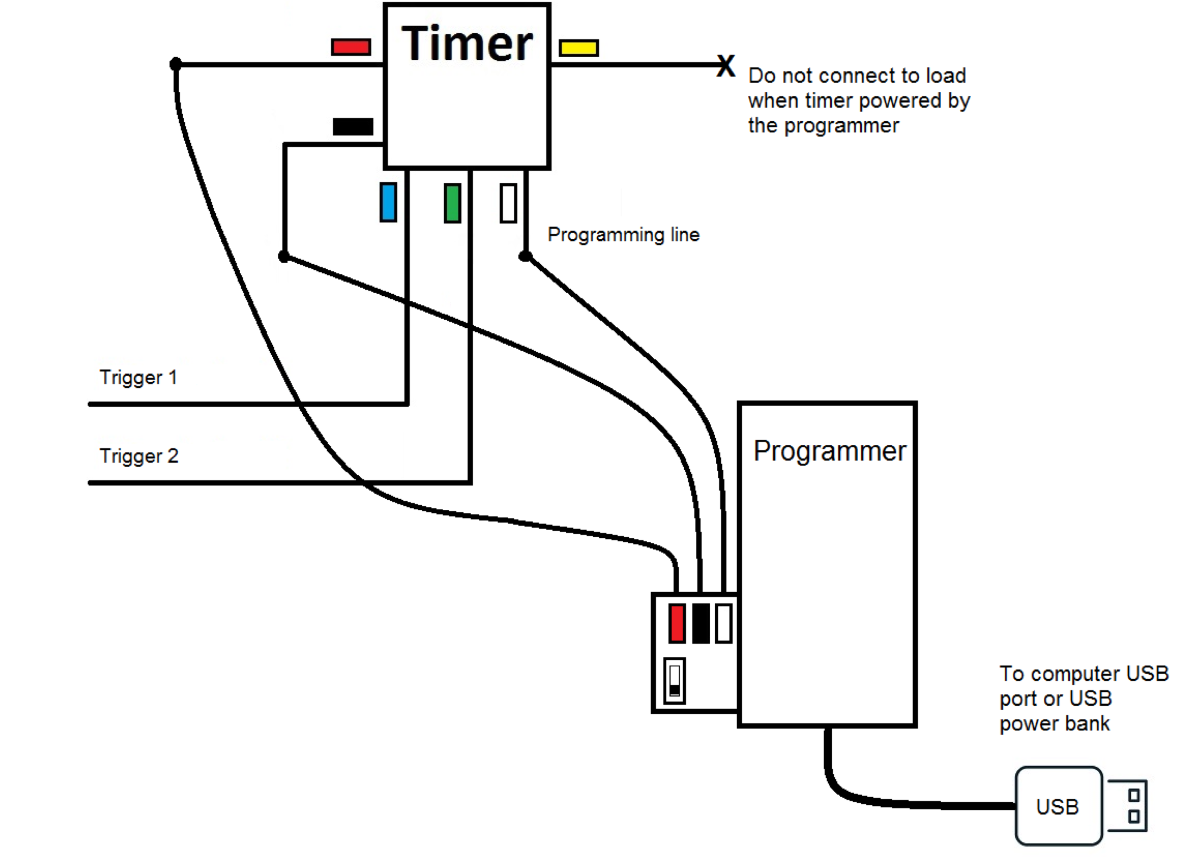
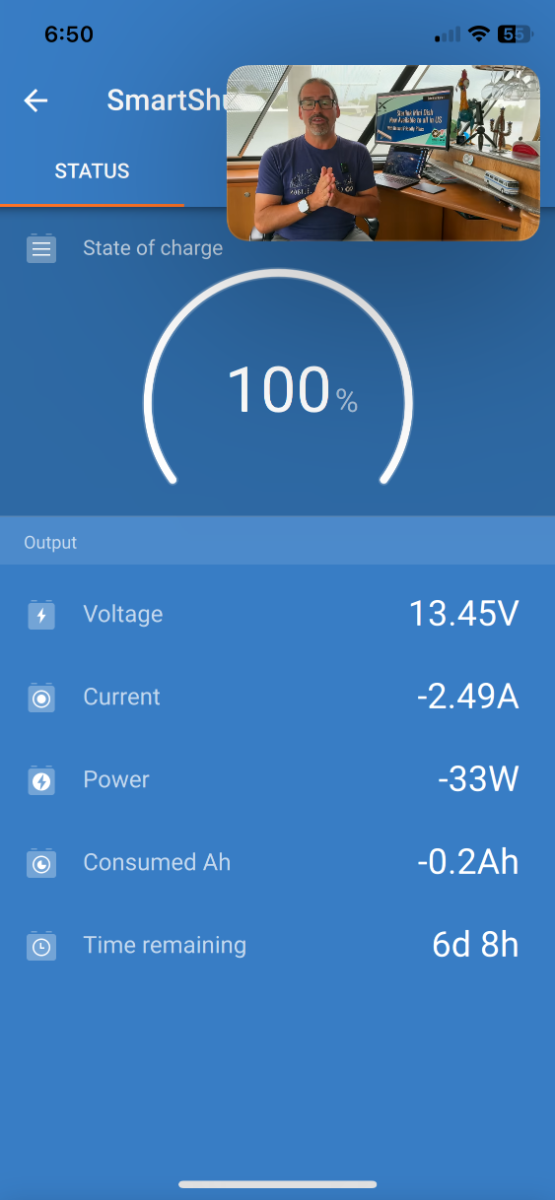
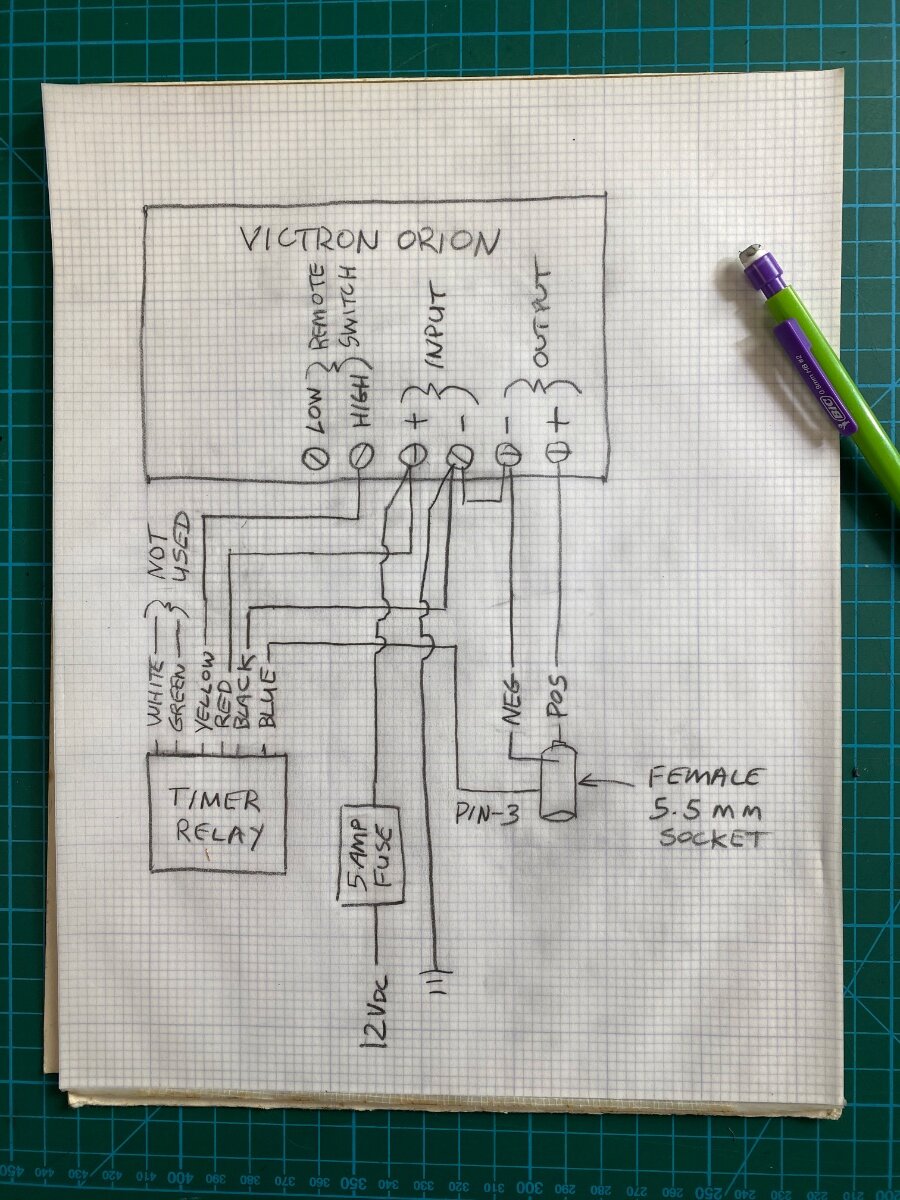
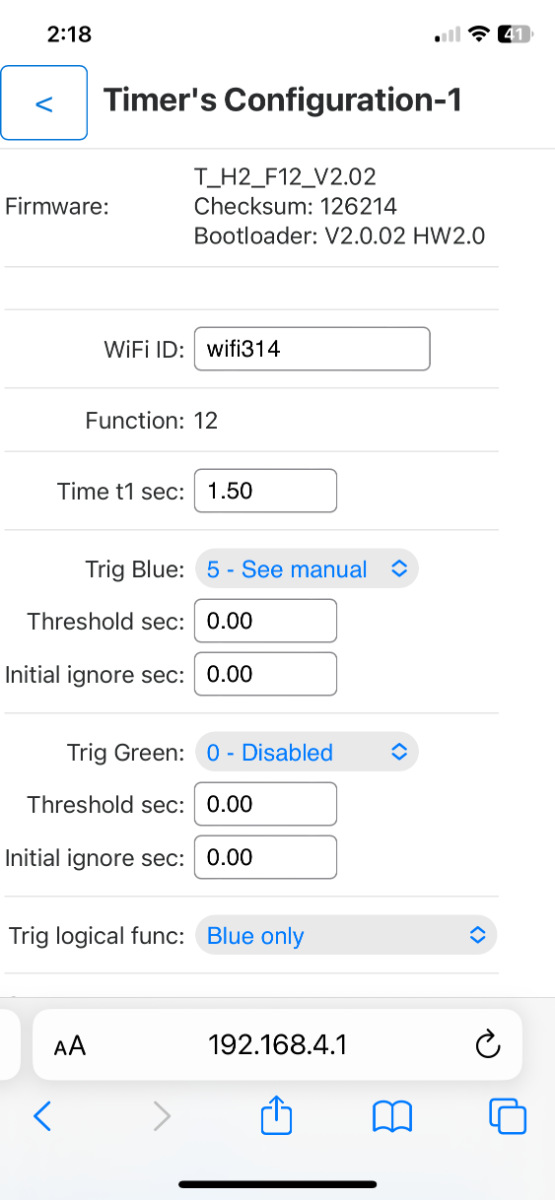
After lugging around my old heavy Gen-1 Starlink for a few years, I was thrilled to get the new Starlink Mini. It’s small and light, and the router is built into the dishy. It speed tested at 202 Mbps, a very respectable speed, although not as fast as the Gen-3 which typically runs over 300 Mbps. The Mini comes with a 50’ x ~1/8” diameter power cord that has 5.5 mm barrel connectors on each end. It also comes with a 120 volt AC wall transformer that puts out 30 volts dc (vdc.) The Mini is rated to run on 12 to 48 volts vdc, and 25 to 40 watts. It peaks at 60 watts with snow melt on. The 12 Vdc rating is an attractive feature, particularly for Boondockers who don’t have inverters. However, when I first hooked it up to the Oliver’s 12 Vdc battery… it would’t work?? After some investigation, it turns out that it’s not so simple and I’ll try to explain why: Given that the AC transformer puts out 30 volts, and the power is about 40 watts, then it would be drawing 1.3 amps per Ohms law (40w/30v = 1.3 amps.) With the same calculation at 12 volts, the amperage increases to 3.3 amps. The resistance of the long thin power cord can’t handle this higher amperage and the resulting voltage drop puts it below the minimum 12 volts operating range. In fact, I did some bench testing and found it would only work at voltages over 18 volts. There are solutions to this issue including cutting the cable shorter, using a larger gauge cable, or increasing the voltage. Without a better option, I chose to increase the voltage. I looked at cheapie power converters that would probably work, but I wanted something more robust and higher quality. I found a Victron Orion TR 12/24-5, isolated, DC to DC Converter, and it was perfect for the job. It has a 12 Vdc (+/-) input and an adjustable output of 20 to 30 Vdc at 5 amps. Standby power is under 80 mA, and it has remote on/off switching capability. It comes factory set at 24 Vdc, but I adjusted it to 30 Vdc output with the potentiometer on the front. To connect the Mini to the trailer’s 12 Vdc power system, I installed a 5.5 mm female panel mount socket into the Satellite TV inlet. I removed the Coax connector and the 5.5 mm socket and nut fits perfectly in it’s place. Oliver conveniently labeled it “Satellite.” If you need the satellite TV, then install a third “Furrion” inlet as I did for my old starlink RJ45 connector. I mounted the Victron under the rear seat on the street side. The socket wiring was sheathed and routed along the ceiling of the outside storage garage. There are a number of options to pick-up 12 volts in that area, I took power off one of the circuit breakers. I ran the negative wire to the ground bus under the rear dinette seat. The Mini comes with both a snap-in kick-stand and a 2” pole mount, and they’re both necessary for optimum RV use. I prefer having it on a pole, but we often have to move the dishy away from the trailer for a clear sky view. That’s why it’s a bad idea to shorten the cord. It also has an RJ45 port that I suppose is for hardwiring without WIFI, but I probably won’t ever use that feature. I built-up some PVC fittings on my 10’ Electrical Metallic Tubing (EMT) mast to fit the Mini’s pole adapter. (See the post for Tacky Starlink Dishy Mast). A little sanding was involved, and the starlink mount uses a thumb screw to hold it in place. It’s better to turn the Victron off when not in use, so I recommend using the remote switching feature with a switch installed in an easily accessible location. I’m too forgetful to switch the Victron off every time, so I came up with a way to turn it on & off when the Mini’s power cord is plugged in & out. Read on if your interested in that part of the installation: The “three pin” 5.5 mm female socket sold by Amazon has a built-in switch that’s designed for appliances that use either batteries or a 120v transformer supply. When the transformer is plugged in, the pin-3 switch opens to disconnect the batteries. This is opposite of what’s needed for the Victron remote switch, but it can be used to trigger a digital relay and it’s actually easier than it sounds. Amazon carries fun little programable 5 &10 amp timer/relays for under $20. I already had the 10 amp version in the Oliver for a hot water recirculation pump timer, and it works great! The 5 amp is adequate for this application, and you will also need the $20 dollar re-usable Bluetooth programer. They use 50 μA of idle current, which is nothing, and they can be programed for delay-on, delay-off, flashers, dimmers, duck decoys, and more. But for our application, we’re just interested in the trigger functions, specifically the “ground-open” trigger. Before installation, the relay has to be programed from a smart phone or computer. It’ links by WiFi to flash the program into the relays memory. Use wire nuts to connect the timer and programer together, and power them from a USB port. Follow the well written and simple programing instructions using the settings shown in the screenshot below. The relay requires a timing function, so I arbitrarily used function #12, which is “delay-on.” I set it randomly to 1.5 seconds. The trigger is programed to use the “Trig Blue” set at #5, which corresponds to the blue wire used as a “grounded trigger.” The green wire trigger is disabled. My wiring sketch shows that the timer is powered with 12 volts from the Victron’s positive and negative inputs. The relay’s yellow output wire feeds the positive side of the Victron’s remote switch (the negative side is not connected). The Victron’s output feeds the 5.5 mm power socket, and the blue trigger wire goes to the 5.5mm socket’s pin-3. Use a continuity tester to identify pin-3, it’s normally shorted to the negative lead of the socket and it “opens” when the male connecter is plugged in. The socket barrel is negative, or ground, and the center pin is positive 12 vdc. There is one other step to make this work. This Victron model is “Isolated,” meaning that the input and output “negative” terminals are isolated from each other. It needs to be “non-isolated” because the timer is grounded to the Victron input, and the socket is grounded to the output, and the trigger needs continuity between the two. So remove the jumper wire that comes on the Victron’s remote switch, and use it to jump across the two negative terminals. Victron support confirmed that shorting the grounds is not a problem, it just un-isolates it. This works satisfyingly well! I checked out the power draw with the solar turned off, and while streaming a video. It was 2 amps, 27 watts (after subtracting the parasite load). That’s a huge improvement over my previous Starlink, and I don’t have to worry about running the inverter and draining down the batteries anymore. I hope someone finds this useful Cheers! Geoff
1 point
-
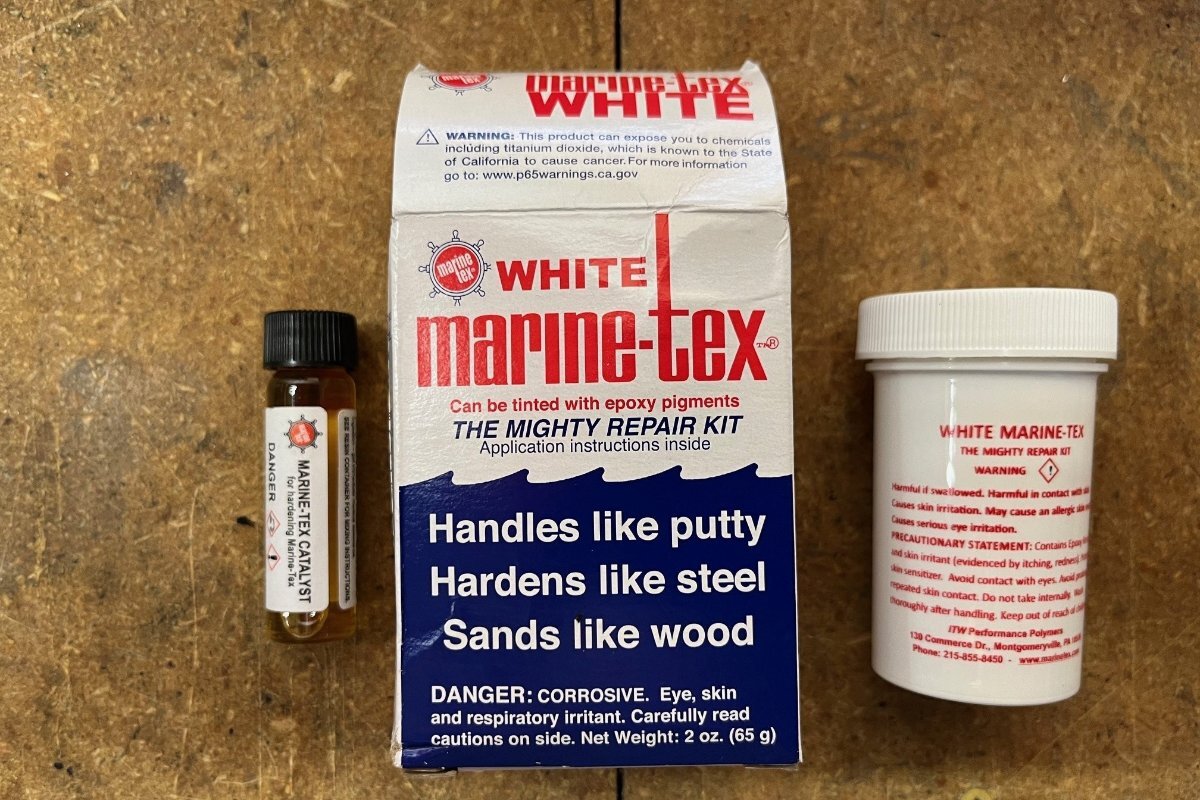
Finished the last task of this project, the fiberglass repair. This product worked well. It's slightly whiter than our yellowing hull. I also patched inside the hull where I had removed the original rear curbside TV mount. The color difference inside is hard to notice if any. I'm not the finish polisher guy, 320 grit sandpaper is the lightest I have. This is fine due to the location (see picture above prior to fill). I'll get it detailed further whenever I get to refinishing the hull.
1 point
-
That's shocking!😁1 point
-
💯agree, I think my set up time is about 5 min.1 point
-
🤣 Systems, we don’t need no schtinken Systems! (that we cannot mod ourselves)1 point
-
Thanks guys. Yes, after many years and two trailers we are considering Oliver...finally. A little due diligence and I discovered this very helpful thread: I also found that these two YouTube videos are helpful: The two things I would miss that we have in our NuCamp is the Alde system and the cool cat ducted AC.1 point
-
with ac on and compressor kicked on it was drawing a total of 80 amps cooling on low. going camping for a few days now but won't need ac til next july for us it is having an ac that we can actually use now that it is so much quieter1 point
-
Happy Campers RV Holding Tank additive eliminated gray tank odors for us.1 point
-
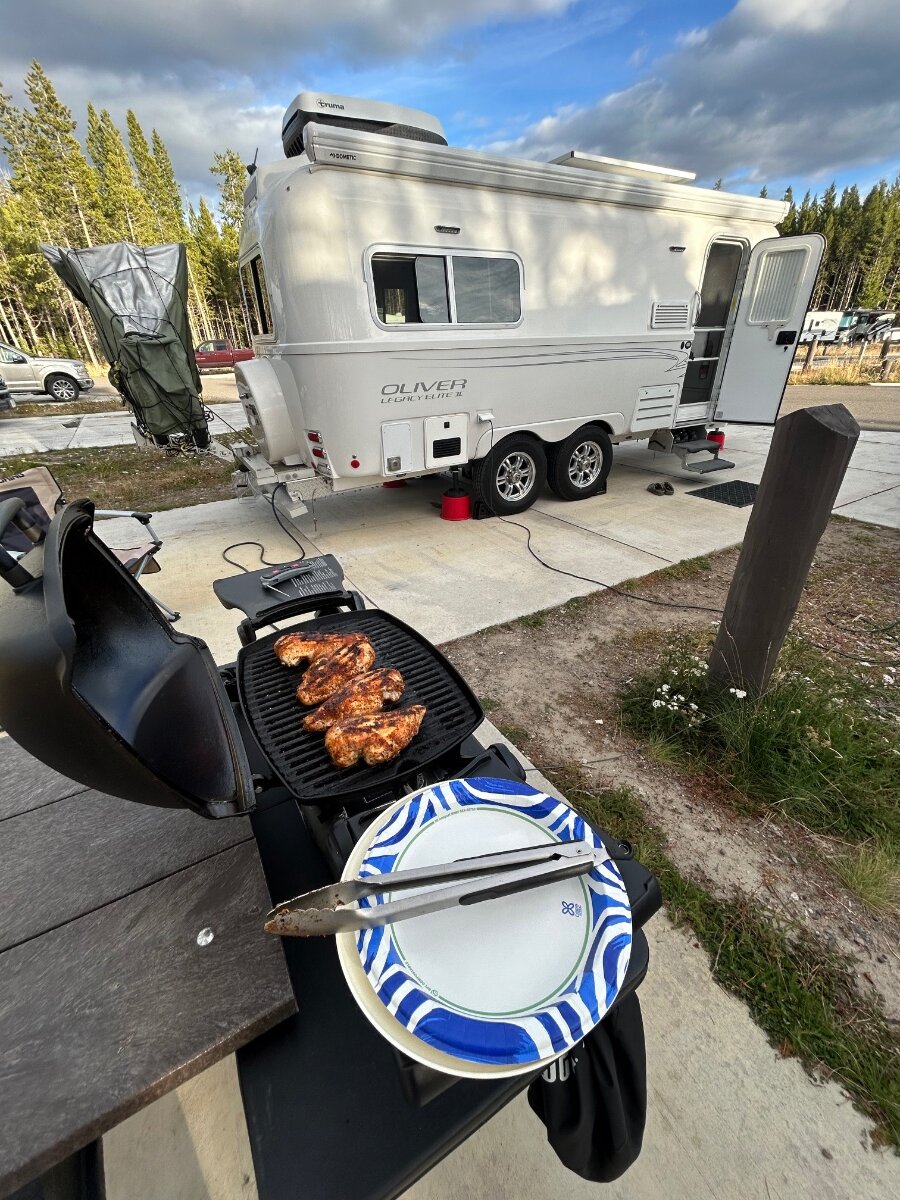
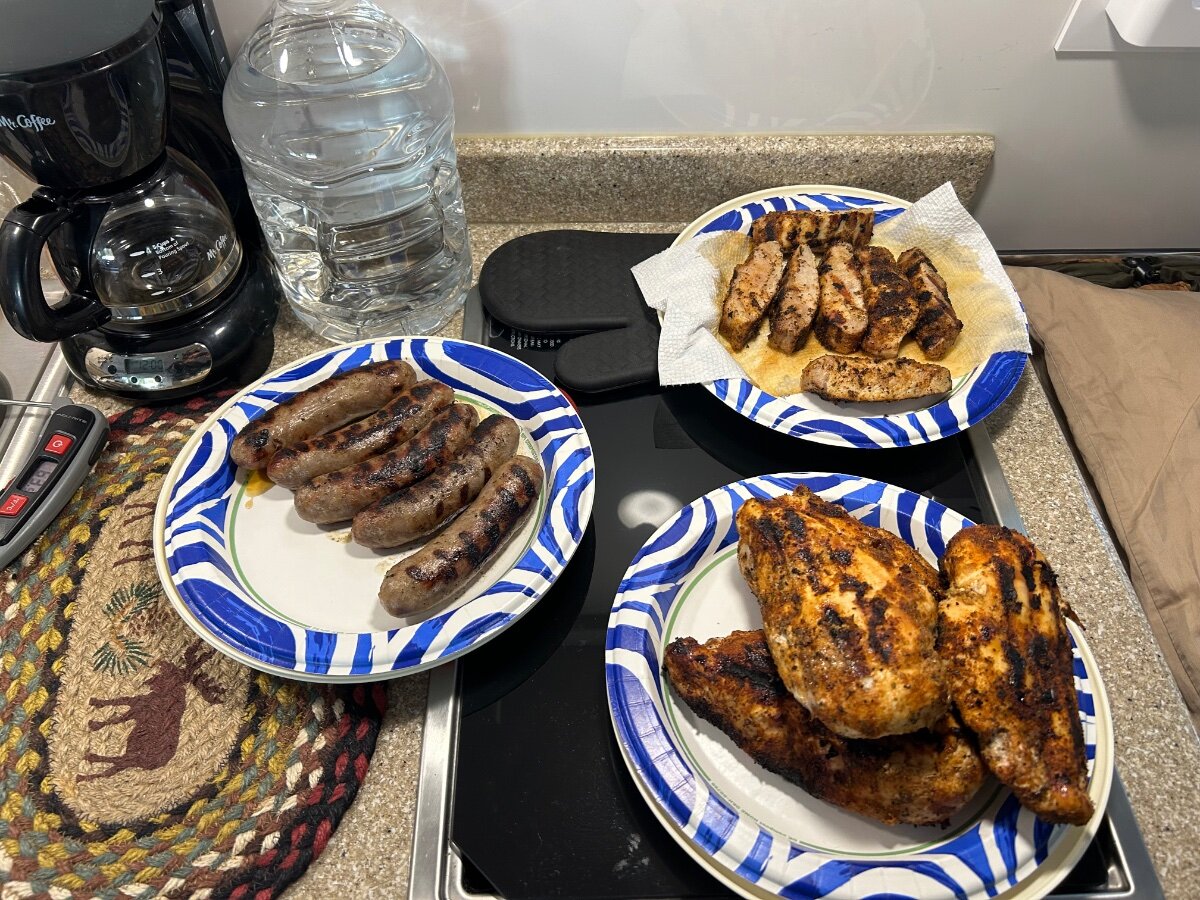
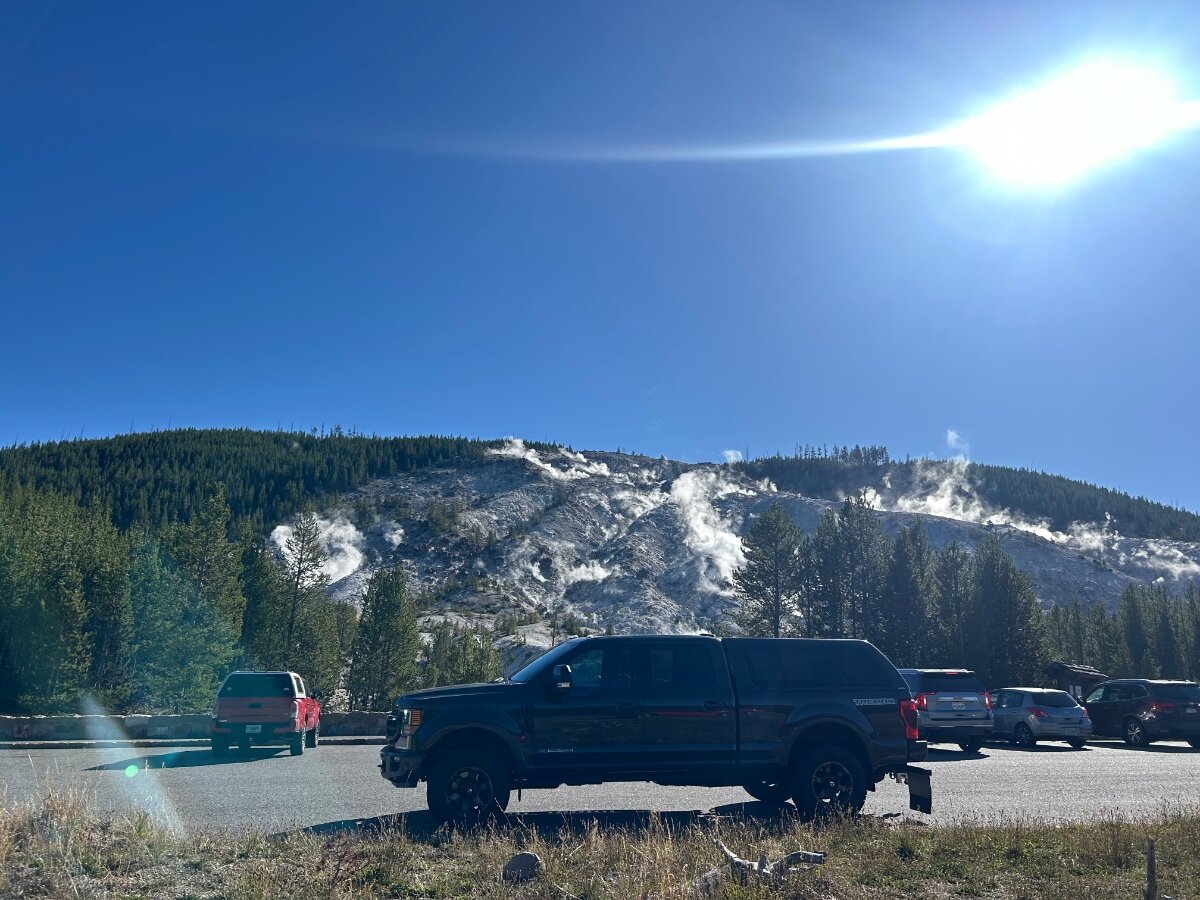
Checked our weather forecast and we decided to add two more days to our stay here at Fishing Bridge here in YS. This will give us a full week to enjoy as much of this gorgeous park as we can. We are staying put in our site! The staff here has been just really good to us. New Loop E is making a perfect base camp for us and I highly recommend it. The bath house and laundry facilities are huge and brand new and kept spotless. Fired up our trusty Weber and got busy grilling to carry us over for a few days. We have visited 5 NPs on this trip so far. Between a week at Grand Tetons and a week here at YS, Kathy and I both agree YS is our favorite NP. Truly a magical place to visit. Happy & Safe Travels! IMG_2005.mov
1 point
-
So I feel like I've exhausted my options in tracking down a black tank odor so before I call the mothership, I'd like to solicit some opinions here. I've gone through all the Oliver forum posts relevant here and in other RV places on the web. I have a standard porcelain toilet and towards the end of last summer and this summer I've had an issue with an on and off smell, especially with the MaxxAir fan on and of course in warmer weather. For the record, I DO NOT put toilet paper in my black tank EVER and don't have any tank sensor issues. I'm also aware that gray tank smells can mimic black emanating from drains. I have been using Happy Camper treatment for over 7 years and have been happy with it but I've been following a company called KLEENTANK who advise not using enzyme treatments due to sludge forming in the lines. https://kleentank.com/throw-away-your-rv-tank-additive-use-this-instead/ so I've been experimenting with their DIY holding tank mix this season. I also use plenty of water (even though I hate to waste water while boondocking) and wait to dump until I'm at least 80% full. Here are the things I've done to track and hopefully fix the problem to no avail: 1. I removed and replaced the ball valve seal on the toilet even though it was holding water just fine. 2. I removed the entire toilet from the base and replaced the seal where the pipes meet the closet flange. It's weird that there's just a pipe to pipe connection there. Not exactly sure what the seal does except maybe prevent leakage if the black tank overflows. 3. If you know me, I have OCD and completely cleaned the toilet by turning it upside down and sterilizing every nook and cranny. A yucky job but I ain't scared. 4. I climbed on the roof and made sure no obstructions like mud daubers or nests were in the vent pipe. I even poured a weak bleachy solution down the vent to see if it would help. 5. I've taken a good look under the dinette seat closest to the bath to see if there are any loose connections on steel bands or any other possible loose connection. I see no evidence of prior leaks. There is a slight black smell but I assume some smell can come from the gate valves. I'm using a commercial ozone generator today in that area. 6. I sealed/blocked off both the shower and sink drains to try to isolate the toilet vent and still have smell. The only thing that I can think of is that I haven't removed the face plate from the bath vanity to see if the vent pipe has come loose or something. I hesitate to do this as Oliver repaired my courtesy light and did an outstanding job on the exterior caulk which I'm pretty sure I won't be able to duplicate. I guess this would be a good time as any to make that area accessible but I was hoping not to tackle that just yet. Any other insight would be greatly appreciated; I might be missing something obvious. Regards, Claudia1 point
-
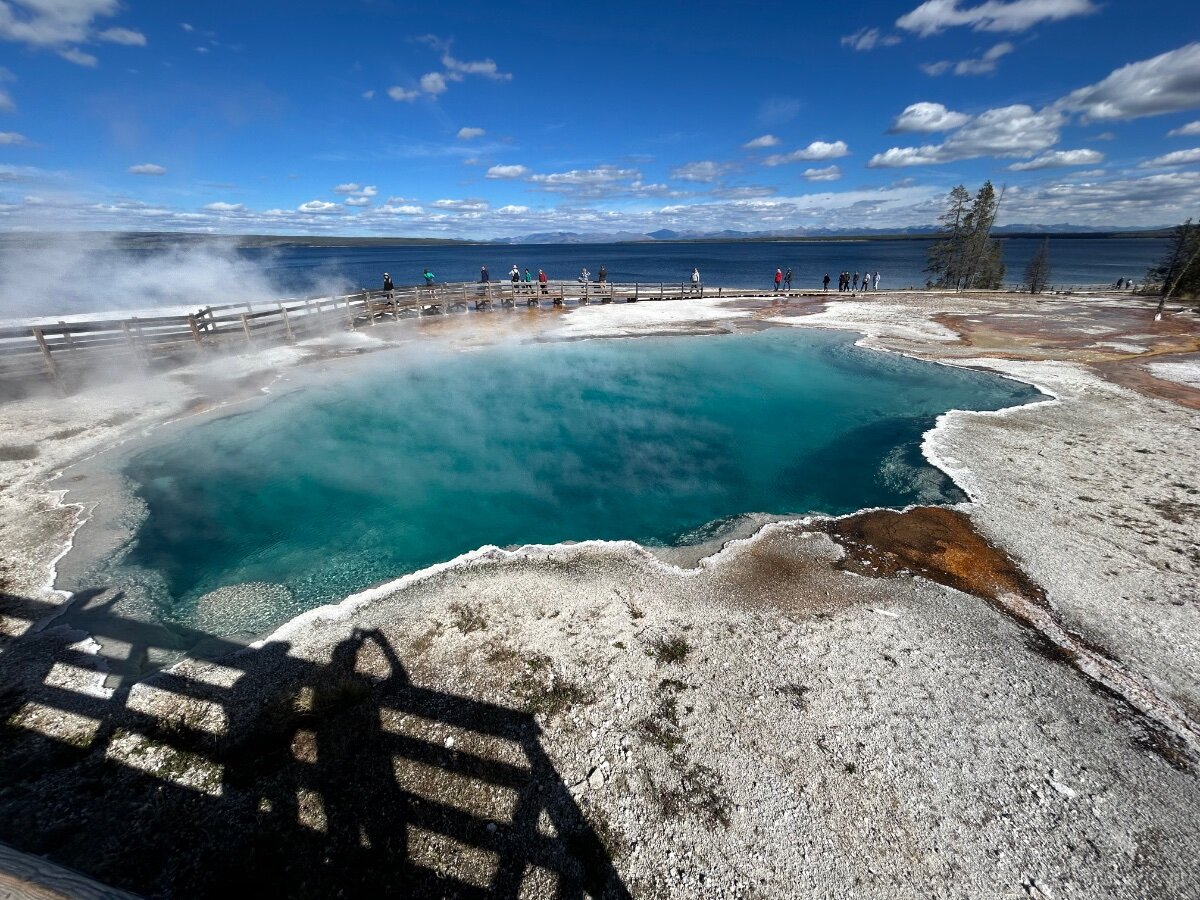
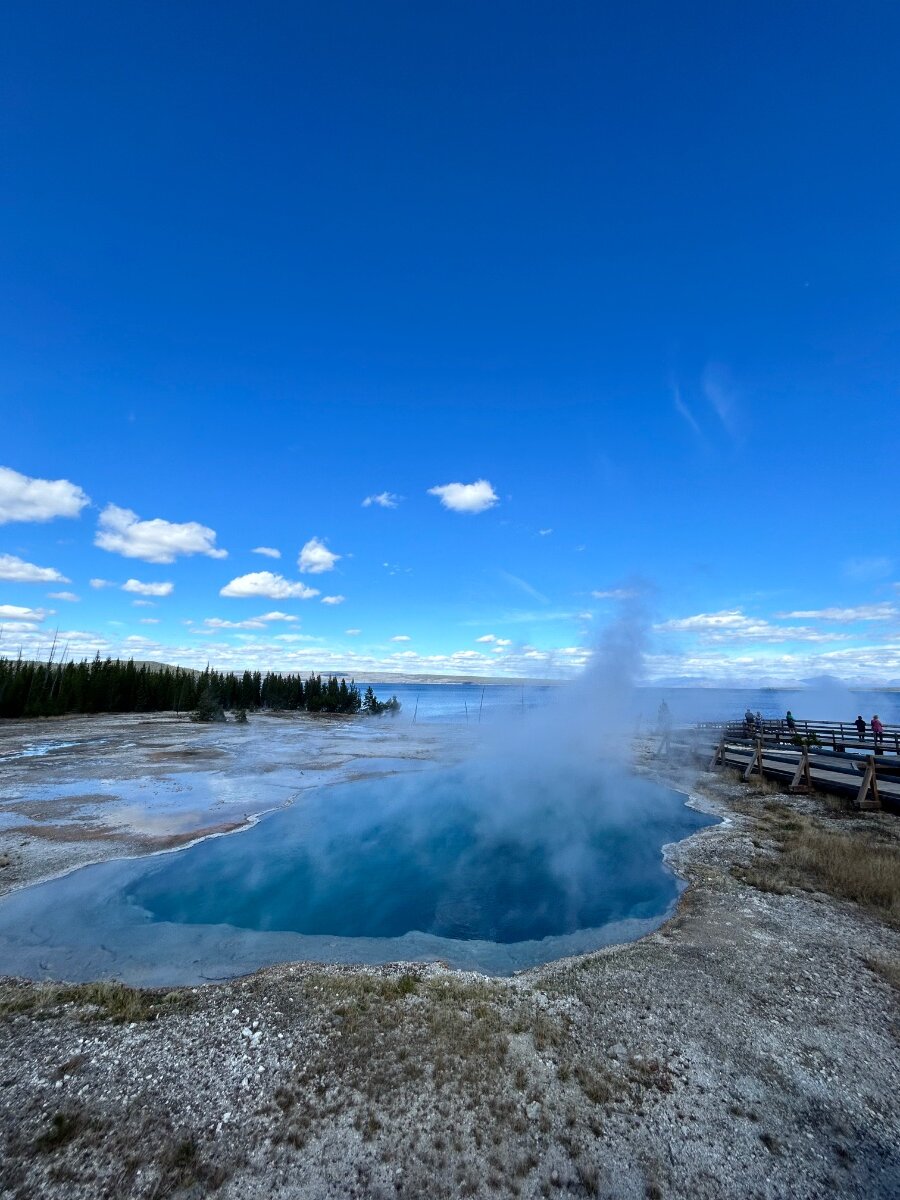
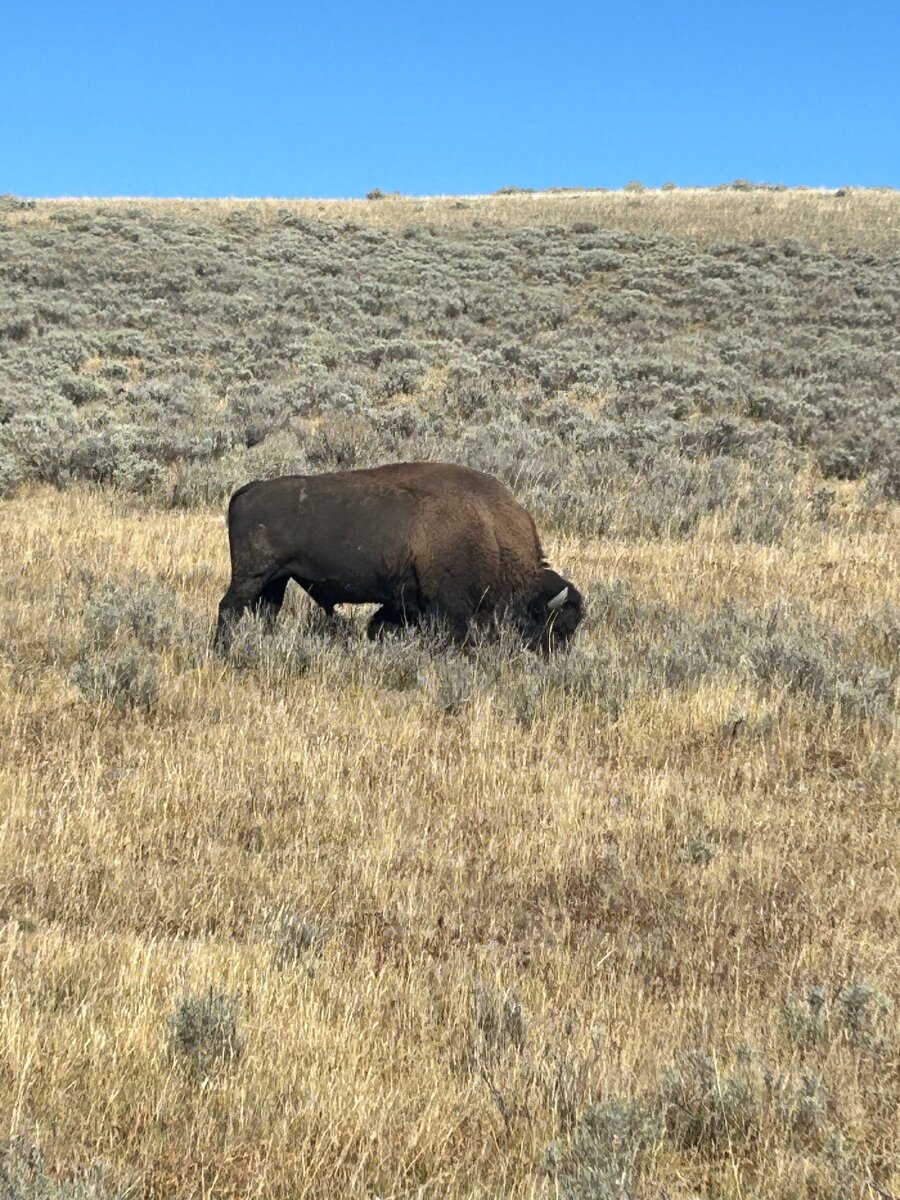
After a great nights rest, we woke up to a 32d morning in our toasty warm Oliver. After a great hot breakfast, we loaded up in the beast and we were on the road to soak up America‘s first and oldest national park (1872). We are still pretty excited about being camped here inside the park. We enjoyed a day of touring and hiking around various areas of Yellowstone. We saw Bison, a wiley coyote, and a large black bear munching and lunching on a bison carcass from a distance (no pic as it was a blur from our vantage point) we saw lots of Osprey hunting. The mud volcanos were pretty impressive to say the least. The “Dragons Mouth” appropriately named was really just amazing.The falls were thunderous as millions of gallons of water crashed down into the canyon. My pics and vids are mere teasers as to what we saw. We have so much more to see and do in YS, we may extend, we’ll see. We have met and enjoyed so many nice people along the way. Tonight our temp drops down to 27d at 2am, no worries as our Oliver will keep us toasty warm. Get out there and travel and camp! If not now when? 😊 Our beast of burden and mother natures beast of burden standing super still and just sleeping. Full On!…..nap time. Kinda like us after our Bison corned beef sandwiches today. Ha! Our attempt at a selfie at the lower falls. We had all kinds of 2’ long lens pointed at our TV, this hot and tired coyote with a thick winter coat was just wanting to get away from all the peeps and the cameras. Us too! 😊 A closer pic of another lone bison just trying to put on much needed winter fat. The falls. Enjoy the what you can of my videos, no expert videographer here, just a work in progress.😊 IMG_1953.mov IMG_1940.mov IMG_1941.mov
1 point
-
I tried to find one of my old threads complaining about leaking connections with those hand tight Oliver fittings. Regularly, on our EII, one of them would loosen up and I would hear the pump running or see water leaking out of one of the weep holes. Recently I tried something that actually seems to have stopped the problem. Kind of counterintuitive. I put food grade, silicone lube (typical use- servicing water filtration systems) on the threads and retightened. A couple of trips with no weeping holes and maybe a solution 🙂1 point
-
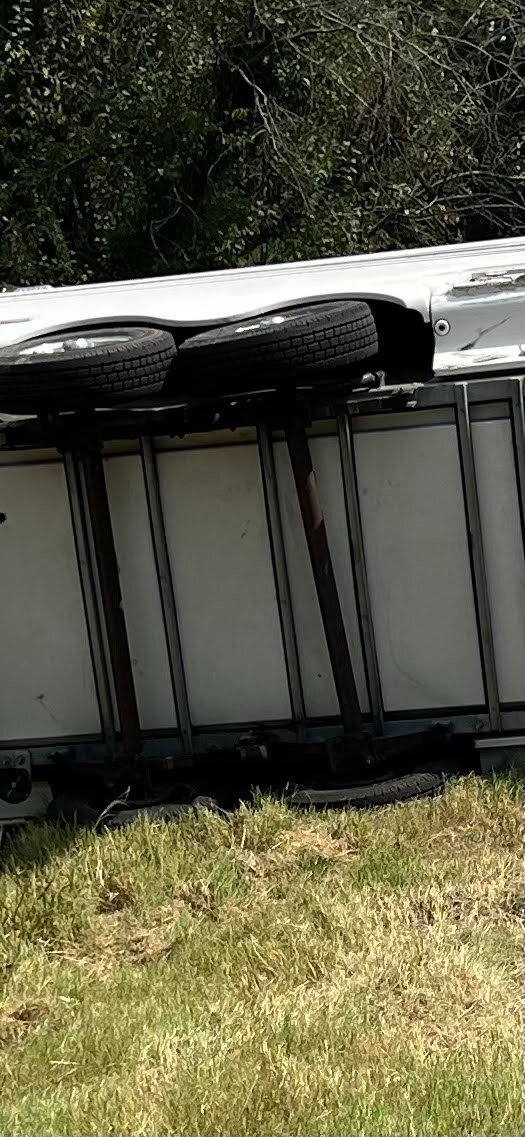
Our beloved 686, one of the last 2020's and one of the first with solar+lithium, was involved in an accident 3 weeks ago. It was deemed a total loss. First, we are very thankful that no one was injured. Second, I'm posting this to as a reminder to review your current insurance position! And, so others can learn from our experiences. The needed facts: our Oliver was struck on the curb side then rolled to the street side. The TV was a F250 and suffered a bruised hitch and a hole in the tailgate. Things we learned: Be acutely aware that your lives can change in a matter of seconds. Keep digital copies of insurance info in your phone wallet or shared drive. Go download their app now and make sure you can login! Even at the accident scene, we were naive enough to think "we will just step inside and get it from the cabinet". That's just not going to happen in a roll over. Know and understand your coverage. Go way beyond the declarations and read the policy. We had "Replacement cost" but there were caveats and rules that we did not know! Know if you can use a repair facility of your choice. If you can, are there penalties for going over on parts or labor? Our accident occurred 6 hours from our home. After grabbing a few things, we drove straight home. Then 4 days later, accepting the reality that it might be totaled, we drove the 12 hour round trip to gather and salvage anything we could. None of that trip was covered on our insurance! I had always assumed the things inside were covered; on our policy they were not! Get a dashcam! Understand and know that in today's insurance world, no one is coming to appraise, touch, or review your damage. You are going to use an app and take 9 pictures (one being the odometer. Yep, they will want you to photo your odometer on your trailer). You will probably not have an advocate. We purchased our insurance through Roamly (listed as our agent). They had a message that said "call your insurance company, not us". That being said, OTT was our ONLY advocate. On our return trip to the impoundment lot, we took over 170 detailed, labeled and scaled pictures and shared those with Mike in service. In less than 2 hours we had an estimate of the damage from him ($77,000). Oddly enough, after about 6 days, we got a repair estimate (from the 9 pictures) from the insurance company that was $1000 more. Keep a record of every penny you spend on the Oliver from the original bill of sale down to the rug in front of the door and the command hooks on the wall. With the help of Oliver and our own record keeping, we raised our valuation by $10,000 from the original insurance valuation. Take lots of pictures. First at the accident scene and then of the damage. Get every angle and multiple zoom levels. Again, please set aside some time and review your insurance! Over all, our story ends well - we have ordered a new Oliver!
1 point
-
I would think the Tundra 5.7L would be a very capable TV for a 7K LB trailer. It's easy enough to add a trans cooler. Adam and I added one to his '97 T100. Our Lexus GX has one OEM. When I replaced the trans fluid there was a procedure to get to trans up to "temp" to fill the fluid to the right level. I thought it was 180F but not sure of the number. Keep in mind this was running the trans in neutral, certainly not towing. You have to imagine that I'm familiar with this stretch of road. Driven it some 100 times in the last 20 years. The Ford E450 Class-C 6.8 v10 we used to have would groan or downshift and scream, barely get to 40 MPH up this stretch! It appears you found a great cooling mod and love you gauges. I was never into gauges on vehicles past but went full route on our Ram which already had a trans cooler. I wanted to keep eye on all relevant temps while towing. Also, the 2nd gen Ram 5.9 Cummins in OEM form is quite detuned, so I also added a tuner for more power. Program #1 adds MPG efficiency when around town. Program #2 adds power for towing (amazing climb on this mountain road), and programs 3-5 are for the crazies that run at tractor pulls (I never use the extreme programs). The Edge Juice w/ Attitude included the tuner and all the gauges and a quality 7" display. TFT stands for Trans Fluid Temp, IAT is Intake Air Temp, ECT is Engine Coolant Temp, and EGT is Exhaust Temp (important to be <1200F when running hard or on tune programs). First need on a Cummins Diesel is to maintain 14 PSI in fuel pressure. Love this setup for towing power and monitoring vitals. This picture was captured towing our Oliver (I asked Chris while I was driving), a mild climb just south of Hoover Dam on N Hwy 93. It was high 90s outside and at 1728 RPM, I was likely driving about 65 MPH in OD. I have never seen numbers over 200F. Obviously, these are different designs in transmissions. The highest temp I've seen was 193F. Not while towing but due to the climb from Parowan UT up to Cedar Breaks NP, a 4000+ FT climb in 20 minutes.
1 point
-
@Rivernerd I had a very similar experience. Just like you, legendary reliability was one of the main reasons that I bought the Toyota. Having already read comments on the Tundras.com forum, I was aware of this potential issue. So soon after I bought the new Tundra, I did some testing and confirmed elevated transmission temperatures while towing upgrade. I purchased a complete installation kit from GenuineCoolingSystems.com and had a local transmission shop install the auxiliary cooler. The true test came when we drove N on I-17 from Phoenix towards Flagstaff on a hot day in June. There is a steady and steep (4-5%) grade for about 7 miles starting near Black Canyon City, exit 244. A sign along the way states “AVOID OVERHEATING TURN OFF AIR CONDITIONER NEXT 5 MILES”. With the ambient temperature at 100 degrees, we passed several overheated trucks and cars while towing our fully loaded trailer at 55 mph with the AC ON. The transmission temperature never exceeded 206. So I am obviously very pleased with that modification to my truck.
1 point
-
Yes, I have. My 2008 Tundra 5.7L with tow package has a factory transmission cooler, and I was unhappy when I learned that my 2019 5.7L with tow package did not. After following a thread on this forum addressing the topic, I bought a Veepeak OBD II scanner that reports via Bluetooth to my Android phone. Towing our Hull #1291 up a long hill on a 100-degree day in August 2023 our transmission pan temp got up to 263 F. Although Toyota claims that up to 300 F is "o.k." with proprietary Toyota transmission fluid, a (2020, I think) Tundra owner who posted on this forum repeatedly overheated, and then blew his transmission, towing an Elite II across the USA in summer temps. I then considered replacing the Tundra with a 3/4 ton GMC. But last winter, I ultimately chose to buy and install an aftermarket transmission cooler in the Tundra, as I still love Toyota reliability. In July 2024 towing our Oliver up that same hill on a 98-degree day, the transmission pan temp maxed out at 232 degrees F. We are keeping the modified 2019 Tundra for now.1 point
-
Rich, you have what I was referring to as a late model HD beast! Not sure of our total payload, but with Chris, Charley and me inside and loaded with all tools and camping equipment, I weigh our TV at under 7400 LBS. Estimating 650 LBS hitch weight (10% of ready Oliver weight), and GWVR at 8800 LBS, it nets 750 LBS available payload. We can hit some flea markets along the way! 🤣 John, I went through the CAT scale in August when we went camping, fully loaded (like when we will go full time end of October) the numbers were: Truck: 8960lbs (gvwr: 10850lbs) Trailer: 6380lbs (gvwr: 7000lbs) Tongue weight: 700lbs WDH is the Anderson. I know I don’t really need it but it was installed for my Touareg before we upgraded to the Chev 2500HD so might as well use it. Interesting numbers with the Anderson and how weight is transferred from the tongue to the trailer and Chevy front axle.
1 point
-
I might have to report you, calling my Toyota Tundra a Nissan is offensive! 🤪1 point
-
I agree these methods work. I haven’t used an Andersen in almost 4 years, but when we did the raising of the hitch with the jack worked well. I never needed to adjust the chains once I got them right. I used the Andersen on 3 different trucks, each needed a bit of adjustment to be right. Mike1 point
-
Lots of ways to do it out there, but most common recommended is jacking up the front of the trailer (also lifting the truck) to provide slack. I did this for a while, but disliked the extra work the jack needed to do to lift the ass-end of the truck. Instead, I introduce slack by overlapping the hitch and ball. I haven't adjusted the nut since Chris Scarff did at the rally in May 2023. When you are hitching up, back the truck under the ball like normal. Then, back up another inch to inch and a half until the nose of the hitch almost touches the ball mount. Now you can easily slip the whale tail on without making any adjustments. It even works at odd angles (within reason) where other methods require dead straight. Unhooking is the opposite: with the hitch still on the ball, open the bail, raise the tongue until the trailer until the ball falls out, back up an inch or so, and drop off the whale tail. Done! Other than the time I needed to hook up almost 90° to the trailer, this method has worked every time. And no extra strain on the jack! I hope that helps1 point
-
You might also be interested in getting one of THESE hitch pins from Tractor Supply or Harbor Freight. The "handle" makes them much easier to grab. Bill1 point
-
What do they say? Imitation is the sincerest form of flattering? LOL..I am considering using plus nuts and white thumb screws for my installation...but am going to practice using them first! Thanks for the link to the gasket material!1 point
-
A Jackery 2000 pro will not run any air conditioner, better suited for small AC appliances or DC supply/charging purposes. Yes, a small dual fuel inverter generator can be used to power the Truma, at minimum 2200W. I carry a dedicated 30# propane tank under cap, which will provide up to twenty hours of a/c comfort for long evening/night periods of cooling. Once that supply is exhausted, I can tap into one of the OTT-mounted propane tanks unless time is taken to refill. I stage the genny on the tongue of the trailer secured with a chain. I primarily use this setup for overnight stays while underway to a campground that has power service. Depending on how an Oliver is wired dictates whether or not the Truma can be used via the inverter. I had to install a dedicated transfer switch to be able the run on DC. If capable, then solar and/or a small generator will sustain limited use of the a/c in actual boondocking situations.
1 point
-
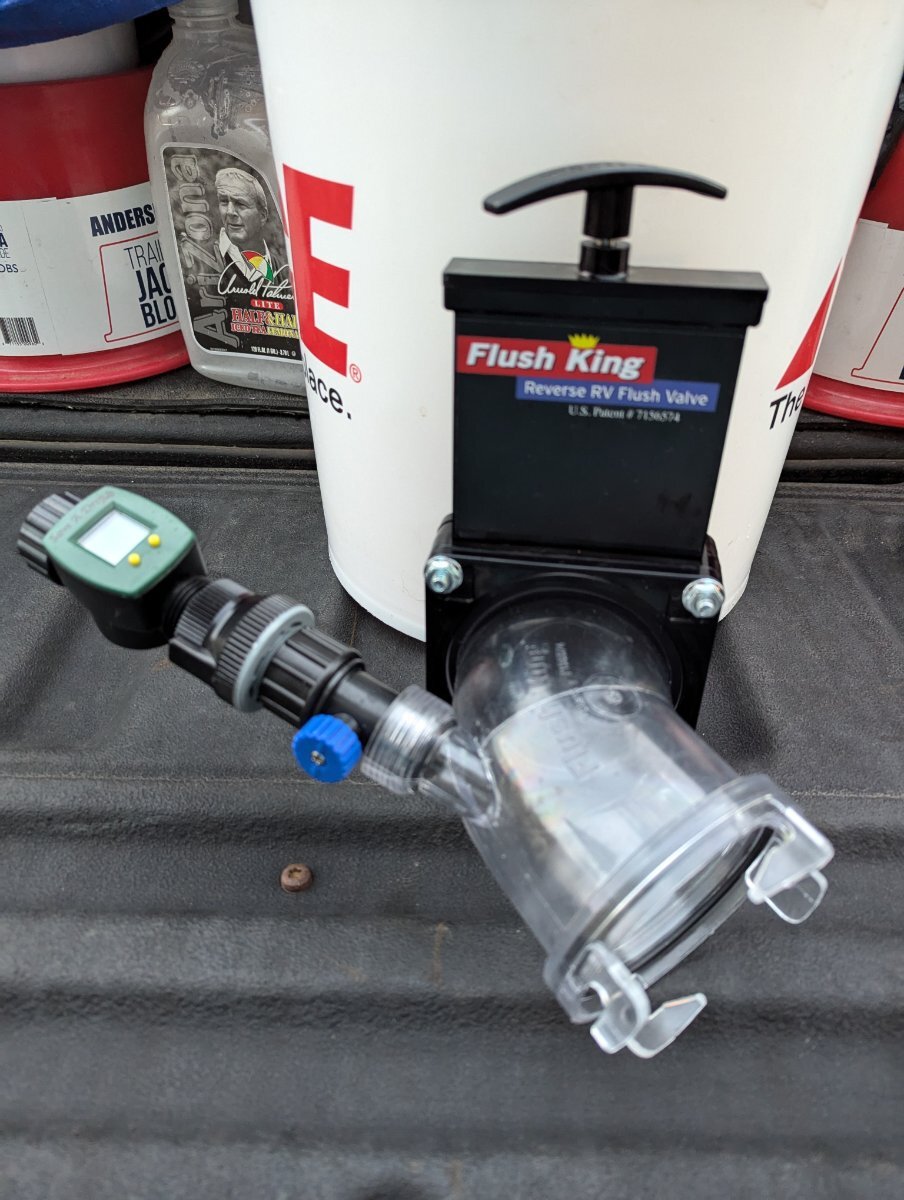
I use the Flush King and connect it to a short Camco hose in the bumper. I connect a hose to the connection on the left. The green thing is a "Save a drop" counter so I don't over fill. I dump each tank first. Empty the black and then the gray. I close the gray tank and reopen the black, turn the water on and watch the counter. There is a knob to turn off the water. Empty and repeat with the gray tank. I still like to use the black flush. Tank Kleen did our tanks at the Rally. The black tank was spotless, but the gray tank was bad. I use their Pine-Sol bath beads solution that Tank Kleen recommends, and add 3 gallons of water into the floor drain and 3 gallons into the toilet so it sloshes around while driving. If boondocking or extended camping I will limit adding water.
1 point
-
Actually, @Frank C did it first and best, quite detailed using u-clips. Mine was a quick job but the part re mine I like is the rubber seal, inexpensive part too!1 point
-
Never thought about the stink pipe. Make sure you use plastic razor blades to cut the sealant. Don't ask me why🙃. Instead of caulk I used a "U" shaped silicone strip around the panel. Screwed back in and replaced the caps over the screws. Either Oliver forgot to install 2 bolts through the flat plate to hold the propane housing to the trailer or it came loose. I didn't find the nut under the sink..1 point
-
I have access to a camera snake; I may try shooting it down the vent before I start ripping things apart.1 point
-
I've got 1 1/2 suggestions: 1 - have you checked the valve under the kitchen sink? you will need to remove 1 or 2 drawers on the left side as you face the sink. Then look at the plumbing and you are looking for a vertical pipe. There are times when the valve in the vertical pipe will become "stuck". Tap on that pipe with a small hammer, piece of wood, crescent wrench, etc. and see if that "reset" the valve from open to closed. 1/2 - after having a similar problem for the past couple of years - as with your case my problem would come and go - I got serious about sticking my nose very close to all of the places from which these kinds of odors emanate. Not being able to locate the source, I too was about to give up and bring in the troops. But, early in this year's 2 month western fly fishing trip my Mr. Buddy propane heater ran out of propane. So, as per usual I picked it up (its normal location while I'm camping at altitude is either just outside the bath door or just inside the bath door on the shower pan) but before I was able to unscrew the used propane bottle I noticed a fairly strong scent of gas. Of course I then screwed in a new bottle but later that day I again picked up the heater and again noticed the same smell. Long story short - this was the source of my problem all along. Good luck with the valve "reset". Bill1 point
-
Here are the program settings for the relay:
1 point


-
Recent Achievements
-


")


")


")


