Leaderboard


Popular Content
Showing content with the highest reputation on 10/01/2024 in Posts
-
@Mike and Carol Thank you Mike for your concern. As reported the Western NC foothills and mountain areas are in really bad shape in a lot of areas. A close friend of mine who works for Duke power told me it looks like a war zone. We did have had friends and neighbors check on our home and to our surprise we were spared and had no damage with exception of a few pines over on the ridge we live on. Sadly, this is not the same report for many of our neighbors. Our LNG Generac standby generator ran for 60 hrs before our power was restored keeping our home on 💯 full power. We are very grateful to say the least. All this said our hearts our heavy for ALL impacted by this storm. I40 which connects eastern Tenn with western NC is closed and it appears it will be for a long time. Our Starlink mini has been a game changer with regard to staying up to date. I have made several attempts to call and txt topgun2 and have not had any success. Mike I am glad hear you got through this morning. We are both relieved he and Sue are ok. I would ask everyone to take a moment and lift up ALL people impacted by this storm in your thoughts and prayers. David & Kathy5 points
-
I am talking to topgun2 as I type this post. He and Sue are safe and sound, with all services. I called again this morning and I was able to reach them. I’m sure he will have stories to share when has full communications back. Mossey4 points
-
We live outside of Asheville, about 35 miles. Total devastation in our county. Services have been knocked out; power, water, phone and internet. Trees down everywhere. Lots of bridges out. Many roads are simply closed. Topgun and Scotty live in Western NC; not sure how they are doing. We have been lucky-house okay.4 points
-
Just returned from a week long trip since the two exterior exhaust and an interior fin fan were installed on the Norcold 3-way. Prior uses required levels 7-9 depending on time of year, for example level 9 in 100+ Texas temps. Although ambient temps this go were mostly mid 80 to lower 90s, level 5 was the sweet spot for all modes of operation; level 6 was not egg friendly at the top shelf in front of the fin/fan combo and ice in the freezer was too cold to handle with wet fingers! No doubt this fan system, as described, vastly improved the efficiency of my unit and will hopefully extend its’ life.3 points
-
Same here! We're "keeping our fingers crossed" and "knocking on wood" hoping that our Dometic fridge hangs in there. It cools fast and freezes nicely - we usually run ours on level 7. The two heat exhaust fans we installed seemed to have helped increase its overall efficiency.3 points
-
Look on the spring retainers. Mine was stamped there. Model PR4B is what came from the factory on my 2021 E2, 3,500lb axles, 4-leaf springs
 3 points
 -
I’m sure we have owners that have been affected by the hurricane, hopefully everyone is okay. Are there any western NC or eastern TN folks that have any updates? I know there are owners around Johnson City, TN and Asheville, NC. We’re a bit worried…. Mike2 points
-
This is so sad. Having traveled this whole area at this time last year, hits home. Our prayers for all affected. Thanks for this post and sharing.2 points
-
The white flakes may be a result of the sacrificial anode's chemical reaction with calcium in the water,,,2 points
-
That’s half the fun! I know I’m going to get a bit wet.2 points
-
Your LP regulator may not be functioning properly, check if the cooktop operates correctly or the QC ports, if equipped. Switch the regulator to the other tank, a tank valve may have been opened too fast and has an internal shutdown. If that doesn’t work close each and reopen slowly for the first quarter turn to reset.2 points
-
Our hull, older than yours and @Ronbrink's has only 5 levels. We run on #4 unless it's really hot outside. Have not tried out the new Beech Lane dual fan yet with fridge on and full of food. Leaving a week from tomorrow for the Texas Rally (a slow 10 days getting there)! The fridge always ran pretty well, freezer great. Hopefully with the fan will allow for better cooling in the fridge section, getting water bottles in the door shelving cold more quickly.1 point
-
This could cause more issue than you would want, as the valve is harder than the pipe it's connect to and the pipe can get damaged or unthread on the opposite end (especially on one manufactured way back in 2015). There is no way to get a wrench on the pipe itself, only the valve.1 point
-
YES THERE IS. You can depressurize the tank with the PTV on top, remove the valve and use a shop vaccuum with a draw tube or a siimple syphon hose to drain the tank. But frankly removing the annode is easier IMHO. GJ1 point
-
I set up a dedicated table at the garage and use the outdoor shower for a hot water wash and rinse; tub, dish drainer, soap, sponge and shower head holder all kept within easy reach. Maybe you could extend the hose to reach your table when used as a wash station.
1 point
-
We enjoyed our stay at James Robb state park. It’s just minutes away from the Colorado National Monument. Enjoy! Mike1 point
-
John, I don’t remember exactly but I found some pictures I took in case I needed to do another one (and I did!). Here’s what I found…
1 point
-
@rich.dev - FYI: We used the 1.4" Blue Sea Cable Gland and drilled the seal to accept the cord - as you tighten the four stainless screws the slightly tapered gland tightens around the cord for a waterproof seal.1 point
-
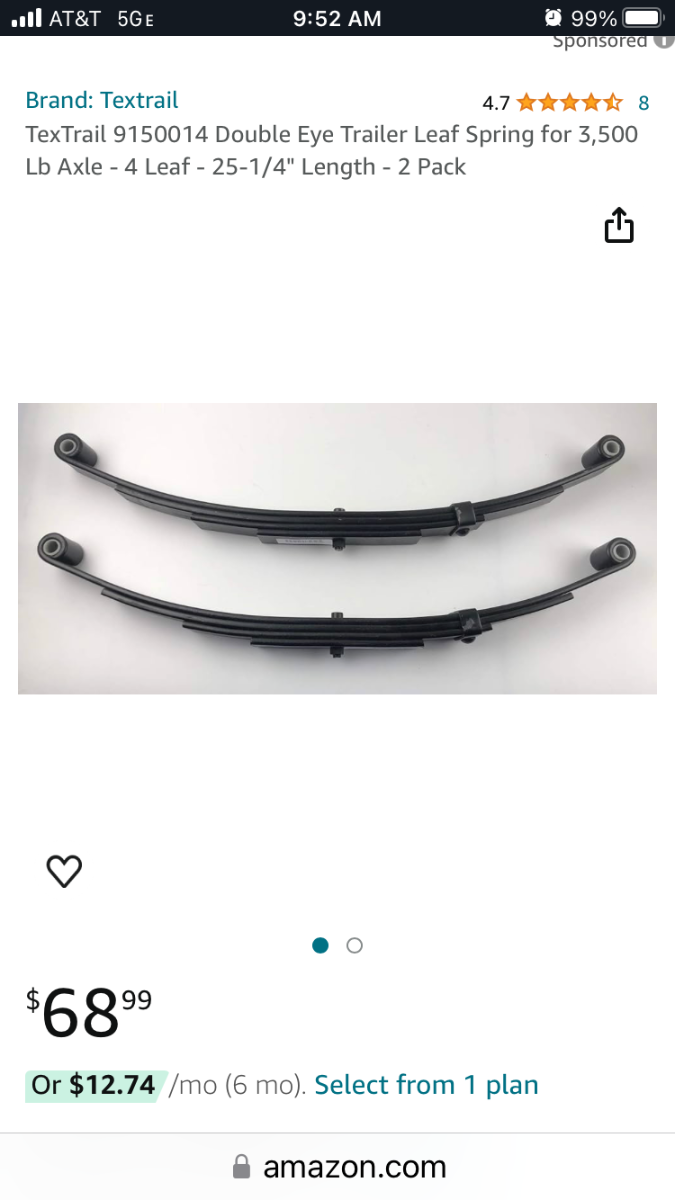
And here is the replacement part number that Oliver service gave me to replace my original springs
1 point
-
Thanks Mike & Carol. We’re currently camped at James M Robb-Colorado River State Park-Fruita Section tonight, planning on visiting Colorado National Monument tomorrow morning. The Colorado state parks are fabulous.
1 point
-
I know somewhere in the 23 pages of this thread, somebody posted the OEM part number for our leaf springs that can be purchased on eTrailer. Was under our hull today and all 4 OEM leafs look excellent, but at $60 I’m thinking of buying one for the toolbox. Also making sure I have the long sockets to replace one on the side of the road. Thx1 point
-
Yes, every night at 7 pm. Ha!1 point
-
We’ve been up and down 550 a lot, towing, and it’s really not too bad. Everyone goes slow enough that there’s not the “white knuckle” experience you would think. An alternative that we’ve done from Fruita (be sure to visit the Colorado Nat’l Monument there) is to head towards Ridgway on 50, which turns into 550. In Ridgway, turn right towards Telluride so that you avoid the Million Dollar Highway part of 550 (Ouray to Silverton). Go past Telluride, through Rico and you’ll be able to pick up 145 south to Cortez. We are usually heading to Durango so we bypass Cortez. It’s a scenic drive without the mountain passes that are on 550. Mike1 point
-
We left Cody the land of Buffalo Bill Cody and arrived at Devils Tower KOA this afternoon. The sites are close to DT have FH’s and are level. Yay! The staff was welcoming and really helpful. We will get a good nights rest and check out this National Monument. The drive through Big Horn National Forest was just pretty spectacular. Safe Travels and Happy Camping! IMG_2221.mov Our site with a decent views of DT.
1 point
-
Good looking cargo box and you will be really glad to have it. Well done!1 point
-
Yes, they "can". But, I'm not aware of any OTT reported frame, mounts or jack tubes from use on reasonably level ground. However, I can certainly envisonate situtations where it could occur when unwisely used on sloping ground and well extended. But I have not yet heard of such damage actually happening within the OTT community. I believe that it is very important that we use blocking under all three jack plates every time. They reduce the lever arm and will prevent jack damage when moved while extended. But this is a topic of a previous post.... A bit off topic, but important. I recently lost on the highway one of my jack foot plates. Recommend checking their single bolt tightness occasionally. Anybody know how to do so and to what torque? My concern is that one could damage the jack tube if it is not restrained during tightening. GJ1 point
-
I'd also check the water pump filter and all of the connections in/around the water pump. I'm suspicious of air getting into the system due to loose connections - probably on the draw side (i.e. where water is drawn into the Ollie from either the winterization port (most likely suspect) or the fresh water fill port). Bill1 point
-
Its one part of whats called a 3 WAY switch. Just like in your house where you can turn a light on/off from opposite sides of the room... this allows you to turn the water pump on from either the wall above dinette OR from the bathroom.1 point
-
GA RV Pros 210 Shamrock Industrial Blvd Tyrone GA 30290 Very nice workshop. Very quick service, we picked it up the next day. Their rate was $180 per hour.1 point
-
My Pins are correct. Whilst on one of our many 'Shake-Down Runs', for lack of a real explanation as to how we shattered our bathroom door mirror. Gorilla Tape was our friend for the remainder of the trip. Later when it came time to remove the door, I opted to remove it by unscrewing the channel where it attaches to the rear facing dinette wall, so I did not remove at the 'pins'. Removal & installation was quite easy. This might be a way that would be easy for you to make repairs. IDK. B~OUT1 point
-
I just looked at my hinge pins and they appear to be installed opposite of those directions also. john1 point
-
Thank you for posting the assembly instructions. What stands out to me is the instructions say to insert the deep end of the hinge pin toward the center of the door. Both of mine have the shallow end toward the center of the door. Maybe the deep end acts as a buffer (bushing?) to prevent it from wearing away the hinge door stop. The weight of the door is mostly supported by the top end of the hinge door stop where the hinge pin rest and that is where mine is damaged. Judging from the photos it looks like Patriot's hinge pins were put in correctly or they are different. Your hull and mine are closer in production than Patriots. Do you know if Oliver buys these doors as a kit and assembles them or buys them already assembled? If the former it might explain some inconsistencies in assembly.1 point
-
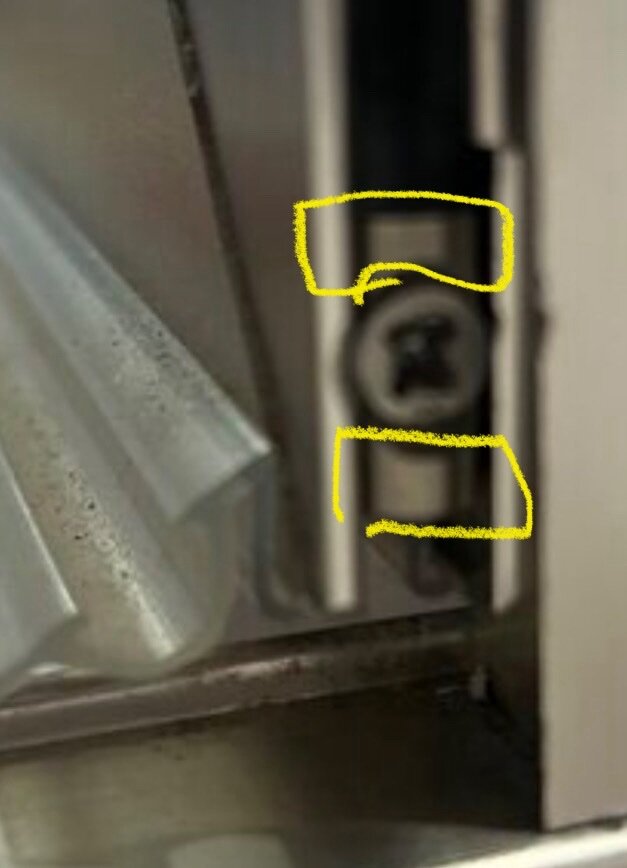
Yes, it appears so. Just added. It also appears in the pic's as though the Phillip's Head driver 'spun' in the screw head during the install...
1 point
-
Thanks @Patriot In my door those pieces above and below the screw (in yellow area on your pix) are missing. tried loosening, lifting and tightening to no avail. I think something fell off or wore away
1 point
-
I placed a plastic cap under the bottom off the hinge. This temp fix holds the door up to cleat the threshold. i wonder what the bottom of that hinge is supposed to have under it? Is there a pin/bushing missing on mine? Anyone that can show a pix of a functioning bottom door hinge area would be a help I have a ticket open for this..
1 point
-
I am posting this in case anyone else has the same issue. Recently I noticed that my Xantrex Freedom XC Pro 2000 was not charging my batteries when hooked up to shore power. However, the microwave was working so the inverter portion of the Xantrex was working properly. The EMS showed good shore power voltage, 60 Hz and no errors. No errors were shown on the Xantrex external display. However, I learned on this forum that there is an app for the Xantrex (FXC Control). Upon downloading and launching the app I saw the following alert: “Utility Power Not Available/Qualified”. This indicated that there was a problem somewhere with input power. I removed the small cover at the back of the inverter. The input and output AC connections are made by WAGO lever connectors. There is a small hole in each lever to allow the voltage to be checked with probes and a multimeter. I measured 120 V at the output of the inverter but no voltage at the input. It turns out that there was a bad connection at the WAGO connector, perhaps caused by road vibration. After disconnecting shore power and upon removal I found that the stranded AC input wires were rather mashed together rather than twisted together. I cut those ends off, removed 10 mm of insulation as specified in the install instructions and used electrician’s pliers to gently twist the wires together. (Note: the install instructions also specify that the exposed copper wire should be tinned with lead-free solder). I found the reinstall to be very difficult because the levers are spring loaded and will not stay open so each wire had to be inserted in sequence. The short length and heavy gage of the wire combined with having to hold the lever open with one hand made this a very difficult task. Nevertheless, I was finally able to insert them properly using a pair of needle nose pliers. This resolved my problem and everything is working properly again. I will also note that the app makes it much easier to check or change the settings on the Xantrex unit compared to doing so on the external display. I highly recommend it.
1 point
-
I stand corrected then. All the brand name WAGO connectors I've ever seen had it printed on the levers. They DO have a strong spring. You don't want your thumbnail under it when it unexpectedly comes down.1 point
-
I would assume that it is Marine Grade Tinned Copper UL1426.1 point
-
We no longer put TP in the black tank; reduces waste volume, less water to flush toilet, and dumping the black tank is much easier and faster. Here’s a couple of ideas: Personal scented waste bags, disposed of as needed. These bags and dispenser are marketed for use in managing baby diapers when on the go and are inexpensive. Handy spray bottle for final bowl rinse, as needed. Amazing how much less water is required, thus further reducing black tank volume.
1 point
-
Finished! Shameless copy of @mountainoliver style custom vents came in today. Installed without difficulty. Very happy with the new fridge. No issue with cabin humidity since it dropped from the high 80s in August. It has been 40-60 since September. Thanks again for everyone who paved the way on this swap/install. Best, Mike
1 point
-
Perhaps a little dab of E6000 on those tabs and then a couple of strips of painters tape to hole everything in place for 24 hours while the E6000 dries would take care to the issue while still allowing for removal if necessary? Bill1 point
-
As some may recall, I have dealt with an issue regarding the ‘charging aspect’ of my Xantrex XC 2000; specifically its’ inability to keep my LFP battery bank at full charge when in storage on shore power. When first powered up, the Xantrex will provide an initial charge cycle, but thereafter no further charge maintenance; thus requiring a weekly visit to the Cow Barn to manually instigate another initial charge cycle to bring the bank up to par. In talking with a Xantrex tech on this matter back when, I was told the unit was likely defective and in need of replacement. No bueno! Since no issues with the ‘inverter aspect’ I opted to install an independent dedicated Cerbo/charger combo to satisfy my charging needs, which has been working great! Problem solved, right? Here’s a recent observation! In looking at the following chart provided upon request by Oliver, notice in particular Settings 20, 22 and 23. (Disregard the text statement at the bottom of chart). This chart is representative of most I’ve seen, updated to address the various recommended Xantrex settings for both Oliver models per battery type. However, I recently learned why Settings 22 and 23 are blacked out and that a charging profile can be customized via these settings, following a change in Setting 20. When scrolling through Setting 20, I selected USE (User defined) rather than LFP(LiFePo), as illustrated above. In doing so, I was then able to access Settings 22 (Custom Absorption Voltage) and 23 (Custom Float Voltage). In general, most LFP manufacturers will have an absorption value ranging from 14.2-14.6 volts; a float value may or may not be provided since not really needed for that battery type. Given I now have LFPs, the custom values entered in my application were 14.6 and 13.6, respectively. As best I can tell, making the above changes to these three settings caused the ‘charging aspect’ of my Xantrex to operate as designed. My battery bank has been maintained at 100% for the past several weeks since, which is in keeping with claim that the Xantrex ‘uses a multistage charging process to keep batteries at full charge when connected to shore power’. Go figure!
1 point
-
This is also true with the Victron MP2 setup where "User Defined" allows you to manually set charge rates to battery manufacturers' specifications. For Epoch batteries, the Absorbtion rate is 14.2V and Float 13.6V.1 point
-
Thank you, but the old body is too sore, and our to-do list is never-ending! 🤣1 point
-
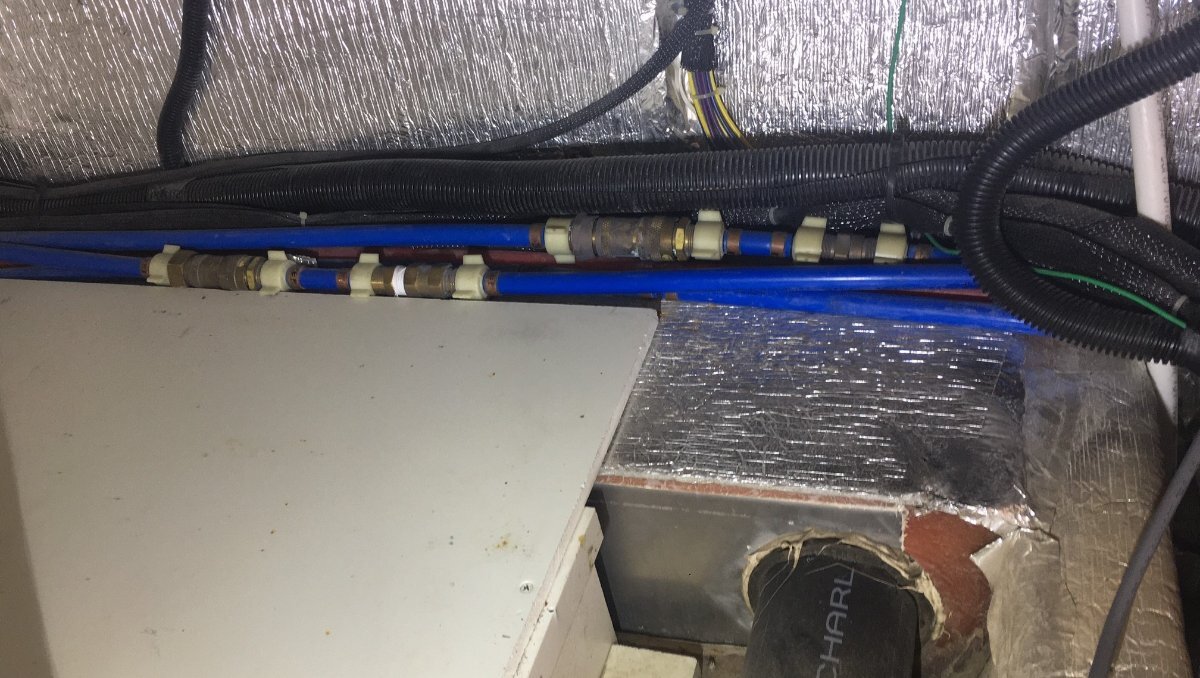
Yes @MnG KY the other thread just got bumped. She removed the OEM installed restrictors to use the external pressure regulator (restrictor-bad, regulator-good). My first picture shows the backflow preventers (necessary) coupled with restrictors (should remove if using external regulator). I also removed all the OEM valves that had 1/4" openings for motorized ball vales with 12mm openings (.25" to .47"). The valves on your newer hull look different but are still small ID restricting. The drill bits in the second picture are 1/4" and 3/8" showing the inner diameters of these parts. OTT installs 1/2" PEX plumbing but the system is downgraded at every elbow, connector and even more-so at every valve.
1 point
-
Jason Essary gets the credit. He authorized the reduction of LBCO after consultation with Xantrex and Lithionics.1 point
-
I lowered the LBCO from 12.1V to 11.5V and that did indeed allow extended use of the A/C via inverter without fear of a sysrem shutdown, That said, I am currently conducting ‘hard reboot’ of my Xantrex 2000W Freedom XC in hopes of resolve of my “inverter misperceives DC voltage” issue. Thanks for your post, definitely an effective “workaround” and solution you presented,1 point
-
The remotes will be fine, but it is very unwise to leave all your keys exposed to the outside world there. Put them inside the closet door or safely hidden away in one of the “safe” compartments. Otherwise somebody could snatch them. John Davies Spokane WA1 point
-
Make sure Oliver sends you the rivets with the lights, and you will need a rivet gun. 👍🏻 The last two PL’s I purchased did not have the rivets in the bag. 😕1 point
-
Do you know which Xantrex 2000W inverter you have? Oliver has used 2 versions of the Xantrex 2000W inverter. The original is a PROwatt SW Inverter. And they newer inverter is a FREEDOM X / XC Inverter. The original has a hard coded High and Low voltage cut off, which can not be modified by the end user to my knowledge. The newer Inverter can be modified by the end user. Is this the model you have? Mossey1 point


-
Recent Achievements
-


")


")


")

