Leaderboard

.thumb.jpg.e34bf01ef7f7d5e99ad31856d45afbeb.jpg)


Popular Content
Showing content with the highest reputation on 11/27/2024 in all areas
-
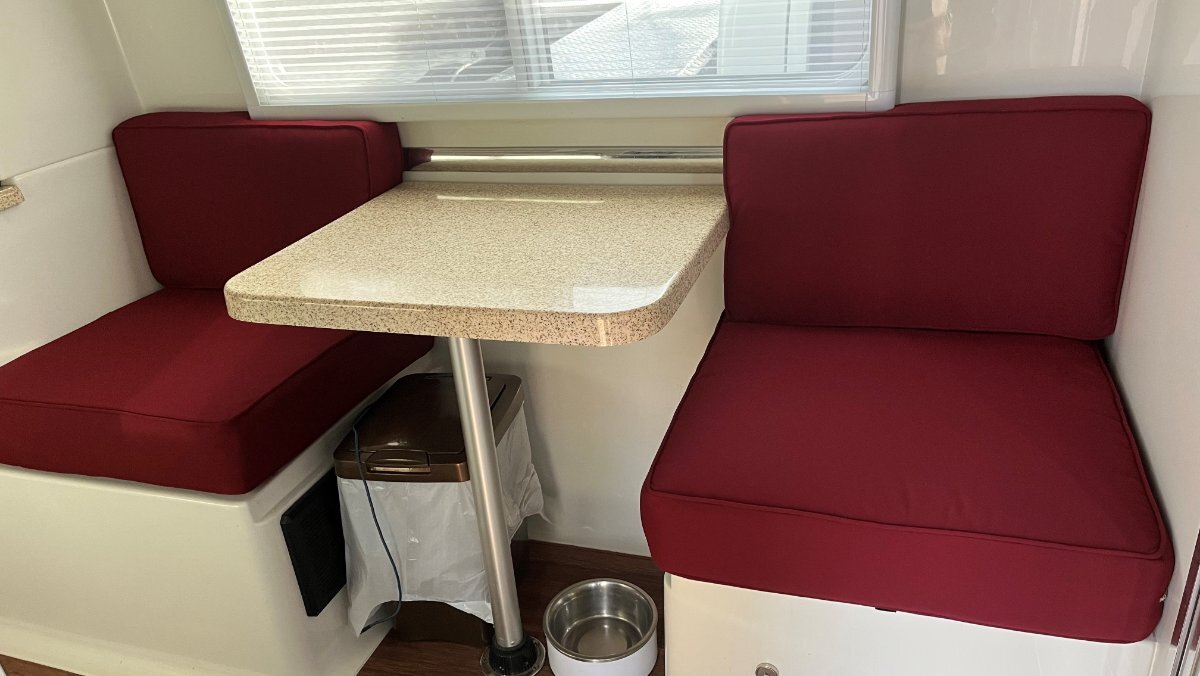
They put us on their November calendar. After running our trip, every time I sat on the old cushions, I thought it would be a shame to merely reupholster with new cloth yet keep the 9-year-old foam. When we dropped them off, I asked about new foam. He said the quality of foam for seating they carry is far superior to what we showed them in the old cushions. We went with 24x25" bottoms with 5" new foam (1" taller) and with the batting and fabric, the cushions are closer to 6" tall. We had 2" clearance under the window frames with the old cushions. The new ones just fill the opening and stay nicely. Went with the original sized 4" foam for the seat backs. All new foam, batting, fabric, zippers with newly corded edges. Chris loves the color given her Red, White and Blue Oliver theme! We spent just under $500 out the door. Which for me was better than the $350 for upholstery only. Soon, she will look as good as she tows or provides inverter power!
 5 points
 -
That main stack is needed to vent gases. An AAV on the stack would cause those gases to back up into the cabin.3 points
-
I could have left the vent cap alone, though it appeared to have an opening under one edge. Not being the guy to caulk over caulk I removed it. The inside seal was cracked in a couple places, so good I did while working up there. Replacement vent cap is only $6. https://a.co/d/9ixjPRi Another 90 minutes on the clock and it’s almost clean enough for fill!
2 points
-
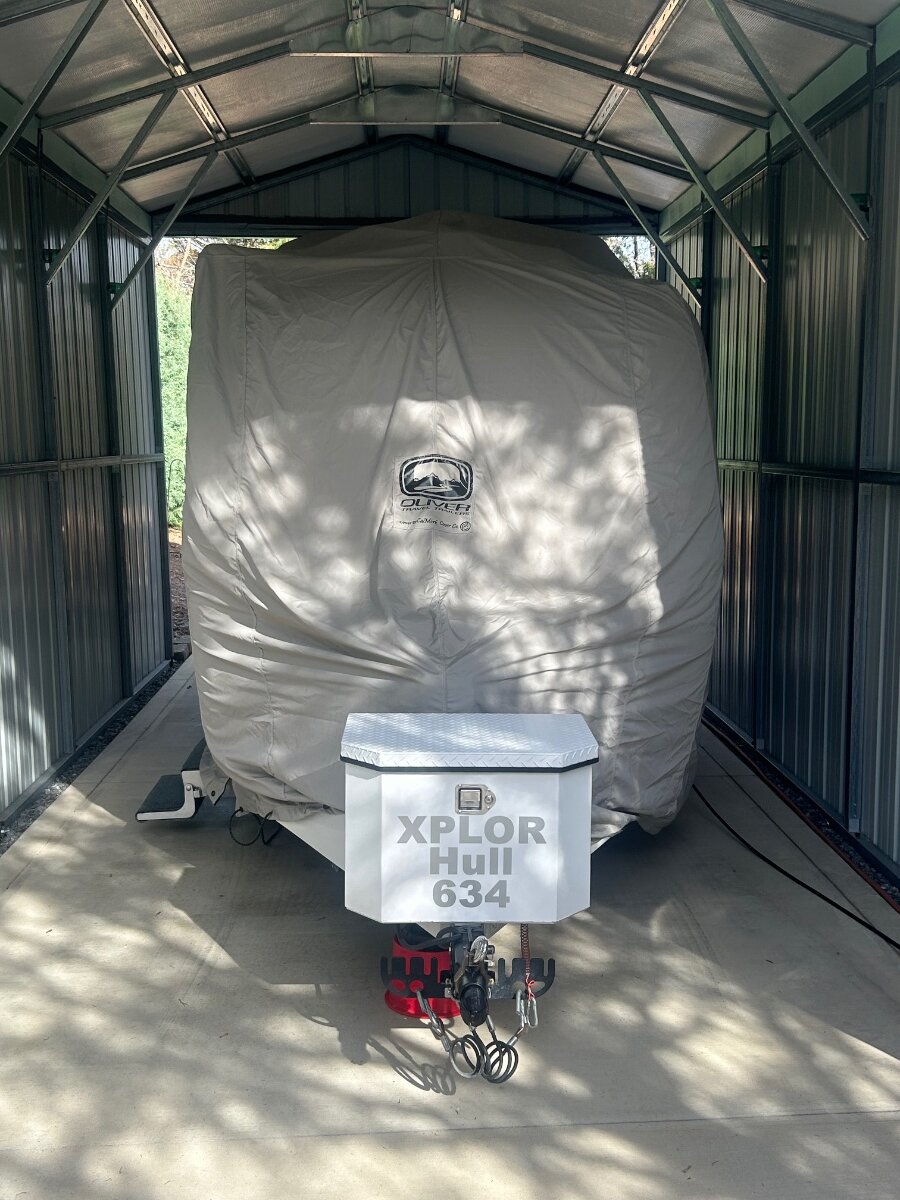
@Heather and Eric Unfortunately we no longer have a classified section on the forum for items such as these. Maybe someone will send you a PM and help you out. I think I saw your post on the Oliver FB page as well good idea. The newer Calmark covers are nice and are a much lighter weight which make them a lot easier manage to than the older heavier covers. Just something to consider if you find a seller. We like our newer lighter weight Calmark. It sure makes a huge difference when uncovering a nice, clean Oliver when you’re getting ready to roll! If I learn of anyone selling a cover I will forward your interest to them. Happy Hunting! Patriot🇺🇸
2 points
-
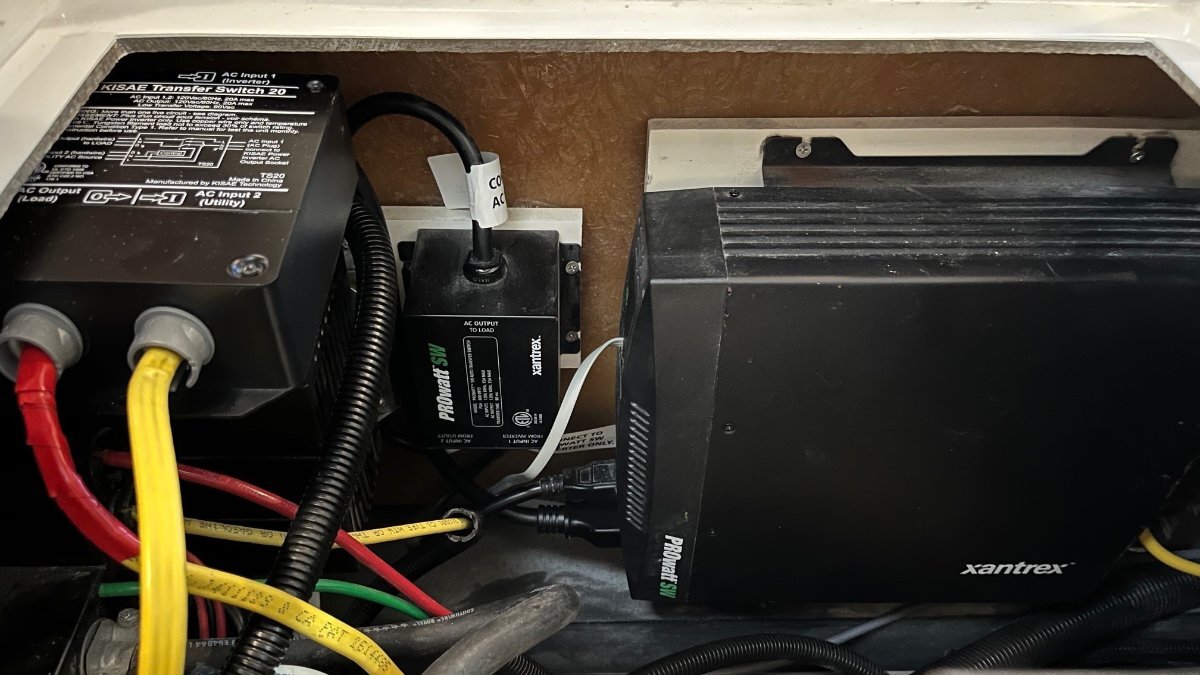
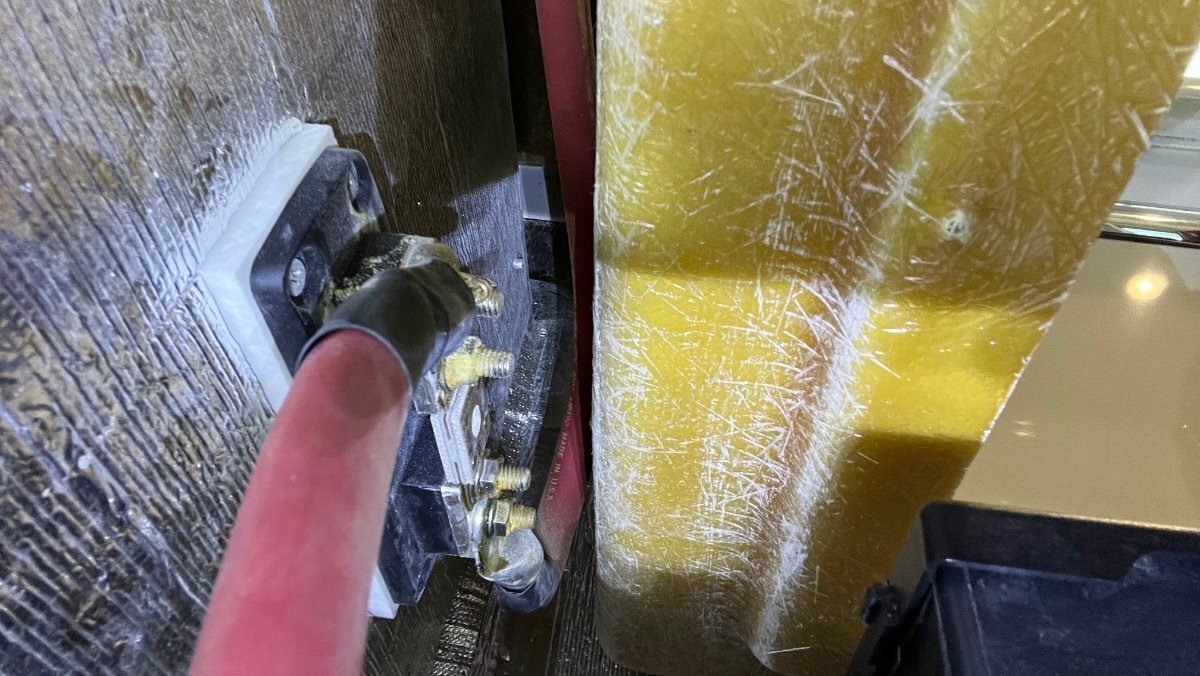
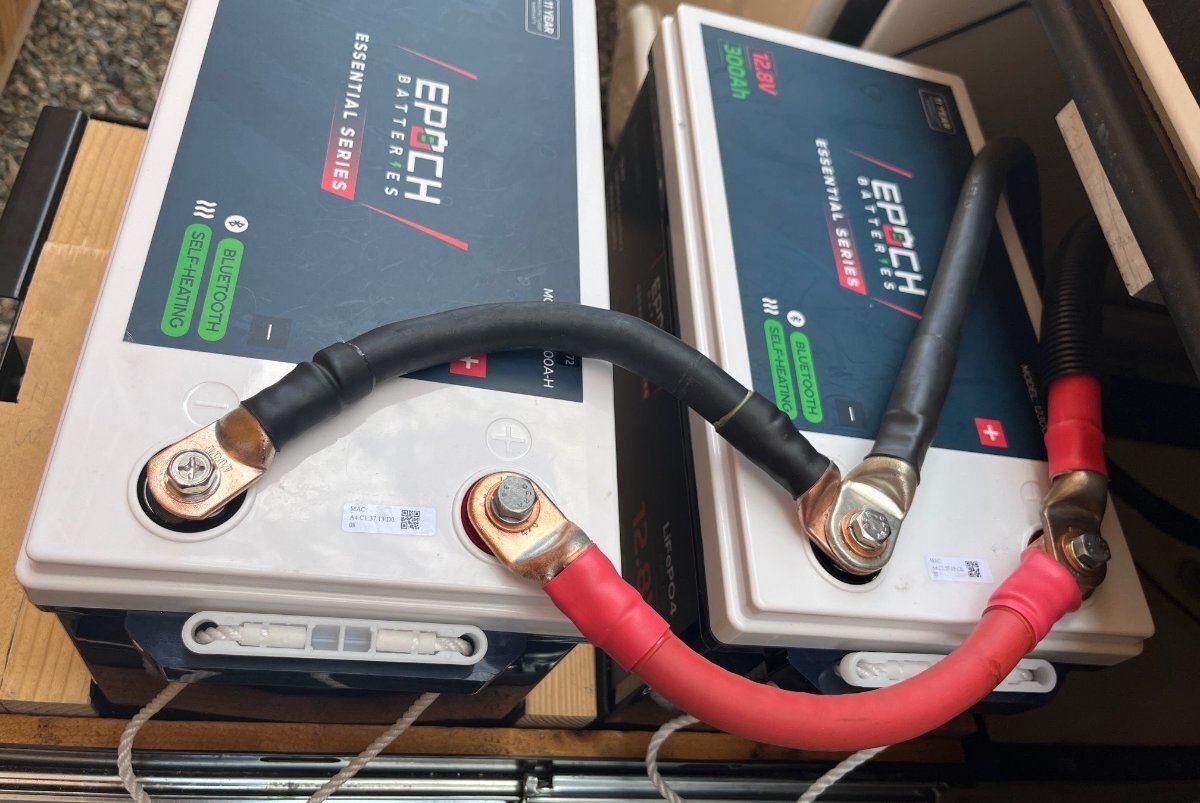
I got a lot done this week! 🤣 In introduction, our 2016 Hull #113 has roof-mounted 340W Zamp solar, and had a 2KW Xantrex inverter (only with separate PD4000 converter) and 450AH 6V lead-acid batteries renewed in 2021. Given a recent price reduction and a 10% off sale with free shipping, we were motivated to purchase two Epoch 300AH LiFePO4 batteries for a total of 600AH and it made sense to upgrade to the Victron Multiplus II inverter/charger at the same time. Everything described to follow came to $3200 total investment including all small parts and the costs of many on-hand shop materials. Just two years ago, the cost of the LiFePO4 batteries alone would be nearly double! First, all the old had to be removed. Demolition is always fun first step in a project! I removed the lead-acid batteries (sold them on Craigs in just a few days) and all the cables, the Inverter, the ATS and junction box. It’s crazy how OTT wired shore power to inverter power, using wire nuts in this junction box, real backyard mechanic stuff (correct design would be to use a dual-bus power panel). Everything in these pics has been removed (anybody need a 2kW Xantrex system or spare parts)? The second crazy thing is where they installed the main DC fuse (see pic). No way would I have known it's up there until I removed the cables! To access this fuse, you have to sit low reaching through the rear dinette seat.
1 point
-
We just received our MetalTech scaffolding today. Got it setup in 90 minutes (on the 70-year old-fart plan, yep just taking my time). In another 90 minutes (working hard this time), I removed EVERYTHING up top-up front on our OLD Hull #113! Boy-oh-boy, do I have a lot of fiberglass repair to do! This scaffolding is awesome and reasonable. I'm 6' 2" and weigh 225 lbs on a good day! This platform did NOT waiver, did not sway, not a blink! I'm also weary of heights and ladders yet felt great on this platform and even forgot I was up there after working a while. Strapped the ladder into place as shown. I climbed up and down 5x while working this first job. A young guy would just climb the scaffolding! 🤣 Pictures to follow are first the scaffolding setup. Then the demolition. Pulling parts is always fun and easier than the final restoration. 🤣 Posts to follow will cover the complete repair of the front roof. Today was easy. I see many hours of repair in my future.
1 point
-
Airstream trailers use a much thicker 'plastic' on the door interior. Probably the ONLY 'plastic kind' of material being used. I do not know the composition, but it is not Aluminum or metal. OK? It is a 2019 as is my 2019 Oliver Elite II. They purchase the plastic from... someone, somewhere. Possibly the same company that makes this 'plastic', or whatever it is... for Oliver. Plastic: PET, POM, PBT, PA... and the list goes on. This door 'material' is thin on the Oliver. After a time span... it has become brittle. Some may say it is used to save WEIGHT to the Trailer. Yeah... right. My wife saw this thread earlier today, which got my attention. Anyone who has worked with Fiber Glass... like some of us did with 1960's Corvettes when they were... cheap... whoa... the smell is something I never forgot. Once 'cured'... no smell. Older automobiles can have parts or components that shrink. Acetate Dice and earlier Nitrate Casino Dice... also have a problem. Nitrates shrink, distort and decompose exposed to air over decades. Acetate Casino Dice... will keep their sharp edges and probably last a hundred or more years. This issue with the very thin interior door 'material' is a problem. I find cracks in my Oliver door. I suspect everyone will have hair line cracks. Some will get those that shrink, but fold and curl up on vertical shrinkage. If you have the horizontal hair line cracks... you are one LUCKY owner. The curling I saw next the door window, may be the same material, but cut to size differently. The material is inexpensive, compared to the LABOR to remove and replace. Makes my nasal hairs... tickle. 😞 Sorry for taking your time... I did OSHA inspections in my youth... and... heard lots of excuses and finger pointing, as well.1 point
-
Ladder tied off as well. Good job👍1 point
-
Thanks for that. Now that I've thought this through, I can see that in this case, ability to vent both in and out would be best. Dave1 point
-
Likely the difference adding to the 1250 LB rating.1 point
-
@Steve-Gwenne, you're new to us, though in my memory, I have read your forum name in the past. Thank you and God bless you for your acknowledgement on my humble post! TY @Mike and Carol and @Derek B, we met just this October, my new BFFs and thank you too! Given the great central Texas and Louisiana, you should be able to build dinette seats at 60c on the dollar of AZ prices. Get er done. Derek work your LiFePO4 purchase first and asap. Love you, guys...1 point
-
Likely they were on a fishing expedition. For a cable of course. Good luck with your effort. It appears that maybe you could add more solar there by running one of them over the exhaust fan. ??? GJ1 point
-
The door interior is a thin pebble grain fiberglass panel similar (but thinner) that you can buy in a big box store. The outer skin appears to be a layered fiberglass panel. ( May be Azdel) The door has an outer frame of aluminum extrusion with a built in c-channel track that the panel slides into during door manufacture. The whole door panel assembly appears to be a sandwich with the following 3 layers bonded together: 1) Outer skin 2) inner frame with foam core between structural members 3) inside pebble grain skin Oliver service confirmed there isn’t a way to repair this failure due to the way the door is constructed. Bill for replacement pre-hung door is $1600.00 at Factory Service Center. They drill out the rivets in the surrounding door frame, drop out old door including hinges and install and rivet in the new door. Best effort to match stripes/decals as originally built. This failure mode appears to be caused by the enough inner surface shrinkage that the inside panel popped out of the frame c channel then as it warmed and expanded it didn’t go back in the c channel track , instead buckling and cracking. I’ll live with it a year until we make a trip back to do an air conditioner swap. Craig
1 point
-
Ordering the MetalTech Scaffold system today while still on sale! Thanks for the scaffold information posted! Needed a safer way to wax and work on Ollie's roof instead of hanging off of a ladder. MetalTech Safeclimb 6 ft. Baker Scaffold with Platform and Included Trap Door, 1250 lbs. Load Capacity I-CISCH1 - The Home Depot1 point
-
Yeah, it can be. I met Ron at the Texas Rally (awesome TV-TT setup with the quiet hum of the new Atmos A/C running)! I estimate weighing 60 LBS more than Ron and my 6' 2" vs. his 5'10". That's a lot of weight off the end which might lift the wheels off on the other side which could cause the scaffold to slip. This model has the plank door which should work when mounted taller and not over the trailer doghouse. This also would not be easy for a big guy to get through. My old tennis-damaged knees make climbing the angle of a stepladder so much easier than straight up a 90-degree vertical. The ladder in that spot was well grounded by itself and truly did not need a strap except for safety when bridging one foot on the platform while the other is still on the 4th rung of the ladder. This one is a 5 ft 250 LB quality Werner ladder. Given the angle, it was an easy one step to crossover. When needed I could use our 8 ft 300 LB Werner to climb greater heights. I felt good getting up and down and I'm not fond of ladders in general!1 point
-
I have no problem climbing the rungs of the scaffold; ditched the ladder because they are unstable, even when supposedly adequately secured! Transitioning from a ladder to scaffold seems a risky maneuver and more cumbersome, especially when changing positions. Definitely not getting any younger, just wiser in my old age! AND, the wife won’t let me climb ladders anymore, she has no concern with using the scaffold. Think ‘living in harmony’! TIP: Make use of a patio umbrella to shade work surfaces, also a fan staged on the scaffold platform to help ‘keep your cool’ while performing rigorous tasks!
1 point
-
After removal of our obsolete rooftop parts, I wish that OTT had never installed anything up there but the bathroom exhaust fan. What a disaster (see before and after pics below). It's truly a mess in its basic OEM installations. It will take me many, many hours of hard work to correct, more on that later. Maybe I should have just left the stuff up there? Everything removed could have been mounted with 3M VHB tape, no screw holes required. Winegard suggests their extra mount kit which adds another 12 screw holes, also unnecessary and this alone is half the repair work ahead of me. Never backed a trailer with a camera on it in my life and modern TVs have back-up cameras. Why does OTT drill a 1 1/8" hole in the hull, when a 3/16" hole is all that is needed? The picture on this 2015 camera system has the resolution of VHS tapes from back in the 90s! 🤣 To me, Wi-Fi and cellular boosters are only useful in some cases, and ours was not working anyway. I installed a Pepwave router setup instead last winter. The Wi-Fi Ranger antenna box is now collateral damage! The OEM exhaust fan was installed with the side marked "FRONT" pointing to the rear of the trailer. I hope OTT is not installing options like this on new builds! Ours is now 9 years old. Those ordering new, my advice is to refuse options that pierce the hull with multiple screw holes! Add only the options you must have and nothing extra. I still need to remove the 4 Winegard brackets, remove all the Dicor and sealants and start filling holes. Thanks for reading...
1 point
-
Look closely at the final picture above and you will see a strap at the top step of the ladder. Old, but not yet too weak, I yanked on this thing hard. Way more grounded than this engineer would have thought. As you may remember, I'm not often complimentary to many design engineers. This would be easier if I lived where boat service shops are frequent, like where @SeaDawg lives. We do live in the desert...1 point
-
One more moab pic. Kane Creek Road. Last full moon.
1 point
-
I re-plumbed the entire rear end of the trailer. I straightened out some lines and rerouted others so that they are neater than they were when our trailer was built in 2014. While I was at it, I put electric valves, that are controlled with a switch in the basement, in both the hot and cold lines going to the outdoor shower. I also ran an airline, that can be controlled with a valve in the basement, to these two valves so that the plumbing of the entire trailer can be blown free of water. The airlines also run to both wheelwells where an air fitting is available for airing up the tires. This entire air system can be supplied via the onboard compressor mounted in the back of the Silverado.1 point
-
U.P. of Michigan. Great view of the Big Mac bridge.
1 point
-
Holy mackerel - did anyone else see that "mountain lion" in the pics above!1 point
-
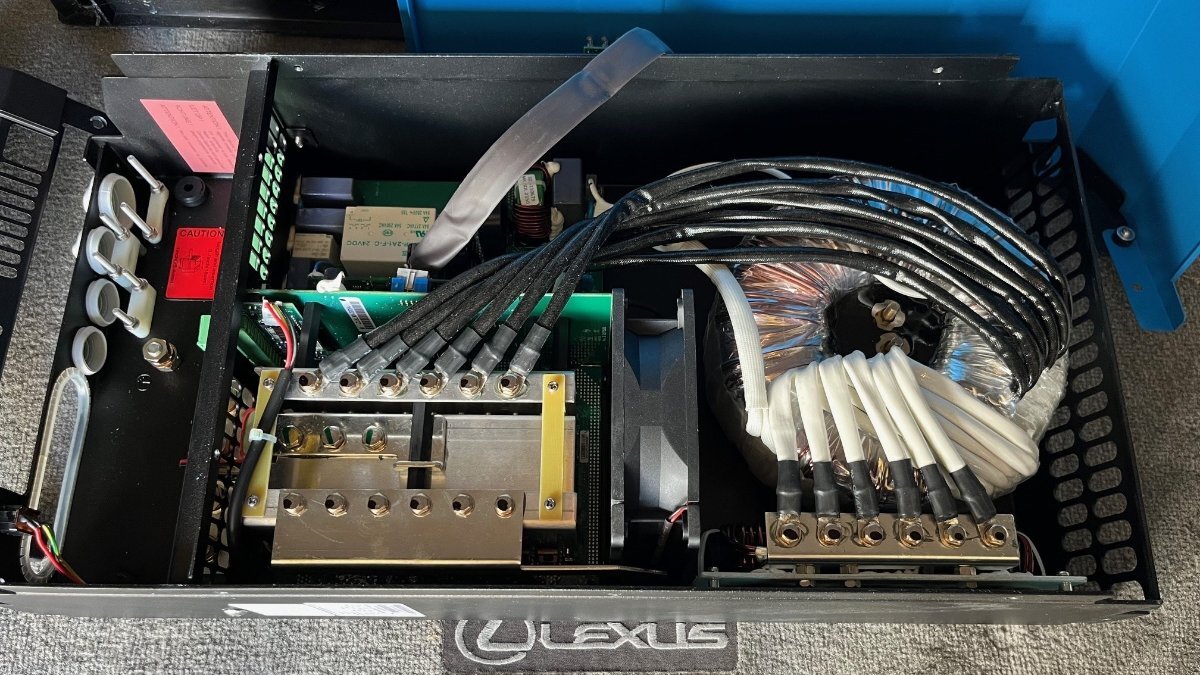
This inverter is a beast! When I first field tested it, I disconnected shore power and ran the A/C off of inverter only. It was reading over 3500W and I didn't understand. This is not a 3KW inverter, but a 3KVA rated at 2400W continuous. How was it able to run at 3500W+ for 1-2 minutes until I realized it and turned off the A/C? When I did the inverter was still pulling over 1500W. I thought that nothing else was on, so I started tripping the 120VAC breakers. The last one did it and I found out we had the HWH AC switch on! Whoa, won't do that again. Then it ran A/C for the next 4 hours. I turned it down to 72 degrees and the compressor was running about 2.5 of the four hours. This old Dometic PII takes +/- 1800W or 150A DC inverted. IT dropped down for 37% SOC. Given 63% of 600AH used is 378AH and if you divide that by 150A for the A/C it comes to 2 1/2 hours running the PII full on compressor running. As @rideadeuce has shown the Atmos A/C takes half this amperage, so with a future A/C upgrade, we should be able to run all the A/C we need for the hot day now and then. Here's the internals of the MP2 Beast!
1 point
-
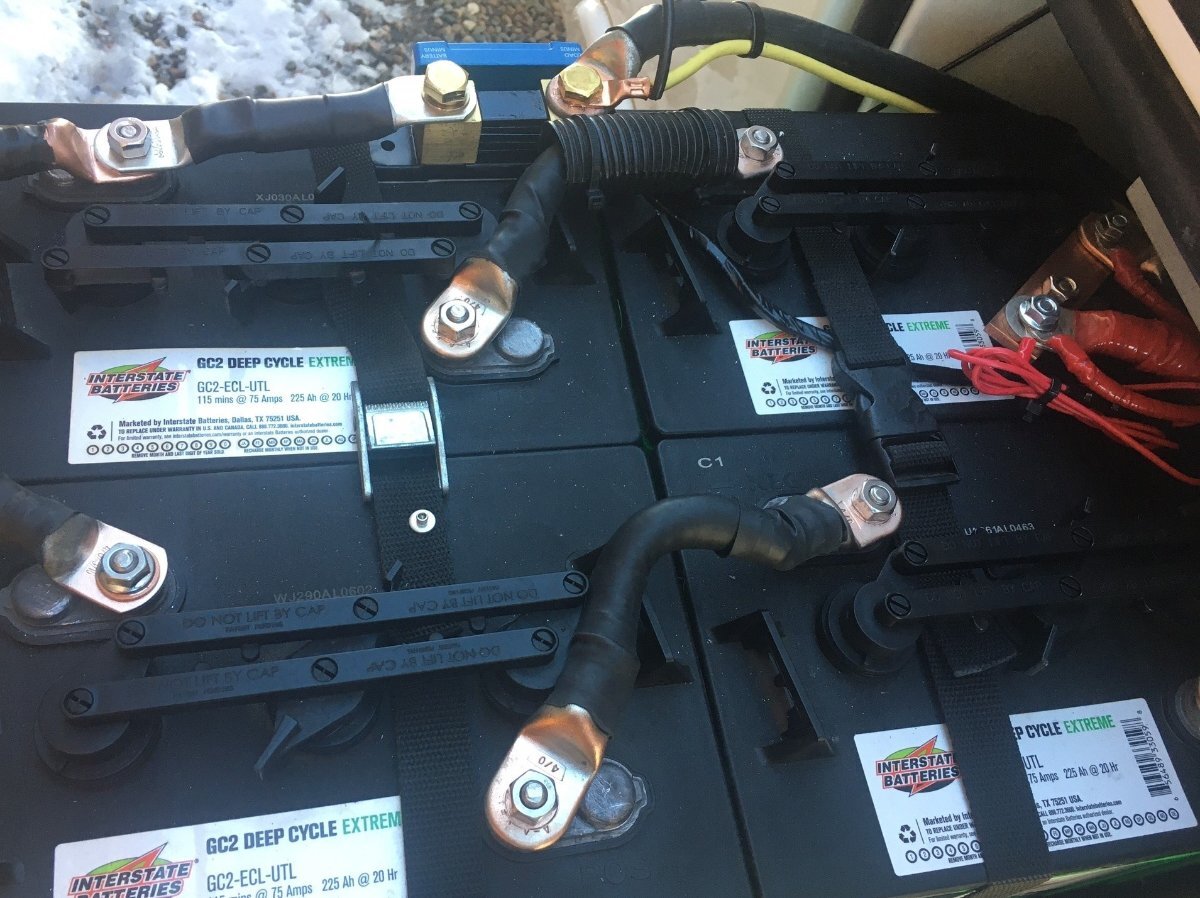
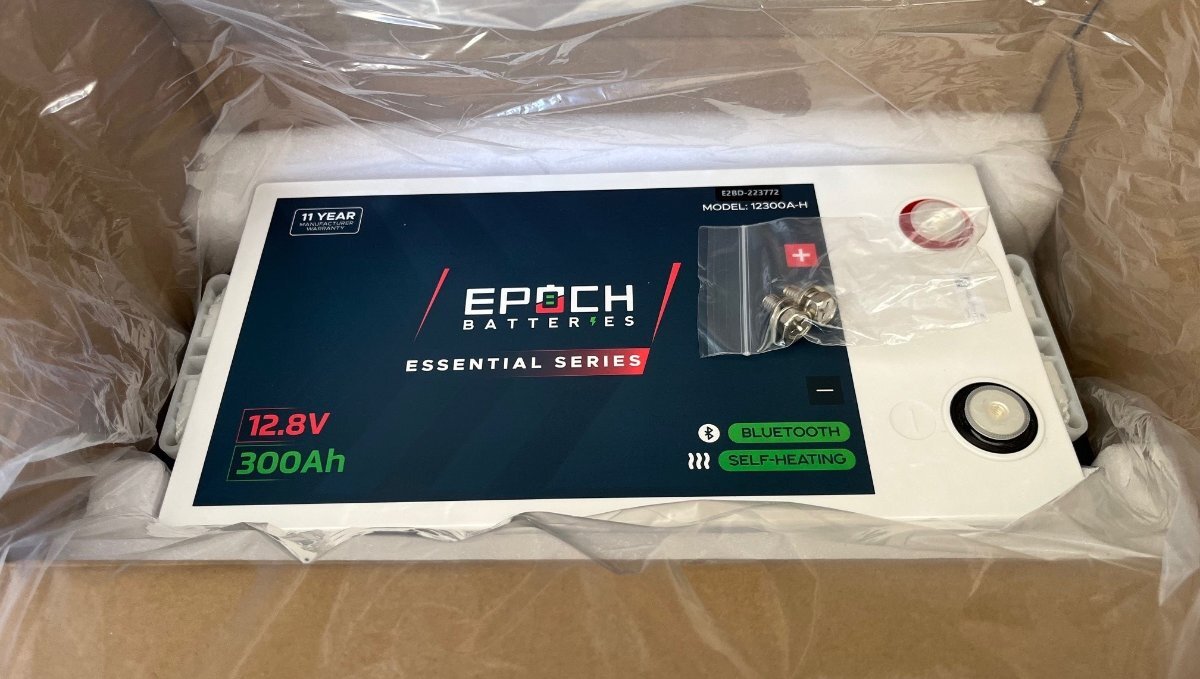
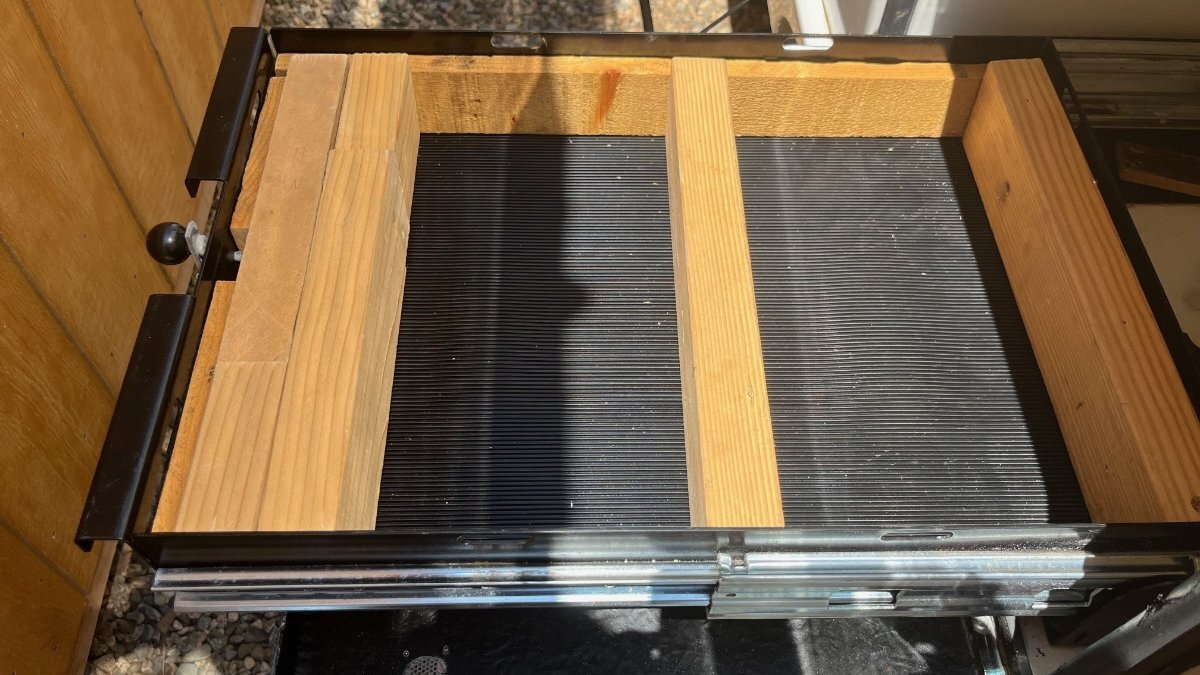
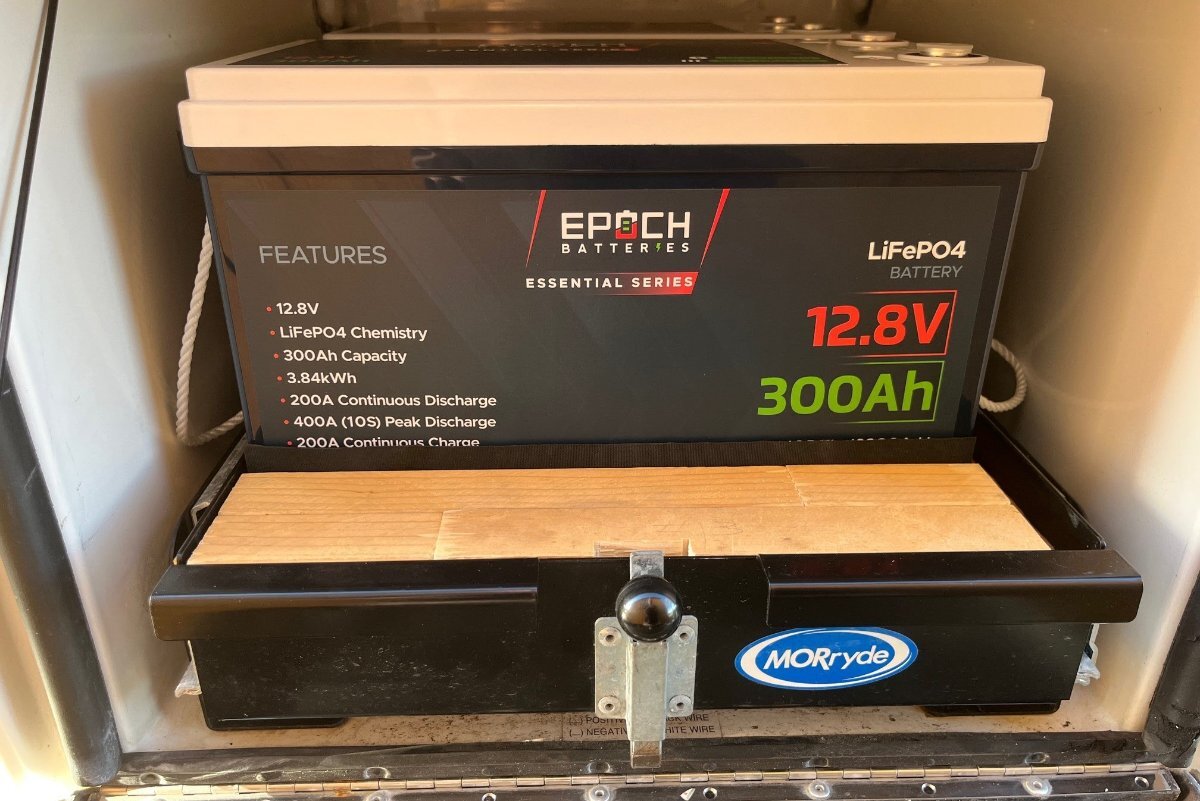
Simplicity in design is something I live by, so the goal is, beyond new batteries and inverter, to reuse everything else possible and not add any unnecessary cables, switches, buses, display screens or the like. Every additional connection adds resistance and possible points of failure. Mine is a minimum viable design (KISS). Getting the batteries positioned was my first task, since their purchase was the start of this project! The Epoch 300AH LiFePO4 batteries at 13 ½” long fit nicely sideways in the 14x21” battery tray. They are 7.3” wide, so there is a lot of space that I’ve filled with some 2x3” stock and rubber toolbox liner, both items I had on-hand. Given the snug fit, I do not believe they need a tie-down strap. They’re not going anywhere! Originally, I thought I would have a breaker and shunt in the battery bay and later decided all could be installed in the interior. I reused the 4/0 cables that OTT had installed but drilled a new hole for the B- cable to go directly rear to the new inverter location under the streetside bed. The B+ cable will be routed to the original Blue Seas ANL mount. I made a new 4/0 cable about 4’ long to get from the fuse assembly to the rear-mounted inverter. I was thinking Class-T fuse but decided to save the money and just buy the Victron specified 400A ANL fuse mounted in the OEM housing. Kept the original 250A fuse as a backup that would work for everything but running the A/C. I've cut battery weight near in half, and they sit further in as well. Don’t these batteries look great and there is nothing that can go wrong here. I’ll check them once or twice and then hope to keep this bay locked for years to come without worry!
1 point
-
Had a similar incident last trip on our way out of Houston, but a slow rolling tire was the ‘target’! Out of nowhere, said tire came rolling into my lane with little time to react and lane change not an option given the heavy traffic. Following some ‘flagrant language’, I immediately started to slow my speed to time for an impact at vehicle dead center. As I worked my way over to the first available exit, my thoughts were on potential damage to the Oliver, most likely to the fiberglass. Thankfully all was found good, but had the tire been on a rim this would have certainly been a dire situation.0 points
-
Lucky this came up just as I was getting around to fixing it. On my way back from alaska this year I ended up having to hit an empty DEF box in the middle of the road. Didn't have a chance to avoid it but if I had thought more about it I would've at least gone over it off center instead of just straight on (initially figured itd be better for it to hit the part of my bumper that sticks down to protect the winch/diff in the center), ended up smashing the plastic loop that holds the cable to the "pin thing". Didn't even realize it was broken until a couple days later when I went to inspect everything to make sure it was still good.0 points


-
Recent Achievements
-


")


")


")


