Leaderboard


Popular Content
Showing content with the highest reputation on 03/30/2025 in all areas
-
GREE manufactures several like units including your Tosot, they are all seemingly the same as the Atmos. You got a very good deal and current pricing on Amazon is now $100 higher, but still a value buy. Others may be interested in knowing what added costs there may be, specifically tax and shipping if applicable. The TURBRO soft start is interesting and value priced, as well, however I would be concerned with its quality. And yes, you are better off having a soft start device if running on LFPs, good move and install! You may want to add an informational ‘Signature’, go to Account Settings.3 points
-
@tallmandan nice work, you will see a huge improvement in capacity with your upgrade.3 points
-
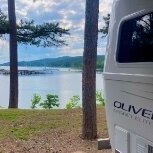
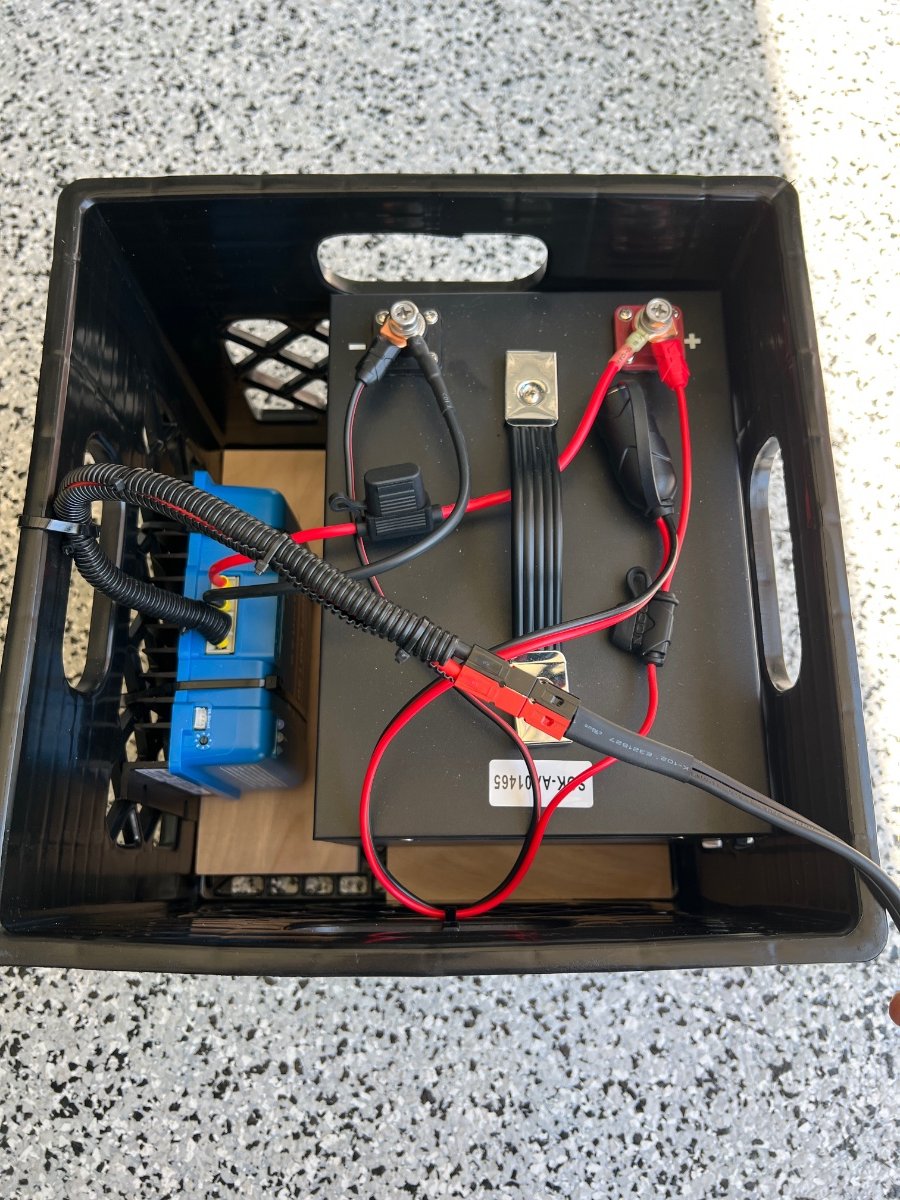
Thought I would follow-up with photos of my finished install. BIG, BIG thanks to @Derek B and especially to @jd1923 for sharing their photos and offering info to help! I don't think I could have done this without you! I would say my install is more "DIY amature" compared to their professsional work because I did not reconfigure the 6g wires inside the trailer on bus bars. This would be best, but I just didn't feel comfortable enough in my level of skill and also didn't really want to spend the time - so my battery compartment is messy compared to theirs but everything works. I wanted to install a manual disconnect switch and this turned out to be a needed extension in my case if I wanted to avoid replacing the main negative cable with a longer one. There was no extra lenght to be pulled through from inside, so the cable was too short to reach far enough forward in the battery tray (without packing the batteries together in the back requiring shorter jumpers to be ordered as well). The switch is connected by re-using one of the short red jumpers and I put black gorilla tap around it to mark it as negative. The switch provided a large/long connection post to stack the multiple neg wires. I did have to use a drill and dremel tool to slightly enlarge the terminal connector holes on the neg 6ga wires as they were slightly too small to fit on the post of the switch (a professional would have replaced these terminal ends with the correct size). I was going to secure the switch to the battery with 3M VBR tape but decided to let it simply sit on a piece of rubberized foam. This allows it to shift slightly as the stiff wires bend to close the drawer. The OEM bolt on the main + terminal had to be replaced with a slightly longer one to accomodate the stack. I have a bit of concern that the stacked terminal connections could be more prone to loosen with vibration over time so I will be checking on this periodically (they were stacked by Oliver's original configuration without a problem) I can easily reach the disconnect switch without pulling out the tray. It was very easy to program my Xantrex 2000 inverter/charger and my Zamp solar controller as they both have settings for LifePo4. My total cost was $1725 ($1698 for the two batteries, $25 for the switch and $2 for the longer terminal bolt) and I'm loaded with 600aH of lithium power. I have SOC and detailed charging/discharging data available in the Epoch app on my phone via bluetooth. Really appreciate the info/help/advice available in this group! Hope this might be valuable to anybody else with similar OEM equipment considering a DIY lithium replacement upgrade. Here are photos of before/after -- not a professional install but it works... IMG_1478.HEIC
 3 points
 -
Can you please confirm if the Tosot you have runs on R410A or R32 refrigerant? With R32 it means it is equal to the Atmos today. The Gree last year was advertising R410A and it's hard to know what you're getting since this Amazon ad and other sources often do not specify. See this article for the superiority of R32: https://aircondlounge.com/types-of-refrigerant-in-air-conditioning/ Still a good "Spring Deal" on Amazon now at $1, 020 + tax, delivery included. Wish we lived in one of your no sales tax states! With the high AZ sales tax, this comes to $1,105. The Atmos is $1,350 + $150 shipping + tax (both numbers without StartStart). https://www.amazon.com/TOSOT-Conditioner-Non-Ducted-Rooftop-High-Efficiency/dp/B0CDWR5RP9/?th=1 The Turbro soft start you show in the picture is $84 plus tax, also on Spring Sale today: https://www.amazon.com/TURBRO-Installation-Compressor-S15-Plus/dp/B0DK8BXHWH/2 points
-
Tosot A/C installed this winter just finished also. Looks similiar to Greer. Very similiar to Atmos. Caught amazon at weak moment Prime day (900.00) and just finished install. Pretty simple if you have a good back mine is not had most of my friends help get a/c on roof with painters scafolding. Has great reviews on dehumidifying. Not needed up here in mt but maybe able to retire someday and head south. Picture below of unit on top is not mounted(FYI) Just set on top. Hardest part was leveling a/c because of factory bump. Could not modify drain lines to get them to work without ton of modifications. Here is a few pics. I installed with 100.00 dollar tosot soft start. I was told really did not need, but decided to install for running on my lithium. Heater works great. (Slow warm Heat 850watts not warm enough to test a/c quite yet. Pulling 900 watts on high but still cold up here in Montana. Great job on Atmos.
2 points
-
I’ll buy the 2nd round. It’s all good,.2 points
-
@Teaney Hull 292 there are 3 ongoing post on the forum right now about lithium up grades and I must admit I have gotten confused on what was said in each one. What I haven’t seen in your post is mention of disconnecting the charge wire for you 7 pin connection. Just want to make sure you don’t miss that requirement when going to lithium. It was discussed recently @tallmandan thread below, https://olivertraveltrailers.com/forums/topic/10748-epoc-lithium-keep-it-simple-upgrade-advice/2 points
-
@tallmandan thanks for posting this and you're certainly welcome for my help. It was only written advice, you did this! You asked for advice and put it quickly to use in your own way! 😂 There are two other threads going here, where others could copy what you did. As you now know, it's not that difficult once you dig in and just do it. There is no better upgrade on our Olivers than 600AH in LiFePO4 batteries!!! Your installation looks great! I would say better than the factory, as compared to the before picture. OTT has a way with plastic loom that is not needed in most cases and yours looks clean. We are all amateurs on our first mods and we get better over time. Good job and I know you'll be happy with it. It was a good idea of yours to add the cut-off switch and the shorty cable you had to add the required length to the battery ground. Otherwise, having all the terminals in the rear would be a pain over time. Your bolts should be fine as long as you have a 1/2" of thread connected. Yes, check them again but if they are still good with time on the road, they'll stay good, and you can forget about them soon. I'm jealous as I paid $100 more for our Epochs! Hope to meet you on the road one day. We'll be in parts of CO this June. Definitely come see us in Arizona when you're down our way!2 points
-
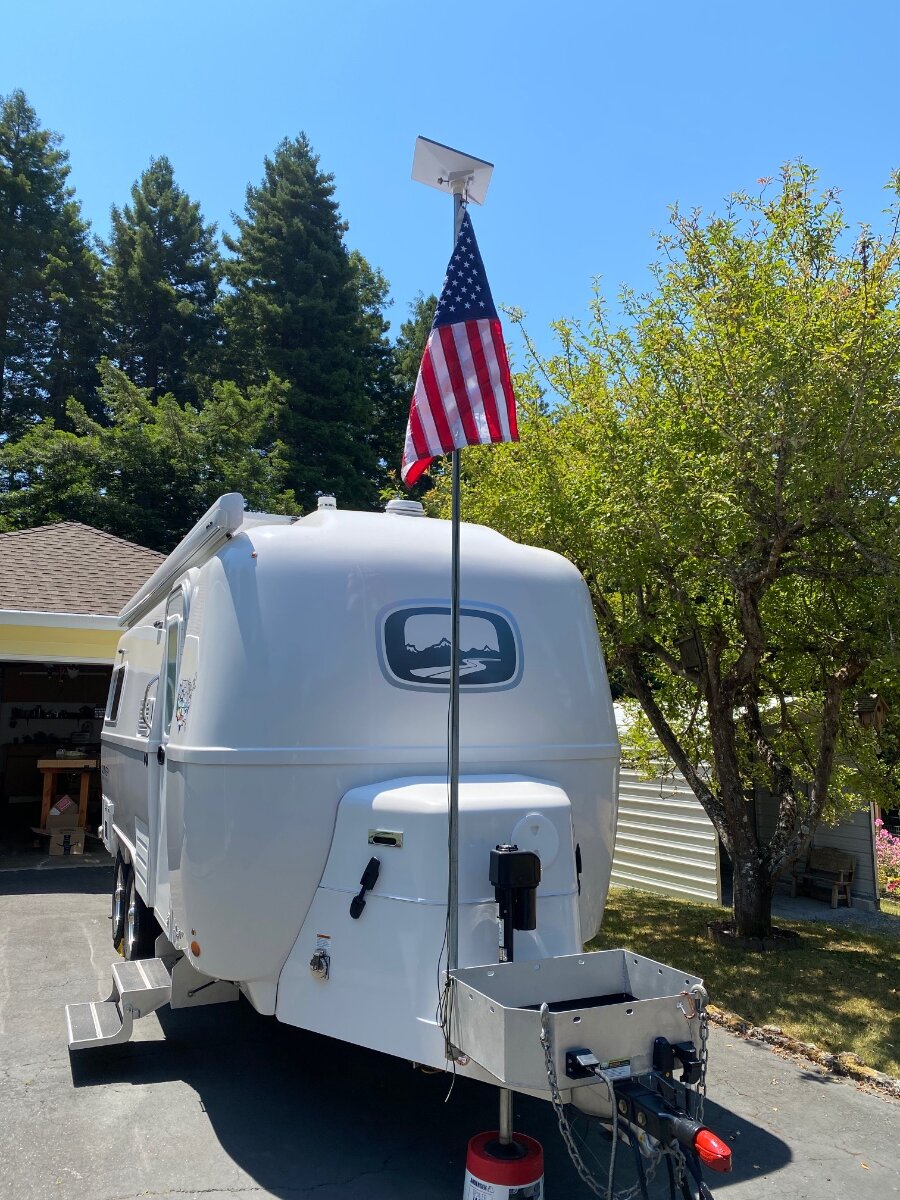
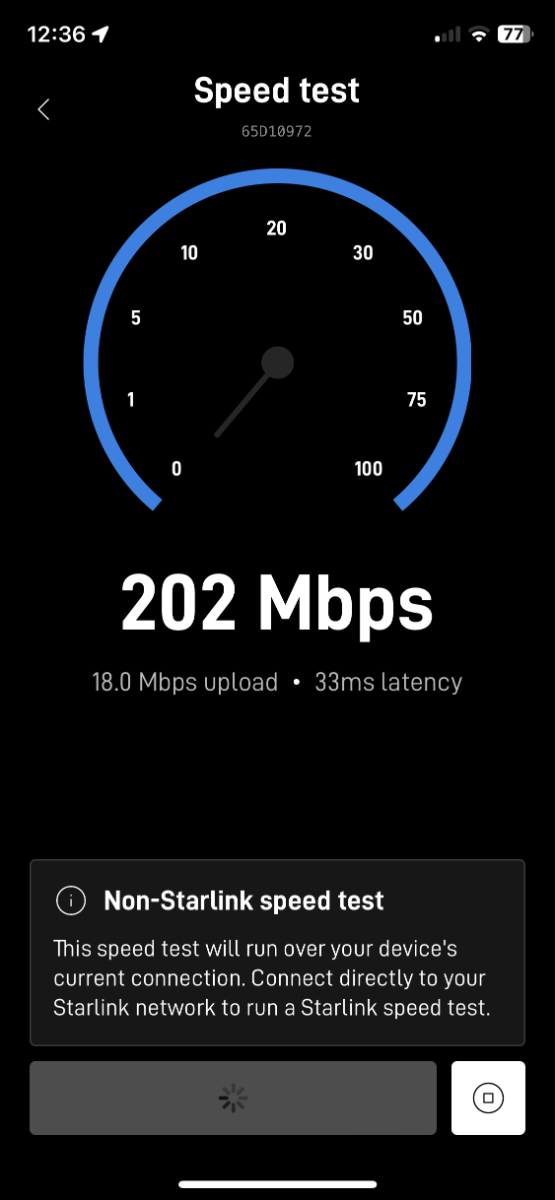
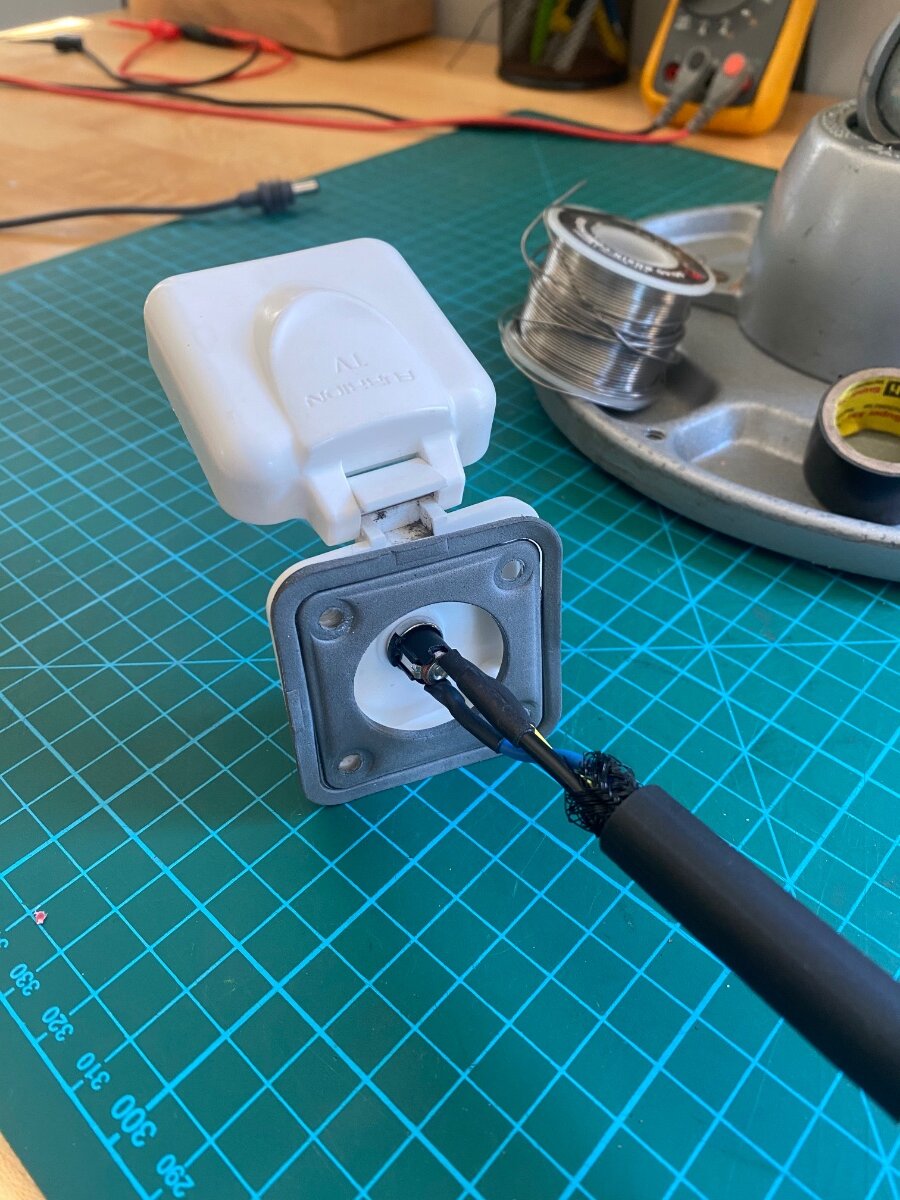
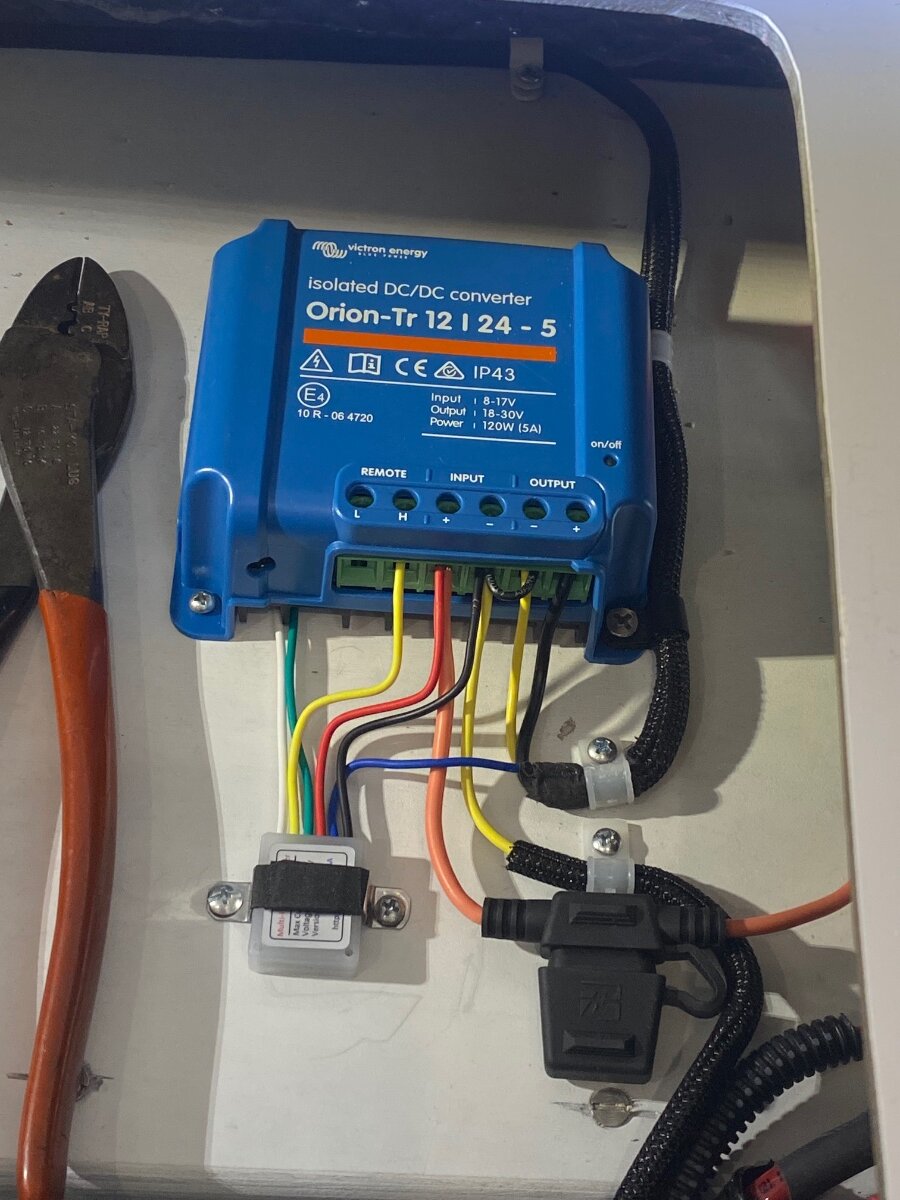
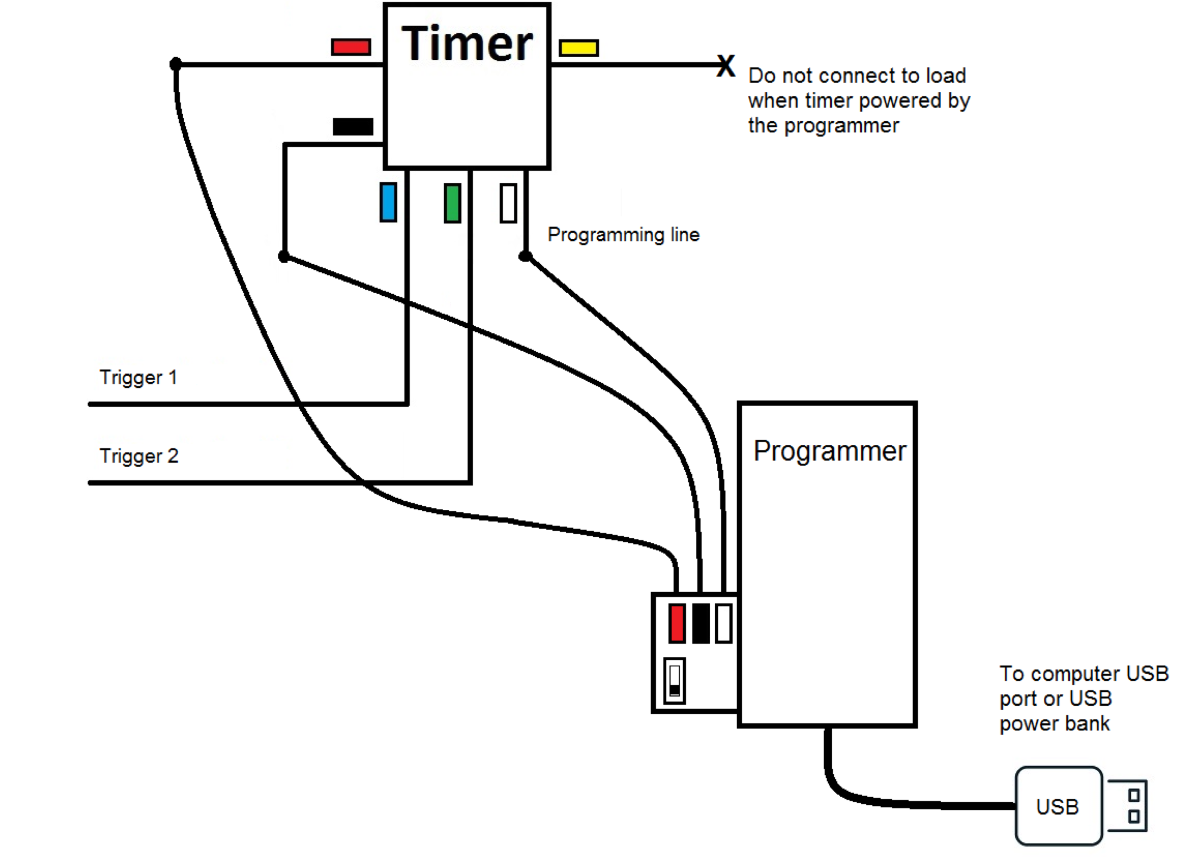
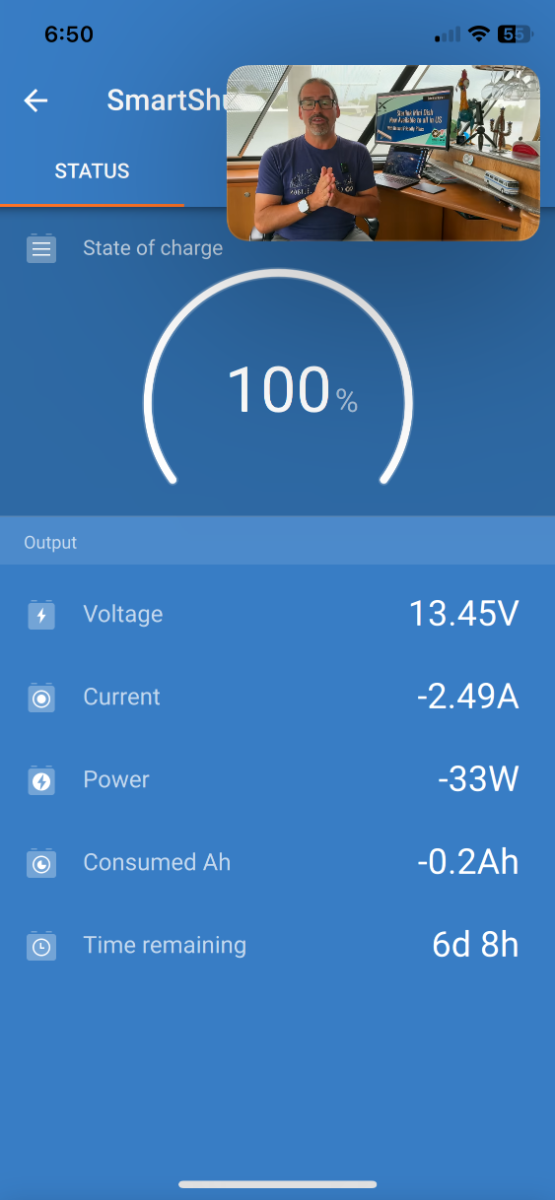
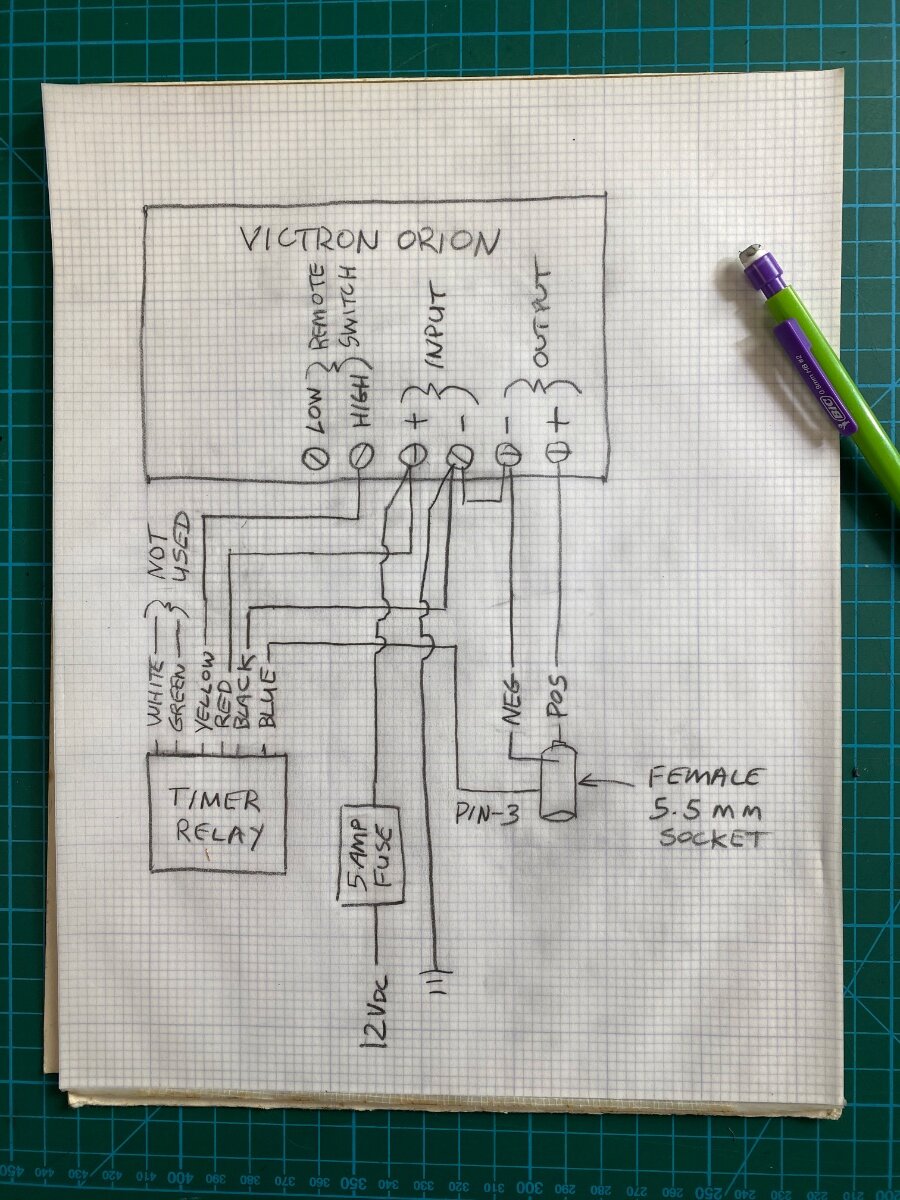
After lugging around my old heavy Gen-1 Starlink for a few years, I was thrilled to get the new Starlink Mini. It’s small and light, and the router is built into the dishy. It speed tested at 202 Mbps, a very respectable speed, although not as fast as the Gen-3 which typically runs over 300 Mbps. The Mini comes with a 50’ x ~1/8” diameter power cord that has 5.5 mm barrel connectors on each end. It also comes with a 120 volt AC wall transformer that puts out 30 volts dc (vdc.) The Mini is rated to run on 12 to 48 volts vdc, and 25 to 40 watts. It peaks at 60 watts with snow melt on. The 12 Vdc rating is an attractive feature, particularly for Boondockers who don’t have inverters. However, when I first hooked it up to the Oliver’s 12 Vdc battery… it would’t work?? After some investigation, it turns out that it’s not so simple and I’ll try to explain why: Given that the AC transformer puts out 30 volts, and the power is about 40 watts, then it would be drawing 1.3 amps per Ohms law (40w/30v = 1.3 amps.) With the same calculation at 12 volts, the amperage increases to 3.3 amps. The resistance of the long thin power cord can’t handle this higher amperage and the resulting voltage drop puts it below the minimum 12 volts operating range. In fact, I did some bench testing and found it would only work at voltages over 18 volts. There are solutions to this issue including cutting the cable shorter, using a larger gauge cable, or increasing the voltage. Without a better option, I chose to increase the voltage. I looked at cheapie power converters that would probably work, but I wanted something more robust and higher quality. I found a Victron Orion TR 12/24-5, isolated, DC to DC Converter, and it was perfect for the job. It has a 12 Vdc (+/-) input and an adjustable output of 20 to 30 Vdc at 5 amps. Standby power is under 80 mA, and it has remote on/off switching capability. It comes factory set at 24 Vdc, but I adjusted it to 30 Vdc output with the potentiometer on the front. To connect the Mini to the trailer’s 12 Vdc power system, I installed a 5.5 mm female panel mount socket into the Satellite TV inlet. I removed the Coax connector and the 5.5 mm socket and nut fits perfectly in it’s place. Oliver conveniently labeled it “Satellite.” If you need the satellite TV, then install a third “Furrion” inlet as I did for my old starlink RJ45 connector. I mounted the Victron under the rear seat on the street side. The socket wiring was sheathed and routed along the ceiling of the outside storage garage. There are a number of options to pick-up 12 volts in that area, I took power off one of the circuit breakers. I ran the negative wire to the ground bus under the rear dinette seat. The Mini comes with both a snap-in kick-stand and a 2” pole mount, and they’re both necessary for optimum RV use. I prefer having it on a pole, but we often have to move the dishy away from the trailer for a clear sky view. That’s why it’s a bad idea to shorten the cord. It also has an RJ45 port that I suppose is for hardwiring without WIFI, but I probably won’t ever use that feature. I built-up some PVC fittings on my 10’ Electrical Metallic Tubing (EMT) mast to fit the Mini’s pole adapter. (See the post for Tacky Starlink Dishy Mast). A little sanding was involved, and the starlink mount uses a thumb screw to hold it in place. It’s better to turn the Victron off when not in use, so I recommend using the remote switching feature with a switch installed in an easily accessible location. I’m too forgetful to switch the Victron off every time, so I came up with a way to turn it on & off when the Mini’s power cord is plugged in & out. Read on if your interested in that part of the installation: The “three pin” 5.5 mm female socket sold by Amazon has a built-in switch that’s designed for appliances that use either batteries or a 120v transformer supply. When the transformer is plugged in, the pin-3 switch opens to disconnect the batteries. This is opposite of what’s needed for the Victron remote switch, but it can be used to trigger a digital relay and it’s actually easier than it sounds. Amazon carries fun little programable 5 &10 amp timer/relays for under $20. I already had the 10 amp version in the Oliver for a hot water recirculation pump timer, and it works great! The 5 amp is adequate for this application, and you will also need the $20 dollar re-usable Bluetooth programer. They use 50 μA of idle current, which is nothing, and they can be programed for delay-on, delay-off, flashers, dimmers, duck decoys, and more. But for our application, we’re just interested in the trigger functions, specifically the “ground-open” trigger. Before installation, the relay has to be programed from a smart phone or computer. It’ links by WiFi to flash the program into the relays memory. Use wire nuts to connect the timer and programer together, and power them from a USB port. Follow the well written and simple programing instructions using the settings shown in the screenshot below. The relay requires a timing function, so I arbitrarily used function #12, which is “delay-on.” I set it randomly to 1.5 seconds. The trigger is programed to use the “Trig Blue” set at #5, which corresponds to the blue wire used as a “grounded trigger.” The green wire trigger is disabled. My wiring sketch shows that the timer is powered with 12 volts from the Victron’s positive and negative inputs. The relay’s yellow output wire feeds the positive side of the Victron’s remote switch (the negative side is not connected). The Victron’s output feeds the 5.5 mm power socket, and the blue trigger wire goes to the 5.5mm socket’s pin-3. Use a continuity tester to identify pin-3, it’s normally shorted to the negative lead of the socket and it “opens” when the male connecter is plugged in. The socket barrel is negative, or ground, and the center pin is positive 12 vdc. There is one other step to make this work. This Victron model is “Isolated,” meaning that the input and output “negative” terminals are isolated from each other. It needs to be “non-isolated” because the timer is grounded to the Victron input, and the socket is grounded to the output, and the trigger needs continuity between the two. So remove the jumper wire that comes on the Victron’s remote switch, and use it to jump across the two negative terminals. Victron support confirmed that shorting the grounds is not a problem, it just un-isolates it. This works satisfyingly well! I checked out the power draw with the solar turned off, and while streaming a video. It was 2 amps, 27 watts (after subtracting the parasite load). That’s a huge improvement over my previous Starlink, and I don’t have to worry about running the inverter and draining down the batteries anymore. I hope someone finds this useful Cheers! Geoff
1 point
-
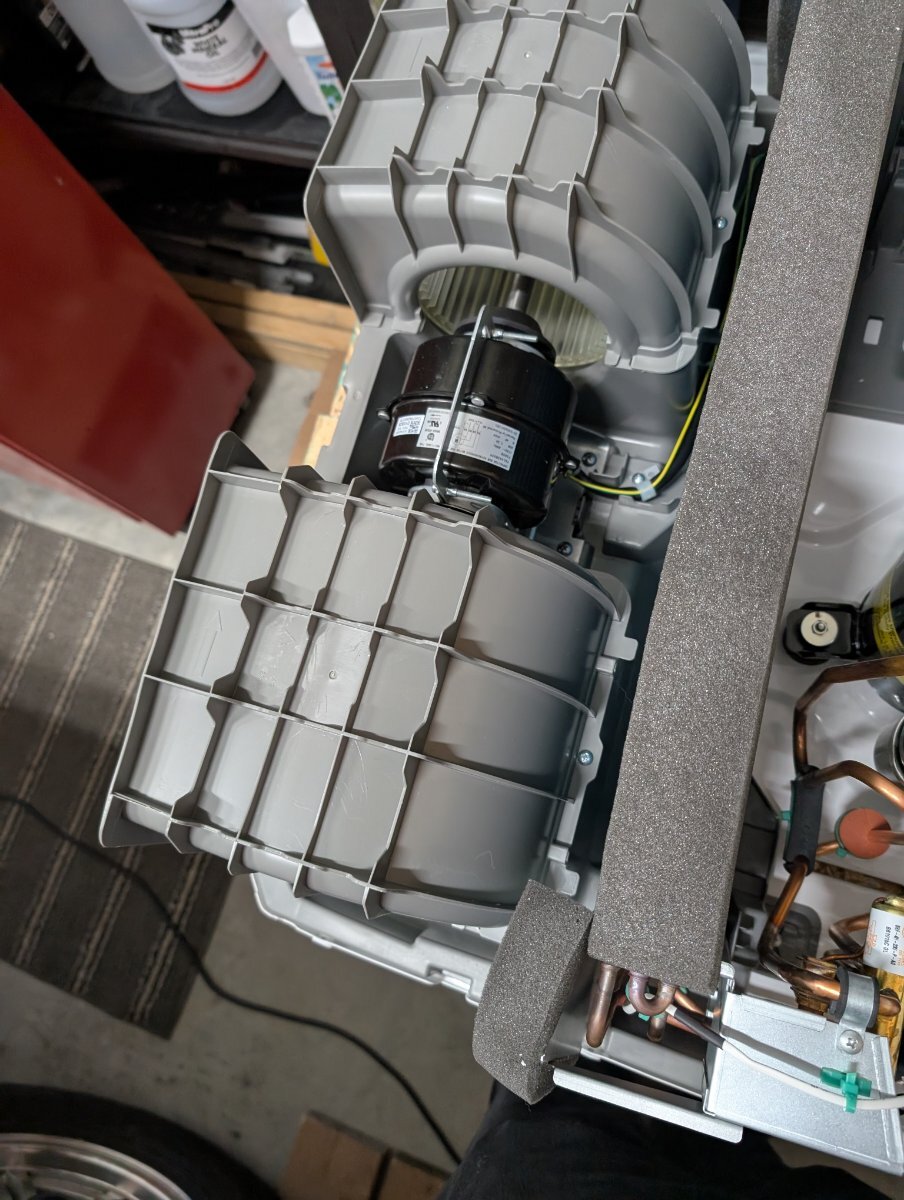
Thought this might help someone else out. The water pump was not working. The main switch light was on and functional. The bathroom switch was functional. No noise from the pump at all. I opening the compartment and immediately saw that one of the wires had come loose from the pump. I plugged it in and all is well. I think I will go back in and try to tighten the connection. Hull 1467
1 point
-
ZLarryb, the plastic connector/tee fitting nut is the red notation. the black plastic tie-down is the yellow notation. the green arrow is pointing to the green "witness marks". Witness marks are sometimes used to mark a 2 part connection like a nut and bolt or in this case it marks both sides of the water pipe connection. It is marked during installation on both sides of the connection and it is a quick visual confirmation of a connector being in the original position or not. Due to the angle of your picture, I can’t verify its position because I can’t see both side of the mark, but you can do a quick verification. Mossey
1 point
-
We also experienced this on a trip in 2017. Both wires were loose and I had to feel around the bottom of the pump to figure out where they were supposed to attach. Crimping has prevented this from happening since. Mike1 point
-
@ZLarryb I could be wrong...but in your photo it appears that your plastic twist connector fitting on your water line has loosened with vibration. This has been a reoccuring issue with my trailer and I periodically check all the twist fittings for tightness. In your photo, it's the line toward you with the black plastic tie-down that is out of place. I have loosened the black plastic tie downs, placed a thin piece of rubber or silicone (even a piece of a rubber band) between it and the twist fitting and then re-secured it. This has helped prevent loosening of those fittings. Just something to check....?1 point
-
My former a/c was the 11K DPll and I would run the LFPs to 50% SOC, never had a reason for a longer period of discharge. Last September a more efficient Dreiha Atmos 4.4 (15K/12K heat pump) was installed and looking forward to a hot summer test for run duration. In general, I run on inverter for lengthy periods at the Cow Barn when performing maintenance, cleanup, travel prep or just hanging out. Upon departure, shore power then provides 80A charge via the Xantrex 2000, however if the SOC was dropped below 75% an auxiliary onboard 30A Victron Blue Smart charger kicks in via a Cerbo for a combined 110A of rapid charge. When traveling, the a/c is run on inverter during various stops to eat, shop, rest etc., as necessary, and when back underway a 40A DC-DC charger then restores the SOC until a destination is reached. If the night’s stay is off grid and a/c is needed, a small dual fuel genny on propane is deployed, which also brings the LFPs to 100% SOC. This is how we roll given our style of camping; lack of solar has never been an issue, nor thoughts of a larger Ah battery bank.1 point
-
Just so you all know, my brain is overflowing with all the great on and off comments. Love them all. I’ve been cutting and pasting notes, and should have created a separate folder for just Batteries and Solar and install. You are all giving me a college course in Oliver Trailer Life. Thanks1 point
-
You are welcome any winter to visit us in Tampa1 point
-
No, you will still get the full 45 amps of charging, it's just that it's split between two batteries when wired parallel, sending 22.5 amps to each.1 point
-
Another reason we love this forum. Even the Master learns here.1 point
-
Oh, did not know about 2 Lithium batteries, means 45 amps with the new 4045CVS board will only charge 22.5 amps. Will have to camp in cool months/up North.1 point
-
Oh my goodness! That was exactly what I was doing! I can’t believe it didn’t dawn on me to put the nut on the back side of the Furrion cover! I spent the next hour in a panic, mumbling bad words occasionally, searching Amazon for a panel mount with longer screw threads! (I found one eventually.) Geez Louise.1 point
-
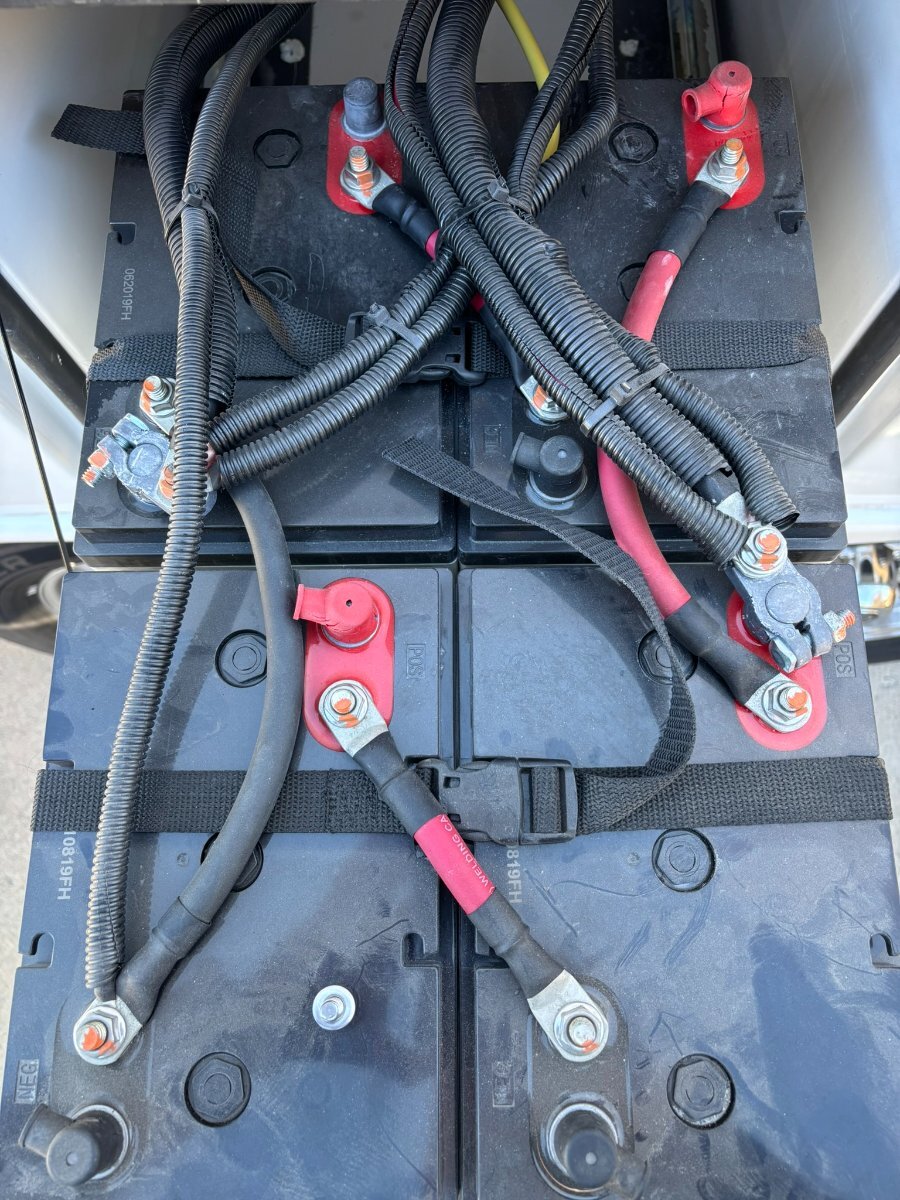
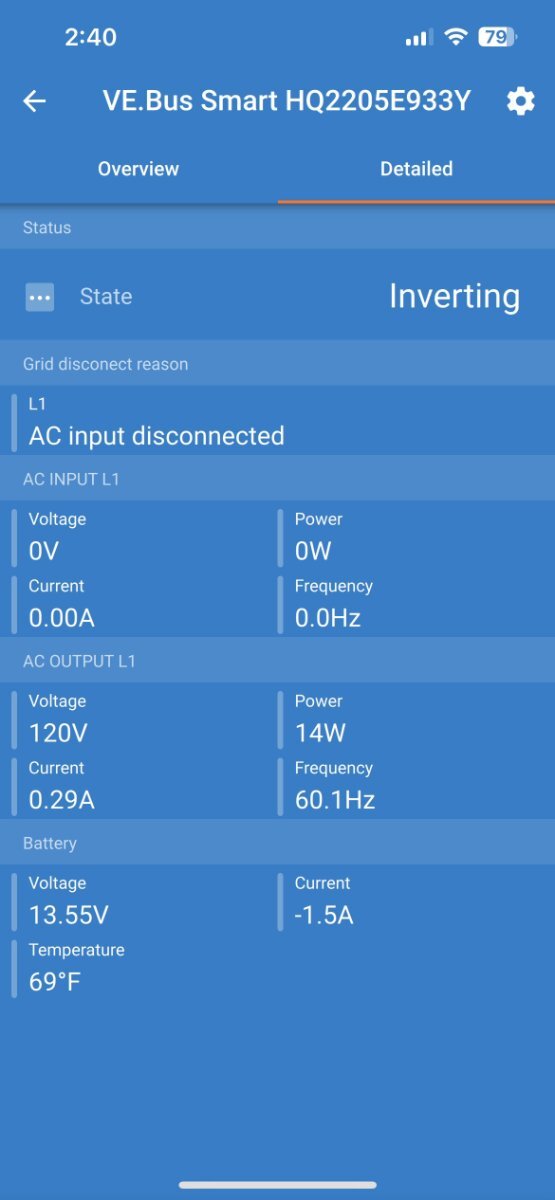
I installed the VE.bus (required addition to the Victron Multiplus providing Bluetooth when going without screen displays), connected by Ethernet cable, in the same basement area on top of the wheel well. I put it there since it measures temp and I wanted it near the top of the same area where our inverter/charger is installed. The picture shows the "Detailed" tab of the app. You can see that today mine reads 69F and my Ruuvi sensor in the back trunk area shows 60F, which is about our outside temp today. The screen states Battery Temp because they assume you install it in the battery bay. So, the Victron is adding up to +9F on a cool day (hardly inverting and not charging at all since shore power is disconnected). Also, the cooling fan is off. BTW, these Beech Lane fans need resetting whenever power is disconnected. Above I mentioned the VE.bus is required. This is only true if you are like me and do not want the other Victron toys and displays, just app connection. I also mentioned USB or USB-C which is wrong for this device. The VE.bus is connected by Ethernet only to provide Bluetooth access to the Multiplus. This VE.bus also allows you to turn the Multiplus ON/OFF, charger ON only, or inverter ON only. There is an accessory you truly need for configuring the Multiplus. It's connected to the Mulitplus also by Ethernet port and at the other end of the device there's a short USB or USB-C cable to connect to your laptop. I have this sitting under the rear dinette seat but have not needed it since the original install. Though I believe I will need it again soon to up my batteries charge rate from 50A to 100A. https://www.amazon.com/gp/product/B0BNBVKSTH/
1 point
-
It’s our first trip in our Oliver and a couple months behind schedule because my bride delayed her retirement a few extra months ………I have been chomping at the bit to go to the southwest and have been gleaning information from old threads on the forum I went to the rally last year as a non owner visitor to tour the open house Olivers and see the real thing . very welcoming group at Guntersville and very knowledgeable , I hate to miss it this year Steve Morris and others without hesitation gave me an Oliver tutorial that cinched it for me and then I started looking at the used market real hard and found a 2022 that the owners were negotiable Ready to get on the road after planning this for over 3 years1 point
-
I will definitely be adding solar sometime next year. My son will be going off to college and my wife and I will be hitting the road for a VERY extended period. Want to be ready for boondocking, which I know we'll have to do along the way, whether she likes it or not! In the beginning stages of planning now and will stuff in as many amp hours worth of batteries, and as many watts of solar as possible, but still crunching numbers and comparing all the other parts and pieces. I really just wanted to go all Victron since I love their monitoring system but when comparing the invertor function of the MultiPlus 12/3000/120-50 to the Xantrex XC Pro 3000 I found a substantial difference in wattage ratings as the temps climb. At 104 degrees and above the Victron de-rates much more than the Xantrex and it only has 1760 watts available for inductive loads while the Xantrex has 2400. Gets even worse at 113 degress where it's 1628 vs 2220. I know we'll eventually end up in some pretty hot places where we'll need to run the AC for a while and I want to be sure I can run it under those conditions, so for now I'm stuck on what to do. Thankfully I have time to figure it out and make a decision. Sorry to hijack your post, @Teaney Hull 292! I'll buy the first round next time!1 point
-
I use mine to run the a/c at nights, as needed, which is often as we make our way to and from a far destination. In doing so, my house batteries get a boost, as well, with no solar. Although I can run the a/c on inverter for several hours, I like knowing we can stay comfortable in the event of a lengthy unplanned holdover. Happy wife, happy ‘travel’ life!1 point
-
JT, I'm not sure which connector you have, or how you're installing it, so forgive me if I state the obvious. I think you might be trying to put the nut on the inside wall of the trailer, that would probably be too thick. The nut goes on the back of the Furrion cable TV port after it's drilled out to fit the Rj45 panel mount. It's assembled on the bench, then installed on the trailer with the 4 mounting screws. The hole through the Oliver might need to be enlarged a little, this is best done with a step drill bit. I sure hope this helps you out!1 point
-
Personally, I won't go anywhere without my little Honda generator. Haven't had to use it yet but it's nice to know it's there in case of emergency. Can run the AC on it for 6-8 hours on just a gallon of gas. Not having solar installed yet is another reason I carry it, so I can top off the batteries in the unlikely event we're ever boondocking (wife hates it 😂). Also, I get that lower charge amps might extend battery life, but in your setup you're only charging each battery at 25 amps, not 50. To get to the recommended 50amps you'll have to set your charger to 100.1 point
-
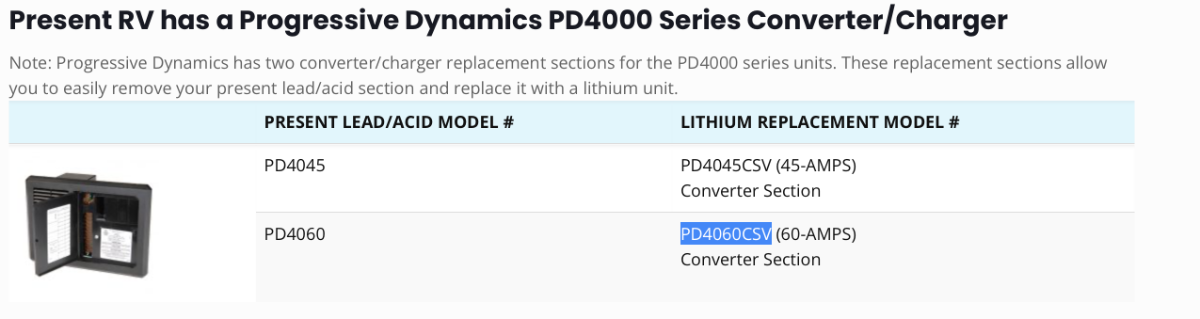
If your current PD4000 Charging board does not have the AGM/Lithium Jumper setting, the PD4000 Series Lithium converter upgrade board is available via E-Trailer. Please check which original converter board you have....60Amp or 45 Amp. (ours was 60Amp) To upgrade your trailer if you have a 45Amp board, stick with the 45AMP LI plug in...if you have 60Amp board, then use 60amp LI version. (Safety for wires is important.) This upgrade only takes about 30 minutes to complete. Here's the overview link to the Progressive dynamics site that shows the lithium replacement part number. https://www.progressivedyn.com/lithium-converter-replacement-units/ Snip from that page: E-Trailer has both boards available. 45 Amp Version https://www.etrailer.com/Accessories-and-Parts/Progressive-Dynamics/PD4045CSV.html?feed=npn&gad_source=1&gbraid=0AAAAAD_vMtnZsg_-Is9SAt6Ew5v33GB0V&gclid=EAIaIQobChMIpem7gN-qjAMVpiytBh3oeBfeEAQYASABEgLqC_D_BwE 60 Amp Version https://www.etrailer.com/Accessories-and-Parts/Progressive-Dynamics/PD4060CSV.html?feed=npn&gad_source=1&gbraid=0AAAAAD_vMtnZsg_-Is9SAt6Ew5v33GB0V&gclid=EAIaIQobChMIi-LJ9N-qjAMVY83CBB3qGQb2EAQYASABEgK0DvD_BwE One big difference between the bigger victron or xantrex charger/inverters is that they charge the batteries at >120Amp output...so faster charging. But you spend a lot more for functions you already have in your trailer. Often the simple path is often the best....with a simple plug in board upgrade and new LI batteries you'll be served for many years. Craig
1 point
-
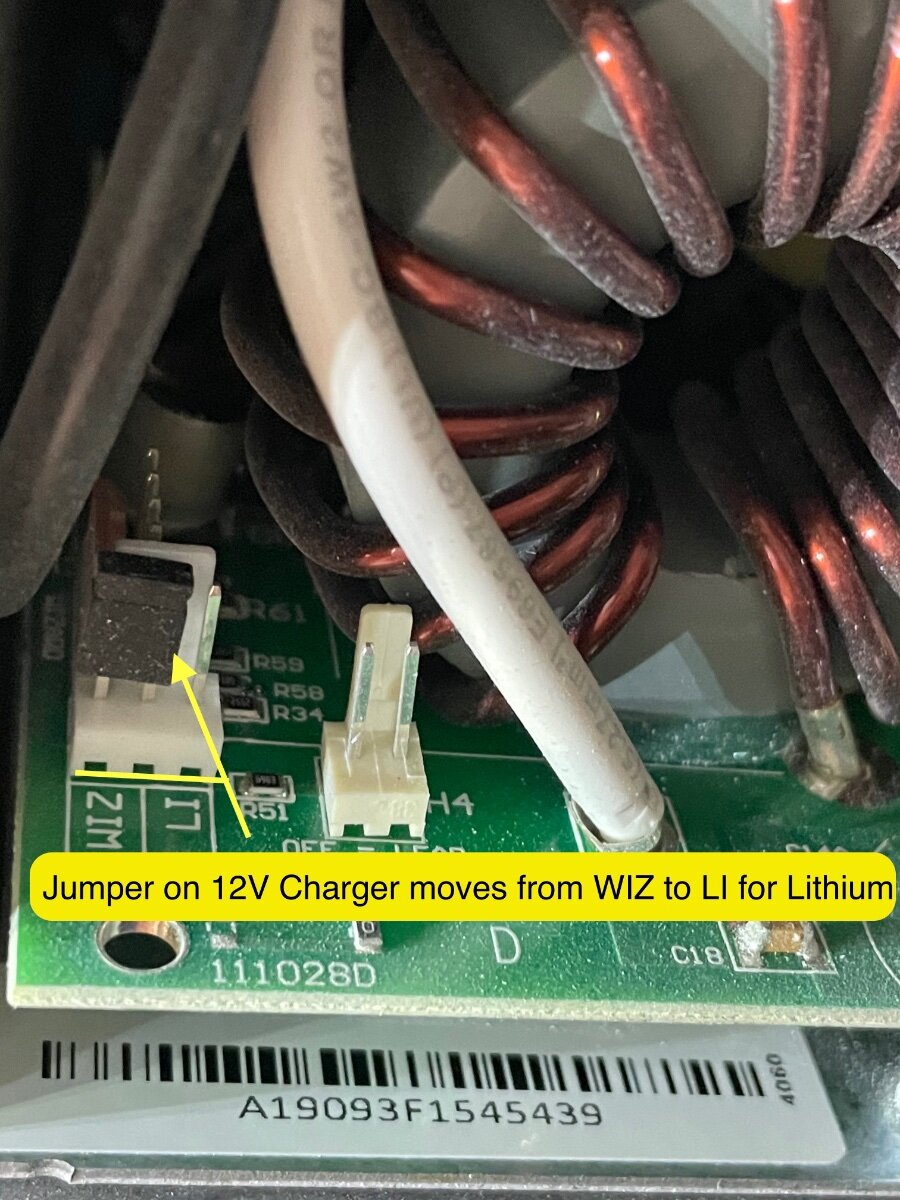
I assume in 2018 model, your xantrex is the INVERTER only function, and for 12V charging you're using the internal progressive dynamics charger (under the dinette seat). Some folks with the Progressive Dynamics charger see a jumper switch for charging lithium. The issue with that setting is it's not the "best" way to charge lithiums as it's simply a constant 14.6V voltage...not a ramped profile. The WIZ setting is a PROFILE for AGM or LEAD Acid. The LI Setting is just 14.6V (no ramp/no profile). Some battery manufacturers (including Lithionics) won't warrant their battery in presence of the constant 14.6V no profile setting. Whichever battery manufacturer you select, LI Time, Epoch, etc....be sure to check what they need as a charging profile. If a constant 14.6V works for them, then you might be able to a drop in maintaining your existing Inverter and existing charging system. I know that battle born did warranty their batteries with the Progressive Dynamics chargers. Also, there are new "Lithium compatible" plug in boards for progressive dynamics that now offer a lithium profile wizard. So just upgrading the charging board in your Progressive Dynamics energy center is a possibility. In our case (2019 model) we swapped out the Xantrex 2000W Inverter (only) for a newer Xantrex 2000 inverter charger before installing new Lithiums. My full upgrade article is here. This may be too much of an effort for what you want to accomplish. https://4-ever-hitched.com/ggs-blog/f/lithium-battery-upgrade?blogcategory=Electrical+Upgrades
1 point
-
We went down with the kids to visit my nephew last night in Birmingham, AL. 3 hr drive. The Oliver is very well suited for city boondocking. We parked with no hookups at his apartment complex in a great spot that very few TT/TV combos could have reached. We had 100% batteries (920 Ah) when we arrived due to the solar and DC/DC charger working great finally. During the night, it dropped down into the low 40s. We had the heat set at 68 AUTO on the Atmos and I have to say between the quiet and new Tochta mattresses it was probably the most pleasant night I have spent in the Oliver. Comfortable and quiet. Great combination. The Auto mode on the Atmos works very well heating or cooling. I have said this before but I like the fan on more during cooling for the air circulation in the cabin. Doesn't get stuffy. I did kick on the heat with the dedicated Honeywell thermostat that sits where the old AC control was and it fired right up.1 point
-
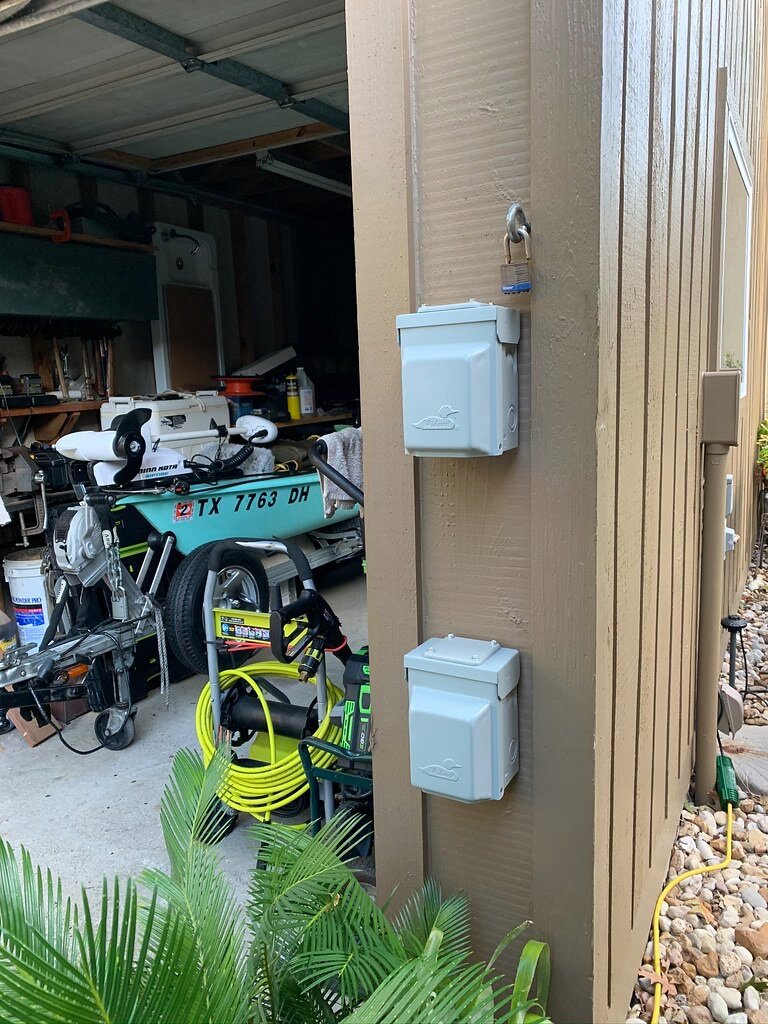
That’s what I did, self installed a 30A for the Oliver and 50A for my Son’s RV when he visited.
1 point
-
Well, plans change! After deciding this whole conversion project was above my pay grade, I spent some time talking with my local solar company reps about my system. I have run out of battery several times with my old AGM's when camping off grid where the sun was rarely seen. Rain and gray here in the PNW, especially in the shoulder seasons. For my current needs, the 400 amp/hr Victron will have more than 3 times the power available to me compared to my old AGM's. Maybe overkill. But looking to the future where I may be getting a compressor fridge (when my 3 way gives up the ghost) then things start to even out. As far as I know, this is the most power one can pack in to the Elite 1 while maintaining the OEM battery box and tray. I also changed my mind and am getting a Victron inverter/charger. Mostly for the better charging compatibility with the Victron batteries. We'll see how this all pans out. The components are expensive but I believe Victron makes a quality product with stellar representation. Pics will be forthcoming when this all gets completed for Elite 1 owners (and anyone else) who may be interested. Cheers, Dave1 point
-
The victron batteries and gear are expensive, but used by many offshore sailors, for many reasons. Separate components are easier to replace than entire batteries, service available around the world. Great technical support, from what i hear from my sailing friends.1 point
-
Wow, great idea Ray with the help of your friend in the solar biz! This is $3/AH (given this is the true OTD price, no tax and free shipping). I spent $1800 OTD on 600AH of Epoch batteries which is again $3/AH, but you fit 800AH in the Oliver battery bay at this price. What an EXCELLENT upgrade! I'm not the guy who worries about warranties and most LiFePO4 warranties are 11 years but likely not full replacement after 5 years. EG4 claims 15 years service to 80% DoD with a 5-year full replacement warranty. It appears they are being honest and do not want to get into prorating warranties after 5 years. Really? on your gorgeous XPLOR! I just assumed you had the OEM Platinum Package. We needed the LiFePO4 upgrade this year, along with Victron MP2 and 400W suitcase solar (now 720W total), allowing us to dry camp for days, and up to a week off-grid using several 110VAC appliances daily. AGM is fine for those who camp with hook-ups. We had very good condition lead-acid batteries, replaced in 2022 by the prior owner. We could have used these for many more years but would have only 220AH available which can be depleted over two cloudy days. Instead, we spent $1800 on 600AH LiFePO4 and sold the LA batteries for $300 on Craigs, net cost $1500! Four years ago on a prior RV, we installed AGM since back then the cost of LiFePO4 was prohibitive. If Ray had posted this 6 months earlier, I would have copied this install for 800AH! Hard to beat this capacity/value. Instead, we'll limp along with only 600. 🤣1 point
-
Thanks - except for that "old dog" part.😁1 point
-
Have you seen the dude? Personally, Chris and I are not beard people, don't get the big beard thing, let alone a naming your battery company as such. Beards, tattoos, piercings, young people needing a good bath and shampoo... I'll stop there. I would say that if there is a new viable battery company, producing great product in Athens TX (not just a website, would want to know of the manufacturing facility), I would support them. I prefer the small co vs online reputation. We have driven through Athens TX, a cute East Texas town like many others, a good half dozen times traveling from Georgetown TX to UT Tyler TX for Adam's tennis tournaments during high school and college. Love all the great small towns of Texas! In East Texas they have a local burger chain named "Jucys." Hey @Jason Foster what do ya know about Jucys? Can you FedEx overnight me a 3/4 LB butter burger with fries? (make that 4 orders!) Jucys Hamburgers | Best Burger in East Texas1 point
-
Is the Bigbeard lithium phosphate (lifepo4)? Not finding the chemistry specs. Also concerning is a tag on "for indoor use only". Not impressed with their website. Maybe I missed something.1 point
-
Hey, Chris - we met at the owner's rally last month. Wish we could've talked more about this then and exchange a ton of info... Anyhow, I'm thinking you're right on track with your approach. Breaking this down a bit, IMO - the battery upgrade (whatever AH storage you choose) and the Victron SmartShunt is what I would call Phase-1. Your 4/0 connections between the batteries and inverter are spot on. Depending on the distance to your negative and positive bus bars - you may consider at least 4 AWG, but that's just me. We upgraded with 2 BB's for a 300AH storage and its suited us very well for our style of camping and boondocking. We'd love to have 640AH or more so we could run the AC for extended periods - that's on our radar, for sure. Don't worry about the "custom" battery connections because you'll be making them yourself with the proper tools - several posts regarding this are found in these forums. The new 45W PD converter board with the Lithium switch is another spot on move on your part. We did the exact same thing last year with the BB upgrade. We've had ZERO issues (knocking on my head) with the PD converter/charger. Regarding the Blue Sky charge controller - this is a great piece of kit. We ran an MPPT BS CC on our AS with 4 AGMs with no issues. The key is if yours is a PWM or MPPT controller. You'll get way better efficiency with the MPPT version - just something to consider. We chose to go with Victron's MPPT 30A CC - very happy with its performance with the 340W worth of modules on the roof. OK, Victron. Great devices, IMO. Except for our Renogy 200W portable modules - everything so far has been a Victron upgrade for our style of boondocking. Game-changer? Maybe. But your Phase-2 might be to get your Victron DC/DC charger. There's a new 50A model available - ours is the 30A unit, but it's plenty of current to get the SOC to max-out by the end of a tow-day. These chargers are real happy running off new smart alternators in TVs manufactured since roughly 2015. @Geronimo John has a wonderful LOI (list of instructions) for this modification, TV and OTT. Phase-3: Victron's GSX monitoring system with either the 5" or 7" touch screen. The screen graphically indicates the status of your charging/load conditions with just a touch. It's a sweet addition to any Oliver owner intend on extended boondocking operations - again, this upgrade is based on your particular style of camping/boondocking. Phase-4/5: Timing of this could easily be based on when your Xantrex 2kW inverter goes Tango Uniform. When ours goes down we'll go for the Victron 3k inverter/charger. Then crank in Phase-5 - this consists of upgrading to an "efficient and quiet" 13.5kBTU HVAC unit with appropriate auto transfer switches that can operate from the battery bank for extended periods. As you've probably already experienced, this path is a very deep and broad RABBIT HOLE! What you're contemplating is not a trivial endeavor - it's like trying to eat an elephant. It's doable, but you have to take it one bite at a time... PM anytime specific challenges arise - we'd be happy to help out, brother! My $0.021 point
-
This is solid evidence that Oliver continues to do the right thing. Regardless of how the 5K rated coupler got to Oliver, Oliver installed it on an Elite II, and took financial responsibility for replacement when it failed, even after expiration of the 1-year warranty. This confirms one of our reasons for choosing an Oliver: a culture of integrity.1 point
-
So everything is working. A/C is running off the batteries as we speak. Woohoo! Shore power to ATS to EMS to MP2 AC IN then AC OUT to panel. GFCI circuit hooked back in to panel, all shore power running through MP2. Finally.... WOooohooo... and power assist is so cool. Still have to mount the Solar charger.
1 point
-
Mossimo, that is interesting. Figures I would pick the one epoxy that does not stick to some plastics. The good new is that is rock solid as of now and most of the weight is being held up by the aluminum supports. I did buy the Marine EP-11 which is stronger than the original formula. I don't know if that makes any difference. Thanks for pointing that out that information though. Best, M1 point
-
I was curious about your use of HDPE and PC-11 Epoxy as I haven’t ever tried using the 2 products together. I haven’t used any of PC-Products line of adhesives, so I went their website and looked into their does and don't. I found the information below, so I will be looking forward to your results. Mossey
1 point
-
If mounting heavier (I.E. Inverters, converters, DC-DC Charging) equipment to vertical surfaces several owners have found that just epoxy, JB Weld or other such products over time fail. For this reason, I use and suggest also adding SS Fender washers and small bolts thru the vertical Ollie surface, the mounting board and the mounting holes of the electrical gear. For our 3,000 watt Renogy Inverter, I used stainless steel four sets of 3/16" bolts, fender washers and nylock nuts. For my grins I also used JB Weld between the vertical hull surface and the cutting board mounts. No worries on our 15,000 mile Alaska trip and over many Rocky Mountain fire roads., Geronimo1 point
-
I have, like many other old school trailers, 2 x 10⁵ agm 12v marine batteries. So, 210 ah, total, marine deka/East penn group 31 batteries. I probably come close to your description above. We can get appreciable charge, when traveling. We also have 400 watts of fixed solar, now, so less important, these days. But still important for those who don't have solar, and have lead acid/agm batteries. Level the front, with the jack, disconnect from the truck. With the plug dangling, not too hard to remember to reconnect in the morning.... Remembering to unplug from the tv is kind of ingrained, from old school days, so not a big deal. We're used to it. Many years of practice. As times change, and most people get lifepo4 batteries, Oliver may discontinue the charging wire. As may other manufacturers. We'll see. Times change. Batteries change. Practices change. Just saying, for those of us without lifepo4 batteries, the charge wire is helpful . PS, we live quite well, many months of camping each year, with 210 ah of battery power. We have learned power management. We camp, don't have an inverter. Everyone has a different camping style. Mine is different from yours, I'm sure, and I'd never criticize yours. We each decide what is most important, and work within our defined limits.1 point
-
If you checked continuity at the plug and that changed after you removed the wire shown in your picture, then you must have removed the correct wire. I believe that the automatic circuit breaker is shown on my Oliver supplied wiring diagram for 2017. My trailer is a 2017 model, hull 208.1 point
-
I've had the Iceco VL75Pro for about a year. Works great, has the danfoss compressor and I paid about $870 bucks with a coupon. I have a similar setup to Steve with solar to charge a battery in the truck bed that then powers the fridge. With partial sun it will run indefinitely.
1 point
-
Hi everyone, I'd like to introduce myself. My name is Brian McCord. My wife and I just purchased #215. Super excited to be officially in the mix! One of our first agenda points is to remove the mostly non-functional AGMs, and to get a basic LiFePo equivalent system underway. I've read through the other threads, and feel like I'm ready to take this on... Thinking to outfit as follows: Batteries: 2) 100AH Battleborn, with the likelihood of a third in the next year or so. Solar: MPPT Zamp upgrade from original 2017 unit Charger (DC): Remove/bypass existing charger, use Xantrex 2000 watt inverter/charger (to replace original inverter already installed) Monitor: Victron Smart shunt, possible expansion in future Am I missing anything? Guidance and wisdom most greatly appreciated! Kind Regards from Southeast Tennessee!1 point
-
@Minnesota Oli did a great post on his upgrade, with lots of photos1 point


.thumb.jpg.e34bf01ef7f7d5e99ad31856d45afbeb.jpg)


-
Recent Achievements
-


")


")


")

