Leaderboard

.thumb.jpg.e34bf01ef7f7d5e99ad31856d45afbeb.jpg)


Popular Content
Showing content with the highest reputation on 01/24/2026 in all areas
-
No way was that caused by a ply failure. You can tell by the wear pattern and the melted rubber buildup on one side that it was caused by a lockup.3 points
-
Hey JD! I resemble that slight! I use a 6" torpedo level. Don't need the accuracy of a foot long torpedo! Besides the only foot long I get is at COSTCO for $1.50. LOL2 points
-
A dead short to ground should leave you with no brakes and a blown fuse, though if only one wheel is getting power on the blue wire it's possible it could be locking only that wheel up. Also, if that one problem wheel has a short in the electromagnet lowering it's resistance it's possible that most or all of the current is going to that one wheel only too. Brake controllers also all send a "phantom voltage" on the blue wire so they know when a trailer is attached, though I don't know if the current is enough to cause a problem if there's a problem with one of the electromagnets. Probably a little different with each model.2 points
-
Yes - poor wording on my part. Perhaps what I should have said was that there might be a malfunction in the wiring system that would (intermittently) cause the brake on that one wheel to engage. And, possibly, that could be inside the axle wiring. Better? Bill2 points
-
I’m thinking a short gives you no brakes, though I’m not certain. What could possibly supply full amperage from the Blue wire to one wheel only? Or are the brakes fine on that wheel and shorted/dead in the other three. That would cause a lockup! Suggestion: test brake amperage at all 4 wheels independently.2 points
-
I often tell myself “life is too short to always stay confused”. Thanks for helping clean up one mess in my mind!2 points
-
Get out of the dark ages guys (more info in my post above). Bubble levelers, ha! 🤣 Then I used the wrong product term 'Rapid' as we also use the 4" levelers. I use two Andersen 8" round blocks under the rear stabilizers and a stack of 1" blocks for the main hitch jack, sometimes very few and other times many are needed. And no need for a tire change jack on an Oliver!2 points
-
I didn't like the huge ones that some have used. So, I simply got a 3 of them at WalMart like THESE. Bill p.s. I put one under the bath window, a second exactly opposite it just before the front door and a third right on the nose of the trailer - all three are right at the belly line. Also, mine are white - not the grey shown on the Amazon link.2 points
-
Tire pressure is independent. Something jammed your wheel temporarily, reasons unknown or TBD. Keep an eye out…2 points
-
The mobile rv tech came by yesterday and was very helpful. He pulled the tire and drums and the brakes looked great. Little pad wear no rust, dirt, rocks or extra parts. Bearings are fine. He had no explanation for why the brakes would temporarily lock up. He suggested that perhaps there was a ply failure that resulted in a bleb that then resulted in increased wear. I think this is possible but hard to imagine occurring in the center of the tread. I am happy the brakes are ok but I suppose time will tell. I will be lowering my tire pressures as per JDs suggestion. I am not sure pressure had anything to do will our recent tire failure but lower pressures certainly seem to make good sense given the trailers weight. Thanks to everyone who posted advice.2 points
-
We turned the fridge on DC one full week ago, the old absorption fridge running on DC 24x7 since. Courtesy Lights on 24x7 too. Coffee water heated daily with 1100W electric kettle. TV and soundbar on morning and night. Cooked on the induction plate, fired the Emeril Air Fryer and ran the new Chill Cube A/C three times just to play with it! It’s been winter hazy, smoke at the Q with fires in the distance and all the dirt RV’rs stir up, not much solar, say +6A on average. We just got back home. If we were camping longer, I could have setup the Renogy 400W suitcase. Still running the fridge since by Monday we’re “on the Road Again!” Might be time to plug in! Though we still have 128 Ah available! 🤣 Looking at the app, it’s so cool LiFePO4 batteries can be down to 14% SOC and still have 12.9V potential! I can tell the fridge isn’t cooling at this moment, since we are charging net +7.3A. My new 3rd battery is again lower than the others, but not the major delta as before. It’s nice not being in a hurry to switch to LP or plug in! 😎
 2 points
 -
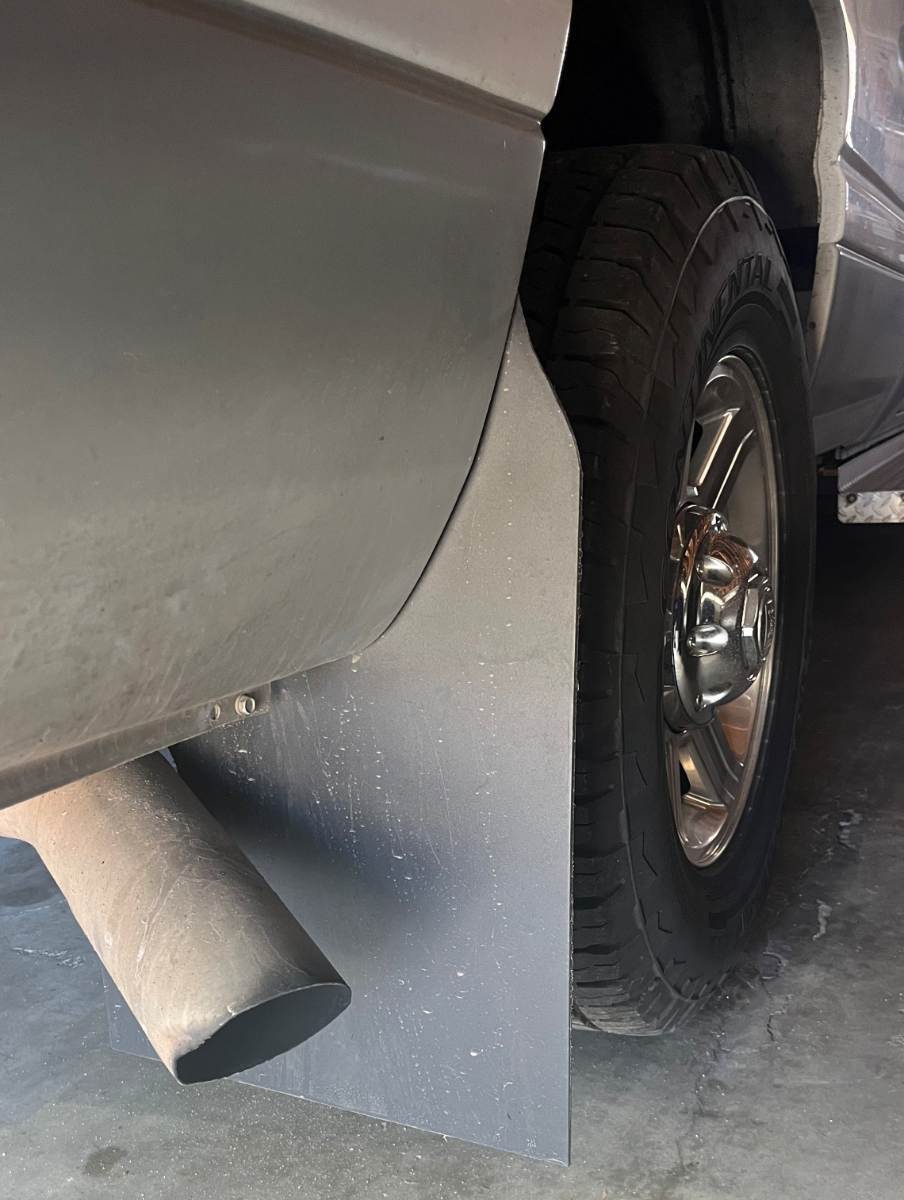
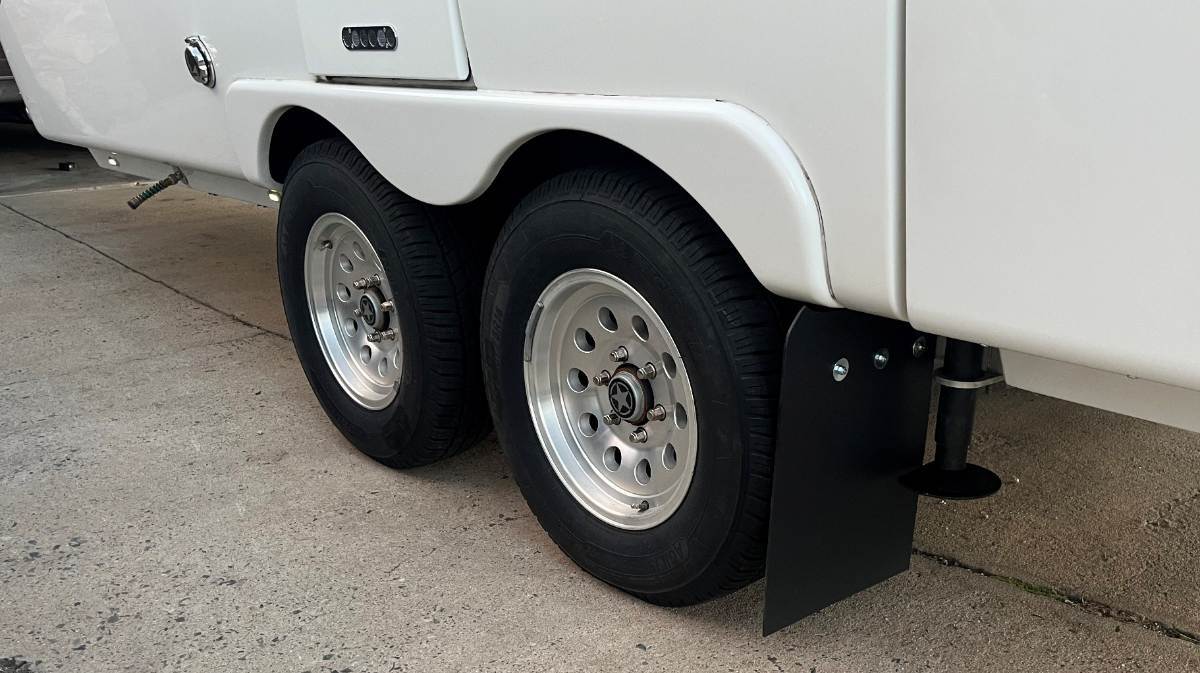
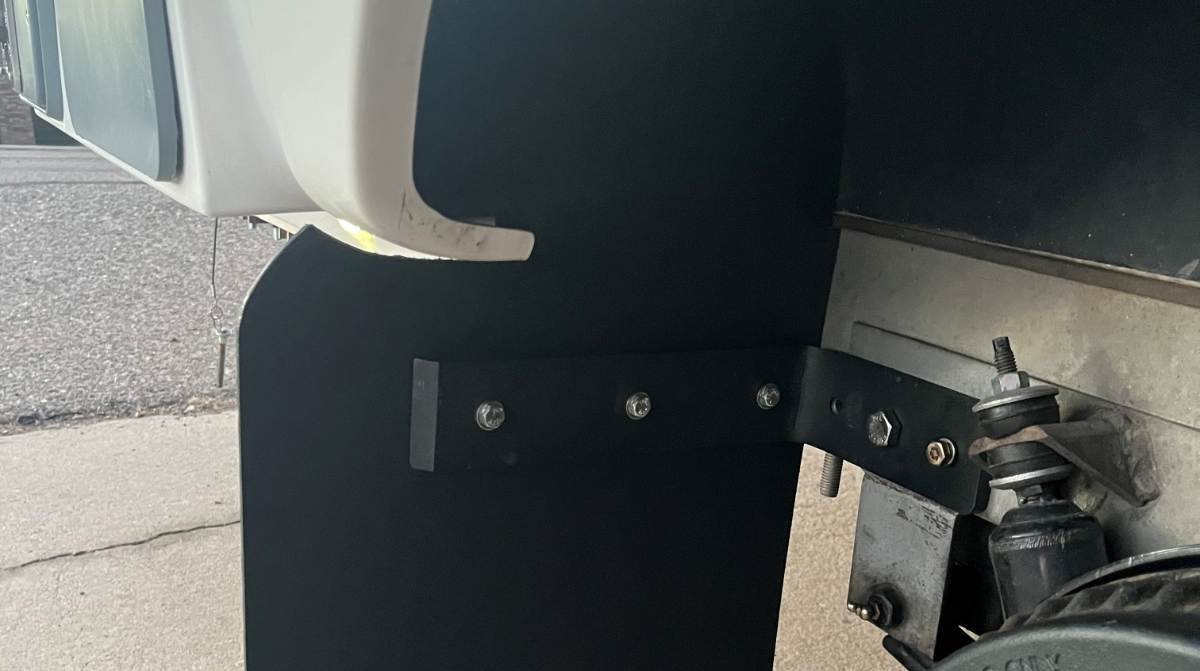
After spending considerable time and money to get our Oliver cleaned, stripped, buffed and ceramic coated, and all exterior trim painted or replaced, I figured is was time protect our major investment! Our TV had bolt-on 12x18" rubber mud flaps which were not nearly wide nor long enough to adequately protect the Oliver. On our camping trip last summer, we hit some mud in the grasslands of North Dakota and the entire lower front and rear bottom of the Oliver were packed with MUD! The TV is most important, to protect the Oliver front, so I started there. I looked for mud flaps that would fit and soon decided to get stock material that could be cut to size. I purchased this product. It's a poly non-rubber material 0.15" thick. It could be a little thicker but I like how it holds its shape and position, not flopping around like rubber. I purchased this huge 24x36" set made for semi-trucks so I had enough material to cut both TV and TT mud flaps! All for only $19! You could find better material but so far so good and now that I have worked this project, replacing the material in the future would be easy enough! 😎 https://www.amazon.com/dp/B06XRHB7GH/?th=1 I removed the original mud flaps, used them as a template and I added 3" in both length and width (1 1/2" wider inside and out). On the curbside, I had to make a large oval cut-out the the tailpipe. Because the new flaps are wider I cut a curve on top to blend the flap the the truck body (see pics).
1 point
-
Just to note - neither ChatGPT or Microsoft CoPilot recommended using methylcrylate alone because adhesives are not that effective with dynamic loads (vibration, etc) which can cause peeling. They can also soften with heat and if the inverter ever had to be replaced or removed for some reason you'd destroy the fiberglass trying to remove it. For a heavy electrical device, mechanical fasteners are the industry standard for a reason. redictable mechanical strength Zero creep over time No sensitivity to temperature No risk of adhesive failure1 point
-
@Rolind too bad the mobile tech didn’t think to do this, or we gave better advice sooner. You should do this before towing another distance. You need a clamp-on multimeter that reads DC Amps. Clamp either single wire behind each braking plate. Each should read between 2-4 Amps when brakes are engaged (or pull safety brake pin for testing). Also the 4 readings should be close in range.1 point
-
Like many I use an electronic device staged in the Oliver, which can be monitored from the driver’s seat whether searching for a desirable (somewhat level) spot when boondocking or parking at a designated site pad. Even with these devices, one must initially use a bubble level in the calibration process and routine checks for device accuracy. Once set, these devices are fairly reliable … until they’re not! The LevelMatePRO served us well for several years, but was not without issues; primarily battery life and connectivity regarding its sleep habits! I recently changed to the Beech Lane Wireless RV Leveling System in hope it will outperform the former. One thing that became very apparent in achieving my ‘optimum level’, was in respect to that of the Norcold 3-Way fridge. I found that having the Norcold absolutely level overrides that of the trailer proper. That said, I use the top of the fridge door as the benchmark when calibrating both past and current leveling devices. Keeping the Norcold ‘happy’ is paramount and a very close second to that of the wife! All of my past woes regarding the Norcold can be contributed to the aforementioned and easily mitigated with proper levelness. For convenience, I carry a folding level in a galley drawer. ‘Nuff said!
1 point
-
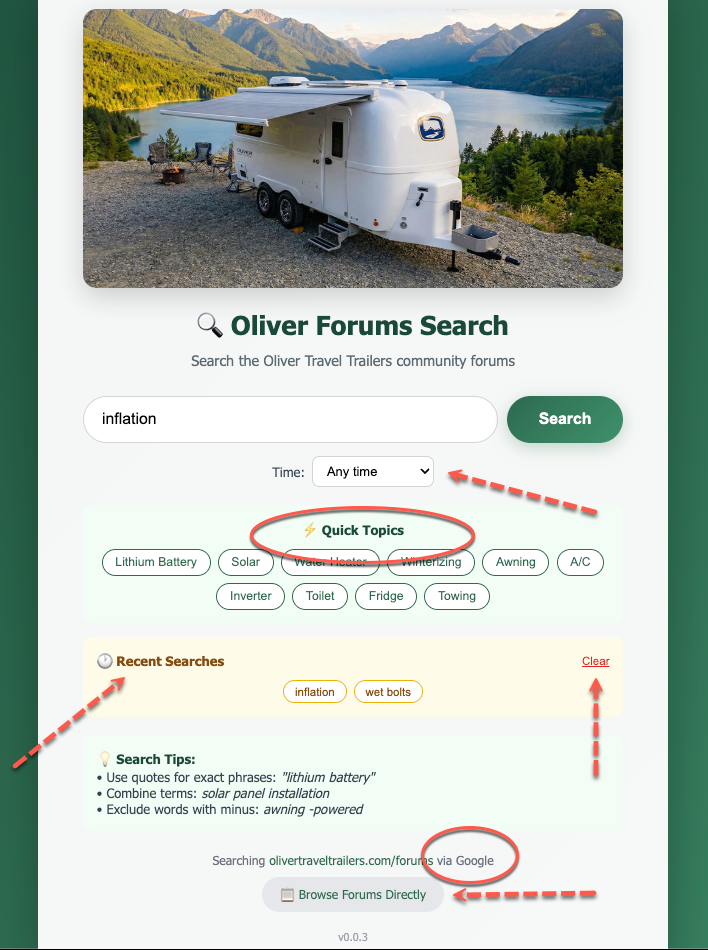
Here's my version 0.0.3, it should work fine with any browser. I did try to get Google to sort results by date, but it really does not work well. But there are some common google-approved "Time" filters from which you can choose. * Added quick Topics * Added Recent Searches which you can simply click on again We should be able to get this type of functionality embedded into the forums themselves, but not sure how well that will present as Google requires an API key and maybe $$ to rout the results back to your own web page. They like their own advertisements. Makes sense. This "should" run on any Operating system using a modern Web browser. I will not be able to test it on Windows, (pronounced & spelled "windoze" by a hard-core Linux/Unix SysAdmin, LOL), mostly out of principle. Microsoft is killing that Operating System with all their BS lately. Anywho... Squirrel! Download it, unzip it, and double click the HTML file and try searching something. During test, I've discovered many great topics which I have missed over the past couple years. Let me know how it goes. Tested on MacOS: Chrome, Edge, Safari Tested on Linux: Firefox, Chrome Screenshot: oliver-forum-search-v003b.zip
1 point
-
Thanks John. It’s one of those things we hope we never have to use. Our power does not go out very often here unless feeder lines on the main roads fold over from the weight of trees during an ice storm. Weighing all the repair costs (to replace frigs, freezers, sheet rock, and all our plumbing) after several nights of freezing temperatures, the one time cost of the generator install seems it will far outweigh frozen pipes and all the home repairs that go with it.1 point
-
Your all set with the generator😊1 point
-
If so, we are a minority of two! GJ1 point
-
Exactly! But short cycling is not the same as Power OFF and then Power ON on a regular basis. Short cycling does not shut down the mother board. Power On Power Off takes the mother board all the way OFF. It would be like the difference of starting a car, letting it cool, restart, let it cool forever. Something will give out sooner. For this unit, my concern would be the unknowns to the mother board and start/run capacitor with so many power on/power off cycles. Will it age it at an accelerated rate? Will it be fine? Only time will tell. GJ1 point
-
Hello to the Oliver we saw heading south on US 1 south of Marathon Florida this morning. We were the northbound Superduty sans Oliver flashing our lights.1 point
-
Great pics!! Lots of familiar faces, brings back memories of our many days at there.1 point
-
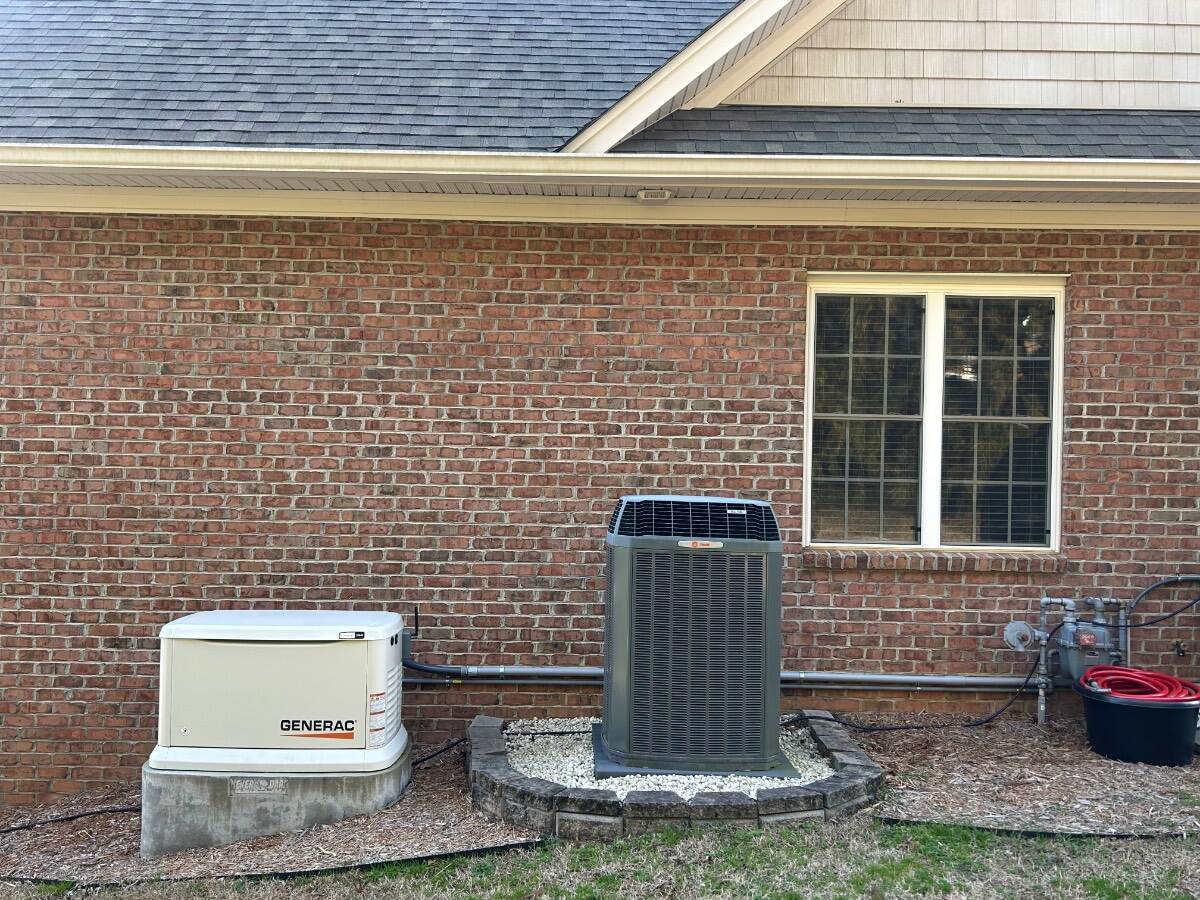
Just checked our forecast here and it appears freezing rain and a chance of a wintery mix forecasted with no significant snow fall accumulation. Certainly all subject to change. 3 years ago when we had our 24KW Generac installed, I still remember a few neighbors thinking it was sorta crazy to spend money on something we hope we never have to use. 🤔 The power does not go out that often which is true however, when it does it sure is nice to have a backup/contingency plan. The freezing temps are predicted to be diving down into the lower teens for the next week or so at night here in Western NC. Suffice to say, during extended power outages with no heat it does not take long for a home to cool down and pipes to freeze. Eventually food in freezers with no ⚡️will expire. For times such as these we are really glad we got our LNG fueled Generac installed. Stay Prepped, Stay Safe and Stay Warm!
1 point
-
4 yrs in Minot, back in the 70's ...I feel your pain :(1 point
-
About 2 miles. Ben there done that 20 years ago. I now do a FULL bearing and brake service before each season. Hint. 🙂 GJ1 point
-
North Dakota, I lived in Grand Forks for 5 years as I was attending UND to acquire a Chemistry Degree. The weather was worse than terrible. One has to live there to understand. -12 last night.1 point
-
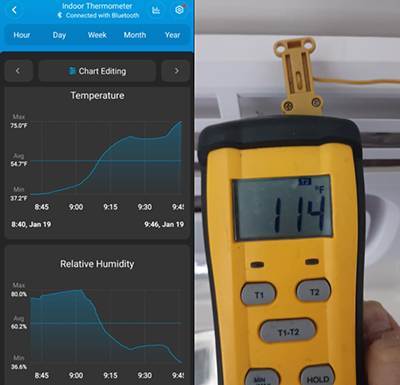
We got down into the 30's this morning so I decided to run a quick test of the heat pump function on the Turbro. After using it down into the 20's while camping over New Year's I already knew it performed well but wanted to put some stats to it. Starting cabin temp was 37.2 when the heat was first turned on. The unit takes about 3 min to actually start producing heat, which most likely to get the evaporator up to operating temp and prevent circulating cold air. Once the heating started, the outlet temps at the duct immediately went to up 114 and peaked at 118 which was much higher than I expected... Took a little over 15 min to get the cabin 10 degrees warmer but from there the temperature warmed quickly and got to setpoint of 67 in a total of 38 min. I left the setpoint alone for 15 min to see if there would be any fluctuations in temps from cycling, but it held steady the whole time. After this I bumped the thermostat up to max and within 8 min the cabin temp was 75 degrees. Ended testing there since we'll never have the heat set that high, though it's nice to know it can get there and probably even higher. It may have some issues, but heating performance isn't one of them!
1 point
-
I hope it works out for you!1 point
-
It took a couple days labor, but I take my time and enjoy the work! $50 in parts for both truck and trailer, you can't beat it. 😎
1 point
-
I replied to this question on your earlier post. The only preowned Oliver’s for sale social media site is the FB page I referenced. You may occasionally find an Oliver for sale on RV trader. Best of luck in your search for a preowned Oliver.1 point
-
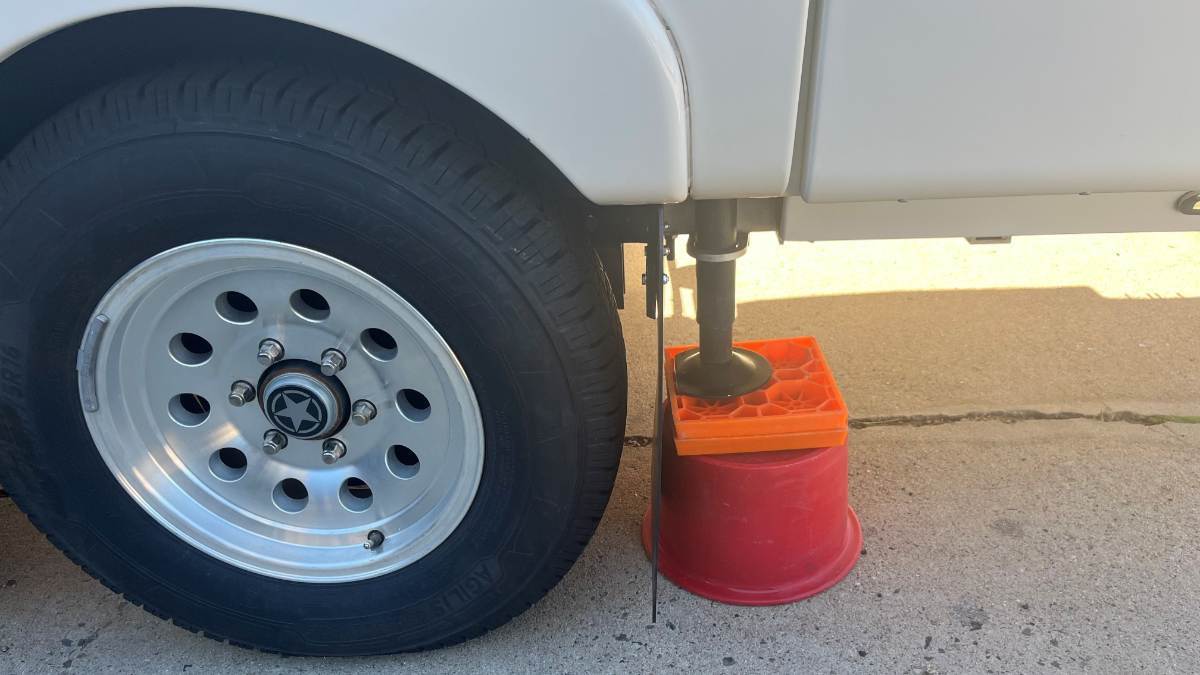
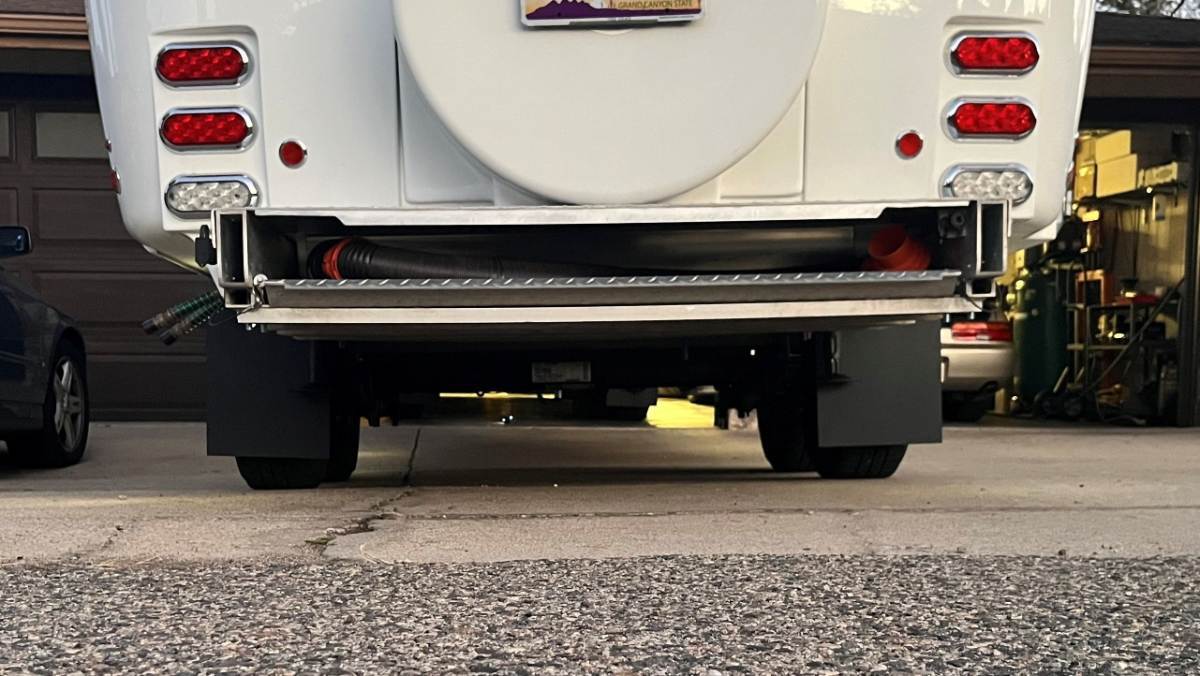
Time to repeat for the other side! Common thinking and my first thought was that I could turn the template upside and trace the mirrored view for the other side. Good thing I thought to measure twice. I positioned the cardboard stencil made for the right side and found I had to drill the holes about 5/16" lower for the left side. Who knows why except that only OTT could do so! Was a simple fix to adjust the drill hole placement, and otherwise the pattern flipped over was identical. Pictures show the streetside and how the jack fits with Andersen blocks, and the view from the rear showing both mud flaps (bumper off for polishing). Boy, I used to hate cleaning the road tar, grease and grime from under there! No more, just pressure wash the mud flaps! 😎
1 point
-
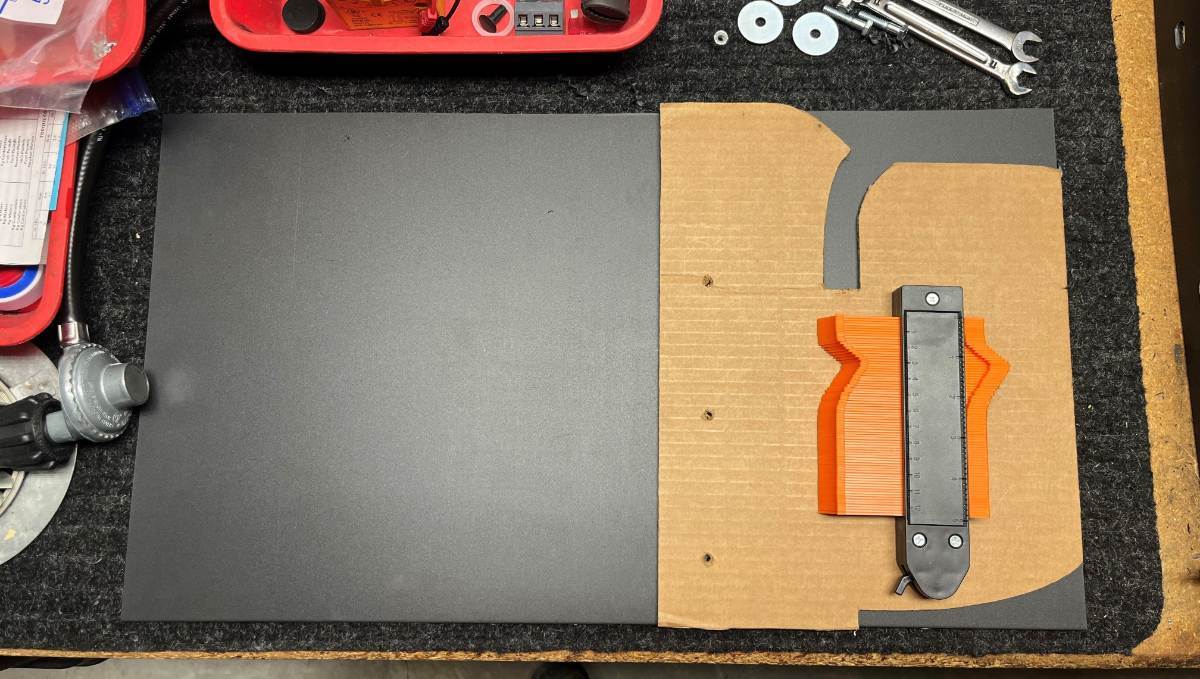
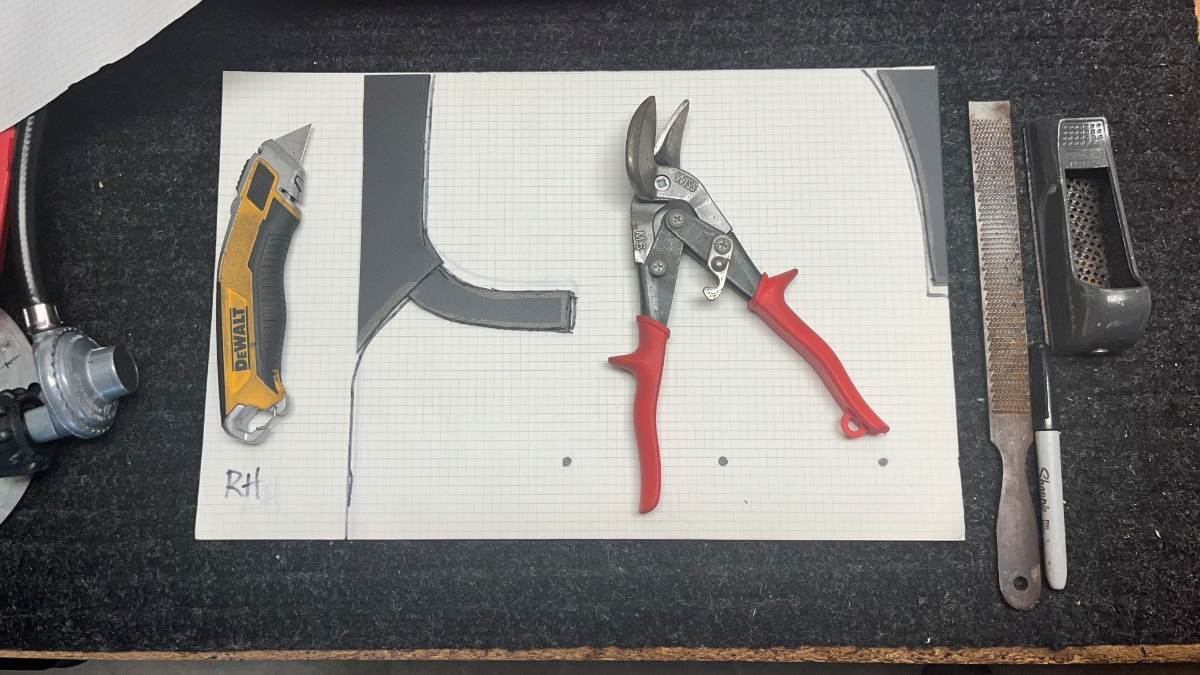
Next step; cut stock for the Oliver flaps. The stock was 24x36" so I cut every flap sideways making them all 24" long to start. I cut the Oliver 13 1/2" wide to stick out 1" beyond the tires and I made the area under the mounting bracket a 13 1/2" square which made the mud flaps sit 4" off the ground. It's too difficult to work with the full length of stock when cutting a pattern to fit around the curved body of the Oliver. So I cut a piece of cardboard 13 1/2" wide like the flap and 10 1/2" tall, the measurement from bottom of bracket to the top. I drilled the 3 mounting holes into the cardboard for alignment. I used the little curvy tool (stocking stuffer from Chris a few years back), took a few measurements and started to cut away at the cardboard making the opening longer and wider. I wanted at least 1/4" clearance above the fender and 1/2" below, so not to touch and to allow for cleaning the fiberglass. Another cut to follow the pattern of the inside wall until the cardboard was perfect. Then traced it onto the poly stock and cut some with a razor-knife and the sideways tin snips worked very well. Used razor blades, a grater block and files to clean up the edges, and voila! 😎 Afterwards, I traced the finished mud flap onto graph paper so I can share my template with our Oliver friends who would like to copy the design!
1 point
-
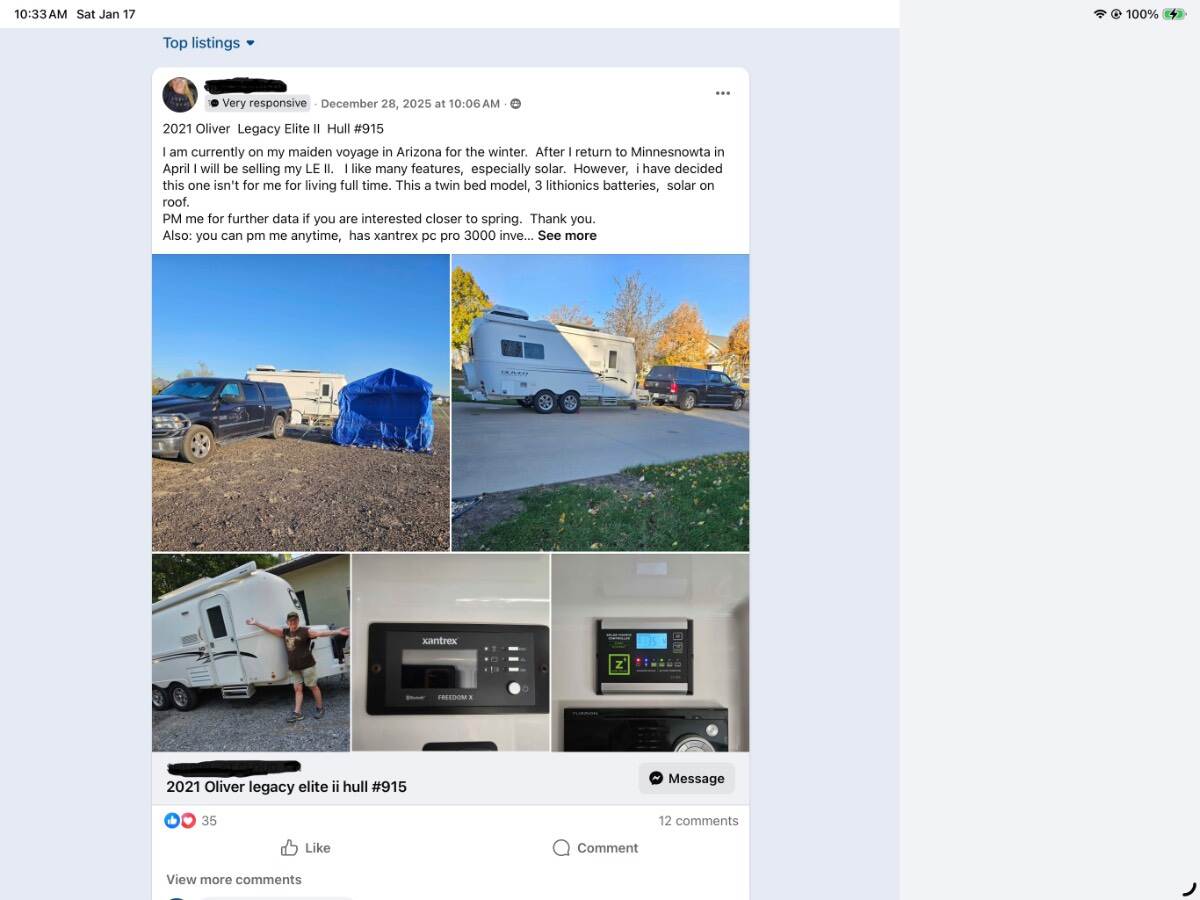
Welcome @TravelWell If you have not already done so keep an eye out on the FB Oliver Travel Trailer For Sale by owner page. There are some really amazing deals that pop up occasionally. I attached a screen shot of one that recently -posted. It’s highly recommend to have cash or check in hand as well kept and maintained Olivers move quickly. Disappointingly to many present forum members/owners, Oliver TT removed the ability for an owner to sell their Oliver on this Fourm. 😏 The concern it would impact nationwide dealer sales. It’s come to pass, that the dealer network really did not take off as planned and is all but limping along sorta of. Many of the original dealers selected are no longer selling or servicing new Olivers. Fortunately Oliver Service in Hohenwald is still servicing Olivers. The good news is as a result an Oliver Travel Trailer For Sale FB page was created. Turns out for those of us that use FB or FB market place now have an even better and easier media to reach out to as prospective buyers interested in purchasing or selling a well maintained preowned Oliver. You will just have to trust me when I say you can SAVE tens of thousands dollars off a new Oliver. Be patient and be ready. Also just beware of Olivers that have little to no actual documented service history. Many owners service their own Olivers as we do. We document everything we do on a spreadsheet to include logged miles, upgrades or mods or any maintenance or repairs completed by Oliver Service. Olivers in my humble opinion and 6 yrs in of long distance travel experience are the best Travel Trailers made. Like any camper they do require regular maintenance. Welcome, do ask questions, and all the best in your search for an OLE2! Edit 01/20/2026- Please note that I have redacted the contact information on the Oliver Travel Trailer Owners FB page for the previous photo in this post. I don’t want anyone “confused” thinking my in intention was to start a classifieds post to sell preowned Olivers. My sole intent in my original post was to only provide a quick screen shot or example of what an FB Oliver TT for sale by owner page looks like to @TravelWell. Advertising or attempting to sell an Oliver Travel Trailer on this forum is not allowed per Oliver Travel Trailers Inc and forum rules. See attached photo with newly redacted contact information of seller. Thanks!
1 point
-
Our much older 2500 series truck was borderline in needing the Andersen WDH. I’ve used it since the manual says to do so over 5K trailer weight and it towed much more smoothly! New Alcans, new 5200 lb axles and we had a few items bounce around. Hanging clothes came off the closet rod, a kitchen drawer opened (never before) and stuff in the attic certainly bounced around! Nothing during a second trip and we only have 1000 miles since. This trip, I went without the Andersen WDH. Descending from Prescott at 5400 ft to The Valley, a 4000+ ft descent, more than most of us do day-to-day, our rig drove like a train on rails! I believe the Oliver suspension is now taking care of itself, very lightly affecting the tow vehicle. Secure the items that bounced around and set correct tire pressure! 55 PSI is only correct if you are carrying about 8,000 LBS GTW! We run at 45 PSI.😎1 point
-
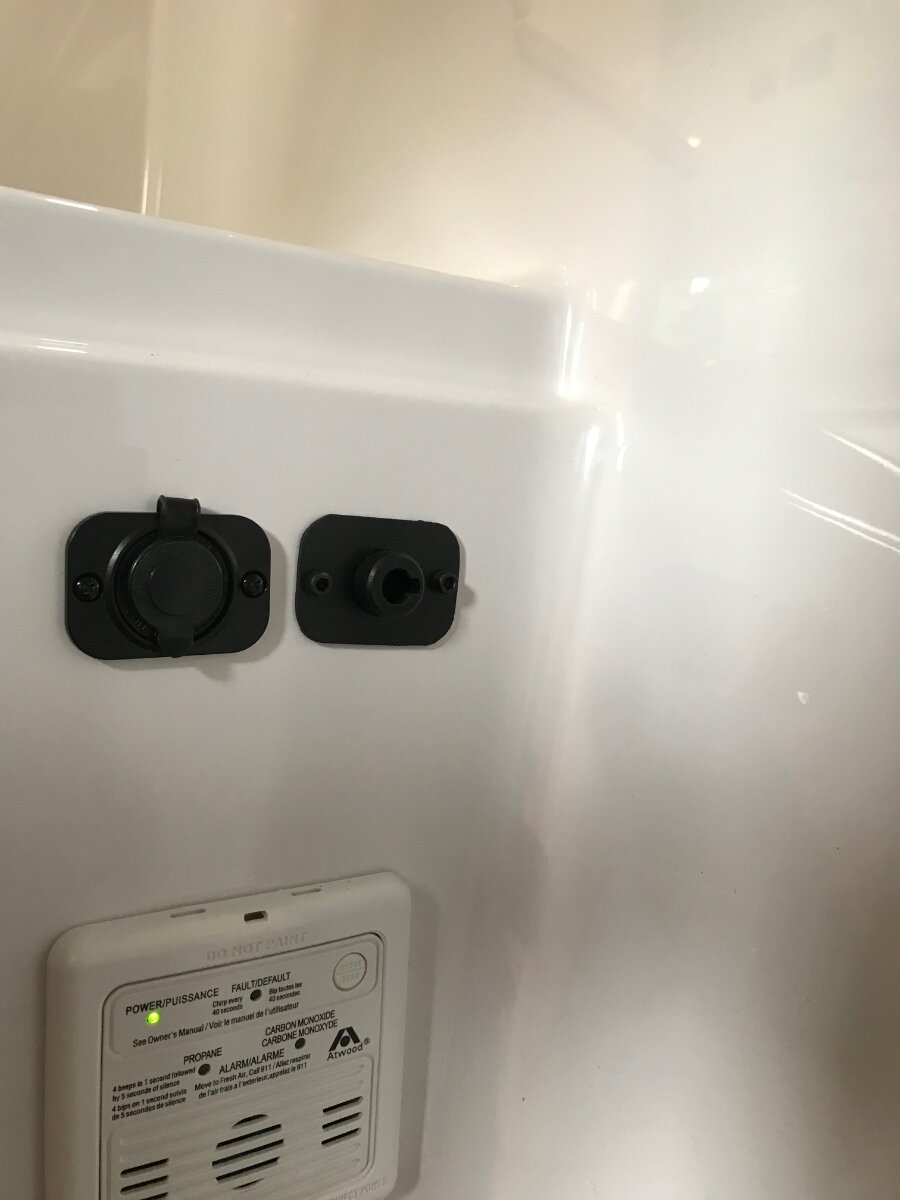
We bought our first Travel Trailer in early 2008. It was Oliver Hull #026, one of the first group of 46 Oliver Elites built between 2007 and 2009. As some of our members probably already know, the trailer line shut down in late 2009 due to a dramatic sag in the economy. No employees were laid off, instead they were moved into other areas of Oliver such as the tub line. Standard equipment on one of the original Elites included a satellite dish on the roof, an electric cord reel that automatically rewound the power cord back into the body, air conditioner, heater, television, audio system, microwave, refrigerator, outside retractable awning, bathroom and three electric leveling (yes, leveling) jacks. Some of these items had optional availability on other fiberglass trailers (Casita, Bigfoot, Escape, etc.) but not one of those manufacturers had all of them as standard equipment and a good many items on that list were not even available at any cost. All this on a trailer that was selling for under $30K. The electric leveling jacks were the absolute stand out among the fiberglass trailer crowd. No other fiberglass trailer manufacturer even offered them. But with them, you could stabilize and level your trailer with the touch of only three buttons. And, as Sherry stated, the rear jack switches were located near each tire and the jacks could be observed while operating them. As the new Elite II builds were coming together it was realized that the outside body molds were different from the ones in the old Elite and the area where the Elite rear jack switches had been located was completely different and there was no place for the switches to go. They asked where they should be mounted and I had them place mine in waterproof boxes built into the sides of the trailer. I also had them extend the wiring from those switches into the left and right areas of the overhead cabinet in the rear. After delivery, I used that extra wiring to make remote inside switches to control the rear jacks. I did the same for the front jack. Now we can comfortably setup or breakdown in the rain using the controls on the inside. Sometime in early 2015, about a year after we had taken possession of the first Oliver Elite II produced in 2014 (Hull # 050), we were at the factory for some reason. John Oliver, (Jim and Evon’s youngest and only child) who was over production of the trailer line at the time, approached me and asked my opinion on a modification they were planning. The placement of the rear jack switches had always created an issue and their new plan was to move them to the front of the trailer where they would be near the front jack. “Now”, he said, “all the jacks can be controlled from a central area. What do you think?” My reply was that I thought it was a “...terrible idea.” I explained that you need to be able to observe the jack while operating it. He disagreed. I told him that I would hate it and I figured the future owners would hate it and the company would have to eventually backtrack and move them back to the rear. It took a while for them to do something about it but I can’t tell you how many times I was questioned by owners as to WHO thought it would be a good idea to put those switches at the FRONT of the trailer. And now you know the rest of the story...1 point
-
Very nice with the vents in the fridge basically matching those in the microwave. Like the additional insulation in the compartment too. Nice job! Bill1 point
-
Deleted the booster and the front camera when I removed the Sat dish and did fiberglass work to fill all the holes and clean up the top front of our hull.1 point
-
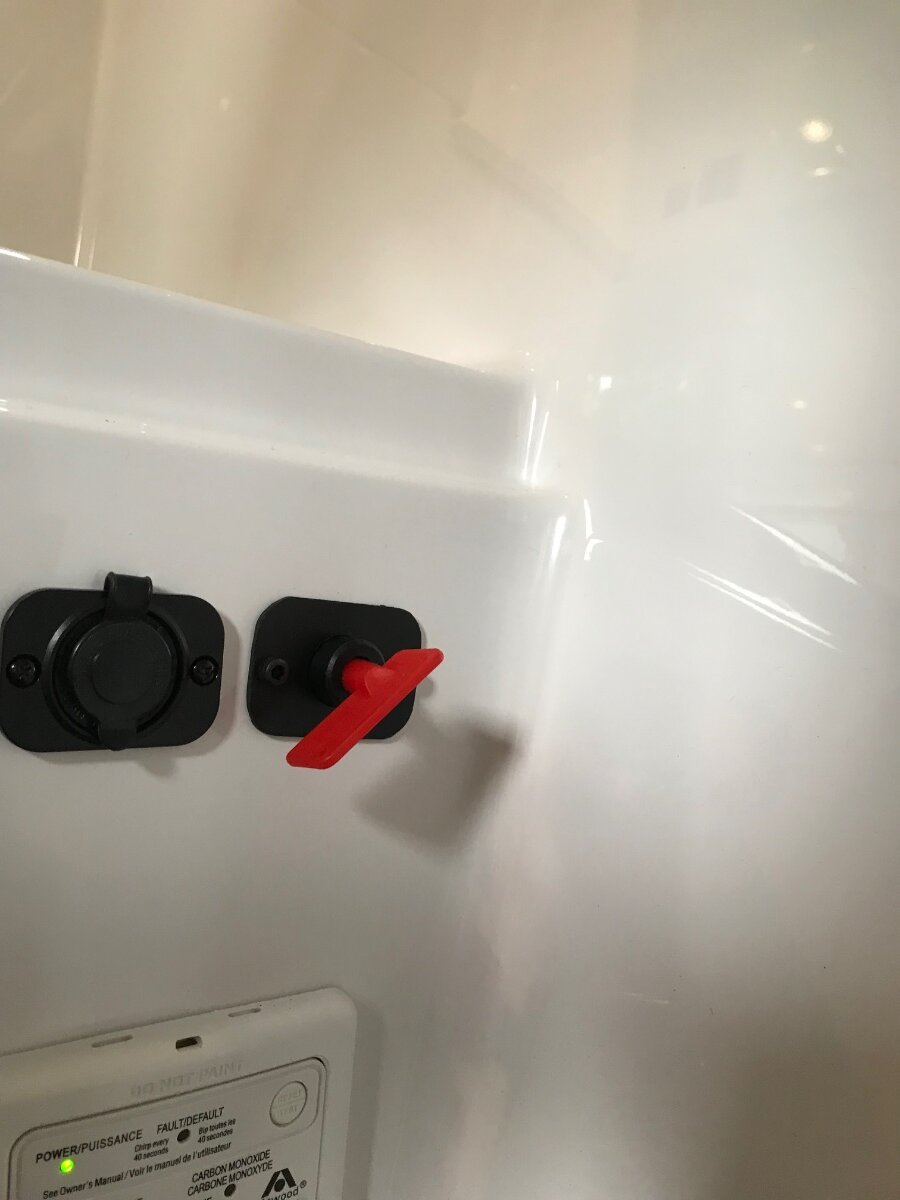
Seven years ago I added a master switch for the leveling jacks. I disconnect the power to the jacks whenever the camper is parked. My hope is that with three jacks firmly down it will be much more difficult to steal. Thankfully, as far as I know no one has ever tried my theory.
1 point
-
I half-wondered why there wasn’t an easily accessed switch that would let the owner disable the front jack so that goofy people couldn’t come by our trailer and hack with it (ha ha) or turn that light if it whatever. Taking the fuse out would do that, but kind of a primitive “switch”. Probably a good mod for one of our owners who like to improve things. A simple toggle or rocker switch would do the trick.1 point
-
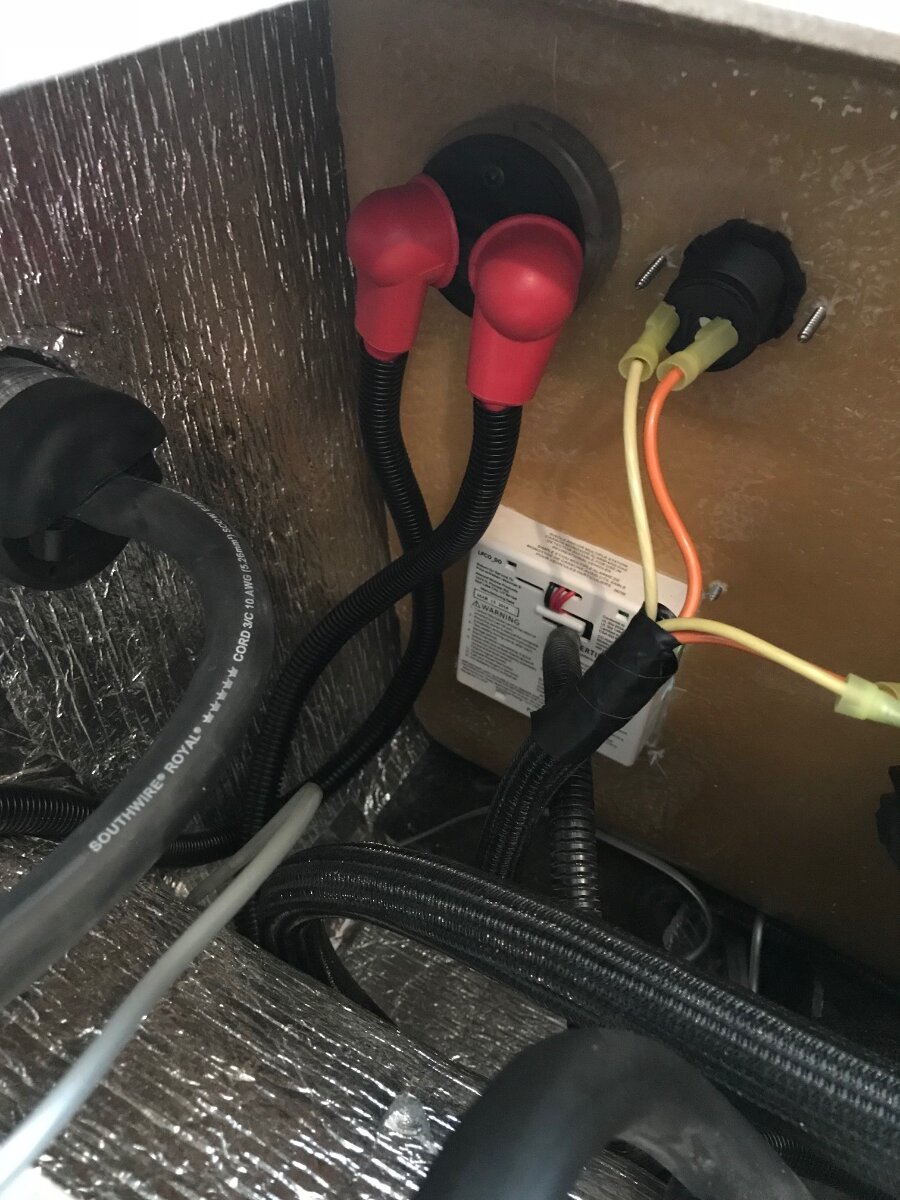
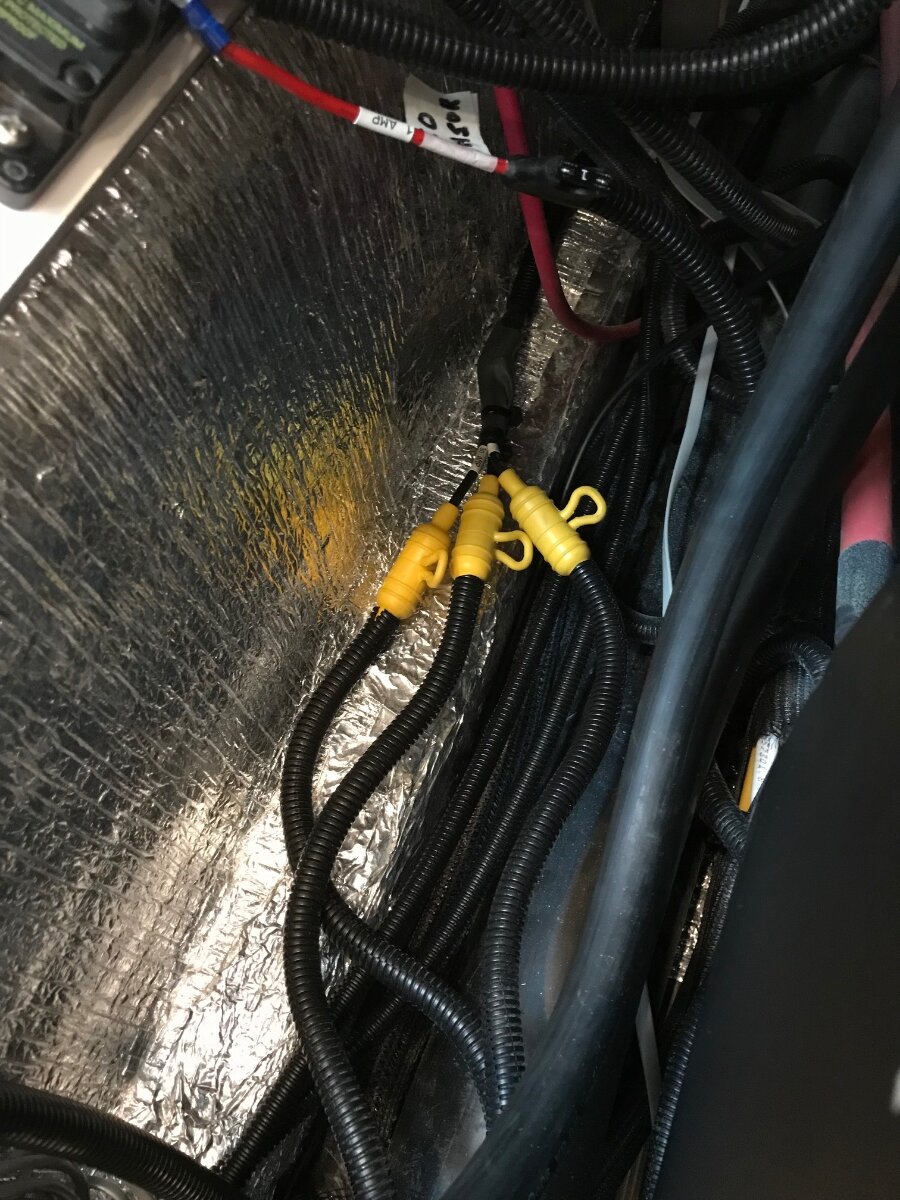
Let’s hope it’s not that - otherwise you may not wake up one cold morning. Anyway - it’s still a scavenger hunt. Definitely coming in under the aft curb side though, as the street side doesn’t have the issue. Counterintuitive as the curb side has the outside access door to the “basement”. Seals around the water heater and furnace are still on my top ten list as those are in the area most affected. I suppose the right taillight also needs to be scrutinized.1 point
-
@Galileo I experienced the exact same issue with cold air intrusion via the heater vents. Since in a CG with electric hookup, I was using my small space heater rather than the gas furnace; this was not in freezing conditions. As a temporary fix, I taped plastic film over all of the vents for the duration of my stay. Prior to covering the vents, I noticed running the wet bath vent exacerbated the issue. We generally don’t camp in cold conditions, so never really tried to chase down this problem. I too would like to know why this was happening. Thanks for raising the question.1 point
-
Not sure where cold air is coming in, but since it is the curbside check that basement area and climb under the trailer in that area. There are 3-4 LP lines that exit the hull to the frame below (Furnace and HWH are easily visible in the rear and further up are lines for gas range and a 4th if you have a LP fridge). Not sure of your hull # but in our older hull all caulk around the LP lines had moved and there was an 1/8" to 1/4" opening around the perimeter of the drilled opening. I STRONGLY RECOMMEND you store the electric heater for a while and run the furnace. It will heat up that basement area and you will not have the condensation and cold wall between the bed and window. You must have seen my mod post on this. Now that I've done this work, closing the heating duct under the bed and adding an intake filter the furnace works great now and is much quieter. Electric heaters save money with paid hookups of course but LP is cheaper than the issues you are having and perhaps more. You mentioned Florida, where it is always humid. When we travel somewhere colder, I like to know the furnace is not only keeping us warm but the hulls, the floor, and inside the basement areas to keep the plumbing above freezing. An electric heater will only keep the cabin and upper inner shell warm.1 point
-
Today my ARES team met up at a local park to test ourselves with some basic activities. I'm pleased as punch that my *new* home-brew (home-made) 9:1 UNUN Antenna -- AKA "a wire hung in the trees", as one of the team members called it -- performed beautifully. Within minutes I was speaking with operators in Hungary, Lithuania, Russia and Ireland (they were busy contesting on 10 meters). (I will add a couple of photos, once the photo upload issue is resolved.) I love this hobby! EDIT: With help from my friend and mentor, this project was built, tried and tested in a single afternoon. Two days later I had it strung up in a local park and I was talking to hams around the world. I highly recommend amateur radio to anyone who is interested in fun science projects. 73 9 turns around a powdered iron toroid core for this End Fed 6 - 40 Meter Multi-band HF Antenna Modifying the box (my mentor has tools) Testing the unit before closing up the box Some assembly was required :) In the park -- the antenna wire has pink flags on it to increase visibility The coax is run to the radio (at 90 degrees to the antenna wire)
1 point
-
Hahaha It's -29 now. Thank goodness it's only 9 mph of wind, though. I can move south in about 2-3 years.0 points
-
In our trailers there is very little that is level, square or symmetrical. And it is amazing how well it is done. When Art and I were making front wardrobe shelves for our OE2's, I "Ass-U-M'ed" that the template for his would work in mine. Nope. I failed to remember the above mantra. GJ0 points
-
I’m afraid I have to agree with you here. Im often tempted to leave my car doors unlocked. Though I try not to leave valuable (looking) stuff in the car, I don’t want some clown breaking a window just to steal my knockoff sunglasses, or hack my $50 cd player out of the dash with a hatchet. (When I worked at the Buick dealer - I saw some pretty expensive damage just to steal a radio or break into a trunk to steal a spare tire!)0 points


-
Recent Achievements
-


")


")


")

