Leaderboard


Popular Content
Showing content with the highest reputation on 05/23/2026 in all areas
-
I had Suncoast Designers rebuild three of my windows several years ago and they did a good job. They remove the entire window, completely disassembled it, disassembled the individual sections, fixed the seal, and reassembled everything and put the whole assembly back in the trailer. They rebuilt both the fixed and the movable sections in order to provide a complete lifetime warranty. Complete disassembly of the frame requires the astragal to be removed by drilling out the pop rivets and replaced with gaskets and pop rivets again. If only the moving panel needs to be fixed, that is easily removed by removing the plastic/rubber track material first then the window just lifts out. After they removed, rebuilt and replaced the windows I had to reseal the frame to trailer myself. Not inexpensive but at the time I had mine done they had a lifetime warranty. If you can rebuild them soon, before any etching takes place between the panels, they can reuse the original glass. They have a fairly large parking lot and nearly every spot has electricity and water so that you can stay in your camper. Also, there used to be a guy at Quartzsite during the big tent rv show that would rebuild windows but you had to remove your own windows and deliver them to him. I have never met him but I know of a couple of Oliver owners who have had windows fixed by him.5 points
-
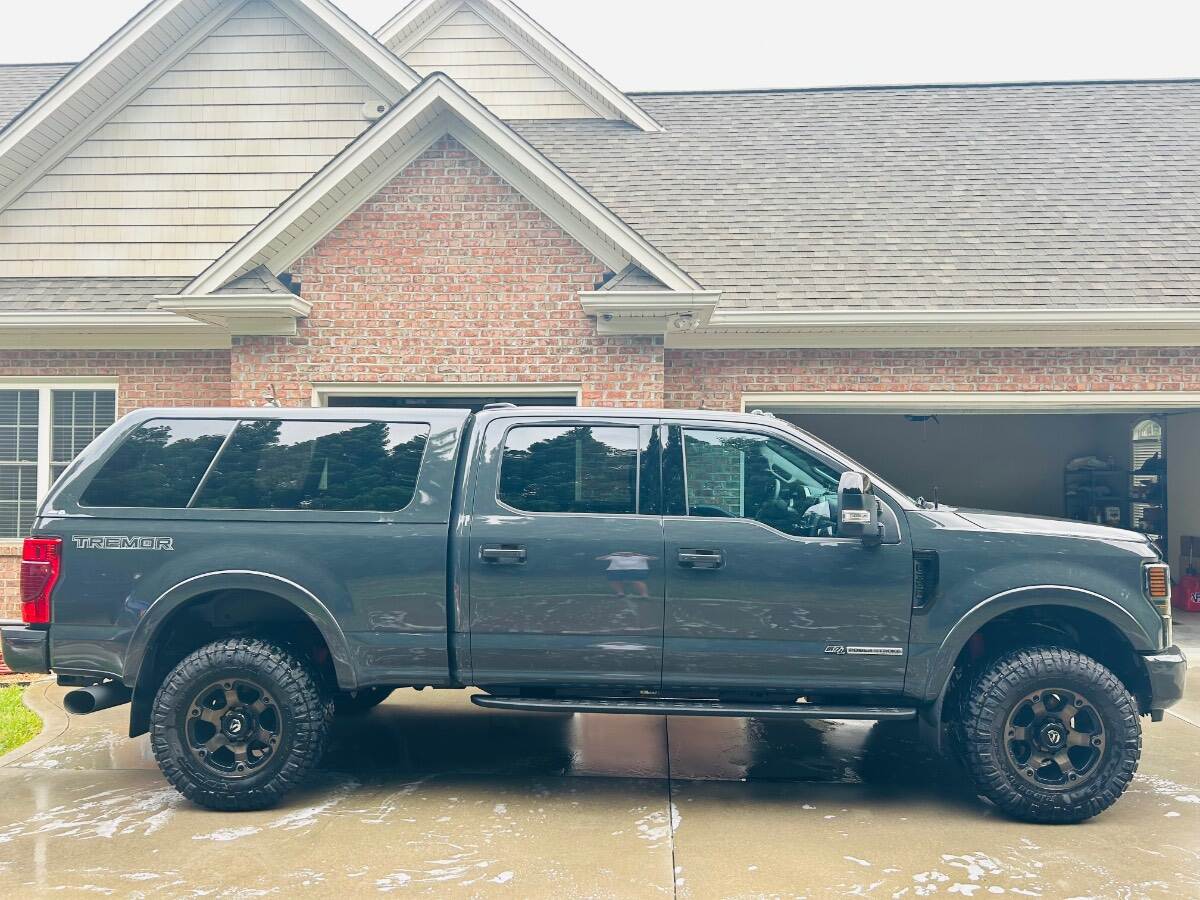
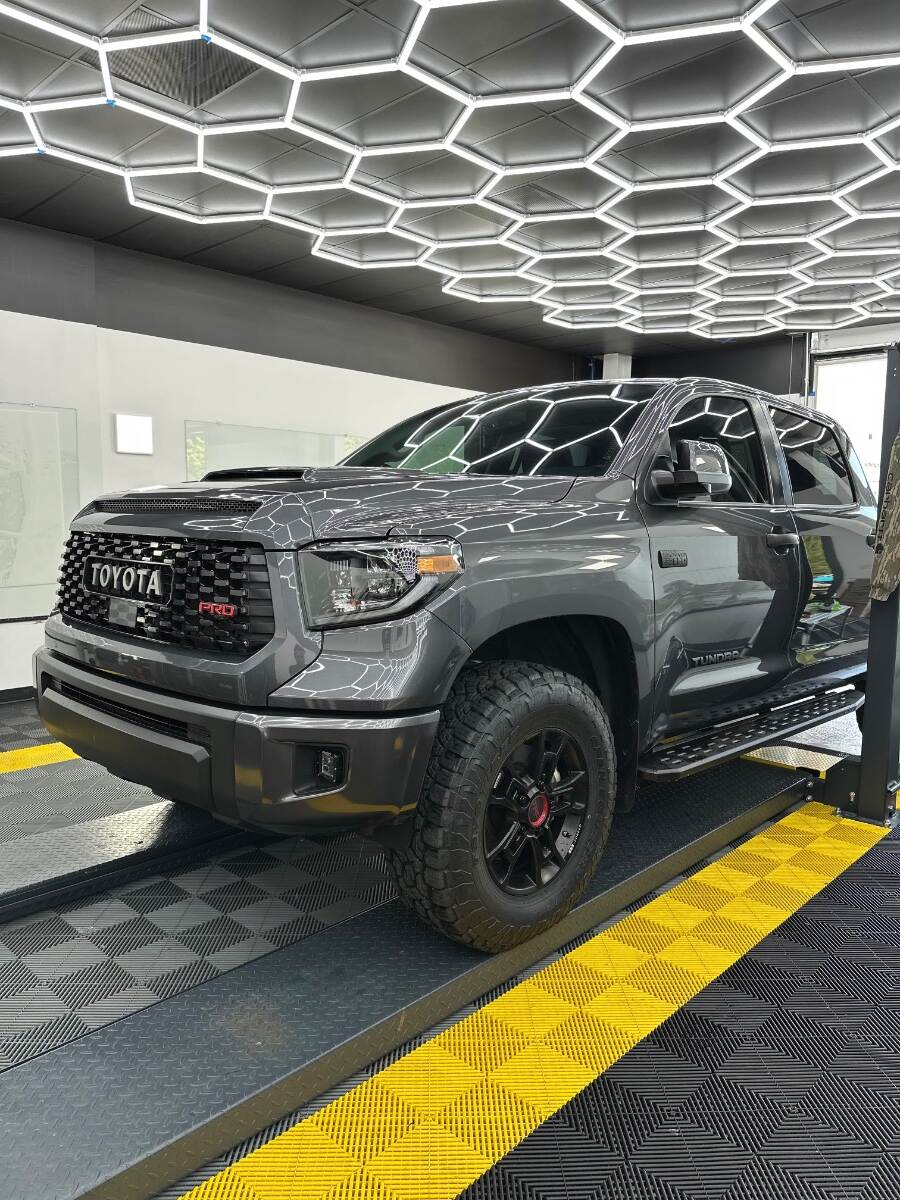
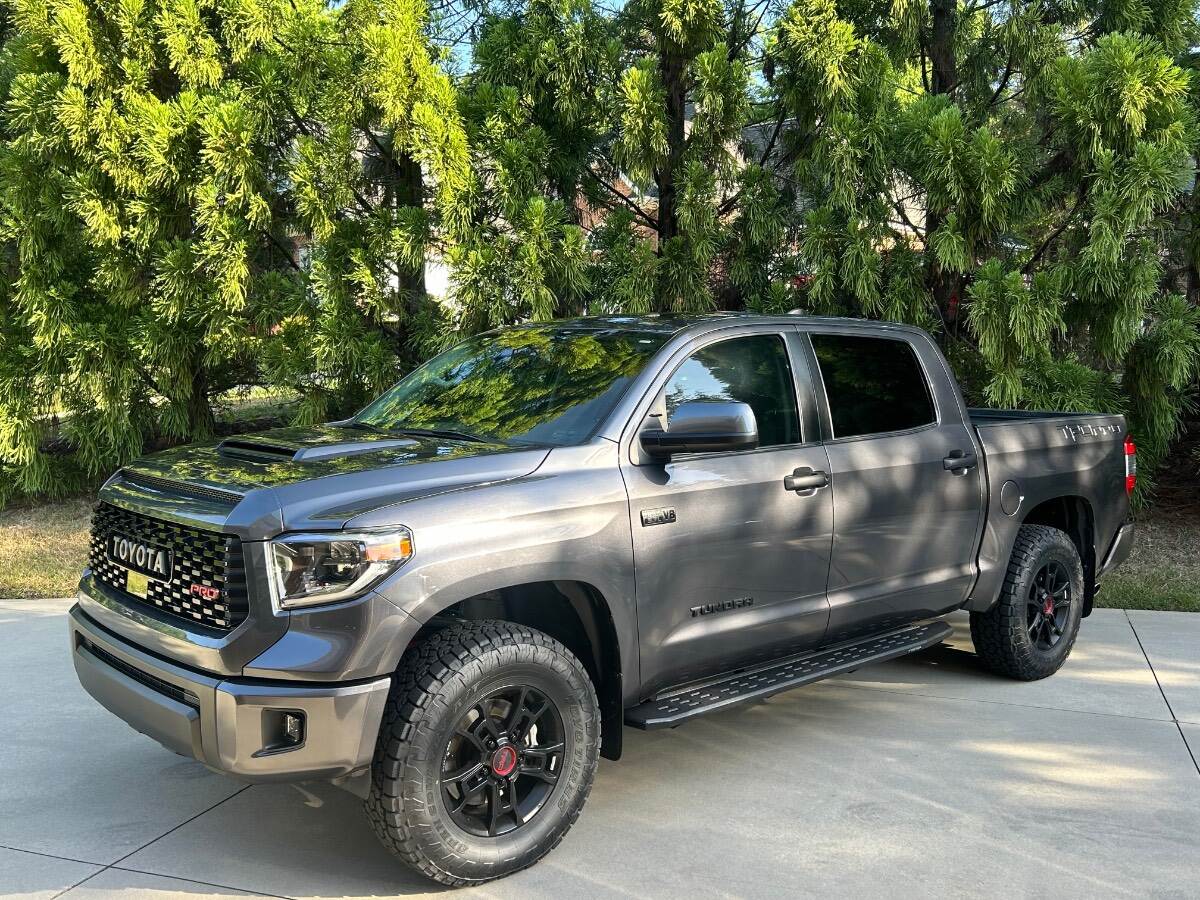
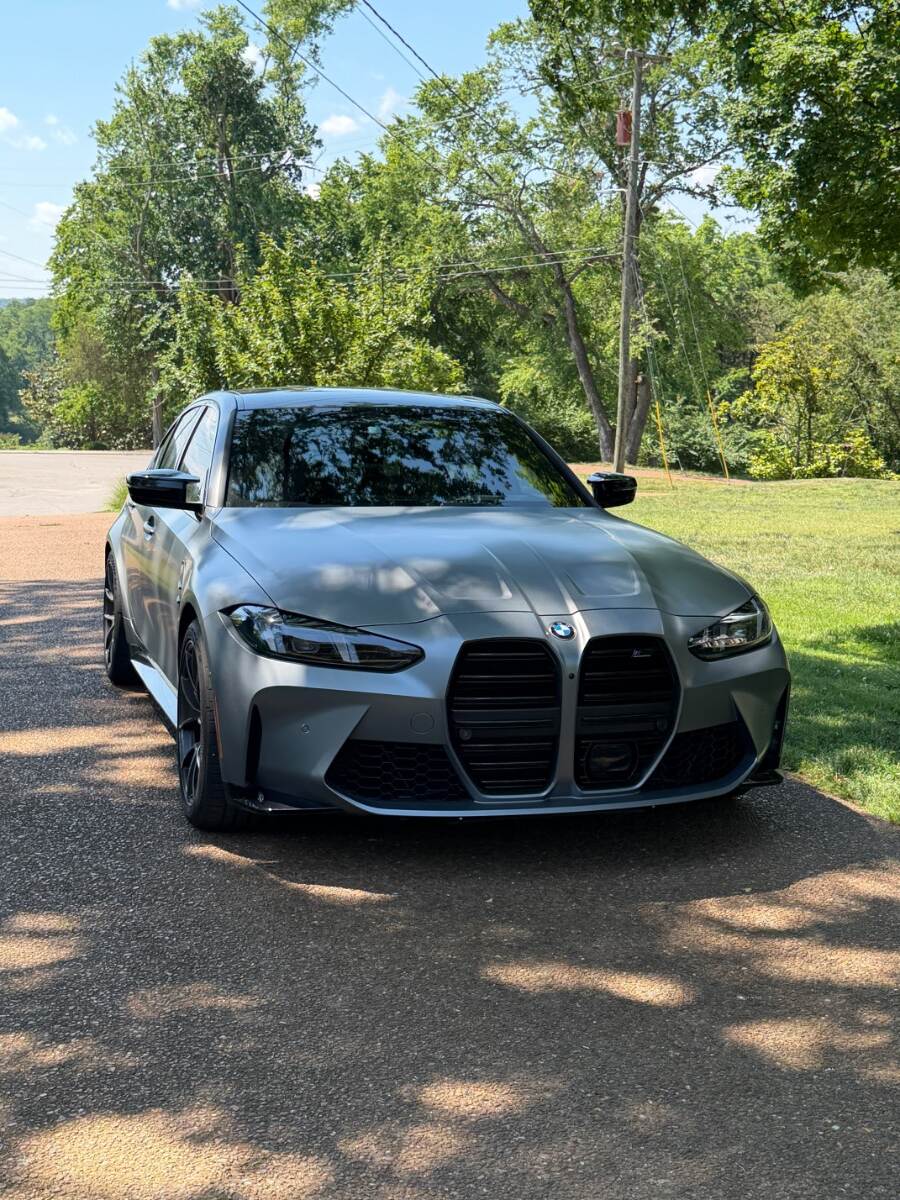
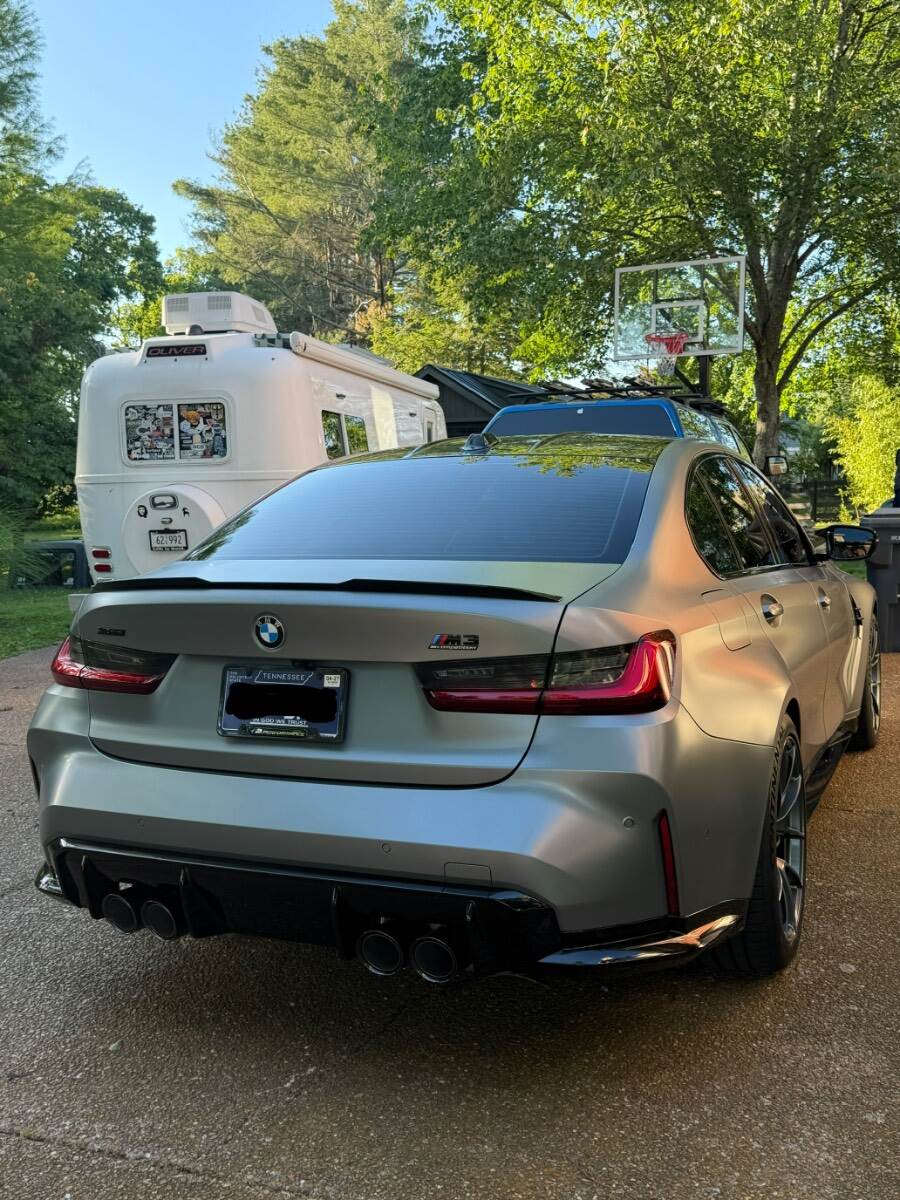
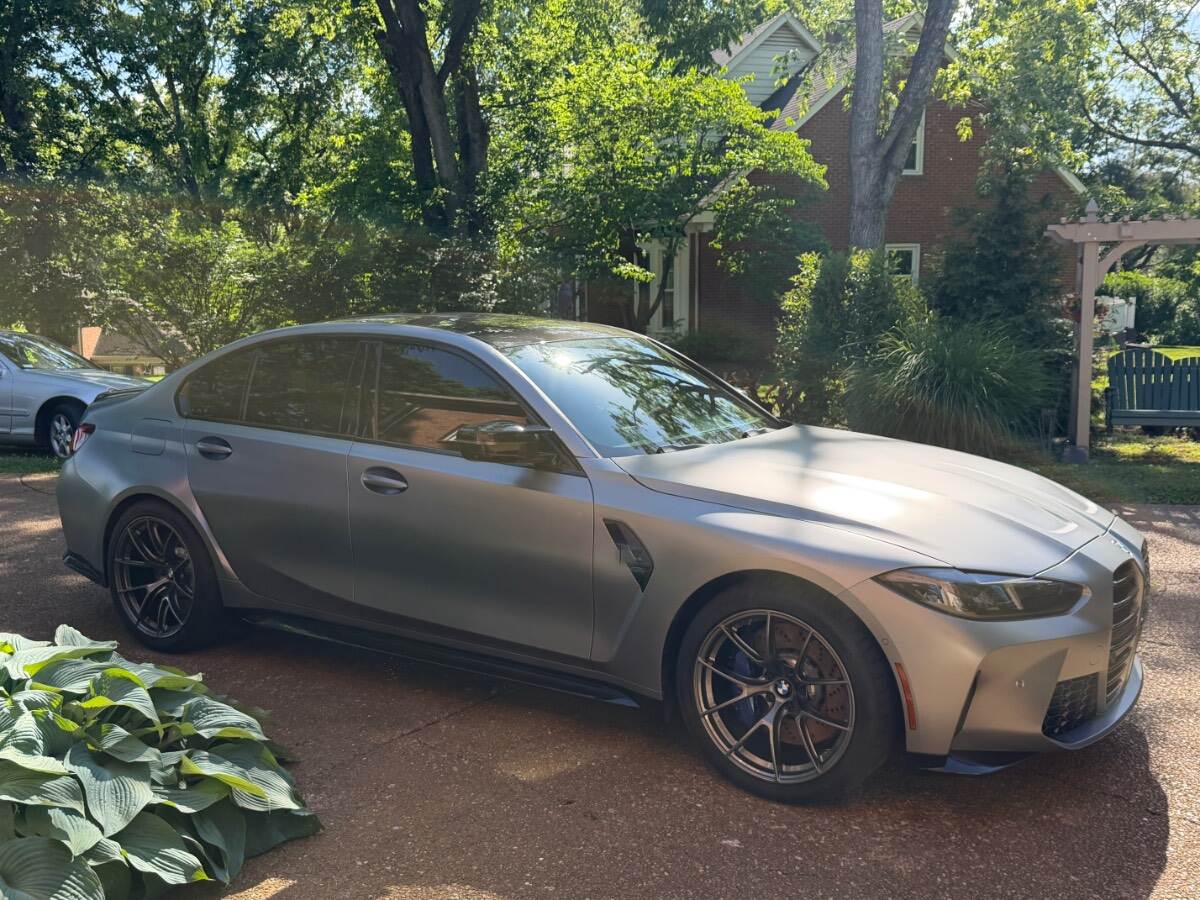
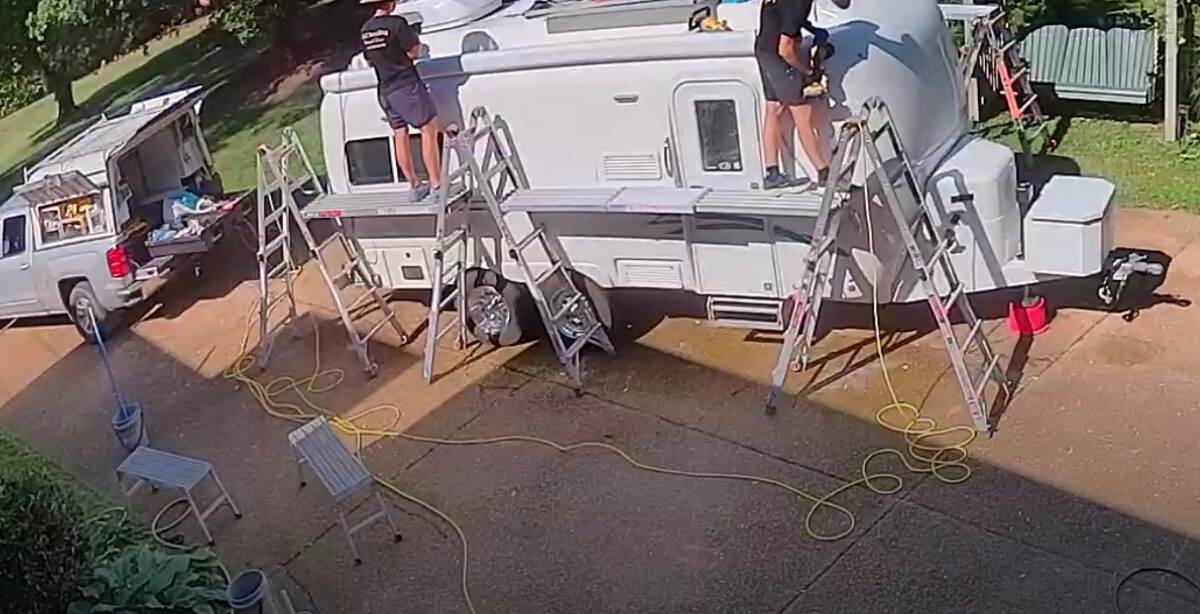
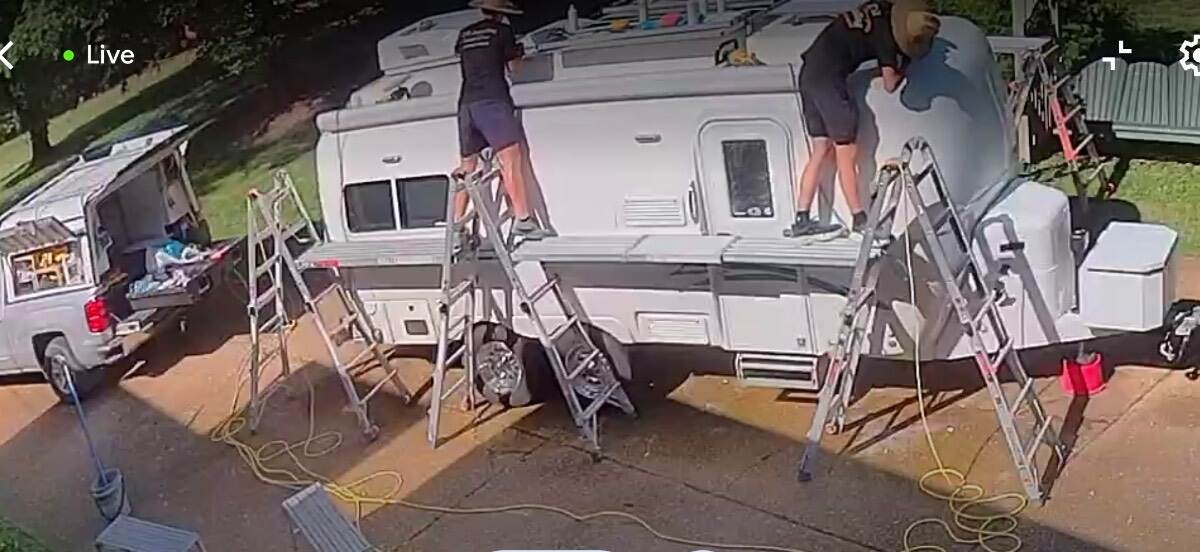
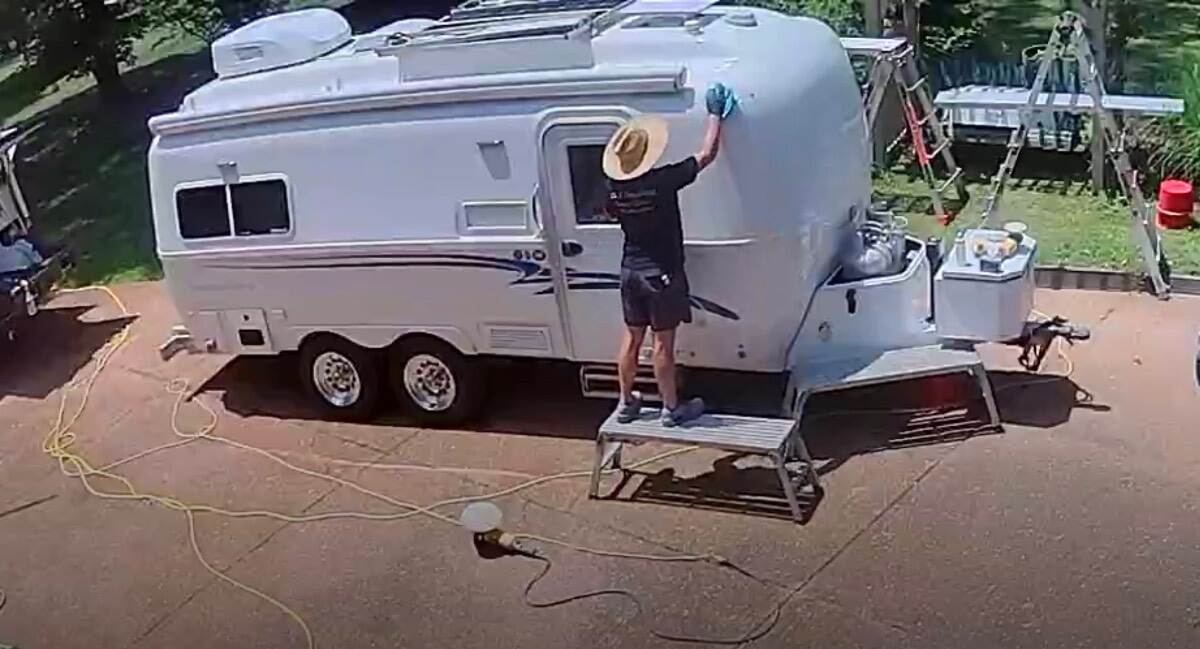
I am glad the CGI crew is now offering PPF on the front of Olivers. We have had XPEL PPF on the “blast zones” on the of our Oliver to include the dog house, aka LP surround and all the way down each side under the bottom edges of both sides of our Oliver. We have had it for several years now and it has really worked as advertised. Shortly after we took delivery of Hull #634 we had 10 mil XPEL paint protection installed. Here is a photo of our installer working his magic. The standard paint protection used on most cars and trucks today is 8 mil. The 10 mil material is naturally thicker and it’s really tough material. It’s presently the thickest p/p made by XPEL. So far, it’s held up great with no damage to our gelcoat. It’s fairly expensive to have installed, but well worth it in our experience. We use a product called Plexus to keep it clean and polished up. Our installers business name is Sun Stoppers located in Cornelius, NC. Also, we have PPF on all our vehicles. The 8 mil still offers robust protection from road rash, missiles etc. https://www.xpel.com This same fella installed 8 mil XPEL PPF on our entire Super Duty just after we purchased it in 2021. It was well worth the money and has kept our TV paint chip free 5 yrs later. If you trade vehicles every few years it may not be worth the expense. We tend to keep our cars and trucks for the long haul. I recently found and purchased a one owner, NC dealer serviced 2020 Toyota TRD Pro. It is in really excellent condition. So I took it to my XPEL PPF tech to let him work his magic. I could not be happier with his work as he exceeded my expectations. It’s all about the install and the installer. A few things to note: if you take it to an installer make sure you don’t have any paint chips on the areas you want protected by PPF. If any installer wants to cover areas on your truck or car with PPF with existing paint chips…in my opinion, you have the wrong installer. Find an installer that does high-end Teslas, Lexus, Benz, Lambos, Bentleys etc. After having a complete paint correction done, I had the headlights, front and rear bumpers, trim below the headlights, the painted grill surround, windshield pillars all covered in 8mil XPEL PPF. The prior owner already had the entire hood and mirror caps covered. The larger the surface area you cover, the higher the cost. I like XPEL PPF as it is hydrophobic and just repels dirt and dust with ease. You can also ceramic coat over XPEL PPF. ** Prices vary on installation, so its best if you’re considering PPF to get a quote from your local installer. My XPEL PPF installers shop 3 weeks ago. I also had XPEL 50% tint installed on the interior front w/s. A game changer in reducing heat and dangerous UV rays into the cabin. Note; check your State DMV on tint % laws. Post PPF install.
 4 points
 -
I Just recently had CGI do the annual touchup on my camper and they told me about a new service they are offering. It is a durable protective gloss film that they apply to the front of the camper. Might be a nice thing to have if you like getting off the beaten path (gravel roads, ALCAN Hwy, etc.), it would help protect the gelcoat from chips and make it easier to keep clean as well. Lasts 5-7 years or more typically and is generally easy to remove/replace. Not cheap but makes life easier and protects your investment. Short video link: IMG_8147.MOV3 points
-
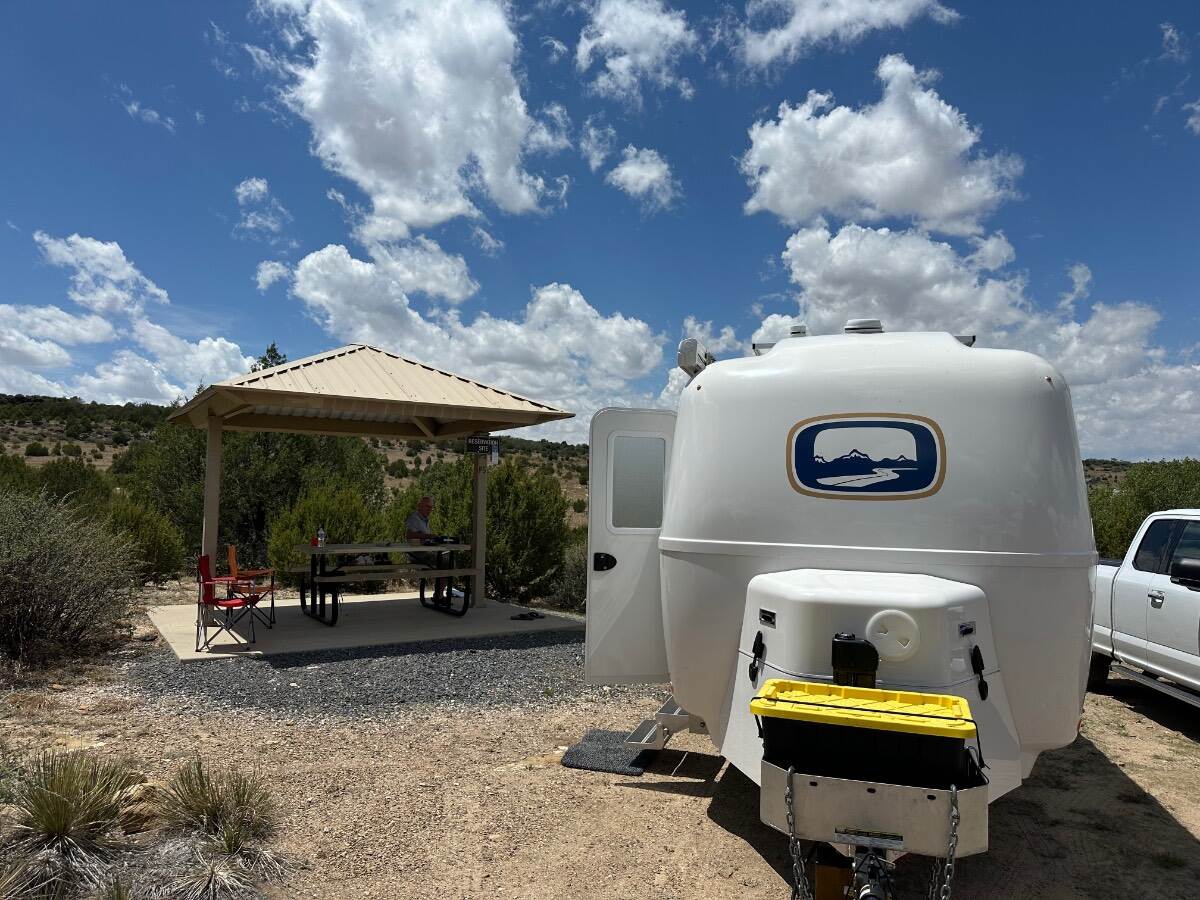
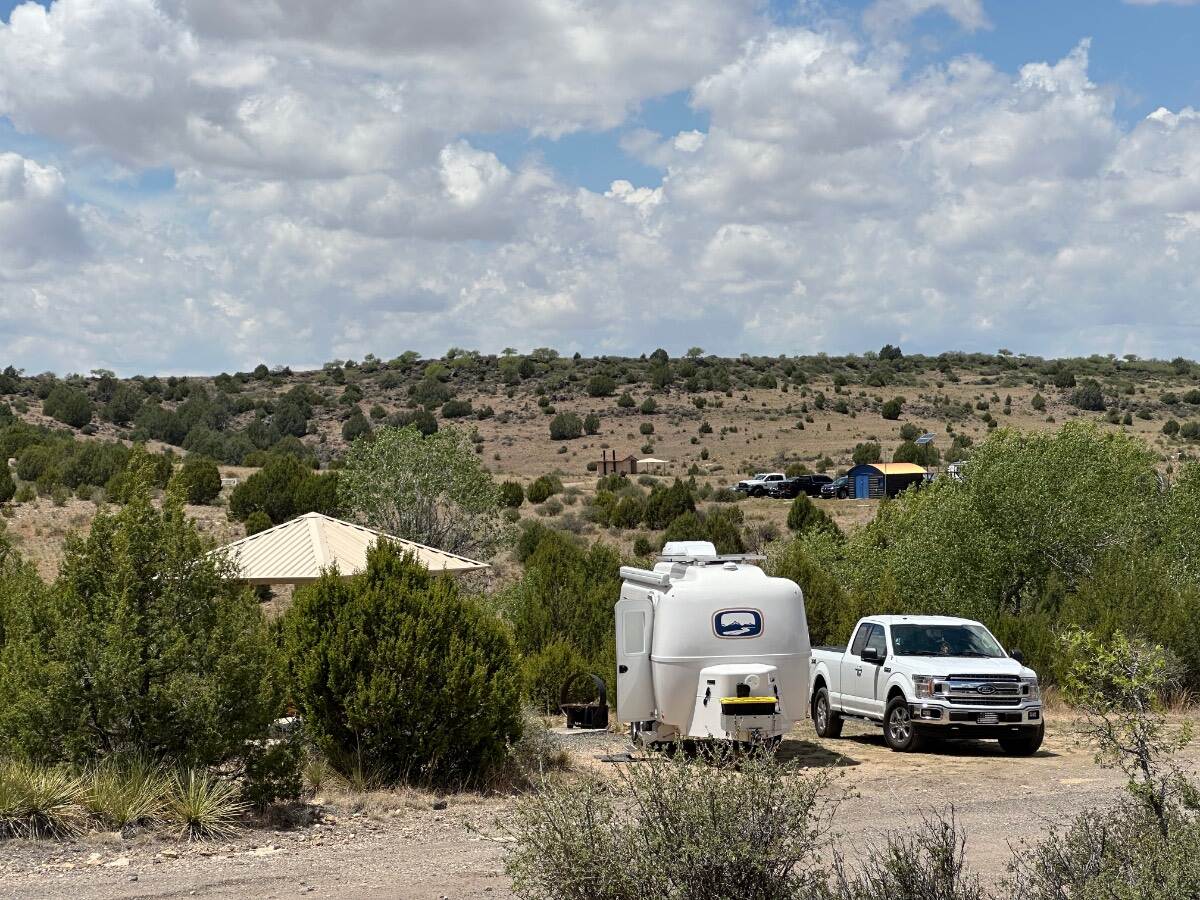
On to Clayton Lake State Park, near Clayton New Mexico first boondocking since we left home April 18 We were enjoying the COE sites at $12.50 per night with power and water gotta practice our energy and water management now Too much rain has been a little depressing, finally saw the sun today
3 points
-
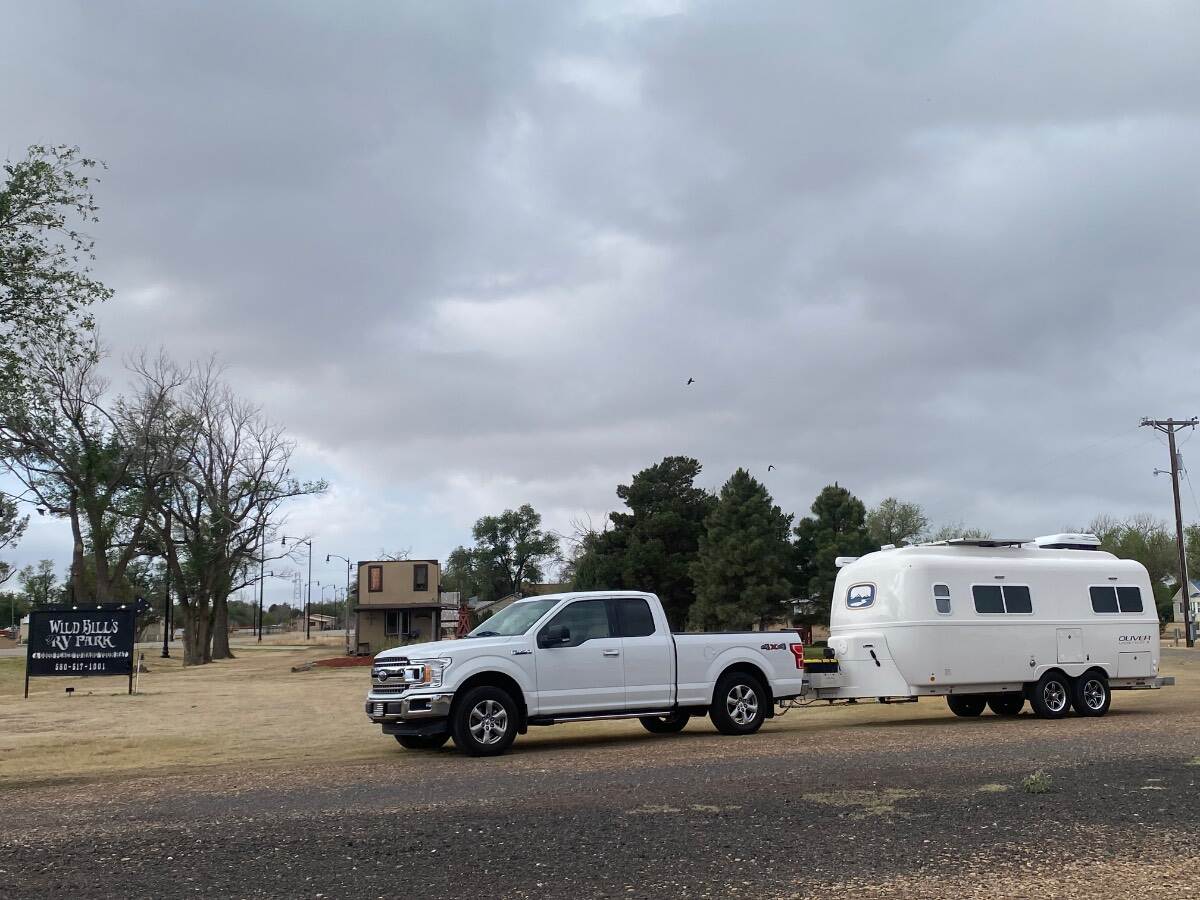
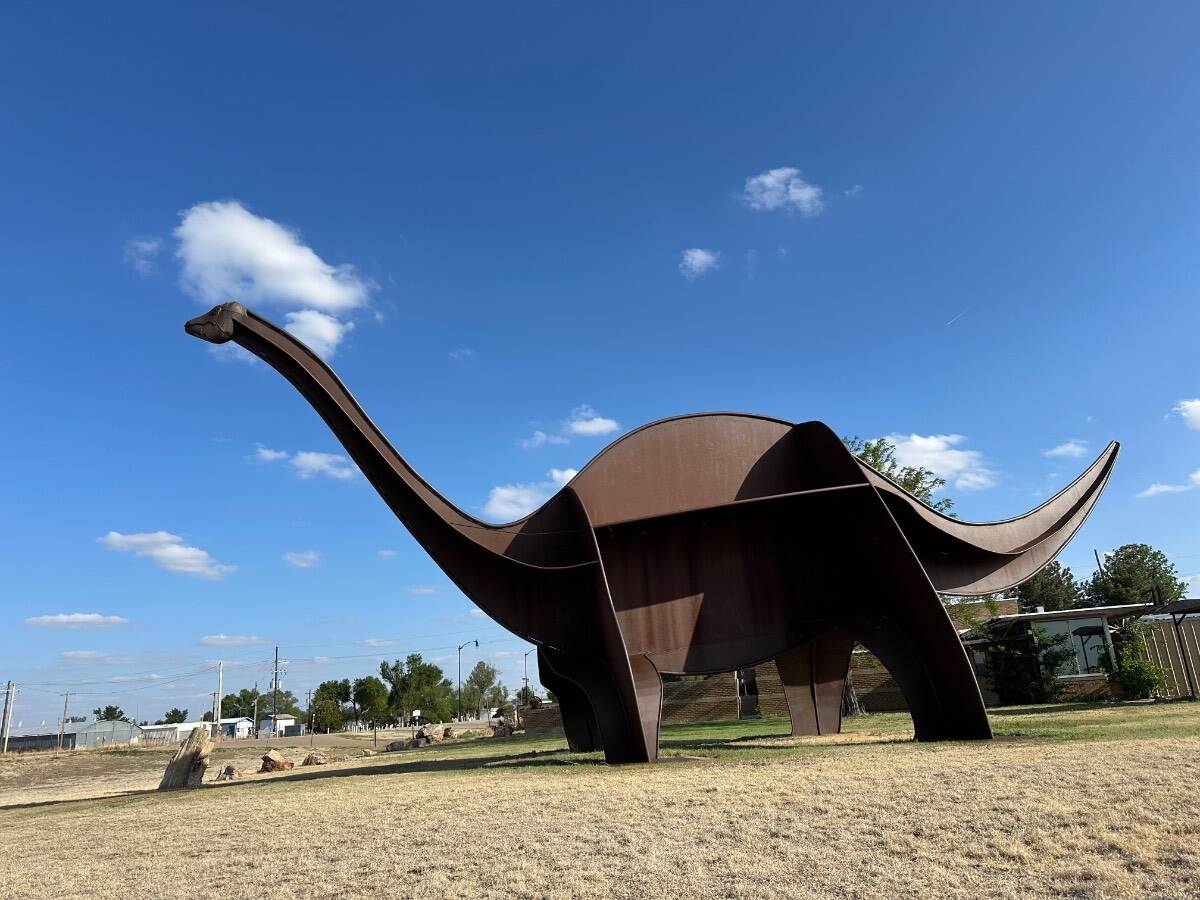
Wild Bills RV and trailer park Boise Oklahoma overnight stop fantastic museum next door do not pass up the museum !!!
3 points
-
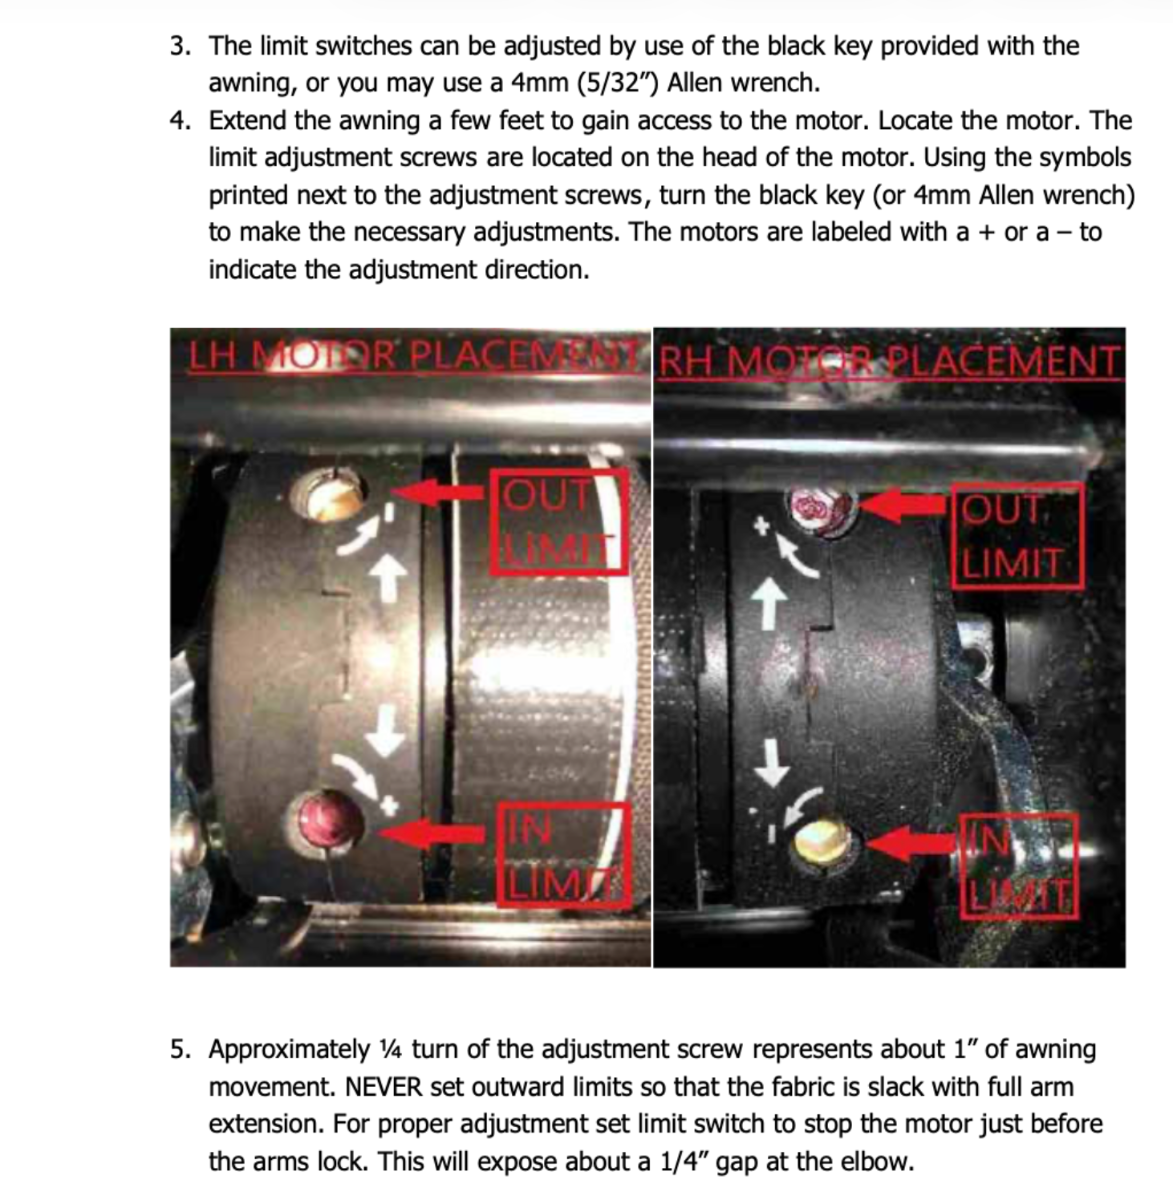
There is an adjustment for that. There should be a description as to how to make that adjustment in your "Oliver Standard Components Manual".
3 points
-
Probably talking about this place- Suncoast Designers. Haven't used them myself, but I have heard good things about them. They provide a lifetime guarantee to the original owner too.3 points
-
Stealth Satin XPEL PPF with Gloss on Carbon fiber roof and black trim.
2 points
-
Good to hear that CGI offers PPF as part of their services. We had our Oliver ceramic coated by CGI after we took delivery at the factory. CGI polished out all the swirl marks that were left by the factory and then applied the ceramic coating that has held up well over the last two years. When we got back home I had XPEL 10mm PPF installed on the lower front of the trailer (similar to how Patriot did his) by a local installer. It has definitely helped protect the fiberglass from impacts. We would have used CGI for the PPF if we could have, so the front of the trailer would have been protected on the drive home.
2 points
-
Thanks Dan for linking this video! I don't look much at the new models and this is a nice presentation, just 7 minutes long! Also no sour beans here, from someone who spent 2 years restoring a 2016 model! We will not be a new Oliver customer, just continue to upgrade and fully enjoy ours. They are really going with a Dometic A/C?!? 🤣 In all these years, still at the bottom of this learning curve. Looks like all the Truma issues will be behind OTT going forward. I'd have to use the awning more than 5 times in 2 years with all that solar up there! I wonder how practical this will be? Must be a heavy awning! We need all LP appliances to work effectively in altitudes up to 10K ft, a must for Colorado travel and elsewhere in the Rockies. 20A on a built-in DC-DC charger, but using the 12 AWG trailer wiring? OMG, you're not going to get 20A and if you do be worried about the wiring! I'll keep our Victron Orion 50A charger, that averages +40 Ah every hour towing. One very knowledge Forum member argued that the 4 AWG wire I used may be too light! You might get +10A on average with this configuration. This leads to OTT sticking with the Xantrex and Lithionics brands. This is not new! Almost everybody on this forum that has added or replaced an inverter has gone to the Victron Multiplus, most with the MP2. I do remember reading one post where a Xantrex was used to replace a FAILED Xantrex. Given the failure, I would have changed brands, but I believe it was chosen to simplify the installation with like kind. There are 100s of posts here citing Xantrex issues. And with all the new LiFePO4 batteries in the marketplace, a new quality brand at a better price point could be chosen. You'll get used to knowing your tank levels. More accurate, yeah sure, we've heard that one before! 🤣 That's what they said about our external tank monitors. We have learned very well how many days it takes us to fill our black and gray tanks. We're not ready for composting, the pee and poop handling, but it is the black tank that makes us return to the dump station! Gray water can be dumped on BLM and FS lands, so we can last a while leaving with 70 gallons fresh. I can guess exactly when we need fresh water, just before the water pump starts gurgling! Then we refill, from our auxiliary tank in the pickup bed. I have seriously not looked at that tank level display in two years, just don't need to. Windows? There are many here that truly dislike the current windows. Some leak when it rains and some have lost their seal between the panes. Our windows are in like new condition, no defects to date, knocking on wood. I enjoy the one-hand operation, especially when lying in bed. Awning windows, something else to worry about in high winds and rain? And if left open at all, even one inch when away, a thief could easily rip the window off and enter the cabin interior. I also do not like how they stick out on the exterior, where our windows are recessed into the hull, flush so taking no wind. We usually close our windows when towing, but if you forget these, there will be damage. I do really like the trimline blinds as the old-style sticks out almost 3" into the cabin interior. One gets in my way when I'm in bed. Our blinds need another hosing down this summer, Like I did when we first purchased our Oliver used My favorite part is the new kitchen counter setup. The new sink and cooktop looks great! However for boondocking, I'm not sure the compressor fridge and induction cooktop are preferable, appliances that cannot operate on AC/DC and LP. But with 900 Ah, oh what the heck! Chris loves cooking with induction, so we have a single-burner cooktop we plugin indoors or out (search for keyword 'induction'). For 2027, did they fix the cramped bathroom countertop/sink? Someday, I'll fix both, like Mike did for their kitchen:2 points
-
Oliver is dedicated to continuous improvement, I like a lot of the changes. I think stepping away from Truma appliances is a good thing. I'd feel more confident traveling knowing that parts and service are more likely to be available for the new appliances. An integrated DC to DC converter is a great addition as well.2 points
-
We had the Furrion DV1230 in our LE2 and it failed after about three seasons. We mostly play DVDs as we’re often in no-signal areas. Basically, the CD/DVD drive failed. Founds an exact replacement on Amazon (where all good things come from) and dropped it right in. With the full-sized remote, it seemed like we were back in business. Passing through some town a few months ago, we found a complete 8-season DVD set of the West Wing at a church thrift store in Pagosa Springs, CO. While I wasn’t a rabid fan, it looked too good to pass up. $10 for the whole 30+ DVD set(!) We enjoyed the whole first season in about 4 days. We had a small about of skipping and drop-outs that I attributed to scratched or dirty discs. Hitting season two - I couldn’t get any of the discs -except- the “special features” ones to play at all in the Furrion. That was true for all the remaining seasons. My brain started working. On a hunch - we visited another thrift store in Washington, UT and bought a used/donated Sanyo Blu-Ray/DVD player for $7. Another $2 bought an HDMI cable. Hooked it up to an unused HDMI port on the ROKU/OON television we replaced the original on with. EVERY disc played perfectly! Verdict: If you didn’t’ have enough to dislike about the Furrion DV1260 - add to it that it won’t play some DVDs. I’m guessing this has to do with the “multi-layer” technology of some high-capacity DVDs. The Sanyo Blu-Ray player now resides in the cabinet above the television. The remote even works through the translucent cabinet door. Cool! Im debating mounting the player under the cabinet above and to the left of the television. That will make changing discs a lot easier. I can likely use 3M “Command” strips to mount it without drilling and keep it damage-free.2 points
-
Try a PM to SeaDawg. I know that she had this issue and a "local" (Florida) place solved the issue for her. Bill2 points
-
Collin and Gavin (CGI Murfreesboro, TN) did a superb job on my camper right before they left for Maine. I always tell them, “It looks better than new.” Worth every penny for the annual job. If I lived in Maine and owned an Oliver, I would definitely take advantage of their skill set while they are there.
2 points
-
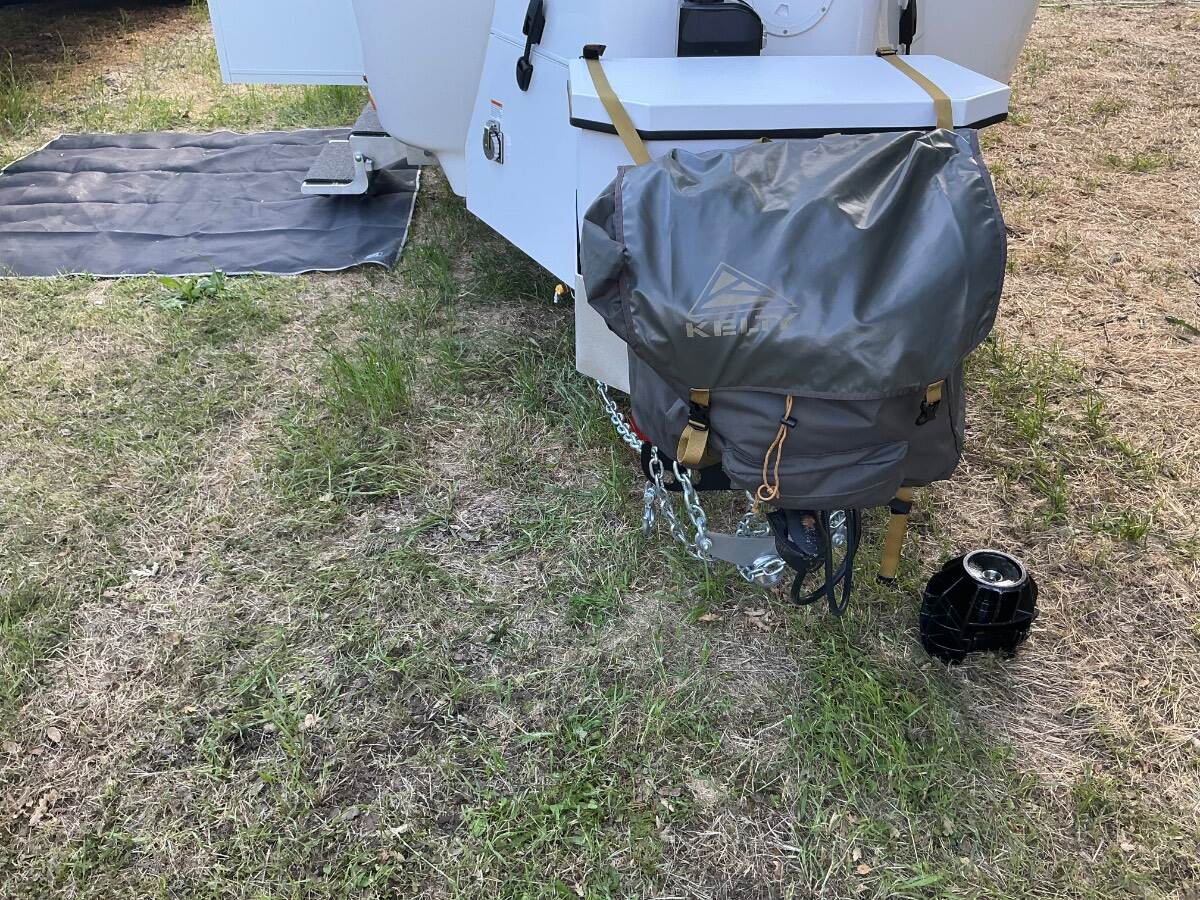
Meta thread of small mods and things I got for the trailer and found worked well, for your entertainment and interest … First up, the Kelty Trash Pak garbage bag It’s big and fits perfectly attached to the front Seabiscuit box. Made to attach to a back spare tires or other places, there’s lots of strapping so plenty of options. If animals are around you can hang it or put it in the truck. It’s waterproof, super sturdy and big enough to separate out compose vegetable scraps, recycling and trash. Quick, it’s been discontinued and is on sale for $90, so get it while you can if interested from Kelty, REI or or favorite outlet. Second in that picture is the Icon Trailer lock. If you follow lock picking - like the Lock Picking Lawyer channel where he picks hitch locks in under a minutes, you’ll know that most locks don’t slow anybody down who has a little determination. Brute force they can drill out, either the cylinder or the body. This lock is nearly immune to all that. Case hardened steel with a structure that’s hard to cut. Anti drill spinner on the lock, and a tumbler system that’s very difficult to pick. In addition I have a chain around the wheels that’s similarly hard to remove, I’ll detail that later. Finally in that picture is CG Gear RV mat over by the door. It’s double layer loose woven plastic material that was designed for helicopter temporary pads for the US Air Force. They needed something that could be thrown down in the field apparently which wouldn't hold dirt or sand. Indeed it just drops through and it always stays clean.
1 point
-
my 2c That Dometic cabin heater style exhaust can have issues at high elevations I believe, there's a high elevation exhaust you should install when in the mountains (according to videos I've seen on this type - may not be true for this model). I've got an unused one if 2027 owners want one 🙂 "Soft main cabin lights" - did they change that? Anyhow actinic bright overheads on the main cabin fan, I'd rather do without Ironically they show the new solar awnings in partial shade which takes down the whole panel, unless they have a sectioned panel with micros (unlikely). I think getting to deploy these and work will be the main issue. Anyhow I'm surprised at how well that 400W does, doing 1.2kWh on a good day easy Why did they change the front (and rear?) jack? Personally I prefer the old one, 500 lb upgrade isn't much to speak of and not font of bubble switches. The older one looks better and more businesslike IMO More accurate tank readings is a big plus Mentioned before I'm not fond of the 'fully open' style new window. Looks like you have to open the screens potentially letting bugs in (and they'll do it!), plus two handed operation. Fully open is nice for a house but don't see the need here, just IMO Anyhow looks like a great trailer as usual and it's not sour beans because I bought a 26, but full honestly I do prefer this years model, except on the tank monitering1 point
-
Is that below the sink? I have one of those Sand-Free Mats and it's the bomb! I think someone at the Oliver Rally had one. It's heavy but came with a bag.1 point
-
I have full XPEL PPF in stealth satin/gloss on my M3 with XPEL XR Plus tint 70/20. First place I took it after pick up was the detail shop. Also, have gloss bra coverage on the Tundra as well. Did you ever post about the PPF install on your Oliver? If you did, I must of missed it. It is great stuff, along with ceramic coatings, tint, etc. CGI is using another brand but still top tier PPF. Nice find on the 2020 Tundra PRO BTW, very popular move these days.1 point
-
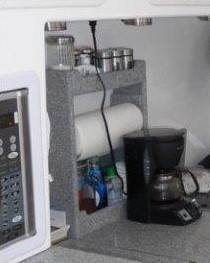
Yep - James Oliver constructed the spice rack/paper towel holder for the very first Oliver made way back when - see below.
1 point
-
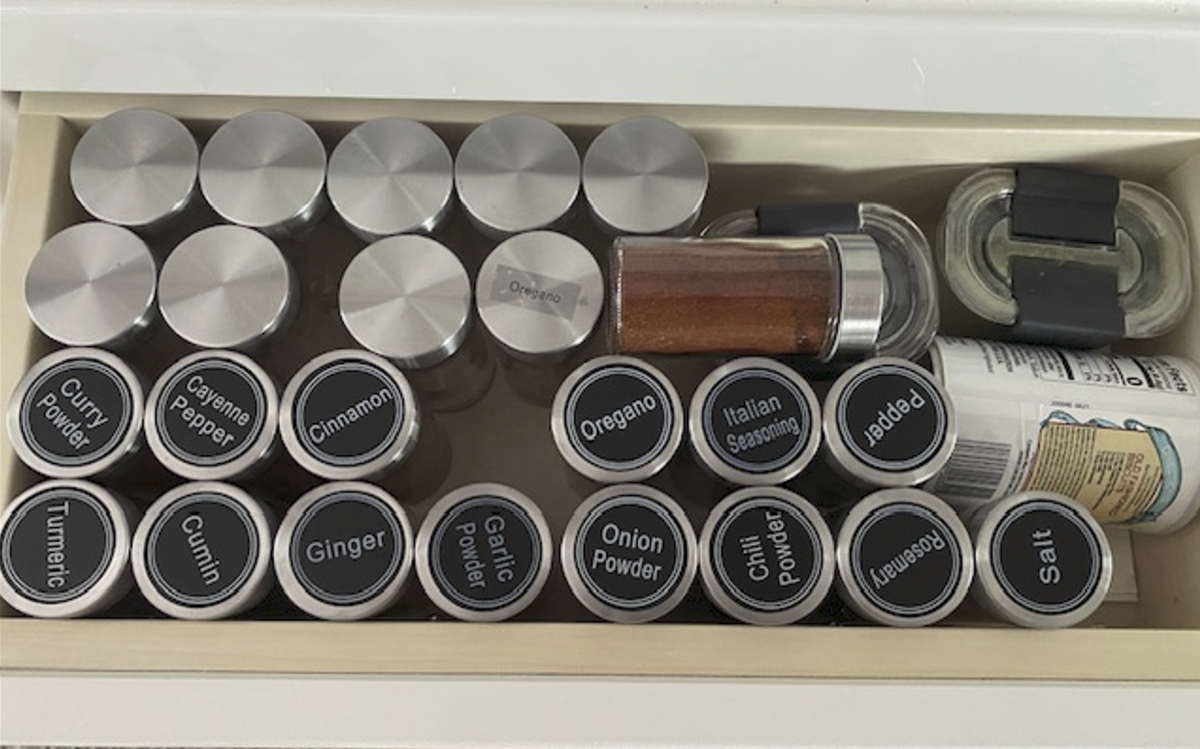
Spice drawer! Surely somebody figured this out but here's my solution, 3 oz jars. Stainless lids and nice thick glass. Holds 1/2-3/4 of a typical store bought which is plenty. There are the only ones I could find that fit height wise https://www.amazon.com/dp/B07KX8S1Z7 https://www.amazon.com/dp/B0797LHWYK
1 point
-
I wonder if the 2022 models can be fitted with the 2027 windows...1 point
-
For the water heater w255w indicates the outside switch is off. w255h could simply indicate there’s no power to the furnace. Check your fuses and circuit breakers.1 point
-
Additional information on our 2015 LE2: Contacted Oliver and they said my window is a Lippert brand and they gave me this link: https://support.lci1.com/8800-series-windows Here's a photo of one of the identification tag on one of our windows: Started searching on the Lippert website, if I find good video for window removal, I will post it.1 point
-
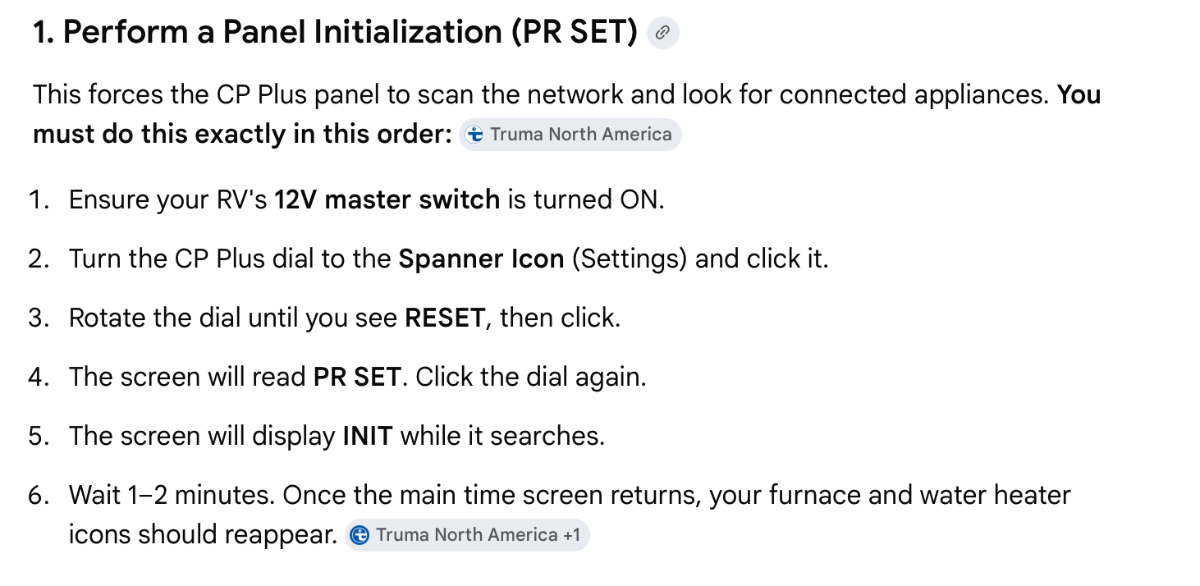
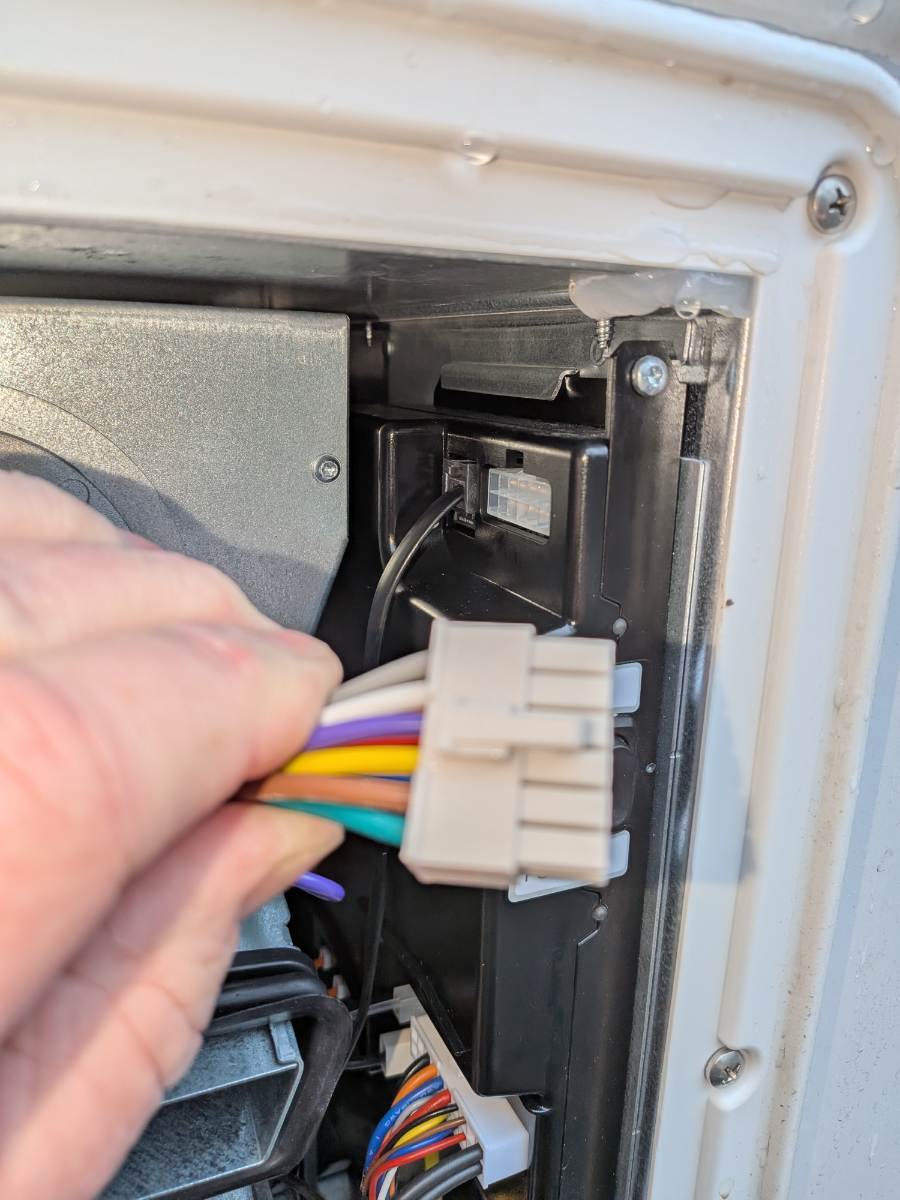
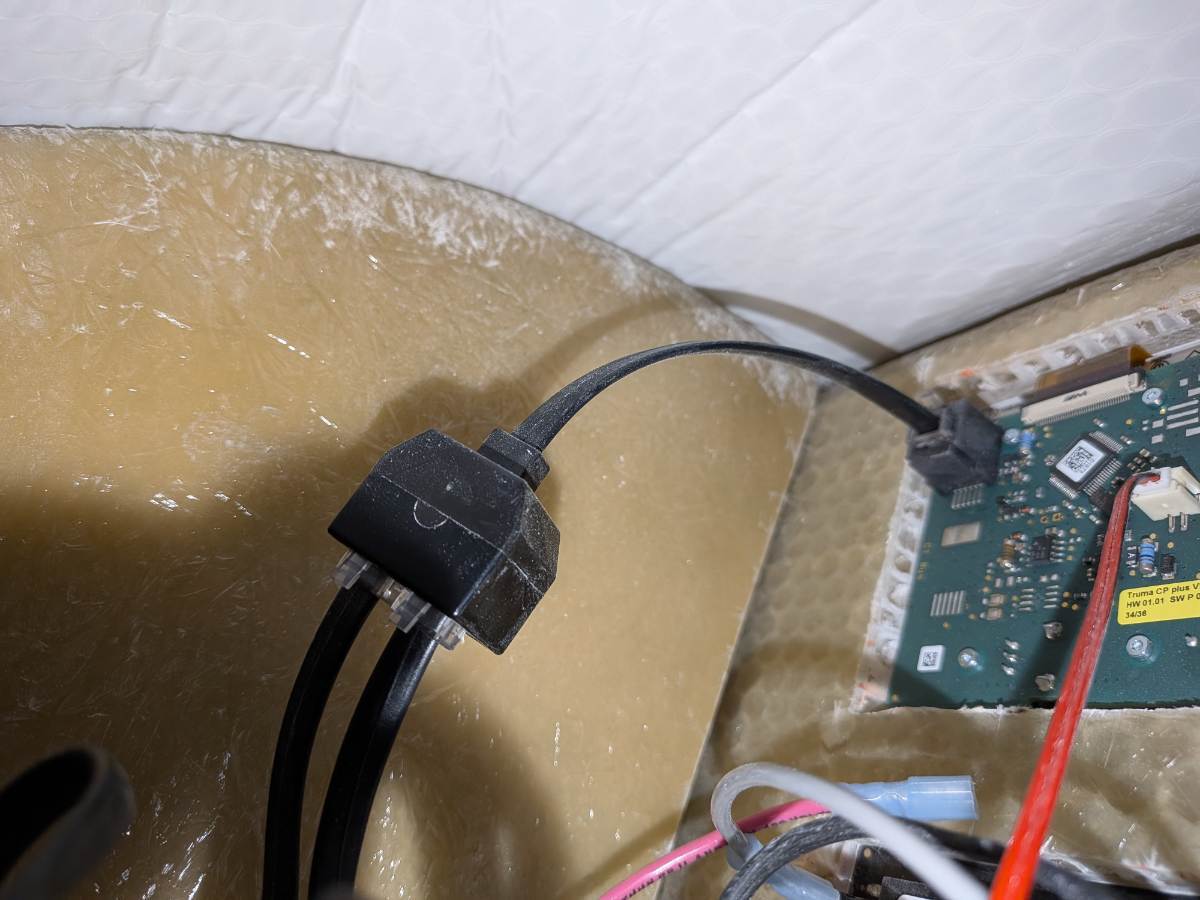
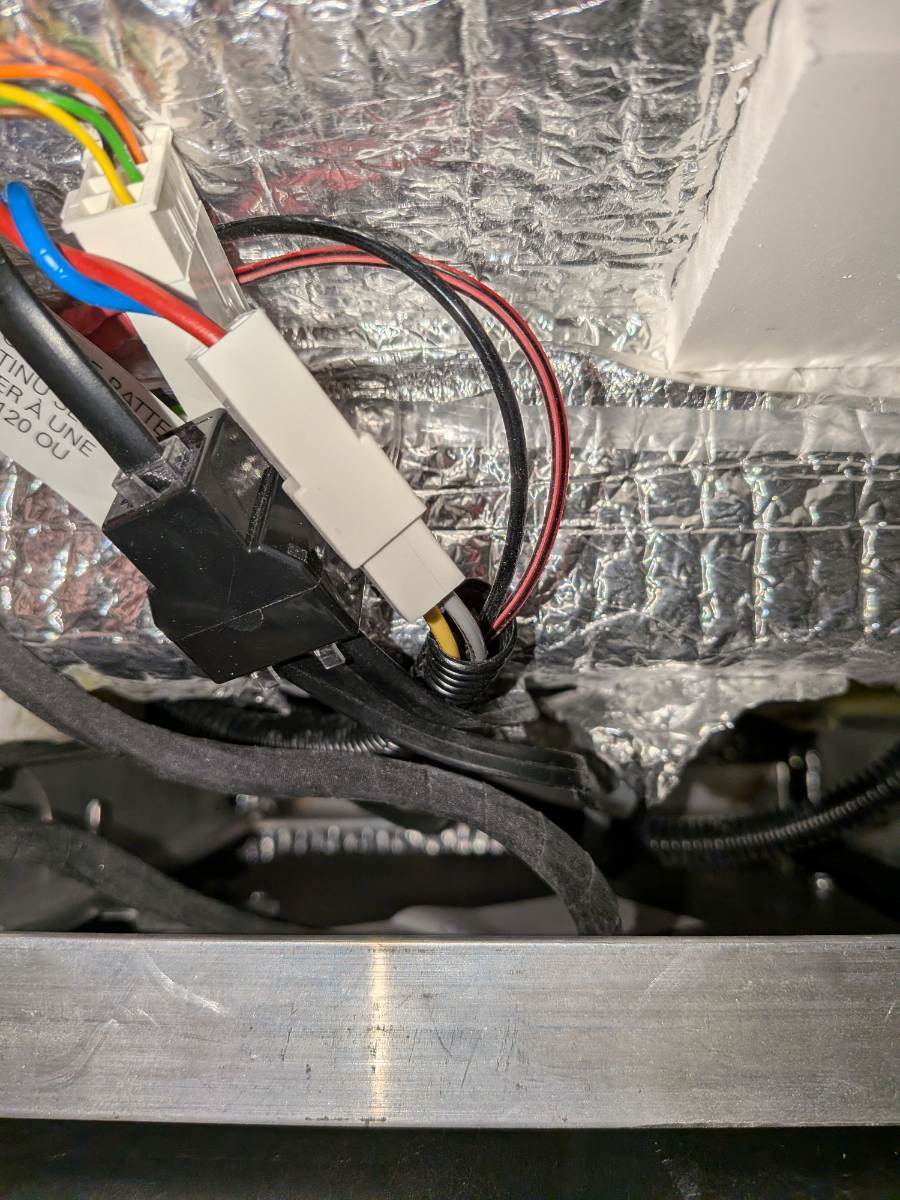
There are a few places to check the data connections: 1) Behind the water heater power connector as show in the video. 2) Under the curb-side bed there will be a junction connector where the data cable from the furnace and the water heater data cable are connected (see photo below). 3) The back of the display unit In terms of re-initializing the system, I found this: Note: I believe that there is also a power switch on the furnace itself that is accessible under the curb-side bed, on the furnace itself near the wall by the gas connection ( if I remember correctly).
1 point
-
Nope - there were no acorns or twigs in the awning. I use a little step stool and a Dewalt 12v blower prior to rolling them up to remove any tree trash that might have fallen. I think it was just a little of stretch in the fabric. After a small adjustment with the limits, all was fine.1 point
-
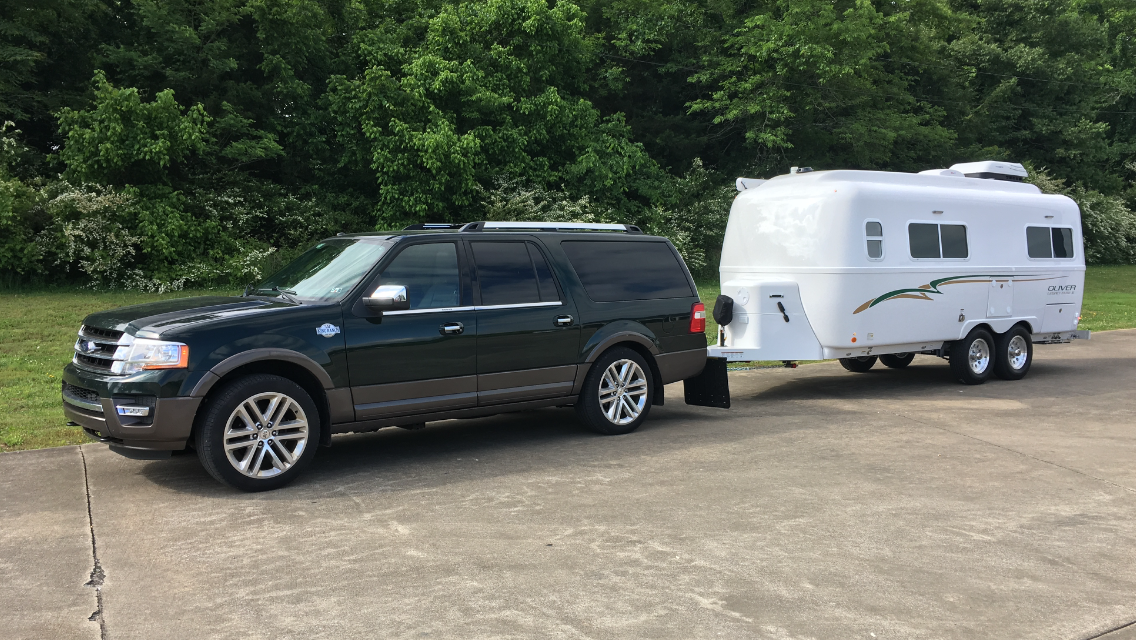
I’ll chime in here. Former Elite II owner here, and also a former Ford Expedition owner. I still check out the owner forums to see what’s new, and because we do miss our travels with our Ollie #461 that is now with a new owner, as we have moved on to some overseas travel as our next adventure in life. Yes, it’s more than safe to tow your Oliver with the Expedition with the factory Tow Package. We had almost the identical setup to yours. Our 2017 Expedition 4X4 was called the EL version (extended length, now called Max). The Ollie is well within the towing specs of the Expedition. It’s a body on frame construction SUV that shares a lot with the Ford F-150 truck. You WILL need to use the Andersen weight distribution hitch. The Ford factory towing package and the factory trailer brake controller worked very well. Use the Tow/Haul mode when towing. There are a couple of cons though: After a couple of years we did find the limited payload capacity became an issue as we started carrying more camping equipment for extended trips. The Ford Eco-Boost turbocharged V6 was adequate but it really had to rev very high in mountainous areas going uphill, and the engine temp tended to get pretty hot. We eventually upgraded to an F-250 to get much higher payload capacity and also eliminate the need for the weight distribution hitch. Enjoy your Ollie!
1 point
-
That's great! I was excited when we finally completed my map. Now, I just want to revisit what we couldn't/didn't have time for . I've logged time in all 50. Not the Oliver in Hawaii or Alaska. When my grandson is old enough for preschool, we will be on the road again. In the meantime, treasured memories, as im sure you have.1 point
-
Camping (Boondocking) northern Minnesota? Check out Kenny! https://youtube.com/@kennyofalltrades?si=6CfmBy2YHWxDcnbk1 point
-
I’ll be watching! I’ve got a preliminary route planned out in my head which includes the above in reverse order. It’s going to be another year or two before we can resume our long trips, though. Mike1 point
-
Excellent, John!! Fall is a perfect time to go, we did that last fall. Take a Picture Rocks Cruise if you get a chance. Camping can be sketchy up that way late in the season as the campgrounds shut down around mid October. Lots to do up that way. Visiting the Sault Ste. Maire lock was fun. Love'ed that trip.1 point
-
If you do a cruise, definitely consider one with a land portion at one end or the other. In 2006, we took Royal Caribbean's Radiance of the Seas from Vancouver, BC. From there we spend the next seven days sailing northward along the coast of Canada and Alaska. We stopped in Juneau, Skagway, Sitka, Hoonah, finally to dock in Seward Alaska. I wasn't a fan of this portion, because everywhere we stopped, 2500 people got off the ship to see the same few sites. These days, that would be 5000 or so at each port. From Seward, we flew to Fairbanks, and spent the next six days on railcars heading south to Anchorage, through some of the most beautiful landscape I've ever seen! Each night was spent at a wonderful lodge or mountain hotel. This was my favorite portion of the Cruise/Tour, and the part that I'd like to do again. Finally, from Anchorage, we flew back to Ohio1 point
-
I recommend reading this thread. While the hard reboot wasn't the ultimate solution, you should check the end of the thread for information about changing settings on the inverter. I agree that it's more of a temporary workaround than a true fix. I experienced a similar issue when running my microwave on battery power, and it seems to affect only certain recent model years. You didn't mention your OTT's year and model, so I'm not sure if you're included in that range.1 point
-
WOLFBOX MF100 or MF200, or MF200 with dual batteries. I have an Amazon business account, so the MF100 is $75.49 with the business discount, $95 for the MF200. The dual battery MF200 comes in at a whopping $123.49 https://www.amazon.com/WOLFBOX-MF200-2PK-Compressed-Duster-Hurricane-Force/dp/B0GH6L9CP3/0 points
-
Thanks for the help everyone. I unplugged the rj45 plug behind the white connector and plugged it back in. Then I did the same to the one under the heater, The two wires going into the splitter and the one going out. Then I did the same to the rj45 connectors in the overhead behind the control panel. Turned the power switch outside back on. Ensured the switch on the heater was on. Turned on the control panel, went to settings, and reset. Still does not recognize the heater or hot water. I placed a ticket with Oliver.
0 points


.thumb.jpg.e34bf01ef7f7d5e99ad31856d45afbeb.jpg)


-
Recent Achievements
-


")


")


")


