Leaderboard


Popular Content
Showing content with the highest reputation on 12/24/2020 in all areas
-
6 points
-
Christmas Florida style. The little boat parade in our daughter's neighborhood, past weekend. We wish you a safe and happy holiday.
 4 points
 -
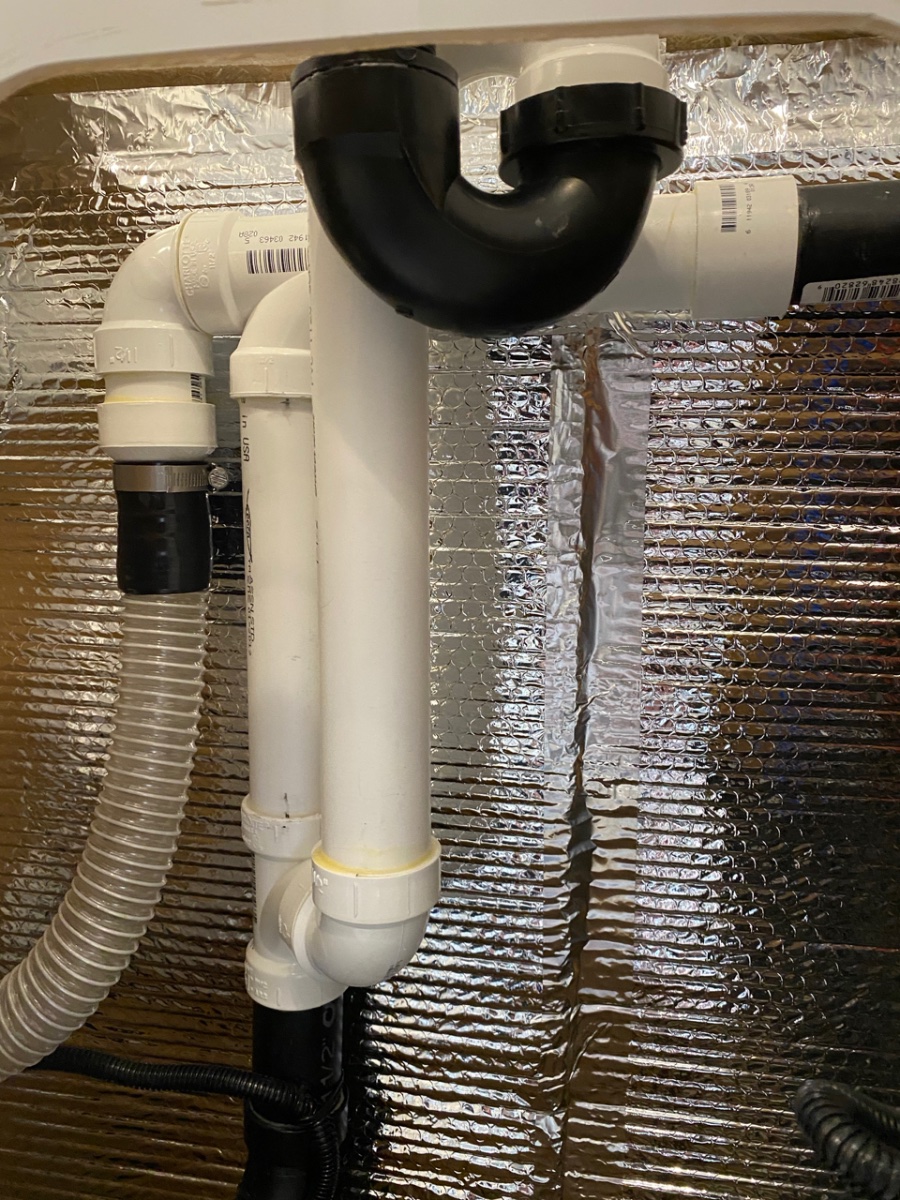
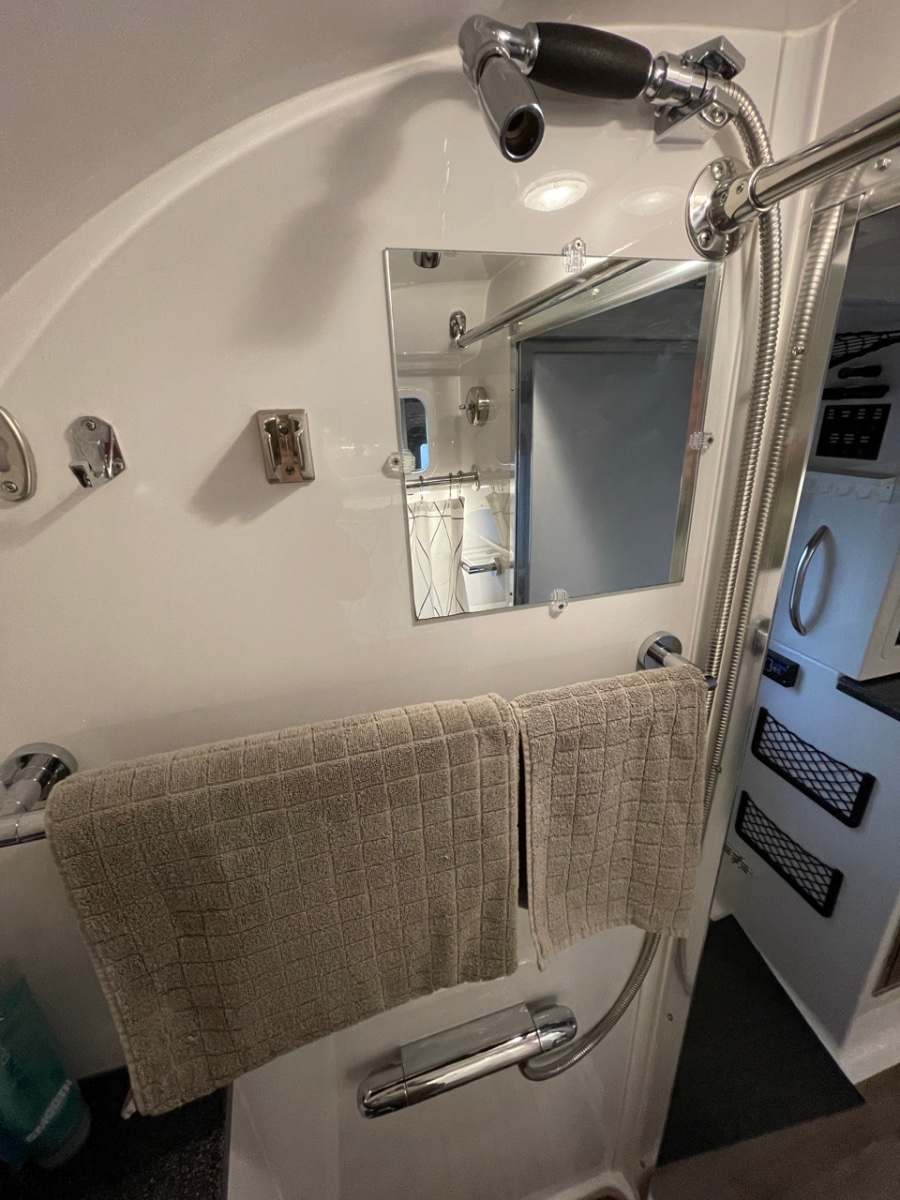
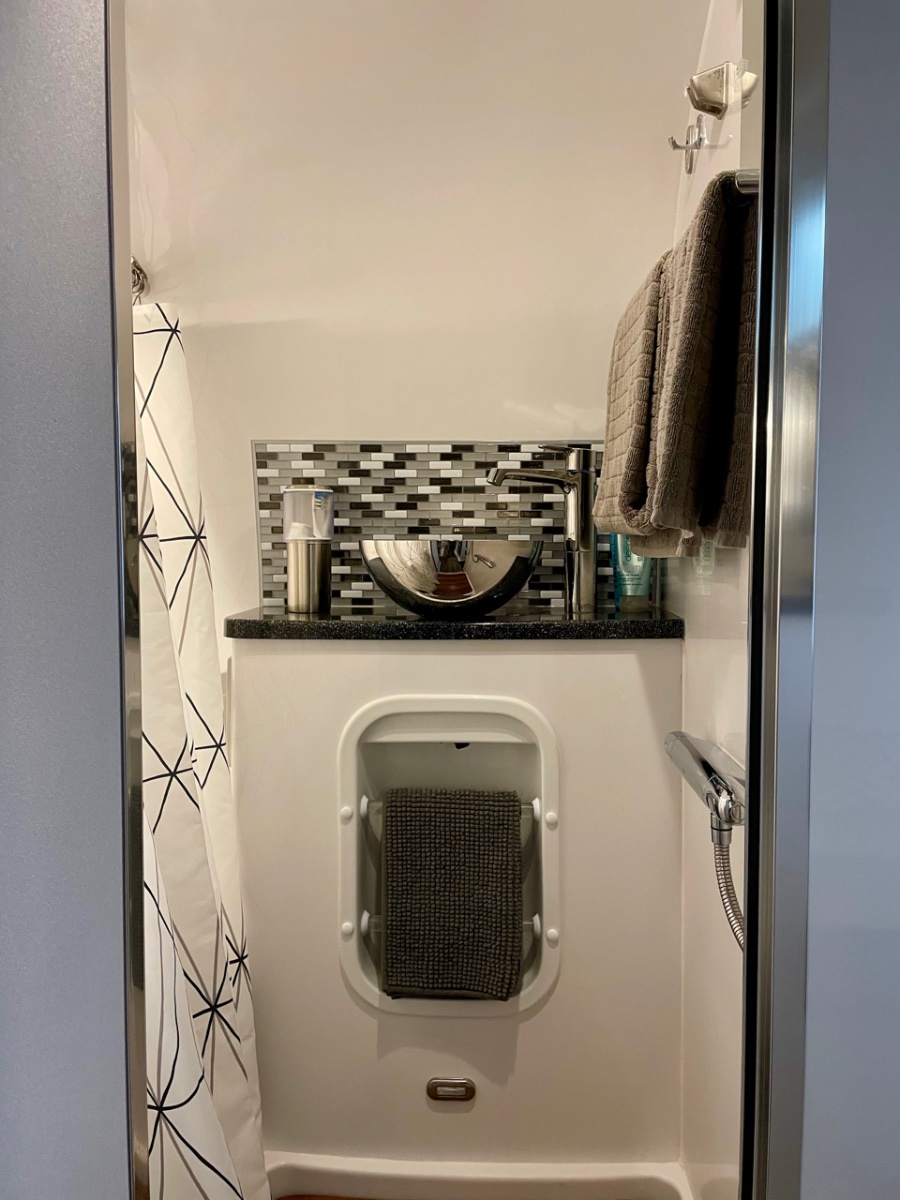
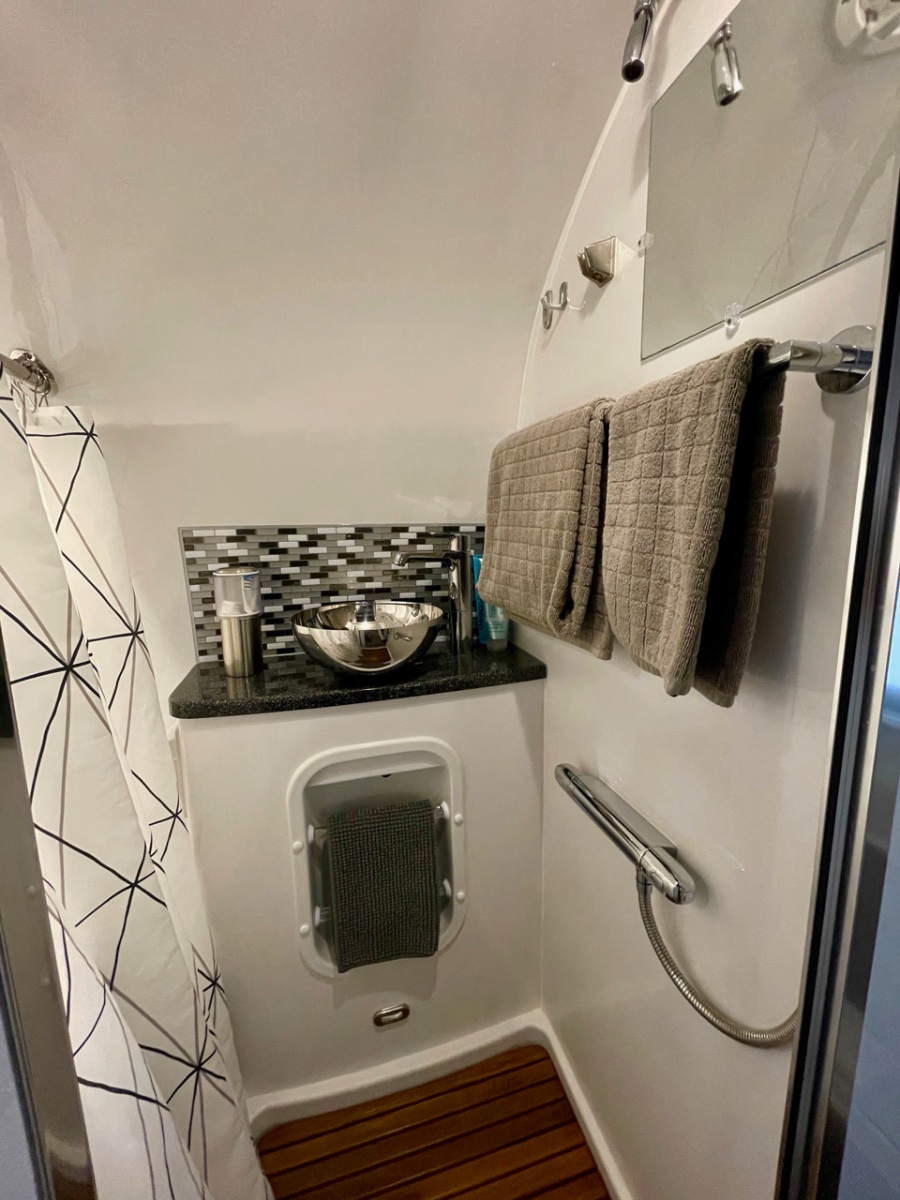
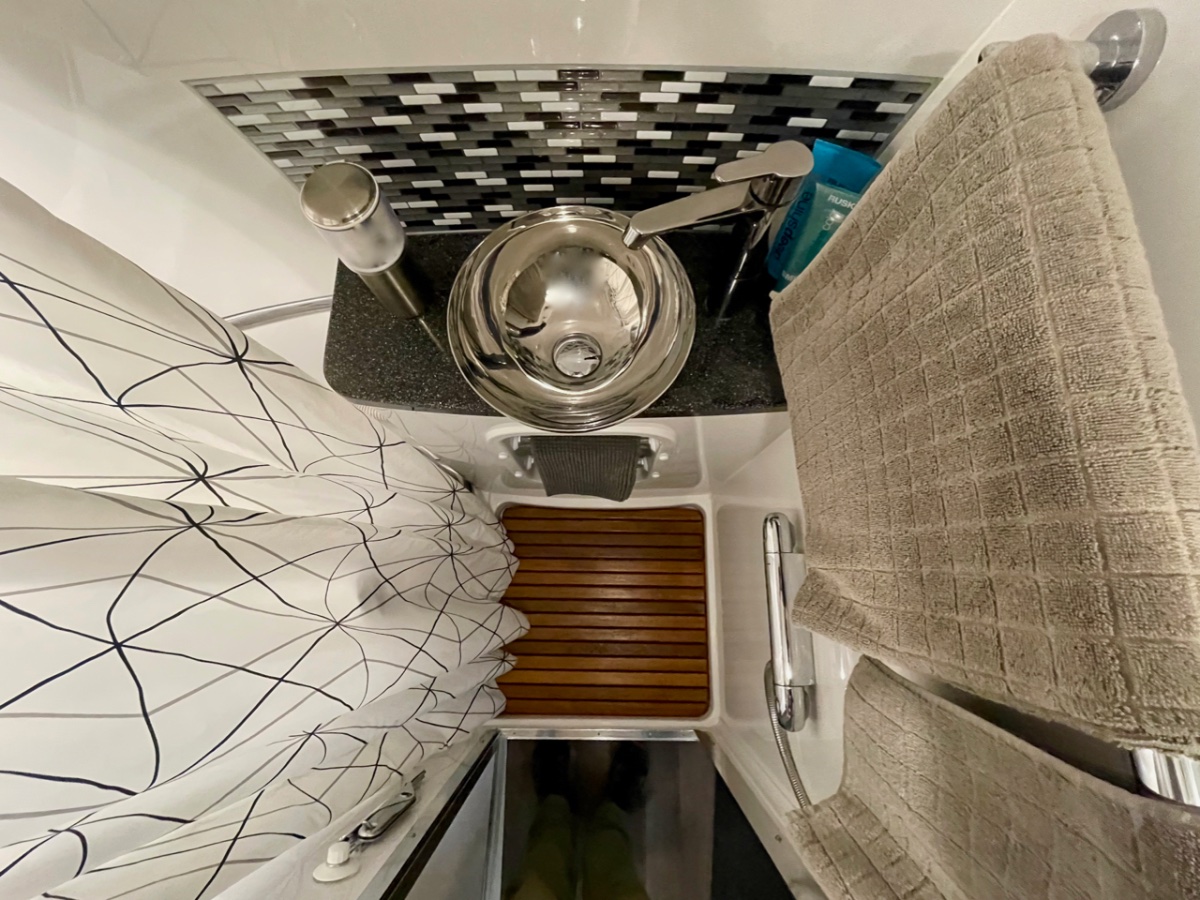
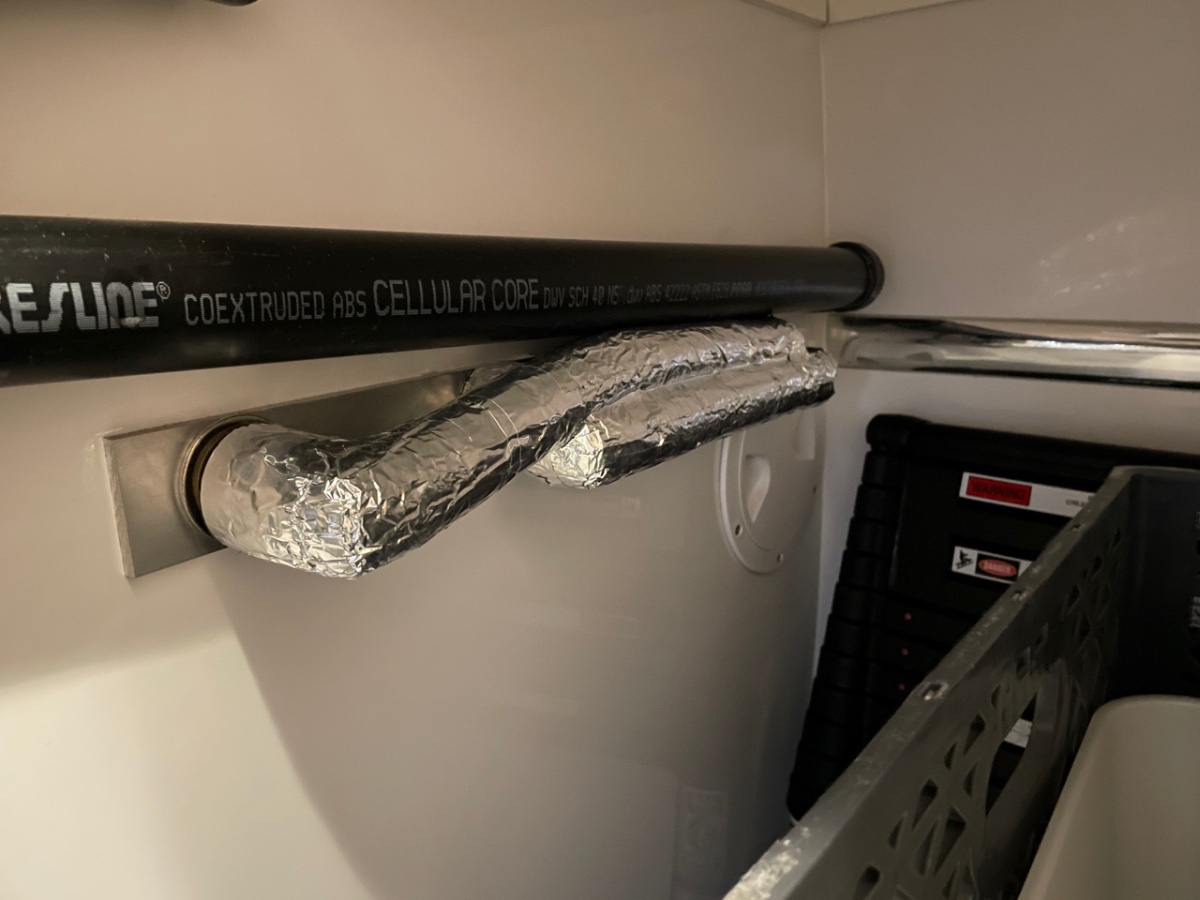
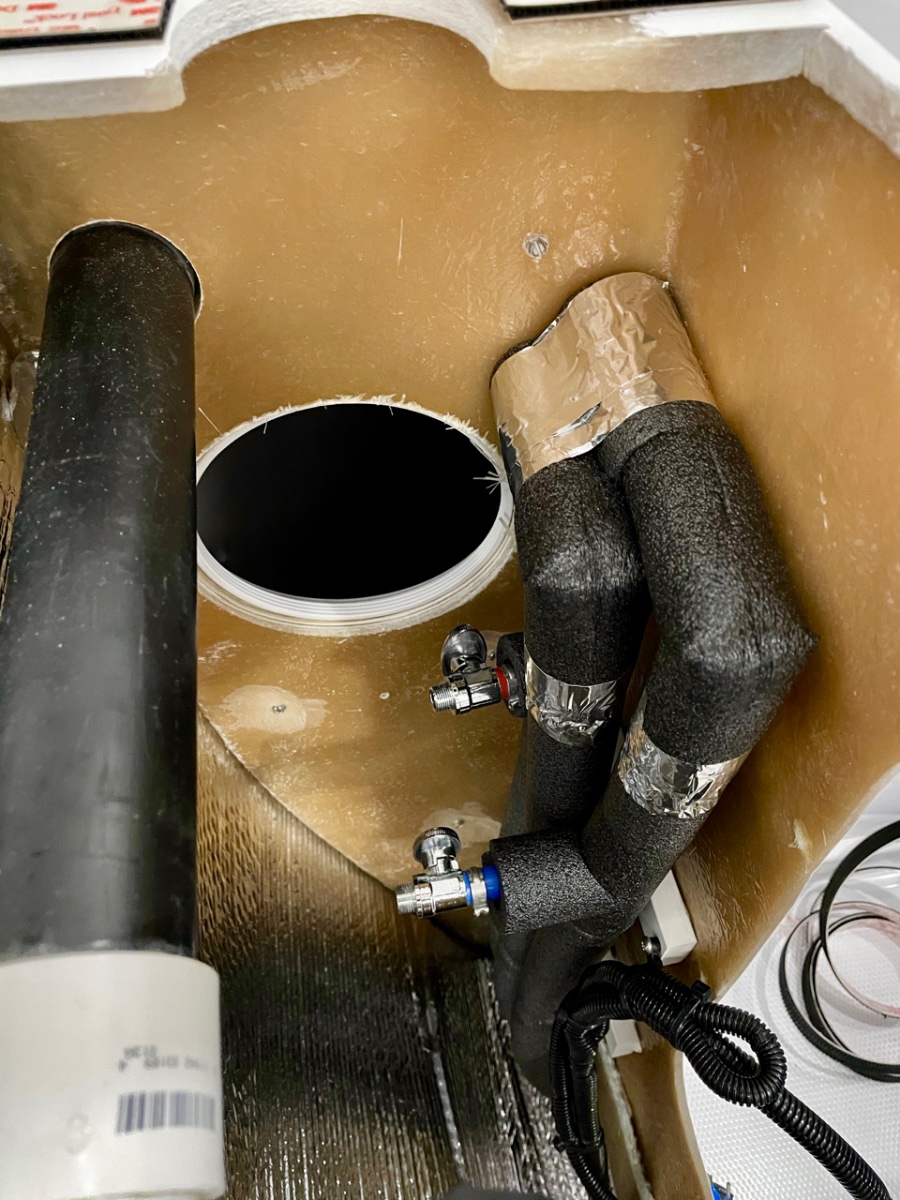
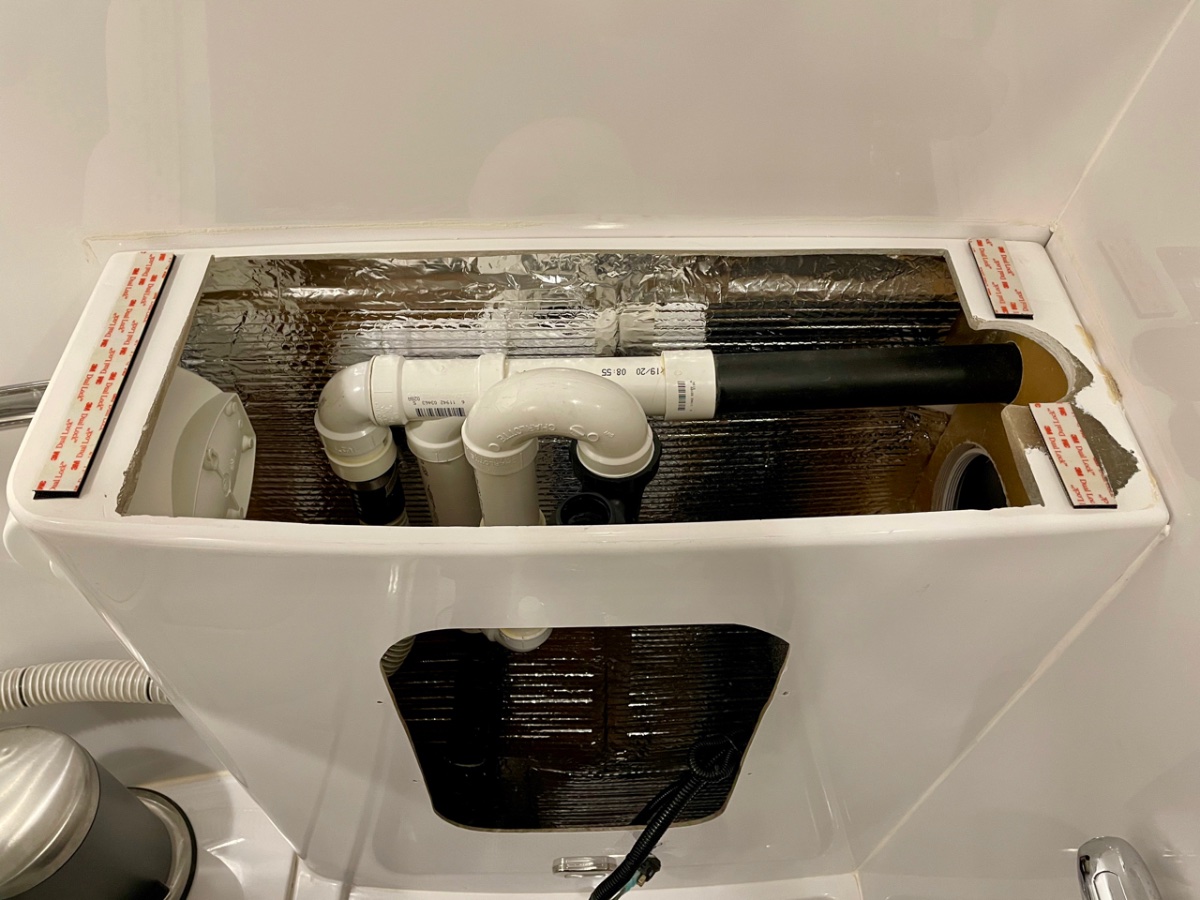
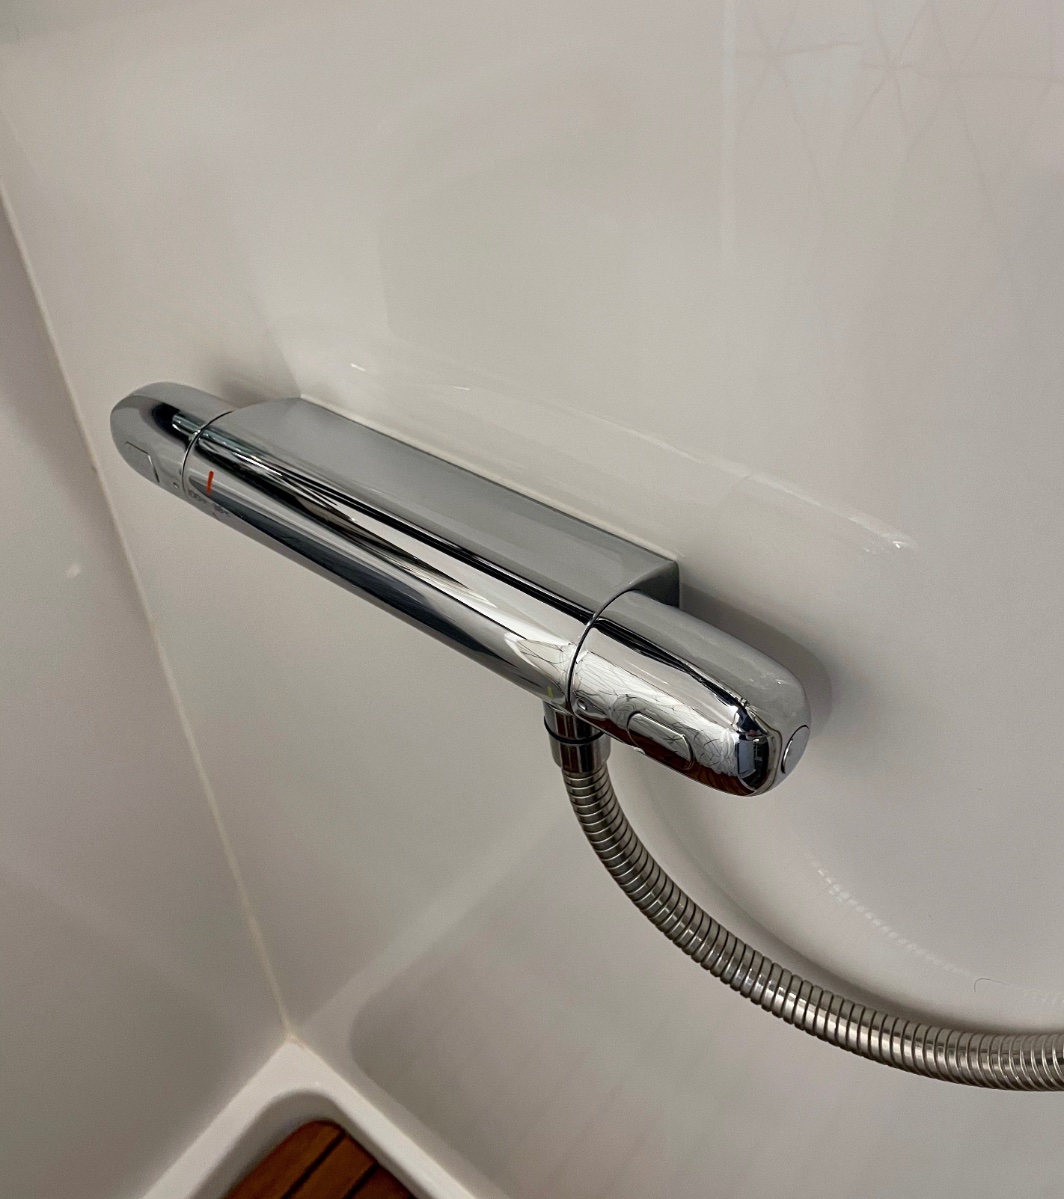
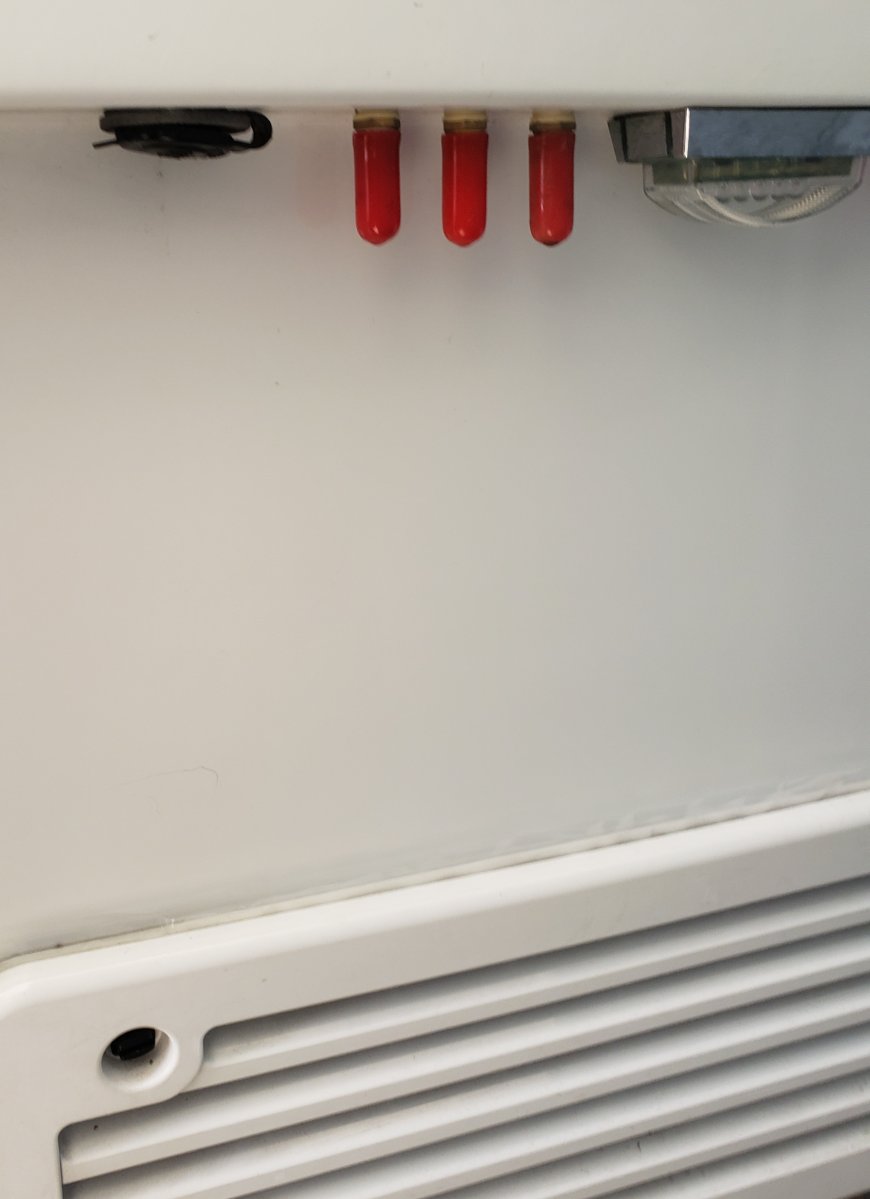
Many of you know that this has been a long, drawn out project. I think I started talking about it to a few people at the 2019 rally - so it's been well over a year in the making, almost two. Not that it was particularly difficult (though certainly a more major mod), but because of laziness and indecision on all the components it ended up being a start and stop project, with months sometimes between fits of activity. And then it snowballed into a complete plumbing overhaul, which was unnecessary - but then that's how the trailer got its name, after all. I'll post about all the plumbing stuff later, but since there have been a few recent posts about shower and bath mods, I figured I'd go ahead and toss this one into the mix. This project started for a few reasons. One, I've always found the bath sink to be mostly useless. It's fine for washing hands, but for most anything else, you've got to crane your neck around with the front wall curving in to hit your head. And trying to use a tiny little sink for washing your face just leaves water everywhere. So we found that were using the kitchen sink almost exclusively. That was fine - no big deal - but with the bigger sink, I was getting tired of wasting water cleaning toothpaste residue out of the sink, and it seemed silly to have a bath sink that got little to no use. The second reason for the upgrade is that after we redid the kitchen sink, the bath sink just looked sad. In addition to functionality, the bath needed some sexy. So the obvious solution was a vessel sink of some sort. Since a vessel sink sits on top of the counter, I'd have much more leeway in size and placement. I could pull it forward as much as I wanted, plus it had the added benefit of raising the sink to a more comfortable height for us. Some experimentation with kitchen bowls of different sized showed that I could get a fairly generous sink that didn't take up too much shower space. I settled on something in the 11" to 12" range; which proved to be a little difficult to source, especially after deciding on the material. I had bookmarks for dozens of sinks of different materials, but I couldn't find one that I really liked. I almost picked a glass one off Amazon, but in the end I thought that was going to be too heavy. What I really wanted - since I had already swapped out almost all of the brushed chrome fixtures in the bath for polished - was a simple polished stainless sink. There were a few out there, but nothing in the right size, nor at a reasonable price. So the project bogged down a bit at that point; but I was confident that I'd find something eventually, and so I went ahead and ordered a new vanity top from Oliver, without any cutouts for the sink or faucet. I’m glad I did, since Oliver has apparently now stopped offering our countertop color And sure enough, a few months later I came across a discontinued sink on Overstock.com that was exactly right. 11.25", polished inside and out. It's the Acquaio sink from WS Bath, if you can find one. I know that other sizes are still available. It was still pricy even on discount, but by that point I didn't care. To make up for the splurge, I got a faucet from Ikea, which is actually pretty nice. The colors from chrome to stainless don't exactly match, but they're close enough and it doesn't bother me. Since I was swapping out the faucet, I needed to find a separate shower valve, which was another lengthy quest. I thought at first that I'd put one to the right of the bath caddy, like @mountainoliver has in his trailer. But most everything I found was just a bit too big to fit (I didn't know about mountainoliver's mod and the mixer valve he used until later). Then I found the Grohe Grohtherm valve, which was interesting in a couple of respects - it didn't recess into the vanity at all (which eliminated a potential issue with the plumbing), it matched the Grohe faucet that I had already installed in the kitchen, and since it was linear, I thought that it might actually fit in the space above the caddy, between it and the vanity top. And it did fit, but looked squished in place, plus I didn't think until trying to place both it and the sink that the the sink drain and trap was going to be difficult to work the plumbing around. Plus putting it there meant that the shower hose was going to be strung across the vanity and generally look bad and be in the way. The problem with this realization was that I'd ordered the valve and the sink before one of my 3-month breaks in the project and now neither was returnable - so I had to make it work. This meant that the shower valve was going on the closet wall. I also realized during the test fitting that when I pulled the sink forward, the drain trap was going to hit the top of the bath caddy, meaning that I couldn't get it far enough forward to work. Small disaster. But I realized though that the bath caddy wasn't symmetrical, and if I turned it upside down, everything fit. I'd lose the flat shelf on the bottom, but we only use the caddy to hold the bath mat, so not a problem. Small problem with the water pump switch placement, though, since it would be on the bottom - but a quick email to Oliver had a new caddy that hadn’t been drilled for the switch on the way. At that point, all the pieces were here, all the logistics worked out, and I was ready to go. Time for another couple months off while I built up the courage to drill through the closet wall. Then finally... First step was to remove the existing vanity top, which is possibly one of the most firmly attached things in the trailer. It's glued in place, so the only way I could find to get it off without completely destroying the vanity was to cut through the joint with an oscillating saw. That's a slow, tiring, dusty endeavor; and it generates a great deal of heat, so you've got to work in spurts to keep the fiberglass resin from burning - which is fine really, since working through the caddy access, your shoulders will welcome the rest. I had to do a tiny bit of trimming on the new top to get it to fit as snuggly as the old one; and once in place, I sealed it with silicone like the original. Top off, new drain lines in place, and I decided to attach the new top with industrial velcro to make it easier to remove in the future (works well). Next, shower lines teed off the existing plumbing, line to the nonexistent toilet removed, and some insulation added to both the plumbing lines and the outside wall behind the vanity. (I have a circulating pump on the hot water, hence the extra line.) I also glued a small PVC block to the back side of the vanity wall to tie down the water lines and prevent them from vibrating too much. And as always, cleaned out as much fiberglass dust as possible, cleaned up and wrapped wiring, etc. The access port on the closet side is something that Oliver gave me in the original build. The sink valves and drain trap are accessible from that port, and since I used velcro for the top, I have the option now of cutting the silicone on the top and pulling that off for access, in addition to taking out the caddy. New plumbing in the closet for the shower. I drilled out a short piece of aluminum as a backing plate for the shower valve. The plumbing is protected somewhat in the closet by the ABS vent, and we really don't keep much in there that could bump around and damage the plumbing. But a few layers of aluminum tape should help protect the insulation from getting beat up and gives a bit of a spaceship vibe. The valve is supposed to stand out from the wall about an inch or so, but I decided to recess it so that it attaches flush and as out of the way as possible. I caulked around the valve and it ended up making a nice little shelf for a razor, and I placed it low enough that my wife can use it to prop a foot while shaving her legs. You can also hang a bar of soap on one of the handles to drip dry. The faucet has a neat feature with stops on both valves, which can be custom set to whatever temperature and flow you prefer. The little buttons on the handles allow you to go past the stops when you want. And that's really it. Installing the sink and faucet is just drilling two holes and following the directions. The only change I made is that the sink came with a short stainless ring to mount between the sink and counter, but I didn't like the look and so just used one of the black rubber gaskets that was inside the ring. That way the sink looks like it’s sitting right on the counter instead of a pedestal. We tested everything out on our last trip and functionally, it all works as expected. The sink isn't in the way at all while showering, and really is so much more usable. Plus I think it looks great. The shower functions just as nicely, with the valve not being obtrusive. I added a second holder for the shower head up high, which works better for me, though my wife prefers the original one. I still need to swap that one out, since I think it's the only bit of brushed chrome left in the trailer. I added the same backsplash material that a few other owners have recommended. I wanted to order a new, wider mirror; but the original one is glued on and so I didn’t want to go through the trouble of trying to get it off. I suppose I could just place one on top of the other, so maybe that’ll be a future project. Glamor shots -
3 points
-
I don't own a drone but I've been impressed by various videos shot from them. It sure is impressive what these drones can be made to do. Happy Holidays! Bill Drones.mp42 points
-
Mike (LongStride) and Yasuko (ShortStep) here. Greetings to all! We are both retired and enjoy hiking the trails of our county, state, and national parks. We normally stay in park lodges, cabins, or nearby hotels. COVID has made those accommodations less appealing. I used to tent camp many years ago and considered going that route again. Not forgetful of the joys of setting up camp in the rain, I quickly ruled that out as a long term solution. I started looking at teardrops but ShortStep said that if it had wheels it had to have an onboard potty. Happy wife, happy home right? Quality is of utmost importance to me, so I immediately began researching single axle Airstreams due to their stellar reputation. It seems that reputation has become tarnished in the past few years since being bought out by Thor Industries (king of the stickies). I read quite a few disturbing owner reviews that had me wondering if "top of the line" did not now mean "the least crappy". It was in an Airstream owners forum that I stumbled upon a thread about Oliver Travel Trailers. Wow! I was shocked to read a number of reviews raving about Olivers, and even a few who unabashedly said they wished they had purchased and Oliver instead of their Airstream. I started researching Olivers and ultimately scheduled a visit to Hohenwald. We were very impressed with the factory tour and Oliver's obvious commitment to quality. We are expecting delivery of our Elite l in early June of 2021. Excited about the new opportunities this will open up for us. We love REMOTE areas and small secluded campsites where we might struggle with a larger trailer. Really appreciate this forum. I have learned much already and think it is wonderful that you folks share your knowledge so willingly. We need to start thinking about finalizing our options before too long. I am sure I will be hitting you up with questions soon. Happy Holidays!2 points
-
The original batteries in our #75 LE2 Ollie were group 27 12V lead/acid batteries that spilled acid in the tray. A few years ago installed Group 27 12V AGM batteries and no longer have acid spillage issues. Removed battery tray to clean and paint. Saw several issues. Found corrosion from battery acid on the battery tray and tray slides & ball bearings. Also found loose rivets that would eventually fail if not replaced. After thinking about replacing slides and rivets, decided to buy a new tray assembly from Oliver. Ordered a new tray assembly last Tuesday that's currently installed on LE2 trailers. When new tray is received will post photos of old and new tray showing differences. Like what I have seen of new trays from photos posted in this thread that appear to better protect batteries.2 points
-
We have six of the 12 volt ports and ten of the USB ports. Four of the 12 volt ports are in constant use and three of the USB ports always have something plugged into them with an additional two more in almost constant use charging something. I have installed them in places that are handy and, being all about overkill, I want whichever port I need to be within arm's reach. We have a lot of batteries that are constantly being charged, cameras, drone, Go-Pro's, walkies-talkies, etc.2 points
-
Jairon, We ordered two and found them to be too large and too noisy. Andrew2 points
-
The James measurements match mine and that is an overall measurement of the portion that adheres to the wall. The pouch is about 1-7/8" deep inside and the large part of the pouch is 3-5/8” wide. The small part is 9/16” wide. My phone is a Samsung Galaxy S7. You can look at BB&B, but I haven’t seen any there in over a year. Last time I looked, they were available at their website. Or there is always Amazon. Mossey
2 points
-
Bill is correct, we’ve been using a water softener for several years. We originally bought a 16K grain from ABCWaters on Amazon. I have since downsized to a 3.2K grain softener, also from ABCWaters. The small one is lightweight and fits nicely in the basement standing up. I kept the 16K grain softener to wash cars and to wash the Oliver. We have softened water at home, so it is nice to have the same in the trailer. The small one stays charged for a long trip (4-6 weeks) and is easily recharged with at container of Morton table salt. Amazon has a decent selection of portable softeners. I wouldn’t go bigger than 8K grain, they tend to get heavy! Mike2 points
-
Merry Christmas and May we ALL have a Blessed Happy Healthy New Year!2 points
-
Wow, that is pretty impressive! I had never heard of a drone show before... Merry Christmas, ya’ll! Mike2 points
-
The Legacy Elite I trailer has two interior 12v ports and one dual USB port located under the cabinets just before you get to the bed. We replaced one of the 12V ports to a dual USB port after we discovered our USB adaptor for the 12V port pulls out easily. I would frequently end up with my phone not charged the next morning.🙁 Perhaps it was just my adapter as the 12v ports have a twist-lock feature that is supposed to reduce this from happening. Can't ever think of a reason we would ever need the 12v port anyway and this allows my wife and I to charge our phones and apple watches (4 USB ports now). Here is a link to what I installed: https://www.amazon.com/gp/product/B086PRHKC1/ref=ppx_yo_dt_b_asin_title_o02_s00?ie=UTF8&psc=1 Installation was very simple as you can access the 12v port via the access hatch within the cabinet. Simply unscrew the holding ring from the back of the 12v port, lower it down to slide off the connectors (make sure you look at the color of the + wire as you will need to hookup correctly on the replacement plug), put the new holding ring onto the wires if you do not use the existing holder, attach the new dual usb plug to the +/- wires correctly, and reinstall into the existing hole. Total time to replace was about 5 min.
1 point
-
Bill: I have used the socket handle and can see no evidence of damage. The new model Anderson shaft ball turns much more easily than the old. If I happen to have the triangle plate installed and the chains unshackled I can turn the shaft with just my hands on the triangle plate, That of course is with no trailer weight on the ball. Best regards, John Shkor SailorsAshore1 point
-
Bill, thanks for this. I’m getting ready to pull out my 4 AGM’s and install 2 Battle Born’s. I think I might have some corrosion on my tray, so I will be interested in the difference between new and old. Mike1 point
-
Overland had it right. Our first gen Ollies had one outside dc outlet here:
1 point
-
Our 12v powers a CPAP machine. We found using the 12v cord a lot more energy efficient than running the inverter. The inverter also consumes power...1 point
-
Except for the being retired part, this sounds exactly like how it all unfolded for us a few months ago. I love the nostalgia and aesthetic of Airstreams and, after ruling out teardrops, thought that was what I wanted. Nope...turns out I wanted an Oliver!1 point
-
NICELY DONE! I can come up with ideas all day long, but seem to have a hard time making them materialize.😅1 point
-
They do have an obnoxious wine to them. Still, they should be about 60 db lower than the AC 🤪1 point
-
Very impressive project... that shower valve looks pretty cool...1 point
-
I’d love to - maybe one day when I’m retired and don’t have to worry about actually making money doing it.1 point
-
An all time favorite. Someone needs to name their trailer the Chariot.1 point
-
We're planning to use these: https://www.amazon.com/Caframo-Ultimate-Cabin-Small-Black/dp/B001449QRY/?th=1 We purchased the separate clamp to use over the suction cup.1 point
-
We’ve got the Dyson, works well and holds a charge. Our appliances are 110 but when we’re without shore power we live a more simple life, using the inverter occasionally when we need power. I use the 12V plug for the little air compressor and to charge my TPMS monitor when the battery is low and we’re not driving. Mike1 point
-
LongStride, Welcome to the forum and congrats on your Elite l, very exciting! This forum has a wealth of knowledge and a great Oliver family to become acquainted with. Everyone is more than willing to lend an ear and answer your questions. You also have plenty of time to study up on your Ollie and become Oliver University Alumni. Being fairly new Oliver owners ourselves, Oliver University has been extremely helpful. Oliver even takes there customer service to another level with great maintenance videos. So dive in snd enjoy. Welcome to the Oliver Family, now hit the books. 📚👍🏻😄 -Patriot1 point
-
Imo, they're all weak on 12v. Better to get a good lithium battery vacuum, like a Dyson, and charge when you have 110. I have a 12vhair dryer. And a 12v blender. Neither really strong on 12v1 point
-
And yes, the outside one is mostly for an air compressor, as topgun noted.1 point
-
I use one for my APAP (CPAP) machine. Much less of a draw than running off an inverter! Andrew1 point
-
Overland, that bath remodel was well worth the wait for me and I’m sure y'all are happy with the results. It is another example of your out of the box thinking. Congratulations on a job well thought out and executed. Now, about the bit of a spaceship vibe. I looked at all of the pictures first because I couldn’t wait any longer to see what you had come up with and then went back and read the text. The closet insulation and aluminum tape made me think of an old tv show, from 1965. Lost in Space Mossey
1 point
-
Wow, you should go into your own business customizing trailers. Given the space constraints you had to work around, the plumbing is amazing to me. The décor and final look are spectacular upgrades. 🙂1 point
-
Same to you Bill.1 point


-
Recent Achievements
-
")


")


")


