Leaderboard


Popular Content
Showing content with the highest reputation on 02/16/2021 in all areas
-
I have stumbled upon something while doing my humidity and temperature testing that should be of interest to those with the xantrex 3000 getting the occasionally persistent [20] error. First, my Xantrex remote had been working for well over a week. On the 14th, I purposely discharged my battery down to 60% and then back up to 80%. When I got to 80% I tripped the cutoff switch between the Xantrex and the batteries to stop the charging. That immediately caused the [20] error. I left it with the [20] error because I didn't know how to make it go away and it hasn't seemed to cause any problems. Well, I noticed this "sawtooth pattern" after looking at the data - I've isolated the street side basement (data visualization works again!!!) and you can see the sawtooth after the charging event: That sawtooth indicates the inverter fan is turning on and off (every 5-7 minutes in fact if I look at the detailed data points). I unplugged the remote at the inverter and the inverter continued to cycle the fan on and off even without the remote. I cut power to the inverter and turned it back on without the remote and the inverter went back to "normal" - working fine without cycling the fan. I then plugged the remote back in and it was working fine again too. Yesterday I repeated this sequence and got the exact same results. The [20] error came on after cutting off the battery from the inverter, the fan began to cycle every 5-7 minutes again, and I was able to correct and fix things by going through the exact same steps. My concern is the fan cycling - that can't be "good" for the inverter and could cause premature wear on the components. I've left my remote disconnected for now so that this can't happen again until we have a fix or an explanation. Who knows what else may be going on with the inverter we may not see. I'll update my OTT service ticket and call Xantrex today with this new information. I'll report back later on any new information.
 6 points
 -
Cool, I 2nd, 3rd, & 4th the sentiments above. We were a Sept 2020 PU date, and all but one of the issues we had were associated with understanding what we were reading/viewing from Ollie Univ. And the Library they give you with the delivery. The only Non-User issue we had, Ollie Service was able to explain how to resolve, and I fixed it and we were good. If you actually have a Non-User issue, well OTT Service is a phone call away (and if you are at DCSP, a short trip away), and they will walk you thru a resolution or be "Opening up a Ticket , to resolve it. On the Forums, describing your issue will either get you a helpful response towards resolution or a recommendation to call Customer Service and open a Ticket. The more experienced owners on this forum know the difference between something which can be fixed via Forum Discussion and an Issue that needs to be resolved by Oliver. If a company does not stand With You on a major purchase and follow through with Customer Service, then word gets out, and they will lose their base and future customers and they will go out of business, simple as that. So far all I have seen is “Oliver is in this for the Future". I kind of equate new OTT ownership to Parenting; well at least for the first born, you have 9 months to prepare, and then the delivery day arrives and Holy-Cow what do we do now . Oh Yah, I remember reading about that, or I remember seeing that... Oh is that what they meant??? The one good thing you have available to you here on the Forum, is a lot Aunties & Uncles that have many hundreds of years accumulations of Ollie Parenting. So you can always Crowdsource for the resolution. And if you are into Mod's, well chances are someone (JD et. al.) has thought about it, is working on it, or has Dun-It... And with each Mod, comes a new variation, which garners accolades from others. I look at the OTT Forums as the Test Lab for possible future OTT enhancements, and the Future is Exciting. My buck-two-eighty-five's worth, now we are just waiting for "Oliver TT Weather"... Bryan5 points
-
Great, thanks for all the great comments. We just place our Order for an Elite 2! Now the big problem, what Options to order? Thanks Pat3 points
-
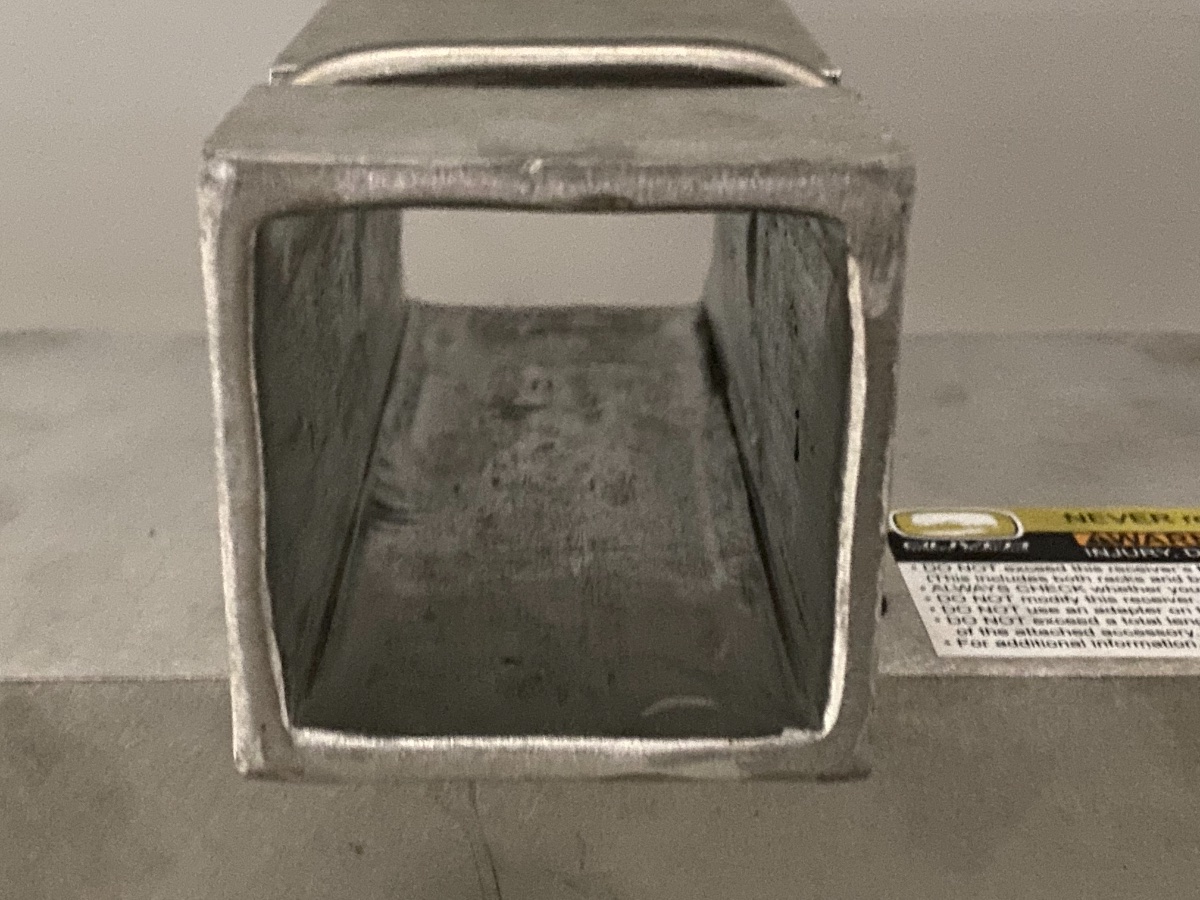
Just be very aware that your receiver is a whole lot weaker than a steel one of the same wall thickness. Expect cracking in the corners and lots of wear inside. Additionally, the wall thickness at the grooves for the retaining ubolts is now very small. It is highly likely to break there! I think it is a most dangerous modification! I suggest that you replace it with a steel receiver ASAP. John Davies Spokane WA3 points
-
Anybody - try checking some local 4x4 offroad custom shops, they are used to fabricating all sorts of stuff. Usually from steel, but some will have aluminum expertise. And don’t forget local machine shops. Jeepers and overlanders get stuff made all the time, you can benefit from those shops. Any machine shop could mill a beautiful 2” receiver from a solid block of 3” square 6061 T6, and put in the necessary holes or grooves. Or they will weld one up from 1/2” plate. This is nothing out of the ordinary for them. John Davies Spokane WA3 points
-
No problem at all. I ordered 4 units (feet) of the cable, which is item No. K650016 and 1 termination kit, which is item No. K651001. I used some heat shrink tubing that I had as well to do an even better job on the cable termination and wiring ends. I also used a 3 amp fuse and 14 gauge red wire for positive and yellow wire for the negative connections. Oh, and some corrugated, split wire loom tubing to protect the wires (same stuff OTT uses everywhere on the wiring). Oh, and the cable turned out beautiful. I carried it around and showed it to my wife and my son and the pets I was so proud. I just forgot to take a picture of it before I wrapped it around the check valves and tie wrapped it in. 😀3 points
-
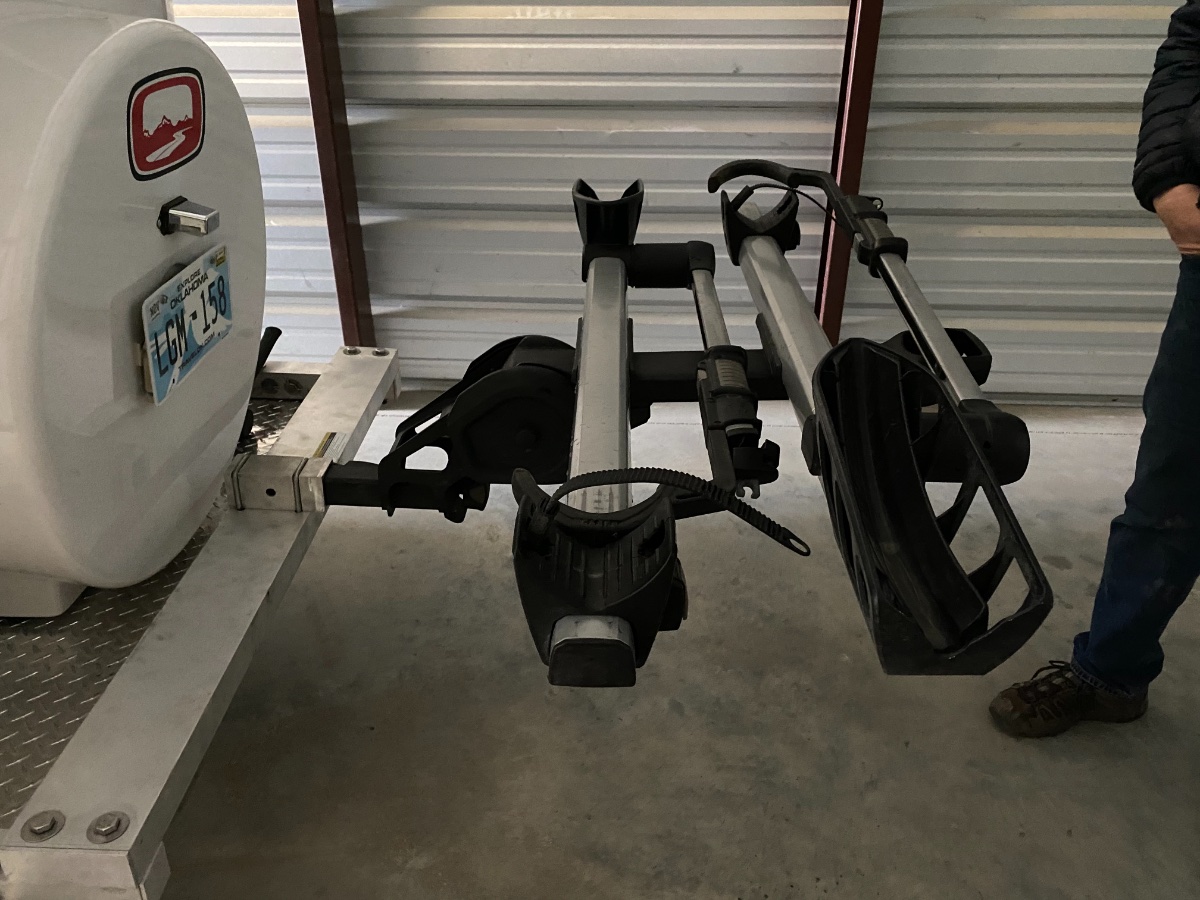
Certainly - the bottom feeders in the practice if LAW cause havoc on the well meaning amongst us - but to often its initiated by unreasonable demands of customers - as they place undue overloads on TV's, pile more into an RV than its rated, and strain that poor little 11/4" hitch hanging off the rear. Oliver once provided a very robust rear "Rack" platform - and discontinued due to - well doesn't matter. Oliver continues to provide the basics of what could be a robust platform. I'm in the camp of - good start - I'll take it from there. Or copy the parts of the design I like - and go from there. Does any other SOB even provide a platform? I understand what Oliver is doing on the rear hitch option. In the end it is attempting to meet customer demands without giving them a potential weapon that could sink the company. RB3 points
-
It is not so much about killing you, as it is also killing that busload of innocent passengers when your trailer swaps lanes on the freeway.... It was their lawyers who are responsible, is my suspicion. Liability lawsuits can destroy a company. A large number of frivolous ones largely helped to wipe out our thriving General Aviation industry forty years ago. It sure would be nice if they gave us super strong parts and just said, “You can use your own judgement, load that sucker down!”. 😬 But the likelihood of that happening is nil. John Davies Spokane WA3 points
-
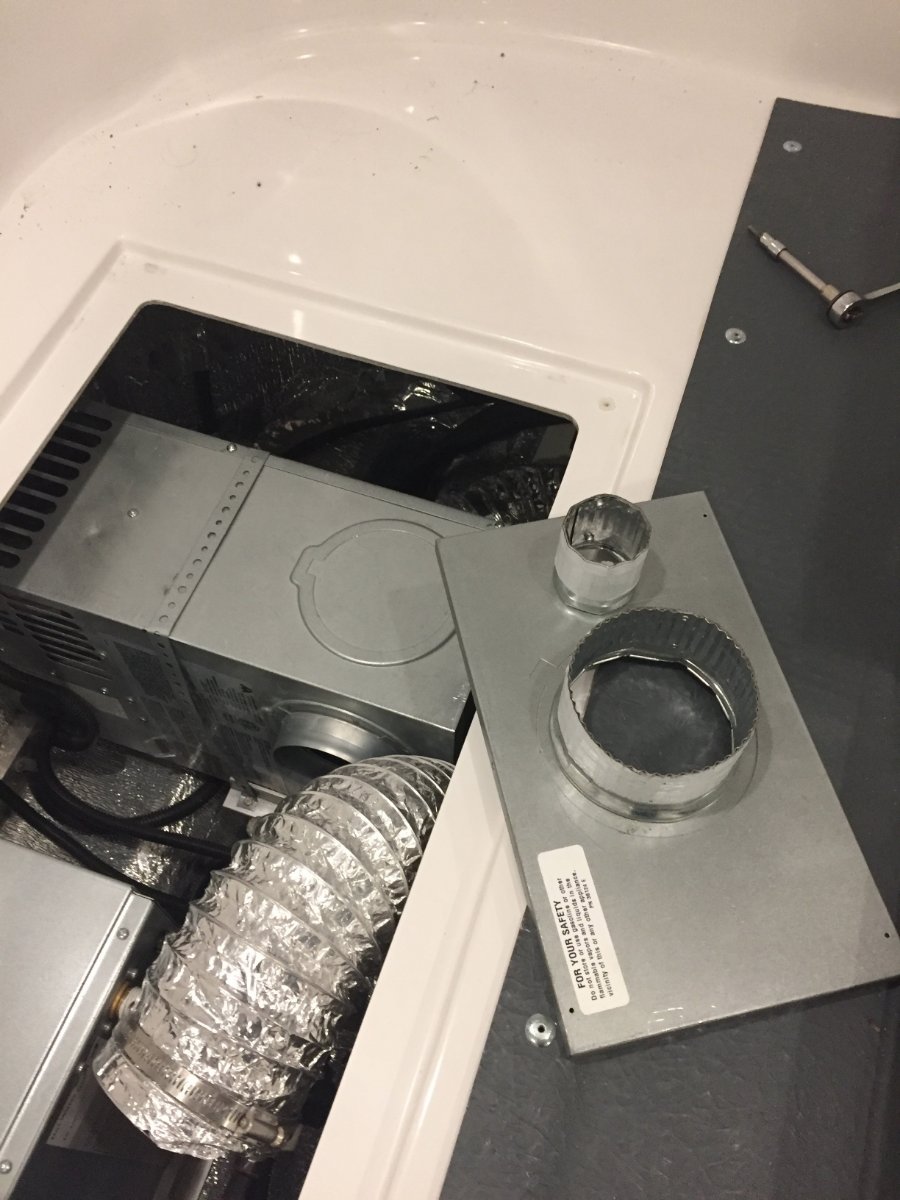
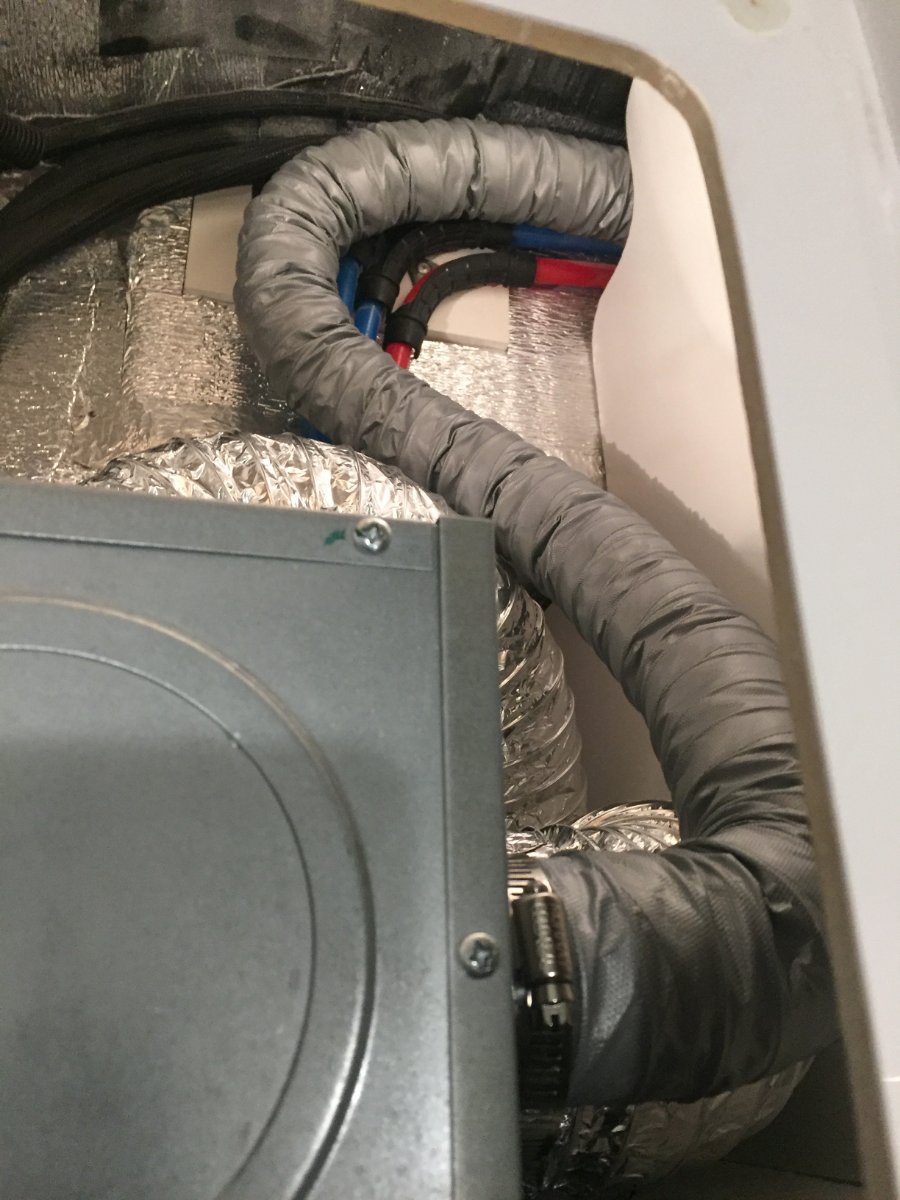
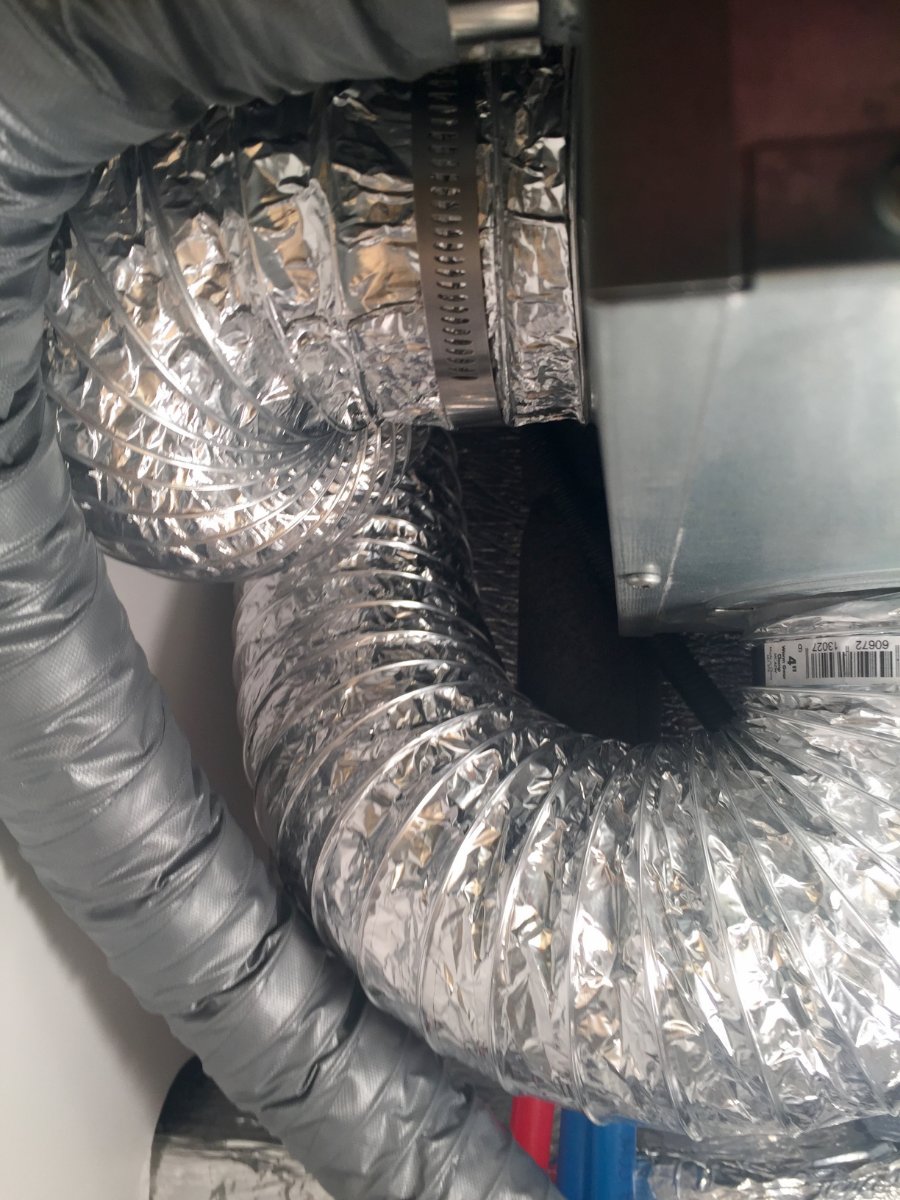
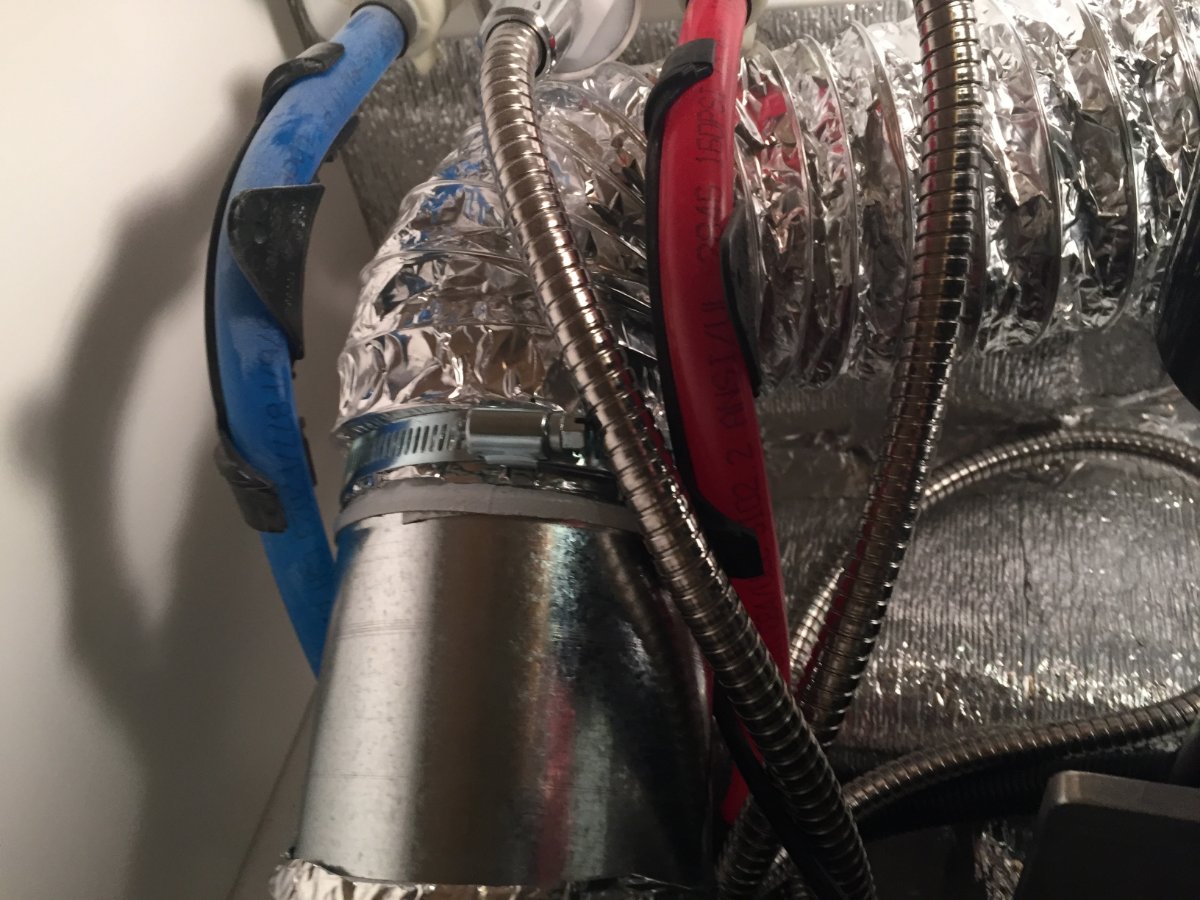
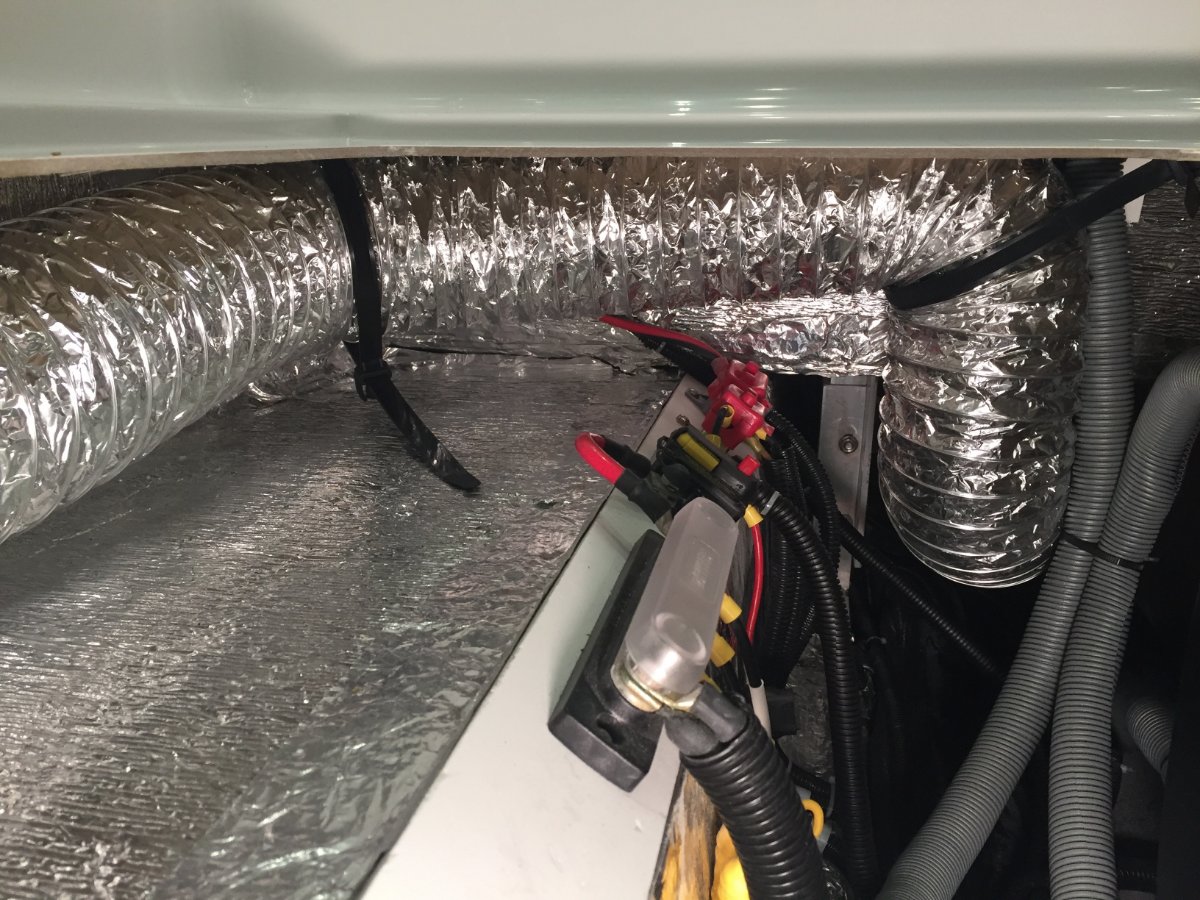
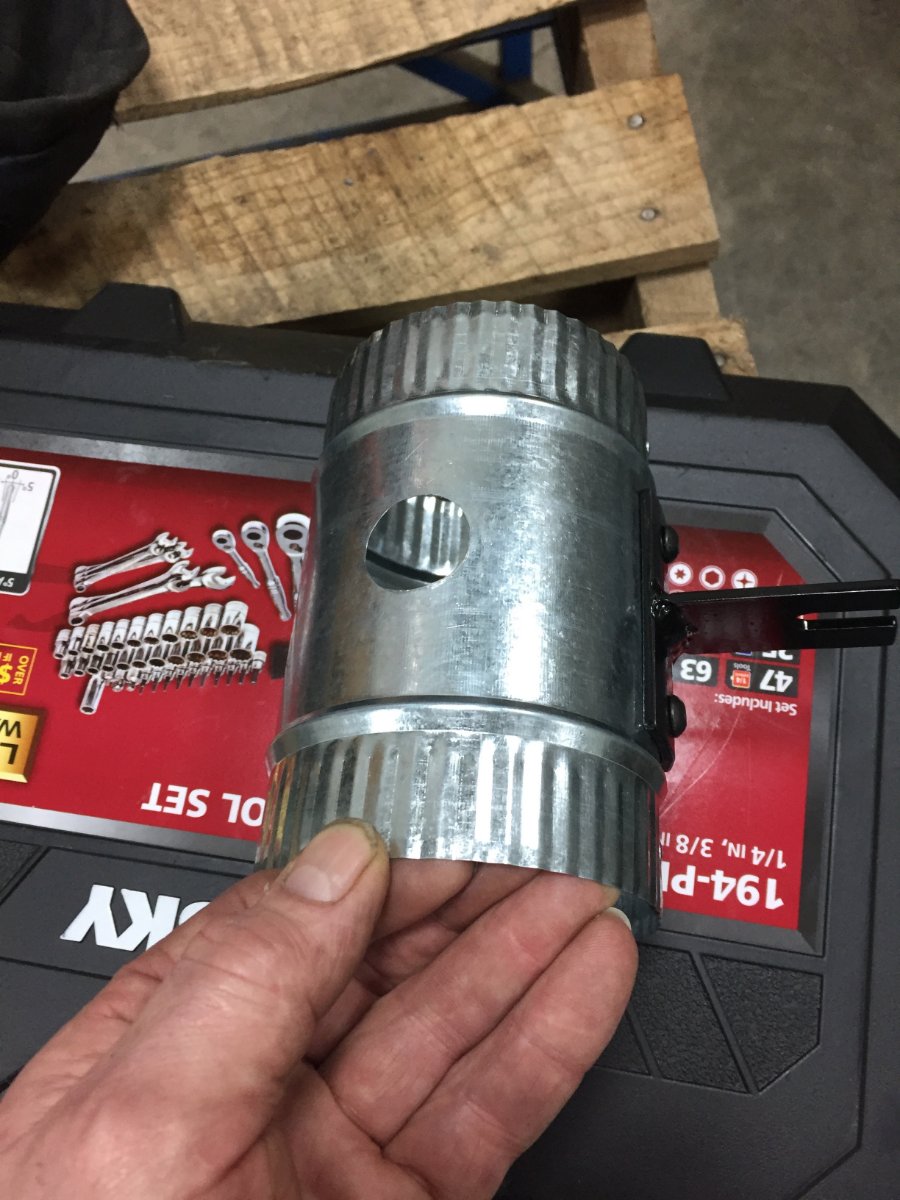
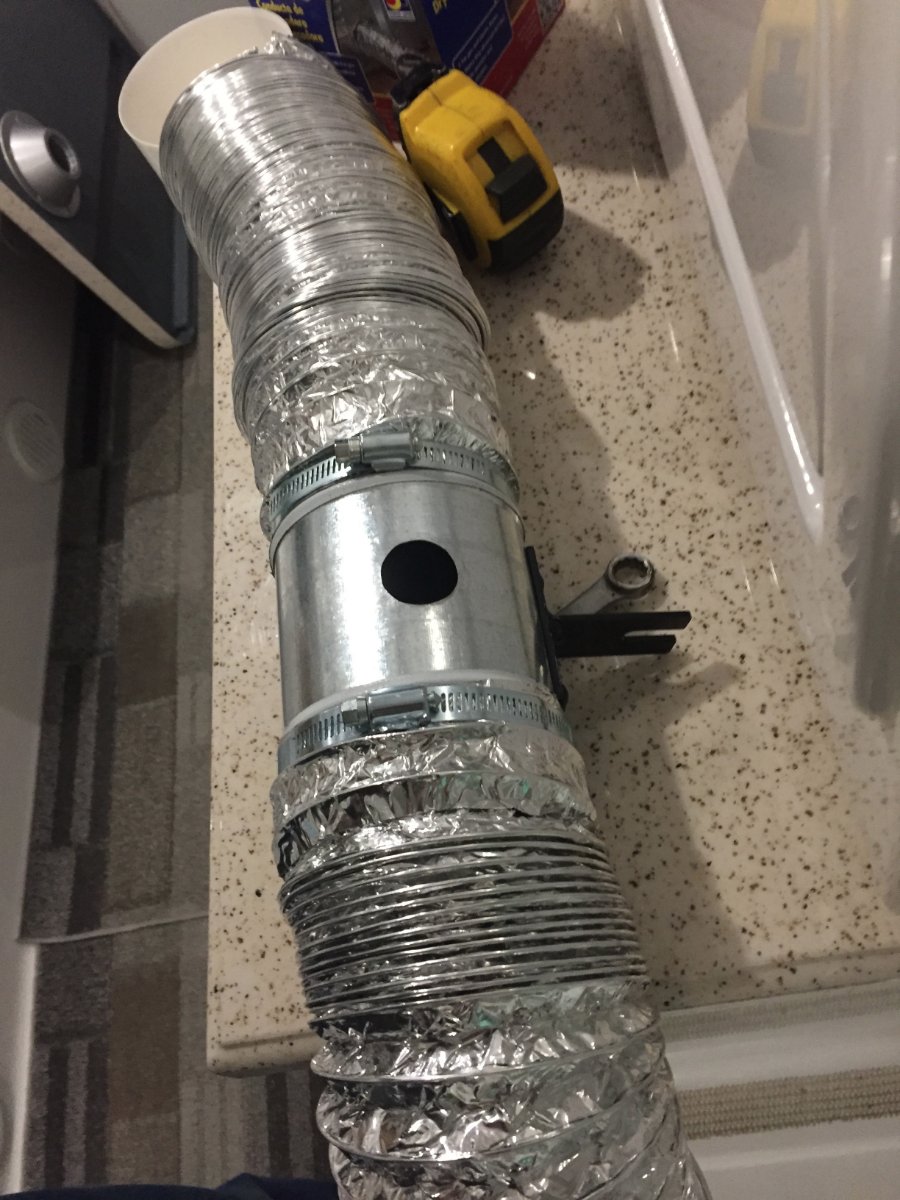
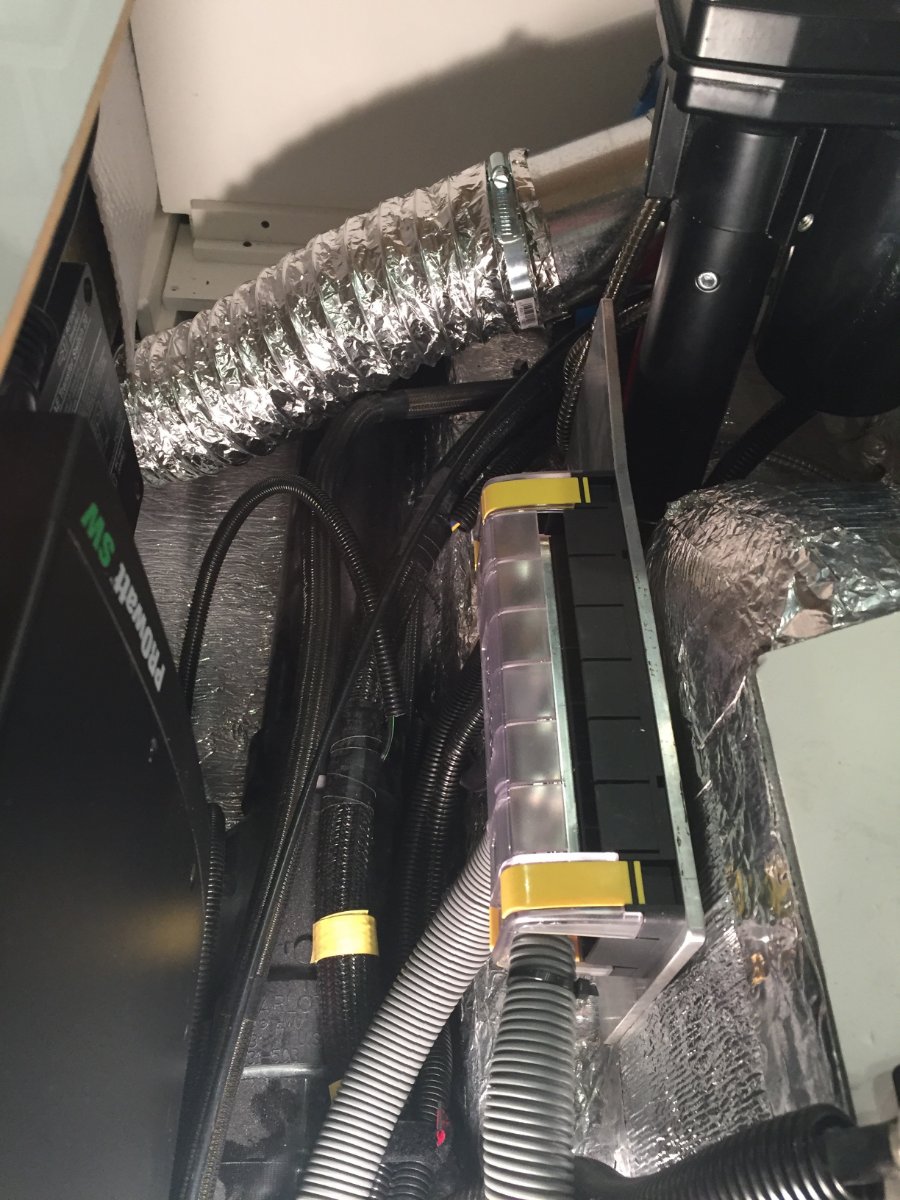
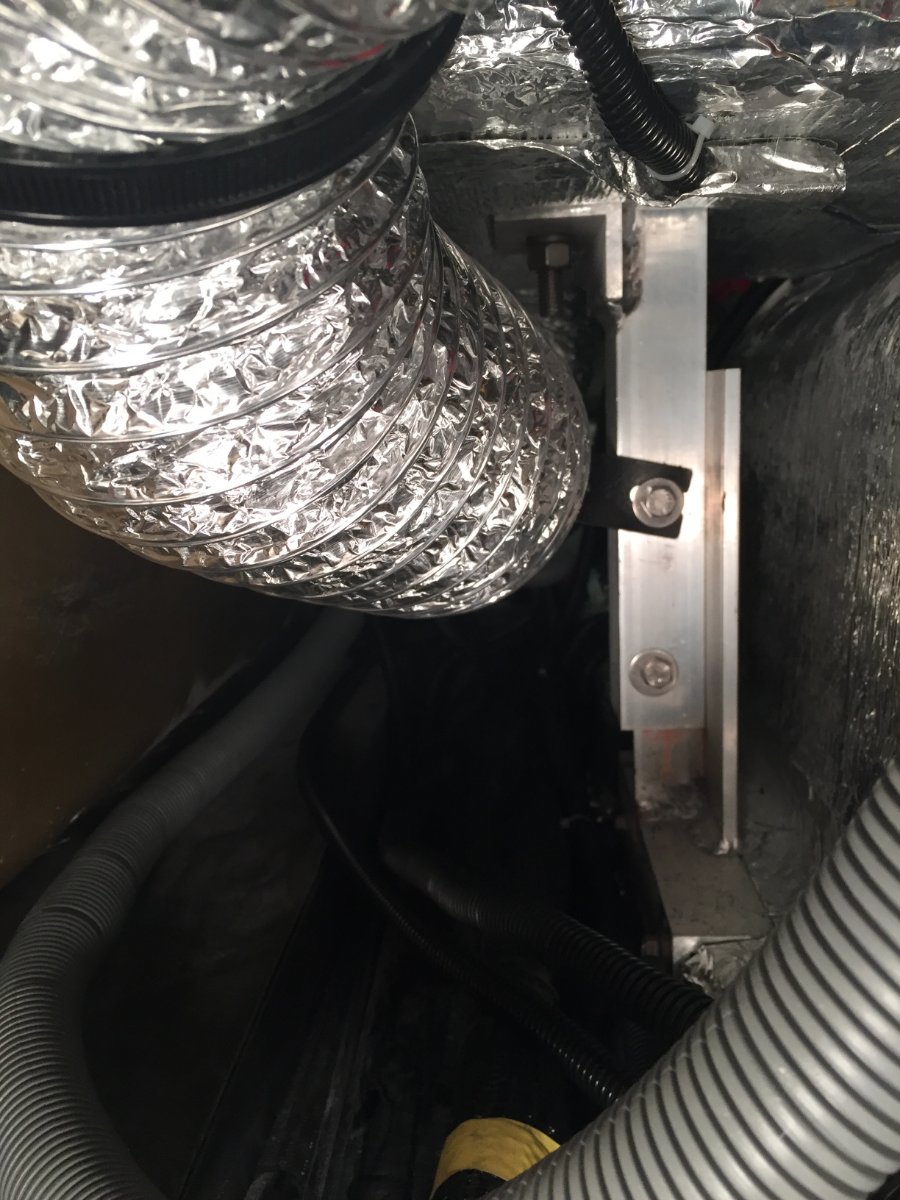
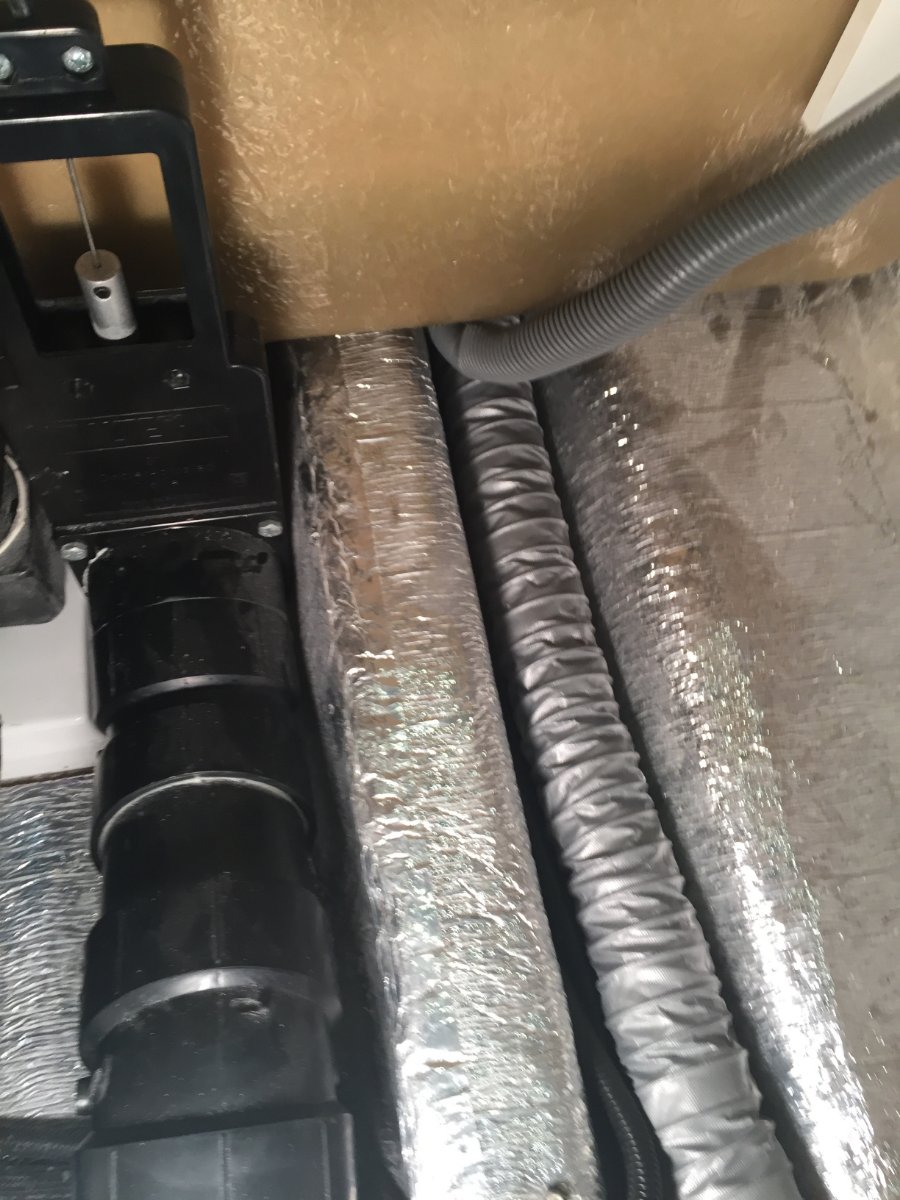
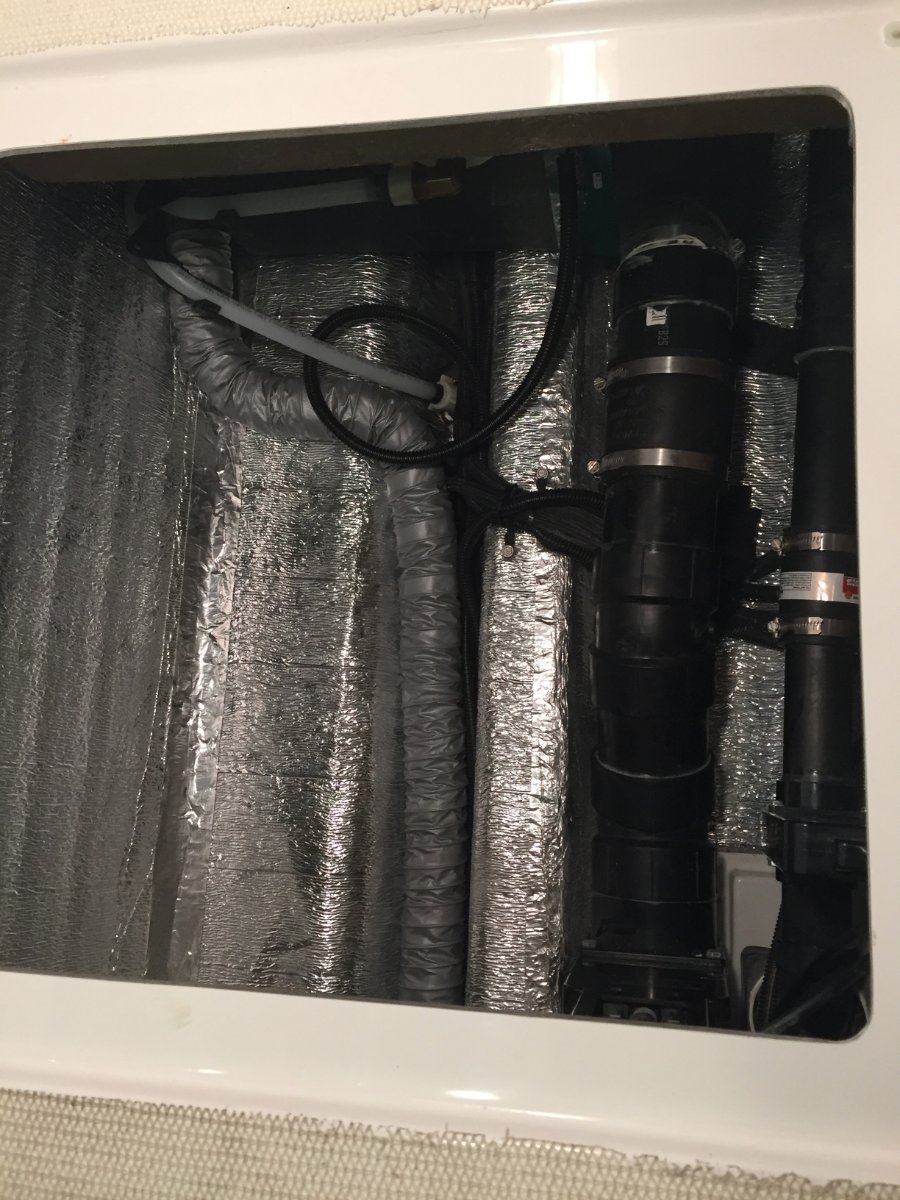
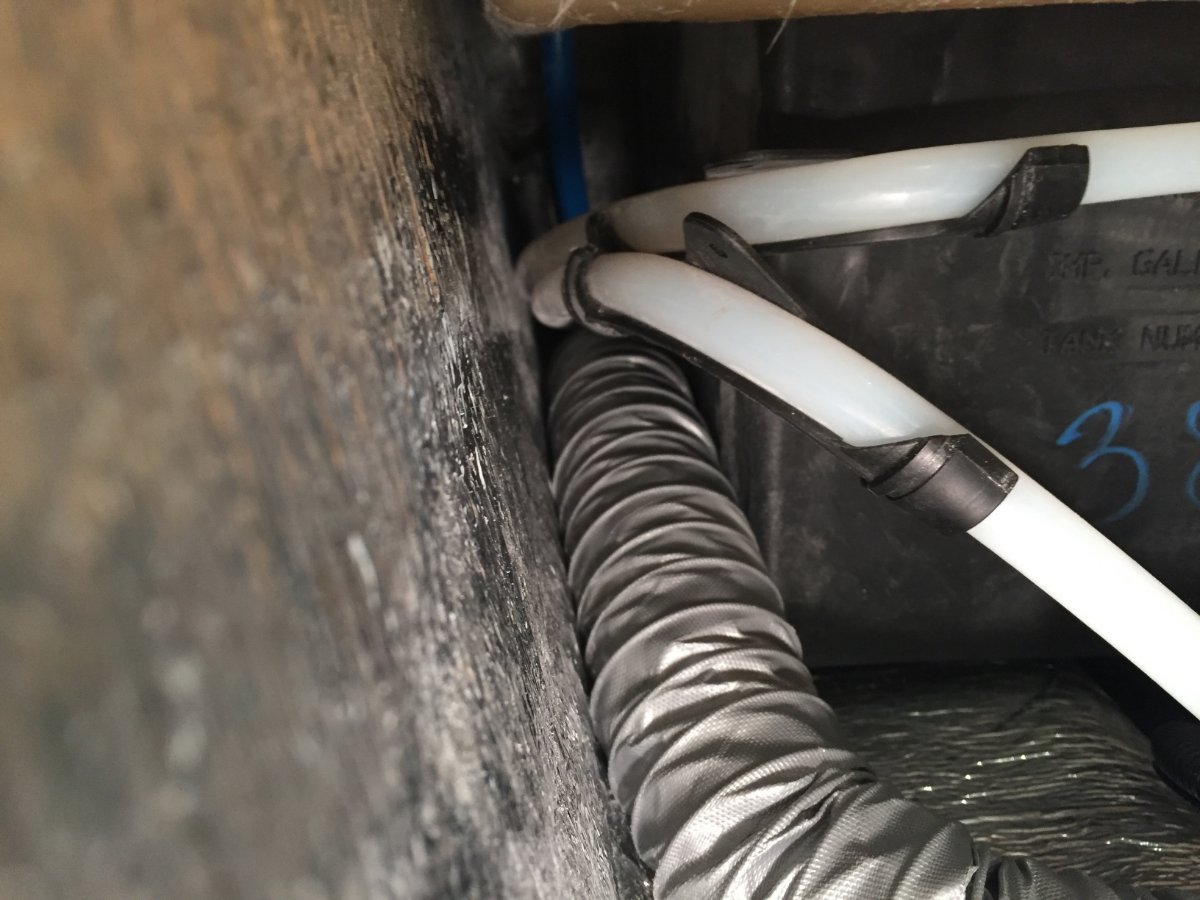
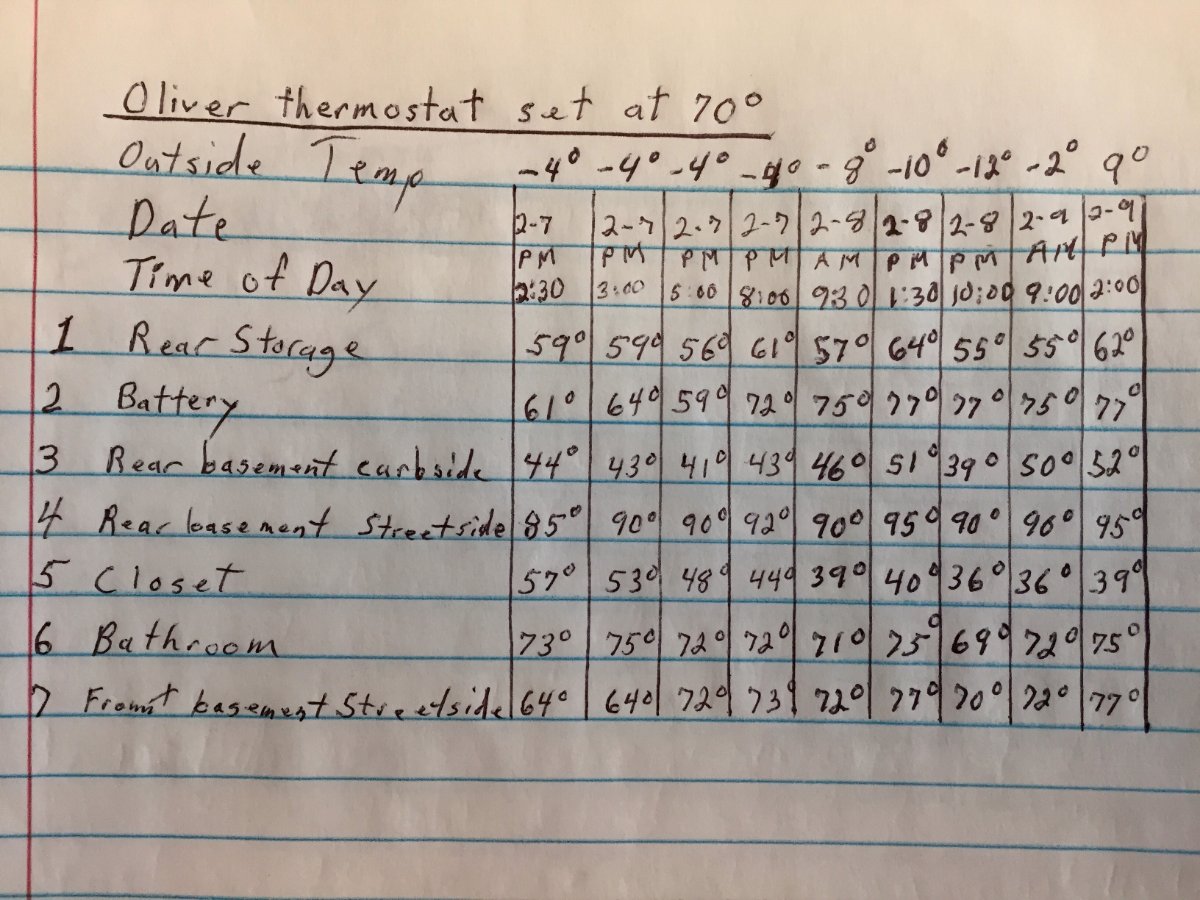
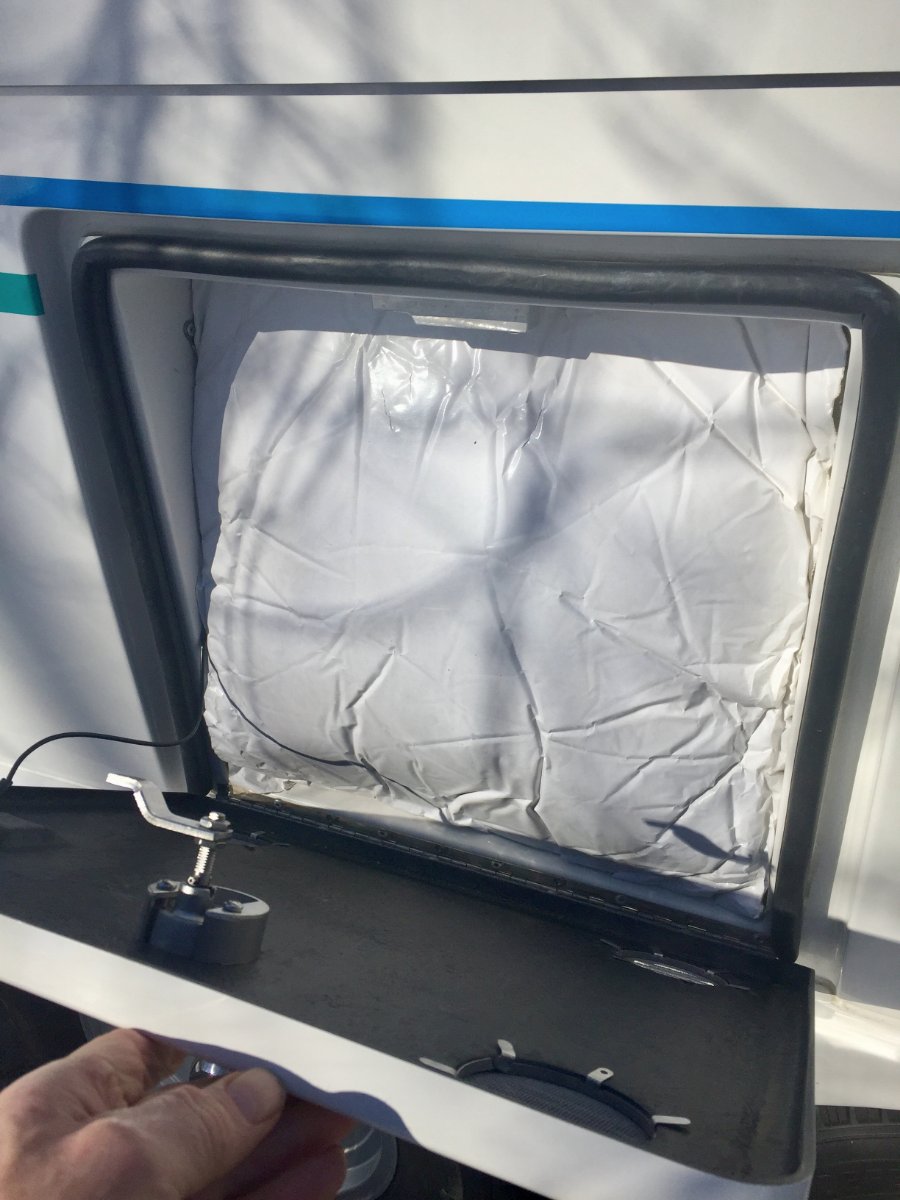
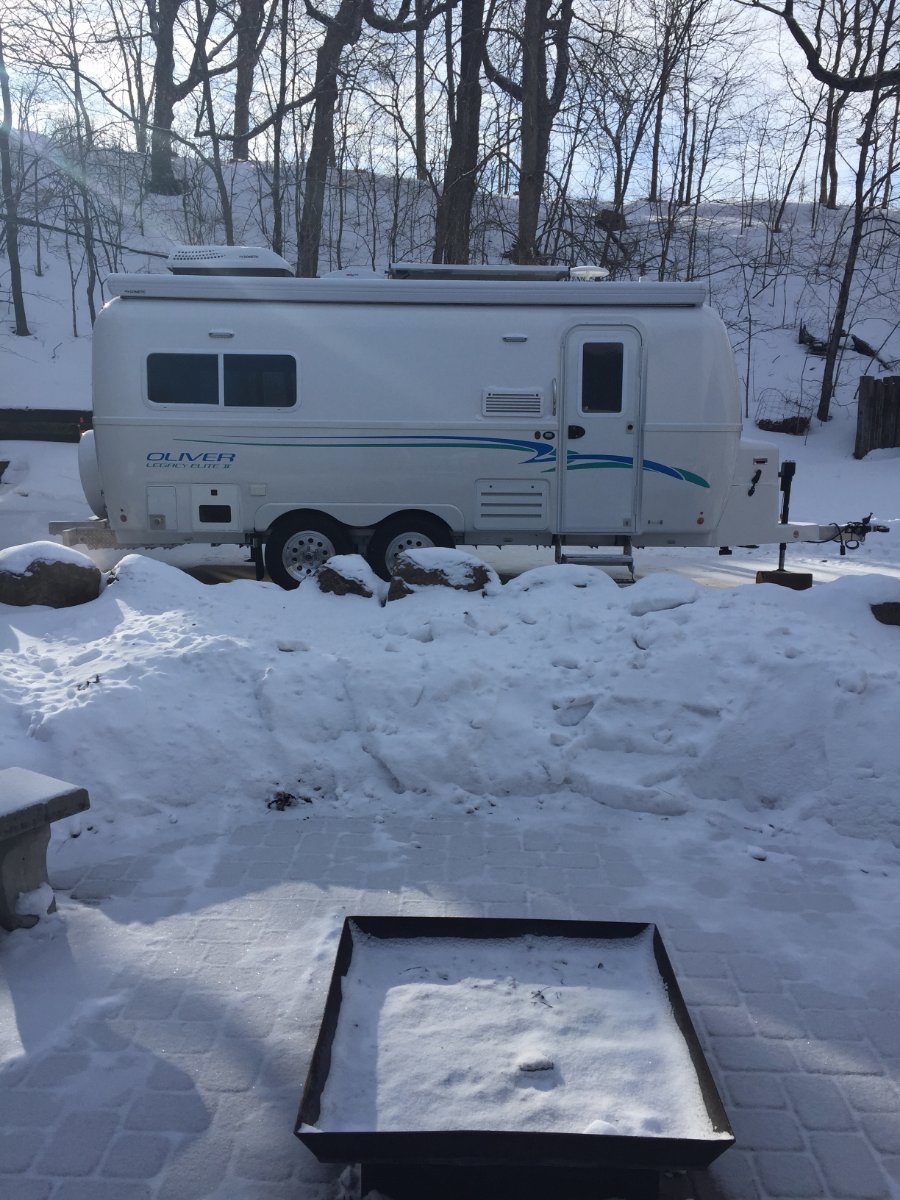
The seed was planted for this furnace mod when we grabbed a canceled reservation three weeks out at a Minnesota State Park. This reservation was mid October and when the date arrived the weather forecast had changed for the worse. We stayed for only two of the three days and we received our first snow of the season, 6 inches of wet snow. We had a non electric site and my batteries were having trouble making it through the night and I was concerned about the water freezing in the Oliver. I have already addressed switching to lithium batteries and posted about it on Oliver Forum. Now I want to share with you what I have done to relieve my worries about water freeze ups in the Oliver, provided that I have a functioning furnace. I first tried to identify the weak spots and came up with the following. Boondocking Inlet Outside Wash Station Fresh Tank Fill Inlet City Water Inlet Black Tank Flush Port Toilet Water Supply Line Hot & Cold Lines Crossing Back Of Oliver The Oliver has all of it's heat ducts run on the curbside which protect the kitchen and the bathroom faucets from freezing. My plan is to run a 2" ducting along the back to the street side and terminating in to the trough that the water lines run in for the city water inlet, fresh tank fill inlet and outside faucet. This trough also has the check valves for those two inlets and has the floor of the exterior storage compartment covering over the top of it. To get at the trough you will have to remove the back wall of the storage compartment and flip the mat back that covers the floor. This exposes the water lines that come across the back of the trailer and drop into that trough. There is a wall that separates the furnace compartment from storage and extends past the wall you just removed. It has a opening for the water lines and it is large enough to run the 2" duct through it and on top of the water lines across the back and into the trough. Now you can flip the mat back down and they are long enough to cover the water lines and the newly installed 2" duct, then the wall is put back in place. On the connection to the furnace I removed the back of the heat exchanger. There is one hard to get at screw on the bottom but the rest are easily accessible. I made two holes, a 2" and a 4" in that back plate. I could not find a 2" starter collar locally so I bought two 4" and removed the rivets on one of them and formed a two inch collar, cut to length and re-rivet. I then installed the 2" and 4" starter collars to the heat exchanger back panel and then the panel to the furnace. I then hooked up the 2" duct to the furnace. Looking in to the access hole under the street side bed you are able to see where the water lines come up and out of the trough and to the valve of the out side wash station. When the furnace fan is running it will blow out a lit Bic Lighter held in that area. So we're protecting water lines, the check valves and dumping warm air underneath the outside wash station valve. Now back at the furnace I attach a 4" heavy duty aluminum foil duct to the newly installed starter collar. It is routed forward a short distance until it can be routed across the basement to the street side and then fed between the hot and cold water lines that go to the outside wash station valve. At this point I need to use a 4" coupler that is 6" long to attach the next 8' piece of 4" duct. I use the 6" long coupler so I can add holes if I need to flood a area with heat, this particular coupler did not need to. I then routed the duct from the wash station valve along the outer wall and over the wheel well, make the corner by the battery compartment and then once getting past the wheel well go down and under battery compartment. Up in that corner I attach a adhesive base 3/4" cable anchor so I can loop a 20" releasable tie strap through it and around the 4" duct holding it up and out of the way. A second 20" tie strap is used were the duct heads down under the battery compartment, it utilizes the loop that anchors the 4/0 cable coming out of the battery compartment. Next I prep another 6" long 4" coupler by adding a metal mounting bracket. It is bolted to the coupler using two 10-24 machine screws that go through the bracket the coupler wall and then a backing plate that has tapped holes. This coupler I will add a1" hole that will be pointed up to flood heat at the battery compartment. The mounting bracket will be utilizing the upper bolt of the support leg for the battery compartment. This keeps the duct up and away from the inverter and electrical components and positions it to flood heat up against the bottom of the battery compartment. The next length of 4" duct is clamped to that coupler and routed up from under the battery compartment over to and along the wheel well. It is held by two 20" tie straps similar to the other side. Because I want to run the heat duct under the foot space of the dinette I need to transition to 2" duct. There is access via the same trough that I utilized in the back of the trailer, but at the front there is more room and I am able to pull the 2" ducting through. From there it continues toward the front until it reaches the black tank flush inlet where it then follows that pipe back along the black tank and terminates by the water supply line for the toilet. At the transition point I add two more short pieces of 2" duct and route them down to where the main black tank drain pipe goes under the dinette foot space, they are terminated on either side of that pipe. There was not enough room to run the 2" duct but enough to force air along either side. At the transition from 4" to the three 2" ducts I simply inserted the three 2" into the end of the 4" and used aluminum foil duct tape to seal the transition. I also want to mention that I used the aluminum foil duct tape to reinforce the ends of every 4" duct by wrapping outside and inside before clamping. That should cover the install, now lets talk about the results of the test in subzero weather. I rounded up seven digital thermometers and put them in the areas I was concerned about. Was placed just inside the empty rear storage compartment. Was placed on top of the batteries and a piece of acoustical insulation that was for large generator enclosure, it was 1-1/2" thick and 19" square. This was squeezed in the opening before the door was closed. Was placed in the rear basement curbside next to boondocking inlet. Was placed in the rear basement street side below the outside wash station valve. Was placed on the floor of the closet with the door left closed. Was placed on the lower shelf in the vanity in the bathroom with the door left closed. Was placed in front basement street side next to the black tank flush port line. I moved it out of the heated shed at 1:00 pm on Sunday 2-7-21. I moved it back in at 3:00 pm on Tuesday 2-9-21. The furnace was cycling off and on at -4 ' but I noticed at -8' and colder it ran continuous. I have the Truma water heater and that was also turned on. I checked propane consumption by putting on two 20 pound tanks that I had weighed and left them in place for 12 hours. It was -12' when I put them on and -2' when I took them off. Because of the subzero temperature the propane was not gasifying very well and the regulator automatically changed from the primary to the reserve after only consuming 2.353 gallons. The total consumed out of both tanks in 12 hours was 3.294 gallons, so that would be .274 gallons in one hour. My Victron BMV-712 was telling me that I had depleted my 400 Ah Battle Born batteries to 47% and at rate of use I had two days and nine hours left. I thought I would comment on a couple of things I like about the outcome of the project. The bathroom was comfy warm and the wall next to the bed was not icy cold. I am not planing to take up subzero camping but it does gives me a benchmark to go off of for any situation that I might run in to. If you have any suggestions or see something that is of concern please let me know. Paul
2 points
-
Some where on an interstate in Texas....
2 points
-
At least you have a long time to figure it out! 🤪 Congrats on pulling the trigger!2 points
-
I think it's a bug because the load was identical on the prior days and there's no sign of the fan cycling. It may not even be related to the remote error code, but it seems suspicious.2 points
-
We decided to give Suncoast designers a try. They offer a lifetime warranty, and you have your choice of staying in one of their many rv electric and water hookups, or dropping off the trailer and picking it up a few days later. We're going with the dropoff/ pick up later option, as it's only a little over an hour away, and not really my kind if camping experience. I know there are similar facilities in Arkansas and Texas. Quite possibly, many more. I only researched close to me.2 points
-
Its all relative. 😇2 points
-
Hi Jairon, Yes, at least on our Oliver (picked up 11/20), the water line is connected and open (filled with pressurized water) to the inlet valve for a standard toilet. There is also a hole under the composting toilet directly over the black tank for a standard toilet, although the black tank has no hole on top of it. I'm glad it's this way though in case we ever decide to go with a standard toilet - or if there are ever next owners that want the standard toilet. I have a post somewhere in the forum that shows pictures of the access hatch I put in the bathroom vanity as well as some shower upgrades. One of the pictures shows the line going to the toilet valve and where I have installed a cutoff valve. I blew the water out of the line to the toilet valve while I had it cut, then I put in the cutoff valve and shut it. Again, it's still there for future use if needed. Let me know if you can't find the post / pics - it's easy once you hack your way into the vanity. 🙂 As for the heated cable, I worked with a company in Minnesota, https://www.oemheaters.com/. I called and talked directly with one of their engineers about the problem I was trying to solve and they recommended a solution. I bought all the parts and built the cable, then wired it in through an open terminal on the Ollie's DC fuse box. Pretty easy and pretty fun. I'm going to collect some temp data tonight and create a post on it hopefully tomorrow. Then everyone can start improving on it from there! 🙂2 points
-
Beautiful work Paul! Thanks for sharing. I did the exact same mod using different materials and have been getting similar results across the entire basement. I just haven't had any really cold nights here in NC this winter to see how it would "scale" in super cold temps. I plan to try and use my Oliver to ski, so I've been trying to winterize it for the "5th season" you are testing in now. I have also added an all electric solution as a backup to the furnace / propane mod. First, I added a smart fan under the dinette seat near the bathroom to pull air from the vent in the back across the basement nooks and crannies, and second I have extra protection for the two backflow check valves on the city and fresh water inlets with 4' of 12V self regulating heat cable. It takes 5 watts per foot and does a fantastic job keeping those check valves toasty on very little power (1.5 amps or so). I thought about putting another one on the winterization/boondocking port as that is a super cold area as well, but there are no check valves there that I can see, so I didn't protect it - I hope the water just drains out before putting the cap back on. 😬 Might just be luck that I haven't had it freeze. Maybe I should add another heat cable there? I also have the composting toilet (no black tank use) and have drained the water in the toilet water line, so I don't need extra heat in those areas.2 points
-
I've been researching this topic since posting yesterday and I've got to correct something I posted (above). Relative humidity is sort of tricky to think about because, well, it's relative to temperature. The dew point is actually another key data point to look at as that represents the amount of water in the air (or space containing the air) independent of temperature. Relative Humidity is important because it tells you how close you are to the dew point - where condensation occurs (also called accidental dehumidification 🙂 ). Dew point is important because it tells you how much moisture is in the air. So, my statement above is not always true. You can actually pull colder, more relatively humid air into the cabin and reduce the overall humidity if the dew point outside is lower than the dew point inside (and you have access to dry heat)! It works because the cold air has less water content (lower dew point) even though the relative humidity is high - when you heat that fresh, cool, dryer air to your cabin temp, it actually has less relative humidity than the air it replaced. Confusing? I thought so. Sorry for my misleading statement.2 points
-
Mr. Cool - I would imagine normal maintenance will be about all you need to think about, but honestly, there may be some things you will discover - that as you deal with them - will give you a better understanding of your Ollie. In my experience - the more I did normal simple maintenance, winterized, used the boondocking water features, greased the running gear, changed bearings, found the best tire pressures for my situation, added TPMS, and on - the more comfortable I became with my Ollie. And if your one of those folks who is always looking to make something better - well - this forum has the expertise to show you the way. At no time have I regarded my Oliver as anything less than a really good TT. I am always amazed at how well it works off grid, how comfortable we are in BFE, and that I was so smart choosing Oliver.🤣 As others have alluded to - take the time to fully appreciate your Ollie - and it will return the favor. The worst angst you will likely experience - will be the waiting for delivery day! RB OFD2 points
-
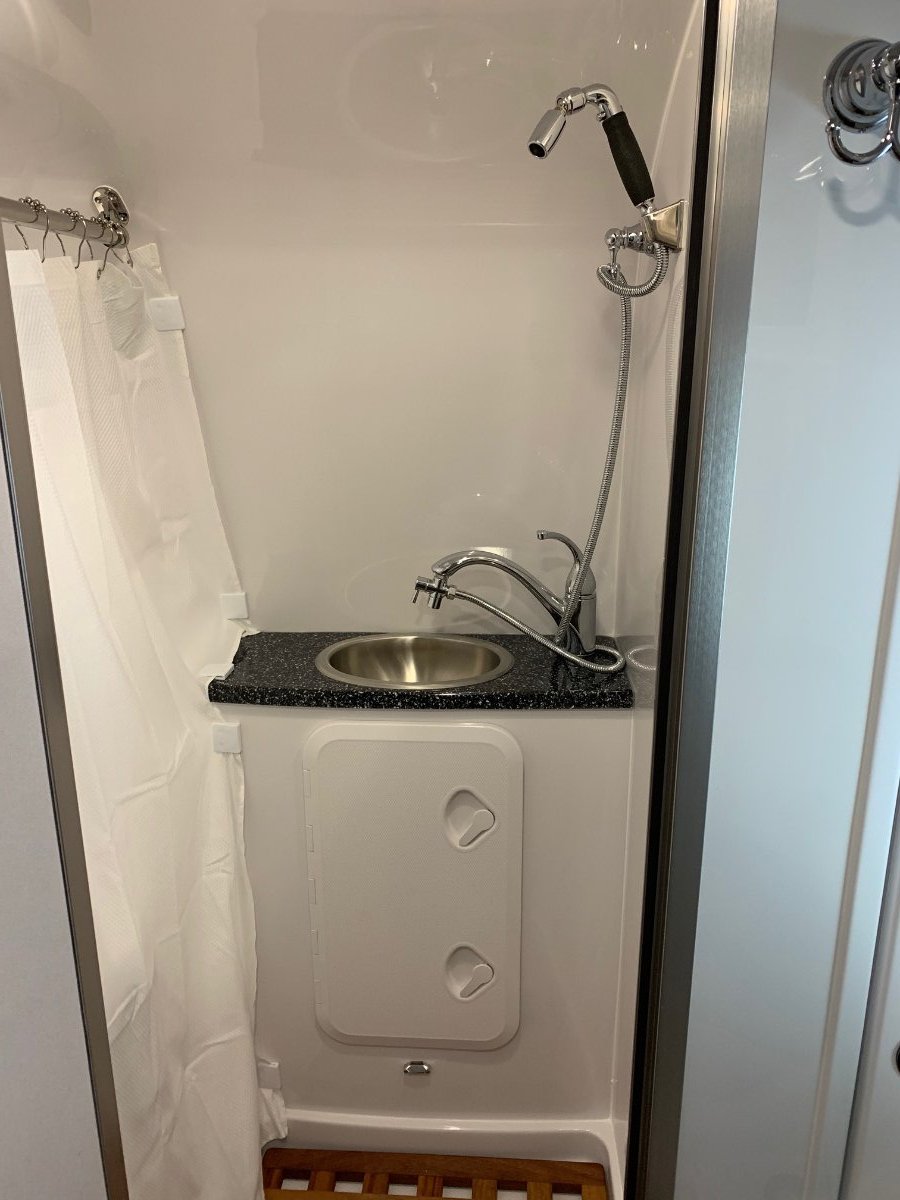
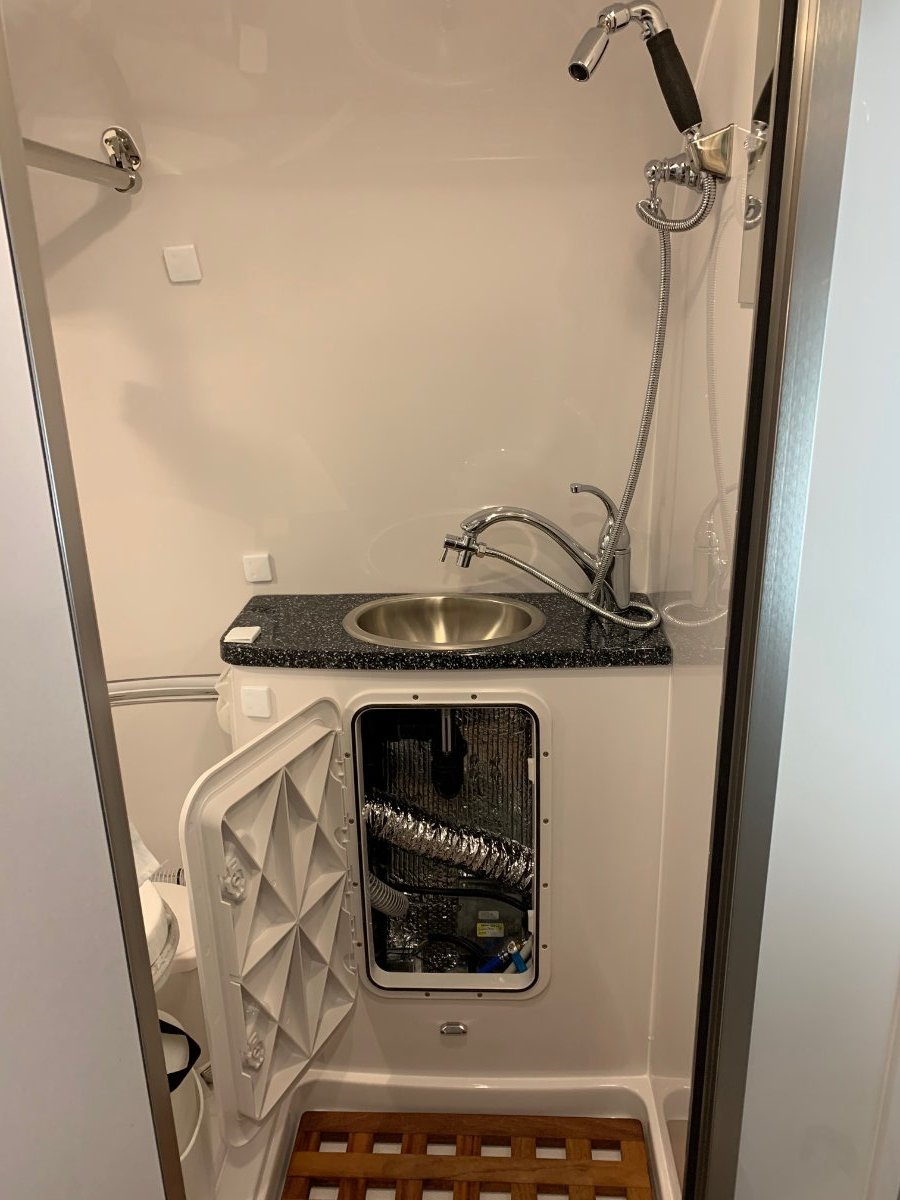
My mission after the first few camping trips was to install a better shower head in the Oliver. I especially didn't like the fact that I had to turn the water off at the faucet handle and lose the setting. Research turned up a highly regarded brand called High Sierra. I searched for those on this forum as well and found that at least one person (Overland) has also upgraded to a High Sierra. I chose the same ugly one with a nice new faucet but an even uglier diverter. 😄 I also hope my wife doesn't notice that her washcloth holder is gone now. 😬 I decided that a permanent access hatch (DasMarine Marine Deck Access Hatch & Lid with Lock, White, 24" Length X 14" Width (606MM. Length X 353MM. Width) in it's place was a better value (at least to me!). I can get at all my new valves now.
1 point
-
Has anybody tried this? I think that having that huge opening right under the sleeping area is a problem. Could the grill be relocated to the other side of the cabin, under the front dinette seat? Or in the front entry wall at the fridge? Then the big hole in back could be covered or replaced with a hinged access door. It seems as if the fan noise would be greatly reduced if it was located far away. You would have to install a baffle to keep stored items from blocking it under the dinette, which would reduce the volume a little. I’m unclear about the fridge area, if that could be suitable. Before I start messing with it, has anybody tried this? Did you do any sound measurements, before and after? There would be an added benefit - conditioned cabin air would be pulled around the water tanks, helping to keep them and the plumbing a little warmer. Thanks. John Davies Spokane WA1 point
-
We are avid bike riders. The 1 1/4 inch hitch receiver does not work for us. Our solution was to knock out the 1 1/4 inch insert. We then used a Dynafile to sand down the 2 inch tube so that it would accept a 2 inch hitch. So far, it works great. We will see how it holds up. The total cost was 2 bottles of Eagleton Whisky I gave my welder to do the work.
1 point
-
Pat and Molly As I said on the phone congradulations. Since you looked at a few used Oliver's it should make your choice of options easier. Richard1 point
-
This sounds like us. We are retired Sailors also and now are in the process of Ordering an OTT. I guess we will Sailing a "Land Yacht" now. I how Airstream doesn't mind the reference. Pat & Molly1 point
-
The Ollie is on some 2x10 scrap - its parked next to my barn - where I had installed a 30amp plug- back in the day - we were practice RVing 😃 Do not know if what I am using was the original design - but once upon a time - Oliver offered what you see - the platform - not the bike rack. It slides into the same brackets Oliver uses now. It is simple to remove. Oliver added their own bike rack - I know there are some out there in Ollie land. I mounted the Thule bike rails, additional 2" aluminum and such. I purchased the assembly from Oliver and installed it - - it was left over after they discontinued the rack system. Any decent fab shop can reproduce it. It is very stable and solid. I do not hesitate to put #150 on it.1 point
-
from what I'm reading here on the forum they need to be concentrating on Quality Control instead of leap fogging production for more $$$1 point
-
I was researching cables last night and that solution sounds far better than the ideas I was seriously considering. If you have a bill of materials and you care to share it, I'd love to copy it. 😁 I remember that post and actually bookmarked it. Keeping that line empty never crossed my mind so I'm very grateful you mentioned it. Here is the post for anyone curious:1 point
-
Someone on Oliver Forum replying to a topic made the statement that the Oliver trailer is really more of mobile tiny home then a camper, and I agree with that. Having your home ready for what ever you may run in to gives peace of mind so a person can really enjoy the time while out having adventures. I really like your ideas of building in redundancies in to the heating systems. Like what I said in my post, my mods are totally reliant on the furnace functioning and that includes not having problems with propane supply and how it has problems with gasifying in subzero temps. I think that when everyone shares there ideas we will be able to come close to having the security of our homes built in to our Oliver.1 point
-
I would imagine it is the 6,2, but with all this cold weather - as those bits and bytes flow across the country - it may have shrunk a few liters. 14 here this morning - wind chill - too cold. But we are good - feel for all those with the power outages and such.1 point
-
Wool - sounds very itchey to me. I stay away from it.1 point
-
John, A bit late to this.... This mod has been on my mind for quite some time! But for different reasons though. The sound deadening potential of moving the cold air return (CAR) away from the furnace unit is one I hadn't thought of, but I think it is a great idea and probably would make a difference deadening the rocket. I have the Elite. The furnace is under the front dinette seat next to the bathroom wall. The CAR is also right there cut into the seat riser. There has been lots of discussion of ways to heat between the hulls while boondocking and using the furnace. For us Elite owners (don't know about the Elite 2, but maybe similar?), the rear street and curb side between the hull corners are problematic in cold weather. What with the water pump and associated plumbing being on the curb side, and the check valves for water fill, and the exterior shower on the street side, they are relatively exposed. There is no space to run supply ducts to this area, so my thought was why not move the CAR back to the rear of the trailer. This way, when the fan kicks on, conditioned air from the cabin would be drawn down between the hulls at the rear of the trailer and make its way forward to the furnace fan. Even if the return air is not as warm as the supply air, it is somewhat warm and just having the air movement between the hulls would really help prevent any freezing down there. The main issue that has come up regarding this is that the blower could potentially receive less air due to passage restriction and/or have to work harder to get the air, causing overheating and furnace shut down. This is what Jason brought up when I posed him the question, but he wasn't sure. He said he would bring it up during the next design meeting. I don't really see this being an issue as there is lots of free space down below for air to move, just no space for duct work. One other potential drawback that I can think of is the fact that RV furnaces don't filter the return air like our home furnaces do. So whatever return air that makes its way to be blower will be recirculated in to the living space. There is a lot of dust from construction between the hulls. Oliver isn't as tidy as I wish they could be. Don't know if this could be a problem or not. Maybe the slow movement of the return air would not pick up any of the fiberglass dust and all that is down there. What I plan to do is tape off the current CAR. Cut out the required space in a sheet of cardboard for a new CAR and tape it to the removed rear seat cover (dining table seat, curb side) and see what happens. I'm buying some remote temp sensors (thanks contributors on the forum for recommendations) to place in the furnace compartment and in the rear basement to see if there is any change in temperature. I'm not an HVAC person, but this seems like it's an idea worth pursuing for the cold weather campers out there. I'll post back in a few weeks when I get my test all completed. Cheers, Dave1 point
-
I found Oliver trailers sometime during 2017 - I was seriously considering a class C 4wd - of the Elkhart clan. After much consternation - it finally jelled in my mind - the trailer was the more flexible platform - with a 4wd TV. I toured the Oliver factory - visited Oliver at least twice before purchase - and we took Ollie home July 2018. As someone with decades of manufacturing experience - I recognized Oliver was perhaps at the top of the heap in RV manufacturing - but just decent -in the whole. Has my ownership experience been perfect, great, good, met my expectations, or worse. Since I began reading this forum - a constant reoccurring theme has been the various questions, concerns, and praise for the OLIVER quality level - and in a few threads - some - second guessing the purchase altogether. Personal consternation over real or perceived quality issues that arise within days, weeks- or months of delivery. And too their credit - forum members are always eager to help - often with personal experience on an issue. We see repeat issues, we see obvious defective build issues, we see a very responsive service group and we see owner mods that make Ollie better, and we see a community of like minded caring Oliver Owners - a preponderance of them with previous RV experience - or - who are handy with tools, and repair procedures - and have no problem fixing many of the minor things that can go wrong with RV ownership. Lets face it - The modern Oliver RV is a complicated multi system RV that relies on its many parts to work correctly - together- to deliver the experience a new owner expects. As good as the forum experience aids and supports the Oliver brand - when your Ollie let you down - soon after writing that check - good intentions don't help much. So what is a reasonable, realistic customer expectation level for the new Oliver owner at purchase. Is it acceptable to have any of the systems inoperative - at delivery- or within days. Is it ok for a system to be less than fully installed. Is it ok for the delivery day process to be less than top shelf. Is it ok that the service department is relied upon to carry the day - too often. Or, does knowing RV's are historically hit and miss on the quality front, and with Oliver's reputation in mind, we look past the initial disappointment. It's not a Toyota after all. (I couldn't resist poking) Your opinions - your feedback - are important - here - and to me - I can be very critical on the subject - but I attempt to temper my comments - and expectations, due to my time in the trenches of manufacturing hell. I believe Oliver is connected to this forum - as it is a feedback loop, and an important first hand accounting. I also believe - we owe it to ourselves, a personal responsibility - to educate and learn about our purchase - and try to understand the issue at hand. But where does the line of responsibility begin and end. You put $$ down, eagerly waited months, happy anticipation for delivery day, and you fully expect your high dollar purchase will be 100% perfect - right? Well - at least be fully usable. So, after 2.5 years of med/heavy use, at least 4 trips to Oliver service for R n R, a few phone calls for info on this or that, does my experience meet my expatiation. Well - mostly - because I expected less than perfect. I understood the Oliver was only as good as its components and the build process - itself. And I inform and educate myself on the product, as best as I can. Yea Oliver is better than SOB, so what, I bought an Oliver, Would I buy my Oliver again. Probably. But if I was a normal ordinary customer - new to the RV world, my view may be less generous. I don't bleed Oliver, that is Scotts job, but I do care about the brand and how customers feel about their purchase - as I represent Oliver with my purchase and continued use. It is much more pleasant to promote than to defend. So, for those of you out there with less than favorable experiences - hang in there - Oliver will get it right, for the satisfied of you, happy trails, and for the rest of us, well - we're never satisfied anyways - well - not for long. 🙄 RB OFD1 point
-
LL Bean sells sleeping bags with flanel inners.1 point
-
I've never owned an RV before my Oliver and in the beginning I was frustrated with things going wrong. It did take awhile for the kinks to get worked out, but one thing I will say the service department folks have assisted me on the phone several times and simply being able to talk with someone is priceless. Part of my research into why I bought an Oliver was the good customer service. If you are new to Rving just understand things happen with rv systems and more likely than not you will have some issues. Now that everything is operating as it should I'm a happy camper and you will be as well.1 point
-
Time2Go - I'm conflicted! First I wanted to give you a "Wow" with regards to the weather issue. Then I wanted to give you a "like - thumbs up" for your new delivery date. AND, then I see that you have sent me a PM. I've not had that second cup of coffee yet!!! Hang in there. Bill1 point
-
The Andersen WDH tends to get maligned here and elsewhere upon occasion, but, in my experience 95% of the time it is better than any other WDH I've seen or used. I've never heard of an Oliver that really "needed" the anti-sway features but those red bushings on the Andersen really do help with dampening the "bounce" or "porpoiseing" that can occur with large bumps like interstate bridge expansion joints. Yes, life would be easier using a TV that didn't require a WDH in the first place. But, these larger vehicles do have some distractions/features that make them not the best choice from an overall perspective for many people - like me. Bill1 point
-
It has been awhile since I started learning about Oliver Trailers and I can report I've learned about them! I am even more convinced than ever about their concepts! I sold my ML 350 because it didn't have a Factory Hitch on it and I wasn't comfortable with an After-Market installation, along with the necessary extra Coolant/Oil/Auto Trans cooling etc. Enter the replacement Tow Vehicle which is a used Mercedes Benz GL450 with Tow Package. According to CanAm, this is one of the BEST "TV" out there! I looked at several Olivers since I first started, a 2016, and 2020, but now I am seriously considering a new one. By the time we spent the money adding the options we wanted to the used trailers, it became obvious that we should consider a new trailer. Down-side is the Lead Time. Of course it would be more expensive, but it would have a Warranty that the 2020 doesn't and would be 1-2 years newer, not to mention the options that my wife wanted. We will sleep on this! I have warmed up to the Andersen Hitch and have even bought a used Hitch and purchased the Update-Kit, saved $550.00 over a new Hitch. As a retired "Heavy Duty Truck Sales Engineer," and experienced RVer, I know the important of proper Weight Distribution as it relates to Safety and good TV Handing. I doubt Oliver would select anything that wasn't able to do the job.1 point
-
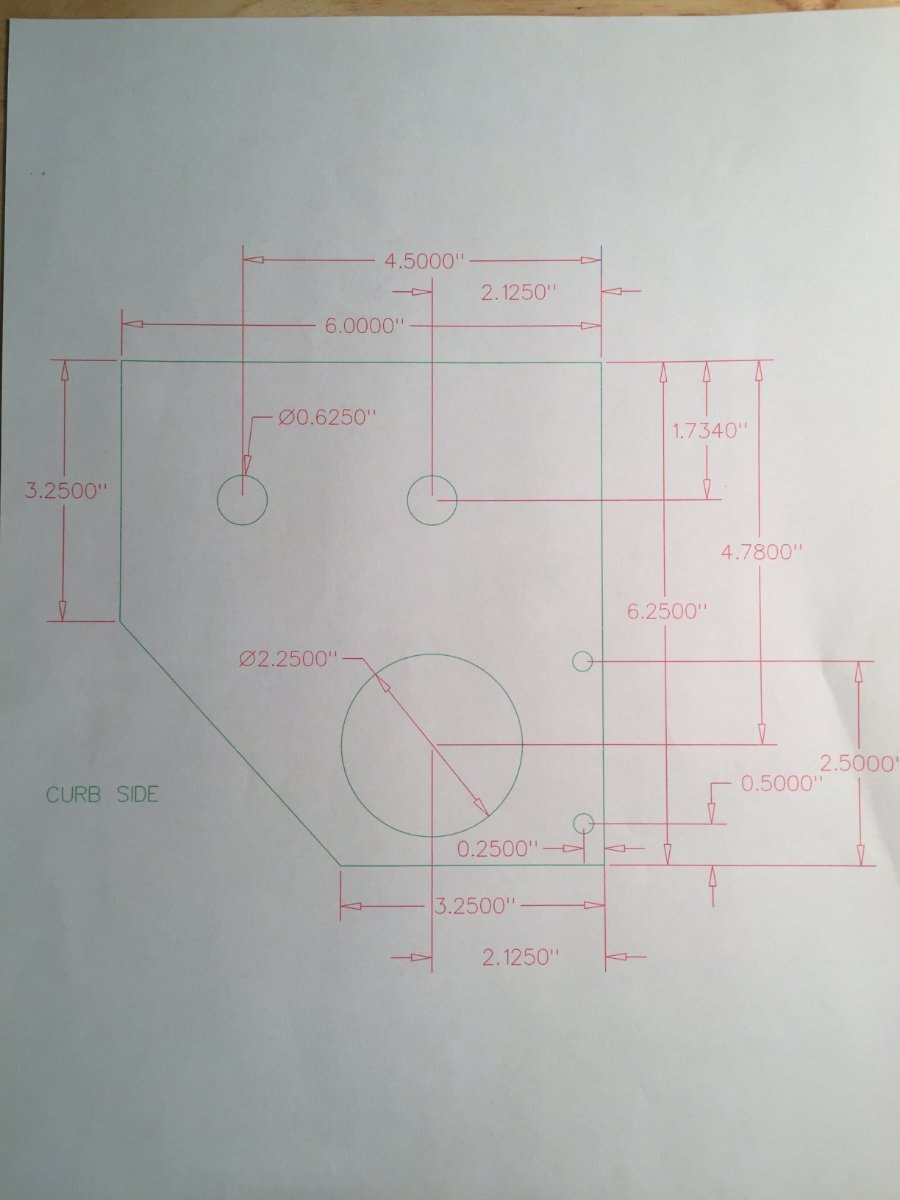
Here are some prints of the main parts needed to mount flaps. i just want to make a couple of points to maybe help someone making this mod. The first one is to remind people that this is a wonderful custom built trailer and like snowflakes they may look the same but each one is unique in it's self. I strongly recommend that you take the print and build a mock up out of a stiff piece of cardboard or a thin piece of plywood. Then put up in place and check the fit of the mount holes and how it aligns with the fender well. This way you will see if adjustments to the holes need to be made. The part that the rubber flap is bolted to has to align perpendicular to the trailers main frame and be aligned with the trailing edge of the wheel well. This way when the rubber flap is bolted on it will extend a little way up into the wheel well and also match the seam of the trim that goes around the outside of the wheel well. You may have to refer to the pictures included in this post to see what I mean, pictures are truly worth thousand words. I suggest getting the main mount plate held by the mounting bolts of the stabilizer jack, checking position and alignment to the wheel well then hold or clamp 3" x 12"long x 1/2" thick plate up against the trailer frame and aligned with the edge of the mount plate. Now transfer the two 1/4" mounting holes positions to the edge of the 3" x 12" plate. These can now be drilled and tapped. On my trailer the curbside stabilizer jack is mounted 1/2" closer to the wheel then the street side that is why there are two sets of prints for that part. They are somewhat picky to install, but I think they are the most effective at protecting the trailer.
1 point
-
I numbered my tanks # 1and # 2. Let's assume both are completely full, mounted in the trailer with the hoses attached. Open the valves on BOTH tanks. Turn the lever on the regulator toward either tank. The indicator will be green. Use your trailer and appliances normally. When the first tank is empty, the regulator will automatically begin using from the second tank. There will be no interruption of the flow of propane, but indicator will now be red. The lever on the the regulator DOES NOT physically move. You will need to be aware of how long a tank will last you and after a period of heavy usage, check the color indicator. When you see it is red, close the valve on the empty tank, remove the hose and take it to be filled. At that point swap the lever to the remaining tank. The indicator will change back to green. When the first tank is replaced, leave the lever pointed toward the second tank until the indicator again turns red indicating the second tank is now empty. I use and highly recommend the Mopeka tank monitoring system. I can check the level of propane in the tanks from inside the coach on a readout or with an app on my phone. I also invested in a couple of these.1 point
-
The Fire TV stick works great in the trailer too. There is a USB connection on the back of the television to provides power. The Fire TV also requires internet to be of any use. I have both the Fire TV Stick and a Roku Stick Pus. The ROKU as a cleaner interface than the Fire stick (IMO) and supports screen sharing if you use IOS and/or MACOS devices, which is very handy. I like both but prefer the Roku. Both work great and do not require the inverter to be powered on to use them.1 point
-
While researching travel trailers in late 2019 / early 2020, I started out thinking we would be in an Airstream and like many others came across some good alternatives, namely the Oliver and Black Series trailers. I eventually narrowed it down to Oliver or BS. I have detailed pros / cons listed for each, although it's my personal opinions based on what I could find on the internet. We ended up choosing the Oliver Elite II, primarily for the following reasons 1. We definitely wanted a tandem trailer for towing stability, so that eliminated the HQ15 and the Oliver Elite I. 2. HQ17 vs Elite II... many pros and cons for each, but in the end it boiled down to the following: a. HQ17 being a bit big for the two of us (it sleeps 4 with bunk beds, so great for a small family). It weighs 3K pounds more than the Elite II. May have had to upgrade from 2500 to 3500 tow vehicle. b. HQ17 made in China - quality issues highly likely and could be tougher to find parts. I've had it with "made in China" for big ticket items - especially if it has any metal (aluminum or steel) in it. This was the real "show stopper" for us.1 point
-
We have the Elite II but just wanted to say that I am so glad we did not get the full mattresses. I am perfectly comfortable with the provided cushions, and my husband added a foam topper. It's so nice to be able to easily lift up the cushions or even put them in the aisle to check on things underneath. The hypervent is a definite plus. We live in the humid SE and just returned from a trip. We kept a constant eye on the humidity using a sensor. One day had condensation on the windows, but we kept things under control with a dehumidifier , cracking windows, and running the fan to pull air out whenever we did any cooking.1 point
-
Everything is fine (3.92 axle ratio is great), except the gas tank is only 23 gallons, no good at all.... why did they put such a small tank in it? Don’t buy this one. John Davies Spokane WA1 point
-
Donthompson towed his LEII with a VW Touareg TDI and was really happy with it. Mossey1 point
-
This picture is from the Oliver website and shows the Lukens towing with their MB and I don’t see a WDH. Mossey
1 point
-
Make it simple, make it safe, and forget it - go buy an adequately sized TV.1 point
-
Along with the ones listed above there is rvparky and park advisor. Then we always use state lines and roadtrippers. One app would be nice but... Ultimate campgrounds is still on top. State Lines tells you the driving laws in each state and they really vary. Reed1 point
-
I just discovered a new app that lists boondocking sites called iOverlander. They have apps for iPhone and for Android. They also have a website: http://ioverlander.com1 point
-
Thanks for the link. Unfortunately the data base is fairly crude and does not show smaller public parcels under a square mile like the one I pictured... I use GAIA and discovered that their Premium membership includes several useful layers such as public land ownership in more detail, and USFS MVUMs (motor vehicle use maps). I always use Google Earth satellite imagery instead of Google Maps for looking around potential camping areas, it has the extra detail needed to focus on important stuff, but it won’t tell you if the track in is open or choked with sagebrush, nor does it show washouts or deep potholes. With GM the detail blurs out as you zoom in, while GE stays sharper. We need a real time source with a resolution of a foot for checking potholes. Not happening in my lifetime. https://help.gaiagps.com/hc/en-us/articles/115003524547-Free-vs-Membership-vs-Premium-Membership John Davies Spokane WA1 point
-
I don't think there is a single source, but here are some: http://www.thegoodluckduck.com/p/boondocking-resources.html http://www.boondockingguide.com https://www.campendium.com/free-camping Ultimate Campgrounds has a phone app. Technomadia has a nifty GPS-based Phone app that solves this problem.1 point
-
I sure hope there is, I really need more detailed info about access. For example, this is state owned public land in central WA. The setting was glorious but all the spurs going back to the sites were rough and very narrow lanes, with sagebrush lining both sides. I just am not comfortable backing my trailer through that stuff.... and much of the main road going in was heavily potholed and partially washed out. It would be nice to have complete descriptions of the way in, and pics of free camping areas. Maybe I just need to start carrying my weed whacker..... John Davies Spokane WA
1 point


.jpg.b4fb182c2dd38b005d42f99a3317e409.jpg)


-
Recent Achievements
-
")


")


")


