Leaderboard


Popular Content
Showing content with the highest reputation on 02/17/2021 in Posts
-
FWIW as this is not the exact same problem as most are having with the Xantrex XCPro 3000. I noticed that I was getting the “20” warning code several days after delivery of my new OTT. Long story short, my issue became no charging of the batteries from shore power. I tried checking all the Xantrex switches, the breakers, the cables, etc. to no avail. I finally downloaded the Xantrex Bluetooth app off their website, and after pairing, went to the settings menu and noticed that there was a switch pertaining to charging from the tow vehicle which was on “auto on” . I thought that’s odd because that can’t be done as my tow vehicle is not set up for that. So I turned this switch in the app to off and lo and behold my batteries finally started charging from shore power. The Xantrex did cut off by itself after the batteries were fully charged. Maybe next week after the weather warms up I can put the system through a discharge/charge cycle or two to see if there are continued issues with the Xantrex.6 points
-
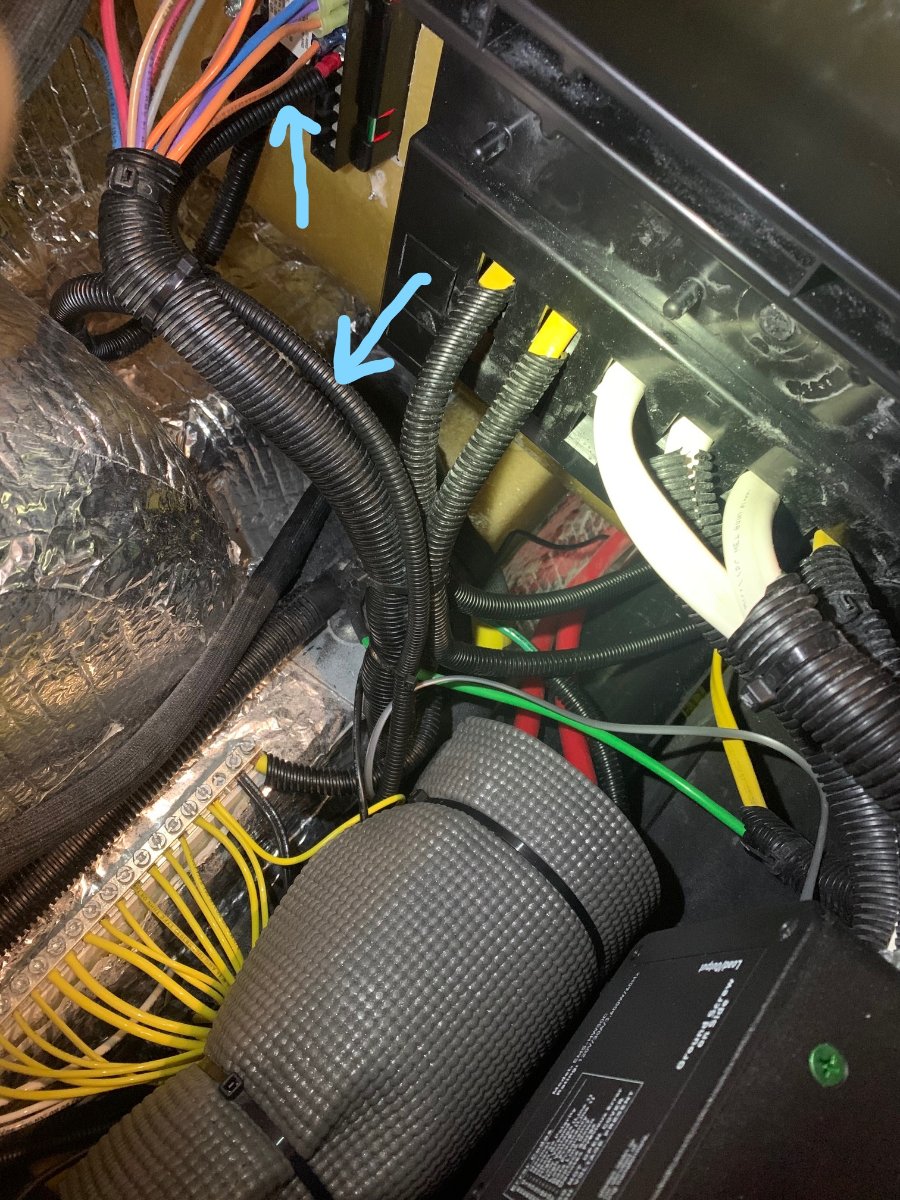
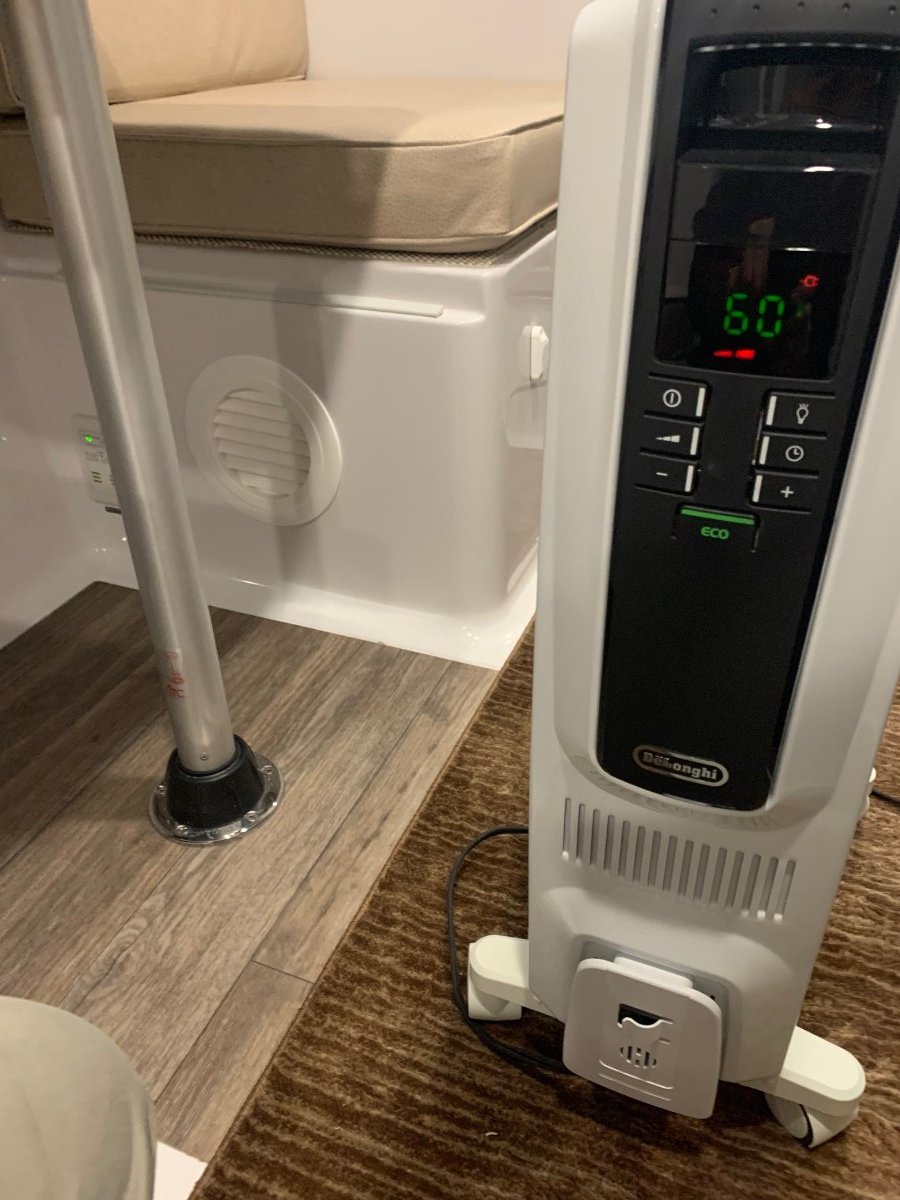
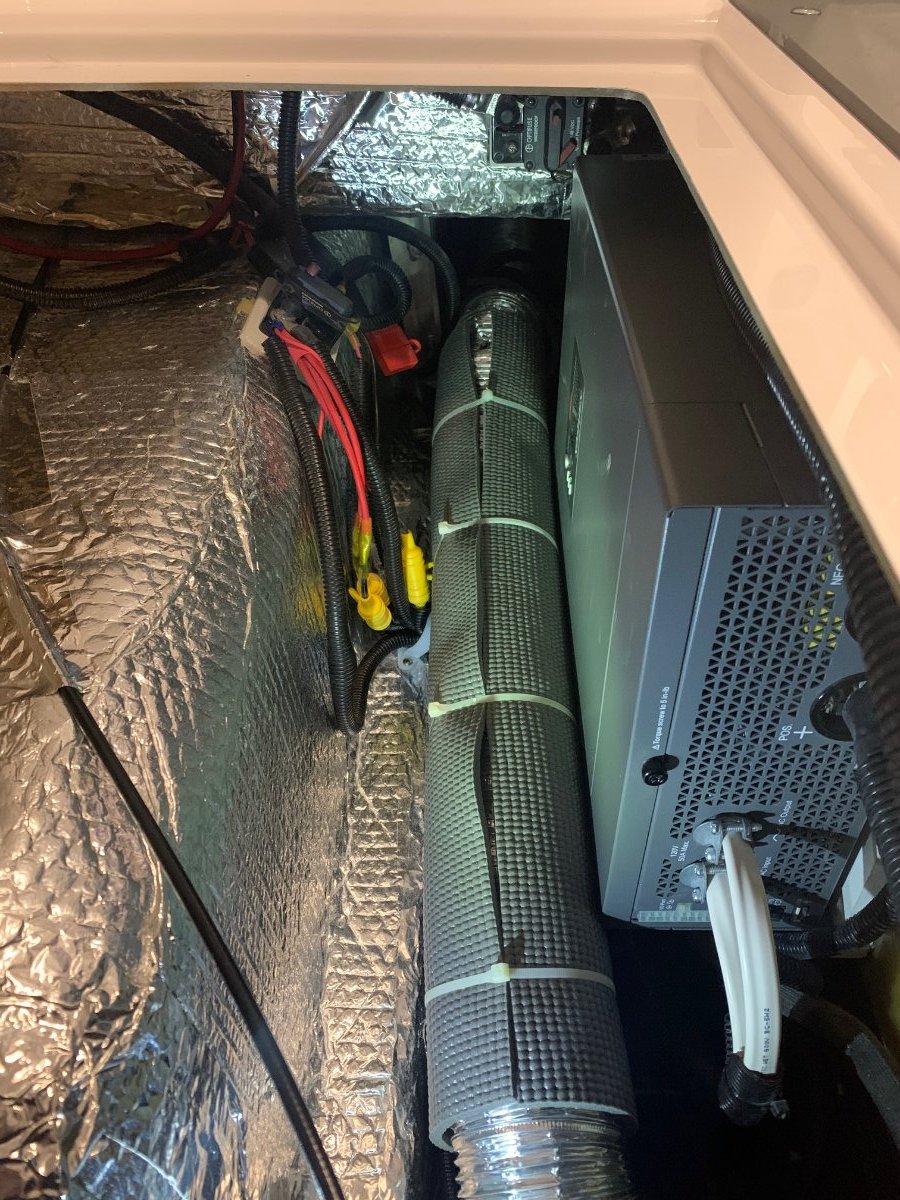
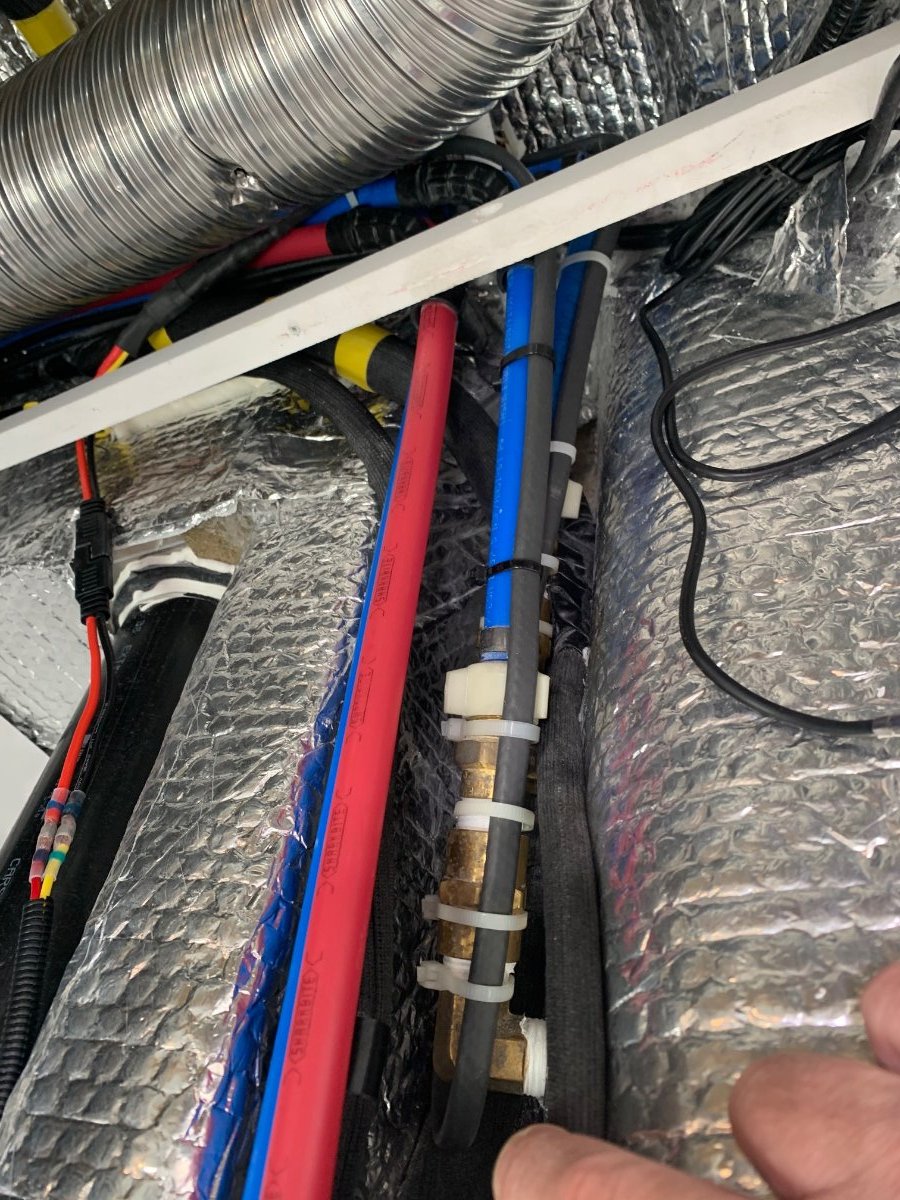
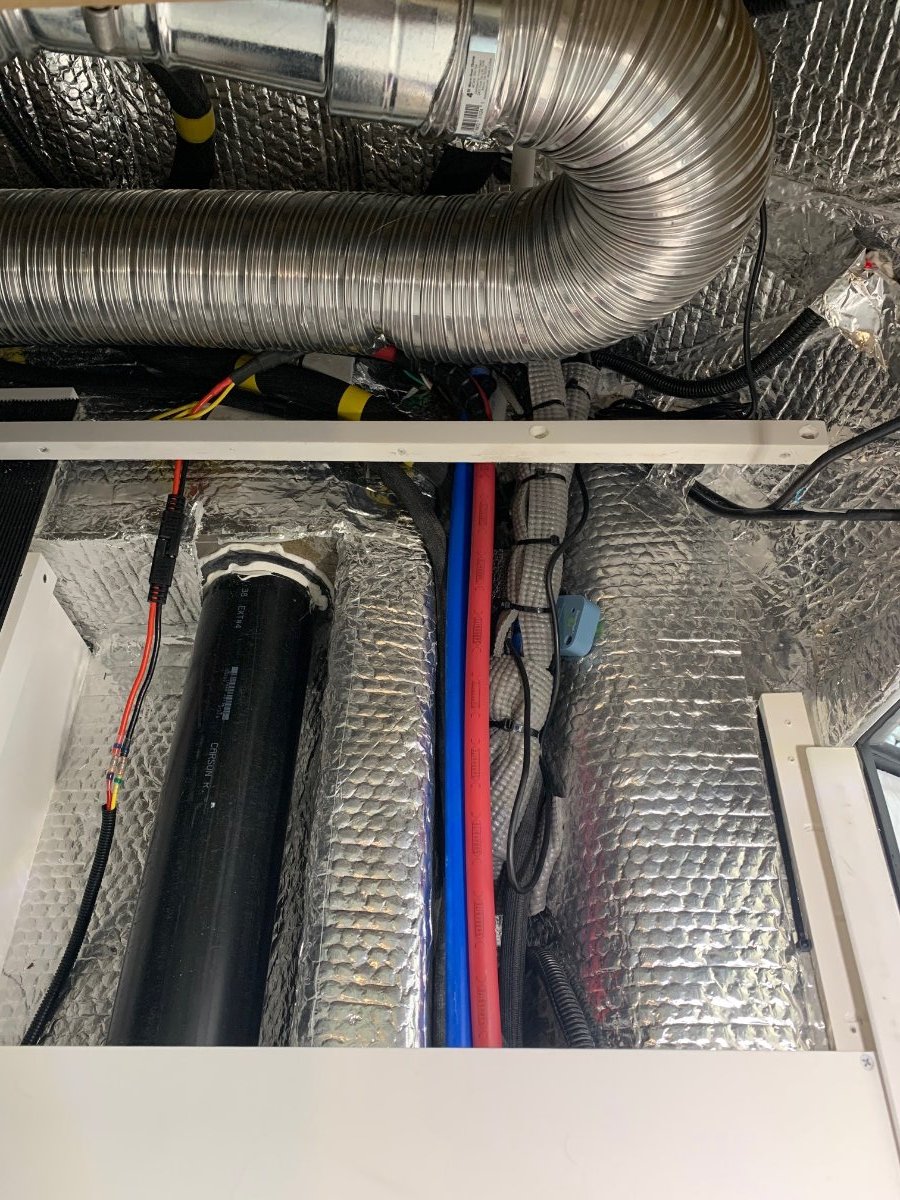
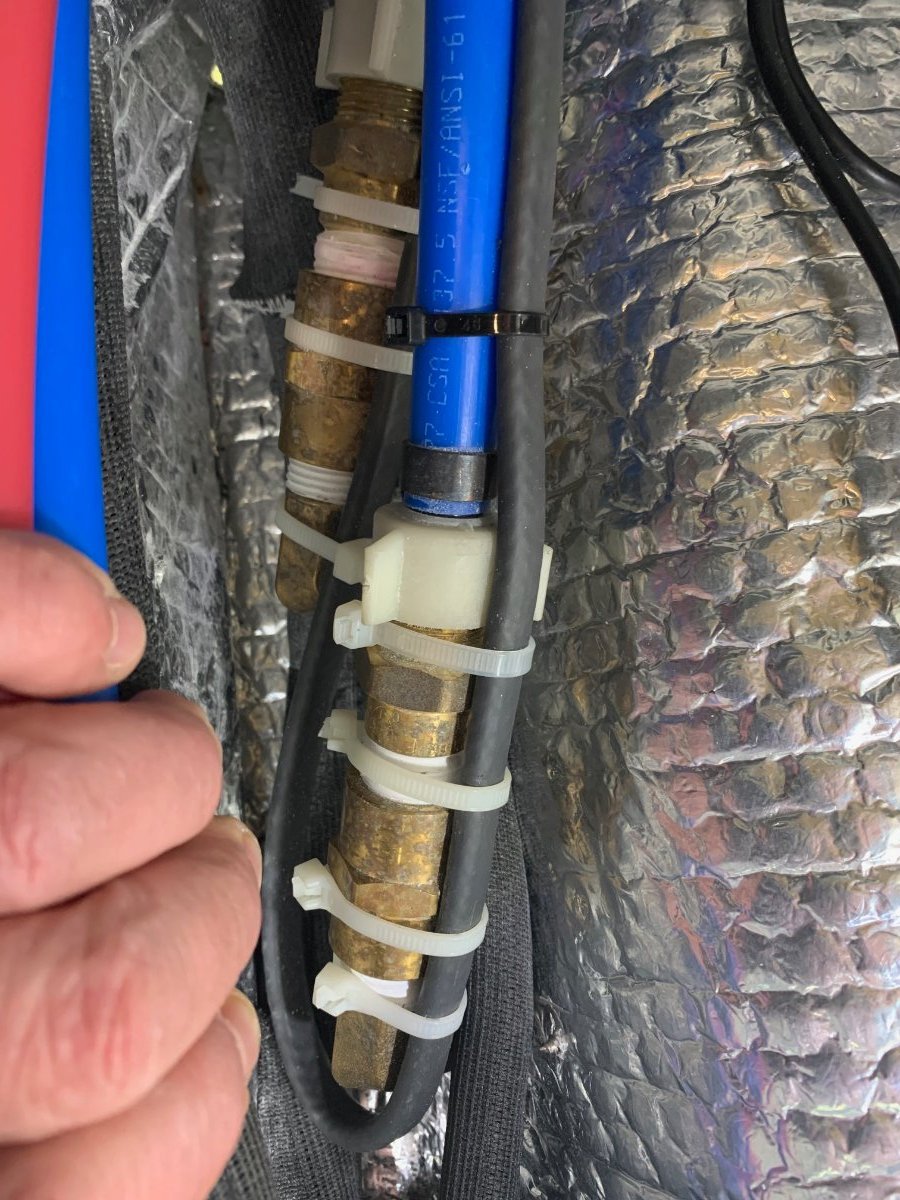
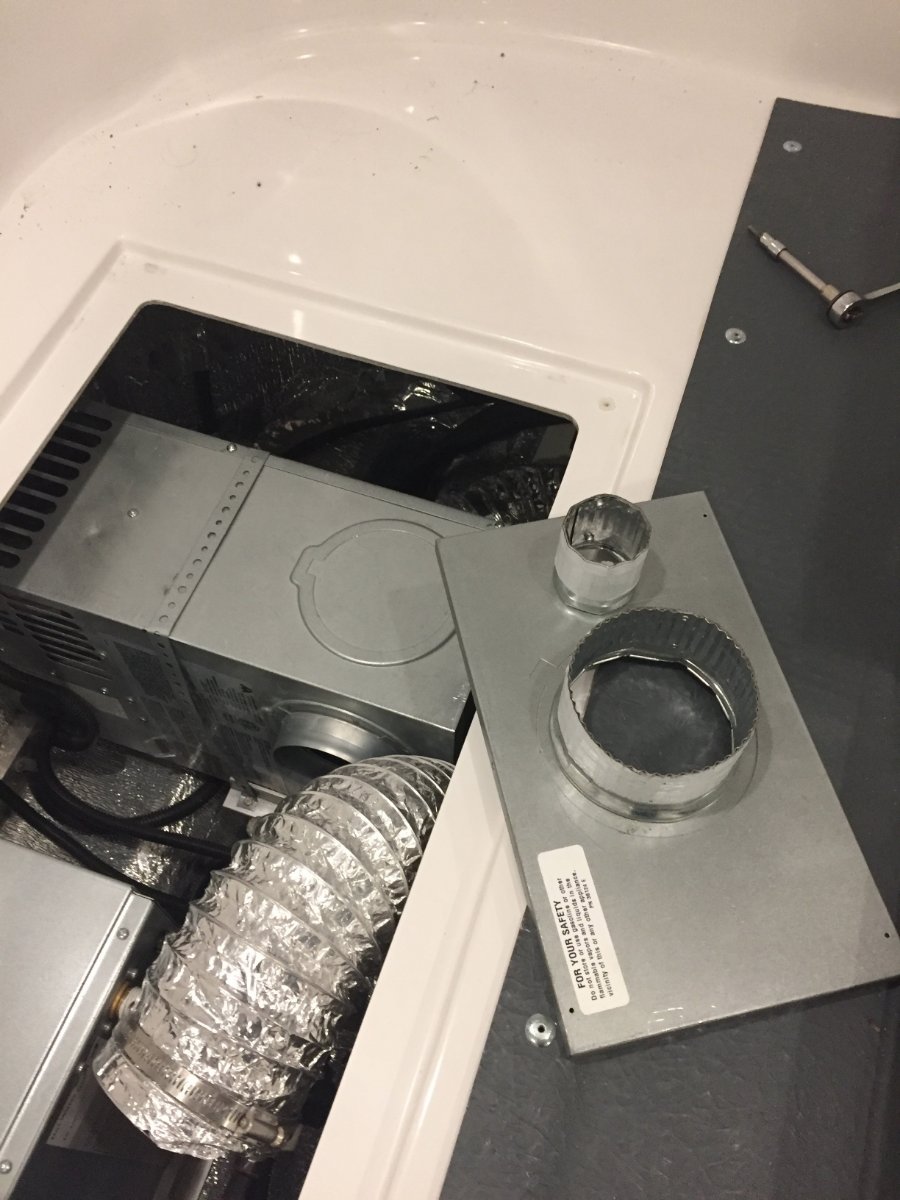
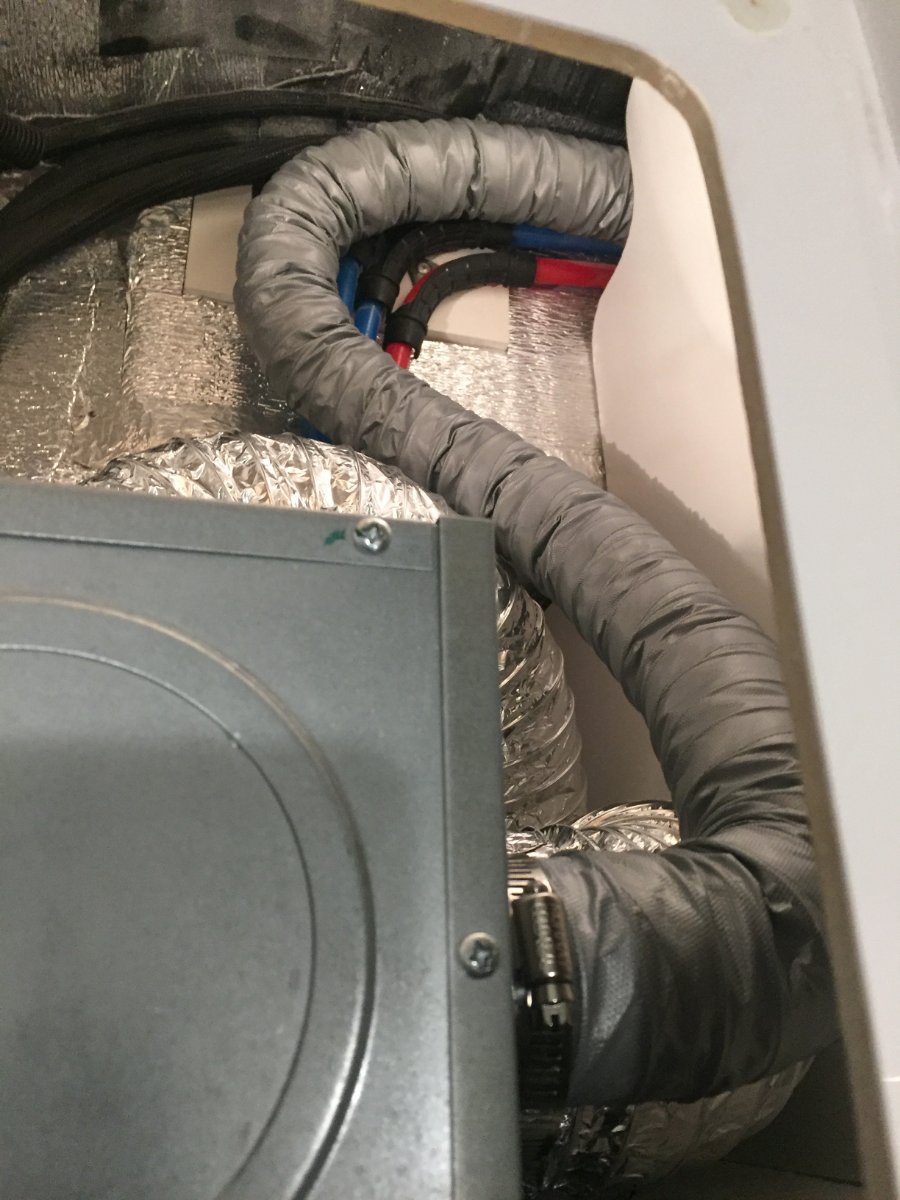
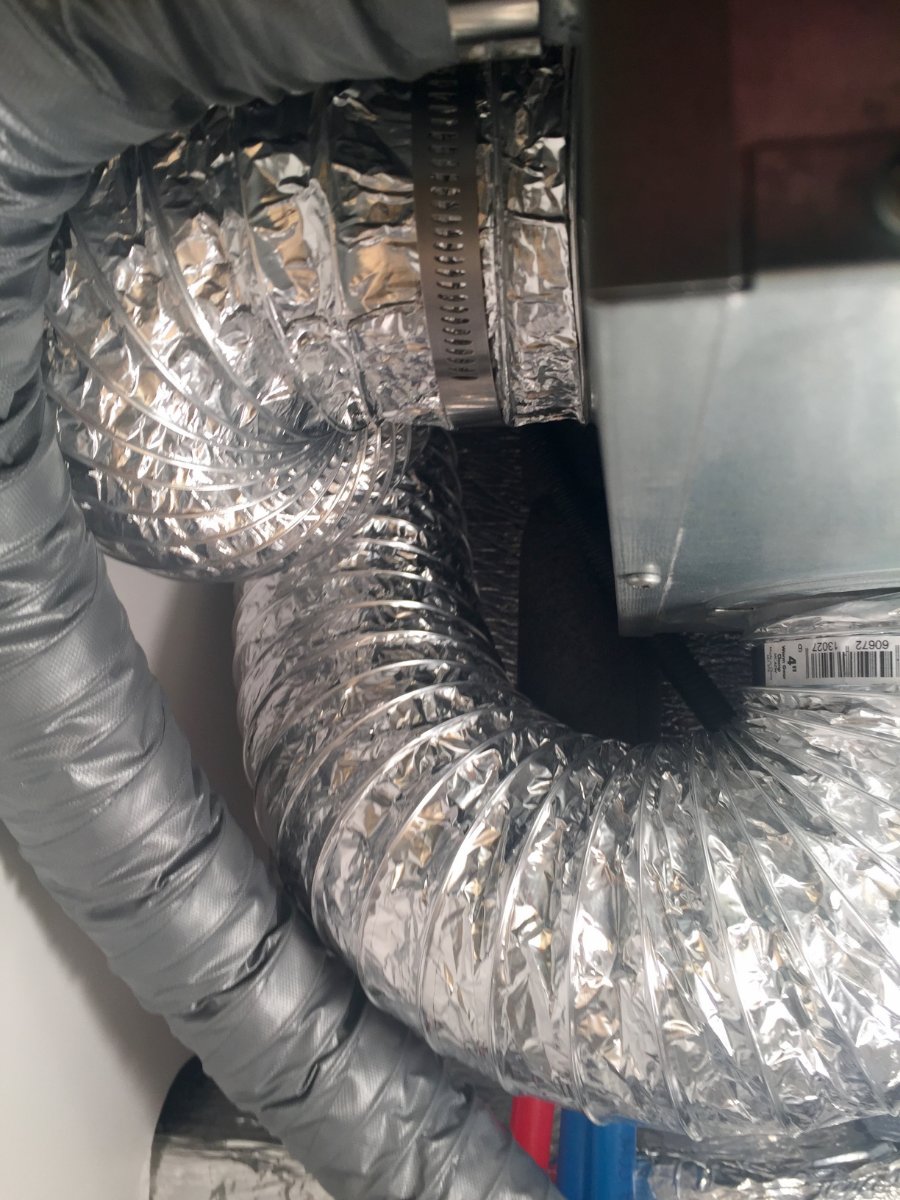
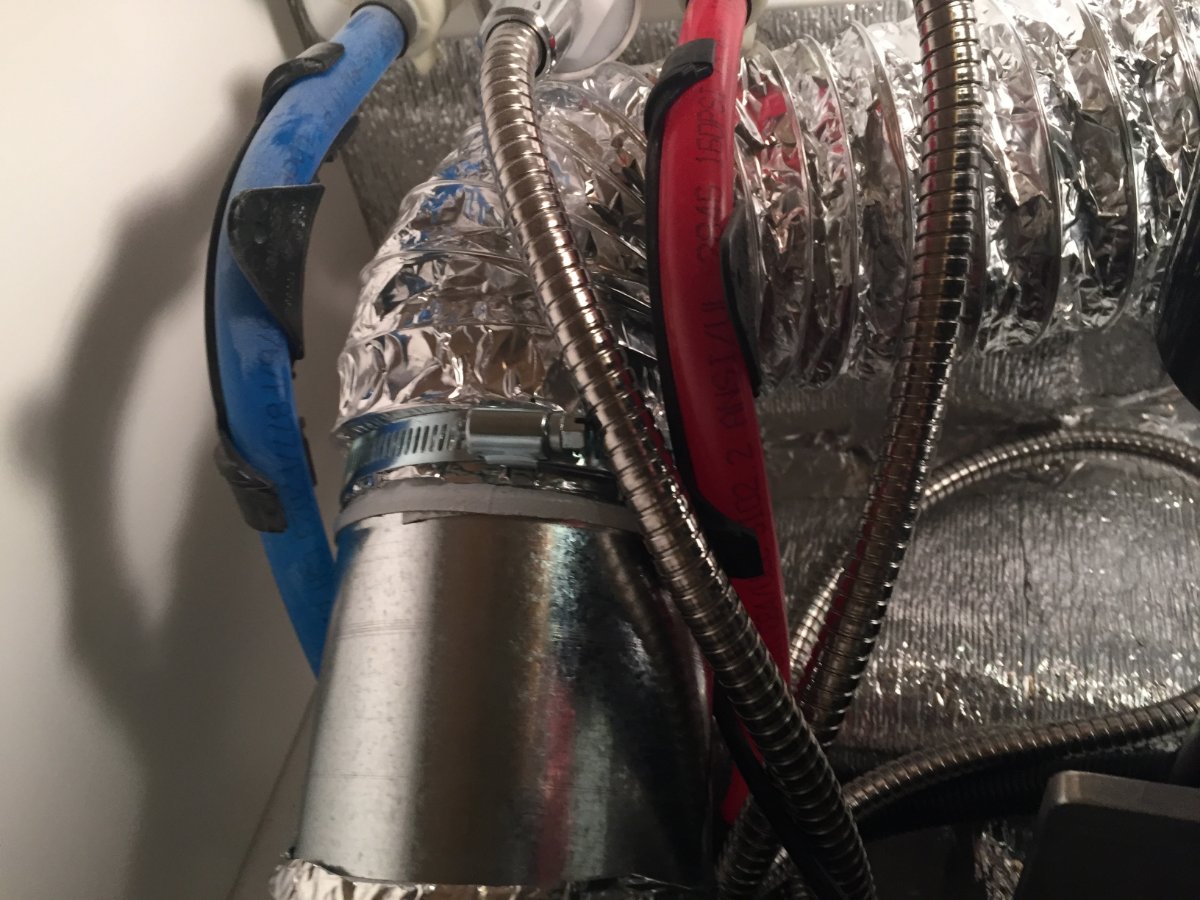
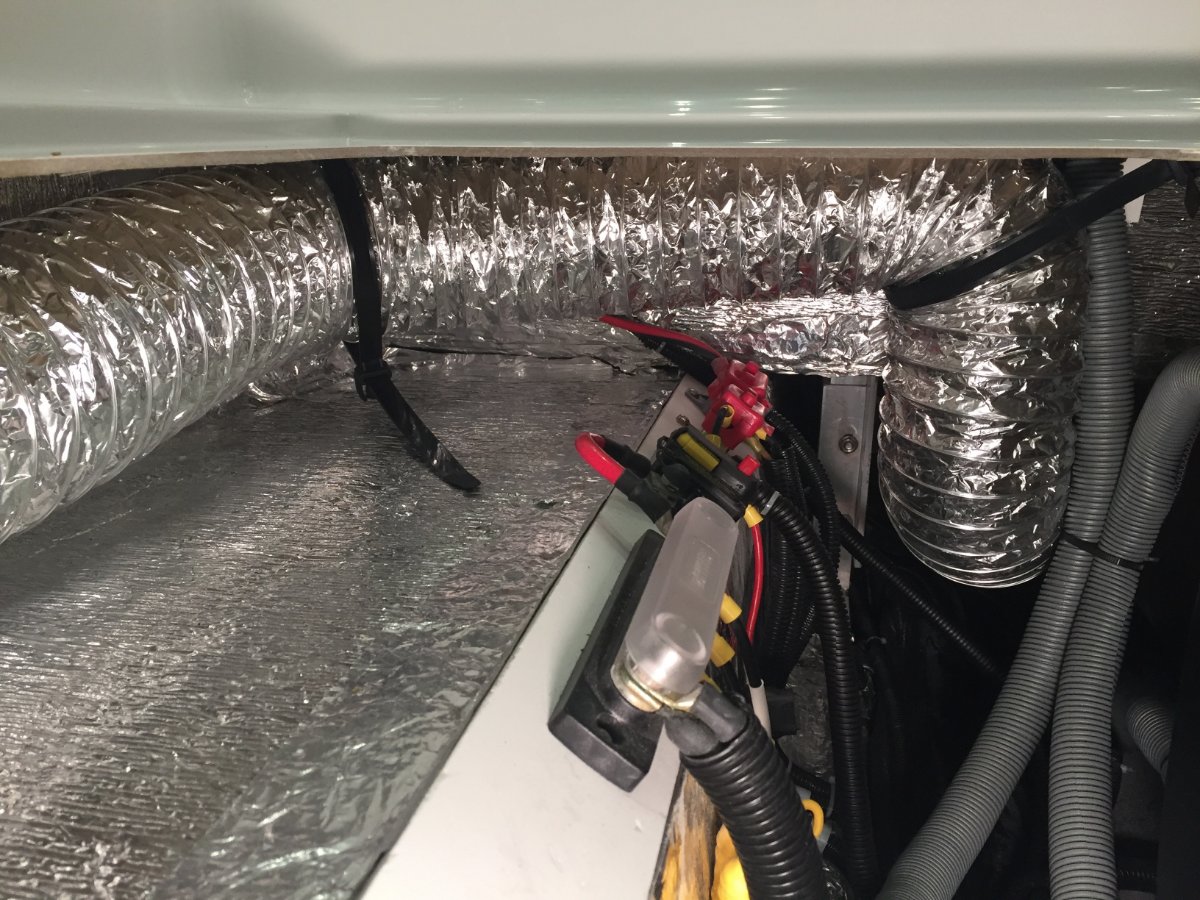
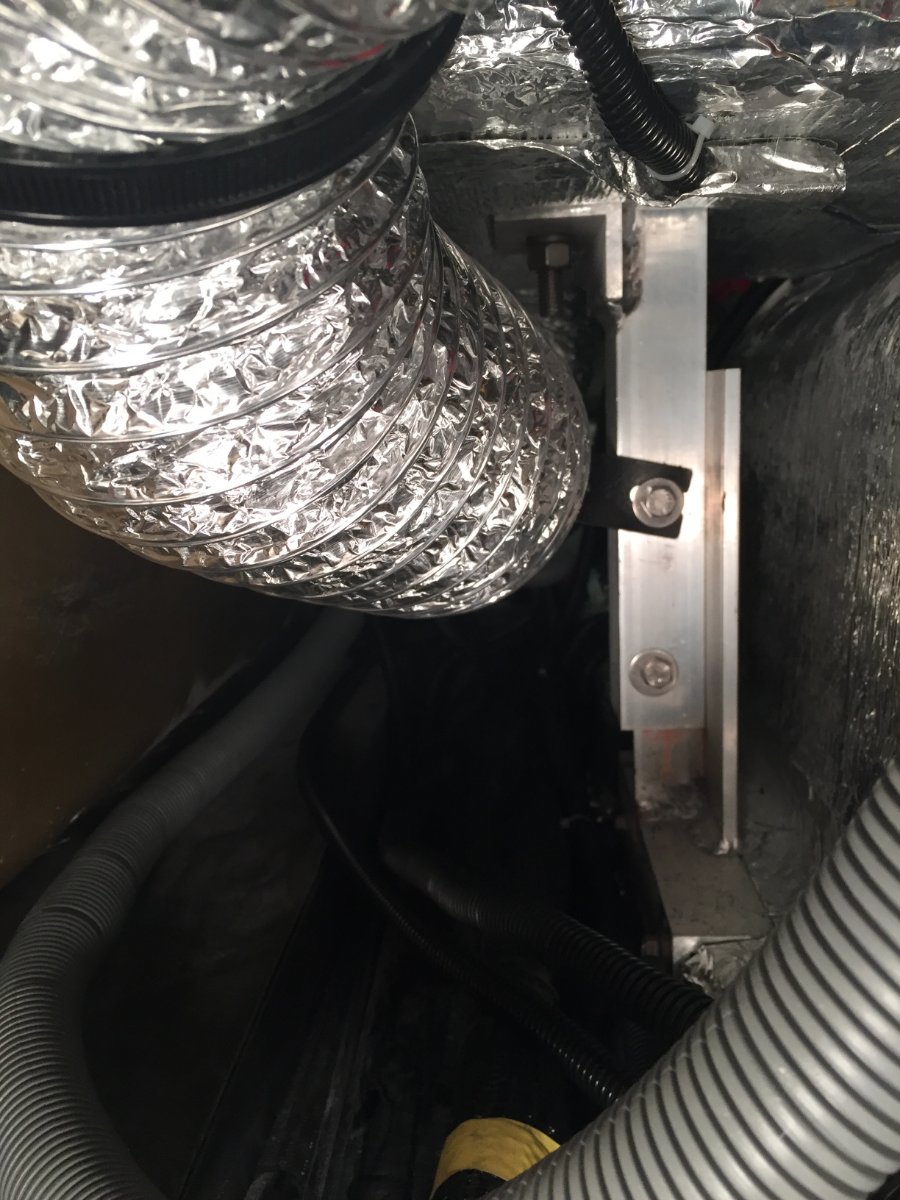
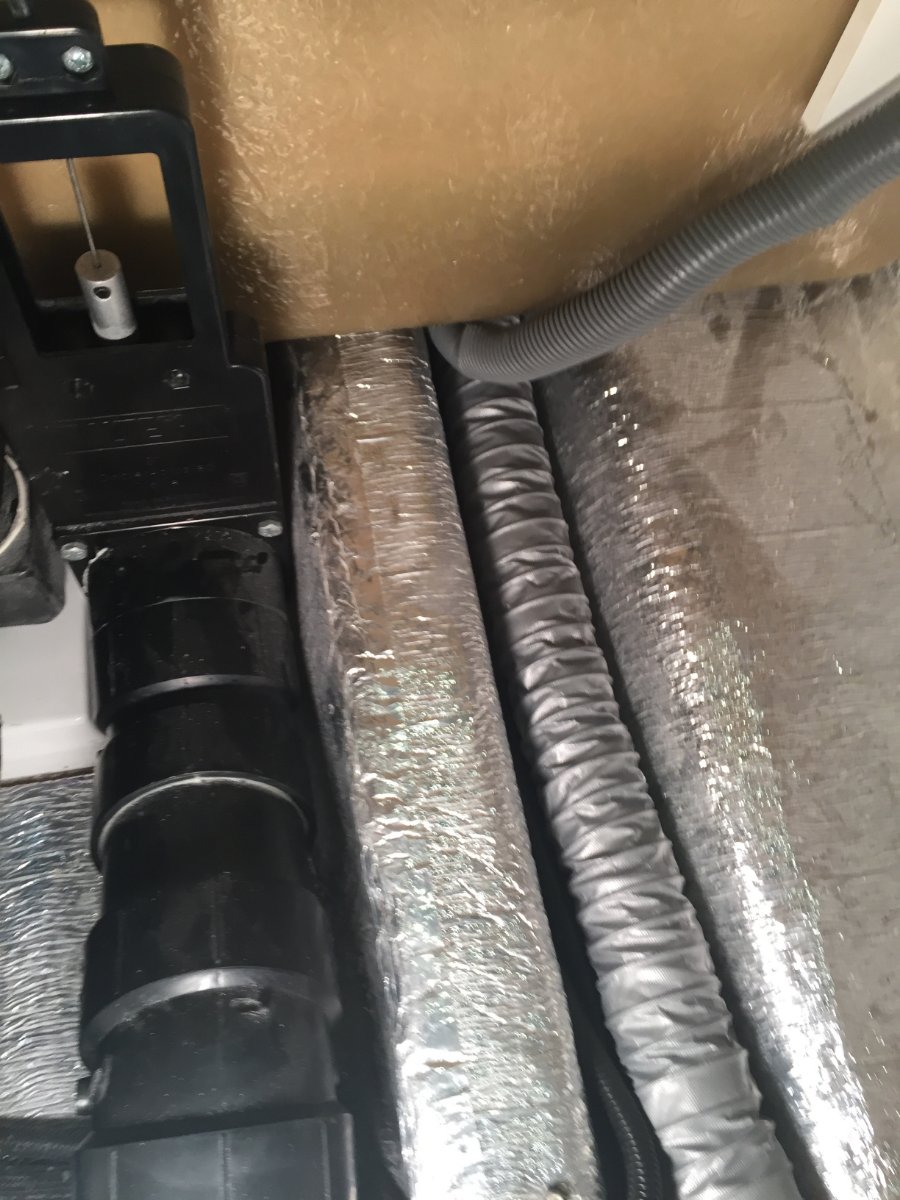
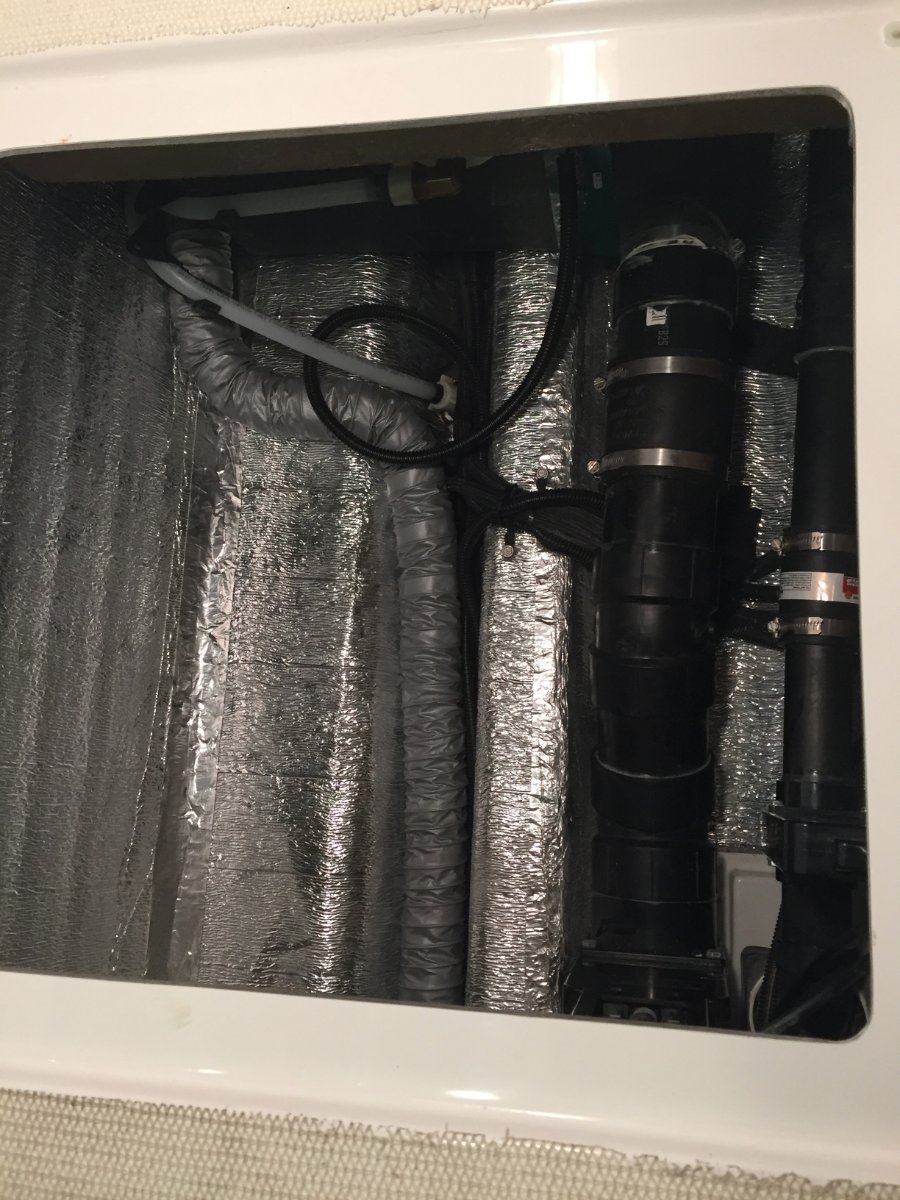
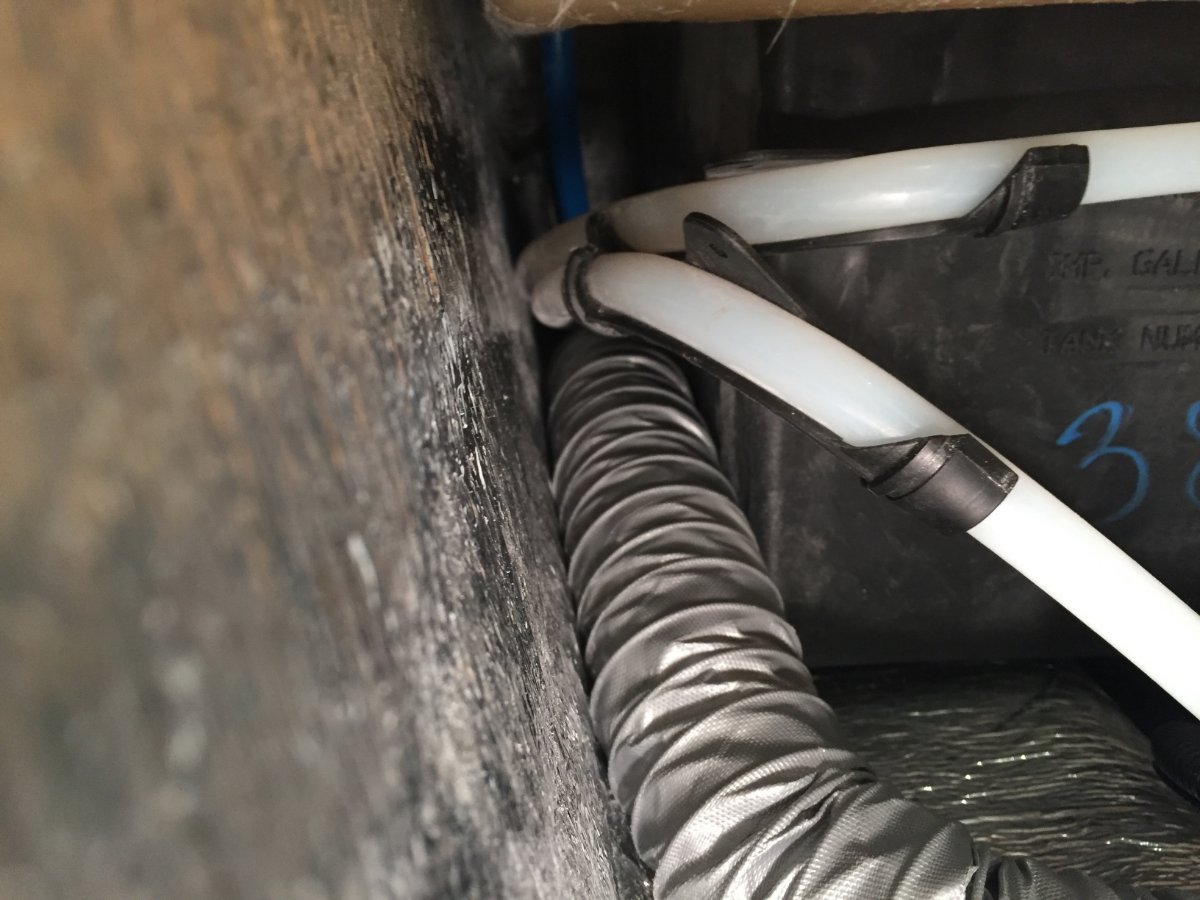
Here are some pictures of the various things we've been sharing ideas on in this post... First, a boring picture of the 6" vent I put in for the "bilge fan" under the front dinette seat. Again, I wanted a way to move conditioned cabin air throughout the basement (hot or cold) that was independent of the furnace fan - which cannot be run without heat anyhow. And the fan itself. You have permission to laugh at the bungee cord installation. It's temporary for now until I find a good way to mount it permanently. Ugly but it is working! 😉 Here's the remote controller for the smart fan. I "hid" it behind the blind sort of. It's not pretty either but it has a temperature sensor and all kinds of ways to program the fan for various situations. Also, no drilling or screws unless absolutely necessary - and it isn't necessary for this as I used 3M two sided tape and just ran the sensor wires through the hatch. Now onto the other part of the "all electric" backup heat solutions... Here's the heat cable tie wrapped to the backflow check valves. Tough to see, but the cable is 4' long so runs 2' on each line - with the cable touching each backflow check valve. This is similar to putting a pump or two of antifreeze into each port when winterizing (I hope). You can see the wires leading to the cable running in the "tray" along the black/gray drain pipe on the left (1st pic above). In the next pic, here's the connection I made to the 12V fuse box (annotated by the arrows) and the negative bus bar (yellow lines). I used lucky terminal number 13 on the fuse box and had to share a connection on the negative bus bar (I know, not a good practice, but OTT already had done it once so what does doing it twice hurt?). I'll put a switch in someday (maybe) - for now it's just put the fuse in if you want the heat cable on, take the fuse out if you want it off. Side note: That thing wrapped in the yoga mat is the end of my HVAC line that runs on the street side. If you look closely, you can see 2 red automotive vacuum hoses coming out of the end and going under the dinette floor. This is how I'm getting some heated air to the front street side from the furnace. I'll share this picture below mainly so you can all laugh at the hole I created in my ductwork below the battery box (I used a screwdriver - LOL). Nowhere near as "sexy" as @Minnesota Oli's beautiful drilled hole! Paul, I may have to put in an order for that part so I can upgrade my solution someday! 🙂 The wire for the heat cable is running right underneath the hvac line in the picture. Last but not least, I put some insulation around the cable, pipes and valves before replacing the floor to help keep the heat where it is supposed to be. You can also see my temp/humidity sensorpush tucked beside the line as well as the temperature probe from the smart fan tucked into and up against the check valve itself (for now I want a really accurate reading of the pipe temp). You are all welcome to laugh again - see the hole in the ductwork right above? Yep, my screwdriver got busy there too in order to direct some heat at the valves and plumbing in that area. 🙂 Heat cable test - not super cold out, but it is working for sure. Turned on the heat cable at 4:30 AM this morning.
 6 points
 -
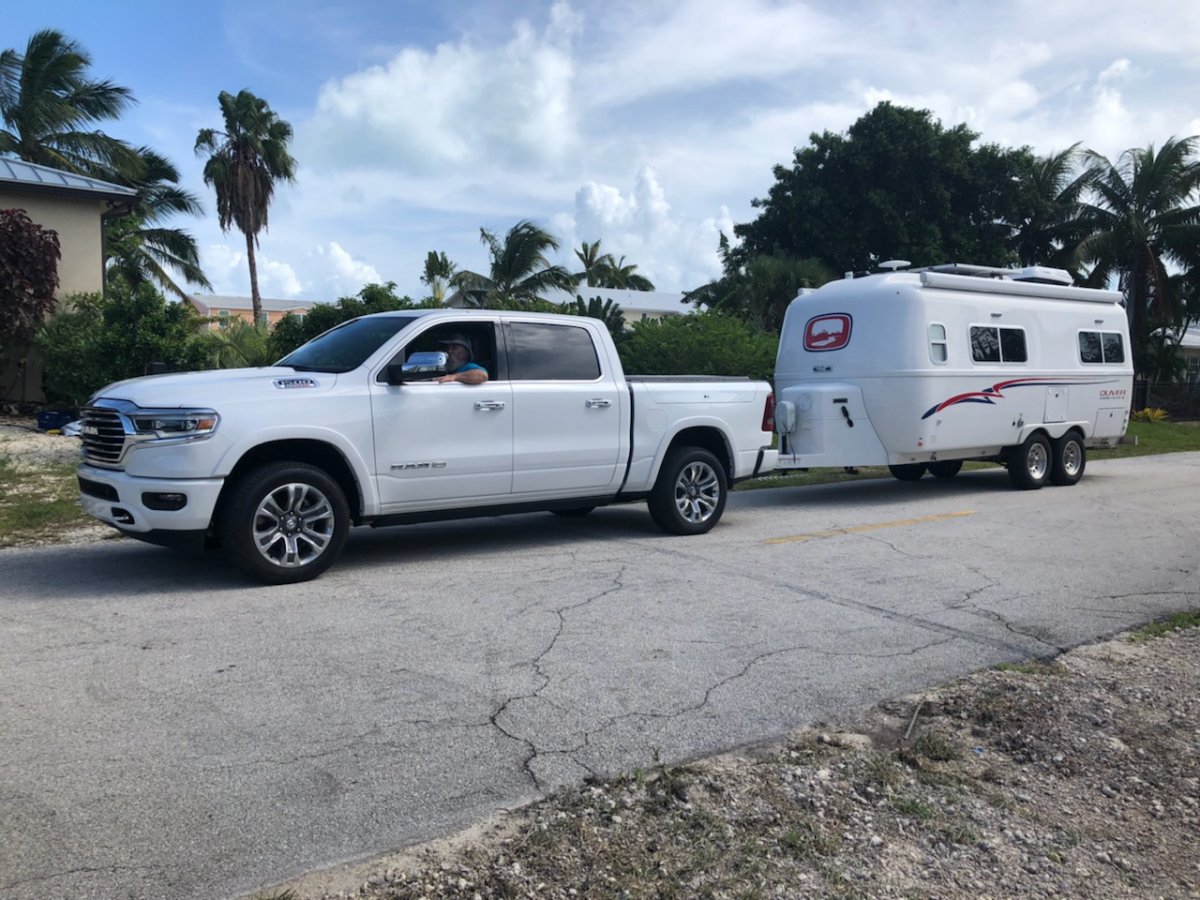
I gotta say we couldn't be happier with our 2020 Ram 1500 Ecodiesel Longhorn with Anderson WDH and air suspension. The WDH is no big deal at all. We don't even notice our 2018 Ollie LEII behind us. And, as others have noted, driving without the trailer around town is a very pleasant ride. We were getting 18 mpg towing on the flat roads of Florida. They seemed to be paired extremely well but we are close to maxing out on payload capacity. When checking in at a State park campground, there was a car that kept circling us taking pictures. Despite being convinced otherwise, my wife assured me that they weren't taking pictures of me 😁.
3 points
-
I don’t know much RV electrical but I’m having to learn. I don’t have much choice living in a very remote location. I added the “FXC Control App” to my phone that can be obtained from the Google Play store or the iOS App Store. This app is specifically for the Xantrex remote to view and monitor and configure the remote. I didn’t know this app existed until I had exhausted all other attempts to find out why my Xantrex was always in a “bypass” mode, never charging the batteries. I thought there has got to be something like a software issue. If one goes to the Xantrex website and looks at the product menu, finds the Xantrex Freedom remote and looks at that page you will see that they mention this application for the Xantrex remote. It might be worth a look and maybe by working with someone at Xantrex they may be of better guidance on using the app. In my case, I was desperate as I needed the lithium batteries charged enough to get the water pump to work so I could winterize before this polar vortex dipping into Texas and it was the weekend. I stuck my neck out and tried the app and out of dumb luck I seemed to have made the right parameter change. I’d recommend calling Xantrex in the future if possible. Sorry for the long diatribe.2 points
-
This page has links to the firmware update and instructions for installation.2 points
-
Hi John A ton of food for thought I really appreciate you taking the time and effort to share with the rest of us. I had to chuckle when you mentioned the nicely drilled hole for flooding hot air it does not compare to your ability to run test, record and chart the results. Thanks again Paul2 points
-
I received the firmware yesterday but won’t be able to install it for a week or so. Like you, I’ve been disconnecting the inverter from the batteries to prevent it from charging them all the time. It’s a real nuisance .. That switch needs to be more accessible.... a project for this summer for sure.2 points
-
It took me a while to figure out what you were referencing. Then I read my signature! I must have been thinking about my "car" which has a 3.0l diesel. If only my X5 had the 6.7l diesel . . . . . . I could outrun anything on the road 🏁 🚔 Thanks for pointing this out; I will make the correction.2 points
-
Someone on Oliver Forum replying to a topic made the statement that the Oliver trailer is really more of mobile tiny home then a camper, and I agree with that. Having your home ready for what ever you may run in to gives peace of mind so a person can really enjoy the time while out having adventures. I really like your ideas of building in redundancies in to the heating systems. Like what I said in my post, my mods are totally reliant on the furnace functioning and that includes not having problems with propane supply and how it has problems with gasifying in subzero temps. I think that when everyone shares there ideas we will be able to come close to having the security of our homes built in to our Oliver.2 points
-
My suggestions: You will certainly want to have a full tank of fresh water and use it rather than hooking up to campground water. It should last you a couple of days. Ask David Crockett SP; the campground faucets might even be turned off. Run the furnace at night,; Oliver can tell you the furnace temp needed to protect internal plumbing. You should winterize the exterior water connections (city water and fresh water tank inlet) by using a hand pump to inject antifreeze as per Oliver winterization instructions. The black flush connection should be fine as it will be dry unless Oliver has used it (check with them). Also ask them how to winterize the external shower. Keep Truma in winter mode (electric freeze protection on). I'm not certain what you do with the Truma while traveling; possibly drain it?? To be on the safe side, I would ask for winterization advice Oliver during your walk-through, based on expected weather conditions. Ask for specifics regarding the different components of the plumbing system and temperature thresholds. Also, if you have the Lithium Pro option, they should advise you regarding battery temperature and protection from freezing temperatures. Oliver called us a day or two prior to delivery to confirm whether we wanted the system winterized; we chose to not winterize. Conditions weren't quite as severe at the time (Dec 7) - no snow; daytime temps above freezing, but it was below freezing at night. We stayed unwinterized all the way home (via I-40 to Oregon). It was above freezing during the days, but a couple of nights in the low 20's in Albuquerque, NM and Flagstaff, AZ. We used only an electric space heater at night, leaving the (optional) basement access door open to warm the inner hull. We placed a remote temp sensors in the area under the curbside bed and in the basement to monitor temps. All stayed above freezing. Hope this helps. Safe travels!2 points
-
Bill - That 13% you cite is very indicative of your front not being raised when dumping. Unless there is a long line at the dump station, I always raise the front during this process. Not only does this help in achieving a "full" dump but it also helps increase the velocity of the liquid during the dump which helps move "things" along. Great to hear that your towing experience is going well. Olivers are certainly easy to tow. Strange that the center cap on the wheel should crack. Do you recall hitting it? A quick call to Service will have a new one on its way in no time. Bill2 points
-
Bill, by design the tanks are very low and long, and the openings are toward the back, so having the tongue raised a few inches helps with getting all the fluid out. John Davies Spokane WA2 points
-
This is a recent issue that several people have been seeing on the Xantrex Inverter. We have already been in contact with Xantrex to determine what is causing this issue as replacing the remote or inverter does not resolve the issue. At this time Xantrex believes it to be a software issue and they are working on a firmware update. I currently do not have any other information as we are waiting on Xantrex to complete the firmware update, test to ensure it does resolve the issue and then communicate to us and other service centers on how they plan to implement this new software update. Anyone that is having this issue, if you haven't already, I would recommend submitting a service ticket so we know who to contact once we have more information. Until the issue is resolved you can still use the inverter by turning it off and on at the main panel. The inverter is located under the driver side bed and the main panel screen looks just like the remote. Simply press the round button to turn the inverter on for powering the 120v systems with battery power. You do not have to turn this on when connected to shore power. You can submit a service ticket at: Service Ticketing System2 points
-
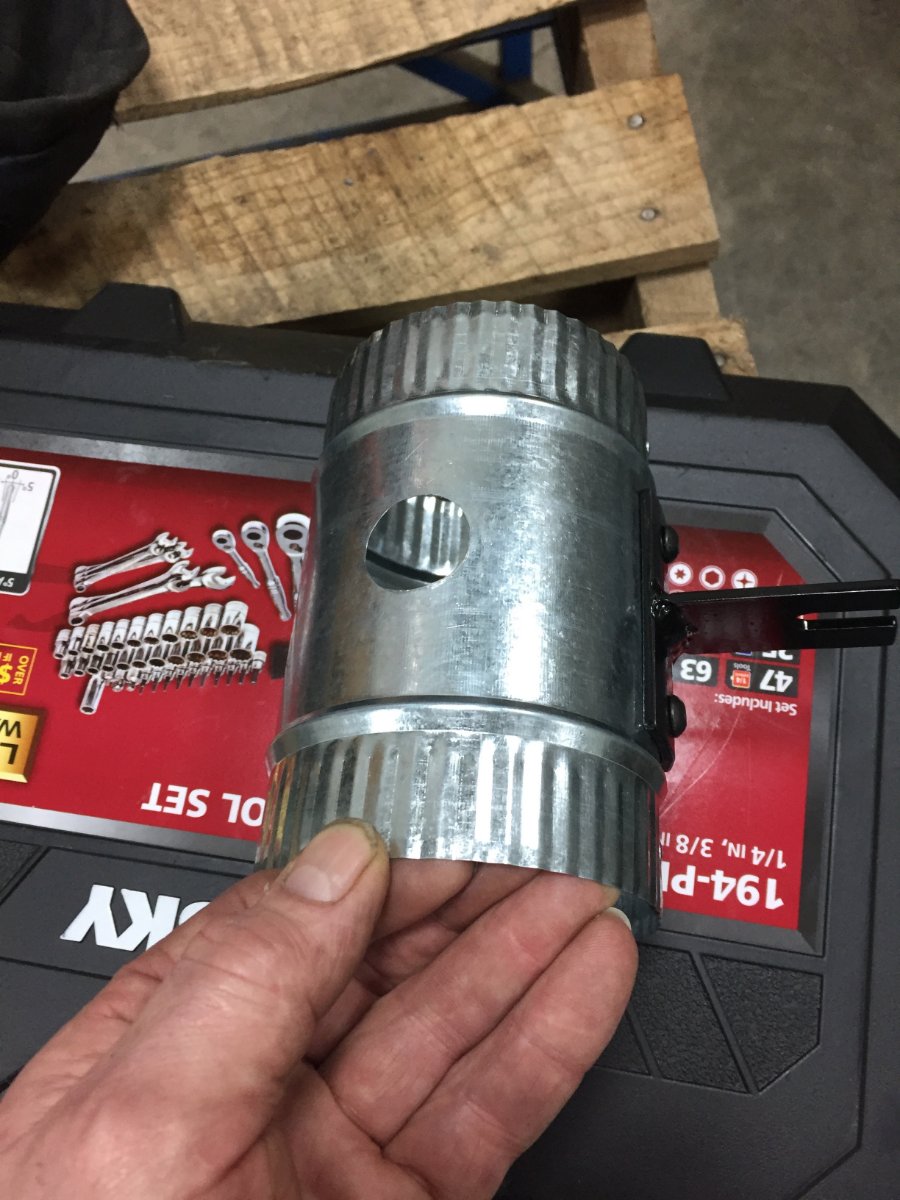
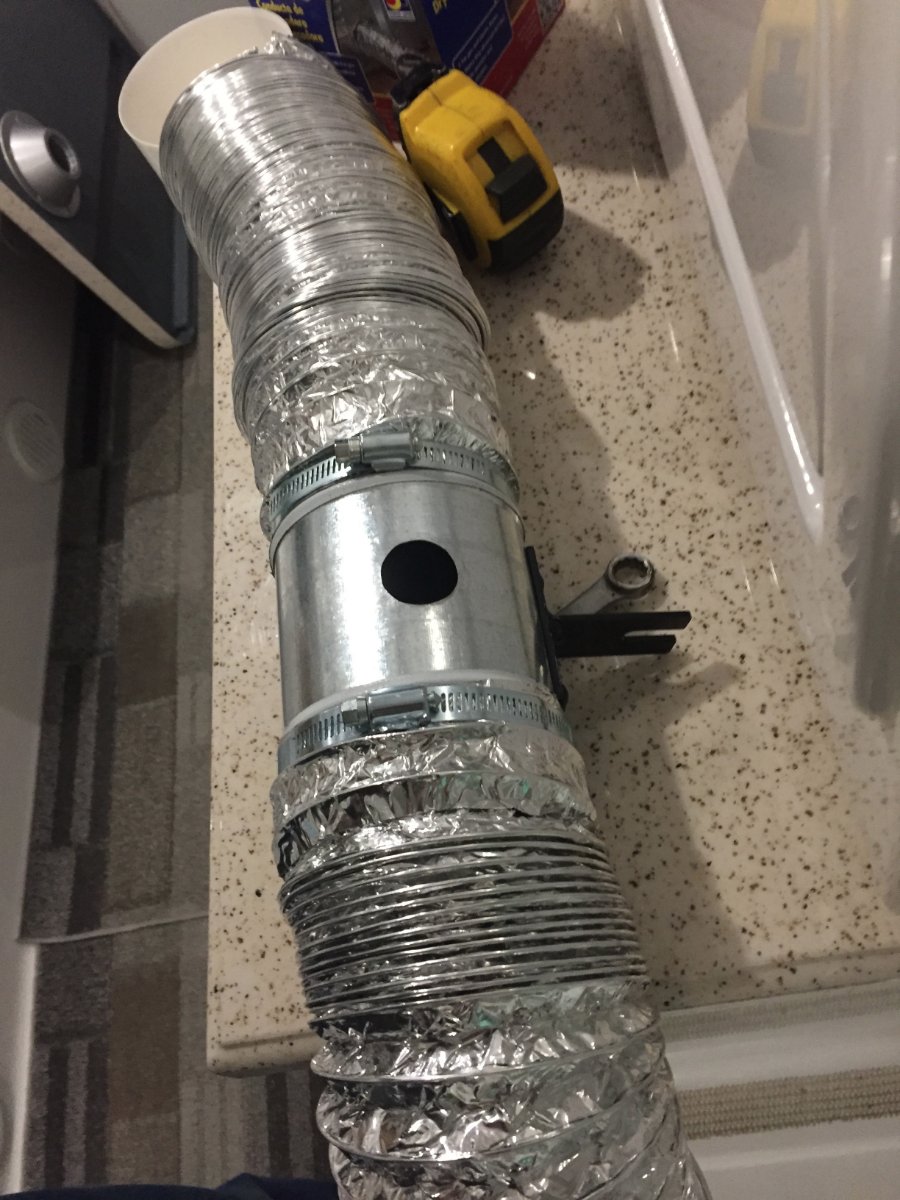
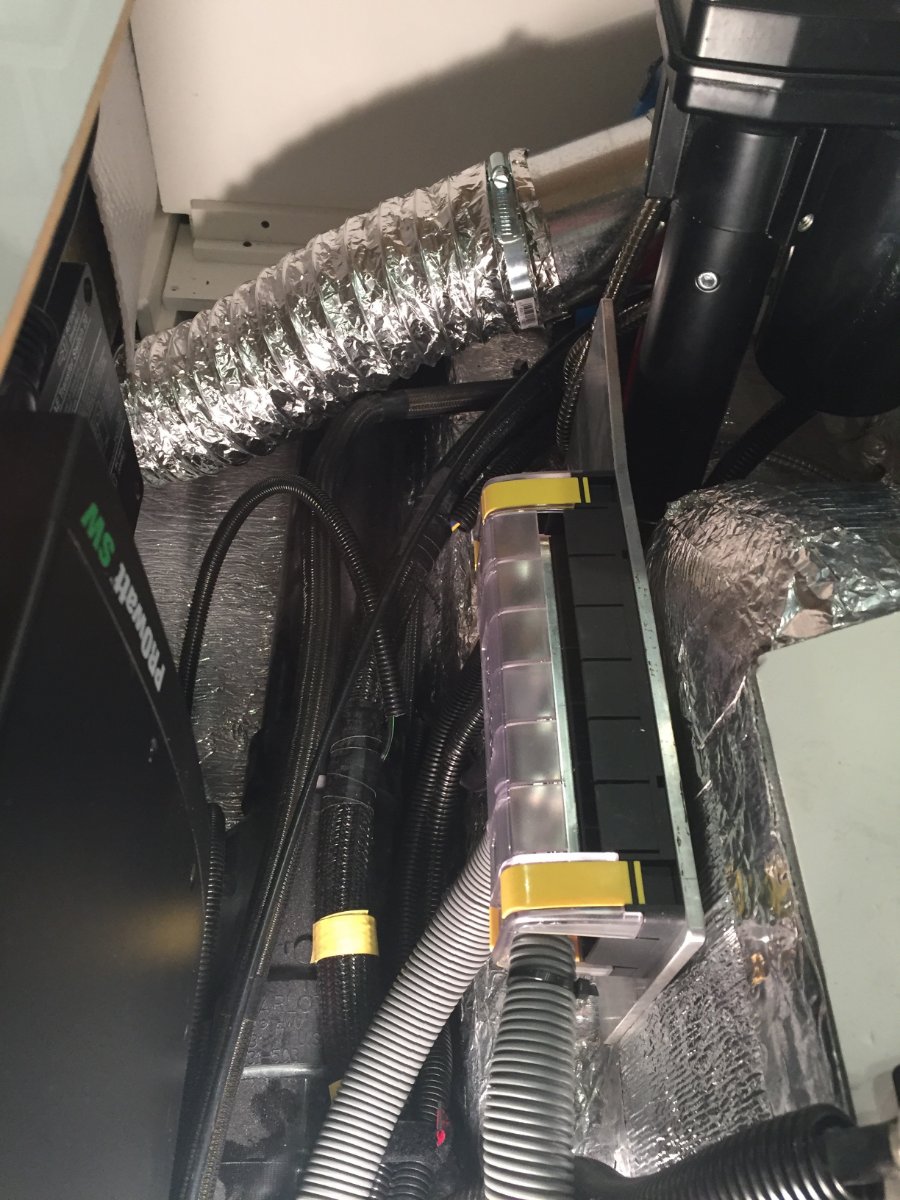
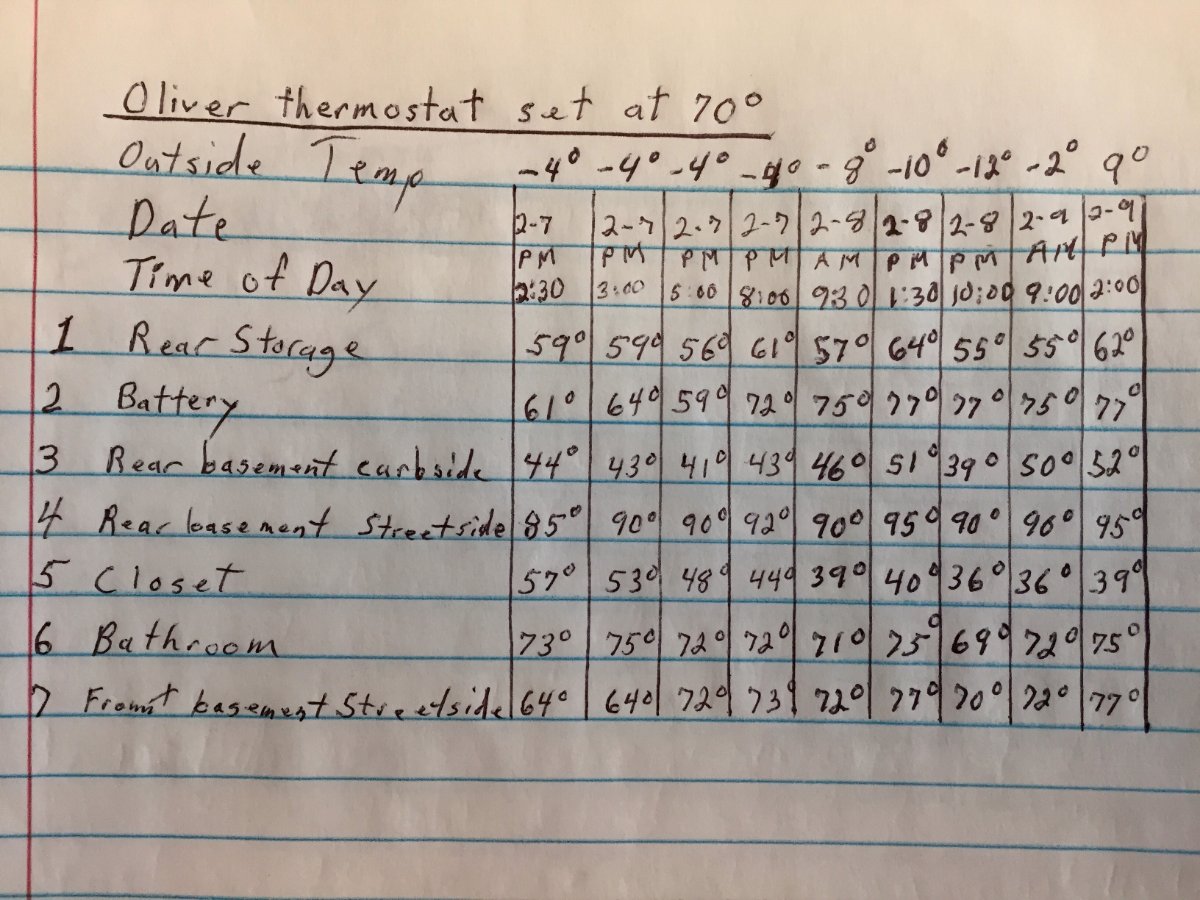
The seed was planted for this furnace mod when we grabbed a canceled reservation three weeks out at a Minnesota State Park. This reservation was mid October and when the date arrived the weather forecast had changed for the worse. We stayed for only two of the three days and we received our first snow of the season, 6 inches of wet snow. We had a non electric site and my batteries were having trouble making it through the night and I was concerned about the water freezing in the Oliver. I have already addressed switching to lithium batteries and posted about it on Oliver Forum. Now I want to share with you what I have done to relieve my worries about water freeze ups in the Oliver, provided that I have a functioning furnace. I first tried to identify the weak spots and came up with the following. Boondocking Inlet Outside Wash Station Fresh Tank Fill Inlet City Water Inlet Black Tank Flush Port Toilet Water Supply Line Hot & Cold Lines Crossing Back Of Oliver The Oliver has all of it's heat ducts run on the curbside which protect the kitchen and the bathroom faucets from freezing. My plan is to run a 2" ducting along the back to the street side and terminating in to the trough that the water lines run in for the city water inlet, fresh tank fill inlet and outside faucet. This trough also has the check valves for those two inlets and has the floor of the exterior storage compartment covering over the top of it. To get at the trough you will have to remove the back wall of the storage compartment and flip the mat back that covers the floor. This exposes the water lines that come across the back of the trailer and drop into that trough. There is a wall that separates the furnace compartment from storage and extends past the wall you just removed. It has a opening for the water lines and it is large enough to run the 2" duct through it and on top of the water lines across the back and into the trough. Now you can flip the mat back down and they are long enough to cover the water lines and the newly installed 2" duct, then the wall is put back in place. On the connection to the furnace I removed the back of the heat exchanger. There is one hard to get at screw on the bottom but the rest are easily accessible. I made two holes, a 2" and a 4" in that back plate. I could not find a 2" starter collar locally so I bought two 4" and removed the rivets on one of them and formed a two inch collar, cut to length and re-rivet. I then installed the 2" and 4" starter collars to the heat exchanger back panel and then the panel to the furnace. I then hooked up the 2" duct to the furnace. Looking in to the access hole under the street side bed you are able to see where the water lines come up and out of the trough and to the valve of the out side wash station. When the furnace fan is running it will blow out a lit Bic Lighter held in that area. So we're protecting water lines, the check valves and dumping warm air underneath the outside wash station valve. Now back at the furnace I attach a 4" heavy duty aluminum foil duct to the newly installed starter collar. It is routed forward a short distance until it can be routed across the basement to the street side and then fed between the hot and cold water lines that go to the outside wash station valve. At this point I need to use a 4" coupler that is 6" long to attach the next 8' piece of 4" duct. I use the 6" long coupler so I can add holes if I need to flood a area with heat, this particular coupler did not need to. I then routed the duct from the wash station valve along the outer wall and over the wheel well, make the corner by the battery compartment and then once getting past the wheel well go down and under battery compartment. Up in that corner I attach a adhesive base 3/4" cable anchor so I can loop a 20" releasable tie strap through it and around the 4" duct holding it up and out of the way. A second 20" tie strap is used were the duct heads down under the battery compartment, it utilizes the loop that anchors the 4/0 cable coming out of the battery compartment. Next I prep another 6" long 4" coupler by adding a metal mounting bracket. It is bolted to the coupler using two 10-24 machine screws that go through the bracket the coupler wall and then a backing plate that has tapped holes. This coupler I will add a1" hole that will be pointed up to flood heat at the battery compartment. The mounting bracket will be utilizing the upper bolt of the support leg for the battery compartment. This keeps the duct up and away from the inverter and electrical components and positions it to flood heat up against the bottom of the battery compartment. The next length of 4" duct is clamped to that coupler and routed up from under the battery compartment over to and along the wheel well. It is held by two 20" tie straps similar to the other side. Because I want to run the heat duct under the foot space of the dinette I need to transition to 2" duct. There is access via the same trough that I utilized in the back of the trailer, but at the front there is more room and I am able to pull the 2" ducting through. From there it continues toward the front until it reaches the black tank flush inlet where it then follows that pipe back along the black tank and terminates by the water supply line for the toilet. At the transition point I add two more short pieces of 2" duct and route them down to where the main black tank drain pipe goes under the dinette foot space, they are terminated on either side of that pipe. There was not enough room to run the 2" duct but enough to force air along either side. At the transition from 4" to the three 2" ducts I simply inserted the three 2" into the end of the 4" and used aluminum foil duct tape to seal the transition. I also want to mention that I used the aluminum foil duct tape to reinforce the ends of every 4" duct by wrapping outside and inside before clamping. That should cover the install, now lets talk about the results of the test in subzero weather. I rounded up seven digital thermometers and put them in the areas I was concerned about. Was placed just inside the empty rear storage compartment. Was placed on top of the batteries and a piece of acoustical insulation that was for large generator enclosure, it was 1-1/2" thick and 19" square. This was squeezed in the opening before the door was closed. Was placed in the rear basement curbside next to boondocking inlet. Was placed in the rear basement street side below the outside wash station valve. Was placed on the floor of the closet with the door left closed. Was placed on the lower shelf in the vanity in the bathroom with the door left closed. Was placed in front basement street side next to the black tank flush port line. I moved it out of the heated shed at 1:00 pm on Sunday 2-7-21. I moved it back in at 3:00 pm on Tuesday 2-9-21. The furnace was cycling off and on at -4 ' but I noticed at -8' and colder it ran continuous. I have the Truma water heater and that was also turned on. I checked propane consumption by putting on two 20 pound tanks that I had weighed and left them in place for 12 hours. It was -12' when I put them on and -2' when I took them off. Because of the subzero temperature the propane was not gasifying very well and the regulator automatically changed from the primary to the reserve after only consuming 2.353 gallons. The total consumed out of both tanks in 12 hours was 3.294 gallons, so that would be .274 gallons in one hour. My Victron BMV-712 was telling me that I had depleted my 400 Ah Battle Born batteries to 47% and at rate of use I had two days and nine hours left. I thought I would comment on a couple of things I like about the outcome of the project. The bathroom was comfy warm and the wall next to the bed was not icy cold. I am not planing to take up subzero camping but it does gives me a benchmark to go off of for any situation that I might run in to. If you have any suggestions or see something that is of concern please let me know. Paul
1 point
-
I ran across a You Tube video with the above subject and gave it a watch. It was interesting to compare buying an Oliver to the "mainstream RV buyer possible concerns about purchasing in 2021. They were listed as very little inventory to choose from, very little discount on the ones available, not getting the exact model or options you want, build quality during covid, and finally when everyone who purchased an RV in 2020 decides it was a poor decision and wants to sell the market for used trailers will tank. One, well as most of us know, there is no inventory to choose from and all Olivers are optioned out just for you. Two, very little discount ha ha how about no discount. The discount went away with the thought of a dealer network. Third, I'm sure covid was a challenge to Oliver as well but I doubt it affected quality. Finnaly, Olivers like many fiberglass trailers hold their values well and unlike the stick and staple units out there there really is value in an Oliver. Enjoy1 point
-
I bought my Hondas from Northern Tool and the new 2200's have the rubber flap covering the outlets and are bluetooth. It is a cool feature that you can see how much the AC draws when it cycles and as you turn things off and on. I purchased both the 2200 and the companion. I know it was over kill but having 2 has already been handy when power outages affected myself and my neighbors. I was able to loan one to him and having 2 kids with families I already see when one might turn up missing and I will have to track it down. Northern Tool shipped right t my house. I just went to their website and Northern tool has them available .1 point
-
You might try THIS Bill1 point
-
If you plan to ever pull a big trailer, or care about resale value, get the 4.3 axles! These SD trucks with their commercial grade engines are built specifically for heavy loads and heavy towing, and the higher ratio you want will greatly reduce the torque at the wheels, by about 20%. That much power loss will be sorely missed when you get high up and face your first 12% grade. These engines lose power at high altitude, your 440 engine ft lbs, at sea level, becomes just 260 ft lbs at 10,000 feet elevation! If you really want better fuel economy buy the turbo diesel. I really like that 7.3 gas engine, but I think getting the 3.55 axles would be a big mistake, that you would regret making every time the towing conditions got extreme. IMHO of course. John Davies Spokane WA1 point
-
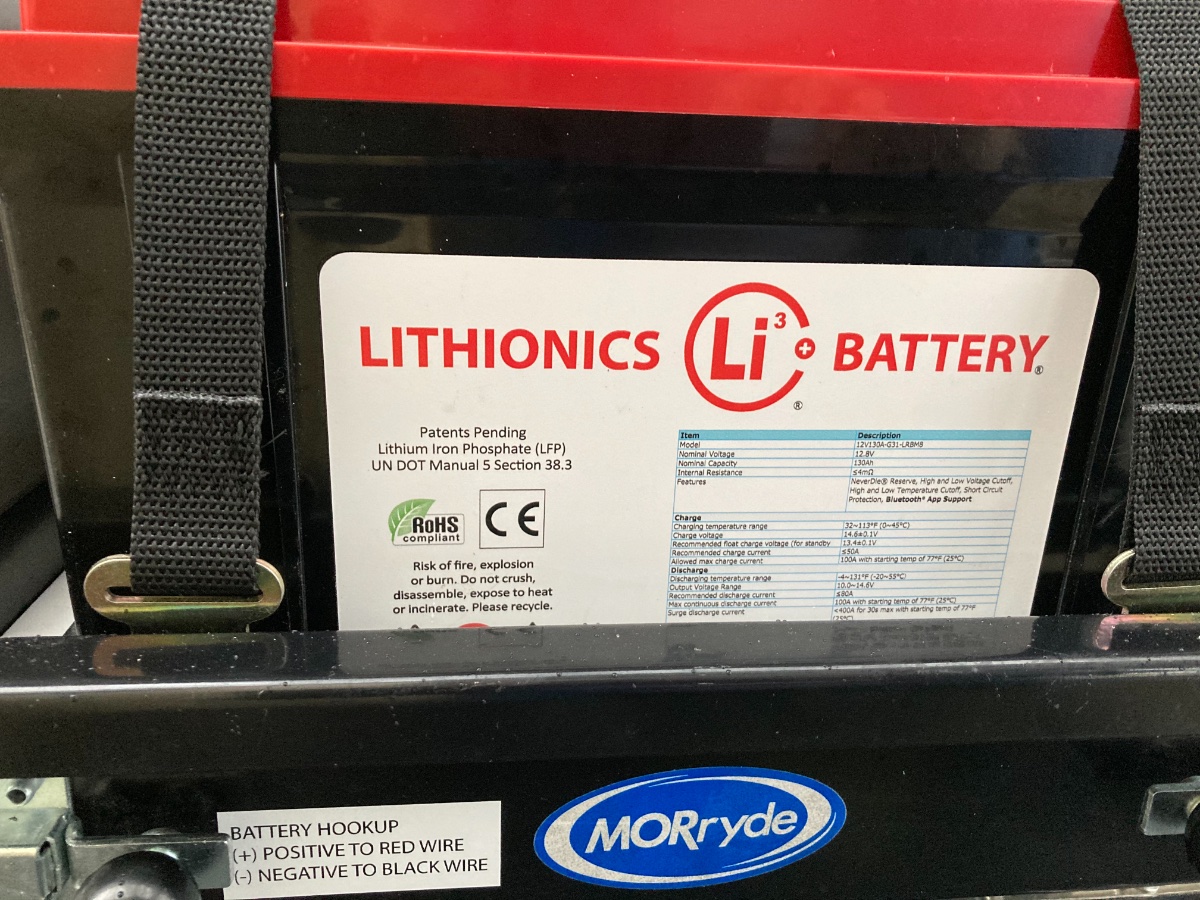
Here’s a picture of the Lithonics battery. Oliver installs three 130 amp hour Lithonics batteries now instead of the two LifeBlue200s.
1 point
-
Congrats Fred! We are just a couple of months ahead of you - having opted for the "old" (2020) vs. "new" (2021) option. We too are shifting from spinning sea to land yarns and look forward to sharing with you in the future! (Assuming we ever thaw out LOL!) Jim and Frances1 point
-
No problem at all. I ordered 4 units (feet) of the cable, which is item No. K650016 and 1 termination kit, which is item No. K651001. I used some heat shrink tubing that I had as well to do an even better job on the cable termination and wiring ends. I also used a 3 amp fuse and 14 gauge red wire for positive and yellow wire for the negative connections. Oh, and some corrugated, split wire loom tubing to protect the wires (same stuff OTT uses everywhere on the wiring). Oh, and the cable turned out beautiful. I carried it around and showed it to my wife and my son and the pets I was so proud. I just forgot to take a picture of it before I wrapped it around the check valves and tie wrapped it in. 😀1 point
-
Hi Jairon, Yes, at least on our Oliver (picked up 11/20), the water line is connected and open (filled with pressurized water) to the inlet valve for a standard toilet. There is also a hole under the composting toilet directly over the black tank for a standard toilet, although the black tank has no hole on top of it. I'm glad it's this way though in case we ever decide to go with a standard toilet - or if there are ever next owners that want the standard toilet. I have a post somewhere in the forum that shows pictures of the access hatch I put in the bathroom vanity as well as some shower upgrades. One of the pictures shows the line going to the toilet valve and where I have installed a cutoff valve. I blew the water out of the line to the toilet valve while I had it cut, then I put in the cutoff valve and shut it. Again, it's still there for future use if needed. Let me know if you can't find the post / pics - it's easy once you hack your way into the vanity. 🙂 As for the heated cable, I worked with a company in Minnesota, https://www.oemheaters.com/. I called and talked directly with one of their engineers about the problem I was trying to solve and they recommended a solution. I bought all the parts and built the cable, then wired it in through an open terminal on the Ollie's DC fuse box. Pretty easy and pretty fun. I'm going to collect some temp data tonight and create a post on it hopefully tomorrow. Then everyone can start improving on it from there! 🙂1 point
-
Beautiful work Paul! Thanks for sharing. I did the exact same mod using different materials and have been getting similar results across the entire basement. I just haven't had any really cold nights here in NC this winter to see how it would "scale" in super cold temps. I plan to try and use my Oliver to ski, so I've been trying to winterize it for the "5th season" you are testing in now. I have also added an all electric solution as a backup to the furnace / propane mod. First, I added a smart fan under the dinette seat near the bathroom to pull air from the vent in the back across the basement nooks and crannies, and second I have extra protection for the two backflow check valves on the city and fresh water inlets with 4' of 12V self regulating heat cable. It takes 5 watts per foot and does a fantastic job keeping those check valves toasty on very little power (1.5 amps or so). I thought about putting another one on the winterization/boondocking port as that is a super cold area as well, but there are no check valves there that I can see, so I didn't protect it - I hope the water just drains out before putting the cap back on. 😬 Might just be luck that I haven't had it freeze. Maybe I should add another heat cable there? I also have the composting toilet (no black tank use) and have drained the water in the toilet water line, so I don't need extra heat in those areas.1 point
-
I have stumbled upon something while doing my humidity and temperature testing that should be of interest to those with the xantrex 3000 getting the occasionally persistent [20] error. First, my Xantrex remote had been working for well over a week. On the 14th, I purposely discharged my battery down to 60% and then back up to 80%. When I got to 80% I tripped the cutoff switch between the Xantrex and the batteries to stop the charging. That immediately caused the [20] error. I left it with the [20] error because I didn't know how to make it go away and it hasn't seemed to cause any problems. Well, I noticed this "sawtooth pattern" after looking at the data - I've isolated the street side basement (data visualization works again!!!) and you can see the sawtooth after the charging event: That sawtooth indicates the inverter fan is turning on and off (every 5-7 minutes in fact if I look at the detailed data points). I unplugged the remote at the inverter and the inverter continued to cycle the fan on and off even without the remote. I cut power to the inverter and turned it back on without the remote and the inverter went back to "normal" - working fine without cycling the fan. I then plugged the remote back in and it was working fine again too. Yesterday I repeated this sequence and got the exact same results. The [20] error came on after cutting off the battery from the inverter, the fan began to cycle every 5-7 minutes again, and I was able to correct and fix things by going through the exact same steps. My concern is the fan cycling - that can't be "good" for the inverter and could cause premature wear on the components. I've left my remote disconnected for now so that this can't happen again until we have a fix or an explanation. Who knows what else may be going on with the inverter we may not see. I'll update my OTT service ticket and call Xantrex today with this new information. I'll report back later on any new information.
1 point
-
As I don't know what Oliver provides any more - The basics - You will most likely be on a 15 amp circuit - perhaps 20 - that is shared with other needs of the dwelling - and I believe Oliver supplies the 30 am to less - adapter. Water- they give you a hose - long enough? - site dependent. Any hose will do in a pinch - but the non smelly ones are preferred. Wheel chocks - I love my Andersons - work in most places - but again - site dependent. It is always nice to have a few extra wooden spacer blocks for the jacks. Have fun - it will come to you - grasshopper!😃 RB1 point
-
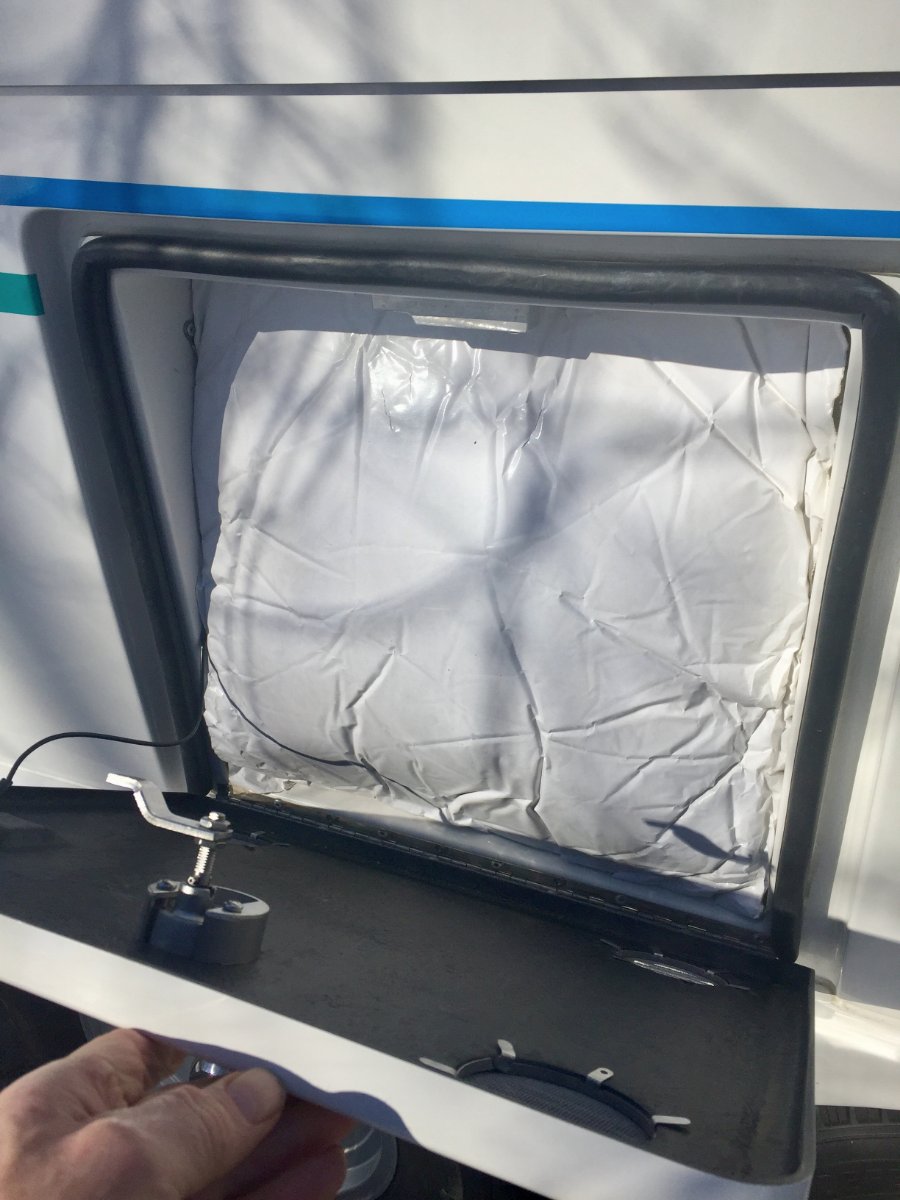
Neat! do you have a link for the flexible insulation material you used in the outside access doors? You might want to think about sealing off the big screened vent holes in your battery door. Wouldn’t it be NICE if Oliver would build these trailers with molded in place fiberglass air ducts going through all those locations? Thanks, John Davies Spokane WA1 point
-
That was our site, too. Dec 7-8. It was in the upper 20's at night, but we did not winterize. We were practically the only campers in the park, though another Oliver did pull in one night while we were there. We explored a bit; saw a lot of wildlife and a nice sunset just across the road from the campground entrance. Enjoy your stay; hope the weather is not too cold.1 point
-
The cracked cap might be due to an irregularity on the hub or inside the wheel opening. It just sort of floats around there, in a recess. I took all mine off and put them away in a spares box on my garage shelf, to give to the next owner.. I prefer to be able to see and touch the axle caps, in case one falls off, or leaks, or the hub is getting hot. You can’t detect any of those problems with it completely hidden by a purely cosmetic chrome doodad. I recall that one owner removed his wheel, only to find that the steel grease cap had been rattling and spinning around inside the cap. It makes for a mess, like metal shavings, especially since a lot of the grease will also escape from the bearings. I am sure it also sounds pretty strange to an onlooker as you drive by. “Bonkety bonk dink bump”. At some point the steel cap could wear a groove completely through the chrome one, and then you will have to replace it and the metal contaminated bearings and races. John Davies Spokane WA1 point
-
Made it back home yesterday in time for the game. Still learning how to tow it, but getting better. Really enjoying this little trailer. Only 2 "issues" with the Ollie so far: (1) rear back-up camera became loose during a storm. (2) center cap from one of my wheels cracked. Both are/were easy and cheap fixes. ANOTHER QUESTION: How do you know when your fresh and gray tanks are completely empty? I though I had completely emptied both tanks prior to towing, but I did notice my truck jerking/lurching a bit when towing. When I got to my destination, I noticed the fresh and gray each were 13% full. I tried the fresh water drain, but didn't see any water pouring out of the bottom of the trailer when I opened it up. Perhaps I just need to really crank up the front jack when I am emptying my tanks? Other ideas? Thx for your tips and advice. Bill1 point
-
I need to measure the tray - seems the 12V 400AH 5DM Module | Lithionics Battery will come close to fitting the space. Two 400 - hmm the future looks interesting. These folks have a lot of good product data and systems info. Thank you for the heads up.1 point
-
Thanks for the information about the Lithionics batteries. I poked around on the Lithionics website and they make an impressive product. Once again, OTT has done their homework and have picked industry leading technology for their trailers. Carl1 point
-
I think that Oliver is now using two Lithionics 130 amp-hour lithium ion batteries in the LE1, for a total of 260 AH (in the LE2, three 130 AH batteries for 390 AH total) as part of the lithium package. The lithionics batteries have a charging range of 32°F to 113°F, and a discharge temperature range of -4°F to 113°F. Acceptable temperature ranges for long-term storage are a bit more constrained (https://lithionicsbattery.com/wp-content/uploads/2019/02/Lithionics-Battery-Storage-Procedure.pdf). The batteries can handle a wider range of temperature when in use (e.g., when traveling) than in long-term storage. My understanding (from what I've read; we do not have our trailer yet) is that you can draw from the batteries below freezing, but charging them requires heating below 32°F. If charging with solar, then all solar gain goes first to the 12V heating system and any excess goes to charging the battery.1 point
-
@SeaDawgis really a great resource for us "shorties". I have found his advice to be very valuable. I contacted OTT and they told me that I can order the Lithium package upgrade for my Ollie even though it is a 2021 which I plan on doing. My only concern about lithium is the cold weather. We love to ski and here in the Pacific Northwest most ski resorts have a dedicated portion of their parking lot for RVs. I have two adult children who bring their trailers up to the resorts. It is really nice to have our "home" right there in the parking lots. However, I have heard that lithium doesn't do well below freezing. OTT indicated their lithium package does include heating pads for the batteries. That should help. Enjoy your every day! Carl1 point
-
@Carl Hansen - I got the solar pro package. I still do not fully understand how well 230 W of solar power will charge two 6V AGM batteries, or how long the batteries will keep me powered. (Heck, I do not understand what my power needs are yet.) But I wanted the coach to be set up for solar and now I have an external Zamp plug (directly into the batteries) and, perhaps later, I can upgrade to lithium, if needed. Also - @SeaDawg strongly recommended that I install solar. If I have learned one thing on this forum, it is to listen to @SeaDawg. I will need a lot more time without shore power to check the efficiency of this solar and battery system. Much to learn.1 point
-
Bill, Thanks for the detailed report! I can see there is a number of systems to check. You seem very thorough. What battery package did you get with your trailer? That’s a great idea to check the lug nuts. I will add that to my checklist as well. Thanks again for sharing! Carl1 point
-
Thank You for the Pic & post. i will add it to our reservation short list when we head south this spring.1 point
-
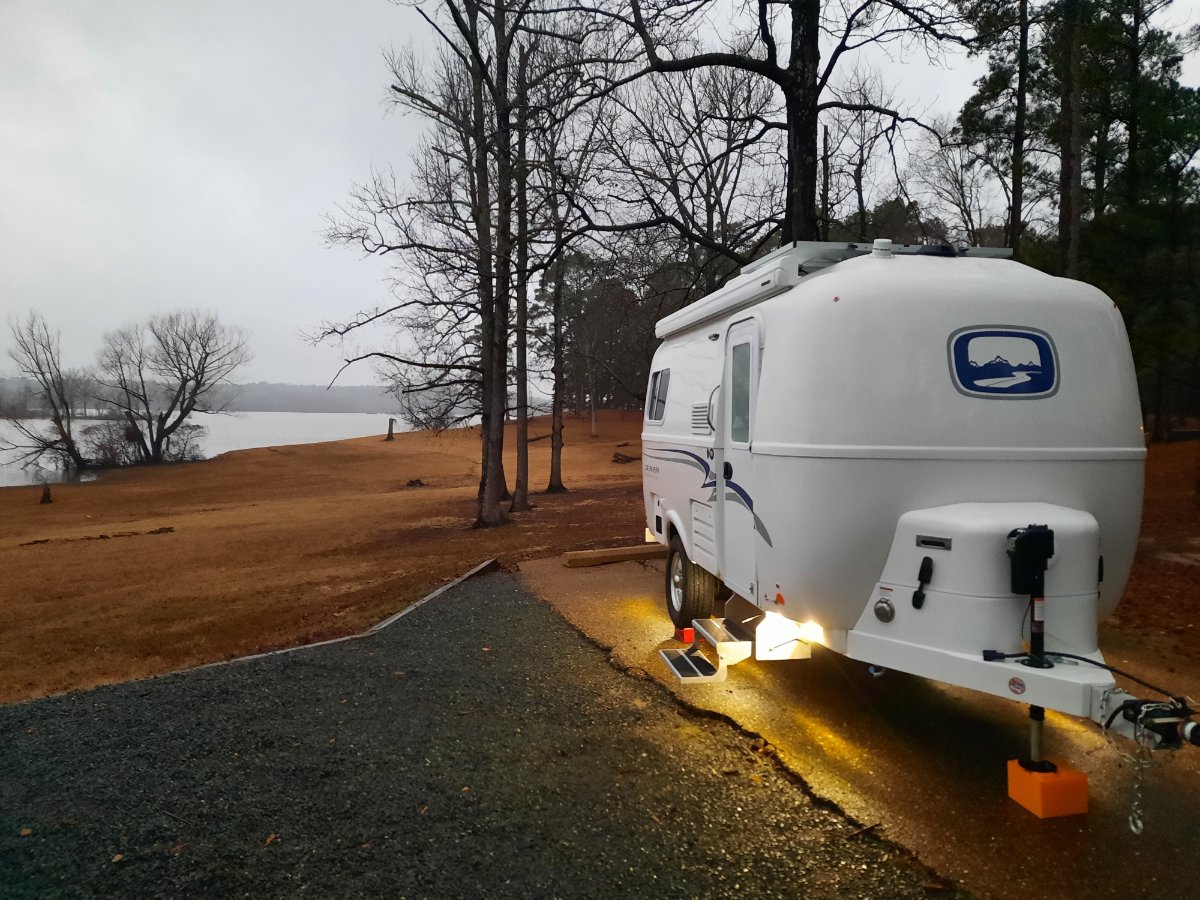
Making my way back to Central TX after 2 nights at David Crockett. I am currently camped at the Clear Springs campground on Wright Patman lake near Texarkana. Thanks @Mike and Carol for the recommendation. All is good in Ollie-land.
1 point
-
Congratulations on your new "Shorty". For those of us that have a long time still to wait for our delivery date (mine is 10/21/21) please feel free to share what you learn and experience. We can live and learn through your experiences and successes and will better prepare us for our delivery. We anticipate taking 2-3 days in the area before we jump into a long trip back to the Portland, Oregon area. What you experience in those initial days will be valuable information for the rest of us, the good, the bad, and the wonderful! Again, congratulations and many happy trails ahead for you! Carl1 point
-
Bill I am feeling special today, as I got the vin for the Elite I, same as yours, that will be picked up in 6 weeks. I will be looking forward to hearing from you about what you have learned the first few days about what may have not been told, or changes you made from recommendations for delivery team, such as reducing the tire pressue. Vehicle registration paperwork is on the way. Enjoy the ride. John1 point
-
That is the exact same site that was assigned to us for our first couple of nights after initial pickup. We called and extended our stay another night just in case we needed to follow-up with Oliver on any issues that might arise. Excellent spot and easy access to bathrooms. Enjoy the stay.1 point
-
We’re assigned site 60 for our pick up. Looks like a nice area. I’m looking forward to exploring the park. Cindy1 point
-
Congratulations! We are also from Texas and will be picking up our Ollie II on 2/15. There have been a lot of posts from fellow Texans in the past few months who have either just picked up or just placed orders. We camp a lot in the Texas State Parks and Corp of Engineers Parks and hope to meet other Oliver owners in the future. Looking forward to more posts about how pick up and your stay at DCSP goes. Cindy1 point
-
Congrats from a fellow Texan! I am in DFW and pickup in May. I lived in Austin years ago when I went to UT. I visit when I can as it is a great place . Good luck !1 point
-
Congrats on your OE1 “shorty” and enjoy your time at David Crockett CG!! This is a perfect time to run ALL your systems and really get a good shake down in before your leave the vicinity of the mothership. Torquing wheel lugs, checking tire pressures and going through your safety check list before your long journey home. May your adventures be filled with miles of smiles!1 point
-
Congratulations, Bill. I hope you enjoy your shorty as much as we have enjoyed ours for 13 seasons. Looks like better weather for unloading the truck and setting up today. At least some sunshine 🌞 I hope you'll get time to run through all the equipment during your stay. Tennessee is a beautiful place to camp, but February weather is iffy. You'll definitely get the chance to see how nice and toasty it is in the trailer in the 20s at night. 🙃 We'll look forward to photos, later.1 point
-
Bill - Amazing - isn't it? Just how can the "simple act" of picking up a camper take the entire day? Before I got my Oliver, the other campers I bought maybe took 2 hours (tops) to get delivered. Glad to hear that all went well and that you are now setting about the chore of actually moving in. At least you are warm and dry and (hopefully) rested. Let us know if we can help! Bill1 point
-
Bill, Welcome to the family of Ollie E1 owners. It just seems like yesterday we picked up our Elite I Hull #664 on September 14. We also live in Texas and have really enjoyed exploring the State Parks over the past few months. Wishing you safe travels to wherever your journey takes you. Mark1 point
-
Pick up day was long... I am currently camped at Davey Crockett Park. Yesterday I drove from Austin and stayed in a VRBO near Henderson. Drove to Hohenwald this morning and took a factory tour this morning. Lunch in Hohenwald at Southern Skillet, and then back to the Sales and Service office for payment, and walk-through. Walk-through took a little more than 3 hours. I left the Oliver Sales and Service facility at 4:30. I made a quick stop at the local auto parts store and I drove a portion of the Natchez Trace to the Davey Crocket park. Beautiful drive. Arrived at the park after dark, and in the rain. I have a truck full of stuff for the trailer, but I have all day tomorrow to get settled in. For now, I have electricity. I am warm and dry. And thankful.1 point
-
Also, nighttime humidity can be more of a problem for some people. I used to occasionally wake up in the morning with the sheets that were against the hull being wet since I had slept with my back leaning against the wall. That stopped when we switched from a mattress to cushions, since I just leave the back cushions in place when I sleep. My wife never had the same problem. We sleep with a window cracked, so we never see any build up of humidity in the cabin at night.1 point
-
Thanks to the double hull, condensation isn't so much the issue as it can be with other fiberglass trailers. And of course, there's no carpet covered walls to hold that moisture and create a potential for mildew. Still, you'll often see some condensation on the walls after taking a shower or around the cooktop when cooking. Like Bill said though, there's not a lot of volume in the trailer so a cracked window and maybe turning the max fan on low will clear it up quickly. We'll do that as routine when cooking. If you install a shower curtain in the bath, it will act as a privacy curtain so that you can also open that window when showering, or just after. The vent fan in the bath is pretty powerful, so it will clear out much if not all of the humidity while you're toweling off, so that it doesn't go into the main cabin when you open the door.1 point
.jpg.c1976ffa4a6e13256e0a8835b0d31861.jpg)


.jpg.b4fb182c2dd38b005d42f99a3317e409.jpg)


-
Recent Achievements
-


")


")


