Leaderboard


Popular Content
Showing content with the highest reputation on 09/26/2022 in all areas
-
I want to thank all of you for your suggestions. Since the other gas appliances were all working, you were right that it had to be some problem with the gas feed for the stove alone. Since both burners were not working, the main supply to the stove must have had an air blockage for some reason. No, I would not stick anything into the brass orifices that could damage them. I was about to take the top of the stove off by removing the two screws that hold it in, but I had a brainstorm. That was, why not try my portable car vac (armorall)? I plugged it into the ceiling circular orifice that is similar to the old cigarette lighters cars used to have back in the "good old days". Flipped over the builtin crevice tool on the vac, and vacuumed around each burner, figuring I might either dislodge something, or even create suction on the jets. Voila! Both burners light...without disassembling the stove top! Once again, this camper is happy, and can now eat inside our land yacht! Again...A big thankyou goes out to all of you. Charlie Citrus Breeze3 points
-
We are on Vancouver Island now, Miracle Beach to be exact. I've spent hours playing in tide pools at low tide. Heading to Pacific Rim NP (Tofino area) tomorrow for a few days then to Victoria. The Cassiar was beautiful. Aspens in their glory the top half. Boya was wonderful & quiet. There is an artesian well near the dump station & you're asked to limit your fill to 20 gallons. And, as always, the Gray Jay's (who thought the button on my cap was edible) were entertaining.
 3 points
 -
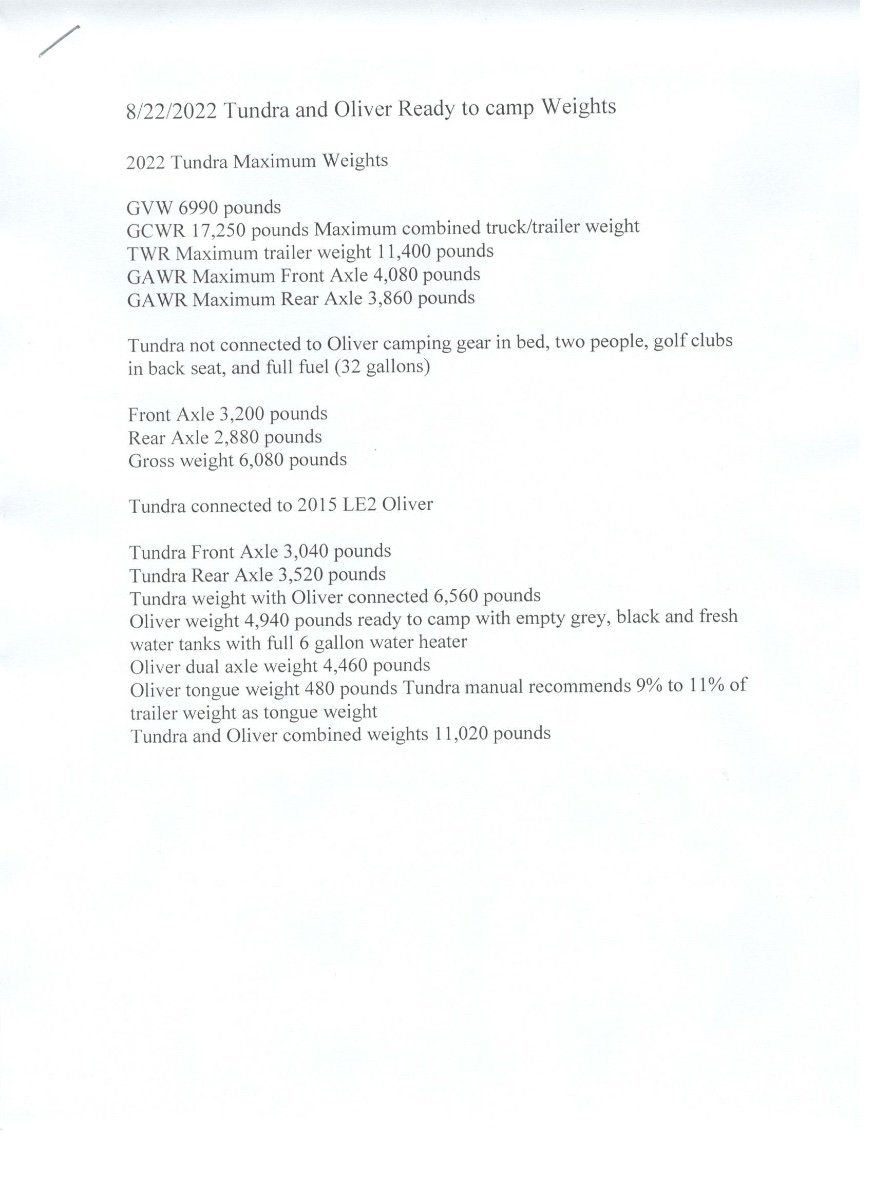
It's surprising that the Land Cruiser's capacity is so close to the Tundra's. My tire and loading sticker lists combined weight of cargo and passengers as 1320 pounds. That's closer to 1460, though, as I've removed the 40# roof basket and the 100# (by other owner's weight posting) 60% second row seating. The Heritage Edition already has the third row seats and running boards removed compared to the Base model. I'm not sure how the loading is calculated, though. Curb weight on the Heritage is listed at 5715 and GVWR at 7385, for a potential 1670 pound load capacity instead of the 1320 on the sticker. Since there are no options available, every truck should weigh right at curb weight. Color me confused... Deb and I consume about 350#, and Elite II tongue weight is listed at 490# before options. Figure tongue weight closer to 690# (12.5% of 5500 pound trailer), that leaves me about 420# of margin, less any other stuff I carry. So I'll need to take extra care to keep the trailer closer to 5000#.2 points
-
I am glad this solved your problem. For anyone else considering using a vacuum in the future remember that they are not designed to vacuum Gas and I would be very careful of anything that may have a motor that can ignite them..... Safety First. Happy Trails. Dan2 points
-
We need to know specifics about your trailer ie model, year, hull #, etc. These should be added to your signature in your profile so they show up in each of your posts. Does your trailer have the onboard EMS?2 points
-
There were some trailers built that did have a valve in the black water line. It was accessed from under the forward dinette seat.2 points
-
If you have Xantrex and you can pair it to the phone app via Bluetooth and change how much it can draw from the grid. You can also change the max current for charging.
2 points
-
Personally I would not consider any SUV or 1/2 ton pick up a “great towing vehicle” after towing with a one ton diesel F 350. We started out towing our Oliver LE2 with an 2014 Tundra with an WDH hitch. It towed ok, but really worked hard in the mountain passes. We soon sold and moved to a much safer and capable TV. We took a hard pass on the 2022 Toyota Tundra for our needs as we felt it was a marginal TV with regard to 1400# cargo capacity, braking, and power after crunching the numbers. 1400 lbs or 1500 lbs of pay load is splitting hairs with regard to being well with in safe legal cargo limits with what we carry. I don’t want to think about how much cargo capacity I am crunching numbers on..ever. Even if you weekend camp with an empty Oliver you may still be really pushing the limits of your cargo capacity when it comes to insurance consequences IF something goes wrong. We presently tow with a one ton diesel and enjoy the mpgs, power, diesel engine brake and especially the total comfort level. Don’t let the tail wag the dog. 😊 Patriot 🇺🇸2 points
-
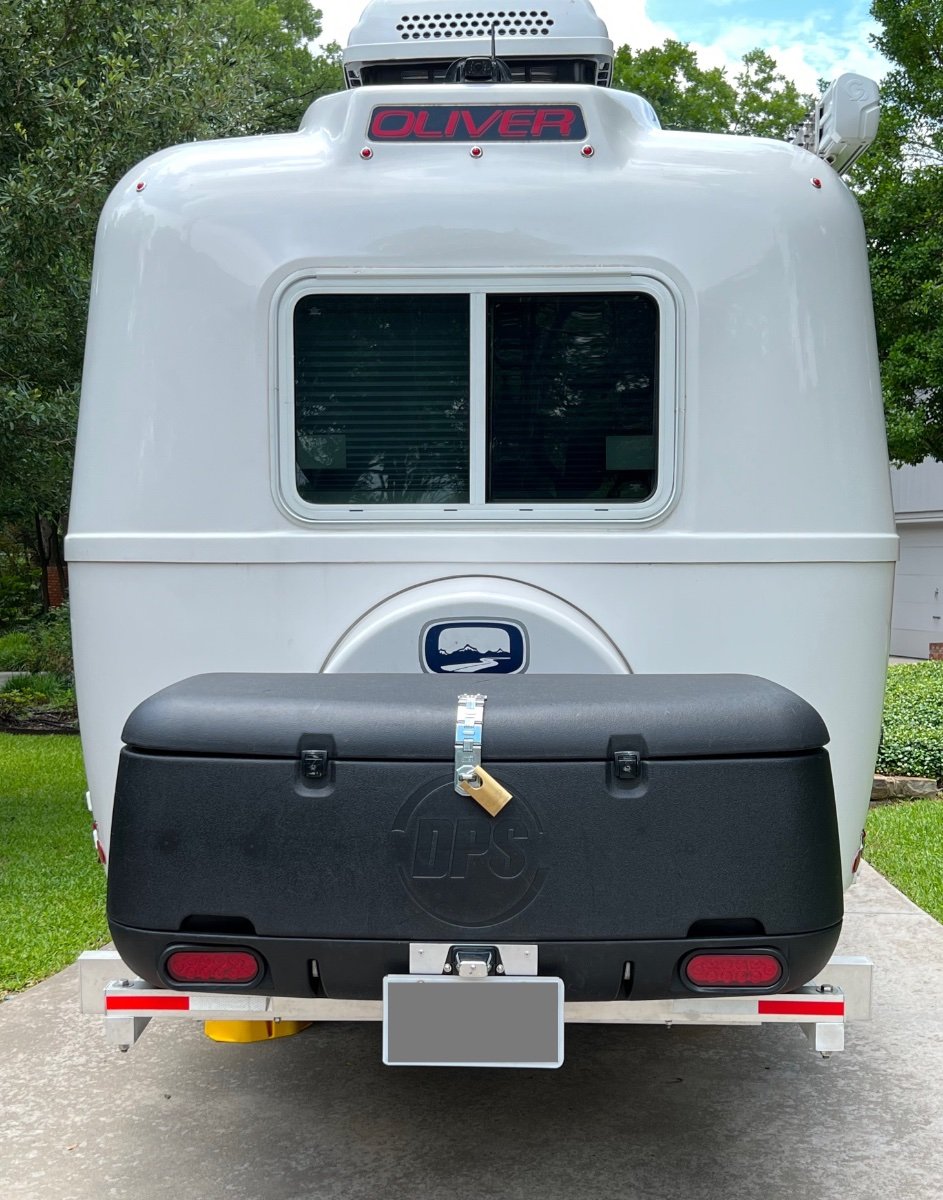
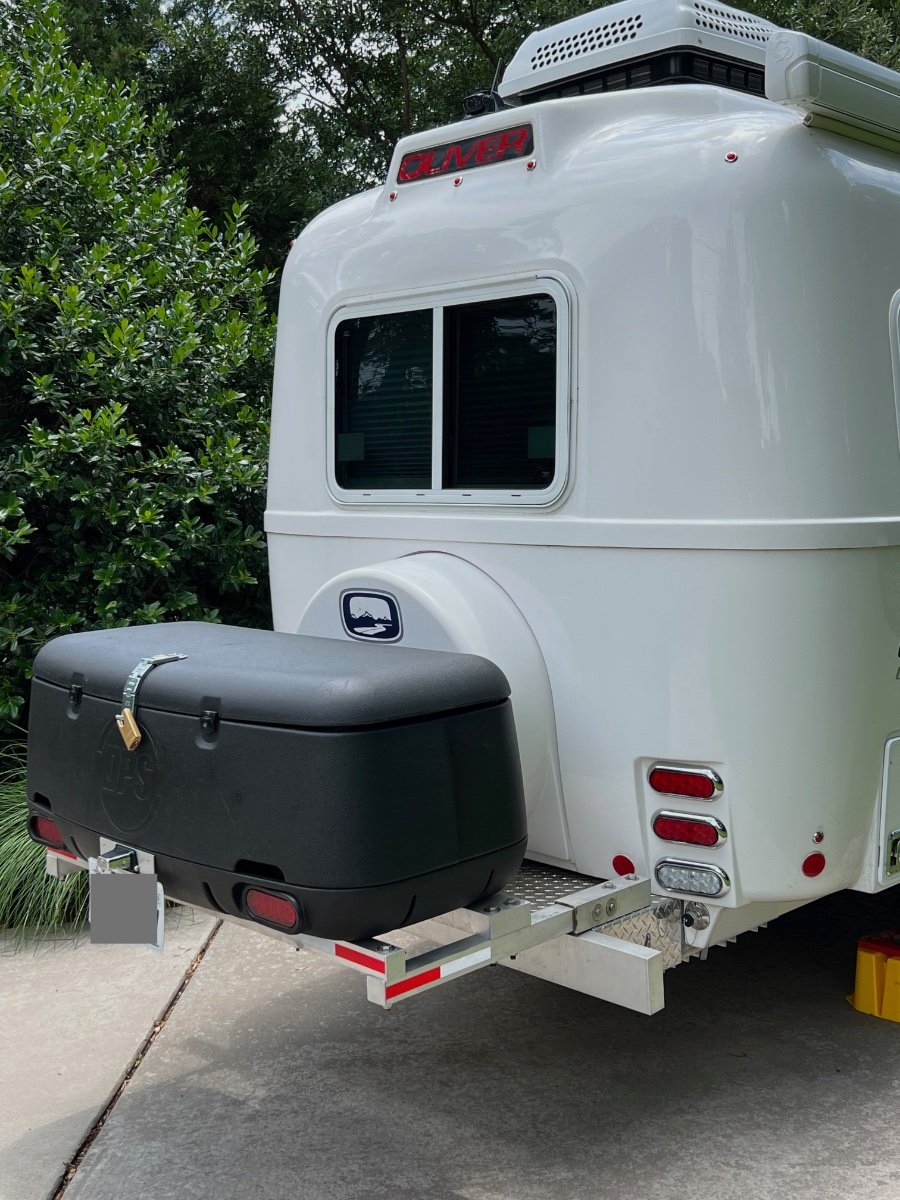
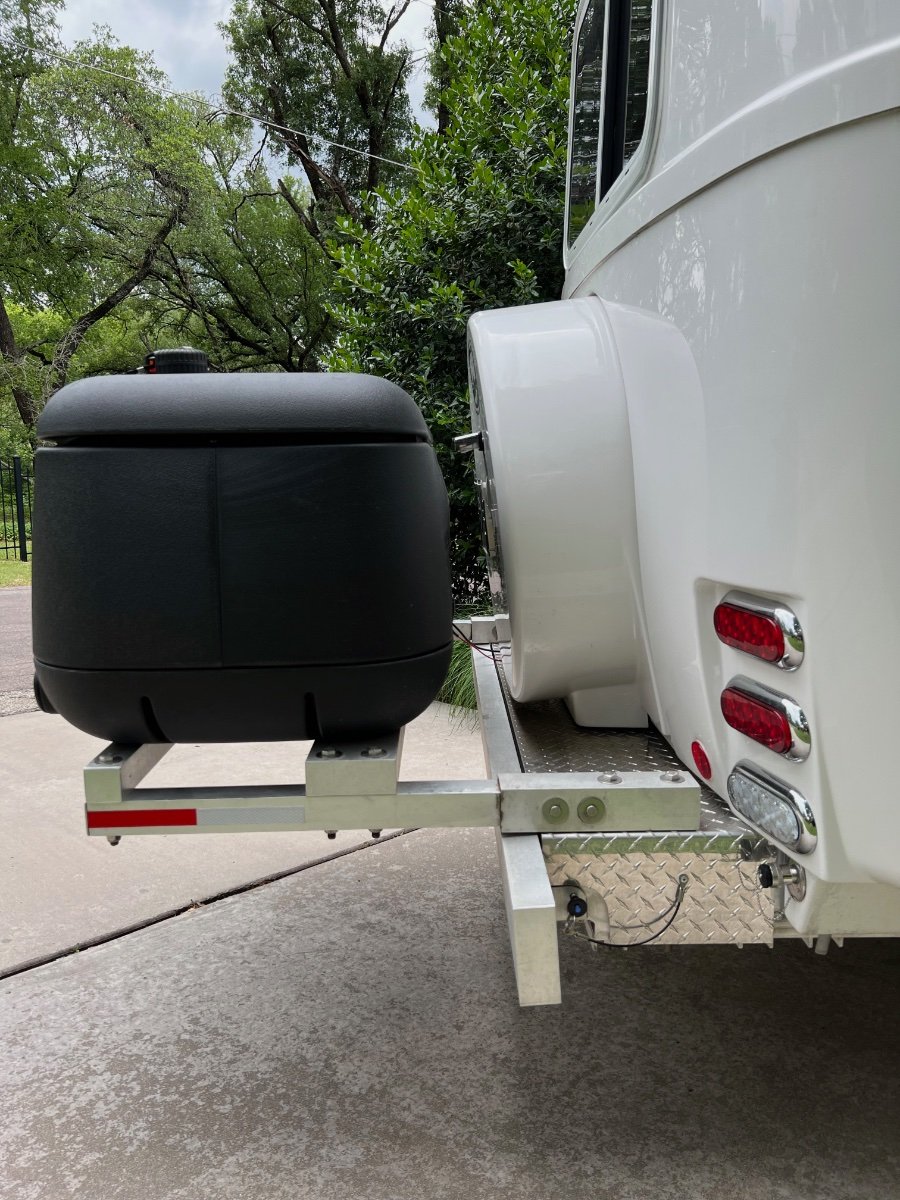
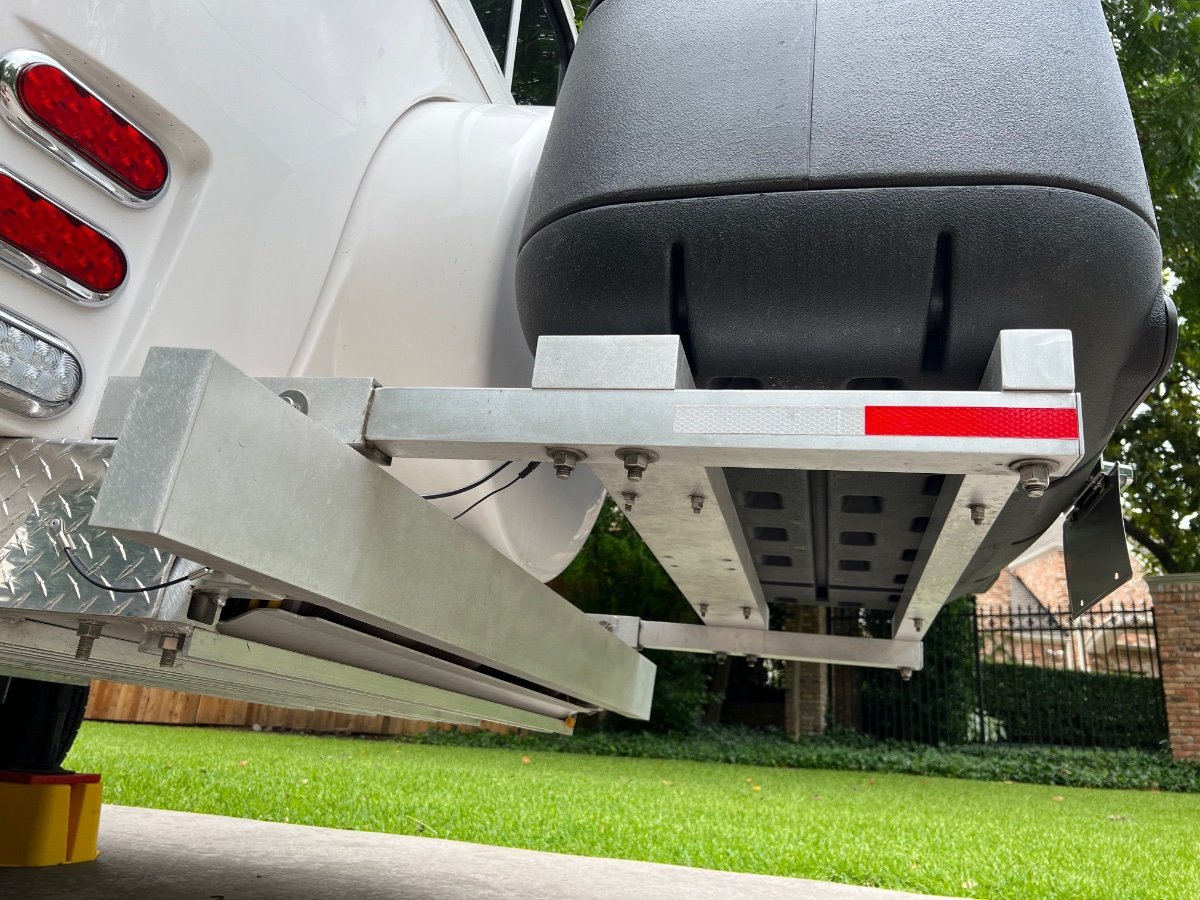
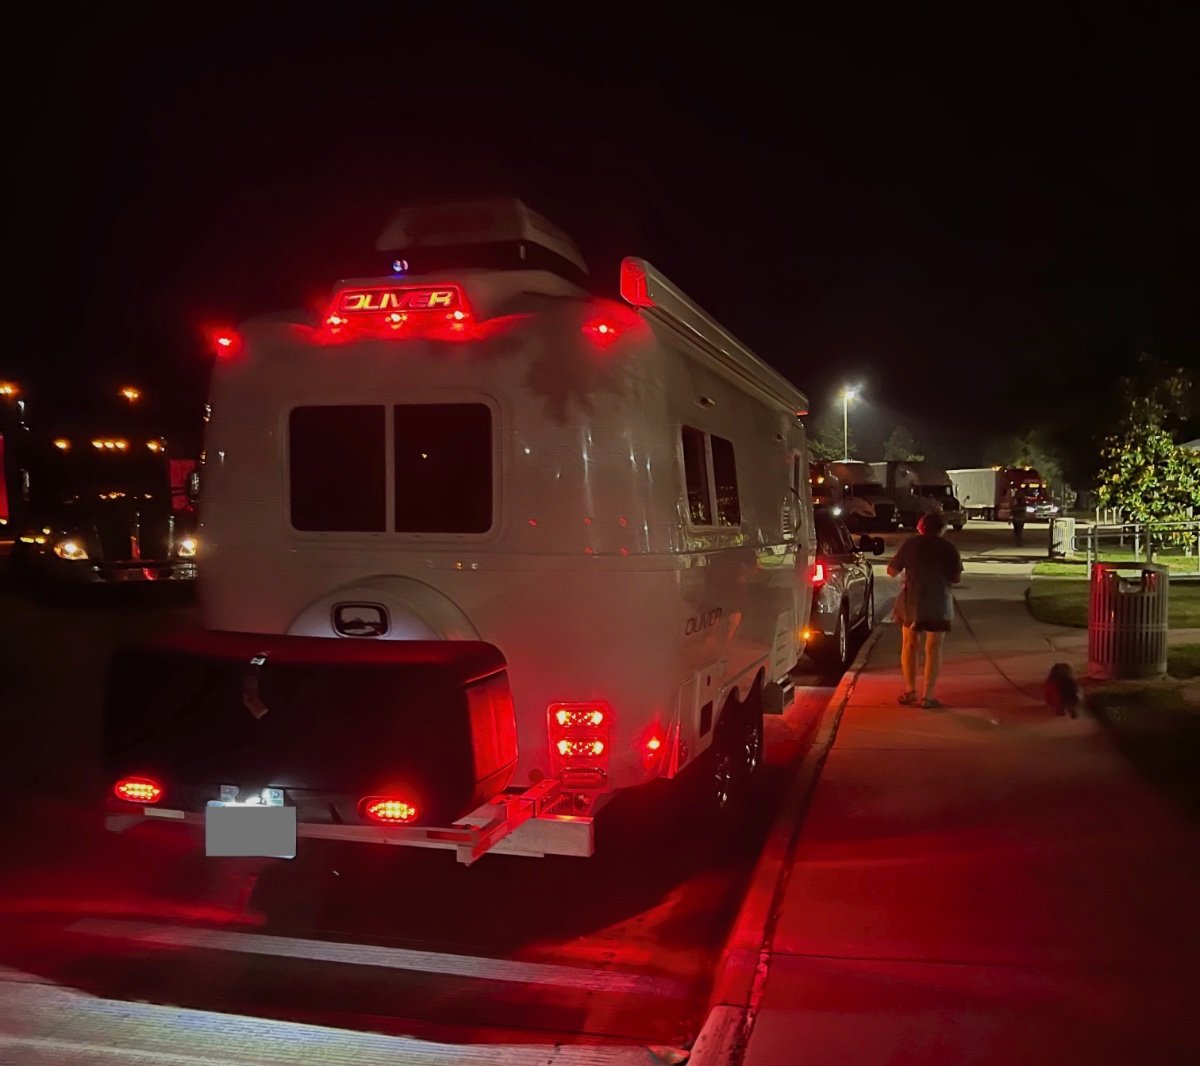
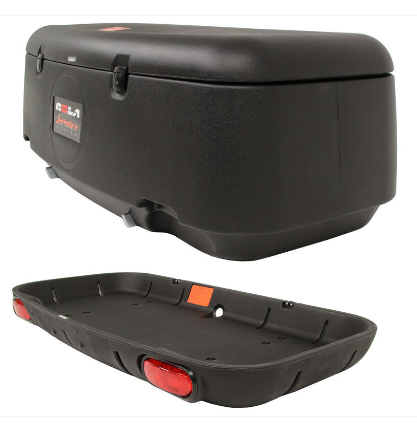
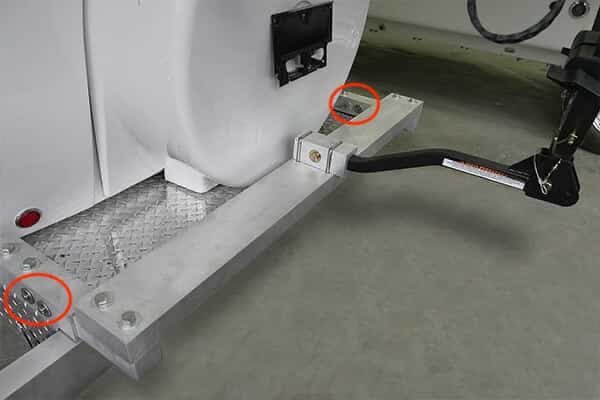
Summary I have installed a rear mounted cargo carrier, with lights, to our 2022 Oliver Legacy Elite II (LEII) travel trailer. We recently completed a two week, ~2000 mile trip, using the cargo carrier, which performed flawlessly. Below are photos of the installed cargo carrier, which are followed by a detailed description of its installation. Storage Constraints Prior to ordering our Oliver Legacy Elite II (LEII) travel trailer I knew we would need additional storage space on the trailer. We are using a 2014 BMW X5 35d (diesel) as our tow vehicle, rather than a pickup truck. Thus, we could not plan to use the pickup bed for supplemental storage. We also needed to stay within the tow vehicle's cargo capacity of 1100 lbs and maximum tongue weight of 600 lbs.. Expecting a tongue weight of approximately 500 lbs. plus two occupants at approximately 300 lbs, we could only accommodate a maximum of 300 lbs. of other cargo. The available payload will be partially used by our camera gear, which must be protected from exposure to moisture. A tongue mounted cargo carrier was not viable, given the tongue weight limit for the tow vehicle. Storage Requirements I anticipated needing additional storage space for the following items: Champion Dual Fuel Generator- 2500 watt (~45 lbs.) (too large for basement storage) Napoleon TravelQ™ 285 Portable Propane Gas Grill and hose (~35 lbs.) (too large for basement storage) Anderson Ultimate Leveling kit (~25 lbs) Harbor Freight rubber chocks (4) (~20 lbs.) Camco Stabilizer Jack Supports (3) (~10 lbs.) Miscellaneous accessories All of these items can tolerate some exposure to moisture, which is likely when stored in any external cargo carrier. A closed and reasonably secure cargo carrier was needed. Searching the owners' forum, I found examples of rear cargo carriers/bike racks and found several examples, including: Oliver's original bike rack design using twin receivers and extending approximately 3 feet beyond the rear bumper; Various rear mounted metal cargo boxes, including custom designs; Rear mounting of an Oliver tongue cargo box by John E. Davies. I also looked extensively at aluminum cargo boxes from various manufacturers, trying to find options which could accommodate the cargo items listed above. I already owned a cargo carrier which we had used on the BMW X5 tow vehicle. This carrier has a heavy steel swing-away frame which mounts to a standard 2" receiver. Mounted on the steel frame are a polypropylene tray and an enclosed container with 13.5 cubic foot capacity. The tray and enclosed container interlock. This cargo carrier also is equipped with fully functional lights (running, brake, turn, flasher). Interlocking pins on the enclosed container mate with the tray. Locking latches secure the container to the tray. Solution Approach I decided to re-use the polypropylene tray and enclosed cargo container, but not the heavy steel frame. Instead, I would use a design similar to the original Oliver bike rack. I ordered the current optional Oliver bike rack when we placed our LEII order, planning to utilize some, but not all, of its components. The current Oliver rear hitch (photo below) utilizes twin receivers that are 11" long, constructed to receive 2" x 2" X 0.25" (wall thickness) T6061 aluminum square tube support arms, which are 17 inches long. The receivers are each mounted to the LEII frame by two long 0.5" diameter stainless steel bolts and nuts. The other components of the rack are a 2" x 5" x 0.25" T6061 aluminum cross-member, 51-1/8" long (with end caps), and a 1-1/4" receiver for connecting a bike rack. I planned to use the twin receivers, and the cross-member, but not the support arms, nor the 1-1/4" receiver. Instead, I would replace the 17" long original support arms with longer equivalents, whose length was to be determined. I would utilize the original 2" x 5" x 0.25" T6061 aluminum cross-member and add another cross member, this one 2" x 2" x 0.25" T6061 aluminum, also 51-1/8" inches long with end caps. The cross members would be bolted to the support arms, in the same manner as on the Oliver rear hitch. The tray and enclosed container from my existing cargo carrier would be mounted to the cross-members. Note the clevis pins circled in the photo below, there are two 0.50" diameter horizontal clevis pins securing the support arms in their receivers. Each clevis pin has a washer on either side of the receiver. Removing the clevis pins permits the support arms to be pulled to the rear, enabling removal of the spare tire cover and spare tire without dismount the support arms. Solution Model A critical dimension to be determined was the length of the 2" x 2" x 0.25" support arms. The new support arms need to be long enough to: Support the polypropylene tray and enclosed cargo box and attach using the molded mounting holes in the tray; Allow the lid of the enclosed cargo box to open without striking the spare tire cover; Permit removal of the spare tire cover and spare tire without removing the cargo carrier and support frame; Permit access to waste water hoses stored behind the bumper; Minimize the additional length of the cargo carrier and support frame to the LEII's length. I fabricated 2" x 2" wooden support arms, approximately 40" long. Using woodworking equipment, I cut slots into one end of each support arm to fit around the bolts holding the twin receivers to the frame. I also drilled horizontal holes for the clevis pins which retain the support arms in the receivers. Positioning the Cargo Carrier on the Cross-members The wooden support arms were inserted into the twin receivers and secured with the clevis pins. Then the 2" x 5" x 51.125" T6061 cross-member was placed across the support arms near the bumper. The additional 2" x 2" x 51.125" wooden cross-member, was also placed across the support arms, but further from the bumper. Clamps were used to hold the cross-members in place on the support arms. The polypropylene tray and enclosed container, latched together, were positioned on the cross-members, centering both to the trailer's width. I opened the lid of the enclosed container and adjusted the spacing (fore and aft) between the lid and the spare tire cover to ensure they did not contact each other. Once I had located the joined tray and enclosed container in what appeared to be a desirable position, I adjusted the positions of the cross-members fore and aft to establish alignment with the mounting holes in the tray. The 2" x 5" cross-member engages two mounting holes on each side of the tray. The 2" x 2" cross- member engages only one mounting hole on each side of the base of the tray. Six 5/16" carriage bolts will fasten the tray to the cross-members. Only four carriage bolts attached the tray to its original steel support frame. I used a mason's string stretched across the width of the tray with weights on either end to aid in aligning the mounting holes in the tray with the positions of the cross-members. I also used carpenter's squares to verify the cross-members were perpendicular to the support arms. Another check of squareness was made by measuring the distance from the trailer bumper to the cross-members. Once I was satisfied with the position of the tray and enclosed container on the support structure, I marked the locations for the holes to be drilled for the six mounting bolts to secure the tray to the cross-members. The tray overhangs the rear cross-member at the rear. With the cargo carrier tray and enclosed container in place on the clamped cross-members, I wanted to determine if the spare tire cover could be removed without removing the entire cargo carrier and support assembly. I found I could remove the clevis pins and pull the support arms aft approximately 7 inches out of the twin receivers and enable removal of the spare tire cover. With the tray and enclosed container positioned on the cross-members, I could now determine the required length of the support arms, which is 33.75 inches. The location of the rear cross-member determines the length of the support arms. After locating the mounting position of the tray and enclosed container I marked all key positions and hole locations on the wooden support arms and wooden rear cross-member. I cut the wooden support arms to the desired final length. Material Sourcing and Machining The required T6061 aluminum components required are: 2" x 2" x 0.25" x 33.75", square tube, quantity 2 (support arms), cost= $110.18 2" x 2" x 0.25" x 51.125", square tube, quantity 1 (cross-member), cost= to $99.08 2" x 12" x 0.125", flat bar, quantity 1 (to be cut into 2" squares for end caps on the support arms and rear cross-member), cost= $6.86 Sales tax= $17.83 No shipping charge. I picked up the materials at the local Metal Supermarkets warehouse Total cost= a $233.95 The above T6061 aluminum components, cut to specified length, were obtained from: Stainless steel bolts and nyloc nuts were obtained from: I was referred by Metal Supermarkets to a local machine shop: When I received the materials I took them and my wooden mockups of the support arms and cross-member to Air & Earth. I also took one of the original support arms. I discussed the machining needed: to cut the slots in one end of the support arms and to drill the needed 0.50 diameter holes for the clevis pins and mounting bolts. I also asked them to cut the 2" x 0.125" flat bar into 2" x 2" squares. I did not ask them to drill the smaller holes for mounting the cargo tray to the cross-members. I was quoted $220 and turnaround of the job within a week. They did an excellent job within the promised timeframe. Finishing and Assembly of the Support Structure After Air & Earth completed the requested machining, I performed the following finishing steps, which included: Rounding the edges of the 2" x 2" square tubing on the slotted end to be inserted into the receivers. I used a 3" wide belt sander with 100 grit sanding belts to round the corners of approximately 12" of the tube which would be inserted into the receivers . The original Oliver support arms also had the corners rounded to more easily slide within the receivers. Several trial fittings were required to verify smooth insertion and removal to/from the receivers. The support arms and the rear cross-member were sanded with an orbital sander using 200 grit disks. This sanding removed markings on the tubes and made the surface textured, similar to the Oliver rear hitch components. The support arms were inserted into their receivers and fastened with the clevis pins. The cross members were aligned with the mounting holes on the support arms and bolted into place. The cargo tray was positioned on the 2" x 5" cross-member at the previously determined mounting position and holes drilled to mount the cargo tray. Holes were then drilled in the 2" x 2" rear cross-member. Carriage bolts, flat washers and double jamb nuts were used to secure the cargo tray to the cross-members. Once all test fittings of the support assembly were completed, lithium grease was applied to the ends of the support arms which are inserted into the receivers. 2" x 2" x 0.125" caps were attached to the open ends of the support arms and the rear cross-member, similar to the end caps used by Oliver. These were attached to the square tubing using JB Weld epoxy. Cargo Carrier Lighting The cargo carrier partially blocks visibility to the taillights of the trailer, which is most noticeable when viewed from close behind the trailer. At a distance the taillights are largely visible. The cargo tray is fitted with two LED light fixtures and a wiring harness with a 4-pin flat connector. A corresponding 4-pin flat connector was installed on the LEII to integrate the lighting on the cargo carrier with the trailer lighting. Details of the installation of the 4-pin connector in the trailer are covered in a separate article. The lights on the cargo carrier ensure the trailer is quite visible from behind. A license plate mount was added to the cargo carrier tray, since the license plate mount on the spare tire cover is blocked by the cargo carrier. Lighting for the license plate mount is provided by adding a Y connector to the license plate light cable under the spare tire cover and adding an extension cable routed to the cargo tray mounted license plate mount. I also added reflective tape to the support frame members. I used the following reflective tape: https://www.amazon.com/gp/your-account/order-history/ref=ppx_yo2ov_dt_b_search?opt=ab&search=reflective Conclusion This addition to our trailer provides significant benefits, with no significant disadvantages. It does add approximately two feet to the length of the trailer. Besides the additional storage space, the cargo carrier and its load slightly reduces the tongue weight. I measured the tongue weight, using a Sherline scale, at 450 lbs., with no water onboard. Tongue weight seems sufficient, as no swaying or other handling issues have been observed. This project had a successful outcome due largely to the information I was able to glean from the Oliver Owners Forum. I hope this information is useful to others on the forum. Comments and suggestions welcome. Regards, Don
1 point
-
Is anyone using an external surge protector? I have one from my previous camper. I tried it and my Ollie was getting NO POWER! Any Ideas?1 point
-
I am interested in what ever parts you have for this project. Let me know how much the postage is and how I can send you the $. I will then order the rest of the parts when I need them to finish the project. Thanks Hull#466. My address is MI 49079 Paw Paw1 point
-
Ohhhh that looks so good!😋1 point
-
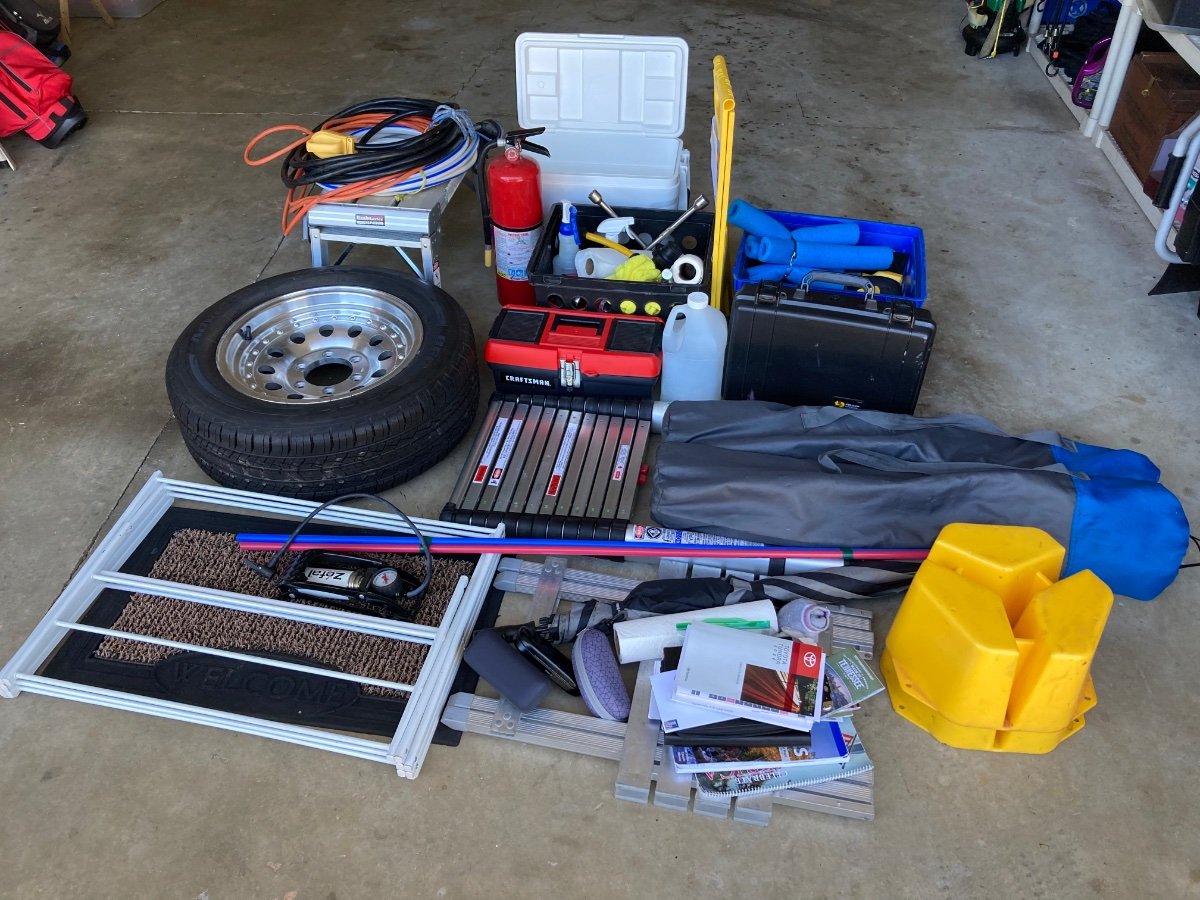
Agree, every truck should weigh listed curb weight before modifications. Surprised me how conservative our Toyota payload weight was after adding about 150 pounds of accessories finding the available Tundra payload is 150 pounds above listed 1400 pound payload after adding accessories. Here’s the camping gear we carry in the Tundra on trips, not seen in photo are two sets of golf clubs (one half set) and Honda 2000 gen-set. We try to only take gear that’s needed for trips, but glad we have the capacity to take our golf gear, too. 🙂
1 point
-
That doughnut looks scrumptious! The last two campouts, we experimented with refrigerator cinnamon rolls on the Skottle. First time we "baked" them, putting water in the bottom, a cooling rack, and then the rolls in a pie pan, covered for about 40 minutes. Came out okay, but not very browned. All eight were like that one gooey center roll that everyone likes. Last week we smashed the cinnamon rolls like a Smashburger, and then fried them. These came out more dense and crispy. Both were very tasty, but also very different.
1 point
-
We had what appears to be the same experience as @Steve and Cindy following delivery of our LEII. Water ran down the wall below the windows to pool along the edge of the beds. Their description of the leak matches what we saw. We returned to Hohenwald, where Oliver Service resolved the problem. They reported a butyl rubber seal had not been installed by the manufacturer of the windows. Oliver installed the butyl seal and returned the trailer to us within about two hours. Since this corrective measure was taken we have NOT had any leaks from the windows, nor elsewhere. Our Hull is #990. I suspect there was a batch of windows with this problem in common.1 point
-
We have a new Oliver Elite trailer and a steep learning curve. Doing winterization for first time - mostly successful but need help with several issues. 1. Water came up through the bathroom drain although we had emptied all water tanks. Why ? We subsequently poured some antifreeze down the drain per the book. 2. When flushing the outside wash station water pump and hand pump had so pressure such that it was difficult to get antifreeze to come out of the hose. 3. Is there a valve in the black water flush system? Unable to find under the street side front dinette seat. This was not mentioned in the book but was in the video. We would welcome any thoughts.1 point
-
You really need to add this info to your signature. It will greatly aid others in helping you with future questions. Also include information about your tow vehicle.1 point
-
I'm not certain that this is what you are asking about with item #2 but ; When using a hand pump in order to inject anti-freeze into the exterior ports (fresh water and city water), it helps if you open a faucet on the interior of the Ollie while you are using the hand pump. This allows the pressure you are building up to go somewhere. Bill1 point
-
I use an external surge protector because we don’t have an internal one. The one I hang on the power pole is our only protection. There has been some discussion about using one with the Oliver installed protection and I think a few are doing it and can offer some thoughts. Mike1 point
-
I had the same problem, but at a later point in the life of my OEII. Initially the dogbone adapter worked fine. The 30A feeder circuit that you will eventually install will not have a GFCI. There is much information on this on the web regarding the controversy of having the National Electrical Code require it. Ultimately they decided it was not required. The way I handled your problem was to first make sure that nothing else was using the GFCI protected circuit. Then I temporarily replaced the CFGI outlet with a standard 20A outlet. OEII was not drawing over 20A so this worked fine. Shortly afterwards, I completed my installation of a dedicated 30A circuit and reinstalled the 20A GFCI. FYI, this link came from Jason: https://wizard-of-watts.com/2020/03/15/the-revised-nec-551-71f-for-rv-parks/1 point
-
Please do not jam a paper clip into a precision brass orifice, carefully or otherwise. You’ll create additional problems for yourself, likely expensive. If you decide this is necessary (unlikely on a newer trailer), you’ll need a probe softer than the brass jet, think more like broom straw, brush bristle, or my favorite, a single strand from a multi strand copper wire. I’ve cleaned dozens (hundreds?) of jets on small engines and RV appliances. Please don’t ruin your jet by ‘cleaning’ it with a paperclip.1 point
-
Great photos Chris and Duke! It sure beats Florida with hurricane Ian on its way.😳1 point
-
Perhaps that Jay is trying to drill for an implant?😁 How's that Ollie treating you guys and gals? Bill1 point
-
Thanks so much for the information.1 point
-
Well, still some questions in my mind before you dive into checking the jets. (In my experience, it's highly unlikely that the jets on both burners would clog up at the very same time.) Accessing the jet is a multistep process, and probably best done by a service tech with proper tools, if you're not an experienced rv diyer. The jet orifice is very small. (Always, if working on a gas appliance, turn off the lp first.) How much have you used your cooktop? Are you pushing in the control knob completely, on "high" or "light", whichever setting you have, and continuing to push in while you try to light the burner? This is a safety feature on rv stoves. Once lit, you still have to hold the knob in until the thermocouple heats up enough to allow gas to continue to flow. (On my older smev, it's a slow count of three.) So, double safety. If you're following the above procedures, neither burner gets gas, and your cooktop hasn't been messed up by boilovers, Etc., I'd open a service ticket. Also, please add your info to your signature, or add info about your trailer in your post. Best of luck.1 point
-
Ordered to keep as a spare if needed. Thanks Frank C!1 point
-
I do carry an assortment of Sharkbite fittings with me at all times in the event I should need to do a plumbing repair while on the road. However, there have been several posts concerning the possible failure of these fittings (unless performed exactly correct) in the various abusive (read that as vibration and flexing) environments that are common with travel trailers. Bill1 point
-
I prefer to think we are still (always) in pursuit of our “favorite” boondocks camp spot 😊 So far I’d say it’s Devil’s Garden in Arches NP. Incredible views, rock formations and hiking trails right in the campground. Sunrise and sunsets were amazing
1 point
-
My tmobile plan gives me a "welcome to canada" message, and my plan is the same as home. Verizon is very different. We get free Internet to .5 gig. Pretty much nothing. Then it drops to 2g, dialup speed. Since we rarely have Verizon, anyway, we turn off that phone, and use the tmobile/rogers. It is important to check (and understand) your plan as @John E Davies suggested1 point
-
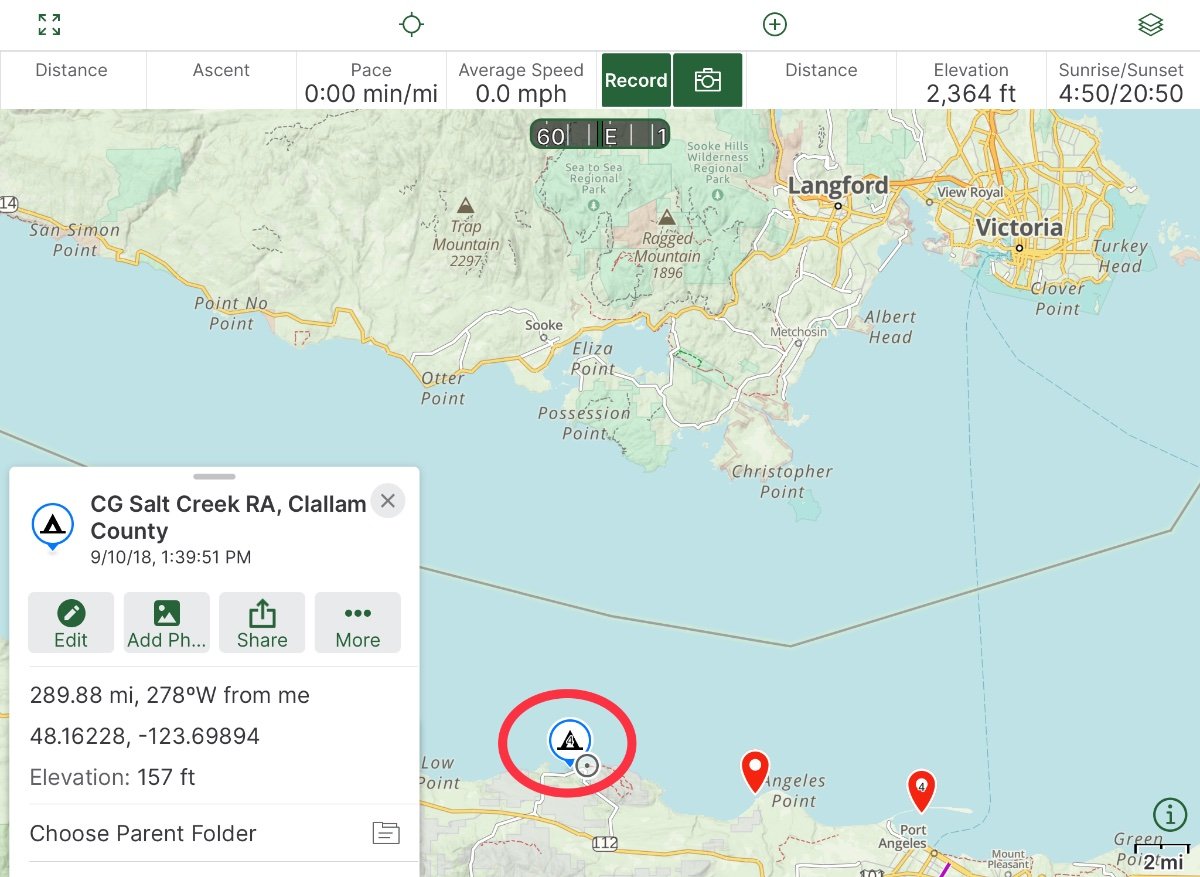
A big word of caution about International roaming…. We camped at a county RV park in Washington, near Port Angeles, almost directly across from Victoria BC, our phones connected to a BC cell tower without our noticing, and we got hit with an enormous US$400 data charge, it took several hours in person at the Verizon store to straighten it out. This was several years ago, I am not sure how the current plans work, but be VERY careful about using cell or hotspot data when you are in the USA, but so very close to Canada. John Davies Spokane WA
1 point
-
@John E Davies, Thanks, John, for kind words. Thanks also for reviewing and commenting on my design approach. In answer to your questions: Yes, I did write the dimensions on the wooden mockup pieces. As I mentioned in my writeup, I also took one of the original support arms to the machine shop and explained the most critical dimensions are for the horizontal holes through which the clevis pins pass to secure the arms to the receivers and the vertical slot. I had initially assumed I would need to provide dimensional drawings to the machine shop. However, when I asked if they needed drawings, they said no, the dimensions on the wooden mockups and having the original support arm were sufficient. Thanks for reminding me to drill drain holes! I had planned to do so, largely from reading some of your write-ups. I agree with the need for them. This is relatively easy to do with the support structure in place. I composed the article initially using the Safari browser interface for Gmail on my MacBook Pro M1 laptop (MBP). I used Gmail because I am very familiar with its behavior, particularly the autosave function. I had to break the article into two draft emails when I reached the 25 MB limit of Gmail, after which it loads images to Google Drive. I wanted the images kept in place in the text flow. Once I completed composition and proofreading I copied the contents of both draft emails into a new topic page in the owners forum. Not having previously composed a long article directly in the new topic page, I was concerned about possible loss of content before completion. All of the photos were taken with my iPhone 13 Pro Max, which automatically stores the images in Apple's Photos/iCloud. I created a smart collection in the Photos using keywords, to make it easier to see all of the related photos together. I selected photos for inclusion in the article and exported them as JPEGs to the Downloads folder on my MBP. I used Apple's Preview app on my MBP to do some minor cropping of the photos and used the annotation features to add arrows, circles and text. I got lazy and used a grey filled rectangle to mask the license plate in a few photos, rather than take the photos into Photoshop for a more elegant edit. The Preview app is surprisingly robust. I do not know of any comparable utility in the Windows or Android worlds. I have previously used Window PCs extensively, but the Android world is foreign to me. I suspect you use a similar annotation process, having seen many of your annotated photos. Finally, yes, posting informative articles is time consuming. I spent most of the day yesterday drafting and editing. I also found I needed to take a few more photos yesterday, in addition to those taken during work on the project. I also had to confirm some measurements and materials details. I have benefitted significantly from reading your well crafted articles and those of many other contributors to the forum. I feel an obligation to contribute. Regards, Don1 point
-
The trim lock or ez rv gutters is most helpful to keep weepholes from being "overpowered" in heavy rain. They don't replace proper installation and caulking, but they do "help" to direct rain away from the windows and weepholes. I'm surprised both sides' windows show "leaks." Over the years,for us, it's usually been only one side that has an issue. I usually look to the Oliver third tail light as first culprit, but not sure in your case. That typically appears as a "leak" in the rear window, and some moisturein the attic. Much depends on how you are set up, side to side, front to back levels. A tiny bubble/gap in caulk can create a significant leak in a downpour. The fiberglass hull flexes as it goes down the road, and can stretch or break caulk. Since you say you have leaks on both sides, I'd probably be looking at rooftop, personally. Possibly ac. Are the bolts to the ac torqued properly? If you typically camp nose high, a bit, as we do, could be fan, as well. I like to use duct tape to figure out where a leak has originated. Any penetration, window or roof, can be the culprit. Our habit is to seal a suspected tiny leak with a strip of tape, and see if it helps in the next storm. If it does not, move on to the next likely culprit penetration. And, here's another. If you lift the leveling jacks higher on one side, does the leak disappear on that side, and only show on the low side? If so, it's probably a roof penetration, not a window. Double hull can make it more difficult to "think like a raindrop, " as a roofer friend told me years ago. Water travels hidden, but always find the lower spot. I suspect you opened a service ticket before, but please do so, again, anyway. It only helps Oliver get better, even if you find the cause yourself.1 point


-
Recent Achievements
-


")


