Leaderboard


Popular Content
Showing content with the highest reputation on 07/12/2023 in Posts
-
Truth is, many people join the forum to see classified, when they want to buy, and don't know the impeccable history of "mouse." , because they haven't been long term members. An amazing Ollie. They may buy one of the cheaper, unknown trailers, sans all the great upgrades, not as well maintained, and wonder, gosh, I bought an Ollie, and.... (it leaks, windows are fogged, jacks don't all work, batteries need replaced, etc.) And, or, no solar, no lithium, etc etc. I personally wouldn't hesitate buy yours, and travel cross country for it. And after purchase, tow it anywhere in North America. Well documented. Supetlativly maintained. Go anywhere, and no worries.9 points
-
Hey John, I think the used RV market is getting flooded based on comments I'm seeing in various places on line. I think a good percentage of people entering the market for used right now are hoping for a bargain. That combined with a general lack of knowledge of the real value of an Oliver may leave a lot of otherwise interested folks scrolling past your adds. As we all know, the typical Oliver buyer is well researched, has a particular attraction to quality and is generally sold before they even see one. With the general slow down in RV sales I'm guessing the serious Oliver type buyer is a smaller percentage at the moment. On the other hand anyone that has their heart set on an Oliver and knows the price of the new ones should be particularly interested in yours. It may just be a waiting game for a longer period than one would have experienced a year ago. Knowing what I do about your camper, I think your price is quite reasonable. But the typical person entering the market at this time may not have that appreciation. If you can, I would recommend getting out and camping in it with a for sale sign on it. There's always a lot of curious folks at camp grounds that may step forward to learn more, and maybe be more than just curious. Just my thoughts.5 points
-
Actual age, with our ollies, is pretty much meaningless, if properly maintained. Mine is 16 seasons young, and no one believes it's true age. It's all about the owners devotion to care. Yours is quantified, and verifiable.4 points
-
Amazon Prime specials on a couple items frequently discussed here: Battleborn 100 ah 12v battery is $719. Renogy 200 watt suitcase solar (36 pounds) is $298, so about $1.50 a watt.
 3 points
 -
His teardown technique is a little crude 😂. But he does point out a big missing feature. No low temp charging cutoff. And looking at the Amazon comments, it looks like that still hasn’t been addressed with the name change.3 points
-
FYI, this is about a firearms company, not about firearms per se. How America’s Oldest Gun Maker Went Bankrupt: A Financial Engineering Mystery When a secretive private equity firm bought Remington, sales were strong and the future bright. A decade later, the company couldn’t escape its debts. I am sure we could perhaps maybe draw some comparisons. John Davies Spokane WA3 points
-
Hi all, in preparation for removing the OTT 1.25" receiver and putting a 2" one on, I took out the four pins that secure the hitch framework. It was very fast. How do you all secure that assembly from theft, especially when you have a nice bike rack attached? John3 points
-
Install 1/2” ? stainless bolts with nylocks in three places, and a short locking hitch pin in the fourth. I am assumng they are 1/2”, you need to measure.. Post a close up picture so we know what it looks like please. John Davies Spokane WA3 points
-
OOPS! Interstates all look alike - that's my story and I'm sticking to it 😄3 points
-
LiTime is a new name for AmpereTime. You can take a look at W8ll Prowse's review, and teardown, here, from two years ago:2 points
-
What brave Oliver owner wants to be the first to try this brand of Lithium ion battery? On Amazon for $319, less than half the price of comparable 100Ah BattleBorn. Surprisingly it has very good reviews. LiTime 12V 100Ah LiFePO4 Battery Built-in 100A BMS, Up to 15000 Cycles, Perfect for RV, Marine, Home Energy Storage https://a.co/d/eK940j32 points
-
That is on the OTT bike rack. I removed the aluminum 1-1/4" receiver, and drilled new holes for this one. I have the 1UP Super Duty Double rack, which requires 2". I inserted a thin tough plastic pad between the hitch and the crossbar.2 points
-
Watched the video. If you focus only on his hands and arms, there is a lot being said which is not spoken. Will be interesting to see how this plays out.2 points
-
That makes sense. Thanks John2 points
-
The lack of a low temp charging cutoff wouldn't deter me from buying this battery. That problem can be easily solved by insulating the battery box, adding a heating mat underneath, or adding a low temp cutoff circuit to your charge controller (if that feature is available). Even if a battery has low temp cutoff built in I'd still have a heating mat under it and insulate the box if I lived or camped in cold weather environments.1 point
-
I have had a pair of the AmpereTime 100Ah batteries for over a year now and I've used them for "extra" battery capacity. I do not use them inside of my Ollie, but I do put them outside and use them with a DC to DC charger that's installed inside to add time/life to my on-board lithium batteries - especially boon docking at night during quiet times when I want to run my A/C without the generator. I also use one of them in my small bass fishing boat to run my trolling motor. So much better than the heavier AGMs! The BMS seems to be working well as I've drained them to 0% quite often - no problem charging them back up to 100% and using them again so far. It's only been a year - and in lithium battery life that's not much but so far so good. But...in my opinion - not sophisticated or time tested enough to put in my Ollie battery tray.1 point
-
I installed a Reese Towpower 81378 bumper hitch yesterday. It isn't the prettiest thing. But many reviews of this style receiver had reports of bad welds, with a couple of instances of complete failures while on the road. (Nothing left of a bike rack with bikes except the bolted down plate.) I chose this one because I don't trust welds on cheaply made products, and it was the only one that I could find that had the base plate wrap up around the receiver. So if the weld fails, there's still a ring of the bolted plate hanging on. Attached with 1/2" stainless fasteners designed for high pressure applications. *If* the local bike shop gets their act together and has our new e-bikes ready before Sunday, we will be testing this setup soon.
1 point
-
Thank you, Mike & Carol. I get it now. This also validates my wanting to purchase a new AC unit to install ourselves.1 point
-
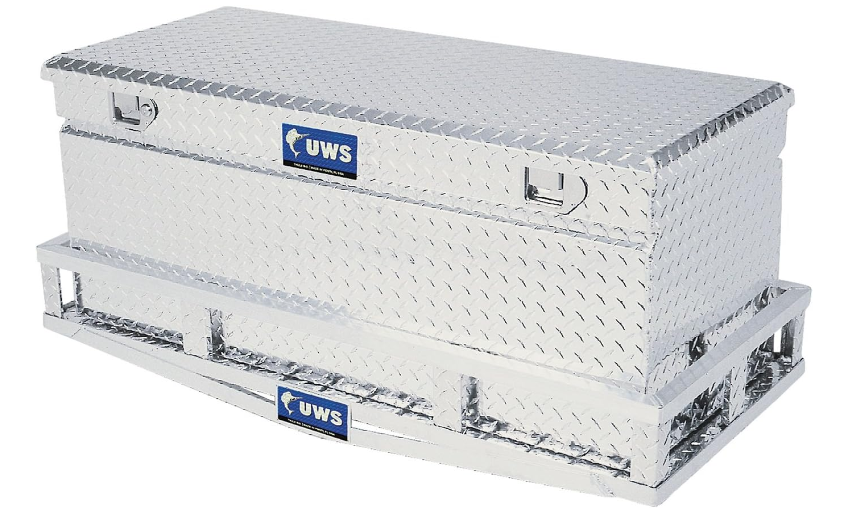
Very nice! I just purchased this set for ours to be installed with the same concept. I was looking for maximum versatility and light weight. The combination empty on the frame extensions will add about 70# to the back of the camper. The empty tool box weighs about 45# and lifts out easily if we want to just carry something in the tray.
1 point
-
Great idea - One is none, 2 is One.... I'll get a couple. Thanks @topgun2!1 point
-
Thanks! We used to keep small rugs where you step off of the beds before installing carpet. We like how it feels to walk on carpet barefooted and stepping out of bed onto carpet, especially on cold mornings. 🙂 We still keep a rubber backed carpet mat at the door entrance over this carpet, for water and debris. Here's another idea how to keep carpet clean from another Ollie Couple that's not active on this forum: They said it's OK to post photos of their step modification using expanded metal where they place their shoes under the door before entering Ollie. If I did this mod, would install a horizontal piece of expanded metal without the piece bent vertically attached to the frame.1 point
-
Am I the only one that noticed that I-40 does not go near Paducah? Or am I not supposed to mention things like that? 😉 BL1 point
-
I would open a service ticket! But it seems like a pretty good safety feature. Mossey1 point
-
I will get one tomorrow!
1 point
-
(...not to highjack the thread) But, HA - this comment cracks us up! We get the "camping withdrawals" after 7-10 days of being home, too! We find ourselves occasionally sharing a cold one while sitting at the dinette table, the shades down, and imagining we're at some of our fav camping sites... (from inside w/shades down - same view, right?)1 point
-
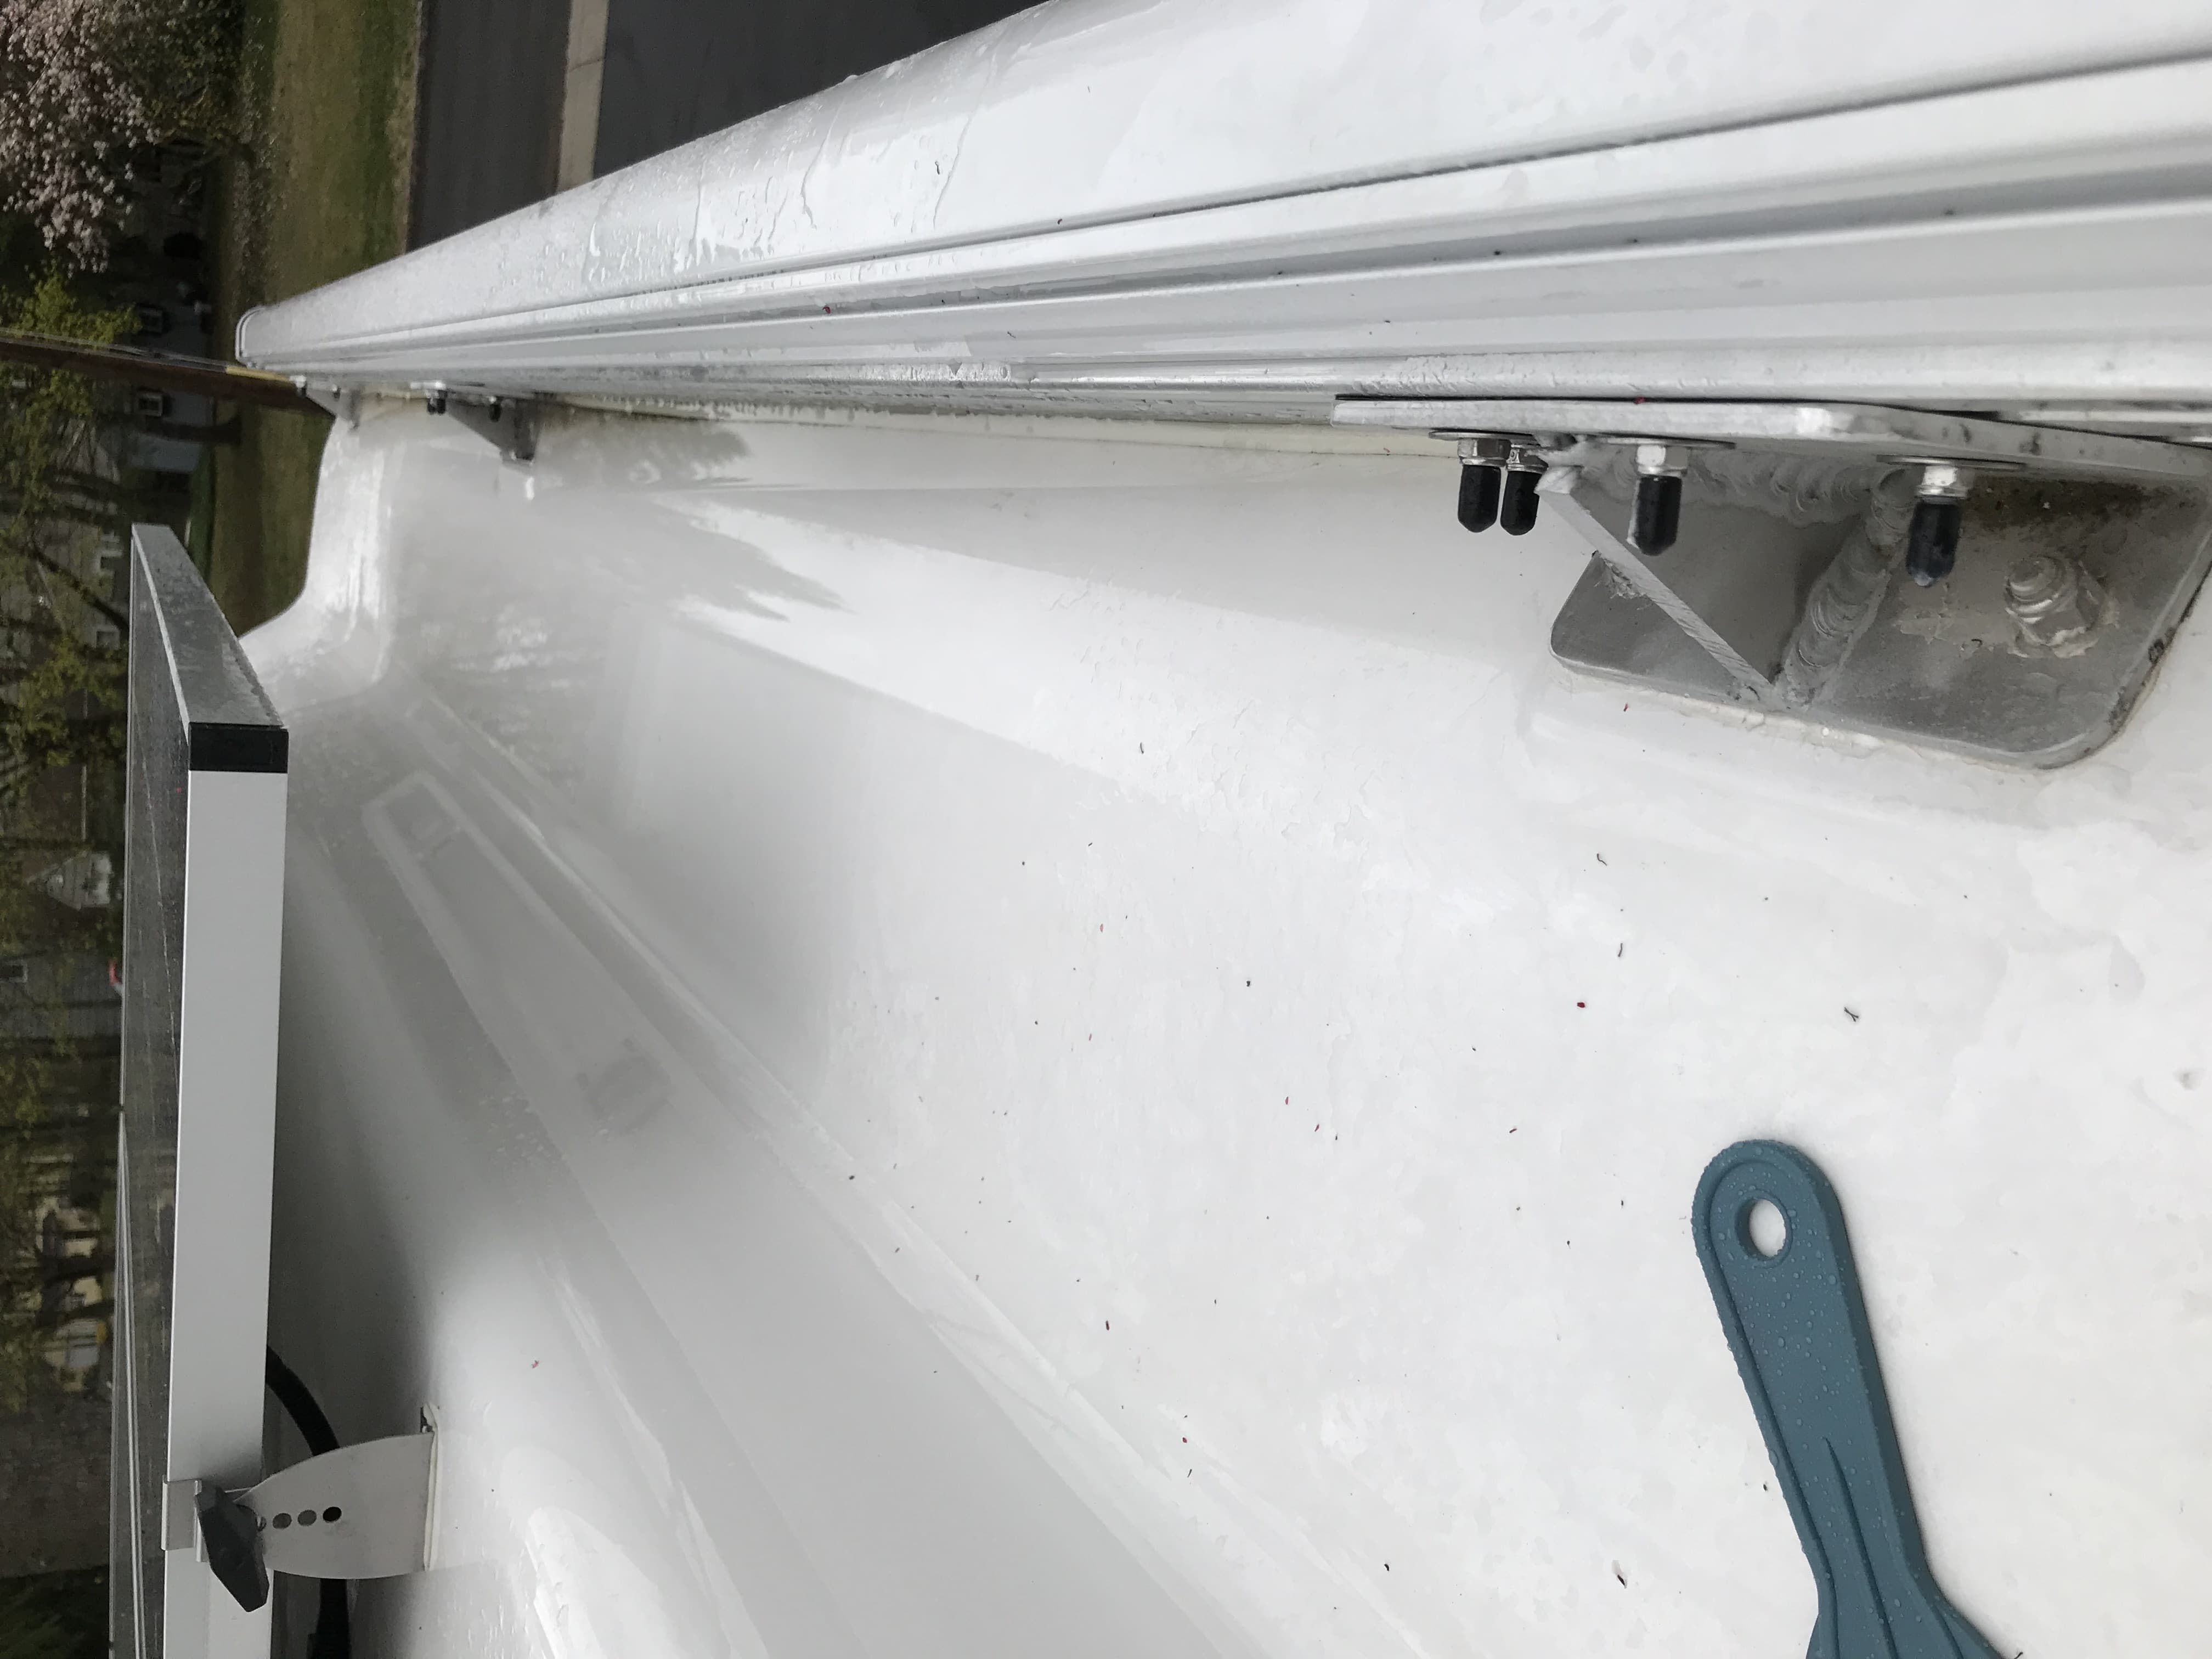
I debated this pretty long.. came to the conclusion that I didn't want to clean another channel like the window gutters. I like the dam effect of the style I have. The rain seems to just channel to each end of the awning.1 point
-
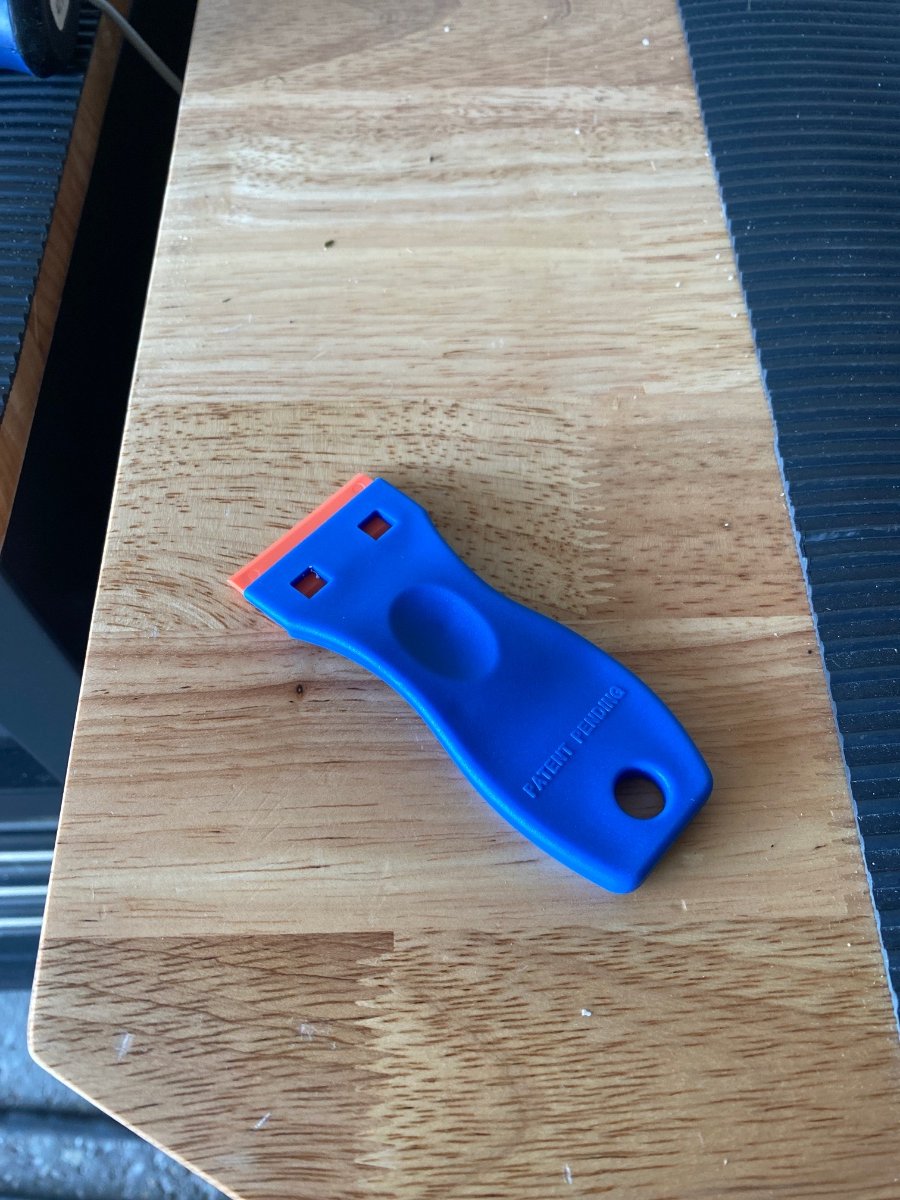
I saw someone recommend those plastic "razors" a couple of months ago and bought one on amazon. It comes with about 100 blades and it was only about $12, WOW, what a great product. I used it to remove the caulking around the access panel on the bathroom vanity and it worked better than anything I've ever used in the past to remove silicone caulk with no worries about damaging the gel coat. I highly recommend it! albert1 point
-
For anyone removing the awning seal adhesive or other “sticky stuff” from the hull, here’s a tool I’ve found very useful on the Oliver for removing caulk or adhesive without damaging the gel-coat. Plastic razor blade scrapers. Gets most of the stuff off, then final cleanup with isopropyl alcohol or automotive wax/tar remover. Limited-time deal: Plastic Razor Blade Scraper, 2PCS Scraper Tool with 60PCS Plastic Blades, Cleaning Scraper Remover for Stickers, Decals, Adhesive, Labels, Paint, Glass, Car, Window, Stove Top, Caulk, No Scratches https://a.co/d/4bf3egM
1 point
-
3M General Purpose Adhesive Cleaner, Quart, 08984 If you have a local Automotive Paint supply store, buy it there, I pay about $14 per quart locally. It is voodoo magic for stuff like this, and for road tar on the gelcoat or your TV. Wear gloves and have some ventilation,, it has all sorts of unpleasant solvents. It won’t hurt gelcoat or paint but it does completely strip off the wax. Body shops use it a lot for prepping the paint. John Davies Spokane WA1 point
-
I'm in the process of taking mine off now. It has deteriorated badly and I've pulled off about 10" from the rear and there is glue still on the trailer. Looks like I'm going to have a time of it. I will also take off the awning completely as a little wind came up in TN and broke my mid-support plastic on the end of it and bent the opening cover of the awning. Maybe I can fix it with a rubber hammer as it's not too bad, maybe now. Hope I can just by the parts I need. I've spent too much money on other things as of late.1 point
-
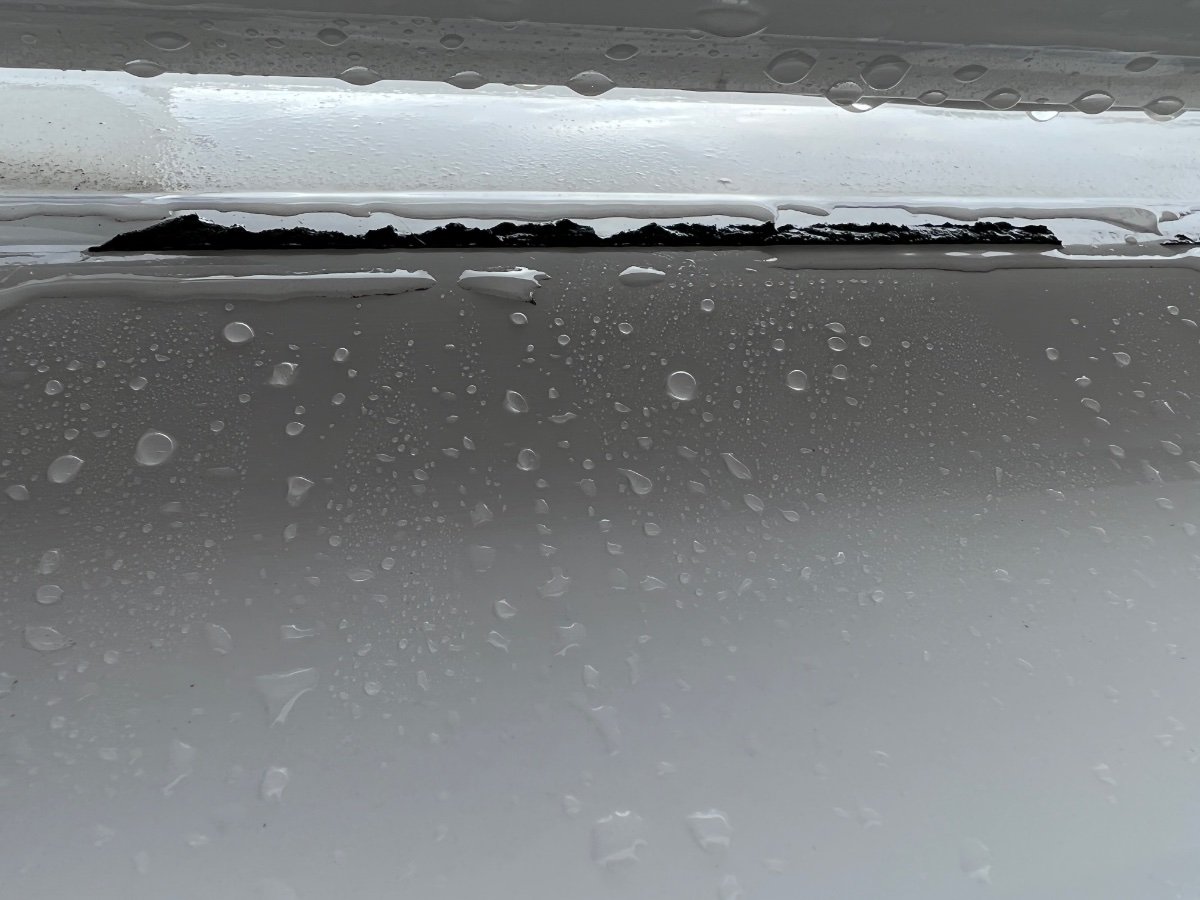
At the rally last month, I noted the demo trailer had the weather stripping applied about 4 or 5 inches below the brackets vice right up against them. It looked really nice and you can see where the collected water and debris issue is mitigated. I got the product information from them and will be ordering the same weather stripping to replace on both awnings on my 2018. Always hated the stained, brown water running down the corners. I didn't see any other trailers modified the way but I liked what I saw.1 point
-
Last May Oliver service replaced our awning seal under warranty and they also drilled out our awning brackets so they drain properly and they now do. The new awning seal was installed just low enough that there is no longer an issue with water puddling and water drains off as it should. When washing the roof of our Oliver I did not see any water puddling along the awning seal or brackets as it just drains off the rear of the trailer as designed. When I wash and detail our Ollie I usually have it a little nose high to facilitate water draining off the roof area. The water also drains off when the Ollie is level. I am fine with how the new seal works now. Regular washing keeps the seal and roof area nice and clean.1 point
-
JD's ver. IM-PEX_01/20/21 Bill's ver. IM-PEX_11/30/17 I did not do a doc scan compare to see what specifically changed.1 point
-
My inclination right now is to remove the street side seal since we will only ever use that side for shade. I do want a gutter/seal on curbside, though, so we'll do our best to fix that. And I will save my email from Jason. mb1 point
-
I submitted a ticket yesterday and Jason's response was to try to reattach with double sided tape. If that failed, they would replace. I supposed that means they would have a local shop replace it? mb1 point
-
Looks like they fixed that issue on my 2021.
1 point
-
One of my friends in the boat business carries the yellow nylon set from harbor freight in his car. He swears by them.1 point
-
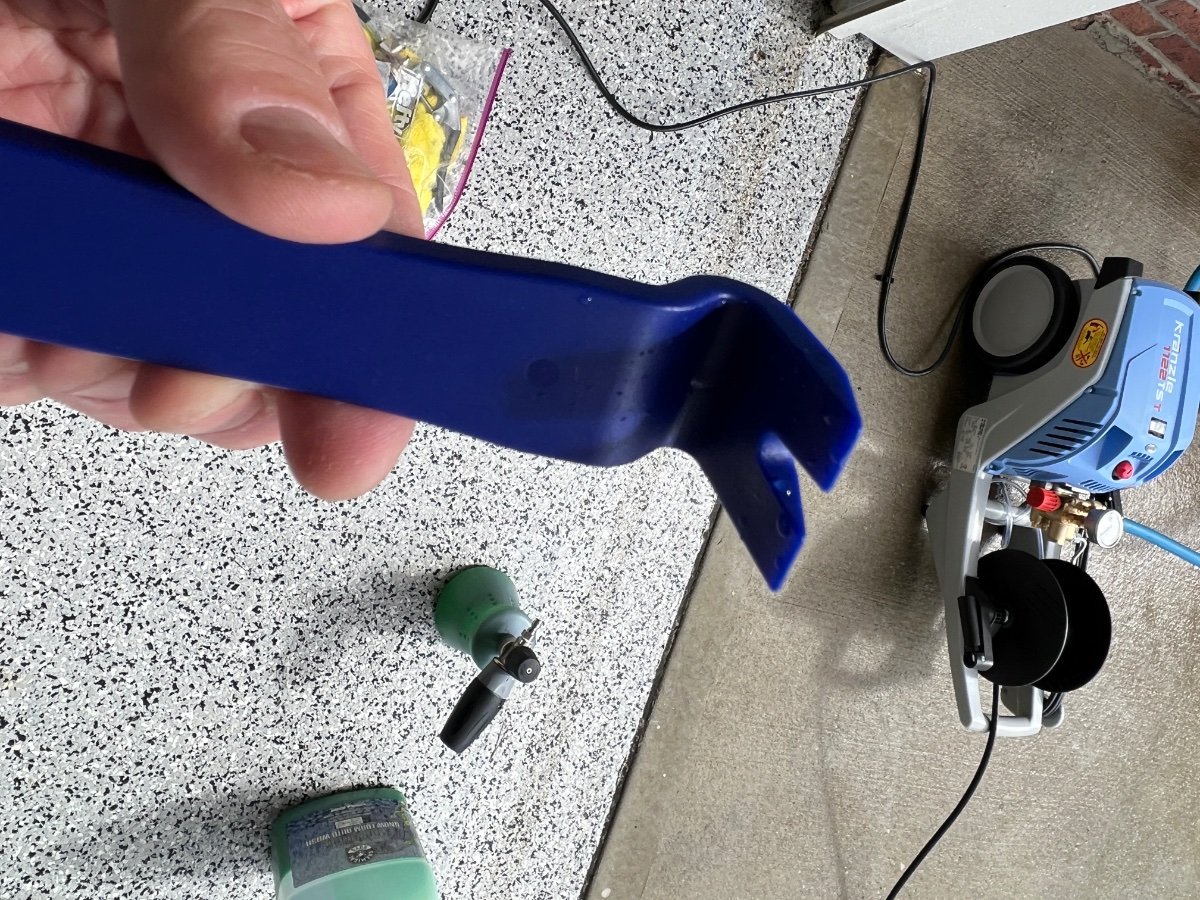
The Girard awnings have the same type of seal. I removed mine today. It left some residue behind that I removed with an auto trim removal tool.
1 point
-
I think that under a bed is a truly horrible location for something you routinely access, unless you travel solo and that bed is not in use, or if it doesn’t have sheets and blankets on it. You could maybe relocate yours to a spot poking through the inner wall near the inverter, if there is room. This mini switch with key would not be very intrusive, but you would need to mount it very high under the mattress overhang so it would not get kicked. It would still be easy to access there. I picked the location up front for the main switch to keep the cable length as short as possible, I do not like long unprotected cables running all over! OTH I installed individual terminal fuses which could also be added to a standard system. I have three chargers, the Progressive Dynamics shore power one has no switch, it gets controlled by its circuit breaker under the front table. The solar and Redarc (DC to DC) chargers each have an output circuit breaker like the main DC one Oliver installs, that can be opened (turned off) by pushing the red button. They are under the rear street side bed. When towing the PD breaker is off normally, even if I plug into power. The others should be adequate for my needs, but I haven’t yet tested them in challenging conditions. I normally don’t fuss with them on the move, the Redarc one does get turned off when stored because it has a small parasitic loss. John Davies Spokane WA1 point
-
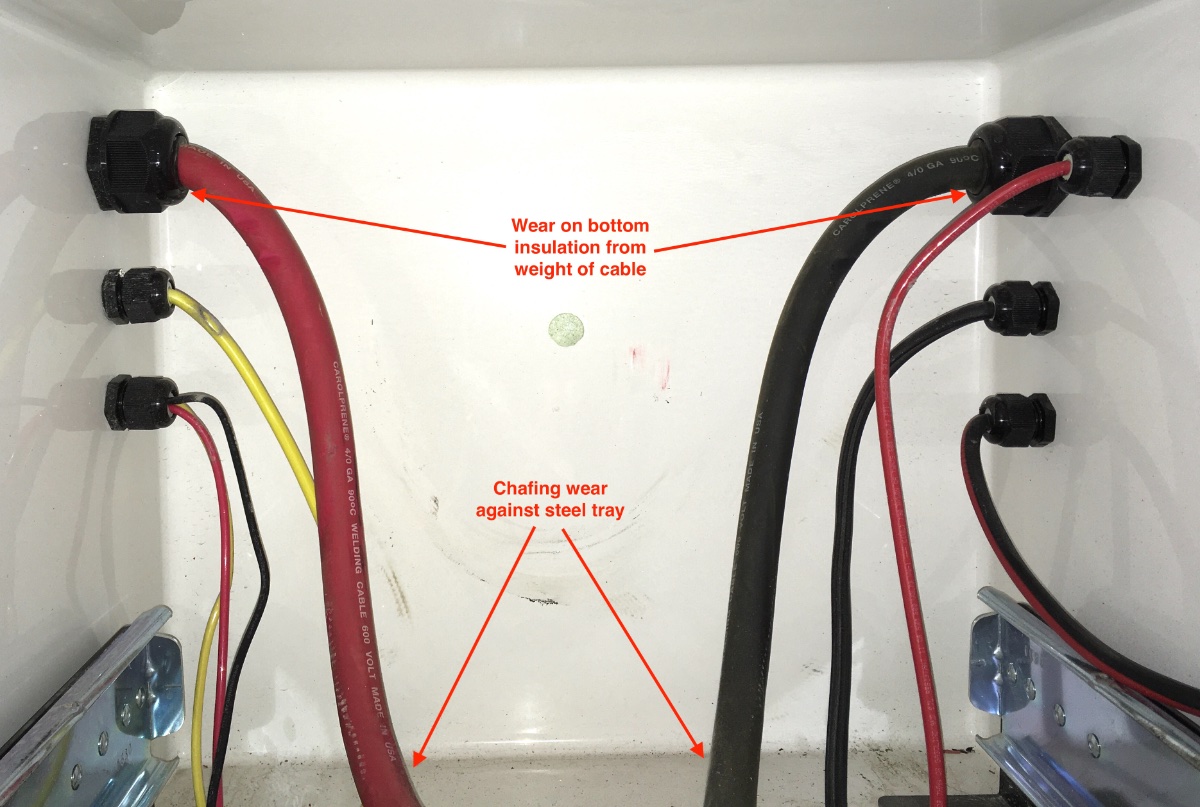
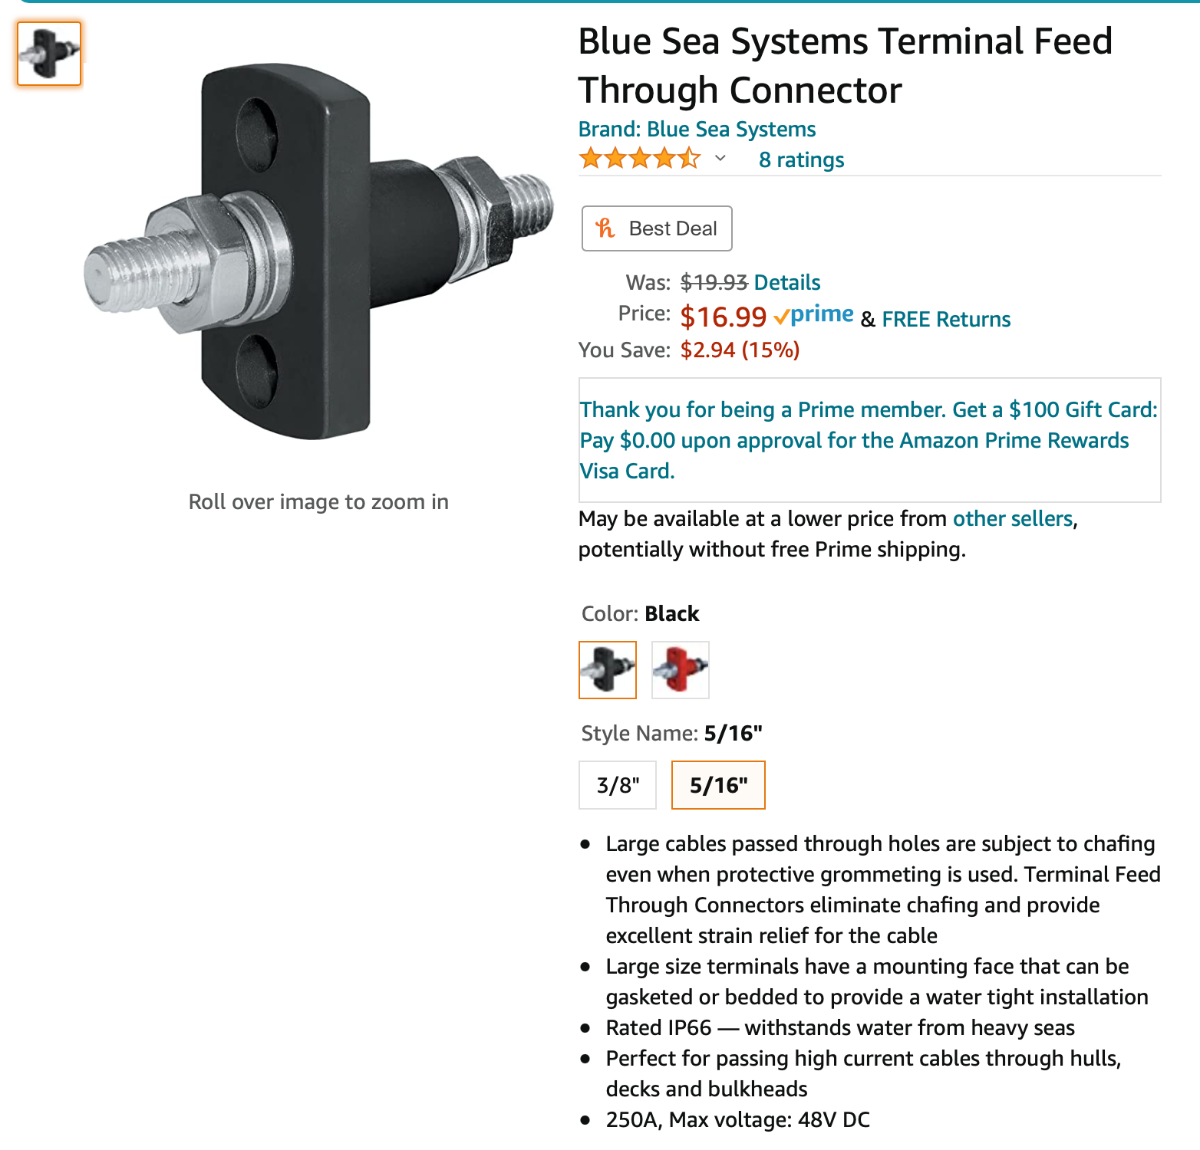
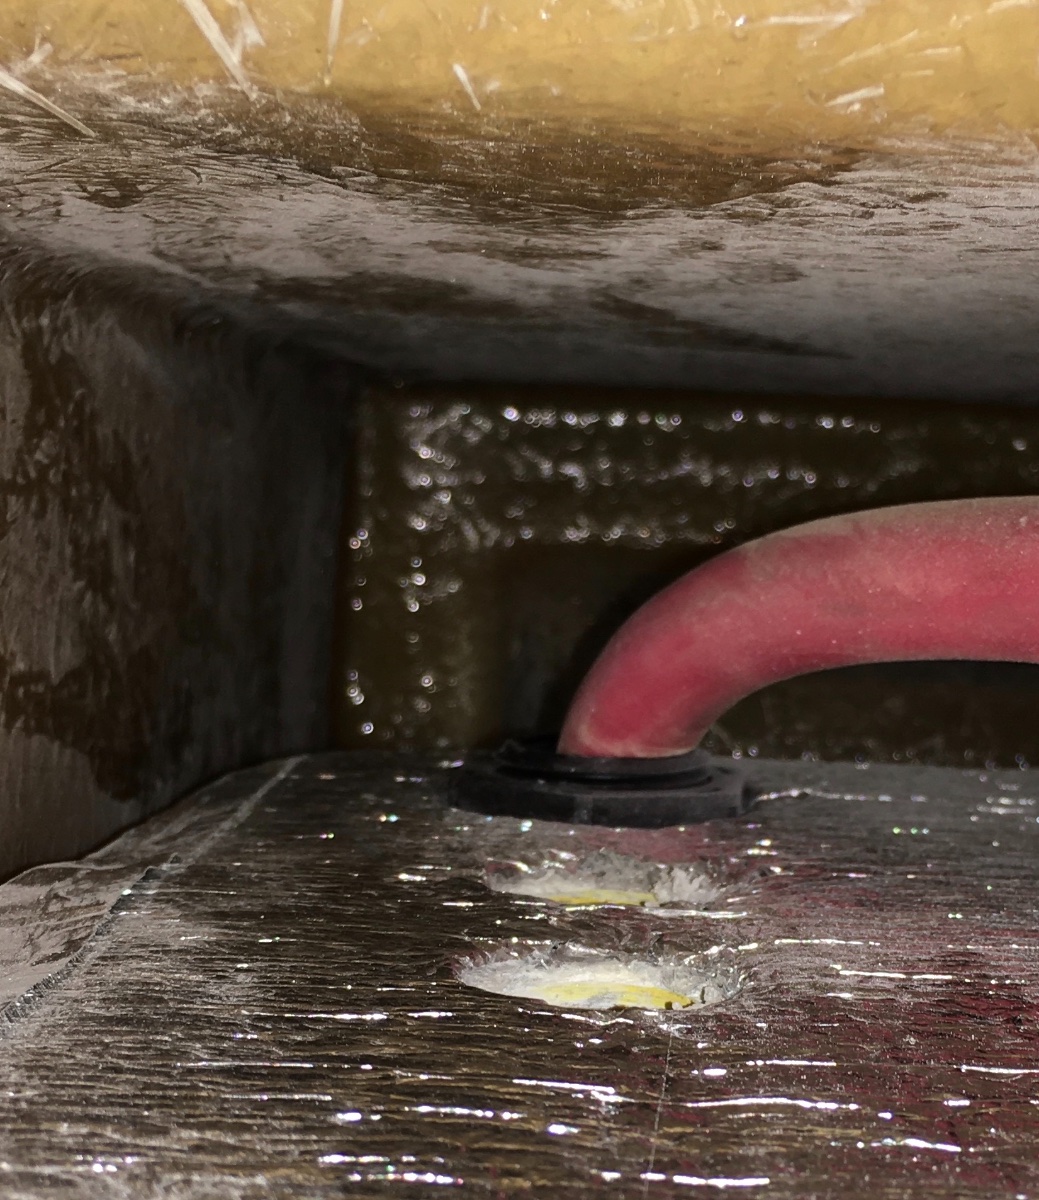
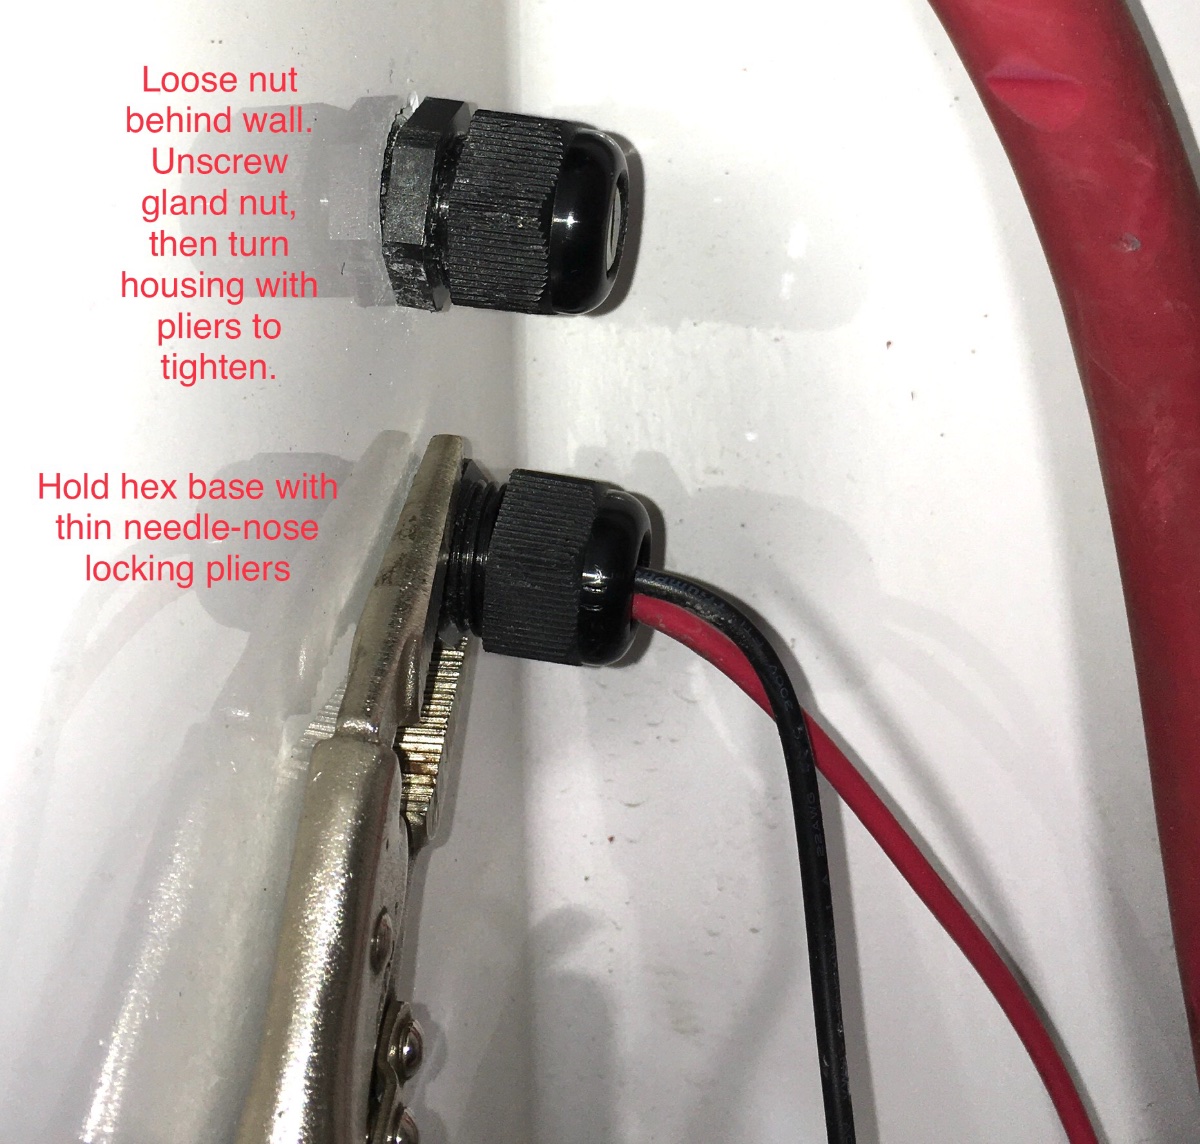
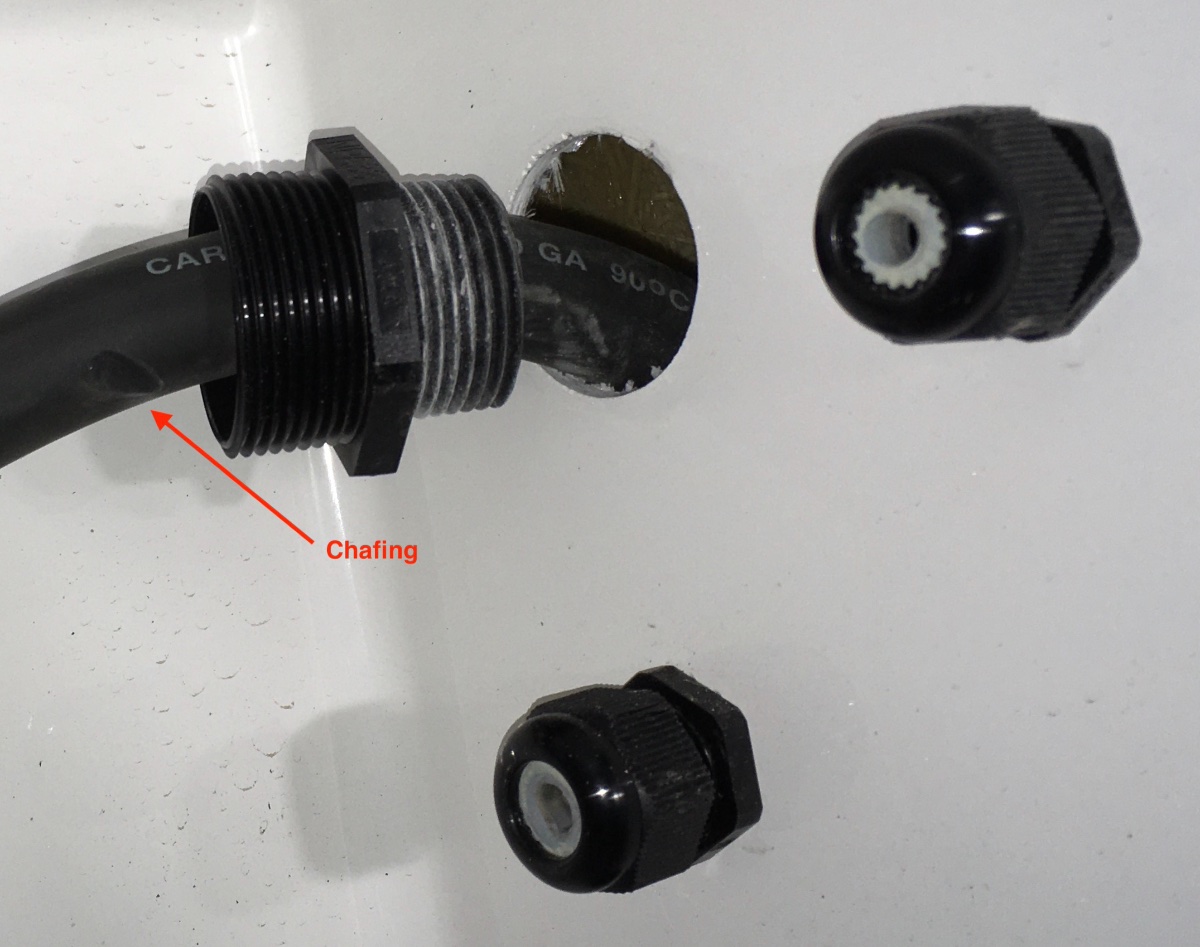
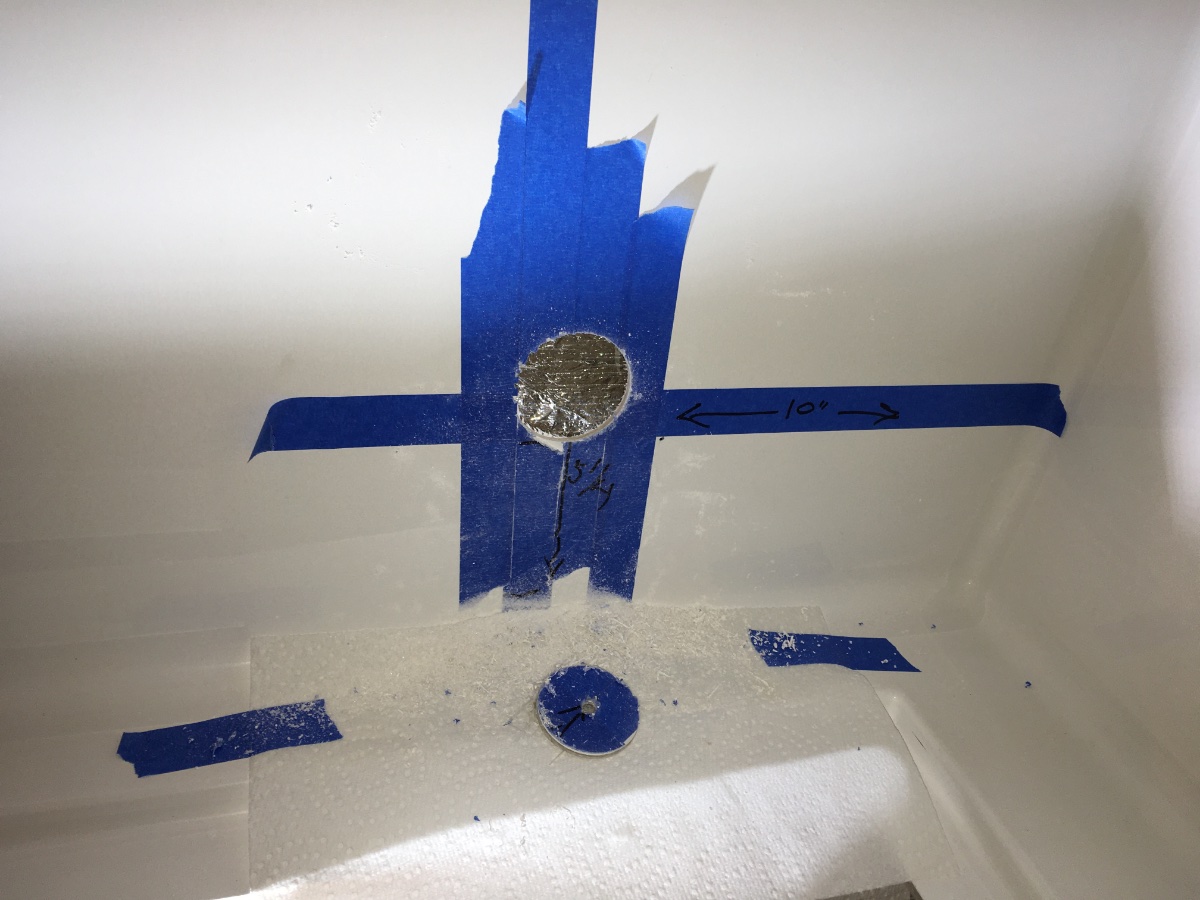
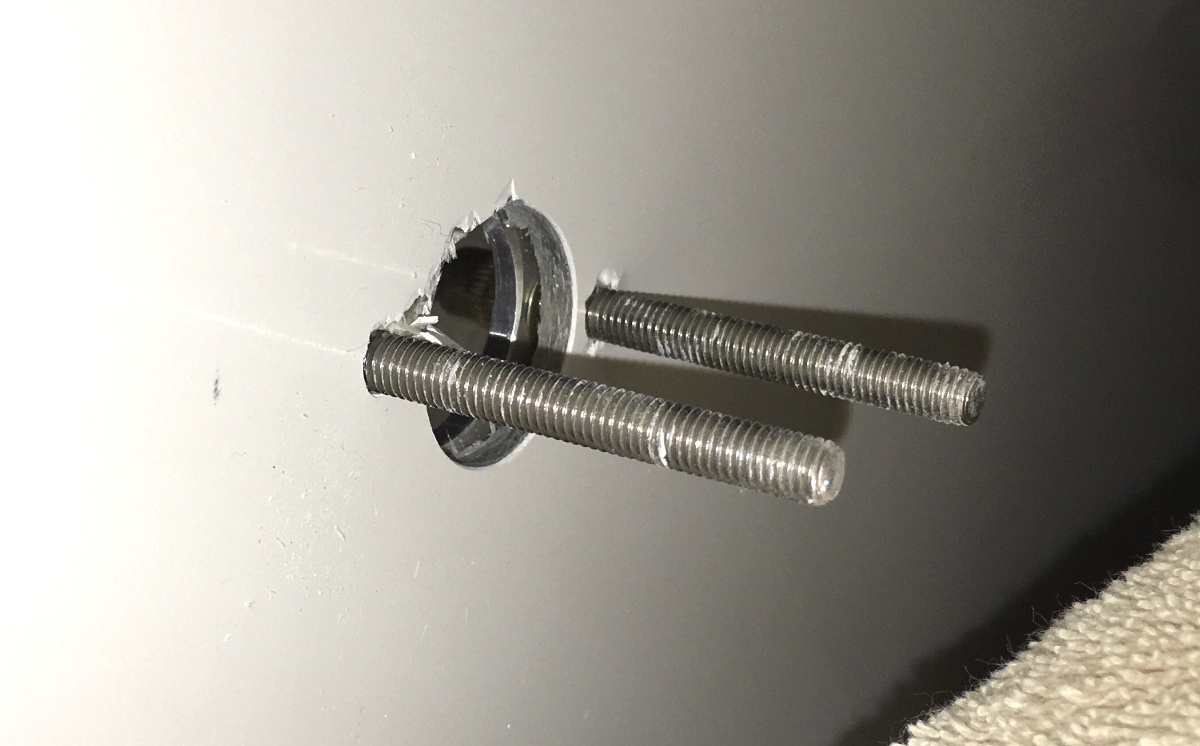
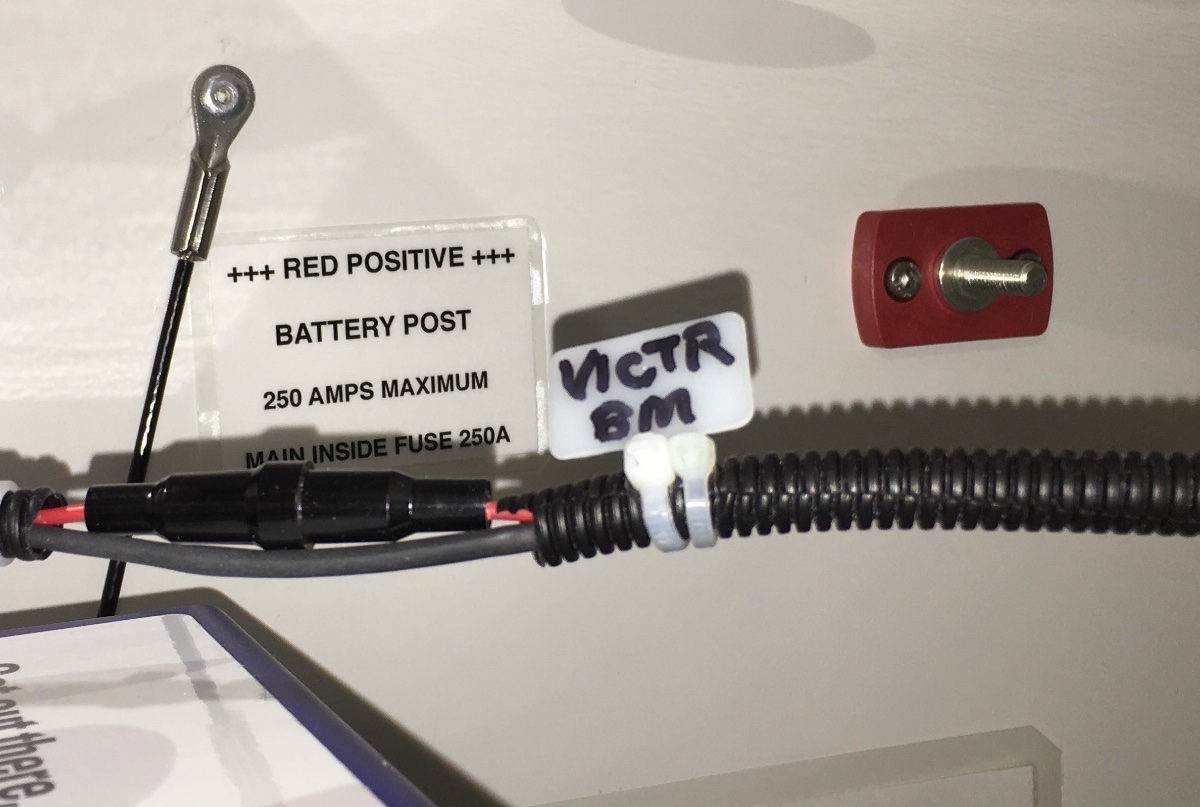
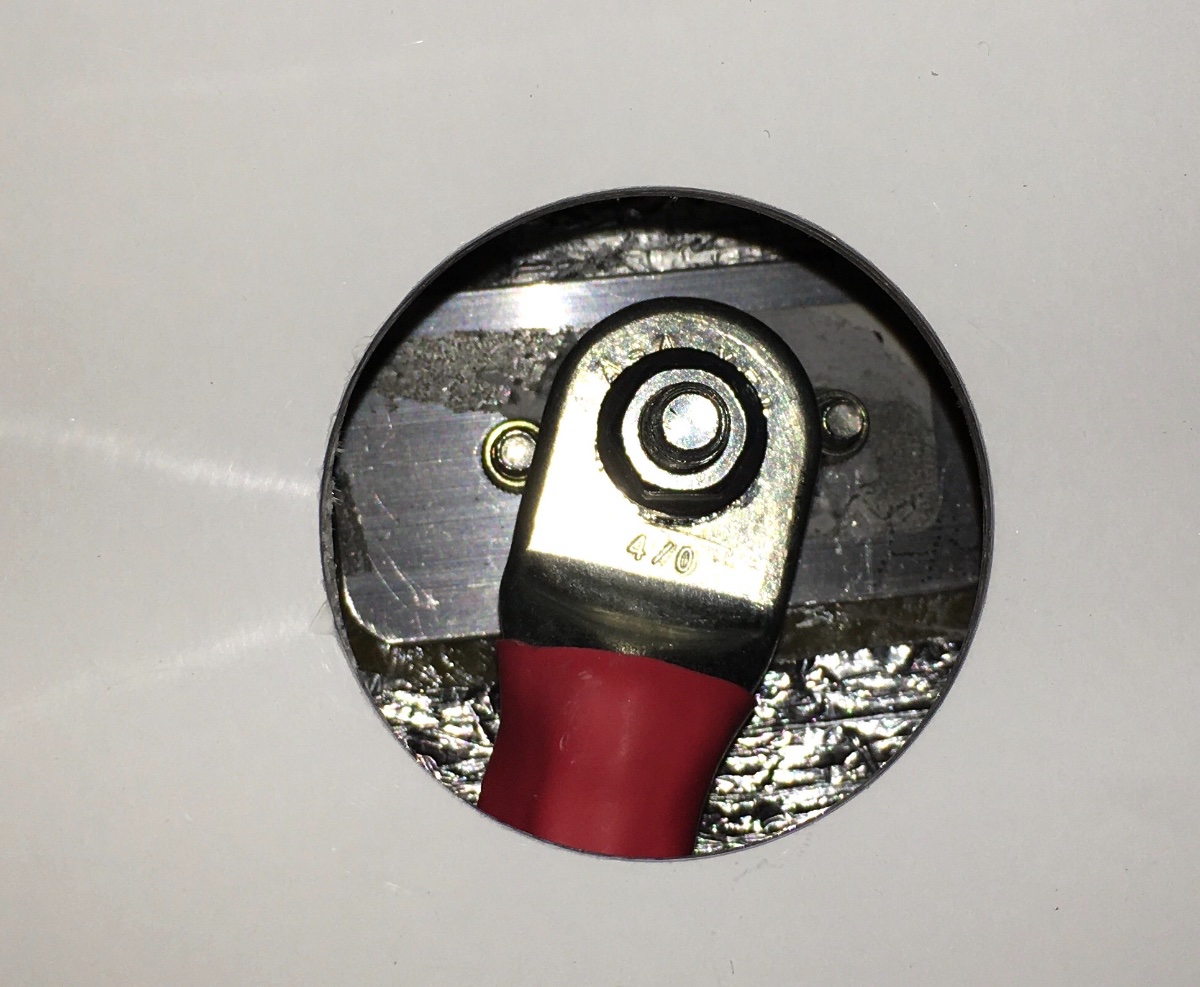
This is a thread I was very hesitant to start, it is pretty complicated, it fundamentally changes the factory design, and it is not for the faint of heart, it involves drilling big holes and reworking a lot of cables. But a couple of members have expressed interest, so I will post my pics and comments, with this caution: don't attempt this if your trailer is still under the initial 1 year warranty. And definitely don't attempt this if you are not comfortable making high quality cables. PLEASE UNDERSTAND: This mod is designed for the standard 2000 watt inverter (with 250 amp main fuse), a larger one will possibly draw too much current, especially if you run the air conditioning!!! This will work for up to three Battle Born 100 AH lithiums, I have no idea if it will be OK with other brands or models. Before doing this mod, I relocated all my small positive and negative cables inside to common bus bars. Here is the original factory wiring on my Hull 218 (2000 watt inverter and four AGM batteries). A little messy: Here is my new lithium battery setup: Each battery has its own 175 amp terminal fuse block and two short, equal length 00 gauge cables that connect to Blue Sea Terminal Feed Through Connectors, rated for 250 amps each. Access to the posts is very easy with a full sized ratchet handle and socket, simply remove two nuts, pop off the cables and slide out the tray. There is room for a third battery, and the cables for it will be identical. You need one of each color, with the 5/16" terminal stud. This matches the other terminal eyes in the wiring and batteries. prices vary wildly, shop around! Holes on the flange are sized for 5 mm screws, I used stainless socket head ones from Amazon, there are lots of sources. First you need to get out all the old cables, that might be a little tricky, since the access is very limited in the "slots" between the battery box and the surrounding inner cabin wall. You can get one arm up there, but it is really awkward and itchy from the fiberglass dust. You can do this from inside the box: Remove all the cables, you can leave one of the small wire glands in place if you need to run an extra wire there, such as a temperature sensor or a power wire for a battery monitor smart shunt. Cover the open holes with aluminum tape if you like, or leave them as-is for some ventilation (lithium batteries ONLY) More.... John Davies Spokane WA
1 point
-
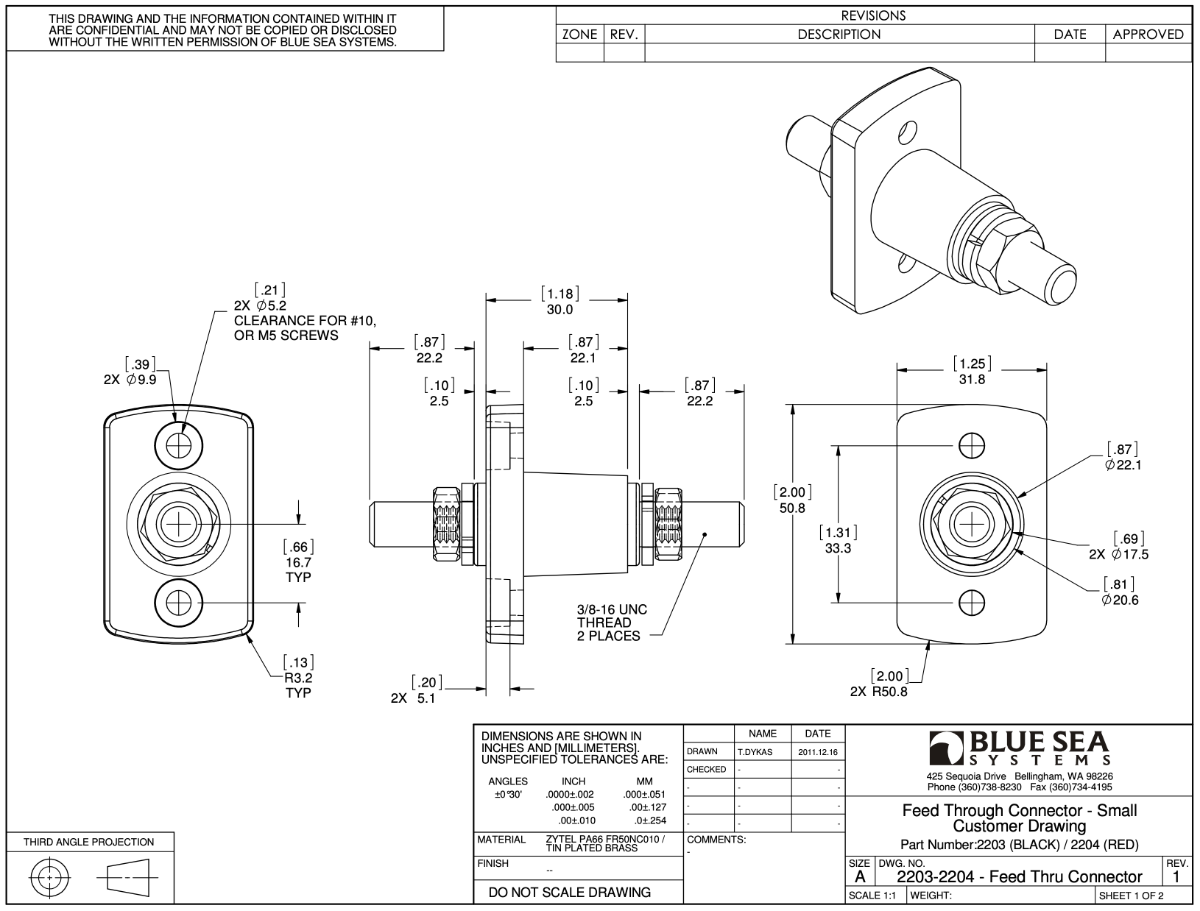
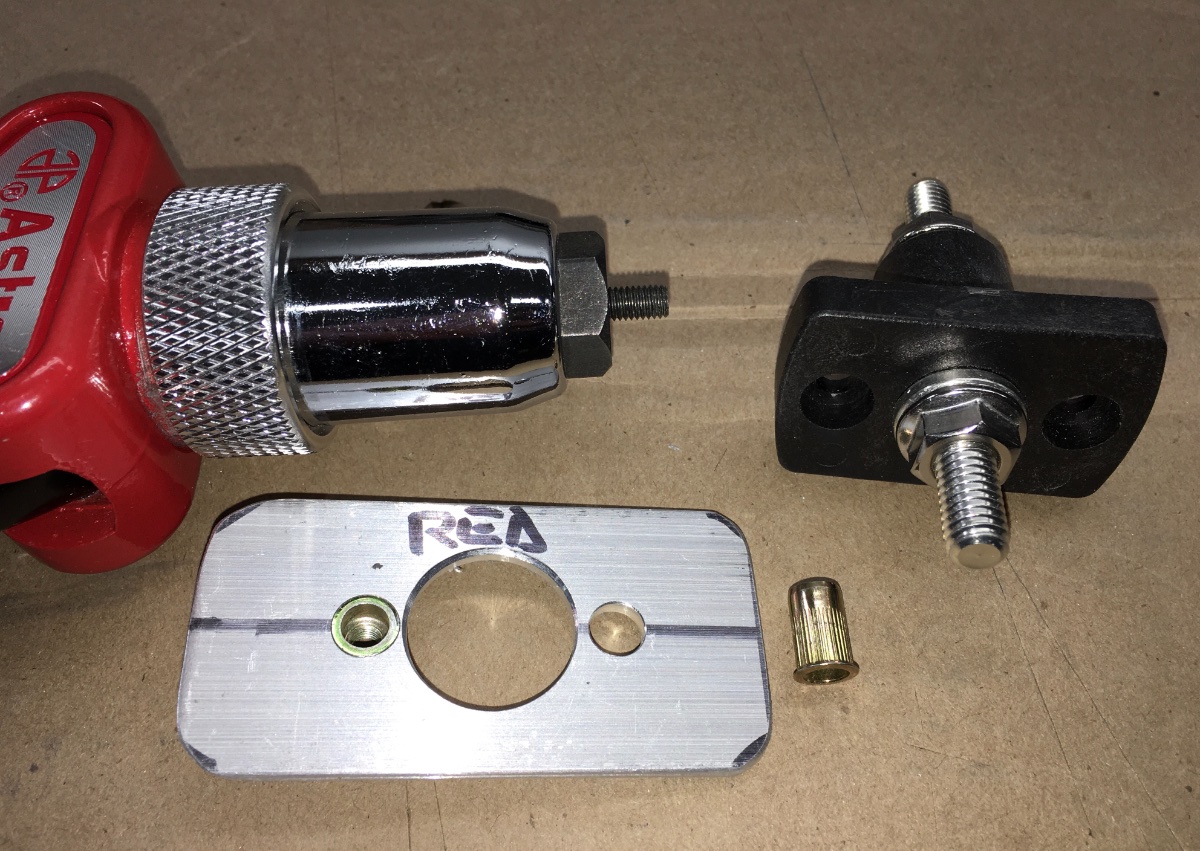
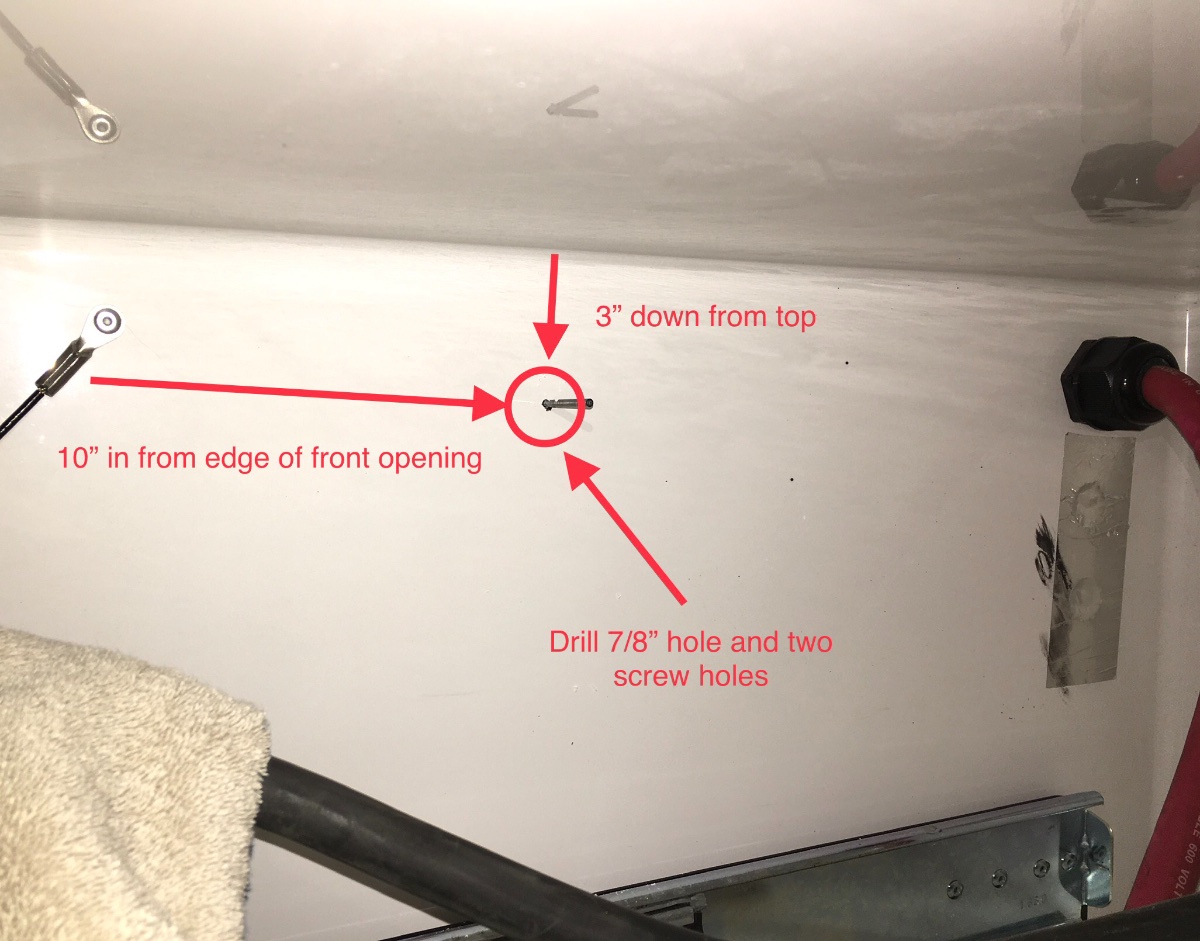
Since access is difficult, I chose to make two backing plates from aluminum 6061 T6 with 5 mm threaded inserts. That allowed me to install the posts by myself; if you have a helper, you can use self locking nuts and flat washers instead. Locate the post positions as shown. Using a long bit (6" or more) drill the center pilot hole, it has to go all the way through the two walls and that big gap between them. Drill the two screw holes in the battery compartment wall only! Then drill the middle hole to 7/8". Inside the cabin, tape off the area around the pilot hole and drill a 2" hole . This hole is scary, since it will show with the seat cushions placed against the outside wall. It will be covered with a white plastic plug after finishing. Use a razor knife to cut and peel away the foil bubble insulation, do NOT leave it in place.The silver foil is conductive, so it should not be close to the positive cable. Sand the 2" hole smooth with coarse sandpaper (80 grit). If you are using nuts, get your helper and slide in the post from the battery box with the short post facing you, and secure it with screws. There should only be one or two threads extending past the nuts, or they will interfere with the cable terminal end. If you made backing plates, cut off a couple of long screws, thread them into the inserts and place it into the box. Place the post over them and then remove one. The other will serve as a grab handle so you can hold it while you get the other screw started. Repeat these steps for the other post. Shorten the big cables as needed and attach them inside the big gaps, access is easy: Cover the holes with plugs. These work OK, but they have to be glued in place with clear silicone or they will fall out: ... 2" White Plastic Hole Plugs If you are anal, make warning placards for the posts. FYI I did not use any epoxy to bed the flanges, it could be added carefully, but I don't think it is needed. It would certainly strengthen the connection. John Davies Spokane WA
1 point
-
It should come off easier in this hot Texas weather.1 point
-
John, Thanks for the idea - which I implemented. (See attached pic.) I used a 3/8 drill bit on about half of them until it broke, then completed the rest with a 5/16. A hose test just after completing the drilling process passed with flying colors. But that test was sterile, i.e., there was no "gunk" from overhanging trees on the roof which would flow and lodge within the holes. Alas, it's spring, so I've allowed said gunk to build - and indeed it gets lodged at the entrance to each hole. Yet, the water still drains off, albeit a bit slower than when the holes are completely clear. So, keeping up with the debris on the roof is (another) maintenance item. P.S. I plan to apply some Dicor lap sealant to the bracket as water will obviously get behind the bracket (and do bad things, especially in the winter). In fact, I've applied Dicor to all of the roof components.
1 point
-
I agree the seal really holds an inordinate amount of trash behind the awning, as do the mounting brackets (as JD shows), but I think I'm going to live with ours for awhile. I'll just hit the area with a good strong water blast when Ollie gets a bath. At some point it may become history, but for n0w, not. At some point, I've got to just use the Oliver, and stop re-engineering stuff...…… well, that and buying more chairs....and, and, and... RB1 point
-
Ideally, they'd add a 1" or so spacer between the mount and awning. Then they could lower the awning back down to meet the roof with a seal, just 1" further forward, and there wouldn't be any obstruction from the mounts at all. Even though I don't have the vertical dam on mine, it's still the mounts that collect the garbage. I think a clean, unobstructed seal would collect far less gunk, and be much easier to spray out with a hose. I also think that they could use a stiffer and easier to clean L-shaped gutter rather than trying to seal it with the soft gasket.1 point
-
Ours is pretty much a long strip of some kind of rubber tubing. It's over ten years old, keeps the rain off my "patio", and, I do travel and live with a lot of rain. 34 inches annual average in my area, and the trailer lives outside 24/7/365. We run a hose up when we can, and wash out the detritis. However. we don't have to deal with a lot of clogging junk..no pines, sticky cottonwood, etc, on a regular basis, at home, or on our camping property in North Carolina. Just leaves. When mine dies, I will replace it. I prefer the gutter to the rainfall in my patio. I think it depends a lot on your region, and where you camp. Each situation is different. Abd, we do have the fiamma awning. Perhaps that also makes a difference. Sherry1 point
-
The folks that assemble these trailers do not always think about drainage. The cabin steps trap lots of water when folded and need some holes. My suggestion before you remove the rubber seal is to drill a couple of 1/4” or larger drain holes as indicated. They need to be large enough so that tree droppings won’t plug them up. In winter that may not be enough. If you store it outside the seal should be removed entirely or you will get a large ice dam. Since I started this thread I have had no regrets about taking it off. Well, one regret. The tech who installed it used a permanent blue ink pen to lay out some guide lines and they won’t come off! Have you alerted the factory about this issue? It is not something minor and they need to know. John Davies Spokane WA
1 point
-
I agree with you, Overland. That design is just a non-starter for me.1 point
-
I'm resurrecting this thread because I just picked up my rig (on 04-11-2019) and see that water pools behind the awning when the seal is in place (see pic #1, IMG_6248). Although I like the idea of preventing rain from running down the entire side of the rig, I don't like 2-3 inches of water pooling back there. The water pools around the awning brackets and much of the bracket is submerged. I suspect that the holes for the bracket bolts go all the way through the outer shell, thereby presenting 8 potential leak points. There is evidence of sealant on only some of the mounting brackets and bolts, so I would assume a steady diet of pooled water would find its way into the rig up there. I'm trying an alternative to removing the seal altogether, which is to slide in a small drain tube in each "pool basin" (see pic #2, IMG 6250). We'll see.
1 point
-
I still have mine and have thought about removing it. I'm not sure it does much good. It does collect debris and is hard to clean. Will be interested in what others have experienced. Mike1 point


.thumb.jpg.e34bf01ef7f7d5e99ad31856d45afbeb.jpg)


-
Recent Achievements
-


")


")


