Leaderboard


Popular Content
Showing content with the highest reputation on 07/14/2023 in all areas
-
I’ve used my air compressor to blow a few bursts of air into the fresh tank drain hose that exits under the hull. That pushes any plastic shavings out of the drain hose and valve, back into the tank. Just make sure the drain valve is open. It worked well. I’ve done it a few times now. Eventually it seems that all the little plastic shavings in the tank will be sucked up and captured in the filter screen on pump inlet so you can get rid of them and the problem goes away.4 points
-
Larger wheels are purely for looks on a truck, they give a harsher ride, are more prone to rim damage (less sidewall to cushion the impact), and replacement tires (and wheels) are more expensive. So unless you love the look of bigger wheels, stick with the base ones. You can always install aftermarket wheels in the future. Bigger wheels are heavier, so the extra rotating mass can add up to a significant amount, that will slow your accelaration very slightly, but won’t measurably affect your fuel economy. Get the 4WD now or regret it later. Some trucks offer shift in the fly 4WD which is as convenient as full time All Wheel Drive (and it is a lot more effective). You just have to push a button when things start to look messy. The Bad Olde Days when you had to stop, get out, and manually engage the two front freewheel hubs is very thankfully long gone. Where do you live? Please add that info to your signature. John Davies Spokane WA4 points
-
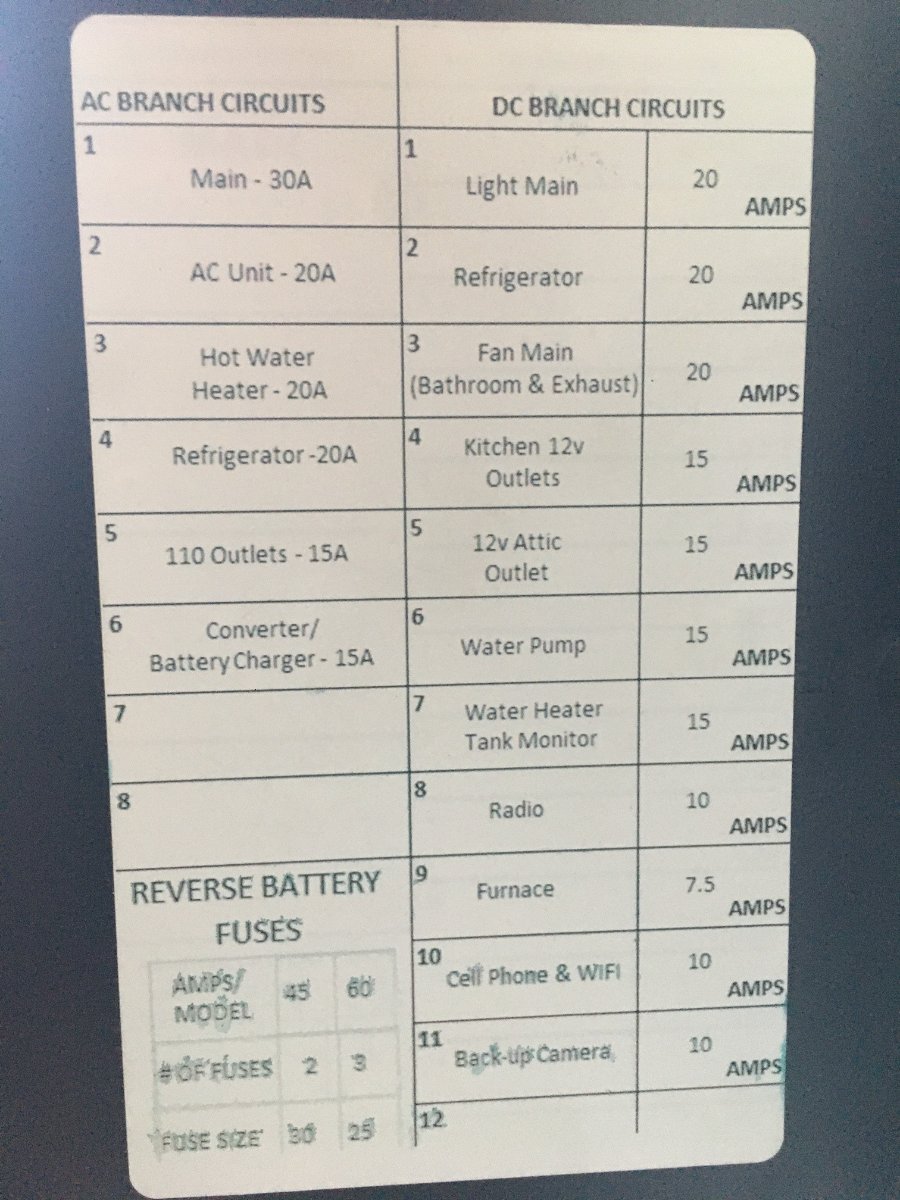
Under the dinette there are 125V AC circuit breakers and 12V DC blade fuses in the Progressive Dynamics 125V/12V power supply. The water pump has a 12V 15 amp blade fuse #6 on our 2015 LE2 Ollie. 12V fuses might vary in number, so look at the number on the left side of the fuse to match with the 12V fuse list.4 points
-
Zerk fitting caps. Available on Amazon. LockNLube Grease Fitting Caps (50 Count) (Yellow) https://a.co/d/1SYGqmF
 3 points
 -
So far it's great! Others on here have used them for thousands of miles. I have the Super Duty model, and I added the foam fender cushion, EZ Pull, and long ramp options. After we get back from this short outing, I'm going to order a couple of sets of folding or quick-disconnect pedals for additional clearance.3 points
-
I take pics of things I have trouble seeing, and after crawling on the floor to get to the fuse panel, I took a pic for future reference (attached). Yours may have a different layout, but on mine it's the 20A DC fuse #3 that feeds both fans. It actually doesn't matter whether solar, generator or shore power is connected, the DC branch circuits feed off the batteries. Pulling this fuse will remove "all energy" to the fans, no matter what incoming power feeds are connected. This is true of all fuses and breakers, whether it's an automotive DC fuse box, and AC panel in your home or an RV which has the combined AC/DC panel. The only power getting to this fan is through this 12V fused circuit. The only reason to throw a main switch is to disconnect all power, coming from the batteries and any connected sources. This would only be necessary if you need to replace the power panel, add a new run for an appliance, wire a new breaker, or other major electrical surgery!
3 points
-
My apologies to all for my late reply to this post. My mother passed away very suddenly on July 6 and we have been traveling with our Oliver to be with family and mourn our loss. During this trip we have successfully run our Truma Aventa with our Honda 3200i in eco mode for a very ptshort period. As a result, I see no need for a soft start for our AC based on our results using the 3200i to power the Truma. 7/21/23 edit - see update below. No go on ECO mode running the Truma AC. Patriot🇺🇸3 points
-
Finally got around to finishing up this project. Ended up ditching the rocker switch with dimmer setup and decided to add on/off dimmer switches on the outside above the lower fridge vent instead. I was a little concerned about running wiring behind the fridge so I ran all the wiring in a high temp shield back up to the panel. Much nicer to be able to control the lighting from the outside and I think it's a cleaner install this way, too. On to the next project! Dimmer switches High temp wire shield
3 points
-
Resetting the fan is the trick. Not sure why the control board forgets who and where it is BUT all energy has to be taken away to reset it - that includes the energy from the solar panels. You could do that via the resettable fuse below and near the pantry. Charlie.3 points
-
We bought our Olliver just 5 weeks ago. We went to see it solely because it is so unique, and after selling our Bigfoot Class-C I thought we should instead buy a lite TT for the seasonal camping we do. Ours was priced quite a bit less than your asking price, and even so, I thought, "no way we're buying this, spending over $50K on any TT! We always joked about the $100K AS TTs we would see at campsites. Thought, why do people like these and spend so much money? Then ours was for-sale locally. We liked the owner who is respected in the community, it appeared well maintained and had the features we required (solar, inverter, mega Ah battery bank, Sat dish, etc.). With a little research, it appeared if we passed on this, we would have to research online and long-distance and likely not do any better. The prior owner even dropped off our Oliver, parked it in our RV space and connected the shore power! LOL I rarely buy new, when good used is available. Like I've bought over 50 used cars or trucks in my life, and I can only remember buying 4 new cars. Would not have a custom home built, though prefer to find the perfect old house on a beautiful property, even if it will require 100s of hours of my own effort. I would prefer to spend less used and provide the M&R work myself. But that's me, as I have the tools and skillsets. However, I'm an odd-ball and I realize 90% of people buy new, especially at this price point, and "call the guy" when service is required. One suggestion is to simplify your ad. Write up only the big options and improvements and less of the little ones (e.g. the Zerks). I write like you do, but I see the guys who sell vehicles in 1-2 days, writing little to nothing in their ads. I had a party overlook my Bigfoot, because as he said, "We're looking for something more original" (the guy had no understanding of RVs.) While I had completely rebuilt the Ford suspension, did all maintenance replacing all fluids, belts, hoses etc. on an 18-year-old rig. Designed, sourced and installed a solar-inverter-battery system from scratch, new large-screen A/V system, new AC, 2 new fantastic fans where they had vents and no power, and the list went on-and-on! I had volumes of posts on their BOCI Forum, 8 pages alone on my solar upgrade project. Yep, over-modified for some. The man who bought our unit low-balled me and he was not at all interested in upgrades I had made. I did OK, but lost some money since he did not see value in the upgrades. I thought, how long to our next offer. I got him up $1500 and we ended up $4500 under my asking price. In seeing your ad, understanding the perfection of your unit, I thought this... It must be worth it (as others here have confirmed). Given prospective buyers with available cash for such a considerable purchase, would these buyers prefer to spend $75K for an extremely well-maintained unit, or go directly to OTT and buy a new one for $100K, while enjoying the new-buyer experience, having the warranty and manufacturer support? Buy new? Or save a lot buying one that will likely need work. Your Ollie sits in the middle. And this creates a very small market niche for your unit, and it will take time. My Bigfoot was on the market 5 months and the dollar loss upon offer seemed better than waiting another month or more. Best wishes and GLWTS!3 points
-
BTW, when bearings are packed properly, they should last for 1000s of miles! There are some that neglect maintenance and some that over-do-it on their toys. I've certainly worked over 20 brake jobs in my life; disc and drum brakes, on cars, motorcycles, trucks & trailers. I will not complete an automotive front-end brake job w/o repacking the bearings. Brake shops do not do this. 98% of the time the old bearings are fine, need repacking, not replacing, unless they're loose or dry when opened, or seal contaminated. I rinse/spin the bearings in old gasoline, then sometimes in a Dawn-water solution, using compressed air to clean each time. I have the nice repacking tool, but back in the day just palmed a swab of new high-temp wheel bearing grease. I expect my new brake pads to last 30-60K miles, depending on application, and I expect to see the bearings still fully packed with grease the next time around.2 points
-
My 2023 (Hull 1360) with 1-1/4" receiver says 150 lbs. I'm sure that the Reese option is at least equivalent, although the weak point is probably upstream from the receiver. The two bikes with batteries removed and 1UP hitch spec out at 153 pounds. I'll definitely be keeping a close eye on them when we go to a state park 114 miles away on Sunday!2 points
-
Oversized wheels, yes agreed, not on a TV, those are for kids and looks. Do they really look better? Sometimes I see truck and cars this way that look awful, but to each their own! Also, stay away from anything lifted, since this truly thows off the suspension geometry, not for towing. I had a 4x4 Ram Cummins for 18 years, and the 4WD came in handy at times (living in VA, TX and AZ). I just bought an older 2WD Ram Cummins, solely for the purpose of an Oliver TV, knowing well the difference from years of experience. I was looking for more highway stability. When you consider a TV, the majority of weight is on the rear axle, making 4WD an option used less often. The 2WD model sits approx. 6" lower, so it's an easier climb to get into as we get older. The lower profile certainly provides more highway stability. We just climbed up to a 7600 ft elevation campsite in AZ, crossing 25 miles of washboard dirt roads and the final stretch included off-road riding, with no issues. But yeah, I will admit I miss the 4WD low-gear setting! We don't RV in bad weather by choice. When the weather is bad, we'll just boondock another day. We have our wonderful Lexus GX470 at home with AWD for off-roading around AZ and for when it snows.2 points
-
Perfect! Happy Wife - Happy Life; true as ever!2 points
-
I towed my 2008 single axle Elite 70,000+ miles without an issue with my Toyota Tacoma 2WD . . . THEN . . . going up a steep gravel slope in the northern tip of Nova Scotia, I thought I wouldn't make it to the top. Not. A. Good. Feeling. When I got home, i had my local mechanic replace the rear end differential with an Eaton Industry limited slip version. Next best thing to actual 4 wheel drive. It helped me several times over the next 40,000 miles. My current TV is an F150 with 4WD. I will not go back to 2WD.2 points
-
It all depends. If your travels are groomed rv park to rv park , and you always stay on paved roads, and usually travel in flatter country, 2wd is fine. But, chances are, you'll someday, somewhere wish you'd spent a bit more, and bought the 4x4. Our experience is similar to @Frank C . The 4wd in our ram has "saved the bacon" many, many times, and on our camping property in WNC, there are areas that simply require the 4wd (gravel, steep inclines, mud, etc.) As much as I love my 2wd Silverado, it's not a good fit for our camping style, as we discovered early on. (It's still great for local towing in Florida.) The payload difference is basically the added weight of the 4wd drive train. 4x4 trucks are simply heavier than 2wd. I do get minimally better gas mileage with the Silverado than the Ram, especially in town.2 points
-
I did just read another post about the MAXXAIR where it stated there was no fuse for the fan! Why in the world would any manufacturer do that? If yours does not have a dedicated fuse for the fan, then what Charlie suggested would be required, turn the battery master switch to the open position.2 points
-
I would not want to have only 2WD for a TV for the Ollie. There have been multiple times at muddy campsites or sloping uphill gravel roads, and even on the slight slope of my grassy yard when wet that the 4WD on my truck was necessary to be able to move the Ollie.2 points
-
Agreed, we have a lot of washboard dirt roads out here too! I have the 2" model and the first thing I did was to remove it! It blocks easy access to the bumper and tank hoses too. I can fit a couple of bikes in the truck bed easy enough and they would stay secure. Not a bicycle guy, since we moved to the mountains, but I take my Honda dirt bike often and at 238 lb dry weight, it ties nicely in the truck bed and would be too much weight for the rear rack anyway.2 points
-
Good idea on the bike pump.2 points
-
Slightly off topic, but we picked them up yesterday. They work great on the 1UP rack, but I didn't account for the rear fender stay width on the dark blue one. So I had to remove the stays and zip tie them to get it home. I'll Mickey Mouse something together for the weekend, and meanwhile, there are a set of fat tire adaptors on the way from 1UP. The bikes didn't move over railroad tracks or bad Ohio roads on the 18 mile trip home. Today I'll move the rack to the Oliver and try out my Reese bumper hitch for the first time. I sure hope things work as expected!!
2 points
-
😂 With the forum software auto-censoring the park's name, I just *had* to investigate. For those curious, the word is a name for a sex toy explicitly phallic in appearance. Think, Waldo, and you're on the right track... I'm guessing that it was named for someone with an unfortunate surname. There should be a link to the park here Absolutely stunning scenery and photos!2 points
-
There are two red wires that connect to the pump. I had both fall off after a bumpy ride. Check those if the fuse is good. Mike2 points
-
Thanks for all the great advice and tips!!! Just a quick update, out first overnight trip was good! We had a short tie-out I used at our stairs while we sat outside, and the bark collar. A morning walk does wonders also. She did have to be reminded a few times to be sweet, she is probably more on the overprotective side. She is still young too... My only negative is that I had big plans for her to sleep on the dinette... but she chose otherwise 😄 who needs to stretch their legs out, right?
2 points
-
Yes, if they aren’t too badly out of round or worn. The drums are marked with the maximum re-bore diameter.
2 points
-
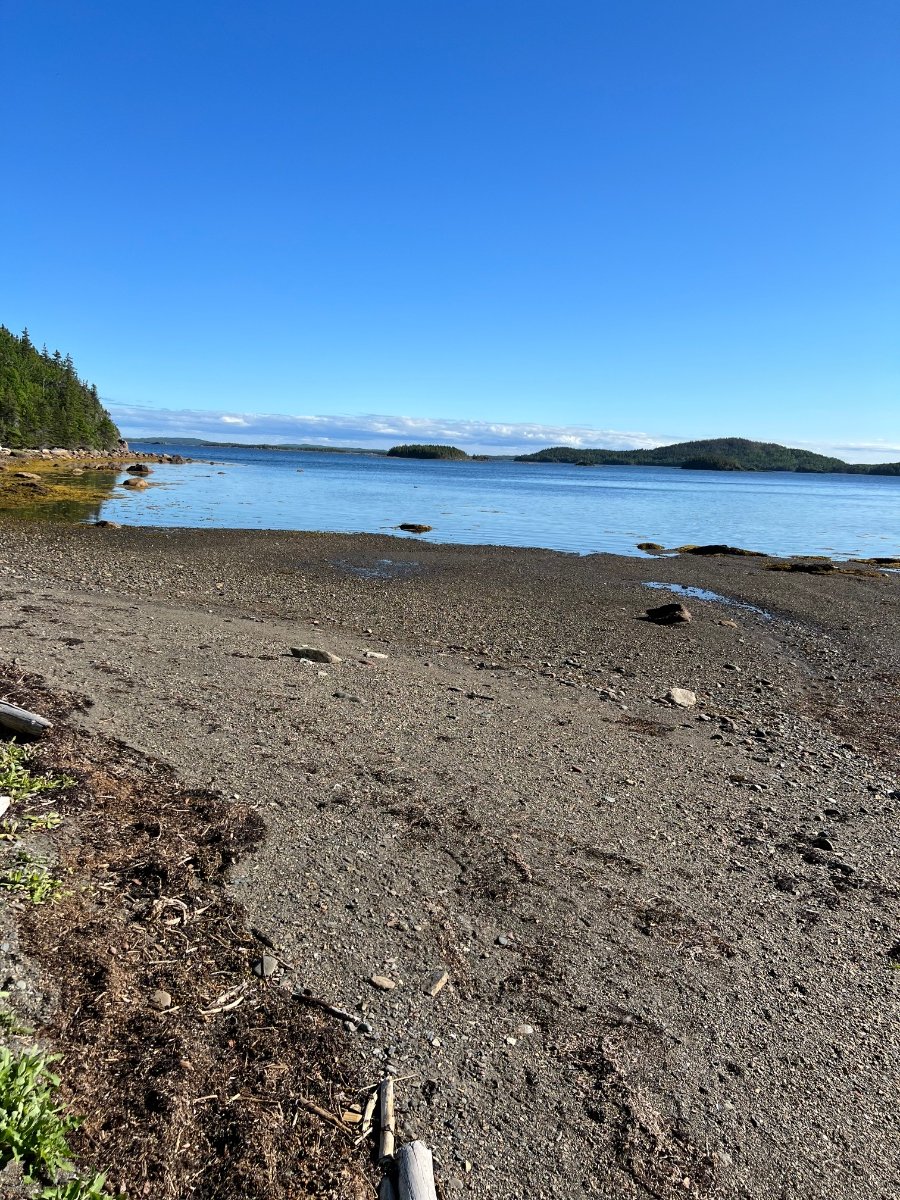
***** Run Provincial Park Beach that was a short walk from ***** Run campground
2 points
-
Beautiful 70 degree day in Brighton Pilleys Island trail Viewing point near Triton
2 points
-
Something to consider-they were in a blister pack that I bought from OTT in April 2022, thanks2 points
-
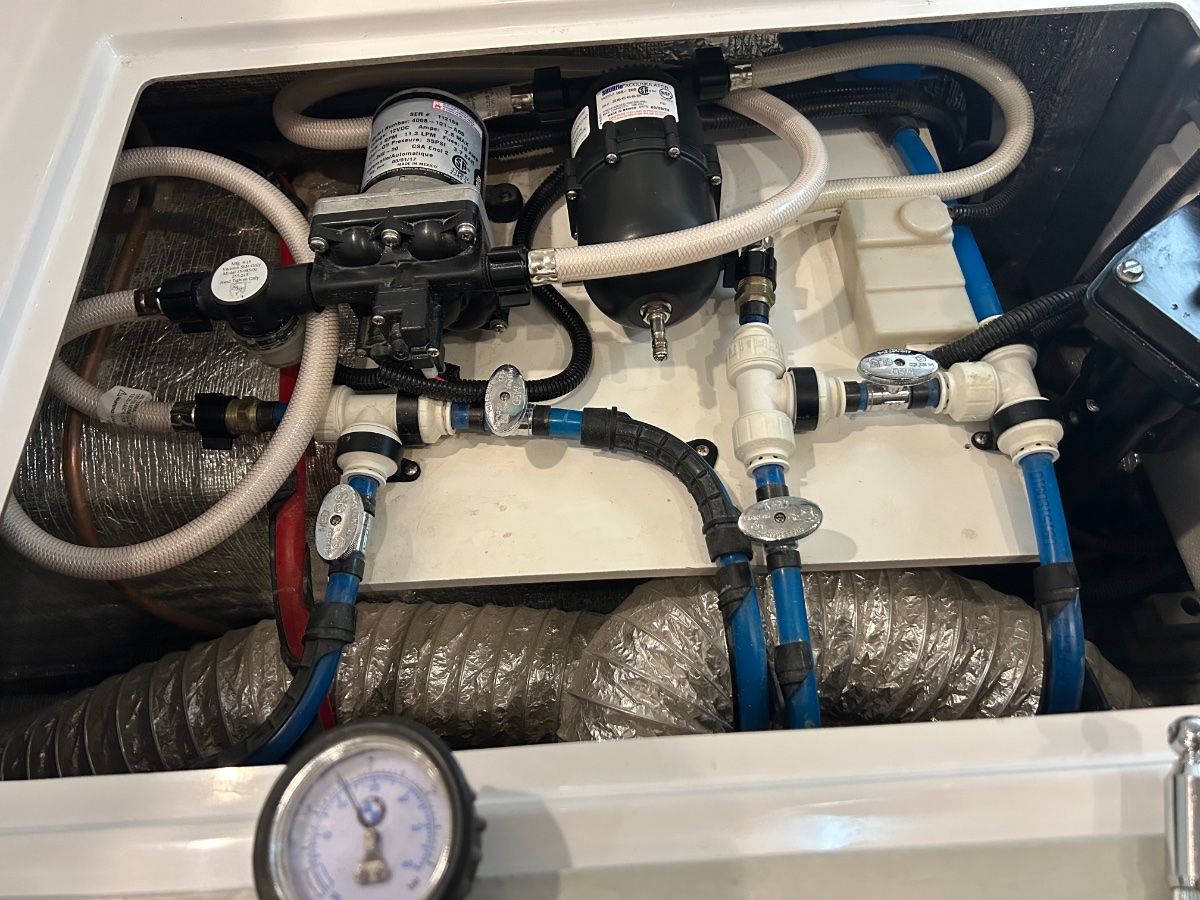
We don't have a need to winterize, so we installed the accumulator horizontally with access to the Shrader valve. Easy install including the longer ShureFlow hoses for the "quiet modification." We've mounted a small mountain bike hand pump on the underside of the forward curbside hatch cover for easier accumulator bladder air adjustments. We've played with air pressure settings between 20 and 40psi; settled on 30. With this pressure, water seems to flow longer from the kitchen sink before the pump starts. FWIW: It does seem to run a bit quieter, according to D. However, I can barely hear it at all... Cheers! A & D
2 points
-
On my 22 it would cause it to retract any time the lights of the truck came on such as opening the doors or locking/unlocking it. i suspect its tied to the trailers running lights as those would come on as well.2 points
-
I wouldn't want to try that with my Silverado 1500. Even though I have the lighter Elite. Your 2500 def gives you more ability to"power through," in lowered gear.1 point
-
Something as simple as these work just as well. I bought these for when I do brake jobs: Amazon.com: 18 Pieces Brake Bleeder Cap Grease Fitting Caps Rubber Zerk Covers Brake Caliper Dust Cover Brake Bleeder Nipple Cap for Cars and Motorcycles : Automotive
1 point
-
Looks like the 410AHr option would fit nicely in the battery compartment... $1600/helluva deal1 point
-
Great idea - I'll look into QD pedals as well... Thanks!1 point
-
Very sanitary install, @CRM! Sweet set-up! Thanks for posting your mod.1 point
-
The picture of the wiring diagram I posted above is from the 2018 Elite 1 manual and it indicates the the WP fuse is 15 amps, not 20. @rideandfly's pictures appears to be from an LE2, but it does show that the WP uses a 15 amp fuse, which is blue. Mossey1 point
-
Can you post a picture of your fuse box label panel? We might be able to guide you to the correct fuse to start troubleshooting...1 point
-
@Patriot, we are so very sorry for your loss. No apologies necessary. Spend your time with your family, and hopefully the good memories, and your faith, will carry you and sustain you through this very difficult time. Our sincere condolences.1 point
-
Used ideas from previous post in this thread, Thanks! Removed old adhesive with 3M adhesive cleaner. Placed blue painter’s tape along top line to guide where new belly band will be placed. Rubbed 3M White Scotch-Brite pad over areas where belly band 3M adhesive strips will contact. Applied 3M adhesion promoter with outside air temperature between 60F and 80F as per 3M instructions. Wore a respirator while using adhesive remover and adhesion promoter. The new belly band is shipped rolled with chrome on outside of roll in an opposite bend direction when applied to the two corners of an Oliver. The day before installation, rolled the belly band with adhesive strips outward in a 3’ diameter roll for overnight at 70 to 80F to get rid of opposite band bend memory to make it adhere better in the corners. The installation went well and should not have any future “Belly Band Sadness”! 🙂
1 point
-
On Amazon, $485, for the 30 amp, but it does include a dogbone. 🙂 and, free returns. 🙂 ActiveStart Softstart RV Air Conditioning 30 Amp Rating; 115 VAC; Reduces inrush current for generators.15K BTU Needs min 2500Watt 13.5K needs 2300Watt Not for Solar Generators https://a.co/d/fK8bpqW1 point
-
In all fairness, the devices he "tested" in the video you posted are listed as not suitable on the active start website, with his almost 15k ac, and a puny 2000 startup/1600 watt running genset. (Not puny for me, with an 9.5k ac, but puny for a 14.5k ac like his.) Website says will not work with a solar generator. https://active-controls-llc.myshopify.com/products/activestart-30-amp-acs30p This guy probably gives a better, more in depth review. He has a big 4k genset, but he can run his 13.5 k ac in ecomode, with the activestart. I have read that it may be problematic if you have a hybrid inverter, like a victron multiplus. Since warranty is voided on a number of ac units if you add a softstart physically wired to the unit, this could possibly be a good alternative. Also possibly good for non tech folks, or those who don't want to work on the slippery roof. Price tag is certainly higher than a soft start wired to the ac. Maybe someone can drill down further into what the unit "actually" does, and why it works, if it does. Why do you need it with your Honda 3200i? Are you hoping to run in eco mode? I'm curious.1 point
-
This popped up in my feed today. Basically a replacement for my favorite tried and true sealant (butyl tape), for windows, vents, and ports. The actor in the video claims it is much faster to use than butyl tape. Since we've used tape so many, many times, we're pretty fast with that. Sealant doesn't look as thick, but it is a nice light gray. I got a kick out of his "finish" with big blobs of lap sealant run around a nice installation of the butyl caulk with the vent. (We normally finish the edge of trimmed butyl tape with a nice even bead of white caulk, to keep the butyl from attracting dirt, and limit uv exposure.) We'll have to wait and see how this compares to old school butyl tape, in the long run. It's so new, I haven't found any user reviews yet. The "can be used on some plastics" is also a concern. I'd want to have a conversation with dicor before using it, as fiberglass is actually glass reinforced plastic, as we all know. https://www.rvtravel.com/product-dicor-butyl-rubber-sealant-2100/
1 point
-
Plastic chisels are also handy. Here’s a set similar to the one I bought.1 point
-
Tiered annual fee determines how often the application scans for last minute cancellations and availability, across multiple reservation sites. https://www.prnewswire.com/news-releases/harvest-hosts-launches-campscanner-to-help-campers-score-sold-out-national-parks-and-state-parks-301827777.htm https://www.campscanner.com/
1 point
-
It's outlined in "terms of use" for campscan. I haven't signed up for the app yet, so I don't know if it's in the actual sign up or not.
1 point
-
Maybe they have done away with auto renewal, it’s was been over a year ago. I believe at the time you needed to uncheck ✅ auto renewal. This was not easy to see the uncheck AR when we registered/signed up. I believe what happened was we never unchecked the auto renewal box. We just happened to see the auto charge on our CC catch the auto renewal just in time. We called HH to cancel and they allowed us to cancel even though we were past our renewal date by one day. The rep we spoke to said they had a number of complaints about the auto-renewal box needing to by unchecked. She said they were working on changing it. Let us know if they did. 😊 You may wanna give them a call and ask what their current renewal policy is.
1 point
-
Yes, I'll post more pics soon once I have all the wiring and switches complete. I made the penetration just underneath the awning bracket directly above the porch light near the door.1 point
-
You might want to try Wanderinglabs.com. Their "basic" program doesn't cost anything. Bill1 point
-
Hi Raspy, sorry, I am not attending. I normally try to stay on the west side of the Great Plains…. but I will be in central Texas in 2024 for the total solar eclipse, we could meet then. 😬 I would appreciate seeing lots of pics of your baby, maybe you could start a detailed thread? I don’t recall, don’t you live in Nevada? In a week we are headed to south Idaho and then Great Basin NP (tho it is too early so we probably won’t be able to get high up there), then west and back through Steens Mountain area. Maybe we will run into each other… John1 point
-
Nice job John, plus I like LED's in everything I own. trainman1 point


.thumb.jpg.e34bf01ef7f7d5e99ad31856d45afbeb.jpg)


-
Recent Achievements
-


")


")


