Leaderboard


Popular Content
Showing content with the highest reputation on 09/08/2023 in all areas
-
When you use the tank flush port or waste water holding tank port, it will fill the black tank with fresh clean water. Once the black tank is full (assuming that you continue to allow fresh water into this port) the water will fill the toilet. Once the toilet is full it will fill your bathroom. Once the bathroom is full ...... The tank termination valve is the place where the black tank terminates - i.e. the blade valve that you use to empty the black tank. With this valve in the open position, the black tank can not fill thus the toilet will not fill nor the bathroom, etc.. Of course, you will not want to open that blade valve unless you have attached the waste water (black water - i.e. sewer water) hose (aka "stinky slinky") to your Oliver and the other end to an appropriate sewage dump. Bill6 points
-
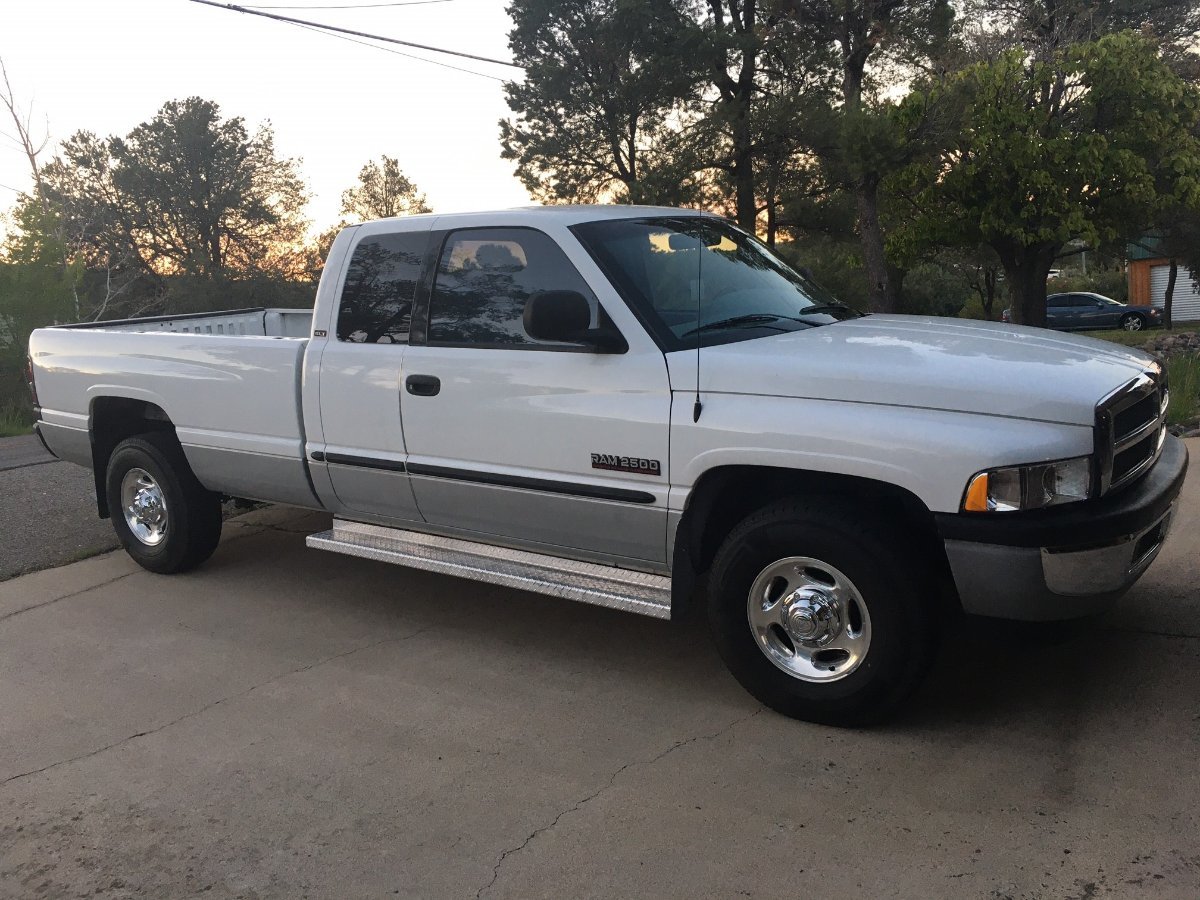
@jd1923 Really nice job bringing an extended service life back to your Ram. It looks really great for a 22 year old truck. It should hopefully provide you with many happy towing miles especially knowing you did the work. Last October we were gifted a 2004 Ford Ranger Edge extra cab V6 4x4 by my FIL. He purchased the truck new in 2004. He is 92 now and just does not need or use his Ranger anymore. He wanted to keep it in the family, we are honoring that. When we picked it up, it only had 53k on the odo. Needless to say he did not put many miles on it over the years. We brought it home and detailed the entire truck inside and out. I swapped out the old battery for new, changed the oil and air filters and ran some fuel treatment through it. I even had a new spare installed as it had the original factory still from 04. I found the Leer camper shell you see in the pic for $350 off CL. I took it to a really reputable body shop and had the topper which was originally black painted to match Sonic Blue for $600. I purchased new seals from Leer for all the windows. As I had the shop pull all the windows to sand the topper down. A new similar Leer topper would have cost $2700 plus. I added new black aluminum running boards to reduce chances of the careless door swingers in parking lots. And they really work well. I recently took it to a local shop and had all four original shocks replaced with Bilsteins which I provided and the shop installed for $125 labor. What a difference! I was glad to pay the shop $125 it was a very hot and humid summer day. We just rolled over 60k on this truck which is primarily used as a Lowes/grocery getter. We will have the transmission serviced soon. It’s really been a great little truck, fun to drive and we are grateful to have it. It also keeps the miles off our F350 TV and our car. It’s also reasonable to register at $59.00 a year. I say all this as I can really appreciate ALL that you have done with your Ram. Again, really nice work on the resto! Now enjoy that truck, it will make a fine TV! 😊 Patriot🇺🇸 Our Ranger will be 20 yrs old soon.
 4 points
 -
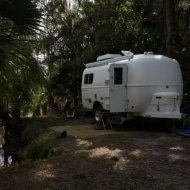
If I close my eyes, I can imagine an Ollie in that spot…. I think I will call this trailer “Mousie”. John Davies Spokane WA
4 points
-
EDIT 10/14/23. I returned the trailer due to multiple issues, a new thread with pics, commentary and videos is here: https://forum.expeditionportal.com/threads/apogee-adapt-x-folding-utility-trailer-cool-design-big-fail-in-the-execution.241264/ I won't be adding any more content here, but I will be happy to discuss. JD _______________________ New aluminum folding trailer. The sides are reflecting the dark ground, they are shiny silver. https://apogeetrailers.com/folding-aluminum-trailers/ https://www.etrailer.com/tv-review-apogee-adapt-x-300-folding-utility-trailer-at44fr.aspx I found it for $2000 off MSRP, paid $3388 out the door (no sales tax in OR, I have to pay that when I register it in WA. I love the design and the build quality and the attention to details, but holy cow, it is sure noisy on lumpy pavement. It sounds as if it is going to explode, even with 450 pounds of ballast. I use a hitch quieter on the ball mount, I tightened the coupler nut and put nylon ties onto every little rattly part like the pivot pins. They do not mention this in the fancy marketing material. This is a really rare trailer in the USA, I think they are not selling a lot, eTrailer.com USED to carry them, but no longer does. Mine is a 2022, I have not seen any 2023 models listed except in the Home Country, Canada. I guess more Canadians need the folding feature for winter storage, plus they are a little cheaper there too. I have not read any user reviews except for a couple of “Gee I really like this.” And “Gee this is really cool, my ATV fits fine!” This thread will change that. I will post lots of pics and info as I learn more. Fixed their home page: I do not intend to carry a 2000 pound ATV all the time, this is for box store and landscaping trips. I do not want this to turn into another bottomless pit of mods, like “Mouse”, but was considering adding this. It uses the existing axle and hubs, unlike their Independent suspension version. Timbren Silent Ride 3500 lbs I am concerned that the rubber dampers may be too stiff, the trailer has a max payload of 2300 pounds but normally will be less than 1000. If the dampers from the smaller 2000 pound kit can be swapped in easily, that would be a possible solution. Does anyone have direct experience with this Silent Ride system? I just got home yesterday afternoon, 700 mile round trip to the dealer in two days, and I am a bit wiped. I could do that a lot easier when I was 30… I need to do some crawling around and measuring. John Davies Spokane WA
3 points
-
A brand new Oliver Elite 2 from Missouri - with a gray and silver front logo like mine!
3 points
-
If you have the time - be sure to drive Needles Highway since you are so close. However, do not take the Ollie with you. And, of course, the Custer State Park Wildlife loop road. I assume that you already know about Mt. Rushmore. Bill3 points
-
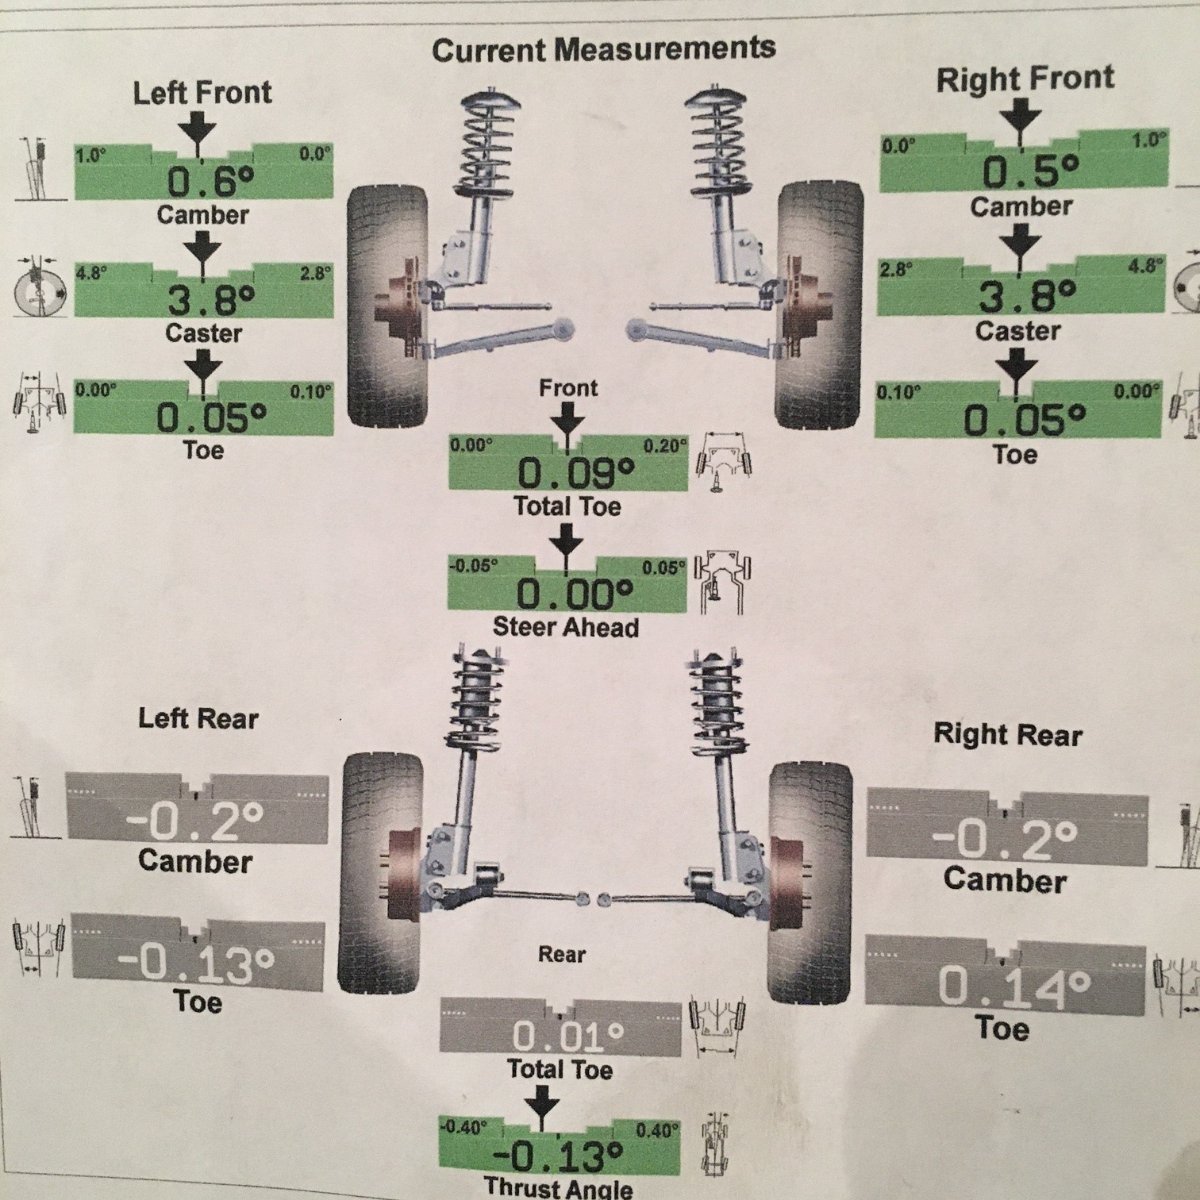
So, it's been a couple of weeks. I rebuilt the left side. Waited on correct rear sway bar links and another UCA bushing (after I crushed one in the press, OMG!) Got everything suspension wise buttoned up, BTW, you have to jack up each control arm, on each side, ride height to final tighten the bushings. Meanwhile, I replaced the trans filter and fluid (all of it), and flushed the brake fluid (yes, all of it). I will write another post on fluids, ah the most important maintenance! Hey, when you take the time to put your truck up on all fours, do everything you can. Hoping my build here will outlive me! The left side looks the same as the right, so no more suspension pics. Got done in time for my alignment appointment yesterday. I asked them to review all of my restoration work too. They said all was good and they finished with the hour. We need confidence when driving our tow vehicles, and when a reputable local repair shop says; "You're good." It certainly helps. I spent a total of $1,120 on steering/suspension/shock rebuild and 60+ hours of my hard work. The cost was mostly on parts (which btw, was 2X cost when I built another truck, just 2 years ago). The alignment was $102 (included in the total). This may sound like a lot to some, but including this cost, my amazing Cummins Diesel tow vehicle is still just under $20K total! (LOL, I'm not done yet. I will spend more!) I know some of you have wonderful late-model Dodge Ram Cummins TVs, and you truly understand what these numbers mean. Wife Chris thought of a great idea to test everything today. She suggested we drive to a favorite lunch spot, just 30 miles away. Yeah, she's great! I have a busy week coming up and will hook up the Oliver soon. Next job, the Oliver axles and more. All is good. and we could not be happier!
3 points
-
Looks like a really nicely built trailer. I have several utility trailers from a 4x6 foot box trailer that I built back in the 1990's to carry camping/SCUBA gear in to a 7x18 foot flatbed. In Gardner, MT at the North Entrance to Yellowstone NP - September, 1997. Getting ready to leave on a rafting trip on the Buffalo NR in Arkansas, April, 2003.
3 points
-
I found this solar powered flag post Led light at HF and am going to give it a try on our next trip. I opted to mount it using heavy duty zip ties vs SS hose clamps for a just little cleaner install. (See unsnipped zip tie) It’s got pretty good reviews, so I thought I would give it a try. I will post up how well it lights up our flag after our first use. The solar panel and light are adjustable. The light can be removed during travel and the mount left in place on the pole. The light will likely need a little tweaking to get it dialed in on the flag. Patriot🇺🇸
3 points
-
We've had the Battery Box on our radar screen since we purchased Casablanca back in March from its PO in TX. One of the Hull #226 selling points for us was that the PO had recently replaced the AGMs with 3 Battle Borns and added a Victron Smart Shunt. However, upon learning from the forum, the BB install by the PO was less than optimum - or at least to our understanding at the time. We were surprised that there wasn't a battery master "shut-off" switch. This fact was the main driver for this project - after looking into what we "really" had on our hands, the pervasive project "scope creep" showed its ugly head! Full Disclosure: Although we've had several RVs over the decades, never have we owned Lithiums. Thanks to these forums, learning about the nuances and particulars of LiFePOs, specifically, Battle Borns - and even more specifically, their application with the Oliver, has taken some time to digest. We didn't want to delve into the "fray" of "cleaning up" what was previously installed until our understanding of this particular system was at a high enough level not to screw something up. So, thanks to the forums, many of y'all's posts regarding the subject, and special thanks go out to @Geronimo John for his patience and guidance with what ended up being a fairly large scale re-design of Casablanca's DC distribution system. Initial Configuration and Issues: 1. A key indicator that there was an issue somewhere within the "DC system" was that the charge controller would never reach 14.4 volts; 13.6 was the max ever observed/measured. 2. The BBs were stacked in an unusual configuration on the battery tray. The rear two batts were aligned side-by-side facing left/right and the third "outer" BB was aligned 90 degrees off facing fore/aft. Several cables were too short not allowing full battery tray extension. Clearly not a neat/tidy or logical configuration. 3. The battery bank was not strapped down. 4. Although likely large enough for intended current, the three BB's parallel connections were made with 1/0 cables versus the 4/0 cables distributing the current into the trailer. 5. Several positive and negative connections were made directly to the battery bank without the use of any sort of terminal post or terminal bar even though the Smart Shunt was in place. These connections were bypassing the SS, not good - thus contributing to phantom current within the DC distribution system and not allowing the Victron App to capture all DC power activity. 6. One cable, a yellow 4 AWG, ran from a negative BB terminal to the wrong side of the Victron SS; this cable essentially paralleled the 4/0 cable from the same terminal to the shunt. This made absolutely no sense. 7. As stated above, no battery master switch. We've always had a master switch in previous campers - handy for longer term storage and eliminating phantom current. In case of fire, we wanted a "safety switch" located outside the camper and inside the battery box to quickly secure DC power after quickly exiting the rig. SUMMARY OF WORK PERFORMED: The closer we looked at the DC set-up the more questions and issues surfaced. There were other ancillary DC system "gripes" but the above list really paints the picture of what we were dealing with... After quite a bit of forum research, thought, and informative and lively discussions with Geronimo John; a clearer project plan developed. 1. We made an assumption that the PO didn't upgrade the "lead-acid" charge controller circuit board as part of the BB installation. This rationale would explain why we never observed more than 13.6 volts on shore power with the controller energized. Sure enough, after pulling the board, it was clear that the board was doing exactly what it was intended to do - charge lead-acid batteries; as it didn't have the Lithium micro-switch option. So, we ordered a replacement 45-Amp board from Amazon with the Lithium option - enter "project scope creep." Above pic shows replacing the LA charge controller with a Li-capable board. The lead-acid board is 100% functional and will be posted for sale on the forums. The new Li-board cranked right up and the BBs finally received the charge intended for a Lithium battery bank: 2. Disconnected and removed the 1/0 cables connecting the 3 BBs, labeled and stacked them sequentially from back to front. Sized cables to allow full extension of the battery tray and added nylon tie-down straps from Rangley. Cut, crimped, heat shrunk, and installed new 4/0 color-coded cables in parallel configuration: Made a terminal buss-bar from 3/16" x 1" solid copper for the Blue Sea Systems master switch (Amazon) which will be heat shrinked once it arrives. Contoured a poly board from an old cutting board to mount the switch, like many owners have done. Mounted a positive (+) terminal bar with the master switch to accommodate DC connections. In the new configuration, only 4/0 cables are connected to battery terminals - removed the various "added-on" connections and placed them appropriately between the (+) terminal bar and the Victron SS. Now, all DC (-) connections are made through the shunt so all DC power measurements are captured with the Victron Application. Peace of mind - priceless. While we were at it, we added an SAE solar input port for the 200W Renogy suitcase solar modules - more scope creep... HA! Not being an EE, I'm sure there's something left out, but in the end, we've got a clean set-up in the battery compartment, fully functional Victron SS, and the appropriate charge controller to manage the BBs. Time for a cold one. Cheers! A & D
2 points
-
The interpretive Ranger-led presentation is well worth the time before you take the loop. Enjoy!2 points
-
@topgun2, both great suggestions. The wild life loop at/near dusk is simply amazing. We saw so much...2 points
-
The campground host says another Oliver came through 2 weeks ago!2 points
-
Better you than me - I never "liked" anything over +- 100 feet! About the same - aluminum frame, well built, durable, compact.......2 points
-
@SeaDawg I am glad the video was helpful. My info is below and I will add that to my signature. I was just running it to share the sound level with someone else who asked. But I did run the AC for a couple hours when I was traveling last month and it dropped the battery about 20%. I have the lithium pro package which is 630 amp hours and 340 watt panels with a 3000 w inverter.2 points
-
If you get to Yellowstone and need a site with power there’s a nice Idaho state park just about 10 or 15 miles to the west. Ralph’s Lake State Park, W/E plus they have new shower buildings. I don’t think they take reservations, we had no problem getting in. It was only a 20 minute drive to Yellowstone.2 points
-
I assume that you have a reservation at Wapiti and (as you may know) they do have a number of sites there that have power. There is another National Forest Service campground west of Wapiti - Rex Hale - that has 6 or 7 electric sites if you need them but they are usually reserved well in advance. If push comes to shove and you really need power (or dump or laundry, you can head back east a few miles to Yellowstone Valley Inn. My favorite campground in West Yellowstone is Baker's Hole - north of the town by about 2 miles (just beyond the airport). Site 50 or 51 will get you a wonderful view into Yellowstone National Park and stunning sunsets. There are also a few electric sites there but (again) they are usually reserved well in advance. The best laundry in West Yellowstone is "Little Ducklings" (520 Madison Ave). There are two grocery stores in town if you need to restock. Propane refills can be obtained at Westmart Building Center (100 S. Faithful Street - its an ACE Hardware store) or at the Mobil Gas station (11 Yellowstone Ave). If you do the research, there are a number of places to boondock near the Grand Tetons. One of my favorite places is a decommissioned National Forest Service camp called Box Creek. It is located approximately 10 miles east on Buffalo Valley Road. If you plan to fish, PM me for suggestions. Have a great trip! Bill2 points
-
Just received a call-back from Guntersville Lake State Park office... We've reserved Site A-6. Planning to arrive 14MAY and departing 20MAY. We're stoked that we got at site, there's still 4 site available for that timeframe, FYI. The staff there are absolutely fantastic and accommodating - very helpful. Looking forward to viewing a sea of Olivers at the rally! Cheers! A & D1 point
-
Got down in there and looked at it - it is indeed one of two nuts that mount the rear street side jack. Both nuts are firmly tight. Thanks... Geoff1 point
-
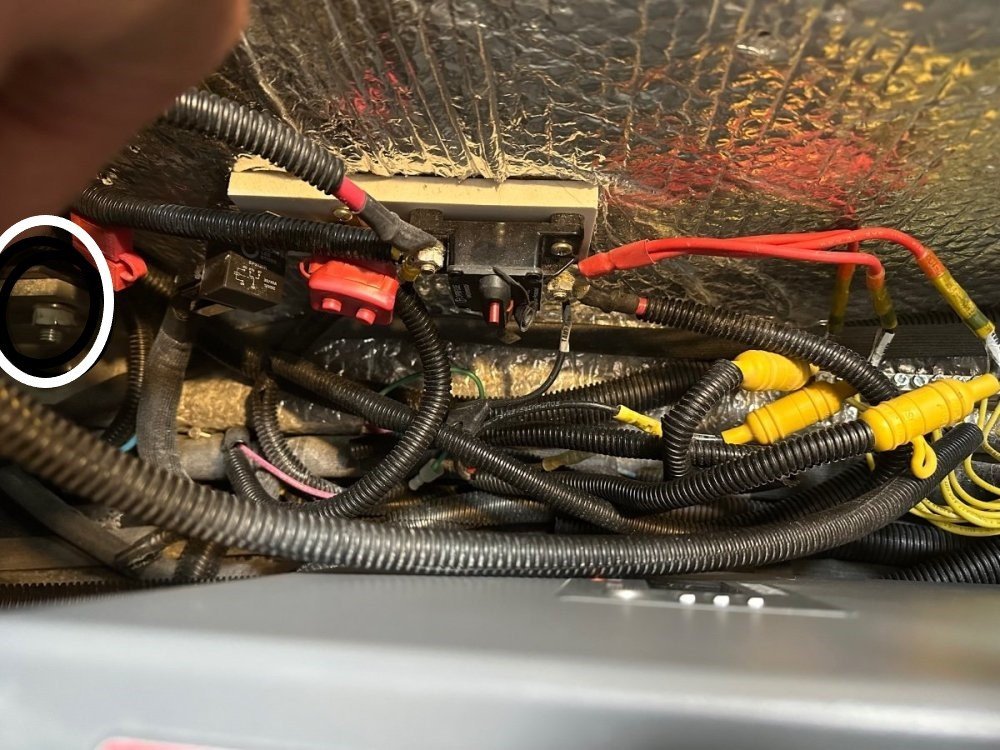
Upon closer examination of your photo, I have circled something that puzzled me. If that is part of the rear jack mounting system, it appears the nut may be loose. If so, you need to check that out and tighten it.
1 point
-
The solid red thing with the "two red buttons" is just a insulated cover. The black unit to its right with one red button is one of the circuit breakers. If you push the red button it will go to the disconnected mode and the flag will pop out. One of the breakers will kill all the 12V power in the coach. Those three yellow things are 30 amp fuse holders, one for each of the jacks. Your front jack may have an additional holder at the jack, meaning that jack has two fuses to check if it quits working.1 point
-
I would think the vent fan is located too far forward to cause water to collect in that area of your trailer. The area around the air conditioner would be more suspect, it seems to me. Well, keep in mind with the solar panels, the position of our fan/AC is different that units without the panels. Our vent fan is actually dripping right on the edge of the bed. But I can't figure out how it's getting underneath the cushion. Very confusing. Will keep a closer eye on if the streetside window might have a small leak - but it's curious, the cushion isn't getting wet on the outside, just on the table side. Very odd. We've been fighting various leaks since pick-up.. it's getting quite exhausting. - Cherie1 point
-
The new anodes arrived from the eBay seller in a padded envelope, no insurance to run up the cost, for such a durable item as this. Here is a side by side comparrison of the old one, 13 months use, and the new one. Yep, you know they will be exchanged and the extra new one will go into the spare parts stowage under the dinnette.1 point
-
Larry, It looks eaten up to me. That thin attachment right behind the plug is actually the core wire in the anode. Yours appears to have been eaten away right below the plug. But, on the other hand, that might not make any difference in the overall performance of it. I'd ask someone smarter than me. Steve1 point
-
Haven't drilled a single hole for hanging anything. Double stick tape, the heavy duty variety works great. Suction cups work good too, the larger the better or the type SeaDawg put us onto from Lowes, they even work hanging from under the cabinets. If you do drill I recommend being very carefully. I drilled a couple of holes for a few customizations and it doesn't take much to go through this material.1 point
-
Here is a possible solution for the where that is occurring where the propane tank cover contacts the trailer body. Not sure how well this will work since it has not been road test yet. I found some felt drawer liner at Lowes that is sticky on one side like tape. I cut it into strips that I applied to the edge of the propane cover that contact the trailer body. Make sure to install the felt at the upper edge of the cover, you should be able to see some wear points. I think you will still need to clean this to prevent dirt and grit from acting like sand paper. In addition to the felt. I found some clear automotive door edge protectors at Adavanced Auto Parts. I installed this on the bottom edge of the cover. The idea is that this is softer than the cut fiber glass edge. The trim goes on tight, but it can be installed. The picture shows what I did, but it might be a little hard to see, especially the clear trim on the lower edge. Overall the cover actually seems to fit a bit more snug.1 point
-
Hi DC and thanks for a great and inexpensive idea! It sure is better to replace $3.oo molding than a $???? propane cover! Chuck1 point
-
Just an FYI to add to this discussion - we stopped at a Blue Rhino to do an exchange, and their signs say that for 'better safety' they're starting to use a proprietary valve/connector. Which means - once you exchange, you can no longer refill on your own. So, we'll probably not be following that route whenever possible. - Cherie1 point
-
I have also been very pleased with the towing performance. Never felt one hint of sway in about 2000 miles of towing. Even strong crosswinds seem to have little effect on the handling. Herm1 point
-
We went with a 20lb and a 30lb setup for the reason of retaining an easy swap out option while giving us extra capacity - as in our travels we have experienced a very wide variety of accessibility to propane. It would be awesome if they come out with a 30lb kevlar tank, than we could continue to keep our 20lb exchange option and get some of the benefits with our more 'permanent' larger capacity tank. So far, we've been very happy with our setup. Although, whenever possible we seek out places that do meter fills (which we've found several), as opposed to charging for a full tank. - Cherie1 point
-
A member sent me a pm asking me to post photos of our mudflaps, so here goes: This is a photo of the small mudflaps that Oliver installed for us on the trailer wheelwells. And this is a photo showing the removeable mudflaps mounted on our pickup. These flaps are mounted to a bar, not the truck, and mount to the receiver, so that we can take them off when not needed. We bought ours from Costco, online (we're not members... you can order online without a membership) for about $180. Also available from other sources, at a variety of prices. If you look carefully at this photo, you can see the permanent, smaller mudflaps we had installed on the truck for the days we don't use the big Rock Tamers. 15,000 plus miles now, and no chips yet! Sherry Sherry1 point
-
Believe it or not, the FWG-110B is already discontinued. It looks like this is the current replacement: http://www.chiefmfg.com/productdetail.a ... ctID=10741. Does it look any different than what you have? Did Oliver supply this item or did you purchase it yourself? I'll definitely be looking forward to your more in-depth report about this item and the rest of the trailer in the coming weeks/months.1 point
-
Herm - You can see pictures of our 24" Dell Ultrasharp monitor and Chief Manufacturing FWG-110B (http://www.chiefmfg.com) Swing Arm in our Oliver Tour, located at: http://serolynne.livejournal.com/533358.html The setup thus far has been fantastic for us - it allows the screen to be positioned in plenty of ideal locations for viewing - from movies in bed, viewing from the kitchen dinette, viewing out the back window and positioning the monitor as a second monitor for our computers when the bed is converted to a table (as shown in the picture in the tour). Our 24" fits really nicely in the back corner with just a tad of covering up the escape window. Daniel and crew spent time with us to spec a mounting hook behind the monitor to secure the screen with a bungee while in motion, as well as drilled a huge finished hole for cables into the upper cabinet. And they mounted an aluminum plate on the outside of the inner hull for extra strength next to the escape window which is what the arm is attached to. We also placed rubber bumpers on the edges of the screen to keep the monitor and fiberglass from touching during transit. So far, this has worked wonderfully for us. But in all honesty, we've not really had the opportunity to be stopped anywhere long enough to fully utilize it and do a full analysis of the setup. Our goal is to be stopped post-Burning Man in September, a fully shake everything out and write a series of reviews of our customizations and impressions of the Oliver for our full-timing lifestyle. - Cherie1 point
-
Also posted here: http://radven.livejournal.com/139484.html ==== One of the major new toys in our nomadic toolbox has been the addition of a Honda EU2000i generator. We found one online at Wise Sales (WiseSales.com) for just $850, with free shipping - way less than from any other retailer. (Honda stupidly prohibits dealers publishing prices online - but I suffer no such limitation...) The Honda EU2000i is a fabulous 2000 watt generator that is small, quiet, weighs just 46lbs, and it gets great fuel economy. We specifically sized the air conditioner in our Oliver to work with this generator - we specced a power-efficient 9,200 btu Coleman Polar Cub rather than a more typical (and formerly Oliver standard) 13,000 btu model. Most RV air conditioners require a 2400 watt or even 3000 watt generator to work, so we were really hoping that we could manage with a smaller, lighter, and more economical Honda EU2000 option. Most of our power needs will be satisfied by our solar setup, but the generator will come in really handy when we need to run the air conditioner away from shore power options. It will also be able to quickly recharge our batteries if the solar power is ever not able to keep up. The big downside of a generator however is dealing with fuel. Carrying around canisters of gas in an enclosed Jeep or trailer is not ideal, and since the Jeep burns diesel the gasoline wouldn't even double as emergency vehicle fuel. My goal was to find a propane conversion kit to allow the Honda EU2000i to run off of our Oliver's ample 50lb propane supply. Until a few weeks ago, the only kit I could find to do this required drilling out the generator's carburetor, and replacing the fuel tank so gasoline was not even an option. But then Cherie found a eBay listing for a "Tri Fuel Kit" from Central Maine Diesel that would allow the Honda EU2000i to run on gasoline, propane, or natural gas. And rather than drilling out my own carb, I could just send Central Maine Diesel the carb from our generator for one that they had already modified rather than me attempting the risky drilling myself. (The kit is $179, or a pre-converted Honda EU2000i is $1269 + shipping...) It turns out that I was the very first customer to get the "installs in minutes" kit, so I had to spend several hours figuring out how to swap out the Honda's carburetor and reroute the necessary hoses with only a picture to go on. The carburetor removal instructions I found posted online were invaluable, and in theory my feedback will be helping Central Maine Diesel create better documentation to include with their kit in the future. With time running out, we only had a brief chance to test the generator running on propane before departing St. Louis last week. But today at Zion National Park in 100 degree heat we got to give the setup a real stress test. It worked GREAT! Even at high altitude (near 4000 feet), the generator was able to power the AC on propane, and the air conditioner did a marvelous job of cooling down the Oliver. Charging the batteries I was able to sustain a 60+ amp charge current, which should allow us to fully charge our battery bank in under two hours. Of course - you have to pick - you can't charge batteries and run the air conditioner at the same time without overloading the generator. But, this setup sure beats carrying around a 135lb 3000 watt Honda. For us, this setup is the perfect backup power source. And if we ever do need to resort to gasoline, this kit still gives us the option. The Oliver folks were fabulous, and the factory hooked up a low-pressure propane hose on the tongue for us so all we have to do is open a valve to get gas to our generator. Based upon the consumption figures published by Central Maine Diesel, I am hoping that we can get 20 to 40 hours of air conditioning use out each 20lb propane cylinder. I am VERY much looking forward to having a few hours of air conditioning every day while in the Black Rock Desert at Burning Man. *grin*1 point
-
Herm - The generator requires low pressure propane. We did not get the rear quick connect kit, but yes - it is high pressure which is typically what a grill needs. The Oliver folks put in a hose and a valve after the regulator for us, giving us a handy forward low pressure hookup. It comes out near the tongue basket. We may eventually mount the generator on the basket, but it would likely interfere with our bike rack. Right now, I am fine using the generator on the ground next to the tongue. - Chris1 point
-
You could mount an oliver on any frame and axle set up you wanted. I don't think it would be possible to mount an Oliver on any other frame. The frame is fully custom, and the fiberglass shells nestle right into it. There may be more flexibility with the axels and shocks though. - Chris1 point
-
I would think it would be, simply because there would be no reason I can think of that it wouldn't be possible. To get a definitive answer, however, you would have to talk to the Oliver people and they might have to do some research on the matter. The problem Oliver would be faced with is that such an axle would itself add more weight and might put the Oliver in a higher towing category from where they are drawing their current market share (highly fuel conscious RVers). Most RV manufacturers and retailers are dying from the high fuel prices. Oliver is not, but I'll bet money that you could have any single axle you wanted put under an Oliver. However, the Gross Vehicle Weight Rating of a travel trailer is not only a function of the axle, but also of the frame. You could mount an oliver on any frame and axle set up you wanted. Doug1 point
-
Good report. Those Fantastic fans will really move the air alright. Thanks paul !1 point
-
Congratulations on your new Oliver, Steve...mine's just going into production now. And thanks for posting your observation re: the frig. I've personally never heard or experienced this problem, but my previous trailer had a top-venting frig. Doug, I think the fan you provided a link for is a perfect solution, and one I might add as well. It's certainly an inexpensive fix. And, it looks like it can easily be added to existing Olivers, provided there is access to 12V power in that area (which I assume must be the case).1 point
-
The upper outside cover to the refrigerator gives access to the curved air flap ( a name I made up for lack of a better word ). A bit of regular household insulation placed behind it nearly eliminated the heat conduction to our interior. We don't have one of the cooling fans, but have wanted to increase our cooling efficiency of the refrigerator with one. A computer cooling fan is very low in power consumption, 12 volt and quiet. I see where they are being used for that purpose on other forums.1 point
-
Tekonsha P3 controller here. Small enough to be mounted inside of our Tacoma ashtray opening. I fabricated a mount that slides in like the ashtray.1 point
-
double ditto on the Prodigy!!! Plug n play on my Silverado. Chuck1 point
-
I've written two long blog posts taking a close look at the systems that are built into the Oliver. Here is my post on the Oliver's plethora of plumbing: http://radven.livejournal.com/132858.html And here is a look at all the appliances that ship with the Oliver: http://radven.livejournal.com/132941.html Here is the text of the Appliances and Utilities post, but follow the link above to read the version with pictures and working links to manufacturer websites. ===== Here's what I know about the core appliances that we will be having built into our Oliver, and how they compare with what we have lived with in Tab... Ceiling Fan / Staying Ventilated: Tab comes with a variable speed reversible Northern Breeze ceiling vent that has worked wonderfully over the past two years. When cranking on full blast it really does cool down the trailer nicely, particularly when combined with a cross breeze from the Tab's huge windows, or with the spray from our Misty Mate. Oliver has been shipping with a three-speed FanTastic Vent Fan Model 6000RBTA that includes a thermostat and a rain sensor to automatically shut the vent if it starts to drizzle while you are out. According to the spec sheet, the FanTastic Fan on high uses 3 amps to blow 920 cubic feet of air per minute, and 1.86 amps to blow 478 cfm on low. The Oliver factory has been investigating offering the SHURflo Comfort Air Gold roof vent as an alternative. One reason to switch is that the SHURflo fan can circulate air even while the roof vent is closed. And the second reason is supposedly lower power consumption, perhaps because the SHURflo has a variable speed control that can be dialed way back for gentle circulation. Looking at the spec sheet, I see that the SHURflo fan claims to use 3.6 amps to blow 980 cfm of air while on max, but it has the potential to use just 0.3 amps at the lowest power setting. This could be very useful for a little low-power airflow while off grid. Both options look like great fans, and they both get great reviews online for quality and customer support. We have asked for the SHURflo Comfort Air Gold model to be built into our Oliver. It gives up the rain sensor and thermostat, but the variable speed control is nice, and we like the idea of being able to use the ceiling fan for air circulation even while the vent is closed. If we wanted to splurge, we could have gotten those features (and also a remote control) in the Comfort Air Platinum model. We are also contemplating asking for an upgrade to the FanTastic 6600, which is a relatively new model that offers both advanced features and lower power consumption. According to the spec sheet, it uses half the power on full blast as all the other fans - only 1.9 amps, while the lowest setting draws only 0.2 amps. In addition to lower power consumption, it adds variable speeds and a remote control to the FanTastic 6000's rain sensor and thermostat features. Air Conditioning / Staying Cool: Though a Cool Cat Air Conditioner is an option with the Tab, having one means giving up a big chunk of the interior storage space since the Tab can not handle a roof unit. We made do without just fine however, and in the worst heat we used a small Misty Mate to do some evaporative chilling by blowing a fine mist into the exhaust from our roof fan. In the dry environment of the desert, it actually worked amazingly well. We will probably continue to make use of the Misty Mate when camping off-grid in the Oliver. The Oliver initially shipped with a 13,500 btu Dometic Duo-Therm roof mount air conditioner, but now the factory is transitioning to the smaller 9,200 btu Coleman Polar Cub. The big advantage of the Polar Cub is that it is able to run off of the relatively small and affordable Honda EU2000i generator, whereas the larger Dometic required a 3000W generator to keep the compressor cooling. Our Oliver will feature the Polar Cub, which should prove to be more than enough to keep such a small interior space cool. Sadly though, air conditioning uses way too much power to ever run effectively off of solar power... Furnace / Staying Warm: The Polar Cub features 5,600 btu electrical heat strips that are effective for "taking the chill off of a cold morning", but only if you are plugged into shore power. For more powerful heating no matter how off-grid we roam, the Oliver comes with a Suburban NT-12S 12,000 btu propane-fired furnace. The furnace in Tab is also 12,000 btu - an Atwood 7900. But the Tab's furnace is located so that it vents out deep UNDER the bed, in an area often blocked by our excess cargo. The Oliver's furnace vent is located effectively, right in the middle of the kitchen cabinet and next to the bed rather than under it. We may also eventually purchase a small electric ceramic heater for use when staying in campgrounds with full hookups where AC power is more cost effective than propane. Stove / Staying Hot: The Oliver Legacy Elite features an "upgraded stovetop" over the base model Oliver - an Italian brand called SMEV. Reportedly, the SMEV cooks faster and uses less propane than a typical RV stove. The lid over the SMEV stove closes flush to the countertop to create extra flat counter space in the Oliver's kitchen. Interestingly, our Tab also features a two burner SMEV stovetop, and we have been very happy with it. One difference is that the Tab's stove required a flame to light, but the Oliver provides a built in ignitor. Refrigerator / Staying Fresh & Icy: Most RV refrigerators use "gas absorption" technology that involves no mechanical compressor (like in your typical home refrigerator), but instead relies on a heat source (ironically) to cause a coolant to flow through a closed loop. Through this mechanically simple process, a hot propane flame is turned into frozen food and cold drinks. It is totally silent while working too. The most efficient heat source for this sort of refrigerator is propane, though "3 way" RV refrigerators can also generate the necessary heat via AC power, or even 12V from your battery. Running a gas absorption refrigerator off of 12V power however is a sure way to kill your batteries in just a matter of hours though, so be careful! A compressor style refrigerator is MUCH more power efficient for 12V use. The two major manufacturers of RV gas absorption refrigerators are NorCold and Dometic, and Oliver so far has been using both, shipping the Dometic Americana DM 2454 and the NorCold N412.3. Both of these refrigerators offer three way (AC, DC, and Propane) operation, and they measure in at 36 9/16" x 23 11/6" x 24" (despite what the Dometic website incorrectly claims). They also both offer automatic mode selection, and electronic propane ignition (despite what the NorCold user manual incorrectly claims). The major practical difference between these two models is that the NorCold offers 4.5 cubic feet of storage and a slightly larger freezer area. The Dometic provides slightly less usable space, with 4.0 cubic feet of refrigeration. Though Tab offers a small 1.8 cubic foot refrigerator as an option, my Clamshell did not come with one. Instead we rotated through two coolers, and frequent ice purchases. This worked surprisingly well for us. Being able to actually make ice cubes in our own freezer while on the road though - now that will be luxury!!! Microwave & Convection Oven / Saving Space: The Oliver currently comes with a Sylvanian SC11000 combination microwave and convection oven. This would at first seem to be a very useful cooking tool on board, but after talking with several Oliver and Casita owners with a built in microwave, most of them rarely use it and they all wished for the extra storage. We have opted to have this area turned into a large cabinet, with an AC outlet located inside. This should give us space for storing a small toaster oven, a blender, and all of our bar supplies. And when the weather is nice, we can relocate the toaster oven outdoors for some cooking on the patio. Washer, Dryer, and Dishwasher: I wish!!!1 point
-
I've used the Polar Cub 9200 at Lake Corpus Christi State Park on two different occasions . . . it works great! One of the sites put the trailer in the sun throughout the afternoon at 95 degrees. Inside temperature stayed at watever I wanted to set on the wall mounted thermostat. Couldn't make it too cool inside only because Oscar would have gotten a chill.1 point
-
Headphones are a pretty good idea (although, I hate wearing things around my ears and it interupts the most important part of movie watching - snuggling).. and the concerns of a sweet spot are very valid. For most folks anyways. But given that Chris is the audiophile, and I'm partially deaf anyway (and just really need closed captioning and some of the sound.. thus part of the need for the larger screen) - as long as Chris is happy with the sound *he's* hearing, I'll adapt and be happy I've personally never understood the desire for surround sound or tweaking sounds systems - as to my ears, it makes very little difference. ~Cherie~1 point
-
Mountainborn, I hope you had enough imagination to open the bathroom door so that jet didn't break your mirror. Chris, you may stumble across some perfect surround sound system for the interior of the Uber-Oliver but wouldn't you need to decide exactly where you wanted the central focus of that surround sound experience? What if you had it all set for lounging on the bed and then shifted to a dinette seat? Would that compromise your experience? What if the "sweet spot" of pure surround sound was only at one pillow location on the full sized bed? Would you & Cherie have to draw straws to see who got the best spot? To avoid pitfalls and if it is that crucial, perhaps some surround sound headphones would solve your problem . . . check out the following: http://www.sennheiserusa.com/newsite/pr ... sid=009925 Next, you & Cherie need to get some cool 3-D glasses for a truly in depth experience and then you can reach up and touch the jet as it passes overhead!1 point
-
It makes the surround sound a cool thing, for these tired old ears to be able to hear all of the sounds in a movie. Ours works well for our needs at this time. However, . . . . As best I can tell reading the AWM960's manual, there actually is not any sort of "surround sound" processing going on like you would have in a typical at home home theater receiver. The AWM960 just does basic stereo - and just like a car radio, it outputs it to four speakers. That is not surround sound. You will not be able to hear a jet fighter in a movie whoosh over your head, for example. And even if the AWM960 did surround sound decoding - the speakers are not located properly. Speaker placement is critical for a good surround effect. - Chris1 point
-
The Oliver trailer comes with either two 20lb propane tanks, or you can upgrade to two 30lb tanks for some extra capacity. The nice thing about choosing 20lb propane tanks is that they are easy to swap out almost anywhere - even at many grocery or hardware stores. Because they are so commonly used for BBQ'ing, cylinder exchange stations are easy to find, and usually pretty cheap. The 30lb propane tank option however gives you a lot of extra capacity, and this can be particularly useful for running a generator converted to use propane fuel. (We are leaning towards a Honda EU2000i converted to use propane, or maybe the Yamaha 2400...) The downside of 30lb propane tanks though is that you can not swap tanks at a tank exchange station, and refueling stations for propane are often tough to find. So -- the idea struck me - why not have one of each, and get the best of both worlds? I talked to Daniel at the Oliver factory, and he thought this was a great idea and he is going to engineer a custom bracket to allow for the mismatched tank sizes. With this setup, the primary tank will be the smaller 20lb propane tank, and when it runs dry the regulator will automatically switch to the larger 30lb tank which will serve as the reserve. The small tank will be easy to swap out when necessary, and whenever we run across a propane filling station we will be able to take advantage of the opportunity and keep the larger reserve topped off. With this hybrid tank strategy, I will have all the convenience of the 20lb tank option, and nearly as much capacity as with the 30lb tank option. I am also hoping that the extra space above the 20lb tank will provide convenient storage for our freshwater hose too. - Chris1 point
-
I've just had a great conversation with Daniel Oliver, the plant manager and Oliver co-designer. He has a really good grasp on the potential voltage drop issues, and he was able to confirm for me the wire gauges that they are currently using. Inside the Oliver, the 12V jacks are all wired with 10 gauge wire. The small distribution panel (to the left as you come in the door) is wired even better - it is connected upstream with 4 gauge wire. This is fabulous, and is a sign of a well engineered design. The main charge wire from the battery forward towards the tow vehicle is 10 gauge, not the smaller 14 gauge I had been told. This is also good news. However, the final 4' cable that connects to the tow vehicle is using 14 gauge wire. This is a potential bottleneck, but one that is hard to avoid. Daniel has been looking for a cable manufacturer that does a cable like this with a thicker 10 AWG charge line, but he hasn't been able to find one. Most tow vehicles offer at best 10 gauge wire to the trailer charge line, so the Oliver's default wiring is probably at least as good as what you are towing with. Daniel and I discussed doing a test to see how well the Oliver's tow vehicle cabling does charging the battery. This will be easy to do accurately once we have an amp-hour meter hooked up to the battery, but for now - the following measurements should give a good idea of how significant the voltage drop issues may be. For each of these test cases, you should measure the voltage at the Oliver battery with the engine off, with the engine idling, and with the engine revving at a fast idle. Be sure to allow a few minutes to make sure that you get a stable reading. For comparison - you should also measure the voltage at the tow vehicle battery to see what the alternator is putting out. The difference will show you the voltage drop over the charge wire. Test #1 -- Fully Charged Oliver Battery / Fridge Off Test #2 -- Fully Charged Oliver Battery / Fridge On 12V DC Test #3 -- 50% Discharged Oliver Battery / Fridge Off Test #4 -- 50% Discharged Oliver Battery / Fridge On 12V DC To tell that the battery is at a 50% drained point - look for a resting voltage reading of 12.1V. If the voltage on the Oliver battery is 14.2V or up, the battery will be charging normally. If the voltage of the battery is at least 13.2V, the battery will be taking a trickle charge. If the battery voltage is below 12.73V, the battery is actually discharging and draining somewhat. This is what we really want to avoid. Current Oliver owners - post here if you have a chance to run these tests. I will respond here again when I get test results from Daniel in the factory. Experimentation always wins out over theory. *grin* - Chris1 point
-
As posted in my Oliver blog thread: http://radven.livejournal.com/tag/oliver Direct Link: http://radven.livejournal.com/128310.html (Read the version linked above to be able to click on the links to more details...) ====== Solar panels are only half the battle... You next need something to take the sun juice and squeeze it into your batteries. There are plenty of reasonably priced basic solar charge controllers, and if you have small panels or you are not overly concerned about every last drop of efficiency - a basic charge controllers is a wise choice. Something like the MorningStar SunSaver SS-10 costs around $50, and can handle 10 amps of power, enough for 140W of solar panels. More advanced solar charge controllers support "Maximum Power Point Tracking", or MPPT. MPPT works by performing a DC-to-DC conversion, allowing the solar panel to run at a higher voltage than the battery. This conversion boosts the charge current into your battery, and can improve overall efficiency by as much as 30%. MPPT is most effective when your battery voltage is low and the solar panels are cold, a common scenario in an RV every morning after a chilly night running lights, heaters, fans, and laptops. MPPT controllers designed for small systems are still relatively rare, and a bit expensive. But the extra efficiency is worth it to me. Here are the contender MPPT solar charge controllers I am looking at: (links go through to the lowest prices I have found...) + MorningStar SunSaver MPPT: 15 amps. Max input voltage: 75V. Suitable for around 200W of solar. Temperature compensation cable optional ($22). Can handle high panel voltages. The MorningStar is a brand new design (just shipped), and it is getting rave reviews from solar geeks. $190 + Heliotrope HPV-22B: 22 amps. Max input voltage: 30V. Suitable for around 300W of solar. Temperature compensation cable included. "Shore Power Mode" for RV's. Based upon the older BlueSky SB2000E design. $265 + BlueSky 2512i: 25 amps. Max input voltage: 35V. Suitable for around 350W of solar. NO temperature compensation supported. $167 + BlueSky 2512iX: 25 amps. Max input voltage: 35V. Suitable for around 350W of solar. Optional temperature compensation cable ($29). Also adds support for battery equalization and control of an auxiliary load - such as dusk to dawn lighting. $201 + BlueSky Solar Bost 3024: 30 amps. Max input voltage: 57V. Suitable for around 400W of solar. Optional temperature compensation cable ($29). Also adds support for battery equalization and control of an auxiliary load - such as dusk to dawn lighting. $287 Temperature Compensation: If you are going to invest in expensive AGM batteries, it is wise to make sure that your solar charge controller has a battery temperature sensor installed to adjust the charge voltage based upon the actual battery temperature. Otherwise, you risk damaging your batteries by over or under charging. Voltage Headroom: Typically, to interface with 12V batteries, you want solar panels with around 17V peak charging voltage. To use panels with a higher charging voltage, you need a MPPT charge controller with enough voltage input range to down-convert the panel voltage. In this case, the higher panel voltage actually becomes an advantage, since there is less line loss running a higher voltage over the wire. The BlueSky 3024 and particularly the MorningStar SunSaver support using higher voltage input. This will let you make use of several larger solar panel options that will overwhelm the other controllers, or you have the flexibility to string multiple smaller panels together in series. The key is to have the open circuit voltage of the panels LOWER than the max input voltage for the charge controller. The MorningStar controller really excels here. Mounting Location: All of these charge controllers are relatively small and can be tucked into any out of the way bulkhead, other than the Heliotrope HPV-22B which needs to be mounted onto an exposed wall area. The HPV-22B has a status screen that shows you battery voltage, and charge current in from the panels and out to the batteries. The HPV-22B also has a "shore power" mode switch which allows you to force the solar charger to step back while you are plugged in. This sort of system status information is nice to have. To get this with the BlueSky controllers, you need to add the optional IPN-Pro Remote ($180). The IPN-Pro does much more than just show charge controller status though. It also acts as a battery monitor, and gives you a real "gas gauge" readout of battery status, an extremely valuable feature. The MorningStar controller can interface with a PC, and there is also a basic remote status display available. Multiple Panel Considerations: Having a larger charge controller (like the BlueSky 3024i) gives more headroom for future expansion, but it is actually often better just to add a second charge controller later - particularly if you will be using mismatched panels. The huge 75V input range on the MorningStar also makes adding multiple panels in series easy. Concluding Thoughts: Each one of these options has merits. But right now I am leaning towards the same setup that is in my current Tab. The BlueSky 2512iX will prevent me from using high voltage panels, but that is really the only limitation. I know and love the ease and attractiveness of the IPN-Pro interface and battery monitoring capabilities. For anyone else installing a system - the BlueSky hardware is a great foundation to build on. You can start relatively cheap, and add the IPN-Pro later. I also have been VERY impressed with the quality of the BlueSky data sheets and documentation. The HPN-22B loses points there for not even having the manuel or detailed specs posted online.1 point


-
Recent Achievements
-


")


")


")


