Leaderboard


Popular Content
Showing content with the highest reputation on 01/31/2024 in all areas
-
OK... You're boon docking in a remote area on BLM/Public land and you experience a critical medical emergency requiring local EMS response. A call to EMS on your commo device (either via local cell net, Starlink, PEPWave, SATPhone, HAM radio, or whatever) will require a hasty report with specific location information as accurately and efficient as possible. You may not have an accurate street address or may not know your grid/GPS coordinates. Even if grid/GPS coordinates are known, this data is a lengthy alphanumeric string of up to 17 characters which could easily be jumbled up or miscommunicated in the heat of the emergency, sending responders to the wrong location. Using the first 6 lines in a military-style "9-Line MEDEVAC" report is a good start to communicate for your EMS request. Line 1 of the 9-Line MEDEVAC format contains the most important data in the report - your location, expressed using either grid or GPS coordinates or a simple street address. Clearly, this critically important data should be quickly and accurately conveyed to the response team in a life-saving scenario. The problem is making this happen accurately from a remote location. An available free application has solved the problem - it's called, "what3words". While attending an amateur radio campout last week, "QuartzFest 2024", one of the EMS presentations introduced this application and how it can be used to more effectively vector-in a response team. At https://what3words.com/products/what3words-app you can learn what this app can do to accurately describe your location to an EMS team using only 3 random words. The developers of "what3words" have mapped the planet into discrete 3-meter grids, each of these grids is assigned 3 random words that never change. For example, sitting here in my living room, my "what3word" address is: "seamlessly.gossips.bottle". Should an emergency response be needed here, we could contact response personnel and pass along these 3 words to describe the location of the emergency. Provided the local EMS has access to the free app, many do, they'll be able to navigate their way to my living room. Responders across the country are using this app, as are companies like Amazon, Uber, and food delivery services, to bring their resources to a precise location without grid/GPS coordinates or inaccurate street addresses. The "what3words" address is compatible with many navigation apps and can be shared via text. Turns out, last year during the QuartzFest, an attendee experienced cardiac arrest. One of the HAMs contacted Quartzsite EMS, quickly communicated the specific "what3words" address of the patient's location and EMS deployed to that grid square using the app's navigation feature. We've got our family members up to speed on the "what3words" capabilities and would like to get the "word" out to the OTT RV community to consider using as part of their boon docking regimen. Stay safe out there! Cheers!9 points
-
This is a follow-up to my earlier post regarding the E5H error. Truma did respond with the following description for the E5H code: "ionisation voltage recognized during standby mode. Could have been from a solenoid sticking for a moment due to moisture on the sensor, or a voltage spike". In my case I'm sure it was due to moisture as a result of traveling during heavy downpours.7 points
-
I know that the Oliver Service Department gets a bunch of praise, and, it is well deserved. Well, here is another bit of praise to add to the pile! Yesterday morning I "opened a service ticket" requesting an appointment for late August, 2024 and two night's camping at Oliver. Late yesterday afternoon I received two emails - one from Mike Sharpe and the other from the Service Departments automated reply to my service ticket. Both of these advised me that I was all set for the appointment and the camping at Oliver. Clean, efficient, easy and prompt. Just like all the other staff at Oliver - these people ROCK! Bill6 points
-
Great report Bill. I have always had a prompt reply from Oliver Service. Given how busy they can get on any given day I am grateful for the service team Oliver has in place. The service ticket system really works well in my experience.6 points
-
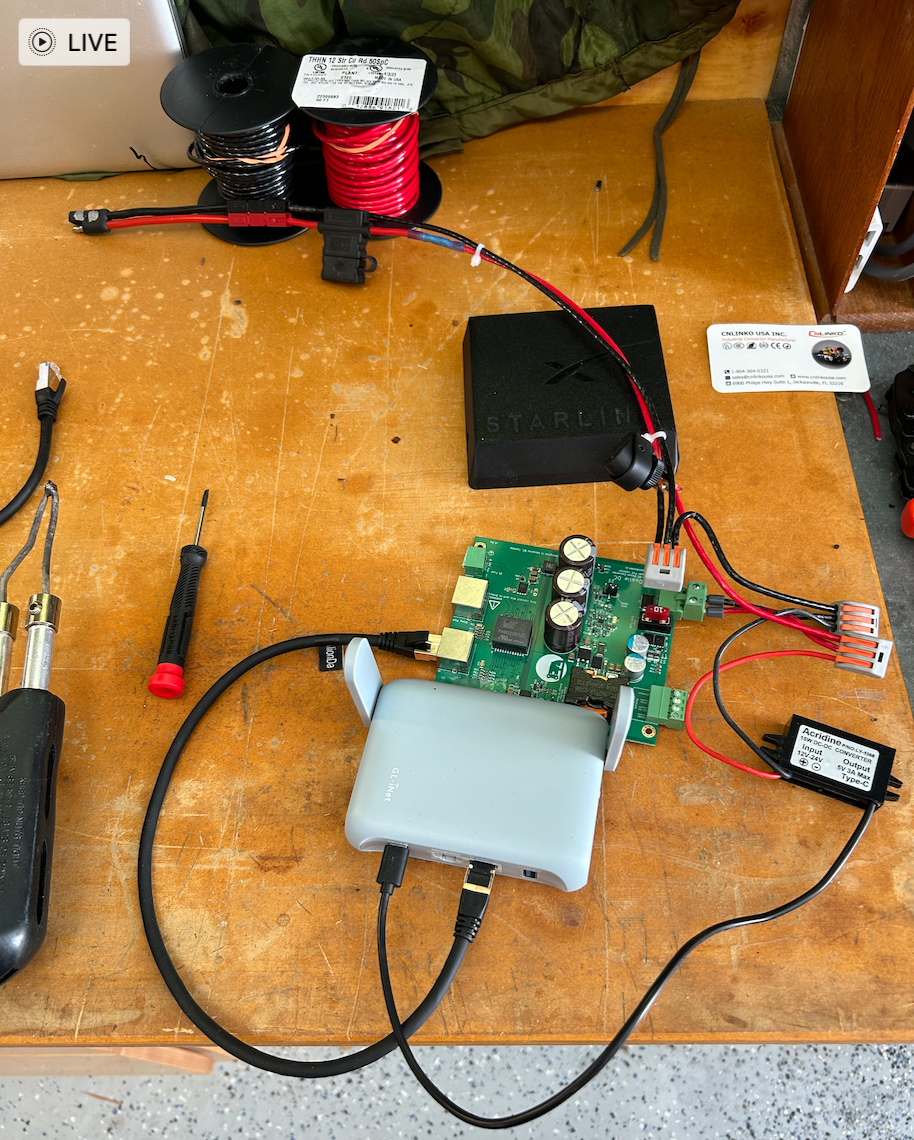
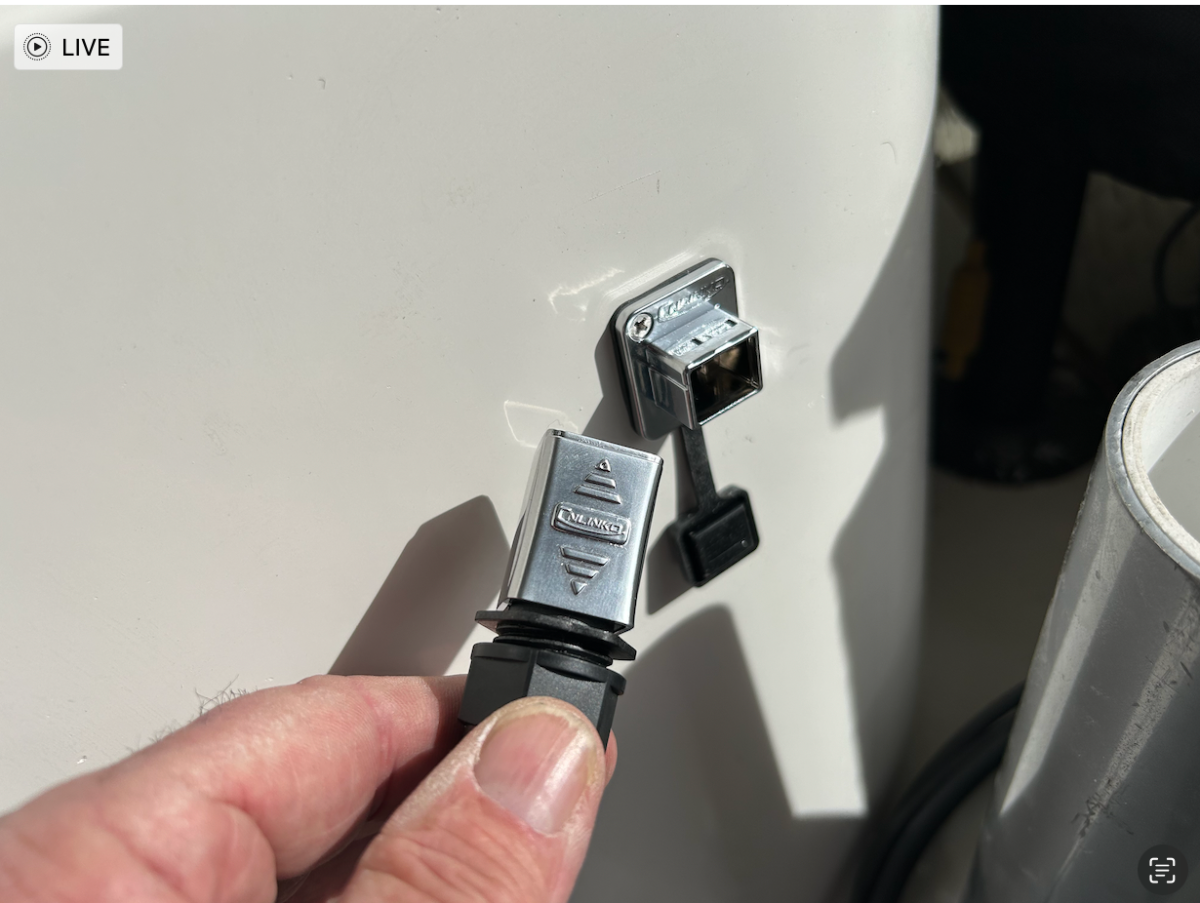
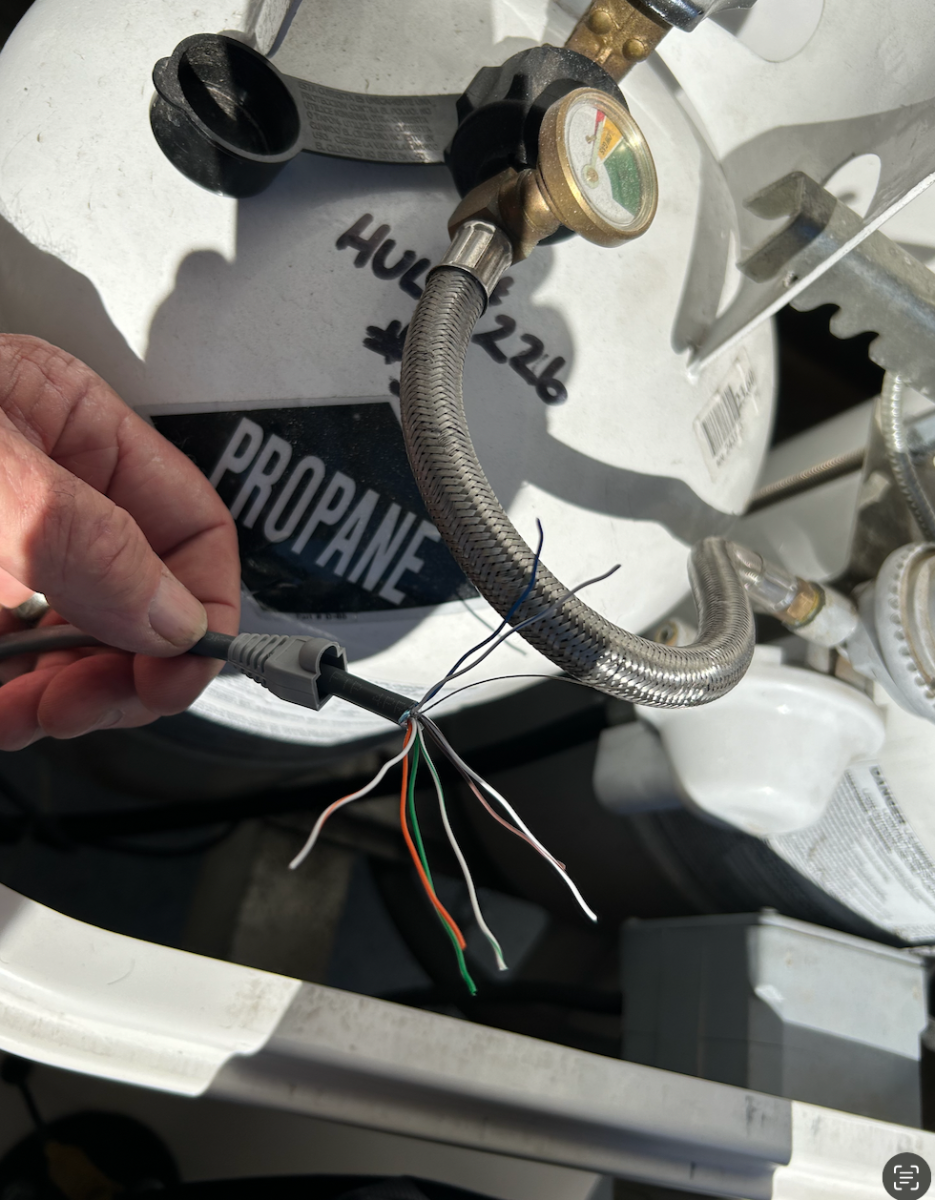
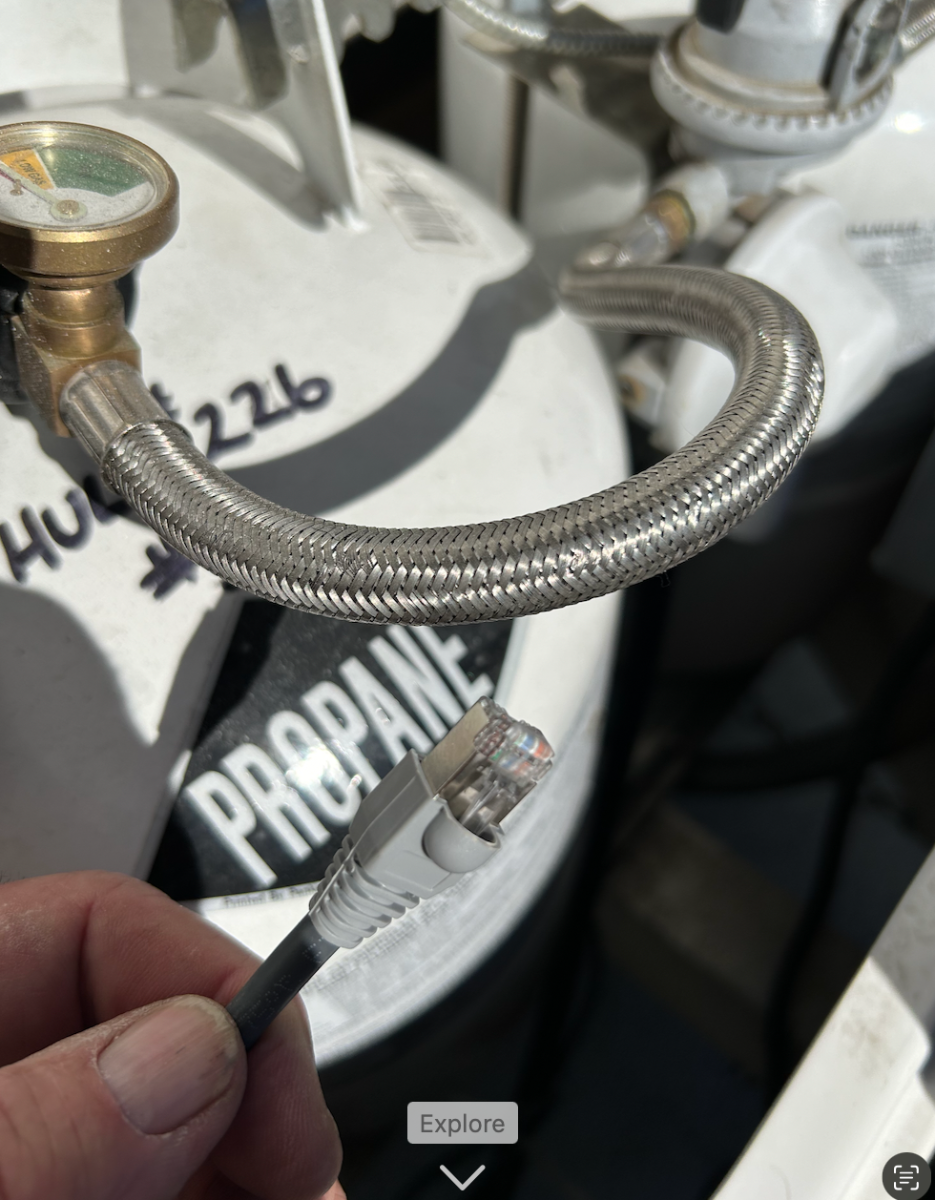
STARLINK 12vDC Conversion UPDATE: After our 2-week Quartzsite trip which put us in 3 campsite locations on BLM LTVAs, it was clear that our Starlink system needed a more permanent install in Casa Blanca. Setting-up/stowing 3 times became a minor PITA. We discussed "how" we wanted to use Starlink and it basically came down to: 1. Maintaining the flexibility of using Starlink with or without our Oliver, such as a back-up to our residential system. Essentially, we still wanted to use the 120vAC option when not camping. Some applications suggest flat-mounting the antenna on the RV roof - this is a permanent option and not for our lifestyle; 2. Making Oliver Starlink operations 12vDC-based and not 120vAC which is the Starlink standard. Power consumption is estimated to be 18 to 25% less using 12vDC rather than using the inverter to energize the Starlink. Spent the last couple days rigging up 12vDC-based "proof of concept" set-up. Using the solar port on the battery hatch for the power source, the test set-up included: 1. A Boondocker.ie sourced "Dual Dishy DC-DC power supply/PoE injector" circuit board ($88, direct from Boondocker.ie); 2. Power supply/PoE injector circuit board box (3D-print file downloaded free, $25 to print box locally) 2. GL.iNet GL-MT3000 (Beryl AX) Pocket-Sized Wi-Fi 6 travel router ($109, Amazon); 3. Acridine 12vDC to 5vDC converter ($12.99, Amazon); 4. LOCHSOEL RJ45 Interface Waterproof Socket Connector, ($17,99, Amazon); 5. Sabra Technologies Shielded rj45 cat6 connectors , ($19.99, Amazon) FULL DISCLOSURE: If cutting a Startlink cable or drilling hull penetrations makes you lose sleep at night, this mod may not be for you. Preparing the 12vDC-based components for the test set-up: Testing the concept of the 12VDC conversion before running power wires and Cat6 cables inside the camper: Description of components in above pic: 1. Upper left: The Starlink "Dishy" satellite antenna. Starlink uses proprietary terminal connectors on either end of the provided shielded 50-foot Cat 6 communications cable. The antenna end is designed to be compatible with the "leg" by being inserted into the tube of the antenna leg. The antenna end connector stays with the 12v conversion - the router end of the cable is not needed for the 12v application. The router connector is removed (cut) 3' from the router end. It will be used later when the cable is fit with a RJ45 shielded connector for the optional 120vAC residential set-up; 2. Lower left: Red Husky box configured inside to stow Starlink gear. The original Starlink 120vAC router and power cord - not used in the 12vDC conversion is on top of the Husky box; 3. On table: Black box (3-D print) housing the Boondocker circuit board, travel router (gray box with antennas "up"), 12vDC to 5vDC converter (small black box to left of router); 4. Power cord from SAE plug on battery hatch (solar connector); 5. Power toggle switch w/green "on" LED (not visible), ($11.99, AutoZone); 6. All connection power wires are 12AWG stranded automobile grade. Prior to firing up the test, the travel router needed to be configured - standard drill. Energizing the test set-up yielded blazing fast internet speed (screenshot taken right from the Starlink app): Notwithstanding changing out the original router with the travel router and adding the Boondocker circuit board, the Starlink app behaves as normal - completely transparent as the major components are housed in the antenna and not in the factory stock router. After cycling the test set-up "on/off" several times with power toggle switch, the Starlink connected each time with 2 or 3 minutes. Confident that the 12v system will perform as planned after testing, we prepared the Cat 6 cable hull penetration. Using the existing DC-to-DC charger (1/0 cables) Blue Seas clam hull penetration, a 1/4" hole was drilled into the rubber weather seal adjacent to the pos/neg 1/0 cables in the clam to accommodate the Starlink cable. This hull penetration is located adjacent to where the 7-pin cable comes through from inside the vanity sink cabinet. After feeding the Cat 6 through the clam into the vanity cabinet, prepared the penetration in the "dog house" adjacent to the flag pole mount. "Weatherproof" RJ45 socket through the Dog House shell. The weatherproof socket as well as all RJ45 connectors were tested for continuity with our cable tester: Each Starlink cable end (except for antenna end) needs an RJ45 shielded connector... The above connector runs from the inside "dog house" connector under the LPG bottles through the clam hull penetration into the vanity cabinet. We decided to mount the Starlink kit inside the closet on the inner bulkhead. Wanting to have a dedicated power run, 12AWG red/black stranded wires run from the main positive bus under the aft dinette seat (red) and from the SmartShunt (black) then they run under the dinette table and forward seat, under the toilet into the vanity cabinet. Drilled a hole just above the 2" black ABS plumbing vent pipe from within the vanity cabinet into the closet. Routed the 12AWG power wires and Cat 6 cable from above the plumbing vent inside the vanity into the closet then up and through the lower and upper closet shelves. Today, components will be mounted on the closet bulkhead, power connections will be made, another RJ45 connector fitted to the Boondocker end of the Starlink cable, then test final install later this afternoon. More to come....
 5 points
 -
How true. Submitting a ticket is key to getting a quick response. Way too many people call, never get anyone, and then say Oliver is unresponsive. 1,500 trailers and 3 people that can provide technical support, Jason, Mike, & Hannah. They aren't sitting by the phone waiting for an Owners call. We just pinned a post on Facebook reminding people to submit a ticket request.5 points
-
Another "arrow" to place in the quiver! While I use a Garmin Inreach mini that automatically transmits my GPS coordinates in the event of an emergency, I can see situations where the "what3words" system would/might come in handy. This is another good place to remind everyone about a presentation that was made a couple of years ago at the Oliver Owner's Rally. This presentation covered the type of information that each of us should have available in the event of an emergency. A copy of the information that would be helpful plus some other ideas can be found IN THIS THREAD. And, for those of us that keep this information with us - now is a good time of year to take a look at it to make sure that the data contained in it is still up to date. Bill5 points
-
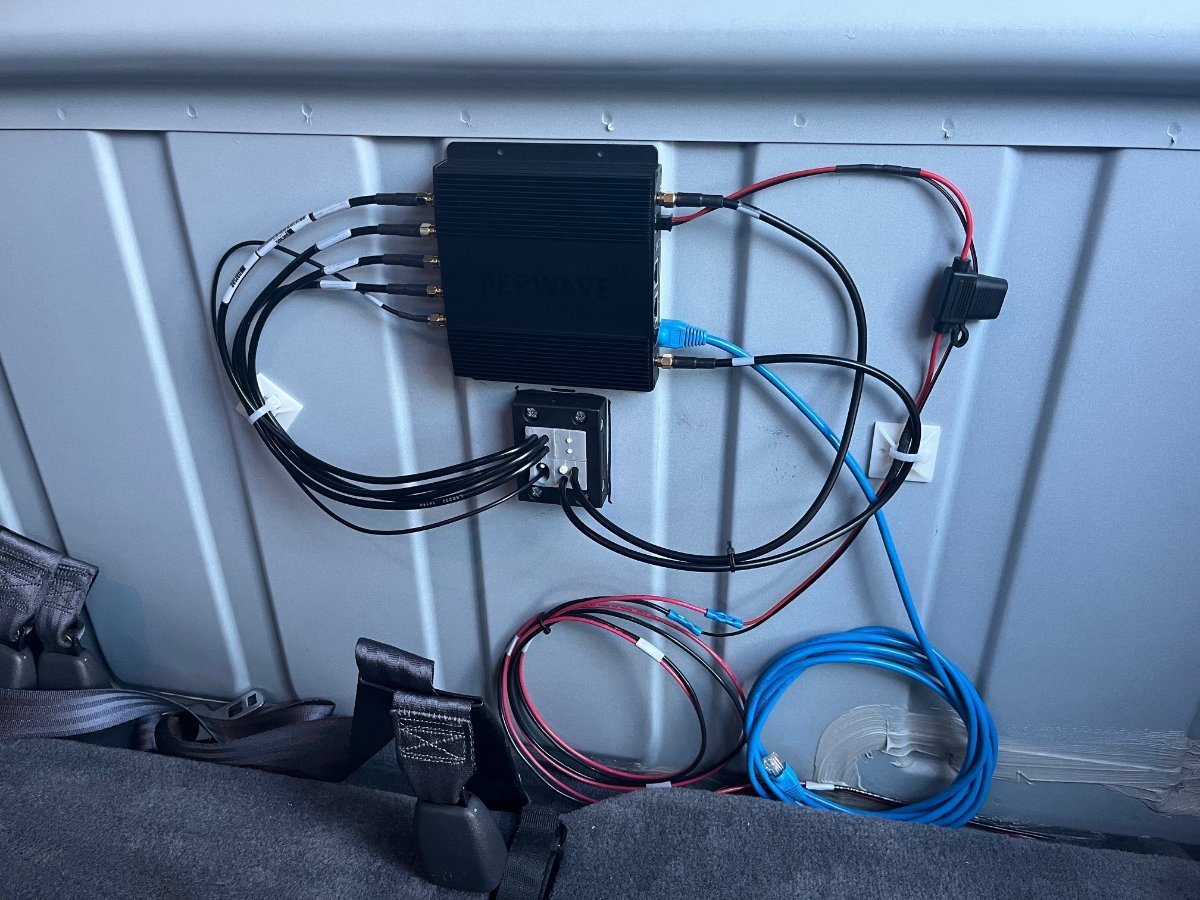
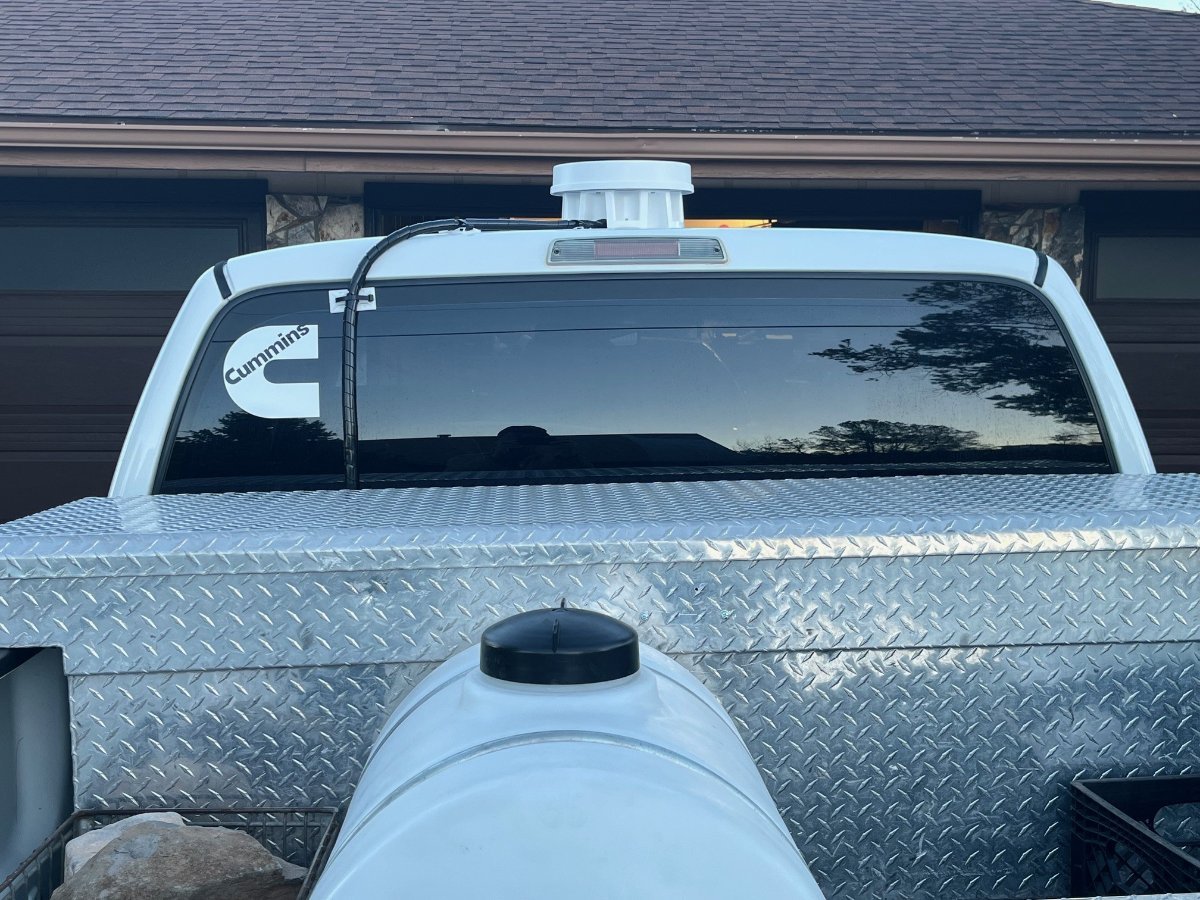
Any of you getting to know me as a new Oliver owner, might have noticed I'm not the conforming sort! So, we wanted better cell reception, had the Verizon MiFi before, OMG how do you actually connect an antenna to that junk? Hate Verizon too, but they historically had the best coverage in the west (AT&T is weak out here). Did some research and came across: Mobile Internet for RV & Boats - Unbiased News, Guidance & Education - Mobile Internet Resource Center (rvmobileinternet.com) After hours of more study, we found: Speed Demon Mobile Internet Bundle – MobileMustHave.com and ended up purchasing this bundle. There is a thread here of an amazing installation on the rear of the Oliver: Pepwave Cellular Router Installation - Ollie Modifications - Oliver Owner Forums (olivertraveltrailers.com) Thank you @Wildbrew Great work, but fabricating a platform, a permanent installation on the roof of the Oliver? It's not for us. We do not travel with the Oliver enough for this to be worthwhile. Thinking not only about the HW costs, but ongoing costs of data plans, I needed something not only for camping, but as a backup to my business. Then I found out that T-Mobile has 5G in much of Arizona, even in our small town and more 5G coverage than the rest. The other thought that concerned me is out here in Arizona and the West in general is the elevation ups and downs, the canyons where we often camp. Why not consider a truck (TV) mounted solution? Often, like last week where we camped at Burro Creek, there was no cell service, no broadcast TV, no AM/FM, nothing. However, when we drove up to the highway we got a signal. Of course, when you drive the truck down the road, you cannot stream TV in the Oliver, but you can make calls, deal with an emergency and get on your laptop to receive and send emails. I had the installation finished last weekend. I paid an extra $49 for MobileMustHave to configure the router, and they finished up this morning. Got a new T-Mobile Business account setup in the last few days and everything came together today! The Okla Speed Test came in at up to 242 Mbps download and 26 up, numbers likely much better than many have at home.
4 points
-
I will join the others with my response for some warranty work. First after we picked up our Oliver we spent the couple days at Oliver then we had plans to head south to explore some areas we had not been to yet. On our way back home we came back past Oliver and stopped, no appt, they had someone come out and take a look and fix a couple small items we found - been a couple weeks. Second - I submitted a ticket on some other issues I suspected this fall, got an email, ticket was updated and did actually get a call next day to discuss the issues. Walked me thru some diagnostics and determined problem, they scheduled appointment for spring to get warranty work completed and schedule yearly maintenance while they had it. Cudo's to those folks, they truly help distinguish Oliver from other Brands/Companies.4 points
-
Same here... We've never had anything but exceptional service from Mike, Jason, Hannah, and Ryder. Their performance only adds more value to owning an Oliver - giving owners confidence in their rig. For example, last May we were headed down to Mexico and overnight near Tuscon, we discovered the water heater was inop. With no time to file a maintenance ticket, called Mike and we figured out that one or both of the two thermocouples in the Atwood unit could have failed. This troubleshooting was accomplished while driving westbound on I-10 approaching Tucson. Well there's a Camping World just north of the interstate, calling them we learned they've got both the electrical and gas thermos - in luck! Vectored to CW, bought two each of the thermos and replaced them in their parking lot - put the spares in the maintenance kit. One and done thanks to Mike's troubleshooting. Keep up the great service, Oliver! BRAVO ZULU!4 points
-
In another unrelated thread, @MAX Burner brought up the idea of the relatively new Nomadic 12v ac unit as a possible upgrade to his trailer. Unlike the Dometic 12v ac, this one fits in the industry standard 14 x 14 opening. Runs directly on 12v, no inverter necessary. It's more expensive than comparable Houghton (what we have) but relatively quiet, very efficient, and runs directly from battery power, 12v. Has anyone seen one in person? And, importantly, heard it? https://nomadicsupply.com/nomadic-cooling-x3-camper-van-air-conditioner/?attribute_pa_exterior-color=black-ripstop&gad_source=1&gclid=CjwKCAiAtt2tBhBDEiwALZuhAFXBEbtCmjNVSFgPvJI4CQkisC2N42rSn6As7vae9b-G3Y1XOrDHGBoCRIEQAvD_BwE First video is a comparison with a traditional 110 dometic, power consumption and temp coming out of ac.4 points
-
After some thought of how little we used our 3200i generator in the cargo tray on our last 42 day trip out west, we decided to move forward with a custom all aluminum cargo/storage box from Sea Biscuit metal fabrication shop. My wife and I took a 3 hr drive up to Johnson City, Tenn and visited the Sea Biscuit metal fabrication shop. We met David and Kristine Hess the owners. Some of the nicest folks you will ever meet, and they are campers as well. After seeing the high quality of the Oliver storage boxes that David and his team craft we decided to purchase one. The fit and finish is excellent. We like supporting small companies and their products made right here in the USA 🇺🇸. We know we will get a lot more use from our cargo box each time we set up camp. It has lots of room for all things for initial set up. Our gen will be secured in the truck bed. I custom ordered and installed the XPLOR metallic silver graphics from https://lettering.com/ another excellent customer service experience. Had a buddy of mine install XPEL PPF on the front and sides of the box as it sits in the road rash blast zone. For questions on custom boxes and pricing reach out to -https://seabiscuitmetaldesigns.com/product/oliver-box/ a few photos - PPF - I bought and trimmed a fatigue mat to fit from HF to line the shelf and bottom. Added graphics- Moose rack holds our cables off the ground. Plenty of storage for all initial set up gear- XPLOR graphics installed-
3 points
-
Chris and Cherie of Technomadia and Mobile Internet Resources were early Oliver Elite owners. They moved from a Tab to an Elite before OTT's temporary shutdown and the sold it and moved to a large RV. They are a great resource for mobile connectivity. Mossey3 points
-
However we think our Olivers are special, a bolt is a bolt and torque is based on bolt grade and diameter. I never look at manufacturer's specs, too much time and trouble. Torque-Tension Reference Guide.pdf (fastenal.com)3 points
-
These are big improvements. I have had to replace batteries because, in the rush to get settled in camp after a long drive, I forgot to turn ours off! And, on ours there is no indication that it is on, other than the switch, which is hard to see.3 points
-
I will have to wait to purchase a leveling system for now. A new model being release called LevelMateMAX Wireless Vehicle Leveling System. Estimated Ship Date: April 2024 LevelMateMAX is a wireless RV leveling tool loaded with state-of-the-art technologies designed to enhance your leveling experience. Using the free LevelMate iOS or Android app, LevelMateMAX provides real-time feedback on how to adjust your vehicle to reach a perfectly level position. LevelMateMAX is powered by three user-replaceable AAA batteries, included with purchase. Level on the Go: Advanced gyroscope technology provides live leveling information, even while your vehicle is in motion, allowing you to find the best spot to park and attain an absolutely level positioning. Listen to Level: The LevelMate app audibly guides users to level via a patent-pending tone feature. Extended Battery Life: More efficient power usage enables a longer battery life. Enjoy up to 395 days of power without battery replacement when using leveling mode for approximately 10 hours/month. Easy Battery Replacement: A front-side battery door provides easy access for battery replacement – no screwdriver required. Remote Power Control: LevelMateMAX can be powered off directly from the app. Power Indicator: A soft-glow light indicator provides visible evidence that the device is powered on. Flexible Mounting: Mount your LevelMateMAX horizontally or vertically.3 points
-
Almost every time I read a thread here on the Forum or watch a video about these locks I consider "upgrading" my old fashion key jobs. But, then I see a story such as this about being "locked out" or worse - the lock simply will not operate and I try to remind myself of why I like to keep things "simple". Simple seems to fit well with my brain!🤪 Even though I still do the key thing the old fashion way, I do keep a set of keys in both the tow vehicle and the Oliver. Plus I have a couple of extra sets in the event I need to give a key to someone else that is going in a different direction than I am. Bill3 points
-
I have been using what3words for a while now, and it is really high resolution, down to a 3 meter area. I have a Motorola Defy, which uses a satellite, but I'm not sure how quick the response would be vs. having cell service and using 911. But would highly recommend what3words.2 points
-
Apologies, @Patriot, for the delayed response. Regarding the EZ-Pole with Dishy mounted during high wind conditions - could be an issue if extended to the entire 24-foot max height. The Dishy antenna is not a huge sail by any stretch - in fact, it's quite sleek and aerodynamic in a tilted position. We experienced high wind conditions in Quartzsite last week, the pole height was lowered to the 6.5-foot lowest setting, no issues - the down/up internet speed remained constant during the windy conditions. Our thoughts regarding the Dishy pole placement was simply to get it off the ground and out of the way. The height of the Dishy doesn't improve or speed up internet signals, but it could be beneficial in avoiding obstacles. In sustained high winds, we'd likely opt to place the Dishy on the quad pod in a protected area such as the truck bed. If you and your lovely bride aren't concerned about having a dedicated SL kit for "XPLOR", our recommendation for y'all would be to modify the antenna such that it could be flat mounted on its roof. Roof real estate being a premium, the antenna dimensions are 12" x 20.25", so depending on your roof configuration, there should be a clean install location up there. FYI, there is a downloadable file available to have a low-profile plastic housing 3D-printed to encapsulate the antenna and its internal components. They're doing this all over the Ukraine and SL antenna shells are literally cast aside along the roadways! However, some may not have the stomach to "not-so-surgically" separate the antenna from its shell - after all, it is a $600 piece of kit that would no longer be under warrantee by Elon. Our's should be rigged-up by this afternoon and tested - so there will be more to share later on... Cheers, brother!2 points
-
I believe it is 43 pound/feet.2 points
-
You may be right. i never actually blocked the skuppers. My thought is that as long as there is moisture in the trailer and temperature differential on between air surfaces, condensation will happen. I was planning on blocking the holes just for the winter in an effort to minimize all that cold air intrusion. Guessed that warm, moist air would rise (like in the atmosphere) and that I could vent through Maxair Fan. Even mid winter, we would crack the fan cover, not turning on the fan itself unless cooking and it did wonders to cut back on condensation. Pretty much limited to windows over beds where we were breathing. We had reflectix inserts in all windows so would open up the ones by beds every couple of days to find a modest amount of frozen condensate. Took no time to dry out. I ultimately gave up on the plan as my experience with digital thermometers in vulnerable spots, proved to me that my un-winterized Oliver, even after mods, had limited cold weather use. Some have had success down to zero with their trailers. I accept their account but could not reproduce the experience myself even after literally month's of winter camping and careful testing. I always found multiple spots in the hull, that had water lines run through them, that would drop to below freezing given consistent exterior temperatures in low teens or lower. Covering some of the skuppers during the dry winter time may have really helped improve performance.2 points
-
Don't forget to plug those "scupper holes"!🥰2 points
-
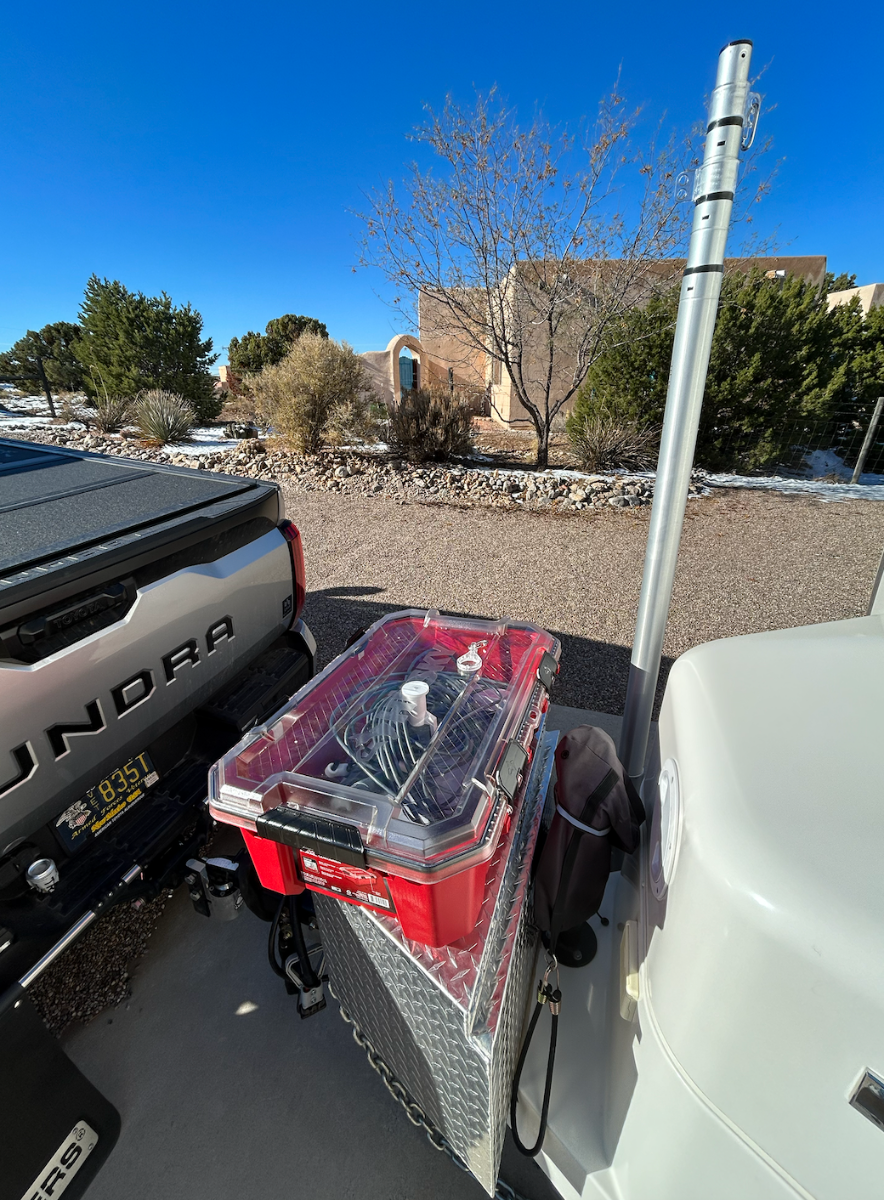
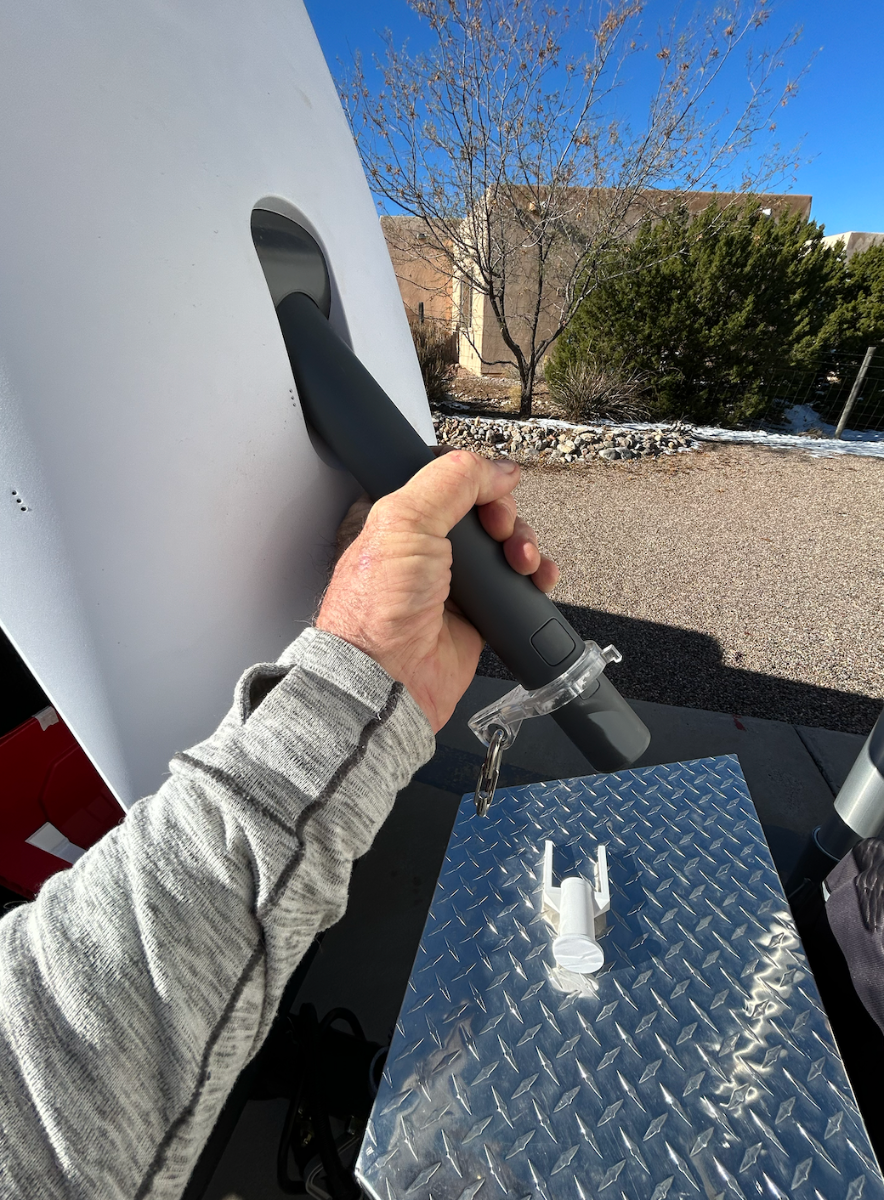
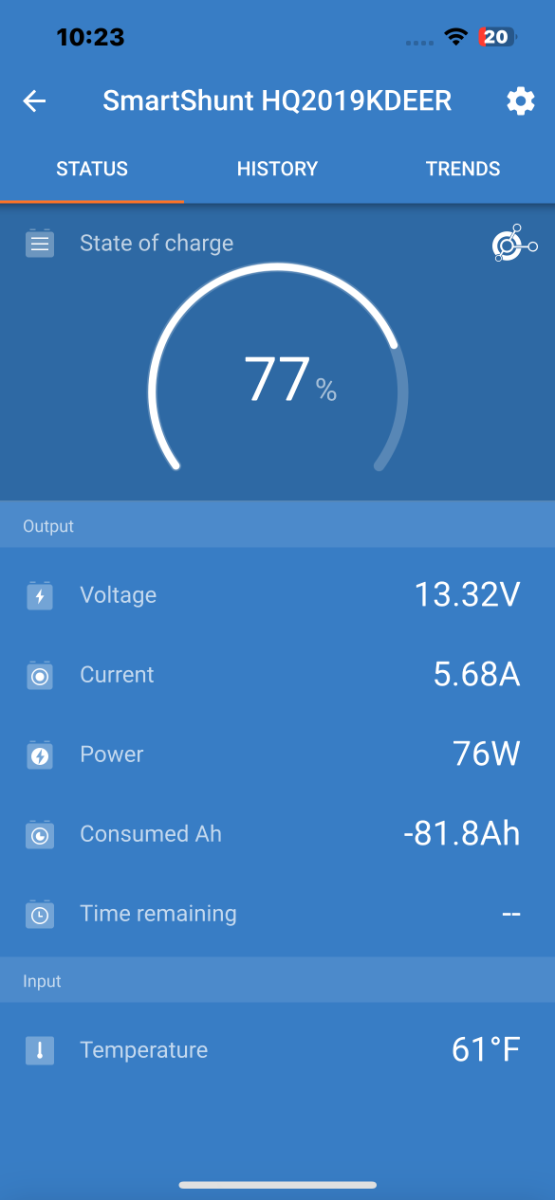
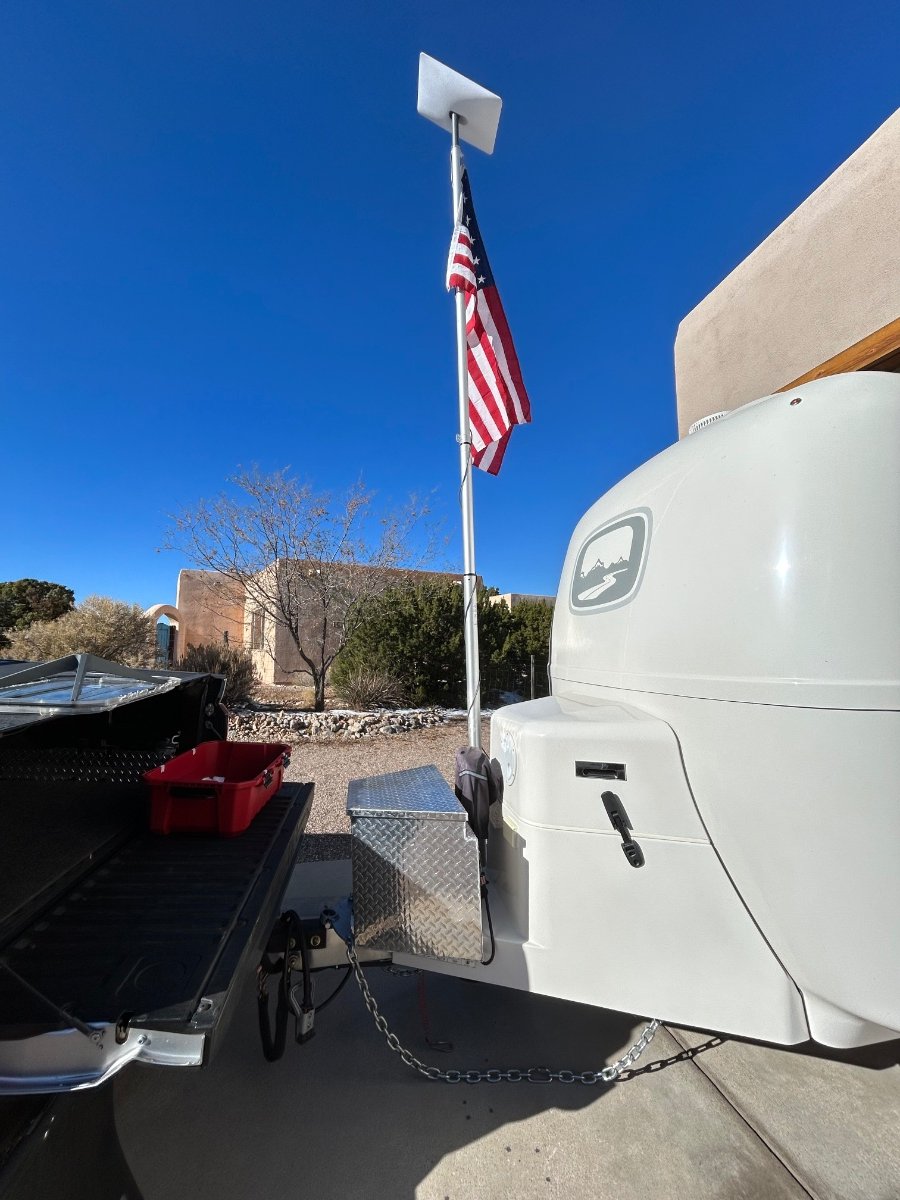
So, since D works from home and spends quite a bit of time on Zoom, Teams, etc., we decided to get into a Starlink-Mobile kit. The kit will allow her to work from Casa Blanca with Starlink's scorching fast internet connectivity and allow us to travel more often. Today we played around with a proof of concept for using Starlink in our Oliver - there are literally dozens of YouTube vids and deep rabbit holes for ideas of how to integrate Starlink with RVs. Here's how we'll be lugging is around: We're using a 12-gallon plastic Husky tote with custom-fit travel pieces from Etsy to keep components from bouncing around when towing. Its a neat and tidy mobile kit. Next, we didn't want to use the Starlink-supplied "quad stand" so we modified the top of our E-Z Flag Pole to accommodate the "Dishy" mount that would normally be inserted into the stand. We inserted an adapter (a 3D print from Etsy) into the top of the E-Z pole so the Dishy just snaps inside. By drilling-out the upper mostIMG_0441.HEIC flag connector with a step-bit, we're still able to fly the colors. We used the exterior curbside AC outlet for the Starlink router power connection. With the inverter energized, it took about 10 minutes for Starlink to connect to its satellite. Energy consumption varies between 60 and 80 watts according to our Victron Smart Shunt via the Cerbo GX. The solar modules are generating about 180watts at today's low sun angle, which more than makes up for the inverter/Starlink consumption. We'll likely put a through-hull connection using a modified waterproof Furrion capped connection (same one OTT uses for the satellite coax connection). The standard supplied cable is 75' and needs to be shortened anyway - so we'll do that when we install the modified Furrion. More later...
1 point
-
Awesome feed back and report on your install. All very helpful should we decide to move forward with SL. I am looking forward to your further updates. I like your idea of a lower profile on really windy days. And no apologies, I felt sure you wanted a little more field experience before posting up. Great mod and thanks Max Burner! Patriot🇺🇸1 point
-
I bought the same package in November 2022 during the holiday sale, even before we had our trailer. Mine is mounted in the trailer's attic, but I'm still using the stub antenna. I have the same external mount as you, but just haven't drilled that big hole yet. I'll be mounting mine on the pole mount, but mine will be on thereat awning bracket instead of using a pole.1 point
-
My RV Lock makes a funny extra (music type) sound when the batteries are low and then still makes the normal (music) sound during unlocking or when the RV Lock is locking. This has been like that for about a month now while the trailer is waiting for spring. Normally, when the batteries are good, I hear a sound with each depression of the 4 password numbers. When the RV Lock accepts the password, it make a music sound during unlocking as well as when locking. So the RV Lock gives plenty of advance notice that the batteries need to be replaced. I really like the RV Lock myself. I keep the key forb and key in my pocket or in the TV. It is nice to just come back from a hike and put in the code and unlock the door without finding a key. I would not be concerned with upgrading to a RV Lock as you can always use the actual key just like on a regular lock.1 point
-
Nope. I have to replace batteries twice a year. In fact a couple weeks ago we went to check on the trailer. I got in OK, but the batteries died and had to use the key to lock it. Have it on our list when we bring it home to load up.1 point
-
Tuskegee National Forest in Alabama. Free!
1 point
-
Correct.1 point
-
We are satisfied. As noted by others, it is quite useful when leveling the trailer side to side, as you can see on your phone in your tow vehicle how close to level you are. Then, of course, the front-to-back leveling is done after disconnecting the tow vehicle.1 point
-
I am very happy with mine and the location above the main panel has worked great. The best part is I can get a good idea from inside the truck for the side to side level. As Allen said, it makes it easy to find the most level spot and then fine tune it. I also like that it tells me how high in inches it needs to get to level; I find that very useful.1 point
-
Allen, absolutely satisfied; highly recommend it. When driving into a campsite you can find the most level section from within your tow vehicle and then fine tune when setting up.1 point
-
The shims are talked about here (time stamp 6:30):1 point
-
We just keep it simple and that has worked well for us. On day one, the 2 soft boxes from our truck camper (our pantry) didn't even fill a third of the lower area of the pantry. We both cracked up laughing. She packs the pantry according to each trip and length. Closet has plastic boxes on the bottom with a Goal Zero 400 Lithium power pack. The shelves have some plastic storage boxes, dehumidifier, all cube heater, First aid kit. 2-attoc areas over dinette have my clothes. Attic over street side bed has blankets, hammock. Attic over curb side bed wife's clothes. 2-attic areas over sink and stove have pots, pans, plates stored in wicker baskets or just in the attic. Rear attic above tv is a back pack, coaxial cable for tv and extra space. Truck bed packed based on trip location and length.1 point
-
No problem - consider it done! Bill1 point
-
Right on, brother. We've come a long way from starting with a '78 VW "Westie" which had a single lead-acid battery and shore power provided by a standard 20A extension cord - no GENSET. Progressed to a 12' pop-up tent trailer/lead-acid/but after adding a Honda 1000 we thought we were in RV Heaven (kick myself every time I think about selling that Eu-1000i)! Two highly modified AS's and a Casita later, we landed in our Casa Blanca, now with an Eu-2000i. We configured the AS's with two AGMs and 250W worth of solar modules - but not enough energy to boon dock for extended periods without firing up the Honda. After just completed a solid 2-week trip to AZ, neither the OTT power cable or the Honda saw the light of day. Granted, mild WX conditions contributed to that. But it's a wonderful feeling not relying on someone else's power. Our thoughts are now (in terms of upgrades), is much like @mossemi explains... wait until the Xantrax 2000 dies and move into a Victron Multi 3000 inverter/charger. At that point, we'd be able to run the Dometic AC unit off the Battle Borns for a few hours. Looking forward to integrating a Victron inverter/charger with our Cerbo S GX unit. Then there's always a Nomadic 12vDC AC unit on the horizon.... HA! Cheers!1 point
-
I can confirm with pictures that water does indeed condense on the hull. I was looking at the way the King Omnidirectional antenna was routed into the attic when i found this horrible leak. After further investigation involving paper towel, a fan and a water hose, I determined it was just condensation on the hull. I will be leaving the scupper holes open but I would sure like a one-way valve on it to reduce air infiltration.
1 point
-
Well - Besides allowing a water leak to drain, the scupper holes allow any moisture to evaporate from within the hulls. Primarily this moisture is the result of water vapor due to cooking and (more importantly) human/animal induced vapor due to breathing and evaporation from the skin. The scuppers were designed as they are in order to create a Venturi effect that actually draws moisture out from between the hulls when the Ollie is being towed. Bill1 point
-
I cut a 4" vent from the back of the closet into the vanity in the bathroom. In my case, also added a 4" adjustsble vent in the door which is pretty much the equivalent as the vents now added standard by Oliver. After this mod, when the heater kicked on, I noticed that warm air from the cabin would get drawn through the closet. No more frost and condensation on the rear wall and clothes dried much better. Still would prop the door open if I had to dry things quickly.1 point
-
The second one pulled by a dark pickup was us. We’re at Catalina State Park, Tucson for now. We noticed you on the eastbound side.
1 point
-
Good stuff and thanks for sharing! We have Starlink at home in northern MN and it works awesome! Our OTT is put away for the winter but we were planning on getting the mobile Starlink for next summer as I also do a lot of work on the road. Thanks again!1 point
-
Totally get y'all's concerns. The key requirement for us was to get the Dishy off the ground and still be able to use it without the OTT. The EZ Pole and mount is robust - 4 nested aluminum tubes. High wind conditions would require striking the colors, lowering the dish to the 6.5-foot position and thus keeping it off the ground. FYI, in snowy conditions, the user can select the snow melt mode (more energy) via the SL app to keep accumulation at check and maintain high signal strength. There are flat mounts available for SL that we've studied - but once its flat-mounted on the roof, you're committed to that application - we wanted flexibility to use SL if we were tent camping, for example. As noted, we're also interested in a 12vDC conversion and shortening the proprietary CAT6 SL cable to save a bit of energy - but that's down the line. We want to log some more trips in the current mode first so we're better able to make an informed decision on what best meets our needs. Guys.... Beware, there are some scary rabbit holes one could fall into when researching the RV-applicable mods for SL kits... Many hours spent crawling through these tunnels. HA!1 point
-
David sold his trailer some time ago and hasn’t been here since. You might try sending him a PM. He was a great contributor to the forum and a great photographer! Mike1 point
-
@MAX Burner, I have nothing to add to the conversation from a technical standpoint, but I do have serious envy of those clear deep blue skies in your photos. So beautiful!1 point
-
Art: Great effort. Down the road June likely will need the same set-up. Some questions: How do you raise the mast? What kind of speed does the system generally provide in "city" and while "remote"? Any wag on the equipment and accessories cost (not counting your time which is priceless of course?). About what does the monthly cost run? Thanks GJ1 point
-
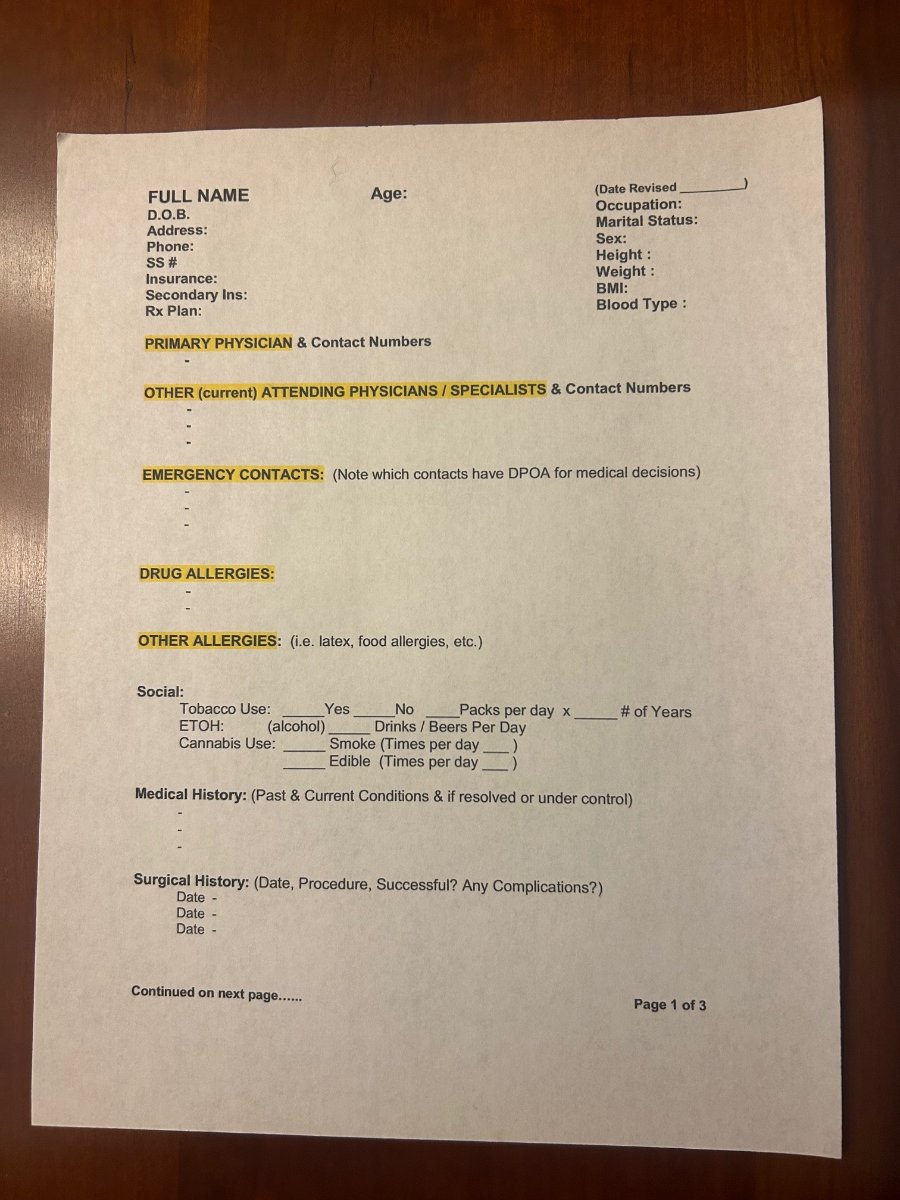
Back on January 17th of 2020, we had an appointment to meet @topgun2 to show us his Oliver LEll aka “Twist”. We throughly enjoyed the 4 hr visit and all the extremely helpful information shared by Bill. And after a factory tour on Jan 21st, and we ordered our Oliver on January 31st!! I mention Bill; as we are not taking any credit for the below checklist. I know we all have checklists for our Oliver, however this is one that you need to have but hopefully will never have to use. We actually carry this checklist with us every time we travel whether pulling the Oliver or not. We don’t have a blank checklist to share in a word doc as ours has our personal info already on it. You should find it fairly easy to personalize your own from the info on the attached pics. So consider taking a few minutes and create a medical checklist that hopefully you will never need. In the event you do it’s invaluable. A special thank you to Bill aka @topgun2for suggesting one of the most important checklists we will always carry and hope we never need. Safe Travels Oliver Family! Patriot🇺🇸
1 point
-
Things a bit slow down there in sunny Florida?😇1 point
-
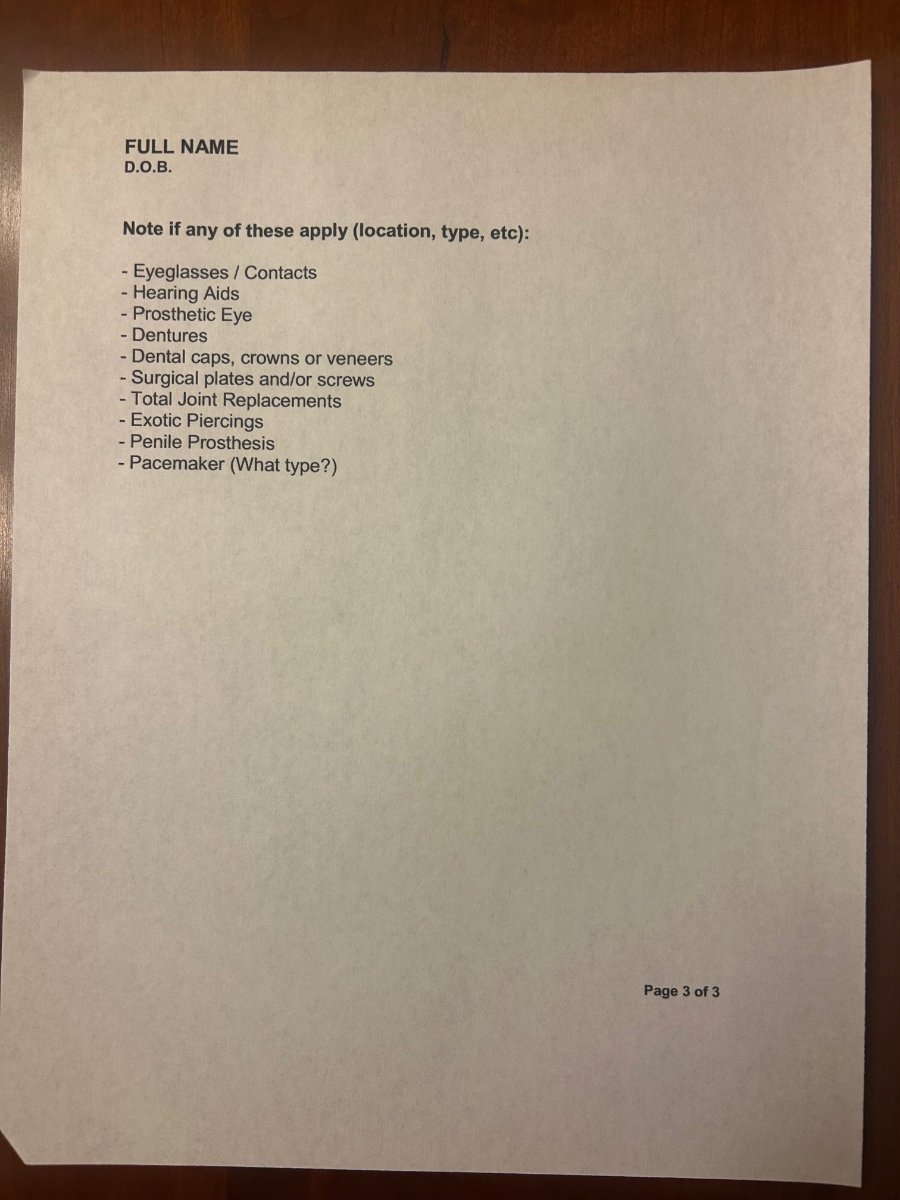
I (finally) found blank copies of the forms Patriot shows above. These details plus copies of your driver's license, medical insurance cards, and any health directives that you may have (medical power of attorney, living will, DNR instructions, etc.) should be together. Hopefully these things will never be needed. Bill Medical-History-Forms (2).pdf1 point
-
Thanks Patriot for the kind words and I'm glad that you have found this list helpful. However, I don't deserve credit (other than passing it along) in that it came from a presentation that was done by a former Oliver owner and his wife (both medical professionals) at an Oliver Owner's Rally a few years ago. This list of medical details and relevant information is to be used in the event that you can't speak for yourself and/or when a medical emergency happens and people are running around in the confusion that many times happens during situations like that, there is one place where all necessary medical information can be easily found. I keep a copy of this in both my tow vehicle and in the Oliver. Both copies have a medical alert drawing (like the one below) on the front of a bright yellow folder. Bill
1 point
-
A very impressive custom detailed install. I too look forward to your future posts on how this works out in your travels. Thanks for posting. -Patriot1 point


-
Recent Achievements
-


")


")


")


