Leaderboard


Popular Content
Showing content with the highest reputation on 07/05/2024 in all areas
-
@ZLarryb - if you still are not able to get grease into some of your wet bolts after trying @Ronbrink's suggestions, you may wish to consider removing those wet bolts that aren't behaving and check for correct grease journal orientation: 1. Carefully jack up the affected side 2. Use a floor jack under the closest axle to adjust its height to completely neutralize the load on the affected wet bolt 3. Stabilized the Zerk end of the wet bolt with a wrench and remove its nut. It's important to stabilize the wet bolt so its splines (on the Zerk end) do not strip-out in the hanger when you're un-tightening it. The splines are intended to keep the wet bolt in place such that the grease journal remains oriented either at the 3 or 9 o'clock position - this is the position of slightly less pressure which allows the grease to flow easier when trailer weight is on the wheels. 4. Tap the wet bolt partially out of the hanger with a brass punch - as the bolt slides out a bit more than half-way from the leaf spring hanger, look for the grease journal at the mid-point of the we bolt. It's a small hole allowing the grease to lubricate the brass (sometimes plastic) leaf spring bushing. Attach your LockNLube and give it a squirt - this will test the Zerk and remove old grease from the wet bolt. 5. Rotate the bolt until it's oriented at the 3 or 9 o'clock position. Clean the Zerk end of the bolt and mark it with white paint in line with the hole. This way you'll know during future lube jobs that the grease journal is oriented correctly or if the wet bolt rotated after you've corrected the issue. 6. Carefully tap the wet bolt back into place, stabilize the Zerk end and torque to specs (45 - 50 lb-feet) 7. Grease the Zerk Hope this helps.5 points
-
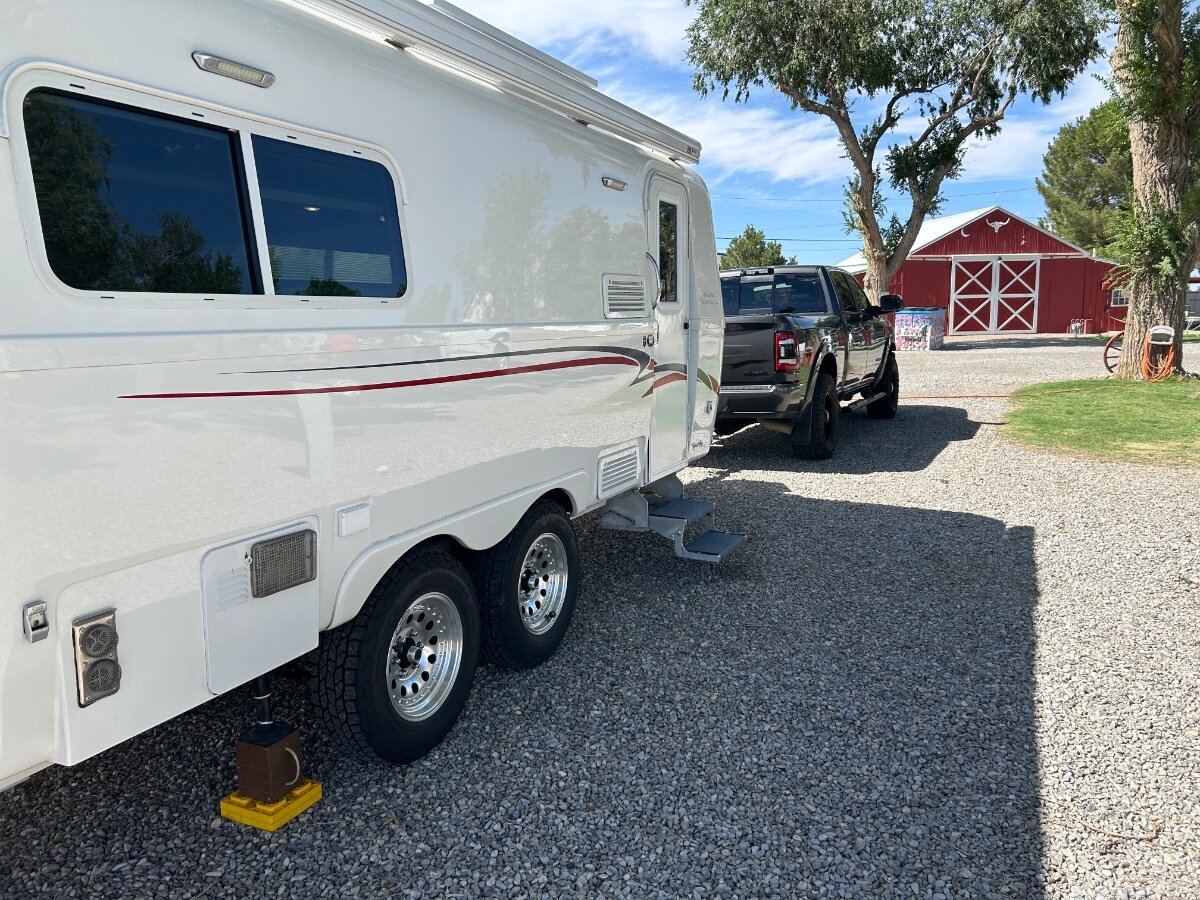
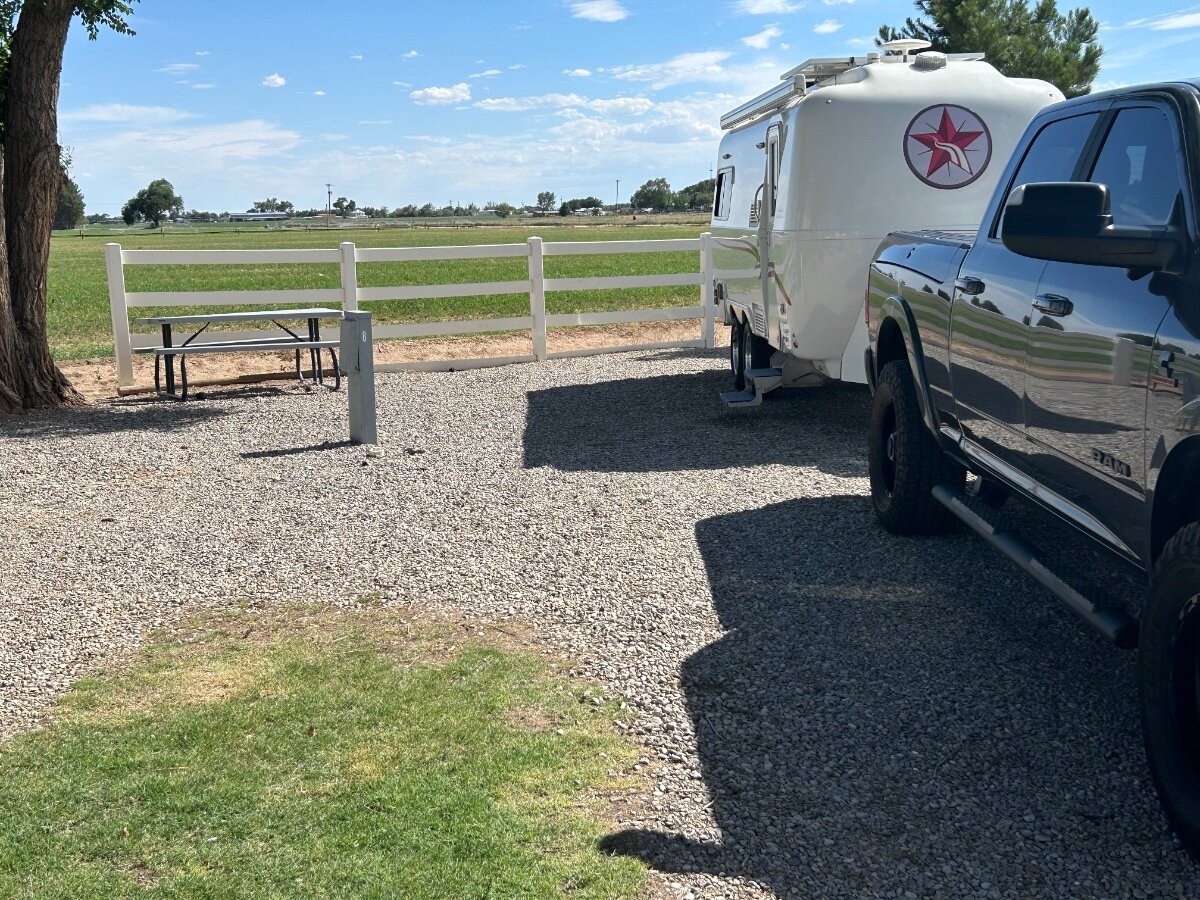
We’re on our way to Colorado to escape the south Texas heat. Overnighting in Roswell, NM which does not get us out of the heat! It was 106 when we pulled in to our campground. No sitting outside, we’re enjoying 70s inside with our loud Dometic AC. We’re at the Red Barn RV Park, very small but clean and convenient. We’ve stayed here at least a dozen times on our way to/from Colorado. Yes, that’s a Red Barn. It’s the office, rec room, rest rooms. She keeps a cooler there with bagged ice, food, ice cream and drinks. Farm field behind us, there’s only about 12 sites total and several are long term folks.
 4 points
 -
Update: Well, I've had the system on a few days of Solar and a few days of 20A shore power. The BlueSky and converter seem to be working totally as expected and as it was before my battery tray clean-up. A good long shutdown/reboot fixes almost everything. Even us. LOL I'll be at the factory for the first time in a few days. Not sure what to expect, but excited.3 points
-
To be clear, the thumb lever on the LockNLube coupler, affixed to your grease gun, will be depressed when attaching the 90° extension to ensure the two components are properly joined; then the adjustable collar at the end of said extension is turned one way to tighten its’ jaws to hold onto the zerk for a good seal and the other way to loosen the jaws for removal from the zerk when done. Many owners simply replace the stock zerks with 45° and/or 90° angled ones to eliminate the need of the adjustable extension.3 points
-
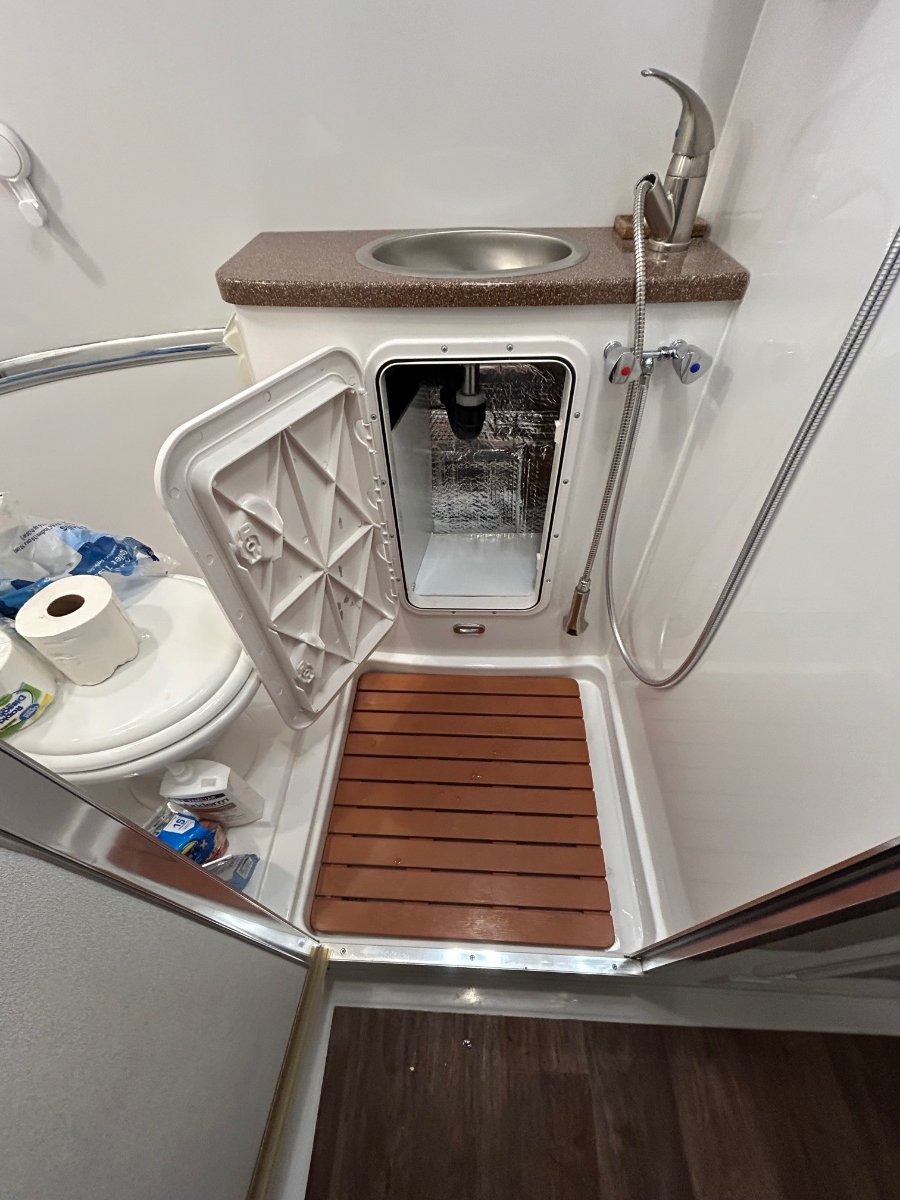
@Boudicca908: While you've got the cubby insert removed and have inspected that "great space" under the sink - try considering replacing the insert with one of these and adding a shelf to store toiletries and stuff: Gives you ready access to all that great space below the vanity sink... Just say'n... Cheers!
2 points
-
Thks. Our road tandem has 1.1" (28mm) wide tires...great for asphalt but that's it. The gravel bike has 2.15" wide tires. This allows us to ride on loose gravel with great stability.2 points
-
We’ve spent time here, our son went to New Mexico Military Institute here for a year before going to West Point. Ruidoso is also a favorite camping spot!2 points
-
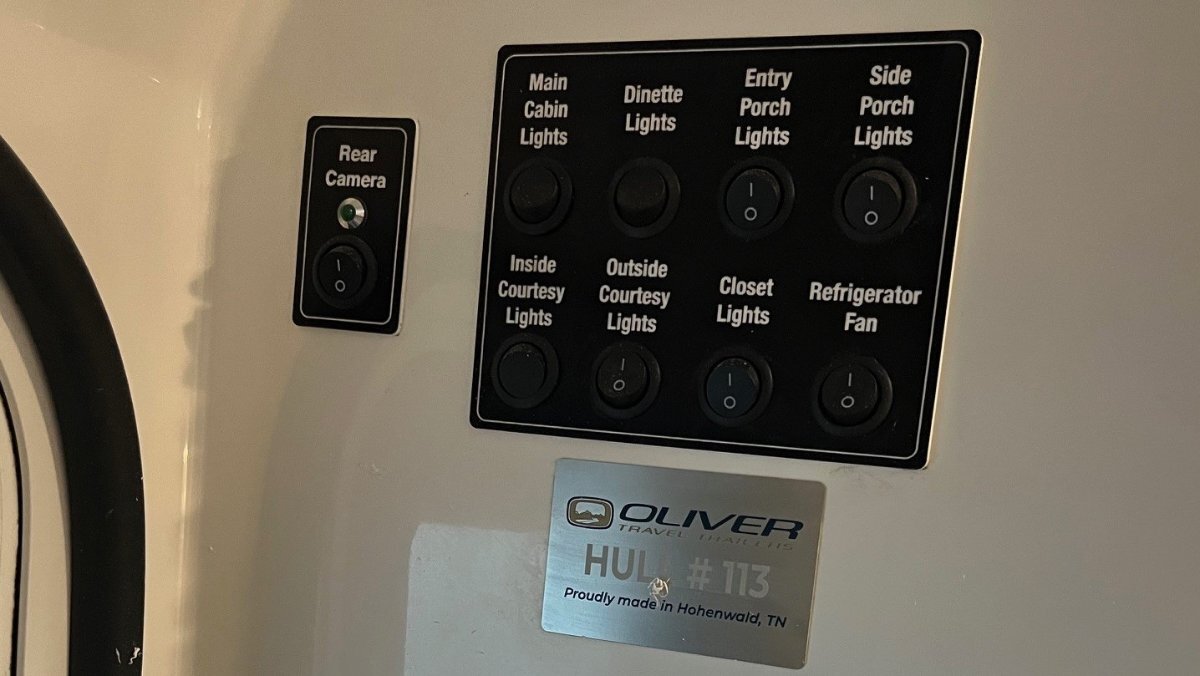
Yes, #110 has the exact setup pictured above. Mike (forget last name) at the AL rally told me how to test my fan and power leading to it. I found that no matter what, there is no power going to the fan. I tested the switch and it appears to work as expected. I have not bothered to pull out the fridge, and/or microwave, to figure out there the disconnect is yet. I've lived with the fan off since I owned the trailer. I will be asking Oliver which to pull out first to trace the wire. I figure it's the fridge. Again, not knowing where it's connected in the cabinet. I wonder if it ever worked, even for the first owner.2 points
-
Happy and safe travels to CO. At 8700’ daytime temps have been mid 70’s with nighttime temps in the 40’s. Should be a welcome relief2 points
-
We’ve done both and south is definitely better. You have good campgrounds, visitor center, hiking and more access to the canyon. We camped in B Loop when the weather was cold at night and we were happy to have electricity for our little electric heater. I was just pointing out that the north side is an option, especially if you’re staying at the state park.2 points
-
Are you depressing the thumb lever to open up the four jaws? Upon release the coupler should be locked onto the zerk, and should not leak or come off until the lever is depressed again to remove.2 points
-
When you say, " does that mean that you have replaced the fitting or simply that you tried another zerk that was already in place? It is possible that the zerk in question was installed improperly - these must be installed relative to the bolt such that they will accept grease. If this is the case then there isn't much you can do except for taking the bolt out and installing it the correct way. However, it is more likely that there is something going on with the way you are trying to connect the grease gun to the zerk. If you have a small "punch" or nail set you could gently press on the little "ball" that is in the end of the zerk to make sure that it will depress under pressure. Sometimes these little ball do get "stuck". Of course I'm also assuming that you were able to get grease into the other zerks on the Ollie? Bill2 points
-
That is great news and as most expected it was a simple fix once it was found. Thanks for posting the resolution as I am sure it will help someone down the road - folks like myself.2 points
-
Steve, A great story! And yes!! Welcome to the club Johnny & Juanita. 👍🏻👍🏻2 points
-
There are 16 zerks (8 on each side), THIS video from Oliver (Jason) is a good reference for where the zerks are and how to apply the grease.2 points
-
Jack up the side of the trailer that the fittings are on that you are trying to grease. This will relieve any pressure being placed onto the wet bolts by the weight of the trailer. That usually makes it much easier to get them to take grease. You may never get it to squirt out both ends of the bushing equally.2 points
-
Max is right about the vanity hatch. We put one in and discovered two things. 1) Trying to remember the name of the hatch manufacturer ... Sea Dog? Nicely built, solid and very easy to install wilh only minor modification of the cut out. 2) Like like in the area behind the rear drawers under the kithchen sink, the installation of couplings was sloppy with loose and leaking fittings The plumbing in our Oliver is the only area where I am really disappointed in the QC. I advise making access to every possible failure point and checking often.1 point
-
So true with us on both counts!! (When we were dating Steph and I tried a tandem canoe trip once, with her trying to steer from the front in rough water. A miracle we didn't flip, honestly. Now we have separate kayaks.)1 point
-
Great information already posted. Like Steve said, when jacking up the trailer sometimes allows the fitting to take grease, sometimes lifting the wheels completely off the ground or partially off the ground allows the fitting to take grease. Try different lifted positions. If you remove the wet pins like Art said to check orientation and the pin's grease port is already at 3 or 9 o'clock is a must, rotating the wet pin 180 degrees if it's already at 3 or 9 o'clock could help, too. Before installing Dexter's soft bronze bushings I always paint the outside diameter with castor oil and the inside of the spring eye, too. This helps allowing the bushing to slide into the spring eye with minimum distortion of the inside diameter of the bronze bushing. You can still have distortion in the inside diameter of the bronze bushing. Even if the wet pin is oriented correctly, you still may have a tight clearance area where the port is located. With time as the bronze wears, you will gain additional clearance, too.1 point
-
Thanks to all who have replied, very helpful! Mossey, this is very clear. Made me think yeah Duh, I can catch a ground in the lower section. Seeing the thermal switch makes me think the female spade connector on the red fan wire is connecting to it on the right side of the top opening. I will have time by today or tomorrow for testing the fan. Wonder if I can use a blow dryer to activate the thermal switch. I'll let you know.1 point
-
why are you selling it? you rave about it on the Airstream forums.1 point
-
Stayed in Roswell a half dozen times in our biannual trips from Georgetown TX to Prescott AZ, over a 10 year period. We didn’t get much into the alien thing, but LOVE Lincoln Co, just two hours west. What a beautiful place up at 7K ft, Lincoln Co, Mt Capitan, Ruidoso NM, and home of Billy the Kid, just145 years ago! 😂1 point
-
That’s the goal! Looking forward to the nighttime temps…. Mike1 point
-
What Houghton really should be doing is working on a new control board for these units. One with Dip switches to be able to select whether the fan runs or not with the compressor and the ability to use a standard wall mount thermostat. One for compressor run time would be a bonus, though that problem might solve itself with a standard thermostat.1 point
-
I installed a Houghton 2801 AC on my Parkliner trailer. The compressor also cycles on/off about every 4 minutes. I don't understand why. I'm wondering if one of the temperature sensors isn't calibrated or working properly and the AC thinks the indoor temp has been reached or coil temp is too low. I modified my AC to install a relay on the low speed fan to try and reduce the humidity, but with the short cycling it's not making much difference.1 point
-
Sorry but I'm in the middle of preparing to leave for the Rockies. However - the reason for the switch is so that you can turn the fan off if the slight noise it emits bothers you while trying to sleep. Both Mossemi and I have replaced the original fan due to bearing failures in the fan and Mossemi also replaced the thermal switch. Hope this helps at least a little. Bill p.s. there are posts here on the Forum about both of these repairs.1 point
-
Good news, I just solved the electrical mystery about 1-hour ago. It turns out that one of the electrical connectors going to the master light switch had fractured and when I pulled on the wire the female end remained connected to the switch. I replaced the connector, reattached the wire and all lights are now functioning. I am so glade it was not a problem with a wire in the wall. Thanks to all who provided thoughts and recommendations. I am sure it is not the last challenge I will face given the Ollie basically experiences a 4 or 5 on the Richter scale each time it gets towed. Also, I have added a multimeter to my Ollie tool box. The forum is a great place to go to learn and find support.1 point
-
Thanks - I have not been there. I will add it to my list! **EDIT -The closures on Rt 50 that I mentioned are between Gunnison and Black Canyon of the Gunnison NP. While their website stated it would be open (one lane only) some other campers here went there 2 or 3 days ago and it was still closed. Be sure to check the road status before you plan to travel through that area.** It's possible to get there, but it might be the long way around. Sometimes that is the best way!1 point
-
Moose and Elk have been spotted by other people a week or so ago, but I haven't seen them yet. I watch, especially during morning and evening hours. Lots of deer including newborn spotted fawns. Lots of birds, though not as many raptors as I expected. I haven't had any issues with bugs -- I suspect because I'm perched on an open ridge overlooking the river, and the wind blows steadily. In the forest areas, it's a different story.1 point
-
Thank you. I think I will wait to try that for a time when I have caulk on hand to repair -- but I've been curious about that space.1 point
-
There are 2 issues. First when you open the door, the cold drops out. You learn to know what you need, open, grab, and close,🙃 Fact of life. The small fan will be a benefit in either a compressor fridge or absorbsion fridge. It circulates air in the fridge, and will have "Zero" negative affect. In our truck camper, we built a shade to provide shade over the 2 vents. 2023 LE2 has one (1) vent and the 2024 LE2 has none as it vents to the interior. Earlier models have the absorbsion fridge and 2 vents. Suggest that you add 2 computer fans behind the upper vent screen if you have a LE2 2023 or earlier. Someone will have to assist with how to wire. The fan I installed in our truck camper behind the upper vent, along with the battery operated fan in the fridge made a huge difference. One learns to park to lessen the sum exposure to the curb side of the trailer. A shade over the vents all will help.1 point
-
This is informative and I get it about the freezer door. I believe I remember reading a post from @HDRider about replacing a broken door hinge. This is what @SeaDawg was pointing to. If your airflow is limited it could act this way. If you find your Isotherm fridge works well at elevation and cool nights, then the fridge is likely OK. Very good work! When you get home, maybe add a cooling fan like others have mentioned on our forum. My older hull has an OEM external fan and ON/OFF switch (see pic). Never seen a switch label like this in another RV.
1 point
-
@SeaDawg yes, we have the old style. I mentioned removing the add-on fan in an earlier post. @DunnYet, we have not heard back re what you may have tried? @topgun2 the fan you showed is what we suggested in removing such device. I like a fridge that runs on propane and will likely keep ours for a while. The freezer is large (I read the Isotherm freezer is teeny and that it has cycling issues on many online forums). It fits two of our jumbo ice cube trays, large cubes for special drinks, and it cools a new tray down every night. 😂1 point
-
I used a mirror to locate them on the panel and then used my cell phone camera to take some pictures, lots of pictures in fact, until I got some that were readable and threw the bad ones away. Mossey1 point
-
Two years ago I installed the "Gas Stop" devices on both my propane tanks. Given that my Oliver was 7 years old at the time I thought that it would also be prudent to install new "pig tail" propane hoses at the same time. At the end of the camping season last year I suspected that I had a small propane leak but since I was placing the Ollie into storage for the winter I didn't investigate the possible leak any further. However, I did purchase a propane leak detector - exactly like the one that Rivernerd mention in THIS THREAD. While attending the Annual Owner's Rally this year, my suspicion of the leak returned. So, today was the day to get serious about finding it. After getting the propane tanks in place and attaching the pig tails I opened the valve on what I thought was the offending tank. Sure enough, I not only smelled it but I even heard it! Obviously, the main brass fitting at the end of the pig tail was the problem (i.e. the fitting that screws directly into the regulator). So, I took that apart, cleaned it up, wrapped yellow Teflon gas specific tape on it and reinstalled. That solved the main smell and certainly the "hissing" issues, but, I still thought that I could smell a leak. Out comes the "bubble test" (i.e. a little dish soap in water sprayed onto the offending area and look for bubbles). Well, sure enough, there was a small leak in the brass reducer between the end of the pig tail and the main brass fitting that I had just repaired. OK, take it apart again, new tape all around, reinstall and using the "bubble test" I thought I had this issue nailed. Sure enough - no bubbles! Great, but maybe my nose was just getting to used to that wonderful propane smell. Maybe I was just imagining it - surely I had fixed everything that there was to be fixed AND there were no bubbles. Just to be sure I used the "test" feature on the Gas Stop devices. Yep - the needle in the little gauge was slowly dropping. I bubble tested again but had the same test result - no bubbles. Being a bit slow witted it was only at this point that I remember my purchase of the propane leak detector (thanks again Rivernerd). I got it out, read the directions and proceeded to "sniff". My repaired connections didn't set off any alarms. But, the connection from the pig tail to the large knob that screws onto the propane tank gave off a "faint" reading (actually a beeping noise on the detector). Sure enough - even though this was a "factory" installed item and I've never had one of these leak in over 25 years of dealing with propane tanks and pig tails, this was the final source of the leaking. I'm still surprised that the "bubble test" didn't show this leak but the "Smart Sensor" picked it up right away. There are a number of these types of sensors available currently on Amazon - both models that are priced higher and lower than the Smart Sensor (HERE). But, as Rivernerd said, "Not only is it worth the peace of mind, but even if only used once, it is less expensive than a motel stay!". Bill1 point
-
I bought the same propane detector base on Rivernerd’s experience but haven’t used it yet. I had a leak a couple of years ago, I could smell it. I took the cover off of the tanks and did the bubble test and found it right away. I ended up ordering and replacing the original 2016 hoses and regulator. I cleaned up and kept the good hose and regulator for back up. Glad to hear the propane detector worked so well! Mike1 point
-
We're home now but I ran ours overnight just to see. I only put a gallon of water in the bottom, and nothing in the freezer. I placed two RUUVi sensors, one in a basket in the freezer and another on the center shelf in the fridge. They read 12 and 47 F the next morning. Maybe this is common with RV fridges, and most people do not notice. Though my test was not valid without food and running longer. We traveled 3 weeks Apr-May, and it got water bottles pretty cold during the day while we were out and certainly cold when left overnight. Thanks for bringing this to my attention. I will measure temps next time out. Given you're still traveling and need a quick fix... Not being familiar with the Isotherm, does it have a small freezer in the top of the fridge like most models? What if you remove the freezer compartment door? And maybe the door shelf in front of it. The cool would sink to the bottom and the warmth from below would rise and perhaps signal the thermostat to keep the compressor running longer. You would lose a freezer but perhaps get a colder fridge. It might be worth a try, and you could always reinstall the parts later.1 point
-
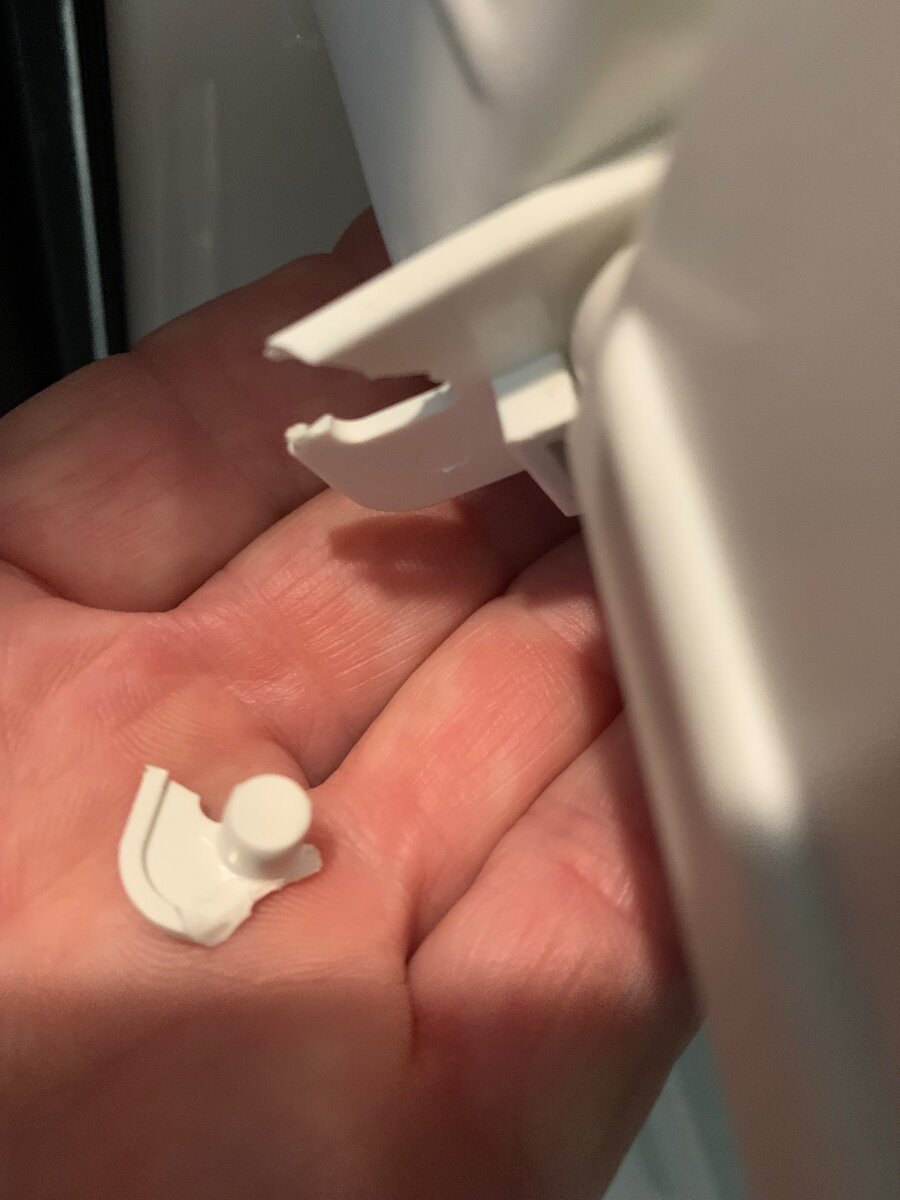
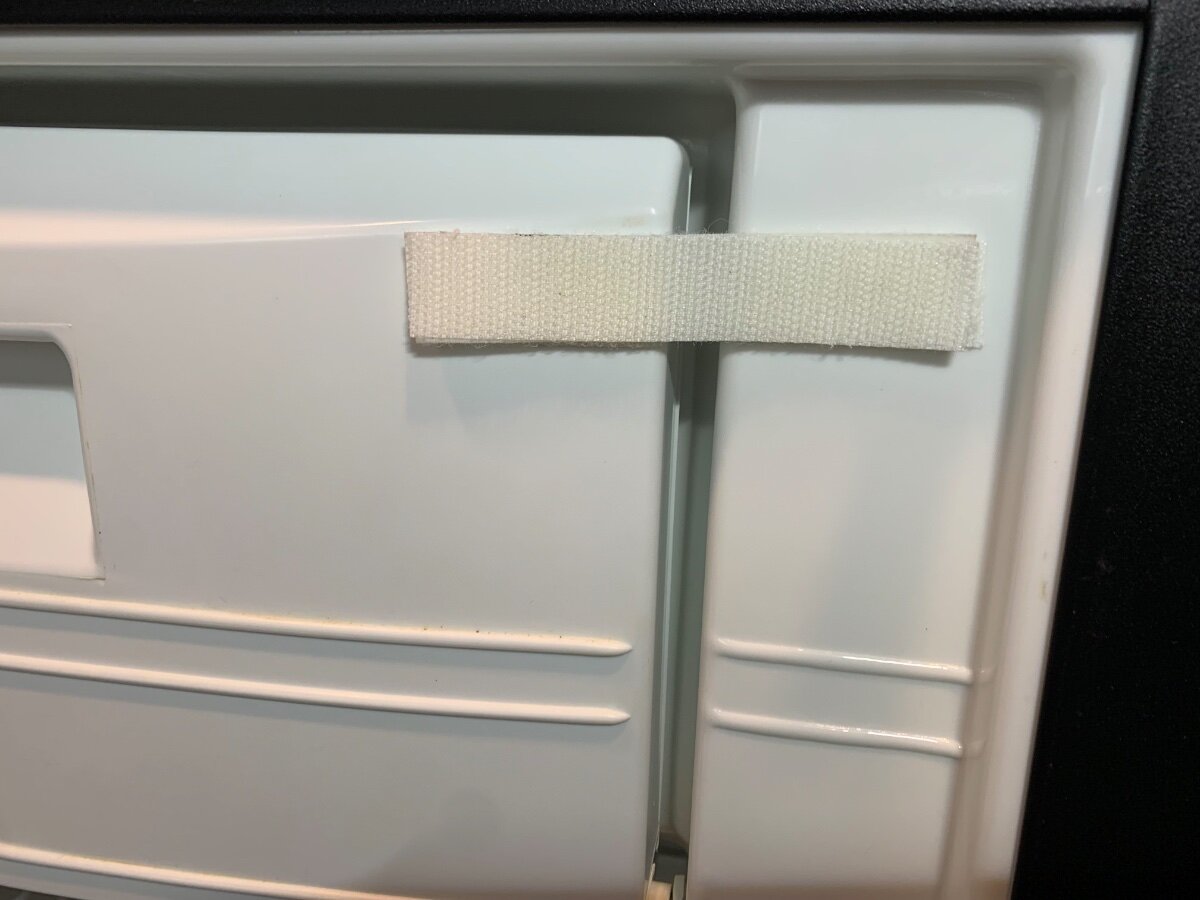
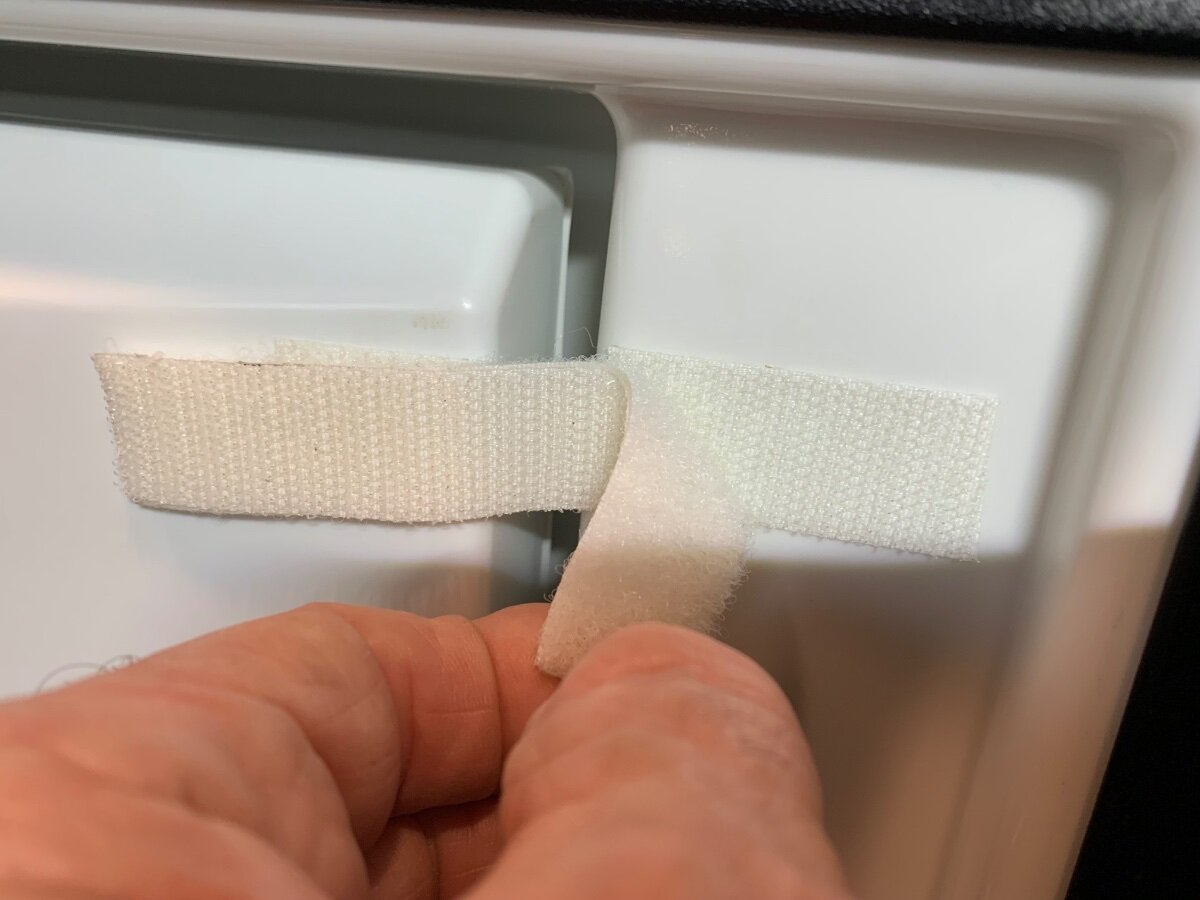
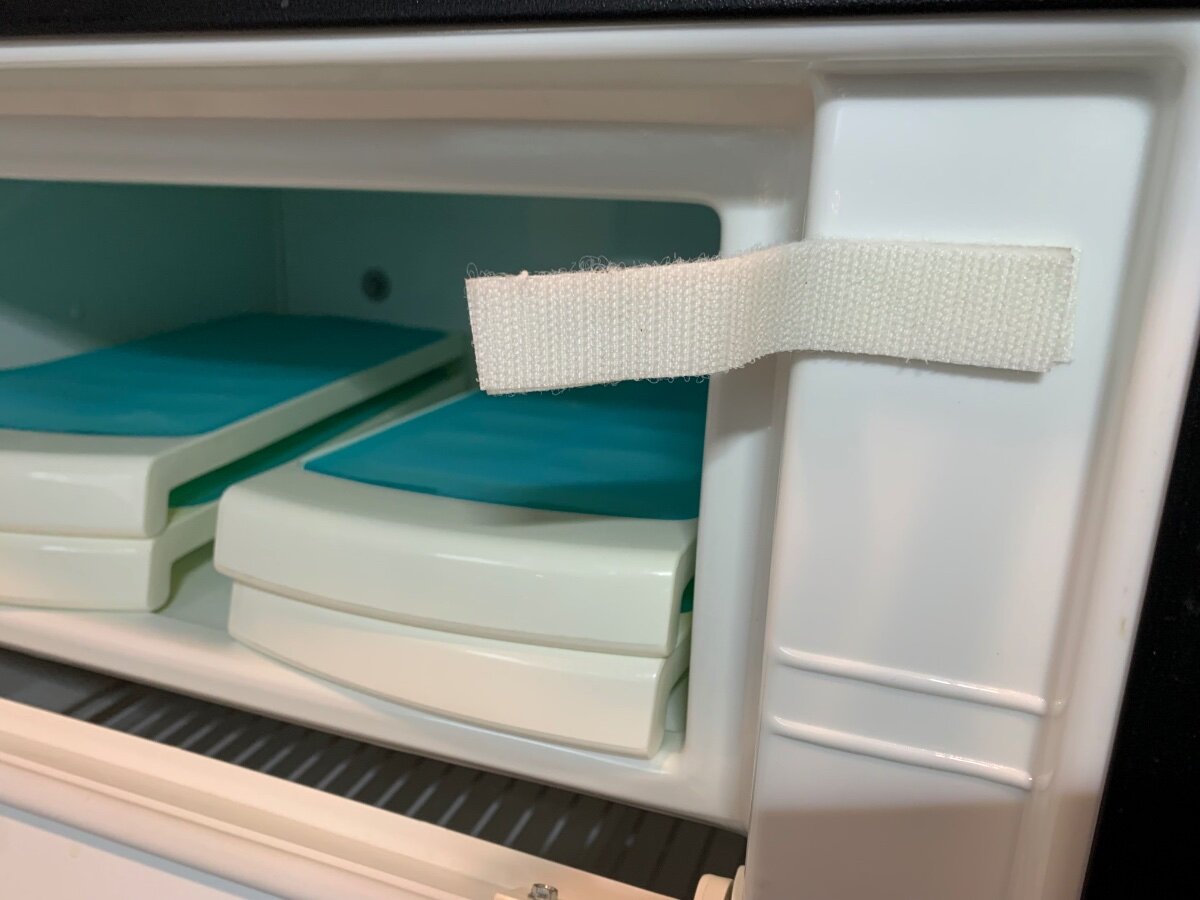
Well, before I had a chance to attempt a fix of the broken hinge, the other side broke shortly into a week’s trip. I did take a quick look prior to departure, but determined glue would likely not hold and besides, I misplaced the tiny spring. There was no urgency when heading out, since the single functional hinge had enough spring action to hold the freezer door closed. However, once it broke I had a troublesome floppy door to contend with. No bueno! Thankfully, I carry some Velcro strips and was able to rectify the problem temporarily. In fact now that I know the replacement hinges are fairly pricey, I may extend use of this fix for awhile longer. Double trouble: Short ‘hook’ section on each side of right door end: Back-to-back ‘hook’ and ‘loop’ strap for the door closure: Mas bueno!
1 point
-
Curious is good! I would think the fan would cause a few amps and your Blue Sky monitor showed earlier a -2.3A draw. just keep your batteries charged in the meantime. It's great that you are visiting OTT Service, and they are and ALWAYS have been GREAT people! Have them do a full diagnostic and report and be happy to pay for their service. Love to see their report! There is nothing technical keeping you from this appointment. After that do NOT do any upgrades on-the-spot, but only required repairs. The Blue Sky solar charger TODAY, can be replaced with a modern Victron, for pennies on the dollar! Amazon.com: Victron Energy SmartSolar MPPT Solar Charge Controller (Bluetooth) - Charge Controllers for Solar Panels - 100V, 30 amp, 12/24-Volt : Patio, Lawn & Garden You do NOT, how many times can I say the word NOT, NOT at all do you want AGM batteries in the day and age of 2024!!! (and do not buy 100AH BB batteries either). I upgraded the batteries my Bigfoot RV back in 2019 to AGM, since yes 5 years ago LiFePO4 were for the rich and famous (obviously that's not us). You can get one (1) 300AH Epoch battery for $1100 today, or 460AH for $1,399 (I suggest this option) and that's likely all you need. We here, Oliver Owners, the great people of this forum can help you with this. I'm planning so many solar/inverter/battery upgrades. And I will tell you, first stay conservative, read and learn, and I or @rideadeuce or @MAX Burner (the DC-to DC expert) and SO MANY OTHERS... will having you lovin' your solar/inverter/battery system ASAP or as soon as you may prefer. I respect your thoughtful posts. God Bless and cannot wait to meet you at an Oliver event. PM me with any questions. Best wishes, JD1 point
-
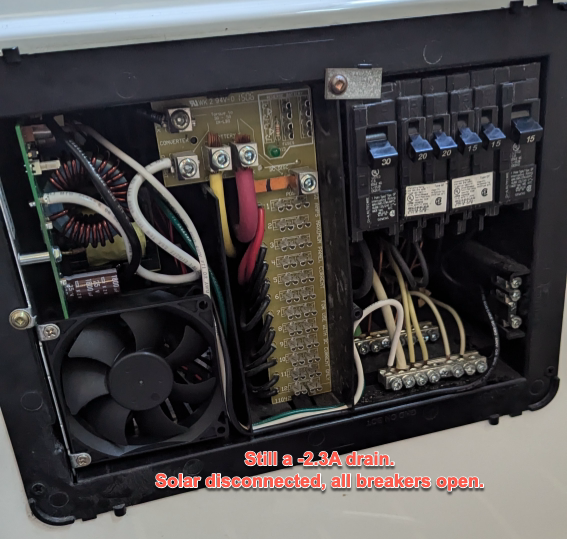
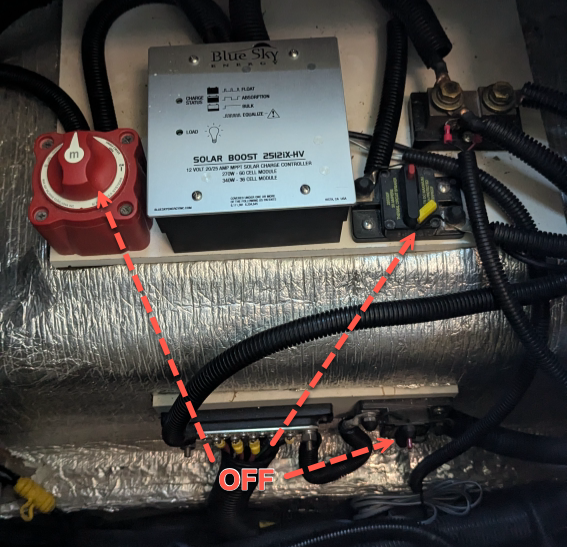
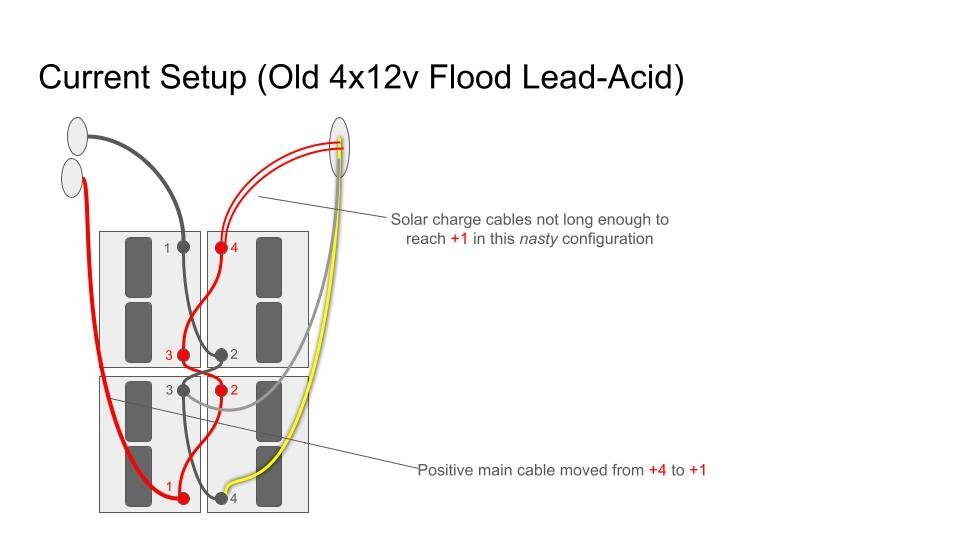
Well darn. I'm not sure if this is normal. I don't think it is. There seems to be a -2.3Amp draw on the system, even with every breaker off, EVERY 12v fused pulled out, and every resettable breaker popped open under the driver's side buck. Could this be the new converter/charger doing this? I need to wait for a cooler day to switch back to check. It's nasty hour in Georgia this morning. The only other thing changed was the battery configuration after tray clean-up. See battery diagrams, current -vs- orginal. That's the easiest to put back. There is NOTHING plugged into the trailer. No shore power, etc. Updated: I just ran through the troubleshooting instructions from Progressive Industries, everything checks out perfect and batteries are charging off of shore power, 120v/20a receptacle. https://www.progressivedyn.com/wp-content/uploads/2017/05/PD4045-TROUBLESHOOTING.pdf For my 2016 Ollie, the converter breaker is the 15amp breaker all the way to the right of the panel picture below. Thanks!
1 point
-
I've been a member watching from the sideline since February 21, 2018. Now, retirement is a week away and we pickup unit #1525 June 8th--EXCITED IS AN UNDERSTATEMENT!!! Delivery photos coming soon.1 point
-
Back in 2018, Anita had called me and wanted to know if I'd show our trailer to a couple from Tupelo. Johnny, his wife Juanita and their daughter came to visit us the next day. After talking with them for a couple of hours, Johnny stated that when he retires he's going to buy an Oliver. Today, six years later ... Tali called me and exclaimed that "...there's a brand new Oliver parked at a house right around the corner from us..." So naturally, I went to investigate. Today was his last day of work. A few days ago while visiting with his daughter (who is now a Nurse Practitioner that lives and works near Atlanta), he realized that about 2 miles from her house was Southland RV in Norcross, GA, one of the new Oliver dealers. They apparently took a ride, went in, fulfilled their six year old dream and are now the proud owners of Hull # 1525. I could not be happier for them. Welcome to the club @josmith68, Johnny and Juanita Smith.1 point
-
The lights and their related switches in our trailers are 12V, with low amperage. Any "bite" from that 12V system should be barely noticeable.1 point
-
JDB - I understand your frustration - its simply no fun trying to chase down what is most likely a "simple" issue. However, electrical problems are very difficult to pinpoint via phone and/or internet. Basically the procedure is a process of elimination and tracing the most likely flows of current and this is difficult to do without the proper equipment. Do you know of a local electrician that you trust (or even a friend that knows a bit about electricity)? Or, a local RV tech that you trust? Either of these should be able to get to the bottom of the issue reasonably quickly, have the tools needed to test for grounds and/or continuity, and that would save you a long drive. As jd1923 points out, your issue is most likely with the grounds that these three circuits share. And, my bet is that the location is at or near those three switches on your Master Panel. As far as liability is concerned - if you are not plugged into shore power, there is not much in or near these switches that can "kill" you. Yes, a bite on your flesh and/or the flash of a short will get you attention and it is a tough learning lesson that can be avoided with knowledge and proper equipment. Stick with it - you'll get to the bottom of the problem. Bill1 point
-
Awesome wrap! Fantastic!1 point
-
Your wrap looks great!1 point
-
Molly is one of the very few Ollies that have been "wrapped". Looks great. Bill1 point
-
Al and Sher, welcome to the group! You’ll find lots of fellow bikers here. Post pictures of your adventures! Mike1 point
-
Welcome to the forum! My wife and I also ride rail trails and both really enjoy cycling whenever we can. We look forward to hearing about your cycling and camping adventures. Your signature line looks great! Pedal On!! 👍🏻1 point
-
Note that - like anything else - these warranties are only as good as the company that issues them. If the issuing company is no longer in business 5, 6, 7, etc. years down the road then the warranty means little. As I said in a recent post, most, if not all, of these lithium battery "cells" are actually made in China. The batteries that we see are then either also made in China or assembled in the USA. And, the same can be said relative to the battery management systems that are such an important part of the overall battery. Due to this, in my recent purchase of a set of lithium batteries, I relied on a fairly well known YouTube "professional" who (I hope) knows much more than I do about the construction, operation and overall quality of these things. Hopefully, once this market settles down and a "normal" pricing level is reached all of us can approach purchasing batteries with the same kind of analysis that we presently do with AGM and/or lead acid batteries (i.e. you get what you pay for - in most cases). Bill1 point


.thumb.jpg.e34bf01ef7f7d5e99ad31856d45afbeb.jpg)


-
Recent Achievements
-
")


")


")


