Leaderboard


Popular Content
Showing content with the highest reputation on 07/08/2024 in all areas
-
@SeaDawg, I’m liken’ my 3-way Norcold more and more!3 points
-
Ok - so city water connection and fresh tank configuration are the same. (Facepalm) Have been traveling with our LE I for two years and somehow this never sank in. I keeping getting wrapped around the double axles on this LE II. yep - I blame the altitude. Hypoxia for sure. I need to go start making controversial posts on Facebook 🙂3 points
-
@rich.dev, I've wondered the same, as you see above. Our danfoss/secop fridge was a retrofit. We installed extra insulation on sides and top of the cavity, still leaving lots of air circulation space, plus a drawer beneath. Our fridge sits on epoxy tabbed in 2x 3's, above a drawer. We also have air infiltration on the sides. I can, and do , open the drawer many times a day, and could leave it ajar a bit for a ton of extra air, if necessary. I "think" if the standard ollie installed requires more lower air, there's usually an access from beneath the drawers. Open it up, and see how/if it helps. The fridge cavity used to be sealed, for three ways needs. N9 longer necessary. We did seal the outside vents, to prevent intrusion from dust/dirt/ mud daubers,etc.
 3 points
 -
Two nights ago it was 27 degrees here along the Taylor River in my Gunnison NF dispersed camp site. I'm going to be sorry to leave this weather when I move on! PS @topgun2 -- yesterday I finally spotted 3 Moose right along the river, just down the road (closer to the reservoir). No Elk, but Doe with spotted Fawns. This has been a wonderful area.2 points
-
Another way to think of it: The "Boondocking" configuration is only for when you need to add water to the fresh tank from the rear inlet when boondocking (i.e., you do not have access to a "city water" connection). "Normal" configuration is for when you need to use water from either the fresh tank or a city water connection, regardless of whether you have a water hookup or are "boondocking" at the time of use.2 points
-
Correct, normal configuration would pull water from the fresh tank. The boondocking configuration is to pump water into the fresh tank from the inlet on the curbside (starboard) rear of the camper. In case you are boondocking and you need to "add" water to the fresh tank. I have several 5 gallon containers I can put water in and then pump the water from them into the fresh tank. Does that make sense?2 points
-
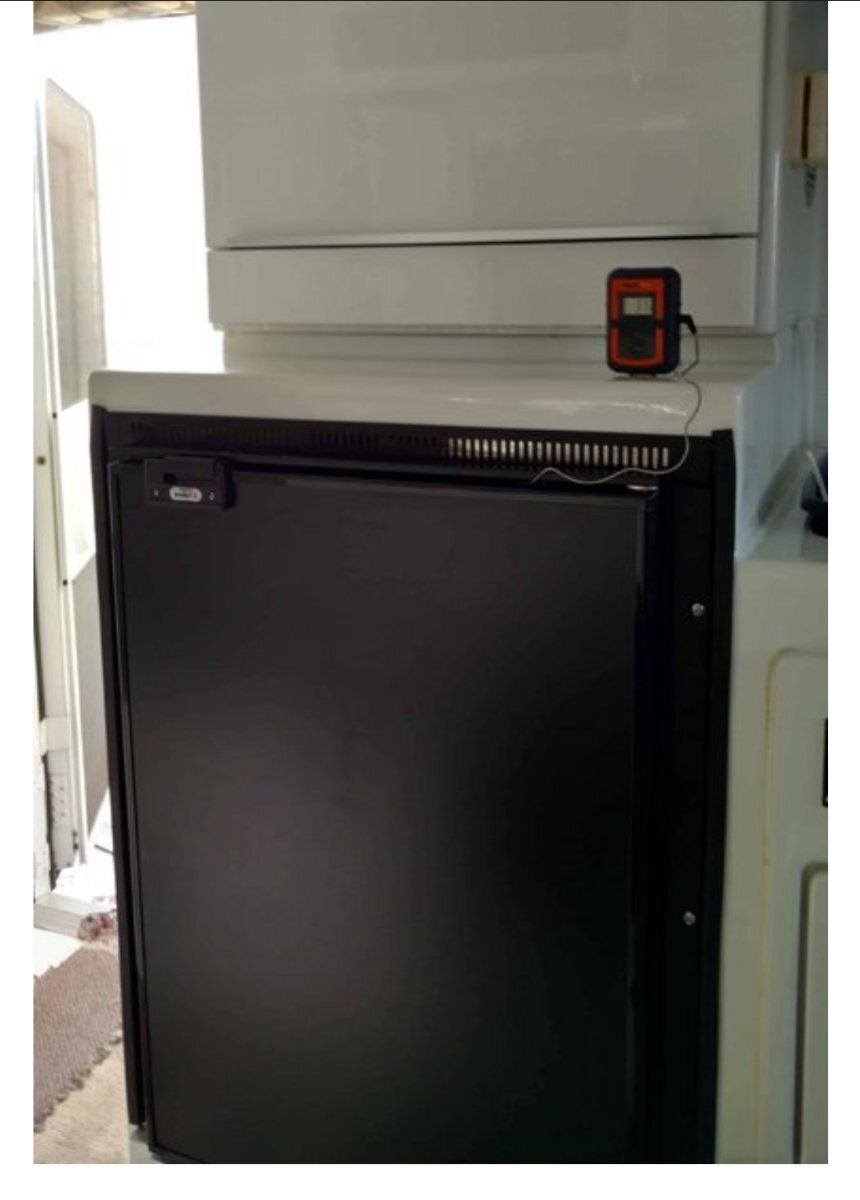
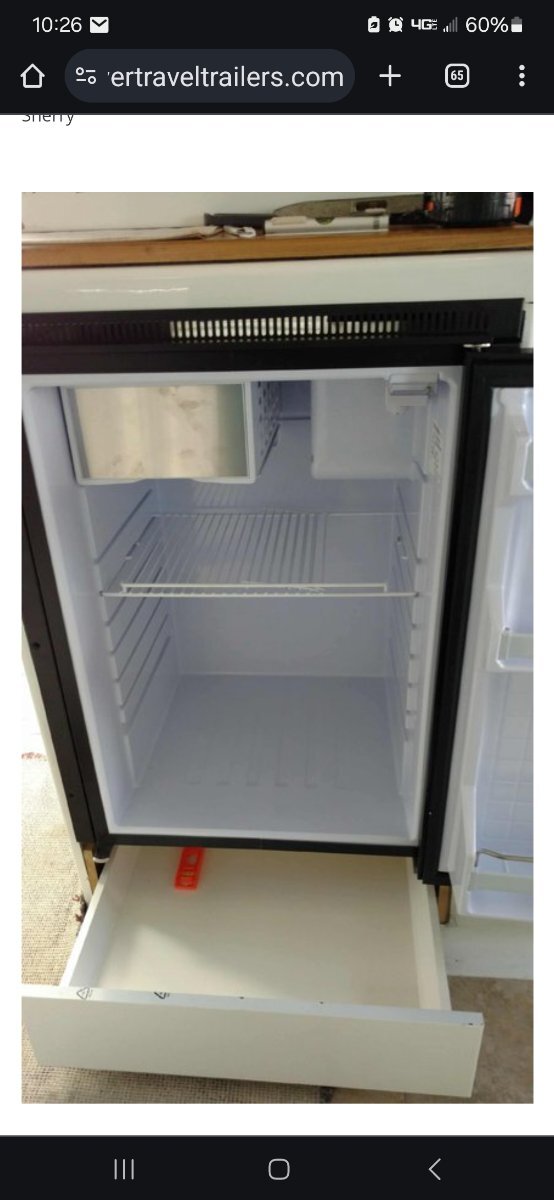
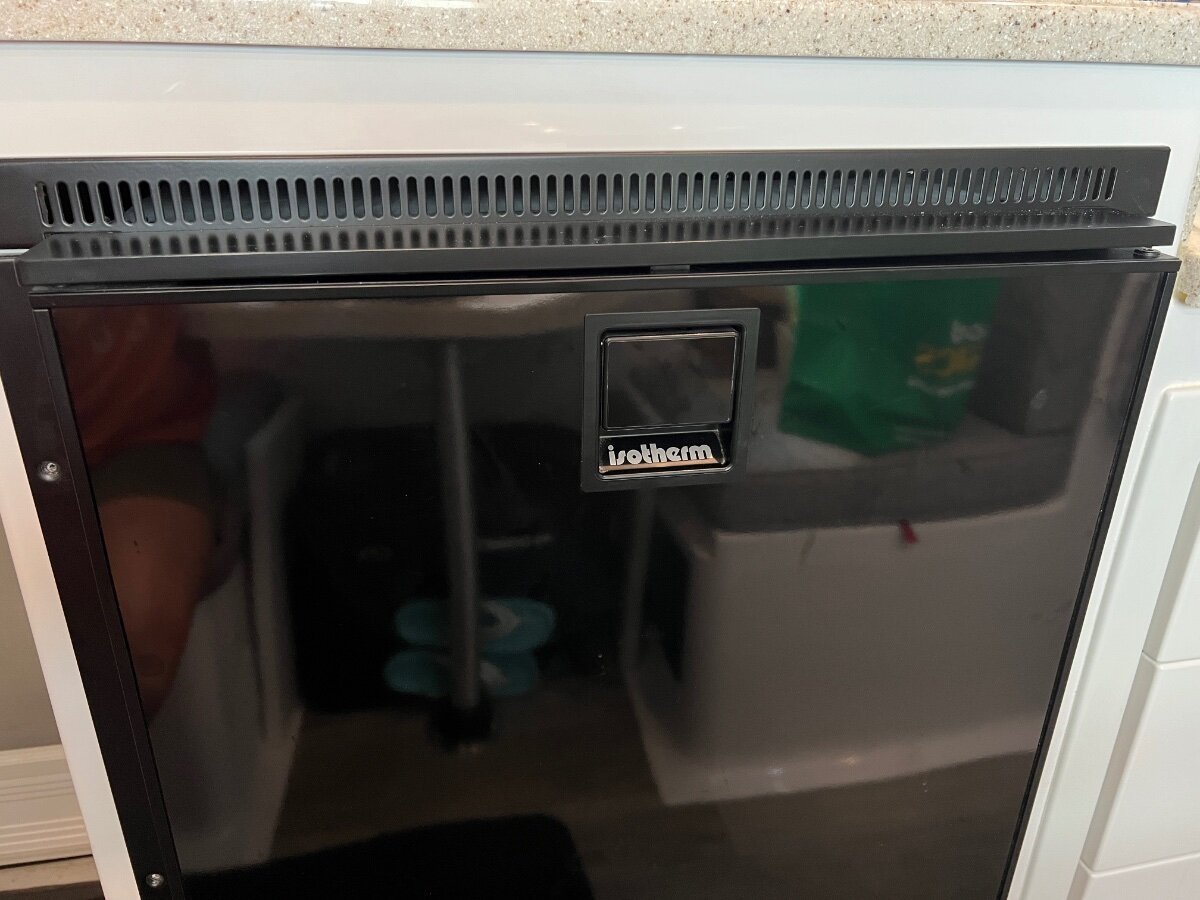
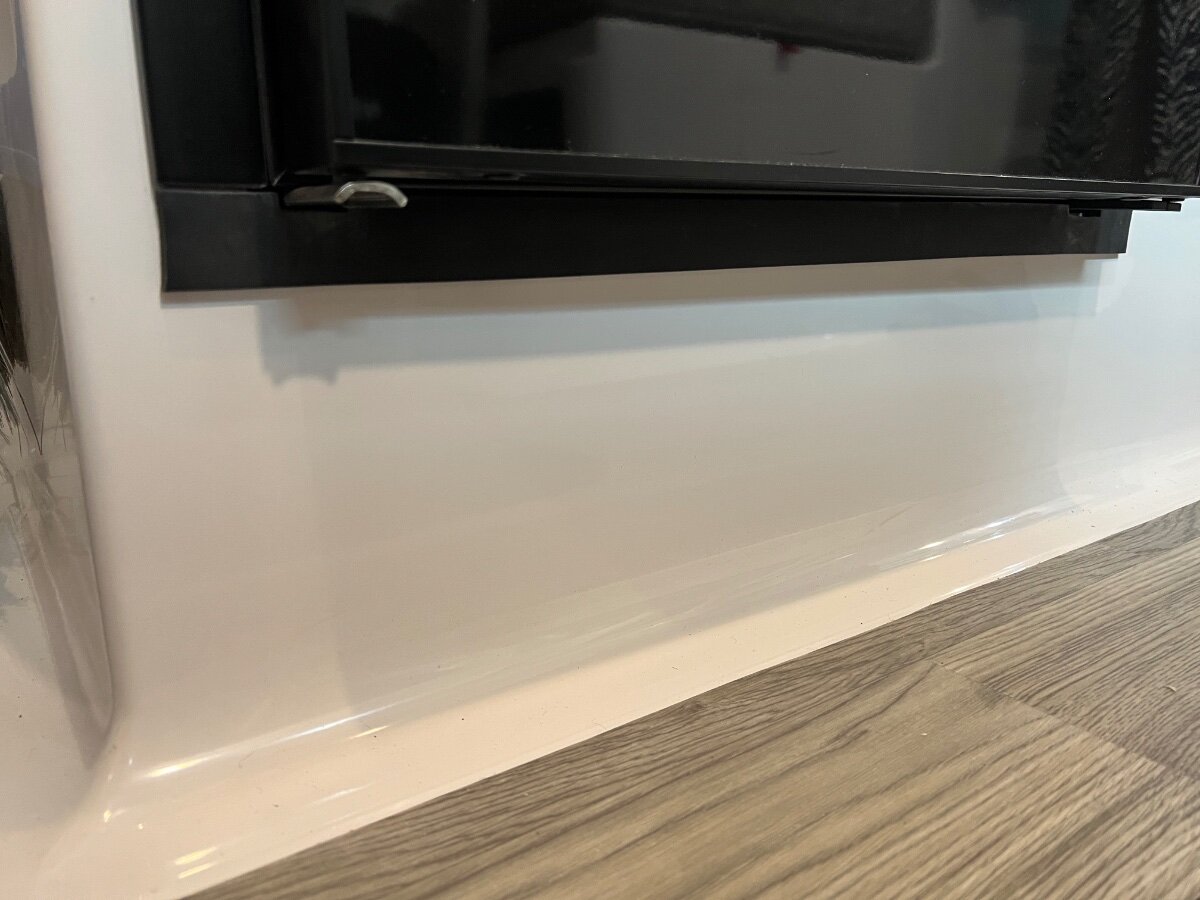
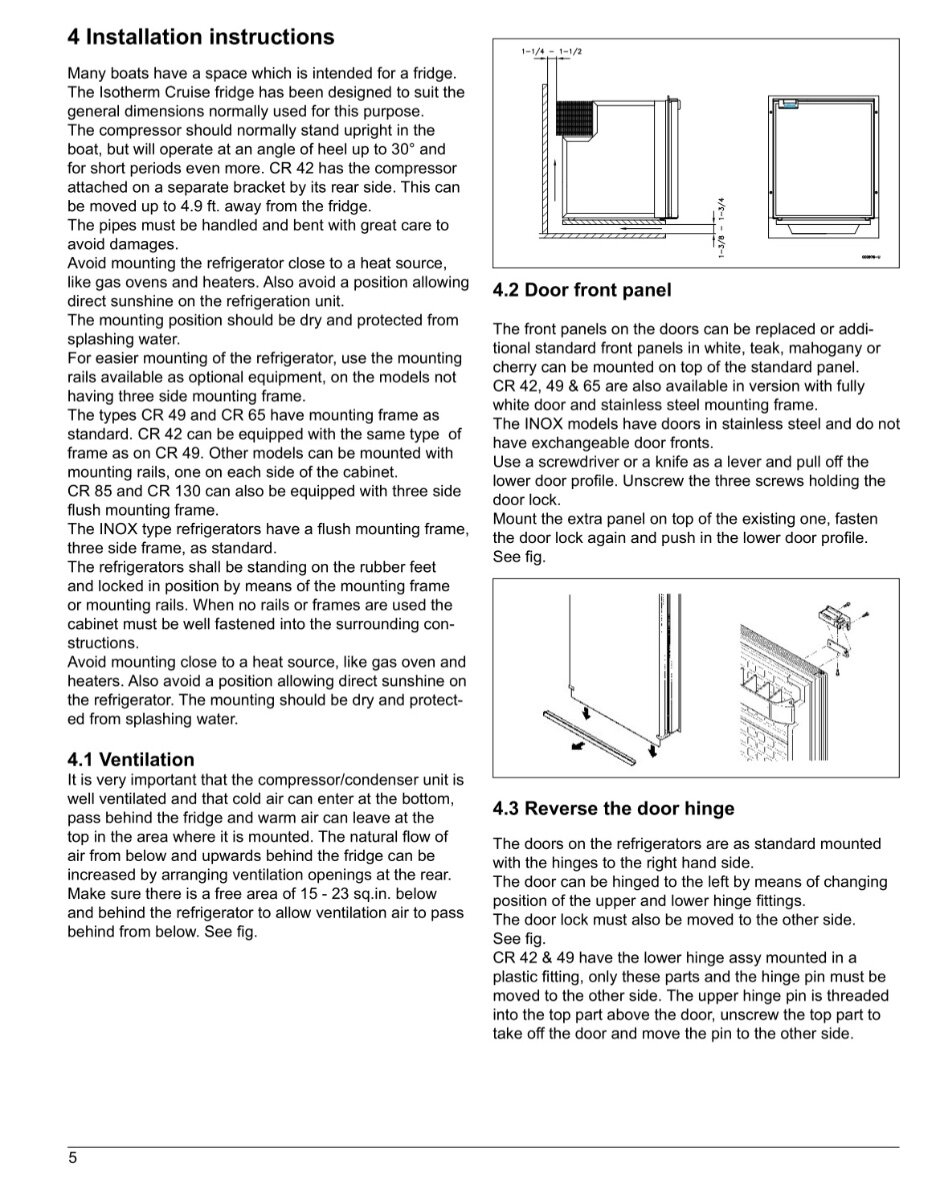
I believe there might be a ventilation flaw with the 2023+ Olivers with Isotherm fridge, at least mine. There is no vent at the bottom so cold air can enter at the bottom, pass behind the fridge and warm air can leave at the top. Per the installation instructions, see “ventilation” in last pic. I have emailed Oliver, will post the response. Vent at top of my fridge No vent at bottom of my fridge Installation instructions
2 points
-
Thanks all, really appreciate it. With a big trip coming up, I was reluctantly going to take the camper to my "trailer guy". Anyway, yesterday I was able to grease all the zerks. Lessons learned and/or reinforced... 1. There is no point in getting mad at an inanimate object, it does not help -- at all. Work in progress.... 2. The 90 elbow attachment is a pain. I realized that if it leaking around the zerk a bit that does not mean it is also not going into the fitting. I think before I was stopping immediately if I saw any leakage. I also realized that it does not have to be totally tight to work. I just tightened it as much as I could. 3. Most of the zerks can be greased without the 90 degree fitting. The primary connector can be a bit off 90% to work. 4. It was hard to pull the trigger and find the fittings at the very top of the axle. I think an old fashion attachment without a trigger would be easier. 5. I am going to change the zerks to 90 degrees. I can't thank you all enough..... Larry2 points
-
When you say, " does that mean that you have replaced the fitting or simply that you tried another zerk that was already in place? It is possible that the zerk in question was installed improperly - these must be installed relative to the bolt such that they will accept grease. If this is the case then there isn't much you can do except for taking the bolt out and installing it the correct way. However, it is more likely that there is something going on with the way you are trying to connect the grease gun to the zerk. If you have a small "punch" or nail set you could gently press on the little "ball" that is in the end of the zerk to make sure that it will depress under pressure. Sometimes these little ball do get "stuck". Of course I'm also assuming that you were able to get grease into the other zerks on the Ollie? Bill2 points
-
All working - we had filled the tanks. I just got it in my head that I needed to switch the valves to pull from the tank. Not sure where that came from except a combination of our longest drive day, a thirty minute plus standstill after a wreck closed our only route, and just not having done a dry camp in a year or two. I sat there doing the prime step ( silver lining - was able to remove a thimble full of plastic shavings from the filter ) with the valves in boondock position. Finally in frustration switched back to normal and everything primed water started flowing etc. I then decided to etch my stupidity in stone by making this post questioning the diagram on the bench cover back. I seem to be determined to make the switch from the LE I to the LE II as traumatic as possible I guess. Have not even started my post on Truma Heaters and Truma Water Heaters and error codes that I never saw on my LE I. But I am making sure I have all my ducks on the same pond before posting that. (Gave up on ducks in a row long ago.)1 point
-
If that gives air movement to the fridge cavity, yes, I think it might help.1 point
-
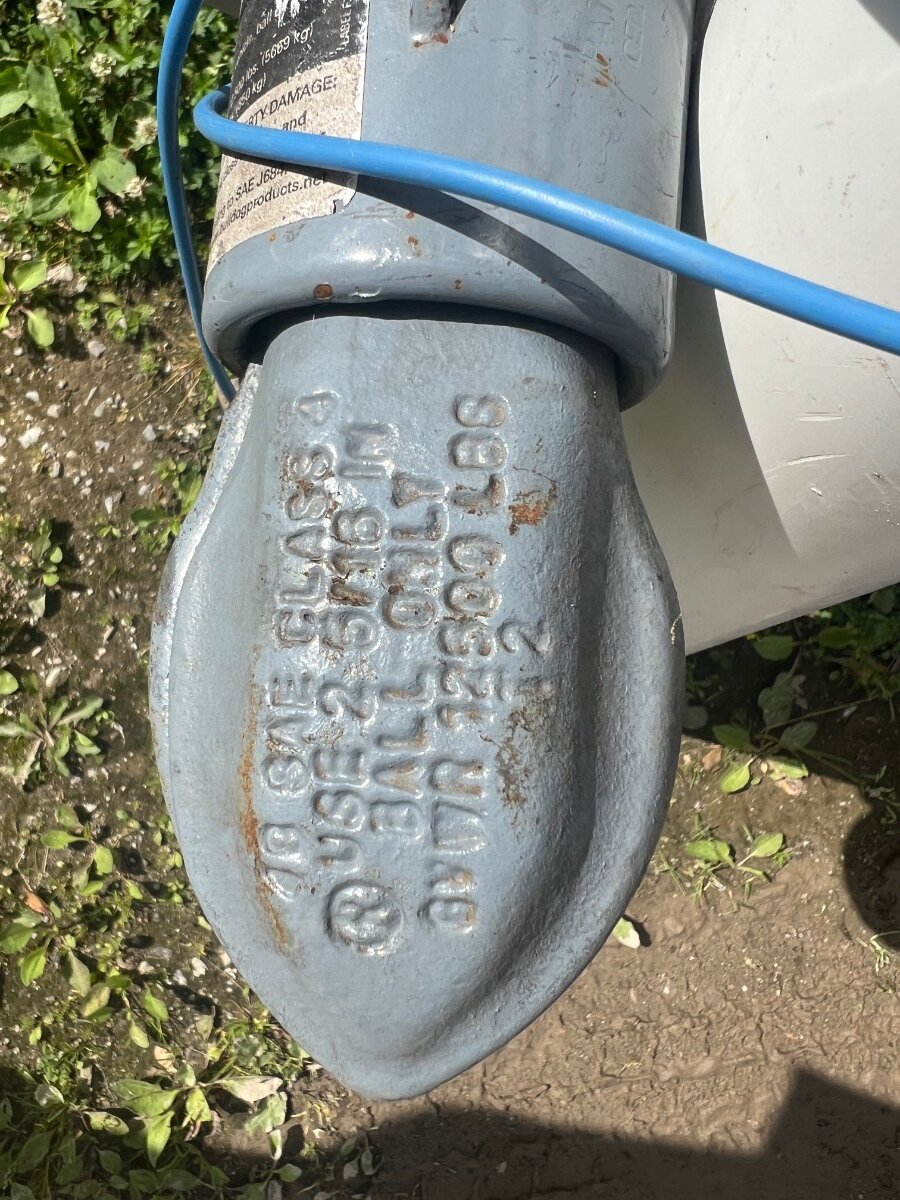
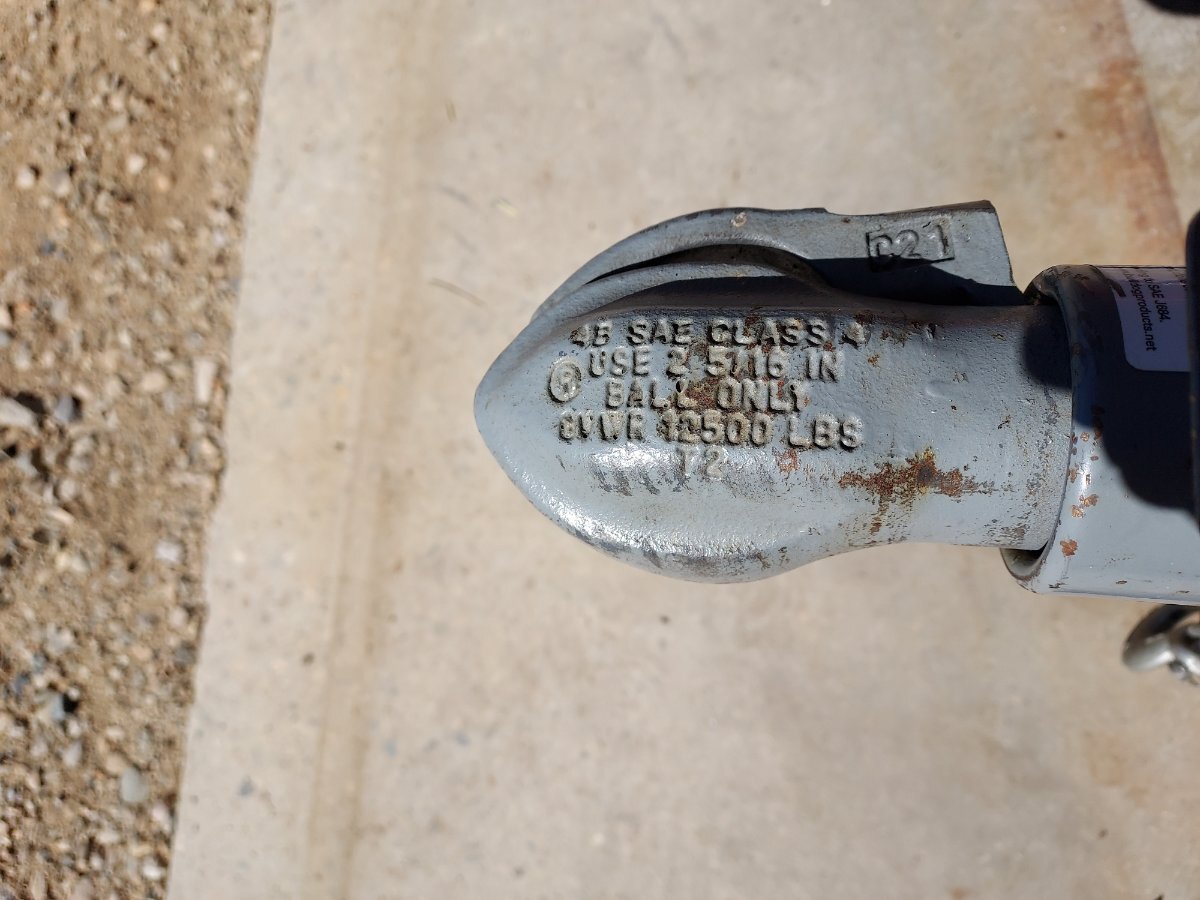
We also got the recall notice for our 2022 LE II Hull No. 1291, even though we bought the factory upgrade to the 2-5/16" Bulldog coupler. As you would expect, our coupler reads "12500 lbs." Oliver is just being overinclusive, to be ….and so did we! 😊 @Mike and Carol what black spray/paint did you use on your coupler?
1 point
-
We also got the recall notice for our 2022 LE II Hull No. 1291, even though we bought the factory upgrade to the 2-5/16" Bulldog coupler. As you would expect, our coupler reads "12500 lbs." Oliver is just being overinclusive, to be safe.
1 point
-
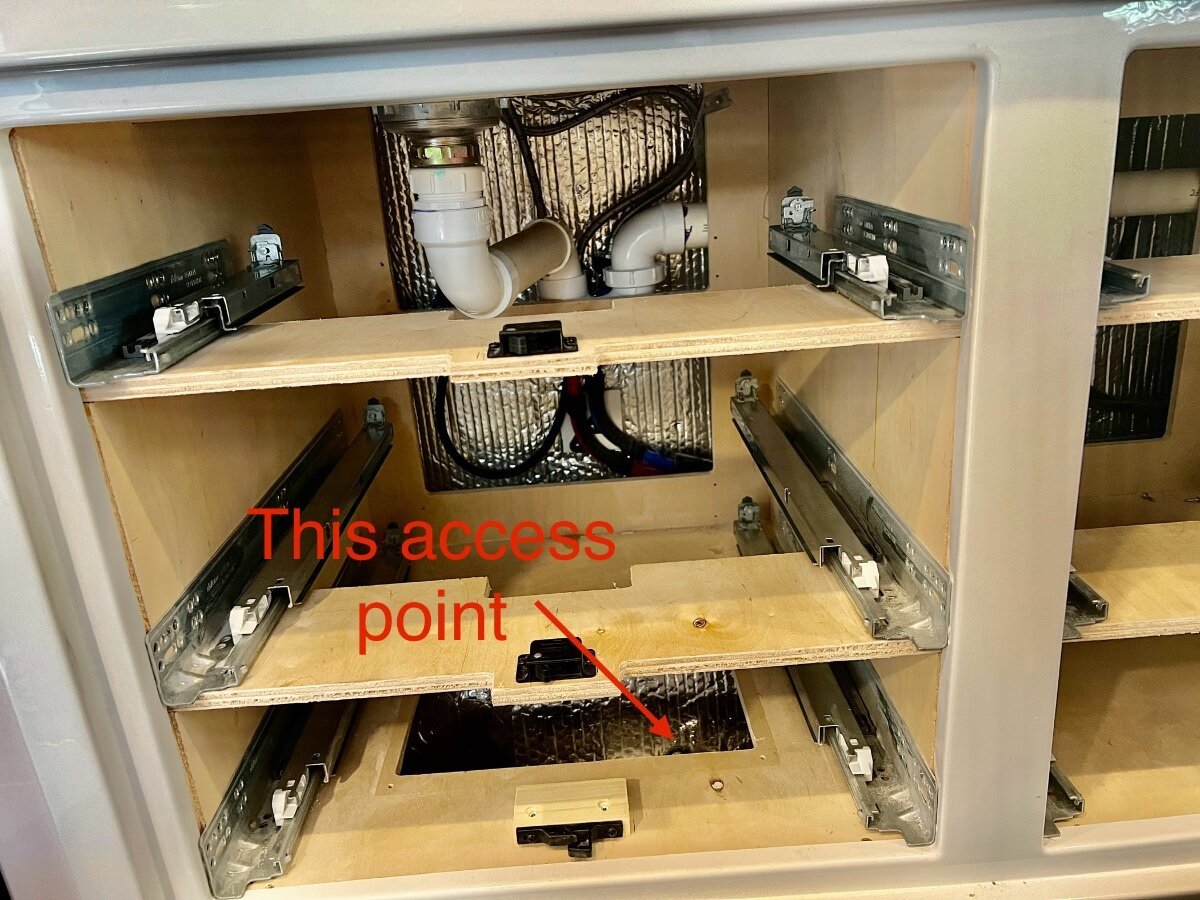
This access point?
1 point
-
Your disconnect needs are different than mine, so I choose a location under the rear dinette seat. I was interested in a disconnect switch in order to allow battery removal for a future battery upgrade and I wanted less obstacles in the battery box. It will work for your needs wherever you place it. I have some small pieces of 4/0 cable and I can make a short jumper if you provide the connectors and cover the shipping cost. Mossey1 point
-
I cannot provide an answer since the Oliver has not been used since this mod. I did however, want easy access to the control panel from the inside, thus the upper cabinet install. I have read where some leave their’s On continuously in Auto mode, I plan to have it turned Off when in storage. Never attempted a link, but can provide a pic of a post you can search. If you haven’t seen, It is very informative and discusses use of a switch at the entry panel, as well as user impressions and comments.
1 point
-
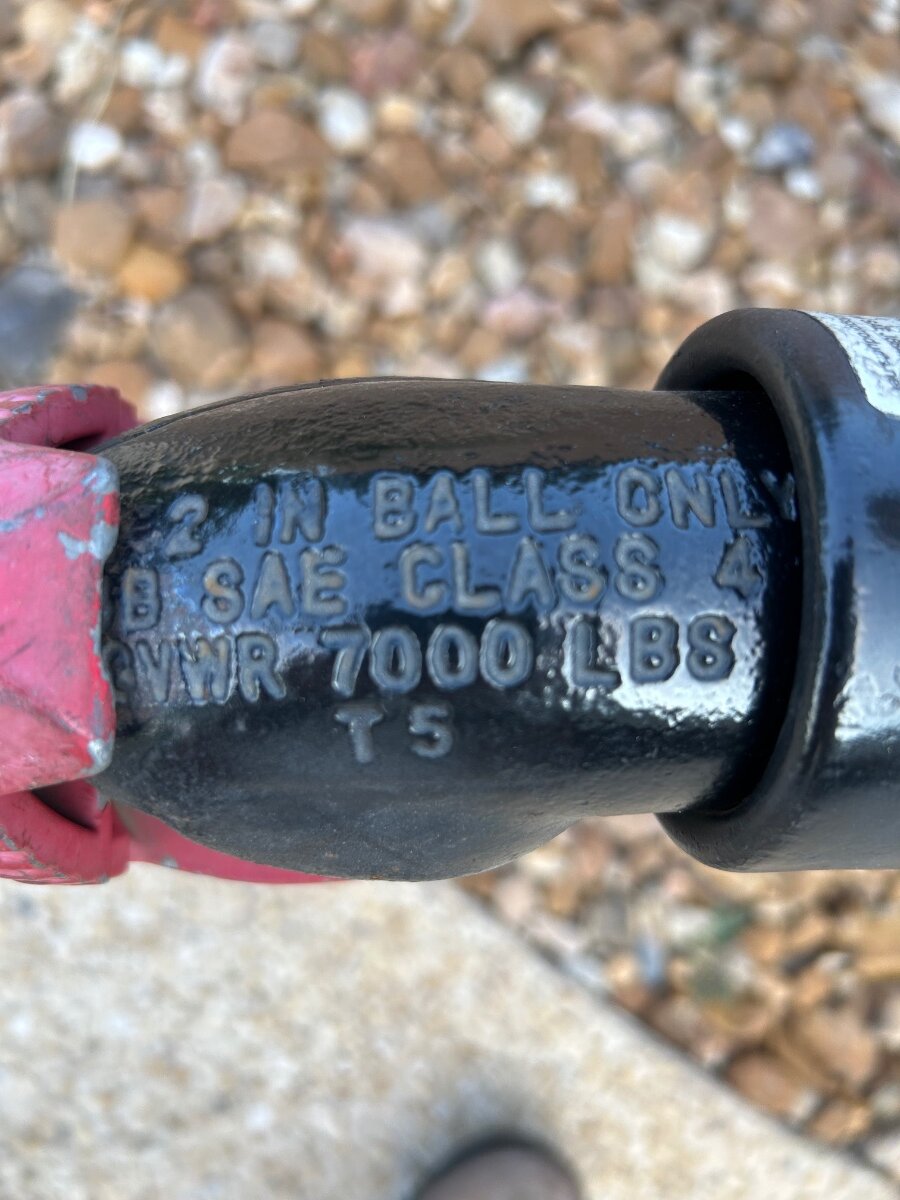
I think most of us got the recall notice. Just need to look at the top of your hitch and make sure it says 7000 lbs, not 5000. Here’s what mine looks like, the red thing is a lock.
1 point
-
Currently Renewable Outdoors is having their 4th of July sale. Just picked up a 460 Victron for $1619 delivered. They also have the non comms version. 2 for $2300 delivered.
1 point
-
So none of yall actually use a mosquito net on the door of your trailers to keep them outside? My friends that live in Fairbanks use one on the door to their house and it works great.1 point
-
We knew we wanted to do something unique so we asked Oliver not to place any decals during fabrication. We then played around with different themes/ideas/sketches until we landed to the chosen scene (Morant's Curve in Banff) which is not too far away from where we live in Alberta. (Original high quality SVG pic purchased from Shutterstock) First two vinyl wrap businesses we approached refused to engage because of the challenges of wrapping compound curves and many surface protrusions. After assuring a third business that we didn't expect absolute perfection, they took on the challenge. A forgiving feature of the image chosen was the subject matter. There were very few straight lines that had to be matched / kept straight and trees/sky/mountains can be blurry. Time will tell on its durability1 point
-
Same here, Mike.... love the "auto" mode on just about anything - so long as it works correctly. HA!1 point
-
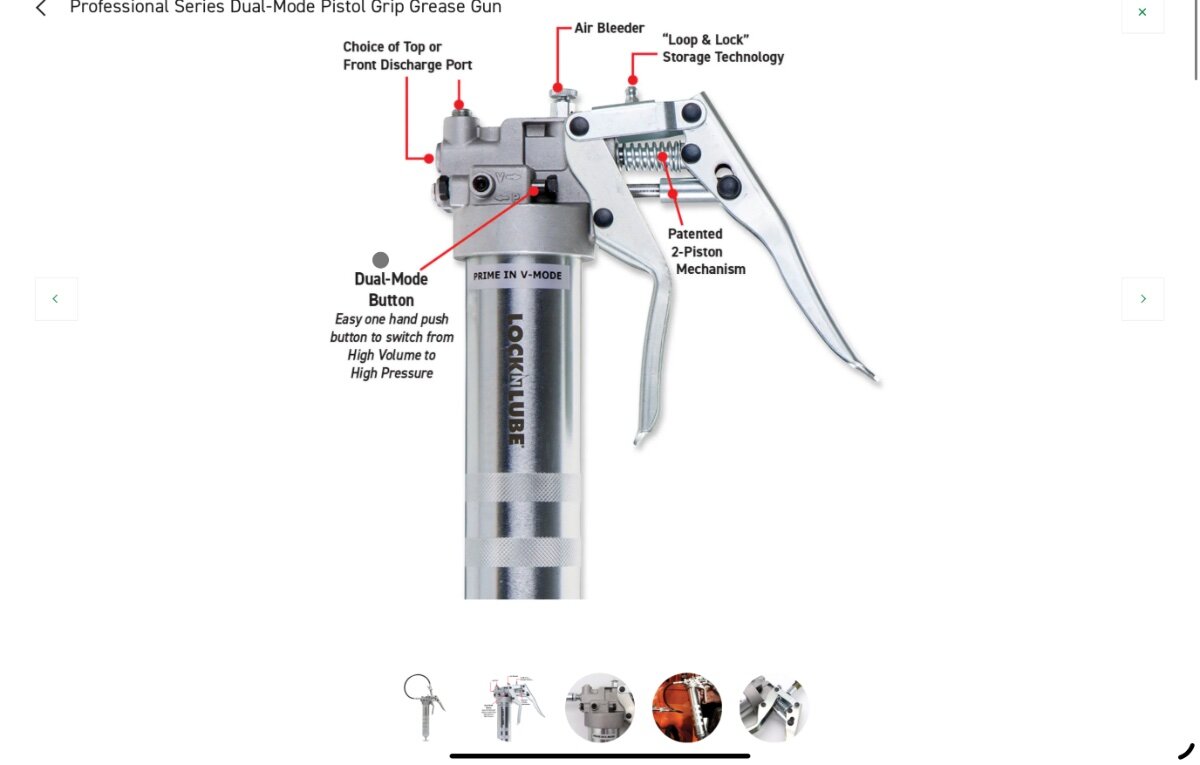
Read lots of good information and experience above. I have never used this but I have thought about it many times with a plugged Zerk. https://locknlube.com/products/grease-buster?variant=32921003327572 This grease gun with high volume vs high pressure mode works well too https://locknlube.com/collections/grease-guns/products/professional-series-dual-mode-pistol-grip-grease-gun?variant=40111323349076 Best, Mike
1 point
-
@DunnYet We also have the isotherm fridge in our 2023 LE 2, and have had problems with interior temps running warmer than we like for food safety (upper 40s). What I found out is that we have to defrost our fridge every week to two week. After defrosting our temps will even out within the fridge compartment , Then as it starts to build frost on the freezer coil our temps will remain cooler on the upper shelf (38) and but start to rise to almost 10 degrees warmer in the food tray at the bottom (45-47). This is with the thermostat set on 4 to 5, the plastic tray below the freezer removed, and we do not currently have an interior fan within the fridge. So, hopefully this help a little.1 point
-
Where else would Ollie be but at Cracker Barrel for the night? Not the best CB location ever, but, the price is right.
1 point
-
Max is right about the vanity hatch. We put one in and discovered two things. 1) Trying to remember the name of the hatch manufacturer ... Sea Dog? Nicely built, solid and very easy to install wilh only minor modification of the cut out. 2) Like like in the area behind the rear drawers under the kithchen sink, the installation of couplings was sloppy with loose and leaking fittings The plumbing in our Oliver is the only area where I am really disappointed in the QC. I advise making access to every possible failure point and checking often.1 point
-
@Boudicca908: While you've got the cubby insert removed and have inspected that "great space" under the sink - try considering replacing the insert with one of these and adding a shelf to store toiletries and stuff: Gives you ready access to all that great space below the vanity sink... Just say'n... Cheers!
1 point
-
@ZLarryb - if you still are not able to get grease into some of your wet bolts after trying @Ronbrink's suggestions, you may wish to consider removing those wet bolts that aren't behaving and check for correct grease journal orientation: 1. Carefully jack up the affected side 2. Use a floor jack under the closest axle to adjust its height to completely neutralize the load on the affected wet bolt 3. Stabilized the Zerk end of the wet bolt with a wrench and remove its nut. It's important to stabilize the wet bolt so its splines (on the Zerk end) do not strip-out in the hanger when you're un-tightening it. The splines are intended to keep the wet bolt in place such that the grease journal remains oriented either at the 3 or 9 o'clock position - this is the position of slightly less pressure which allows the grease to flow easier when trailer weight is on the wheels. 4. Tap the wet bolt partially out of the hanger with a brass punch - as the bolt slides out a bit more than half-way from the leaf spring hanger, look for the grease journal at the mid-point of the we bolt. It's a small hole allowing the grease to lubricate the brass (sometimes plastic) leaf spring bushing. Attach your LockNLube and give it a squirt - this will test the Zerk and remove old grease from the wet bolt. 5. Rotate the bolt until it's oriented at the 3 or 9 o'clock position. Clean the Zerk end of the bolt and mark it with white paint in line with the hole. This way you'll know during future lube jobs that the grease journal is oriented correctly or if the wet bolt rotated after you've corrected the issue. 6. Carefully tap the wet bolt back into place, stabilize the Zerk end and torque to specs (45 - 50 lb-feet) 7. Grease the Zerk Hope this helps.1 point
-
We’ve spent time here, our son went to New Mexico Military Institute here for a year before going to West Point. Ruidoso is also a favorite camping spot!1 point
-
Stayed in Roswell a half dozen times in our biannual trips from Georgetown TX to Prescott AZ, over a 10 year period. We didn’t get much into the alien thing, but LOVE Lincoln Co, just two hours west. What a beautiful place up at 7K ft, Lincoln Co, Mt Capitan, Ruidoso NM, and home of Billy the Kid, just145 years ago! 😂1 point
-
Happy and safe travels to CO. At 8700’ daytime temps have been mid 70’s with nighttime temps in the 40’s. Should be a welcome relief1 point
-
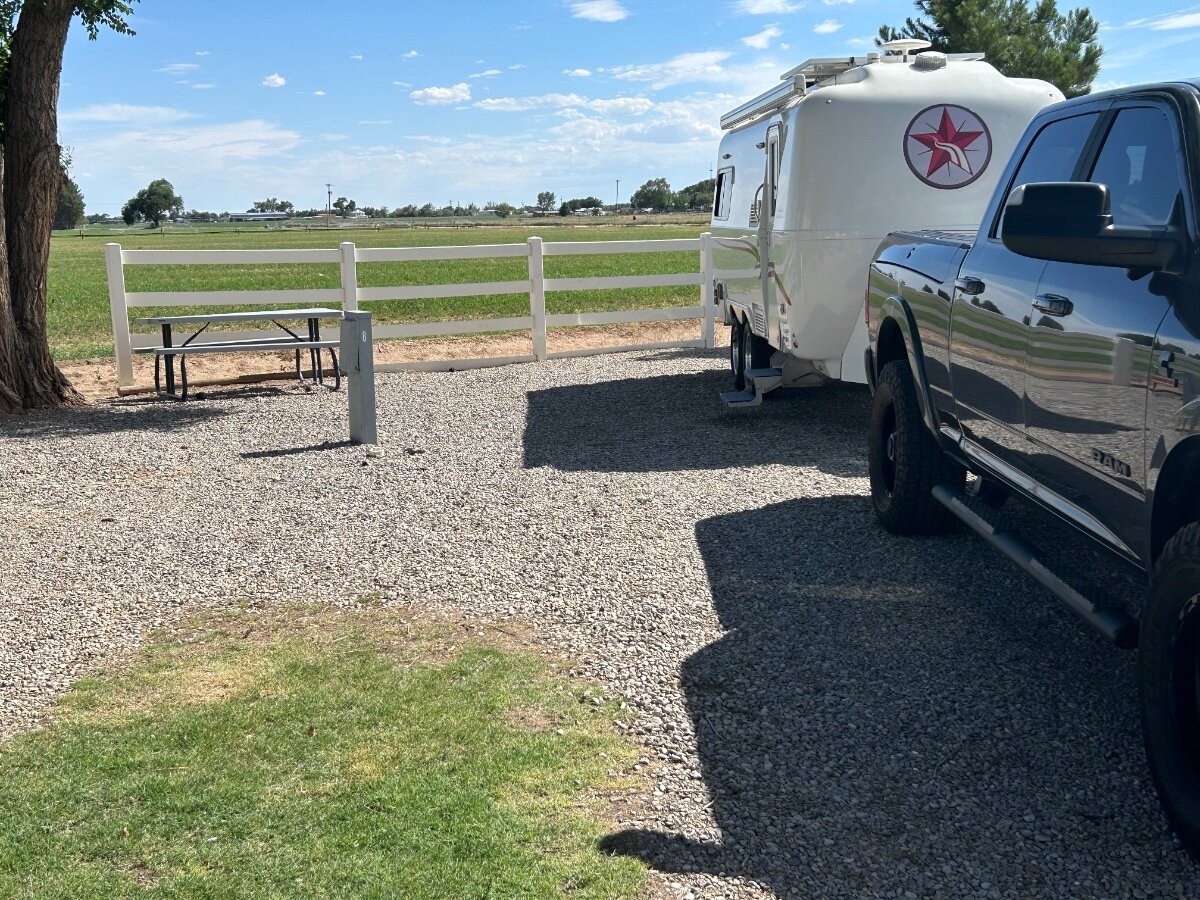
We’re on our way to Colorado to escape the south Texas heat. Overnighting in Roswell, NM which does not get us out of the heat! It was 106 when we pulled in to our campground. No sitting outside, we’re enjoying 70s inside with our loud Dometic AC. We’re at the Red Barn RV Park, very small but clean and convenient. We’ve stayed here at least a dozen times on our way to/from Colorado. Yes, that’s a Red Barn. It’s the office, rec room, rest rooms. She keeps a cooler there with bagged ice, food, ice cream and drinks. Farm field behind us, there’s only about 12 sites total and several are long term folks.
1 point
-
We’ve done both and south is definitely better. You have good campgrounds, visitor center, hiking and more access to the canyon. We camped in B Loop when the weather was cold at night and we were happy to have electricity for our little electric heater. I was just pointing out that the north side is an option, especially if you’re staying at the state park.1 point
-
Jason Essary gets the credit. He authorized the reduction of LBCO after consultation with Xantrex and Lithionics.1 point
-
After using Roadpass/Roadtripper/Campendium on a recent 6 week camping trip I have decided to cancel my subscription. I found it exasperating to use in its newest format and I switched to a Allstays Premium membership in the middle of our trip. Allstays and Campendium used to be free to use and I used both. I chose Campendium's paid subscription to begin with and was a happy camper until they completed their app migration. Mossey1 point
-
We camped at the South NP campground. The visitor Centre is there, access to the bottom of the canyon is also there. Beautiful campground and Loop B has electric. Access to Montrose is very close. If I remember the North campground and park access is off the beaten path. I chose South over North based on several recommendations, so I can't compare one to the other1 point
-
You can access the canyon from the north side, near Crawford, CO. Crawford State Park is a nice little park and only about a 20 minute drive to the north side of the canyon. There is BLM camping there. The access is limited compared to going into the NP but it does give you the sense of the size of the canyon! Mike1 point
-
We’ll be in Durango for the weekend the up 550 to Ridgway State Park outside of Ouray for a week. Then we’ll head to Utah for a couple of weeks before heading back to Colorado for the rest of the month. Mike1 point
-
In our retrofit install of the tf130, we sealed both vents. (We had both.) We added insulation to the vents, and the sides of the cavity, still leaving an airgap around the fridge. Made sure we had more than 24 square inches of venting, to the interior. No more screening necessary to keep mud daubers out. We've never had an overtemp issue in ours. Normally run the fridge on 5 or so. But, we don't camp in 95 or 100+ degree weather, either. I leave that to younger, more heat tolerant folks. We do keep plenty of cold sink foods/beverages in the fridge. All fridges seem to work better when loaded, vs empty/lightly loaded. As someone else suggested, all the cold comes from the tiny freezer. I think the temp sensor is within the wall of the freezer, as well. There are some air slots at the back. Maybe move your fan from center to left, and try to draw more cool air from the freezer? You could also have a faulty thermostat. Isotherm sells a kit which includes a sensor in the fridge cavity, as well. Many boater use it. I think Overland installed it for his, maybe. I'll see what I find. The other suggestions of shading the fridge side are good. Wondering if you have a true 24 square inches of interior venting?1 point
-
Spy any moose down there in the willows? How are the bugs? Bill1 point
-
That’s the exact one we have. We purchased it for the Tri-Fuel fridge and moved it to the LE II Isotherm compressor fridge. It helped greatly in the tri-Fuel.1 point
-
There are 16 zerks (8 on each side), THIS video from Oliver (Jason) is a good reference for where the zerks are and how to apply the grease.1 point
-
Jack up the side of the trailer that the fittings are on that you are trying to grease. This will relieve any pressure being placed onto the wet bolts by the weight of the trailer. That usually makes it much easier to get them to take grease. You may never get it to squirt out both ends of the bushing equally.1 point
-
Our "real world" test was a success. After resetting the LBCO to 11.5V, as authorized by Jason Essary, we had no inverter shutdowns when boondocking (without shore power, of course) over the weekend. We used the Truma AC, a small 120V vacuum cleaner, a hairdryer and the microwave (one at a time, of course), at various SOC levels, with no inverter shutdowns. I learned from Jason Essary that the origin of the problem may be traceable to a new bus bar that Oliver began installing in late 2022, and then 2023 models, with the Truma AC. Apparently, the new bus bar reduces the DC voltage sensed by the inverter by enough to trigger a Low Battery Voltage Cutoff (LBCO) if the default setting of 12.0V is not lowered. In our case, resetting the LBCO to 11.5V eliminated the annoying inverter shutdowns. Jason advised that Lilthionics has approved the adjustment to an 11.5V LBCO for those with the new bus bar. I chalk this up to "growing pains" incorporating the new Truma components into the Oliver electrical system. To his credit, Jason Essary kept conducting tests, and working the problem, until he found the solution. So, contrary to the suggestion in the initial post in this thread, the solution to inverter LBCO shutdowns is NOT a hard reboot, but simply resetting the LBCO to 11.5V. I cannot explain why both the first and second hard reboot produced short-term results. Maybe one of you electric engineers can tackle that question. But for now, the LBCO reset appears to be working. Hope this helps anyone else with a late 2022 or 2023 model that is experiencing LBCO inverter shutdowns.1 point


-
Recent Achievements
-


")


")


")


