Leaderboard


Popular Content
Showing content with the highest reputation on 07/14/2024 in all areas
-
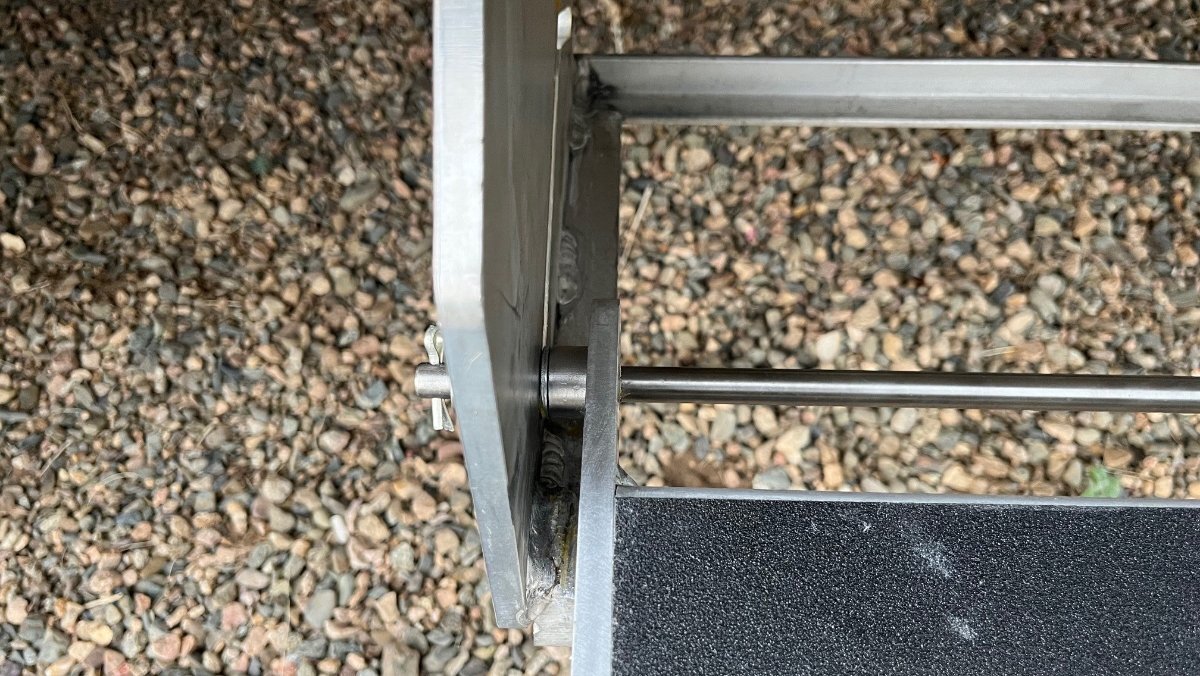
When installing bronze bushings in Ollie's spring eye, I coat the outside of the bushing and inside of the spring eye with castor oil to help the soft bronze slide into the spring eye easier, attempting to prevent damage to the soft bronze bushing. The last bronze bushings I installed used a piece of threaded rod from a local Lowes with flat washers and nuts.7 points
-
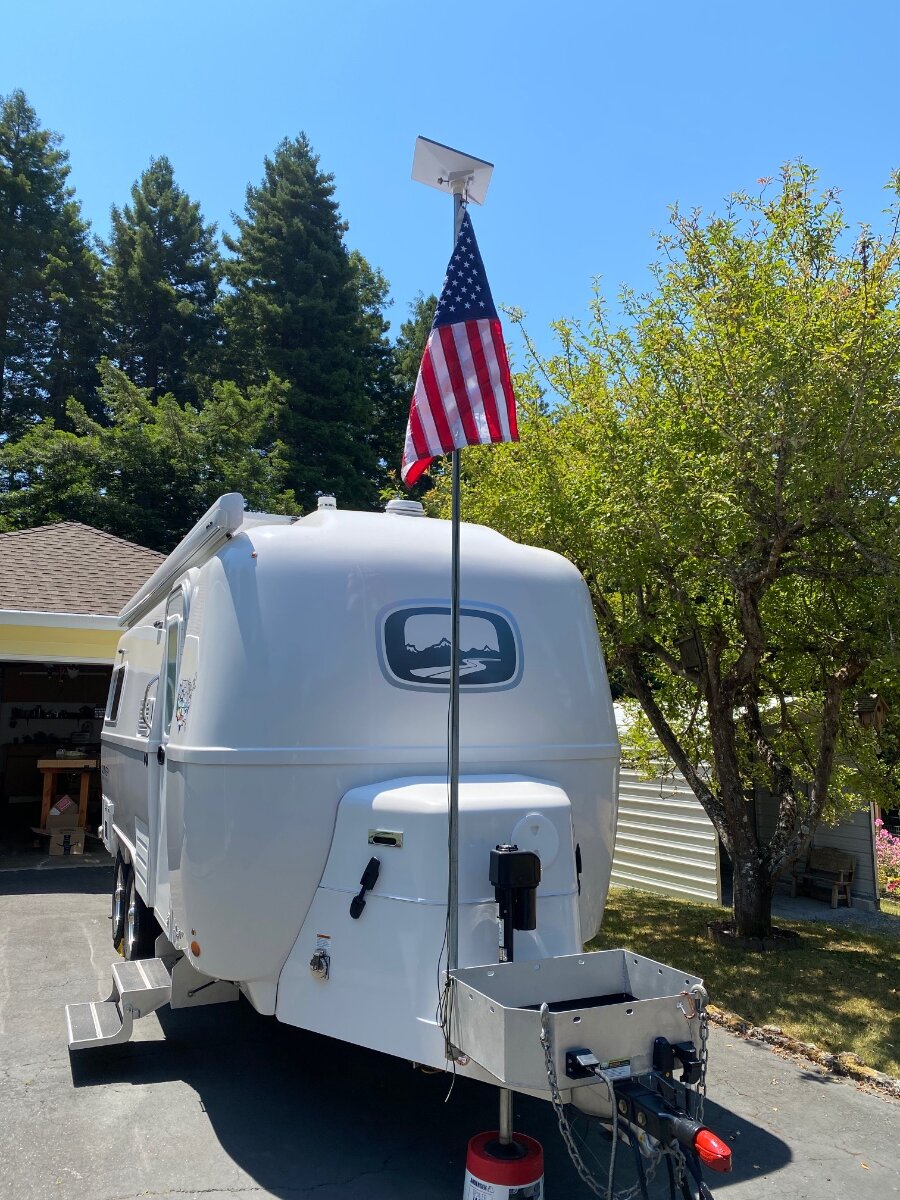
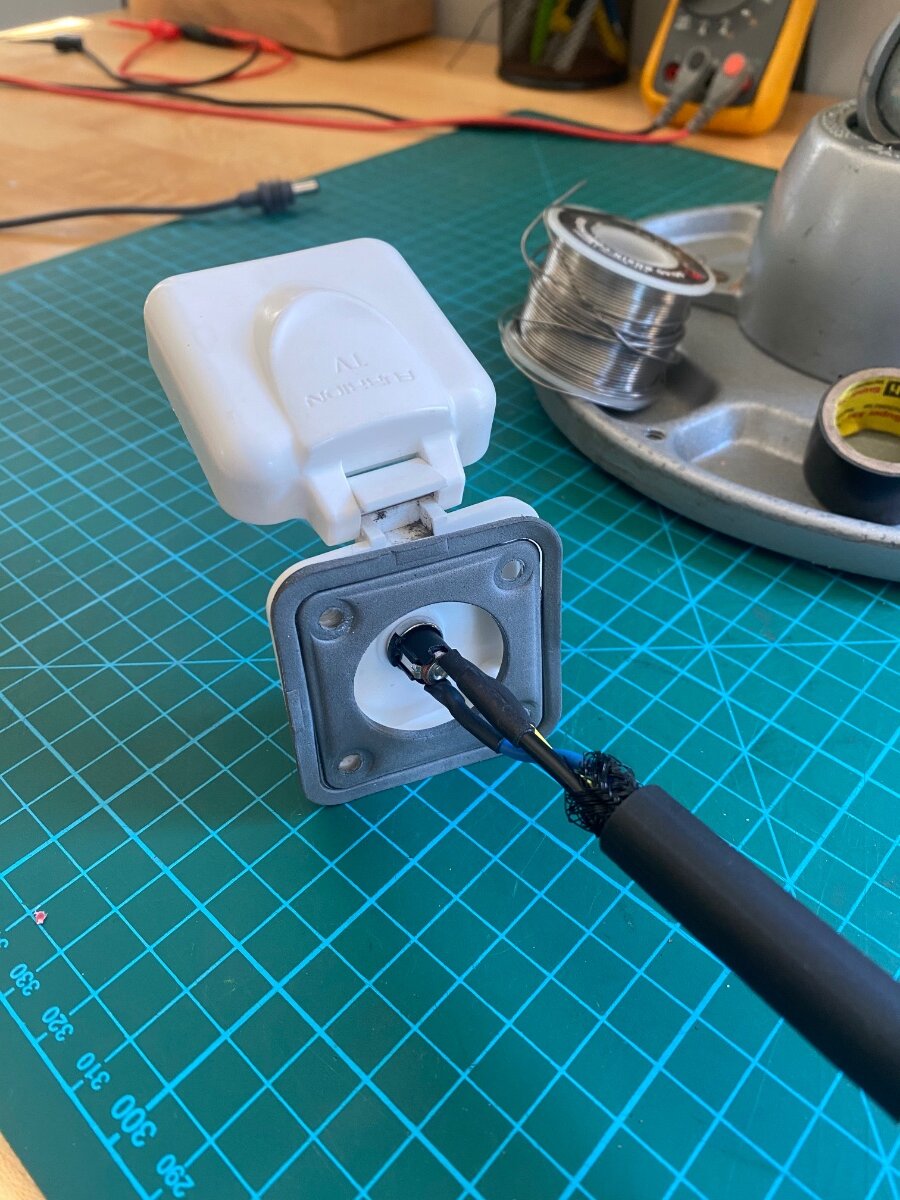
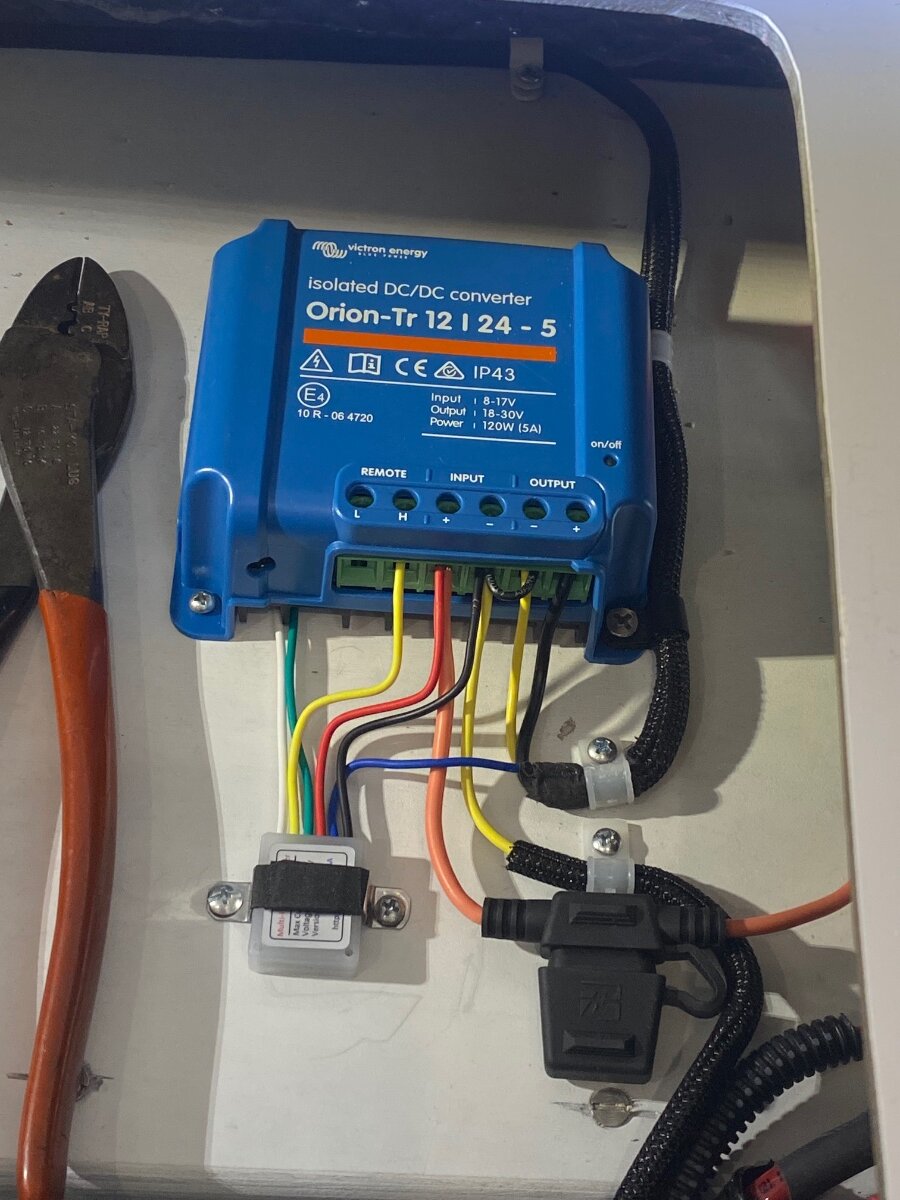
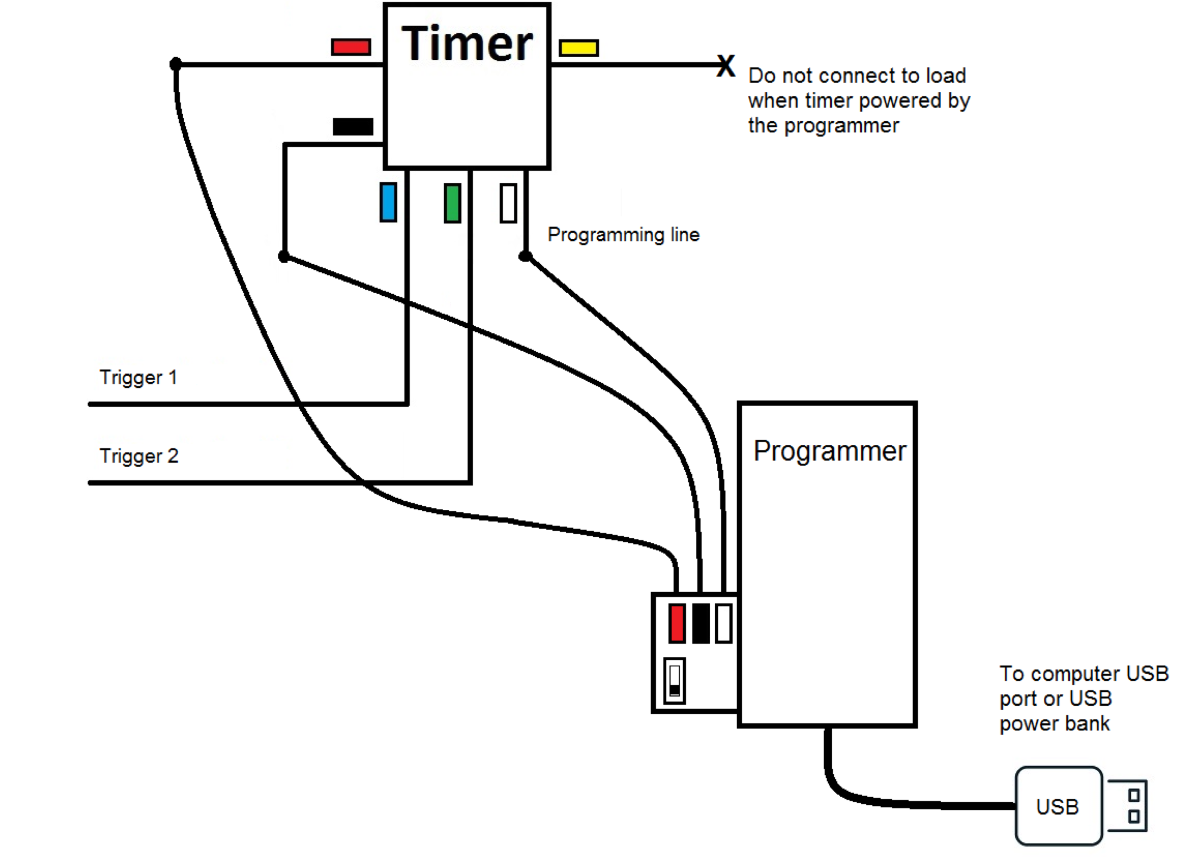
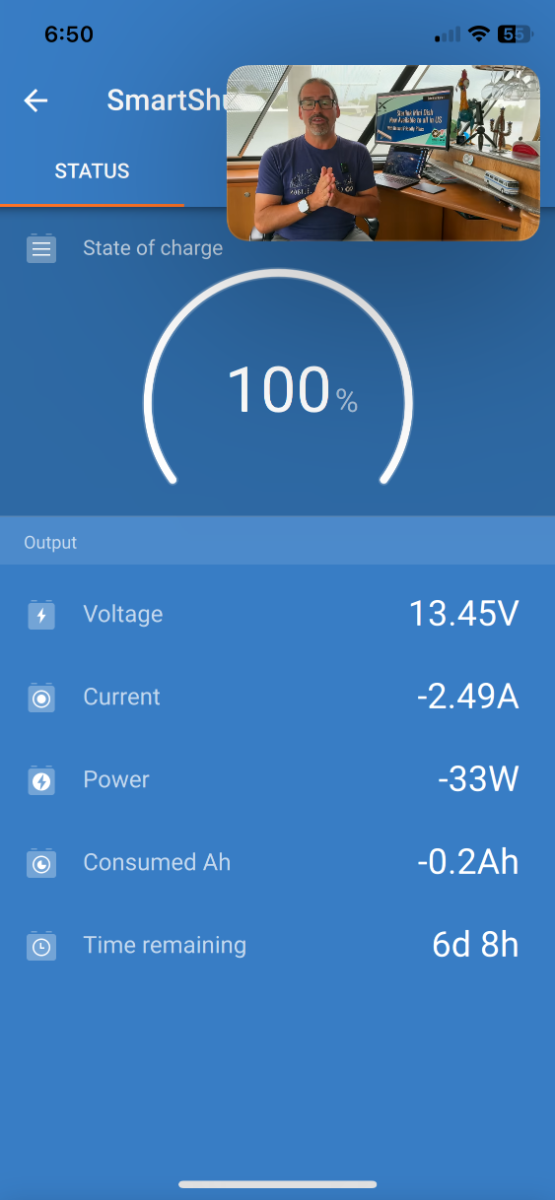
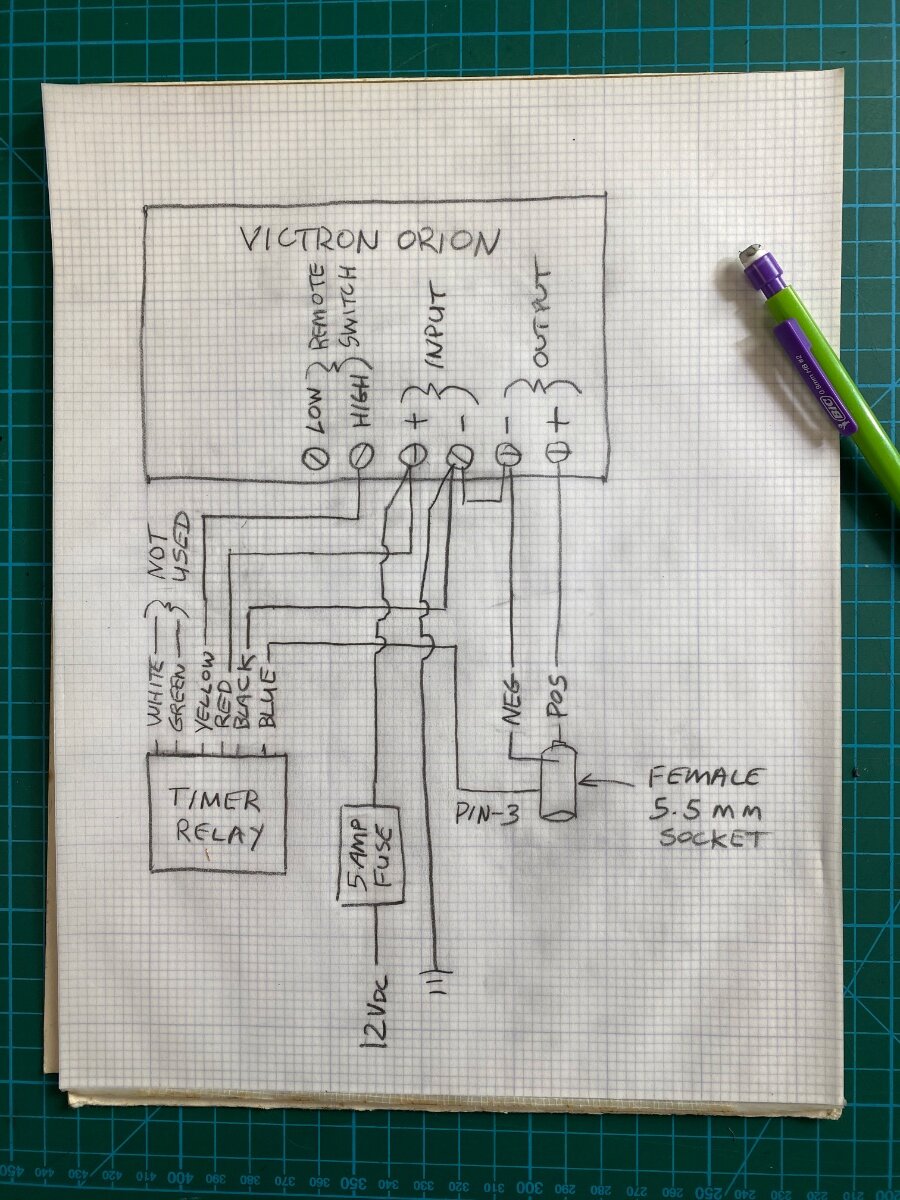
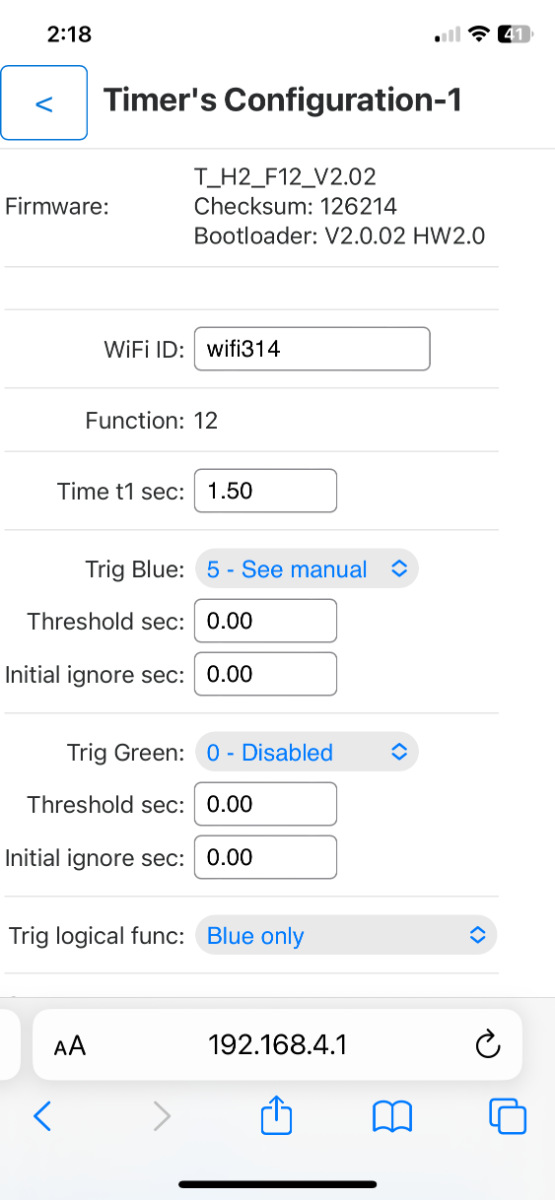
After lugging around my old heavy Gen-1 Starlink for a few years, I was thrilled to get the new Starlink Mini. It’s small and light, and the router is built into the dishy. It speed tested at 202 Mbps, a very respectable speed, although not as fast as the Gen-3 which typically runs over 300 Mbps. The Mini comes with a 50’ x ~1/8” diameter power cord that has 5.5 mm barrel connectors on each end. It also comes with a 120 volt AC wall transformer that puts out 30 volts dc (vdc.) The Mini is rated to run on 12 to 48 volts vdc, and 25 to 40 watts. It peaks at 60 watts with snow melt on. The 12 Vdc rating is an attractive feature, particularly for Boondockers who don’t have inverters. However, when I first hooked it up to the Oliver’s 12 Vdc battery… it would’t work?? After some investigation, it turns out that it’s not so simple and I’ll try to explain why: Given that the AC transformer puts out 30 volts, and the power is about 40 watts, then it would be drawing 1.3 amps per Ohms law (40w/30v = 1.3 amps.) With the same calculation at 12 volts, the amperage increases to 3.3 amps. The resistance of the long thin power cord can’t handle this higher amperage and the resulting voltage drop puts it below the minimum 12 volts operating range. In fact, I did some bench testing and found it would only work at voltages over 18 volts. There are solutions to this issue including cutting the cable shorter, using a larger gauge cable, or increasing the voltage. Without a better option, I chose to increase the voltage. I looked at cheapie power converters that would probably work, but I wanted something more robust and higher quality. I found a Victron Orion TR 12/24-5, isolated, DC to DC Converter, and it was perfect for the job. It has a 12 Vdc (+/-) input and an adjustable output of 20 to 30 Vdc at 5 amps. Standby power is under 80 mA, and it has remote on/off switching capability. It comes factory set at 24 Vdc, but I adjusted it to 30 Vdc output with the potentiometer on the front. To connect the Mini to the trailer’s 12 Vdc power system, I installed a 5.5 mm female panel mount socket into the Satellite TV inlet. I removed the Coax connector and the 5.5 mm socket and nut fits perfectly in it’s place. Oliver conveniently labeled it “Satellite.” If you need the satellite TV, then install a third “Furrion” inlet as I did for my old starlink RJ45 connector. I mounted the Victron under the rear seat on the street side. The socket wiring was sheathed and routed along the ceiling of the outside storage garage. There are a number of options to pick-up 12 volts in that area, I took power off one of the circuit breakers. I ran the negative wire to the ground bus under the rear dinette seat. The Mini comes with both a snap-in kick-stand and a 2” pole mount, and they’re both necessary for optimum RV use. I prefer having it on a pole, but we often have to move the dishy away from the trailer for a clear sky view. That’s why it’s a bad idea to shorten the cord. It also has an RJ45 port that I suppose is for hardwiring without WIFI, but I probably won’t ever use that feature. I built-up some PVC fittings on my 10’ Electrical Metallic Tubing (EMT) mast to fit the Mini’s pole adapter. (See the post for Tacky Starlink Dishy Mast). A little sanding was involved, and the starlink mount uses a thumb screw to hold it in place. It’s better to turn the Victron off when not in use, so I recommend using the remote switching feature with a switch installed in an easily accessible location. I’m too forgetful to switch the Victron off every time, so I came up with a way to turn it on & off when the Mini’s power cord is plugged in & out. Read on if your interested in that part of the installation: The “three pin” 5.5 mm female socket sold by Amazon has a built-in switch that’s designed for appliances that use either batteries or a 120v transformer supply. When the transformer is plugged in, the pin-3 switch opens to disconnect the batteries. This is opposite of what’s needed for the Victron remote switch, but it can be used to trigger a digital relay and it’s actually easier than it sounds. Amazon carries fun little programable 5 &10 amp timer/relays for under $20. I already had the 10 amp version in the Oliver for a hot water recirculation pump timer, and it works great! The 5 amp is adequate for this application, and you will also need the $20 dollar re-usable Bluetooth programer. They use 50 μA of idle current, which is nothing, and they can be programed for delay-on, delay-off, flashers, dimmers, duck decoys, and more. But for our application, we’re just interested in the trigger functions, specifically the “ground-open” trigger. Before installation, the relay has to be programed from a smart phone or computer. It’ links by WiFi to flash the program into the relays memory. Use wire nuts to connect the timer and programer together, and power them from a USB port. Follow the well written and simple programing instructions using the settings shown in the screenshot below. The relay requires a timing function, so I arbitrarily used function #12, which is “delay-on.” I set it randomly to 1.5 seconds. The trigger is programed to use the “Trig Blue” set at #5, which corresponds to the blue wire used as a “grounded trigger.” The green wire trigger is disabled. My wiring sketch shows that the timer is powered with 12 volts from the Victron’s positive and negative inputs. The relay’s yellow output wire feeds the positive side of the Victron’s remote switch (the negative side is not connected). The Victron’s output feeds the 5.5 mm power socket, and the blue trigger wire goes to the 5.5mm socket’s pin-3. Use a continuity tester to identify pin-3, it’s normally shorted to the negative lead of the socket and it “opens” when the male connecter is plugged in. The socket barrel is negative, or ground, and the center pin is positive 12 vdc. There is one other step to make this work. This Victron model is “Isolated,” meaning that the input and output “negative” terminals are isolated from each other. It needs to be “non-isolated” because the timer is grounded to the Victron input, and the socket is grounded to the output, and the trigger needs continuity between the two. So remove the jumper wire that comes on the Victron’s remote switch, and use it to jump across the two negative terminals. Victron support confirmed that shorting the grounds is not a problem, it just un-isolates it. This works satisfyingly well! I checked out the power draw with the solar turned off, and while streaming a video. It was 2 amps, 27 watts (after subtracting the parasite load). That’s a huge improvement over my previous Starlink, and I don’t have to worry about running the inverter and draining down the batteries anymore. I hope someone finds this useful Cheers! Geoff
 6 points
 -
@jdmmtx ; If you're still in need of replacement leaf springs, you're welcome to have my OEM 4-leaf springs - no longer needed because we replaced them last April using the Alcan 5-leaf spring packs that @Steph and Dud B mentioned above. Shoot me a PM with a shipping address and cover the shipping costs... You can have 1 or all 4 of the springs. They are in serviceable condition. Cheers, Art4 points
-
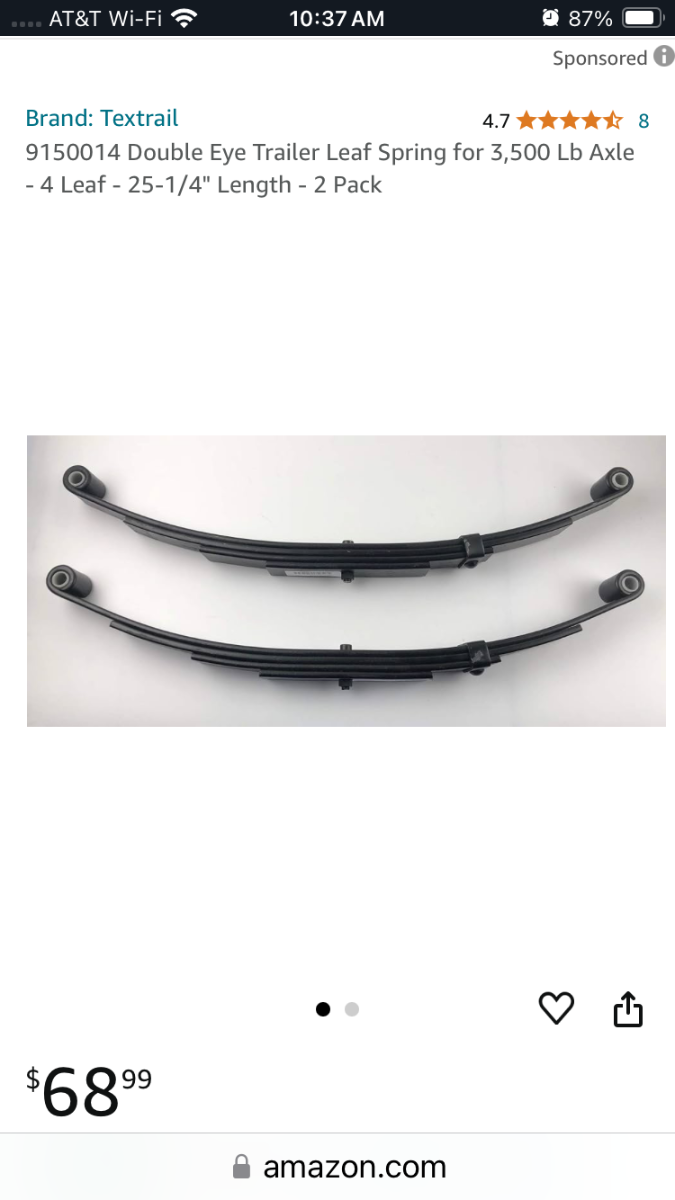
Here is the replacement spring info Oliver Service sent me for my 2021 E2. They can be found on Amazon in pairs for $68. Note that the springs on Amazon appear to have nylon bushings rather than bronze, but they would serve to get you back on the road and home where you can figure out your final solution Please open a service ticket with Oliver so they are aware of the issue and can advise for your exact hull#
4 points
-
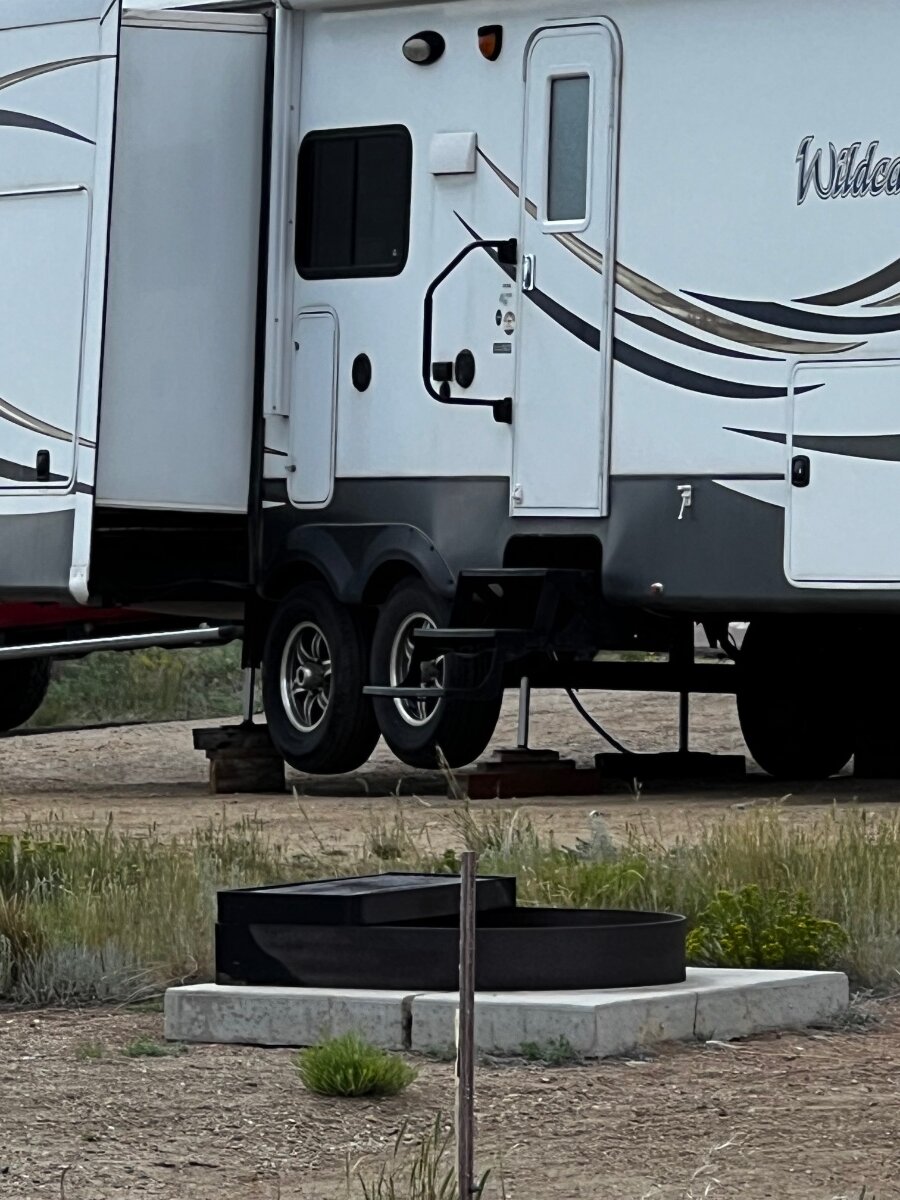
We spent last week at Ridgway State Park, just 20 minutes north of Ouray. We drove up from our son’s house in Durango but didn’t take 550 this time. We took the western route which is about 40 minutes longer but provides with some different scenery. It takes you by Telluride. It was a nice drive. This is just a few miles outside of Telluride on the way to Ridgway. Another stop on the way up to Ridgway. Our site at Ridgway State Park We did a walk around the town of Ridgway. This is the town park in the middle of town. Downtown Ouray. Downtown Ouray. Hiking around the Ridgway Reservoir. Nice hike, good views. More hiking.
3 points
-
John there are many videos on YouTube on how to calibrate it yourself, here’s one.3 points
-
When I bought my torque wrench, I wint onto u-tube and learn how to do it myself. I just needed to buy a lugage weight scale. After watching the video a couple of times, I found it easy to do myself.2 points
-
@rideadeuce, thanks for the update on the other owner’s status. In one of the videos viewed, it was stated that a temp could be set and cold/heat would maintain it. There has been some misinformation given before that proved not to be true or at least not fully understood/conveyed. Good luck with the install. SDG has done a good job on video taping various installs, any chance your Oliver install will be similarly documented?2 points
-
Perhaps even more important is the load capacity - how much stuff can it carry? Find the sticker inside the driver's door jam and then add up your hitch weight, plus all the other things you carry (like people, dogs, equipment in the bed, etc.) and compare those two numbers. Most 1/2 trucks have a "limited" capacity in this regard. Bill Posted from a sage brush field outside Meeteetse, WY2 points
-
Update: July 13, 2024 I completed the Houghton 3400 “Humidity Mod” as presented in the attached "Wiring Modification for Interior Fan" document. This excellent write-up was provided by GSM Bear, Version 2 and posted 7/30/2023. His document needs to be fully understood before starting this Mod. It took me about 2 hours working off a ladder on the curb side to carefully complete the mod. Suggestions: The suggested wire measurements are adequate and allow for re-termination if necessary. No need to add any extra length. I recommend that you prefabricate the new brown, black, and white wires. Much easier to do so on your bench vs. on the roof. Then physically plug them into the relay. One less thing to worry about when on the ladder. You will need all the “Parts and Tools Needed” as listed by GSMBear. Additional Tools and Supplied I Found Useful: Ladder Head lamp Wire cutter Magnet on a stick Large Phillips bit Silicone to reseal the electrical box Needle nosed & regular pliers Camera (I took pictures to allow me to “blow up” to get a closer look into the electrical box connections.) Mod Results: The Houghton ran as expected as the fan shut down with the compressor when it cycled down to low speed (Fan set to auto). Houghton also worked as expected with the fan set to low speed. This is the ultra good dehumidifying and quietest setting. Significantly lowered the humidity levels in the cabin. I had to set the remote temperature to a MUCH lower setting to get the cabin to a cool level. The unit Cycle time was significantly extended with the mod. As in extended way too infrequently. I believe that at the end of a compressor run, the fan shuts down with the overhead super cold coils, The coils then chill the air in the unit and being heavier it sinks down past the thermistor. As a result, the process keeps the thermistor “Chilled”. This delays the restart longer than desired. Moving the thermister to a location outside of the unit is needed Hence, the Thermistor Mod is required, as GSMBear states in his document. More to follow with completion of the Thermistor Mod in the next day or two. GJ GSM BEAR V2 RecPro Houghton Interior Fan Mod v2.pdf2 points
-
The stabilizer jacks well exceed their intended use; but do require special attention as to not over extend/retract, which can cause a fuse to blow and/or gear head damage. Additionally, one should routinely check the jack mounts for loose hardware and ensure they are examined as part of the departure checklist.2 points
-
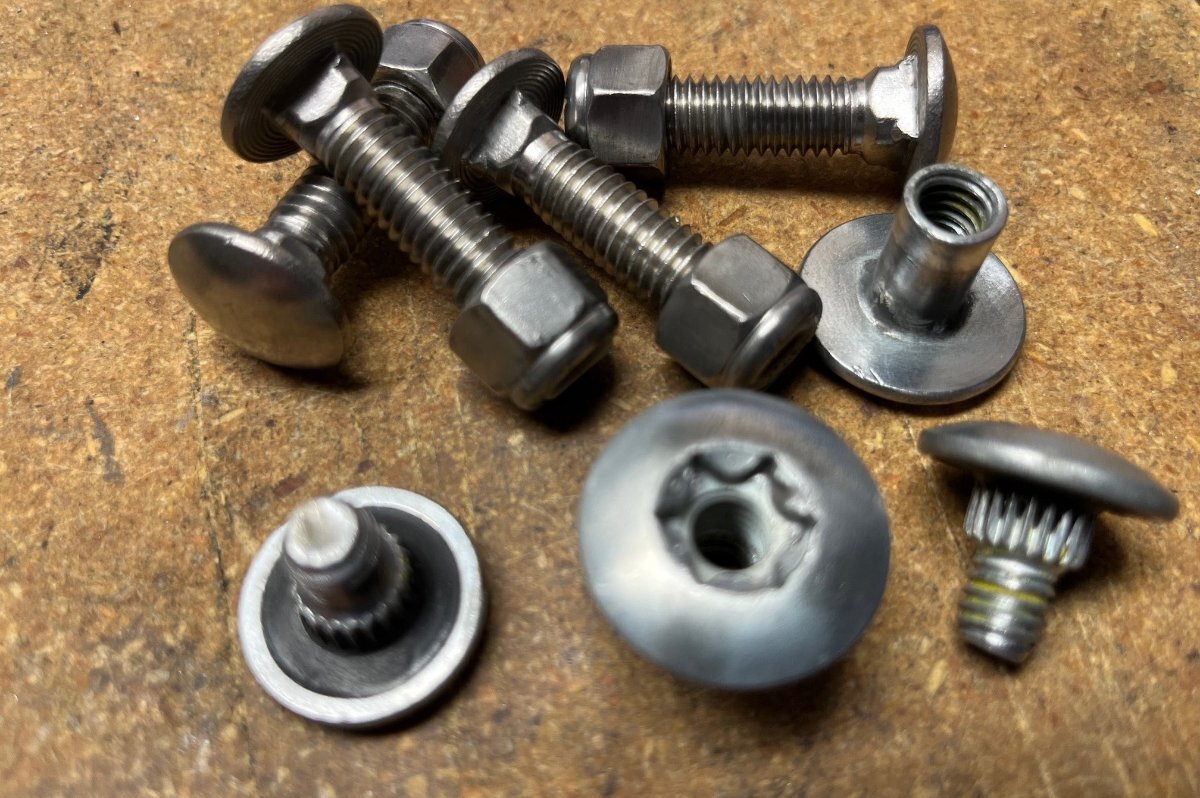
There is no part number. When you call, ask for Lew or Mike and tell them you have a Oliver Elite II(this way they can make sure the centering pin is set up for our spring under axle configuration). According to Alcan, their springs are rated at 2,750 lb/ea. While most of us who have installed them notice very little incremental stiffness, you should be aware of this going into the purchase. If you order your new ubolts and nuts from them, make sure you know your axle diameter when you call so they send the correct ubolt size.1 point
-
You may want to call Victron or Victron rep and have a chat. They're both great units. Same warranty. Some many discussions on victron forum https://community.victronenergy.com/questions/63741/difference-between-multiplus-and-multiplus-ii.html1 point
-
Thanks Mike, I had not run across the manual. Reading this makes more sense. Not sure when I questioned Kevin, he didn't inform me that I could use COOL vs. AUTO modes for what I asked. The fan will still run all night. My fix for that is the timer or the remote would be in arms reach, powered off when needed. Now that I have the furnace duct mod, with bedside duct capped off, I believe I would likely rarely use the heat pump which would blow warm air over the beds and not front or in the bathroom. Many voice they like the heat pump option. I'd give it a try to see but would likely prefer the warm bathroom and heat aimed on the floor vs. up in our face. For those of us who camp more often on inverter than connected to shore power, when A/C the sun is out and there is some positive AH offset. When you need heat, most of the time it's dark outside using considerable AH without solar replenishment and we carry 60 gallons of efficient LP.1 point
-
Here are the program settings for the relay:
1 point
-
SDG said they would document and take pics of the install. I will try to gather as much information as I can, as well. On family vacation, so I am kind of sneaking this into the mix. Ha! Mike1 point
-
I used 4AWG cable for my DC-DC install, bought 50’ red+, 50’ black-.1 point
-
Given the PD5100 ATS, the MP inverter would treat a small generator as a form of under-powered shore power and the Power Assist would kick in, adding required power. But yes, adding the SoftStart lowers the initial surge to allow running on a household 15A circuit without tripping a breaker. The extra features of the MP2, I will likely not use. It is the dimensions and +1AH more on idle is 24AH per day. Still what fits best will make the decision. Next week I will open all street-side basement panels, measure, plan, decide and purchase. Given the MP2 is better, why can I buy one for $997 and the MP is $1,169, from authorized dealers. Another point for the MP2!1 point
-
The MultiPlus-II combines the functions of the MultiPlus and the MultiGrid. It has all the features of the MultiPlus, plus an external current transformer option to implement PowerControl and PowerAssist and to optimize self-consumption with external current sensing (max. 32A). - Victron The MultiPlus-II is a newer model; it is also a single inverter/charger unit, but it has some improvements over the original MultiPlus. It has a more powerful microprocessor, which allows it to provide more accurate and precise control over the charging process. - Victron MP-II form factor is longer and slimmer. So, depending on install may be easier to mount. Idle power draw is less for the MP2 11w vs 25w for the original. Having installed it, in retrospect, I might look at using Victron Lynx power distribution instead of DIY bus bars. A lot to think about. Best, Mike1 point
-
Nice truck, but I can't see it handling very well in the water... 🦆🚣♂️1 point
-
This is the issue. For example, at home we program our thermostat for summer A/C temps between 78 degrees in the heat of the afternoons and much cooler to 74 overnight to keep some air movement and sleep better. For winter heat, the numbers are much lower; down to 64 degrees prior to dawn and up to 70 in the evenings. This makes us comfortable at home. The last thing I want in the Oliver, or anywhere else for that matter, is for when it gets naturally cooler overnight approaching dawn is for the heat pump to come on when the temp gets 1-2 degrees lower, OMG! A valid design has at least two set temps, one for each system (at home we have 4 per day for A/C and 4 more for heat). Why do these design engineers not understand something so basic. When I talked to Kevin at SDG, the Atmos rep and installation co., he explained it in this way. I asked him, why would I want that? He explained it as a positive feature, and I replied that to me this is an issue. I would rather the A/C not have heat pump, or at least the ability to turn it off. We use the ceiling A/C when it's hot, run the LP furnace when it/s cold and I have NEVER seen a 24-hour period where we want or need both.1 point
-
Thread here: https://www.google.com/url?sa=t&source=web&rct=j&opi=89978449&url=https://olivertraveltrailers.com/forums/topic/9996-made-in-usa-leaf-springs/&ved=2ahUKEwj7uaXMrKSHAxWUElkFHRtoA9wQFnoECCsQAQ&usg=AOvVaw2TuWEqPQCoyqb1wVMIHpcR One of the posts lists his replacement specs as: "Made in USA with USA sourced 5160 spring steel -Bronze eye bushings vs. plastic -2,000lb rating/ea vs. 1,750 (will not change gvwr as axles/bearings remain determining factor) -5 leaves vs, 4 -second leaf extends underneath eye on each end (protecting common break area) -steel, bolted spring keepers (one each end) vs a single, sheet metal band -width = 1.75" -drop = 3” -length (eye-to-eye) = 25.25” The company I sourced them from is ALCAN."1 point
-
It is my understanding based on reads that one setting is made, wherein the unit will maintain that set temp as cold or heat is needed. Also looking forward to the outcome of @rideadeuce’s install and first impressions, as well. I lost contact with another owner on FB that made the first purchase of an Atmos 4.4 for his Oliver. I would think that install has been completed by now, but no subsequent report to date.1 point
-
Many have commented over the years on the use of the stabilizer jacks to lift the trailer enough to change a flat tire, well exceeding one or two inches of lift. However, from a safety aspect the trailer should always be connected to a TV when doing so and never ever have any part of your person under the trailer during the process. That said, I feel comfortable using the jacks to further tweak the level side-to-side, but only after utilizing some kind of leveling blocks or wedges first, thus minimizing the degree of actual jack lift. Once the leveling task is achieved, wheel chocks/wedges are placed to lessen any movement when disconnecting the TV.1 point
-
I got ours done today and I asked Chris to walk on it first with her light touch. I didn't want to even climb aboard with my work shoes on! 🤣 Yes, they will get dirty again as soon, as we hit an Arizona dirt road, likely September. Man, all-in-all this turned out really nice! Dirty later yes, but I can pull it down and put it up with one centered hand and just a light push. I did make a minor modification, adding washers to take up space on the axle, since there was about 3/8" of left to right slop (way too much). The added washers cut that in half. This is some of the issue in the difficulty in working the steps. Anybody considering this full maintenance, order a new set of short splined Torx bolts from OTT first (see pic). These are very short and upon compression, they get somewhat deformed. I was able to rethread one, but not the other after many attempts. Temporarily I used a 5/16" bolt with nylock nut. I have rebuilt a half dozen old car and truck suspensions, done over 20 brake jobs and if I could not get these bolts to thread, most DIYers would not have a chance, I promise. I have another item or two I want to order from OTT and will likely by 3 of these. One to replace the bad one and a pair for the next time (unless they cost $20 each)! The secret in getting the steps to push and pull smoothly is to file the up-n-down slanted groove where the axle lies (pic above). Then I lubed all contact point with Napa Sil-Glyde: Lubricant - Multi Purpose Sil-Glyde Lubricates 4oz. Plastic Tube BK 7651351 | Buy Online - NAPA Auto Parts (napaonline.com) I've used this product in multiple brake jobs, rebuilding the calipers on my '84 Goldwing and more (lasting for YEARS now). After rubbing it into every contact point, the ends of the axle, every spacer and washer, the bottom edge where the steps contact the frame, and the frame contact points too (not a WD-40 fan)... Work the steps back and forth several times and then spend time removing all the excess, as excess grease collects dirt. I'm not going to fight with these steps anymore, and for years to come!
1 point
-
Would not recommend using them like this. Plus - I have no idea how the occupants ever reached that first step.
1 point
-
theOrca, The Dometic FreshJet comes with a very nice factory seal where it makes contact with the Oliver. It also comes with four additional factory installed blocks at each corner that help distribute the weight of the unit over a larger area. In addition the FreshJet weighs less than the Penguin. The bolt pattern is inside of the opening, the same as the old noisy Penguin. I hope this answers some of your concerns, you are welcome to message me if you have any questions about my AC installation.1 point
-
"If" I powdercoated the steps, I'd probably go with silver. Aluminum color. I treat mine with garage door silicone spray, and no issues. White would undoubtedly get really dirty looking, riding where they do. The incredibly sturdy double step is standard for most of you, but it was an upgrade (years later) for those of us with 2008's. I cracked a rib on a crazy site trying to reach a footstool below the step. 2010? It flipped. Anyway, one of the best upgrades, ever, standard for all you new folks.1 point
-
It amazes me that since OTT created this defect, back when hull #110 was built, that they did not correct it now when you were in the shop. They should have cut out the old hangers, and welded new ones at their expense and then you could have paid for your desired axle upgrade.1 point
-
Footprint and the required opening are different subjects, not at all the same. Footprint equates to where and how much support the roof provides the upper unit. You do not want unsupported weight when fiberglass is being stressed by having that weight transferred to it by leverage. It is desirable to have the entire floor pan of the upper unit supported by the roof. Bolt pattern is always "outside" of the 14x14 opening, and is sometimes very different between brands. These are subjects which require "data" to resolve.1 point
-
The two rear jacks are exactly the same mechanically as the front one, they just don't have a control head. Barker makes them specially for Oliver so you won't find them listed online.1 point
-
Here are the ones I have. Hope it helps. BOM - Baker VIP 3000 Power Jack Parts List.docxOM - Barker VIP Power Jack 3000 Manual.pdf1 point
-
I failed to get that measurement and I won't see them again. If those hangers are perfectly flush with the sub-frame, you have a good chance of them working. My hangers are not flush at all. Maybe the welder had a really good party the night before. LoL1 point


-
Recent Achievements
-


")


")


")


