Leaderboard


Popular Content
Showing content with the highest reputation on 02/02/2025 in all areas
-
Maybe we should start a thread on managing resources while boondocking. When we had AGM’s we did a lot of no hook up camping, mostly at National Parks, COE and FS areas, Harvest Hosts and of course Quartzsite. No 30a hookup meant fridge on propane, hot water on propane, boil water on propane stovetop for pour over coffee, etc. The only electrical load on the batteries was the furnace fan, lights and water pump. We seldom use the inverter, an occasional minute or two of microwave and maybe a blow dry after a shower. Keeping an eye on where the battery charge was happened frequently. If we weren’t back to near 100% by mid-afternoon the generator came out (happened at Glacier and Grand Teton, some dark cold days!). Our AGM’s lasted 5 years and got replaced because two were starting to leak. Now with Lithiums (just 300ah) we still camp the same when boondocking and rarely get down to 80% charge by morning. It’s a mistake to think that solar allows the same kind of camping off grid as with FHU. Mike6 points
-
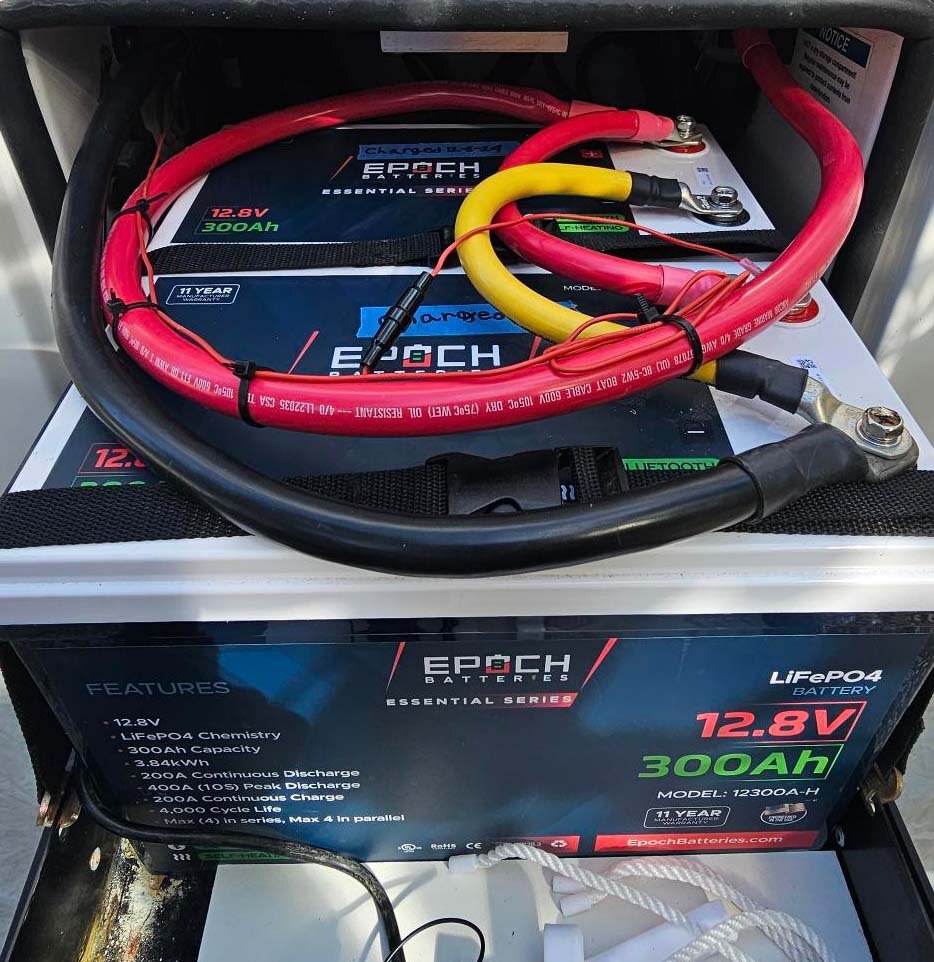
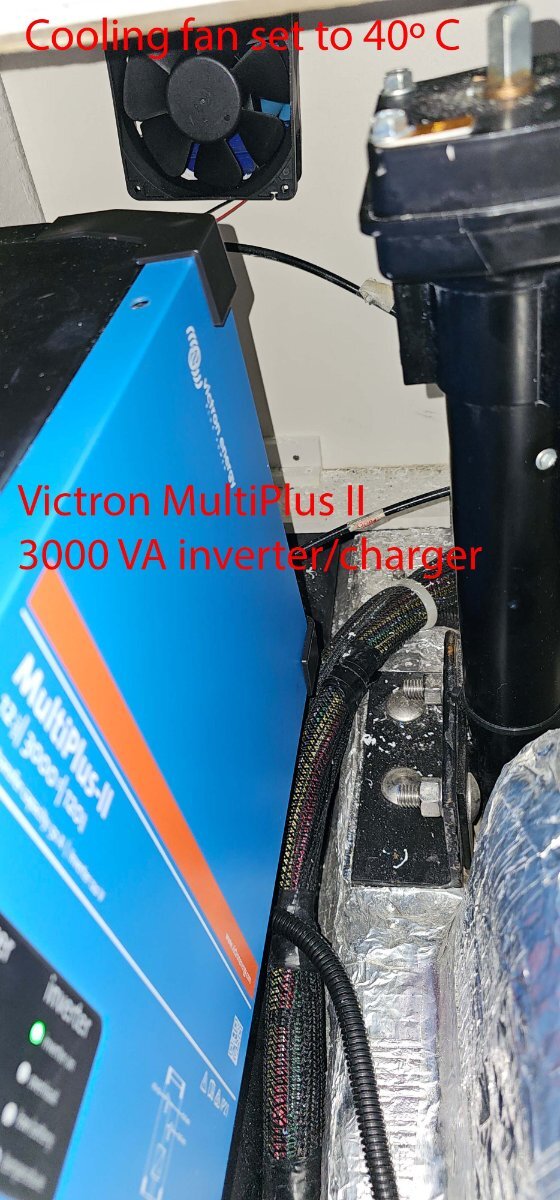
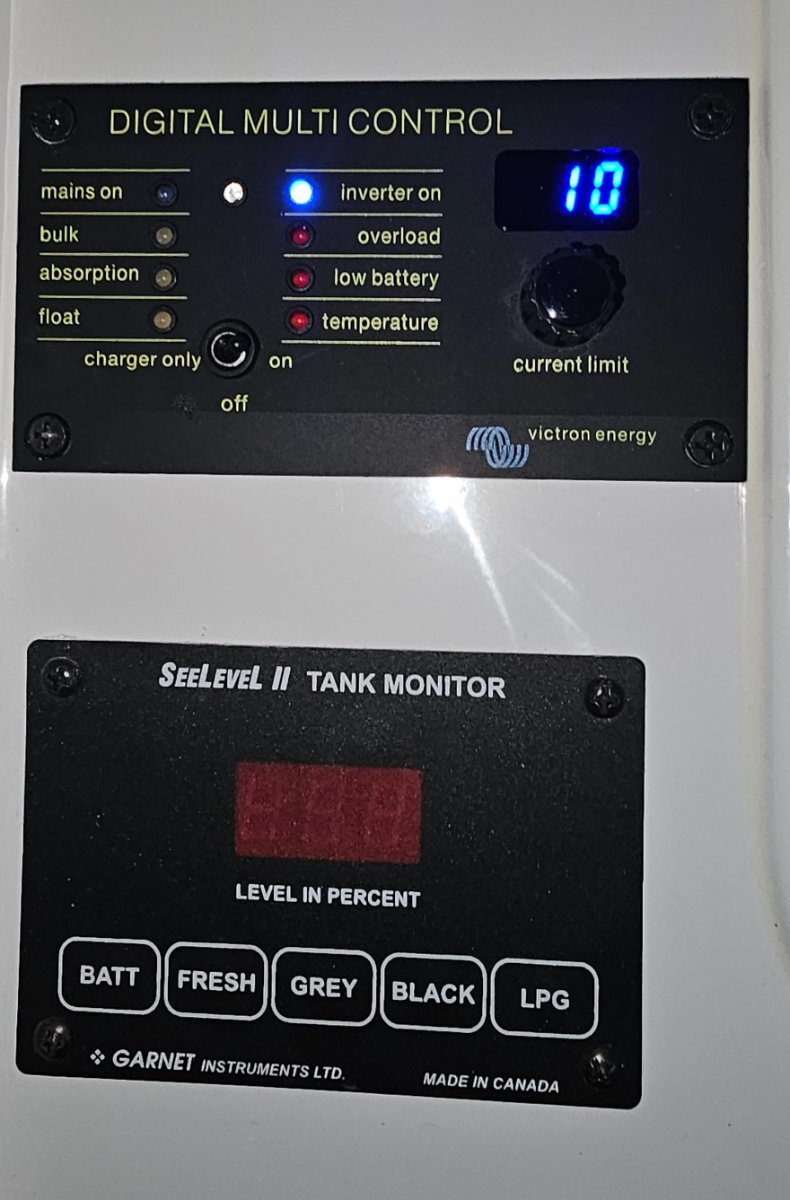
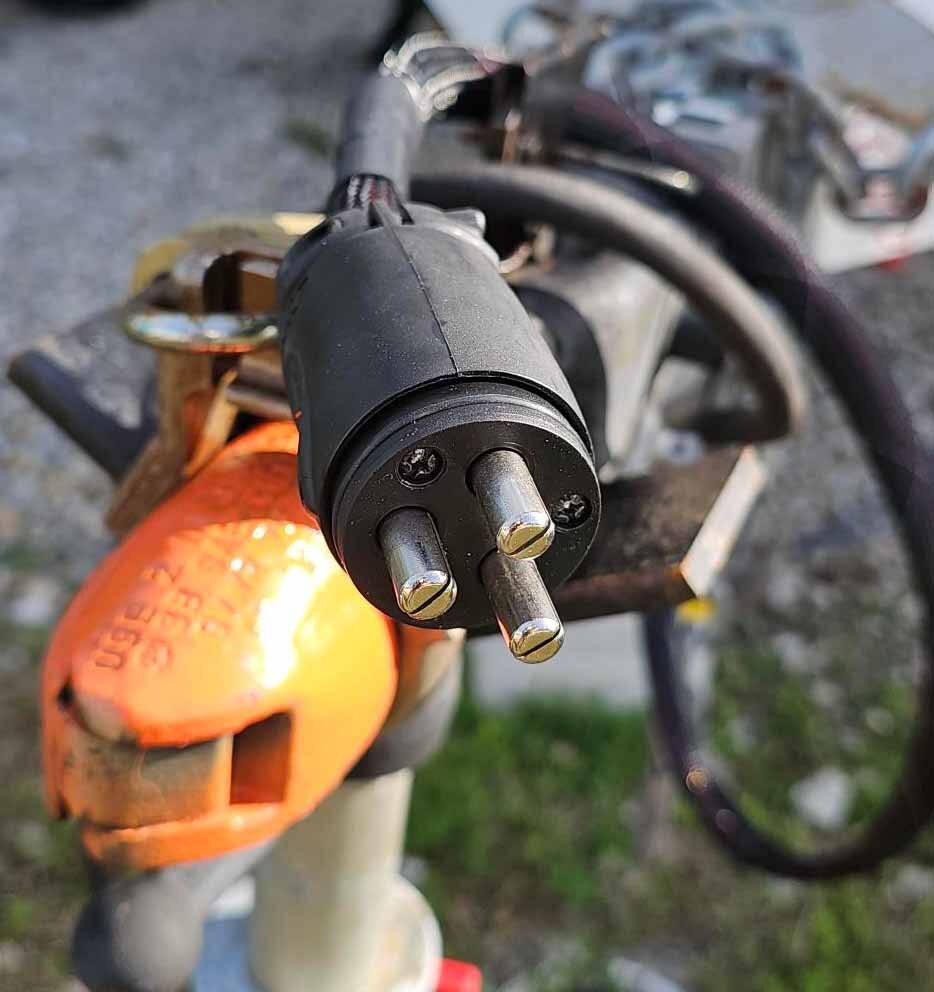
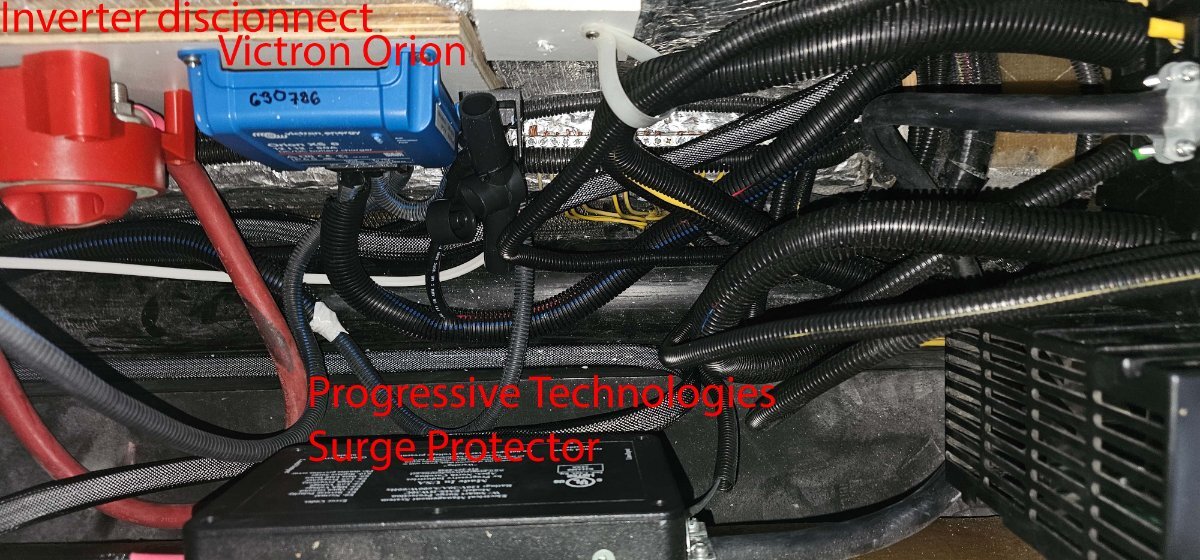
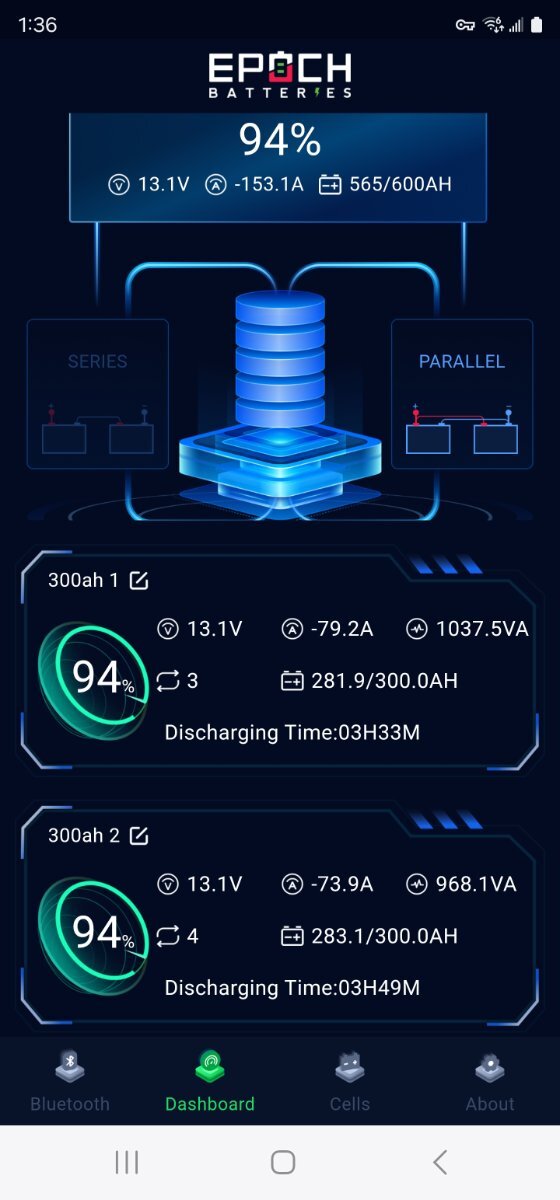
Overview We just got done upgrading our 2018 LEII (hull #344) from AGM to Lithium. The death knell had sounded for our original AGM batteries. So, given the cost to replace the AGMs, their weight, and the limited usable capacity inherent in AGMs, we decided to upgrade to lithium. We settled on 2, Epoch 300 Ah LiPO4 batteries with internal heating (a total of 600 Ah). The decision to purchase the Epochs was made easier by a 15% sale so we bit the bullet and purchased the batteries , a new Victron Multiplus 2 3000 VA inverter and charger, and a Victron Orion DC to DC charger which will allow us to charge directly from the tow vehicle. Here are more specific details about each step. We relied to a great extent on our tech. Victron Orion DC to DC charging We mounted the 50 amp Victron Orion under the aft seat in the dinette. The Orion was set to draw 30 amps from the alternator on the 2020 Ram 1500 Ecodiesel tow vehicle. The alternator puts out about 220 amps so we are confident this is well within safe operating parameters with all existing loads. We used 4 awg coupled to a marine connector from the TV to the trailer which looks to be quite robust. Of course, we disconnected the power from the 7-pin connector. Victron Multiplus 2, 3000 VA inverter and charger We mounted the inverter vertically under the streetside bunk. We also added a dc fan onto the bulkhead between the bunk and the basement to address heat issues and set it to operate above 40C. The inverter has a main disconnect as well as an inline breaker as per code. System Monitoring A Victron Multicontrol replaced the Progressive Technologies inverter switch from the OEM install and was installed in the same location. This is our primary control panel which provides operational status of the system, and allows us to control the input current. Specific battery State of Charge and other more granular data are available in the Victron shunt app, the Epoch app, and the Victron Multiplus app (as well as the original Xantrex Solar Controller which we did not change). Performance of the system We tested the system today by running our OEM Dometic Penguin A/C off the battery bank. We set the thermostat to 75 F. After 5 hours, we were at 55% SOC. Full disclosure, we only finished the install today and the tests were conducted in our winter conditions here in the Keys at 78 F ambient. The trailer did get warm during the day, but I do think we are likely to get 5 hours or so of A/C in the hotter summer months. Maybe even more. We haven't tested the DC to DC other than at idle. As mentioned, we set the charger to 30 amps so we are likely to get a full charge after a full day driving but that is just an estimate. We have enough leeway to turn up the output from the alternator if needed. Special KUDOS A great deal of thanks goes to our tech who helped install all this - Anthony from Outboard Rigging here in Marathon is the Man! Pictures of the install follows:
 2 points
 -
My choice of propane tanks goes to (minimizing) weight being the highest priority. My tow vehicle (TV) has very little cargo capacity so minimizing tongue weight is very important to me. I am an outlier in that regard on this forum. To minimize weight I switched to composite propane tanks shortly after I acquired my LEII. When empty, they weigh about 1/2 of what a common steel tank weighs although the capacities are reduced somewhat. The 20 lb equivalent holds 17 lbs and the 30 lb equivalent holds 22 lbs of propane. Most people couldn't justify the cost because they are much more expensive than steel tanks. However, if lowering tongue weight is important for you as it is for me, you might want to check them out. They are way less expensive then a new TV🤑 I am pretty sure there are a few of you out there that would really appreciate the light weight and don't do extensive cold weather camping. Even if I get a new tow vehicle, I will probably continue to use the composite tanks because they are so much nicer for everyday use. In addition to being much lighter when full, they have a wide base and are extremely stable in the back of the vehicle without tie-downs. Also, they have no sharp edges whatsoever so it is much easier to carry around and pack in the Ollie when carrying a spare tank as I do for cold weather camping. I have never had any problems getting them refilled. They are made in Europe and imported by Viking Cylinders. https://www.vikingcylinders.com/online-shop/ Since they have a much larger diameter base, if you switch to them you will need to switch out your 2 tank mounting tray inside of the doghouse. Viking Cylinders sells a custom fit replacement tray for $40 and the old tray is easy to swap out for the new one and back again if necessary.2 points
-
I certainly understand! Good thing we found an older hull used at about half the cost of a well-equipped new one! Since June 2023 I have added $12K in maintenance and upgrades, parts cost only with my labor. I believe your price was quite fair. Not sure what OTT charges for their 390AH package, but it’s not 600A! Also, it does not include a DC-DC charger. OTT advertised one on sale recently, where they would install the lesser model, the older bulky 30A Victron charger on the Oliver side only (TV cabling and install on you). I calculated they had near $1000 for labor alone (for half the installation). Your installer spent a lot of hours installing your complete system. I know what is entailed here. Your 153A reading at 13.1V translates to 16.7A on 120VAC (153 x 13.1 / 120). Given the Atmos will cool well using 10A on 120VAC it should consume 60% as many AHs! (or last 67% longer on equal AHs). I cannot stand the NOISE of the P2! After I install our Victron Orion XS 50A system (parts paid for), I have the Atmos and a Starlink mini on my list (as we can afford them)! Best wishes and again enjoy! 😂2 points
-
Lithium batteries are the way to go. I spent 8 years in a truck camper with 2-12 volt AGM's and a 12v compressor fridge. I got 4.5 years out of the batteries before replacement. We also had only 100w solar on the roof, with an 80w portable panel and eventually a Honda 2200i. We did replace the 100w panel for 2-100w Zamp panel for the last 3 years, before purchasing the Oliver. Most of our camping was deep in the back country, so no Hook-ups. I can say this, we never got lower than 12.2. We managed our system very well. At night to save we used battery powered lights to see. It is so much better not having to be on "Battery Watch"2 points
-
Spoken like a true Professional!2 points
-
So far, you have received very good advice, but not causal reasoning, except for this pertinent blurb from @Rivernerd Amen. What you wrote above is not possible on two simple LA or AGM batteries (basically the same thing). You can watch TV all night on inverter, run coffee machines or the microwave for a few minutes, but NO-WAY the fridge and furnace All-Night-Long! The science is not there. We have LP for that and if you have a fridge w/o LP you need better batteries to dry camp, period. We have 600AH Epoch liFePO4 batteries. Just stopped to camp today, immediately turned the LP on for fridge and later tonight for furnace. Onetime we stopped at a friend’s house, left the fridge on DC (inverter) for longer than two days! We still had 30%, two LA batteries would have boiled over or went dead to ground in one day! 🤣 If you want to Boondock, you need to upgrade. Not to worry re your AGMs, they’re likely toast. It gives you the perfect reason to move into the future!2 points
-
Our original AGM's lasted about 2 years (with 1 year warranty) from the battery maker. They were OK until we drew them well below the 60% point a couple times. After trying multiple ways to bring them back to life, a friend of ours (who worked at Interstate Batteries local HQ) had me bring them in for testing. All 4 - 6V AGM's were toast. That's what triggered me to go do the Lithium Conversion. All that said, given a Nov 2024 purchase date, you should be within some warranty either with the battery maker or with Oliver. Start with Oliver with a service ticket and see if you can get them replaced via some warranty. Also here's my blog page on the conversion from AGM to Lithium with more details: https://4-ever-hitched.com/ggs-blog/f/lithium-battery-upgrade?blogcategory=Electrical+Upgrades Sandman - if you have a chance, please update your signature page to include details about which trailer you own and which options you have installed. That way we can look at the signature and see more quickly how we might help answer questions.1 point
-
It is my understanding that propane tanks under 100 pounds have 12 years before they need to be re-certified. So you have until 06/2030! 👍 Dave1 point
-
Received your dm @topgun2 Bill, I responded and invited John @jd19231 point
-
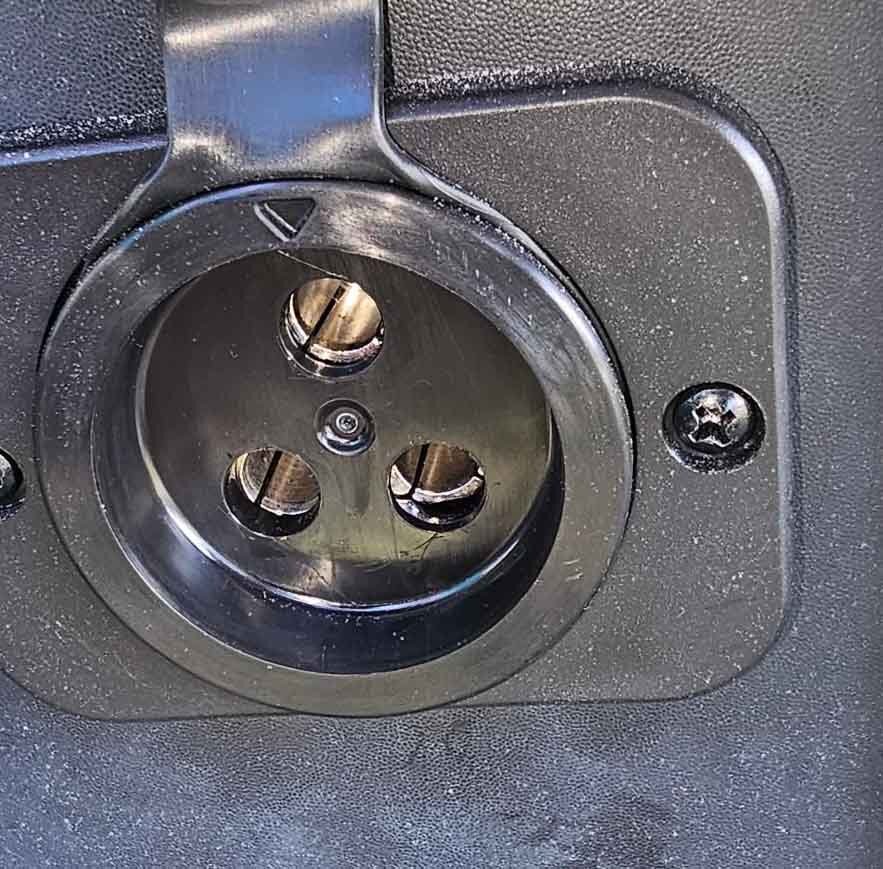
Hello JD. We have the 13,500 BTU Dometic Penguin. Neither my wife nor I are too bothered by the noise unlike many others. And yes, we do have the solar package. We were drawing roughly 150-160 amps with the a/c running (see screenshot below). We are looking at alternative a/c options, but at this point, we have already spent a great deal on the LiFePO4 system. And, we are about to upgrade the shocks - we just received our Bulldogs and are cautiously pessimistic as we note that they are made in China. Hoping our leaf springs last a while longer. So, our major upgrade is complete, but there are more to come. With regards to dc2dc charging, we are considering a 400 w suitcase to add to the rooftop capacity and we can boost the output from the alternator above the 30 amps it is set at. Math tells us we will be short, but empirical testing will provide more insightful info. To answer your other question: only two of the 3 pins are connected and functional. We were wondering why they had 3 pins and all we could come up with is that it is for stability and reduces flex. Note that each battery is drawing about 79 amps. BUT, we had our 3-way Dometic absorption fridge on DC - this consumes a whopping 15 amps on its own.
1 point
-
WD40 is a very safe adhesive remover. I would try that, with a plastic razor blade scraper, before considering other products that could damage anything.1 point
-
As others stated, slowly, hair dryer, and plastic razor blades. I have no experience with using Goo Gone in the process.1 point
-
To remove our graphics I used a heat gun set on low while working the vinyl off slowly with a plastic razor blade. Not moving too fast was critical since whenever I tried moving a little faster the vinyl would end up ripping and coming off in small pieces which slowed the whole process down. Cleanup of the remaining residue was done with Goo Gone.1 point
-
When I removed the OTT front decal, I only used a plastic razor blade and a hair dryer, which is less hot than a heat gun. I agree with Patriot that a warm sunny day makes the removal easier. Make sure you get all the glue off after removal of the old decal and prior to installing the new decal. The plastic razor blade also work good to remove the glue.1 point
-
Joe & Janet - A few more quick thoughts since you are "first timers" - 1 - bring a camera. You will not remember all of the things you see. A picture will help several months down the road to jog your memory of that mod you thought was interesting. 2 - bring a notebook for many of the same reasons you bring a camera. 3 - bring good walking shoes. I think that you will find that one of the better benefits of attending the Rally is meeting and talking to other owners. This is best done by simply grabbing that camera and notebook and going for a walk. 4 - bring a bike. For many of the same reasons as #3 above. Also, depending on where you are camped, a bike can make quick work of getting down to the vendor area, the Beach Pavilion, camp store/check-in or simply to another campsite. A bike certainly isn't necessary but it can save some walking/driving. Unless you are an exceptional biker - don't even think about biking up to the Lodge for presentations and seminars. The hill is fairly steep. 5 - be mindful of wildlife. Early in the morning and at dusk the deer really do come out and they are not afraid of humans and vehicles. Also, particularly if you are camped up near the road note that there have been reports of snakes seeking the warmth of the asphalt. I've never noticed a poisonous snake but a bite is a bite - just keep an eye out if you tend to walk around after sunset. There really aren't many but --- 6 - be sure to save some time to relax. Usually I get back home from the Rally really tired. The State Park is really pretty - be sure to schedule watching the sunset from up at the Lodge deck or from down by the water. If you see a group around a campfire or even someone simply relaxing outside their Ollie, grab a chair and ask to join them. 7 - never leave your Ollie with the awning deployed. A few years ago a sudden storm came up and at least four Ollies had the awning destroyed. Even last year a sudden storm nearly claimed an awning or two. 8 - with reference to #3 above - Do not be afraid to approach people or simply knock on a door. Most of us love to talk about these trailers and are more than happy to show you what we mods have done. 9 - if you have (business) cards bring them. This will save you a bunch of time giving out this information if you chose to do so. 10 - don't worry about what to bring. We are all camping! Attire for the opening meeting will range from shorts and t-shirts to business slacks and collared shirt. Most will have nice jeans and a golf type polo or shirt. Always bring a sweater or light jacket when going up to the Lodge - there ae times when the air conditioning can be a bit cool. In this same vein a hat and sun glasses are always a good idea when going down near the lake. For supplies - there are a couple of grocery stores in Guntersville to include a nice Publix. There are also hardware stores and the like. There are a number of nice casual restaurants in town too. 11 - finally, as with virtually all things, don't be afraid to ask for recommendations, to borrow just about anything, advice on how to fix just about all things related to your Oliver, etc.. There will be plenty of owners in attendance that will be more than willing to help with just about anything you might need. Bill1 point
-
We do the same. That's what the kool kids do! 🤣 Honestly, I stopped looking at SeaLevel gauges when they did not read correctly in a Class-A we had, in a Class-C, and again in the Oliver. The Oliver is so sensitive to level that you can bring up or down the front jack an inch and the reading may change 10-20%! We stopped looking long ago, though given this thread I will study this during our trip to the Q this week. We fill the FWT when we hear the pump pulling air, we know our gray tank lasts 3-5 days and a good 10 days on the black, so we don't bother with readings that are more often inaccurate. Our hull has the suction tube defect. We pull air way sooner than 13%! (more like 44%) We have only 18 gallons usable in our FWT. Good thing we hold another 36-gal in the tank in our truck bed, having 3 x 18-gal for 54-gal total. I know it's 18 gallons. Every time the water pump pulls air we refill the tank via the boondocking port (good thing I replaced the 1/4" ID brass turn-valves for 12mm ID motorized valves). I measure the refill and after 4-5 times measuring it has always been right at 18 gallons. BTW, measuring the amount it takes to refill, 'til the tank starts to overflow is the ONLY way to determine the amount filled and the net amount remaining in the tank! Filling both tanks tomorrow to head out to the Q this weekend. Warming up soon with highs of 80F in the SW valleys next week! 😂1 point
-
Good thoughts as always. PS: Tire covers generally come free with the trailer cover. That's why I did not mention them in my posts. GJ1 point
-
Yep, that would be us! Our hull #113 is titled a 2016, yet every time I tear something apart I see 2015 dates! Everything on our hull is approaching 10-years-old in 2025. I filled our tanks in November after our October trip to the Texas Rally. I asked the parts guy at our Ford dealer (best local LP price at $2.50/gal) about the date codes and neither he nor I could decipher the codes on our 30# tanks. Any advice? The date codes on brand new 20# tanks, purchased locally for our grill and fire ring on our deck, has very clearly marked date codes. I run the furnace while parked outdoors over the winter at 40F, to keep the cabin just above freezing (40F is the lowest setting on the Dometic thermostat). I used one tank in ten weeks since and just recently turned to tank #2. Friday when home I will refill the empty tank for a week in Quartzsite! I guess if the local tech can't determine the dates then I'm good for this trip! 🤣1 point
-
We are doing something similar only we are starting in Oregon and taking a southern route down to Colorado, Kansas, Oklahoma Arkansas, back to Tennessee, Kentucky back up to Lake Michigan, Lake Superior, then back across the top of the US on highway 2 (turns into 20) then BC, Canada to Hope, then Vancouver, then back down home. I am trying my best to use 2 lane roads and minimize the interstate(not always possible). We are going to Boon Dock at Harvest Hosts sites, then hit a Full hookup every 4-5 days. Trying to keep the travels to 4-5 hours a day when on the road. I noticed you are turning around right around the California border. Might want to go a little farther and see the Red Woods.1 point
-
Sunrising at Picacho Peak SP near Tucson this AM viewed from the Casablanca command center.... Oscar's still in the rack! Headed out to Dome Rock area at the "Q" to link up with about 5 more OTTs that have been arriving there over the weekend. Plan to land there before noon - not even through my first cuppa BRCC (Blackbeard's Delight, FYI).
1 point
-
It’s interesting to me that hull 1108 and hull 1111 both experienced the same issue. Having a source for owners to share their knowledge and experiences rocks!1 point
-
Hello everyone, I'm grateful for this community and especially for the helpful post from Mark and Lorraine. Their experience mirrored the issues we had with our intermittent furnace. I wanted to share our solution in case it helps others: it was a faulty thermostat-to-AC wire. Symptoms: Below ~60°F: Furnace blower would start, ignite briefly, and then shut off after a few minutes. Blower would start, ignite, then immediately go out. Blower would start with no ignition. In each case, I heard a "click" from a relay in the AC, followed by another "click" as the system shut down. The blower would then enter shutdown mode. Oddly, stepping on a specific spot near the pantry/seat seemed to trigger the on/off cycle. Above ~60°F: Furnace worked perfectly with no issues. The Fix: Initially, I suspected temperature-related components and replaced the gas regulator switchover valve and upper-limit switch. This did not resolve the problem, so I changed the sail switch, control board, and thermostat, just to throw everything at it. (I now have spare parts on the ready) After finding Mark and Lorraine’s post, I confirmed their diagnosis: a faulty thermostat-to-AC wire. Here’s how I fixed it: Purchased an 18-3 wire from Home Depot. Removed the interior AC cowling to locate the thermostat wire’s connection to the HVAC control unit. Disconnected the thermostat and connected a new wire directly to the HVAC control box using compact splicing connectors. I tested it with this jumper and it worked as expected, without issue. Fished the new wire with a wire hanger from the HVAC towards the curb side (opposite of factory wire routing), back to the rear compartment, over to the street side, behind the radio and pantry, then down to the thermostat. It was actually really easy to fish the wire around. Once completed, the furnace worked flawlessly, even in cold temperatures, regardless of where I stood inside or outside the trailer. I hope this helps someone else!1 point
-
Never did like old "Sparky Spots". He tends to jump up and bite you when you least expect it. Bill1 point
-
And if this is the correct cover, again it looks a little different, it's only $10 with tax. BUT, if I had the can of paint on hand, paid for, I would do the same and save the $10!1 point
-
Looks like the sun is shining on those spots in the photos. Could you add a few more, when the sun is lower in the sky? What products have you been using, and how frequently? Where in the country are you, and do you use a cover? Stored inside or outside? I'm sorry for your problem. Maybe some more info can help.1 point
-
Southbird - You might want to take a look at THIS THREAD for some help thanks to ScubaRX. Note that this pertains only to older Olivers and their original window shades versus newer Olivers with the pure white shades and different sized windows. Bill1 point


.thumb.jpg.e34bf01ef7f7d5e99ad31856d45afbeb.jpg)


-
Recent Achievements
-


")


")


")


