Leaderboard


Popular Content
Showing content with the highest reputation on 08/07/2025 in all areas
-
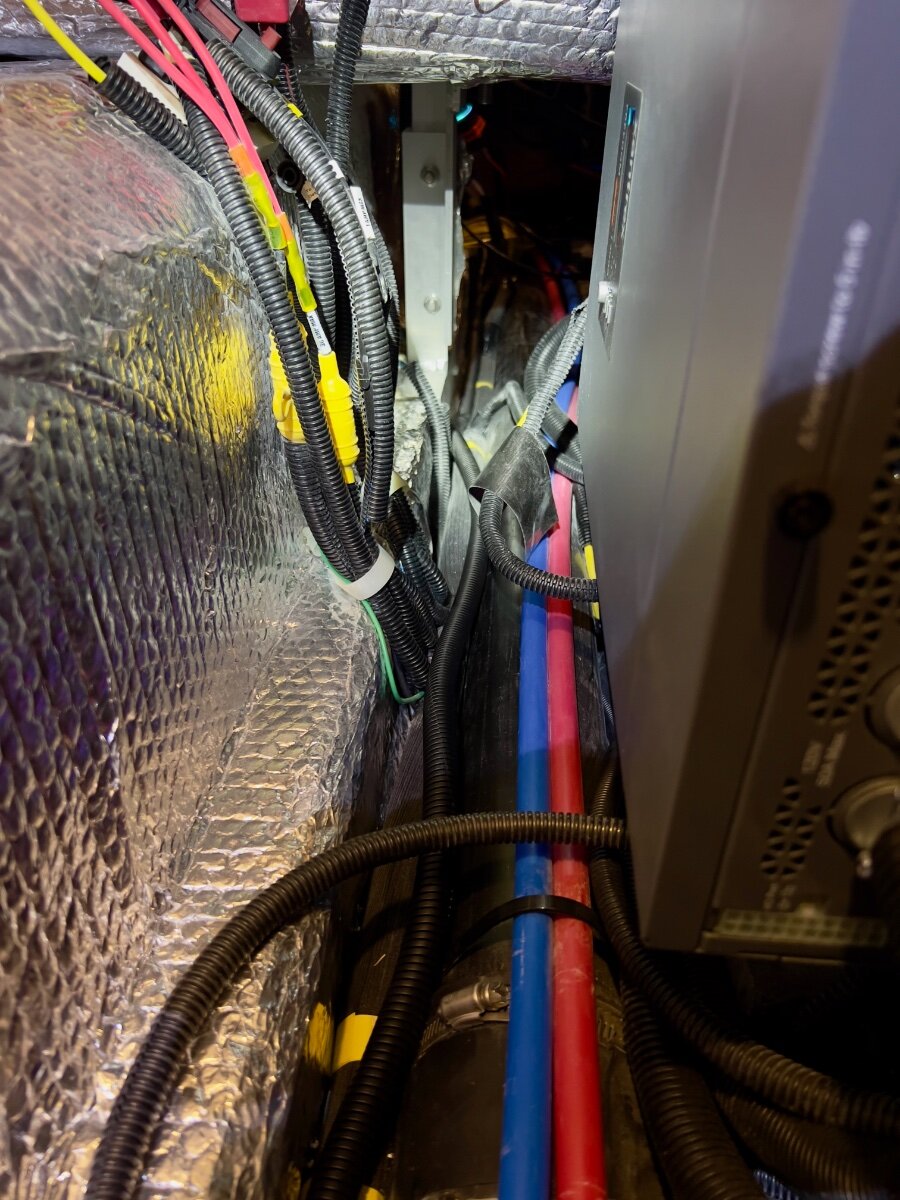
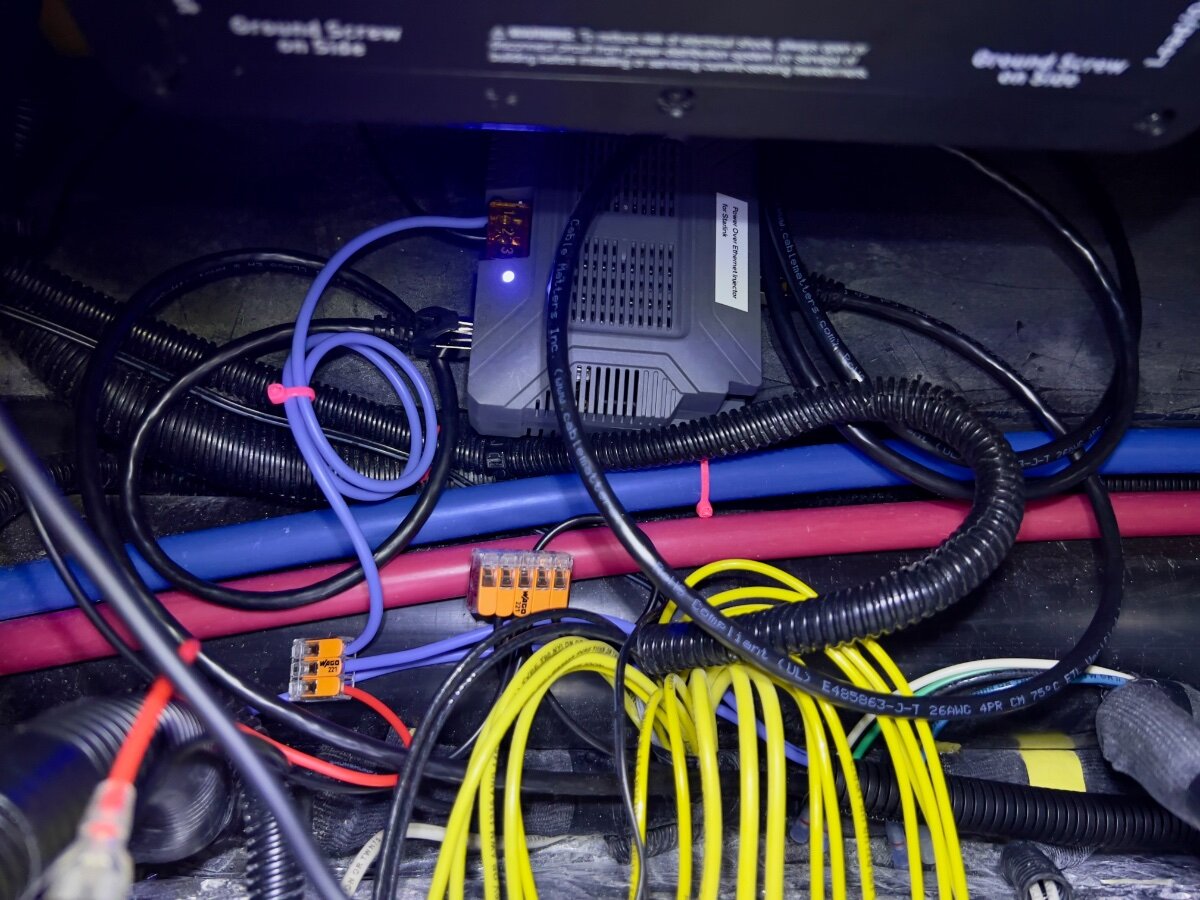
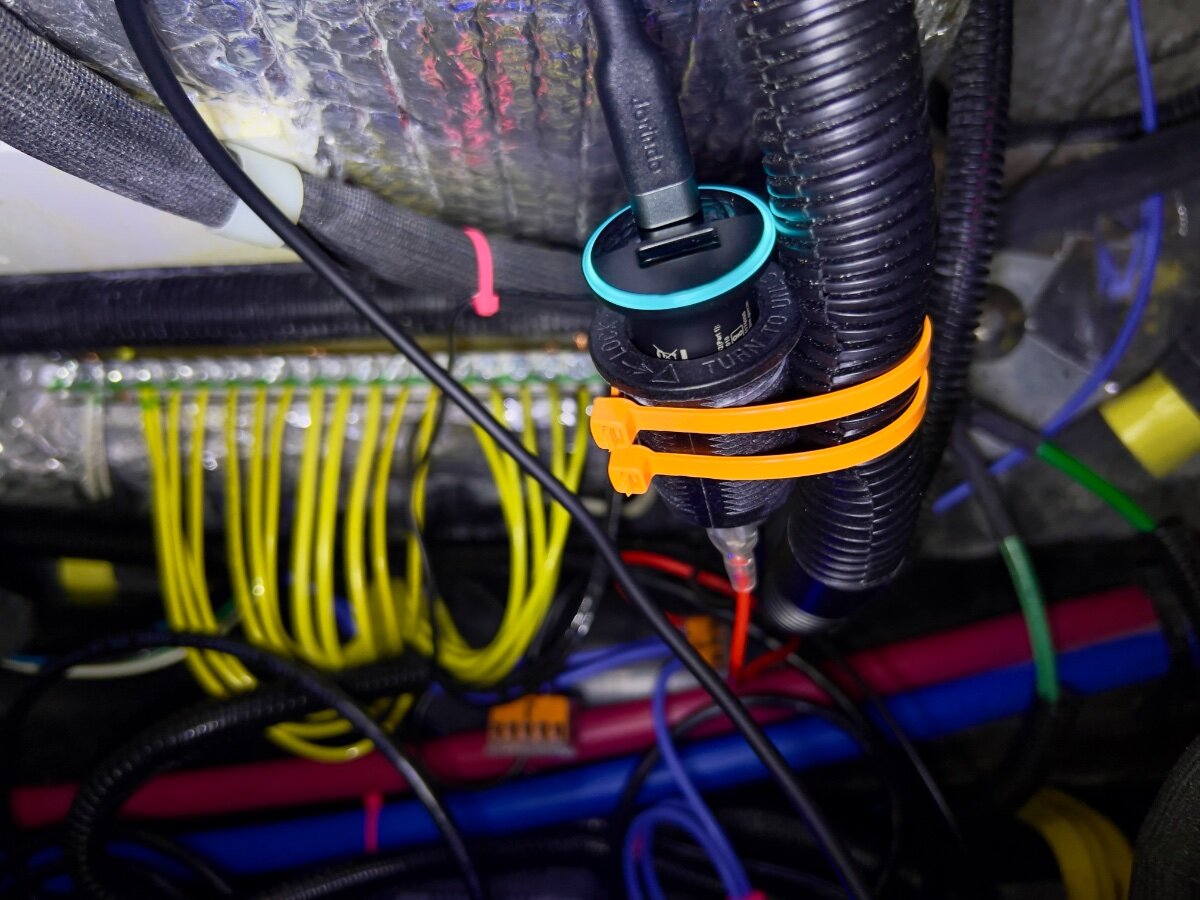
On a recent trip from Dallas to South Carolina we stayed in multiple locations with no (or very limited) communications capabilities (cell phone or WiFi). Over the three years we have owned our LEII, there have been many other occasions with no ability to communicate. As a result, we decided to order a Starlink Mini and a Starlink Router Mini to use on our trailer trips. I have been following Starlink related postings on the OTT Owners Forum, especially since the release of the Starlink Mini. I have found the postings by @Snackchaser particularly helpful in planning the installation of our Starlink system. I especially liked the use of a Power over Ethernet (PoE) injector to power the Starlink Mini and to provide an Ethernet connection from the built-in router back to the trailer, using a single cable. Installing the PoE injector and a DC powered router in the attic of the LEII seemed a reasonable location, being nearly directly above the exterior Furrion ports for connecting satellite and cable TV. So I planned to install in a similar location in the attic of our LEII, assembling a list of the components required. I ordered a PoE injector from MobileMustHave.com and the rest from Amazon. Once all the key components had been delivered, I began the installation, with the first step being to replace the Furrion Satellite coax port with an RJ45 pass-through connector and to fish an Ethernet cable from the basement to the attic. Replacing the Furrion coax connector with the RJ45 pass-through connector was no problem, even though enlarging the hole through fiberglass exterior shell was required. However, fishing an Ethernet cable from the basement to the attic proved to be a major obstacle. Although I have prior experience fishing wires through difficult spaces, I was unsuccessful getting a fish tape (or rods) from the attic to the basement. I could get the end of the fish tape rods down near the ceiling of the basement, where the interior shell ends and multiple cables run up to the attic area at the rear of the trailer, but not into the basement. As suggested, I tried following the A/C drain line and multiple other locations but could not get past the bottom of the inner shell into the basement. I tried running the fish tape/rods in both directions. No luck. Consequently, I began to ponder other installation locations inside the trailer for the PoE injector and Starlink Router Mini. After a couple of days, I had an Aha! moment- install the PoE Injector and Router Mini under the rear dinette seat. I inspected the space between the basement and the rear dinette seat, nearly all of which is readily accessible from the two rear street side hatches and the rear dinette seat hatch. Only the space under the battery compartment is not accessible from directly above, but is easily accessed from either side. I looked for any obstacles to using this location and found none. I could easily route the Ethernet cable from the Furrion/RJ45 pass-through connector forward to beneath the rear dinette seat. I located the PoE Injector atop the trailer frame member, just below the Progressive surge protector box, which is mounted on the aisle wall of the rear dinette seat. The PoE jack and the power terminals of the PoE Injector are positioned toward the front of the trailer. I connected a 20 foot shielded Cat 6 cable from the inner side of the Furrion/ RJ45 port, then routed it under the floor of the basement, around the street side rear stabilizer, then following the waste water line, forward to the area under the rear dinette hatch. About 3 feet of excess cable are coiled in the basement, concealed by the rear wall of the basement. I installed a lighted rocker switch through the forward basement wall, mounted high, almost directly above the side-to-side bubble level on the left side of the basement entry. This switch is to control 12VDC power to the PoE Injector and the Starlink Router Mini. Using 14 AWG silicone coated wire, I ran two purple colored wires from the space beneath the rear dinette hatch back to the rocker switch on the forward basement wall. A third, 14 AWG black wire was also run along the same route to the rocker switch. The switch has two terminals with red lead wires,: one to the DC power source and one to the load. The third terminal has a black wire, which connects to ground (the bus bar). The ground wire enables the light on the switch to operate when DC power is ON. On the DC power panel, position 15, I installed a 15 amp fuse. One of the purple wires connects to the 12VDC positive terminal on the PoE Injector. The other purple wire connects to position 15 on the rear of the DC power panel, using a crimp on connector. The single black wire from the switch connects to the ground bus located under the rear dinette seat. Another 14 AWG wire connects the PoE Injector negative terminal with the other end connecting to the bus bar. All wire-to-wire connections were made using Wago lever lock connectors. I also added a 12VDC auxiliary power outlet (cigarette lighter type) which is connected to the same circuit as that which powers the PoE Injector. An Anker 323 USB-C Car Charger Adapter (USB Power Delivery (PD) capable) plugs into the auxiliary power outlet. A USB-C to Male to DC 3.5 x 1.35mm Male Power Jack is used to power the Starlink Router Mini from the Anker charger. I found the Starlink Router Mini conveniently fits on top of the Progressive Surge Protector box. I later secured it with a releasable zip tie around the surge protector. The 20 foot Cat 6 Ethernet cable from the rear connects to the PoE jack of the PoE Injector. A 5 foot Cat 6 Ethernet cable connects to the LAN jack of the PoE Injector and to the WAN/Satellite port of the Starlink Router Mini. All Cat 6 Ethernet cables used are shielded. I believe this installation location approach has several advantages over an attic installation: Access is MUCH easier. Fishing wires is no challenge. A dedicated circuit from the DC power panel provides power to all Starlink related components. A lighted switch for the PoE Injector and Starlink Router Mini is located in the basement, near the exterior pass-through Ethernet jack. The PoE Injector is located where it cannot be covered by clothing or other cargo stored in the attic which might cause overheating. The VERY bright blue light on the PoE Injector is not visible in the cabin (always ON if power to the PoE Injector is ON). The Starlink Router Mini is located centrally in the trailer and should provide uniform WiFi coverage within the trailer. We have not yet taken the Starlink on a shakedown trip, but plan to do so at the end of August. Regards, Don
 5 points
 -
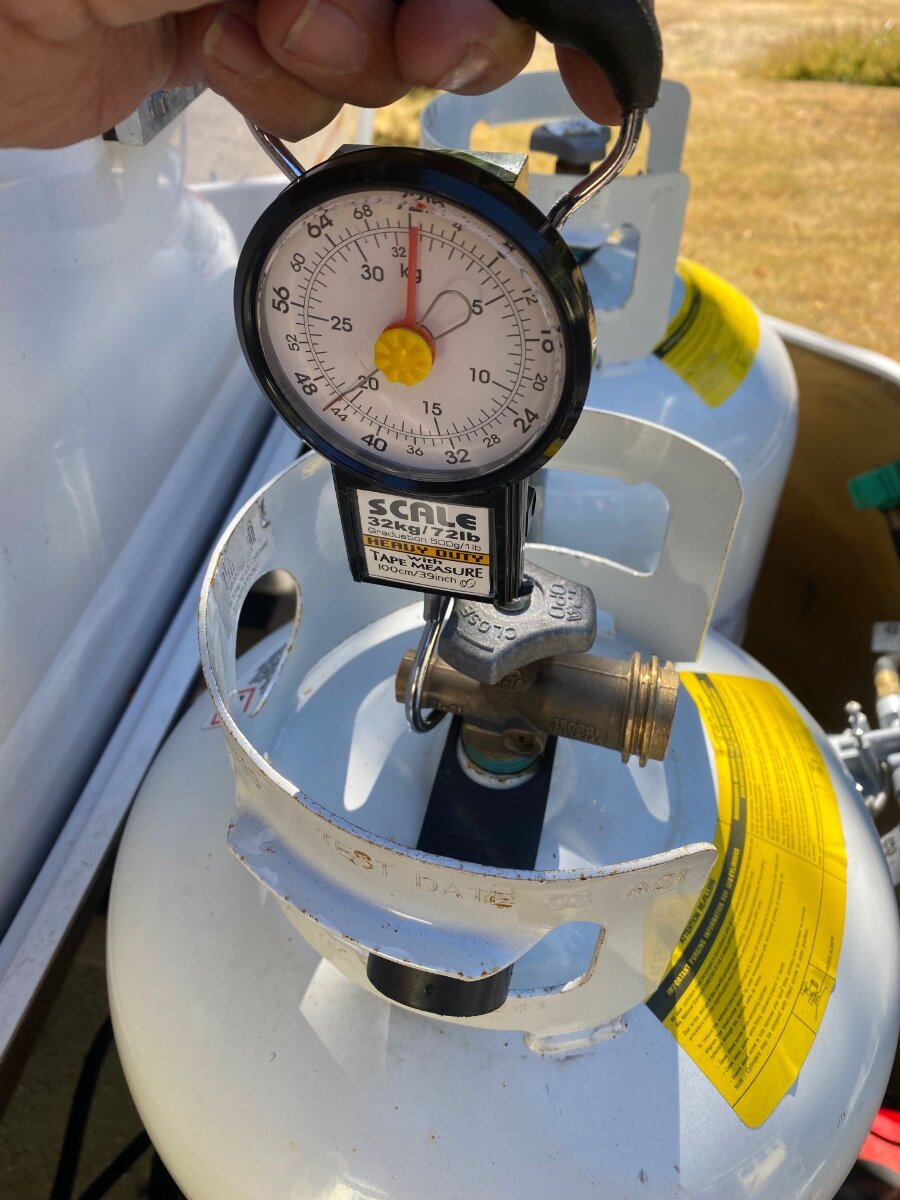
Although there are several ways to check propane tank levels, I’ve found the easiest way for me is a luggage scale. They have large hooks that balance nicely when hooked on to the fill valve, and they remember the weight so you don’t have to contort yourself to see the scale. Mine has an analog dial with a memory needle, and thankfully no batteries. I’d recommend these over ones with batteries that always seem to be dead when you need them. Flame King sells a more expensive scale made for this purpose. It conveniently reads in percentage, but it’s battery operated too. A 30 pound tank weighs around 55 lbs when full, and about 25 lbs when empty. A 20 pound tank is around 37 lbs full and 17 lbs. empty. I’ve labeled my tanks with their weights and I can determine exactly how many pounds are left with the scale. The tanks can be weighed in place with the spin-off clamp loosened, and it helps to put a stick or bar through the scale handle to lift with both hands. I know some people swear by the Mopeka ultrasonic level detectors, and I heard the newer ones work pretty good. But I’m still not over the problems and uncertainty of my old ones, so I’ll stick with my trusty scale for now. Cheers! Geoff
3 points
-
Have two 30lb tanks and never even bother to weigh them. Run one tank until it's empty , switch to the full one, and then just plan on filling the empty one as soon as I can.3 points
-
Yes, that's all you need to get started! Later you can add features to make usage easier. I purchased the Mini Router after @Snackchaser proved its effectiveness in allowing for good access speeds at greater distance. I truly purchased it hoping I can interface the Mini Router to our Pepwave router. This would allow one Wi-Fi login and the Pepwave would link the Mini when cell signal is weak. The Mini Router may not be capable of that, but I thought for $40 I'd take a chance. I have not taken the time to use it yet or see if WAN interface to the Pepwave is feasible. We had it onboard for our recent 5-week trip to Minnesota and back and did not need it, did not use it. I thought if distance was an issue somewhere I would break it out of the box, plug it with supplied wiring and give it a try. I'm not comfortable with the Mini being more than, let alone, 50 ft away from the Oliver for reasons of damage to the unit or theft. Most of our trip, being in the Midwest, we did not need Starlink as our T-Mobile and cell router had good signal. In WY and CO we used Starlink quite a bit, but we never needed it to be more than 20-30 ft away from the Oliver, so the Mini Router sat in the box. I prefer when I can place the Mini in the Oliver front basket or the bed of our pickup truck to keep it out of the wind and out of site to other campers. We only had 2-3 days where I had to placed it away from the truck. Minimal setup, just buy the Mini and use the provided power cord and adapter plugged into your 110V outlet, inverter ON. Want to invest more, get a battery setup to move the Mini at will without wires getting in the way. Later, think you need greater distance? Then buy the Mini Router. Wire it to your TT or TV with provided power supply or something custom. This is independent of wiring the Mini dish. The Mini can be wired to the Mini Router by Ethernet cable but they also communicate over air and Geoff proved they're still quite efficient in over-air communication. Now that we are battery-powered cord-free with our Starlink Mini, I would never entertain a wired solution. We just swap and charge batteries twice a day. No winding and storage of power cords!3 points
-
Sounds like click bait, but it’s true! During a recent trip, the master switch on the main panel started flickering on and off, and that caused the blue LED indicator lights for other switches to flash. It turns out that one of the spade terminals for the switch had loosened from the strain of the tangled mass of wires that were tightly stuffed in behind the switches. Many of the wires were individual grounds for the LED switch indicators, and there just isn’t enough room for all of them. The wires are oversized and stiff, and they used bulky splices to connect them all together. So I cut the mass of yellow wires out and replaced them with a single smaller wire that was daisy chained to each switch. That space is much less tangled now, and there is more room and less strain on the switches. Now I have room for a new switch for a future project. While I was in there, I decided to address another peeve. I’ve always thought that those blue LED’s were too bright, so I soldered a 47K ohm resistor on the termination end of the new LED ground jumper. This dimmed the LEDs by about 50%. . . so much better! If anyone’s interested in doing this, Amazon carries a 525 piece resistor assortment for $8 so you can experiment with various levels of dimness. Only one resistor is needed for all the switches, so you could do a little twisted resistor art with the leftovers. I hope that someone finds this useful. Cheers! Geoff
2 points
-
Do any of the RV AC Systems have a variable speed fan for pushing the climatized Air? I had a few mini splits in homes and I never saw one that had a variable fan for the climatized air. All were 3 speeds L, M, H and Auto. None shut off after the cycle completed. This is what makes the Cielo Breeze Max T Stat so good it shuts the fan off after the cycle completes if you want that to happen.2 points
-
Thanks for the question David, and the reminder to source a waterproof casing! 😂 Dewalt batteries are water resistant, not waterproof nor IP rated. Purchase of two (2) waterproof 24v LI batteries would be a good solution if you need something solely for this purpose. I went with DeWalt because I had them for other tools. We don't travel much in rain but had several rainy days on our June trip to Minnesota. One overnight we left the DeWalt battery out, Starlink running. and in the morning it was discharged and drenched! I shook it out, wiped it dry, and let it sit in the sun for a couple hours. Later it charged without issue. I try to place the battery under the dish or somewhere covered, or you could merely wrap in a heavy plastic bag or purchase an IP-rated case. Something like these products might work well as a waterproof casing: https://a.co/d/5I9YH3M https://a.co/d/9JbWYwV2 points
-
Regarding price.... We just had 5200 lbs Nev-R-Lube axles and 5-leaf springs installed by ALCAN. Total price was $3,928.28, and that included $141.99 in convenience fee for using a credit card (3.75%). They only accept the equivalent of wire transfers to avoid the convenience fee. They do not accept checks (I didn't ask about cash). Regarding the functionality... Larger brakes did not cause me to reduce the brake controller gain on my OEM controller (2020 F250). I had to increase it initially, but as the brakes adjusted I decreased it back to roughly where it was initially (+5). Braking is MUCH better. The first two tows were 50 miles each, and ALCAN re-torqued the U-bolts each time. Both times the TV had come down, but nothing else was disturbed. We then towed about 237 miles and then 170 miles, and the TV has not come down again. I usually use the stabilizer jacks to take out less than 2" of height on the low side for leveling. When I first tried to take out 1.75", the wheels lifted off the ground. I had to use the Andersen leveling wedges, and found that anything more than 1/2" would cause the wheels to lift off the ground. As we relocated, this improved somewhat, and Tanner said it would improve more as the springs break in. I expect it will be even better riding when I get new shocks. Two of them were blown, and one of these was broken as well. ALCAN fixed it up the best they could, and we ordered Monroe shocks to replace all four. I would have ordered the Bulldog shocks, but the stories on availability had me concerned in the timeframe in which I needed them. They will be installed this coming Monday.2 points
-
FWIW, Costco sells 20 lb tanks with a built in gauge. I have only one but it seems to work well enough. Like most things they have had a price increase recently but locally they are running around $42.2 points
-
Great idea. Do you have a link to the luggage scale?2 points
-
Hey John, Chat GPT is often wrong because it relies on opinions like mine🫢 My opinion is that Gen-3 has slightly better reception because of the larger surface area and its motor driven alignment. However, I don't think it is a significant difference, certainly not enough to offset the benefits of the Mini. When there are too many obstructions, neither one is going to work well. But I agree that the Gen-3 is faster, I think probably because of a better Wifi signal, hence I recommend using the Mini Mesh Node Router with the Mini Dishy. See my post: "The new Starlink Mini router, for what ails you." We used to turn-off the power hungry Gen-3 at night to save our battery, the Mini stays on 24/7, a big benefit. Also, the dishy spends most of its time on a mast, and the heavier Gen-3 on the same mast used to rock the trailer in breeze. The mini is small and light as a feather in comparison. See my post "Tacky Starlink mast." BTW, I see folks buying padded cases and protectors for the Mini, but they're pretty rugged and mine just lives in the hidden drawer below the pantry when traveling. It's more challenging to route the Gen-3 cable into the trailer, I've posted some designs on this too, see: "Great news! Starlink Gen-3 is here and it has Rj45 connectors." Other folks have posted ways to power it from DC, but I've never looked into that. The Mini is easy to power, and there are portable power supplies available that can be taken on hiking trips. I make a 3d printed version with built in battery charger, hit me up if interested. I also have a post on powering the Mini from 12 volts with a 12-48 volt Victron converter, this was for one of the early Mini's and before any commercial solutions were available. See my post: "Starlink Mini installation, cracking the 12 volt barrier... or not." That post also includes a clean method to get the power cord into the trailer. I still use that power supply today, but there are cheaper power supplies now available. Albeit, not as good or energy efficient😆 Hope that helps with your decision process! Cheers, Geoff2 points
-
Great idea. I had one with our off road trailer. I need to check and see if there is room with our mud flap installed on the hitch ball attachment.2 points
-
Hi John, We cut the cable years ago, and I’ve used the larger units, Gen-1 and Gen-3 for the Oliver. Now I use the Mini exclusively with no complaints and we still keep the Gen-3 active at home for security devices and guests while we're away. The Mini, with it’s built in Routrer, looses speed the farther away it is. This is due to the WiFi signal dropping off. So if you go with the Mini Dishy, then I recommend getting a Mini Mesh Node Router for $40 because there are times when you will need to move it farther away to find clear sky. See my post: The new Starlink Mini Router, for what ails you. Starlink Beam Switching keeps improving and there are increasing numbers satellites so reception keeps improving and the Mini seems to work as well as the Gen-3 in that regard. My Mini isn’t quite as fast as the Gen-3, but it’s still blistering fast, and way faster than most cable connections. There are a number of options to run the Mini from the trailers 12 volt system. You just can’t use the included 50’ cable because of voltage drop without boosting the voltage. You can do that with a voltage converter to increase voltage, or one of the available power supplies, or use a shorter cable. Hope that answers your questions! Cheers! Geoff2 points
-
Thanks, CRM, We full time and our address is an UPS box back in SC so we would be totally "roaming". The 12v converter you mention would connect to A/C I suppose? so I have the choices of shore power, the trailer inverter (2000W) or an Anker 1056 WH Solix power bank to provide the A/C. Guess it's going to come down to performance differences. Thanks, John2 points
-
Tech moving fast with beam switching. 👍🏻🇺🇸 https://www.dishytech.com/starlink-beam-switching-upgrade-improves-reliability-for-obstructed-dishes/2 points
-
I have a 2019 RAM 1500, so I am not sure if that qualifies as a late model anymore, and it has worked great for me. The only issue I have had was it would not recognize my iPhone at first. Service replaced the USB port on the truck and ever since then no issues. As far as infotainment issues, I had to reset it after replacing the battery once. After the reset all apps came back like normal.1 point
-
See now I must just be different? I like all the little lights inside at night... the way they reflect in multiple places, bouncing from curve to curve around the interior. I think of them as my Ollies star-lights! 🙂 That said... I really appreciate the nice neat daisy chained ground wires! Good job!1 point
-
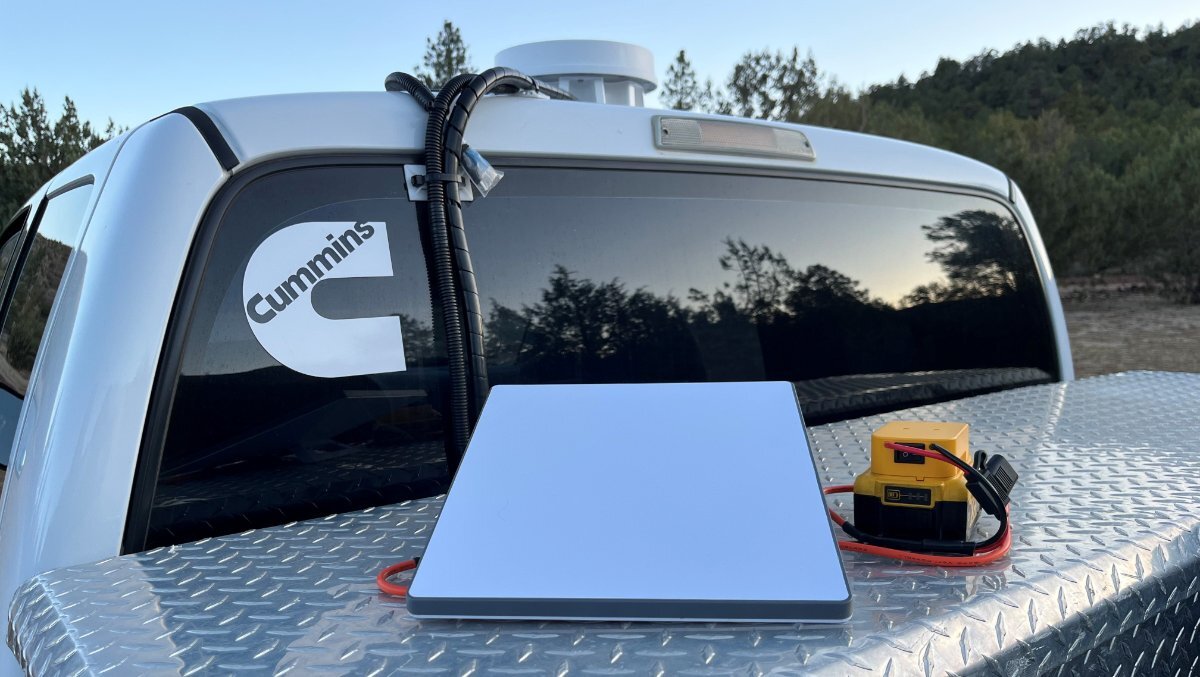
After looking at several options, I thought to buy this simple item to think through the possibilities! Hope to use it soon! I would not screw down the cover as designed. Instead, I would think of a simple way to clamshell the two halves together while being waterproof. You need to change batteries every half day. Therefore, the container must open and close simply! Rain is rare where we live and camp, so I could build a waterproof box, redundant wiring, $50 total as an option, to use on rainy weather days. Use the simple harness I've built 80% of the time... when it's just another sunny day in Arizona! Our 10 Ah DeWalt batteries, measuring 5.5x3.5x3.5", should fit nicely in this case and soon we shall have a simple waterproof casing. 😂 https://www.amazon.com/dp/B0DHKW6DH3/?th=11 point
-
Like @Snackchaser, I use a luggage scale to get an accurate read on the propane level in the tanks. I purchased a pair of Mopeka sensors and found them to be unreliable and not very accurate. I had a couple replaced under warranty. They also seemed to have need frequent battery replacement. I would NOT recommend them. Amazon has a large selection of luggage scales for about $10, that are compact and accurate. With tare weight labelled on both tanks there is no mystery to the amount of propane when the total weight is known. Such as: https://www.amazon.com/Etekcity-Portable-Handheld-Suitcase-Temperature/dp/B082LYC2TN/ref=sr_1_7?crid=2PAZR2PQNSA24&dib=eyJ2IjoiMSJ9.lrxtiYiAaOxFumPFwJLLfi-V2pD7fJpKxfsl6UyzsKbSFL3YNBR0L1a7Px8SBzHhhW25VLBh912CrUyahxdkUjT1pqB3pRe933JDFfDr7ZaTgoTCb1mXdfINMMhl5OU0FibEUB2mMbq_9R89XeAeSb5MhrkSnnQ5YT6uUSpTQctrjSJqa-90Rcwkt-jGQLzD4jSFjCSRtp-YFlVIJhme_3etEGEES17uG605HrMmwLGyk2YZsL2lLr-nGzZUe7jC60bztrvKDpr9oVktN97bzUFLTJ8jfQEvF9T4OU-tq1A.NFHYzomQyFXtHPcZxq8NaPUGd5FyqkWMxZL0L2YMZgw&dib_tag=se&keywords=digital%2Bluggage%2Bscale&qid=1754537940&sprefix=digital%2Blugga%2Caps%2C138&sr=8-7&th=1 Don1 point
-
I've resorted to using a bathroom scale by taring my weight then lifting tanks to check their weight and several other valid methods. I prefer Mopeka for the convenience, but it's nice, and probably safer, to understand options. Having a way to measure the weight could come in handy in some situations, like boon docking or hurricane dodging.1 point
-
How weather resistant is the battery powered set up? Will it with stand a torrential down pour? Is it water proof? We leave out Mini out all night long and do not think about whether it rains or not. Just curious.1 point
-
Hey John, So I can use the supplied 50ft cable and the supplied power adapter connected to my A/C with my inverter and all will work well? I suppose I can also connect to my 1000wh Anker Solix solar generator/battery as well... it also supplies A/C with its internal inverter. I can at least get up and running and figure all the power options at a later date. John1 point
-
Thanks, John!1 point
-
@johnwen if you go with the Mini, I strongly suggest forget about all the wiring schemes and just get a battery for it! You can use the power adapter included 50 ft cord, 30V output plugged into a your 110V outlet with your inverter running. You can do what Geoff did adding a DC converter to up 12V to 24-30V so you can run the longer cable. OR you can just wiring it to any DC battery from 12V to 30V. For us it made perfect sense to go with the DeWalt batteries we already have several Dewalt power tools and batteries we bring with us. They run at 20V which is a good voltage for the Mini. It seems that we get close to 1 hour of runtime for each Ah of battery. I purchased two 10Ah batteries and each runs the mini for 8+ hours. Connect one in the morning. Swap the other before dinner and its will run way past when we fall asleep. We move the Mini anywhere required without untangling and tripping over wiring. I mounted a Dewalt battery charger in the Oliver Attic! This part will connect to any battery terminal: https://www.amazon.com/CERRXIAN-DC5521-Power-Pigtails-Cable/dp/B0F8Q4V9FC/ This part works for DeWalt and there are so many other battery choices: https://www.amazon.com/Adapter-Battery-Converter-Terminals-Robotics/dp/B0CDGR4Y8K/?th=1 BTW, Starlink is offering factory refurbished Minis for $299 now. Sure wish they offered this earlier this year when we made our purchase at 10% off $499.1 point
-
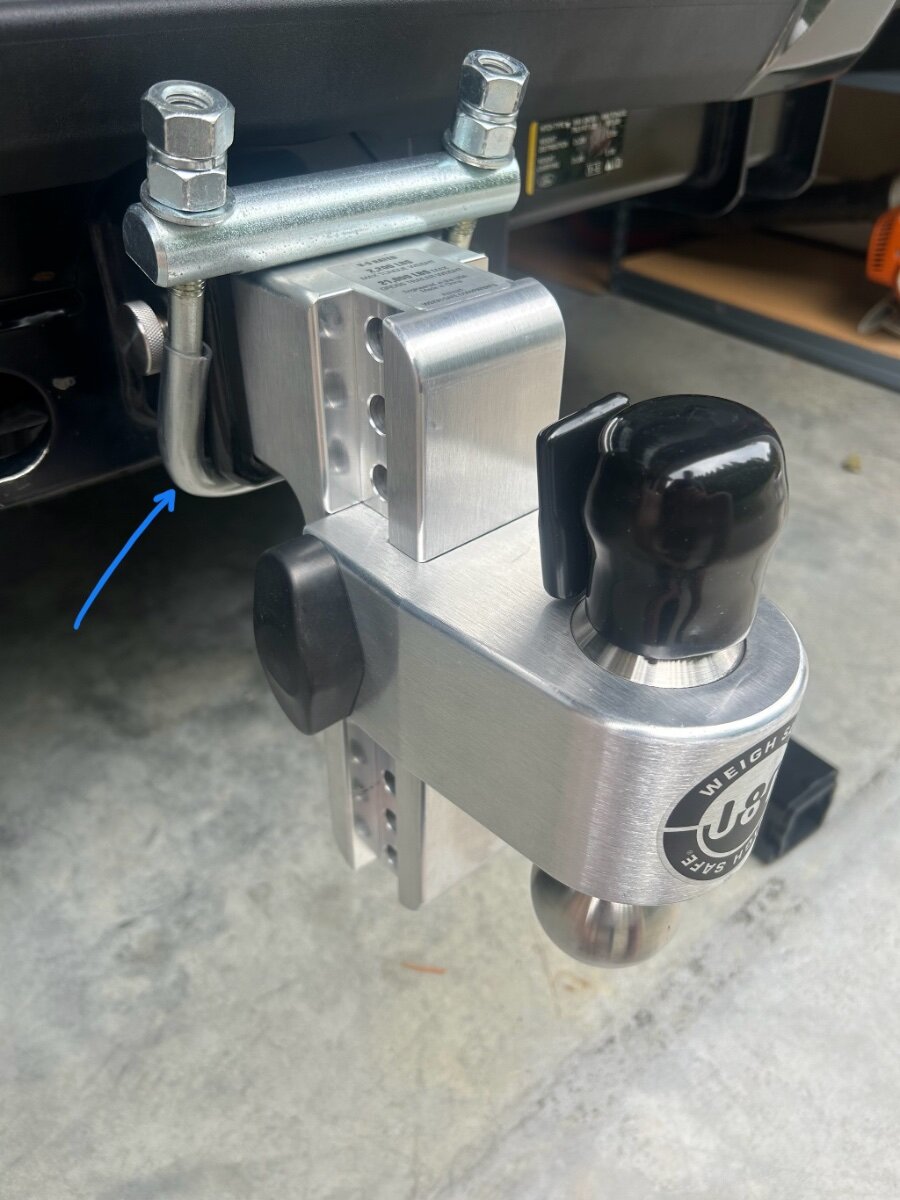
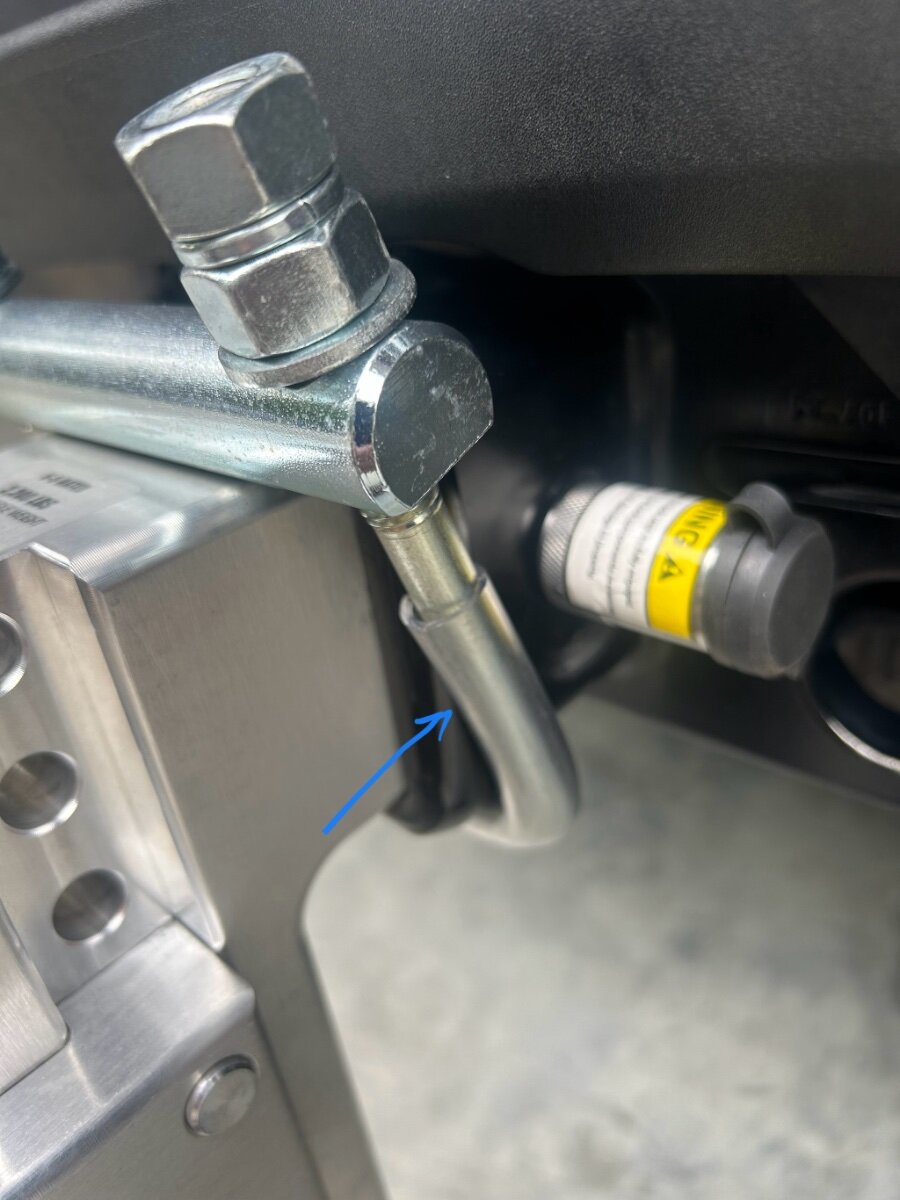
Field use follow up. After towing our OLE2 I can report that the hitch 3” hitch clamp worked exactly as designed. The 3” shank while inserted into the 3” receiver is completely silent while under way. Win! It’s recommended to periodically check the clamp fasteners which I did. They stayed tight the entire trip. I opted to add a short piece of plastic tubing to insulate the bottom of the clamp from metal on metal chaffing the bottom of my receiver. (Pic) It took a little while to get this tubing to cooperate while sliding it on to the clamp. I warmed the tubing up in hot water which made it a little easier. I am satisfied with the outcome.
1 point
-
Ours does have D52 so we have the 5200 pound axles on our 2022 hull #12901 point
-
Cut the cord! 🤣 (I also purchased the Mini Router per @Snackchaser post proving its use, but have not had the time to pull it out of its packaging.)
1 point
-
I WAS going to break down and get a standard unit this week, but....in light of David's post on beam switching I may have to do a little more research. I had gravitated to the larger Gen3 because I would prefer the stronger reception and upgraded router. But the mini has the advantage in size and weight savings. And the DC power ability. And less equipment re the built in router. Does the larger unit actually receive any better with partial tree obstruction? We are not power users but we do stream a good movie occasionally. This beam switching seems like it could bring me back into the "mini" market. I finally talked Wendy into the Starlink technology so I want to make the smartest choice. We've boondocked 4 out of 7 months this year and have had really spotty connections with our Verizon unlimited plans. They work very well if within reach of their towers. How long of a cable can be used to move the mini dish to an unobstructed site? Is there anyone who switched from the larger unit to the mini who wishes they had stayed with the larger? Thanks for any help, John1 point
-
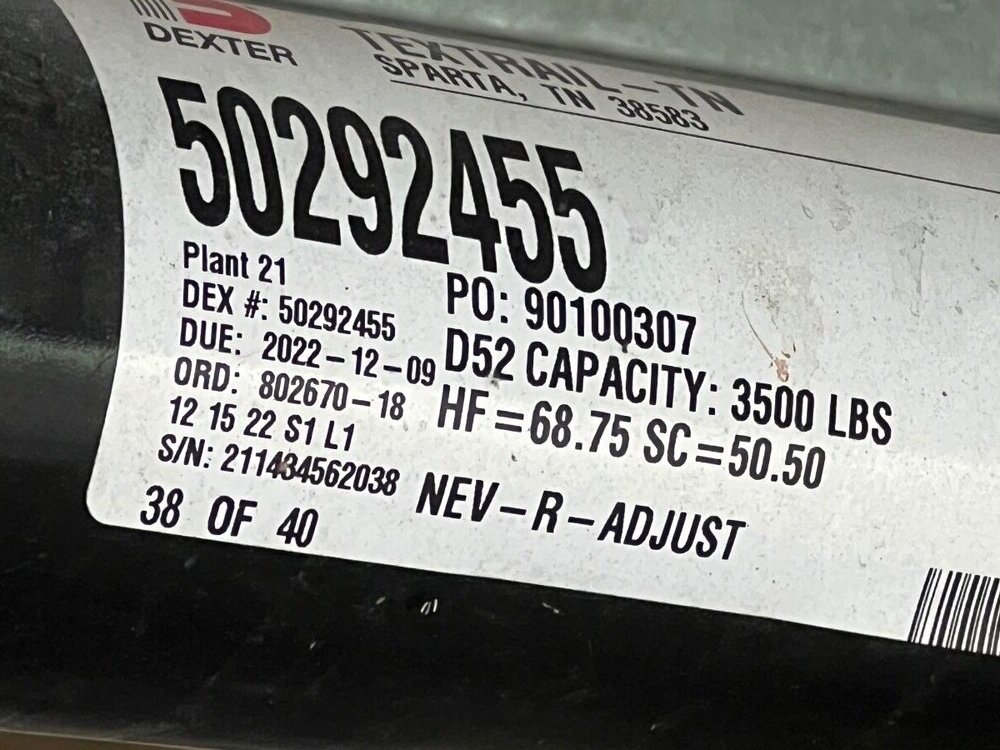
Alcan said they contacted Dexter and Alcan said Dexter my Oliver did not have Nev-r-lube. In addition others had a different opinion of both you and Alcan. So I went on a mission to determine for myself even tho you, and others, were so sure of themselves. Not until late this morning did I determine for sure I have both. Oliver websites have alot of "experts" who are often wrong.1 point
-
I have shared with you numerous times that 2022 LE2 's have: 1. 5200 lb. Axles 2. Nev-R-Lube axles/Hubs 3. Nev-Adjust brakes This was confirmed by Oliver. Your Hull # is 200+ after ours. Since I'm responding to this again, why are you replacing springs? The problems were with old Oliver's with the 3500 axles. You have the beefer axles and shouldn't need to replace them at this time. Unless you are planning to drive to Alaska, or drive wash board roads, and/or chemically treated roads, you shouldn't need to replace them.1 point
-
According to Oliver all 2022 LE2 's received 5200 lb. axles, with Nev-R-Lube axles/hubs, Nev-Adjust brakes. His trailer is 200+ Hull #'s after ours😊1 point
-
@John Dorrer had answered, YES for 2022 to 2025 Olivers. But to be sure... You should just check yours. Remove one wheel so you can see the drum. If you see the bearing cover plate like in the first picture you have the Nev-R Lube bearings. The cover plate is larger and has Nev-R Lube stamped into the cover. Second picture is the only picture I had with the drum on, just before I did a first bearing service on our older hull. It shows the old style axle with inner and outer bearings that must be packed with grease. The bearing cover is smaller without stamping. I believe if you have the EZ-Lube model, the cover plate has a Zerk fitting to add grease. EZ-Lube is not Nev-R Lube.
1 point
-
The axle label includes "nev-r-adjust"......does that mean this axle does not include "nev-r-lube"? Confusing. Does the 2022 have both
1 point
-
There was one in Savannah Ga, for a while, recently I was trying to find them to get some work done. I was wondering why they no longer showed up.1 point
-
Hurray! Another OTT person in Wisconsin! Columbia Cty for me but I service my Oli near Sheboygan. Not quite sure how to have a private chat to share info but I am open to it.1 point
-
Thanks... This is one of my concerns.... How to know if the trailer is still safe to pull? If there are stress cracks. How can this be repaired? I think this would be beyond most RV owners' or RV Service departments' knowledge and skills to repair. I also wonder what the usable lifespan is compared to a traditional trailer.1 point
-
Thanks... This is one of my concerns.... How to know if the trailer is still safe to pull? If there are stress cracks, how can this be repaired? I think this would be beyong most RV owners or RV Service Departments to repair.1 point
-
Correction, it was the GFCI outlet that the inverter plugged into. I did not notice that was a GFCI plug, until I was going through Galloway Girls post again. Went back to double-check that outlet and walla! The circuit was tripped. Thanks for the help!1 point
-
Thanks, yes I have the GFCI outlet under the dinette. I tested that when I was plugged into shore power and it tested fine, so I ruled that out. But just double-checked it now, with only the inverter on (not on shore power) and it will not trip, when I test it. I plugged back into shore power and the GFCI outlet tests and resets fine. Looks like that might be it. I'll replace it today. Thanks to all!1 point
-
A good way to check if the GFCI on the inverter is working is to see if the microwave has power, since it plugs directly into the GFCI outlet on the inverter. If the microwave has power then your inverter is working. If not, the GFCI has tripped and needs to be reset. For reasons unknown my GFCI has tripped, wherein the microwave and outlet receptacles have no power. There have been times when it took a few presses of the reset button on the GFCI to get it to work again. Once power is confirmed at the microwave, all is good. This may not be your remedy, but a good place to start.1 point
-
Ditto. There have never been any Oliver dealers in Wisconsin or anywhere close to me. It is almost a draw between the closest out of state dealer and going to OTT in Tennessee. I am not complaining as I understood this when I bought the trailer. My solution: I found a reliable RV service center (and dealer of other brands) in the state that is also an authorized Truma service center. They work well with Oliver, Truma, Xantrex, etc. They did a couple of warranty repairs for me with no issues and Oliver providing reimbursement (Thank you Jason E.). If I need other repairs, I will go back there. At one time, we discussed having an informal Oliver service center directory. I understand there may be some implied endorsement issues with having that posted here but it sure would be handy (assuming everyone understood the ground rules).1 point
-
All the comments are right on the money. But for a little more perspective of why you fell short of power, consider this: My guess is that you have about 400 Amp Hours with your 4 AGM batteries, which gives you about 200 AH usable power without going below 50%. You stated that your inverter stays on. A Xantrex Freedom inverter uses 72 AH per 24 hours of standby power (turned on without a load.) The Victron Multiplus is better at 40 AH a day with standard factory settings, and as low as 16 amp hours a day with power saving settings. These are both zero AH when turned off. The batteries are being supplemented with an assumed 320 watt solar system, which is under 30 AH a day in sunny conditions. You mentioned a coffee maker which burns a lot of power, typically about 20 AH to brew coffee, and more if your keeping it warm. That could cancel out the solar contribution. Now add in the AH values for whatever else you're using, and you can figure out how long you can last when boondocking. Hope that helps! Cheers, Geoff1 point
-
I recommend you leave your inverter off until you need to use 110, especially with AGM’s. As mentioned above, just having your inverter on and not being used draws down battery capacity. We rarely turn our inverter on.1 point
-
If your batteries are too low of voltage < 10.5v the 2000 watt inverter shuts down. the inverter should alarm on low voltage or give an E01 code. when you are in solar if the batteries drop too low the inverter will not turn on again until the batteries are charged When we boondock we leave the inverter off unless we need 110 as it draws down the batteries just being turned on. if you fully charge your batteries the inverter should begin working.
1 point
-
Interesting. What's the new company with the CF frames?1 point
-
I have four AGM batteries and the inverter is always turned on when using the solar.1 point
-
Your outlets will only work with shore power, a generator, or with an inverter turned on if you have one. More information is required. What batteries do you have1 point
-
I've never heard of a carbon fiber frame for RV's but given that thousands of road and mountain bikes are made from this material and given how they are ridden most likely a frame made of the same material would hold up well too. It's expensive to make, so one has to take that into consideration as well, meaning the price of admission for an RV made partly or whole with CC could become very pricey. Not that the Olivers are chump change, far from it.1 point
-
Most things that "go wrong" in my 17 year experience can be handled by me and my husband, or a local rv tech. That said, every 3 to 5 years, we head to hohenwald. Mostly because we want to see the progress the factory has made, and reconnect with friends there. Oliver was always very good at helping remote locations with our few issues.1 point
-
When I bought my Oliver they were just getting ready to launch the dealer partnerships. I live in Tampa. They suggested that I might be super happy because I could be supported by one of those closer dealerships. I wished them luck, but told them I doubted they would succeed. At least not for me. Of course driving to Hohenwald is a pita for me. But I chose them because I didn't like anything between here and there.1 point

.jpeg.799f3cf194b3b21d05b2a7bb19f728b1.jpeg)
.jpeg.dd379fc2e5087fa6910ce21b437441ad.jpeg)
forPoEInjector.jpeg.2ff4c7b3725adaf25e5bdfc30965ceff.jpeg)
atopProgressiveSurgeProtector.jpeg.5c03a313182d5fdb47bf1a254dec329d.jpeg)
.thumb.jpg.e34bf01ef7f7d5e99ad31856d45afbeb.jpg)


-
Recent Achievements
-


")


")


")

