Leaderboard


Popular Content
Showing content with the highest reputation on 01/16/2026 in all areas
-
John, I think there’s a little more to it than that. I’m happy with my truck and car but I enjoy reading about other brands and recent changes and innovations. Same with my tech (phone, tablet, watch, ring), happy with all but interested in trends. I like my banjos and guitars but read and watch reviews on other manufacturers and luthiers. Etc., Etc. So, I’m interested in the RV industry because I like to keep up on recent innovations, new technology, etc. No reflection on Oliver one way or the other. Just curiosity! Mike4 points
-
This looks like a nice trailer and a good first model for them in the fiberglass space. It’s good that they offer an off-road suspension upgrade. I like the dry bath, big fridge and flooring. The tanks are slightly larger but not enough to make me change. It does look nice on the outside but that’s an individual taste. Competition and innovation is good. We’ll see how they do. Mike4 points
-
My likes and not likes: LIKES: Removeable floor for outside cleaning. Big size refrigerator 6'8" ceilings Ducted AC/Heat Shower (Dry Bath) NOT LIKES: Rubber torsion axles. This is a deal breaker for us. Had one on a Jayco, will NEVER have another) Low sewer connection Hose storage (Where would you put the 90 degree connection and all the other little things we carry in ours?) Front window (Rock Magnet) Front upper window (Heat Load and future leak potential) Upper cabinet doors (Prefer OTT's options) Convection/Micro at knee height Pantry (As where is it?) TV (Placement on side of trailer. Not viewable from anywhere as displayed in video Dry Shower (Takes up too much space needed for storage) For us prefer OTT's design Black mold looking accents in cabinet tops Several storage areas should have a means for installing shelving Overall, for a first production model, I think their design decisions will appeal to many first time owners. But their design needs some adjustments, just as what The Olliver's did with their first OE... make some and put them out for review and upgrade suggestions. In a few years they would have a trailer that could compete head to head. But with plans of smaller and larger versions, frankly it does not appear that such a slow rollout and improvement of this model is their game plan. In a nut shell: I would not swap my 2018 OTT OE2 for a brand new one of theirs. GJ4 points
-
I just corrected the original post. JD3 points
-
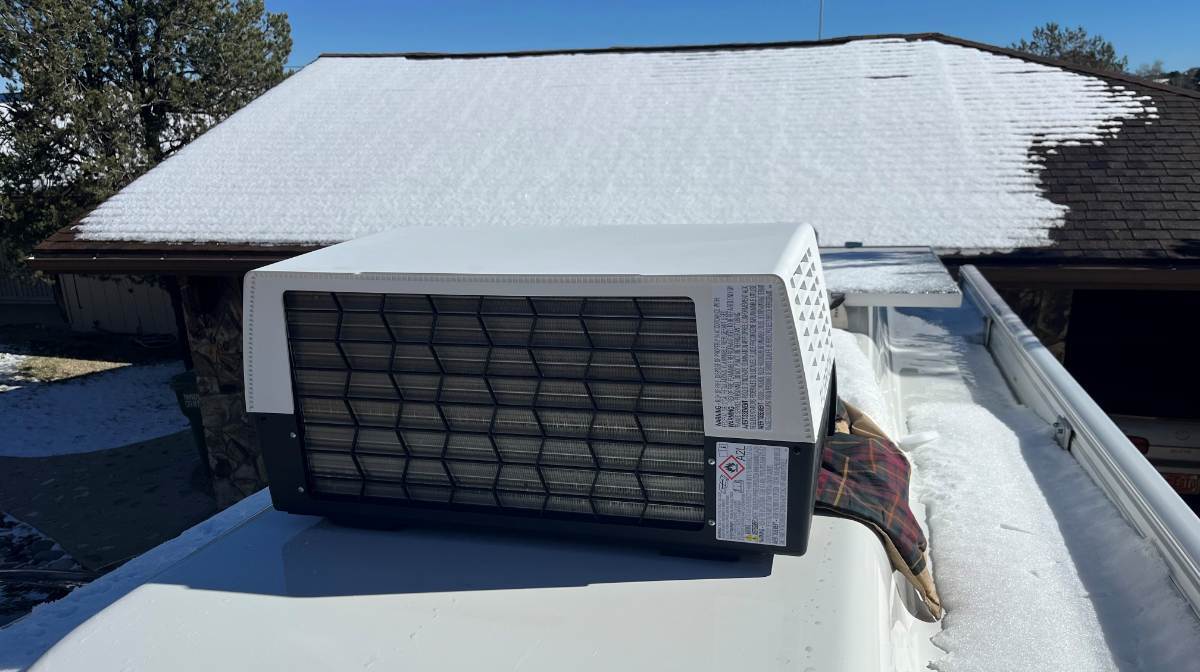
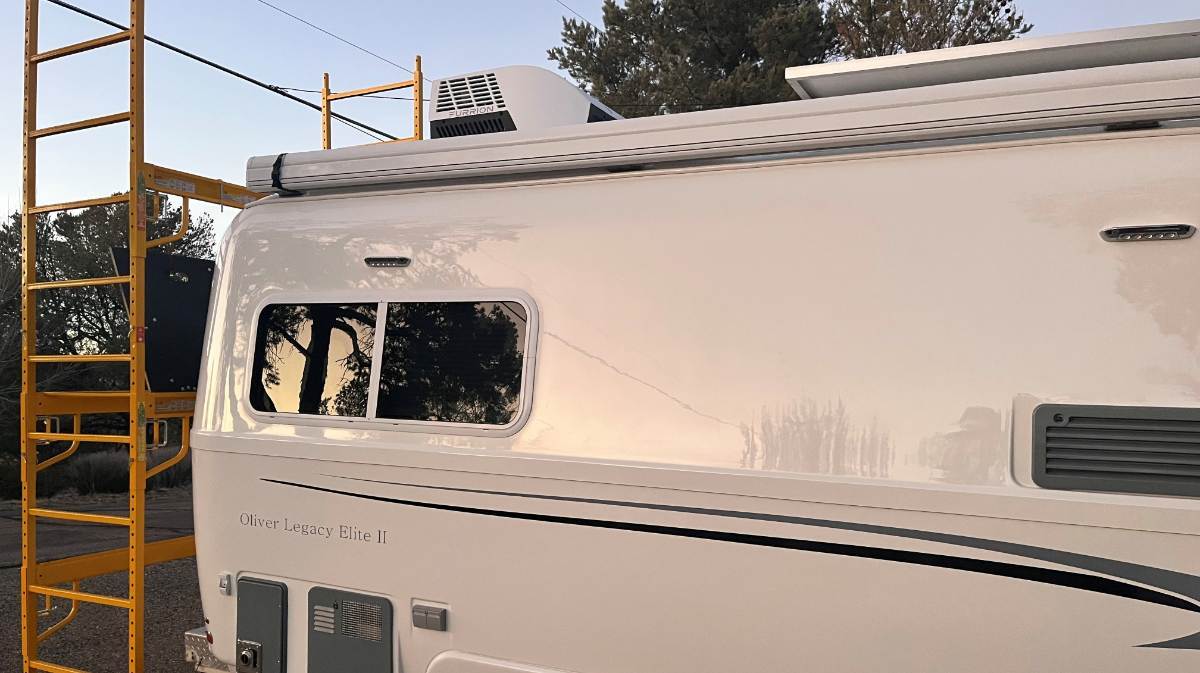
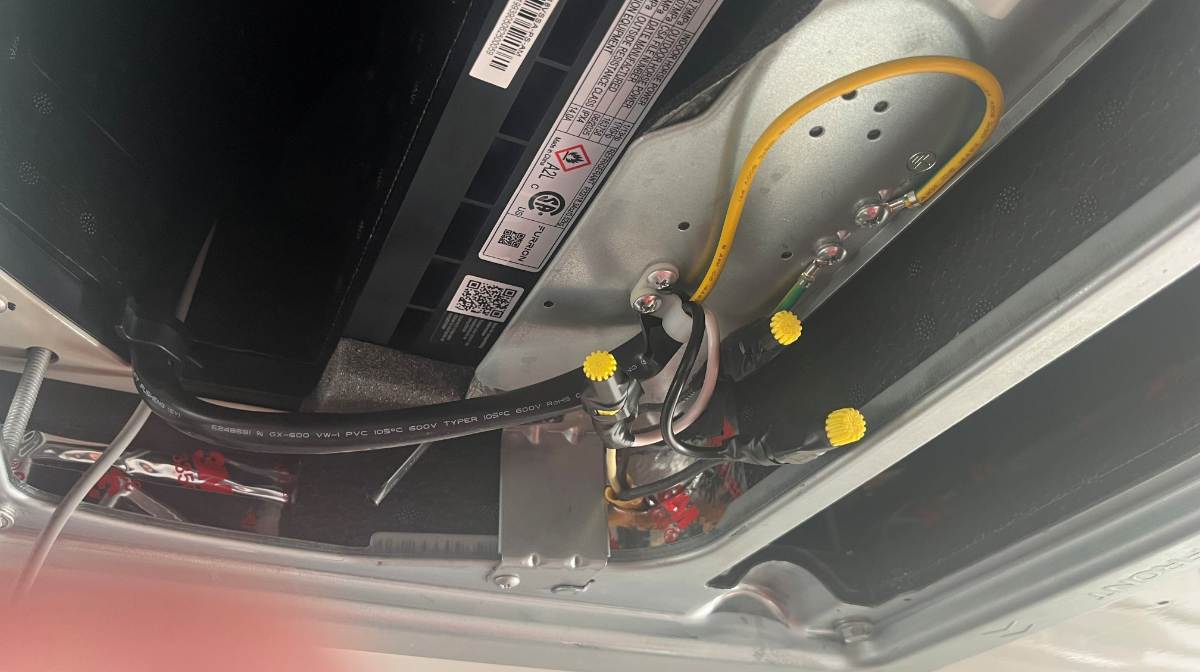
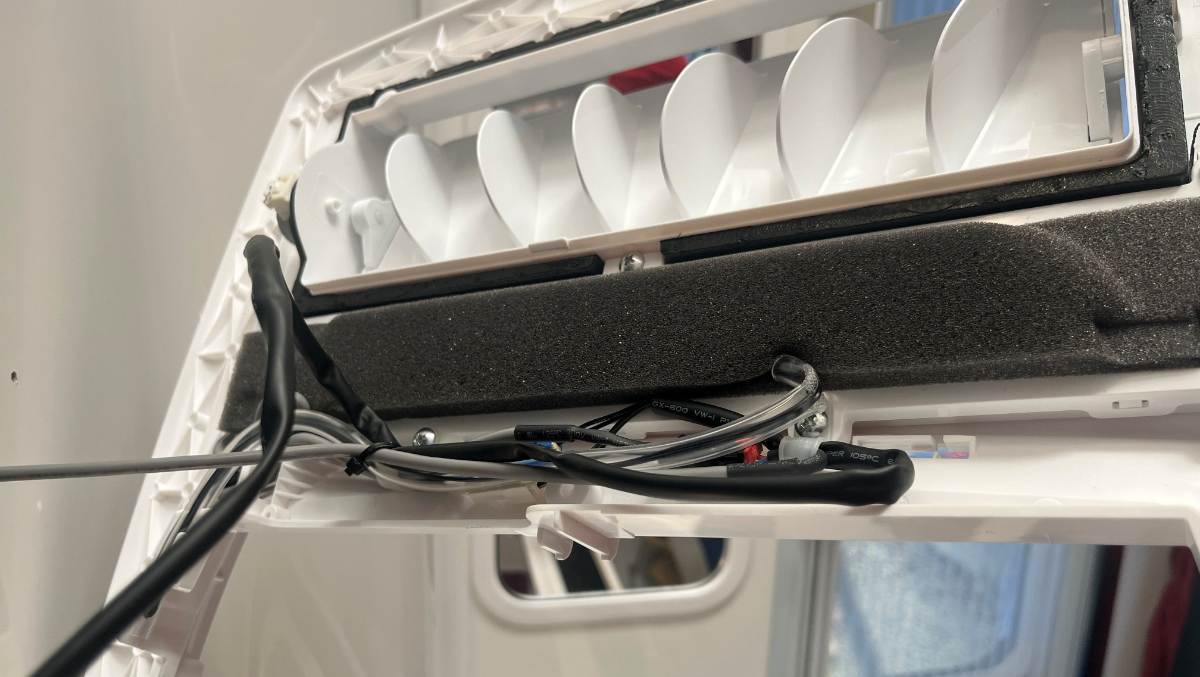
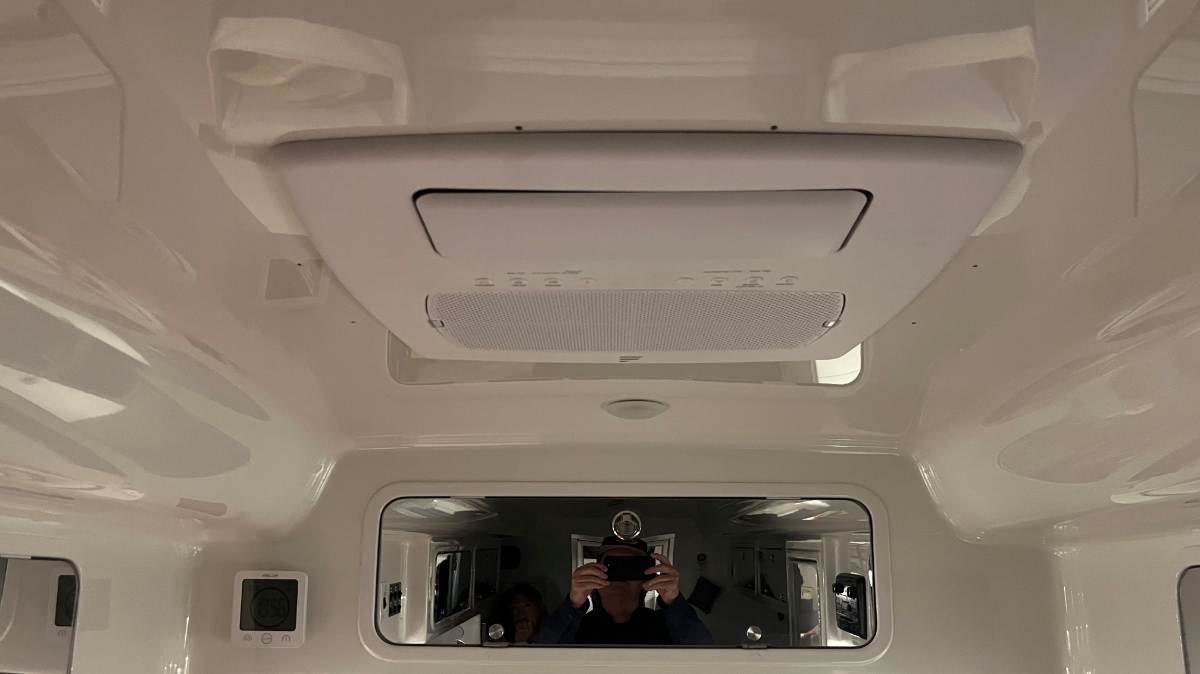
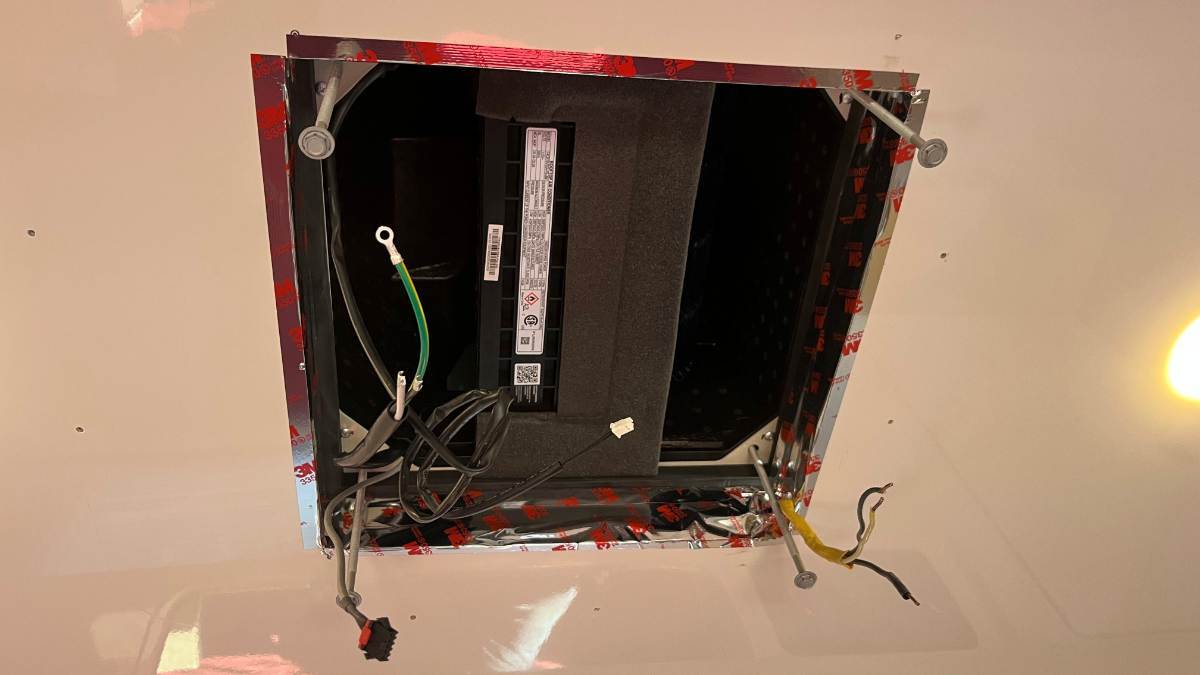
Adam and I got up on the scaffold to remove the defective (and refunded) Turbro unit. We set one scaffold cross beam and the same height as the roof so to have a place to rest the A/C on the way down. When we picked up the new Chill Cube, Adam said, “Wow, this one is light!” (Turbro weighs 88.2 LBS and the P2 was heavier, the Chill Cube is 72.4 LBS.) It’s also easier to maneuver with it’s tall square shape, foot-print about 60% of the others. I forget a bath towel like we used last time, so I took off my jacket to have something to help slide the top unit into place. Then inside, I pushed up on the A/C and pulled the jacket down through the opening. Screwed in the four corner bolts, to see and align the exterior unit over the opening. You don’t need the air baffle extension, and the primary hard foam baffle must be trimmed. I trimmed ours about 1/2". When you measure, realize the foam seal on the exterior unit once torqued should also be 1/2". If you trim too much (bad mistake) you will have a gap between the warm in and the cold air out! Better to error on trimming too little, but if it’s too tall it will be pushed up against a hard plate and could crush. I first cut only 1/4" off and it contacted the upper plate before the foam seal compressed at all. I then knew another 1/4" had to be trimmed. Better to do it twice, than to over cut! (many pics to follow) I was not able to use the 120VAC connector they supplied and used standard wire nuts instead. I also made a hole into the foam baffle to get the Romex into the center area. I moved the wire clamps to be usable based on the where the Romex was installed. Not easy to fit all the wires in the narrow center area. The extra length of some cables can be inserted into the junction box. The main thing is you have to feel the center mounting screw will seat without any wiring obstructing it. The instructions say to use the long screws for the plastic air handler, but they do not supply any! I used two long screws I had to get started, but once the plastic cover snapped into the metal frame all I needed was 5 of the supplied 1/2" screws. Mount the filter components and you’re done! (Notice the screw holes in last pic. I still need to patch the ceiling fiberglass.)
 3 points
 -
I have to agree Mike, I really enjoy learning about all the latest and greatest new tech in our world as life rockets 🚀 by. Today’s latest tech seems to be old news tomorrow. I like banjo’s as well and actually owned one. Took a few lessons and practiced and practiced and played for people that could not hear. 😄 It will be interesting to see if Morning Star actually produces a 29’ model. Certainly time will tell how well this Morning Star actually performs in the field. David3 points
-
Hello to all! We are the new owners of a 2019 LEII, Hull 514, as of last week! We have owned travel trailers for about 20 years and started seriously looking at fiberglass trailers about 6 months ago. We are looking forward to our first trip in the next few weeks. We plan to do a lot of boon-docking in out-of-the way NFS campgrounds for trout fishing, hiking, etc. and our large toy hauler was NOT suitable for that. Hull 514 did not come with an inverter or any solar, so I am installing Lithium batteries and an inverter over the next few weeks and then will add some solar charging capabilities. I'll probably create a post about that project after I'm done in case it helps others who are in the same boat. I have already enjoyed and gathered great ideas reading about the various approaches others have taken on this forum. We will likely convert to the Twin layout eventually as well. I also plan to swap out to 30 lb Propane tanks and add my LevelMate Pro this weekend (both from my current camper). Anyway, just wanted to do a quick intro for this very active and informative group. Glad to be in the family!2 points
-
Welcome to the Oliver family -- our forum is the best. Enjoy!2 points
-
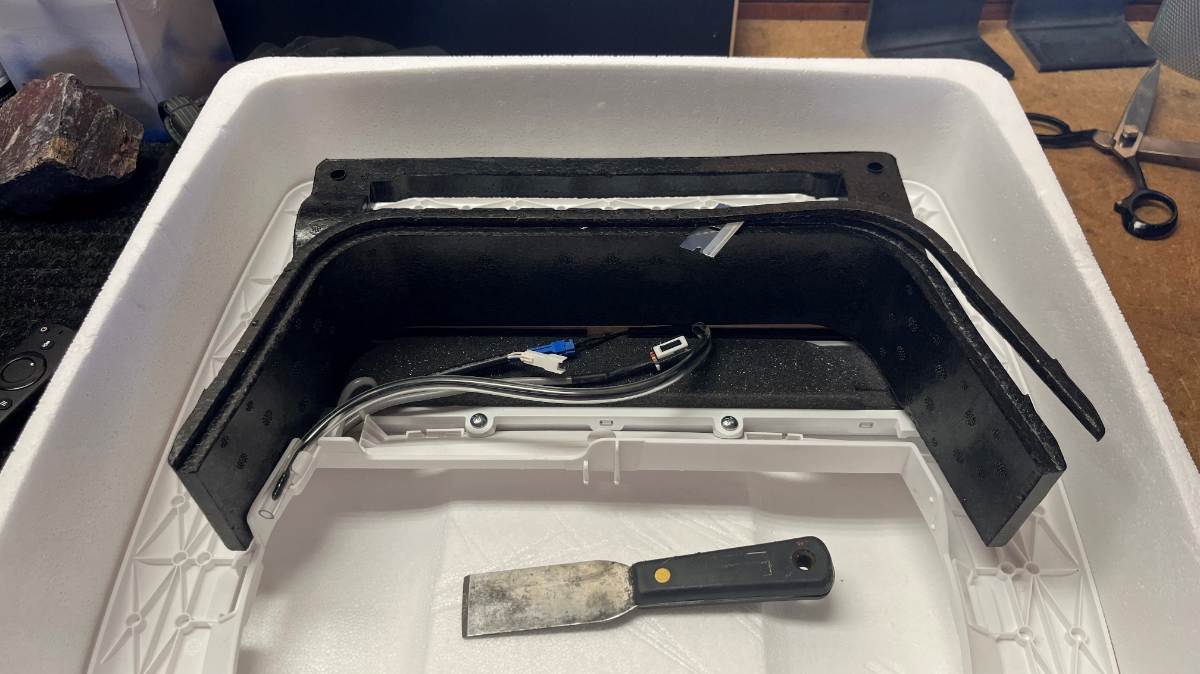
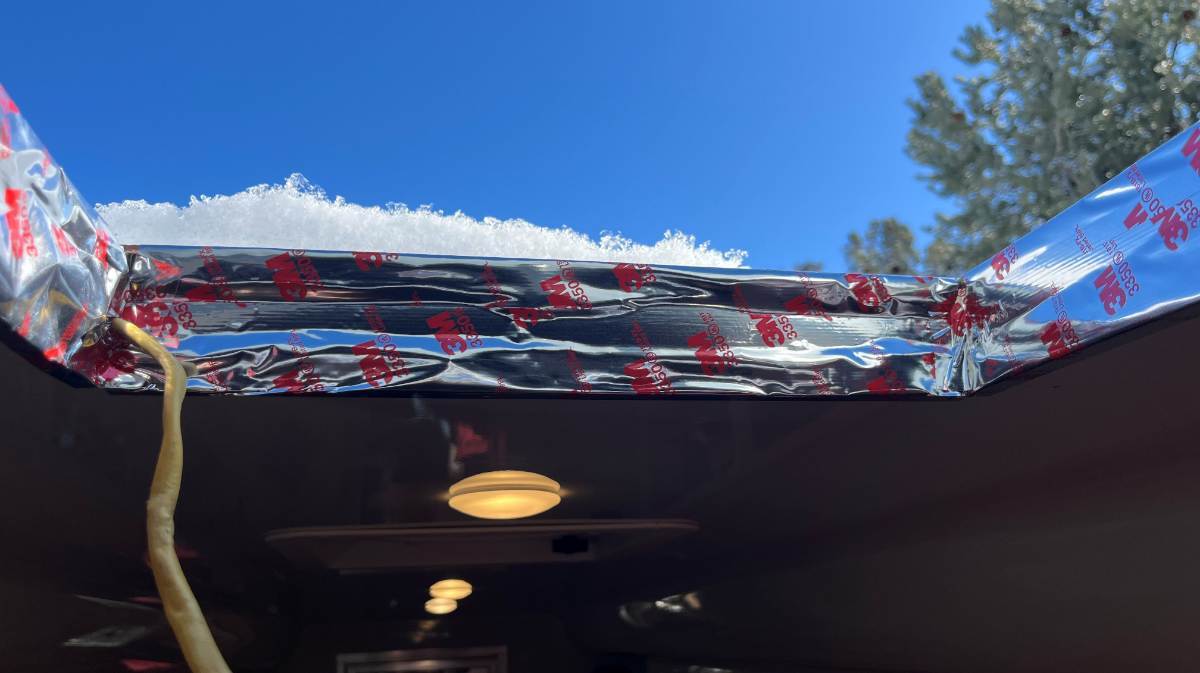
Back to the subject of the current Furrion Chill Cube, installation notes to follow... First step was to remove the Air Distribution Box (ADB) of the old A/C unit. Spend time cleaning the roof after removal. I had removed the old unit, plugged the 14x14” opening, prior to having the Oliver cleaned, stripped, buffed and ceramic coating. The new A/C unit is now mounted on a perfectly polished roof. At least clean the opening well so the new units seals well. Oh man, as usual, OTT with their drill-happy installers, we now have eight (8) drill holes in our ceiling! To date, I’ve had to fill over 30+ holes in interior and exterior holes in the fiberglass (beside here, the thermostat, the old inverter switch, the corner TV mount, the sat dish, Wi-Fi Ranger, both exterior cameras, etc.) OMG! Fortunately, new models like the Turbro and Furrion Chill Cube mount the ADB to the interior frame that’s bolted to the outside unit. If I had installed the original Dometic P2, I would have figured out a work-around, bolt to the frame or if need use 3M VHB on the edges vs. 8 screws. First measure the thickness of the opening (pic1) to know how much to trim the air baffle that fits inside. Cut off the thermostat wiring connectors and push remaining wiring and condensate drain plumbing into the ceiling, leaving only the 12 AWG 120VAC Romex wiring. Then I covered the opening with 3M 3350, a thin foil duct tape. I used one 14” length above and below wrapping about 1/2" on the roof and ceiling so it would stay sealed (pic2).
2 points
-
And that's why I ended with; "Hey, it's always fun to see what's new in General Discussion of our great Forum!" Though I spent a career in Technology and, just me, I've lost the desire! Way too much marketing today, too much noise, IMO. Talking Guitars! I've bought and sold more than 20 fine luthier-built acoustics in my life, mostly from 2007 to 2018. At that time we moved back to AZ where now I have more outdoor interests. I sold most, gave my son a couple and now have just two fine instruments, a McAlister Concert and Mustapick Hybrid (nylon strings). It's a lot like our Oliver, I don't need another TT or guitar in my future. At 70, I'm starting to realize the things I own are WAY more than most have and that we need. It's more time to trim the heard rather than continue being the hunter-gatherer! 🤣2 points
-
My immediate feedback regarding this model and competition in the fiberglass market is, "Who cares?" We don't. We stopped looking in 2023 upon purchase of our Oliver. I've spent two years and a good 1,000 man-hours making improvements. I'm finishing custom mud flaps today, new quiet A/C was installed last week, new axles with Alcan Springs, 6 Victron devices and overhaul of OEM wiring, ALL new interior furnishings, beds and dinette cushions, hulls detailed inside and out! Start over? NO Way! A friend of ours, an ex-Oliver owner purchased a Brinkley I235. Being full-timers, the Oliver became too small for their needs and they sure did not like the Oliver windows. Brinkley replaced flat leaf springs immediately under warranty and after the 2nd set showed no improvement they worked a 3rd try with heavier springs. This reads about the same for leaf springs used by OTT. Some of these short-comings are industry-wide. "The grass is always greener." Yet all RVs, all TTs, and all products have issues and will continue to have some. Believe it or not, the list is shorter than ever and I'm actually about done! Hull #113 is no doubt better than the next Oliver that comes off the OTT factory floor! We also do not care what features OTT adds to the new models except to be happy for new Oliver Owners! In our opinion, the Oliver is better than examples seen to date in its simplicity of design and basic good looks! 😎 No way a new trailer will ever be a thought in our family. Chris loves getting away in the Oliver, me too, and it's become the perfect travel trailer for us! But if you're younger, need more room, and have a ton more money to throw at another travel trailer, and truly dislike the features of your Oliver that cannot be changed, then OK, "hasta la vista!" 🤣 Hey, it's always fun to see what's new in General Discussion of our great Forum!2 points
-
We definitely like the rubber backed woven vinyl floor cover. We use a runner in the main aisle plus an inside door mat that work okay, but they don't stay in place. I've thought about having a custom cut one-piece carpet with bound edges similar to what's shown in the video to cover the entire floor. It would be easy to remove & replace for deep cleaning. Has anyone done this for their Oliver?2 points
-
If you have fat tire e-bikes take them, great to zoom around in the desert and town. Just watch out for traffic in town, gets very busy during the big tent event.2 points
-
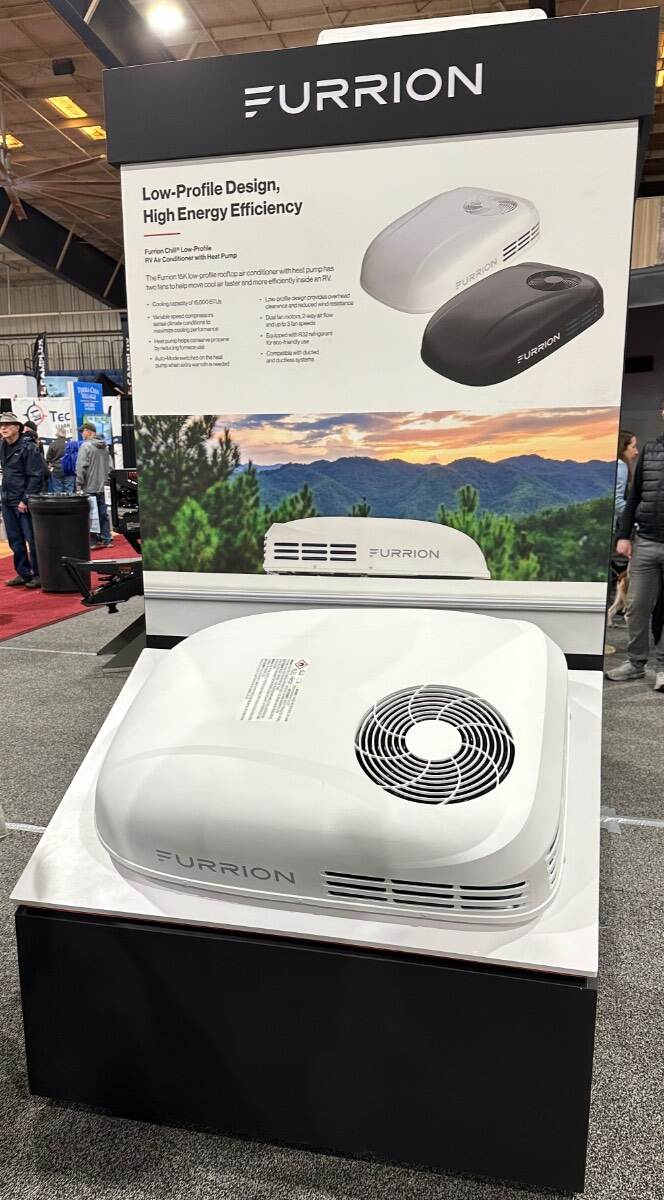
Looks like it's just a rebadged Turbro / Pioneer.2 points
-
I saw the Furrion Chill Cube today at the RV Super Show in Tampa and it is indeed very impressive. And now the really good news, Furrion will introduce a low profile model in April according to the gentleman that gave me the demo. It is advertised as 15,000 BTU's and also has a heat pump. Mossey
2 points
-
Excellent thinking as this is exactly my reasoning! Last week we got down in the low 20s three consecutive nights. If it’s high 20s for a night or two, I’ve learned not to worry. I have a Ruuvi temp sensor in the rear lower basement, under the incoming water lines to keep tabs. We had water in the plumbing, hot water heater, etc. I worked the procedure and we’re good. The other day, since the Oliver was already in our driveway, I worked all 12 steps in <5 min (from memory after years). We’re leaving Monday morning to Quartzsite. Thank goodness I only have to fill the FWT, prime the plumbing, fill the extra 35-gal FWT in the truck and we’re on the road! 😎2 points
-
Yes, good catch Roger, and Mike is correct in his comment! I had many critiques, 2 years ago, when I wrote these instructions and nobody had noticed this before! Just ask @Geronimo John, as I sometimes have a left/right brain thing goin’ on! Directions I’ve written that state drive East as I was thinking West! 🤣 it should read like this: 8) Connect the compressor airline to the Fresh Water inlet (a few seconds is all required). 9) Connect the compressor airline to the City Water inlet (leave it connected) Then yes, work step #10 on City Water. I will revise the instructional thread and I’m also going remove step #13 which I added upon suggestion, but do not believe is necessary. No pink stuff will ever be in my Walmart shopping cart! 😎2 points
-
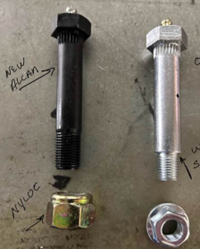
Chris: Some thoughts about the standard wet bolts vs step bolts for trailer springs: Standard bolts generally used for light duty trailer shackles using a 9/16" diameter shackle bolts without a zirk fitting. Step Wet Bolts Bolts are used for heavy duty axles where the step is necessary for proper function with bronze bushings. I believe that all of the OTT trailers, and the most other heavy duty trailer spring shackle bolts are step bolts. Yet Alcon is using a standard bolts. This got me wondering about the topic. Wet bolts sandwich the springs between the subframe mounting "tabs". With the step, the step bolts mechanically limit the clamping of the springs. The result is that the bolt head is prevented from turning in the mounting tabs by two means. First, the splines. Secondly the friction on the tabs by the step and the nut itseld. As a result of the design, the spring always has some clearance allowing it to more freely rotate relative to the bolt center line. My concerns are: The Alcans could easily be over tightened thereby forcing the mounting tangs against the springs. This process would result in the spring binding in the tabs and facilitate the stripping of the bolt splines thus creating a "spun bolt". A spun bolt will act as a crude bearing causing the mounting tab holes to quickly wear. And the repair is rather difficult. Been there myself. Use of Nylock's in high torque situtations often results in the Nylock becoming impossible to remove with hand tools. To do so, one will likely want access to air tools or electric grinders to literally cut the nut off. Trying to do so with a hack saw and punch will be tedious, especially it appears that their bolts are very high quality grade 8. As such, failure of a wet bolt will complicate life a lot. The only way I would want standard bolts for a splined application is if the bolt head head was fixed using a Hex Capture Washer. After two years of working with OTT Jason, this approach ended up being the only acceptable long term repair for a spun bolt spline. DIY - Dexter EZ-Flex Center Bolt Spline Repair (20 APR 2024).docx What are your thoughts about Alcon not using step bolts on our springs? Thanks GJ
2 points
-
I'm not sure how useful this would be to others. I got tired of typing into google site:https://olivertraveltrailers.com/forums/ "some search term". This little html file works fantastic, but I had my Claude.AI create a page I could keep on my local computer, maybe on the desktop, where I can simply type in my search term and all the results only come from the forums pages, but via Google Results. Try it out. It's a single HTML document. Download it and type in something you wish to search for in these forums. I use Claude AI for work and find it to be the best in coding. oliver-forum-search.html1 point
-
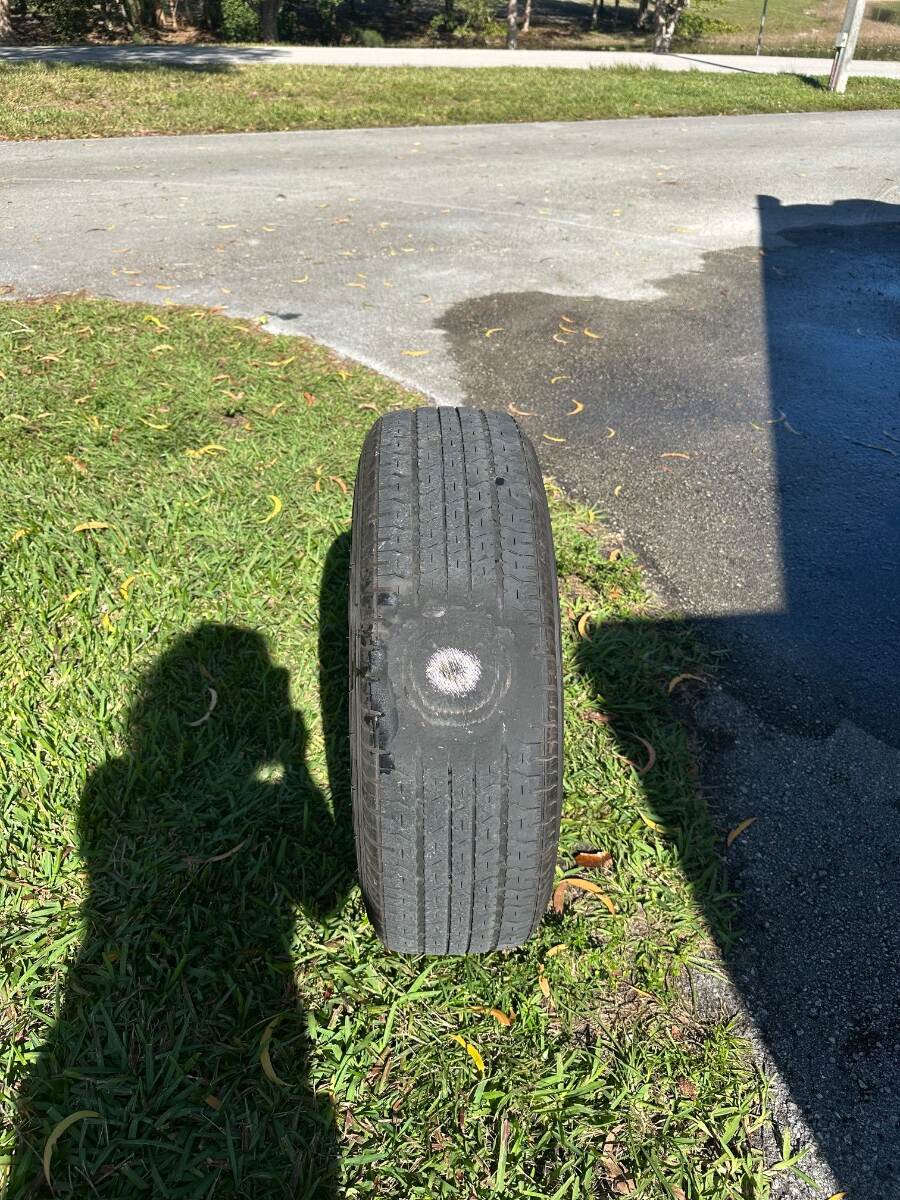
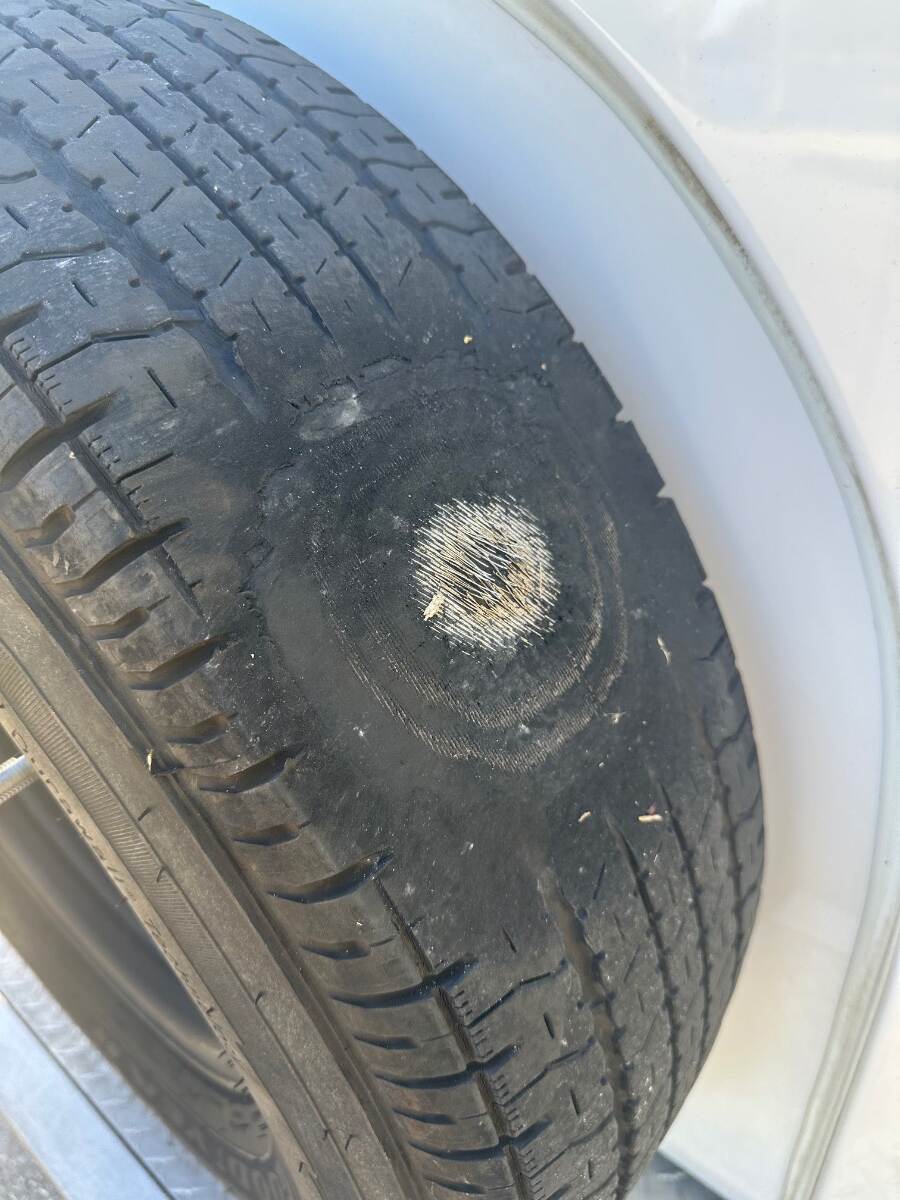
The only thing that I can think of is that something got jammed in the brakes which either made that single brake lock in the "on" position or that something was like a stone that jammed the brake very tight to the drum on that one brake. Then as you backed up the trailer - probably into the camping spot - whatever was jammed became released thus causing everything to return to normal. I assume that your mobile tech will check the brake wiring, the magnet and all other parts of the brake (at least on that wheel) plus the bearings, etc.. What pressure do you run in your tires? I ask because the worn spot is directly in the center of the tire as opposed to being spread out. This might indicate that your pressures are too high. Also, can you tell us what TPMS system you are using and what your "high" temperature limit is set at? I would have thought that the temps should have reached a high enough level to trigger the TPMS unless (of course) the wheel wasn't really "locked up" all that long. Bill p.s. glad that other than the cost of the tire and the mobile tech that everyone is OK.1 point
-
Thanks, Mike! Before I had the scaffolding we installed an A/C on our Bigfoot. Adam climbed up the ladder on the big Class-C. There was an old Dometic up top where the fan had jammed. I instructed him to heave the old unit off the side, hit the gravel drive and nothing else! 🤣 I had the new A/C still in the shipping box bottom, tied a strap around it sitting at the bottom of an extension ladder. He pulled the strap as I walked it up the ladder. Either way you need two people. I'm not walking on top the Oliver, so my scaffolding investment has been helpful. When not in use, the upper section is stored away but the bottom frame sits around the nose of a car parked in our garage. I use the shelf for shipments in and out and empty boxes, it's been a handy staging shelf. You can always use more counter space! https://www.homedepot.com/p/MetalTech-Safeclimb-6-ft-Baker-Scaffold-with-Platform-and-Included-Trap-Door-1250-lbs-Load-Capacity-I-CISCH1/302038304 Or you can rent if you do not want to purchase and make room for one. This rental page shows a double set and outriggers like I purchased, plus the upper safety surround: https://www.homedepot.com/p/rental/Interior-Scaffold-I-TCISCH1/316821794 I'm on my 3rd jar of Marine-Tex with all the holes I've filled. Simple to use and the color is very close to our hulls, at least the older ones. I can't easily see the large holes I filled from where the TV was mounted in the corner originally. https://www.amazon.com/dp/B0014419V0/ I have some ready but will wait 'til we return from camping in a few weeks to fill these eight small holes. I'll need to drill a recessed bevel first making a shallow wider opening to better take and level the fill. I have other work too that needs a second coat, where before I removed the rear camera, the bathroom gray valve handle (replaced with electric valve), and the door latch that was riveted bottom right of the entrance (don't need it after adding Lippert Friction Hinges)! You need a second coat after the first shrinks. She's getting cleaner all the time! 😎1 point
-
My wife and I had purchased a lightly used Jayco UDST pop-up with a single torsion axle. We completely rebuilt all the systems above the axle. We departed SLC for a month long tour along the west coast and northern tier border and back to SLC. As part of our rebuild, I had new tires and a pro inspected the torsion axle. Axle appeared good. Probem with torsion axles is they look good until they are not. Ours failed 100 miles from Reno NV on a Thursday before a 3 day holiday weekend. When they fail, they scruffed off our new tires the no time at all. No warning, on side of road, with 100 miles of nothing. No options but getting three replacement tires at a Super Walmart and scruffing them all to bare cords to get to an axle shop. Limped into Reno just before the axle shop was to close. Learned that a new torsion axle would be 7 days out. Saw they had lots of steel and welders so while waiting until Tuesday for the shop to reopen, I designed a replacement axle subframe to support an in stock Dexter 3500 axle. With annual bearing service, it is a lot easier to tell when a standard axle is going south and to leave you on the highway. Torsions....... not so easy. Hence my dislike for torsion axles. GJ1 point
-
I still watch all the new pop-up and hardside truck campers. The new technology amazes me. I do the same with the fiberglass trailers. The grass is always greener. I'm happy with our Oliver and hope we can stay healthy and enjoy another 4-5 years. As far as Morning Star, my issues are no pantry, their using Battleborn Batteries, television placement, lack of storage compared to our LE2, rear side entry, front bed, small closet limited to 4-5 hanging items and zero room for shelves, 650 lbs. +/- heavier than a loaded LE2, leaving little room for everything else. We like to travel with a full tank of water. Also the rear manual jacks are very "Cheesey" compared the the Oliver jacks. Also, the low clearance and their suspension maybe suspect.1 point
-
1 point
-
On second review, it's not a straight rebadge. Looks like they're using the same outside unit mechanicals as the Turbro, which is it's best feature, and redesigned the airbox and electronics, which are it's worst features... and you can either have a wall thermostat or manual controls. https://lci-support-doc.s3.amazonaws.com/furrion_specsheets/ccd-0006147.pdf https://lci-support-doc.s3.amazonaws.com/furrion documentation/air conditioning/aftermarket/ccd-0009380-en.pdf Best part for us Turbro owners is that the internal airbox parts as well as electronic controls are sold separately and will most likely be able to be used with the turbo.1 point
-
Have Fun. Maybe in the future for us.1 point
-
We’re leaving Monday, be there in the afternoon! See ya! 😎1 point
-
Doing the final string tie is the only tricky part. I looped the string through the end of the spring and pulled it out enough I to tied my know (a couple of half hitches). Before you start, note the tension in the spring and try to match it with the new string. If it’s too loose the shade won’t hold its position, if it’s too tight it will be hard to adjust. I had to adjust both of the ones I did. One was too tight and one too loose.1 point
-
That is what I was thinking. Thanks for the clarification. I live outside Atlanta and we occasionally get cold enough to need to winterize but I would prefer not to use antifreeze. I take trips during the winter months and it is a hassle to winterize and de-winterize each trip.1 point
-
Really imitated the Airstream 23' rear bath front twin unit. I noticed the roughness of the cabinet cutouts while they were showing off the storage......and how thin the facia panel is...this could be an issue for owners. Given they said this is a "production model" I'll bet they will need to put some type of corner moulding around the openings (to keep cuts off of hands) or some other way to reinforce the narrow remaining pillars. Once one of those cracks there will be no easy fix.
1 point
-
@tallmandan You beat me to posting this. As someone looking to purchase an travel trailer in a few years, competition is good. Without seeing this in person it is hard to judge everything. Plus it would be nice to see the construction process to see how that compares. A few of the highlights for me: dry bath, larger refrigerator, nicer windows and shades than the current Oliver implementation, off-road suspension option. Some issues I see is the ability to access some areas: under the sink, solar/battery hardware. Awaken RV says they will be releasing a smaller model (17 footer) and larger model (29 footer). Again, competition is good. Hopefully this causes the competitors to up their game.1 point
-
I have since updated the post. The 5" increase is from my Houghton A/C height. JD's remeasured and it is 3.25" higher than the Dometic Penguin II. In our case, there is no way I could back it into our storage area. Especially since there is a ramp at the entrance and that kicks the area behind Ollie's axles up even further. So if height of your storage areas is close, it would be wise to double check. GJ1 point
-
Ran across this video just posted to youtube... They are clearly targeting Oliver LEII and Airstream FlyingCloud 23fb as their competitors. Starting price on their website is $88,900 but it looks to be inclusive. Several things are appealing. The larger sink and upright fridge/separate freezer would sure be nice. Don't think I like the vinyl flooring. Those manual scissor jacks at the back make it look cheap. Above them are copy-cat 3-piece Oliver-style tail lights - just tunred diagonal 🫤1 point
-
Chris - Ideas? Heavy mods like axles, air conditioners, inverters, batteries, etc.? Light mods like cloths lines, cedar lining in pantry/closet bottoms, paper towel holders, entry step covers, etc.? Routine maintenance items like jacks, bearings, winterization, descaling, etc.? You're doing a great job on this - please keep it up! Bill1 point
-
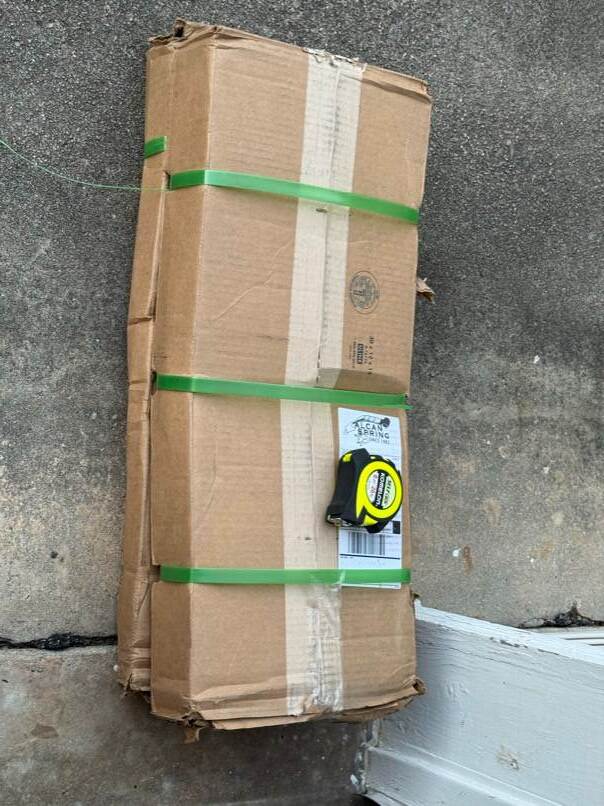
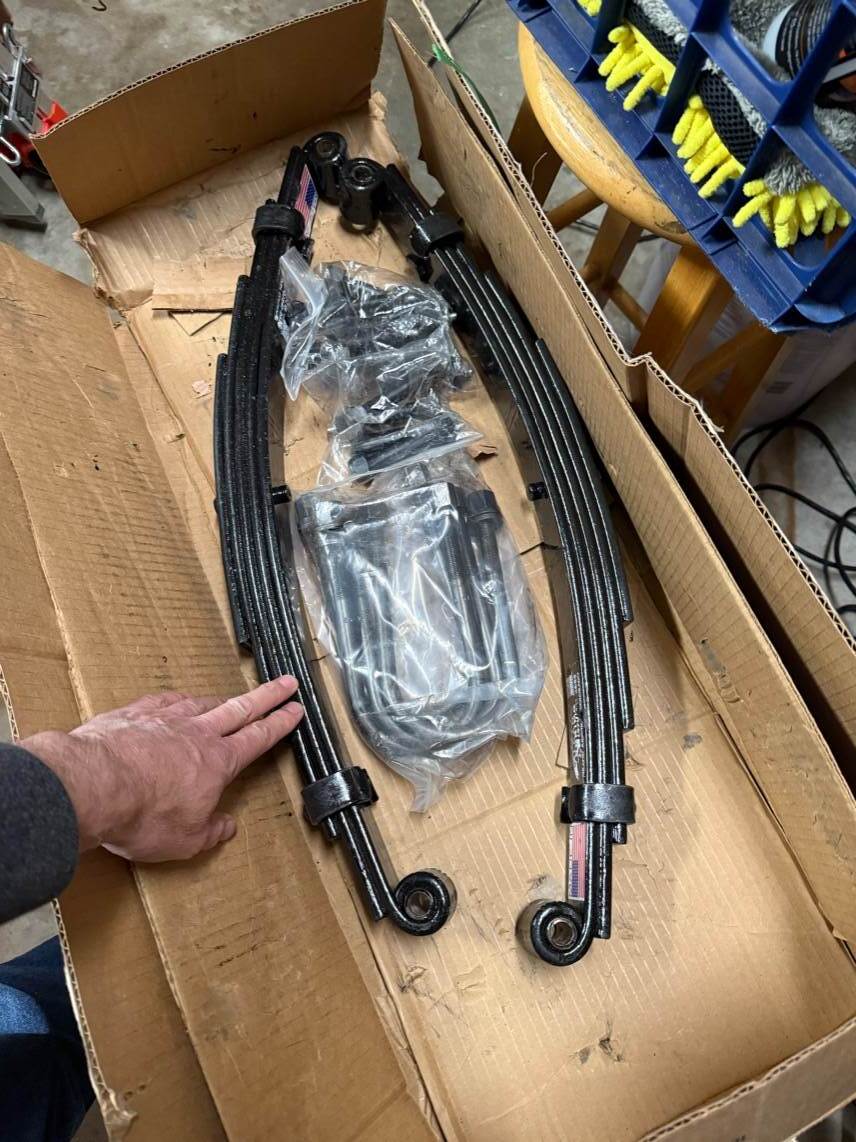
I only have 1 day before I depart for the Eggs & S'Mores rally in FL. No time to install springs with the need to work today. oh well. The UPS guy, who was quite large, carried both 50 lb boxes of Alcan springs in a bear-hug style. I was impressed. I'm ready with some awesome new tools.
1 point
-
Congratulations, and Welcome! We have an early 2021 #797 with factory solar option. There was no Lithium Pro option available at that time, it was offered on later models. Mine was equipped from the factory with the Blue Seas solar disconnect switch as yours is. It connects to the Zamp 30A PWM controller mounted adjacent to it on the side wall. There was no main battery disconnect switch. Within a month of taking delivery of my new 2021, I replaced the factory lead-acid batteries with 2 Battle Born 100A batteries, and installed an identical Blue Seas battery disconnect switch under the street side bunk. Cleaned up the wiring and installed MTBF fuses on the batteries, and added a Victron monitor and shunt. I do not have (or need) an inverter, I have the factory installed Progressive Dynamics 60A charger. The system has worked flawlessly for nearly 5 years. You are fortunate that your trailer was modified after manufacture by the previous owner, either as a DIY or at the factory. I don’t see a Zamp controller on your wall, and I do see a Victron battery monitor. Hopefully you have a Victron MPPT solar controller mounted somewhere under street side bunk, and maybe Lithionics batteries. None of these mods were offered by Oliver Service in 2020 or 2021. If you do have these mods, you have a terrific setup and as @Rolind mentioned, you can shut off the Lithionics batteries if needed. You can check with Oliver Service to confirm if and when they did the work. If you have Battle Born batteries (a common mod for us owners at the time), Oliver Service did not do the install. If so, I recommend you heed the advice in other threads about the safety issues with Battle Born batteries.1 point
-
We had the same mattress Mike pictured above when we purchased our Oliver used. I didn't think "heavy and firm" but more so squishy, like you would sink into the foam, but who knows they could have been up to 8 years old. I did not want to spend on custom mattresses and shipping. We went with our local Brooklyn Bedding made in Phoenix AZ. We've driven down to their plant to pickup the Cali-King bed we have at home but the all foam mattresses ship at no additional cost. We went with two singles 30x75", removed the stitching on one corner and cut a radius with an insulation to fit the curved end (used cardboard to model the shape). We went with the 10" for medium firmness but it's actually nicely firm for me, at times a little to firm for Chris but she has gotten used to it. A 4-6" mattress is better for sitting, and the taller you go your heads may hit the cabinets when sitting! They are heavy but I've added electric water valves and moved all fuses and switches to under the dinette. Chris stands them on their sides to fit sheets and I will remove a mattress, stand it up at the pantry when I'm servicing anything underneath. There's a lot to think about re the sizing depending on how you use the area. We sit up to watch TV or read a book, I sit up with my laptop but we do not regularly use our sleeping area as a daytime living area. These are the products we use in our sleeping area: https://rvmattress.com/products/brooklyn-wanderlust-memory-foam/rv-bunk-30x75-10-inch https://www.amazon.com/Retrospec-Sequoia-Yoga-Bolster-Pillow/dp/B092DYYR5W/?th=1 https://www.amazon.com/Sofia-Sam-Purpose-Supports-Laptops/dp/B013KHAIKQ/1 point
-
It’s always great to see another fiberglass towable. It will be interesting to see the final offerings of this camper. Wondering if it will have solar? Thanks for posting. Back to camping in the Great North Woods! The fall colors are beginning to really pop!! 🏕️😊1 point
-
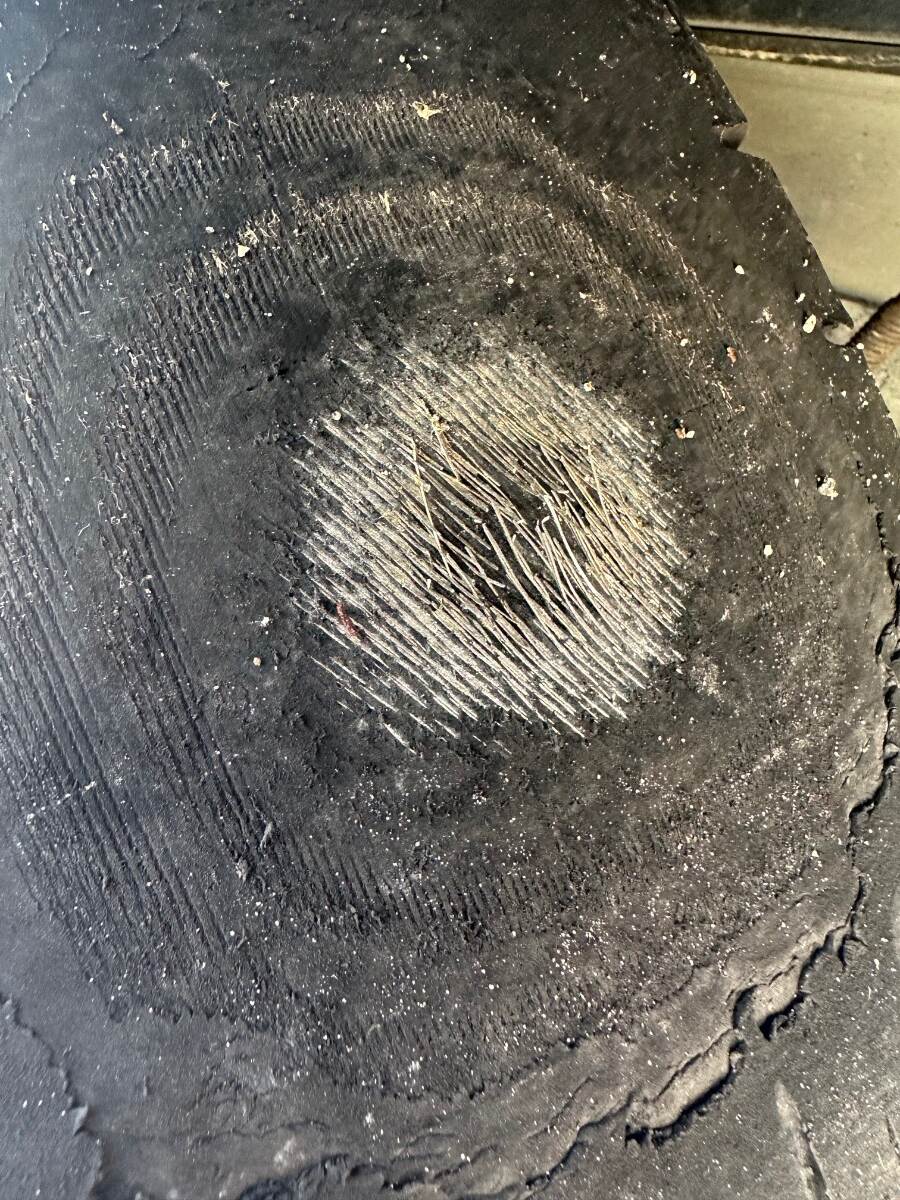
We arrived at Ft Lauderdale on the way to the Keys today and noted a severe flat spot on one tire worn into the steel plys. We have a TST tire monitor and never had a high temp warning and fortunately the tire is still holding pressure. Brakes didn’t feel hot and tire at arrival was same temp as all the others. Changed the tire, and brakes seem to work fine and no obvious bearing issues with hand rotation. We are getting a new tire in Marathon tomorrow and a mobile service tv tech is coming to look over the brakes on Wednesday. Trailer has about 27k miles on it. Any other suggestions on what happened and what to do next.
0 points
-
A new contender in the fiberglass RV market for the US: Awaken RV -https://share.google/Zzpg4orVpsEvoSdpL Nice looking exterior. Autoevolution reporting a price of $82,500 and dry weight of 5500#: https://www.autoevolution.com/news/awaken-rv-s-fiberglass-morningstar-flagship-camper-is-here-to-shift-how-american-s-camp-257902.html0 points
-
It's odd their only interior picture is actually an Oliver interior picture! They also site OTT as a Canadian company. Hard to tell how much of the dark surfaces are actually windows.0 points


.thumb.jpg.e34bf01ef7f7d5e99ad31856d45afbeb.jpg)


-
Recent Achievements
-


")


")


