Leaderboard


Popular Content
Showing content with the highest reputation on 06/12/2026 in all areas
-
3 points
-
Both the rocker switch and dimmer to replace it have ground, 12v+ power supply and 12v+ load connections. The dimmer comes with a wiring diagram. The red wire on its pigtail was labeled "power", the ground wire was black and the yellow wire goes to load. The Oliver wires aren't labeled so you'll need your multimeter. In our trailer there were two red (power and load) and one yellow (ground) connected to the rocker. I had to supply crimp-on 4.8 mm spade connectors for the pigtail wires, and I used a 7/8" step drill to enlarge the hole. It was one of the easier mods I've done.2 points
-
Thank you sir and I’m definitely excited to get into the Apex! I appreciate the advice and “yes” I’ll be at the annual rally (site F-22 to make your Topgun moniker smile…).2 points
-
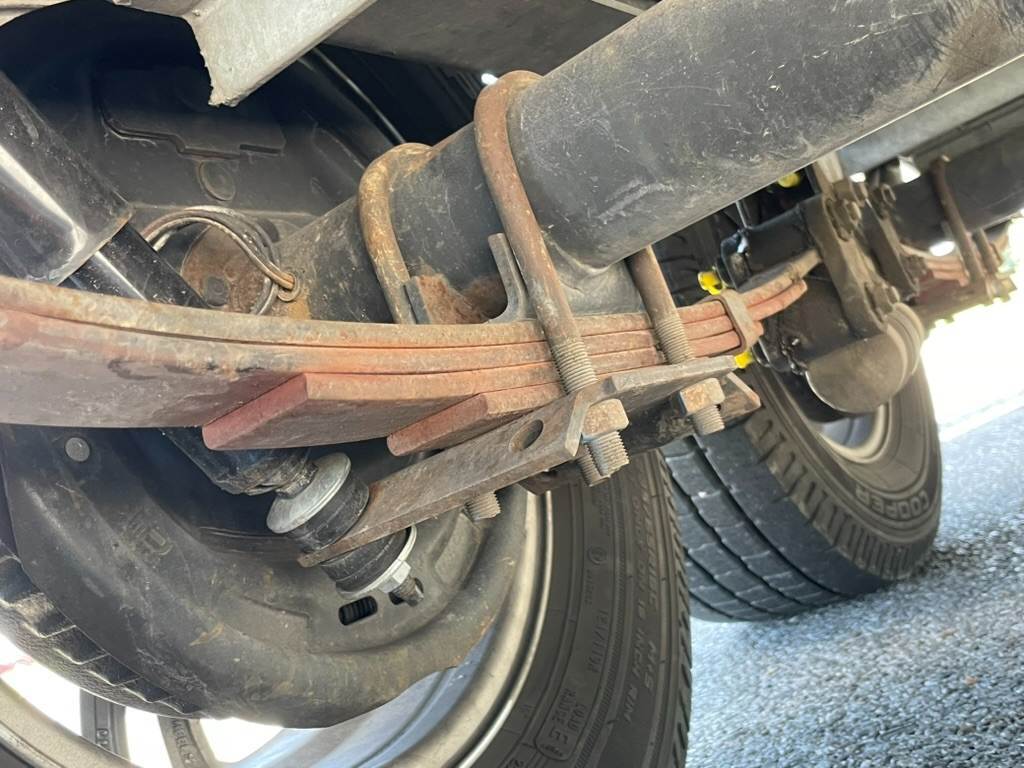
My understanding is that the brake wires come that way from Dexter, Oliver just installs the axles as they receive them. Mike2 points
-
Intermittent trailer disconnect messages have happened to a number of owners. My problem was worn wires inside the axle. Bryan @SNY SD UP in ND identified this issue first and shared his solution. Simply replacing those worn wires fixed the issue. I did go through months of troubleshooting and having my truck checked and tested at the dealer. The thread below is one of several on this topic. Trailer Brake Disconnect Message Mike2 points
-
Wow, so many variables and it's more difficult when you have to count on service technicians, to whom are not all created equal. Yes, all 7-pin cables are the same. And yes, you can replace male head only (OTT is not always right). GJ did his and I did mine, been fine for 2 years. Changing out the whole cable is a bit of work. On my hull it's connected under the front dinette, past the wastewater plumbing (see pic). But who knows on yours since OTT hires random installers year-to year. In the picture you showed of a residential junction box, I don't see the trailer cable, the large black coupler cable, spliced down like you see in my picture. If you want to be absolutely certain whether your issue is the truck or trailer, take your truck to U-Haul and rent the cheapest trailer with a 7-pin connector! There is a lot less liability in doing this than borrowing a friend's truck or trailer, and less money than an hour of labor, shop rate at the Stealership! 🤣 See if you get the error message when towing the U-Haul trailer. The logic is binary. If it still shows the error, then it's the truck. Tow the trailer long enough and if it doesn't display the error code, then you have a wiring problem with your Oliver. So, if it's the Oliver, the next thing I would do is to test the brakes. Pull the pin on the emergency brake switch (the little cable you connect when hitching). Then take a clamp ammeter to the streetside, under the wheel well where you see two wires coming out of the hull, going to the brakes. Clamp onto only one wire, either wire of the pair. The ammeter should read about 6A on both sides (front and back axles). If it does, then all your brake wiring is good, so you can rule that out. (Don't forget to replace the safety brake pin when done.) If this test fails, then you have wiring issues at the axles, but don't waste time there unless you must. If the above test is positive, then connect the 7-pin coupler to your truck and run the same test. If it tests bad, then the brake wiring from the coupler back is bad (open) somewhere. Your next step would be to replace the 7-pin male on the Oliver. This will likely fix any Oliver-side issues. You don't really want to replace the entire cable unless you have too and OTT would likely charge a fortune to do this job. If towing the U-Haul trailer showed an error message, then it's your truck. What a shame 4 GM dealers cannot properly troubleshoot and fix the products they sell. If it was me, in a heartbeat I would disable the factory brake controller. Pull the fuses for it, buy an aftermarket Tekonsha controller and run new wiring to the female 7-pin outlet on your rear bumper (this is what I did from the start, since my older truck does not have a factory controller). This would cost about $200 in parts and likely 2 shop-hours to install, ANY trailer shop can do this, has the parts, maybe even the same U-Haul dealer could do it. I'd rather go to the dentist for a couple extractions than make a service appointment with an auto dealer, OMG! 🤣 And your story certainly shows why. Keep us posted and let me know if you have questions on anything I suggested. Best wishes, JD
 2 points
 -
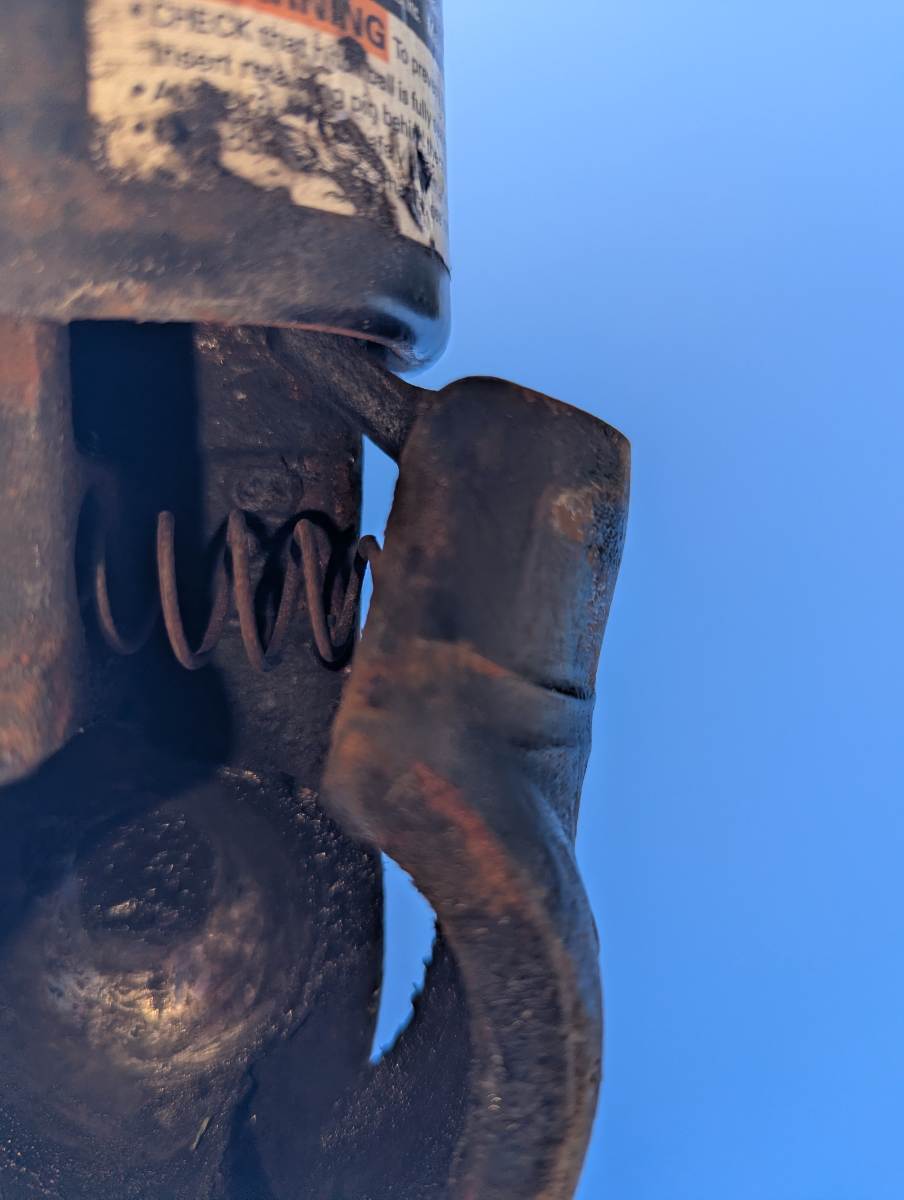
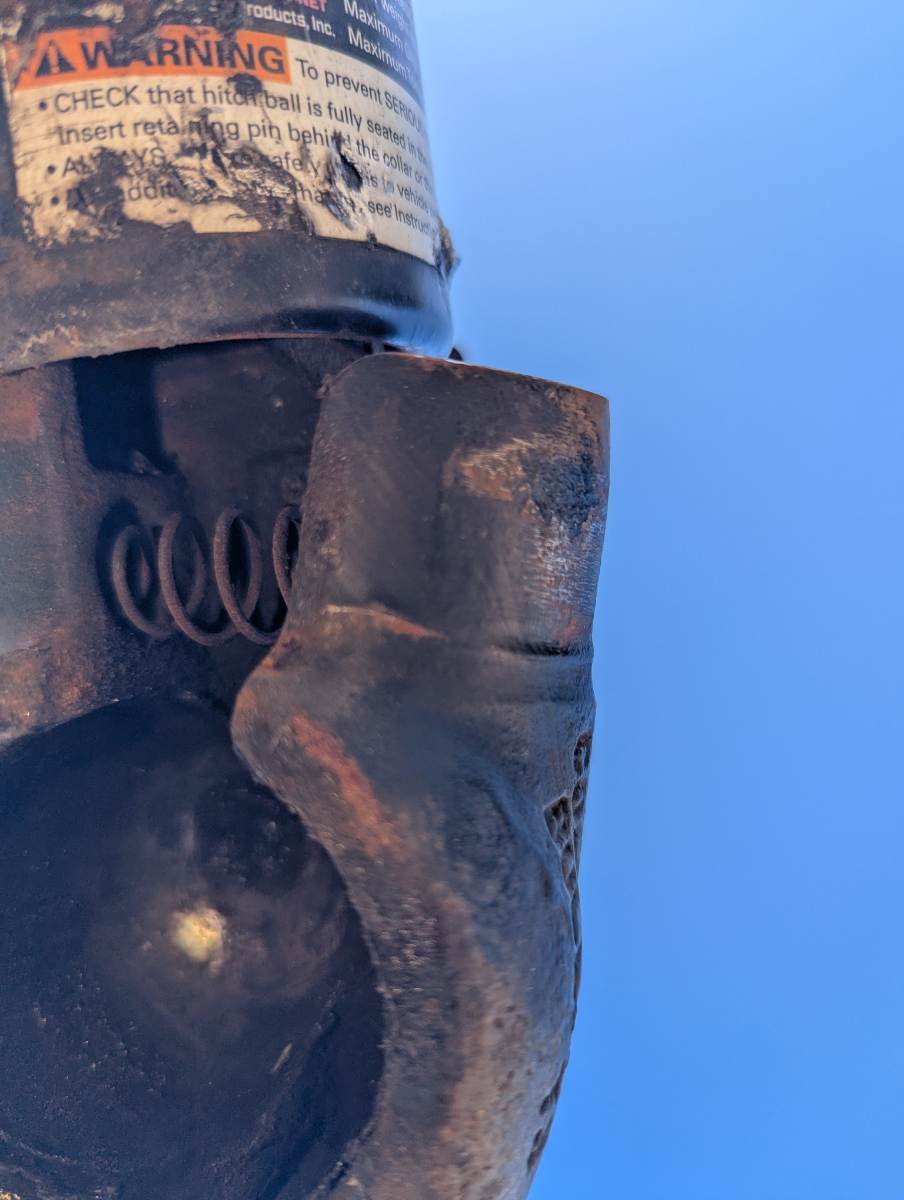
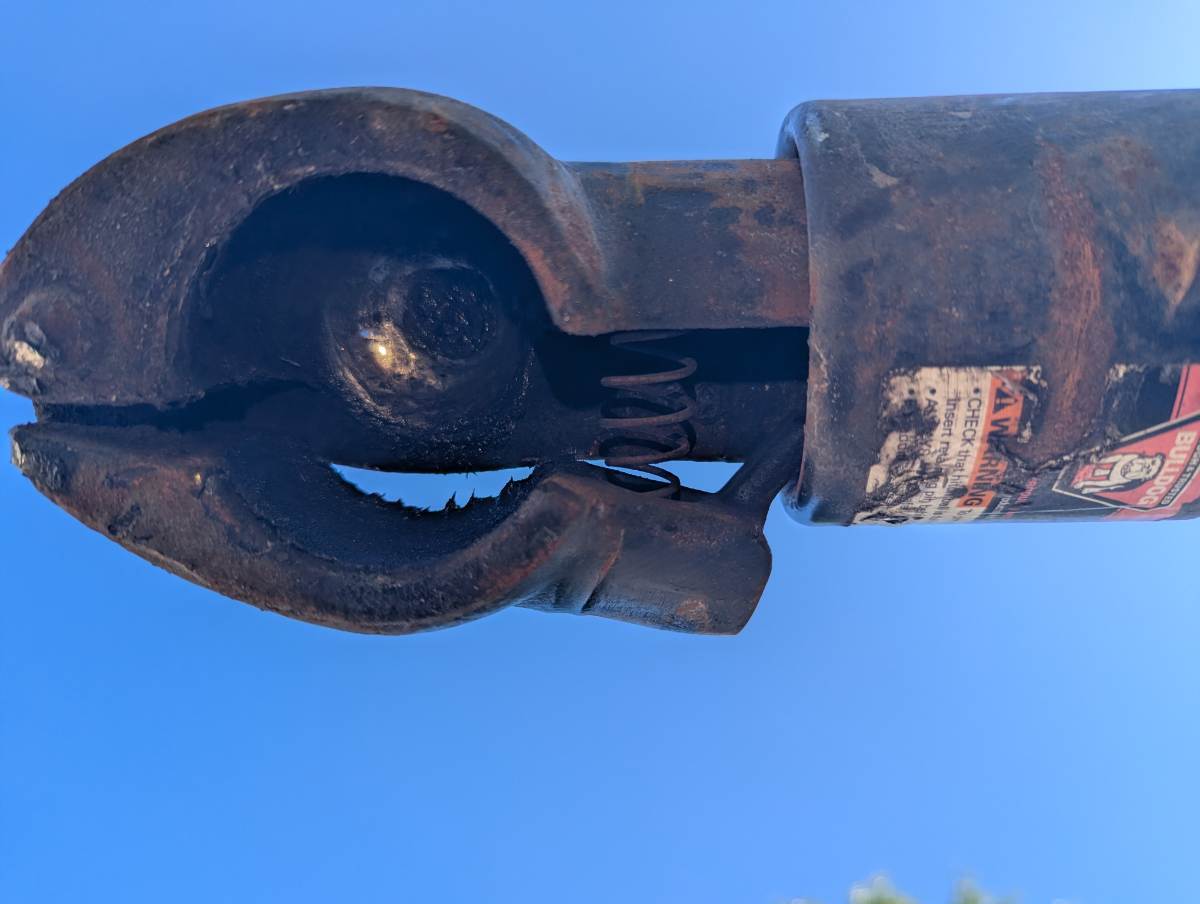
Yeah, except it popped off and is no longer fit for highway use (around town OK). I would replace it ASAP with the 12.5K 2 5/16" coupler. Glad I made the upgrade before something like this, and more so since our trailer is much older. The heavier Alcan Springs will keep the Oliver from porpoising. It will be less forgiving, and over a bump could creat force in the opposite direction. Given this failure, it would have happened eventually since the sagging 1750s are more foregiving. Sounds like your back or near home. John, you do not want a repeat episode! Please get it replaced! This is what I purchased which is still reasonably priced today => Bulldog Collar-Lok Trailer Coupler 2-5/16" Ball 12,500 lbs 3" Channel Tongue w/ High Profile Latch | TrailerJacks.com2 points
-
Check out the Oliver Outfitters guide: Oliver Outfitters Guide on Amazon also look over our travel web page for camping reviews and blog posts 4 Ever Hitched Blog also found at the bottom of our signature below.2 points
-
Wow what a difficult time you have had. Frustrating for sure. I had a simular issue with my 2018 OE2. Problem was the male 7-pin. Art and I changed it out and it stopped the rogue errors like yours. Many owners have had problems with the brake cable inside the axles. John Davies used the cable protection like you used and ran the cables outside the axle with a bunch of zip ties. He ran it on the back side to protect it some from flying stones. One thing to try is to hook up your trailer to a different truck and see if they get a problem as well. But finding someone willing to do that would be difficult. GJ2 points
-
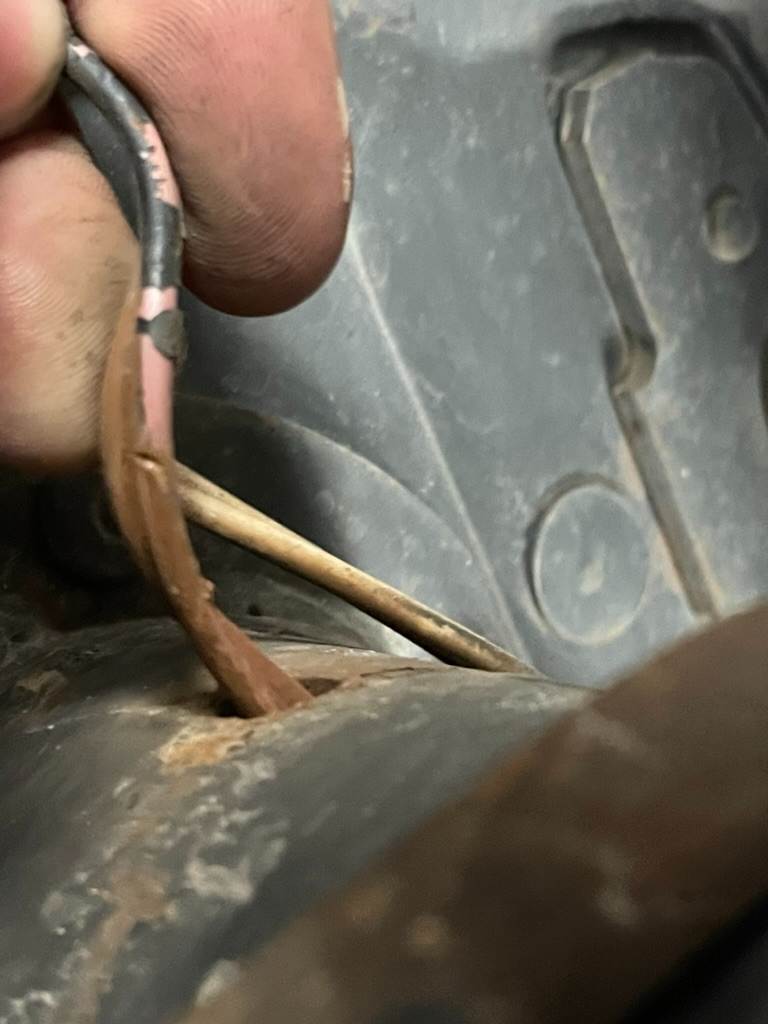
Certainly that hole where your brake wire exit the axel SHOULD have a grommet. However, as a number of owners have found out - the brake wires that run through the axle can "short" due to the insulation wearing off INSIDE the axle where you simply can't see it. Mike Thompson (among others) experienced this. The good news is that the fix is fairly simply and inexpensive - run a new set of wires on the outside of the axel(s). I'm sure that Mike (or others) would be happy to give you the details. Bill2 points
-
DR - Welcome to our Family! Bet ya can't wait for that new Apex. Make sure that you ask your Sales person what items are included at delivery with your new Ollie. This information will help you to either delay purchase or only get those things that you believe will suit your type of camping/travel. Any chance that you are planning on attending the annual Owner's Rally? If yes, then really delay so that you can see what others have . Next - start reading this Forum specifically looking for mods that might interest you. For instance - the use of "blocks" to shorten the distance your "levelers" have to travel is a practice used by many of us. These blocks not only save wear and tear on your levelers but also act as a "slip plane" (something that easily slides away such that a more permanent thing like you jack/leveler is not harmed) in the event you mistakenly leave the leveler down while moving the Ollie. Blocks can be as simple as a stack of wood, or, a 6x6 10 to 11 inch long block of wood, or, something like an Andersen block like THIS or THIS or "legos" like This or some combination of all these. Another item to consider is some type of side to side leveling helper - again like stacks of lumber or the "lego" blocks mentioned above or "ramps" such as THESE from Andersen. Once you have taken a look to see what's out there, come on back here and ask about the goods and bads of a particular item. Most likely you will get a variety of opinions on just about any single item, so, again, it would be helpful to detail what your intent is for usage. Have fun with all of this but don't go crazy until you get some idea of what things just might work best for YOU. Bill2 points
-
It's a lesson to all of us to always have a spare set of shorts handy for occasions like this. 😜2 points
-
Or, three or four! I do know of a person (me) that was leaving VERY early one morning from a campsite in Yellowstone and just had this "funny" feeling that all was not right. I (oops - this person that I know) stopped at the camp entrance just to take a look around and saw that while the bulldog was clamped shut and locked, it was "resting" on the top of the ball - NOT down and clamped around the ball as it should have been. This person has never told me just how he got the bulldog closed and locked without being down on the ball. I've accused him of not being as careful as he should have been and he claims that in the early morning darkness plus being in a hurry may have had something to do with the issue.🥴 Bill2 points
-
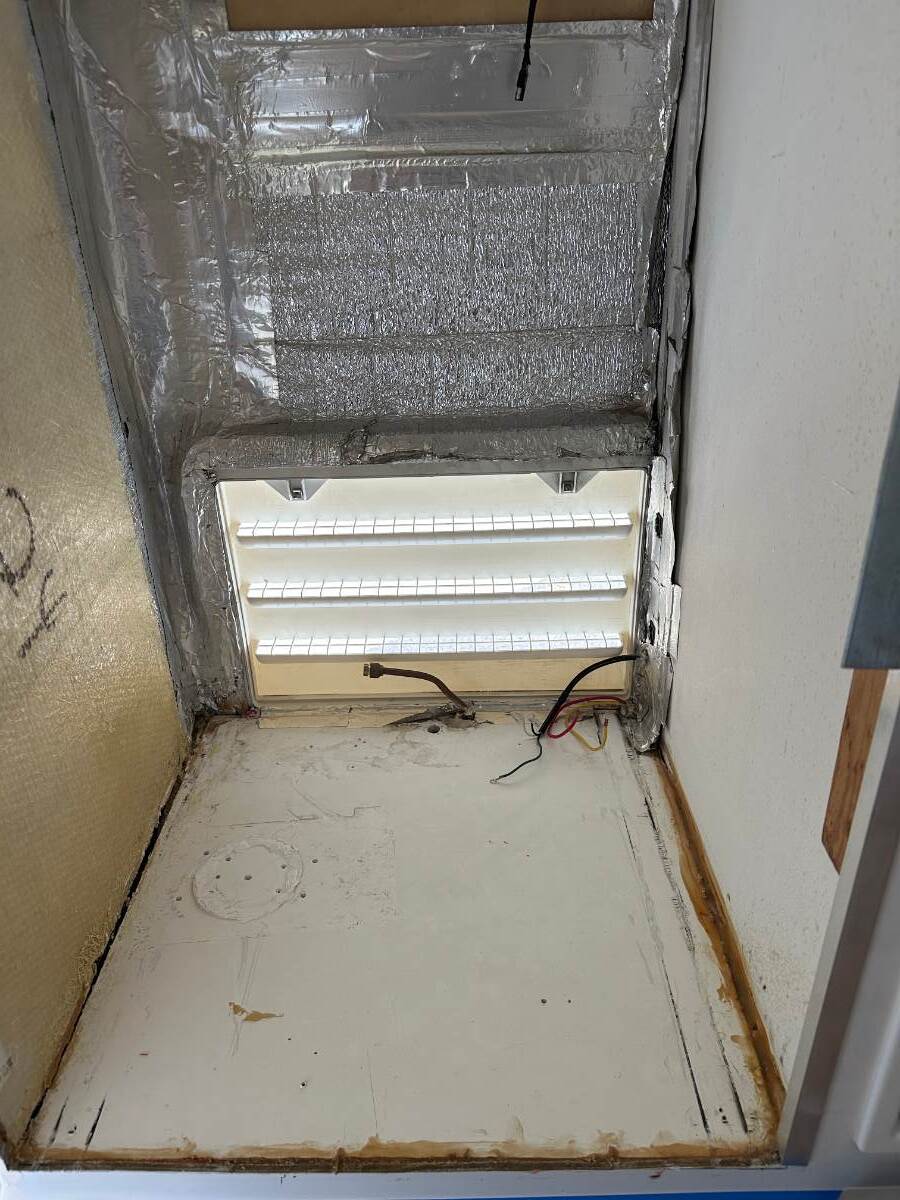
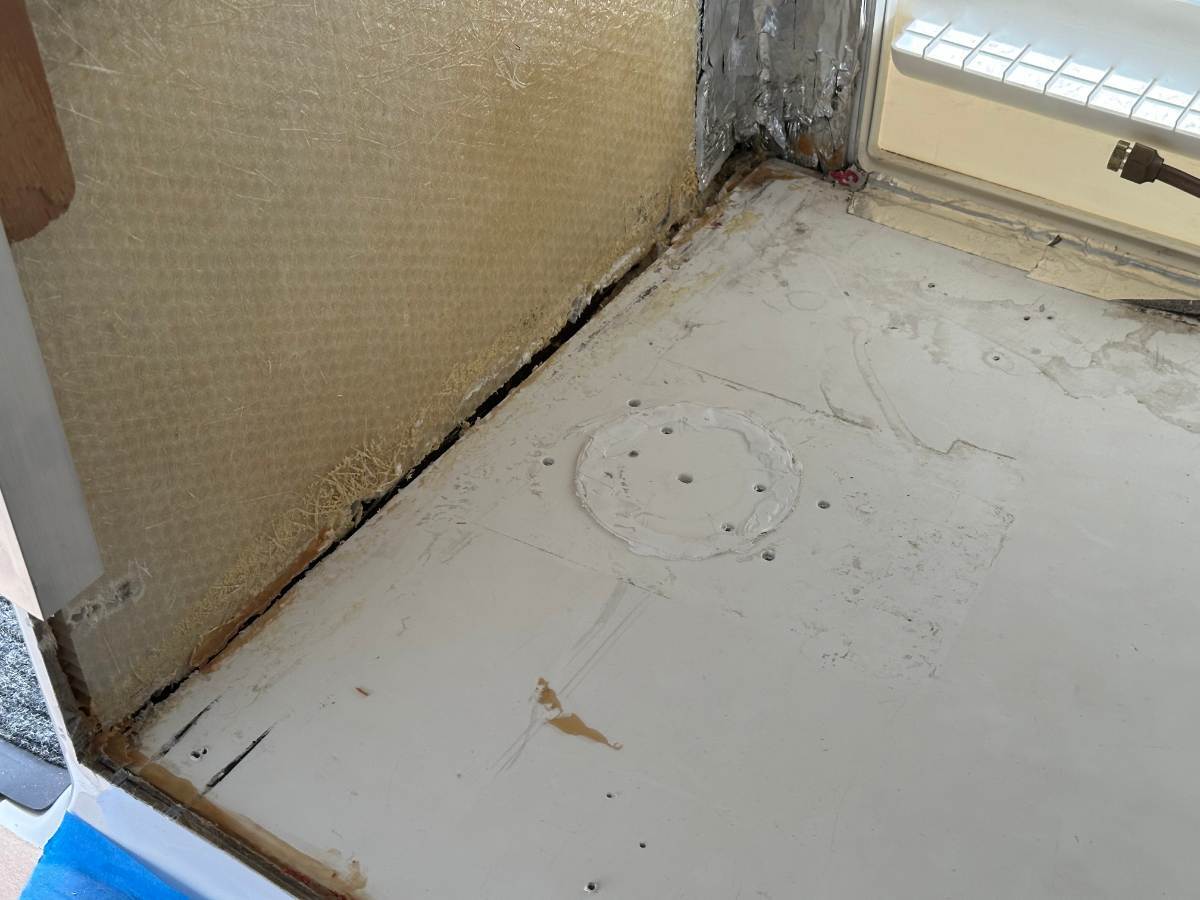
Does anyone know how the floor under the refrigerator is supported (2018 Elite I model)? I'm replacing the Dometic absorption fridge with a Nova Kool compressor fridge. The "floor" of the fridge cabinet appears somewhat unsupported... the left side will flex when I put some weight on it. The caulk/adhesive seal between the floor and the left wall has also separated; not sure if that was what supported the floor or not. I'd like to tear the old floor out and put something solid in, but have no intel on what is below to support it? I've found a few threads that discuss the cabinetry (nothing square/plumb, lots of caulk and foil tape), but only one reference to support below the floor and that looks like a custom aluminum welding job (that I'm not capable of) on a much newer model. I'm leaning towards supporting a new floor with some aluminum angle attached to the side panels, absent any good solution to beef up the existing floor...
1 point
-
In process of getting the 2-5/161 point
-
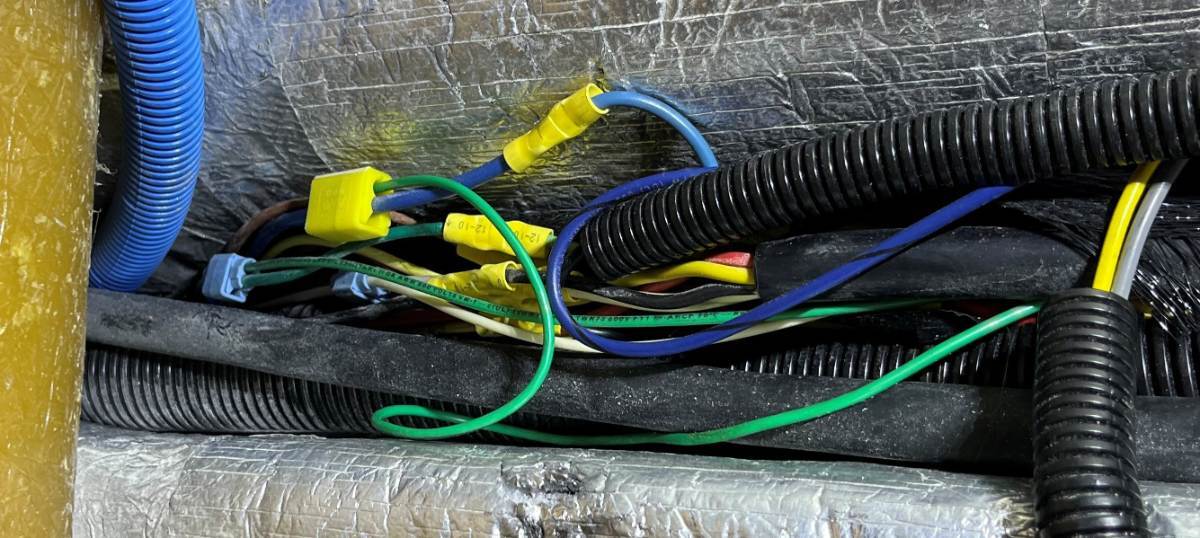
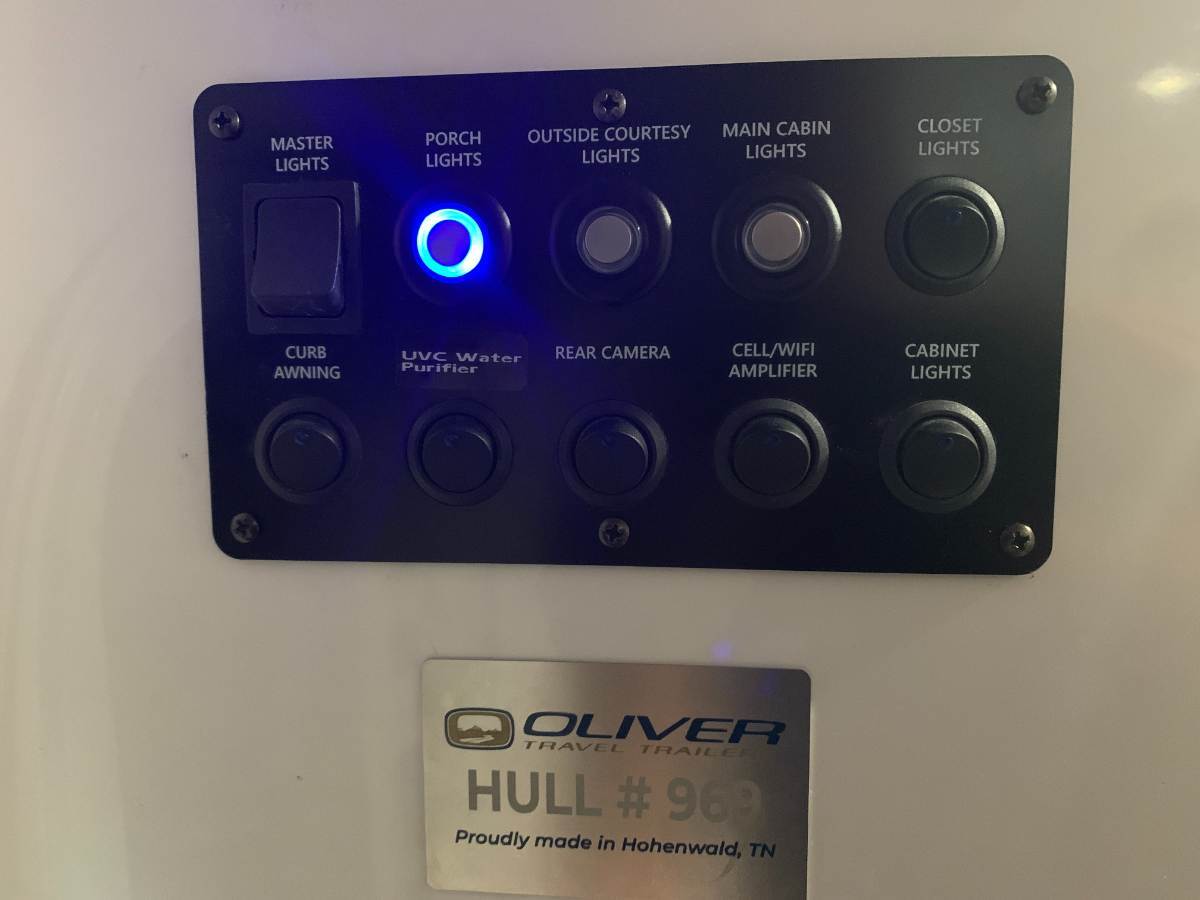
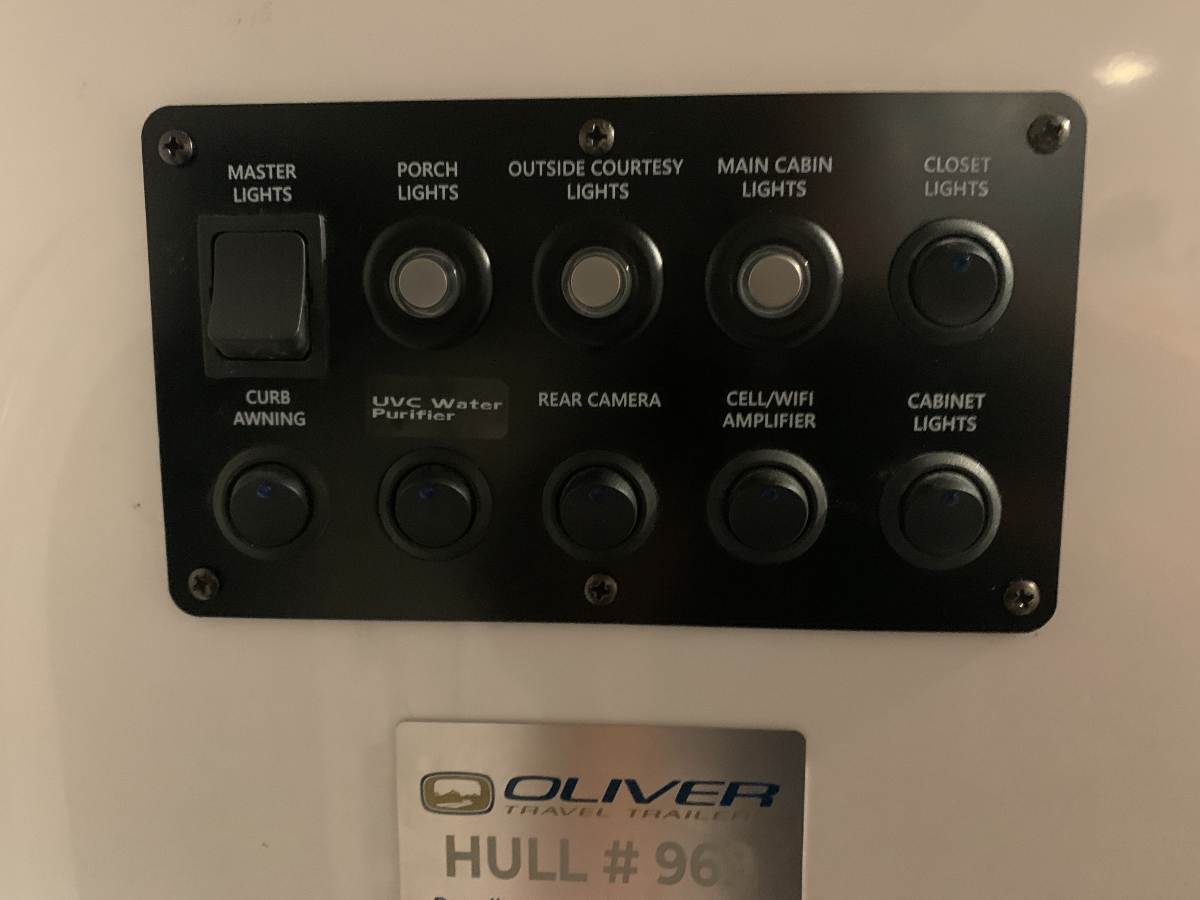
The recent posts about adding lights to the rear and tongue reminded me to share this. There had also been a few previous posts about the bright exterior lights, and some mentioned adding dimmers. We've added these dimmers to ours. From what I've read, Oliver has changed the way the exterior lights are switched over the years so this modification may not work for everyone. On our 2022 LE2, the four Porch lights on both sides of the trailer are on a single switch, as are the lower Courtesy lights. The Porch lights are quite bright, which can be very annoying, especially to neighbors on the streetside. Though we can just use the awning light if we need to keep the streetside dark, sometimes we like less intense lighting. These dimmers replace the rockers in the original control panel. It's an easy modification, but requires enlarging the rocker hole slightly. We also added a dimmer to the Main Cabin lights. (Note: the blue light ring in the picture doesn't indicate whether the light is on/off, it's always on or off depending on a separate setting.) Steve
1 point
-
ADK - The first thing I would do is contact Oliver and ask if they can give you any information on how that original floor was constructed. Below is a pic of what I believe is under the floor that you have in your pic. Bill
1 point
-
@ADKCamper, I don’t know, we still have the Dometic absorption fridge. My first thought is to drill small hole in the center of the floor carefully. Then poke a screwdriver down to see how much room you have. Then use a hole saw in the same spot so you can get a mirror down there, or maybe you have one of those endoscopic cameras. Very likely you’ll remove that bottom sheet. How was the original fridge supported? If the new fridge is designed to be floor supported, you’ll need to build a proper platform. I’d also search the Forum for keyword Nova or Kool. I remember reading a mod post on this model fridge. You also need to deal with the LP line. I’d want it terminated under the hull so no chance of leaking gas inside. The flare nuts on the T-fittings below are extremely difficult to turn without bending the copper pipe. Use two good wrenches and hopefully you can replace the T with a straight coupler. Something else to consider.1 point
-
At least we finally got to try the dinette as a bed. Too small for me, but Steph was able to fit. Will be good for our grandson someday.1 point
-
Yeah I hear you on that. Likewise have also been fairly diligent about cleaning the windows as well. Doesn't matter this is a very flawed design and made somewhat worse by the fact the channels lean in the wrong direction for proper drainage. By that I mean the side of the Oliver rest at about 5-10º in the opposite direction (inward) that would allow the water to flow out of the weep holes adequately effectively backing up and filling both channels of the sliding window. With that in mind I have drilled larger weep holes in one experimental window. Two holes per weeping slit on either side. Also looking into a way of eliminating the natural water adhesion which prevents easy water flow from the channels. Pipe cleaners have not worked at all. Just this past week we ran into the same issue, new twin beds installed and no sooner than that and we received several days of rain. Mattresses and all were very wet, had to remove the entire enchilada to dry and mop up and this was after having cleaned the windows out thoroughly the day before. Because of this I am now in the process of re-engineering a better prevention system that hopefully will mitigate water intrusion to begin with. If this effort fails we will be buying other windows to install. Is it any wonder so many stick built trailers have rot issues? Its not because stick building is so inherently bad, after all most houses are made with sticks but the windows installed on the vast majority of these trailers are designed to absolutely allow water to flow into the trailers. Previously I ad considered installing window awnings on the Oliver but didn't like the idea of drilling holes into the outer shell and didn't particularly care for most of the fabrics offered with what products I found.1 point
-
black1 point
-
Thank you very much for the linked thread! Will read it when I get to my next destination later today. In process of breaking camp now and hitting the road. :) It's interesting that my messages never reported Trailer Disconnected (except when I unplug the 7 pin connector, of course). My messages have always come as the pair: Check Trailer Wiring AND Trailer Brakes Connected. Rewiring is sounding more and more likely to be on my plate in the near future, especially if it clears all of this up. So, I read that link in the past and I have saved both of them for re-reading later. I will add a couple of notes: Everyone associated with Chevy GM said "it's the trailer" and everyone NOT associated with Chevy GM said "it's the truck." My 'last' auto mechanic was careful to check the ground connection at the bus bar (that was one of the first things he did). It all looked okay to him, and to me (though I don't know much about electrical). I suspect the wires inside the axles are damaged, having seen the insulation rubbed near the wheels. And my mechanic said he found 'bare copper wire' which didn't make him very happy. I'm surprised, given the issues encountered, that OTT hasn't changed the way they approach this brake wiring -- and maybe they have changed it? My trailer is four years old now. Thanks to all for the help, links, comments, etc. I will be back.1 point
-
Some do, it depends on the unit. I would prefer to trim the lineset to the correct lengths and thoroughly vacuum the lines myself. That's the exact process I used on my Pioneer. I would highly recommend applying Nylog Blue to all sides of the flare fittings/threads and the dustcap threads.1 point
-
One try will be your last! What frustration in reconnecting it every time we towed. I don't need the big socket and hammer anymore! We have a much lesser truck than your new beauty and I did need it until I upgraded leaf springs on the trailer. No more porpoising, so no more need for it. 😎 Ours has been taking up space in my shed for a year. You just gave me an idea to reuse the chains for new safety chains on the Oliver. What you got there is a new boat anchor for your river raft! 🤣1 point
-
Screws are good, but bolts are better...... GJ1 point
-
Back to a factory direct sales model. We officially showed ours about 30 times and helped close 12 sales. Maybe they’ll restart the owner referral program again.1 point
-
That is a mystery. I was so shaken that I started checking to see if the jack worked. I had to disconnect everything, which meant no flashers on the trailer and is flying by, that all I wanted to do is get hooked up and off the shoulder. So not sure whether this was my error or something that was the perfect storm. Bad bridge joint, new springs, something with the Bulldog. The Bulldog looked fine.1 point
-
Every couple of years I clean that area with a bit of acetone on an old rag. Be careful and do not get too aggressive with the acetone. Good luck! Bill1 point
-
The only "issue" (in addition to the above mentioned ones) is a possible regulator failure. If you have both tanks connected and the regulator fails at the automatic changeover and/or internal seals, then the other tank is there to stop the flow of propane. Bill1 point
-
Wow, John! I can just picture how terrifying that must have been. It gives me goosebumps just thinking about it! I’m so glad you and everyone else are okay and came through unscathed.1 point
-
Lots of us saw this coming when they first announced they were going to dealer sales.1 point
-
While in Colorado this summer I started getting an intermittent “trailer brakes disconnected” message on my dash. Very intermittent. At times I could drive a couple hours and all was good, then the message would come on intermittently for the next hour. It only stays on for anywhere from a few seconds to 20 or 30 seconds and then go off again. When I had the message the trailer brakes were definitely off. I checked the 7 pin connector and looked for loose wires. When we got home I had my local RV guy check the trailer. He found nothing. I took my truck in to the dealer, he checked everything (connector, traced wires, used trailer simulator and drove around, etc) and he found nothing. I just pulled our trailer over to the house to get ready for our next trip and sure enough I got the message couple of times before we got home. In the spring my RV guy recommended we replace the brakes next visit because there’s not much life left. When working they still have good stopping power. I’m thinking after this next trip (home mid-October) I’ll go ahead and have him replace them. My hunch is that it’s something loose or not well connected on the trailer side. Any thoughts? Mike1 point
-
M & C, Are you getting the notice via your Dash Messages? We did, and here is what it was. (I am working on a Post about this). JD had a similar post about Brake wire issues, which I found informative. https://olivertraveltrailers.com/forums/topic/2685-how-to-brake-wiring-is-undersized-some-answers-and-partial-solution/#comment-25131 There is a 2-wire pair (mine looked like old brown table lamp cord) which travels through the front and rear axles that bring the current for electric brakes from the Drivers side to the Pass side. It is a common way RV manufactures do it. That wire has slack and sits inside and rubs inside those tubes. Ours rubbed/abraded to bare wires on a couple of surfaces, causing an intermittent short that soon became a constant short. I basically just cut the old wires off and ran a larger insulated 2-wire pair 12awg across the outside of the back of the axles at the rear so to prevent rock strikes, once I had it all connected. WE HAD BRAKES AGAIN… I found that removing the wheels made it easier to get in and work at each hub, where green brake wires go into back of the plate to get to the brakes. Before you cut your wires, maybe test the green wire going into brakes with a meter to make sure. If you pull the "Brake break-away" cable and then measure the current where the brake wires come in (inside driver side wheel well) you might get a reading, but I am not sure what an electrical short might do to that reading. I was told 80% of the time it is the 7-pin (which it was not), so I naively replaced it, before I found out what the real issue is; now I have a “bugly” 7pin, which is not sealed to the weather like the OTT factory one... Best of luck. B~Out
1 point
-
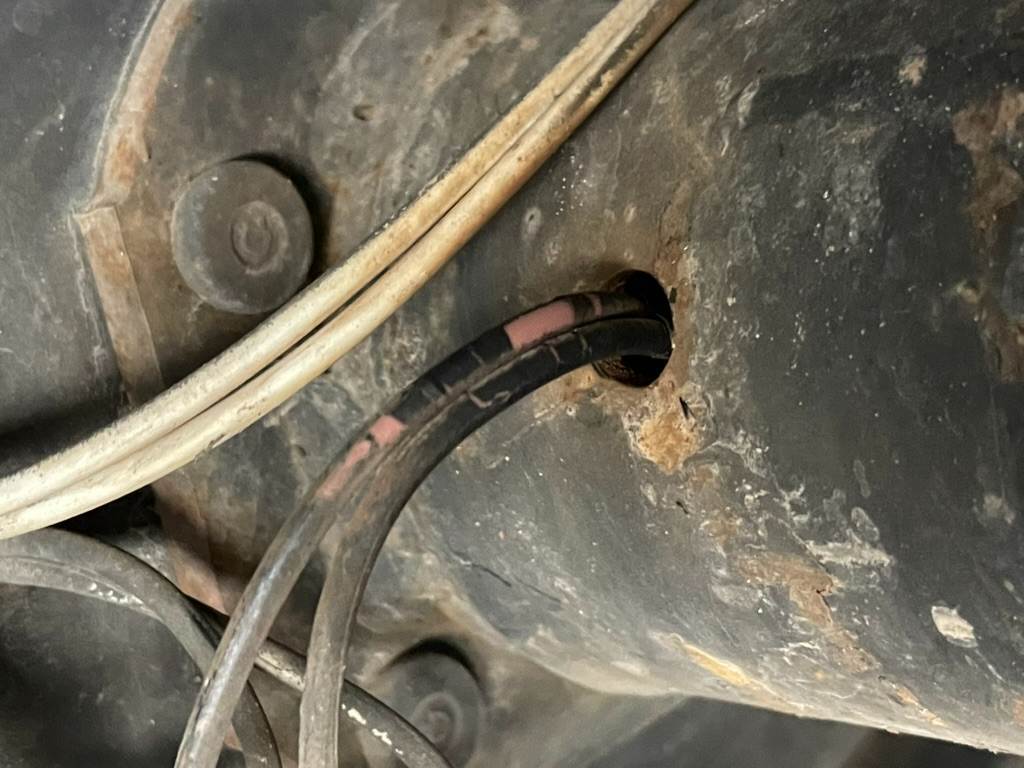
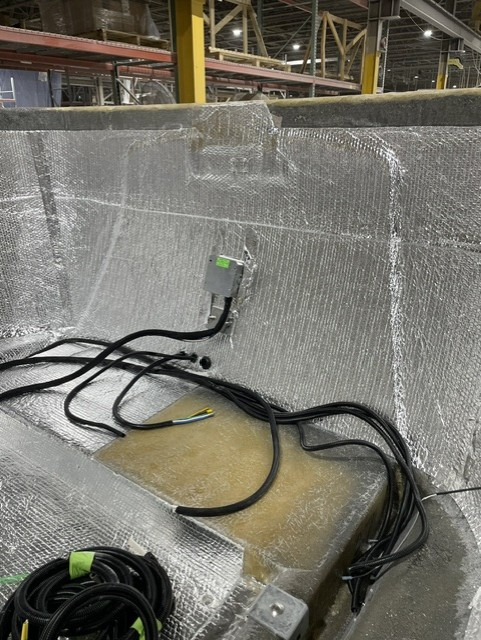
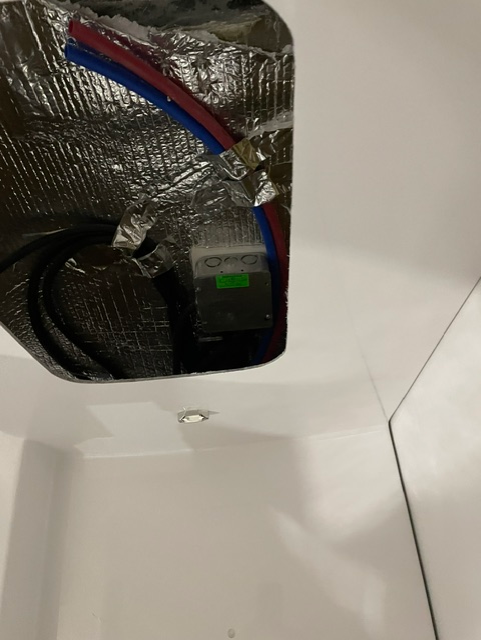
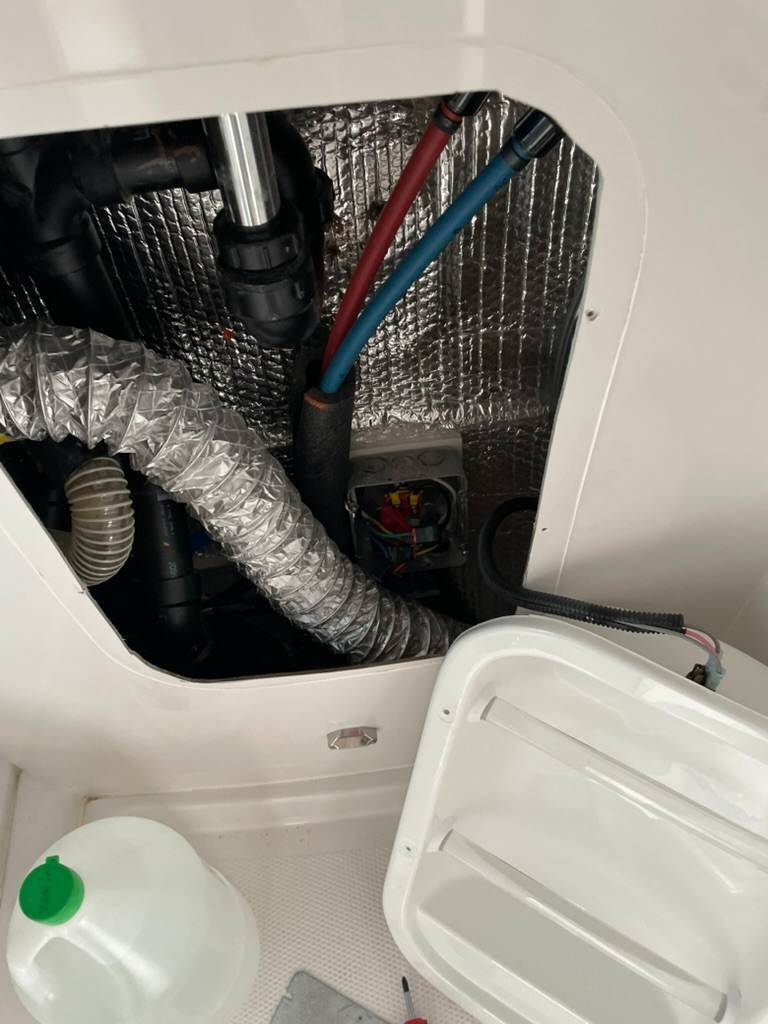
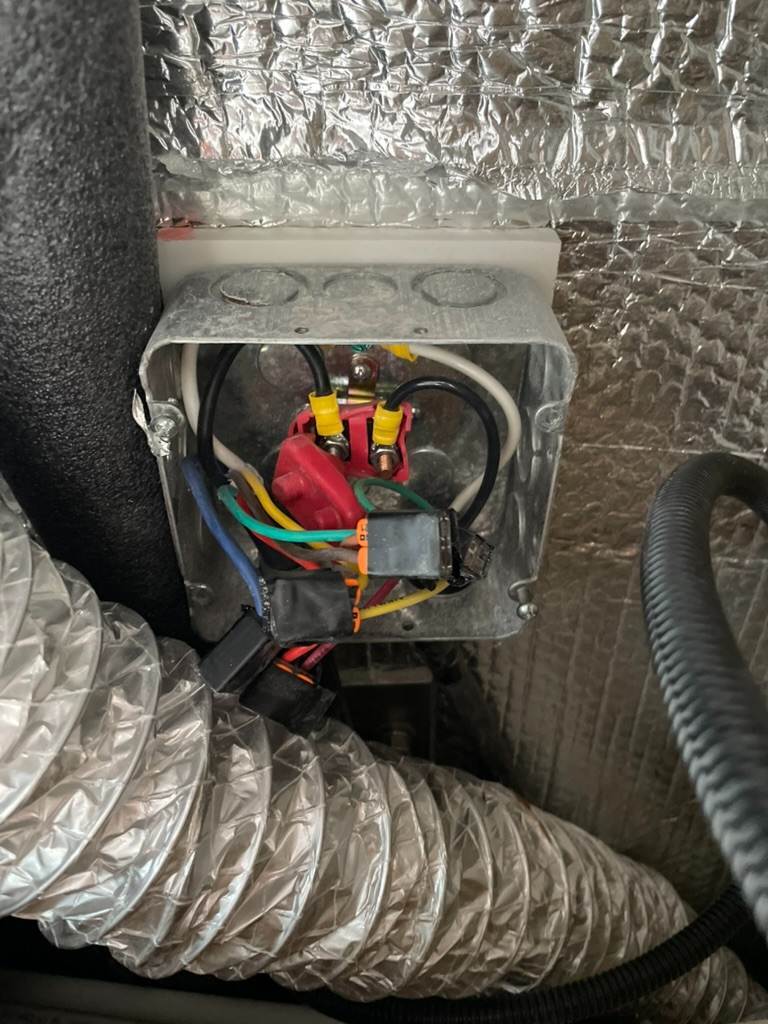
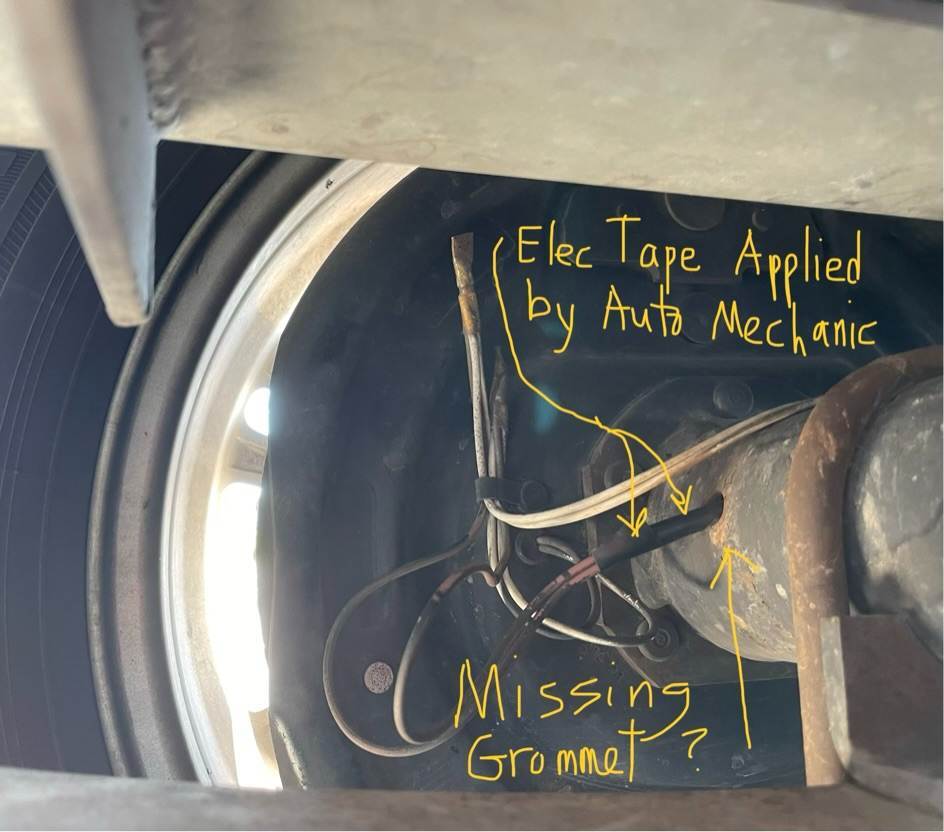
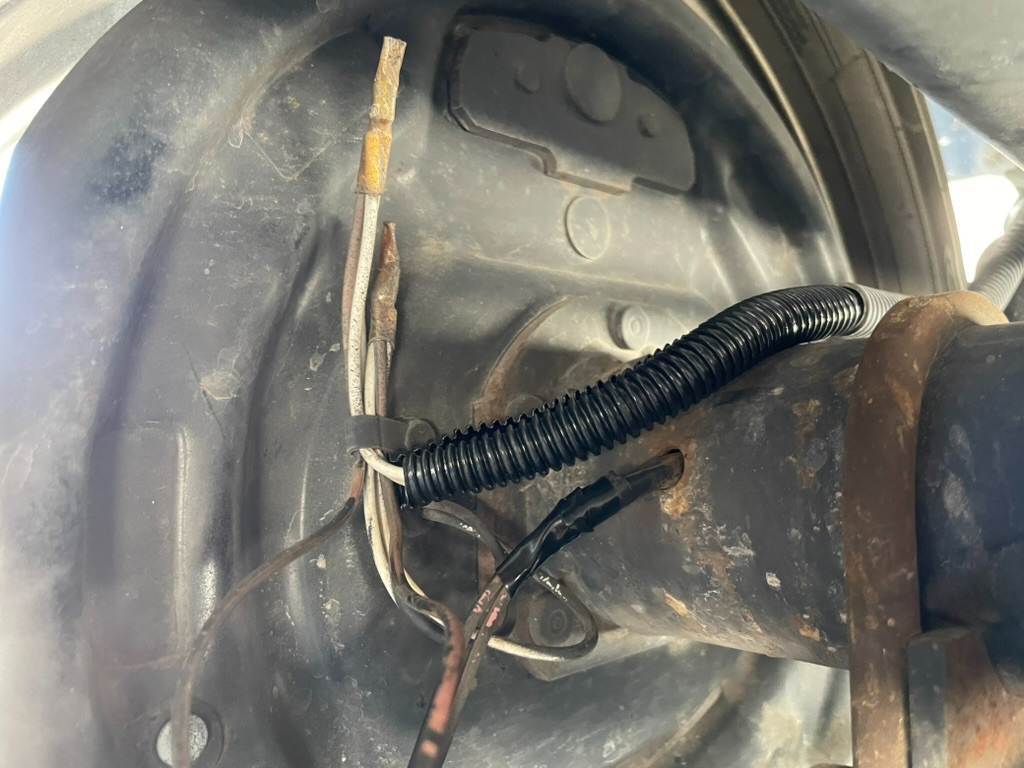
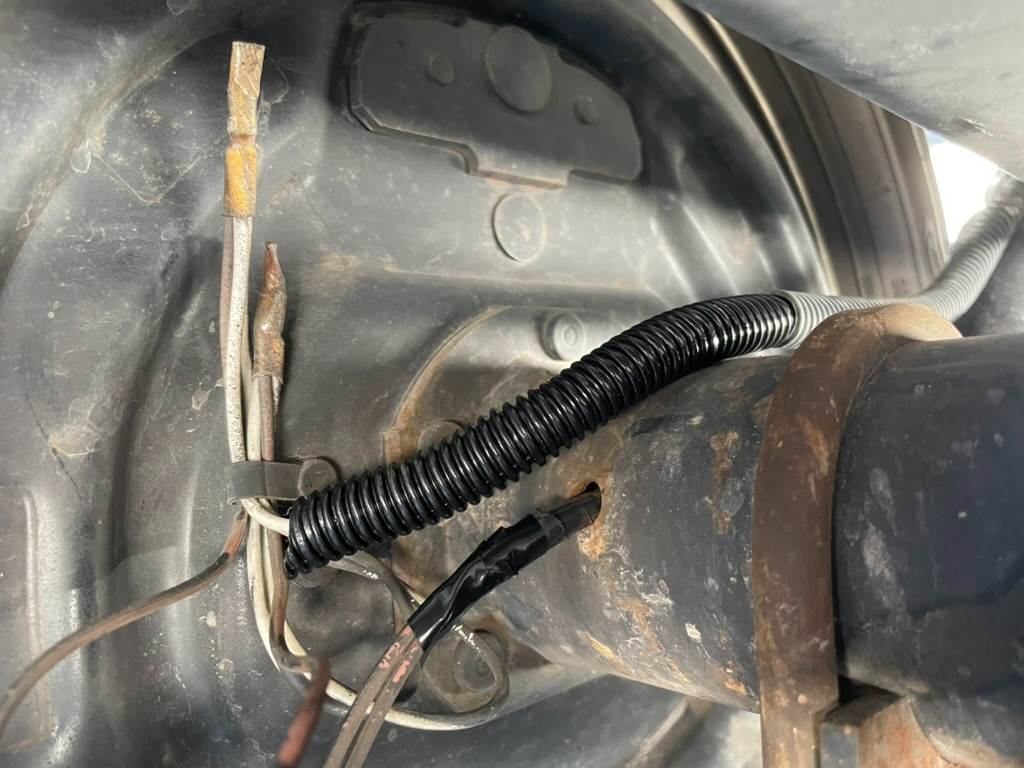
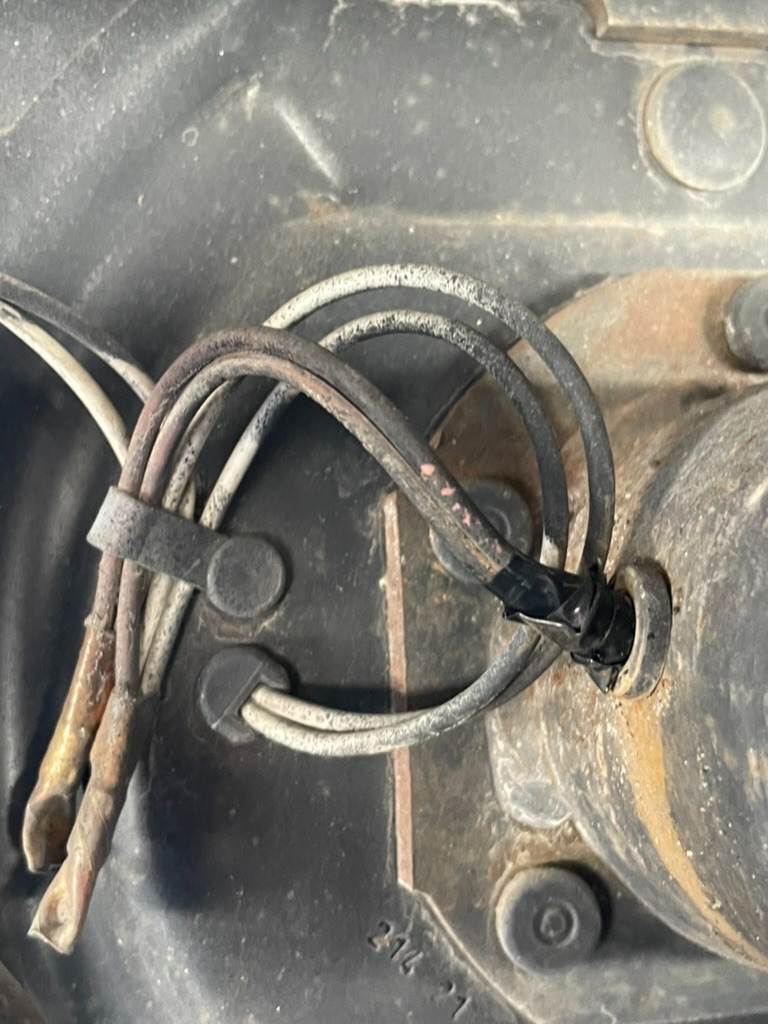
Last September (2025) I mentioned this issue in another thread, and said I would post a new thread when I had it resolved. The thing is -- I don't have it resolved. I've been chasing this for months, unhappily. So I am going to share the saga, I will try to boil it down into concise bits, and maybe some of our more mechanically inclined members will have some ideas and suggestions. TV is a 2023 Chevy Silverado HD 2500 diesel truck. Oliver is a 2022 Elite 2, bought new from OTT. In early September 2025 I needed new tires. I dropped my truck off in the late afternoon at a reputable place in Pinedale WY. I asked them to check the spare while they were working on it. The following morning they called to inform me that my batteries were dead, so I needed new batteries as well. The next afternoon I picked up my truck; by the time I arrived back at camp, it was getting dark. I shut off the truck and discovered they had turned on my overhead lights and left them on (hence my dead batteries?)... In the morning I hooked up to tow to my next destination, and began getting alternating warning messages on my dashboard and center console: "Check Trailer Wiring" and "Trailer Brakes Connected" I pulled over (not 5 miles from camp) and checked my 7 pin connector; it looked clean, was firmly attached, my trailer lights all seemed to be working. But the messages continued. I could 'dismiss' these messages from the steering wheel, but they would pop back up immediately and they interrupted my view of my map on the center console, making it difficult to follow. In Denver CO, I had 10 days with family. I was convinced that something had happened to my wiring under the truck near the spare tire (wires, modules all in proximity.) I took my truck to two Chevy GM dealerships; neither had time for me nor would they allow me to bring the TT on site, but each ran their diagnostic and both came up with these history codes: B1325 Control Module Power Circuit Low Voltage, failure code 0x03; C1114 Trailer Brake Control Solenoid Valves Control Circuit, failure code 0x00; and P0562 Voltage Low, fail code 0x00. I call ahead to Amarillo TX dealership, explain the situation, guy on phone says he knows exactly what is wrong. Make appt. They don't do anything on Friday except change the oil; then the electrical guy is off for the weekend. I finally get the truck the next week, with this description: "Verified concern. Connected scan tool, found DTC C114 set in chassis control module, Checked trailer 7 pin connector for signs of corrosion, none found. Removed connector x188 at trailer receptacle and inspected for worn and pushed out pins, everything OK. Placed test lamp at pic c to ground and commanded low to high percentage with scan tool. Test lamp followed command from low intensity to high intensity change in bulb. Internal malfunction in k133 trailer brake control module. Replaced trailer brake control module and cleared DTC. Test drove to verify message did not appear on dash." (They did test drive the truck -- 18 miles worth.) $400 bill. I hooked up my Oliver to pull out, and the warnings continue. All during this time, my trailer lights and brakes seem to be working fine, but the warning messages continue. Fast forward to February. I hooked up for a short camping trip in Florida and the messages return. **I should note: I can't keep my OTT at home, and it's in a storage facility about 50 minutes north of my home. I'm not allowed to 'work' on it at the storage facility, and I can bring it on site to my neighborhood but only for a few days each year.** I call OTT Service dept on May 3, to check their calendar in case I need to come up before I head west for the summer; they have openings both spring and fall. I am determined to dog this thing and to try to resolve it without having to tow 900 miles to Hohenwald before my trip west. I have now taken the truck to 4 dealerships. They all say, "It's the trailer." I take my truck to an independent mechanic and he says, "It's the truck, but the modules should be under warranty, so go back to the dealer for this." Just to be sure, I find a Mobile RV Tech, tow the OTT to my neighborhood for one night, have him do his service (everything checks out fine on OTT, all working, but he finds something loose under the truck and the messages go away. But then they came back. This is exhausting. May 2026 -- Issue was still there, and now my trailer brakes aren't working. That is a new symptom. I say not working, but it was really intermittent; I could test with the gain control on center console and sometimes working, sometimes not. June 3, 2026 -- Back to dealer (45 minutes north of me), "It's the trailer." This time they let me bring OTT in tow; but they still say, "It's the trailer." A friend suggested another independent diesel mechanic that happens to be near the dealer. From the dealership I towed OTT to Elite Diesel in North Fort Myers, it's 3:30pm. They make a cursory review for about an hour, and say they believe it's the truck. June 4th, 2026 -- At this point, I am nearing departure date, so I haul trailer home, take truck back the next morning, get a ride home. Within 30 minutes they call me, "Can you tell us why your left side truck battery ground wire isn't connected? It still has the black cap on the end that it's shipped with, the cap on end of ground cable was never removed from the cable." (I've made 5 visits to Chevy dealerships citing need for regular service AND this electrical issue and NONE of them noticed this?) My new mechanic thinks this has solved the issue. I get ride back up (45 min), retrieve the truck, drive home (45 min), connect the trailer, issue still there. I tow the truck and trailer both back to independent diesel mechanic (45 min). I have work I need to do on my Oliver, so the mechanic agrees to let me do my work there (greasing my zerks in his parking lot) while they disassemble the spare tire, remove modules, check wiring in back of truck..... Now they are thinking something must be amiss in the trailer wiring. They don't stock that cable, so I might need to order one. I call OTT Service to inquire about what model or brand Oliver uses, since I've read that they are not all alike; Mike says he can't help me, transfers me to Tech Support. Jerry at OTT Tech Support talks to me about the 7 pin cable. He says the 7 pin cables are really the same (but Chevy Service Manual warns to use the "right one" to correctly operate the Chevy.) Jerry gives me some solid advice -- don't let them cut the head off the 7 pin connector; if head needs replacing, take it back to the junction box under the vanity, and other tips. I have no idea about this junction box; I can't find it in my manual or wiring diagrams, but I'm not a mechanic or electrical engineer. Jerry sends me a series of photos that show the route of the 7 pin cable in the trailer to a junction box inside the vanity cabinet. (see below) He says "if it has to go farther back from there, it's a really big job." (Oh boy.) My mechanic removed the vanity panel -- immediately saw two wire connections are loose though still have the nuts on the connection (below). ** I need to find the correct caulk (and thanks again to Jerry for providing the name of it) Silicone: ASI 335 Advanced Adhesion 100% Neutral Cure RTV Silicone, WHITE. Until that is fixed, I won't be using my shower, since it's open to this electrical junction box.** He tightened that down. Then he tried to find the rest of the wire, crawls under the trailer, sees wiring going into the street-side front axle where the insulation has been rubbed off. I am dumbfounded, so I wriggle under there, stick my head around the corner; these are really small wires, going through a hole in metal without any protection; they rub on that hole in the metal axle, and I see there is no grommet on the hole. This doesn't seem right to me. He wrapped it with electrician's tape. I drove around, and the issue had cleared up. I drove around some more. No warning messages. I had not crawled all the way under my Oliver before, though I have been greasing my zerks regularly; I grease the zerks from the side, not from below. I gave my phone to the mechanic and he snapped a couple of photos that I shared with Jerry, before he put the tape on. I was ecstatic, and so happy that with 3 distinct wiring issues this mechanic was willing to dog it, find them and deal with them. And THANK YOU JERRY. This is June 4th. My reservations are all in place and I depart early on June 8th. Yesterday June 10th, I called OTT Service again to inquire about whether there should be a grommet on that hole, and if so what size or could they ship them to me? Mike says he doesn't know if there should be a grommet, doesn't know the size and doesn't sell parts; transfers me straight to Tech Support. I talk to Jerry -- my hero -- and I send Jerry the photo from my mechanic before it had electrical tape on it. I had already purchased some Liquid Tape, extra electrician's tape and a box of Wire Conduit (that black plastic sleeve that is used all over the OTT). At that point in time, I was not getting the warning messages any more, but I was not entirely convinced that the tape on the wires would hold up to thousands of miles of travel. Jerry encouraged me to keep my eye on things, and I could get it repaired during my scheduled service in October on my way to the rally before I go back home to sw Florida. Don't you know it, less than an hour later, the messages came back. My trailer brakes seem to be working, as well as my lights, but it's very disconcerting. I found a Walmart parking lot and spent about an hour crawling around under my OTT. I applied more tape, put on a piece of wire conduit (sleeve) and inspected the other 3 axles. (below - you can see OLD piece of sleeve on far right side, and my new piece of sleeve, and you can see Mechanic's tape and my additional tape which is shiny and not dusty.) Additional tape and new conduit sleeve (above) on the street-side front that the Mechanic repaired. Other axels -- I added tape to one, shoved the grommet back into the hole on another (below). PHOTOGRAPHS & CREDITS: Wiring into axle (2 photos by Elite Diesel in North Ft Myers); Routing of 7 pin cable (5 photos by Jerry OTT Tech Support); the rest are my own photos, including my junction box with loose connections and my wire at axle with question about missing grommet (2 photos I sent to OTT); and then my 'discovery' of the grommets on the other 3 axles yesterday. The warning messages continue though they are sporadic. SO FAR the brakes are working (tested by using the gain control on my center console, when traveling slow speed). I'm inclined to keep going on my travels. I have an appointment with OTT Service in October. But I am interested in any additional input, and -- if for no other purpose -- I submit this for others who might have to figure out where that 7 pin cable goes and possible places to look. *I did try to search for other threads about this, but found none. I feel certain I've seen some comments about "usually trailer ground wire issue" but didn't find it. Thanks to all who have been in touch, and especially JERRY at OTT Tech Support for his kind and timely service. *** Please note: my wifi connection is via starlink and might be sporadic, and only when I'm not traveling. ***
0 points
-
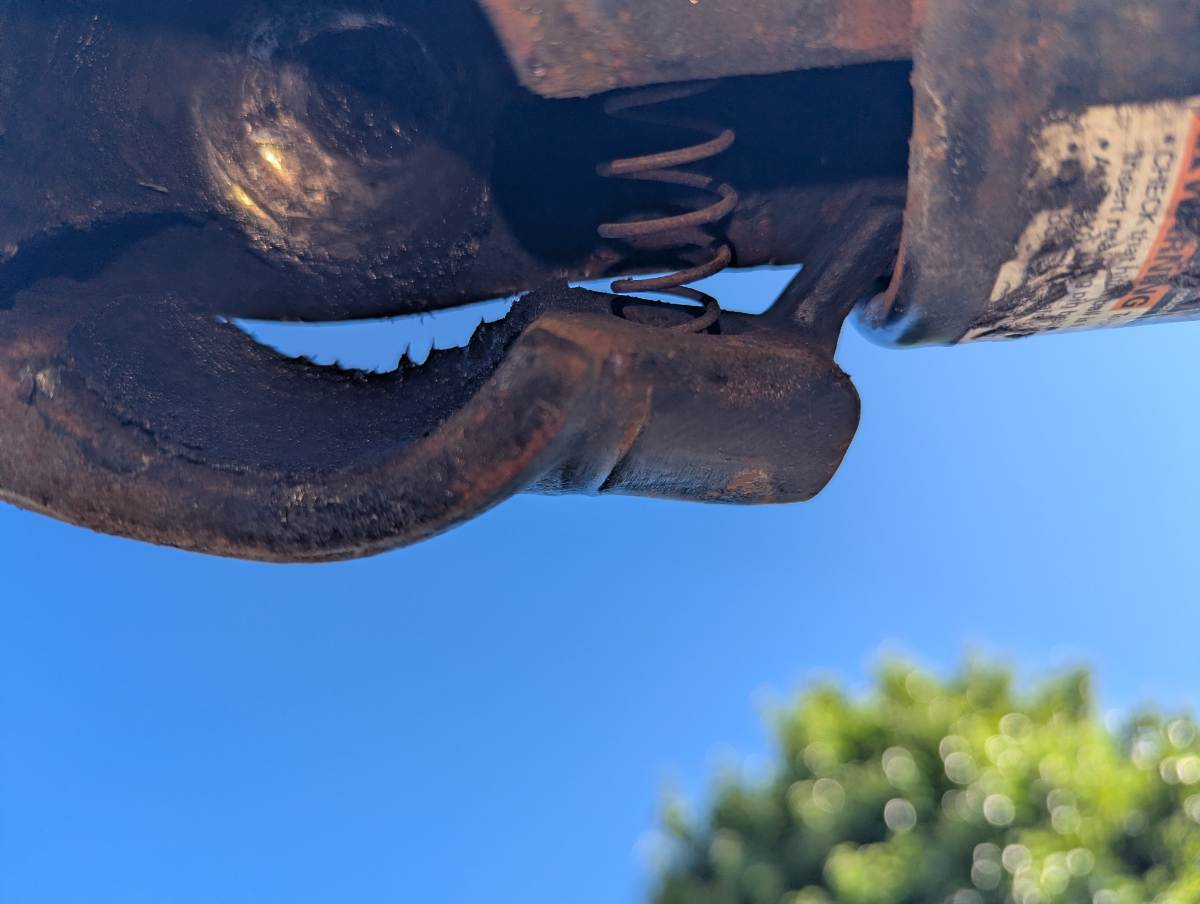
Yesterday while traveling home from Northern Indiana on US 31, we hit a bridge joint. It was a big jolt followed by a load bang. Looking back the front of the trailer had dropped. We slowed and pulled off onto the shoulder. The crossed chains did their job, as did the brake cable. Got out and was pretty shaken so I didn't look closely at the hitch, and can't remember anything, other than the pin was in place. We just had Alcan 5-leaf springs installed and our travel home was completing the 500 miles before re-torque, which will be done tomorrow. The springs are still stiff and will be for awhile. Wonder if this could have contributed I found no damage to the Bulldog Hitch. We have the 2" ball and 2" Bulldog. Very scary. Only damage was the foot plated of the front jack. I will get that replaced.
0 points
-
I have no idea what gave you the impression that I have dismissed anything. I've done my best, given no space to "work" on my Oliver (not at home and not in storage) and given no tools (very few, I should say, because ALL of them have to be stored in the truck or the trailer, as I have no garage). I take everything here to heart. Please cut me some slack. I'm trying, believe me, to end my nightmare.0 points
-
I'm pretty diligent with our sliding windows, cleaning the tracks and drain holes regularly, but they let me down last night. We were away from the trailer when a heavy thunderstorm rolled in. Came home to my bed soaked. Found a drowned stink bug in the outer track. I think he blocked either the track or the drain hole. Fortunately, it's hot and sunny today and the mattress is on the picnic table to dry, but if it was a rainy week we'd have a problem getting things dry. That's the downside of these sliding windows.0 points


-
Recent Achievements
-
")


")


