Leaderboard

.thumb.JPG.dd838cdb3df463dab6a16861fa23a319.JPG)


Popular Content
Showing content with the highest reputation on 01/08/2021 in all areas
-
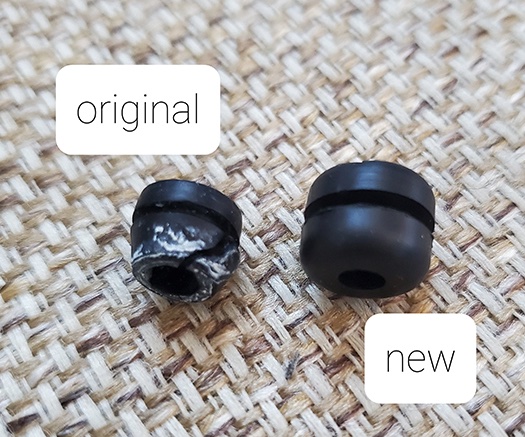
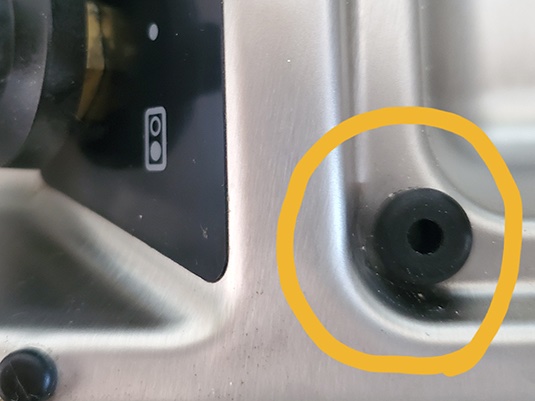
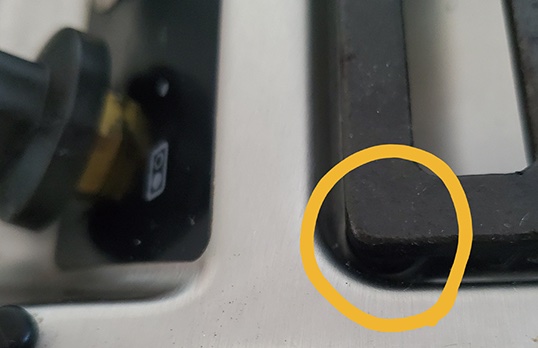
One of the small rubber feet supporting our Dometic D21 Drop-in Cooktop Grill needed replacing. I found an option online that works. It's not the exact size/design as the original, but it does the trick. Actually feels like a more durable rubber compared to the original. https://www.rubberfeetwarehouse.com/products/5-32-inside-diameter-rubber-grommet-fits-1-4-holes
 4 points
 -
I found there was not with some of the larger plug adapters out there. However, I did also find that once I got it set up with an adapter plug that allowed room (there's a photo of one such adapter above in another post), that I was getting an error on the Surge protector panel in the attic (the description of the error in the SP manual mentioned neutral-ground issue IIRC). So I tried it w/o the neutral ground plug and lo and behold I got E0 - i.e. no error and happy current flowing to outlets and charging the batteries etc. I.e. with just the one outlet into which the trailer was plugged). This appears to defy the conventional wisdom I've read in generator threads on this forum but there it is in any case... BTW I also bought the Hutch Mountain propane conversion kit and found it similarly easy to install, and it worked just fine on first try, though ran just a touch more smoothly after doing the easy-to-make airflow adjustment that's clearly described in the HM instructions (it's nice to know how easy this is as they suggest it may need re-adjusting at altitude).3 points
-
John, I did basically the same thing you’re thinking a couple of years ago. I took two low amperage 12 volt computer fans and mounted them to the inside of the furnace return grill. Now that I have removed the problematic propane fridge, I use the fridge fan switch by the entry door to operate these fans. I don’t use a thermostat but just turn them on and let them run. They are able to take the conditioned cabin air and force it into the basement. Not a lot of flow but I can feel a slight bit leaking thru the converter grill under the dinette. A higher capacity fan(s) would be great but I would be careful not to have so much that you run the risk of activating the furnace sail switch.2 points
-
https://www.instragram.com/gastateparks/ My camper has now made it to the Ga state parks website on Instagram My son took this shot this past summer. Oliver may get some free advertisement from this photo! It is amazing that I was told when I start camping with my Ollie people would ask about it and want to see it. We have camped about 6 times in 6 months and I have been stopped every time as people love the look and quality.1 point
-
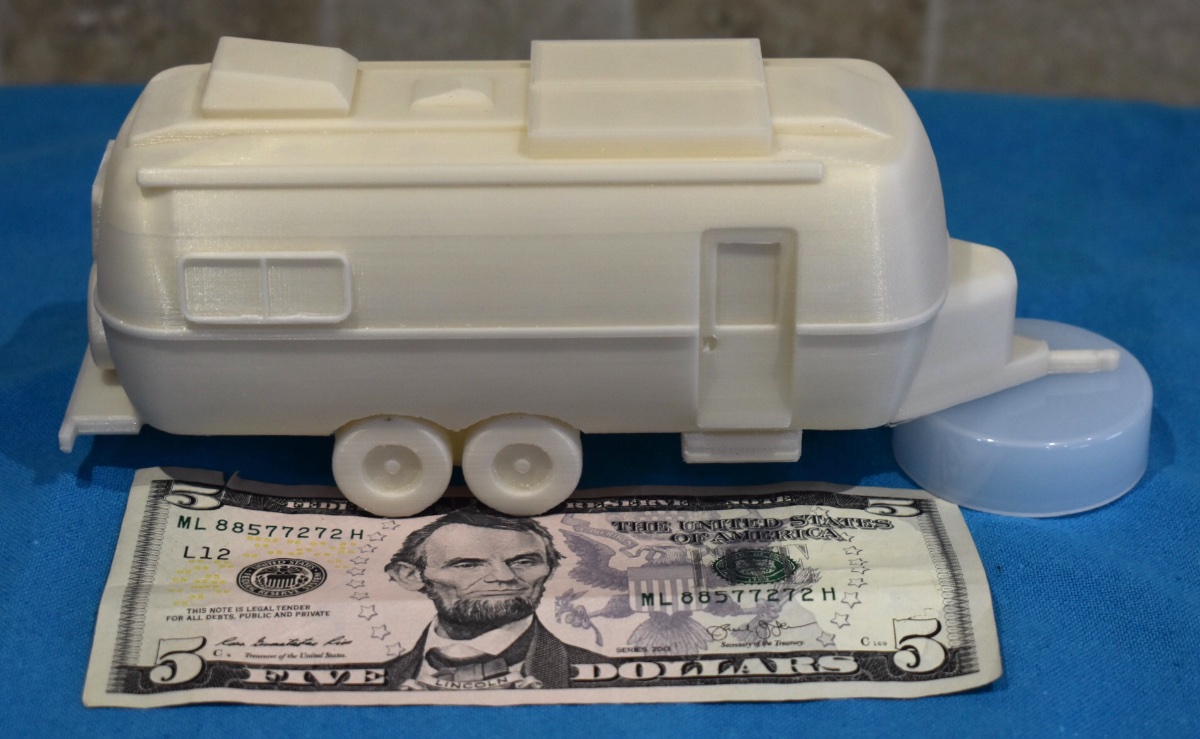
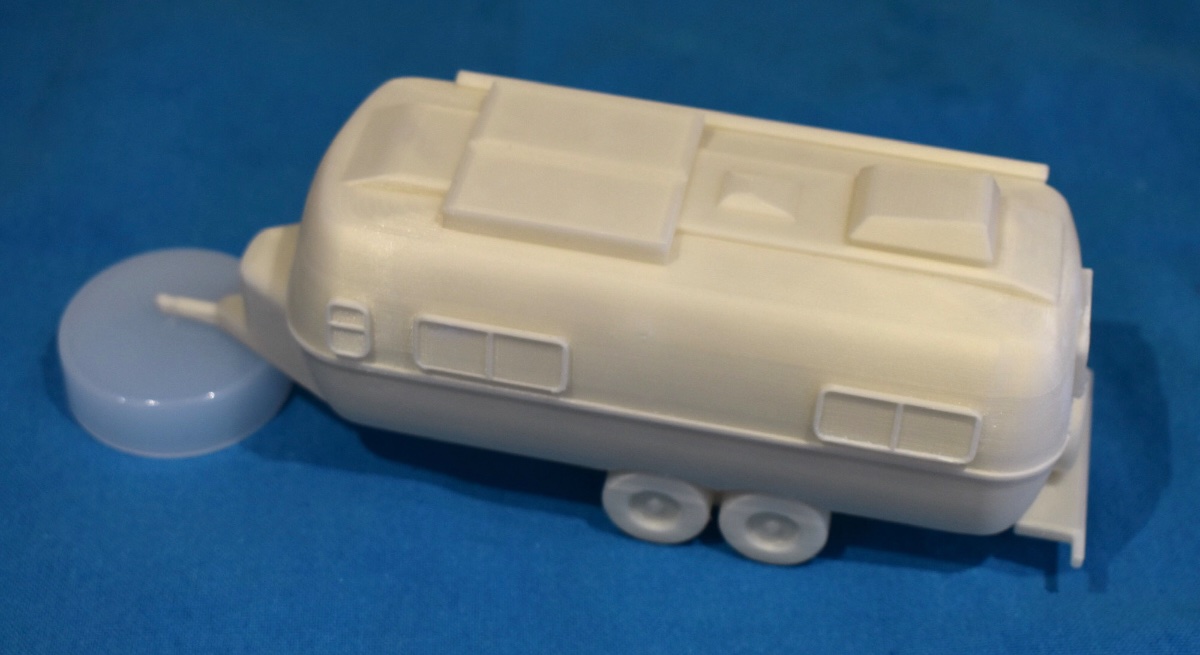
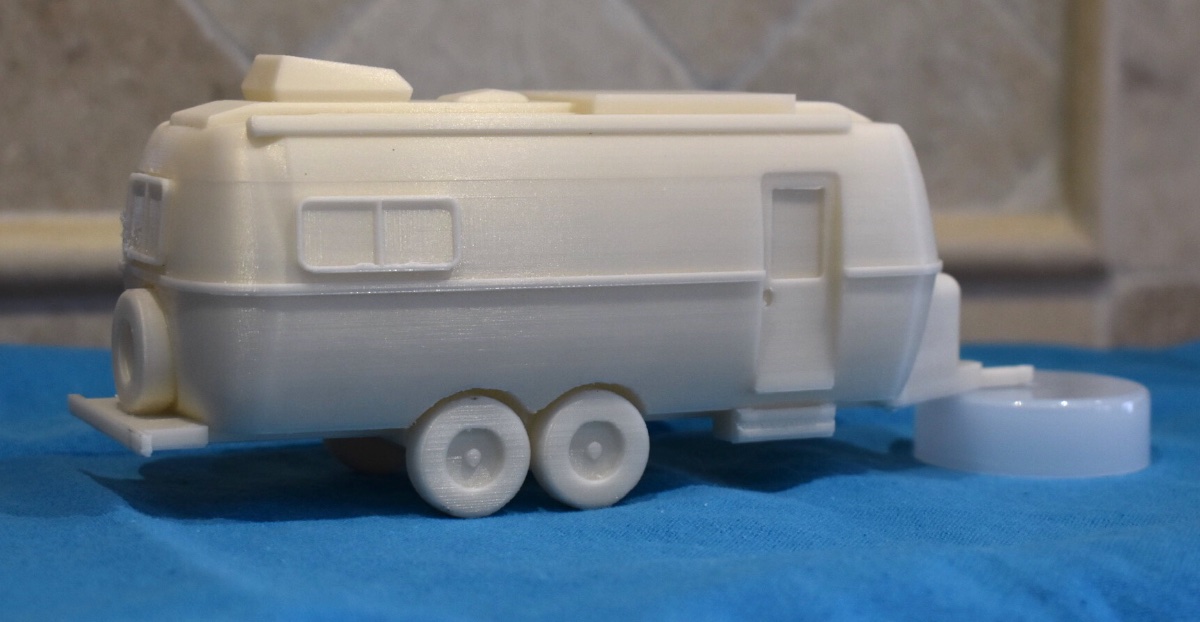
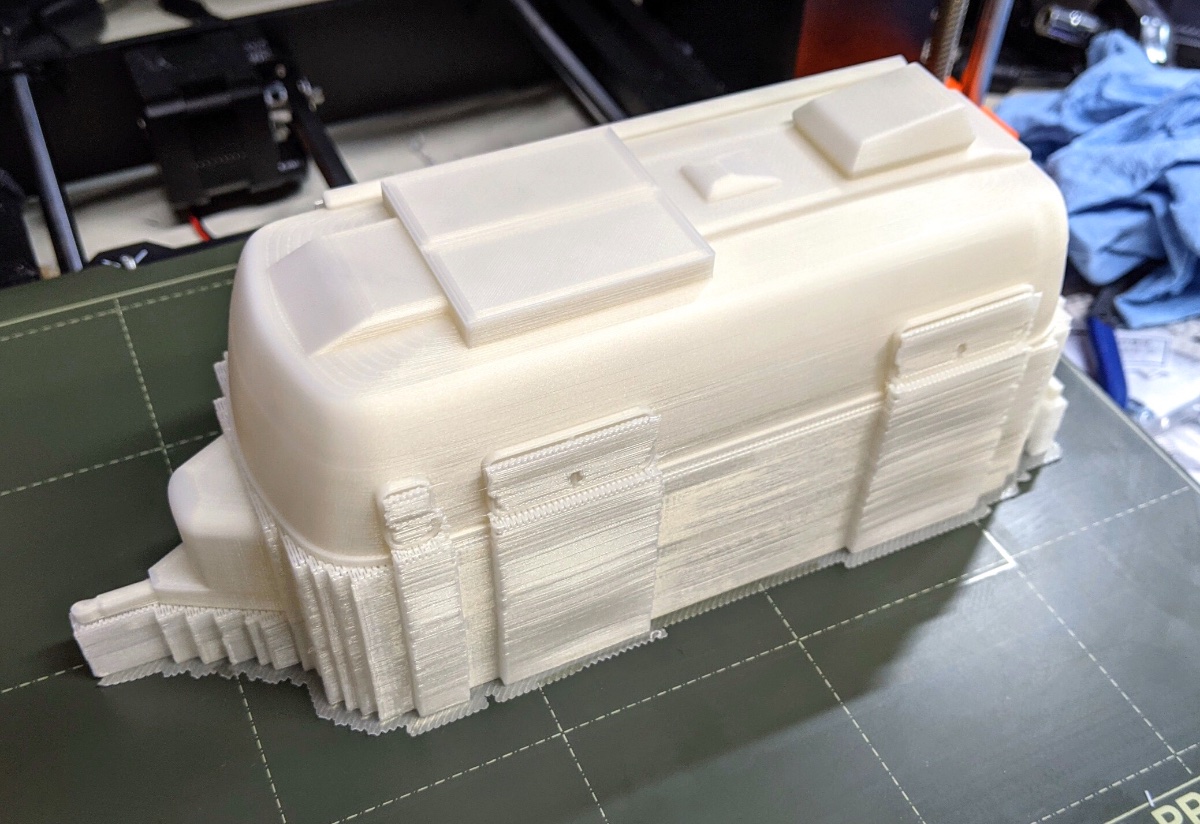
My son is a computer game programmer and they recently got into 3D printing. Here is what arrived for Christmas...... It was a total surprise. The $5 bill is for scale. The hull is exactly 6” long, the LE2 hull is 18’, so this makes the model 1:32 scale. There are lots of truck models in this size, my Land Cruiser 200 would be 5.9” long at this scale. ..... https://www.ebay.com/itm/Toyota-Land-Cruiser-4x4-1-32-Scale-200-VX-Wagon-SUV-Diecast-Model-Mini-4wd-Car-/362667098231 And this is what the model looked like before final trim “processing”, I have NO clue how that is done. They were not able to find an actual data file online, they did this completely from scratch using photos. They are willing to share the print file if somebody wants to try this at home. They are thinking about dividing the build into layers, so you could print the tires, frame and hull in different colors and then join them.... but it would not be too difficult to prime and paint the all white version. And no, they do not want to start mass producing these. That would be something for the much rumored, never seen Ollie Store in Hohenwald. Happy Holidays. John Davies Spokane WA EDIT: FILES AND BASIC 3D PRINT INSTRUCTIONS. NO GUARANTEES, THIS IS NOT PLUG AND PLAY EASY. If you cannot download these files directly from this thread, let me know and I will try another method. Thanks to my son Ian! oliver legacy elite 2 trailer davies.stl oliver legacy elite 2 trailer davies.3mf “Provided as is - this shouldn't be too hard of a print, but you'll probably want to have a basic handle on printing. The print specifics below are what I used to print it. They're not required, but might serve as a starting point. Print specifics: Printer: Original Prusa i3 MK3S, 0.4mm nozzle Slicer: PrusaSlicer 2.2 Filament: 1.75mm Prusament PLA (stock profile in PrusaSlicer) Perimeters: 3 Layer Height: 0.1mm Infill: Gyroid, 5% Supports: On Raft: 2 layers (not necessary, just makes it a bit easier to get the tires round) Model print scale: 850% (~200mm x 66mm x 82mm) Total filament (including supports): 143g/48m If you slice it yourself, you'll probably want to put support blockers in the wheel wells - cleaning supports out of there is a pain. This will require some postprocessing - mostly just removing supports from small gaps. If your printer isn't precise enough, or if you're printing with a larger layer height, you may want to do some sanding to get the curves more fluid.” I. D.
1 point
-
Hello, We are Dan and Theresa from Colorado. Yesterday we brought home our new 2020 Elite II as second owners. (Hull #627). After a couple decades of camping with pop-up tent trailers, we have moved up...way up! We first learned of Oliver just a few months ago as we started researching travel trailers and finding that we were dissapointed with the quality of pretty much everything we saw. I started reading through the forums several weeks ago as we were considering this purchase. There seems to be so much great information shared and a sense of family. I'm sure I will have questions as I get some experience and start to ready the trailer for a trip and would sure appreciate the wisdom of this group! The weight and size of the Oliver meant we needed to upgrade our tow vehicle as well. So --- we pulled the Ollie home with our brand new Silverado 1500 I6 Duramax and it was fantastic. We are a little (Ha ha) lighter in the wallet now but excited for upcoming adventures as recent "empty nesters." Already have reservations at Great Sand Dunes NP in Spring, Rocky Mountain NP in June and Mount Rusmore/Custer SP in Fall. Looking to add more in-between. Again, appreciate all the great info shared here! Dan & Theresa 2020 Oliver Elite II, Hull 627, 2021 Chevrolet Silverado 1500 3.0L I6 Duramax1 point
-
Check voltage at the pump - no voltage - trace back to problem. 12v at pump - hmmm. Try to visually verify there is nothing in the pump - blocking action. With pump on - tap it a few times - a swift but gentle tap - if nothing happens, its probably a bad pump.1 point
-
Which is why one gets something like THIS. Bill1 point
-
Thanks! Great idea to give a try! I can test how this works with a fan mounted on a piece of plywood that fits over the access hatch under the dinette seat. I'll set it up and see how it moves the temps around the basement. If there are still some dead areas that stay cold I may be forced to use the ducts as I have those set up and targeted specifically at the problem areas. The entire basement really needs some heat all around as the plumbing wraps around 3/4 of the trailer. The battery compartment is staying surprisingly warm and looks like it won't need any venting specifically for heat. I have the Oliver provided heat pad in there anyhow as a last resort. Trying to keep the battery compartment cool(er) is a different problem than trying to keep all of the basement plumbing from freezing. I may be able to leverage some of this work I'm doing on the heat, but I don't necessarily have to. I'm going to wait and see how hot it gets in that compartment - I'm in NC and I won't have to wait long for some steamy temps - then I'll figure something out. You should have some great data on your venting project by then too!1 point
-
I think this could be a very cool solution (pun intended) for when you are on shore power. I actually don’t think it needs to be inside a furnace duct at all. The spaces under the floor are all essentially tied together by the huge gaps at the front and rear of the water tanks. You already have a great big air inlet at the curb side, for the furnace air. How about this....? Mount your fan under the front dinette seat, if you can tolerate a loss of storage, or alternately under the rear one (use plastic ductwork because of the high voltage there). Leave its intake wide open and duct the outlet air into the cabin through a 4” hole cutout. Put your space heater on the floor in the middle, facing backwards. Warm air will tend to pool near the back and will get sucked into the furnace grill. It will then flow all around the basement, through your new fan and out the front grill. No dampers needed. It might be fine with the furnace running (the suction could disrupt air entering the furnace box), but OTH I don’t think it would at all be needed when you are heating with propane. In summer it will suck out the hot air from under the floor and cabinets and provide some extra cabin air circulation, as you commented. I do think you should add holes in your battery box for the lithium battery area to ventilate. It consists of two closed and nested cubes and traps heat if the door vents are sealed. I don’t think you need nearly as much as 160 cfm for heating, but in summer it would provide a nice blast of air. Research “bilge blower” in some power boat forums for some ideas, that is what essentially you are building. Look at 4” marine blower fans, I am not sure what is available in 120 volts AC, maybe there are some. Good luck. John Davies Spokane WA1 point
-
I'll take delivery of LEII in Sep 2021. My TV is a 2018 F150 XL STX, SCREW SB, 4x4, 5.0 V8,10 spd auto, tow pkg ...1959 payload on the door sticker. So, it's not "loaded" but it has good payload for F150.1 point
-
My delivery date is later in 2021 but have been thinking about options since placing my deposit. Here are my thoughts and decisions relative to your points above. Hoping input from another person in similar situation as you helps. 1. Awning - Choice: standard, curbside only. Rationale: If I spent a lot of time in warmer climates ( e.g. SE) I would consider standard streetside awning as well. Pro features are not worth it to me and the $ can be used better elsewhere 2. Solar - Choice: Solar Pro package. Rationale: 6V AGM batteries can run well over $250/ea and a group of four hold many more Ah that (4) 12v wet cell batteries. The additional Ah for $500 was a no brainer for me. I also have solar on my TV with a battery bank in the bed which powers my Dometic compressor fridge/freezer. Even though I plan to mostly dry camp, the additional cost of Lithium is a no-go for me 3. Truma water heater. Choice: Standard water heater. Rationale: mostly will be dry camping so on-demand is of little value to me. If I spent most of my time with Full hookups I might reconsider, but likely would still stay with tried and true, old school tank water heater. Easy maintenance and easy and less costly to replace. 4. Toilet - Choice: Composting toilet. Rationale: mostly dry camping in the boonies so can go longer before having to empty. Plus, I want to utilize the rear bumper storage area nor more than the few contaminated items relating to black water dump. 5. Countertops - Choice: Standard white counters. Rationale: I prefer the clean, white look. My plan is to replace the dinette table, nightstand top and both narrow counters with live edge hardwood at a later date. The counters will remain white. 6. Wi-Fi/cell boosters - Choice: neither chosen as options on my Elite II. Rationale: I have a hard time having them drill more holes in the top of my trailer to place technoloigy items which will be outpaced by replacement technology soon thereafter. I have a WiFi Ranger which I will mount to the rack on my TV, but likely will not use it as the cell plan I have is pretty much unlimited everything. I wish Oliver would entertain installation of compressor fridges. The fridge in my trailer will get light use as I have two dometic chest compressor fridges which sip Amps from Solar. Its a shame to take up space with the installed three-way but it will get used to store pantry items and sauces, etc. The compressor fridge option would also allow for the two vent panels and corresponding holes in the side of the trailer to be eliminated which would give a cleaner look. I asked Oliver and they said they would not entertain this option. I may end up yanking the 3-way later and installing my own Engel or other 12v compressor fridge once my chest dometics die off. Please let us know what you decide.1 point
-
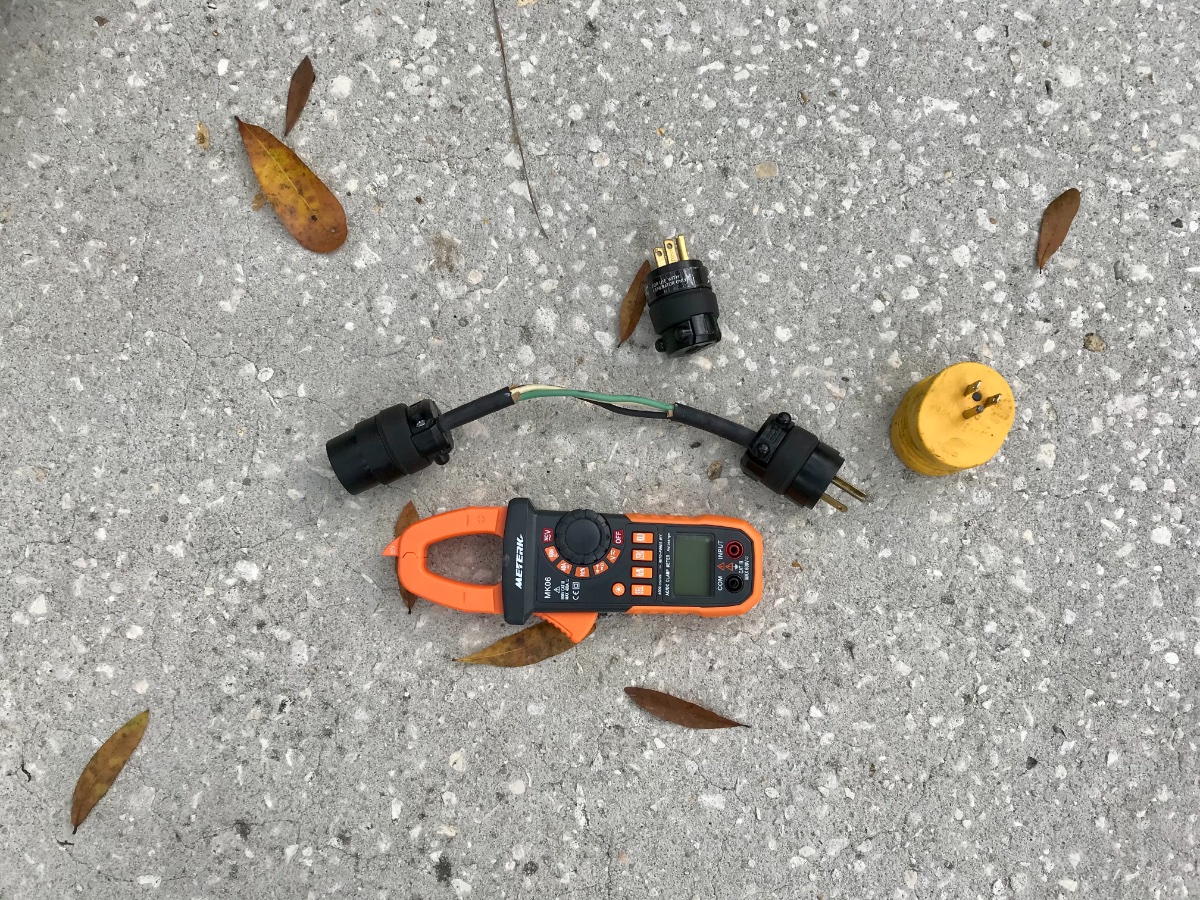
I assume you are referring to the Honda 2200i Companion. The pictures I see on Google look like it but I can’t be sure because I can’t physically test that. And it looks like the newest model have cover over the outlets so that’s another variable to consider. The following pictures show my equipment. I use a 50' 12 gauge extension cord plugged into an outdoor 15 amp outlet at home to power my trailer 24/7 365. But I can run the air conditioner with the same extension cord plugged into the Honda 2000i. And I will mention it again, I do have an Easy Start. I recently helped a friend install a Soft Start on his 10 year old SOB trailer and he is using a Yamaha 2200i. Works just fine. The other equipment in the pictures are the neutral ground plug that came with my trailer. A test cable I made out of a male and female 15 amp replacement plugs and a scrap of wire. An AC/DC Amp meter to take load readings from the generator. A 15 to 30 amp conversion plug. Mossey
1 point
-
Probably because with only a single generator, 15 amps is the max. These generators are made for more than just travel trailers and having only a 30 Amp plug with a 15 amp generator would limit it's usefulness elsewhere. When you add a companion, you can now produce 30 Amps so a 30 Amp plug makes sense. I have the (non-companion) Honda 2200 and did the propane conversion like @IL_Travelers. Absolutely love it so far. I use my 15 Amp to 30 Amp adapter (which I'm sure you have as well) to connect to my Ollie shore power connection.1 point
-
No. I hope to never find out, but pretty darn hot I'll bet! I'd rather be in a blizzard in the Rockies than in the desert at 110F! I'll keep my Ollie shaded in the garage if it's that hot outside. 😃 Cool idea! Can't wait to see how it turns out! While driving the pre-existing vents will keep the compartment "chilled" and for camping in heat I'm thinking maybe I'll first try a small DC fan or set of fans (similar to the nature's head fan) to move air in and out of the pre-existing vents that I have temporarily plugged up for the winter. I need some real life temperature data before I start drilling and venting inside just yet.1 point
-
1. Awning - I would go with two awnings so that you have shade on both sides. I think the electrical would be nice, but did hear that they sometimes close at the slightest wind. 2. I had the AGM batteries, but just replaced with two 150 amp hour Life Blue lithium for ~ $3000. I really like them, can go for days in the rain without worrying about running out of power (think I could go 7 days if need be, but if it is raining that much I am going home). And, they include a Battery Management System that connects to your cell phone via blue-tooth. 3. Truma water heater - we have the Truma, really like it. My wife and I can shower back to back without running out of hot water, and it doesn't take 6 gallons to fill it. 4. composting toilet - I agree, interesting, but I am not interested for a variety of reasons. 5. Countertops That seems like a lot of money to upgrade counters. Anyone with std white have regrets? --- Personal choice. 6. Wi-Fi/cell boosters- can these be sourced afterwards and not permanently mounted? With a mobile hotspot device are they even needed? --- I would go with sourcing afterwards. I tried one from Amazon and found it did very little for me. Plus, we tend to camp in places where there is absolutely no signal, nothing to boost. 7. Solar - I didn't buy the installed panels, instead I bought an 80 watt portable. It will recharge the batteries in one day of sunshine, plus, I have the lithium batteries that don't need to be charged every day anyway. The roof top solar doesn't work when you are under a tree, in the shade. Solar panels are also very sensitive to the angle of the sun. Difference from perpendicular to 45 degrees can be 1/2 the output. The portable was abut $350, much cheaper. Lastly, if you put a cover on your Oliver when not using it the solar panels tend to rip the cover. One plus for roof top is that if you store the camper outside where there is no power you do have a way to keep the batteries charged. Any specific options you have found to be must haves. I’m sure these have all been asked before and sorry to ask again but having in one place to reference is helpful to me. ----- One cheap one is the shower curtain in the bathroom. Allows you to shower and not get the entire bathroom wet.1 point
-
TexasGuy, I highly suggest after market Lithium batteries. We went with Battle Born and have solar. The conversation is simple. All you need to start is a shut based battery monitor, one battery and you will have more usable power than any other two battery system and two Lithium batteies would be better than any other four battery system. For more information, check out Battle Born’s white paper on the subject and Morton On The Moves recent YouTube video. Andrew1 point
-
DeeKay, As I mentioned a couple of posts above, the black tank is several inches higher than the grey. So you would need a pump to do what you suggest. Also it would be difficult to keep an inlet screen free from debris like hair and soap scum. Draining in the reverse direction, black to grey or black to fresh, would be simple. And yes, the bathroom sink drains into the grey tank, along with the shower. They share a common drain line, which is where the isolation (“travel”) valve comes into play, it blocks that pipe so smelly water does not slosh up into the shower pan when you hit the brakes. PS, I think in another post you mentioned you were getting an Elite, you need to clarify when asking questions, since there are differences in the way the systems are laid out. If you don’t specify, most people will assume the larger trailer since that is by far the most common model. John Davies Spokane WAl1 point
-
For what it's worth: To be on the safe side, we never run our fridge on auto mode. If you switch it manually and it doesn't detect power, it should alarm to let you know.1 point
-
If the refrigerator was indeed accidentally running on DC, that may well be the cause of the "problem" with the batteries not charging. They may have been charging normally all along and the fridge was simply using more amps than were coming from the panels and truck combined with the end result being depleted batteries. It can easily draw 16-17 amps. If this be the case, you can claim to be the poster child in the campaign to not ever run the fridge on DC. Most of us have be preaching this for years. If the fridge is operating properly, it will never "default" to DC. You always have to make it go to DC and the AUTO button must be OFF in order to do so. When the AUTO button is ON the refrigerator will automatically select between AC and LP, but never DC.1 point
-
Just a few thoughts. Have you actually gone out and measured the voltage of each individual battery? Have you checked all the battery terminals and made sure they are not corroded or loose? Are the lights dim? Will the tongue jack lift the trailer when plugged in vs not plugged in? I am not familiar with the current wiring layout, but I believe that the problem will turn out to be a connection issue. This one reason I've never been a fan of the Zamp system. What are the amps doing? With no shunt and no way to monitor anything other than volts, it's very difficult to tell what's going on.1 point
-
>> How to utilize the existing black water tank (deposit liquids) from the bath/shower space in the case where a composting toilet is fitted ? (0) I am assuming that depositing partially treated urine or other liquids into the black tank could be a benefit in some situations. *************** I have the thought that a flat box (rectangular hollow and slightly bigger than the footprint of the composting toilet) can be constructed that :: (1) will increase the height of the composting toilet ( ? 1.5 to 3 inches ?) and I acknowledge the extra height is a challenge. (2) has an opening at the bottom that fits into the black tank floor toilet hole. (3) has access port or ports outside the footprint of the composting toilet such that a tube/funnel will permit pouring in liquids. (4) built to come apart so that the interior can be cleaned as needed. (5) Gas/drain Trap: possibly ?? the interior construction could allow a sort of drain trap to keep gasses/smells from easily exiting any time the input port/tube/funnel is used. This feature seems a bit of a stretch when trying to keep the unit thin so as to not raise the composting toilet too too high. (6) the top surface of the box would fit/accommodate the bottom of the composting toilet so all items may be secured. the fitting of the box into the toilet tank drain would in itself prevent any siding/shifting. *************** Boondocking :: Thoughts on efficient use of water. Having spent some time 'long long ago in a land far away' living on very small boats, I found it possible to live a clean and comfortable life while using very little water for washing everything. The trick was to use "Low Flow/High Pressure" ( pump up garden sprayer in my case ). We as a society assume water is an infinite free resource and easy disposal is a given, hence we commonly use Low Pressure/High Flow which doesn't work out too well when boon-docking etc. If a luxury warm shower for two is a gallon or less and if rinsing off dishes after washing is measured in ounces, it is conceivable that one can easily boondock for extended times even if one has to transport potable water in and grey and black water out of the campsite. ***************1 point


-
Recent Achievements
-


")


")
")


