Leaderboard


Popular Content
Showing content with the highest reputation on 03/30/2021 in all areas
-
We find the Cellular Booster works well, with a boost of 1-2 signal bars if used properly. This signal increase is great when camped in areas of poor cellular signal. However, there are details that matter. The interior antenna for the Cellular Booster is mounted under the cabinet above the dinette, and a cell phone must be within 18-36 inches of that antenna. Thus, the Cellular Booster only works at the dinette. There is an additional important step to get the Cellular Booster to work properly. After you turn on the Cellular Booster you should briefly put the phone in airplane mode, and then turn off airplane mode. This forces the phone to let go of the distant cell tower with the weak signal, and to now look for the closest “cell tower,” which is your Cellular Booster. If you have been out hiking all day, your phone will remain connected to the distant cell tower, and you can get it to connect to the Cellular Booster by cycling into and out of airplane mode when at the dinette. If you also have the WiFi Ranger router system, there are additional possibilities. If you have a MiFi device, it can be placed on the dinette and be connected to the WiFi Ranger, either by WiFi or a wired direct connection. This allows all of your devices to connect to the WiFi Ranger, and gain the speed boost from the Cellular Booster via the MiFi device. Your devices can then take advantage of the speed boost not just at the dinette, but throughout the trailer and outside as well. Finally, if you set your phone to use Calling Over WiFi you can similarly use the signal boost for phone calls throughout the trailer and outside as well.4 points
-
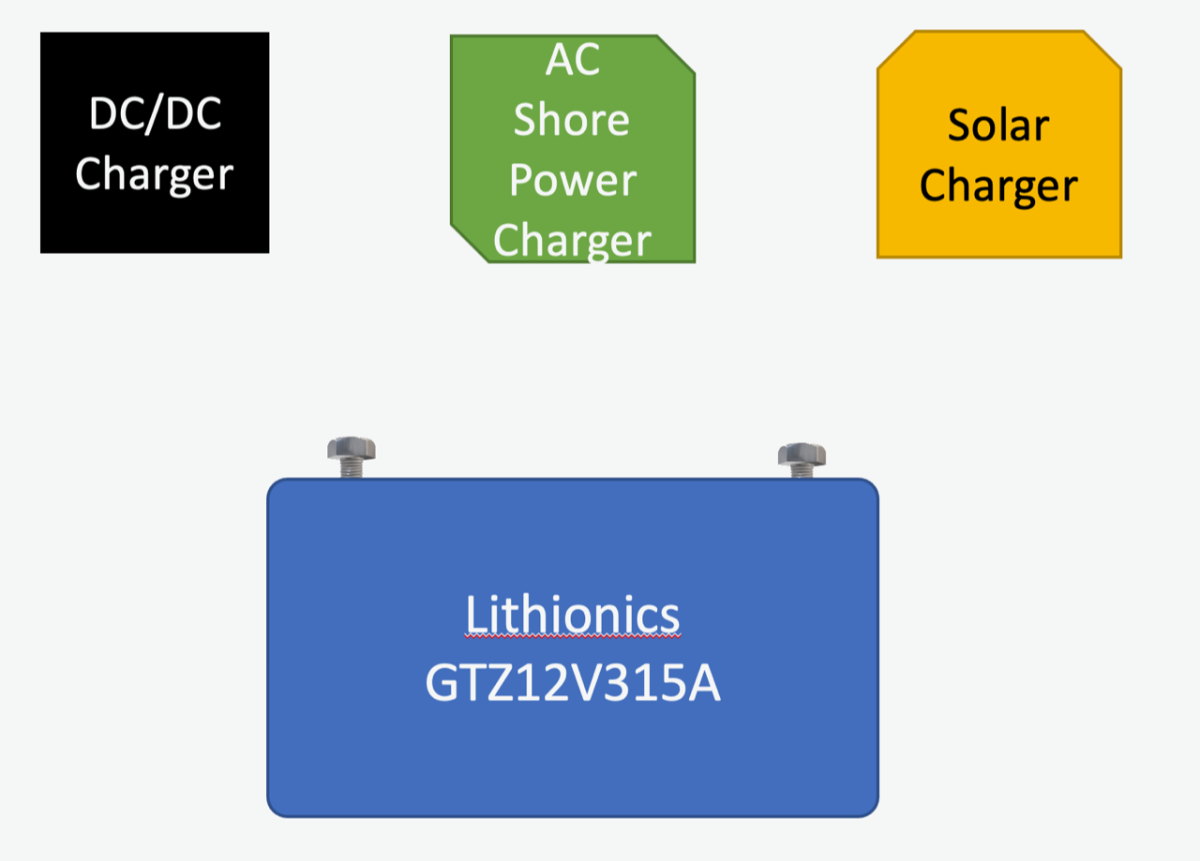
I'm starting a Lithium upgrade on a 2019 Elite II Hull 505 - I've reviewed many other posts and projects (thanks for your postings) and decided to start this one to document my project to install new Lithionics batteries. Comments from those of you with experience very welcome: Overview: Lithium Upgrade Project: Reason I'm upgrading: My 4 AGM's finally died this spring. I've got some time now to do this project now before a 9 month road trip later this year. There are three ways that batteries get charged in hull 505: 1) From Alternator/7PIN 2) From AC Shore Power 3) From Solar: 1) Alternator or DC/DC CHARGING: Our Oliver's batteries get charged through the 7 pin connector while driving. This is considered Alternator Charging or DC/DC charging. For Lead Acid Chemistry this charging method works fine as the amount of current drawn by AGM's or WET Lead Acid's is relatively low because they have higher internal resistance. Many of you know that you can't rely on that 7 pin connection to fully re-charge your batteries but they can keep them from declining. Hull 505 was built with a 20A breaker in this 7 Pin line to protect the wiring and Tow Vehicle alternator. For Lithium batteries with very low internal impedance this current draw can be many time higher, and result in overloading the tow vehicle alternator or cause wiring overloads. To make charging more consistent and protect the alternator a DC/DC charger is the preferred choice for LI batteries. My Plan: I will be adding a Victron DC/DC 30A Charger on board the Oliver. Installation Research and feedback from Oliver Service says that I need to: Carefully inspect the existing 7 pin wiring and do load calculations. Worst case I'll be running a new pair of dedicated 6 AWB charging wires from engine bay of Truck all the way back to the DC/DC charger. Figure out my location to mount for the Victron DC/DC charger. Must be near the batteries and have some cooling space and dissipation plate under the charger. Run new 6AWG wires from my Truck Engine Bay all the way back to an Anderson Connector on the Rear Bumper of my truck. On the Oliver, run 6AWG wires back into the same bay as the DC/DC charger. 2) AC Shore Power Charging - Upgrade to Xantrex XC 2000 Pro Inverter/Charger - provides 100A Battery Charging In my specific hull 505 I have a Progressive Dynamics 4000 load center. This houses the AC Breakers, DC Fuses and a converter section for battery charging. In my PD4000 there is a PD 4065 Converter section (65A) with Lithium Jumper for Battery Charging. In normal operation that charger is set to WIZ (or Lead Acid) position and it follows a profile that's perfect for lead acid batteries and AGM's. If I move the switch (or jumper) to the LI position, it now has a constant output at 14.6V which is OK for Lithium but not optimum for the Lithionics batteries. Lithionics prefers that I use another charger with a programmable LI profile. My Plan: I'm upgrading my current PD converter charger and separate Prosine 2000W inverter to an integrate Xantrex XC2000 Pro Charger/Inverter. Note: I don't plan on running my AC off the batteries so the 2000W inverter is plenty for my needs. In the Platinum Package Oliver installs the XC3000. Installation Research and feedback from Oliver Service says that I need to Disconnect the existing PD4065 converter charging leads that go to the batteries and tape them up. Leave the charger block in the PD4000 load center cage - just in case I need to downgrade later back to AGM's. Remove the existing 2000W Inverter and Auto Transfer switch. (The load and AC wires go back into the new XC2000 along with the 4/0 B+ and GND leads) Mounting issue: I'll need to figure out how to attach the new inverter to the same spot under the street side bed. 3) Solar Charging - No Change at this time In my Hull 505, I have a Zamp 30A PWM Solar Controller. This controller isn't as efficient as an MPPT controller, but it is already installed and works. In keeping this first install simple, I'm leaving that in place. My Plan: I'll be leaving Zamp 30A Charger in place for now, and will upgrade to a higher power MPPT controller in the future along with more solar panels. Installation Research and feedback from Lithionics says that I need to: Install a breaker on the solar + line so I can Isolate from batteries. 4) Decluttering the battery box - It looks like many of you have moved all the loads and negatives to common bus bars as a way to declutter the battery box area. I want to do the same...I've read the posts so far but wonder what's been the most difficult part of those change overs? I plan to wire in a cutoff switche for the main B+ power (Big Red Knob) and a breaker for the Solar Inputs so I can cut all power for winter LI battery storage. Comments welcome before I get to the start line. Craig Hull 505
 3 points
 -
We bought our 2020 Elite II with LifeBlue Lithiums, so I can't comment on an upgrade, but I can comment on things I've learned that you may want to consider in your "design". 1. Temperature control: the Lithiums like to be at room temperature (+/- 20F). OTT installs a heating mat custom made for super-cold conditions. I know a lot of owners with Lithium, including myself, have sealed off the battery box vents and insulated the door. Conditioned air is also something to consider. @John E Davieshas vented and installed a computer fan to help with temperatures in his battery box. I took a different approach and decided to keep the battery box air tight and tie it in directly with the cabin conditioned air using a dedicated 4" smart fan and ducts. 2. A charger that has either software control or an easy to access cutoff between the charger and the batteries. Lithiums don't like to be topped off and kept at 100%, so I have found that I do a lot of shorter charge cycles like from 50% to 85% or so. Turning the charger off / on may be something you find you would like to do more often than you have in the past, so easy access is very nice to have. Good luck - I'm sure you will get lots of great advice and help from other members that have just done the actual upgrade! John3 points
-
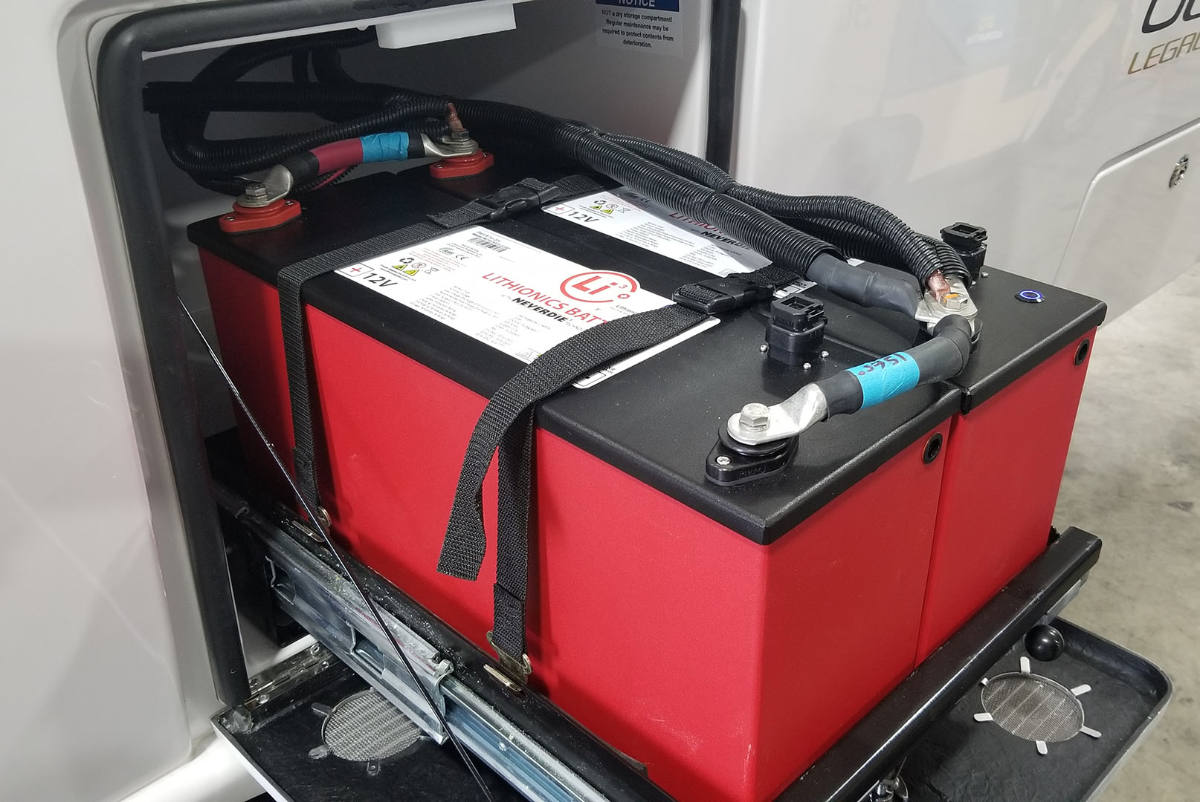
John -- So having the ability to turn on or off the charger is useful...and that I should let the lithiums drain down further before recharging. Does that mean while connected to shore power I should turn off the Xantrex 2000XC Pro charger until the batteries are down to 50% ? FYI: The batteries I'm using come from Lithionics and are internally heated with embedded wireless BT monitors. They also have integrated ON/OFF switch for cutoff of power for safety and storage. They are now being offered by Oliver as part of their new Lithium Platinum Package. Attached is the full data sheet on the Lithionics GTX 315A battery. Two of these batteries will perfectly fit into the existing Battery Tray. Based on the dimensions, and Oliver testing they have ~1/2" space each side for spacer blocks to keep batteries tightly secured along with the strap system. Once I get the batteries in hand I'll be doing a set of schematic drawings. I'll be taking pictures of tear out, and reinstall and any other mods I need to make along the way. I'll also be adding a Xantrex XC 2000 Pro - Inverter Charger with BT Monitor/control panel. ********** Picture and text below from the Oliver Website including the picture of batteries in the existing tray ***************** https://olivertraveltrailers.com/travel-trailers/legacy-elite-2/upgrades-add-ons/ The 2022 Oliver Lithium Platinum Package includes... - 630 AH Lithium Batteries Package (2 Lithionics GTX315A) - 340 Watt Solar Package with Charge Controller (Zamp PWM Controller) - 3000 Watt Inverter - Xantrex XC 3000 Pro - Micro-Air soft start capacitor for the A/C GTX12V315A-E2107-CS200-R7.pdf
2 points
-
...howling good show!!1 point
-
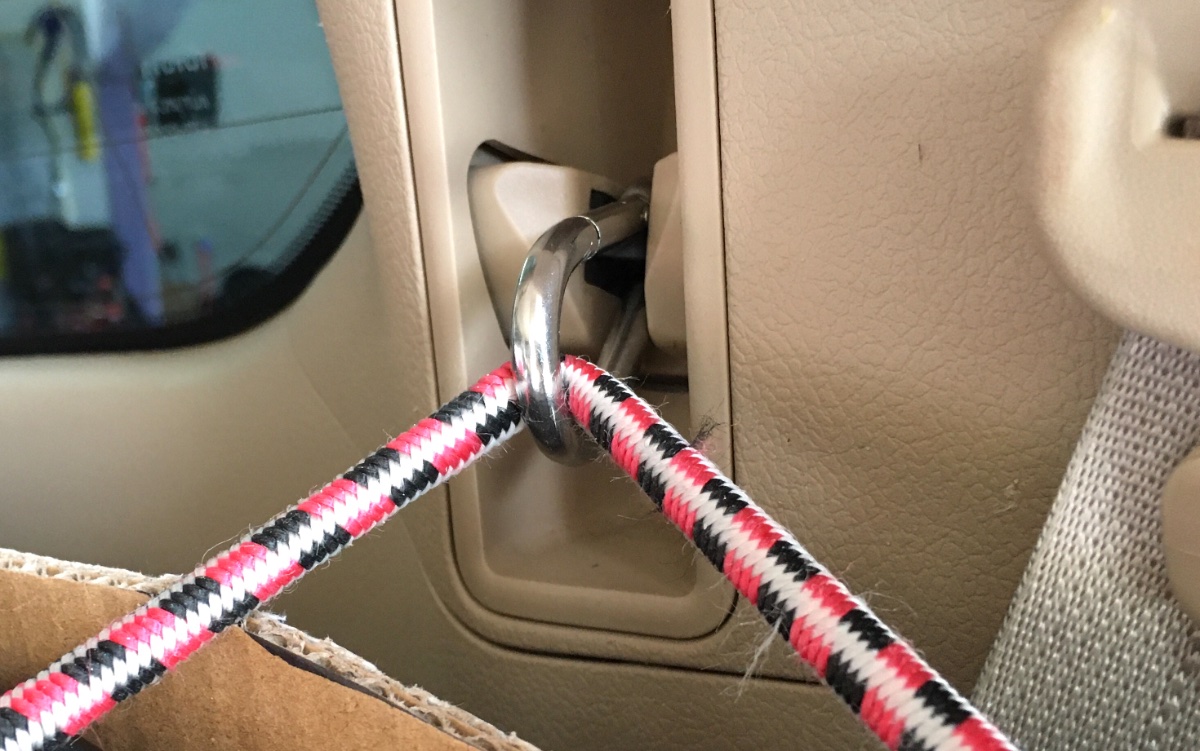
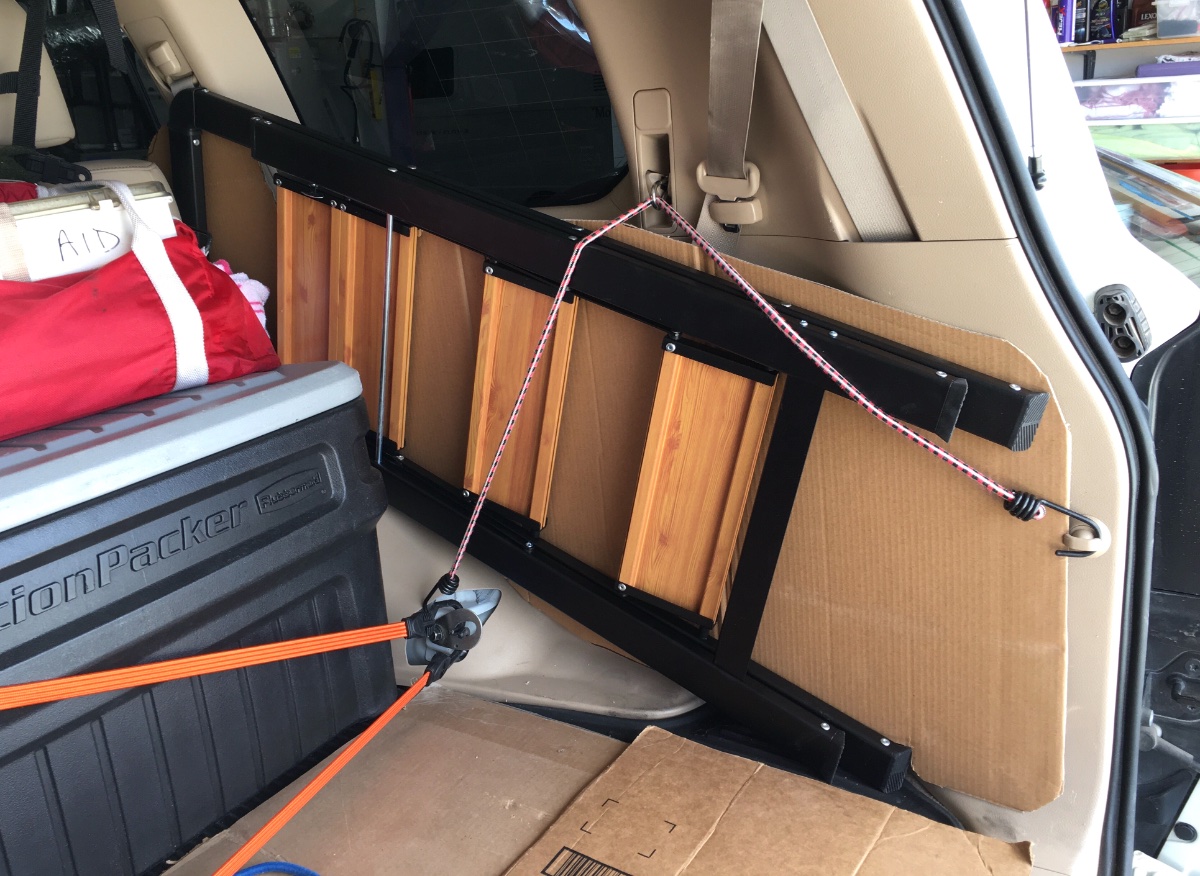
Add a couple of super strong cargo tiedowns in less than a minute, assuming you removed your third row seats. Full thread is here : https://forum.ih8mud.com/threads/add-2-solid-cargo-anchors-for-less-than-10-at-the-third-row-seat-latch.1247368/ FYI this should work with any SUV with third row seat anchor in the wall or floor, but you might need to use a different size hook. John Davies Spokane WA
1 point
-
Yes, when connected to shore power, that's exactly what I do - I turn off the charger at 80% or so and back on at 50% - which is several days since there's primarily lights and fans draining the batteries slowly. I figured out how to use the Xantrex 3000 software to turn the charger off and on. I know the BMS protects the batteries from overcharge, but being full all the time does stress the cells as well. If I know I'll be dry camping, I will top the batteries off, but I'll not keep the charger on (including solar) when they get back to 100%. I'm not sure if any of this will increase the longevity of the batteries significantly, but I don't mind doing it so far. Time will tell.1 point
-
May I recommend the Victron MultiPlus over the Xantrex? It's less than $300 more and will give you a true hybrid inverter/charger, 3000 watts, and would cover the biggest expense in creating a full Victron network, with all the bells and whistles that entails.1 point
-
Still thinking about unused Black Tank: ( EII #751 w/ composting ) Motivated by dreams of extended stays at places with few or no facilities. URINE STORAGE ::: People generate LOTS of urine but 18 gallons of urine storage would last a while . . BLACK KITCHEN WATER STORAGE ::: We are trying to control the quality of the water in grey tank to make it less noxious/intrusive/nasty so as to facilitate disposal into the environment when necessary/possible. The water in kitchen is going into small dishpan in sink where fats/oils are broken down with soap and solids/particulates settle out before liquids go down the drain . BLACK TANK is a great place for the stuff that is messy, chunky and stinky and with care 18 gallons of storage could last for a while . . ************************************************ ACCESS to BLACK TANK: OLD Original idea was: ( complicated flat drain box under composter that used regular toilet drain flange-pipe assemble ) (a) lift compost toilet (b) Install std toilet hardware (flange w/pipe and sealing bushing into plastic tank top) (c) construct somewhat complicated flat hollow base under compost with inlet ports to side of composter that sets on top of std flange and under composter /// weird-wonky and raises an already tall composter . . ---------- NEW Improved idea from Jason is: ( small pipe into top of black tank set near bathroom wall with some funnel/cap thing at top of pipe ) Talked to Jason at new owner pickup time and asked to purchase the parts used to plumb the std toilet so as I could proceed with OLD ORIGINAL IDEA and his suggestion was (a) a new hole in fiberglass floor (b) enter black tank top with same type rubber-ish sealing bushing but do this off to the side ?somewhere? and thereby avoid the rather complicated construction and future cleaning/sealing issues of the OLD Original Idea shown above. So , (i) identify the pipe-in-hole sealing bushing type/name/mfg like that which Oliver uses in std toilet install and then check available sizes, (ii) measure/find black tank under floor to evaluate possible placement of new pipe (iii) figure out details of pipe size/location/top fittings-funnel-cap-?trap or notrap?-mounting/bracing/prettyness . . . stuff. (iv) start using the black tank. ----------- Any thoughts appreciated.1 point
-
FWIW, as to options I could have done without: shower curtain track, Andersen, hypervent matting (I would find it myself if I wanted-needed it later and cut the pieces myself because to me they look kinda like those anti-skid area rug things for hardwood floors and just sit there loose between bottom of cushions and fiberglass compartments under them; wifi cell booster (I notice no difference at all but maybe I am just not aware of something techy I am not doing or have not set up something with it - it is a switch you flip off or on). YMMV!!!! Options I LOVE: convection micro (and I don’t even “cook”), Easy Start AC, solar panels, Truma, power awning, keyless door lock and fob, missile launcher out the rear (ok I made that one up). Heh. Remember, I am talking ONLY about a 2021 E1. YMMV! PS. I bought a good dehumidifier and keep it in the shower basin. But that’s just me.1 point
-
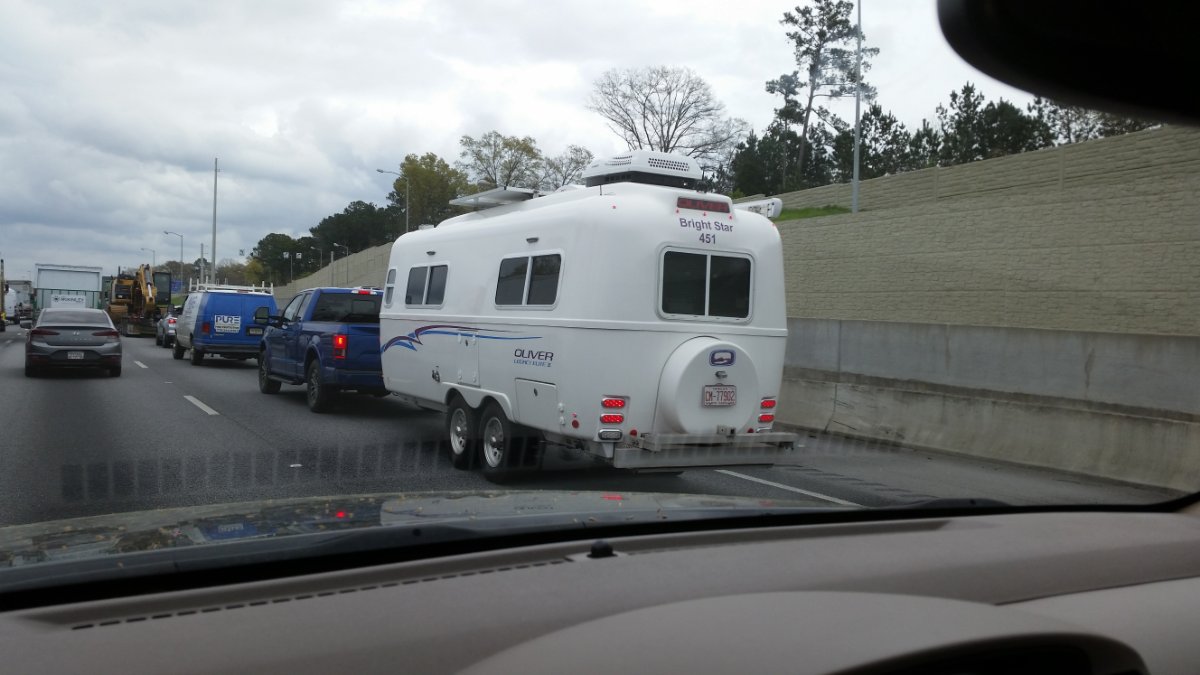
I spotted this OLIVER traveling on 285 near Decatur/Atlanta. Was excited to see my first Oliver rolling down a highway. Name and number on back was "Bright Star" #451.....wonder if it belongs to a forum member?? Happy Trails....
1 point
-
@doug14 (#451) hasn't been on the forum in 18 months, but maybe they're too busy camping!1 point
-
I checked with a neighbor who used to live on Marco about storage. Unfortunately, they didn't have an rv then, just a boat. I did notice a farm site listed probably 40 miles away on Harvest Host. Maybe you could check about storage there, and camping on the way down? I'm not a hh member, so I could only see the general location...1 point
-
They also have 800 amp hours of lithium batteries on Delos. And other boats I've followed have even more battery power. And, they live full time on the boat. I was skeptical about induction on sailboats, at the beginning. Worried that the magnetic field would mess with expensive electronics. And, also worried about non-gimballed, slippery ceramic cooktop underway. Wondered about the amp hours consumed. Several boats I've watched have added a slim silicon sheet for non-skid on the cooktop. Some have added a fiddle (railing), and some have re-used the gimbal of their old propane stove for a new electric/induction stove. None of these are important in Ollies, where we only use the stove when stationary, of course. And ah consumption, as reported, has been not as high as I would have expected. I could definitely see a good induction cooktop in an Ollie that had a way to power it. I love cooking with induction. Fast, clean, minimal extra heat, no fumes, etc.1 point
-
I care and applaud you for it!1 point
-
There is also feature to turn off all signature info. Alternatively, I took my maps off my signature because they were so big. I'm not sure if anyone cares that I've camped in 48 contiguous states, Alaska, and most of Canada, etc.
1 point
-
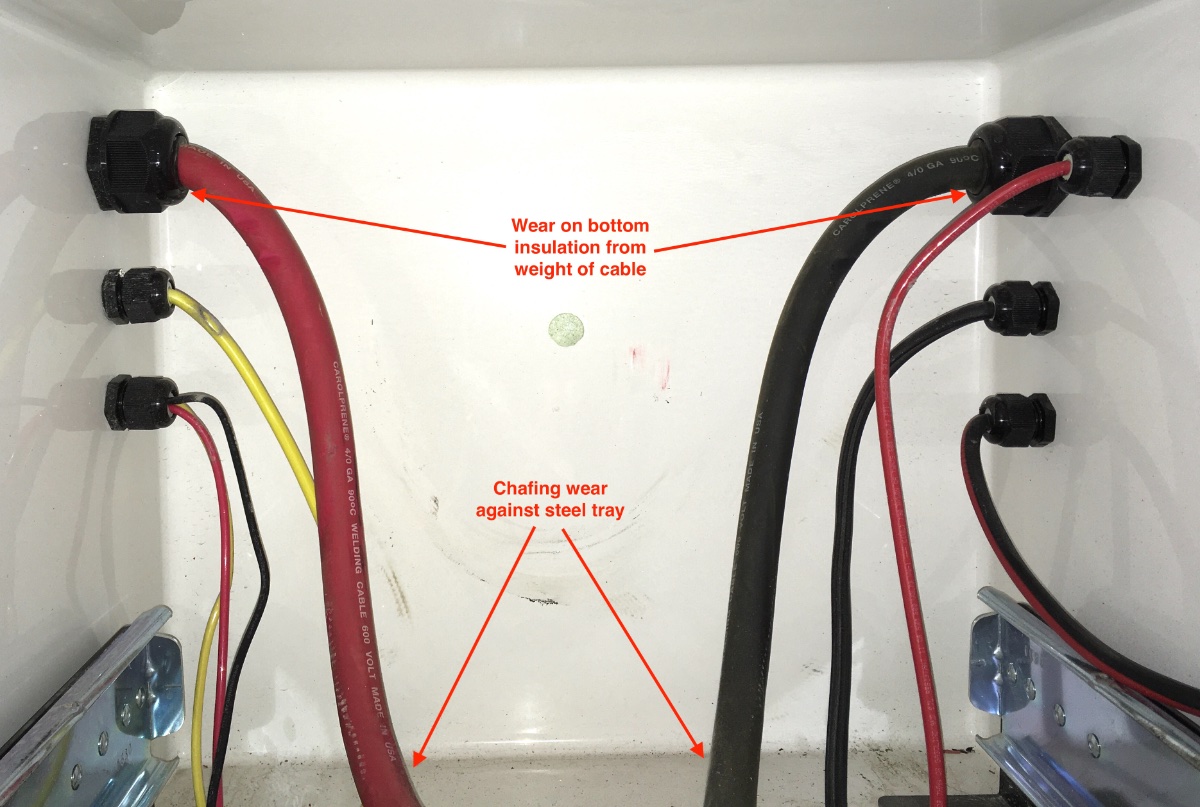
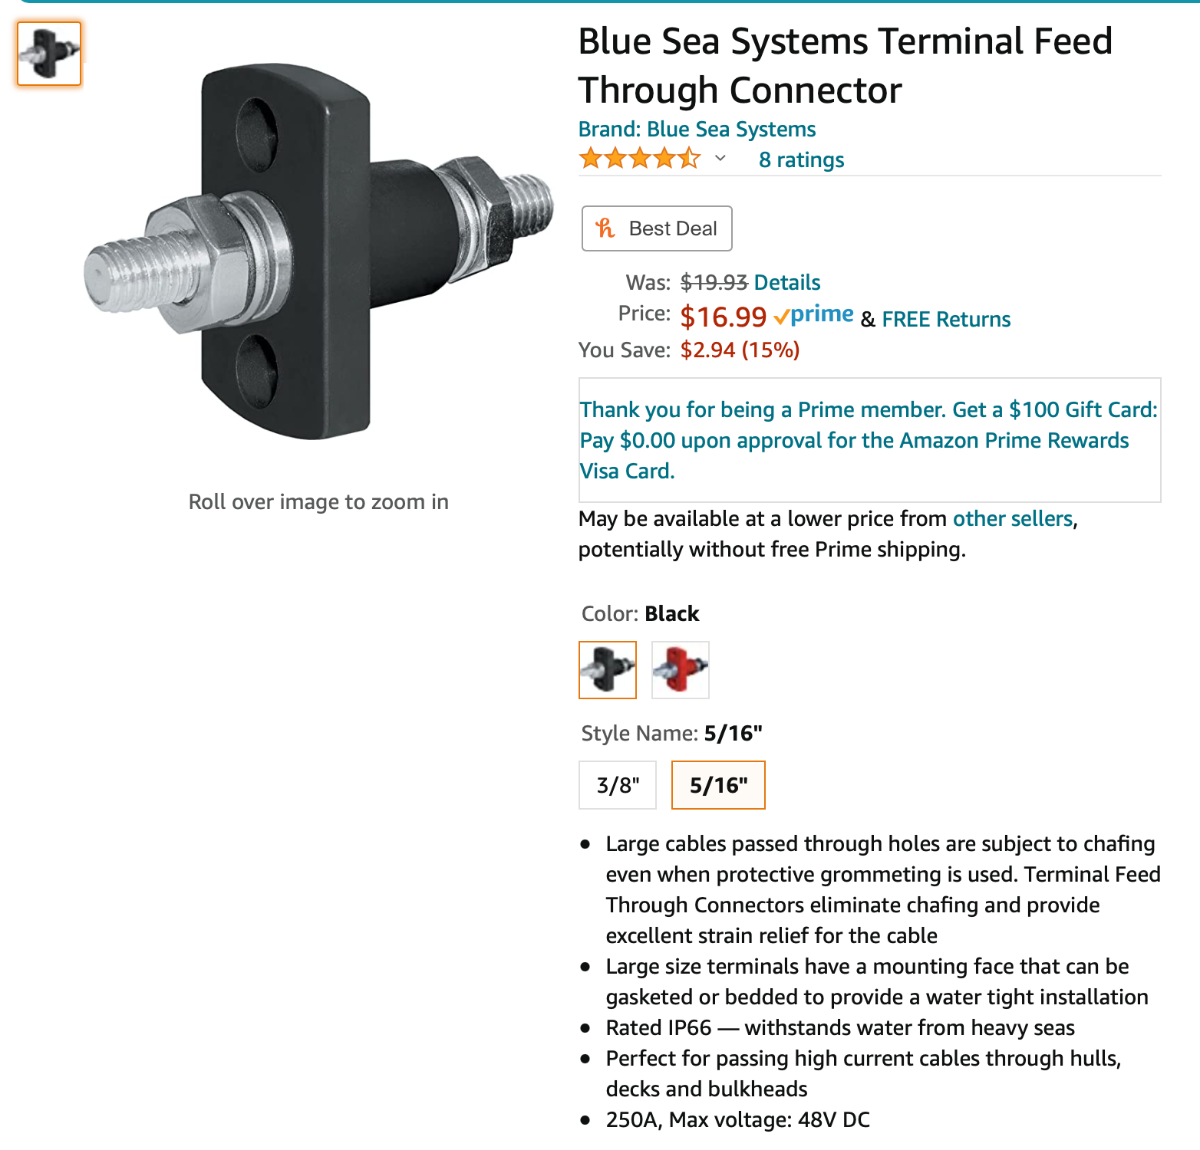
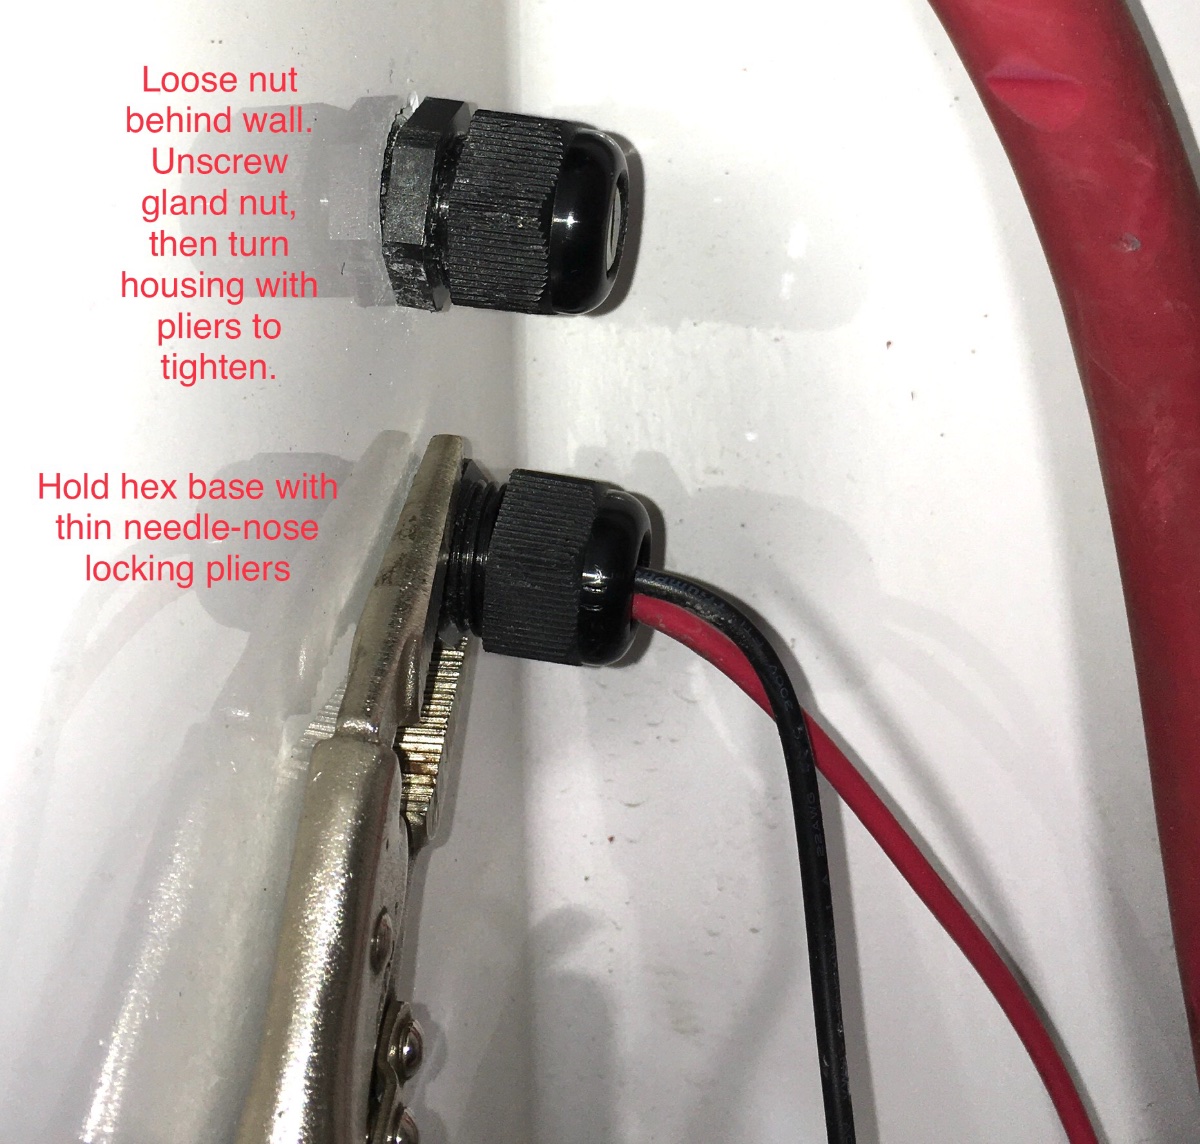
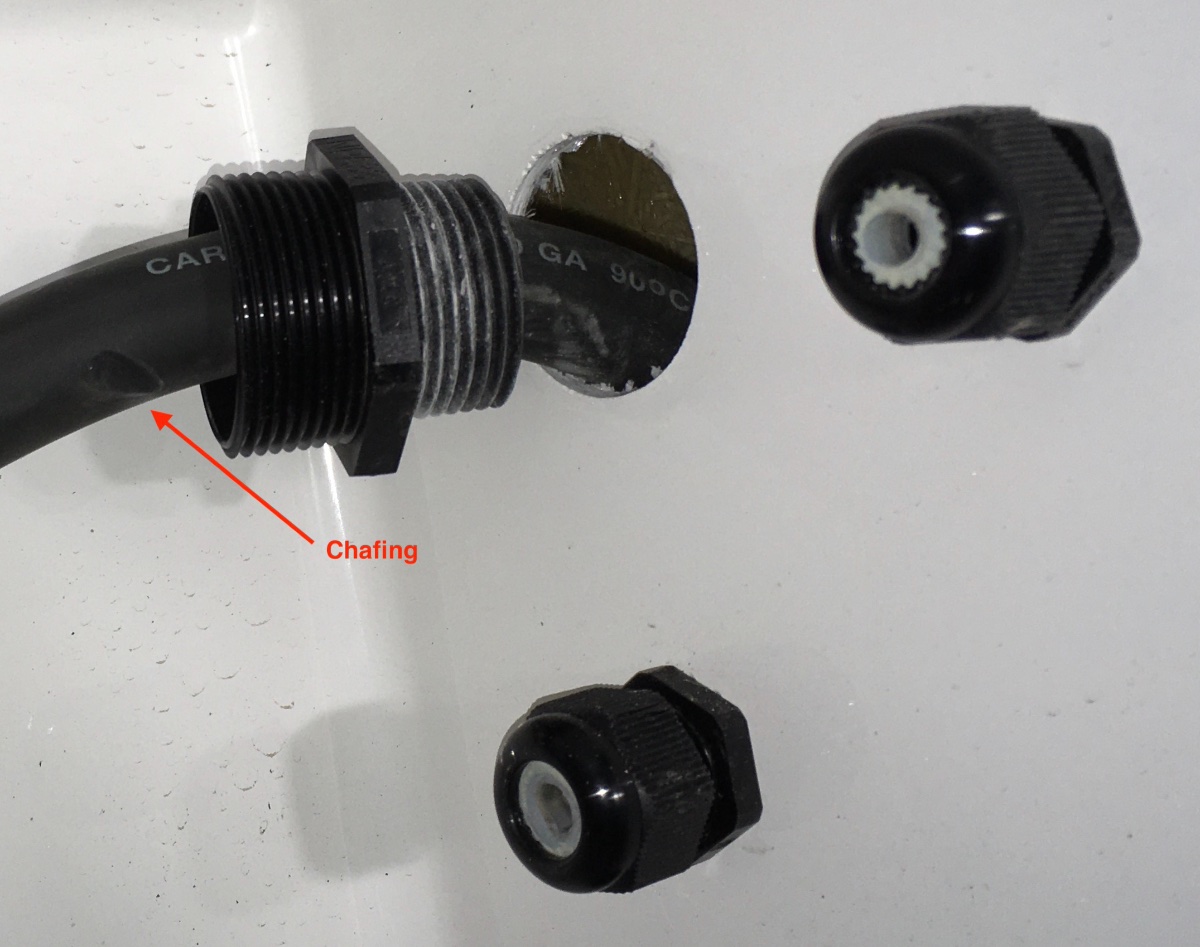
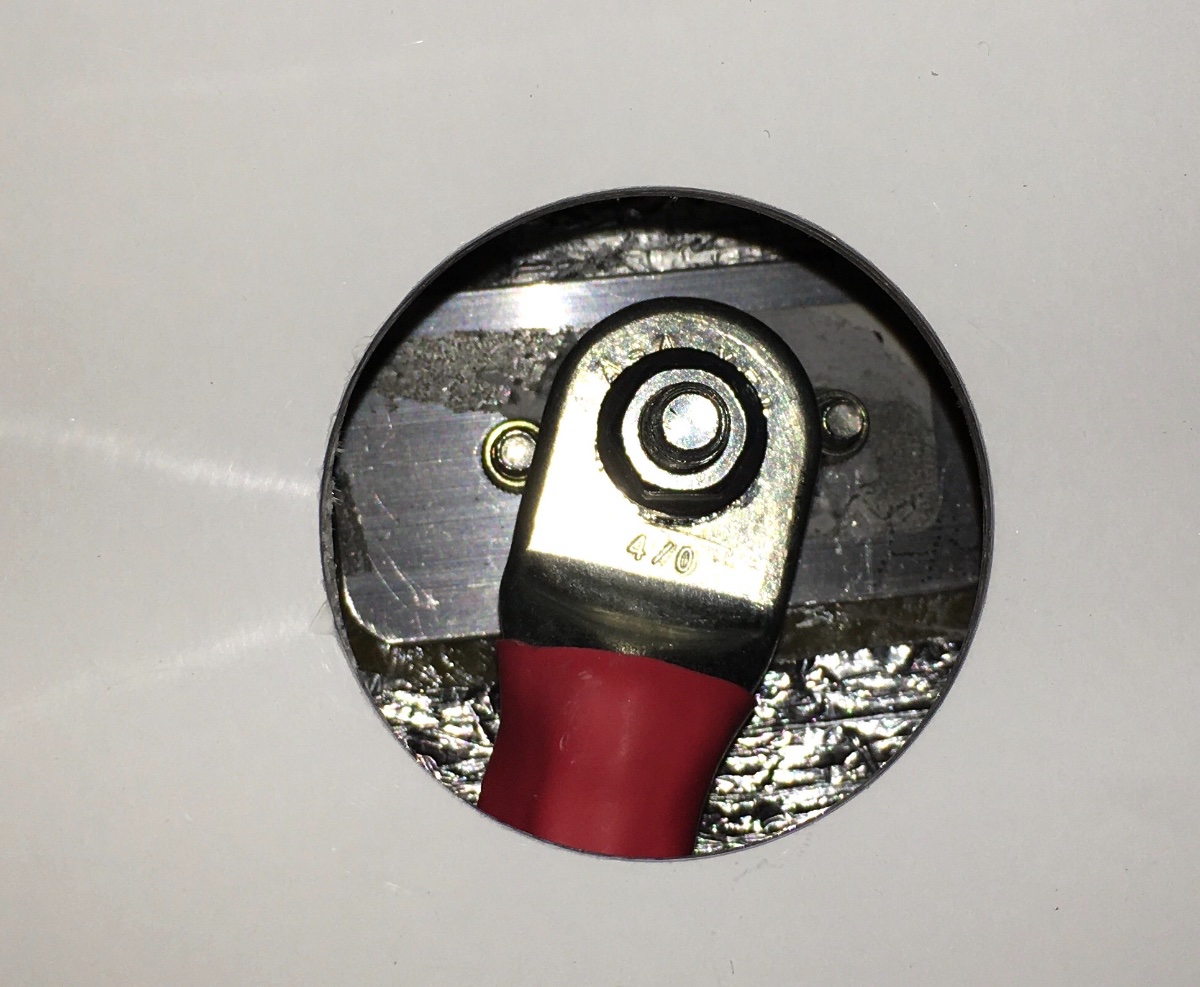
This is a thread I was very hesitant to start, it is pretty complicated, it fundamentally changes the factory design, and it is not for the faint of heart, it involves drilling big holes and reworking a lot of cables. But a couple of members have expressed interest, so I will post my pics and comments, with this caution: don't attempt this if your trailer is still under the initial 1 year warranty. And definitely don't attempt this if you are not comfortable making high quality cables. PLEASE UNDERSTAND: This mod is designed for the standard 2000 watt inverter (with 250 amp main fuse), a larger one will possibly draw too much current, especially if you run the air conditioning!!! This will work for up to three Battle Born 100 AH lithiums, I have no idea if it will be OK with other brands or models. Before doing this mod, I relocated all my small positive and negative cables inside to common bus bars. Here is the original factory wiring on my Hull 218 (2000 watt inverter and four AGM batteries). A little messy: Here is my new lithium battery setup: Each battery has its own 175 amp terminal fuse block and two short, equal length 00 gauge cables that connect to Blue Sea Terminal Feed Through Connectors, rated for 250 amps each. Access to the posts is very easy with a full sized ratchet handle and socket, simply remove two nuts, pop off the cables and slide out the tray. There is room for a third battery, and the cables for it will be identical. You need one of each color, with the 5/16" terminal stud. This matches the other terminal eyes in the wiring and batteries. prices vary wildly, shop around! Holes on the flange are sized for 5 mm screws, I used stainless socket head ones from Amazon, there are lots of sources. First you need to get out all the old cables, that might be a little tricky, since the access is very limited in the "slots" between the battery box and the surrounding inner cabin wall. You can get one arm up there, but it is really awkward and itchy from the fiberglass dust. You can do this from inside the box: Remove all the cables, you can leave one of the small wire glands in place if you need to run an extra wire there, such as a temperature sensor or a power wire for a battery monitor smart shunt. Cover the open holes with aluminum tape if you like, or leave them as-is for some ventilation (lithium batteries ONLY) More.... John Davies Spokane WA
1 point
-
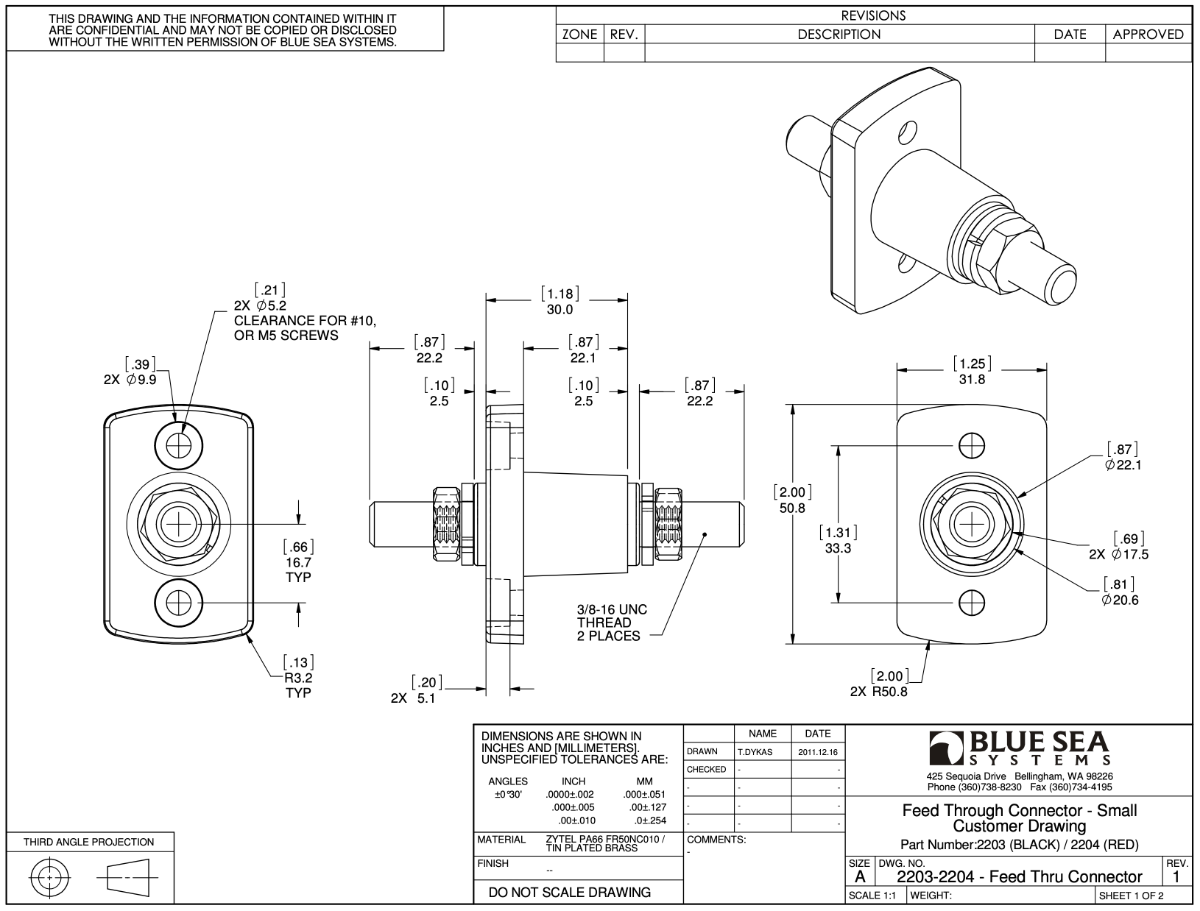
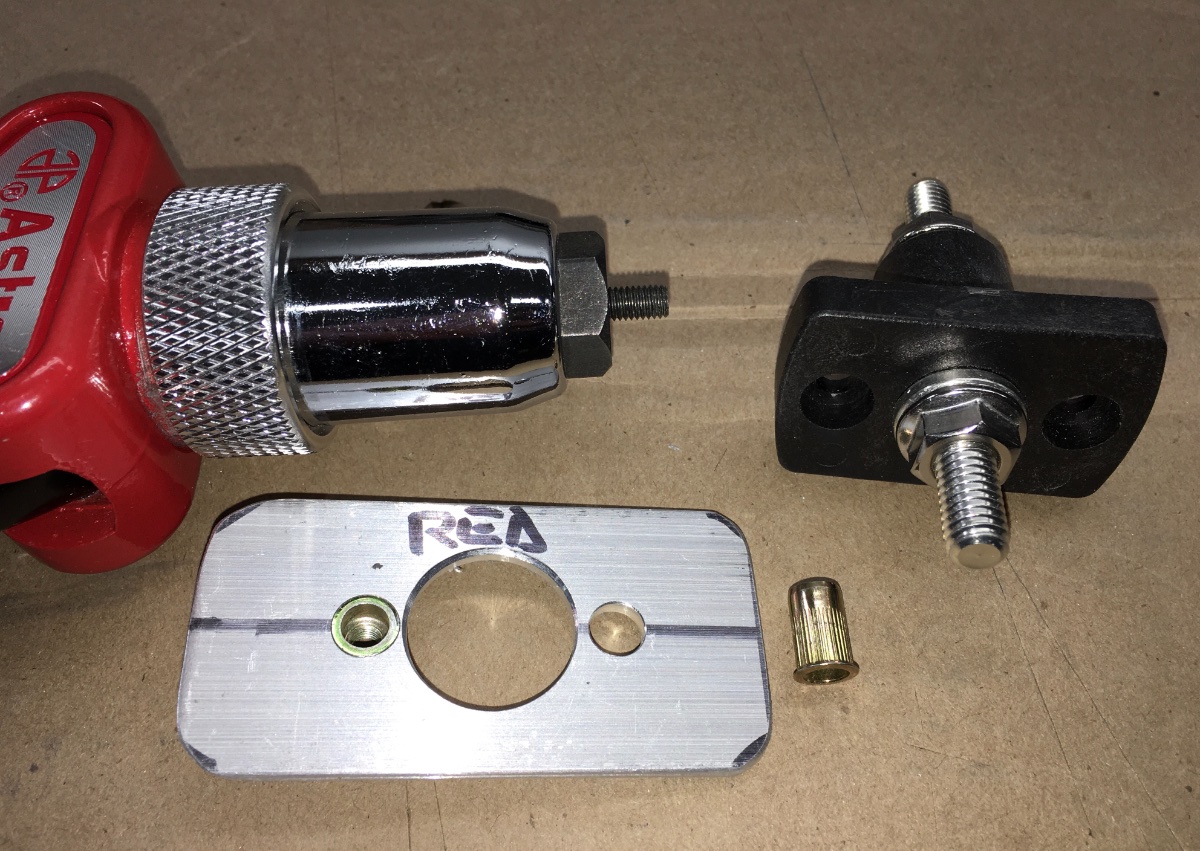
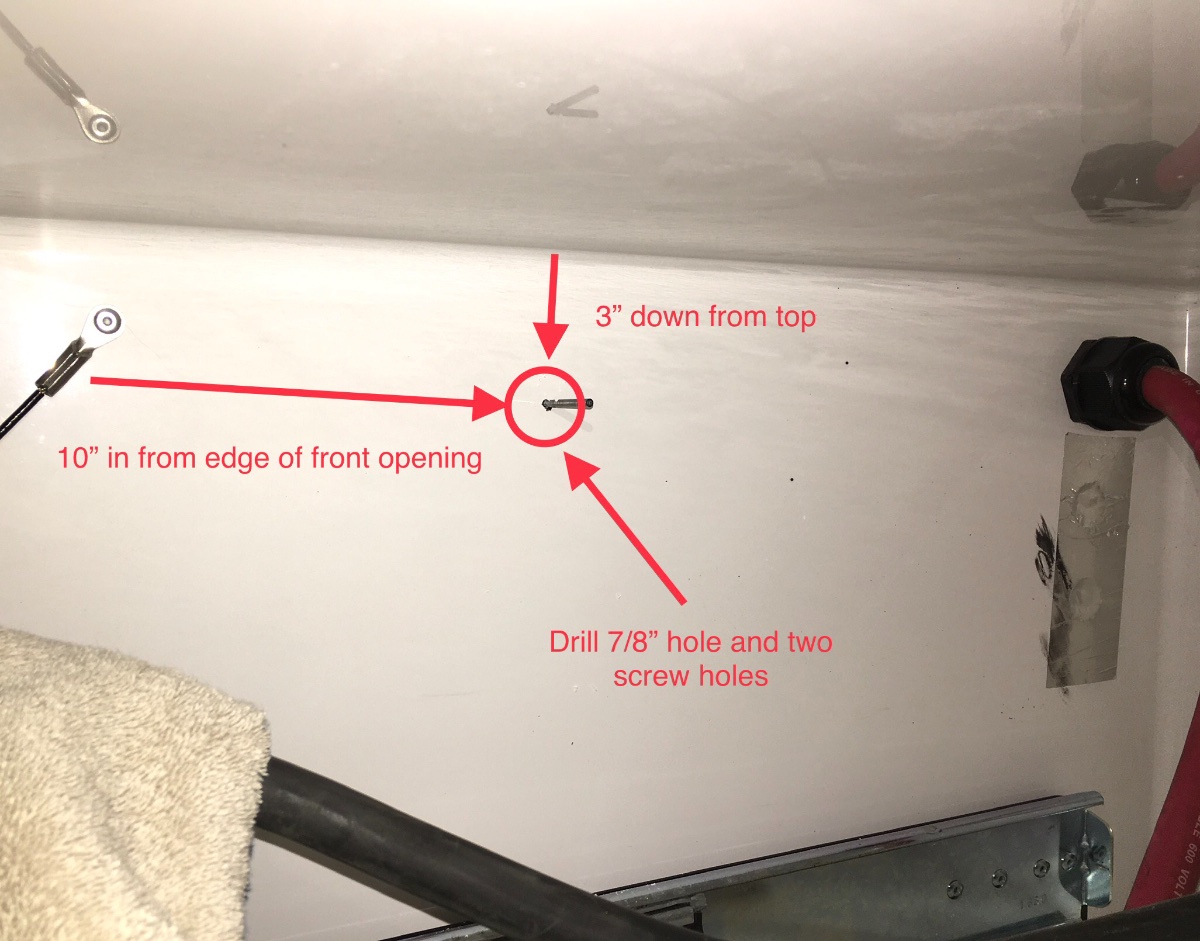
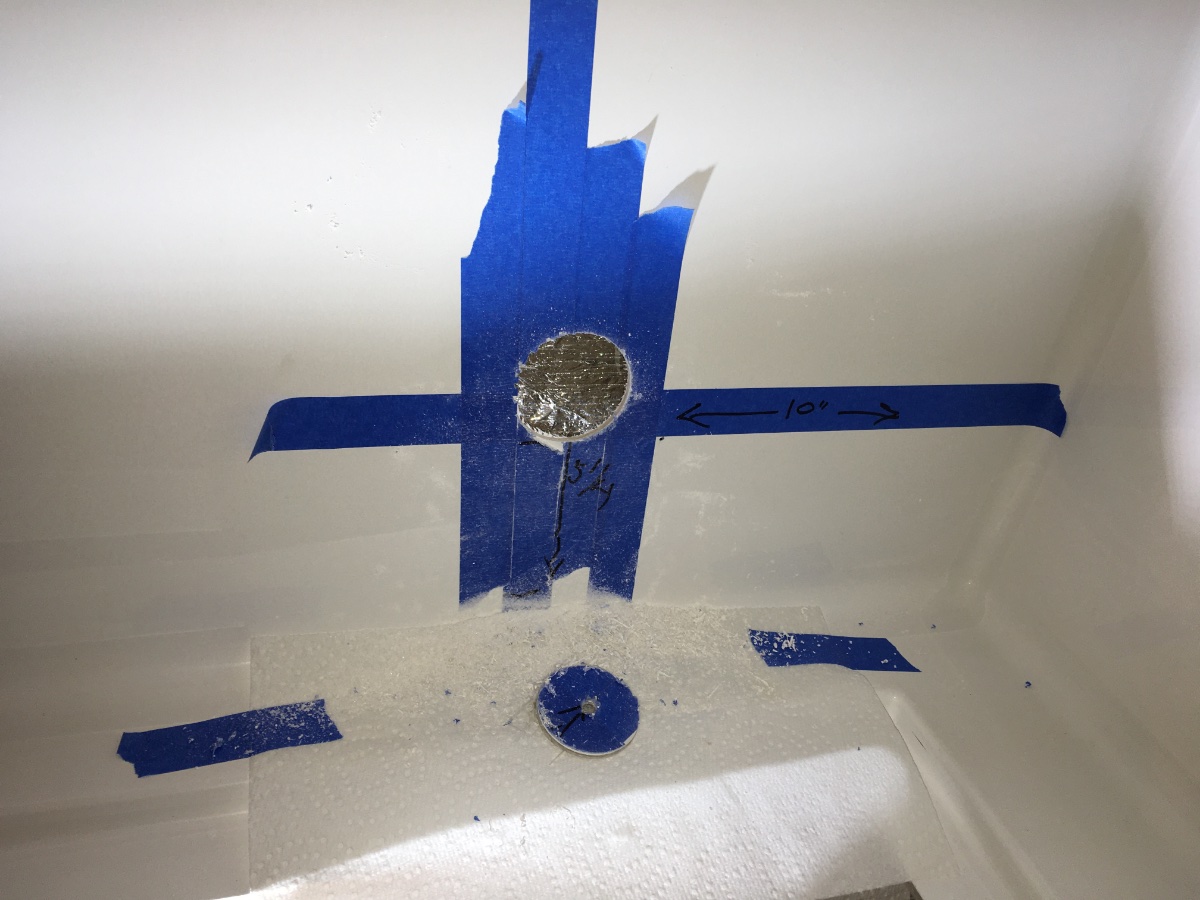
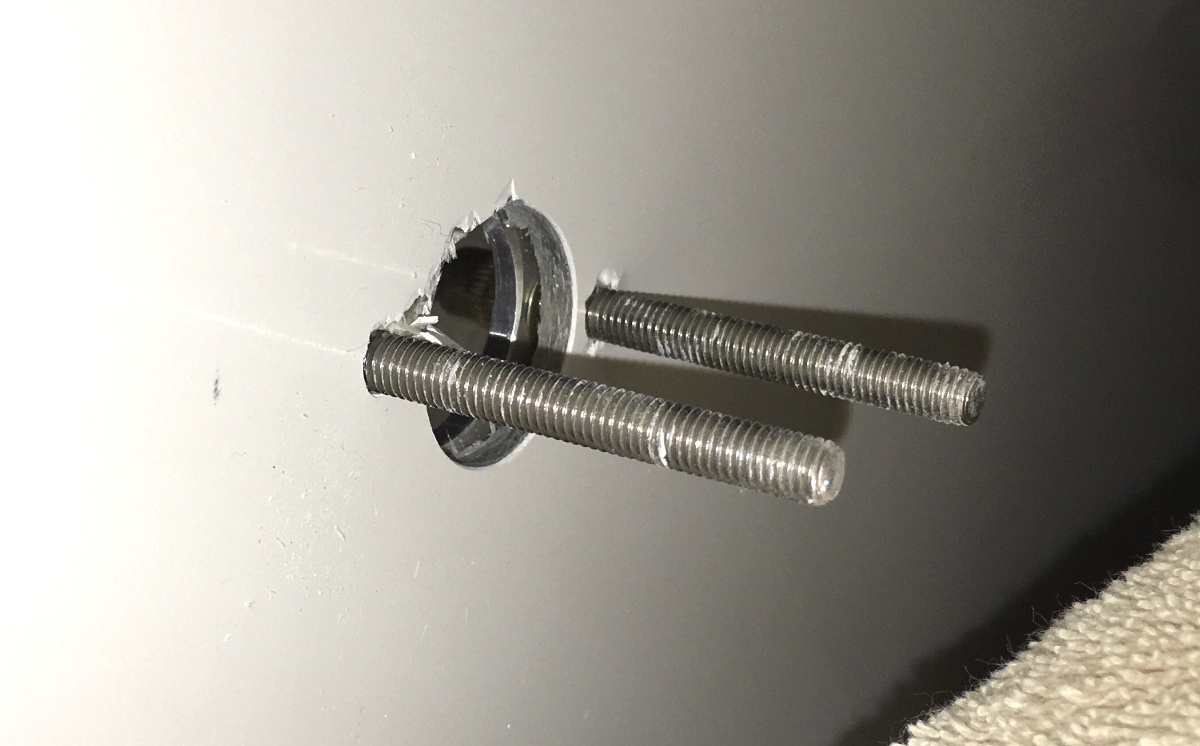
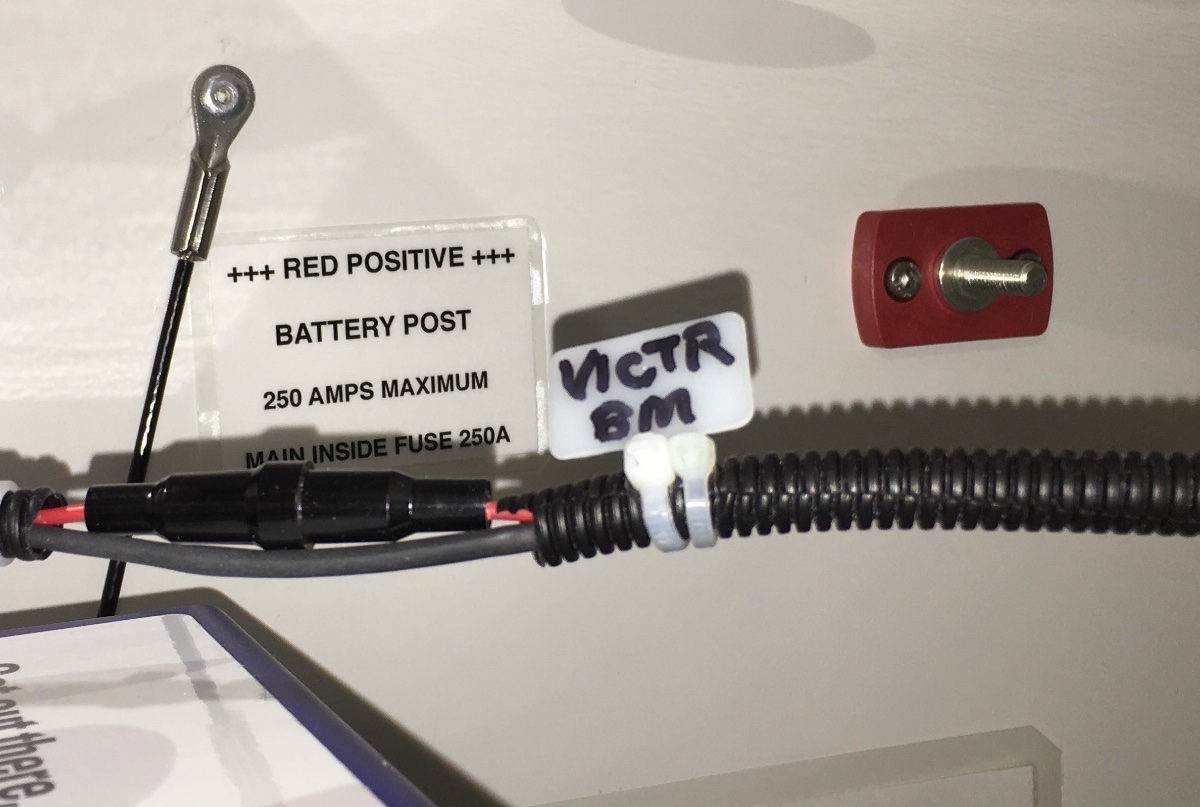
Since access is difficult, I chose to make two backing plates from aluminum 6061 T6 with 5 mm threaded inserts. That allowed me to install the posts by myself; if you have a helper, you can use self locking nuts and flat washers instead. Locate the post positions as shown. Using a long bit (6" or more) drill the center pilot hole, it has to go all the way through the two walls and that big gap between them. Drill the two screw holes in the battery compartment wall only! Then drill the middle hole to 7/8". Inside the cabin, tape off the area around the pilot hole and drill a 2" hole . This hole is scary, since it will show with the seat cushions placed against the outside wall. It will be covered with a white plastic plug after finishing. Use a razor knife to cut and peel away the foil bubble insulation, do NOT leave it in place.The silver foil is conductive, so it should not be close to the positive cable. Sand the 2" hole smooth with coarse sandpaper (80 grit). If you are using nuts, get your helper and slide in the post from the battery box with the short post facing you, and secure it with screws. There should only be one or two threads extending past the nuts, or they will interfere with the cable terminal end. If you made backing plates, cut off a couple of long screws, thread them into the inserts and place it into the box. Place the post over them and then remove one. The other will serve as a grab handle so you can hold it while you get the other screw started. Repeat these steps for the other post. Shorten the big cables as needed and attach them inside the big gaps, access is easy: Cover the holes with plugs. These work OK, but they have to be glued in place with clear silicone or they will fall out: ... 2" White Plastic Hole Plugs If you are anal, make warning placards for the posts. FYI I did not use any epoxy to bed the flanges, it could be added carefully, but I don't think it is needed. It would certainly strengthen the connection. John Davies Spokane WA
1 point
-
Welcome PMG, this site link will get your started on linens and fitted sheets, blankets etc for your new Ollie. We have had excellent results with their products and above and beyond professional customer service. I highly recommend them. Give them a call if you have questions, https://www.ablifestyles.net Congrats on your delivery day, it will be here before you know it!1 point
-
Thanks everyone! We ordered a 9 x 12 Camco from Amazon. Next purchase is a water purification system; decided on the Clear Source Ultra. Gotta have good water. R-Villa starts down the production line tomorrow! And we are waiting for a new GMC ¾-ton, too! Hard to believe it is finally happening.1 point
-
For the shower we use a hybrid system - part of the curtain is connected to the factory slide and we use small suction cups to keep it placed across the door opening, and just above the rear of the sink. When done, it stows conveniently in the front left corner by way of suction cups with the shock cord/ball end. I suppose we could do without, but have just settled on this process for now. Newsflash - we used the microwave last night - made fine baked tators. to go with the stake and shrimp. So, I will now say the micro was/is a good use of space..... yes dear.... We had the easy start from the factory - but have not run it off a genset - yet. Compost toilet - I think in the total - it is just easier than the black tank - and dump station process. Grey water is no problem. Inclement weather - today and tomorrow - first time stuck in the Ollie - but we have the WWW, and local stations, oh, and each other😍 RB1 point
-
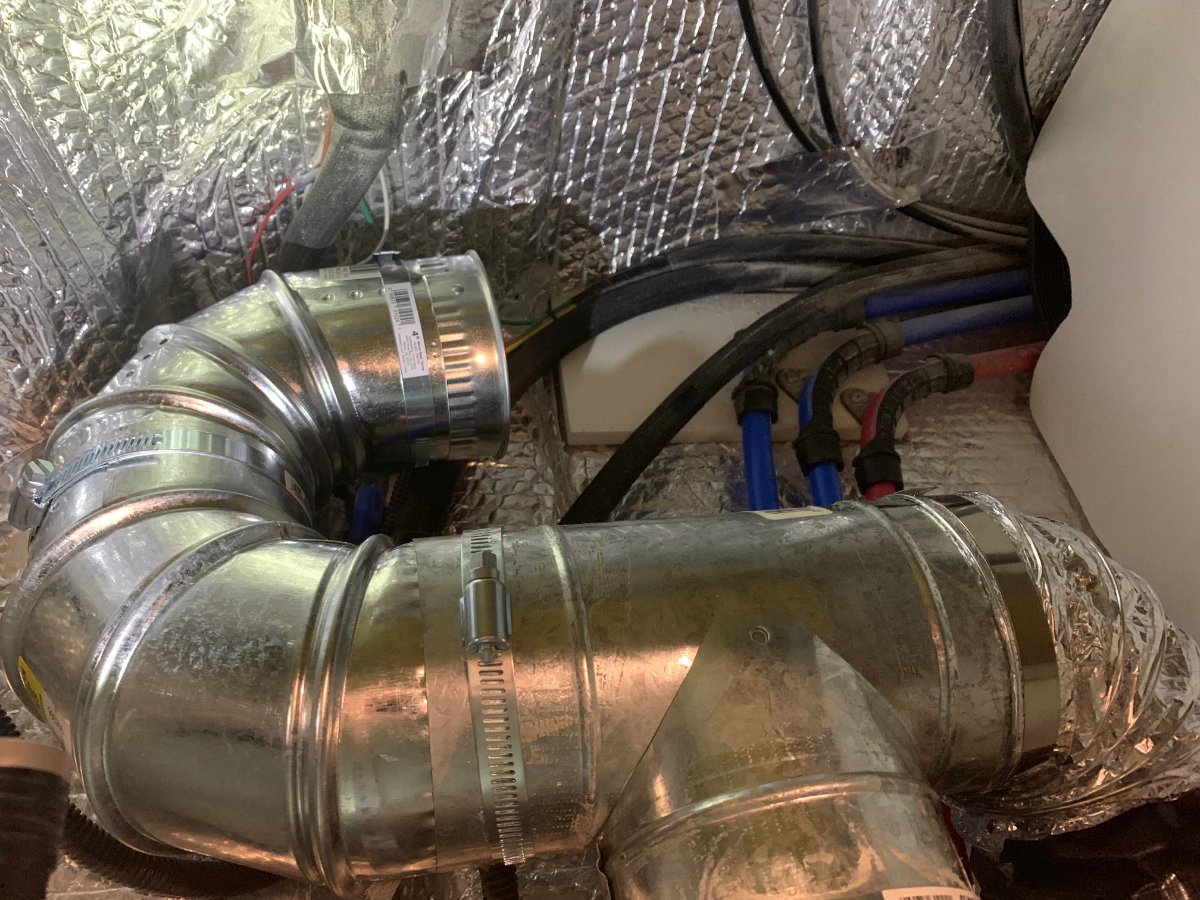
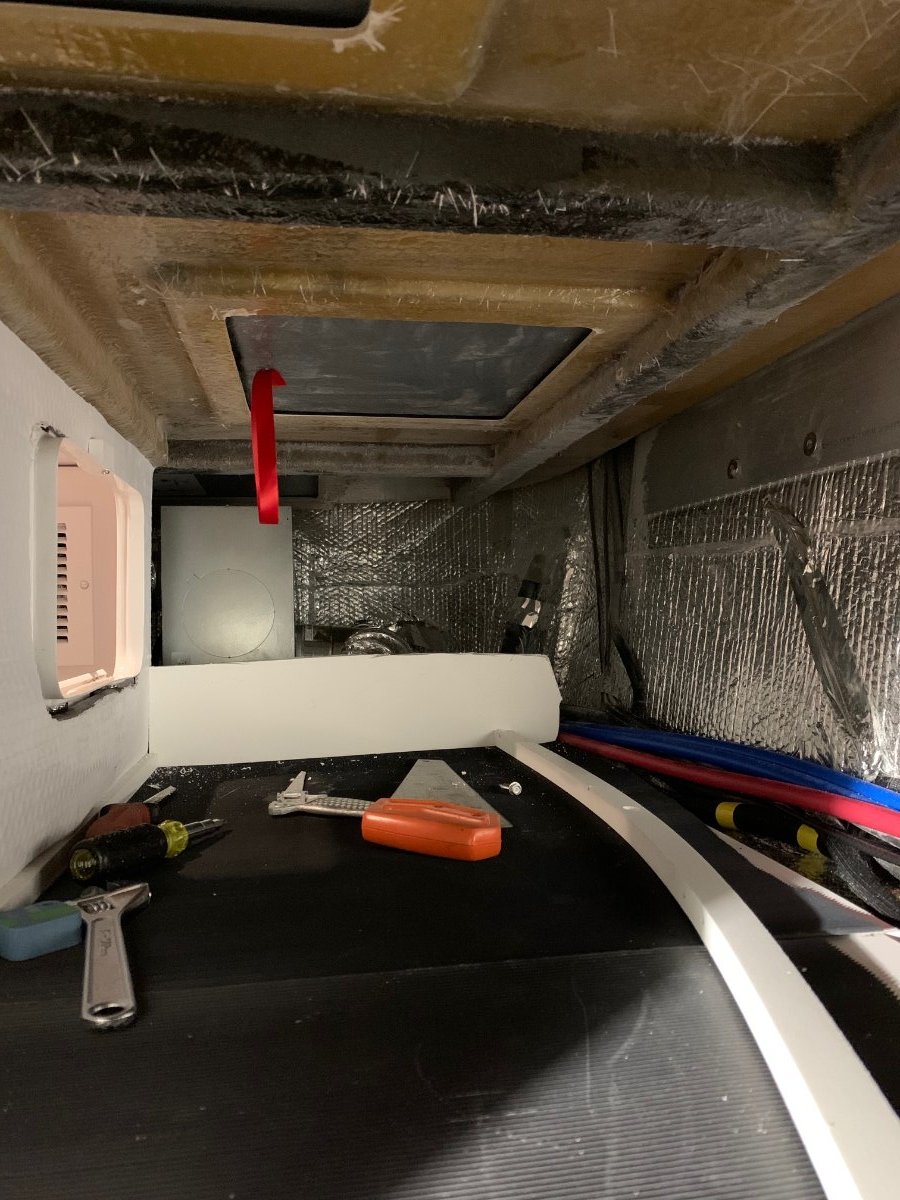
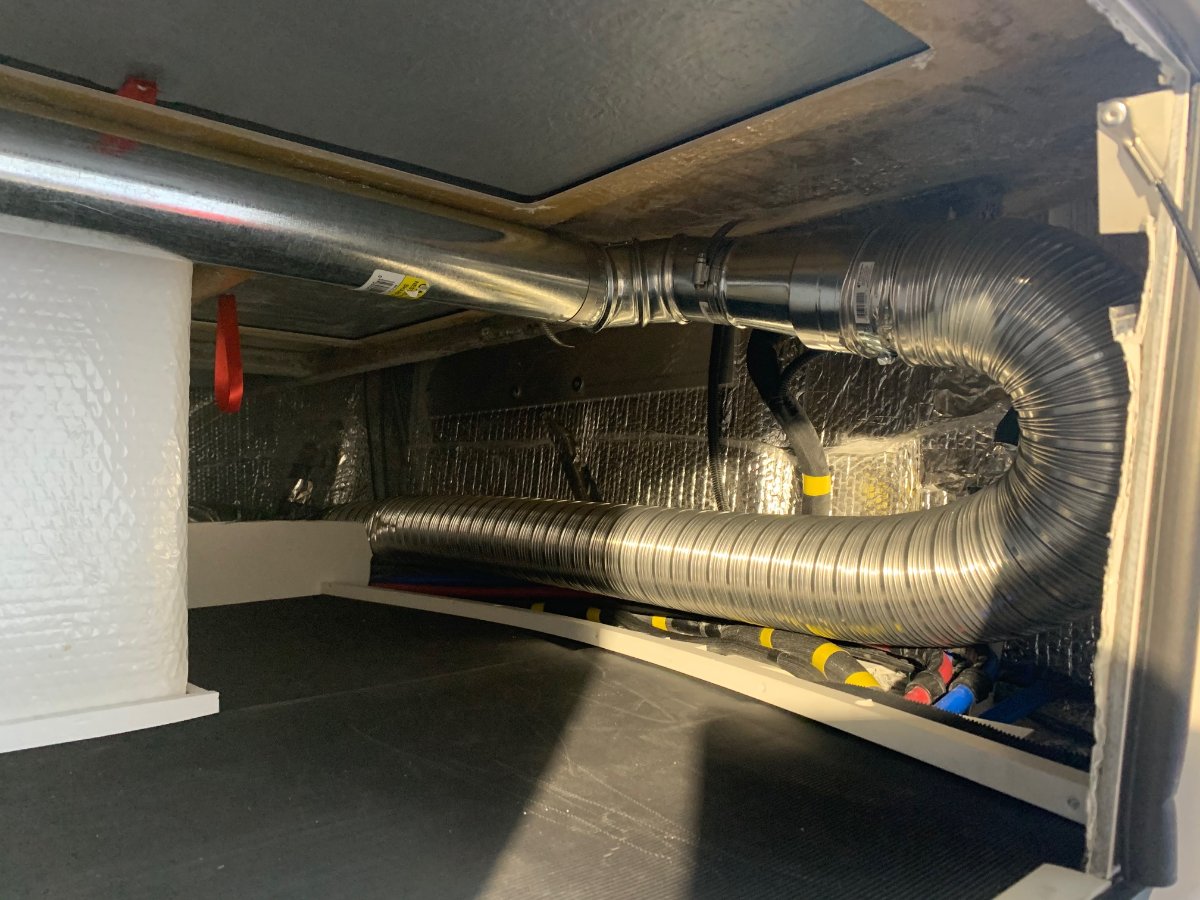
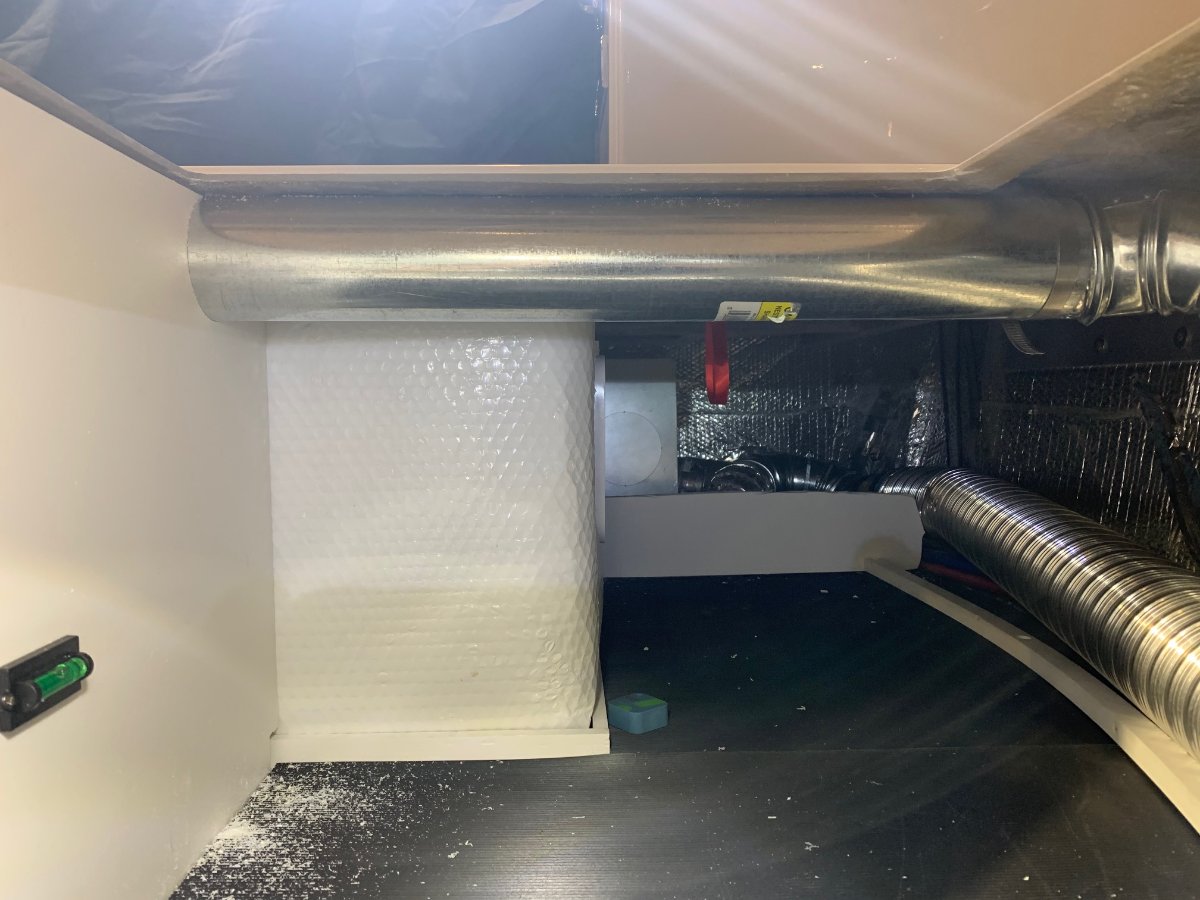
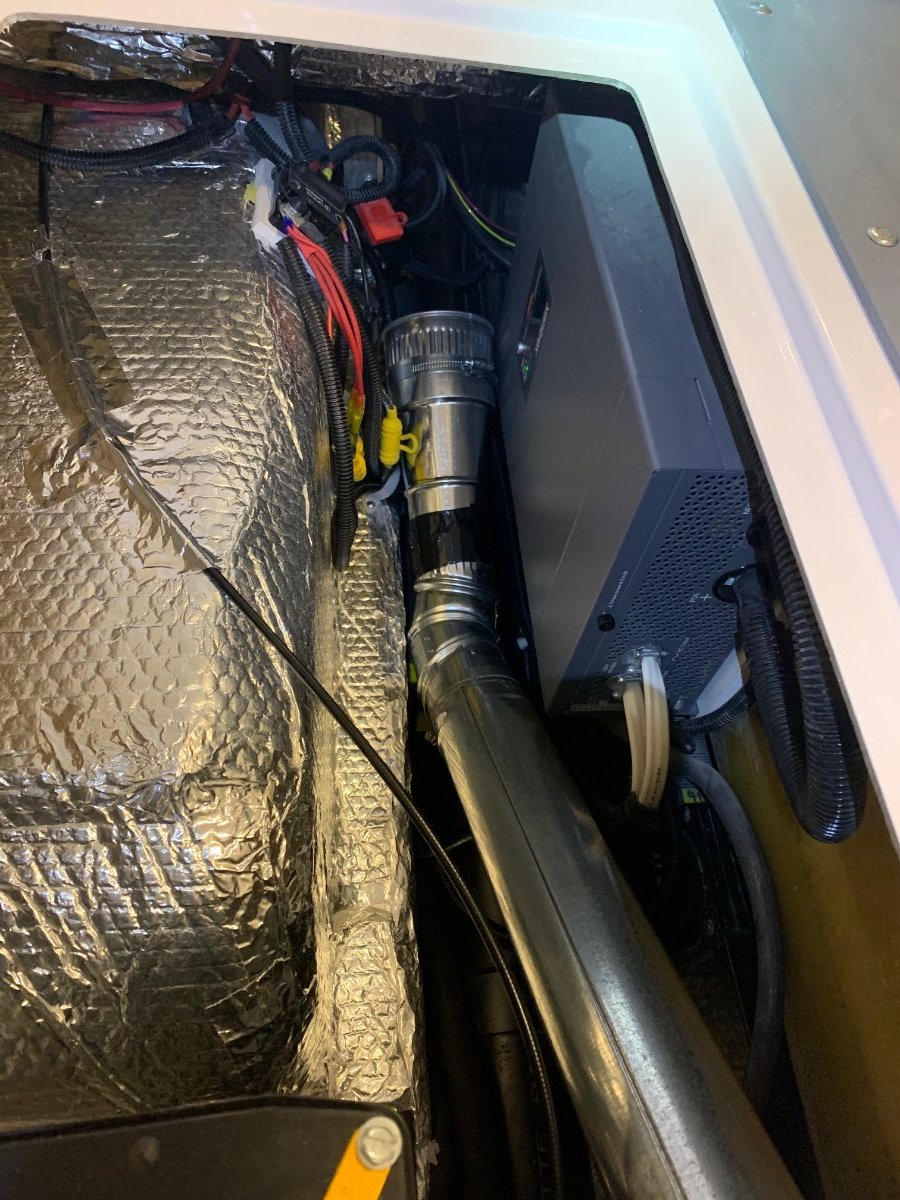
Here's a propane-dependent solution I'm implementing to warm problem areas along the curb-side basement. I have found that by default, the street side basement runs about 10 degrees cooler than the curb-side basement when the furnace is on. The difference increases as the outside temp decreases. My simple goal is to balance the basements in order to protect the street-side plumbing. It's not particularly difficult to run another HVAC line down the curb-side and it takes advantage of the existing furnace. First, I just used a T connector on the back side of the furnace and tied into the line that goes up to the curb-side all the way to the bathroom. Here's a picture. I'm going to install a manual damper inline so I can restrict flow as needed. I then removed the flimsy plastic walls on the side and rear of the basement to make room. Here's the view looking into the basement from outside after removal: You can see the plumbing running along the back bumper area. This area runs a few degrees cooler than the street-side basement, so it's important to get some heat here as well to prevent freezing. I used 4" dryer duct to run along the back bumper plumbing. Then it's reduces down to a 3" solid duct that runs along the basement roof out of the way. Here goes the 3" duct through the basement wall (pvc board) into the street-side basement: Here's the final picture for now, looking from the back of the trailer towards the front (you can see the inverter on the right). I ran out of time yesterday so I just terminated the connection inside the street-side basement. It's super easy to finish running the 3" duct the rest of the way up the black tank drain pipe to where the footwell for the dinette is. I'm going to put some strategically placed holes along the duct now in order to balance out the temps on both sides at something reasonable. Still need an all-electric backup, but I feel like this is a good start. Easy, quick and takes advantage of the existing components.
1 point
-
Wow. Now I know why it's been discussed but no one has tried anything like I was thinking. I don't think I'll be removing the tank either if I can't take it out whole and replace it if we ever decide to sell or switch toilets. I'll just rest easy for now knowing that I have a spare tank on board that won't need any special attention. Thanks Overland and SeaDawg for sharing your thoughts and experience. I'll just have to make do with various water storage containers to make it all work if/when we'll be camping dry for an extended period.1 point
-
You’ll find that even taking the tank out for storage space gives limited benefit and isn’t all that easy. I had to chop mine into pieces to get it out, which was fun but also not fun. You could of course take out the toilet floor and remove the tank in one piece but that’s even more trouble. Then there’s the question of what to do with that space. It’s narrow and not easily accessed so you need to put some thought into what you’d actually store there before you go through the trouble. I cut out a hatch in the floor just smaller than the footprint of the toilet, added a tray underneath and that’s where I store extra bags of peat for the toilet. That actually works quite well since of course you have to remove the toilet to empty it, so there’s your extra peat. I also gained a bit more space under the dinette seat and that’s where I carry spares, my repair kit, and an electric heater.1 point
-
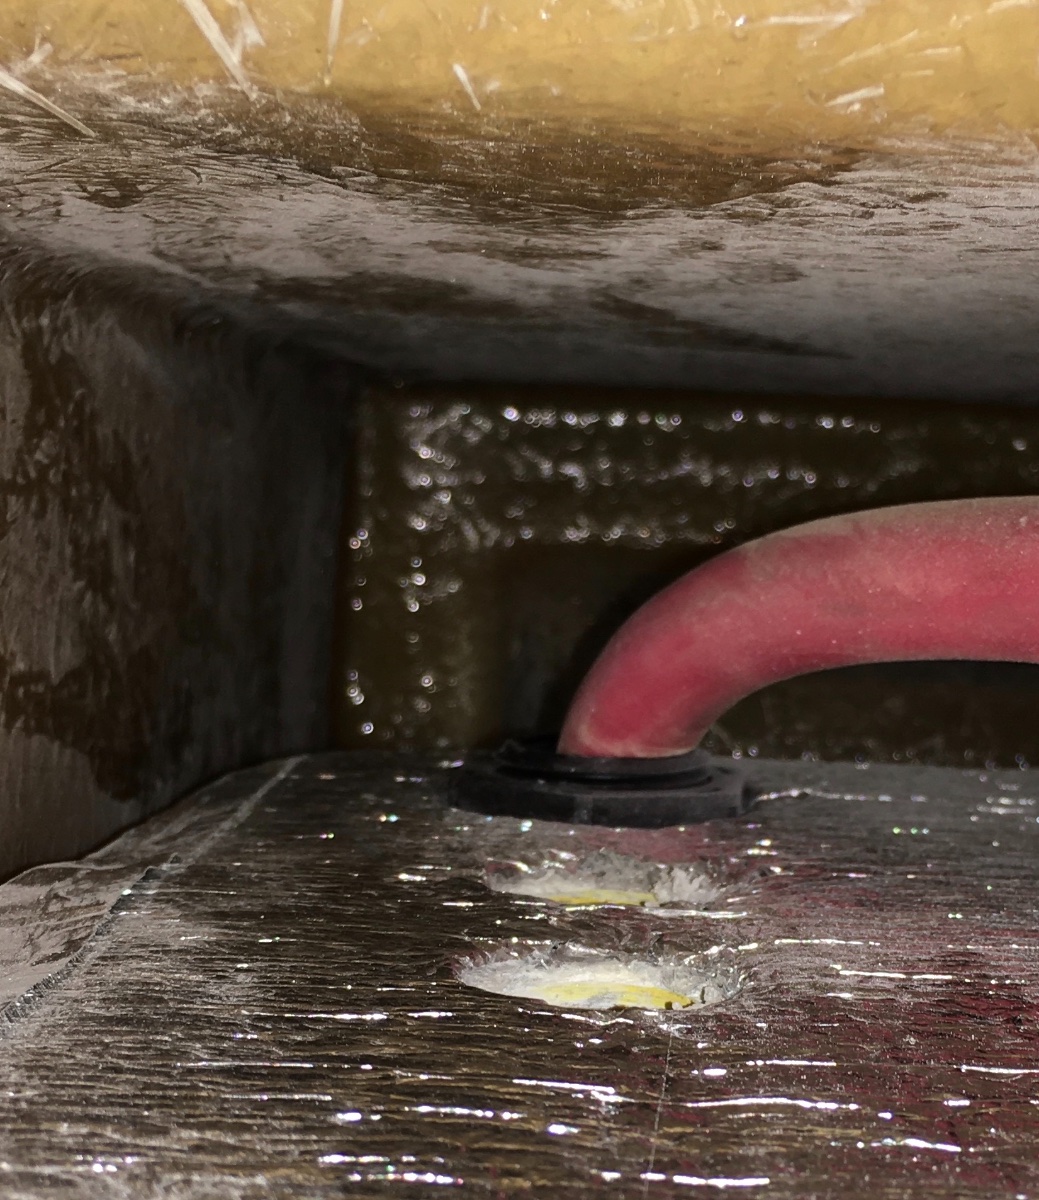
Using a tpms with a temp sensor will help assure you never see the warning light of the glowing overheated hub, btw. Even though it reads air temp, not hub temp, it'll give you a warning before the disaster "glow." Btw, did you guys know there are actually bolts manufactured for semi trailers that have temp sensors? I didn't, til I looked today.
0 points


-
Recent Achievements
-


")


")
")


