Leaderboard


Popular Content
Showing content with the highest reputation since 02/02/2026 in Posts
-
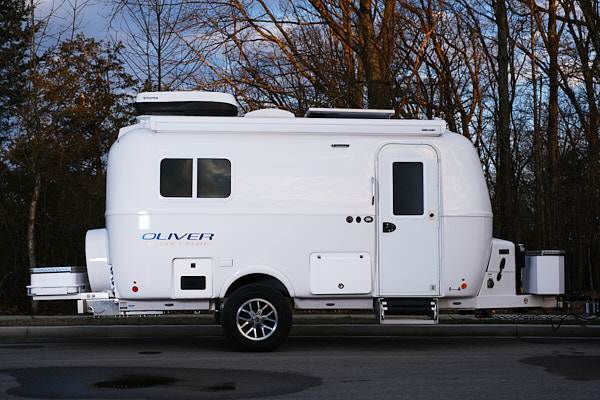
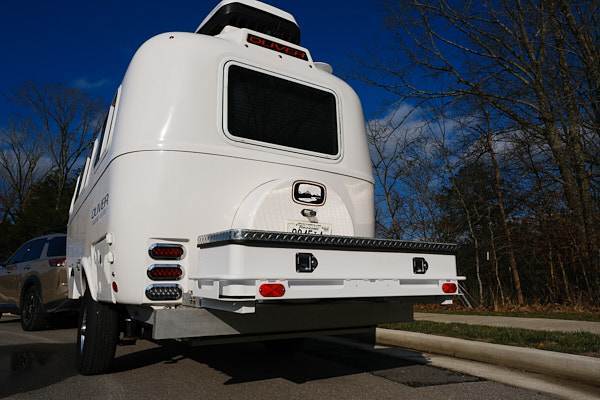
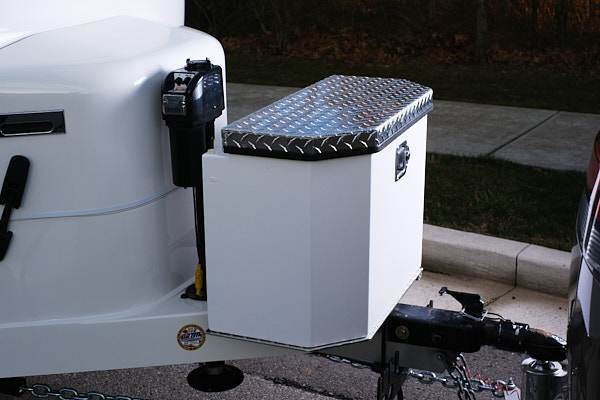
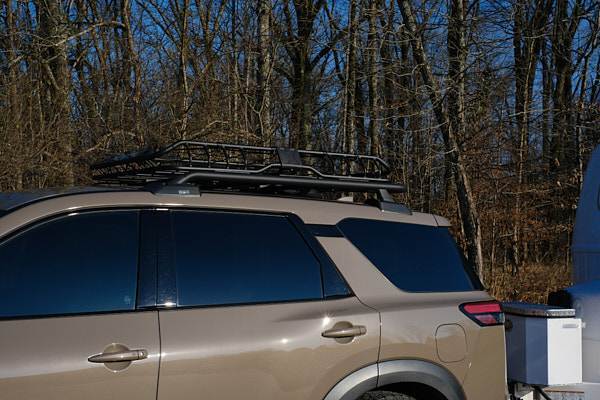
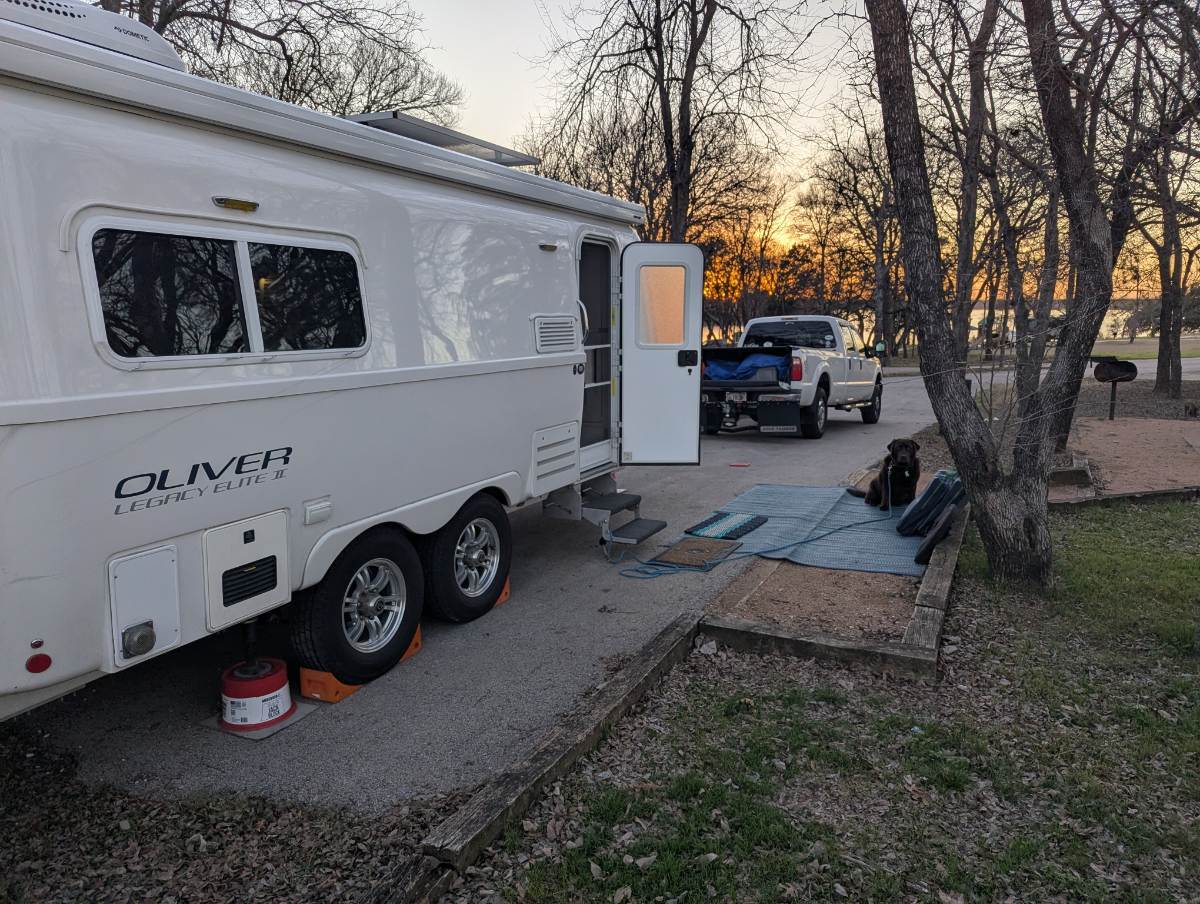
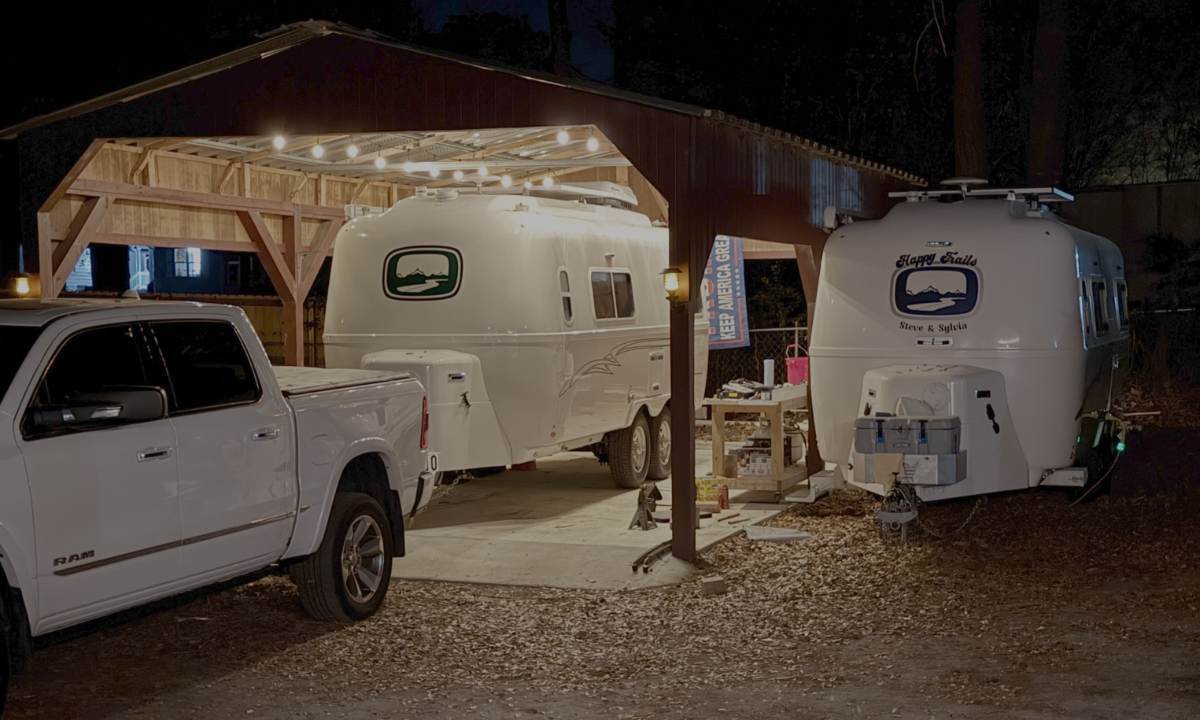
Barb and I have had our LE I for about 18 months now. We fancy ourselves minimalists, but truth be told, we viewed the LE I as a bit of an experiment knowing that it would be a challenge getting all of our gear in the trailer and the Pathfinder. What helps is that we are both perpetual organizers and efficiency nuts so we welcomed the challenge. The game changer for us has been connecting with the folks at Sea Biscuit. Knowing we needed a little more storage one of the first accessories we added was the rear basket from Sea Biscuit. We weren't quite sure what types of containers we could put in the basket, but we knew it gave us lots of options for adding storage. After looking at the myriad options of storage containers, boxes, etc. that could go in that rear basket, we settled on the rear storage box from Sea Biscuit. The locking rear box is home for our hookups, a large tool bag, our outdoor carpet for under the awning, and several other items that immediately come out when we land at a destination. Our sewer hose for draining the gray tank (we have a composting toilet, so no black tank hose) is still in the bumper and it is surprisingly easy to store and deploy when needed even with the box over top. The expanded storage we gained from the rear basket and box combo was our first game changing moment. It allowed us to move several items out of the Pathfinder permanently. Shortly thereafter we noticed the front box that many of the LE II owners had added. To our disappointment, the box was not compatible with the LE I, but we started a conversation with Dave and Kristine at Sea Biscuit about our options. Fast forward several more months and we are one of the first to acquire a front box unit designed specifically for the LE I. The front box is deeper than the rear box and fits neatly between the front jack post and the bull dog coupler. It sits on a steel platform making it super stable, and when opened leaves plenty of clearance for the jack post. The front box now holds our DC to DC charging cables, wheel chocks, and several other necessities that also formerly rode in the back of the Pathfinder. This was game changing moment number 2. One of the final accessories we added to compliment our storage accessories from Sea Biscuit was the rooftop basket from Rhino Rack. The rack holds our chairs and camp table that were also - yes, you guessed it - in the back of the Pathfinder. (Low and behold, I can now see out of the back window.) Barb and I are huge fans of the little Ollie having put over 15,000 miles on it, visiting 21 states in 2025. Our travel style is such that we rarely spend more than a couple of days in one spot so the flexibility of the smaller LE I, and smaller tow vehicle (17 mpg with the Pathfinder) is the perfect combination for us. For anyone who is considering an LE I, or who has an LE I and is looking for quality accessories to expand your storage, we cannot recommend the folks at Sea Biscuit highly enough. The products are top notch and the Hess's are awesome folks. See you on the road!
 13 points
 -
After I had heard about the issues that Battle Born was having, I initially tested my three batteries. I installed my batteries about six years ago and at least initially didn’t have any issues with them. We were in the midst of a two month trip so my testing was very rudimentary. I just ran a 1500 watt electric heater on my inverter for about a half hour. That loaded the batteries to 122 amps which only put about 41 amps on each battery. With this test I was only checking for hot positive terminals. No issues there. After we got back home I decided to replace all of the Battle Born batteries with two Epoch 300 ah batteries at the wise counsel of another Oliver owner. Anyway, I decided to perform a more detailed test on the three old batteries. I had an old 400 watt inverter that I connected with a 100 watt incandescent light bulb (remember those) and connected the input to each battery one at a time. This would put approximately 8 amps load on the battery. I first charged each battery to make sure they were fully charged. I finished my initial battery test today. First and third batteries lasted about 12 hours each. The inverter will turn itself off at 10 volts which is the voltage that a lithium battery is considered dead. The 12 hour time frame seems about right, 100 amp/hr (battery) divided by 8 amps (load) is about 12.5 hours so I think my actual test is fairly accurate. The second battery only lasted a few hours and died to the point that the charger would not recognize any voltage so wouldn’t start charging. I had to jumper a good battery in parallel with the dead one so that the charger would start then after just a couple of minutes I removed the good battery and charging continued. Anyway, I’m going to re test the bad one tomorrow. My original 300 ah had turned into 200 ah! Over the past couple of years I had noticed that the battery pack seemed to draw down quicker than before and that I had to recharge them more frequently. We do all sorts of camping typically, a mixture of boondocking and various stages of campgrounds. We typically camp not just a few days boondocking which is easy for any trailer but we’ll boondock for maybe two weeks at a time. This past year we were in our camper for a total of six months. Four months in the west and two months in the south east. During that time we spent a week here and there boondocking and sometimes in campgrounds with no hook ups. Anyway, it had become more difficult to boondock in the last couple of years. We have a compressor fridge that of course runs 24/7 and then other typical loads. I didn’t know it but we had one third of our battery capacity gone! I’m glad I changed these out for the Epoch batteries! My takeaway and suggestion for others (not just Battle Born owners) is to periodically fully test your lithium batteries. There are load testers sold on Amazon specifically designed to test them and they are a little more elegant than the inverter/light bulb arrangement that I used. The Epoch Essentials 300ah batteries have Bluetooth and can be electronically controlled. The output or charge input can be turned off and on through the app so in a multi battery setup each battery can be isolated. I have not experimented with this feature yet but could potentially make it easier to test one battery at a time in place without having to remove them. Anyway, fellow Battle Born owners test your batteries!8 points
-
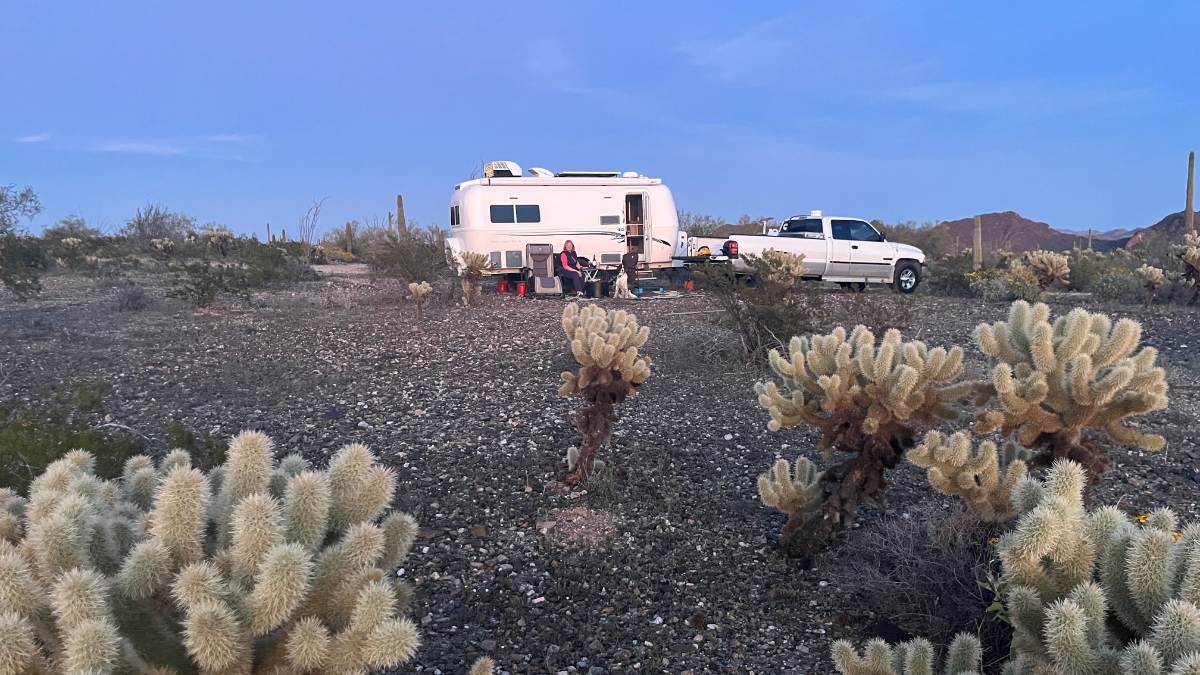
We'll have 4 peaceful overnights in this beautiful and mostly quiet BLM lands. Quiet except for occasional UTVs passing by to run the shelf road to the top of Harquahala Mountain! (3 groups so far on this Sunday.) We got 100 yards off the main road and all I hear are the insects of the Sonoran Desert (perhaps too dry here for many birds). Not one sound overnight! Up close and personal with the Cholla and Saguaro cactus! 75F this afternoon and should reach 85 in a couple days! Drinking coffee this morning, in shorts, shirt off, basking in the Arizona sun. From I-10, halfway between Phoenix and Quartzsite, take Salome Rd to Eagle Eye Rd north. Or take Eagle Eye Rd south off US Hwy 60 at Aguila AZ. The roads are all paved until you get to the staging area and the road to the top is of course dirt, where decades ago there was a Smithsonian observatory. Our tow vehicle is only 2WD and I'm not much for hairy shelf roads anyway! I'd like to drive up close enough to hike the rest of the climb. We'll check it out soon! We each have a good book to read and getting some sun and warmth (got cold and snowing in Prescott) and much needed rest, is all we need to finish up this trip! 😎
8 points
-
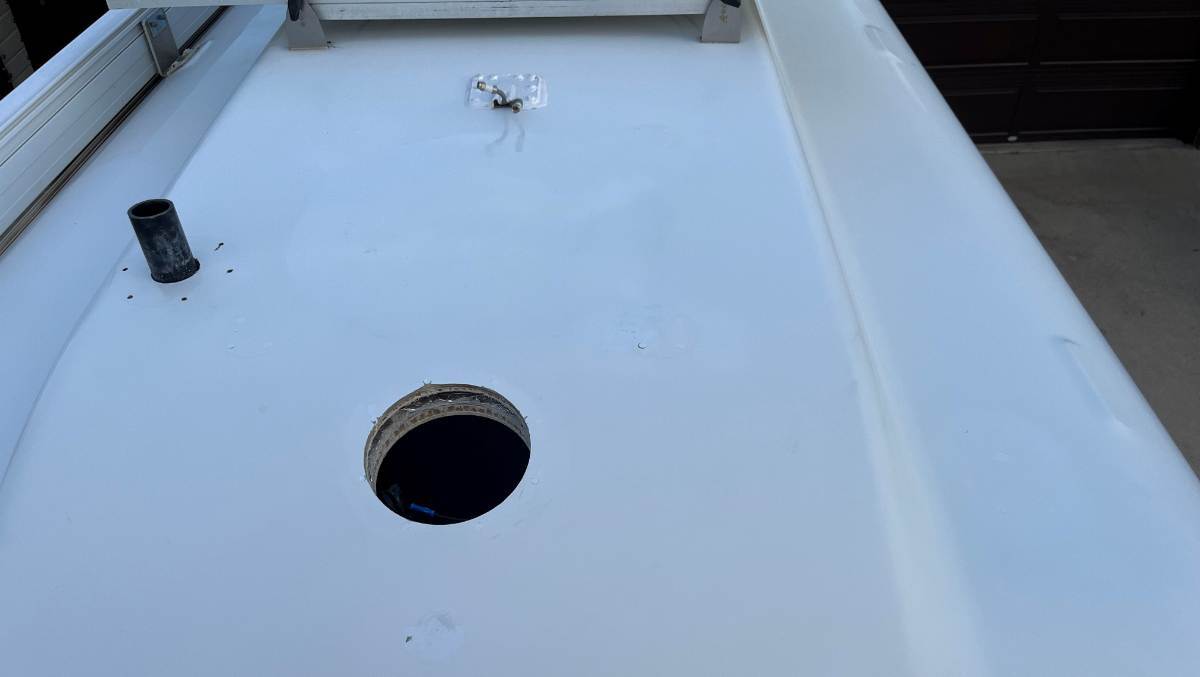
If for any reason you are not satisfied with the color match, I'd guess that you could lightly sand out some of the Marine-Tek and coat over it with the appropriate color gelcoat. Note - Oliver can tell you what type and color gelcoat is on your Ollie.8 points
-
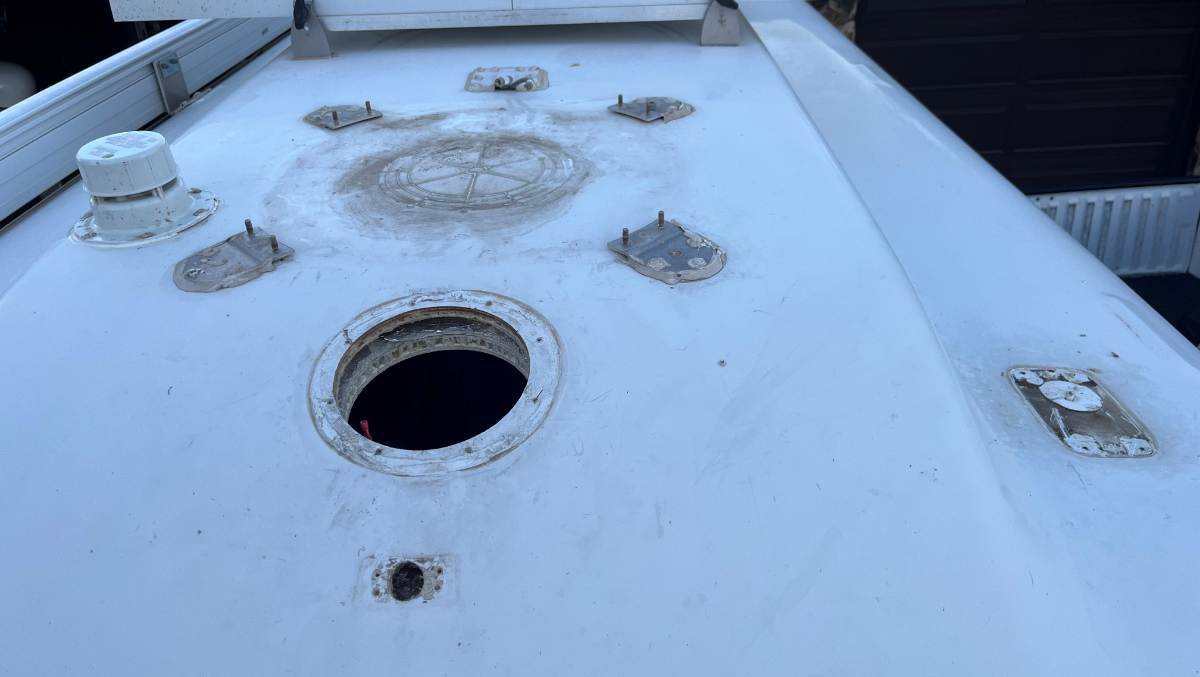
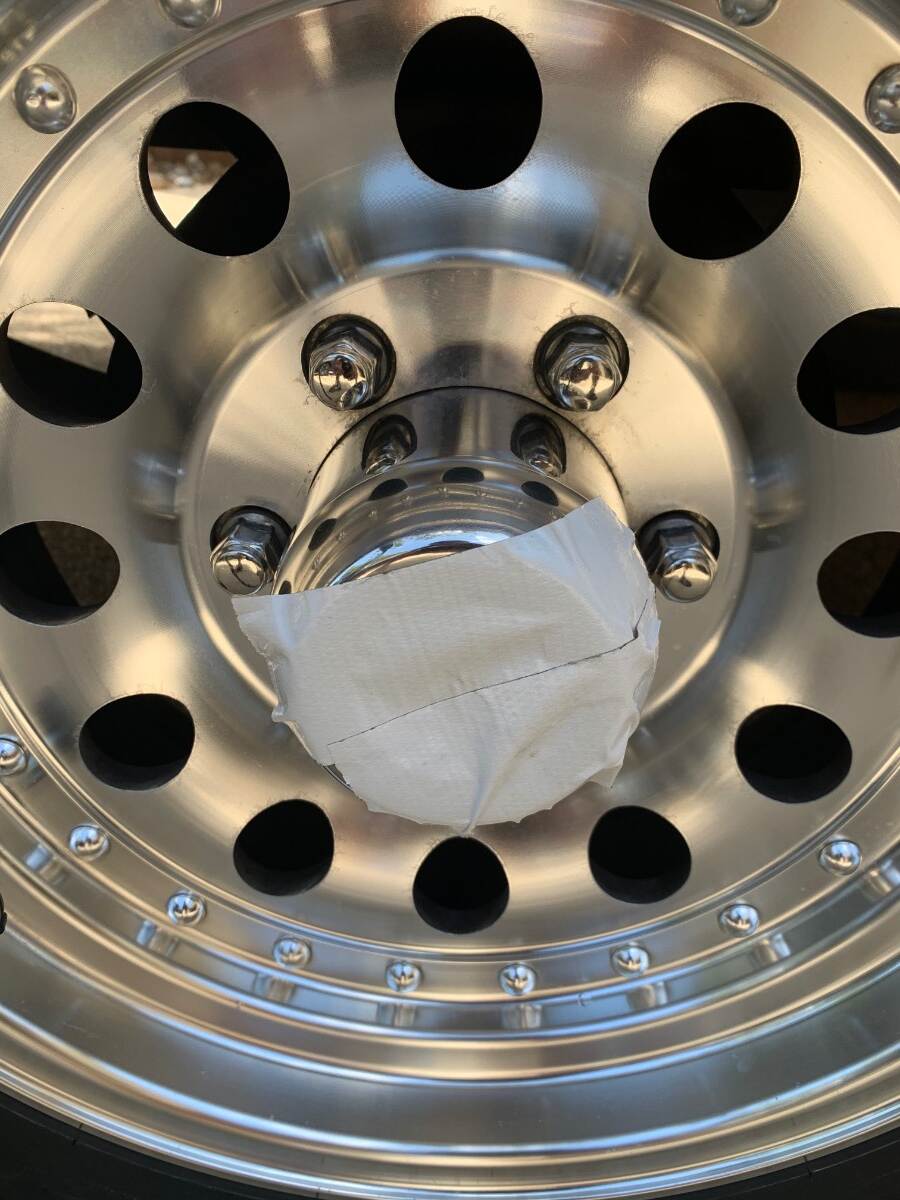
Hello @Mroth, this is not truly my area of expertise, but given how many holes are drilled in OTT installation processes, and that I have removed many of the old-tech products on our Oliver, I've filled way too many holes! I've used this epoxy based product and the color match is good. It's just a touch whiter than our older hull and I've read somewhere that the newer hulls are a tone brighter. I would say this product may work well for your purpose in the shower. It's simple and inexpensive. https://www.amazon.com/Marine-Tex-RM305K-White-oz/dp/B0014419V0/ I have also plugged the holes made for the TV mount, the drain pull handle in the bathroom, the door hook outside, both cameras and everything in these pics (see before and after).
8 points
-
Preview for Oliver friends: Since we're between trips with Hull 505, we decided to try out some ai song creation tools and do a road log video. This is the link below is to our page which includes the lyrics for the video shown below: Blog Article with Video and Lyrics Craig & Rose Video from our website below: Oliver 505 640 - SD 480p.mov8 points
-
We installed two Epoch 105 AH replacing two 100AH BB batteries on Ollie. We don't have factory solar charging and only have an onboard Progressive Dynamics 45A Lithium charger. The BB worked nicely with this setup. The Epoch 105AH batteries are a little smaller physically and lighter than the 100AH BB batteries. I like the carry handles on them, too. The new Epoch batteries with the carry handles are easy to install and remove on Ollie. I removed them in less than 10 minutes when I put Ollie in storage this winter. It will take a little longer to install them later this month. Really like the Epoch app, too. Edit: I looked at the Epoch 105AH link in your post and thought you were installing 105AH, what ever size is used, they are very nice batteries.8 points
-
If anyone needs new chocks for the upcoming season, Harbor Freight has them on sale with the coupon below: Bill7 points
-
Lake Waco Midway Park (COE), full hook-ups. 81° Thursday. Dropped 20° for the next 2 days and high 30's tonight.
7 points
-
First time here, we met this guy! 😎
7 points
-
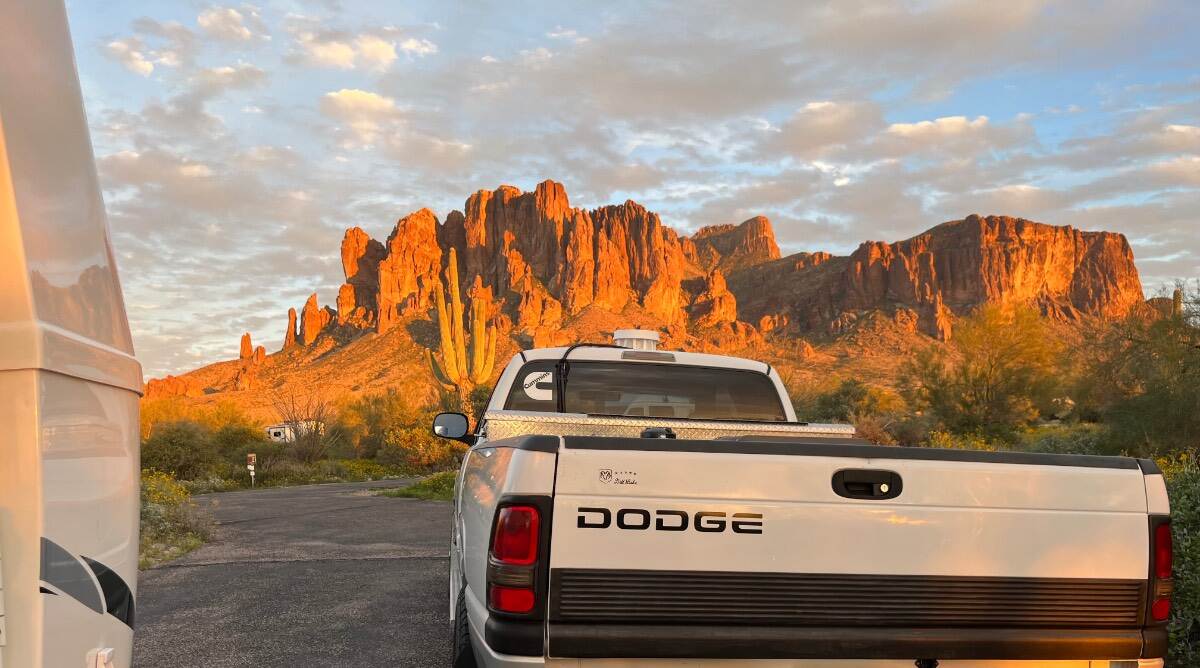
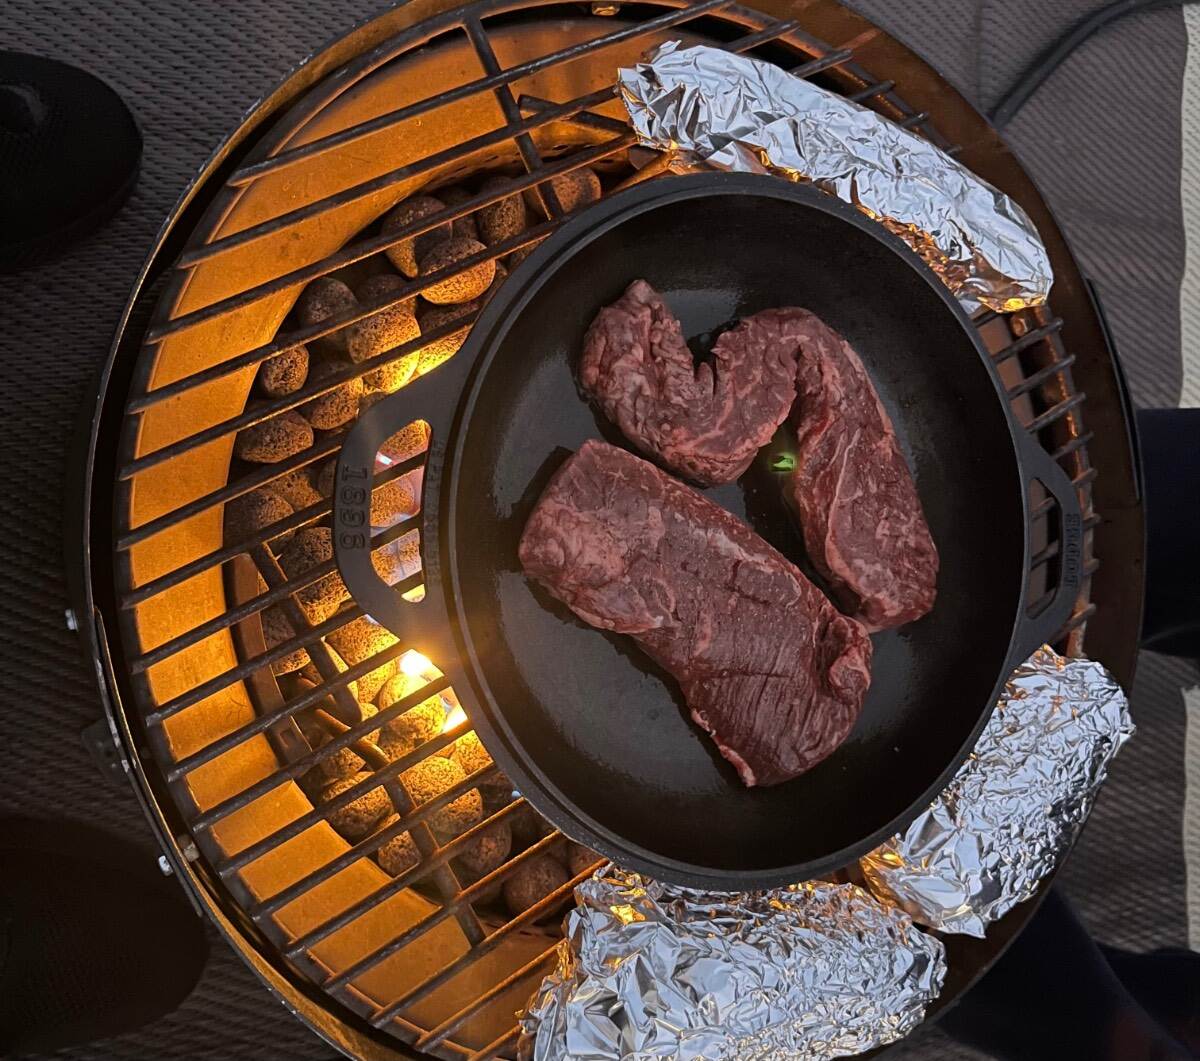
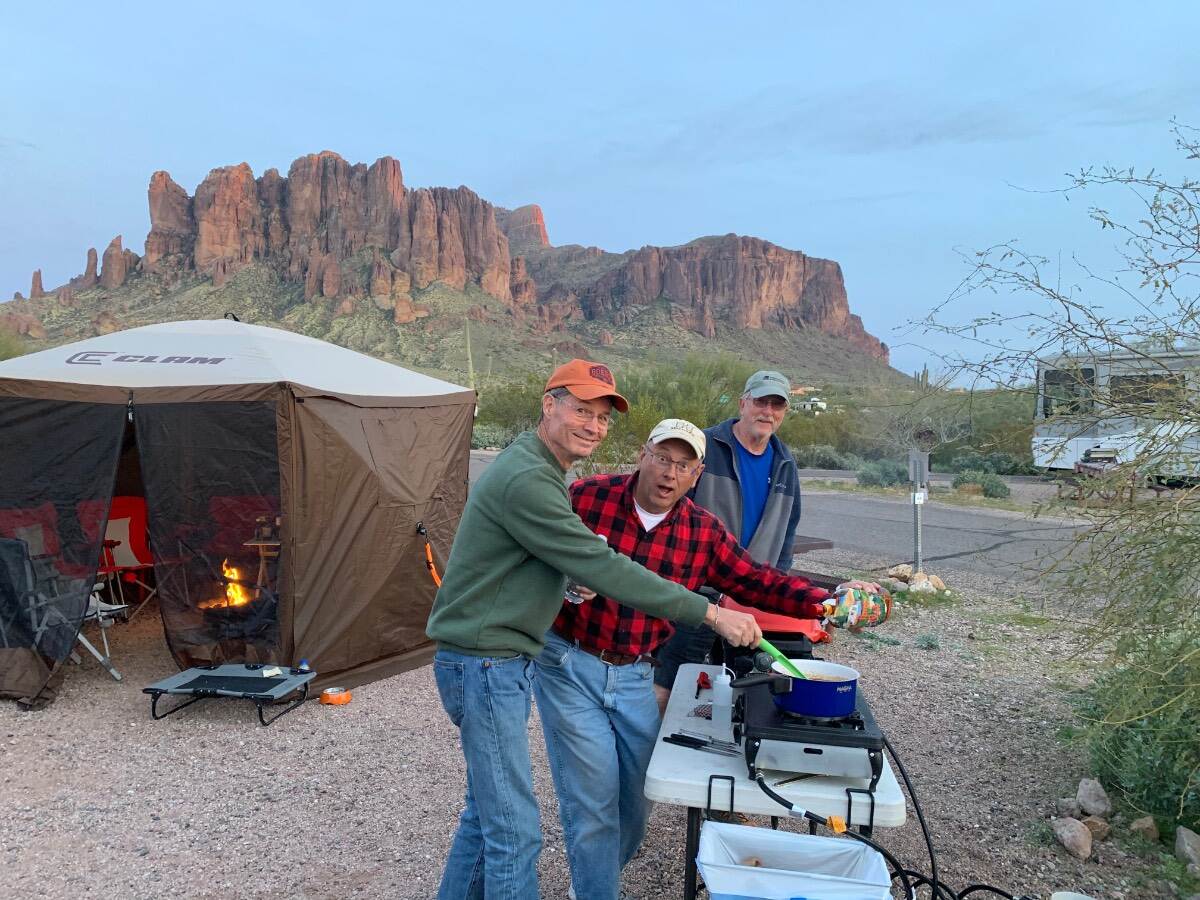
4th visit to Lost Dutchman. I’ll make it up Flat Iron one day (got halfway up last time as it was getting dark)! Came this weekend since the PPA Pickleball pro tournament is in Mesa this week, only a half hour away! What a view! Hangar steaks, baked and sweet potato with asparagus, cooked over the fire ring! 😎
7 points
-
Those that might be contemplating getting a Levelmate should know that a newer model was released last year called the Levelmate Max. I had never gone for a Levelmate before but decided to try the Max version and have been extremely satisfied. There is absolutely no need to hardwire it because it runs on three AAA batteries that last over a year and can be replaced in under a minute. As far as technology upgrades over the Pro and Pro+, the Max adds a gyroscope in addition to the accelerometer. This enables one to observe continuous instant changes in level (side to side and front to back) with the trailer hitched and vehicle moving (called leveling on the go). This feature can be useful in finding the best spot to stop and unhitch when boondocking on uneven ground. Another feature is that it can remember the preferred tongue height when it is time to hitch up without having to back the vehicle up to the tongue first. Levelmate recommendz permanently mounting it with screws but I used 2 inch wide heavy duty velcro to mount it just inside the door under the rocker switch panel. No holes drilled.7 points
-
A short (by comparison for once) summmary: I concur with the "To Each Their Own" concept. That using hind-sight is an unfair approach to just about anything. That OTT has and still makes a product we all are proud to have, use and keep. That over time our requirements and circumstances will change. We will all end up modify, donating or selling our Olivers. We each exhibit moments of brilliance, and moments we wish we would have avoided. This forum is vibrant because we understand the above for ourselves and others. God bless Scott Oliver, his family and the OTT TEAM they have built. And all the participants of this forum. John Russell7 points
-
I’m probably a minority here, but I like my bubble level. It’s used everytime we set up. Generally accurate although it does take adjusting every so often. I haven’t gone for some of the electronic/automatic upgrades (digital door lock, motorized black/gray tank gates, auto levelers, etc). I like simplicity. It’s instructive to remember how Oliver Travel Trailers began. Jim and John traveled around in their Casita(s) for their fiberglass businesses. When it came time to get a new Casita they decided they could make their own. They did, and sometime around 2007 the Elite I was born. They were not RV industry experts, just experienced RVers who used their fiberglass experience to create a new travel trailer. The mechanical parts (electricity, plumbing, etc) have evolved over time with the early trailers not being very standardized. When I look at the newer models compared to those built when ours was, they’ve come a long way and have continued to refine and make improvements. Those of us with 2015/16/17 trailers don’t have that benefit of lessons learned over the years but we still have a solid trailer. Our trailer is 10 years old, just over 110,000 miles and can/does pass for a new trailer (thanks CGI guys). All systems work fine and reliability over the last 6 or 7 years has been outstanding. Mike7 points
-
No one (certainly me) has said that "OTT has good reasons for all things they do!". As I would hope you already know, in manufacturing there are a myriad of factors that enter into virtually all aspects of even the smallest detail of any product. In my almost 11 years of dealing with OTT products and personnel I believe that they are truly concerned and connected with virtually every aspect and they seek to make our trailers better in every way that they can while still producing a product that meets all of the requirements necessary/desired for the broad segment they are trying to serve. Indeed, many of the "improvements" made to these trailers have been at the insistence of owners. In my personal opinion, some of these "improvements" have actually made the trailers less desirable to me. You have made this point before without consideration or concern for any segment of the market that chooses (for what ever reason) to not be "bothered" with yet another electronic device. I regret that it is "painful" for you to have to deal with those that (again) for whatever reason choose to not use a "LevelMate" or, perhaps, even cell phones. I'm truly glad for your delight in the ease and simplicity you seem to find in using these types of devices. I would certainly agree that they do have a place and time. But, ALWAYS and in ALL situations is a bit of a stretch. About 500 days ago the area where I live was badly hit with a "hurricane" that literally destroyed several towns and this area is still dealing with the issues caused. One of the things that simply didn't work during this storm was the cell phone network. Perhaps in the eyes of some (actually most if looking at the current stats regarding cell phone ownership - some 95% of adults in America own them) having a land line for phone service belongs in the "stone age". But, I'm sure glad that we still had/have ours when this happened. I've never felt the "need" for being perfectly level or perfectly comfortable, or virtually perfectly almost anything else since my days in the Army. Again, I'm sorry that "It gets me when...". I believe that people do with their money what they want (within the law of course). With cell phones to LevelMates, to Oliver's and beyond people can spend money as they choose. Yes, I do wonder sometimes about these choices that people make. Heck, I even question my own sanity from time to time but I sure don't let it bother me. I'm sorry too that you have had to spend "2 years making too many corrections and improvements!" to your Ollie. From reading most of your posts I believe that some of these "corrections and improvements" had to be made due to the neglect or mistreatment your trailer suffered from its previous owner(s). Others things that you have done, indeed, correct, improve or update original things done during manufacturing. Finally, I prefer to believe that much of our "100's of pages long" Mods section here on the Forum has more to do with improved technology, materials, design and related factors than it does with Oliver not having good reasons for doing what they did. As an example - I believe that you have basically rewired your entire Ollie (and nicely so too). You did this because you saw "problems" with the original wiring that (for good reason) caused you concern. And, since this original wiring was done during the original build your assumption is/was that Oliver was somehow "bad" for allowing the wiring to be completed in this manner. But, as with many things, there is more to the story than what one usually sees by only observing what they can immediately see. Back when your trailer was built, Oliver didn't have "in house" electricians. They knew how other RV's were wired but felt that if they hired certified electricians they would get the best wiring for an Oliver available. From the history I know, there were as many as three individual electricians (I'm sure that they knew each other given the small town/area around Hohenwald) that usually came into Oliver after normal working hours to wire our trailers. This is why not all trailers produced at that time were necessarily wired the same. After "problems" were being reported by owners, Oliver felt that they should have more control over how the trailers were being wired in order to reduce the number of "quality control" issues they were having. Once Oliver took this area "in house" they standardized the wiring for all trailers. This meant that all trailers would be wired with the same wiring harness and would, therefore, actually cost more in wire but less in installation as compared to hiring these "outside" certified electricians. These same type of issues were the reason for the switch from BlueSky to Zamp solar controllers even though Oliver was chastised for not having an MPPT controller, These same type of issues came up with the switch from 16 inch to 15 inch tires and with the orientation of the propane stove and with window blinds and with interior design choices and with ..... In my experience, Oliver has no comparison (not even close) to any other company in the world that I've ever been associated with or done business with. They have consistently done things for customers that are far and away beyond anything that might be considered necessary - regardless of warranties or any other related legal issue. If Oliver has a fault in this area I believe that it lies in the lack of marketing all of the things that they have done other than letting the final product speak for itself. Does this mean that I believe Oliver is perfect? NO! But the company and its product are the best thing on the market even at the price of $100,000. Bill7 points
-
With all the cautions mentioned above, I do what others have mentioned. Get the trailer close to level using lifts or blocks under the wheels, if needed, and then use the jacks the last few inches to make the trailer level. The jacks are pretty robust and seem to lift and support the trailer without problem. Having said that, I also highly recommend the use of blocks under the lifts to reduce the amount they have to extend. I read this forum weekly if not daily and find it a valuable resource of information for owning, using and enjoying your Oliver.7 points
-
And yet more potential bad news for BB. They better get a handle on this or they may have some rough times ahead - true or not. Will's latest YT video "Battleborn 270Ah Failure! Yikes!" has been up for 1 day and viewed more than 87,000 times. 🤦♂️ Looking from the outside in, it appears BB may indeed have an engineering issue on their hands. I think Will was a bit shocked at how the 270Ah was constructed. Not sure why BB chose to completely seal the batteries without screws. Maybe to save money and/or safety. Who knows. This situation, if true, is cyclical - not the first time, and not the last time, as long as we roam the Earth we'll see this stuff. Experience should have taught us that we seldom get a "good deal" for less money spent. I think that's now a law, isn't it? If so, I can't stand that law. 🤣 The best thing to take away from all this social media is, at least, awareness. As I recently discovered my girlfriends very dry lead acid battery about to explode from heat, this is a bit close to home for me. I nearly burned my hand on the battery plastic housing, it was that bad. It's always a good idea to carry a digital thermometer or even a thermal imager for your phone. I was going to be adding a thermal imager to my gear soon, even before these vids started showing up. I might drag my butt out to Texas for five weeks of RV tech training after retirement. We'll see if I have the continued inspiration.
7 points
-
We’ve never used a booster for our TST. Works fine.6 points
-
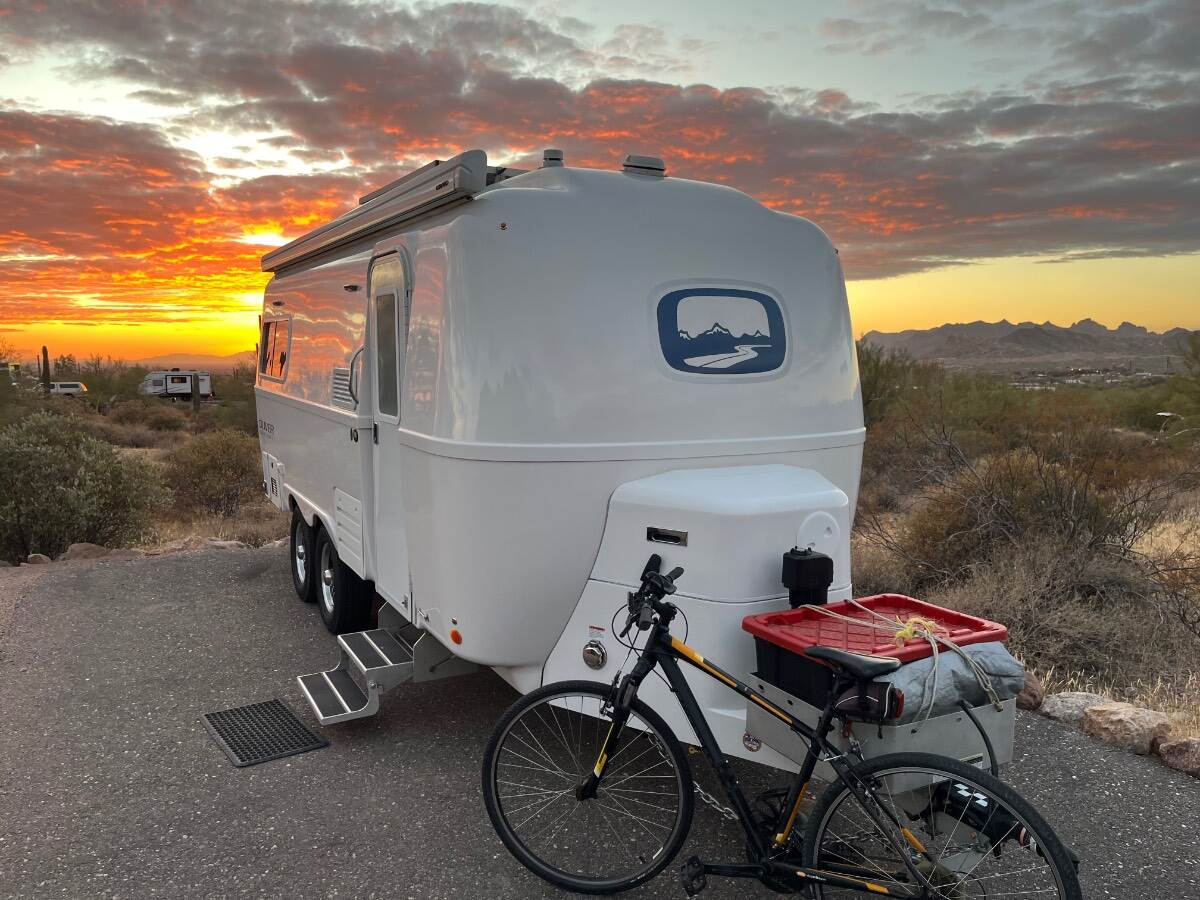
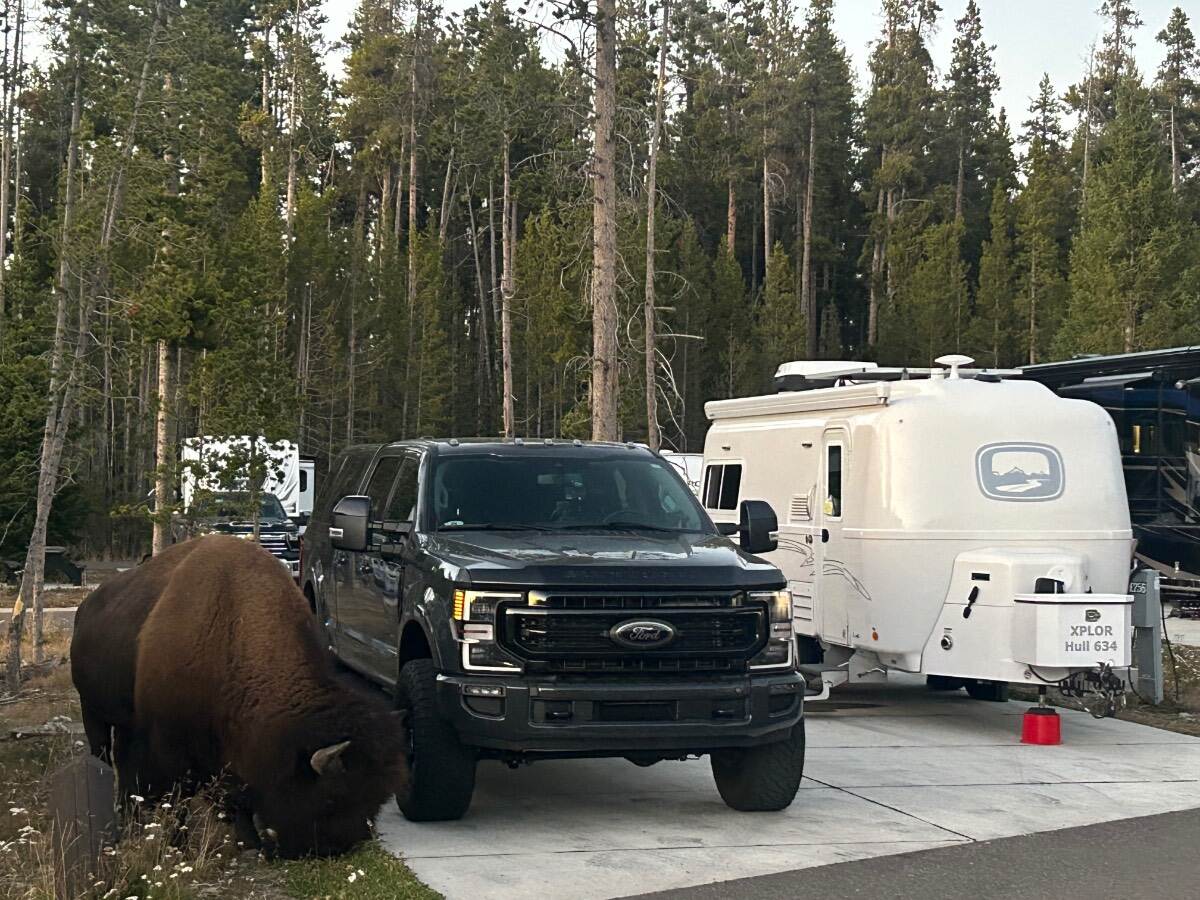
@Olive2Roam Great post and photos! We are big fans of our friends David and Kristine Hess owners of Sea Biscuit. You won’t meet a finer couple who fully support the RV industry with their products. My wife and I have been to their factory where they craft their products. Our front cargo box is has been one of our top mods. We store our chocks, blocks, 30amp cord and all other “possibles” for a quick set up and take down of our campsite. I installed a sheet of XPEL PPF (paint protection film) to the front of the cargo box of XPLOR to keep it protected from the blast zone and road missiles when in tow behind our TV. Your LE1 looks amazing, congrats on your mods! Beauty and the Beast - camped inside Yellowstone NP 🇺🇸
6 points
-
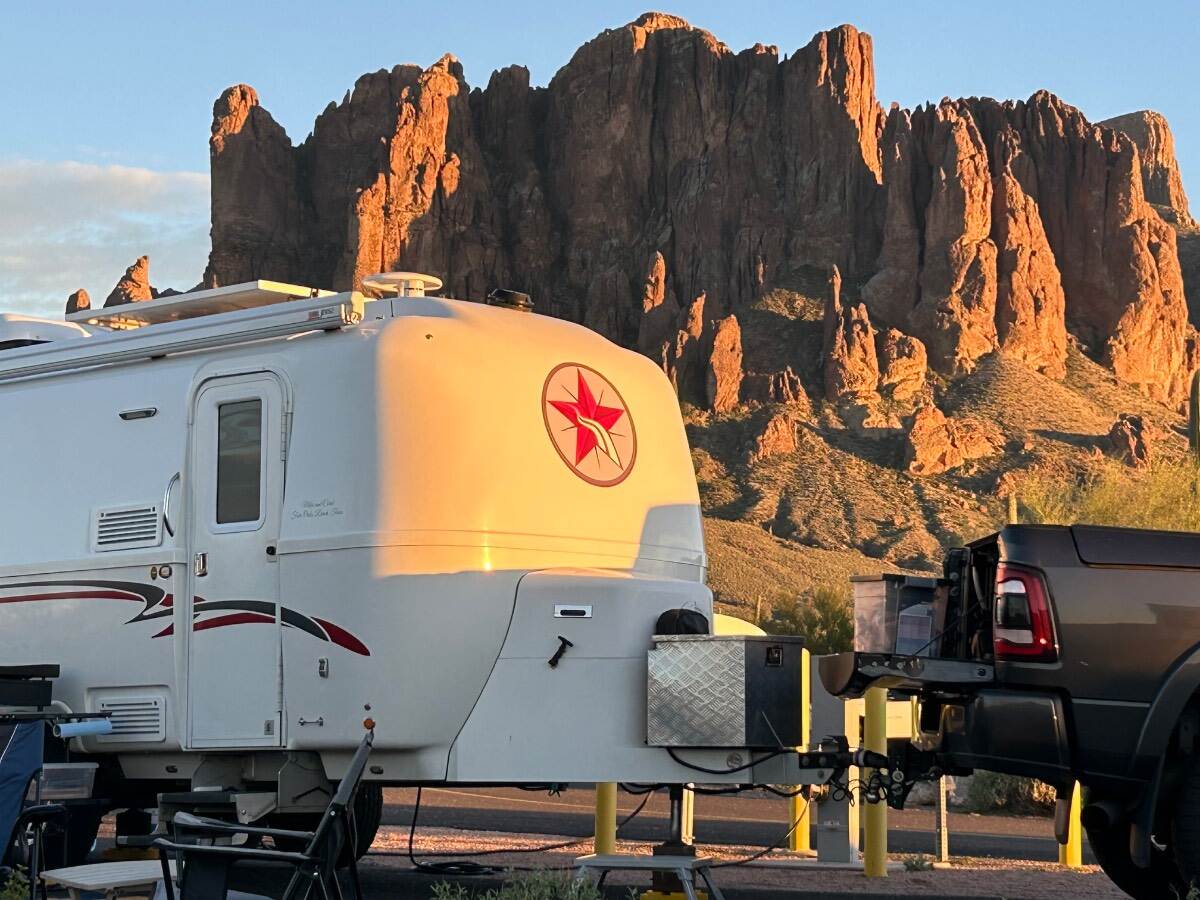
We like Lost Dutchman! Sunset. Anonymous Oliver owners.
6 points
-
Hi. Go to Google and search for "Oliver trailers lithium upgrade." Several relevant threads pop up, including this one: Lead Acid to Lithium - Ollie Modifications - Oliver Owner Forums https://share.google/oayGb76nRTfLxwQnx Lots of good information in those threads that can help you.6 points
-
Bill, Very accurate and well stated. Thanks for your thoughtful and respectful insight and most importantly your input! Without question based on our ownership and traveling across the country field experience Oliver is the best TT traveler on the market. As our good friend Rodney you to say -“Everything you need and nothing you don’t”. 👍🏻🇺🇸 - David6 points
-
Well, thanks to my buddy Steve, we had a good time putting on the new springs at a great location. He's paying me back for helping him put his springs on. Based off what Lew at Alcan said, this is around 200 Oliver's receiving the springs. Pretty good. Once the weather clears I'll do the first 50 mile ride, come back, and retorque the U-Bolt nuts again to 90 pounds. Oh, and between two of you (us), do not lose your 7/8 inch deep impact socket, and do not forget to pick one up before starting the job. LOL Or, driving to the store to get one will delay you. LOL Helpful tools and hints: The new Ryobi impact drill, grease gun, and 4x4 hydraulic jack were all amazing - made things easy. Best to also have two small bottle jacks, 2x" & 4x" wood for cribbing. Not to mention PB Blaster, or equivalent, for the old U-bolts nuts, and small wire brush to clean off those old U-bolt threads before attempting to remove the nuts. One nut got bound up and I had to use old muscles and extra leverage to get the nut off. (Fun times). LOL
6 points
-
The shorter your jacks, the more stable your trailer will be. We use the round Andersen Jack Stands. The Jack Stands reduce the jack extension by approximately 7"+.6 points
-
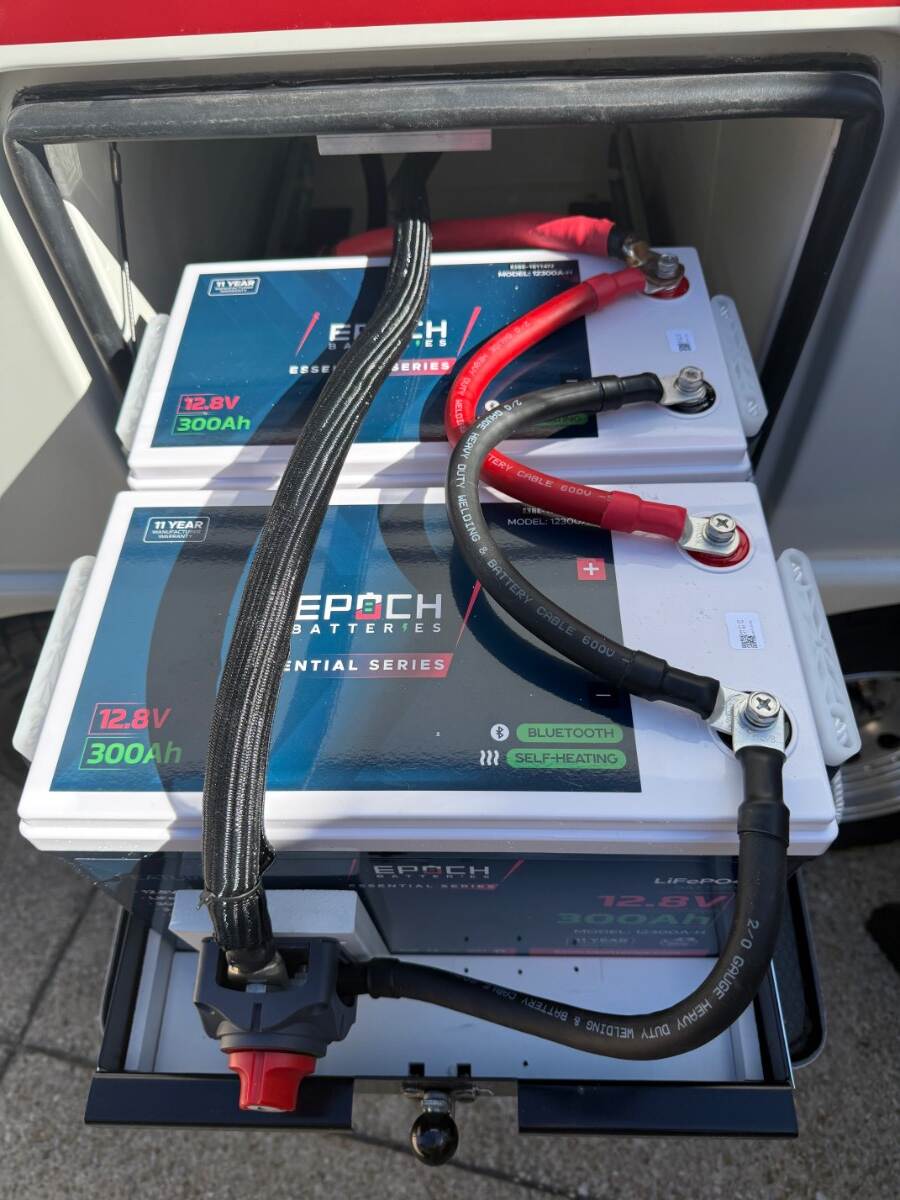
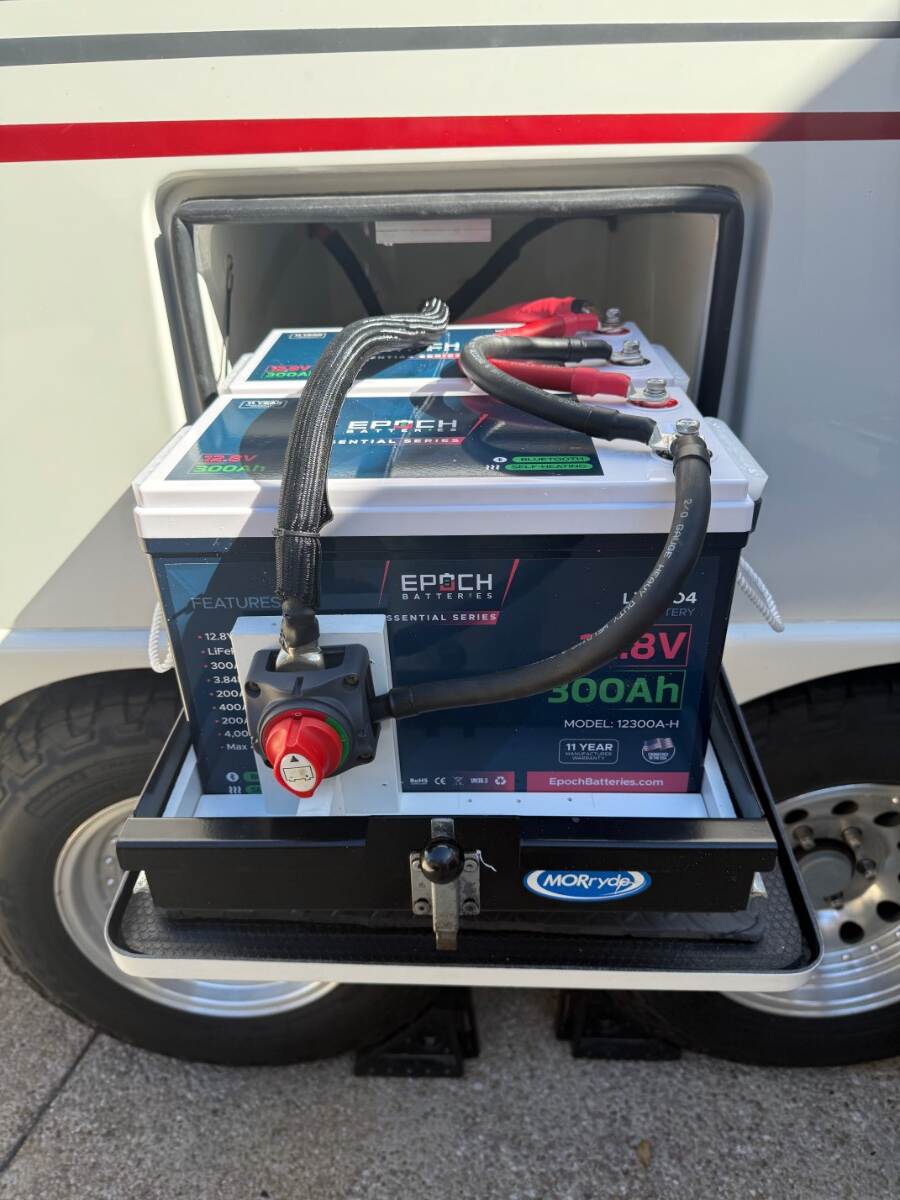
I’ve ordered my new Epoch 300aH batteries. When we, @mountainoliver and I, did my upgrade from AGM’s to the Battle Borns, we also recabled everything so that like John, I have one red cable and one black cable in the battery box. My Battle Borns are just over 5 years old. I’ll keep them for a while as this Dragon Fly crisis progresses. Mike6 points
-
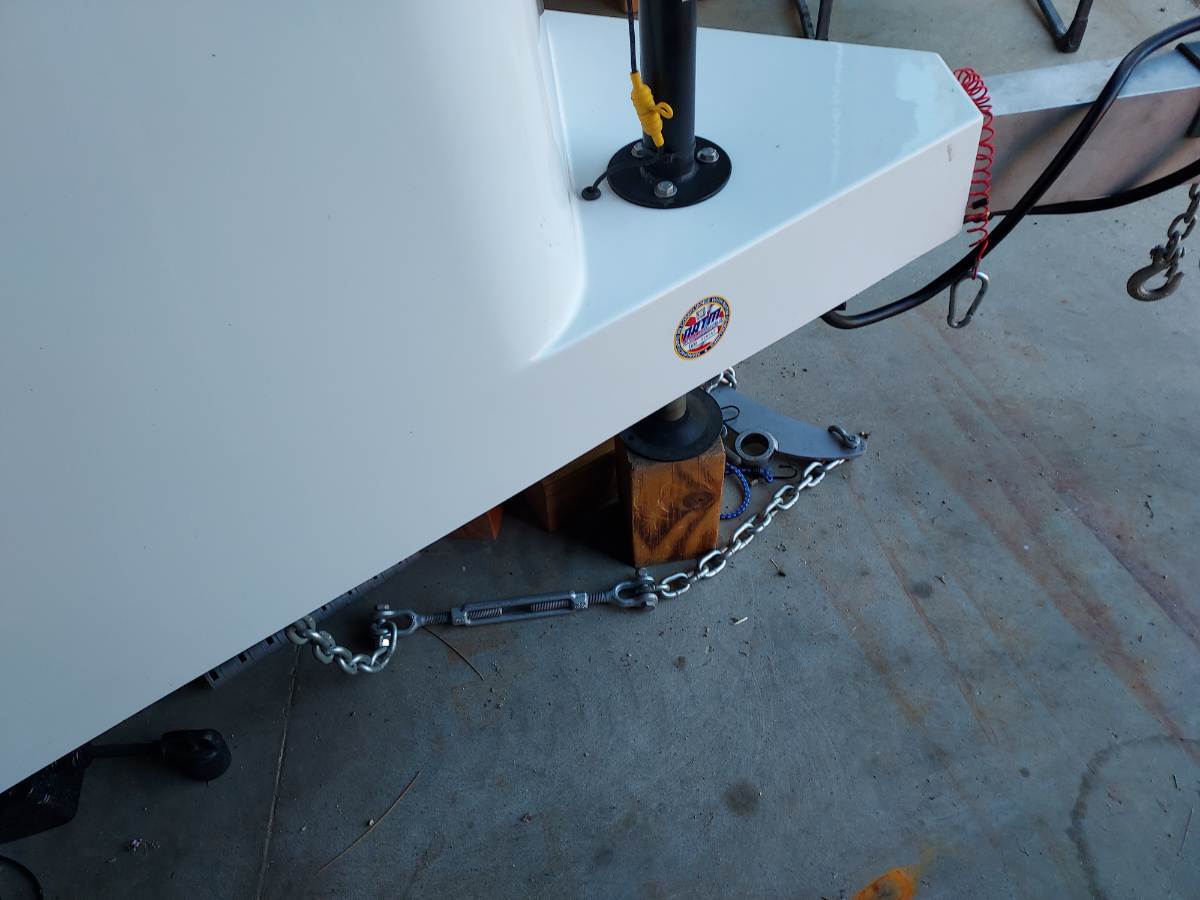
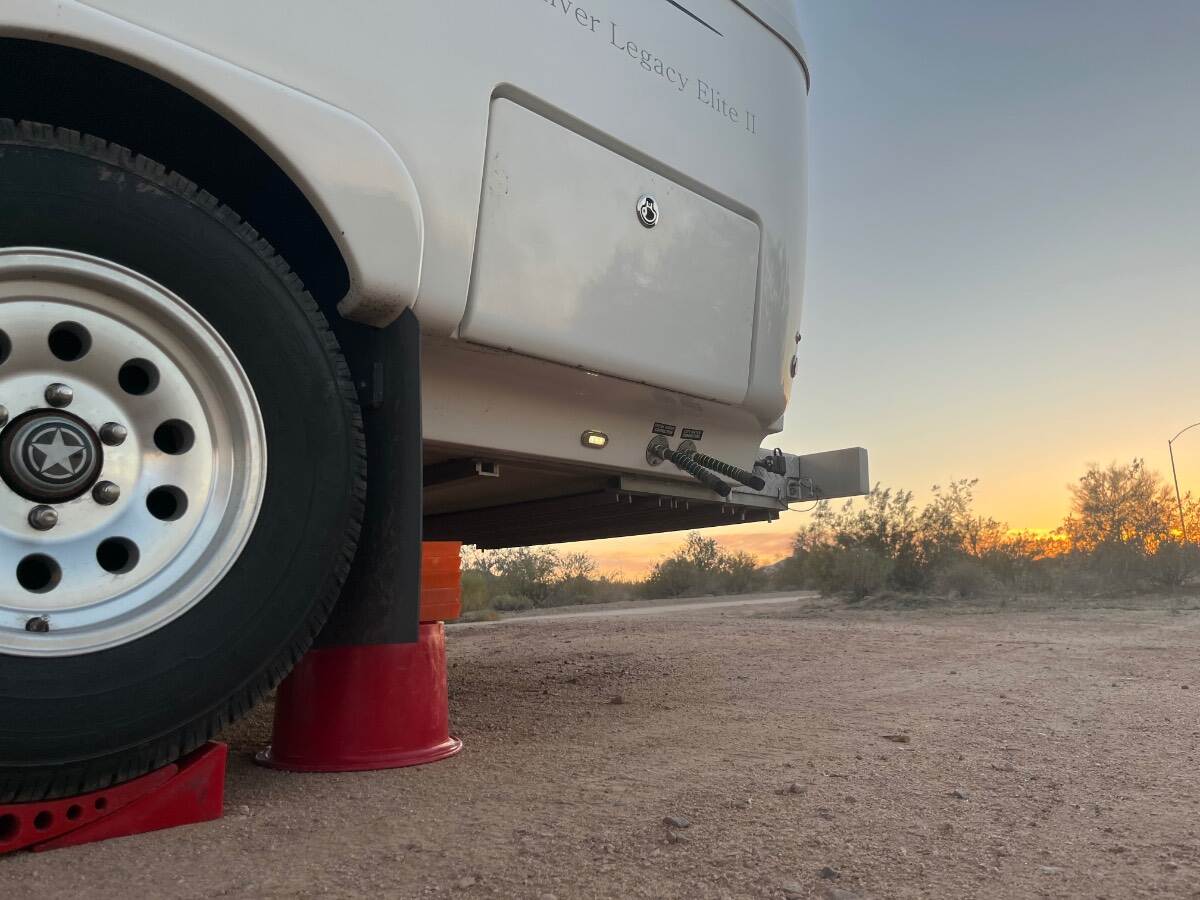
We, too, level and raise our Hull #1291 (2022) with the jacks. But, we always use support blocks for two reasons: (1) to avoid jack damage if we forget to raise the jacks before driving off and (2) to shorten jack travel distance. See photo below of one of our three support blocks in place under the front jack. Since that photo was taken, we have added Snap Pads, as recommended by Patriot, above. We like 'em. One caution: ensure that the jack foot is placed on level ground, or the foot plate can be bent, requiring replacement. If using the jack on a slope (such as on the side of significantly crowned roadway), place tapered levelers under the jack foot to provide a level platform. Don't ask me how I know...
6 points
-
We do use them for leveling and have done so since our first Oliver bought back I early 2008. Advice: Chock the tires fore and aft, then unhook the trailer and move the truck. Raise/Lower the front jack first to get the trailer level front to rear. If the trailer is not level side to side, use the jack to raise the low side to level. Then lower the opposite side to stabilize it. Make sure you place a block between the jack foot and the ground. That way when you forget to raise them before driving away, you won’t ruin $1200 worth of jacks. Routinely check the bolt that holds the foot plate to the inner jack tube. If this bolt works loose, you will lose the foot plate that will cost you close to $40 to replace.6 points
-
I updated my Truck to a 245Amp alternator with 4/0 to one battery and upgraded the link between batteries to 2/0. I ran 1/0 back to the Oli for the Victron DC to DC charger. While I was working with the big wires, I did the John Davies clean up in the battery compartment with 4/0 with smartshunt and shut off switch so that when I upgrade from AGM to Lithium I would have a good foundation. I bought a hydraulic crimper and I loved it. Made all the work so much easier. While I was at it I bought several extra lugs from 6ga to 4/0. I love my dog but for me tools are mans best friend. They can make life so much easier, they just aren't warm and snuggly.6 points
-
We use ours for leveling all the time, have for the last 10 years. I’ve also used them to change tires. As Bill mentioned, this has been discussed a lot here, if you want more data do a search and you’ll find lots of opinions! Mike6 points
-
ripple963 - First - Welcome to the Forum. There is a TON of information here and it is amazing what one can learn by simply "poking around". There is also the Oliver University where you can find videos and help on all sorts of things involving your Ollie. Please do not hesitate to contribute to the Forum with your own ideas, mods and travel experience - pictures are especially welcome (they to say 1,000 words). Second - You can use the "search" function to find previous "threads" that just might help with what you are looking for. Unfortunately, our search function is not what one might call "the best" and there have been posts here over the past few days regarding ways that you can use to help refine your search and to actually speed up that search. Third - Your question - there are numerous threads on the Forum regarding this very question. There was a time a number of years ago when Oliver actually noted that our jacks could be used for both stabilizing and leveling - and - jacking one side of the scamper in order to change a tire! However, due to a number of "issues" over the years, Oliver now only recommends the jacks be used for stabilization. Having said this, there are many of us who still use the jacks for all things even to include tires changes/bearing service, etc.. Please note here that if you are inclined to use your jacks for purposes other than those recommended by Oliver, you do so at your own risk and should take ALL of the proper precautions in order to protect yourself (and others) from all relevant risks similar to what you do when jacking a car/truck wheel off the ground. If you intend to do this then I'd highly recommend that you read everything that you can find here on the Forum so that you are aware of how to do this properly without damage to your new Oliver and/or the people near you. Forth - Congrats on the new Oliver! The longer you live with this camper the more friendly it becomes. Bill6 points
-
Yes have done this for years. Level and stabilize and not to worry. That said I do make every effort to get as level as possible before with blocks etc before setting down the jacks. Hope this helps6 points
-
We are still on our yearly western sojourn but I have 2 x 300Ah Epoch’s waiting for me at home. If you are using BB’s, I certainly can’t promise you they will fail. But if they do, I can promise you it won’t be in a convenient place.6 points
-
I watched Will’s latest video this morning. The news keeps getting more disappointing. I’m looking at replacements now, the BB’s have been fine so far but don’t want to wait for a failure before taking action.6 points
-
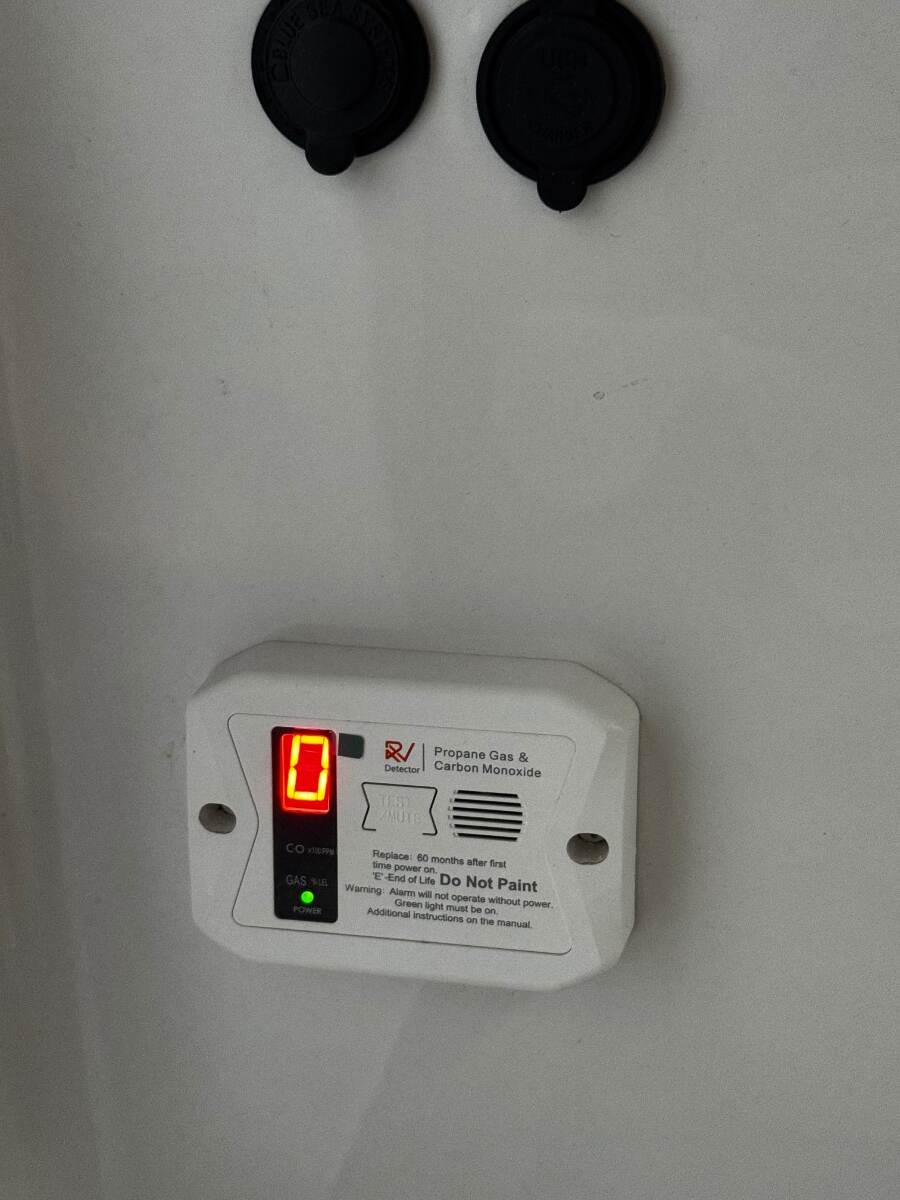
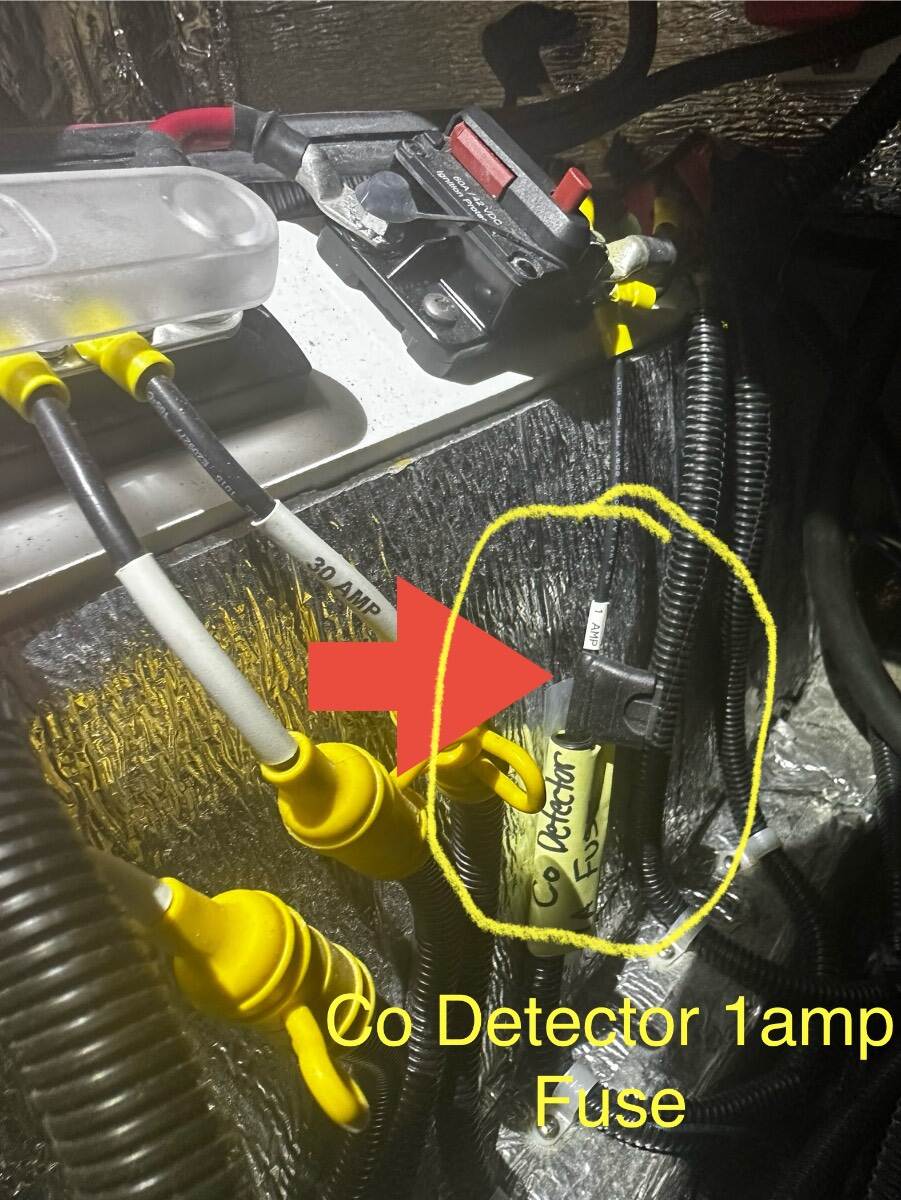
So… first thanks to each of you that responded! The CO/LP detector fuse is easy to find and get to (under street side bed)… IF YOU KNOW WHERE TO LOOK! I put a tag on it similar to what Galway girl did (Good idea!) I added another 1 amp fuse to my box of emergency fuses and also realized I only had one 30 amp slow blow inline fuse (for the three electric jacks)…. So ordered some more. The new detector looks good and the fun thing is it adds to my collection of little lights that reflect all around inside the camper when I find myself wide awake in the middle of the night. I like to think of them as “stars”.
6 points
-
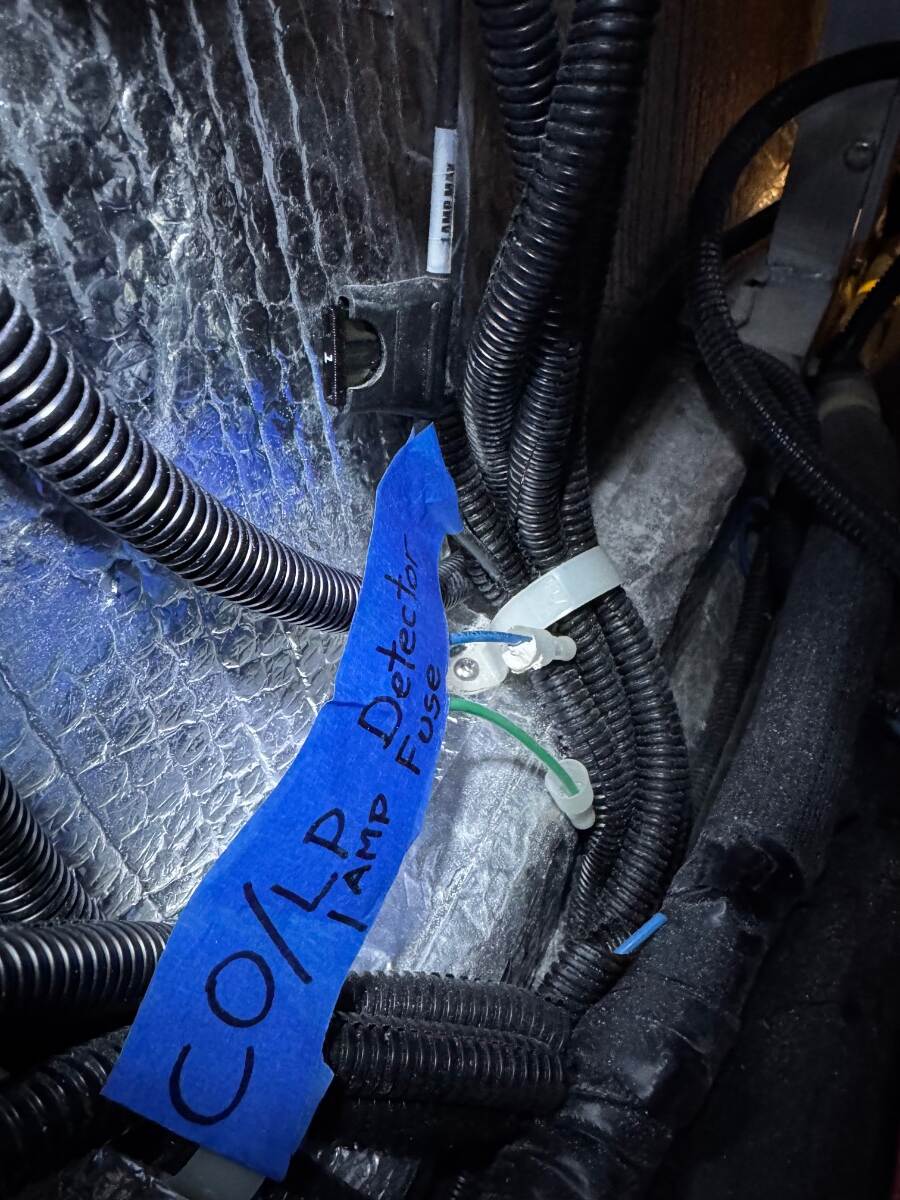
If you follow that cut wire back you'll eventually find an in line automotive style 1 AMP fuse in a holder nearer to the area where the 12v lines go to buss bars etc (Under the street side bed). It's that fuse you could have pulled instead of cutting the wire. You may have inadvertently popped that fuse. Hope you find the fuse and that it helps. (This is a 2019 trailer so your wiring may be different.)
6 points
-
Battle Borns gone. Epoch’s installed. Hold down straps aren’t on yet.
5 points
-
Here's additional photos of the spare tire removed on our LE2:5 points
-
My first thought is thanks for sharing! Even though we have ample carrying capacity, it's still of interest as what you have done here is truly excellent work! I've also heard very good reports re Sea Biscuit. Your white boxes, especially the rear box with the white railing surround, even white supports, look to be a perfect match like it was done at the factory, just gorgeous! 😂 18 months now? We remember meeting a friendly couple with a brand new E1 at the fall 2024 Texas Rally! Would that be you? Please, keep having fun in your cute little Oliver!5 points
-
@HDRider Jeff: I do not think the bumper needs to be removed. On my OTT, Elite II, the trailer hitch receiver needs to be removed.5 points
-
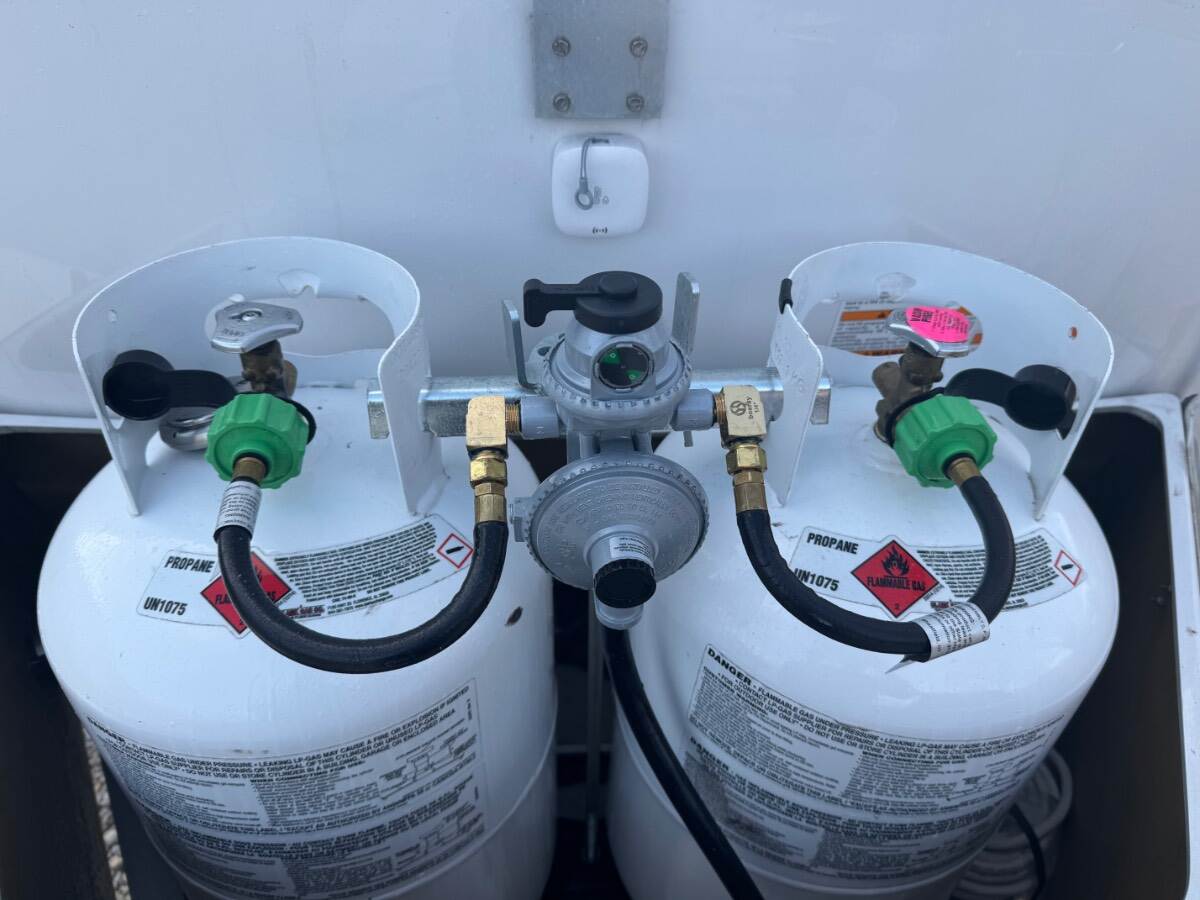
Well we had a “warm” day today so I decided to do one final upgrade that several others have previously done to their propane systems. I got the right angle fittings for the regulator connections a few weeks ago and finally decided to install them. It only takes a few minutes to do in place. The adapter fittings that come on the regulator have check valves built in, so I purchased standard 1/4” street elbows and reused the original adapters to make the connection. One little trick to make the installation easier, with the cold temps, the hose is stiff and feels like it will split if you try to reshape it into the new configuration. If you take the hoses into the kitchen and immerse the rubber part in a pan of boiling water for a minute, the hose will naturally straighten out, and while warm can easily be installed on the tanks and regulators with little tension in the process. There’s a much gentler bend in the hose when completed that should make the hoses last much longer. Before: After: Thanks to everyone who previously made this upgrade and for sharing on the forum.
5 points
-
“Curiosity” is currently parked next to “Dickens” at CGI Detailing’s shop in Murfreesboro, Tennessee. Getting the shine even shinier!5 points
-
Ron, From what you describe, this is a power issue, not an audio source issue. So you can rule out the HDMI ARC feature of many modern components that sends a signal to automatically switch the stereo to the active sound source. However, there is another HDMI feature on some higher end TV/Stereos that allows the TV to also turn on another component such as a stereo. If this is the case with your TV, then you might have a HDMI cable issue causing spurious signals. Try unplugging the HDMI cable to see if that resolves the problem. If it does, then try a new high quality HDMI cable with a Ferrite choke (little barrel looking thing that goes over the cable). This is a quick and easy check to eliminate one potential cause. If that doesn't work, then it could be something to do with the yellow Accessory trigger wire common on 12 volt stereos. I'd have to think on that one a bit more, so let us know what you find. Cheers, Geoff5 points
-
Here’s an improvised cover that anyone can make when out on the road….
5 points
-
Just more bla bla bla…when I read garbage generic responses like this I want to 🤮, the CEO’s coffee maker probably pulled this letter from their 10yo archives! Why not own up to the fact their batteries have an issue, or at least come back with a something /video some explanation that makes sense to people that have more than 2 brain cells why Will Prowse, and btw Lithionics who called them out for same issues year ago, are taking too much kool aid!5 points
-
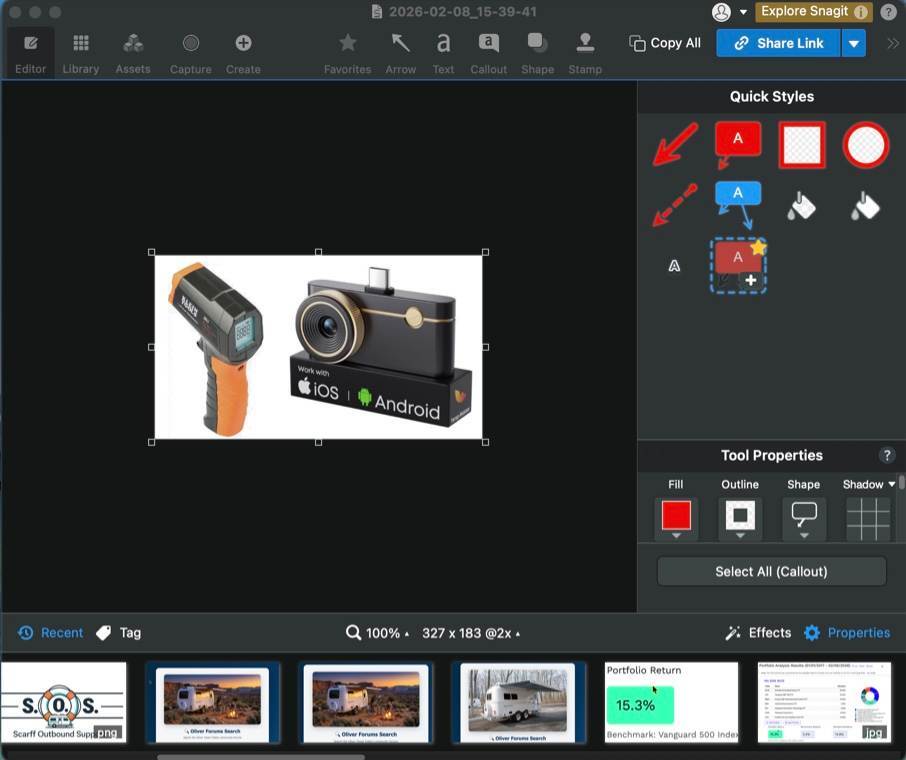
There are a good number of folks on these forums who love to share what they know, have discovered, and how they modified or fixed their rigs. This is awesome for new Oliver owners. They get to read the words and see detailed annotated pictures from the authors, dear I call them "Content Creators". As I approach retirement in December, there is at least one peace of software I now own personally that I have discovered from the work-place. I have created and edited hundreds of desktop video recordings for software demos and instructional videos in recent years. I use Camtasia from TechSmith for easy video editing, but another small piece of software they make, and is very inexpensive, is their SnagIt software. I will capture and edit pictures (and videos) from my desktop, browsers, or personal photos. This is what I use to very quickly annotate most of my uploaded pictures here in the forums. I'm hoping never touch MS Windows as long as I live, but SnagIt does work on both Windows and MacOS. I now mostly use MacOS as a "daily driver" OS, even though I'm a Linux lover at heart. Here's a screenshot of what SnagIt looks like. You can tell I've been doing all sorts of captures today, from my own future logo, to Olivers, and portfolio stuff. I thought this might be helpful to those who love to share their Oliver project pictures on their rigs. I won't link it here, just Google "SnagIt" - it's from TechSmith. I hope this helps others. If you have any questions, feel free to ask. Cheers,
5 points
-
This thread has evolved into an incredible resource thanks to everyone's input. It’s worth remembering that none of us are affiliated with or endorsed by Battle Born. If a product fails to live up to the marketing hype, we have to prioritize the safety of our families and move on. We can only hope that BB management find their own way out of this. While the name 'Battle Born' implies strength and integrity, corporate marketing doesn't always align with the reality of the consumer experience. The best approach is to listen to those doing the real-world research and keep sharing what we learn. We won’t always have all the answers, but as a close-knit team, we’re much safer and more successful together. Keep the great info coming, Oliver family!5 points
-
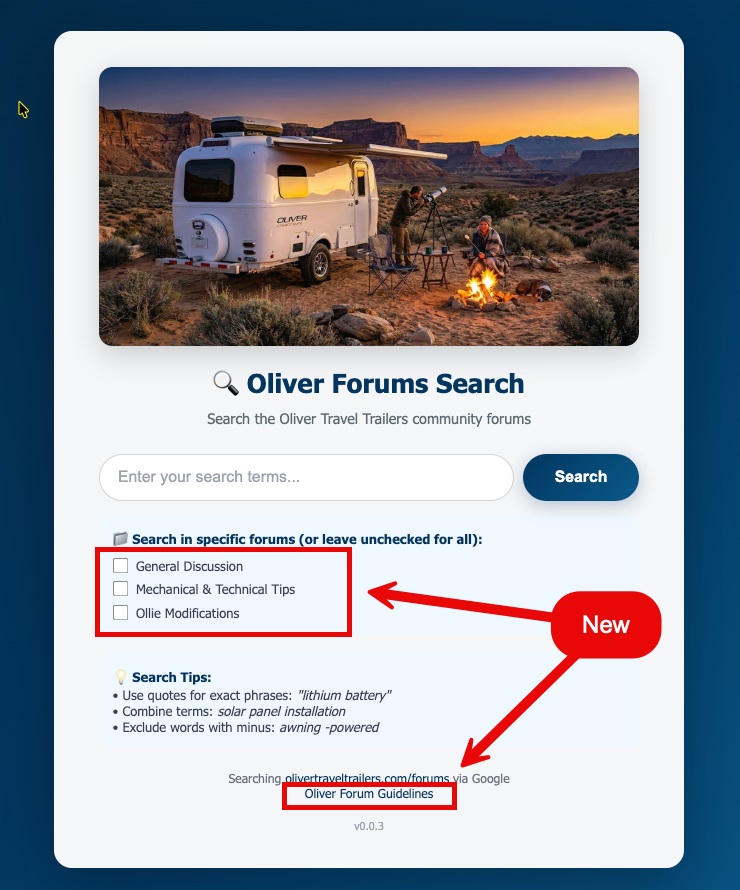
I've enjoyed working on this a bit more. Not sure how truly useful it is, but nice to have on my desktop to just pop open and search. This is what I've changed today: 1. Changed the color theme to match that of OTT. 2. Added check boxes to only search popular forums, such as "General Discussion". 3. Added a link at the bottom to always get a reminder of the forum Guidelines. 4. Page image(s) now come straight from OTT image library and cycles randomly with a page refresh. - There are only three images in the mix for now, so randomness is weak. Zip file attached containing only the single HTML file - nothing fancy. oliver-forum-search.zip
5 points
-
According to Andersen: "Attach the Trailer Jack Block to the pad and level. It's that easy. The Trailer Jack Block offers 5th wheel & RV stabilization, all while reducing stress on your jacks. The built-in magnets instantly attach to the jack, so there is no need to double-check and adjust each block. Available in either 4" or 8" height options, each Jack Block is designed to be used with up to 9" round jack pads. The 4" option is rated up to 30,000 lbs each or 20,000 lbs double stacked. The 8" option is rated up to 8,000 lbs each or 1,500 lbs double stacked. All of our plastic trailer accessories are made in the USA Covered under a lifetime warranty" Therefore it appears that they CAN be double stacked and even though they do not specifically mention internal reinforcement the stated "ratings" would appear to confirm that they are fairly strong. Bill5 points
-
Certainly I'm well aware that there are those who are experiencing much worse weather than I am. However, once again this morning an "un-forecast" thing happened - welcome to the sunny South!
5 points
-
One week on the road. Besides 700+ miles so far, we’ve run 30+ miles on washboard dirt, and through some muddy washes too! No dirt on the rear lowers and no splatters front of Ollie due to the wider TV mud flaps! 😎
5 points


-
Recent Achievements
-
")


")


")

")


