Leaderboard


Popular Content
Showing content with the highest reputation since 03/12/2026 in all areas
-
What I just posted in John's Facebook group for Oliver Owners. This does not require a lot of discussion. WARNING: Fake Facebook groups cropping up everywhere! Folks, we have a growing disturbing problem with Facebook (FB) groups, especially, because you are reading this, in regards to owning an Oliver. You may have noticed at least one or two new Oliver-related FB groups crop up lately. From the very first picture posted, from the Oliver group that has the word "Community" in it, there are suspicious postings & members. Now the more legit people who join these fake groups will make the group look more and more legit itself. Our information is being collected, I promise you. I'm not usually an overly suspicious person, but as an active Information Technology (IT) guy who also supports cyber security, I'm seeing more obvious signs of trouble. Even a dumb monkey like me can start to see the issues. Now, I just left that "Oliver Community" group just last night after I had seen enough AI generated material and started to smell bad actors. You can ask any AI out there this question and read for yourself why and how and why this is happening. Just ask it something like this: Are there fake facebook groups being created to collect information on us? I usually have not cared about what is collected on me, as big American businesses are notorious about collecting info. These fake groups are not maintained by American businesses, I promise you that. I have no stake, nor real loyalty, to this group we are in right now. I am not an admin, and frankly, I was once kicked out of the group for a misunderstanding on my part. I was later asked to rejoin due to my loyalty to the OTT owners in general. That's it. I'm sure this will be received like politics. We will be split down the middle 50/50 or at least split 33/33/33. Just be VERY safe out there in this mucky world of social media we have created. This group is managed by real good people. We may not always understand why they do what they do, but that is because you are not trying to keep bad actors out of a private group. It's a fulltime job these days. Some forums of the world have to block entire countries due to the issues developing now. Be safe and "you do you", but you've been warned.11 points
-
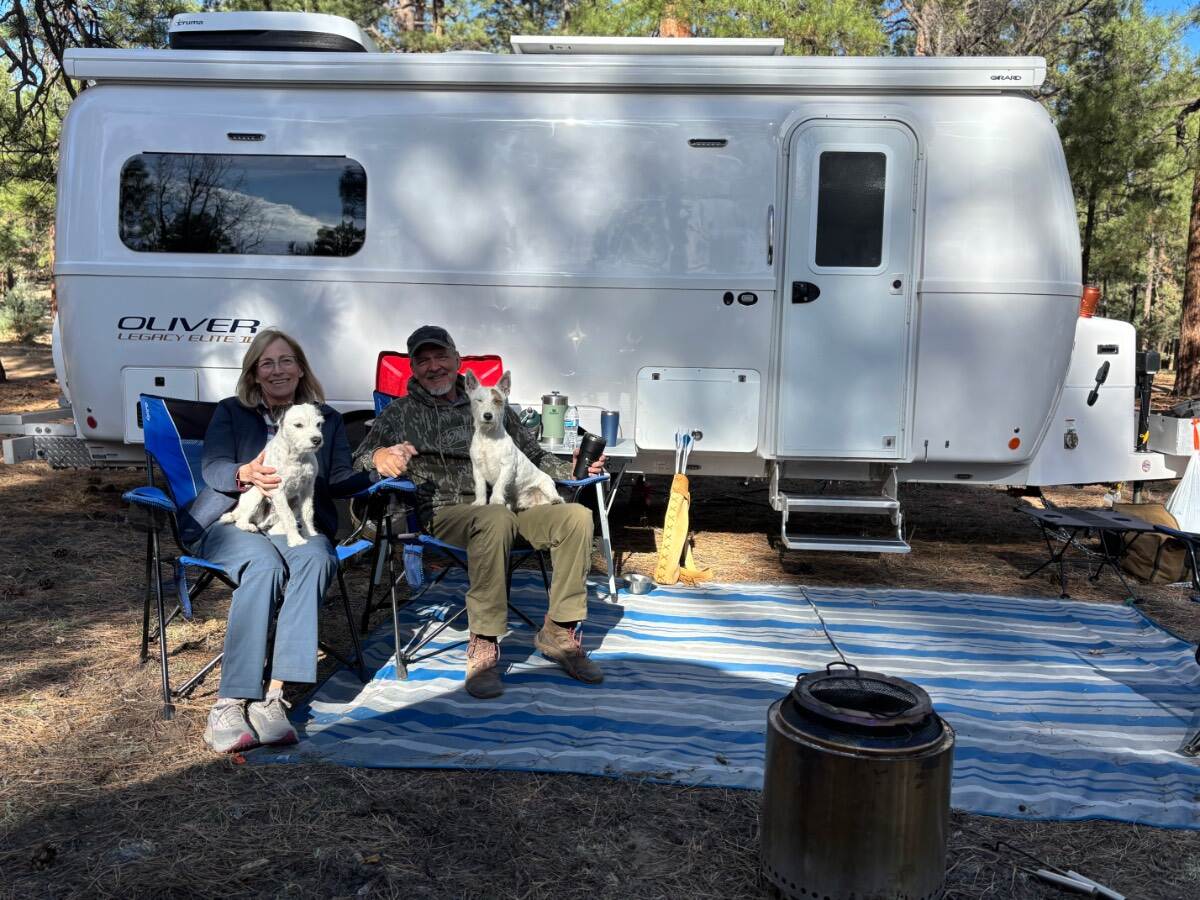
Greetings to you all! We are the happy new owners of Hull #1665, an Oliver Elite II. We picked up our new camper at the dealer in Colorado a few weeks ago. Our first night in the camper was at a Cracker Barrel on the drive home to New Mexico. Last weekend we had our first official 3 day -2 night camping trip and had a wonderful time. Our previous camper was a nuCamp Tab 400. We really loved that camper and it will be missed, but we both realized it was time to get a camper with more head room on the bed! (Especially Mary who always slept scrunched against the wall with two pups at her feet. :0) ) We live in Albuquerque and have been long time hikers, climbers, skiers, campers, hunters and general outdoor enthusiasts. Having a larger camper definitely makes traveling so much more comfortable. There is much about the camper that we love. We like the fact that the Ollie has a great suspension that will allow us to go on two track roads. The battery capacity and solar means that we can be off grid in NM for quite some time. After our first trip, we both realized just how comfortable and usable this camper really is. This summer we are planning a long trip back east for an archery competition and will be making a stop in Hohlenwald for some minor issues with the camper. We also are planning a long trip to Portland this fall to visit a new baby granddaughter. We look forward to meeting other Ollie owners on the road as we travel and at future Ollie rallies! Zane and Mary Rakes '26 Oliver Elite II One man, one woman, two small dogs and a sense of humor. 😊
 11 points
 -
Snackchaser was spot on. I got up this morning and found the emergency breakaway switch had gotten pulled out during setup. I put it back in and voila, back to 0 draw. Thanks you all so much for the responses. I was really stressing out about this issue.11 points
-
RV owners should know the height of their trailer or rig. For the last ten years 9’ 7” has been in my brain just in case we encountered a low overpass. My thinking has always been if it’s under 10’ I’m turning around! Some years ago we came to an overpass on a back road somewhere that was 9’6”, there was no traffic and I was able to easily back up turn around and find another route. On our trip home from Hohenwald a couple of weeks ago we were on I-35 South between Dallas and Waco when our GPS showed a red road ahead and recommended we exit and take back roads. That’s what we usually do anyway so we followed all the other folks doing the same thing. We started out on normal county roads but after a half hour or so we were put on a small, unnamed road for a few miles before intersecting with a major highway. We were one of many, there was a big boat and two long travel trailers ahead of us. The road soon narrowed to about a lane and a half. Basically one way traffic unless you moved over to be half off the road. There were a few oncoming vehicles, so we slowed and moved over. We could see the highway ahead so we ventured on with everyone else. When we got close to the highway we saw that we had to go under the highway, make a sharp left and continue on the access road before merging onto the highway. As we got closer we could see a big sign on the overpass - 9’10”. The boat ahead went right under. The 30+’ travel trailer stopped and two guys got out, scratched their heads, rubbed their chins looking at the overpass and their trailer while traffic is backing up behind us. They turned around and announced they couldn’t go under and would back up to get out of the way. This is on a 1.5 lane road, with a curve and a line of traffic. Cars started to scrunch over and he proceeded to back his long trailer with his big dually pick up. I put my truck mirrors in, there was about 12” clearance as he went by, slowly. Once he passed the guy in front of me came back and asked me “how tall are yew?. I said 9’7”, how tall are you? He said he had no idea and wasn’t about to measure now. He said I could just go around and then he’d do the backup thing too. When I looked at the line of traffic behind and the narrow road I estimated that it would be a better choice to break my 10’ rule and go for it. We pulled around the other long trailer and moved slowly to the overpass. Carol jumped out to watch and I was checking my mirrors. We had at least 2” to spare. I heard cheers and “he made it!” being yelled as Carol jumped back in and were were quickly on our way. Worst case I figured I might have to replace my noisy Dometic AC, but alas it is still there! Mike11 points
-
Check to make sure that your brake "breakaway switch" wasn't accidentally pulled out. If so, the electric brakes have been on the whole time. Four brakes would draw 3-4 amps each. If you were reading 2-3 amps draw on your Lithionics battery App, then that's only one of the 3 batteries. So it's actually 9-12 amps. Add in the solar input and it's about right for what the brakes would draw. Good luck, Geoff10 points
-
Finally getting to much needed upgrades on hull 994.
9 points
-
For those of us who have been around for a few decades or so, probably have a collection of USB cords numbering anywhere from the hundreds to perhaps the thousands. I know I do. I decided to go through all of mine and sort them by type. For anyone that's not been paying attention there are currently three types of USB cables: A-B-C. Within these types there are at least five sub-types. Within all of these there are many versions of capabilities and speeds. Some will only carry data, some will only carry power. Some will carry both. Before I started sorting I wrote a little document to help me understand the differences. All this information was copied from multiple sites on the internet so I know it is all accurate. 🤪 I have included a PDF for anyone that has nothing better or more interesting to do. Enjoy... USB Cable Types.pdf9 points
-
Wife, puppy, and I just bought hull 327, a 2018 LE2, and are bringing her from Arizona to her new home in the Lost Sierras/Lake Davis CA. We’ve owned a coleman pop-up, and a big 5th wheel with slides in our past life… and after TONS of research (including understanding how bomb-proof ocean-crossing fiberglass sailboats are constructed), we couldn’t be more impressed with the quality of the Oliver trailers. Looking forward to seeing ya’ll out there!
7 points
-
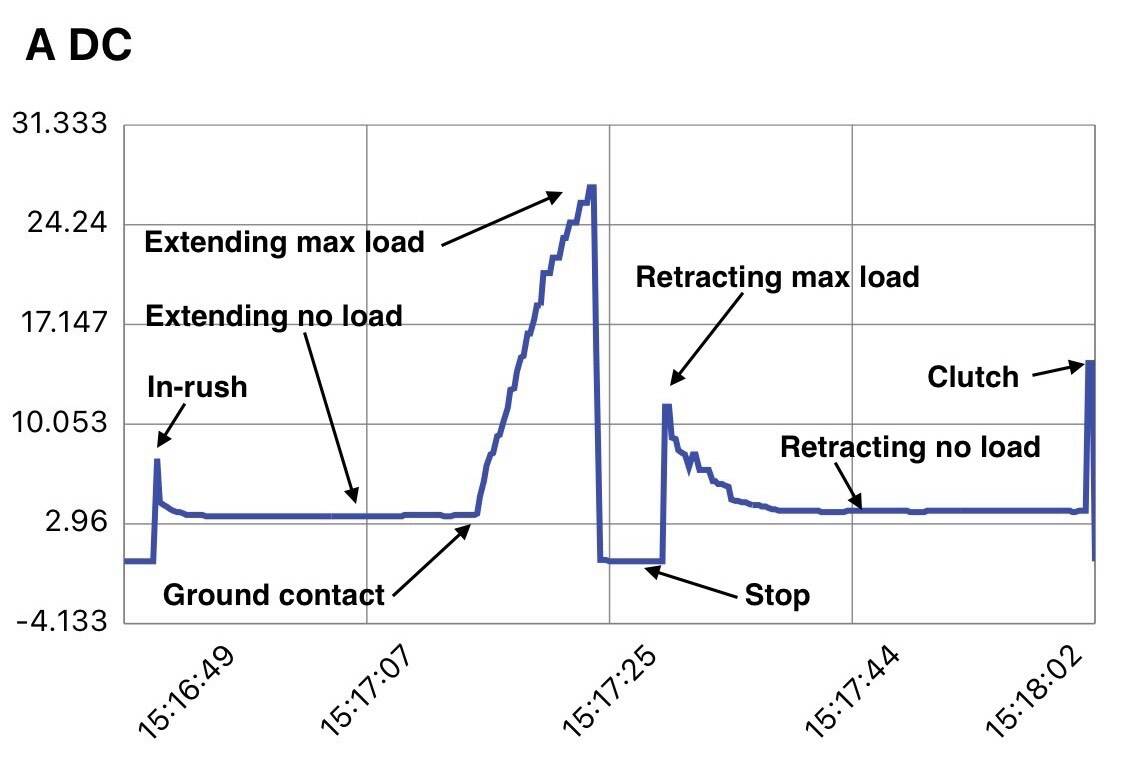
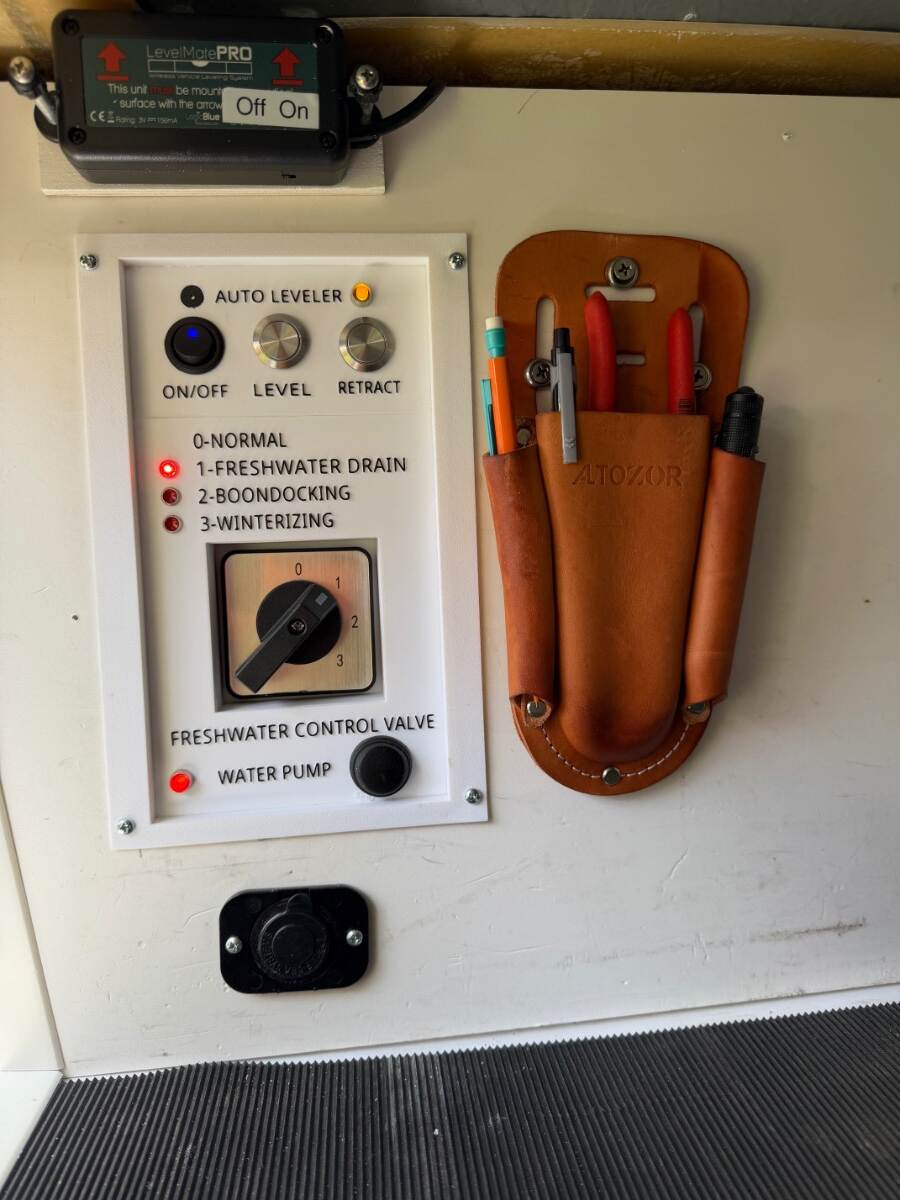
As far as I can tell, I’ve made the first automatic leveling system for the Oliver’s Barker stabilizing jacks! Maybe even the first 3-jack leveling system on a travel trailer! It’s simple to operate, safe, and works great! I built the leveling system as a novelty for my own entertainment, so I’m only posting it as a interest item not a recommended project. In reality, manually leveling with the electric jacks is already easy, particularly with a LevelMate, so automatic leveling isn’t really needed. There are even warnings that the jacks are stabilizers, not to be used for leveling. However, I believe the warnings are more about liability than capability, as long as the jacks are used within reasonable limits. I'd been thinking about an auto-leveling project for a long time, but was deterred by the thought of modifying the jacks with fiddly proximity sensors or revolution counters as used in conventional leveling systems. I didn't want to alter the jacks for a DIY project that might not even work. But then it dawned on me. The only time I really needed to know the position of the jacks, is when retracting them to their parked position. I wasn’t interested in returning the tongue jack to the truck hitch hight like some systems offer. So this led to a revelation that automatic leveling could be done with nothing more than current sensors mounted in a control box rather than on the jacks themselves. This was only possible because of the Barker jack’s mechanical clutch. When the jack reaches the end of its travel, the clutch activates with a distinct clack-clack sound. It was likely that clutch engagement would produce a unique current signature that could be used to detect when the jack is fully retracted. A plan was developing, but I needed actual amperage values for proof of concept. Fortunately I had a data logging ammeter, and the chart below illustrates the results for one of rear jacks starting from its fully retracted parked position. The jack was extended through free air until it touched ground and began picking up load, maxing out when the wheel lifted off the ground. Then it was retracted to the parked position until the clutch actuated: I didn’t include the tongue jack chart because it's far less dynamic — it's always under load, and the clutch doesn't normally actuate during leveling. The clutch only comes into play after trailer is hooked up to the TV and the tongue is manually retracted. The amperage results confirmed that current sensors could work, and beyond detecting the parked position, they could also be used to distinguish the different leveling phases: rear jack extension until firm ground contact for stabilizing, and then transition to "roll" leveling if needed. Completion of the rear jack phase could then trigger the tongue jack phase to handle "pitch" leveling. The amperage chart became the basis for the circuit and software design. No proximity sensors. No revolution counting. No permanent modifications — just two wires to each jack, a component box, and a control board. Sounds easy, but this was only just the start of a long process to perfect the system. I hope someone finds this interesting! Cheers! Geoff
7 points
-
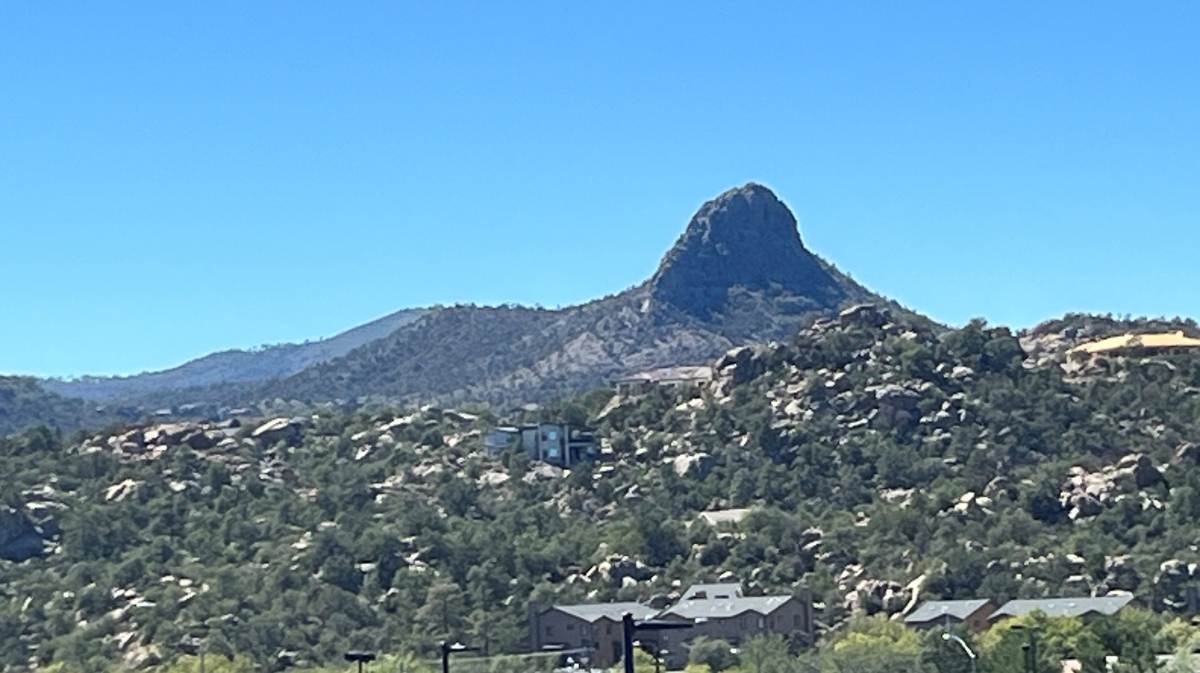
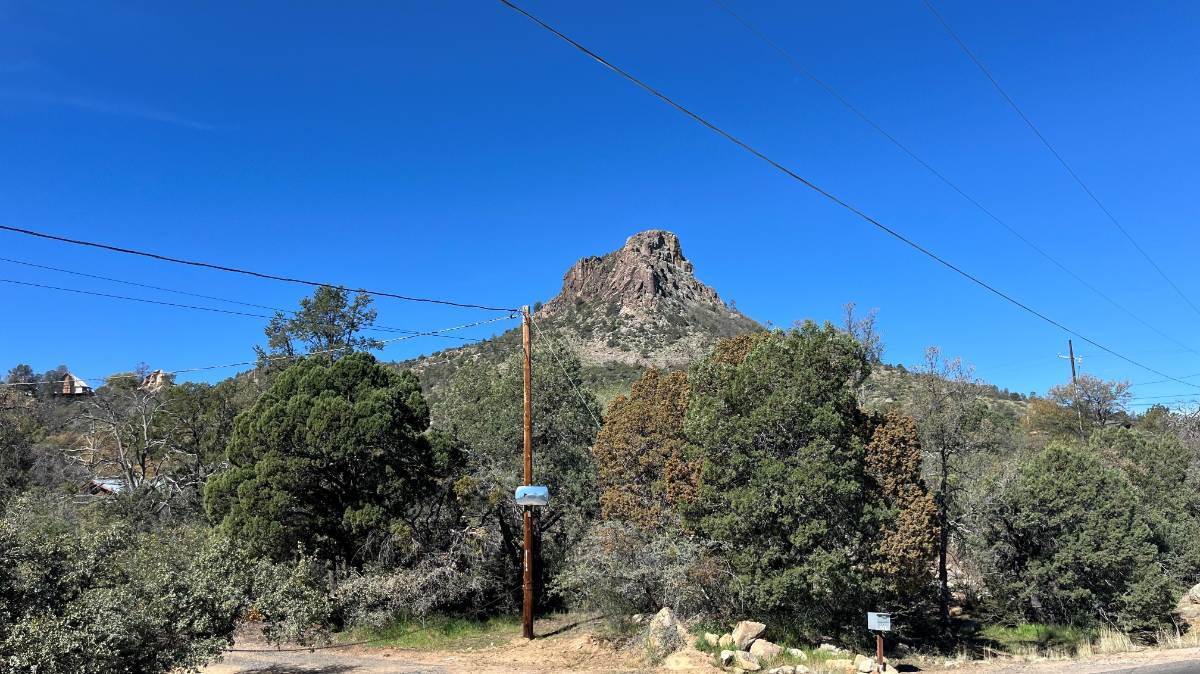
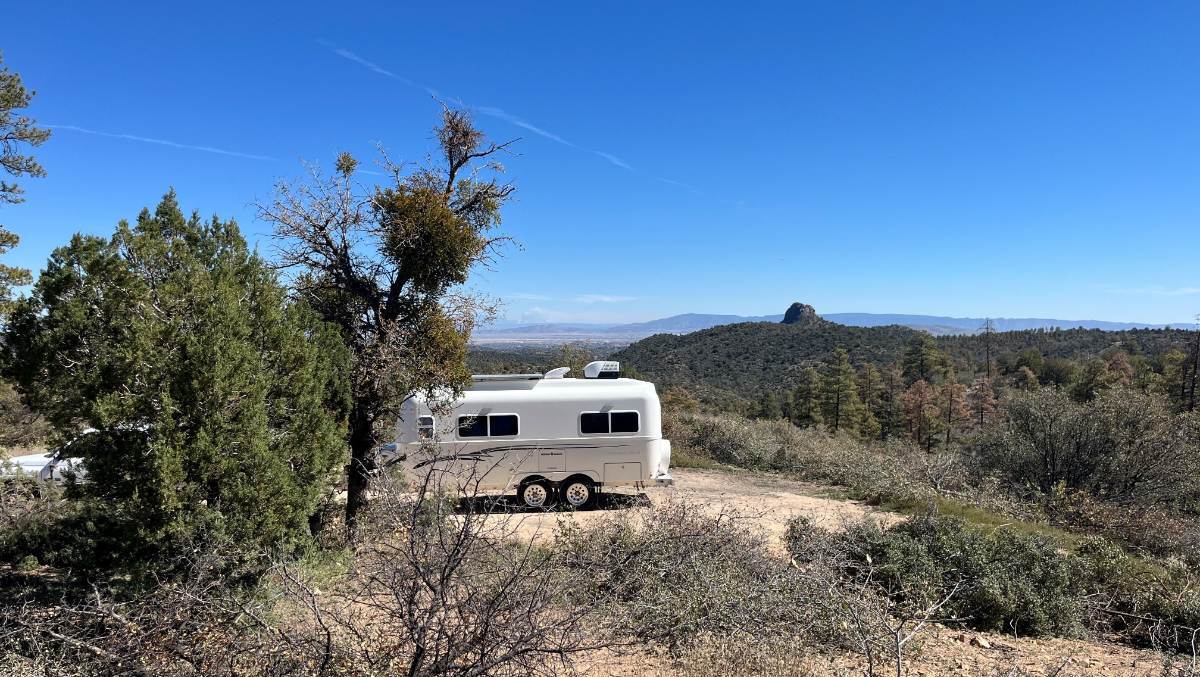
Our camping trip last week was canceled... 😒 We were headed to St. George for the PPA Red Rock Open (pickleball tournament) at the Black Desert Resort (amazing red rock views) in Ivins UT. We had earmarked boondocking spots along the way and a nice BLM area just 20 min north of the tournament. Then we were going to spend another week in SW Utah. The weather for the second time this WINTER had become unseasonably HOT, low 90s a couple days in Prescott and high 90s everyday in SW Utah. Our drive would have seen 100F temps at lower elevations! But the A/C charge on our tow vehicle had leaked/emptied with non-use since last season. I really wanted to try running our new Chill Cube A/C on battery, which should have been fine when camping, but towing in this heat without A/C would !be unbearable! I could have finished up the A/C work on the TV and left a day later, but then there is the price of diesel fuel, OMG! Why the market is so volatile and why a blockade at the Straights of Hormuz nearly doubles the cost of diesel in the SW US? Who knows, but trip canceled! Our son Adam had some time off and he wanted to camp and learn about the Oliver. She will be his one day! We have a LOT of camping nearby, needing very little fuel. And staying at high elevation, means A/C in the TV is less important. He spent a week on Thumb Butte road where there are designated dispersed numbered campsites. There is about a 10 mile radius around Prescott where you can only camp at designated dispersed sites. Further out you can camp anywhere in the FS and BLM lands. We got lucky towing up on a Friday just after noon to find site #8 open. It's at the top with the best view of Prescott below. 😎 BTW, up here are countless hiking trails and a grand mountain bike trail that runs 8 miles, dropping 1200 FT, running all the way down to the city below. Guys drive up with multiple trucks and bikes to run this trail. Thumb Butte is the iconic Prescott Mountain, the core of an extinct volcano! It's like a baby version of Wyoming's Devils Tower within Prescott City limits! City streets were laid out so that all streets pointing west have a view of Thumb Butte! This campsite is not for everybody! You must climb 1000 FT in 6 miles. The last mile is dirt, heavily rutted and very steep. I towed our Oliver up, parked it and returned with the TV so I could work on the A/C! Trans temp should be about 190F on this warm day, but given the climb <5 MPH, trans temp hit 230F by the time I parked! The views are worth it! Come visit Prescott on your next SW trip and I can point you to 100 amazing campsites with an hour of town! 😎
7 points
-
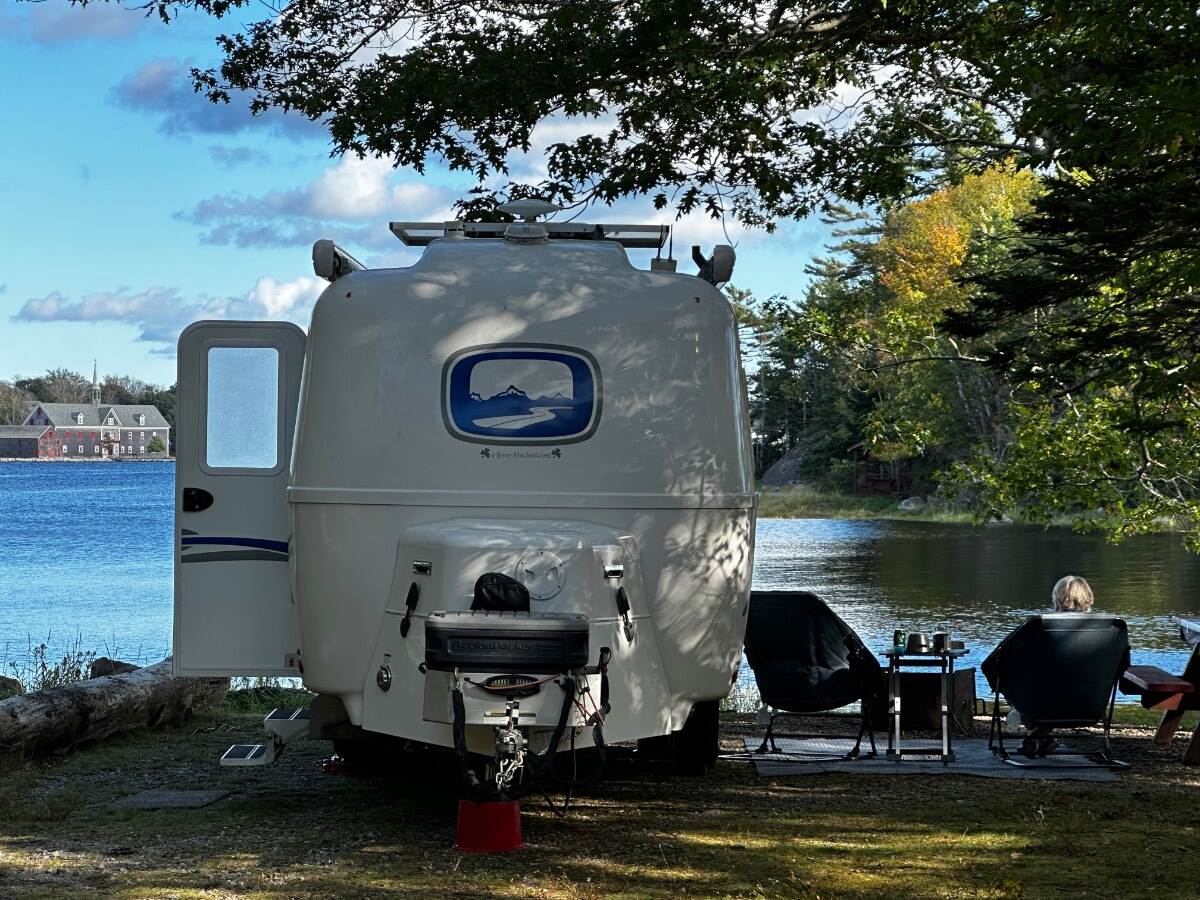
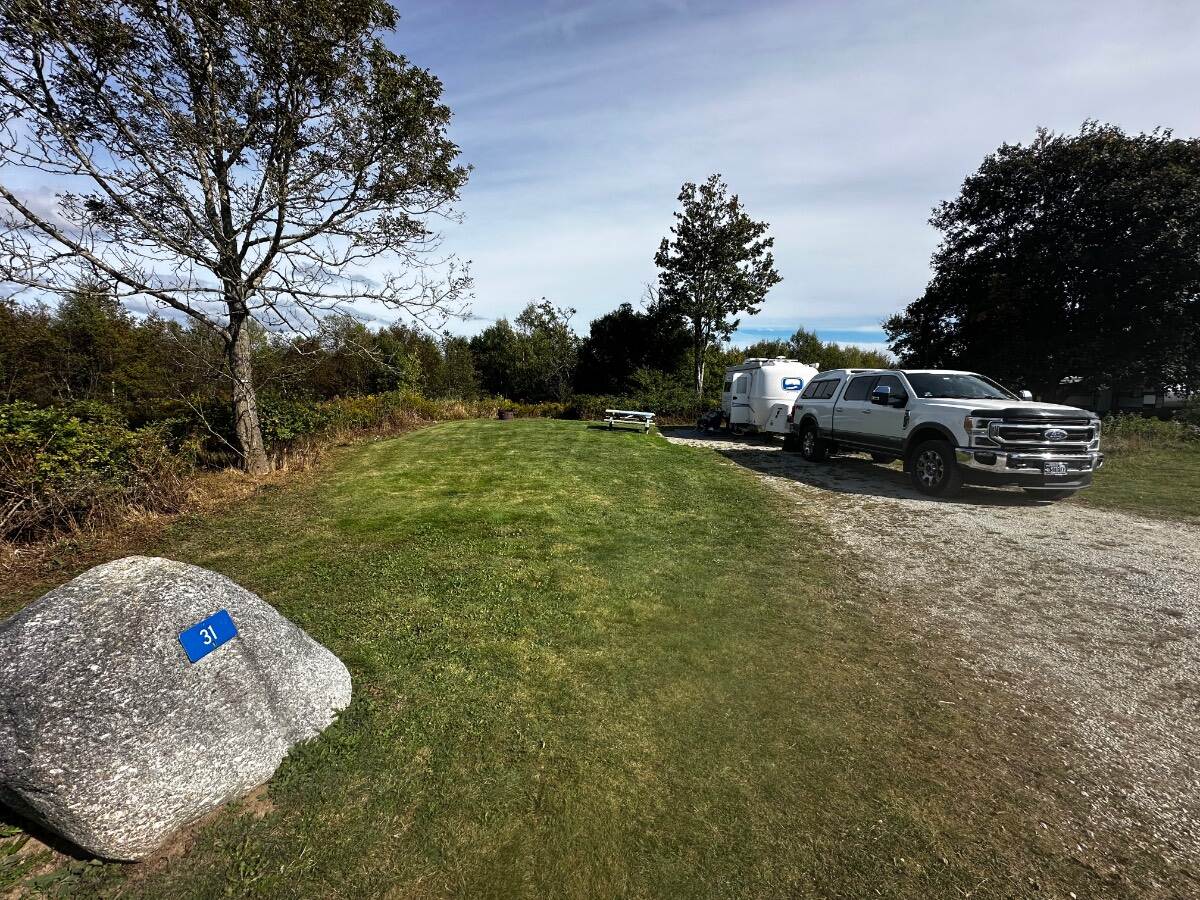
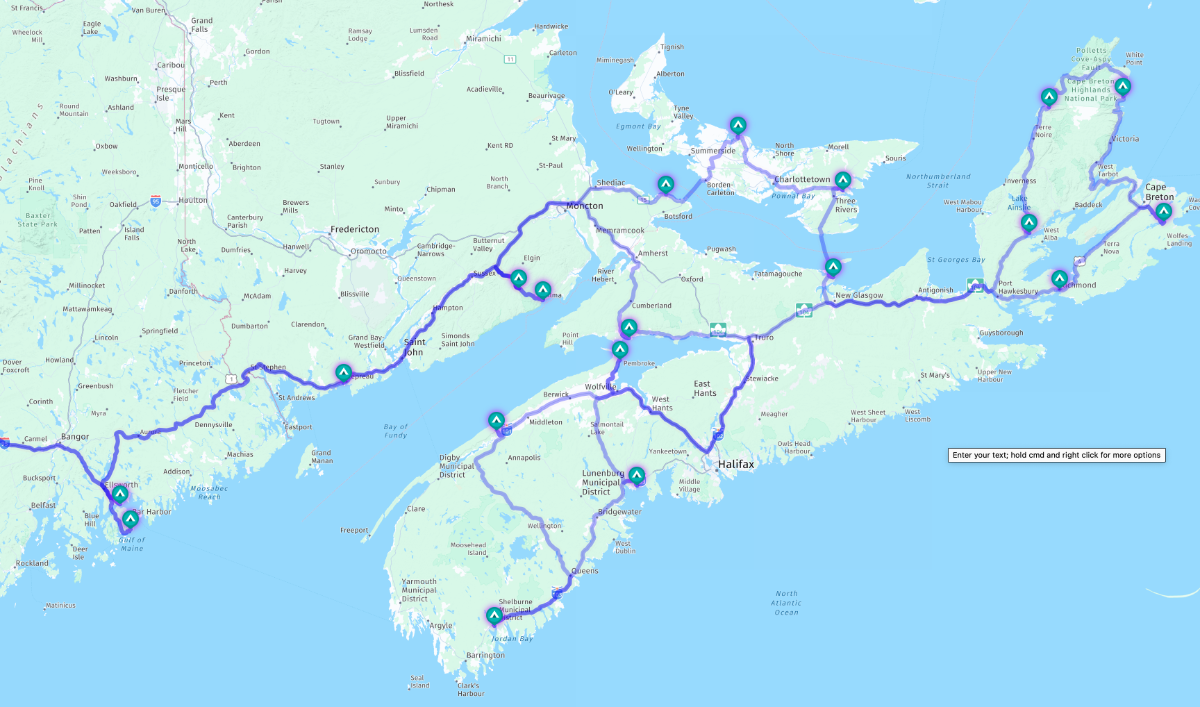
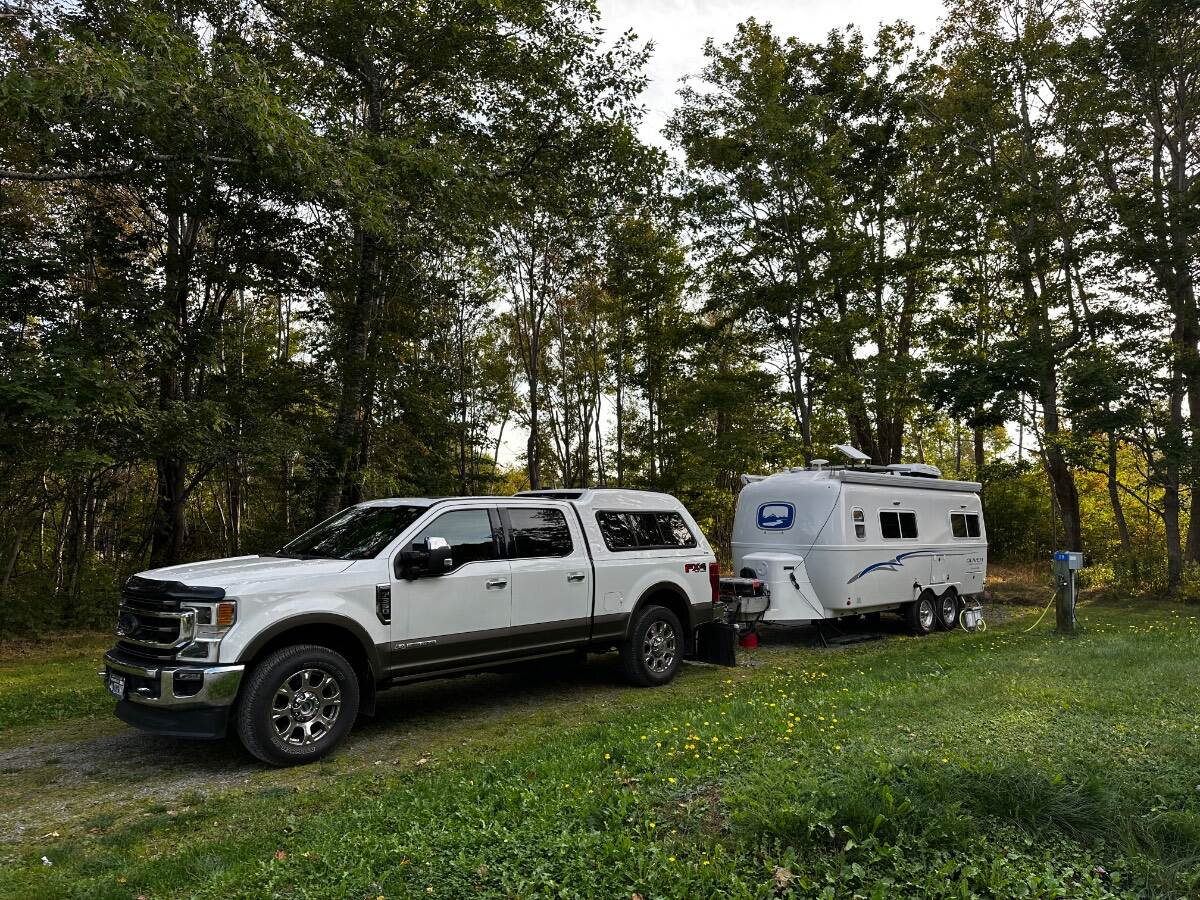
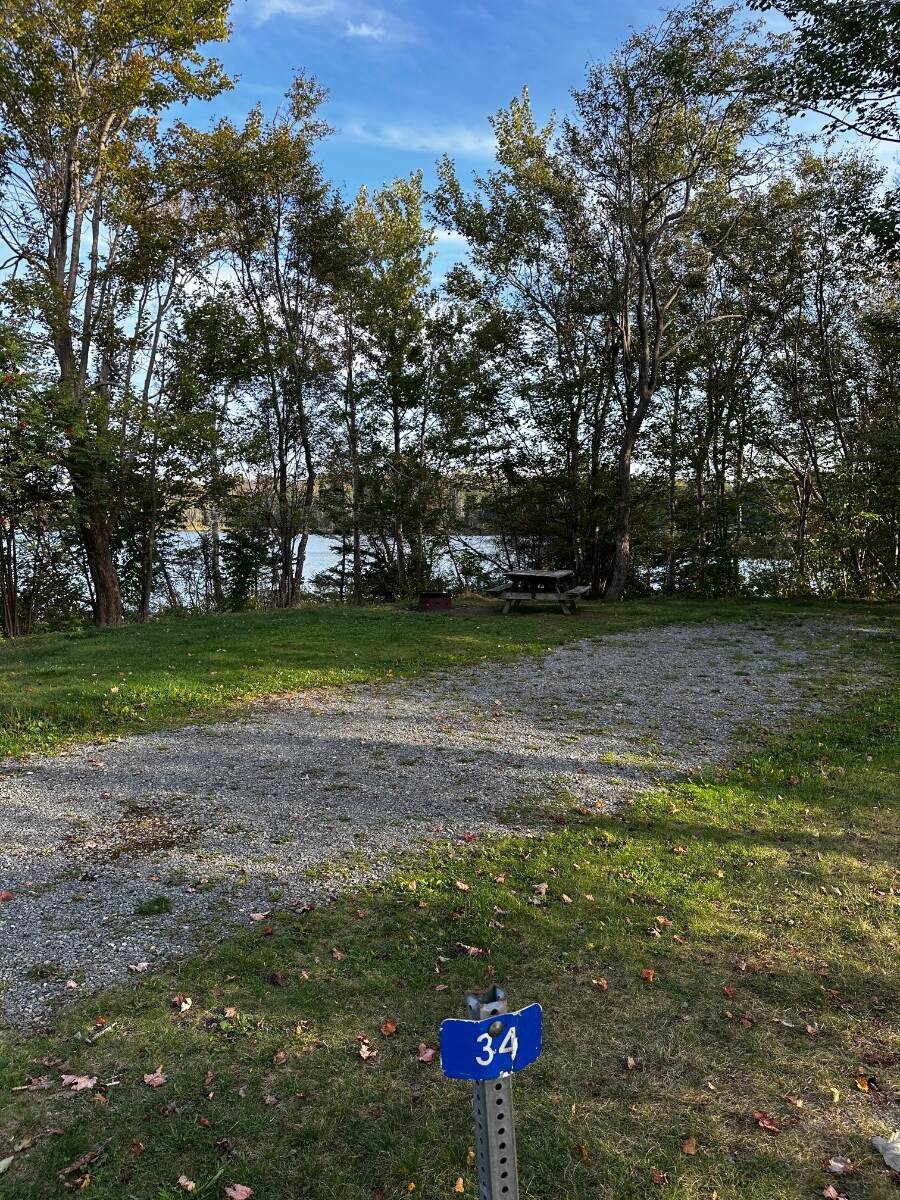
We did a full month long trip in Sept thru early October to the area shown 2 years ago and it was barely long enough. Each of the items with a TENT on the map are highlighted in our trip..."the big loop" and and be seen in pictures with comments here: Scroll down to the pix section on Nova Scotia Main Island. https://4-ever-hitched.com/the-big-loop-2024 Graves Island Provincial Park - Site 31 Shown - is Just South of Halifax on the main island. Puts you perfectly in a spot for the UNESCO site of Lunenburg, Halifax and Peggys Cove as day trips. I would stay there at least 4-5 days if I were doing over. To get into the park you cross a causeway into the park which is on an island. Going south don't miss staying at "The Islands PP" Further SE = Site 54 - Islands Provincial Park - Puts you on the edge of the water....this is on the SE Corner of the main Island. North on the main Island before you cross onto Breton Island you may want to also see the Fortress of Louisburg...which is on the north east side of the island. A good stop point is Mira River Provincial Park as you can easily drive down to Fortress Louisburg from Mira River...and then north after that stop. SIte 28 - Electric & Water at Mira River PP Above....but the site 34 below would fit and is right on the bay, but no Electric or Water... I've labeled all the campsite photos for each park in our blog, but If you have any specific questions we could get on a call. Craig & Rose
7 points
-
Wow. This forum is worth its weight in fiberglass.7 points
-
Greetings, I just purchased a 2022 Oliver. It is the Legacy, Elite II. This is my first RV and it has been interesting learning about the various systems. So far I haven’t made any costly mistakes. I need to find my way to an empty parking lot and practice backing up. Until that becomes muscle memory, I likely won’t venture too far away from home. I hope to spend a lot of time in British Columbia, Canada. I enjoy trout fishing and I think that region will allow me to find some nice fishing and allow me to boondock on Crown Land. Wishing all of you safe travels in the sunny days ahead.
7 points
-
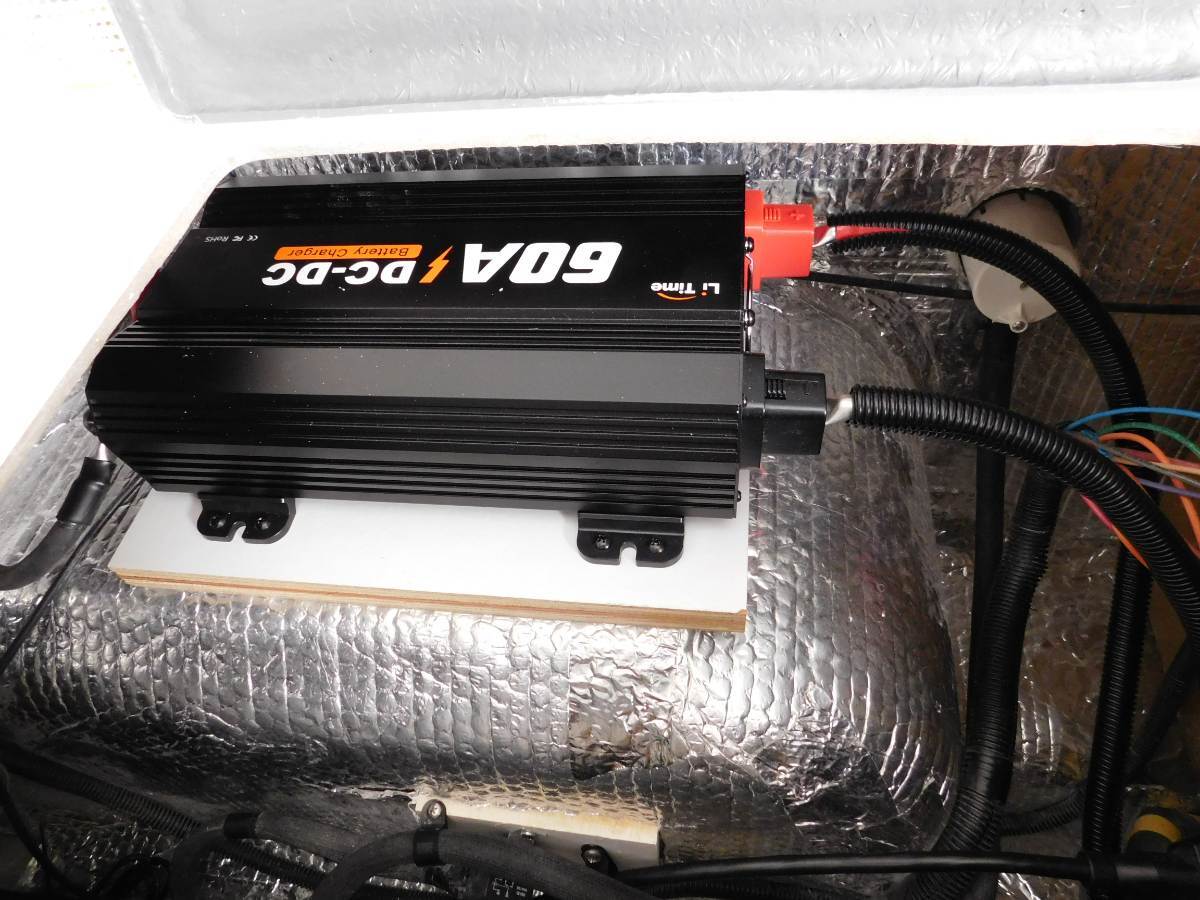
Hi everyone — I previously did an intro in the introductions section, but my wife and I are new (to us) Oliver owners (about 2 months in). We’ve camped twice so far and already have several trips planned over the next several months, including a lot of boondocking in USFS campgrounds. I've had travel trailers of various forms for about 20 years and we are super excited to now be Oliver owners. I just finished a lithium / inverter / portable solar upgrade on our 2019 Legacy Elite II (Hull 514) and put together a detailed project write-up with photos, wiring approach, parts list, and lessons learned (see attached). The trailer came from the factory without an inverter, no roof solar, and no solar connector. It had two AGM batteries when we bought it. The main goal was a clean, reliable, serviceable install that leverages the existing factory AC/DC wiring/routing and keeps the system simple (including an inline inverter/charger pass-through so the trailer’s AC panel works “like stock,” just with inverter capability). I found great info on this forum as I undertook this project and hope to give back just a little by posting this as a practical reference for anyone planning a similar upgrade — happy to answer questions or share any additional photos/details if it helps. Happy camping!! Lithium Inverter Solar Write-Up.pdf6 points
-
"Me do me" means no Facebook whatsoever - problem solved. I just don't see eye-to-eye with Mr. Zuckerberg's vision. There are other ways to communicate with your friends. Thanks for the heads up and continuing to help me affirm my decision.6 points
-
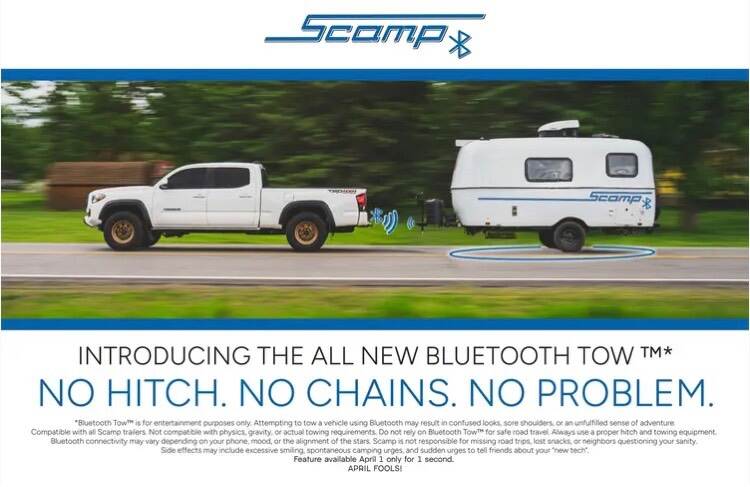
As posted on the Scamp facebook page, but I see no reason why this would not work just as well when towing an Ollie. Available one day only (today, April 1). This bluetooth connectivity capability answers so many issues faced by the typical Oliver owner like tongue weight, having to use Andersen hitch with 1/2 ton pickups, tow chains, and the 2” vs. 2 5/16” ball dilemma. If anyone was successful in getting ahold of one of these during the tight window of availability today, please post your experience with this seemingly too good to be true answer to all issues related to having to physically connect our trailers to our tow vehicles.
6 points
-
Rob: Great for you! When I commercially air travel, I always go to the new scanners. I love watching the operator as he sees my replacement ankle, two replacement knees, and two replacement shoulders. Usually utters holy s h _ t and looks over to see who is grinning back to him/her. I often get asked what happened. I smile and say I sort of wore them out. Other than getting a great surgeon, it is all about the PT. Each joint has it's own protocols, and they DO NOT transfer to other joints. For knees, the PT is can to can't deal. Under supervision, you can work them at your MAX tolerable effort to exhaustion. Do it every time and keep improving that up-slope curve and the "Bean Counters" will keep you getting better. For the knees ten weeks after surgery I was with my wife a Snowbird UT. First run I was being passed by all the first graders. Each run I got faster... first 6th graders, then some high schoolers. After four runs I was feeling 75% of what I was many years before. After run 5, I was feeling stoked and asked my wife if she wanted to bet a pitcher of beer for the winner to the club house. Her response was sure, but I want a 30 second head start. She bought the beer. Point is do the PT and do the PT homework to the max your PT team will allow. Tell them your goal is the knees of a 29-year-old. Then do the work to get them. Now at 74, I can outwork anybody I know even close to my age. I'm still flying paragliders, swimming three miles a week, doing weight training, and of course sure surf kayaking. Aim high! GJ6 points
-
Our Ollie is the first trailer we've owned. Moreover, the truck we pull it with is the first truck we've ever owned. As luck would have it, on our very first trip, having just picked up the trailer from Hohenwald, we were rerouted off of the highway due to construction. After a few miles we came across a beautiful covered bridge. 9 ft. I had no choice but to perform a "3 point" turn. Right in front of someone's driveway. After my 3rd or 4th (very clumsy) attempt, a car pulled up behind me. Of course, it was the owner of the driveway. And I was blocking her way. 🤪 She was extremely understanding, even complimenting us on the pretty trailer. Thank God for nice people. Another couple of tries and we got turned around. She smiled and waved us on our way. In about 20K miles of towing since then, we have not encountered a single low bridge. P.S. I am a little better at 3 pt turns now. 😁6 points
-
🎉 Introducing: Oliversary Stories! We've just added a brand-new section to the forum, and we couldn't be more excited to share it with you. Oliversary Stories is a dedicated space for celebrating the adventures of Oliver owners — real journeys, favorite destinations, and the memories that make life on the road so special. Whether it's a cross-country haul, a hidden gem campsite, or a trip that changed everything, these are the stories that remind us why we love this community. Here's how it works: our team will reach out to owners to gather highlights and share them here, so every story you read comes straight from someone in the Oliver family. This forum has always been built on the experiences of real owners, and Oliversary Stories is our way of putting those experiences front and center. We can't wait to start sharing — and we have a feeling you'll find plenty of inspiration for your next adventure. Interested in sharing your story? We'd love to hear from you! Reach out to us at media@olivertraveltrailers.com and let's make your adventure part of the Oliver family story. Stay tuned. More stories are coming. 🛖✨ https://olivertraveltrailers.com/forums/37-oliversary-stories/6 points
-
"The Mayor of Prescott" 😊5 points
-
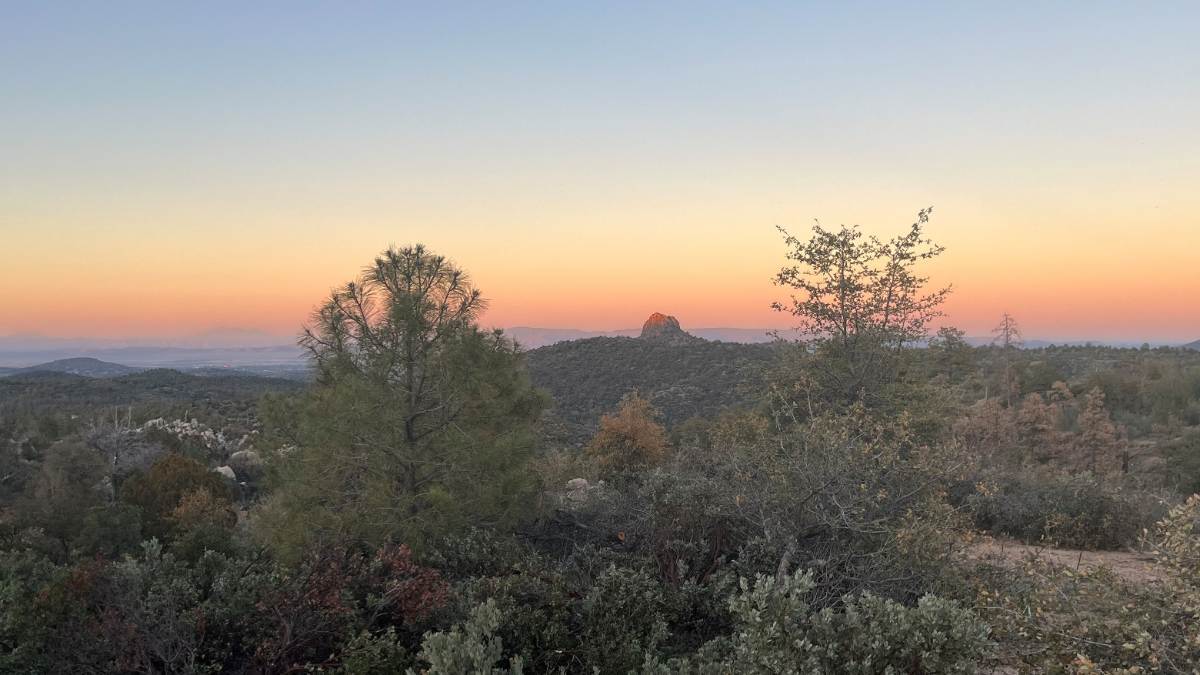
Thanks Mike! Yavapai Campground at the Granite Mountain Wilderness Area is a nice spot to visit Prescott. No hairy roads like driving up Thumb Butte Rd last week. It's paved all the way in. There are 21 FS campsites, and only $9/night with the old-fart pass! Sorry @John Dorrer, I'm being the Prescott "Resident Chamber of Commerce" person again! 🤣 Though where is everybody else? There should be a Where's Ollie post, or two, every day of the year! We're in site 16, which is one of two FF sites. It was easy for us to grab this spot, since the park reopened on April 1 and we got there at 9AM (just 20 min from home). Nice to camp for the week and only use a 1/4 tank of diesel with these prices today! Second pic is a view of Granite Mountain from the entry road. Adam and I hiked to the top 10 years ago and I hope to do it one more time before it get's too late for me! 😂
5 points
-
I watch a good bit of Will's content these days. He pretty much sticks with the same tests. However, over the years he has added to his tool chest with better and better diagnostic equipment. Creators trying to educate, do not usually make it to 1.1 million subscribers. Compared to where he came from, pretty much homeless, it's very impressive, especially for young folks these days. I used to watch Will when he was full-timing in a beat up trailer teaching himself his craft. Many years ago... nine years, I just checked. Here's the first video I remember watching from him.5 points
-
I upgraded from a F150 to a F350. It was wonderful getting rid of the Anderson hitch and the F350 doesn't need sway control. However, the best part is driving down mountains is so much less stressful. That all by itself makes the bigger truck worth it.5 points
-
My understanding is that it uses Blockchains.5 points
-
Two total knees, 2019 and 2020. I, too, have lumbar scoliosis. Full recovery for each knee took 6 months+, but the recovery was truly full. Once you can tolerate it, cycling is a big help to full recovery from knee replacement. I eventually recovered full range of motion. I need knee pads when kneeling on hard surfaces, but once I was fully recovered, I could kneel without pain. My 2 total knee replacements impose no limitations on use, or maintenance of, our 2022 Elite II. Keep at it!5 points
-
I was always active, marathons, triathlons, racket sports, etc. I lost the ACL in my left knee due to a college football injury. I kept up the activity even without that ACL which resulted in re-injuring that knee multiple times. I had ACL replacement surgery, meniscus repair surgery, excess fluid drainings and kept up the activity. Finally, the pain pushed me to go to a sports orthopedic surgeon who told me bluntly to stop all the sports stuff! He told me the last thing I should do is a knee replacement, spend the time you would be running to do strength exercises for both legs. He sent me to physical therapy to do that. That was 15 years ago and now I just walk. He told me that if after physical therapy day to day activities did not result in pain, then avoid knee replacement. At the time, even my walks (a few miles) resulted in pain, but after the physical therapy and continued strength training that pain has been gone for years. I still tweak that knee occasionally, but it heals after a few days. I can squat, climb a ladder, lift, slide under the trailer and drive long distances pain free. Hope this helps, just another variable in your decision equation! Mike5 points
-
Been there and done that x2 (ten years apart.. Both times I used a stationary training bike during rehab. It few weeks after surgery before I could get the knee joint loose enough to get all the way around the top of the pedal stroke. it was probably 2 months before I could get a above 40 rpm still without force. By 3 months I was walking 5 miles a day and standing on my feet 8 hours a day before I went back to work as a cardiac RN. Both times I did each knee during the summer. It wasn't until spring that I got out on a real bicycle. Even at 9 months I still had to Ice the knee after bike rides. As mentioned above it was about 1 year the I forgot that I had a knee surgery. Also as stated above rehab is tough and painful. Do what PT tells you. The important thing is getting full mobility back. Then getting muscle stronger. This takes months. I still have a minor problem with my left leg (Dominate) with standing on one leg and balancing long enough to put my pants on easily standing up. I still do it, but I am clumsy. I did have an exterior tendon release a few years before the surgery because the tracking on my patella to the knee joint, which might has cause the slight balance issues. Things I have never done again. I love sports and always pushed my self hard. Down hill skiing, If I could not do the double diamonds, and push myself it wasn't worth skiing. Jumping down off of anything: The truck tailgate, large logs and rocks when hiking, Anything that required cutting side to side, soccer, racket ball, etc. As far as trailer maintenance, 3-6 months for some of the easy stuff. The hard stuff like repacking bearings 9+months. You learn about getting down on the ground and getting back up. I still can not squat down to the ground like a mechanic would to work on things. Only do what is comfortable and you feel safe. Remember baby steps. If you have to repack bearings or such coming up soon you should have someone else do it. I do all of my maintenance on my Oli it just means modifying how you do things. I know little old ladies that still garden that have had knee replacement. You should be back in the camp grounds in around 6 months or so. Remember Ice and Stretching during the next 9 months. I spent my lunch breaks Icing the knee on my lunch breaks. I was the best surgeries I have done. Hang in there and don't give up.5 points
-
We tow with a sprinter 3500 van. With its roof mounted accessories, it's a bit taller than the LE2. Its radio antenna is mounted just above the center of the windshield. We switched out the standard mast with a longer antenna that's extends about 2" higher than anything else for just that reason. It serves as an overhead curb feeler.5 points
-
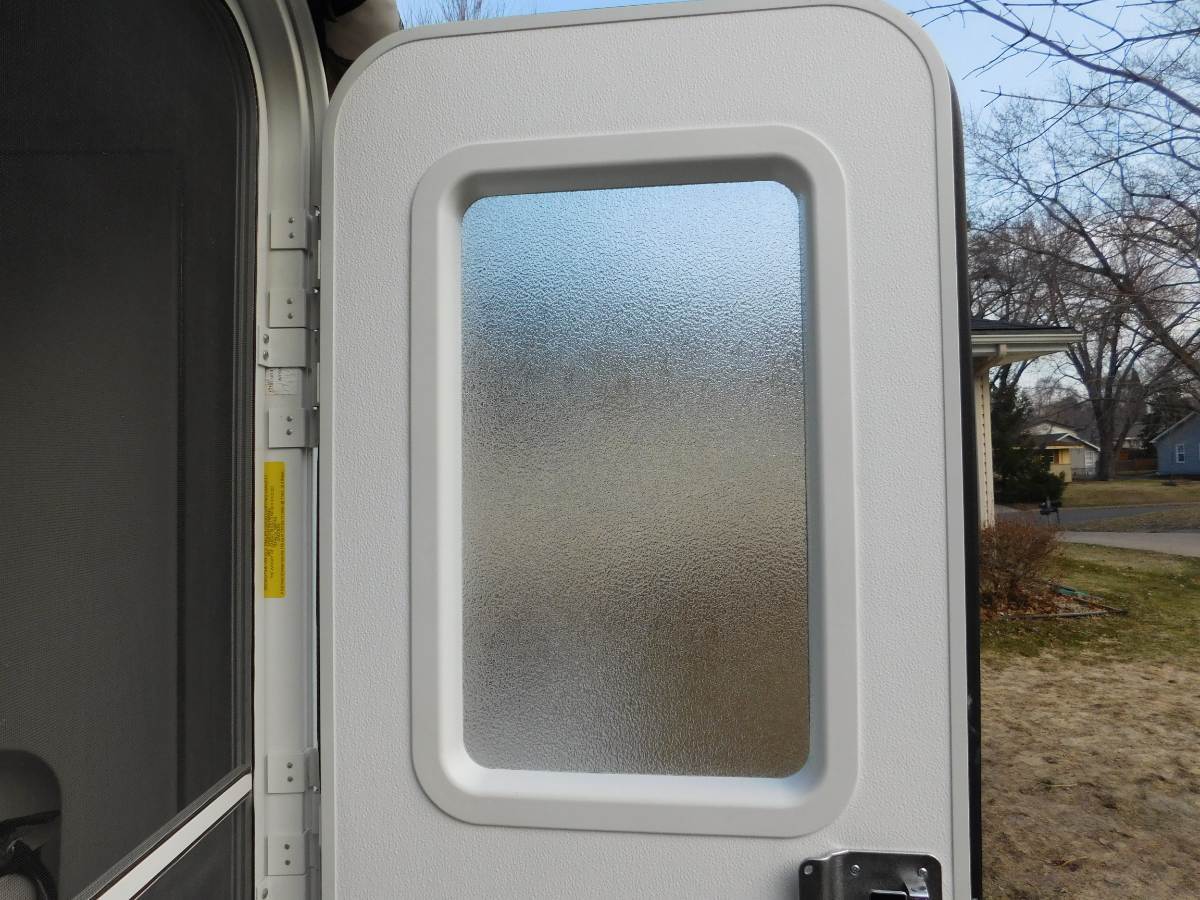
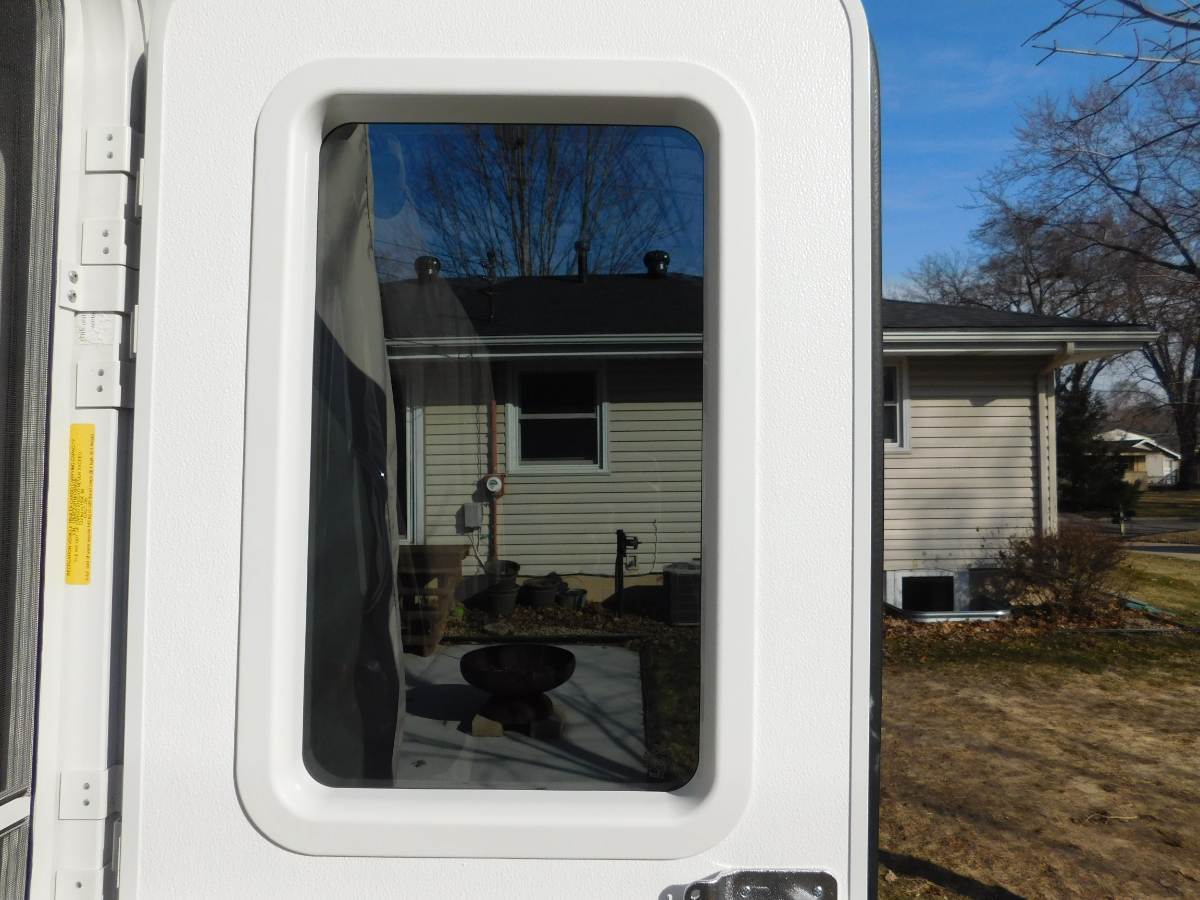
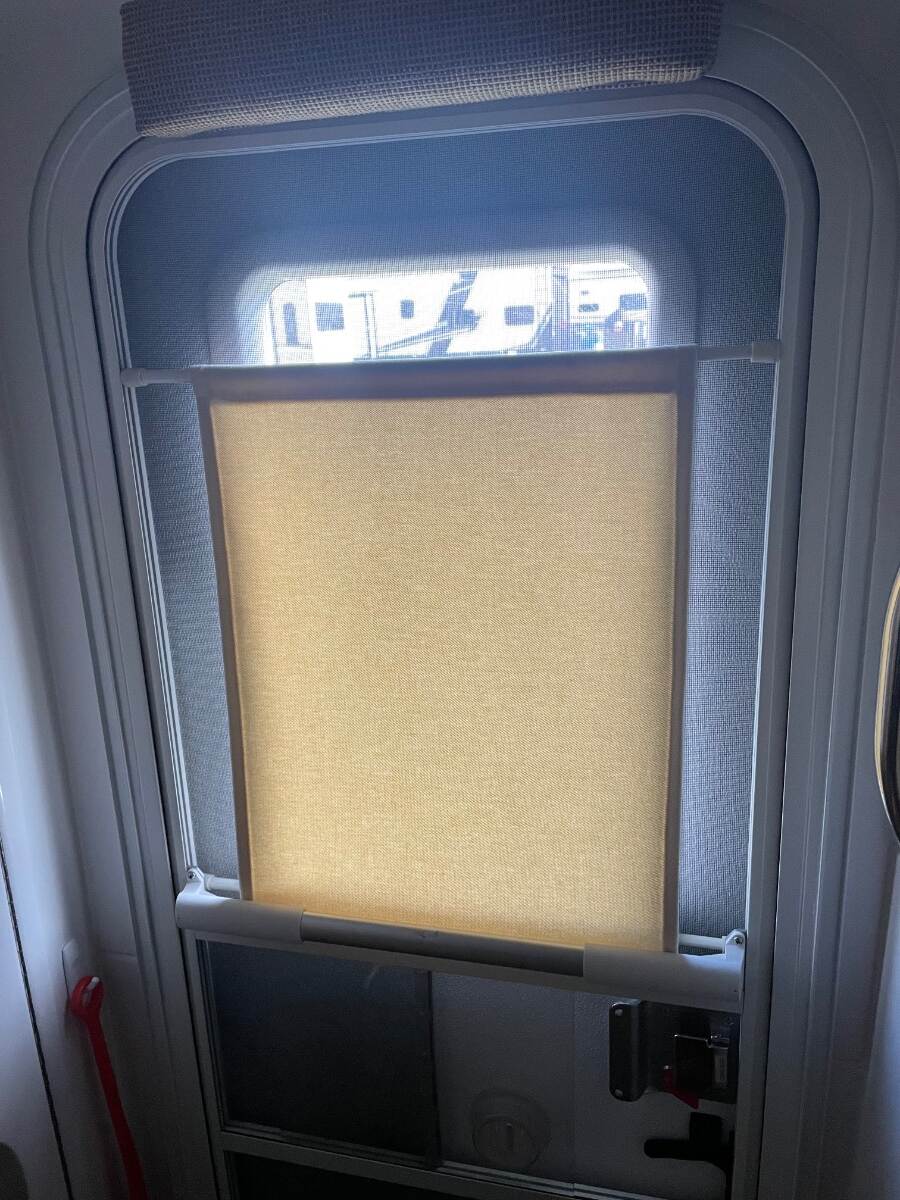
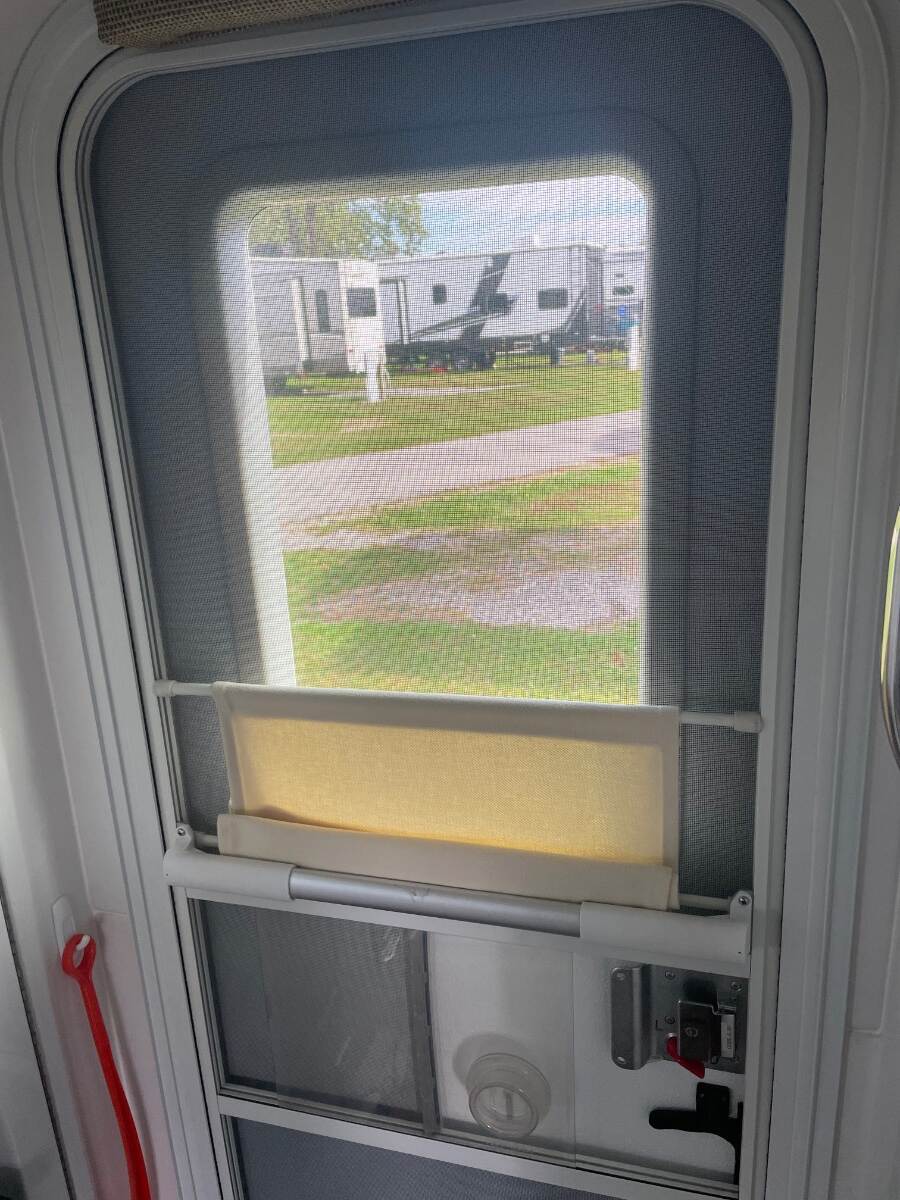
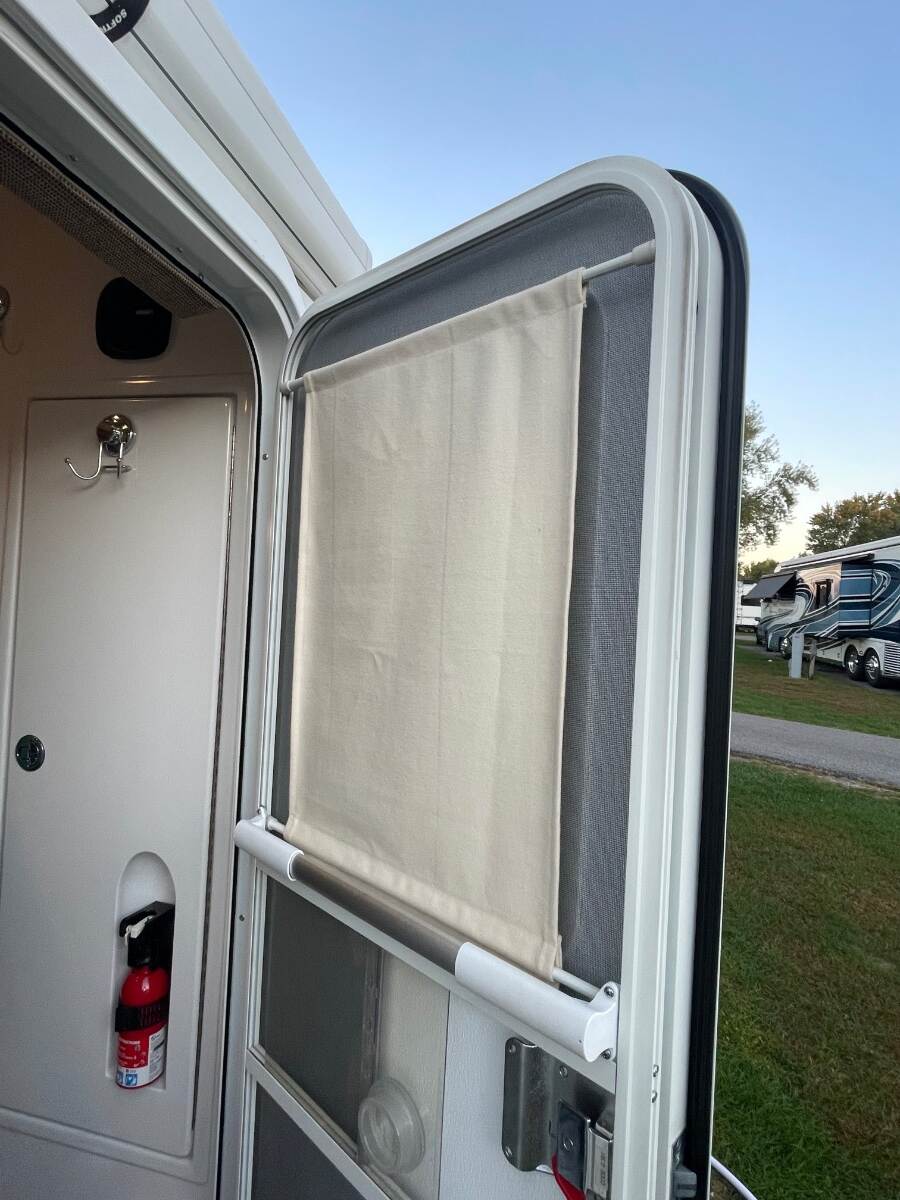
Read my posts in this thread. I used a Lippert tinted glass insert because the door is a Lippert. Be sure to get the frame release clips and a new inside and outside frame because you will break some tabs while removing the frames. The new frames will also have new intact seals. After installing the clear tinted glass I wanted a blind that could be operated without having to open the screen door. I had a friend that sews make me a blind out of heavy curtain material and used 2 spring rods to position the blind in the screen door frame. The top spring rod can be lowered to allow a viewing area at the top.
5 points
-
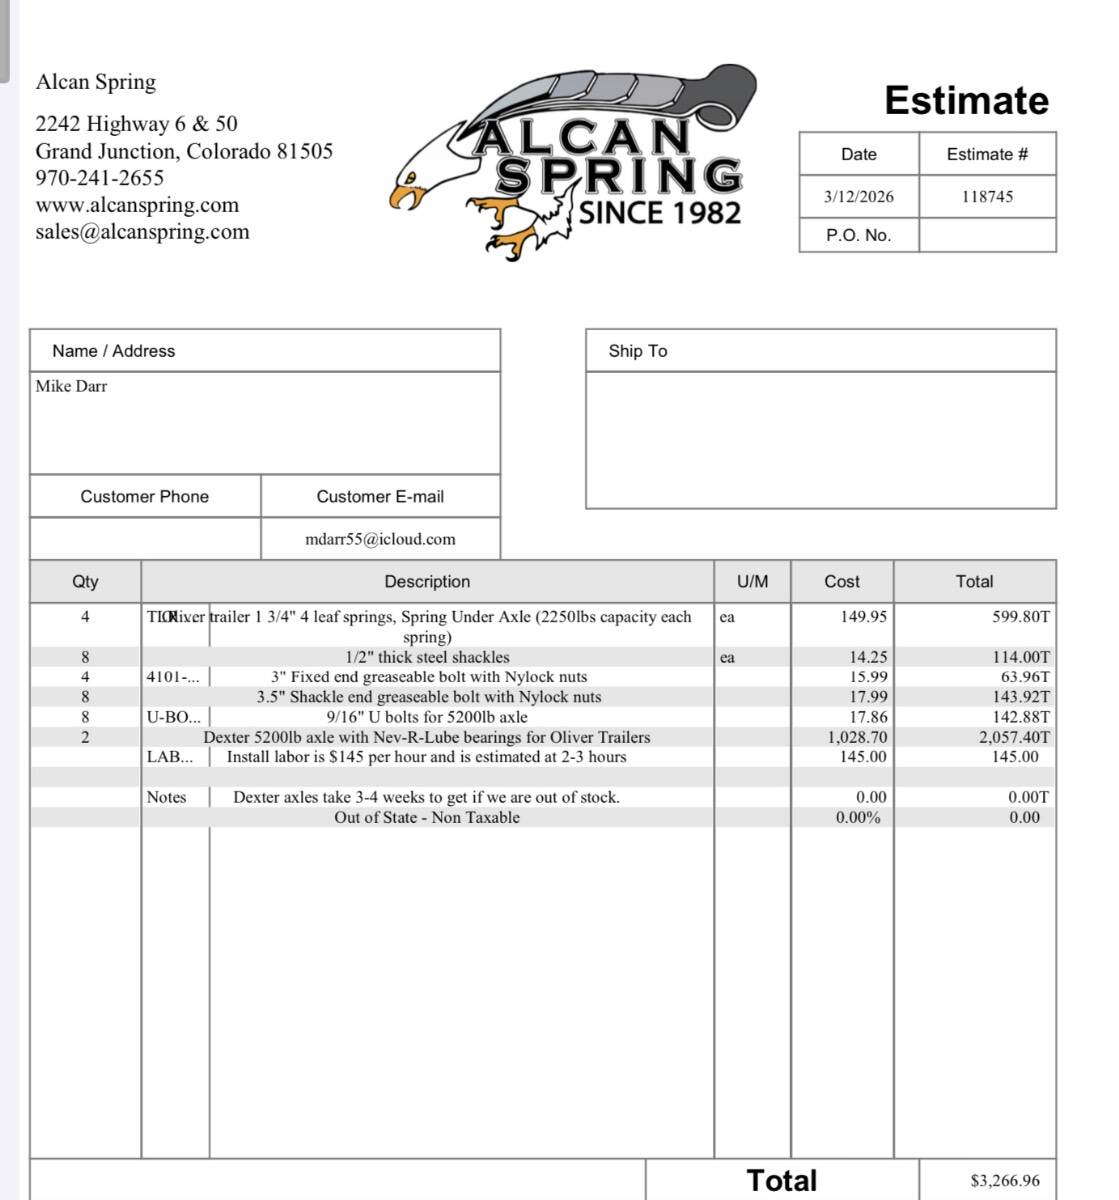
Camped just outside of Grand Junction awaiting our Tuesday appointment with Alcan for an axle upgrade. Already did the 5200# spring upgrade as we were treated to the sight of a broken spring last fall. As these things generally go, our breakdown was nearly 40 miles off the nearest highway. The tow, springs, labor and expenses related to this adventure reached well over $4000, of which $1800 was thankfully covered by insurance. When one of these cheap 3500# spring breaks in the usual spot, the trailer will not be able to be moved to any serious degree as the remaining spring will contact the wheel well if a bump of any consequence is experienced and the fibreglass wheelwell will be badly damaged. This would not be an easy or cheap fix. My advice to any considering an axle and spring upgrade is to do it and sleep easy.5 points
-
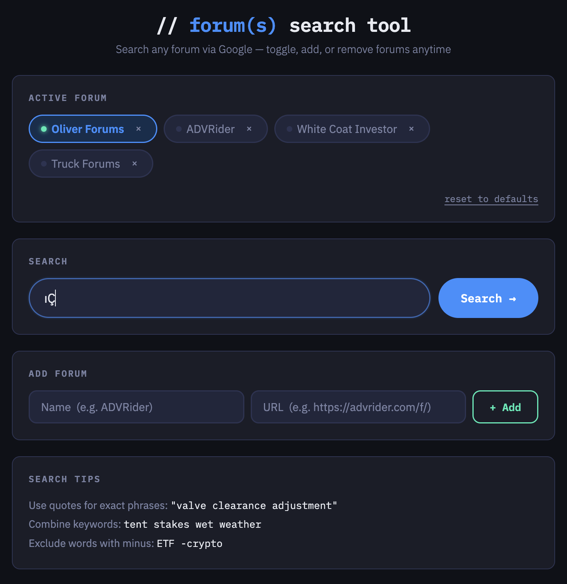
A couple folks asked for a more generic, multi-forum search tool. This is what I came up with, it's not Oliver Pretty, but works great. Now you can add or remove specific forums which meet all your camping forum needs. As a starting point, I added Oliver, a trucks forum, motor cycles, and to pay for all your retirement toys, an investors forum. LOL Change as you wish and reset back to defaults when needed. Or edit the HTML file yourself and tinker with it. Simply download zip file, extract HMTL file, and open in your favorite browser. Should just work. Have not figured out yet how to get it to play nice on an iPad. FYI: @Hokieman @Ollie-Haus forums-search-tool-v1.1.html.zip
5 points
-
I’m considering replacing my suspension, still have some teardown and inspection of brakes and drums to do first. I don’t have any problems, my trailer tows great with my F250, no WDH, doesn’t porpoise or wallow, not top heavy. I plan to travel to Colorado in June to camp for a month, so I called Alcan and discussed a quote with Tim. I advised him I was interested in the 4 leaf springs rated at 2250 lbs, D52 axles. I recently weighed my trailer at a Cat scale, it was 5940 lbs fully loaded, water tank full, gray tank empty. I can appreciate why many feel best with 5 leaf springs, but 9k spring capacity with a 6k trailer allows for significant overcapacity, which I feel safe with. Alcan 4 leaf spring leafs also extend well past the weak point on the Dexter OEM springs. Attached is the quote if interested. I had a few technical questions for Tim based on legitimate concerns raised by Geronimo John earlier in this thread. 1) Why does Alcan supply splined wet bolts, but the shackles are smooth bore? It seems this would allow the grease ports to rotate out of the optimal position. Tim explained the bolts are an interference fit, so once tightened up, they shouldn’t rotate. 2) Why does Alcan use 9/16” straight shank wet bolts, as compared to Dexter 9/16” shank stepped down to 1/2” threads? Tim explained they have seen many Dexter bolts sheared off at the shoulder (likely due to over-torquing). Dexter wet bolts should be torqued to 30 ft-lbs min, 50 ft-lbs max (see Dexter instructions attached). As Geronimo John explained, the Dexter wet bolt shoulder is designed to allow the proper clearance between the hanger tabs and the spring bushing. If Alcan straight shank wet bolts are over-tightened, there may not be adequate clearance between the hanger tabs, resulting in abnormal wear and possible difficulty getting grease to purge. Alcan provides a torque spec of 65 ft-lbs, but regardless, clearance should be checked, and torque modified as needed. Hence the reason Alcan use Nylock nuts. So, Alcan takes a different approach to this application than Dexter. Lessons we’ve learned from each other are to use caution torquing your wet bolts (either Dexter or Alcan), and be mindful not to strip the splines. I recommend strongly securing the bolt head while torquing the nut. Sent from my iPad 059-867-00_ez_flex_complete.pdf
5 points
-
Greetings to the two Olivers we saw on i-95 South today, one near Savannah, one near the Florida Georgia line.5 points
-
Maybe? Love our Tesla stock! I bought a bunch when the paid-protester crazies were fire-bombing the dealerships and the stock dropped down to near $200. I’ve never been one for sound investing, yet we sure won on this one, monies doubled! BTW, after our last trip, I forgot to pause our account, from the $50 to the $5 standby plan. Got the email re monthly renewal charges, but it was too late to change plans (even though it was the day before the new billing month). I entered a CS ticket. It took 3 days and after a second request, then Starlink CS wrote back. They wrote the next month is still live on the $50 plan, but they apologized for the inconvenience and put a $50 credit in our account for future charges. In our family, we Love Elon, his genius and ALL of his great companies!!! 😎5 points
-
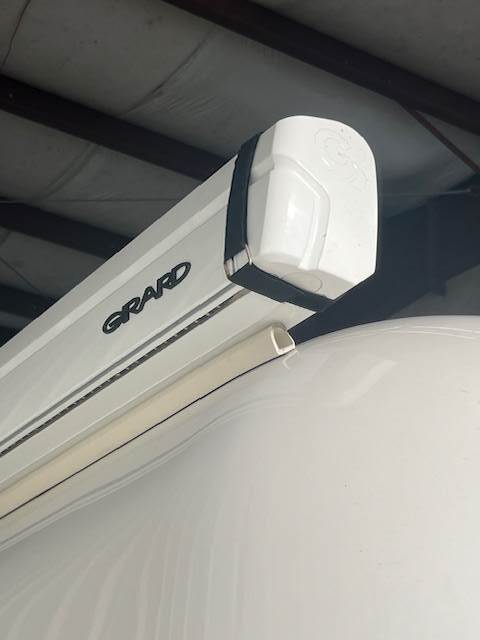
Having seen and talked with owners (non-Oliver) that have experienced awning unfurlings at 60MPH, I added some inexpensive safety straps to our awnings. (As Justin Wilson use to say, "I wear a belt with my suspenders 'cuz I'm a safety engineer"). The actual straps work great. The buckles will start to rust after a year or so but are inexpensive to replace. UV will also likely reduce the strength of the straps so it's on our recurring maintenance replacement list. The "lock out" indicators help me from opening the awning with the strap on, which assuredly I would do! Parts used listed below. Straps from Amazon Red Velcro for "Lock Out" indicators Small Circular White Velcro Dots w/ Adhesive
4 points
-
Just wanted to check in and let everyone know the Chill Cube with Heat Pump is now available at United RV Parts in Texas. Looks exactly like the Chill Cube (not low profile). I should have mine installed today! I'm following instructions posted by @jd1923 and everything is going well. I was even able to get the old Dometic off the roof by myself by leaning an 8' step ladder against the street side and carefully sliding it down. Having the top of the step ladder near the edge of the roof made it easy to slowly work it off onto the ladder. The gasket on the bottom of the unit also helps to offer some resistance on the way down. I have the Dometic Penguin II (low hours, works perfectly) on FB Marketplace in Central Florida if anyone needs a replacement. Can't wait to get this Chill Cube fired up!4 points
-
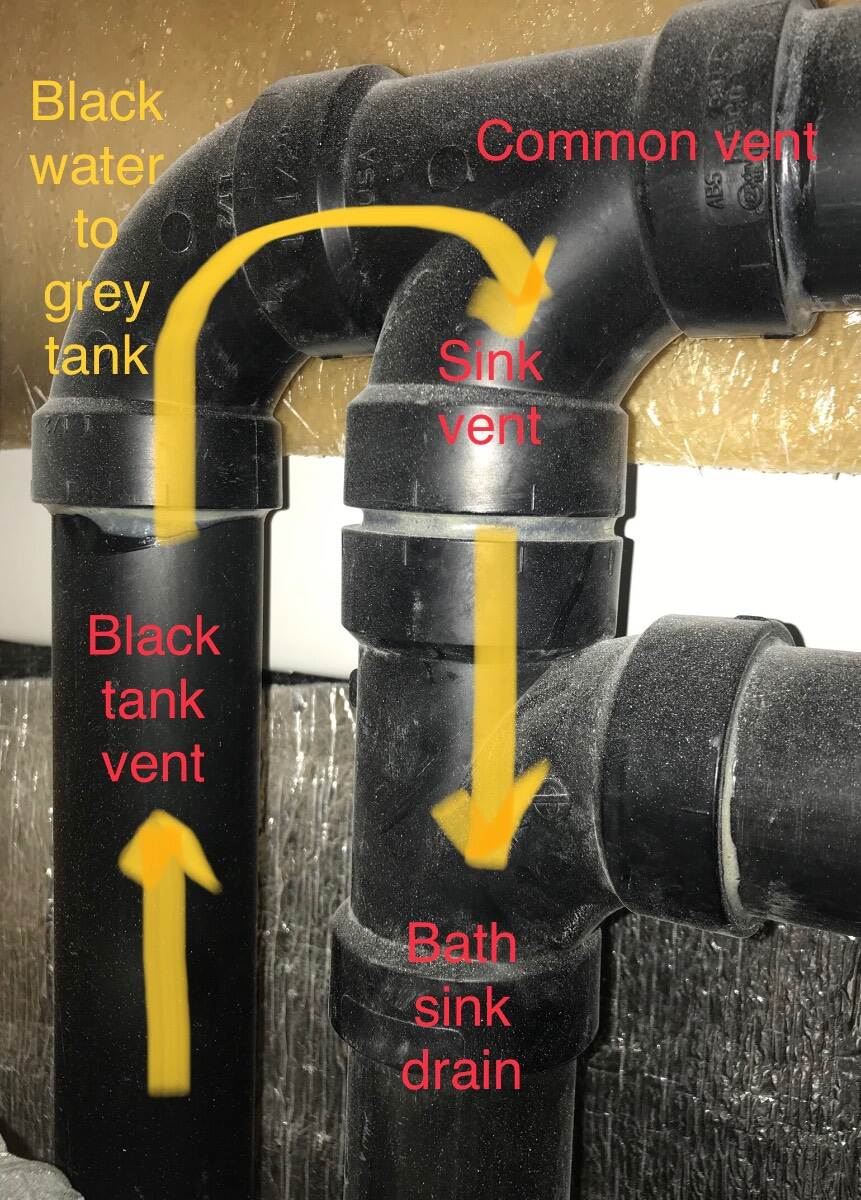
Are they sure it’s kitchen water? Are they adding water to the black tank using the No Fuss Flush fitting? If they are flushing the black tank and have let it get too full and the shower drain valve is closed the water from the black tank can back up in the black tank vent and flow over into the sink drain and rise up through the shower drain and fill the shower pan and could actually overflow the pan and flood the trailer floor. Do not rely on the tank level display when diagnosing water level and drainage problems, or any other time really. I apologize for the “ands” and the run-on sentence. Bill
4 points
-
In addition to your awing decision. We would strongly recommend NOT TO INSTALL THE RAIN GUTTER ADHESIVE STRIP under the awing. We found its primary function is to capture debris that makes a big mess on your roof. We removed our gutters several years ago and let the water drain down the side of the trailer with no issues. If you wish, you can install gutters over the windows. We live in a rainy climate on the pacific coast and are much happier without any gutters. Without gutters, you will find it much easier to keep your trailer clean. And congratulation on your purchase. We hope you enjoy your Oliver as much as we have.4 points
-
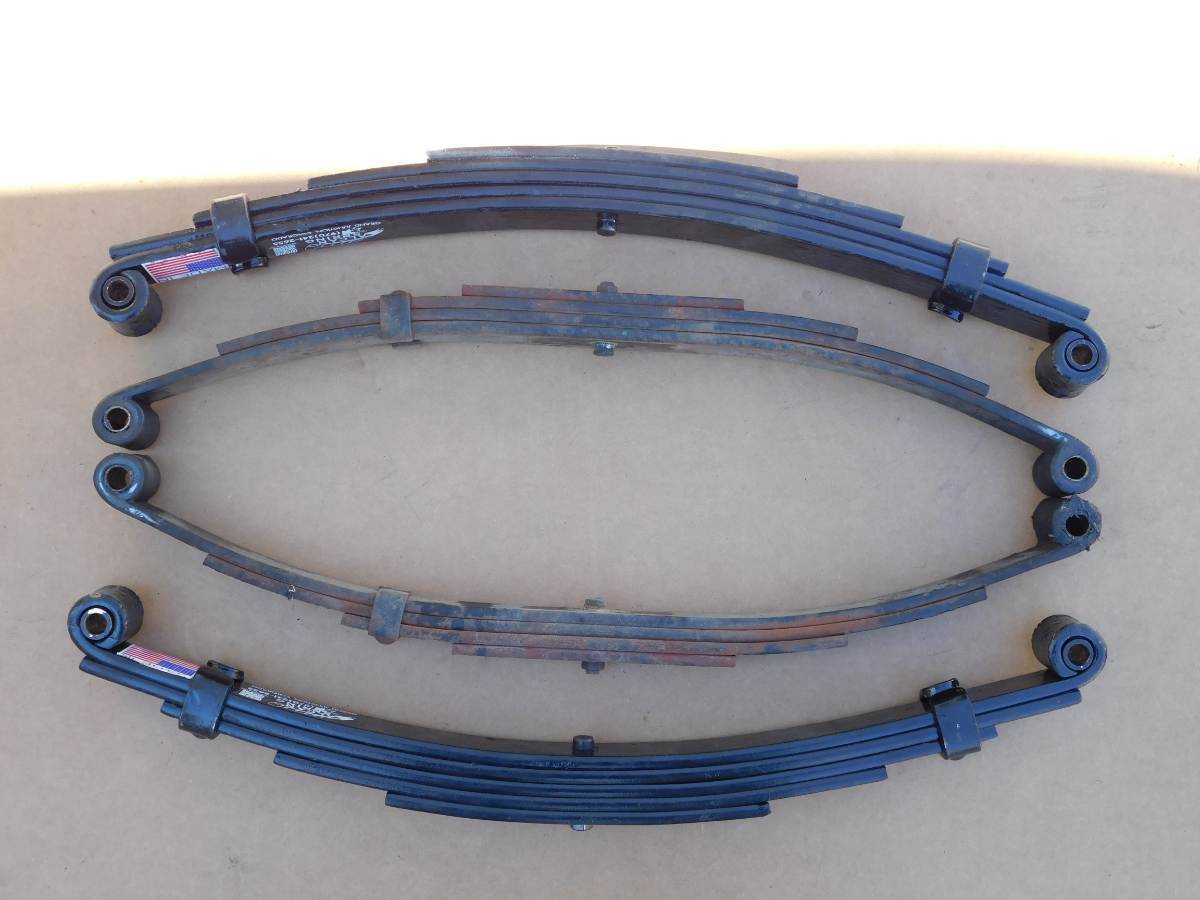
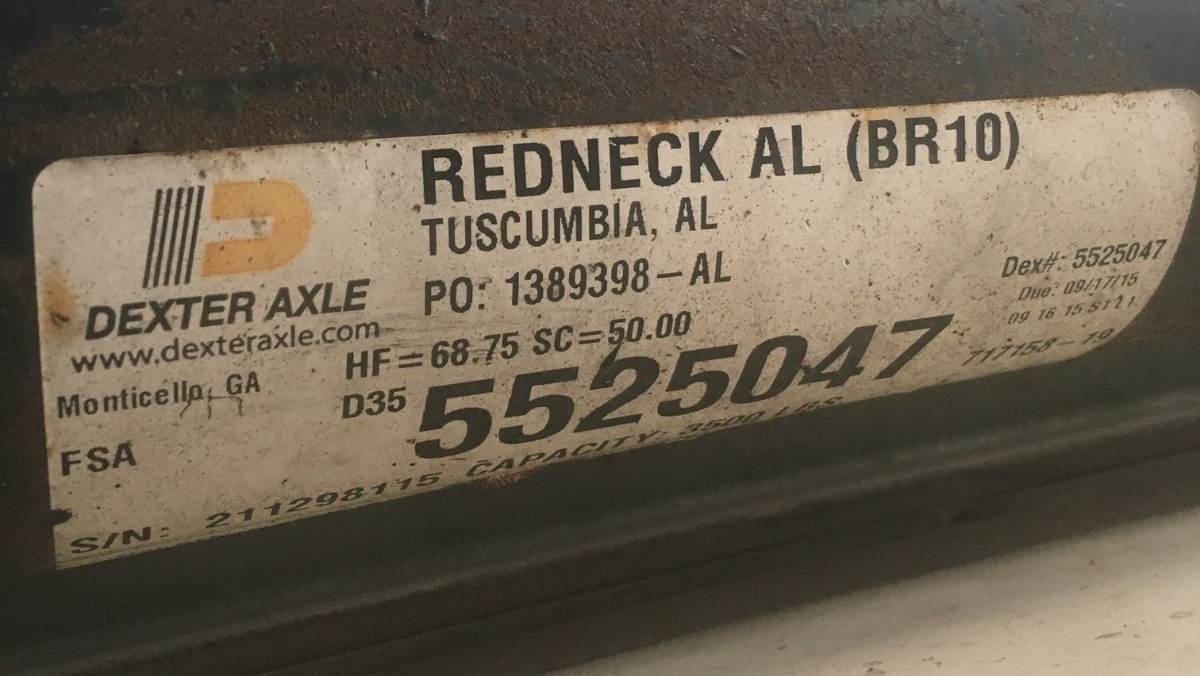
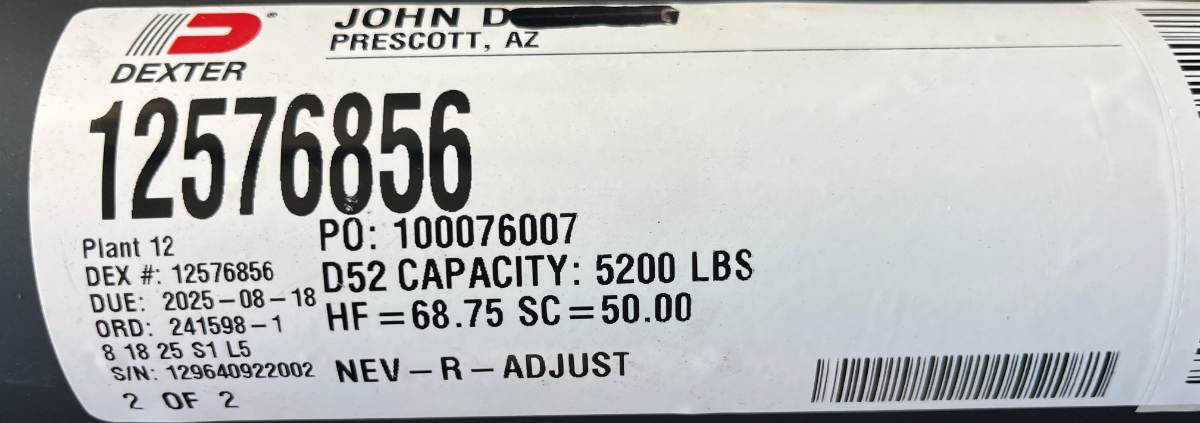
Not all Oliver TTs use the same axle. Our older hull was fitted with a 50" bracket length and most others have 50.5" (note the 50.00 marking on my labels). Since the axles on our Oliver were unique, Alcan took a picture of my original axle label for the custom order, copied all the specs except went from D35 to D52 for 5200 LB axles. They only make Nev-R Adjust and Nev-R Lube axles now, so the rest is the same. So, the part numbers for our hull will NOT be what you need. Likely if a Forum member that upgraded recently with 50.50" axles posted a picture of their label, it would be what you need. But to be certain, take a picture of your axle label and then call Dexter Customer Service. They are not bad to talk to and they will give you a proper part number for your D52 upgraded axles. I'd want to be certain spending $2K plus shipping! HF stands for Hub Face, the measurement between hub faces. SC or Spring Center is the distance between leaf spring centers. These numbers must remain the same for the new D52 axles. Our before & after axle labels to follow:
4 points
-
Confirmed. I do not use sway control and appreciate the ease and speed of hookup in a variety of conditions. Have not once felt the need for sway control with the Elite II and 3/4 ton truck. This one of several advantages of having a truck somewhat more than what you actually need for the Elite II.4 points
-
We recently upgraded to the 5200 lb Dexter axles, purchased thru Alcan, and chose to use the 4 leaf Alcan springs to match the weight of the trailer. We also purchased the Dexter EZ flex and wet bolt kit from etrailer, replicating the stock setup, since we preferred to use step bolts. In addition, we replaced all four shocks with new factory style Monroe shock absorbers. We performed the installation ourselves. Our tire pressures are set at 45:psi which we monitor with our TST tire pressure monitor. We’ve had excellent results, the springs are noticeably firmer, both when towing and when set up for camping. We find that the ride is not unduly harsh and we haven’t had any issue with items coming loose or things falling off. Time will tell if the Monroe shocks will work well long term. We are very happy with the setup and our interactions with Alcan Spring.4 points
-
We’ve got a 2020 Ram 2500 diesel. Tow on the ball, no sway control. Lots of miles and never an issue. Mike4 points
-
We went 5-leaf since Alcan designed it this way specifically for the Oliver. They installed a few 4-leaf springs only due to Oliver owner requests. I would guess over 95% of us have installed the standard 5-leaf system. I've had to go over a lot of speed bumps lately. My truck suspension, being so tight, bangs hard over speed bumps, but the Oliver suspension glides over them so nicely! Looking through the sideview mirror, you can see each tire articulate up and down without affecting the other axle, while the hull does not budge an inch! I should buy Alcan leaf springs for the rear of our tow vehicle! 😎 We always tow with a dog bowl half full of water. The water stays put, and never had a drawer open. We did have items jostled in the Attic and hanging clothes fall in the closet once in the first few miles. Once I worked the first required torquing of wet and U-bolts, we never had another issue.4 points
-
We have the 3.5K axels I put the 5 leaf springs on the Oli. I have almost 11K miles on them. The first couple of days (750 miles) seemed a little rougher then they mellowed out. I do go on gravel, and some of the 2 lane roads in the nation are as bad or worst than gravel roads. I just got done doing a lub on the wet bolts and checking everything out. All seems fine. The Oli weighs about 6500 pounds when loaded. I haven't notice any problems in the interior, it was worse with the original springs. The trailer stays pretty mellow with movements of an inch or two after uneven pavement. Where it used to bob and weave like a drunken sailor before making it harder to control. After the leafs no control issues. I think you would be fine either way.4 points
-
We have 3.5K Axles and used 4 leaf Alcan, had them do the install, they gave me the 5th leaf to carry with me if we wanted to install it later. After 5k miles with 4 leaves we're just fine. That said if you have the 5K axles on your trailer, then most folks use the 5 leaf version to match the axle rating.4 points
-
Please let us know what you did to resolve your issue when it's corrected. Thanks. 😎4 points
-
Wow! Thanks for all of the great feedback and information. Really appreciate it. Some great stories in here too with your injuries occurred and how you have over come them. Congratulations to all who have gotten back to where you wanted to be. I will add this regarding my situation. My left knee issue is most likely due scoliosis which renders one leg being ever so slightly shorter than the other, it runs in the family. Playing football in high school at 110 lbs soaking wet didn't help. I was known as Big Bruiser on those days. Name given to me by our coach Bill Oliver who went on to be head defensive coach at the University of Alabama back in the day. Suffice it to say my knees and other body parts took a beating as well. Lesson learned… sort of. Had to give up running several years ago but always kept hiking, walking, and cycling. This past year, as all of the previous years before, my wife and I walked, hiked and biked well over a 1,000 miles with an accumulated elevation gain of more than twice Mount Everest until it all came crashing down in late Nov or early Dec '25. Knee injections were no longer an option to get through it. The next couple of months I was in a bit of denial, this can't be happening to me. Finally made the decision to get it over with. On off days from PT I exercise and stretch and will continue this as long as needed. I was at 119º flex on Wednesday but did not get measured today, so getting there slowly. PT's have had me on stationary bikes most sessions for about five minutes and while it's uncomfortable I can kneel on a padded cushion for short periods. And for those who have gone through this you'll love the next part of the story. I fell down our stairs into the basement a week ago due to my stupidity of walking down in sock feet on carpeted stairs. Good knee slipped and bad knee made a forced nearly 140º flex while sliding down. The pain was beyond anything I can ever recall but fortunately got over it within a few days and back to walking again almost every day since pacing at around 3.25 MPH ±. Thanks again for the encouragement.4 points
-
I have a 2022 Elite II. I ran three lines of heat tracing on the water lines including bathroom, outside shower lines, water intake lines, over the water pump, etc. I also added a heat duct to carry heat through the streetside basement. This gives me two lines of defense from freezing temperatures. Monitoring my bluetooth thermometers tell me that the furnace does a fantastic job of keeping the basement above freezing. The furnace actually runs more efficiently and quieter with the added duct. When plugged into shorepower I use a small AC space heater and open the little garage door and face the heater toward the garage. When driving I turn on the inverter to run the heat tracing which comes on at 40 degrees. I have three thermometers placed around the basement and they have confirmed when the heat tracing comes on. So far we have driven and camped through 20 degree weather. Yes, all of this required me to stand on my head and squeeze into small places but the peace of mind is well worth the struggles. I have yet to test not winterizing for next winter, but think I might try it. Input?4 points
-
We had two newer BB 100AH batteries in Ollie, but recently installed two 105 AH Epoch batteries in parallel. I like the physically smaller/lighter Epoch batteries for our application compared to BB along with Epoch's customer support and Epoch's app to monitor Epoch Bluetooth Smart battery condition. Really like the built in Epoch carry handles on the 105AH batteries making it easy to install & remove these 22lb batteries. We don't have factory solar or an inverter like many folks here. We have a Progressive Dynamics 45 amp charger and also charge with up to two Renogy 100W Portable Suitcase Solar Panels and Renogy Solar controller when away from shore power. Looking forward to seeing how fast the Epoch batteries will charge with 100W Portable Suitcase Solar Panels during the 2026 camping season.4 points
-
One lane, three mile long, dead road (unknown to us) deep in the back woods of West Virginia. Sharp fall offs on both sides of the road and absolutely no possible way to turn the truck and trailer around. Front hitch on the truck. I wouldn’t go anywhere without it.4 points


-
Recent Achievements
-


")


")


