Townesw
-
Posts
510 -
Joined
-
Last visited
-
Days Won
18
Everything posted by Townesw
-
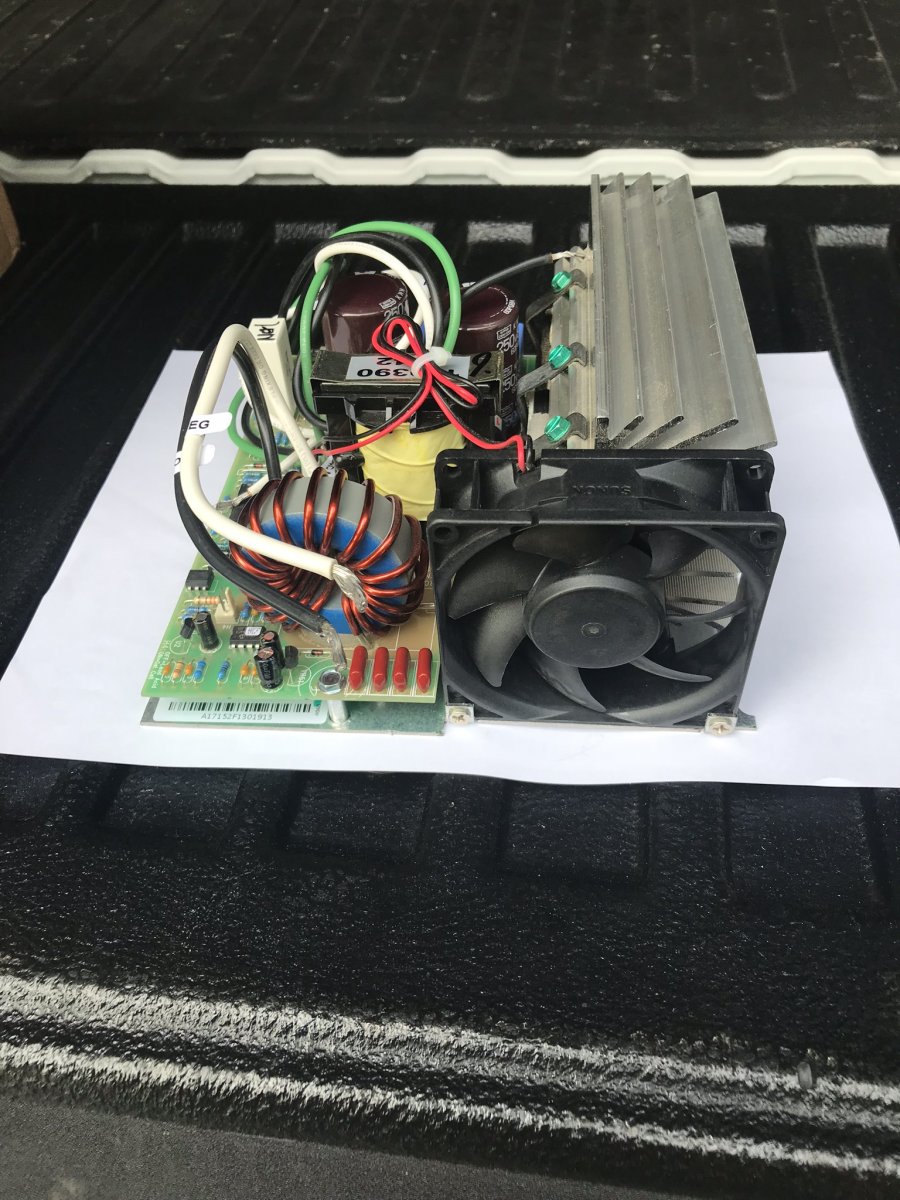
That Progressive Dynamics Power Converter has a cooling fan on it. Have you heard it running?

-
I think it’s about 79 inches.
-
June 2019 I had to wait 6 weeks to get the bed cap. I don’t know what the wait time is now. As sakthorp said they use the paint code from the vehicle to match the paint but if your vehicle is older the paint may have faded. My cap has a hinged window with sliding glass in the front so that you can wash the windows between the cab and cap. Also has an LED light with a prop switch that can be set to turn on when rear window is raised. The lock on the rear window is wired to the truck and is activated with the truck locks. The cap doesn’t completely seal the bed so you still get some dust inside but your stuff will be covered and somewhat secure. The cap will increase the noise level in the cab slightly, especially in the back seat.
-
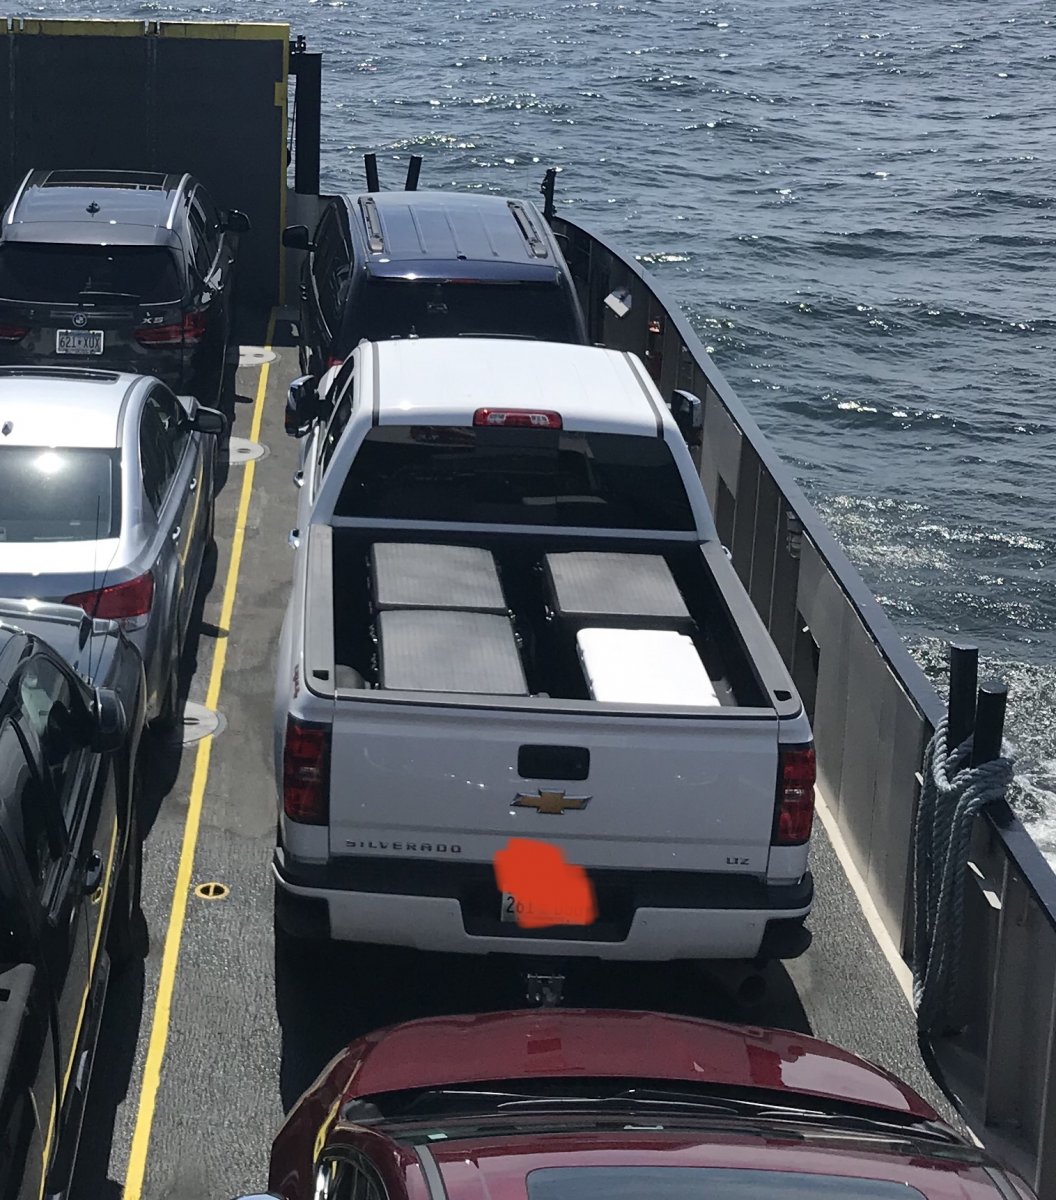
Sold our 1/2 Ton short bed with an ARE bed cap. Bought a Duramax standard bed. Ordered an ARE bed cap for standard bed but it had a long lead time. In the meantime we used 3 Contico tool boxes for storage. Really worked well. I did use a cable to lock the big cooler to the truck. Picture taken on the Washington Island Ferry.
-
The ones about Fords, Rams and Toyotas 😜
-
Is there a procedure for staying overnight at a Cracker Barrel? Are you supposed to notify the manager or do you just pull in and spend the night?
-

Poll: Sleeping direction on Ollie LE2 Twin Bed
Townesw replied to DavidS's topic in General Discussion
Also: rain water behind the awning runs off the back of the trailer, refrigerator door doesn’t swing open the wrong way and break the hinges, tanks drain better (Number 1 rule of plumbing: “stuff” goes downhill), fresh water pickup is at the rear of the fresh tank, AC condensate drains better. -
Poll: Sleeping direction on Ollie LE2 Twin Bed
Townesw replied to DavidS's topic in General Discussion
Head towards the front. We keep our trailer slightly nose high. Sleeping with your head downhill will make you goofy. KountryKamper told me so. Must be true. -
Is that flange solvent welded to the pipe connected to the top of the black tank?
-
Parts list https://www.airxcel.com/docs/default-source/maxxair/fans/maxxfan-deluxe/r-619d_maxxfan-deluxe-xp-08-2017.pdf?sfvrsn=1cc016b_6 Looks like e-trailer has the lift arm https://www.etrailer.com/Accessories-and-Parts/Maxxair/MA10-20222KS.html If you have an older fan you might consider replacing the whole unit. I have hull 313. It doesn’t have a switch for the refrigerator fan. You must have an earlier hull. Maybe someone with the switch will answer.
-
Ours too.
-
Yes, I was a scout also, and then worked with Scouts for about 20 years as an adult. I said I was through sleeping on the ground and bought an Oliver. 😉 We had been at Grand Marais for a few days and were headed back south so we drove past Lakehead Basin and took a look at it then went on out to Park Point Recreation Area and ate lunch. Just scouting out the RV Park to see if we might want to stop there in the future. It really is in a good location. Thanks, Bill
-
KenB Thanks for the information. We camped next to a retired naval architect at Walker, MN. I talked to him a bit about boats, Great Lakes shipping and the Edmund Fitzgerald. He had a boat at Lakehead Basin and said that it was a good place to watch boats come and go. I understand it is nothing but an asphalt parking lot. We stayed at a similar “RV Park”, Liberty Harbor RV Park in Jersey City, NJ just across the Hudson from Manhattan. Wasn’t much of an RV Park but the location was great. Thanks again. By the way, I’ll take a stab at that landmark in your picture in Nancy K.’s thread about Logo Colors back on May 26. Is it The Tooth of Time at Philmont Scout Ranch? Bill
-
I’ll take a stab at that land feature. Is it The Tooth of Time at Philmont Scout Ranch? Bill
-
Has anyone stayed at the Lakehead Boat Basin RV Park in Duluth MN? If so, what did you think? http://www.lakeheadboatbasin.com/rv.html
-
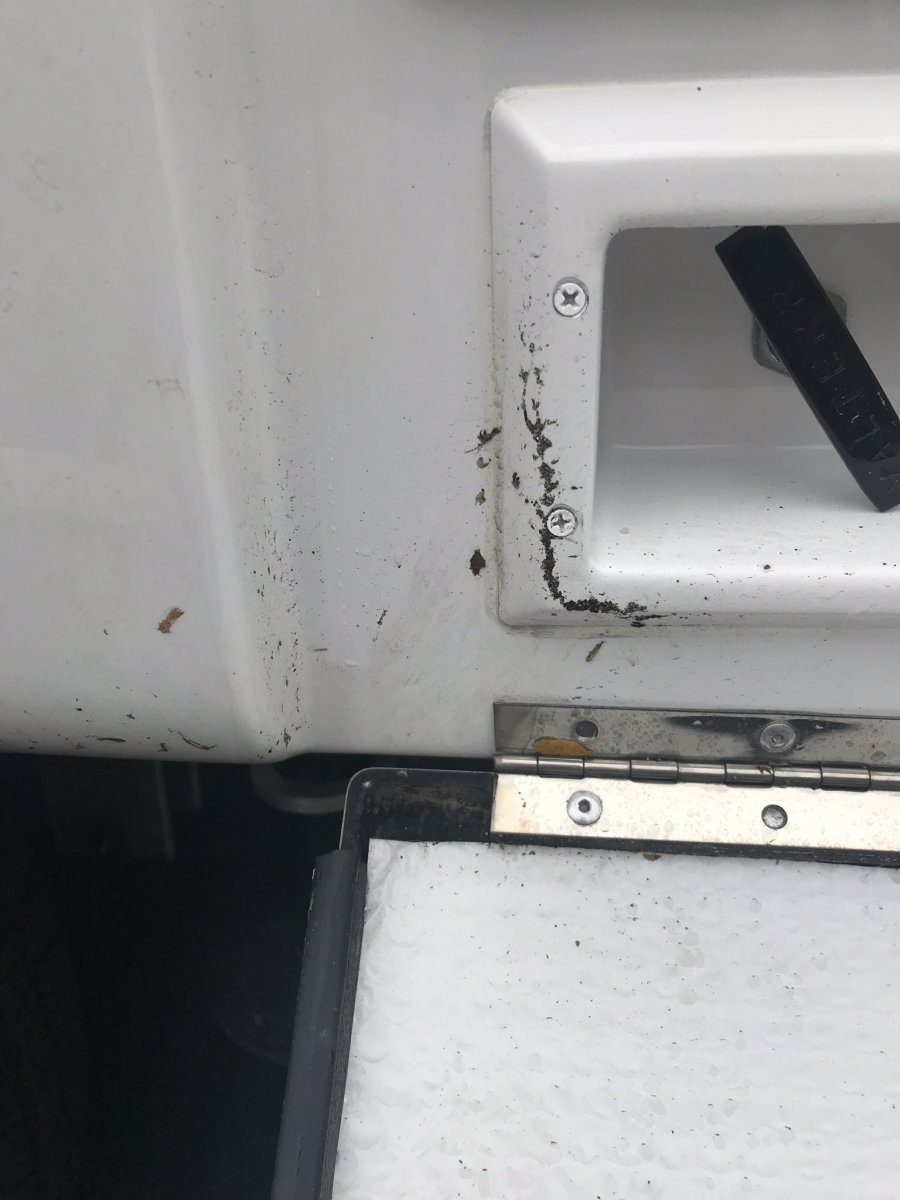
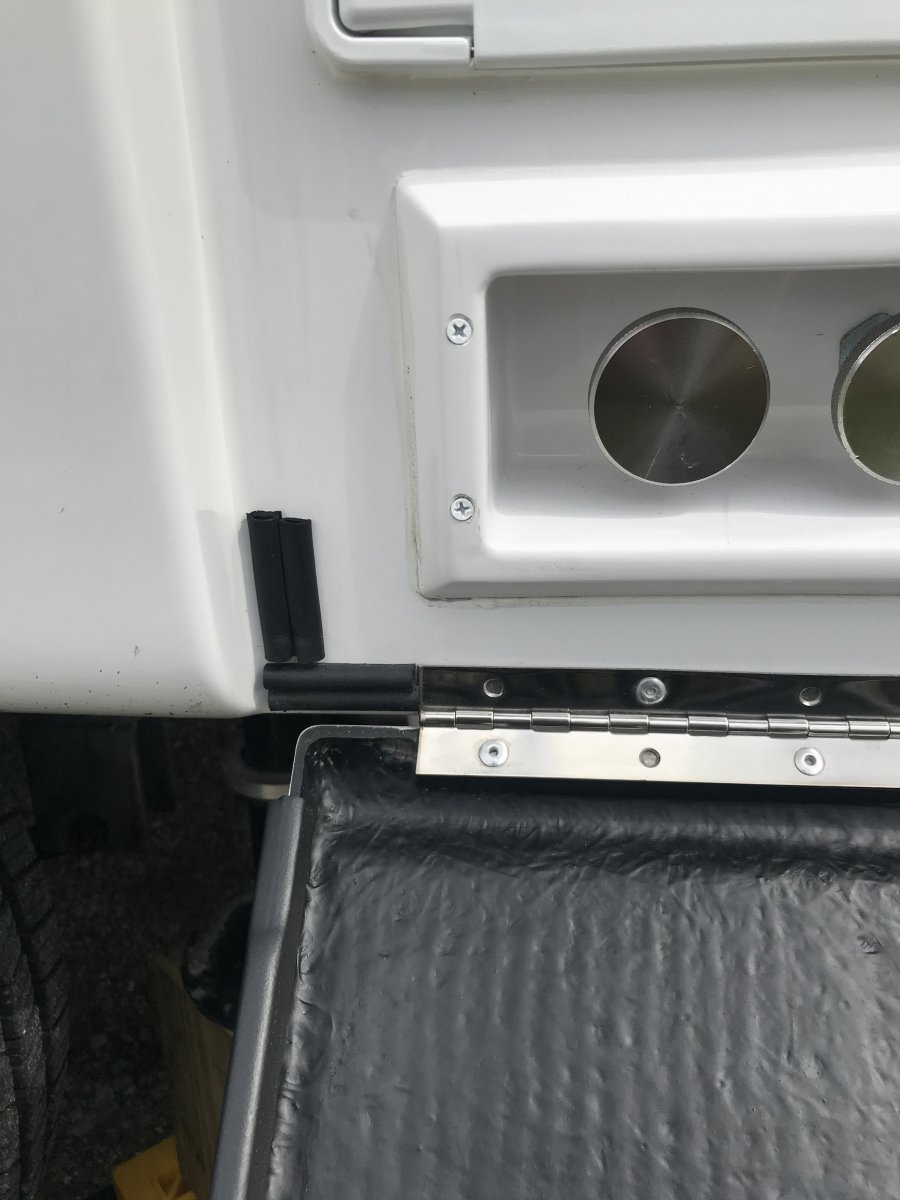
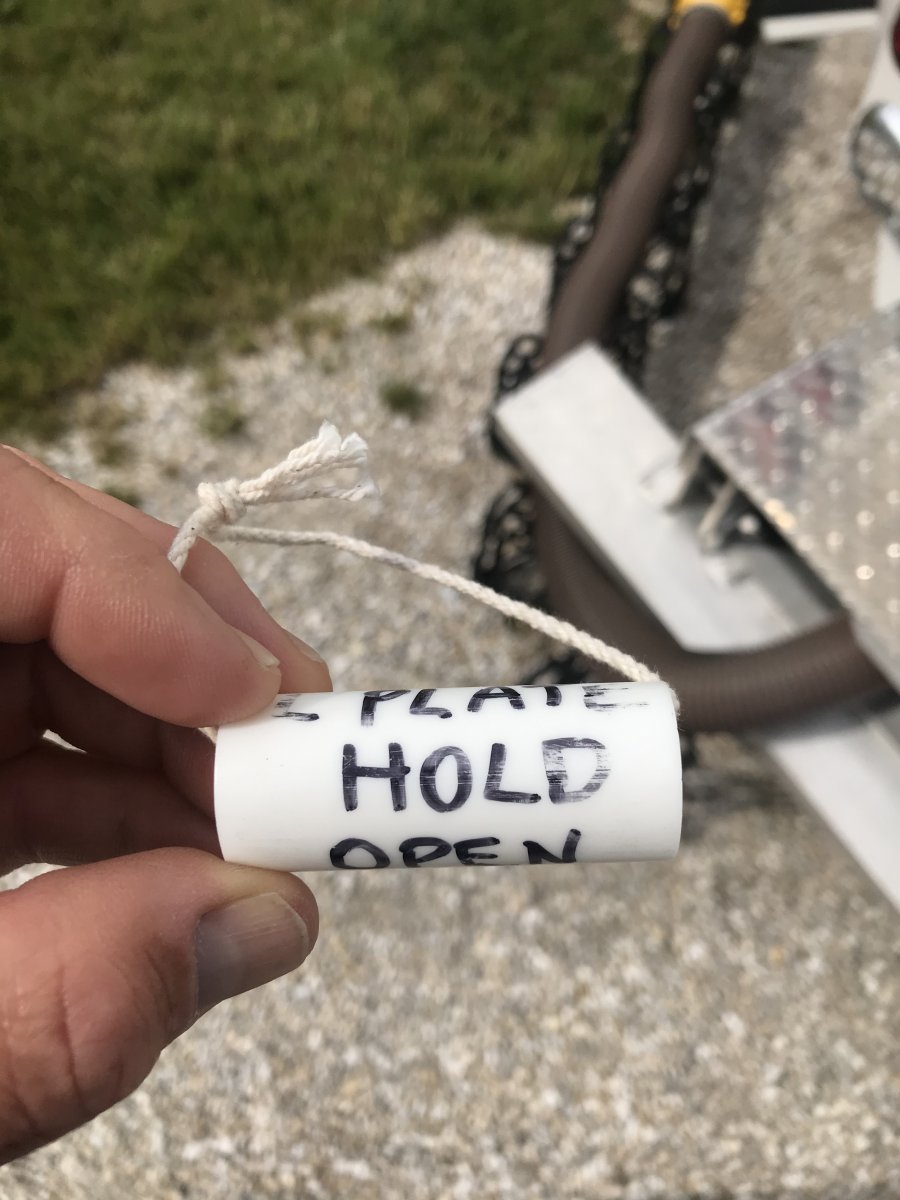
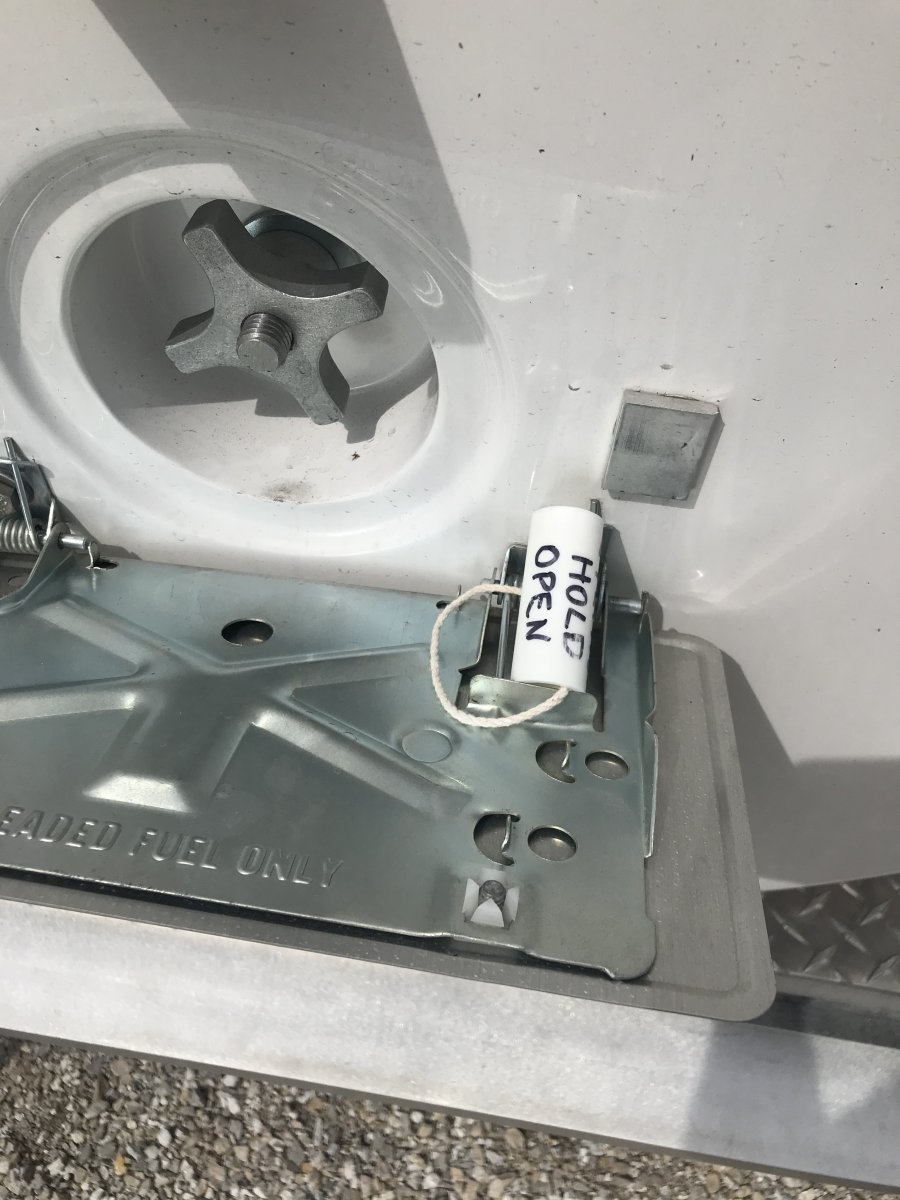
The whole basement area could stand some additional development, from the door to the placement of the valve knobs to the way it’s finished out. You’ll need to get some EPDM foam and seal the front lower corner to prevent road spray from entering. This won’t keep all of the spray out, or keep road grit out of the door hinge, but it will help. Before After Go ahead and remove the insulation and repaint the inside of the door. The insulation keeps the water that gets behind it from drying quickly. The Valterra handles were rubbing the bottom of the recessed handle box and I had read where a couple of people had broken the original handles so I went ahead and replaced mine with stainless steel knobs. Also cut a piece of something like this, I used a piece of PEX tubing And keep it handy to use to hold the license plate door open when you need to remove the spare tire cover or wash behind the license plate. I keep mine just inside the basement door. Back when the gas cap on cars was located under the license plate you would put the gas cap here to hold the plate open while you filled the gas tank. I hope these tips are useful. Bill
-
That MaxxAir fan is also available without the LED light ring https://www.amazon.com/MAXXAIR-VENT-00-03810W-White-Maxxfan/dp/B07TVQF5QD
-
Oh, I fully understand. I operate the same way. If you’ve seen my screen door handle mounting plates you’ll agree. Thanks.
-
Door Window Replacement - Need Window Treatment Idea
Townesw replied to AndrewK's topic in Ollie Modifications
Mossey What is SME? I want to be able to look out the top. This is what KountryKamper did
-
bhncb Please post more info on the PWM controller installation for your Ventline fan.
-
Door Window Replacement - Need Window Treatment Idea
Townesw replied to AndrewK's topic in Ollie Modifications
AndrewK Did you just replace the glass pane and reuse your old frames? Do you think that the shade could be mounted upside down, so that a viewing gap could be left open near the top of the window instead of the bottom? Also noticed that your head bump cushion is missing. It didn’t affect installation or usage of the shade, did it? -
Sign me up. I’m willing to try it. Don’t care for the Ventline. Was going to replace mine when I get home anyway.
-
I’ve said this before and I’ll say it again: it’s absolutely asinine that, as manufactured, you have to open the basement door to pull the dump valves and if it’s raining water runs off the roof onto the open basement door. I know you can add auto drain valves and do other mods to get around this but this design should never have made it into production. And yes, it’s raining right now and I’m having to dump my tanks. Edited to add: Even though this is bothersome, I still wouldn’t trade my Oliver for another RV 🙂
-
I have used the 3M 08984 for years. It’s good stuff.
-
I was also displeased with the documentation provided on Oliver University for the equipment on my Oliver. I took pictures of the identifying information or data plates on each piece of equipment and then downloaded and printed the specific manuals for the model number and, if applicable, the serial number range, for the equipment onboard my trailer. You can often find installation and service manuals also, which will provide more information than is available in owner’s or user’s manuals alone.