Search the Community
Showing results for 'Generator box'.
-

Simple AGM to Lithium Conversion question(s)
Guest replied to Danno and Donna's topic in Mechanical & Technical Tips
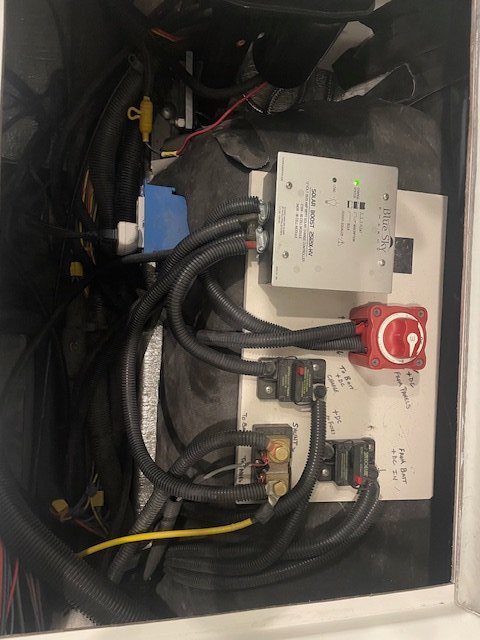
EDITED/UPDATED Group ... apologies for confusion ... I've just discovered I apparently have two accounts/profiles in this forum ... one is displayed as "Danno and Donna" ... the other as FauxPa (an earlier account that I though had been disabled) ... so, postings from either of these profiles/accounts are from the same person Me!) ... going forward I'll post all under "Danno and Donna" ... so sorry! That said ... mmm ... all very intriguing ... here is my street side (under the rear bed) service bay ... from this I can share a number of things ... neither of the suggested TV Charger disconnects (from JD1023 nor mountainoliver earlier in this thread) seem to exist in my Ollie (# 069 2015) ... or, at least I'm not seeing them (my wife gets frustrated when I can't find the ketchup in the Frig - it's always right in front of me!) the busbar in JD1923's pic is not in mine (perhaps located somewhere else in the trailer?) however, there is a busbar in the dinette seat (rear) service bay ... I'm thinking that was either placed the in the original build to better accommodate other customizations, or was moved there later with some other changes the 2nd owner made ... I'll need to chase down some of the wiring on that busbar to see if one of them is, in fact, the TV Charger connection. SIDE NOTE: as I know someone will ask ... the blue junction box in my pic appears to be for 110V power to three tank heaters - 1 ea. for fresh, grey, and black tanks (switches for these are locate in the front closet along with three similar 12V switches) ... I understand these were installed as a customization for the original build/purchaser my #069 has a 2500W COTEK Pure Sine Wave power inverter installed under the dinette seat (rear) - this was either installed as part of the same original build customization, or was installed later (2nd owner?) as a replacement for the original I find the handwritten notes interesting ... apparently someone else was attempting to better understand the wiring/power scheme like me - some of it helpful, some of it confusing.
-

Simple AGM to Lithium Conversion question(s)
mossemi replied to Danno and Donna's topic in Mechanical & Technical Tips
I see that @mountainoliver is a lot faster than I am so there is a lot of duplication in my response. I follow Oliver’s lead for hardware mounting, such as the water pump and or accumulator tank. Although Oliver uses a composite material that is available in larger sheets, I usually use big box stores line of PVC lumber. You can choose from a wide variety of dimensional PVC lumber and put 2 different pieces side by side as needed. After I have decided what size boards I need for the equipment to be mounted, I will determine the location for mounting. Using the top of the wheel well as an example, I will draw an outline of the mounting board on the Reflectix insulation and remove the Reflectix by cutting and scraping to provide a clean surface for J-B Weld epoxy. I like the 10 oz. size, it’s cheaper and stores pretty well. I will roughen the side of the PVC lumber that will be epoxied down, hoping to create better adhesion. I add some weight to the top and let the epoxy cure. Flat surfaces like the top of the wheel well is pretty easy, whereas vertical surfaces are more difficult. Mossey
-

Simple AGM to Lithium Conversion question(s)
jd1923 replied to Danno and Donna's topic in Mechanical & Technical Tips
This is why I did not recognize the wiring in your earlier photo. Also, you have your inverter in this compartment and mine was installed by OTT under the rear side of the dinette. @Ronbrink Unless you purchased yours new, somebody must have added that galvanized threaded pipe mount! I can't imagine a purpose for such a large ugly mount in that location. Glue or tape everything possible, stay away from penetrating the hulls, except if you need to run wires. @mountainoliver has an excellent example and description here! I installed the standard PI EMS (that did not come on older hulls) under the dinette, no mounting plate, laying on the insulation using only carpet tape to seat it. The heavy cables also hold it down and it is a large sealed box having its own base (I have a thread on this install). -

Simple AGM to Lithium Conversion question(s)
mountainoliver replied to Danno and Donna's topic in Mechanical & Technical Tips
The tow vehicle charge wire (the black wire) is attached to an automatic reset circuit breaker. This circuit breaker is located under the pantry side bed close to the battery box. At least that’s where it’s located on my 2017 hull 208. Just remove the black wire and insulate the ring terminal. I used heat shrink to insulate it. Double check that this is correct by checking for voltage at the trailer plug. Checking the correct terminal on the plug there should not be any voltage after you have disconnected the wire from the circuit breaker. Caution: do not remove the lavender or purple wire from the circuit breaker. That wire supplies voltage to the brakes through the emergency disconnect switch located at the tongue. Don’t be tempted to move the purple wire to the other terminal, you don’t want emergency brake power going through a circuit breaker!
-
I looked at these options as well. LUND Fender Well Gun Box | Bass Pro Shops Dee Zee STEEL WHEEL WELL TOOLBOX WITH DRAWERS (5) (DZ95D) | Zoro Then there is this. I like this one the best but it comes with a few problems: Expensive and access. I have a foldable tonneau cover so it isn't a problem. For those that don't have access like that, they will have to crawl in grab it off the wall. Chevrolet Silverado 1500 (2019 - 2023) - BuiltRight Industries
-
I don't have issue with anyone's particular camping style, as long as it doesn't bother others (referring to loud, obnoxious and bright during the night people). Personally, I love being outdoors most of the time. However, I'm not a big fan of heat and humidity and I sweat a lot during the summer. A/C is a must in the southern latitudes, especially at night because I don't particularly sleep well on wet sheets. If I could chase mild climates during the year, I would, leaning more towards colder regions. In Spring, Fall and southern Winters, I will gladly park my rear in a free location and just use the batteries. This is the ideal situation. The Oliver is the first camper I have ever had that contained batteries with enough capacity to boondock effectively. The option I chose when I bought the trailer was 390 ah and 400 watts solar. I believe that if I don't use the A/C, watch TV all night long or run the microwave/convection oven, I will likely never run out of power. Of course, if the weather doesn't cooperate, and the solar panels don't get the optimal amount of sunlight, I will either have to cut back on power output or break out the Cummins generator. Most of the time, I would consider this the backup plan. For this reason, the power cable isn't all that important to me. I suppose I would change my mind if I owned an Airstream with one battery mounted on the front. Those things are dependent on external power sources unless someone refitted them with a much larger battery bank and solar. This is also one of the other reasons I went with Oliver over the Airstream. I don't want to be dependent upon someone else's power.
-
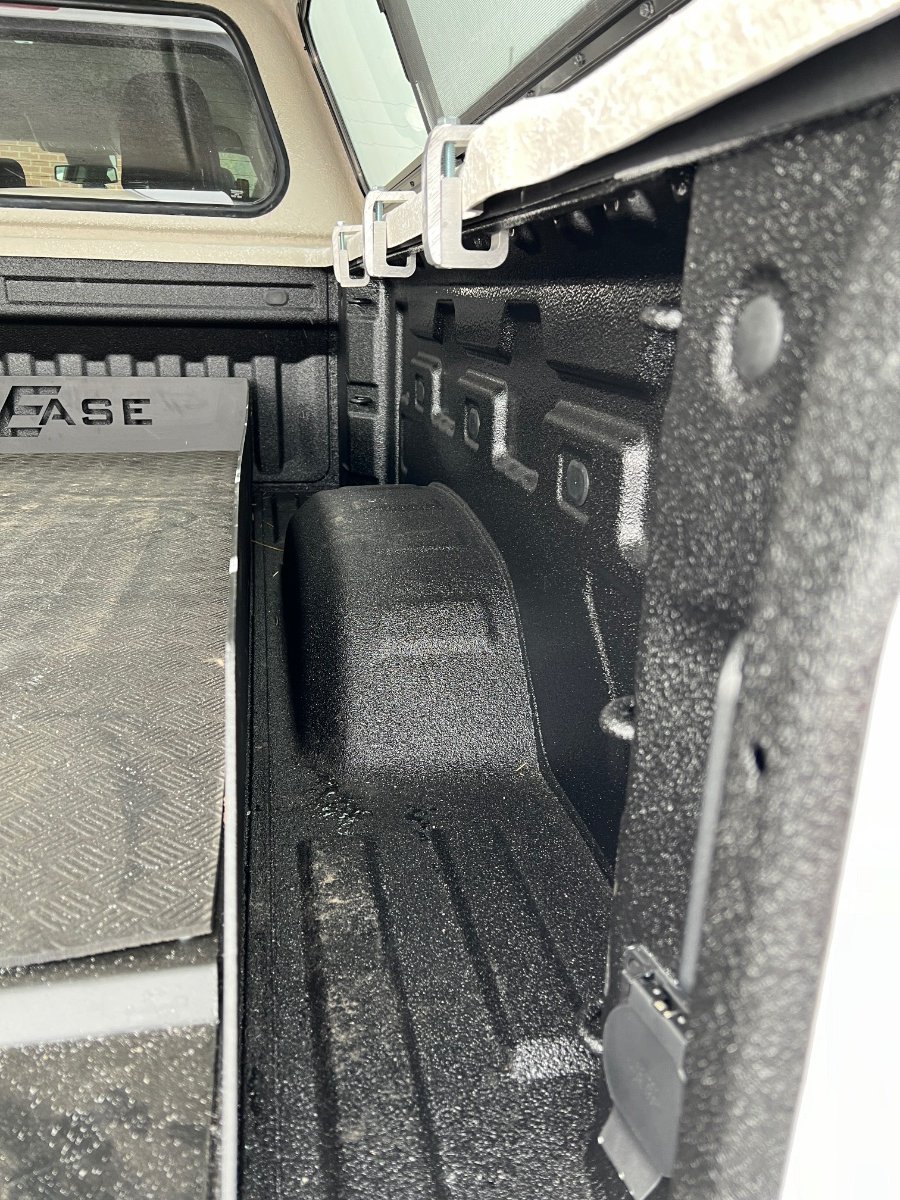
Time to resurrect this thread! I had my truck box sprayed with Line-X, added a cargo ease slide and leer cap Now for those who have a slide, what are you all using for storage on the sides of your slide, the gaps in front and behind the wheel wells? And please if you don’t have a slide, your ideas/suggestions are also welcomed!😊 **FYI, I posted same question here.
-
So here’s the finished product, box, sprayed with Line-X, a Leer cap and cargo glide slide! 🙂 Now, what are you all using for storage on the sides of your slide, the gaps in front and behind the wheel wells?
-
Has anyone installed a Tongue Box on their Oliver? I did not get the basket option. I would like to get a small box to store leveling blocks, etc. that I can lock. I have looked some on -line that are aluminum.......Any recommendations on a box and the install process
-
Looking through this entire post again, I'm now planning on adding the 2" vent to the bath/dinette wall and upper/lower vents to the closet. Anyone have thoughts on adding a vent going through the wall that is under the street-side bed area so air can circulate from the area near the exterior shower region to the floor of the main cabin, directly across from the large return air duct to the furnace that's on the curb side? I'm thinking that with the added 2" bath to dinette vent, the warmed air from the bath would be able to circulate under the street side of the cabin, under the battery box and then be pulled back to the furnace without causing a loss of airflow to the furnace. Am I over thinking this?? albert
-
Your engineer grandson can surely follow the simple wiring diagram posted by Mossemi above to enable you to install much-more-available 12V AGM batteries rather than the harder-to-find 6V AGMs. "4/0" and "6 ga." (or AWG) should be wire sizes with which he is familiar. The key is fitting the replacement batteries into the Elite II battery tray. Once your battery box is re-wired for 12V, your will be set for the next time you need replacement batteries. I recommend you measure the "footprint" of your battery tray, provide it to your engineer grandson, then look for 12V AGM batteries that will fit within that footprint. Since you rarely boondock, maxing out the space available in the battery tray is not essential for you. You just need enough amp hours to get you by when not connected to shore power, not the maximum number of amp hours possible in that space (which is what Oliver does when installing AGMs at the factory). For example, you can buy (3) 100Ah 12V Renogy AGM batteries from HomeDepot.com today and have them shipped to your home, with free delivery. The price is good, at $190 each+tax. They will provide you with 300 Ah of 12V power, which should be fine for your camping style. At 6.9" W x 13.1" D x 8.6" H, all three should fit in your battery tray, it if is the same size as the one in my 2022 Elite II (14.2" W x 21.1" D). See link below: https://www.homedepot.com/p/Renogy-Deep-Cycle-AGM-Battery-12-Volt-100Ah-Safe-Charge-Most-Home-Appliances-for-RV-Off-Grid-Solar-System-Maintenance-Free-BATT-AGM12-100/303412933?source=shoppingads&locale=en-US&srsltid=AfmBOorSneKvTVWw2r3sIKlQ45WwEGlz22BrxiHdIMFves4CLf8EQjveME4#overlay That is what I would do in your shoes. Great price, sensible solution given how you use your Oliver. Once your grandson rewires your battery box for 12V (any additional 4/0 or 6AWG wire needed for the rewire should also be available at any Home Depot retail store), you should be good to go. Good luck! And, please post the solution you end up with.
-
The following information applies to Hull 193. SeeLevel monitors fresh, grey and black water levels and the battery voltage. In order to display that information on my Cerbo GX Touch display, a new SeeLevel display and a modified comm cable from the SeeLevel display to the Cerbo GX was required. Mopeka monitors the propane level of the propane tanks and required a Mopeka Pro Check Universal for steel tanks for each tank to be monitored. RuuviTag's monitor the temperature, humidity, air pressure and motion. I have 3 of this model in Hull 193. The RuuviTag Pro is available in IP67 or IP68/ IP69 versions for wet and rough conditions. I have one IP67 model in the propane box. Mopeka and RuuviTag sensors communicate with the Cerbo GX via bluetooth. I am including some resources that may be of help. Mossey Victron Cerbo GX Links.pdf
-
 You can't run the A/C off any of the non-lithium OEM packages. With the Platinum lithium package you can run the standard A/C for a few hours. But, you still have to put that energy back in the batteries somehow. That leaves you either running the generator or going to full hookups to recharge. In actual usage this summer we ran the generator on the Platinum battery system for about an hour before bed on a few nights of a 2 week trip. The solar wasn't able to to completely replace those watts the next day but we had enough total capacity to get through the trip without needing the generator. In other words, we were able to run the A/C off battery for short periods on the really bad nights. I think each hour used roughly 10% of our total capacity. When I get a chance, I'll check my notes.
 -

Simple AGM to Lithium Conversion question(s)
Ollie-Haus replied to Danno and Donna's topic in Mechanical & Technical Tips
I personally like the simplicity of the single battery option. The odds of a single battery failure in a multiple lithium system seems unlikely. If you do something wrong that will destroy a battery, both will be effected the same. Besides as you said, the generator is a satisfactory backup. I like simple when it's possible. -
 mossemi - "added a toggle switch to the charge line. This makes in available for future use if needed " ... this is a great idea ... how/where did you install it? (in the tow vehicle? the camper? what type of switch - part# perhaps) mountainoliver - "if one big battery fails you’ll be out of luck" ... great point - I hadn't thought about that ... a single point of failure ... I'll have to think that thru a bit ... I would assume I could use my generator for emergency power eve if the LI battery fails ... thoughts? mountainoliver - "lithium batteries like to be in a comfortable temperature range" - ... the Epoch comes with heating. However, I want to confirm the specs on this with the supplier - wondering if the heater work automatically (thermostat?), or if there are other considerations (I live in Pittsburgh where it gets quite chilly in the winters) Thanks, again, everyone ... what a great community we have! Cheers, -Dan
 -
Thanks Fellas - exactly the kind of info I'm looking for! I'm leaning toward a single Epoch 12v 460Ah (https://www.epochbatteries.com/products/12v-460ah-lifepo4-battery-ip67-heated-bluetooth-victron-comms ) ... a single unit so no series/parallel wiring needed - should be a straight switch of the Neg/Pos from the dual 6V series/parallel to the single Neg/Pos poles of the new Epoch (am I missing something on this?). So, no new cable should be needed and, in fact, I can do away with all of the series/parallel interconnects - will certainly make the battery compartment much neater. I can easily switch the shore power charger to LI and I'll connect with the BlueSky folks to confirm the settings (might be a bit different than with you aforementioned (3) BattleBorns?). Getting really excited, too, about the economics of this. (4) Trojan t-105 6V AGMs = around $1200 - $1400 for (1) Epoch 460Ah = around $2000 So, for me the add'l cost to upgrade to Lithium amounts to only $600 to $800 ... makes the upgrade very palatable! One other item I've uncovered is that Charging the Lithium from the Tow Vehicle is questionable in this arrangement ... anyone with thoughts? ... worst case scenario I can disable the tow vehicle charging (remove/cut the specific wire from th7-pin?) and, in emergency, recharge using a generator?
-
Mopeka only monitors the propane tanks. They are magnetic and stick to the bottom of the propane tanks. RuuviTags are from Finland and that is where I got mine. They have been around long enough to be sold on the web. Check out the web site and compare packaging and photos. The black one with mounting ears is the 3 in 1 and is weatherproof. That’s the one I have in the propane box. My others are all white and the have silicone holders much like Apple Air Tags you find on Amazon. Mossey
-
 I have a follow up to my Bonding Plug post question. I need to fix the generator which is a Powermate 2000 (about 7 years old). I bought it for $20. The guy tried to start it 3 years ago and could not get it started. He set it aside for the last 3 years and the engine is now seized up and all the gas in the tank evaporated. I am guessing the carb may also be gummed up. I took out the spark plug and poured in some Marvel Mystery Oil into the cylinder, after Googling how to fix a seized engine cylinder and talking to another Mainer that has run into this situation in the past. Hopefull after 2 or 3 days or 4 or 5 days it will loosen up the piston. I really do not want to take off the cylinder head if the Mystery Oil does not work. If I can not free up the cylinder, I may just take the generator to the metal recycle dump. If anyone has any ideas on freeing up the cylinder or clearing the carb (short of taking the carb apart), please let me know. Thanks
 -
Your observations on the inferior design of the HVAC (furnace) "system" is spot on. I think Oliver has maybe not given this issue sufficient design attention because a large proportion of Oliver Owners probably winterize their trailers and don't care much about the furnace. I use my Oliver throughout the year, store outside, and do not winterize. My primary concern is the ability to keep the plumbing from freezing even when the cabin is warm. I have placed internet connected thermometers in the basement by the outside shower hoses and other spots, and found that the basement temperatures can fall to 30 degrees or more below the cabin temperatures when outside air temps drop into the low 20's or teens. I found that if the outside temperatures go very much below freezing, I have to keep the cabin at least 65 degrees to keep most of the basement areas (except for right around the furnace itself) above freezing. I determined the problem is insufficient warm air circulation through the basement (i.e., no return air vents in the front of the trailer (bathroom). Oliver did add a small return air vent in the bathroom in more recent models. I have resisted running new ductwork or cutting holes in the trailer to address this while I studied the issue in the field. Finally, and just recently, I tried a non-invasive hack that appears upon initial testing to work quite well. The outside temperatures last week dipped into the mid-teens for several days, yet my basement temps stayed within 15 degrees of the cabin temps (the Oliver was in outside storage). I am heading out next week and will test the cabin and bathroom comfort in temperatures expected to be just below freezing, and I expect to find a much warmer bathroom and more comfortable trailer, as well as the warmer basement temps. What I finally did was easy. I removed the "front bottle plate" from the bathroom vanity and disconnected the flex duct from the bathroom vent, creating a 3'' (or 4") return air vent in the bathroom. I then left the disconnected air duct loose under the sink to put extra heat into the front of the basement. Combined with the new return air vent in the bathroom, the warm cabin air flows forward into the bathroom and the warm air bathroom air is pulled under the bathroom and shower to be slowly circulated from front of the basement to the back of the basement when the furnace fan is running, more effectively heating all the plumbing and battery box. I do need to keep the bathroom door cracked (but not open) for this to work, unless or until I install a vent between the bathroom and main cabin. I am not sure if a functional return vent like this would cause problems in Olivers with the composting toilet. I have the standard toilet.
-
Our TST repeater came with ring terminals already crimped on, so we bolted them directly to the battery terminals, arranged so they're not between the battery terminal and the 4/0 cables the bolts hold down. We don't want the ring terminals to conduct current between the battery and the inverter/charger. This thread got me curious, so I looked up TST's repeater instructions online, which doesn't mention mounting the repeater close to the wheels. I was certain I was following this direction when I installed it, so I found the original documents that came with the kit. There's a separate card describing the preferred mounting location as "FOR BEST RESULTS MOUNT IN BATTERY BOX CLOSEST TO THE WHEELS". I suppose the battery box is on the tongue of most trailers, so "closest to wheels" was probably meant to avoid mounting where the battery shields the repeater from the sensors. Of course, for our trailers the battery box is close to the wheels. It works fine. Steve Repeater insert.pdfTST-Repeater.pdf
-
It looks like you have Hull #113. There have been many changes through the years to the trailers. Ours has a heat outlet just under the toilet paper holder in the vanity of the bathroom which keeps the bath quite nice and warm. I'm sure many will comment on your post over the next day or two, but my guess is that the problem you are describing is unique to the older units. There have been many threads posted on increasing the heat to various locations in the trailers. Paste this into the search bar (in the upper right corner of this page) for an interesting modification to help increase the heating to the street side under the bed and battery box, It could be extended to include the bathroom with only minimal effort I expect. Paste: "Breaking Subzero" Include the quotes to help limit what is retrieved. the thread was posted by: By Minnesota Oli February 11, 2021 in Ollie Modifications Good luck and please keep us posted on what you do albert
-
Thanks for the kind words. Sorry, I don’t document my projects very well. The MOP's I’ve written have always been from my point of view and I have a difficult time writing them so everybody can follow my thoughts. A little history of how I got to this point. My Xantrex 2000 ProWatt inverter failed in my second year of ownership and I wasn’t confident enough to start buying Victron gear and putting in a Multi Plus instead of another Xantrex. When one of my Trojan 105's failed, I moved to 2 Battle Borns and added a BMV 712. The Smart Shunt was not available and I never have really used the 712 display, it’s always been mounted in the below the seating/sleeping area’s. So I used an old cellular phone and Bluetooth to communicate with the 712. I also have tested the Bluetooth by moving the 712 display high and low and RF always propagate's better with elevation. Moving on, I used a Raspberry Pi micro computer and display running Victron software. That was a $400 experiment that just wetted my appetite for more Victron gear. Because I was already running Victron software, I was aware of Victron's plans to integrate SeeLevel, Mopeka and Ruuvi sensors and decided to upgrade to a Cerbo GX with a 7 inch display. The Ruuvi tags were the easiest add and the Mopeka was pretty simple as well. The SeeLevel required a new display and a modified Comm cable. Some place along this journey I also added a Victron MPPT 150/45 SC and two 90 watt solar panels and a third Battle Born. I'm never satisfied with the mods I do, so things are in a state of flux most of the time. And I failed planning one 0 one. Enough about my limitations! There is a Ruuvi sensor in the fridge, on the kitchen counter, tie wrapped to the SS jack post and the fourth is in the Propane box for outside temp readings. I am adding some locations for information on items you mentioned. Victron's community forum is a great place for answers and don’t forget the Air forums. There are some very smart people there with Victron gear.
-
When you take a look inside you will see that the microwave has a sheet metal piece attached to the bottom that extends about 5/8 inch from the bottom of the microwave. Then there are four rubber feet - one at each corner - that extends another 5/8 or so for a total of 1 1/4 to 1 1/2 inches. As I remember, I used scrap 2 x 4 around the bottom to wedge around that wood box and under the microwave until the wedges hit the rubber feet. Then where that didn't fit I shaved off slices (using my radial arm saw) until it was tight. Pay attention to the fore/aft movement - you can wedge wood not only against the rubber feet but also between the sheet metal at the base of the microwave and the front of the interior cabinet. I did not drill into anything - the simple wedging did the trick. Once you get the trim piece off, you will see that the "metal" is actually very thin and only supported via the plastic framing. There really isn't much metal there at all. Bill p.s. in wedging the material around the unit I used a small hammer to tap the wedges into place. Small because of the working space and I didn't want to bend anything out of shape on the microwave. However, I did want to have the wedges very snug. Finally, when I was satisfied I drilled four holes in the front of the face plate and screwed directly through the fiberglass into the wood box. Then I used screw covers to "hide" and dress up the screws. No one has ever commented that the covers look out of place.
-

Pepwave Cellular Router Installation
Steve Morris replied to Wildbrew's topic in Ollie Modifications
@Wildbrew It does, and thank you very much! I'm surprised to see that you only needed a one inch bulkhead fitting to feed the seven antenna cables through. I figured I'd need 1'1/2 or 2". I've seen people use a 1-1/2" PVC pipe through the roof and sealed well inside and out, and sticking up enough into a junction box that a little water in the box wouldn't spill into the open pipe. But that never looked like a solid enough connection to the hull to me. Here's an interesting option for mounting the antenna, too. I got the magnetic base option on the antenna, as I didn't know how I was going to mount it. MMH says you can go from the magnetic base to the standard, but not the other way 'round, so I went with the magnetic just in case. I could use it on top of a junction box to get a little more height. I planned to use this mount on the inside of the rear awning mount to get additional height and move it as far away from the air conditioner as possible. But it sounds as if yours is working fine right beside the AC, so maybe I'm overly concerned with the separation. Bill, it is just an alternative to the Oliver optional internet package, but with more modern (and upgradable) components.
-
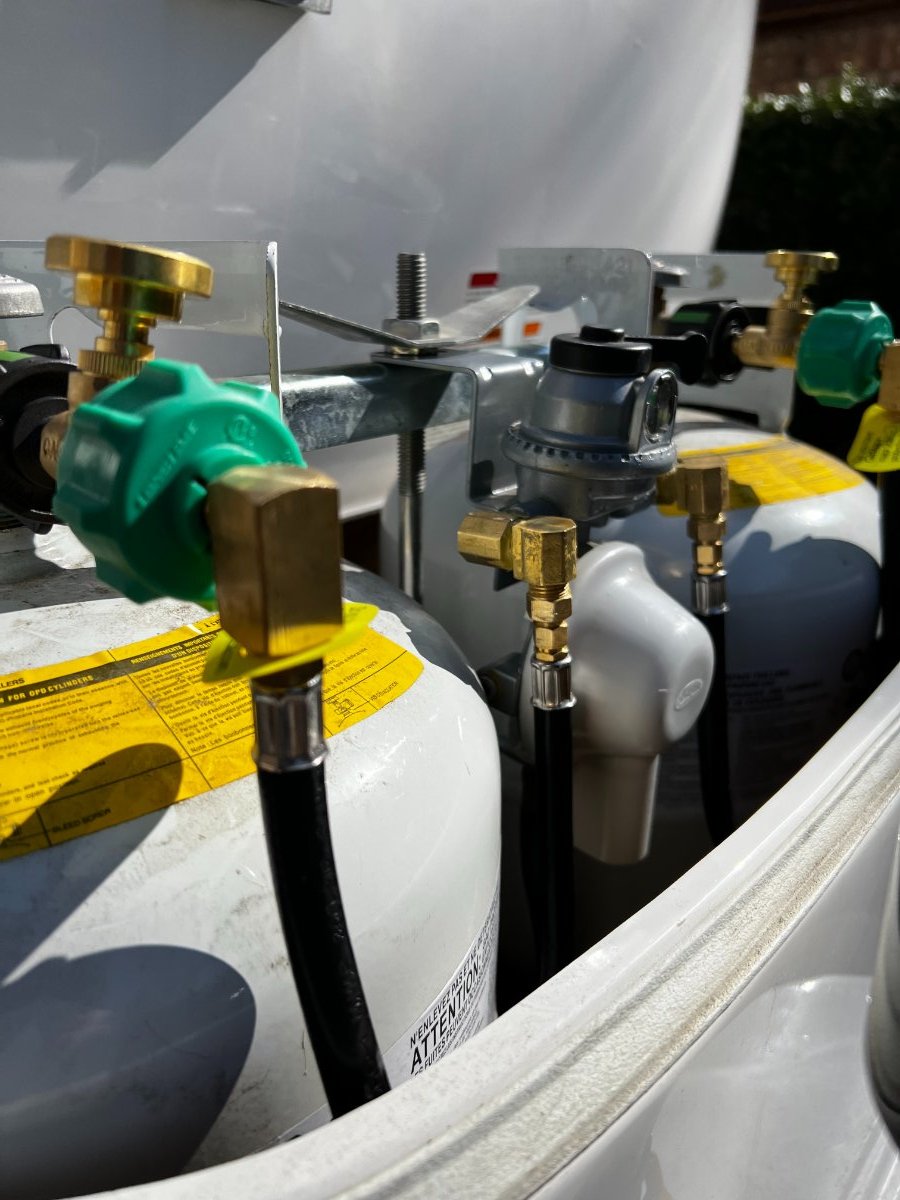
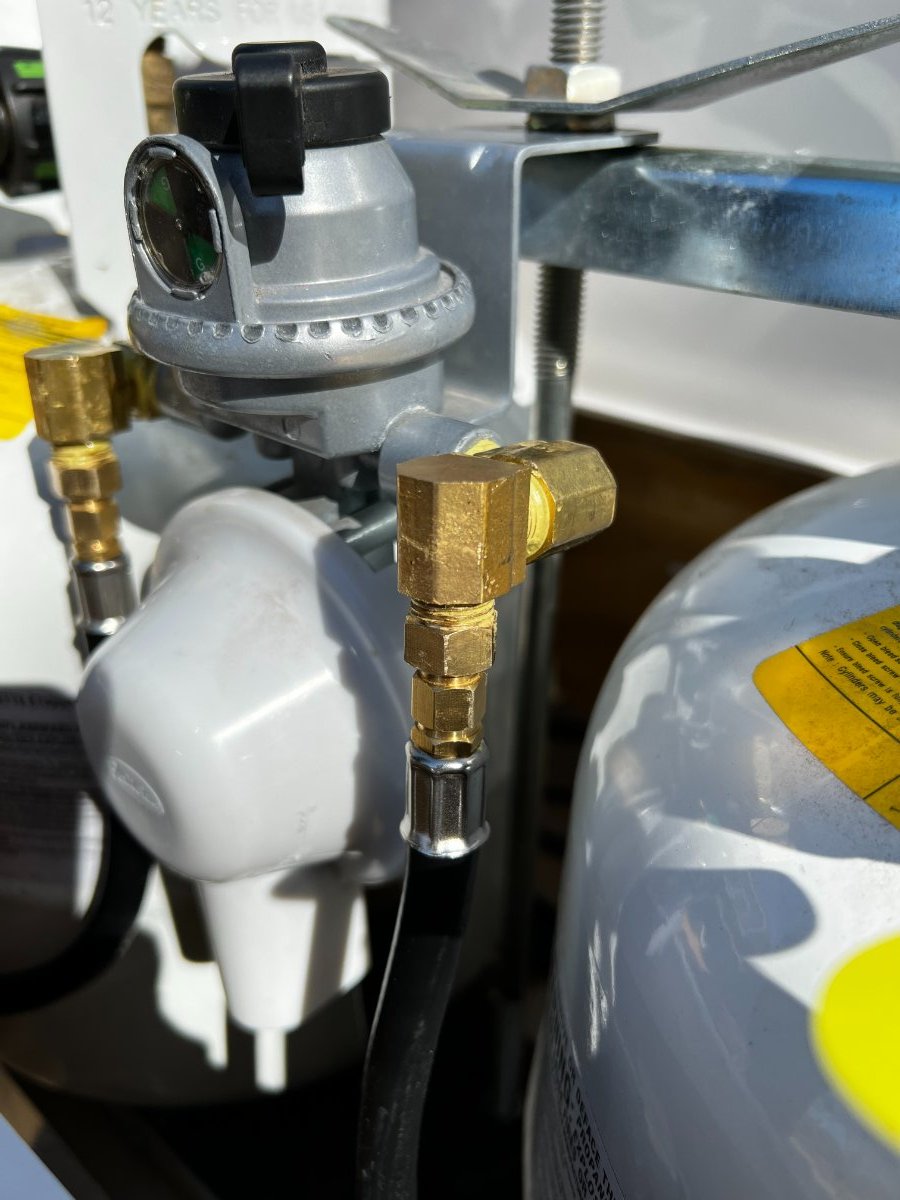
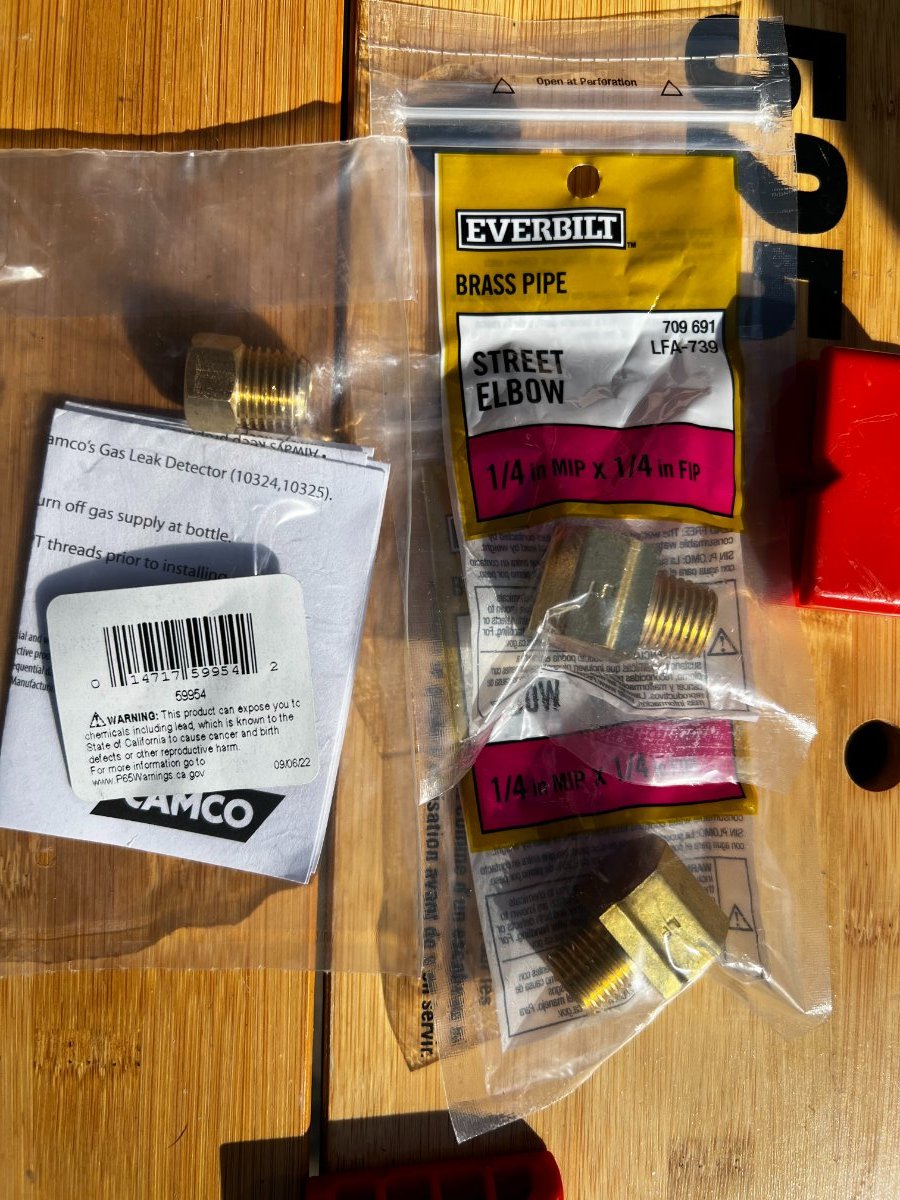
 After reading @VBistro's excellent write up ( Propane Tank Mod - Installation of GasStop Valves ) on adding GasStop safety valves to LE II Hull #953 I decided that I wanted to tackle that on "Reset" LE I Hull #1030. However, as LE I owners know on the forum, what working on an LE II may or may not work on an LE I. When I put the gas stops on the LE I it was apparent that the LE I has a shorter propane box than the LE II, making the end of the hoses stick out of the box and preventing the lid from fitting correctly. I had to pull the GasStop valves off and re-evaluate. I really wanted those GasStop units on there. 🙂 Tried re-orienting the tanks, shifting hoses, etc. but nothing worked. So, I started digging around and found hoses with 90-degree heads. That solved the distance to the front problem. However – the replacement hose length was longer than the original hoses and ended up with a second bend in the line that – while technically within spec – did not make me happy for having done the work. So here is the solution that I finally came up with. Be aware that there are a good number of joints here – make sure you are comfortable with (1) gas, (2) wrenches, (3) Sealing cream or tape for gas, and that you test for leaks on each and every joint. Soapy water works great, if you know a home brewer or commercial kitchen operator Star San bubbles like crazy at the smallest leak and is a literal lifesaver in this case. Of specific note: This bit of info from @John E Davies is critical. At least for me, when I removed the old hoses, I could not get the old check valve off. It was so tightly sealed that I initially assumed that it was part of the original hose. I am including the replacement for the check valve in the parts as you will need to be able to remove it and palace it on the new 90-degree hose, or put a replacement on the new hose. Parts List (I have referenced Manufacturer Websites, most are available through Amazon as well) Quantity is for both tanks. 1) 2 GasStop Propane Shut-off Valves - Qty 2 GasStop – Use Gas Safer With GasStop (gasstopusa.com) https://gasstopusa.com/ 2) 90° Propane Pigtail Hose (12″, Rubber) - Qty 2 Product details – GasGear (gas-gear.com) https://gas-gear.com/product-details/#product1 3) ¼” NPT BRASS Street Elbows (double-check the size of your particular fitting) - Qty 4 Everbilt 1/4 in. MIP x 1/4 in. FIP 90-Degree Brass Street Elbow Fitting 802099 - The Home Depot https://www.homedepot.com/p/Everbilt-1-4-in-MIP-x-1-4-in-FIP-90-Degree-Brass-Street-Elbow-Fitting-802099/300095976 4) Pipe Thread Sealant (specifically formulated for gasses) -Qty 1 RectorSeal 1.75 oz. #5 Pipe Thread Sealant 25790 - The Home Depot https://www.homedepot.com/p/RectorSeal-1-75-oz-5-Pipe-Thread-Sealant-25790/100144191 5) Low Pressure Fitting - 1 / 4" M NPT x 1 / 4" F Inverted Flare w / Check Valve - Qty 2 Low Pressure Fitting (camco.net) https://www.camco.net/low-pressure-fitting-1-4-m-npt-x-1-4-f-inverted-flare-w-check-valve-59954 Method (Copied and expanded from original post) Detach propane hose from the ¼” straight NPT fitting at the regulator Remove the straight ¼” fitting at the low pressure regulator Remove the ACME connection at the propane tank Clean as much old pipe thread sealant as you can from both the regulator side and the hose side, being careful not to let any shavings enter the regulator Apply thread sealant to the male end of the new elbow fitting and install it at the low pressure regulator. Tighten to position the female end away from the trailer, toward the hitch. Place a second elbow fitting into the first, applying thread sealant to the male end. Tighten to position the female end pointing downward. This next step represents a preference thing for me. I feel that attaching the check valve to the new 90 degree hose before attaching the hose to the downward facing female elbow works better, as the end of the hose is an odd size for which I did not have a wrench requiring me to use an adjustable crescent wrench. Proper tool may be a small pipe wrench, which was not to hand. As always, apply sealant to the male threads and tighten firmly. Apply thread sealant to the check fitting’s male end and screw it onto the street elbow. You can use a pipe or crescent wrench to snug this connection. This is the connection where I ended up with a leak, as the dangling hose can make you think that you have it connected but in realith the hose is just binding. Re-attach gas stop to propane tank and new 90 degree hose to gas stop. Let sealant cure for 24 hours Pressurize system and leak test! Note – if your tank is full and the gas stop shows “low” this is a good indication of a leak. Here are some photos of the finished project. Again thanks to @VBistro, @MarkV, and @John E Davies for the original post and follow-ups for this great idea. I hope this helps LE I owners in making this modification to their Oliver.