Leaderboard


Popular Content
Showing content with the highest reputation on 03/28/2021 in all areas
-
That's what it was. Hidden setting in the menu. It's fixed now.4 points
-
Sorry, but I didn't personally find that "snarky" at all. Just another opinion. It looks nice, and fits in your basket. I can find the same container at my locally owned Ace for $11 less, and, I do try to support my local store. I so often find them helpful, and handy. But, I, too, spend quite a bit on Amazon. It just depends. Shipping cost can sometimes really drive up the price on bulky items at Amazon, and even some of the big box stores.3 points
-
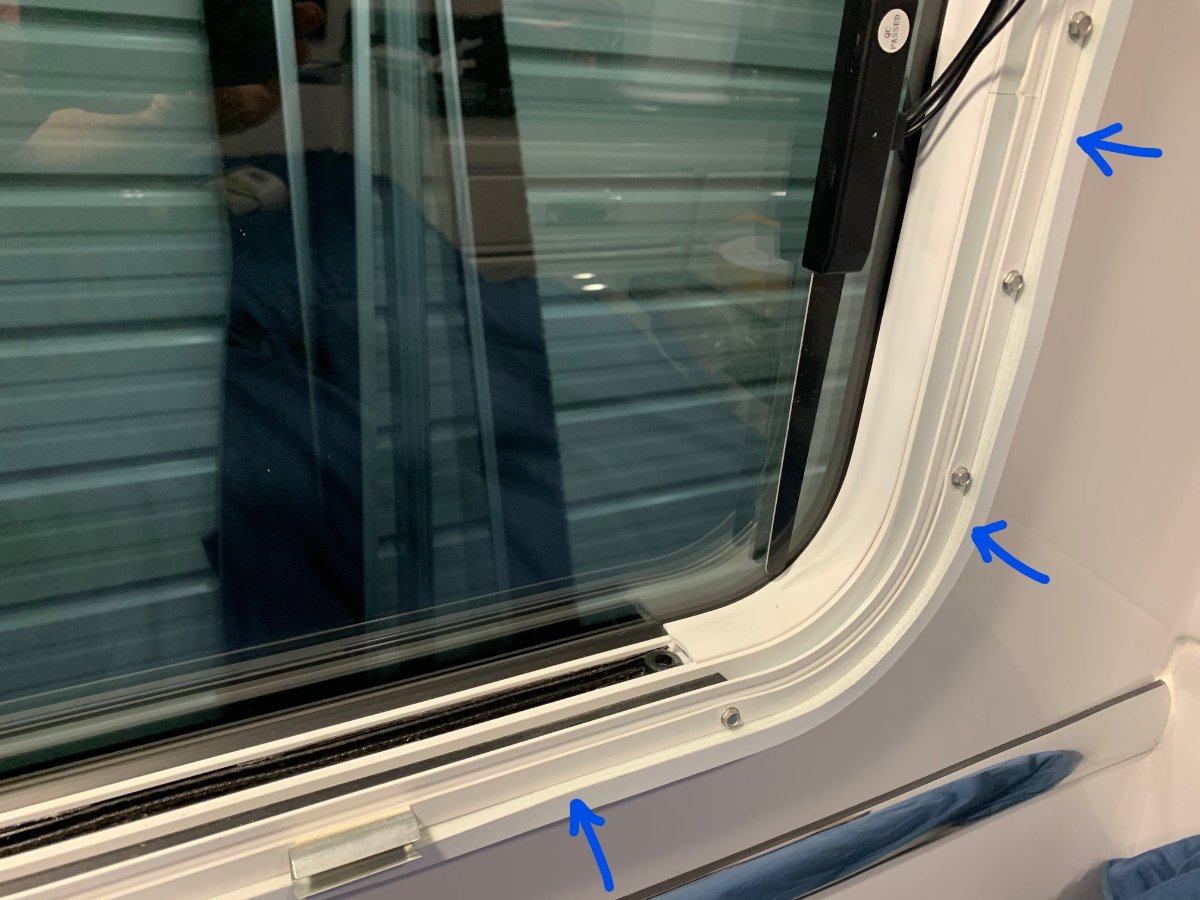
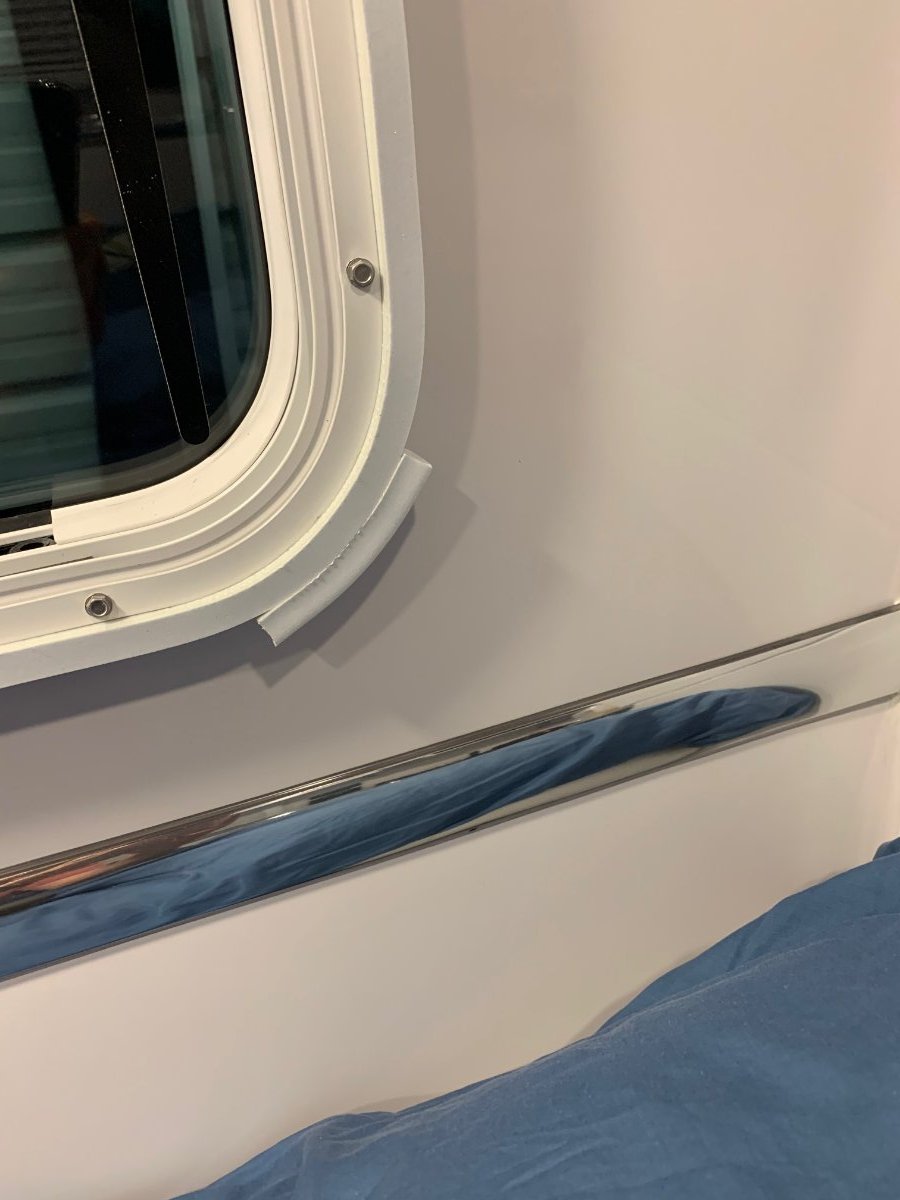
I'm guessing there are lots of owners out there who have figured out various methods to either insulate, black out or do both to their windows. I'll share what I did - it was pretty simple and fairly inexpensive. The materials I used were a roll of Reflectix BP48010 Double Pack Insulation, 48 in. x 10 ft and a pack of White Foam Strips with Adhesive - 2 rolls, 1/2" x 1/2" for each large window (I'll reply to this post with an update on the back window, which is a different design). I took my window frames out and measured and cut the reflectix to fit inside snugly, even a bit oversize to make sure it insulates well and blocks all light. With the reflectix only in the window, I could feel hot air coming up through the crack and I could also see light coming through when the cabin was dark. To fix both those issues I used the foam strip to go around the outside edge of the window, leaving 1/4" overhanging the ledge. This overhang will fill the small gap(s) that exist between the shade frame and the window frame. It took one pack of foam strip per "large" window (with a small amount left over), so 3 packs total if you want to do all of them. I also found that there was still a small gap in each corner where the shade frame is more square, so I used a small piece of foam on each corner: Then I put the window frame back in and reinstalled the reflectix to make sure everything fit nicely: And the blind will further secure and snug everything up: Voila... no more hot/cold air or light penetration from the windows if you don't want it. The stripping is "permanent" in that it won't be removed on purpose but the relectrix can be put in and taken out as needed. When not in use I roll it up and it stores nicely in the basement.
 2 points
 -
PMG - You might find all the information (and more) by using the "Search" function at the top of the page. For instance - THIS is the kind of result you will find with regards to mattresses to include the KTT. Happy reading! Bill2 points
-
Phone calls are cheap. I always try to support are local brick and mortar stores. Some day you might miss them.2 points
-
When I was using a Toyota Sequoia as my TV, I needed all seven threads on the Anderson chains to level things out. During year two, I approached a parts store entrance where there was a significant grade change from the road. At less than 5 MPH, when my TV went nose higher, I heard noise from the trailer that caused me to stop. I saw that the Anderson chains were really really really tight. I gave them the 245 pound bounce test, they did not move at all. I backed out of the driveway, and loosened the Anderson chain nuts 4 threads and tried again. I stopped at the same place and did another bounce test. This time they could be moved just a bit. To get into the driveway, I had to loosen them to full slack. Point is that a quick grade change will increase or decrease your Anderson chain tension. If your chains are set real tight, and you add to their load a grade change, it can be enough to damage your quick link(s).2 points
-
The lack of documentation in the current owners manual is a significant downgrade for the trailers themselves. It's a shame that Oliver doesn't see it that way.2 points
-
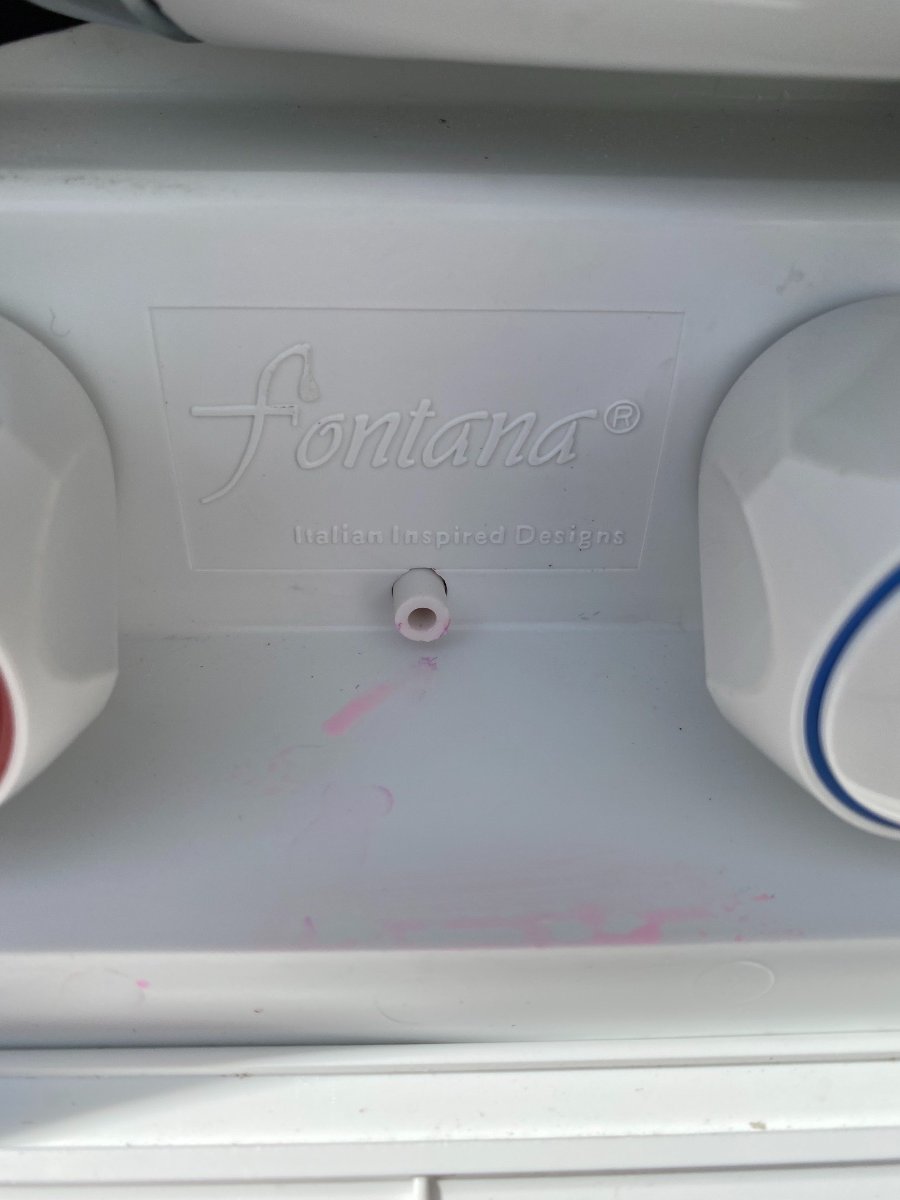
There’s a small tube on the outside shower receptacle between the hot and cold knobs. I’ve noticed a few small drops of the winterizing solution dripping out of this tube. Is that normal? I don’t see the details anywhere in the instructions of what that little tube is, or where it’s connected to. Is that small amount of dripping normal? The ITC webpage mentions that this faucet does have an anti-siphon vacuum breaker feature to prevent backflow to the fresh water tank. So may be something to do with that.
1 point
-
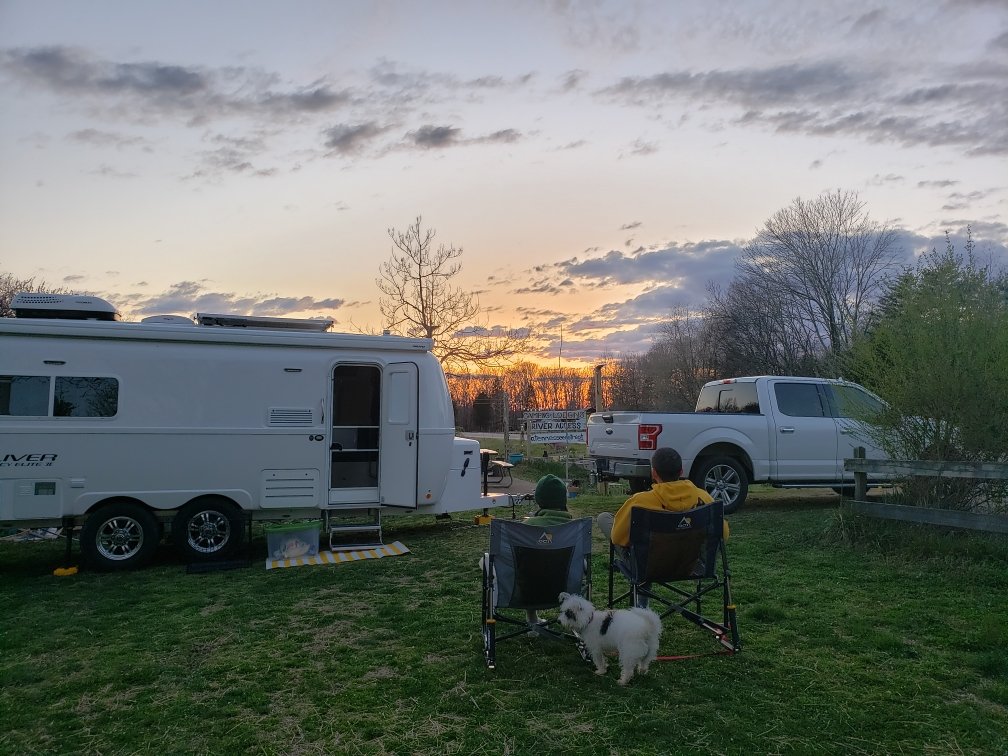
We picked up our camper on Friday of last week (March 19th 2021), and after a fairly long day of questions, tutorials, etc we set out on the Natchez Trace for our first night at Davey Crockett, followed by heading back north to where we are now, and will stay until Easter. Thanks to everyone who has answered my questions over the past year or so. Every one of your answers has helped my wife and I (and our dog valentine) get to this point and we love our camper so far.
1 point
-
(¡Overland! Me encanta su uso de la lengua linda... ) We hope there will be some get-togethers to share expertise and stories... We’ve both been vaccinated and still wear masks and are cautious... but SO looking forward to Ollie Interaction.1 point
-
A simple click modern technology love it . It’s back. Thank you1 point
-
As a reminder, please be considerate and do not choose a map size larger than medium. Actually, because so many people view the site from their phone, the smallest size is preferable, and is perfectly viewable. Some of the maps I'm seeing lately are literally the size of an 8 1/2 x 11 sheet of paper on my monitor. We all like seeing where you've been, but no one is *that* interested. The pull down menu to choose your map size is located right above the button to create your map.
1 point
-
Excellent - thanks!1 point
-
I am going to take the minimum stance. Oliver supplies you with a decent starter "kit" to get operating. Sheets, dishes, and all the other stuff - is very subjective. Every one of us has stuff we purchased - and don't use (if ever). Take a very minimum starter set of the "other" and pick up what you find you need as you go. One is very seldom far from a store that has the basics. Look at all the suggestions - and evaluate as you gain experience. Chocks, leveling blocks, etc.., just depends on what you like - I have found the Anderson stuff very useful, along with some home made 6x6 blocks. But you may find other to your liking. Just ignore this post if you have excess $$ and like to buy stuff that looks needy - but is in fact - not. Enjoy the process Supersize Life - a blog that has some tried and true examples. https://supersizelife.com/ RB1 point
-
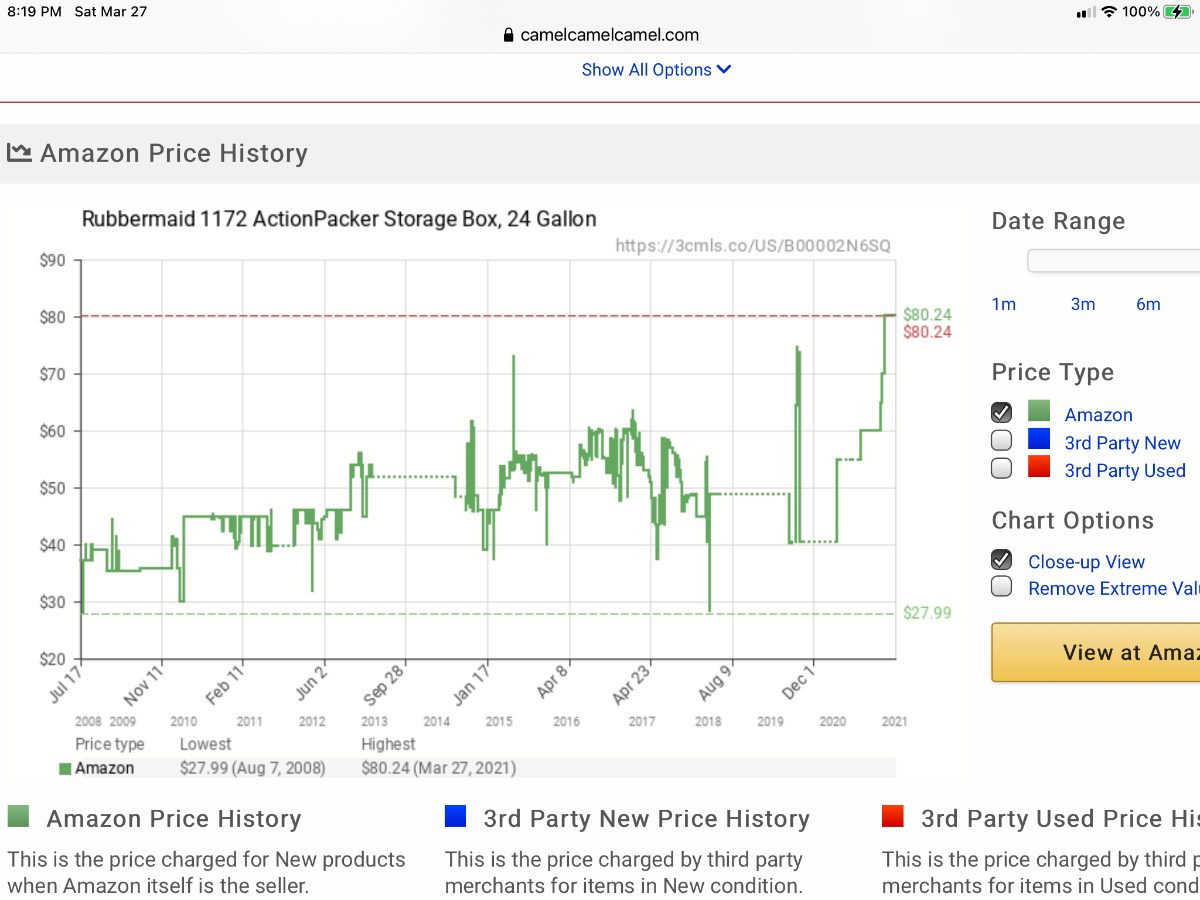
I ordered this Rubbermaid 24 gallon storage container thanks to a post by another owner on the Ollie FB page. I think will work fine for carrying our Andersen chocks, jack blocks and other initial trailer set items while freeing up even more room in the truck bed. I will post a review of how much gear it will hold after it arrives.
1 point
-
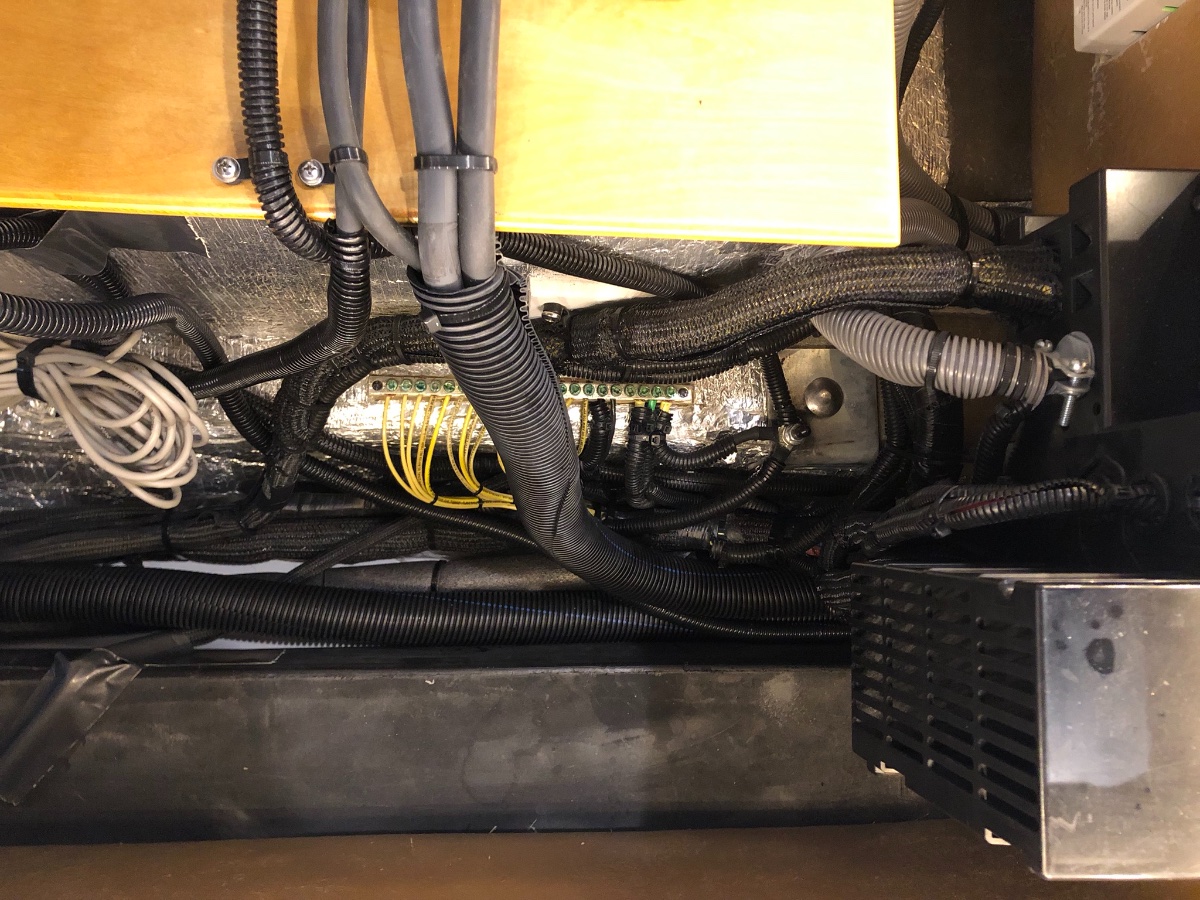
I doubt if any of the front marker lights would be connected to the attic bus bar in the back. I think JRK is referring specifically to the big “Oliver” light on the back of the trailer. More likely the light that you’re having trouble with is hooked to the main bus under the pantry/dinette. That’s a ~6” long aluminum bus bar on the very bottom under the dinette seat with a ton of yellow wires attached: I’d check those connections but also there should be a round access hatch in the closet to access that light, so check the connection there too. Should be noted that you can overtighten the screws on those bus bars, cutting the wires; so don’t go crazy tightening all the screws. Just snug enough that the wire doesn’t pull out.
1 point
-
@Landrover I’m pretty sure that this is going to be a problem with the Member+ group, but we’ll see once Jason checks it. I think when he created that group, all of the settings didn’t get duplicated - there were earlier, more obvious issues when he first set it up, but this one is more subtle. Thanks for bringing it up and hopefully Jason can get it corrected shortly.1 point
-
Ahh would have been too easy! 😉1 point
-
Thanks I appreciate your thoughts and feedback. 👍🏻 Amazon makes it a pretty easy purchase not burning up GTO (gas, oil, tires) driving all over to brick and motor stores only to find no or low stock to save a few dollars. Three days with prime and it’s on the porch. 👍🏻1 point
-
I’ve have used ours, but I can’t comment on how waterproof they are. Mine are under a bed cover, so they aren’t exposed to rain. They do seem very sturdy and have nice strong latches with holes for a lock (although no plastic container is really secure), plus holes on the handles to also attach bungees for tie down. And this 24 gallon size provides a good bit of useful storage space but can still be carried pretty easily.1 point
-
I have used those for decades to carry emergency gear in my trucks, they are great, but not even water resistant, make sure you have some drain holes in the bottom, and don’t put anything inside that you don’t want getting damp. Prices vary wildly, search well and don’t assume the current Amazon price is the best.. If you are not in a hurry, return that one (free) and wait for a price drop.... And REI has it for $50, if there is a store near you, pick it up there.... https://www.rei.com/product/634288/rubbermaid-action-packer-24-gallon. If you are not already a member, join for free and save 20% on that purchase..... John Davies Spokane WA
1 point
-
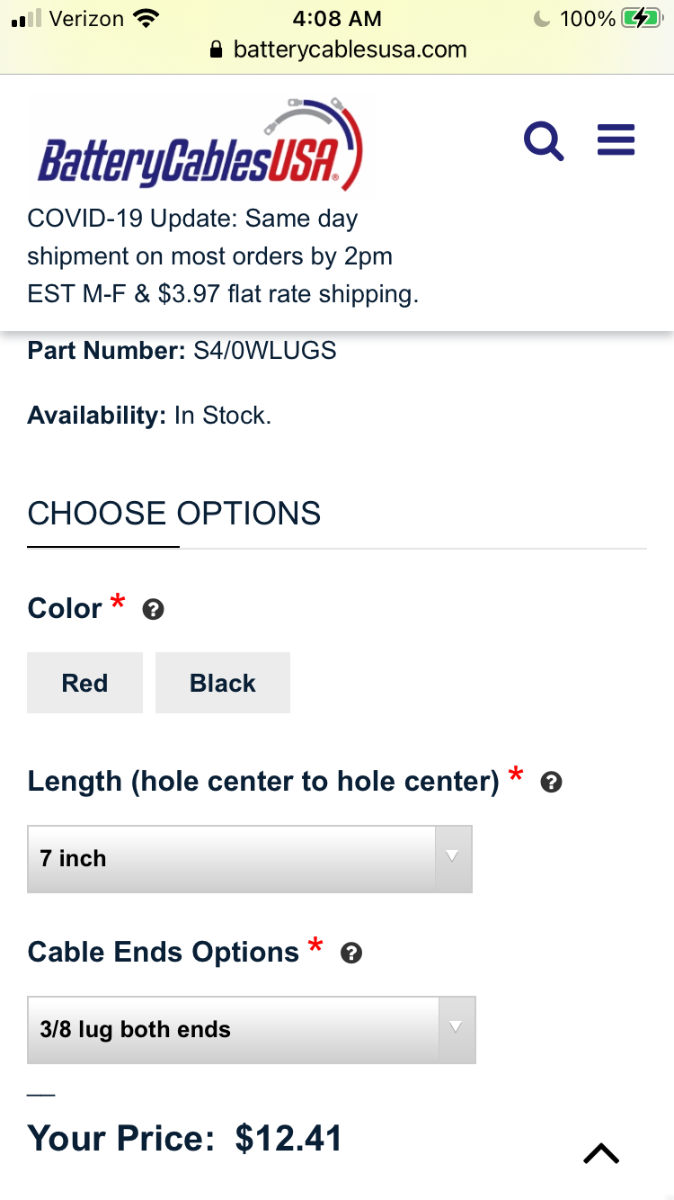
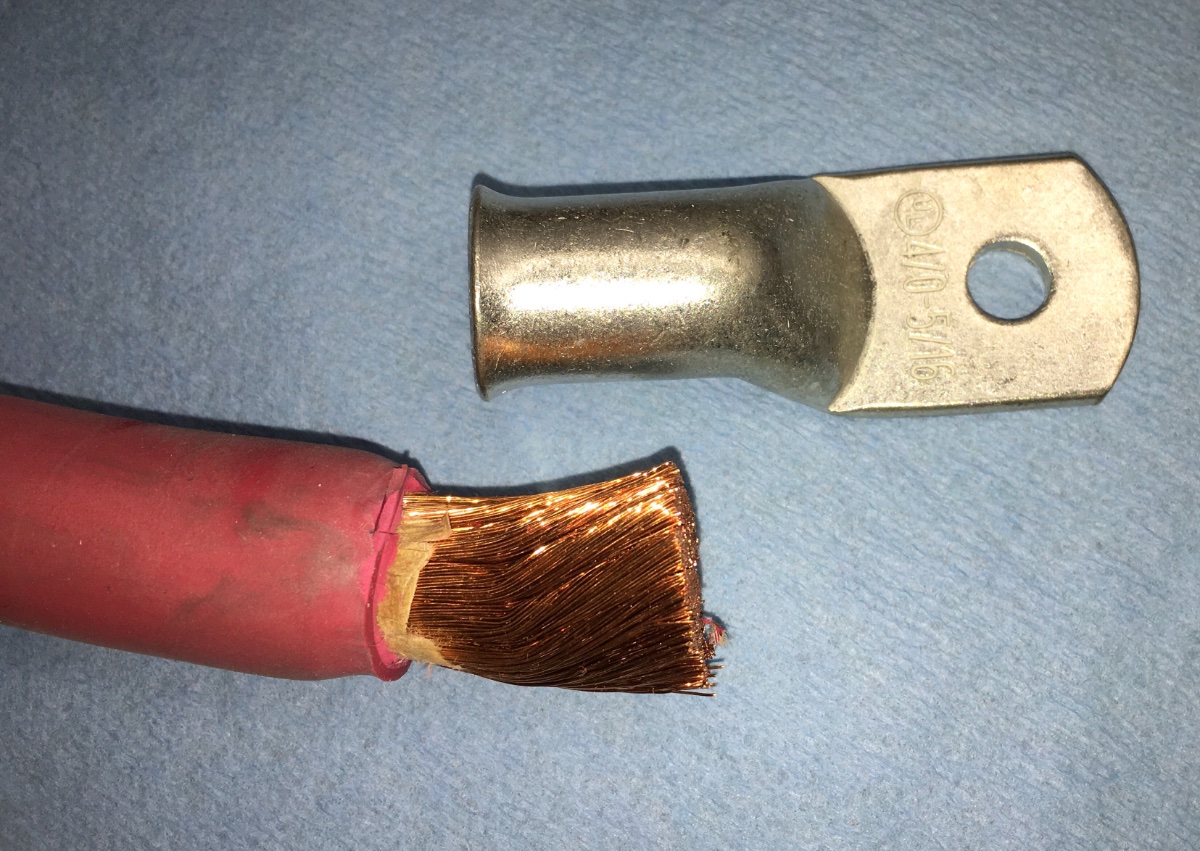
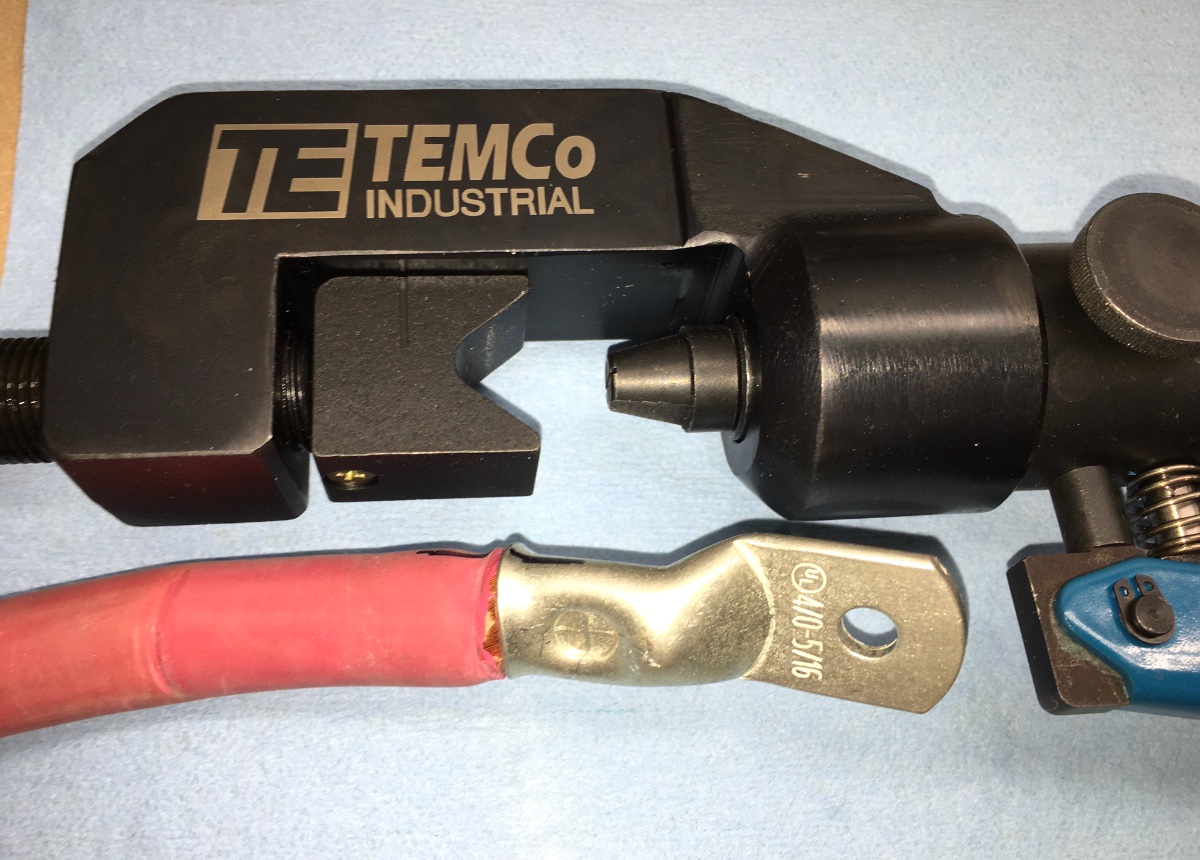
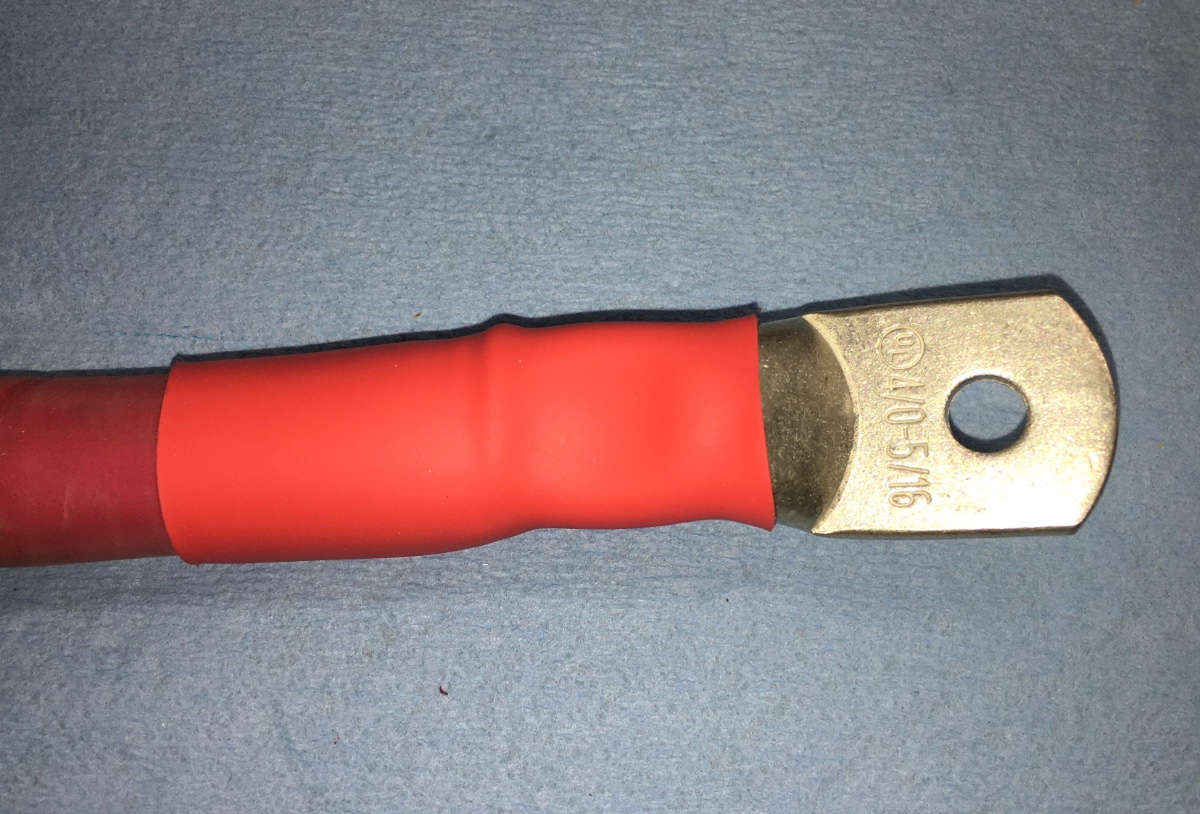
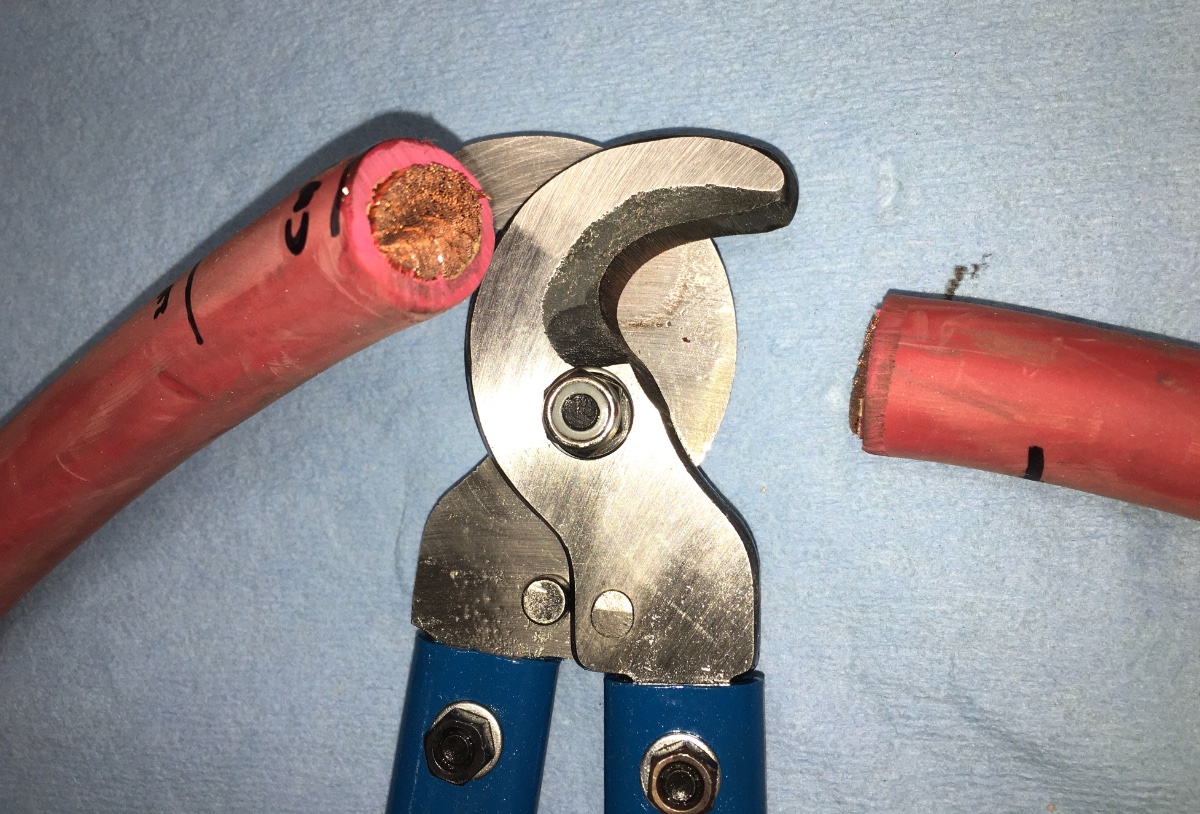
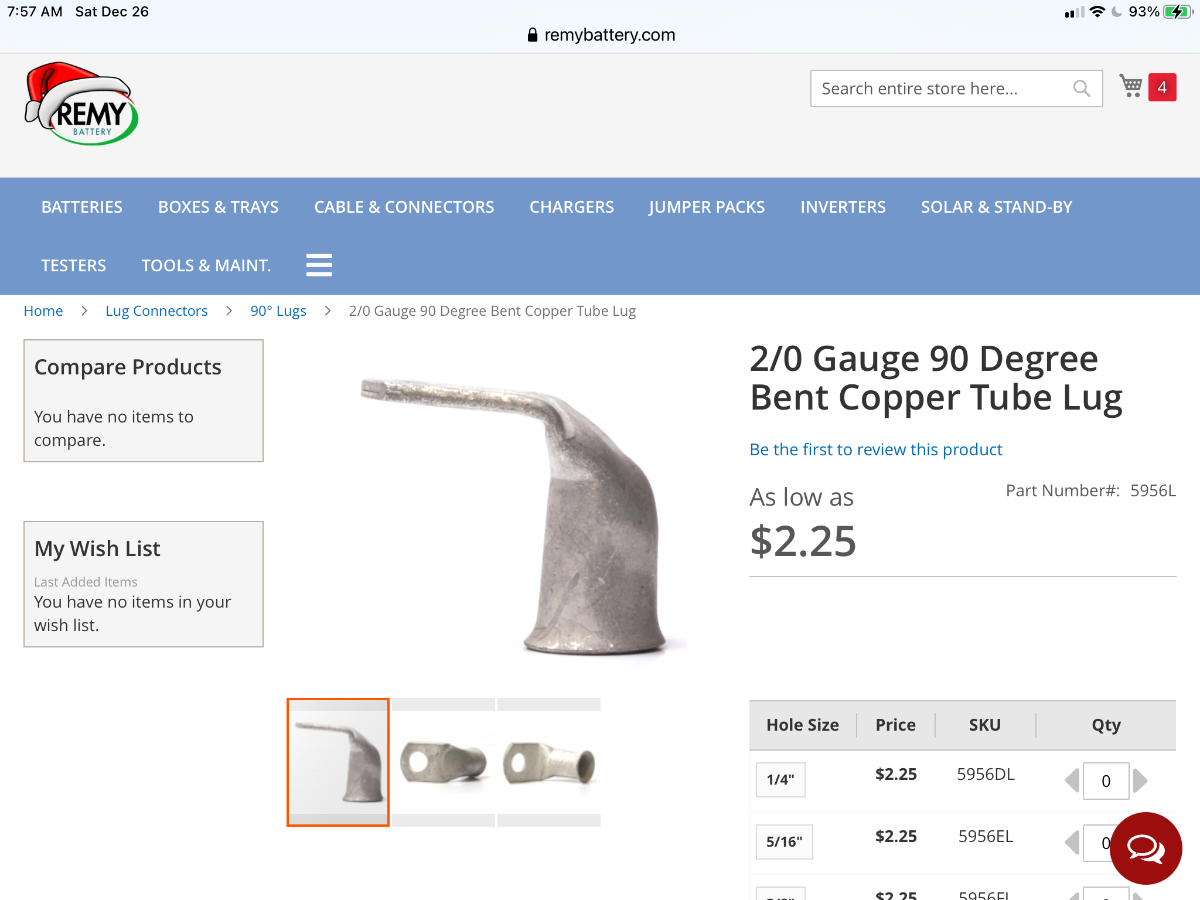
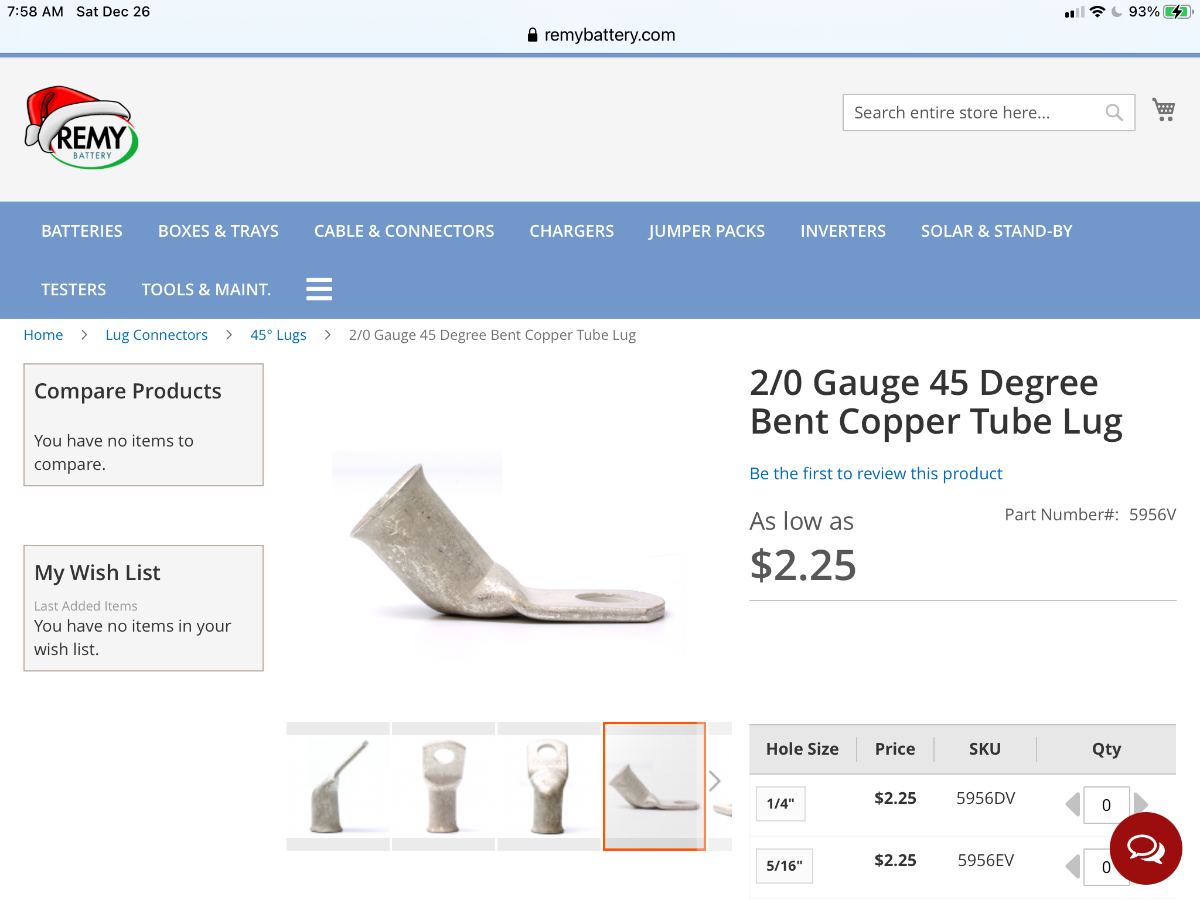
You can buy custom length cables of any type and size, and they are quite affordable, but this really limits how well they will fit and also you have to wait for them to be made and shipped. I don't believe they will install anything but straight ends, but you can order one unfinished, with one raw end for you to complete. They also sell high quality battery cable by the foot, they have all sizes. The prices are a little lower than most other suppliers. A good crimper is essential, a crude "beat on it with a hammer" one will be acceptable if you can access the parts away from the trailer. If they are in a tight location, or to make perfect crimps, you need a good hydraulic tool: TEMCo Hydraulic Lug Crimper Tool TH1818 DIELESS Indent 10AWG to 400MCM And some heavy self adhesive heat shrink tubing to cover and reinforce the connection: For cutting, a big cold chisel and that great big hammer will work, with the cable laid onto a piece of steel plate or a bench vice. This is way more elegant, it gives precise even cuts, it won't slip and smash your hand, and you won't say any bad words: That particular tool will fit over the big 4/0 welding cable that Oliver uses (with inverter) but only if it is slid down the length of it from one end. If you need to chop a long 4/0 or larger cable in situ, you will need a big size cutter. I had no troubles using this medium sized one on all the Ollie cables. TEMCo TH0001 4/0 (0000 Gauge) Wire and Cable Cutter – with 12 in. Handles Sometimes an angled end terminal fitting will be useful, to allow the cable to lie in a more natural position. These are very hard to find locally, and it is not recommended that you bend a straight one, it can cause cracks and eventual failure. Choose a terminal end with the exact hole size you need, or one smaller (you can drill it larger). For any cable carrying high current, do not install oversized ends on a smaller post, it limits the contact area and could possibly cause issues like overheating or loosening. I hope this is useful. Measure three times, cut once! John Davies Spokane WA
1 point
-
We'll have no puns here, so tut it out.1 point
-
Tutts the matter with me?1 point
-
John, Thanks for your input on Grease, I repacked all of our bicycles this winter, and of coarse I used Phil Wood Grease. I love it, using CV2 on most of my grease needs.1 point
-
I store 30’ (3 x 10’ sections) in the bumper, plus the elbow and rubber seal for the campsite sewer connection, and a collapsible Camco hose support (separated into 2 sections). It all fits in the bumper storage compartment, just barely, with careful packing.1 point
-
That looks like a firewall insulation, sucked into the filter by the fan. Telltail evidence is likely upstream in the intake ducting somewhere.1 point
-
Not really - on an Ollie, the black tank is higher than the grey so you'd have to use a pump.1 point
-
are a poppin'1 point
-
AB Lifestyles made our 11" Memory Foam twin mattresses, they are very comfortable, but more expensive than Southern Mattress. Found out about Southern Mattress after AB Lifestyles made our mattresses. https://www.ablifestyles.net/1 point
-
We can't compare as we chose Southern Mattress. We have been very happy with them so far. There is a "hard" side and a "softer" side but both must be one or the other because of the curve. We currently use the "hard" side and have had a very good nights sleep each night. Cindy1 point
-
I have had the new firmware on my 3000W XC Pro for a little over 3 weeks now and I started using the software cutoff I discovered rather than the physical cutoff relay to disconnect the battery from the inverter (to stop charging). Haven't seen the [20] error code since. Maybe it's fixed. I haven't heard back from OTT on their test results with the firmware though and they haven't closed my ticket yet so maybe they know something I don't.1 point
-
The short answer is that I did not find out earlier. The longer answer is that the 2021 "Optional Feature Manuals" in the Oliver University files include manuals for both Freedom XC (which covers 1000W and 2000W inverters) and a Freedom XC Pro (which covers a 2000W and a 3000W model). From this I'd infer (although perhaps incorrectly) that Oliver offers the 2000W Freedom XC (for AGMs) or the 3000 XC Pro (for lithiums) -- and that is why they include both the XC and XC Pro manuals. FWIW, I ordered the lithium package (and therefore the 3000 XC Pro), and am hoping that they get the error code issue resolved before I pick up the trailer in late April. Hope this helps...1 point
-
There is no way Oliver could begin production without having had wiring diagrams. Somebody has them. I wonder how receptive a third-party shop that agrees to perform warranty repairs would be. Hope they get a straight t&m agreement. Given 2021 production status, and this service department comment, if customer available 2020 diagrams haven' t appeared by now, the plans seem obvious.1 point
-
Just a few that seem to be related to the Lithium package: 1. The 12V charge wire from the TV tow harness is not connected as shown in the 2019 electrical schematic. 2. There are now a bunch of cutoff switches to the batteries: solar input cutoff switch, a main battery cutoff and an inverter input cutoff. I think this is all to enable isolation of the Lithiums so we can shut off charge sources, etc. Lithiums don't like to be kept topped off all the time and I get the sense the BMS and various other charge controllers just don't "get it" yet. So just playing around with the various cutoff switches, I discovered that when on shore power, you can use the inverter cutoff to stop the inverter from continuously charging the batteries. Anyways - that's cool but I didn't even know about it until I stuck my head under the seat. 🙂1 point
-
I’ve asked Jason about an electrical plan as well, no luck.. The difference between the electrical sections of the 2019 and 2020 owners manuals is pretty amazing. Comparatively, the lack of information in the 2020 version is impressive. Perhaps the 2019 and 20 models have the same wiring plan, and we can refer to the 2019 manual... Have you encountered any situations in your explorations of the guts of your trailer where the wiring doesn’t jive with the 2019 schematic?1 point
-
Bryan, we have just picked up hull 688 last month. The quality and workmanship of the plumbing and electric is very impressive. I was worried looking at pictures and reading about the struggles of past owners with the quality of these internal systems, but I must say I'm relieved that 688 doesn't seem to have many of those older issues. I have one major gripe so far. The lack of up to date documentation on the electrical diagrams to me is unacceptable. I'm already frustrated trying to figure out electrical issues or questions by having to look at older owners manuals, hope someone from the forum knows where a wire is running or opening a service ticket. Thankfully Jason has been very responsive to the tickets I'm opening, but it still takes a day or more to get simple answers that can be answered by an electrical schematic. I can't seem to find the right person to bug yet at Oliver. I've tried my sales person and Jason. Jason says the service department doesn't even have any!1 point
-
Good to know for LIthium package owners: I couldn't find my charge wire connections or the relay, so I decided to put my fuse back in to activate my charge wire and see what happened. Well, I saw nothing at all - no charge, no draw, etc. I opened a ticket and Jason answered that the charge wire is not being connected with the Lithium package. I'm good with that since it's pretty much useless without the upgraded wiring and DC to DC charger that JD is considering.1 point
-
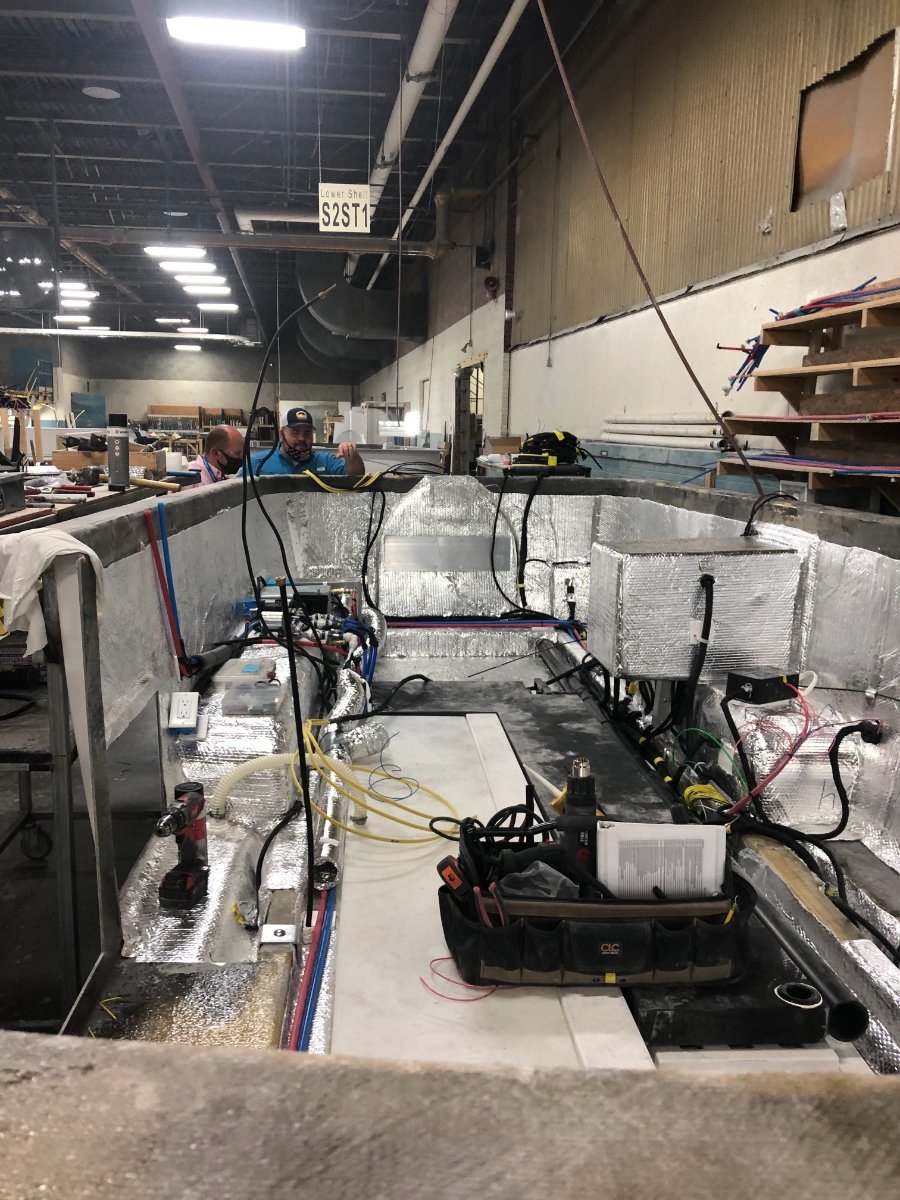
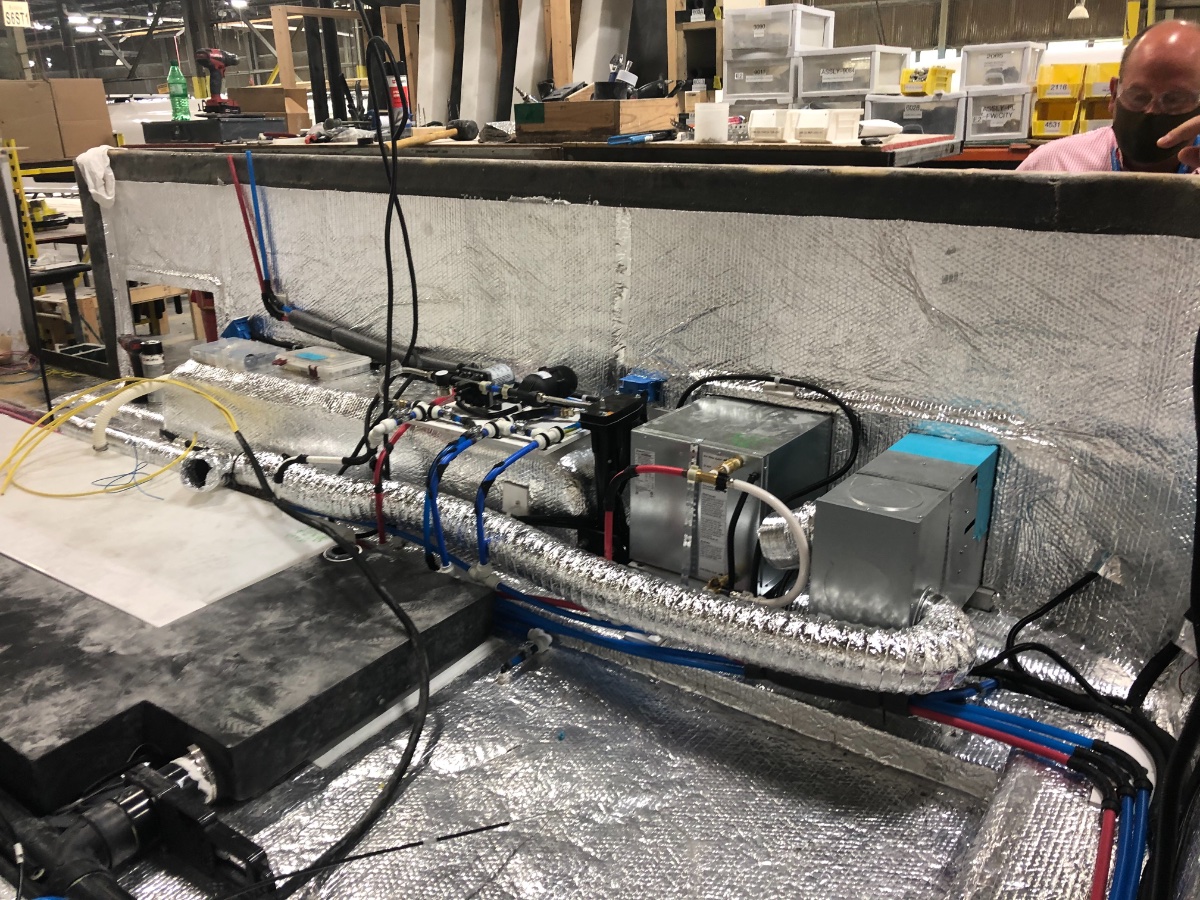
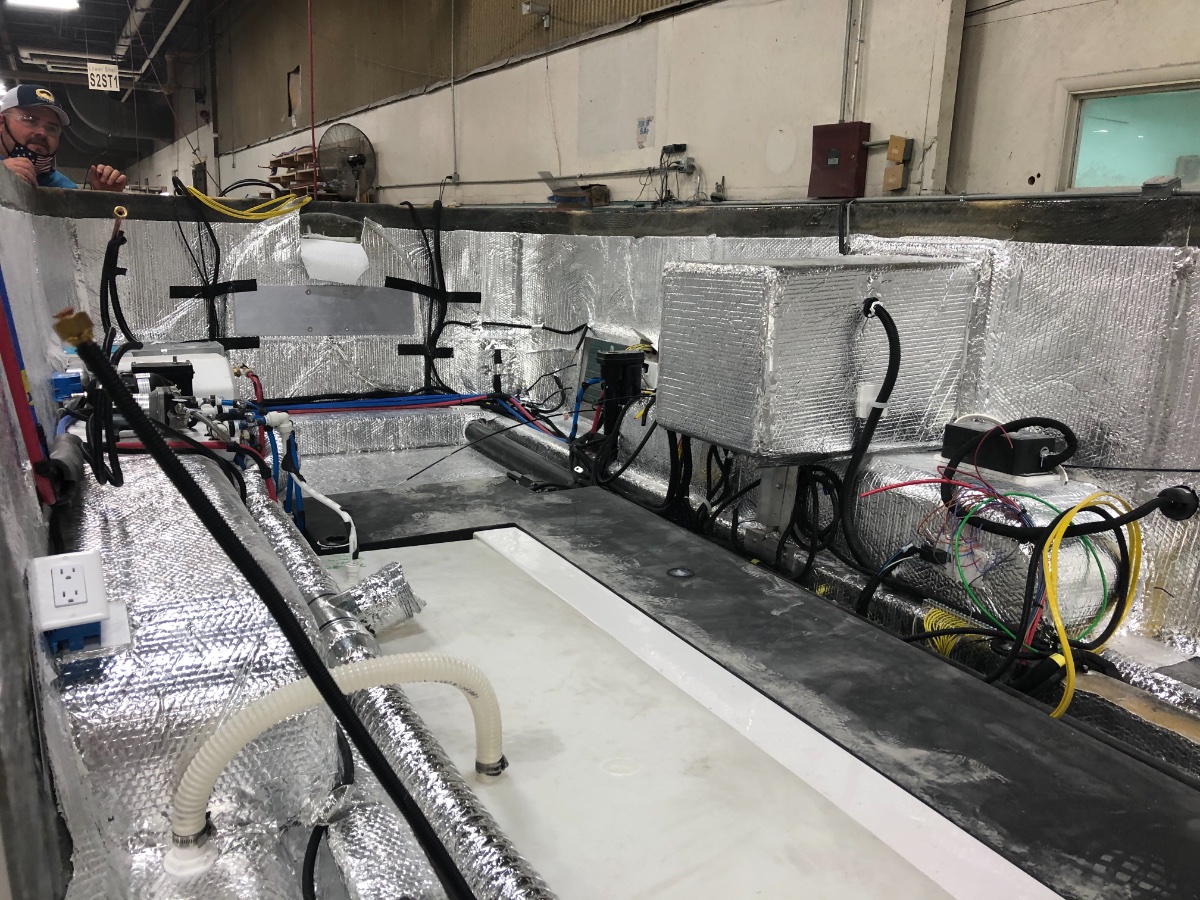
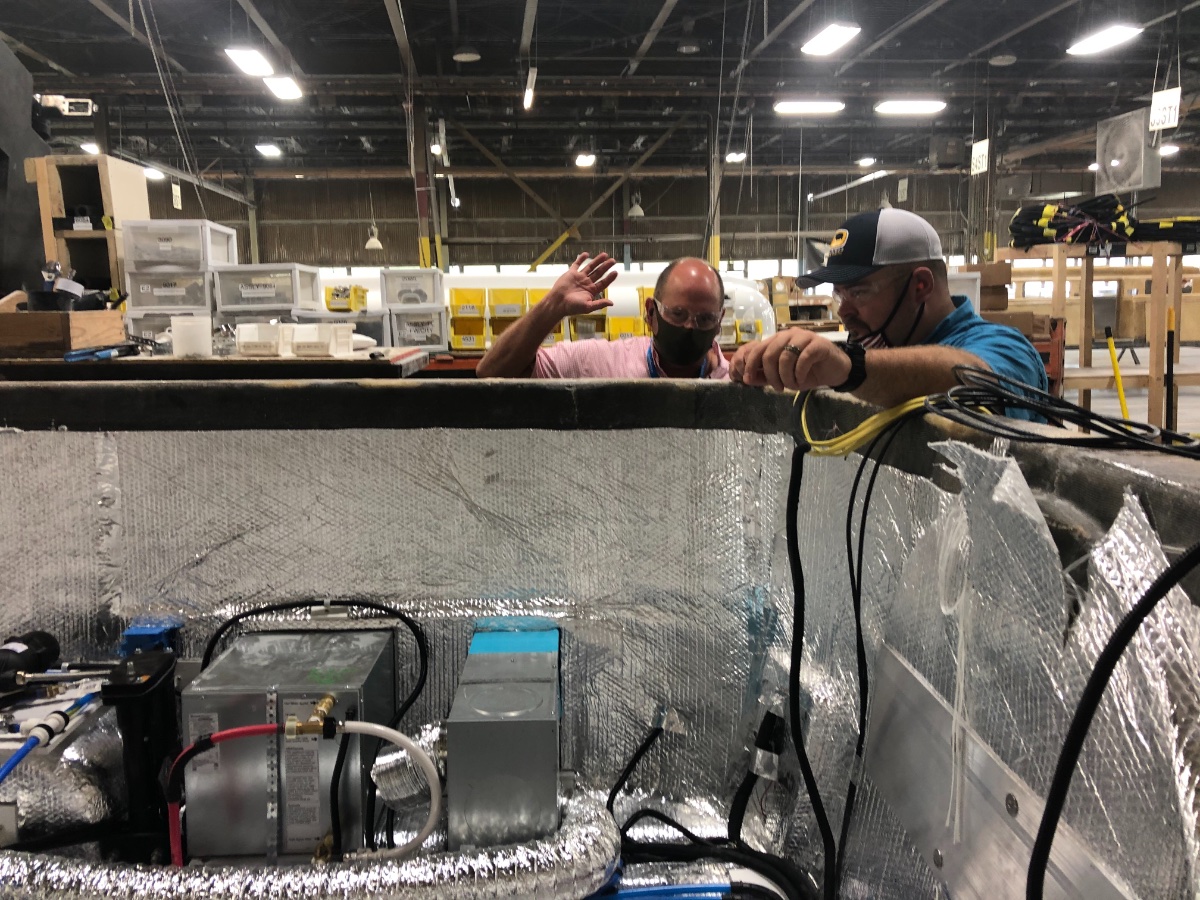
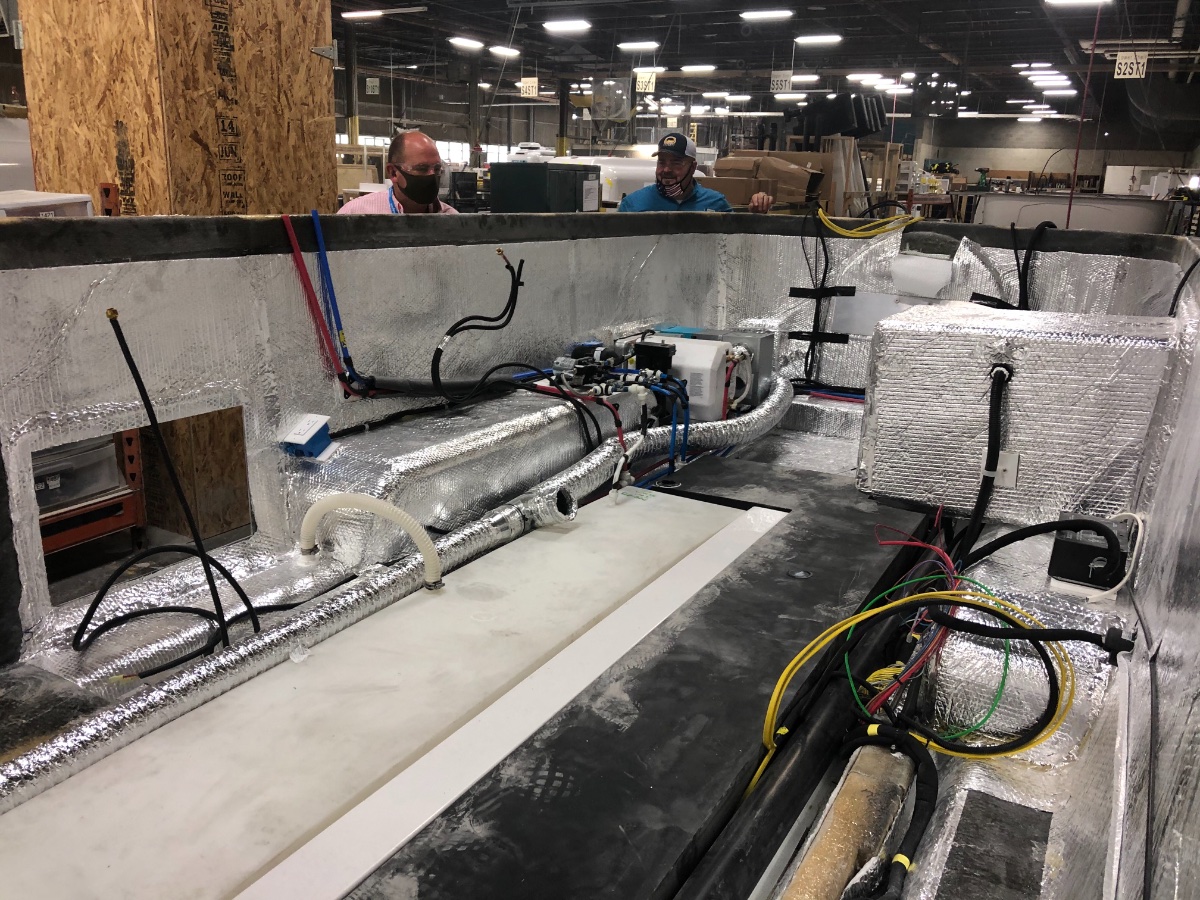
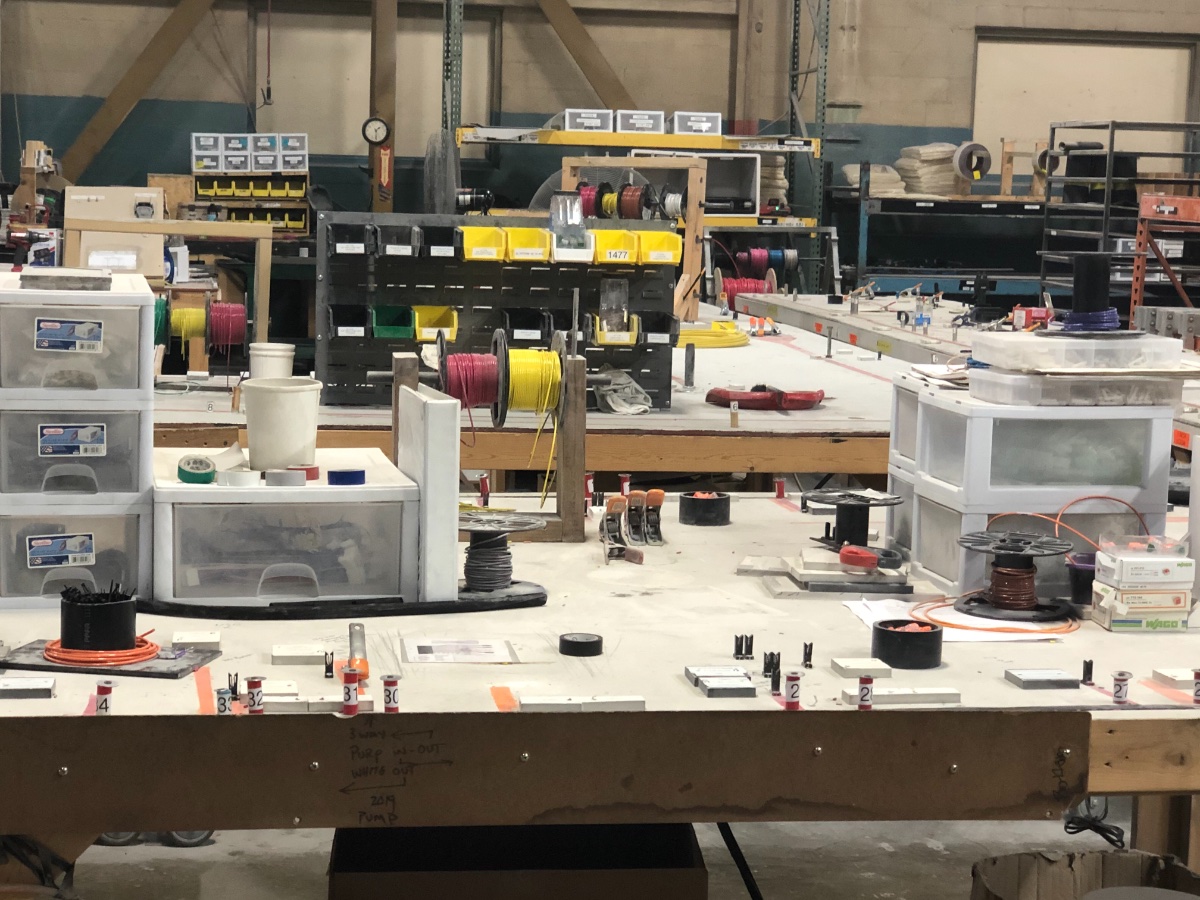
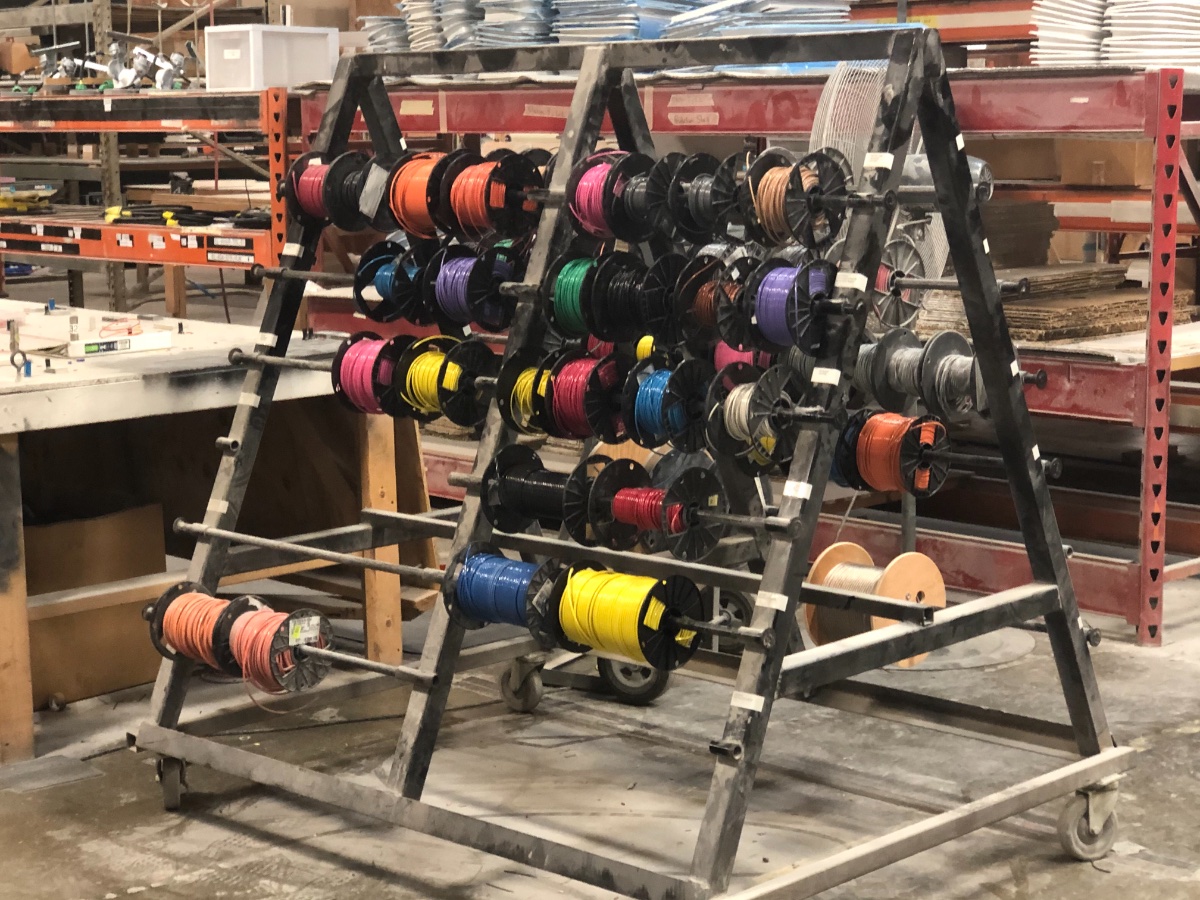
Here are some in-production pictures I took mid August during our tour. It might give you some idea of the hidden wires that are between the inner and outer shells before they are put together. We were very impressed with the quality.
1 point


.jpg.15f940f26c9f46b24aa4a720a90df607.jpg)


.thumb.JPG.c11094a6a8c73946473572dfe3e34685.JPG)


-
Recent Achievements
-


")


")


