Leaderboard


Popular Content
Showing content with the highest reputation on 03/31/2022 in all areas
-
Normal Configuration This is the configuration that the valves will be in most of the time. This will allow for use of the plumbing system when connected to city water or when using the water pump to pull from the onboard fresh water tank. Boondocking Configuration This configuration utilizes the rear water inlet and water pump to pull from an external source. It will then pump the fluid directly into the onboard fresh water tank. You can set a 5gal water jug below the water inlet with a 2ft or shorter hose to refill your fresh water supply. You can also use this to sanitize your fresh water tank. Winterization Configuration This configuration also utilizes the rear water inlet and water pump to pull from an external source and push the fluid directly to the plumbing fixtures inside your camper. You can use this to winterize the camper by pulling RV antifreeze into the plumbing. You can also use distilled white vinegar to decalcify the plumbing lines & fixtures. CAUTION: NEVER mix bleach & vinegar! You should never perform the decalcification and sanitization together. Mixing bleach and vinegar causes a toxic chlorine gas. Visit the Oliver Service Portal for more helpful articles!4 points
-
These are great suggestions. I too share your passion for smoking of meat (my wife likes smoked eggplant). I do not currently have plans for a smoker in my Oliver. If any of you all want to show up at the Oliver Rally with these units, I will humbly offer my services to do a taste comparison. 🤣😋4 points
-
Eggcited for you!3 points
-
Eggceptional!3 points
-
Eggcellent name!3 points
-
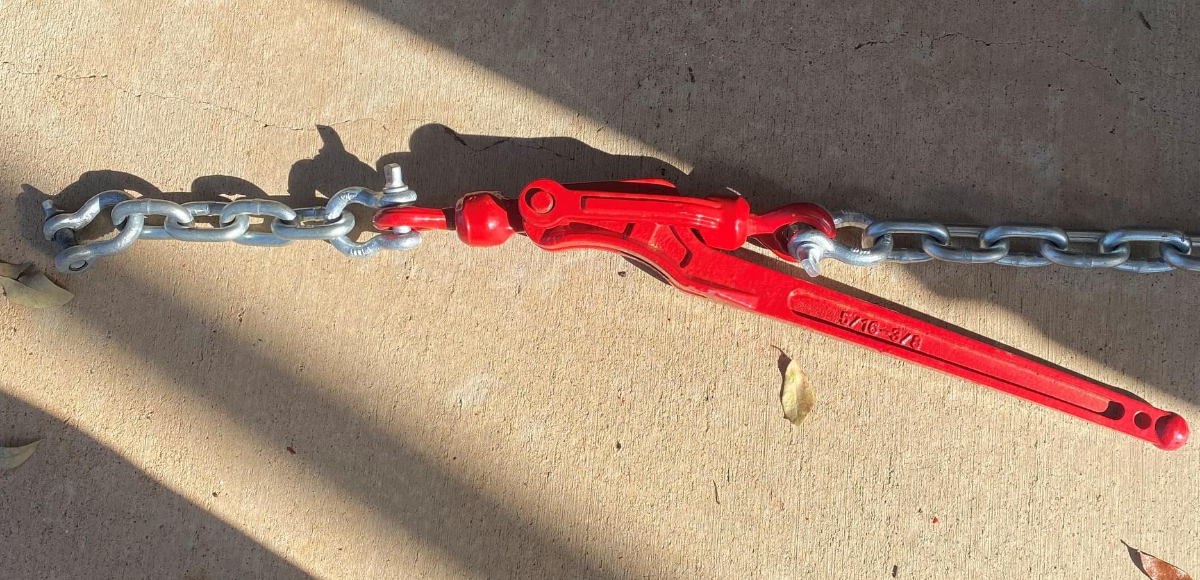
A while back, I had an idea for a hack to my Andersen Hitch to simplify hookup. The modification involves putting a chain binder in the two chains which adds slack in the chain when doing the hookup. If you're interested in it's operation, I attached a brief video explaining.
 2 points
 -
We now have a hull number, and a name. Hull #1150 shall be called... Eggcelsior. (With a tip of the hat to our neighbors in NY!) 😃2 points
-
Outstanding mod! Beautiful workmanship! Should you go that direction, I too am interested in a set! The fact that they are super strong leads to two possible ideas for V2. If the leading and trailing edges were tapered so as to guide obstructions away from the hull that would be even better. It would tend to reduce the potential for damage to the eyebrow itself. Would likely require some increase the length to do so. I appears that the eyebrow itself is made from very stout aluminum. It may be possible to reduce the thickness a gauge for weight reduction. That said, I like that they are stout and as such, lay very straight! Amazing Mod! Thank you for taking the time to post your work. GJ
2 points
-
Normal Configuration This is the configuration that the valves will be in most of the time. This will allow for use of the plumbing system when connected to city water or when using the water pump to pull from the onboard fresh water tank. Boondocking Configuration This configuration utilizes the rear water inlet and water pump to pull from an external source. It will then pump the fluid directly into the onboard fresh water tank. You can set a 5gal water jug below the water inlet with a 2ft or shorter hose to refill your fresh water supply. You can also use this to sanitize your fresh water tank. Winterization Configuration This configuration also utilizes the rear water inlet and water pump to pull from an external source and push the fluid directly to the plumbing fixtures inside your camper. You can use this to winterize the camper by pulling RV antifreeze into the plumbing. You can also use distilled white vinegar to decalcify the plumbing lines & fixtures. CAUTION: NEVER mix bleach & vinegar! You should never perform the decalcification and sanitization together. Mixing bleach and vinegar causes a toxic chlorine gas. Visit the Oliver Service Portal for more helpful articles!2 points
-
You're eggaggerating! 😁2 points
-
Nice number and interesting name! It won't be long now. Bill2 points
-
We too had never camped in a RV. The last camping we had done was well over 20 years & that was car camping with the Boy Scouts. I too was quite skeptical about dealing with the 'stinky-slinky'. After talking with a guy who had the composting toilet, we went with it. Aside from being so environmentally friendly, it is so much easier to deal with. We mainly use park bathhouses for pooping, if I may be blunt. Steve camouflages the pee tank in a canvas bag & empties in the bathhouse. Do a Forum search for "Natures Head' and "Compost Toilet' and you will info that should convince you that the compost toilet is the way to go. [pun unintended]2 points
-
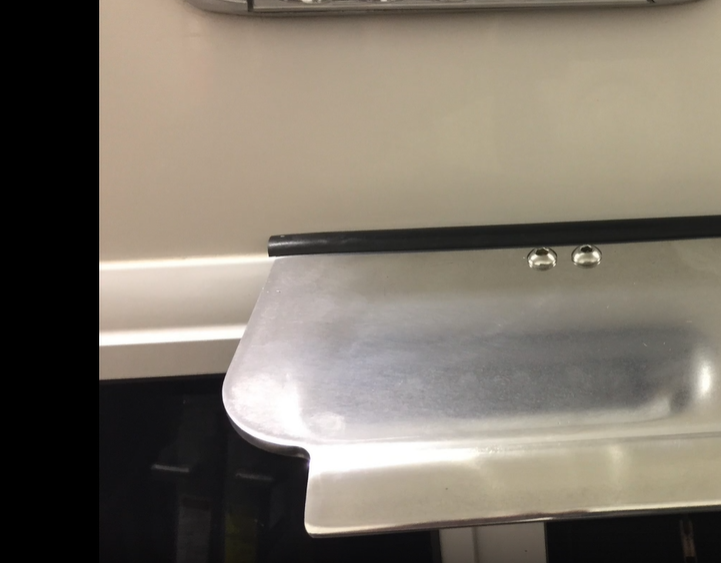
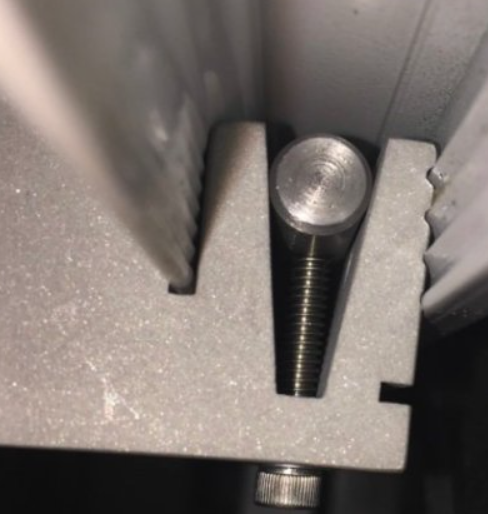
When I took my first camping trip with the new to me Oliver I was thrilled with the experience it gave me, and as I added more trips I started a mental list of things that I could tweak or add to the Oliver that would make that experience even greater. Today's post is addressing one of the items on that list concerning the windows and how they are limited to only being able to be open in fair weather conditions. Because they lean inward at the top of the window they can create problems in rainy conditions whether the window is opened or closed. When closed they have to deal with all the water that runs down from the roof and sidewalls, this can overload the drainage holes in the window frames which can result in getting the bedding wet. Many Oliver owners have installed rain gutters to help alleviate that problem, but there's still the problem of having the windows open while it's raining to mitigate high humidity or that closed in feeling. What I came up with for a solution I'm calling window eyebrows. I created a list of design parameters or considerations that I wanted to hit for this project. The first one was I did not want to alter the Oliver in anyway, that included the drilling of hole to mount the eyebrow to the windows, this really slowed my project down. I'm the type of guy that builds it in my mind before the prototype is built, I went through many different design ideas before I settled on this one. I designed a mount that clamps into the window frame and to spread the load out over a larger area I utilize three of these mount per window. The mounts are inserted into the window frame and the screw on the bottom is tighten which draws down the 5/16" diameter rod in the tapered slot which then spreads the mount to engage the ribs that are formed into the window frame that hold the rubber molding in place. I inserted a still picture in the following video showing that process. To remove the mount you have to take that screw out with the 5/16" rod and there is a hole on the bottom where that same screw is inserted and when tighten it releases the mount. The eyebrow itself is made of 3/16" thick x 5" wide x 29" long aluminum which has 3/4" of the outer edge turn down. I used a neoprene edging trim bought from McMaster-Carr along the length that mated with the Oliver, my hope was that it could be pushed tight enough to seal the water from coming between the eyebrow and the side of the Oliver making for a easy instillation. When I tested this in the rain it looked like it was going to work but after about ten minutes I noticed each window developed a drop of water by one of the mounts and it would fall and hit against the screen about every couple of minutes. So plan B I was forced to use a 1/4" wide weather strip tape between the neoprene edging and the fiberglass wall of the Oliver. There was one more problem, I had to incorporate a drip edge to the eyebrow to keep the water from following around the edge and falling towards the window. This eyebrow is fastened with two stainless steel 1/4-20 button head hex drive screws to each of the three mounts. This makes for a quick install or removal of the eyebrow, Here in Minnesota we had a warm up and it rained one day so that is all the testing I have been able to do, so time will tell if all is well with the design. As far as the rigidity of the eyebrow I'm extremely pleased you can literally grab onto them and push and pull with no flex of the eyebrow. EYEBROW.mp41 point
-
Note: This information is specifically related to the Xantrex Freedom 2000w or 3000w Inverter/Chargers. Inverter - What is it and how does it work? An inverter produces 120V AC power from a 12V DC power source. The easiest way to think about this is 12v power x 10 = 120v. This is not exactly accurate as it takes slightly more power but this is the easiest way to do a quick conversion. For instance, a laptop might be rated to use 3 amps when plugged into 120VAC but when used through the inverter it would equate to 3a x 10 = 30 amps. The importance of this is because while on shore power your energy is endless. When using the inverter, you are limited to the battery’s capacity. Battery capacity varies from battery to battery. Charger - What is it and how does it work? The charger uses incoming 120VAC power and steps it down to 12VDC power. The charger is setup with a specific charge profile based on the type of batteries and the number of batteries that you have. Each and every battery has a charge profile set by the battery manufacturer. The charger has 3 stages of charging: Bulk Charge, Absorption Charge & Float. In Bulk charge it will supply a set amount of voltage, typically 14.0 - 14.6 volts and a large amount of amperage to replenish your battery charge quickly. The length of this stage depends on the battery type, number of batteries, charge profile and *incoming power. Absorption charge is a timed charge cycle. It keeps the voltage high but lowers the amperage going into the batteries. Once in Float charge mode it drops the voltage right above the batteries resting voltage to top them off & maintain them. Note: When in Bulk Charge rate it is passing the max amount of energy allowed to the batteries. With Lithium batteries this is a large amount of amperage which generates a tremendous amount of heat. During this stage it is normal for the fan to run at a high speed which causes it to produce a lot of noise. *Amps setting based on battery type & number of batteries. Shore Power *Incoming Power The camper is designed for 30 amps however smaller power sources can be connected using adapters. It is important to understand that the camper and the inverter/charger are setup for 30 amps and when using a power source smaller than 30, it may result in poor performance or failure. House: When you are connected to a regular home receptacle, you are connected to a 20a or 15a circuit, unless you had a dedicated 30a receptacle installed. You also have to consider that the circuit most likely is not dedicated to the camper which means other appliances inside your house are running on that same circuit. When connected to a house circuit you may also experience failure at the circuit breaker in your hose. If this occurs, you have overloaded your house circuit meaning you are requesting more power than what it is rated to provide. You would need to locate a dedicated circuit, a circuit that is not being used, or turn off some of the appliances to lighten the load. Generator: When you are connected to a generator the incoming power depends on the size of the generator. We recommend at least a 3000w generator which will provide about 25 amps of power. You can use a smaller generator however you will again be limited to how much power it can provide. Note: When using a generator, because it is not grounded, it is recommended to use a Neutral Ground Plug. Without the plug you would be required to turn off the surge protector, which we DO NOT recommend. WARNING: Using an undersized or long extension cord may result in poor performance and failure. When using an extension cord it is important that you use the appropriate size & length. A 100ft extension cord will have voltage loss resulting in heat buildup at the power inlet which can cause the inlet & cord to melt. We recommend using a 10ga/25ft max extension cord. Flow of Power Solar & Shore power have their own path to the batteries for charging and they work independently of each other. The battery is just the storage device for the energy whether that energy comes from Solar or the Charger via shore connection. See pic below for path of power The red arrows indicate the direction of power with both stopping at the battery bank. NOTE: The Inverter/Charger has two connections to the AC Panel as shown above. One connection comes from the Main power supply to the input side of the inverter. The Input side is what supplies 120vac power to the inverter/charger. Once the inverter/charger has the incoming power it passes it through the output side back to the AC Panel on a split bar to allow AC power to any breaker located on that side of the panel. The inverter/charger also uses this same power to charge the batteries. When not connected to 120vac power and the inverter is turned on it pulls 12vdc power from the battery bank and converts it to 120vac power, sending it down the same output connection in order to supply power to the AC panel on the split bar. Caution: We do not recommend leaving the inverter on. The inverter will pick up the AC load within seconds if something happens to the incoming 120vac power but this will start to pull from your batteries which will cause the batteries to drain without your knowledge. Solar vs Charger Solar collects and charges at 12vdc whereas the Charger uses 120vac incoming power to charge at 12vdc. The difference is in the amount of amps supplied to the battery. The max amp output that the solar panels can provide is 18.8a per hour however this is dependent on the sun, while the charger can put out up to 150a per hour depending on the charge rate setting in the charger. Bottom line is that a shore power connection whether it be at a camp ground, your house or a generator will always charge faster than the solar. Areas highlighted in light blue below are the primary settings to review. Please make sure you locate the appropriate battery column for your camper build. Below are some links to the Service Knowledge Base articles. *These links may require login credentials as some of the articles are posted for Oliver owners only and cannot be viewed without an account. Xantrex Inverter Settings Inverter/Charger - Battery Charge Profiles Xantrex Inverter - Error 20
1 point
-
Thanks for the info/clarification John. 👍🏻1 point
-
The early hulls like mine (218) did not come with an accumulator. Tho an owner could have installed one. John Davies Spokane WA1 point
-
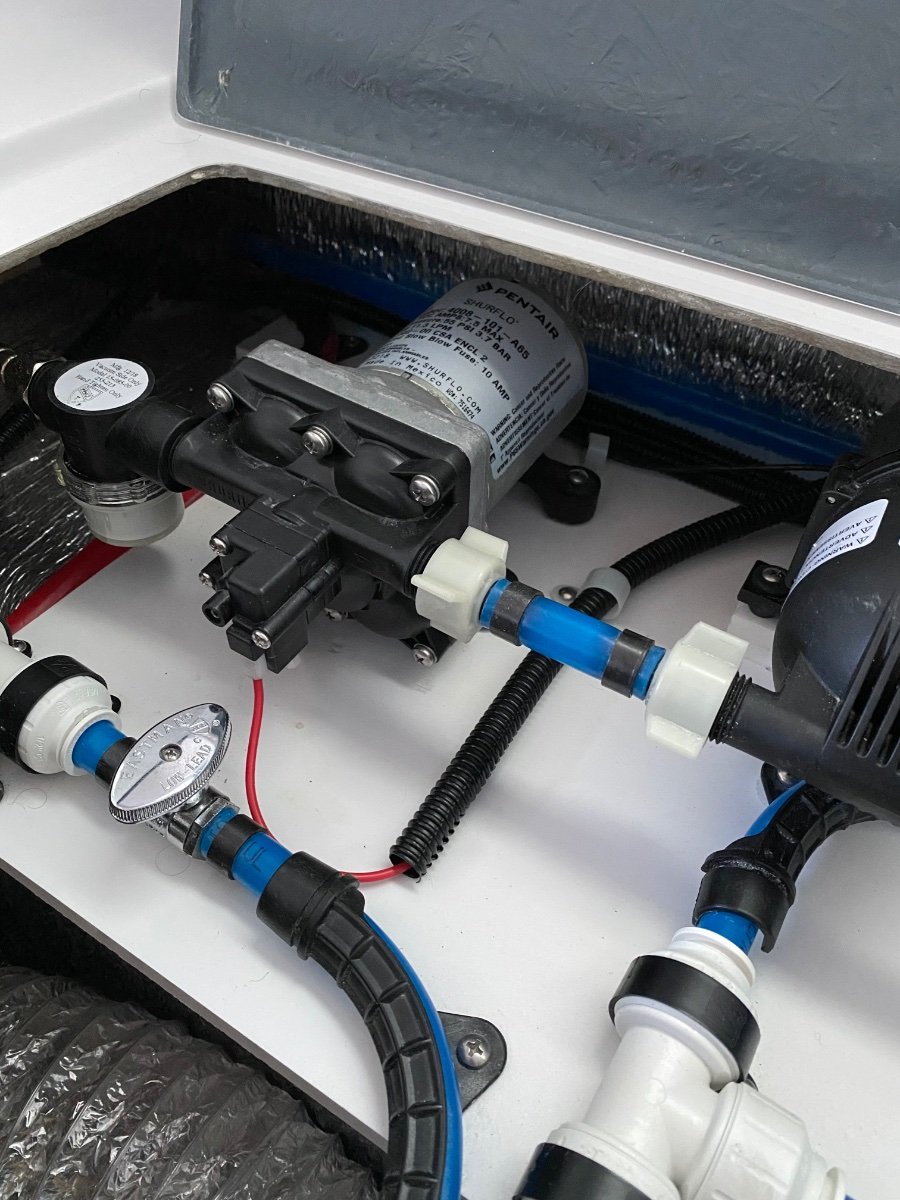
If you’re not hooked to a city water connection, even with the pump off, the accumulator tank that’s just downstream of the pump will maintain some pressure in the lines (accumulator to the right of the pump in this photo). That is what is providing the pressure for your drip. Until you can try the vinegar flush or repair/replace the faucet, a simple way eliminate the drip is to shut the pump off and then turn the faucet on until the water pressure in the accumulator drops to zero, then close the faucet (assuming you’re not connected to a city water hookup).
1 point
-
Hey John ... I've not tried the vinegar flush ... will check the online threads and give that a go. Thanks! -Dan1 point
-
Were the brackets "printed"? What are they made from so as to flex for tightness, yet be strong? Ingenious solution! GJ
1 point
-
It will be an eggsistencial experience.1 point
-
I intended for them to stay in place. They are removable for window maintenance.1 point
-
I would delete the app and reinstall it. When you scan the code make sure you cover up the bar code and only scan the QR code. The ones I bought from summit did the same things until I took these steps. Also if you choose offline check you you can scan all the codes at once and then hit validate all codes. Works a little faster that way. John
1 point
-
June will mark 38 for us 🙂 We're full-timers and in Texas waiting for Bluebonnet to happen next month. Then, who knows? Happy trails!!!1 point
-
John, Our payload is 1400 pounds. I used to reach 7100lb GVW with our 2016 Tundra with almost everything I wanted to carry, but this new Tundra will carry everything I want to carry being a couple hundred pounds under GVW with Ollie attached. I don't weigh individual items, but make sure we don't exceed front & rear axle maximums & TV gross weight. Initially Toyota dealers removed the cab to replace the passenger side turbo, but recently they started removing the passenger side front wheel to access the turbo through the wheel well. Not aware of driver side turbo actuator replacements, so can't address driver's side access to turbo. We purchased this base SR5 Tundra for Ollie towing duty. The CrewMax cab cloth interior is nice, the front seats are not bad, but not as comfortable as our 2016 SR5 Tundra's front seats. LED lights overhead in the cab work for me, but some folks want brighter interior lights. Understand the higher trim level front seats are very comfortable. Purchased a Garmin 780 RV GPS and use it in the center console behind the smart phone cradle. Around town we get 19MPG and 22MPG on the highway. If I'm at a stop sign with high speed traffic approaching, the new Tundra's acceleration makes it easy to pull out putting distance between me and the oncoming traffic quickly. It's quick when needed. We have never owned an SUV, but if we purchased one it would be the 2023 Sequoia on the new Tundra platform. Place the gear shifter from D to sport mode to see the complete GPS screen when placed in this location:1 point
-
Update on our SR5 CrewMax 2WD Tundra. One of the features I really like is the electric rear cab (complete) window. Letting the rear window down is a nice feature for fresh air circulation without as much noise as open side windows. The Ollie/Tundra rig is very stable with plenty of power with the 3.5L twin turbo. Some (less than 1%) new Tundra owners have had issues with passenger side turbo actuators, but we have not had any issues with our Tundra. The latest reported Turbo warranty replacement requires removing the passenger side wheel/tire for access to the turbo through the fender well. With 1500 miles on our 2WD Tundra yielded 14MPG in central NC/SC areas towing Ollie at 60 to 65MPH in 8th gear turning 1750 to 1900 RPM. When not towing Ollie getting 22MPG in 10th gear mostly highway driving same region at 65MPH at 1500RPM with over 2000 miles on the Tundra so far. Fuel economy towing Ollie with our 2016 Tundra was 12MPG. I am very easy on the throttle during take off and don't use cruise control while towing. Our Ollie weighs in ready to camp as per CAT scales from 4900 to 4950lbs with empty tanks except for full hot water heater. This Tundra's GVW is 6990 pounds, lower than our 2016 5.7L Tundra's 7100 pound GVW. Tundra's operators manual states a WDH is required for any trailer over 5,000 pounds, since our Ollie weighs in under 5,000 pounds ready to camp, towed Ollie without a WDH and the rig was very stable. Believe 99% of LE2 Ollies weigh in at least 5,000 to 6,000 pounds. We are camping minimalist and reduce gear taken on trips to a minimum. The Tundra's operators manual indicates a sway device is required with trailer weights above 2,000 pounds, so I have an electronic device that activates trailer brakes in a sway event, but honestly the Ollie has such fine towing manners, don't believe we have ever encountered any sway events. The Anderson WDH is also a sway device. Here's CAT scale results of the Tundra/Ollie rig with Ollie's water tanks empty including hot water heater was empty. After following CAT scale results still needed to load 50 pounds of gear in the Tundra and 50 pounds of gear in the front of Ollie before a camping trip in February. The Tundra had two people on board, 30 gallons of fuel, and camping gear loaded, except for what I mentioned earlier in this paragraph. Additional 50lbs of weight in the front of the trailer will put the tongue weight within 9% to 11% of Tundra's recommended trailer tongue weight. With Ollie connected. Our Tundra does not have OEM airbags or any rear suspension enhancement installed, yet. OEM airbags would be a nice option to have.1 point
-
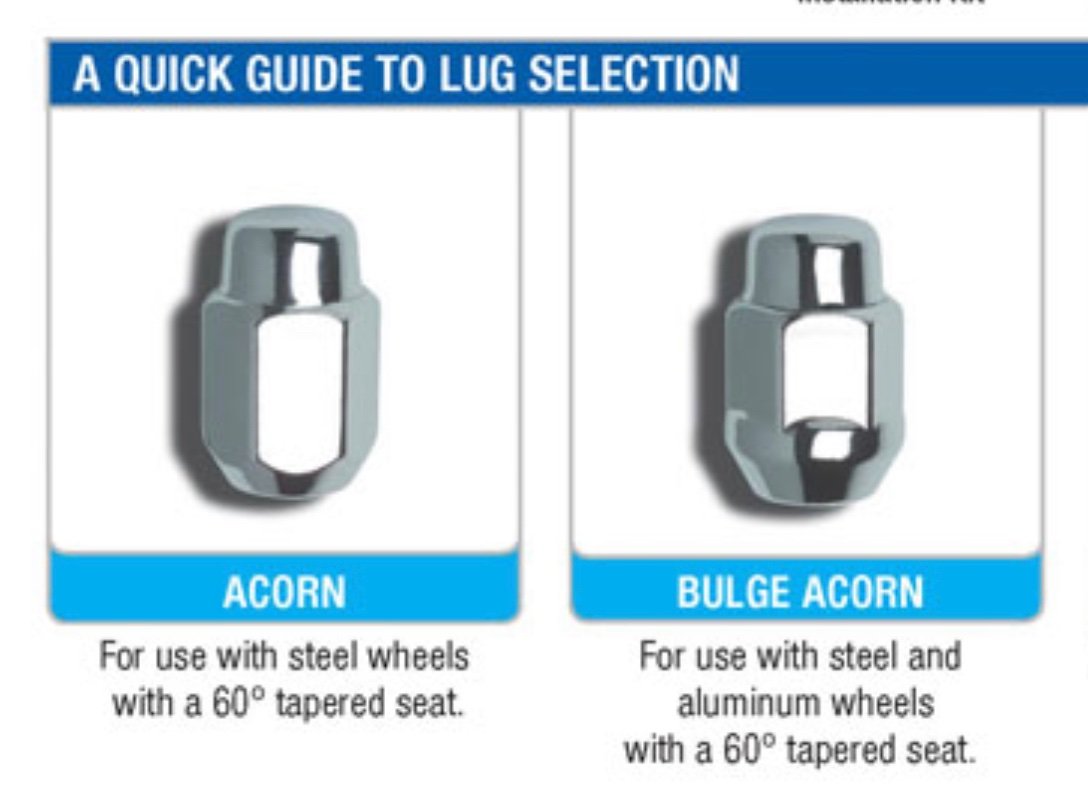
For anyone getting replacement lug nuts, make sure you get the proper type for aluminum wheels. The correct ones are the “bulge acorn” type which have a larger conical seating surface for use on aluminum wheels. Aluminum wheels are softer than steel wheels and require the larger seating surface. The ones installed by Oliver are the correct bulge acorn type so get the same style. “Acorn” type have a smaller conical face and are for steel wheels.
1 point
-
You’ll usually get an abundance of thoughts and opinions here!1 point
-
We are HH members, but have yet to stay at one of their locations. I'm guessing the merger will make it easier to search for sites, with only one interface. That being said, anything remotely related to RV life is so unpredictable amid the Covid pandemic; where you once could have a reasonable anticipation of campground availability according to time of year, day of the week, and location, now it is hard to travel without advance reservations. I blame some of this on the Internet which seems to be taking advantage of the surge in RV campers by posting a lot of hype on popular destinations, and even some not so popular ones, in order to bring in advertiser $$$$. I'm hoping, when schools are back in session and workers return to their offices, the situation will improve. We rely a lot on Campendium to find some lesser know campgrounds.1 point
-
I've found most camping reviews are either great, or in the dump. Same campground. Either super happy, or ax to grind. If I click on the reviewer, and read their reviews, I often find a stream of the same. My needs are not the same as someone traveling in a sunblocker motorhome or giant fifth wheel, so I take some comnents with a grain of salt. Where I worry are multiple reports of lots of cranky permanent residents, old trailers, poorly maintained facilities, etc.1 point
-
As we are hull #211 we must be 'ancient'. But with the shine on it as if it was new. I like the term vintage better.1 point
-
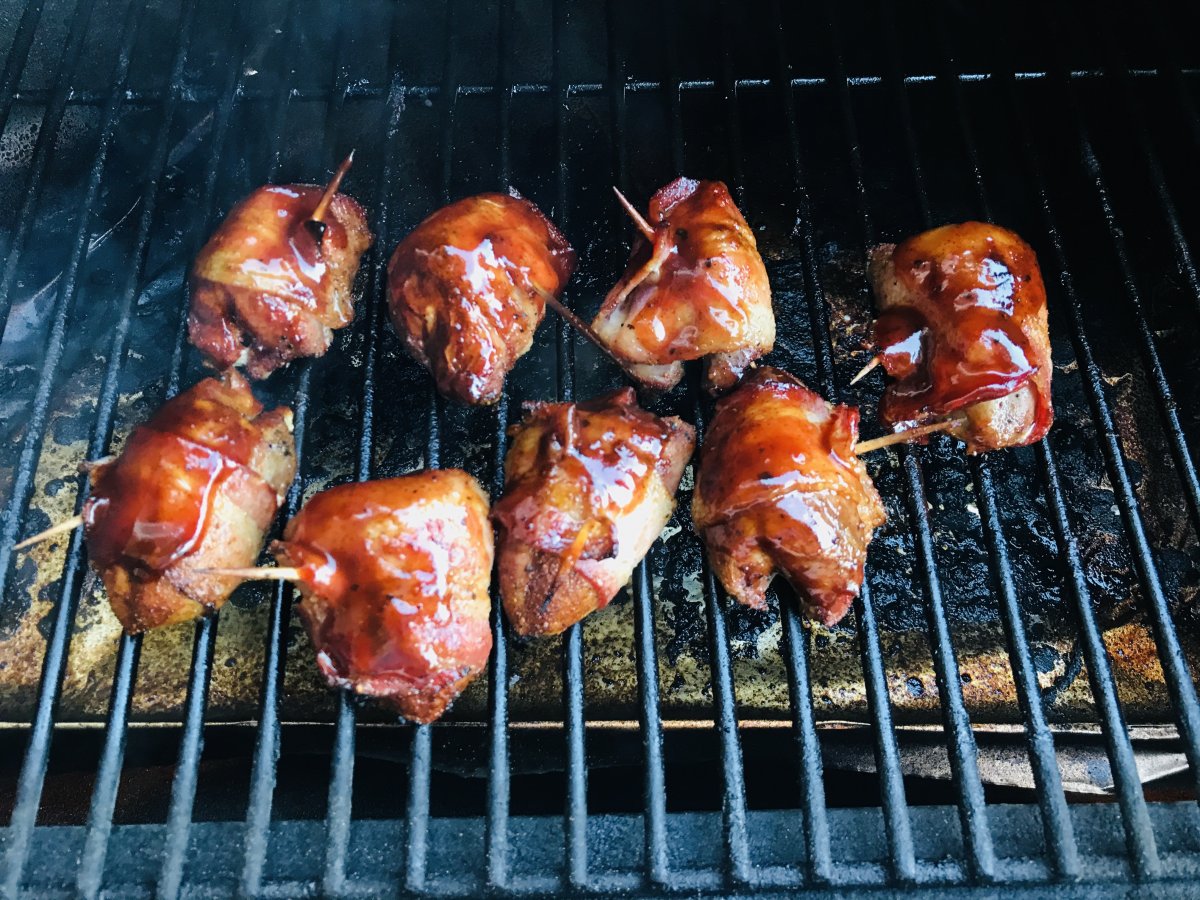
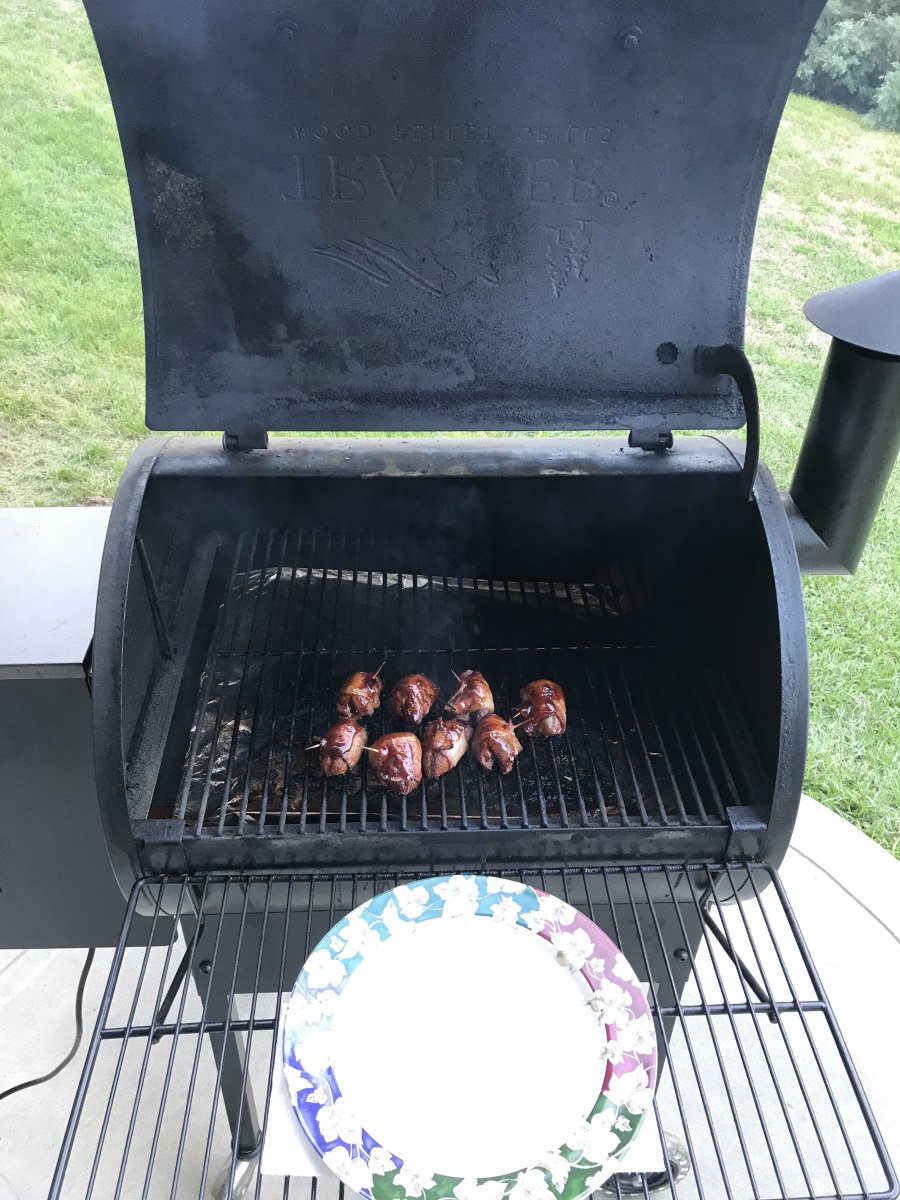
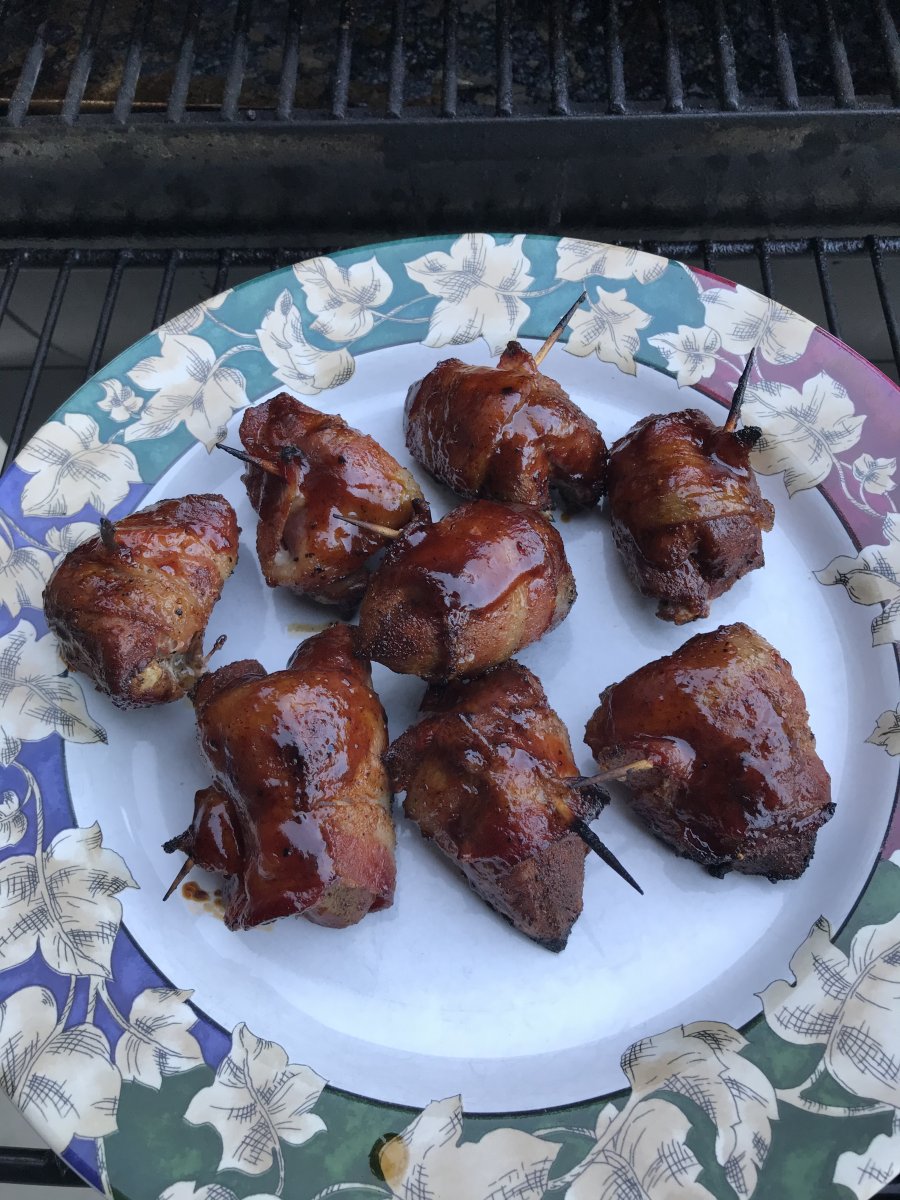
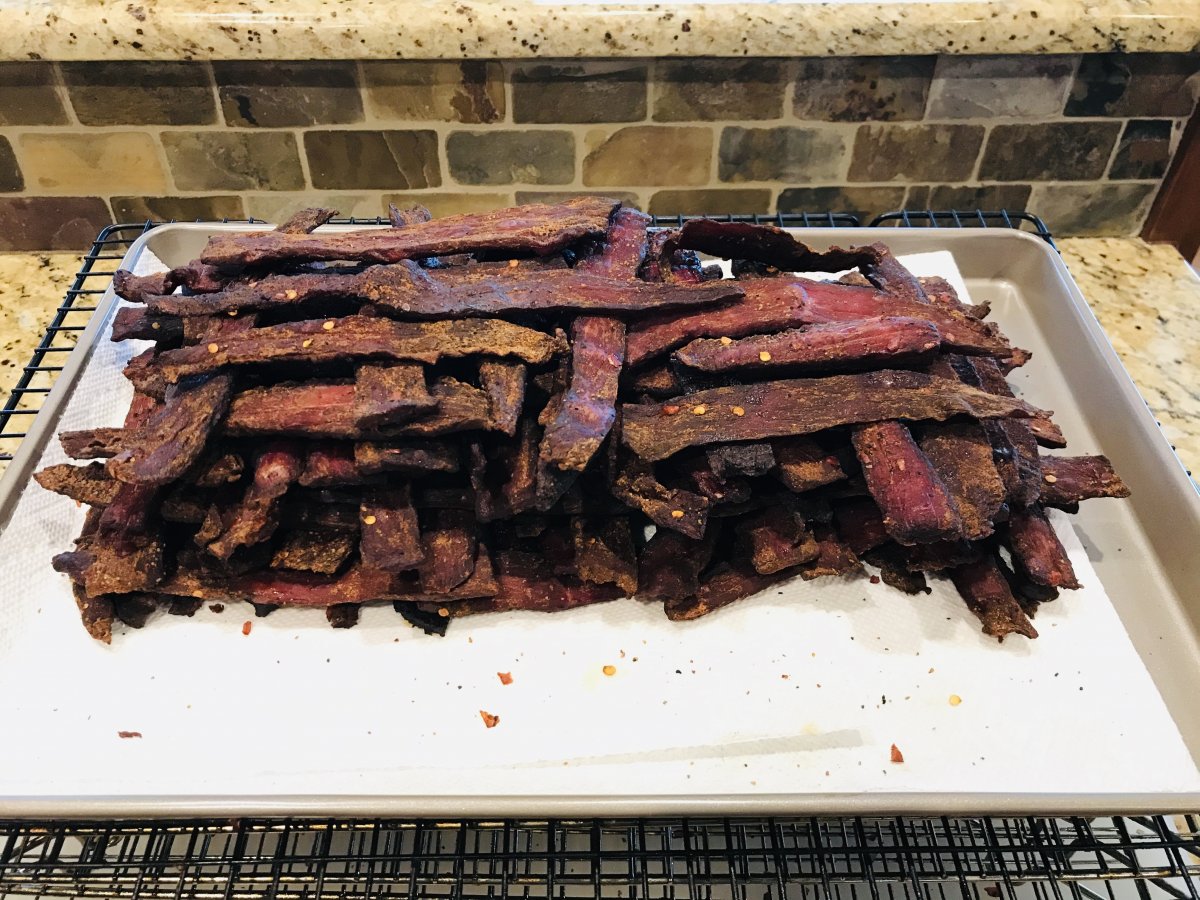
A hobby- We have owned our Traeger pellet smoker for over 5 yrs and have smoked baby back ribs, a few 9# briskets, chicken, trout, wings, plenty of wild game. Venison, wild turkey and bacon wrapped pecan smoked wild dove pictured, my wife’s favorite. We have been extremely happy with our Traeger and would not hesitate to replace it with another Traeger. I use apple, pecan, hickory and mesquite pellets depending on what I meat or game I am going to smoke. Ours is the Little Texas model, not for travel. We may consider a smaller Traeger scout grill or the Traeger ranger for travel. We really have enjoyed our Traeger. I also pecan smoke our own 12 hr marinated jerky. I need to determine if the scout or ranger is compact enough to carry in our TV- https://www.traegergrills.com/pellet-grills/portable/scout Edit 06/11/23 - we have owned our Traeger 8 yrs now. 👨🏼🍳
1 point
-
So many things I use are online or on my phone/tablet...so I'll break this down into 3 parts: 1) My favorite "online - web based" roadtrip/camping planning tool: RV Trip Wizard is an Online tool I used for planning my trip to/from Hohenwald...it's great. - https://www.rvtripwizard.com/ 2) Apps my Phone/Tablet Tools for Finding and Reserving Campsites: Allstays Camp & RV - also a good lookup tool for campgrounds - https://www.allstays.com/ Campendium - For reviews of campgrounds - https://www.campendium.com/ The Ultimate US Campground App - For locating boondocking sites.= http://www.ultimatecampgrounds.com/ All Trails - for finding localized hiking info - https://www.alltrails.com/ Recreation.Gov - for doing many of the reservations in Nat'l forests, and parks - https://www.recreation.gov/ Harvest Hosts App - for one night stays at wineries, farms, etc. - https://harvesthosts.com/ RV LIfe - All round app I use as a portal into reviews and new campground info. - http://rvlife.com/ 3) Seeing the actual campground sites: I've found so far that I use several apps when planning a long trip. Some are great for finding "camping" others are good for planning the drive. In addition, there are resources we use that help us plan by showing actual campsites as photo's or drive through's including these three sites: Campsite Photo's - https://www.campsitephotos.com/ Campground Views : https://www.campgroundviews.com/ - featuring drive throughs of a campground in 360 deg format so you can look around. The Dyrt - a great site for what's good about a specific campground: https://thedyrt.com/ Hope that helps... Craig & Rose Hull 505 - Galway Girl1 point
-
Hi. My name is Chuck and I just picked up hull #297 on Thursday in Panama City, FL. Immediately pulled it up to Augusta, GA where I'm visiting my grandson and GDIL (that's grand daughter-in-love). Tomorrow I'll head towards Shreveport and then Allen, Texas for Thanksgiving with my Dad, sister and her family. My profile contains more of my story, but I'm looking forward to lots of great trips, learning a lot, sharing my experiences and meeting other Oliver owners. I'm currently camping at a Boondockers Welcome site in Augusta. Host has been great and I'm only 15 minutes from the kids. I'm towing with a 2019 Expedition Limited. I'll be picking up 2 Zamp panels plus the roofcap in Dallas next week for DIY install at home in Monument, CO when I get a stretch of good weather. I'll try to document that process for the benefit of others who may care to follow. I've already been following this forum and have gained some invaluable knowledge -- THANKS! BTW -- I can't figure out how to add a signature line. Anyone point me in the right direction? TIA 10FCC3B7-054C-4590-9447-333E0FF20452.heic1 point
-
When you click on your Forum name a page will open - in the upper right hand corner of that page will be a fairly lightly colored area that says "edit your profile". Click on that and then go to the bottom of that page to find the "signature area". Sorry for the confusion. Bill1 point
-
Chuck - And NOW you really are a part of the Family. Welcome for real! About that "signature" thing - just click on your name and then on "edit profile". scroll all the way to the bottom of your profile and there is a section called "signature". Type what you want your signature to be in that box and save it and your done. Bill1 point
-
Hi Chuck, Welcome to the Oliver Owners' Forums!1 point
-
I was worried about dumping the black tank too, my only previous experience watching Robin Williams in RV. It actually turned out to be "not that bad". I suppose I do have a certain tolerance, however, for "yuck", perhaps from my days as a combat medic. I won't belabor the excellent points brought out previously in this thread, but do have two suggestions that I did not see mentioned in my quick read. First, be certain you have a secure connection to the trailer. That connection comes under stress as you pull, push, and bend the hose. Don't let it come loose! Secondly, I saw on you-tube (and it made sense to me) that after dumping we should refill the black tank 10% with water. The water should help keep the material from mounding help to avoid future issues with smell and blockages. Many ways to put water into your black tank, but I would avoid using your fresh water hose? Happy dumping to you1 point
-
This is something that might be worth discussing (not to hijack the thread too much). We do like to make campground reservations, sometimes well in advance or sometimes the day before or the day of. We rarely stay at commercial campgrounds with high rates. Mostly NP, COE, BLM, state parks, etc. Our geezer pass (we got ours at $10 before the increase) has paid for itself many times over. Many of those sites don’t take reservations, so we show up a little early to ensure we get a site. While we didn’t decide to RV to save money (the cost of the trailer, storage, gear, maintenance is substantial) we do save a lot on the actual travel. A car and a motel are expensive, you have to add in meals, and limit where you can go. Our trailer allows us to travel to places where motels don’t exist. We were at Pinnacles National Park in February and it is literally in the middle of nowhere, not a motel within an hour or two. Plus, we have our own bed, bath, kitchen, etc. Hotels/motels have no appeal these days! Expensive camping results from commercial campgrounds and lots restaurant eating, which a lot of folks do and enjoy. Camping for free or $10 somewhere remote with a steak on the grill is where we’re at. Mike1 point
-
Good advice. Since we had never camped in a trailer before we started out trying to find places with FHU. Then, we started considering sites with W/E. Now, no hookups is not an issue. Especially in a lot of National Parks FHU camping is not possible but you don’t want to pass up camping in some great places because they don’t have any hook ups, or just W/E. BLM land and a lot COE sites have no hook ups but our Oliver’s will do fine in dry camping spots. Mike1 point
-
Dwain, don't let lack of full hookups keep you from enjoying a great campground. You'll see. Start with full hookups, and work your way around.1 point
-
Dumping has not been a problem in the 3 years we’ve had our Oliver. Never experienced a “splash” and it usually is not stinky depending on the dump site. The most critical step is to make sure the fitting at the end of your hose is secure in the dump hole. Sometimes you can screw it in, sometimes there’s a heavy metal lid, sometimes a rock and sometimes your foot. Full hookup sites are easiest because you aren’t sharing with anyone and have time to set up and dump at your leisure. Dump stations can have a little more pressure if there are others waiting. I try to time dump station usage when it looks the least busy but that is not always possible. If at a FHU site or dump station with nobody waiting I dump the black, fill it with the rinse connection, dump again and then do that a third time. Then I dump the gray. I have a clear right angle fitting at the end of the hose so I can see what is being dumped. The third black dump is always clear. The gray tank on the Oliver is flat and will drain best if the front of the trailer is elevated a little. If you are at a FHU site you only need gloves when hooking up and unhooking. Dumping while camped is just a matter of pulling the lever. As John mentioned, leave the the valves closed until you dump. I use gloves at dump stations. Another discussion is what to use in your black tank after you dump. I use a capful of Calgon water softener and a laundry detergent pod. After a trip I also put in some Happier Camper powder in both the black and gray tanks. When I get home, I thoroughly clean the end caps and clear end of the hose fitting for the next trip. I keep latex gloves and bleach wipes in the basement for easy access when dumping. Mike1 point
-
As far as how long between dumps, it really depends on your camping and personal use If we're in a campsite with a toilet (even a pit or vault), we'll use that in the daytime. That extends dumping for up to a week or more, if we are miserly on grey. I do dishes once a day. Minimal 1 to two gallon navy showers. Use paper plates. Mark our glasses and cups. Don't have to wash glasses daily, just rinse. . If you use a lot of water in grey ( showers, dishwashing, etc) you will have to dump sooner. Some people can only manage two or three days.1 point
-
Well, the stinky slinky isn't that bad, if you don't get the composting toilet. (Actually, really easy for me to say, because it's mainly Pauls job, but I do assist...and learned how years ago traveling on my own in my parents' rv...) If you've never used an rv dump, or full hookups, watch a few videos (not Robin Williams rv...) When you get the trailer, you could practice setting up and dumping with a half tank of clean water in clean black and grey tanks a few times. You won't be as nervous without the debris in there, and can be more relaxed about making sure you've connected the fittings properly, operating the valves, etc. To accomplish that quickly, run a hose through the bathroom window, hold the toilet open with your foot, and run clean water down the stool. Fill the empty black tank. Don't walk away and let it overflow... it holds less than 20 gallons. Hook up your clean drain hose, and give it a try. Or two or three, til you get it right, if you have a full hook up site. People behind you will get impatient if there is a line at the dump station. Btw, most dump stations have a rock or lid or some kind of weight to hold your hose in the inlet. If not, your foot works. Wear disposable gloves for connecting and disconnecting. I keep some in the driver's side door pocket, and a few in the outside shower. Most accidents happen when the hose flops out of the inlet, or someone didn't get the fitting connected right, or, there's a pinhole leak in the hose. Yucky, but there's almost always a nonpotable hose to wash the effluent down the drain. Use it if necessary. Tens of thousands of people learn this new routine every year.. new trailer owners, new rv renters. Like i said, not that big of a deal. Sherry1 point
-
Everyone has a different tolerance for gross stuff. Mine is pretty low, and I always hated dumping waste tanks. Even if you wear, gloves and are careful you can get splashed with fecal material and that is just not very nice. The dump stations are not very sanitary either, I won’t camp where the fresh and waste systems are together in one place. Like the old Fall Hollow CG near the Oliver factory. The fresh taps are underground next to the sewer, yuck. They should be well separated and the fresh tap should be above ground. The composting toilet is a great option, especially if you boondock or travel in the western areas that often have no hookups of any kind. But there is usually a toilet at least, where you can empty the pee tank. And off season, most dumps are closed and you may have a really hard time finding one. The free ones at Interstate rest stops are usually closed during freezing weather. The ones here in WA are still not open.... I have never seen a survey, but my feeling from reading posts here is that those owners with composting toilets are glad they chose that option. There is no way to tell you how quickly the 18 gallon tank will fill up, it depends on how often you use other toilets. The flush does use a lot of your precious fresh water. The black tank spray just rinses out the solids into the drain pipe, it doesn’t make things less messy. It just keeps the tank from getting a build up of dried crud. When you camp with your sewer hose connected, your dump valves should all be closed at all times. Let the tank level get at least half way before you dump, so the large outrush of water carries the solids away. Follow up by dumping the grey tank, to rinse out the hose. Then use the black flush system if you like. If you leave the valves open all the time, your hose will fill up with poop and paper and perhaps clog. Double yuck. John Davies Spokane WA1 point


-
Recent Achievements
-


")


")


")
