Leaderboard


Popular Content
Showing content with the highest reputation on 05/31/2022 in all areas
-
I had seen the posting on 4/22/21 by @Calypso showing an externally mounted towel bar on the side of Hull #520. The towel bar was made from a suction cup lifter and a piece of ¾" PVC tubing. I thought this a great idea and made one for our LEII picked up on 2/17/22. Due to nearly constant downpours in central TN the week we picked up Hull #990, we had immediate need for an external towel bar. We recently returned from a two week trip during which we also encountered several downpours. We used the towel bar nearly every day, often not having enough space to hang damp items. Upon our return I was about to make a second towel bar. I was thinking of adding an improvement to offset the bar/tube further from the hull of our LEII, to avoid having towels in contact with dirt on the hull. After mulling over a design for several days, I had an Aha! moment. I could modify my existing PVC towel bar assembly and add additional tubes for greater capacity, while also moving the tubes further away from the hull. Below are photos and a description of the result. Materials (Quantity, Description, Source, Cost, URL) 1- 4-2/3 In., 125 Lb. Dual Suction Cup Lifter (Harbor Freight, $8.99, https://www.harborfreight.com/4-23-in-125-lb-dual-suction-cup-lifter-57501.html?_br_psugg_q=suction+cup+lifters) 2- 3/4 in. PVC Schedule 40 MPT x S Male Adapter (Home Depot,$0.71/each, https://www.homedepot.com/p/Charlotte-Pipe-3-4-in-PVC-Schedule-40-MPT-x-S-Male-Adapter-PVC021090800HD/203811638 4- 3/4 in. PVC Schedule. 40 90° S x S Elbow Fitting (Home Depot, $0.75/each, https://www.homedepot.com/p/Charlotte-Pipe-3-4-in-PVC-Schedule-40-90-S-x-S-Elbow-Fitting-PVC023000800HD/203812123) 4- 3/4 in. Schedule 40 S x S x S Tee (Home Depot. $0.85, https://www.homedepot.com/p/Charlotte-Pipe-3-4-in-Schedule-40-S-x-S-x-S-Tee-PVC024000800HD/203812197) 2- 3/4 in. x 10 ft. PVC Schedule 40 Plain-End Pipe (Home Depot, $6.98/each, https://www.homedepot.com/p/Charlotte-Pipe-3-4-in-x-10-ft-PVC-Schedule-40-Plain-End-Pipe-PVC-04007-0600/100348472) 1- 0.091 in. x 2-3/4 in. Zinc-Plated Safety Pin (2-Piece) (Home Depot, $2.31, https://www.homedepot.com/p/Everbilt-0-091-in-x-2-3-4-in-Zinc-Plated-Safety-Pin-2-Piece-815408/204276312#overlay) The finished towel bar/drying rack shown in place below. The disassembled parts are shown below: I chose NOT to cement the entire assembly, since it would be much harder to store when in transit. Construction Cut the handle of the HF Dual Suction Cup Lifter in half transversely. A hack saw or bandsaw is recommended. File/sand the cut edges to remove burrs. Use PVC primer and cement to fasten the threaded end of each 3/4 in. PVC Schedule 40 MPT x S Male Adapters to each of the cut ends of the handles of the Dual Suction Cup Lifter. Cut the ¾" PVC tubing for the hanging tubes I chose to make 3 hanging tubes, each 45" long. This length easily fits in our rear cargo carrier and sags very little Adjust length to suit yourself. Cut 8 pieces of ¾" PVC tube to 1-½" in length. These short pieces serve to couple the elbows, tees and adapter together. Using a belt sander I slightly beveled the cut ends of the hanging tubes and the connector tubes so they would more easily slide into the tee and elbow sockets. Assemble the two "manifolds" as shown above, each having: 2 elbows, 2 tees and 4 of the 1-½" connector tubes. Use PVC primer and regular PVC cement to assemble one joint at a time. Be sure to align the open sockets of the tees and elbows. Hold each joint until cement prevents movement of components. The manifolds should be identical. NOTE: do not put PVC primer or cement on the short connector tubes which will be inserted into the adapters cemented onto each handle of the Dual Suction Cup Lifter. When the manifolds are assembled insert the hanging tubes into the three open sockets on each manifold. Again, I chose not to glue the hanging tubes to the manifolds for ease of storage. Insert the connector tube on each manifold into the adapters cemented to each half of the Dual Suction Cup handle. Again, do not use PVC primer or glue. With all components assembled, do a test fitting on the hull of your Oliver. Slightly dampening the suction cups significantly improves their grip on the hull. The hanging tubes and manifolds assembled should largely support themselves horizontally. I had leveled my trailer and used a level to also level the towel bar/rack. When the towel bar/rack is level drill a 7/64" hole vertically through the adapter coupling joining each half of the Dual Suction Cup Lifter to the short connector tube of each manifold. The purpose of the hole is to permit insertion of the zinc plated safety pin which will prevent the towel bar/rack from sagging, while still permitting the rack to be disassembled. Insert the zinc plated safety pins through the holes drilled into the adapter couplings to maintain the towel bar/rack in a horizontal position extending from the hull. I marked the suction cups and manifolds Left and Right to avoid difficulty later inserting the pins through the connectors. I also put an index mark on the adapters and manifold connectors for easier alignment. I have not yet tested this assembly in the field, but am confident it is strong enough to hold as many towels and clothes as will fit. I expect it could also support wet shoes or hiking boots. I hope this is useful to other owners. I welcome suggestions for improvements. As a final note, update your departure checklists to include removing and stowing the towel bar/rack.
 9 points
 -
Hello, We are Kathy & John from Michigan. After searching for several months we found a 2021 Oliver Elite ll just 10 minutes from our home! It was exactly what we’ve been looking for and we purchased it on 5/30/22. We previously owned an Airstream Nest that we loved for short trips but quickly found it too small for anything more then a few days. The amazing coincidence is the couple we bought our Nest from and the couple we bought the Oliver from are from the same city and just minutes from our home! What are the odds of that?! We are super excited to be a part of the Oliver family and look forward to many adventures!
5 points
-
It is now. I wasn’t sure how to spell it!5 points
-
Command Strip products are awesome in the Ollie. If you havent checked them out yet, Tooletries makes a shower storage line that works in the Ollie as much more than just shower accessories. I have two of the “Henry” holders in the bed area of my trailer to hold all of the remotes. They are silicone so do not scratch and also have several of the “Arnold” hooks around inside the trailer for string lights, keys, etc. In the shower, the “Frank” holds the shampoo and conditioner on the wall and out of the way. https://tooletries.com/collections/shower-bath-organization Also just ordered two of these for the living area https://30watt.com/products/sudski It is fun finding new things to make life inside the Ollie more dialed-in3 points
-
Yes, even for the 2016 OLEII we received (2) 10' sections.😁 I still have mine - new, never been out of the box. Black tank is getting a bit full though 😉. Bill3 points
-
It’s my new word of the day. Now I just need to work it into a conversation.3 points
-
We don’t have the Dicor sealant. I’ve never done anything to the seals on the roof. No leaks in 6 years, nearing 100K miles. Recaulking is on my to-do list and I’m sure I’ll get around to it sometime in the near future. If my Hull number was 1120 I wouldn’t be too concerned and I wouldn’t add anything up there. Mike3 points
-
I’m betting that none of your previous rigs were Oliver’s. Two Oliver’s, almost 15 years and >150K miles traveling, never a roof leak.3 points
-
I am a huge fan of Mr. Miyagi. Wax-on, Wax-off. Found several tins of the discontinued, 3M Marine Ultra paste wax. Its pretty easy to apply and buffs out nice. Plus, It gets me ready for the Summer Parade Season with my parade wave (elbow, elbow, wrist, wrist). 🤪2 points
-
Saturday is National Trail Day. North Carolina groups are offering a full agenda of guided trail activities by foot, bike, and water for everyone interested. I'm sure there's something fun near wherever you're camped, as well. https://www.carolinathreadtrail.org/ntd/2 points
-
Nan, when you install your screens, put a small tarp on the ground in case one of the little spring hooks flies off the little tool. It makes finding the hooks much easier. (Ask me how I know...😂😂😂)2 points
-
Nicely done and wonderful write-up. I can attest to the holding power of those HF suction cups. I hang waders and wading boot using them and have never had a single issue. Note that the color of the suction cups helps in not forgetting to remove them prior to departure.😃 Bill2 points
-
We had 2 for 20' total. Mine lasted for about 1 month before the plastic split apart. I bought 2 x10' and 1x 5' sections of Rhino Flex and and am happy with it so far. I see you pick up in June....YAY! Good luck and have fun 🙂 John2 points
-
100% total recovery! 👍🏻 😅2 points
-
It’s the past tense of “to ceramic”. Yesterday, I ceramiced my trailer. Maybe there should be a “k” in there. Yesterday, I ceramicked my trailer. 🤓2 points
-
I have to agree with Steve here, something isn’t right. Even when we had AGM’s, running the furnace, charging phones and iPads, using lights, microwave and sound system on dark winter nights we never had any issues. Mike2 points
-
Nan, Oliver Service sells those screens. I saw a recently purchased Ollie and service installed the screens for the new owner. Maybe give them a call. - David2 points
-
That load should account for little more than 50 amps overnight. Something is wrong with this scenario. Hold off on that gennie until you discover what went wrong.2 points
-
I got screens for the furnace (two little round screens) and the hot water tank (big square screen) on Amazon. I haven’t done anything to the fridge openings. I had a mud dauber nest in the air conditioner last year, when I found it there were no insects but was a bit of a pain to clean out.2 points
-
I checked out 050 at the rally and it did look good. Those guys did a good job. As soon as we’re home for a while, or in Tennessee, I’m going to get my trailer ceramiced too. Mike2 points
-
Tina and I find ourselves back here on this lake like it’s a magnet. Osprey Campground on Priest Lake in Idaho. We are out on an excursion needing to be back home around the 24th of June. We will see where the gas prices take us. Payed 5.15 in Tonasket WA. Just letting all the great folks on the forum know you and your info are appreciated. It is very interesting to find that a lot of crickets can create a slick spot in your travels. Mike
2 points
-
Thank you! The Platinum Package is much more descriptive and useful for troubleshooting than "battery package our $$$ could buy". I know you all are newbie’s, but when speaking about your Ollie, please remember that there is no such thing as TMI. To much information equals more accurate support from the forum members. Mossey2 points
-
Persistence pays off! Congratulations and happy camping!2 points
-
Congratulations on your “new” trailer. Hope to see you out on the road! Mike2 points
-
Congratulations! Wishing you many safe miles and adventures!2 points
-
I would love to see a pic of this install when you have a chance. No hurry. It's something I've been meaning to do. The Lithionics App drives me nuts. Thanks! mb1 point
-
Can you say "burn a piston and burn a valve and burn a wallet" all in the same breath? Ouch!1 point
-
Love this! My BIL is visiting for 7 weeks this summer -- he's always looking for a project, so I'm putting this one on his list! 🙂 @MarkV1 point
-
I might pay high $$$ so I can say I ceramicked my trailer.1 point
-
@Jps190, I'm with you. I'll wait and see. Our 2008, waxed twice yearly, with quality, uv protection carnuba based wax, still looks great, stored outside 24/7/365. We also wash it frequently, with marine soap. My only tangential experience with ceramic coating was my neighbor's 28 ft boat. Took two days to complete. Lasted 2 years in Florida sun and salt spray. Our boats do better/look better than that with twice yearly wax, and far less costly. My neighbor sold the boat, so didn't care. I would. I'd look for a local mobile detailer if I didn't want to keep up with waxing routines. Everyone has to follow their gut on this decision. Either way, if not diy, it's a high $$$ investment.1 point
-
I would not care to have the superfluous dicor everywhere, as I've seen on so many sob trailers and motorhomes. I think they throw all that crap up there to hide shoddy workmanship. It definitely makes tracing leaks harder, and resealing more difficult, if there are bulges of sealant, everywhere. Unlike others, I've had a couple roof leaks, in 15 seasons. The original dometic ac bolts needed to be retorqued after a year and many miles. Easy fix. Then, about a year or two ago, the bath fan leaked. Gasket failure. Needed reseating. We decided to replace it with a better fan, with a light, and no regrets, rather than reseating an old working fan. We used butyl tape to bed the new fan, and I love the overhead light in the bath. Oliver generally does an amazing job with sealing penetrations, and uses good quality, long life sealants, imo. I'm in my 15th season, and have very few complaints. Two small roof leaks, in over a decade, is pretty good, for me. We have also had a window sealant leak, and, the third tail light is the biggest culprit. Ours, I think is forever fixed, imo. BUT, hey, my trailer is in its 15th season. But, our boat is in its 44th. We're used to resealing, as necessary.1 point
-
I like and use the command strip products also in the Olie. Somewhere on this forum lst year, someone posted about silicone pockets that stick to the interior of the Oliver without any command strips or glue. I think that Mossemi may have had them on one of his storage posts but I bought them on-line somewhere not where Mossemi bought his. I have a couple in the bathroom to hold tooth bushes, tooth paste and comb and have one in the main cabin to hold my reading glasses, pen and flashlight. They are made either in white or black. I tired to find them on the forum Search feature to post it here but could not find the post. If anyone knows what I am referring to please post it as I want to buy a couple more.1 point
-
Welcome to the family. If you have any questions, someone or a bunch of people here will likely be able to help you. Additionally, you might want to contact Oliver and tell them what hull number you have and to give them your contact information. The picture you provide looks great. Nice green lawns. What City are you in?1 point
-
Not that I didn't believe Seadawg - but - I have never seen the "spring hooks" sold separately. So, HERE they are on Amazon. Yeah!😇 Bill1 point
-
Just following up here concerning positioning of the little hole in the shaft of the wet bolt. Dexter confirmed that there can be issues with a plugged bolt (grease not being able to come out of the hole) unless the hole is oriented to 3:00 or 9:00. I spoke to someone at the Oliver shop, just after removing and re-orientating the problem bolt on my trailer and he stated that he thought the orientation was irrelevant but would contact Dexter to confirm. A week or so later, he followed up with me to let me know that Dexter had repeated the information given to me. Word to the wise: If you are having an issue getting your wet bolts to accept grease, it may have been installed improperly at Oliver. This was a doable but clumsy job to complete as it was difficult to de-weight the nut to allow it to be removed..1 point
-
Yes, even for the 2020 OLEll we received (2) 10’ sections. Our salesperson provided us a list of what we would receive on delivery day. We also upgraded to the Rhino Flex hose the day of delivery. Happy Camping!1 point
-
The truth.1 point
-
@Jps190 I’m not sure I follow your reasoning. It seems basackerds to me. My Elite II is the oldest one on the road. Hull #050. We had never waxed it, washed it a couple of times in the past 10 years. Always stored under cover. Had it ceramic coated and it looks better than the new ones being delivered today.1 point
-
No and no. Bill1 point
-
OH - Measure your openings and then go HERE. Bill1 point
-
This highly depends on where you will be storing your trailer. I have 2 vehicles with Opticoat pro ceramic on them. My truck lives outside and my wires car lives in the garage. If you are storing inside then I would say yes to ceramic on the trailer. If storing outside then I would probably advise against it. The coating I have is supposed to last "5 years". Wife's car still looks immaculate, but the horizontal surfaces on my truck (hood and roof) appear to losing there hydrophobic properties after about 1.5 years. If storing outside I would probably just wax it every 6 months or pay to have it done. With ceramic if it starts to break down you have to remove it with mechanical means to start over which will add to the expense of maintaining your trailers appearance. Wax is just wash/polish/wax again to be good as new. John1 point
-
It sure does! Thank you 🙂1 point
-
Kathy & John - What are the odds - but - good for you two! Welcome to the Family and enjoy the heck out of that wonderful camper. Bill1 point
-
@Galway Girl, @SteveCr Thank you for the answers to my questions! As I said, I do not have Lithionics batteries or the Xantrex Inverter/Charger so my question’s are simply for my education and the hope that I do not provide incorrect information in the future. And the picture I posted above is a screenshot from the Lithionics website of one of their guides and not from my equipment. Mossey1 point
-
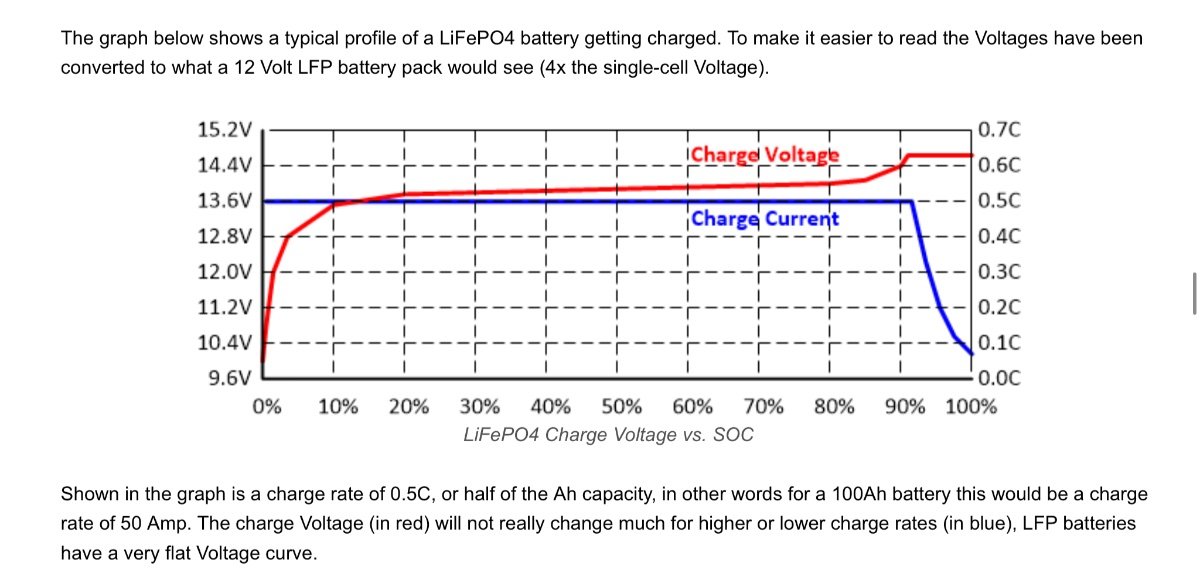
The percent State of Charge (SOC) can be a little deceptive, it isn’t an absolute condition, it is the result of the little computer chip doing all sorts of calculations about charge and discharge rates. My Victron smart bus system actually has a calibration button to “Set SOC to 100%”, for example when it reads say 98% but the charge rate has dropped down to zero. Where I am getting is, don’t rely too much on that figure. OTH I would tend to believe the lithium battery results rather than the solar monitor one. Fully charged resting voltage (no load) should be around 13.5 to 13.6. Your 12.7 volts means a dead battery bank. Do you have a generator? You need one, in this case you should connect it and charge that way for at least three hours. Your tow vehicle doesn’t do anything, Oliver leaves that charge wire disconnected for the lithium packages, and your solar may just not have had enough actual sun exposure. What has the weather been like? The 75% SOC Zamp solar figure sounds very bogus to me.You need to read and understand more about how your lithiums work, they are completely different form the typical lead acid battery in your truck. From an article linked below: Your voltmeter shows not just the condition of the battery but the voltage of what is charging it, for example in full sunlight at full charge my battery voltage is around 14.4. That shows the result of the current coming in from the panels, which operate at a higher voltage than the batteries, otherwise nothing would happen (no current would flow). If the sun goes behind a tree, the panel voltage drops and what you see is the resting battery voltage. Without any major loads it should be about 13.2 to 13.4. Your 12.7 volts represents a dead battery. The battery voltage typical changes very little as it discharges, then it quickly tanks at the bottom. If you have a lthium battery powered drill, you see that when it works fine up to the very end, then it just dies. https://olivertraveltrailers.com/forums/topic/6629-how-to-find-happiness-with-lifepo4-lithium-ion-batteries-solacity-article/ I think you are not getting nearly enough sun exposure, plus maybe there is an issue with your Zamp controller. This is a prime example of why we carry generators. If you do not have one, get one 😬 Good luck. John Davies Spokane WA
1 point
-
I have never had any upgrade batteries in our trailer, only the stock factory deep cycle ones that come with the trailer. All being said, our batteries have always lasted through the night running the MaxFan and possibly some other 12v item without the batteries discharging to a low level that things quit working. I'm sure you will get your answers soon on this forum as many are hovering over there computer as I speak. trainman1 point
-
Take it from someone who had a travel trailer some 45 years ago and are now camping again not much has changed in all that time. Yes all new electronics and appliances that are updated, but when it gets down to it most things are still done pretty much the same way. I personally feel that todays camping ways are pretty much as they were 40 yeas ago, no automatic sewer hookups, still need water hose and electrical connections, and you still get to level the trailer in campsites today. Best thing about camping today is there is in most cases a Walmart close by for those needed things. When I look at list that are posted today for camping there not to much difference from days past, in fact I sometime think they were easier back then. trainman1 point
-
Before I made further efforts to remove the wet bolt, I would invest in a Grease Buster and give it a try on the bad zerk with some PB Blaster. It has worked for me on a bad zerk on my tractor. https://locknlube.com/collections/grease-buster/products/grease-buster-shop-size?gclid=EAIaIQobChMI_vrelKLQ9gIVhyCtBh3D9wptEAAYASABEgLgwvD_BwE I am a big Lock-N-Lube fan. Their Grease Couplers are big time savers when lubing more than 30 zerks on my tractor!1 point
-
Try swapping the zerk fitting with one of the others that will accept grease. Which bolt position is the problem and you're trying to remove?1 point
-
Torque Specifications WHEEL LUG NUTS: 90 - 120ft lbs. Note: Oliver has set 110ft lbs as the standard as of 2023 year models & older. BULLDOG COUPLER: 80 ft lbs AXLE/U-BOLTS: 70 ft lbs SHACKLE BOLTS: 40 ft lbs1 point


-
Recent Achievements
-


")


")


")


