
Leaderboard


Popular Content
Showing content with the highest reputation on 08/09/2022 in Posts
-
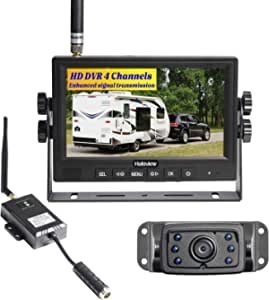
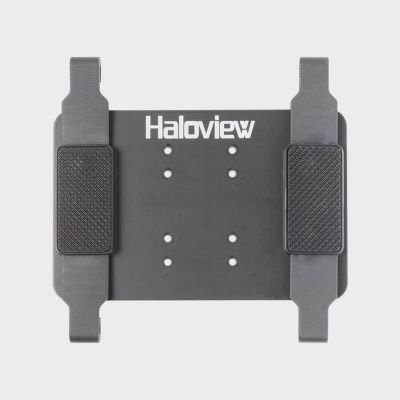
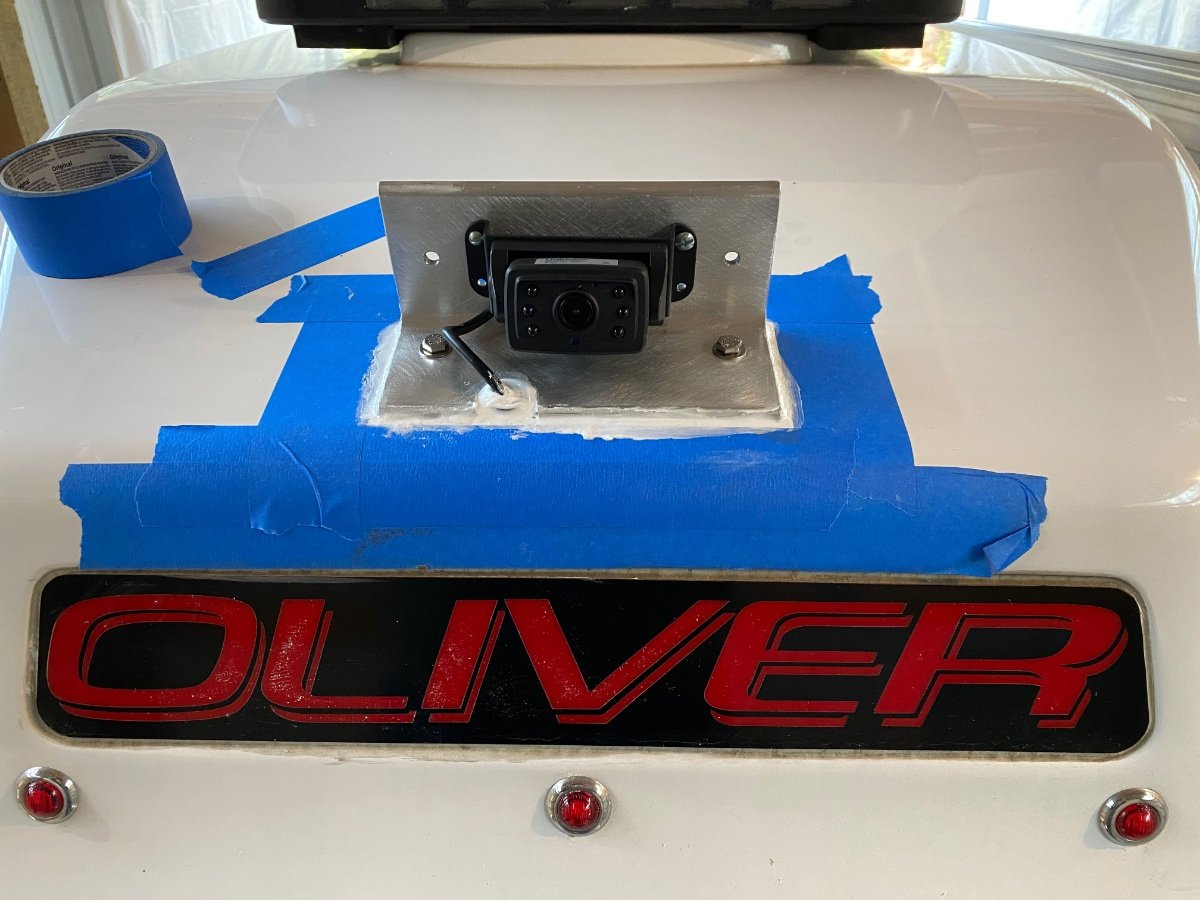
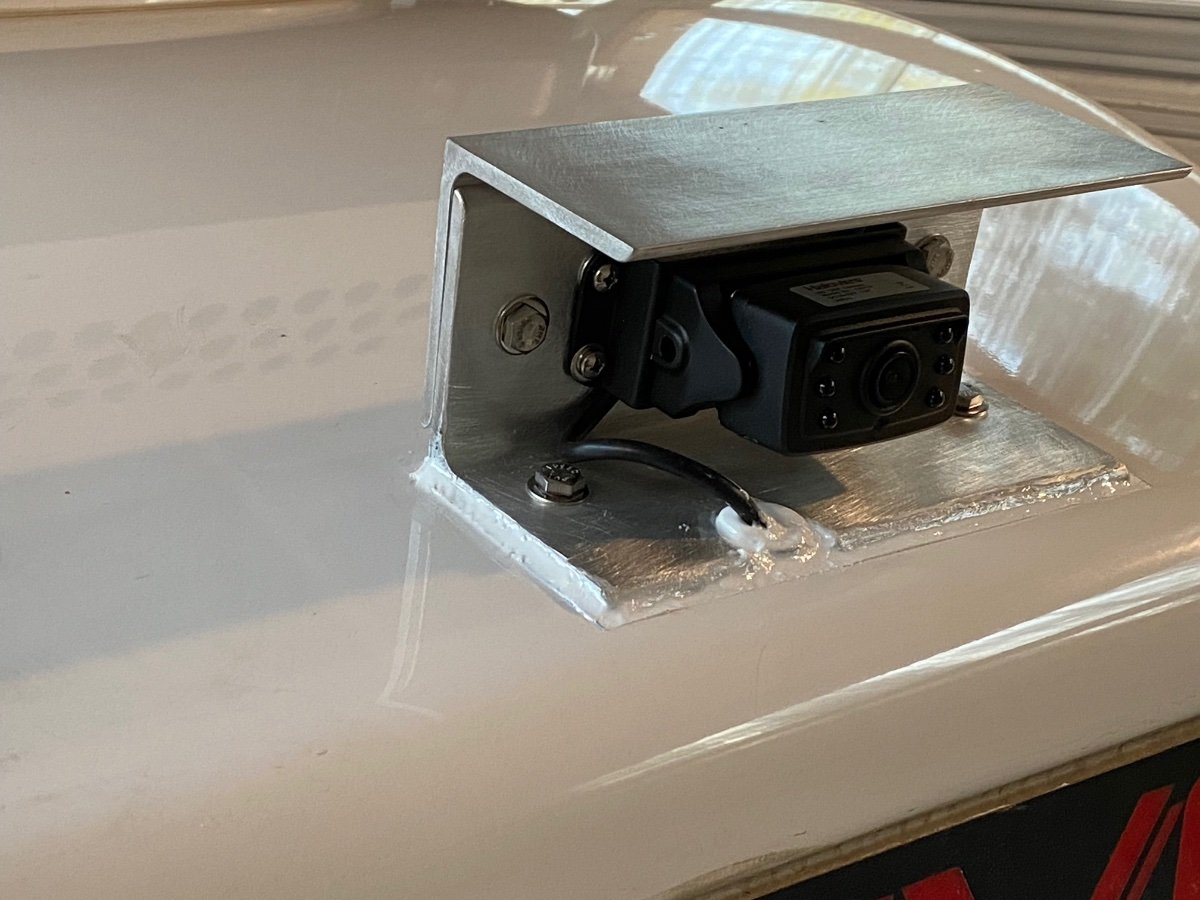
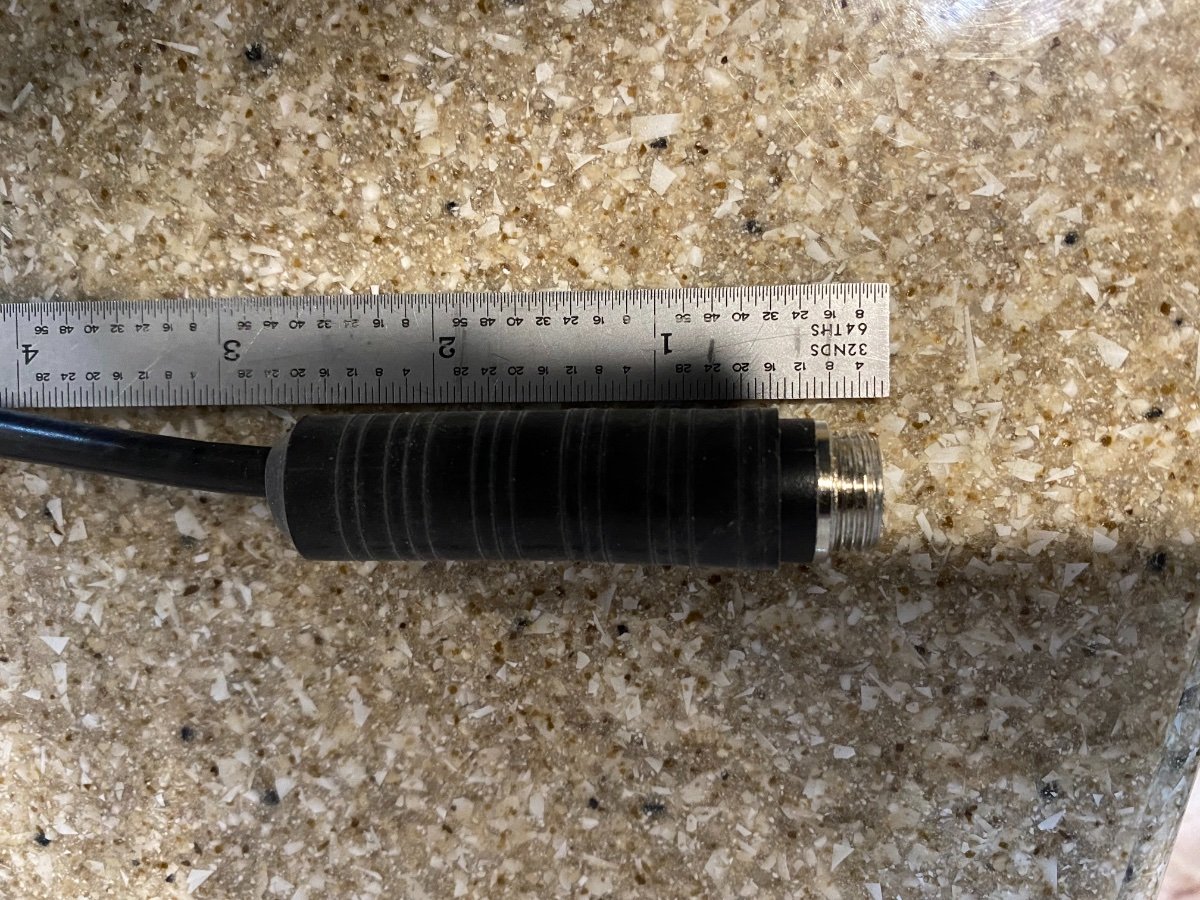
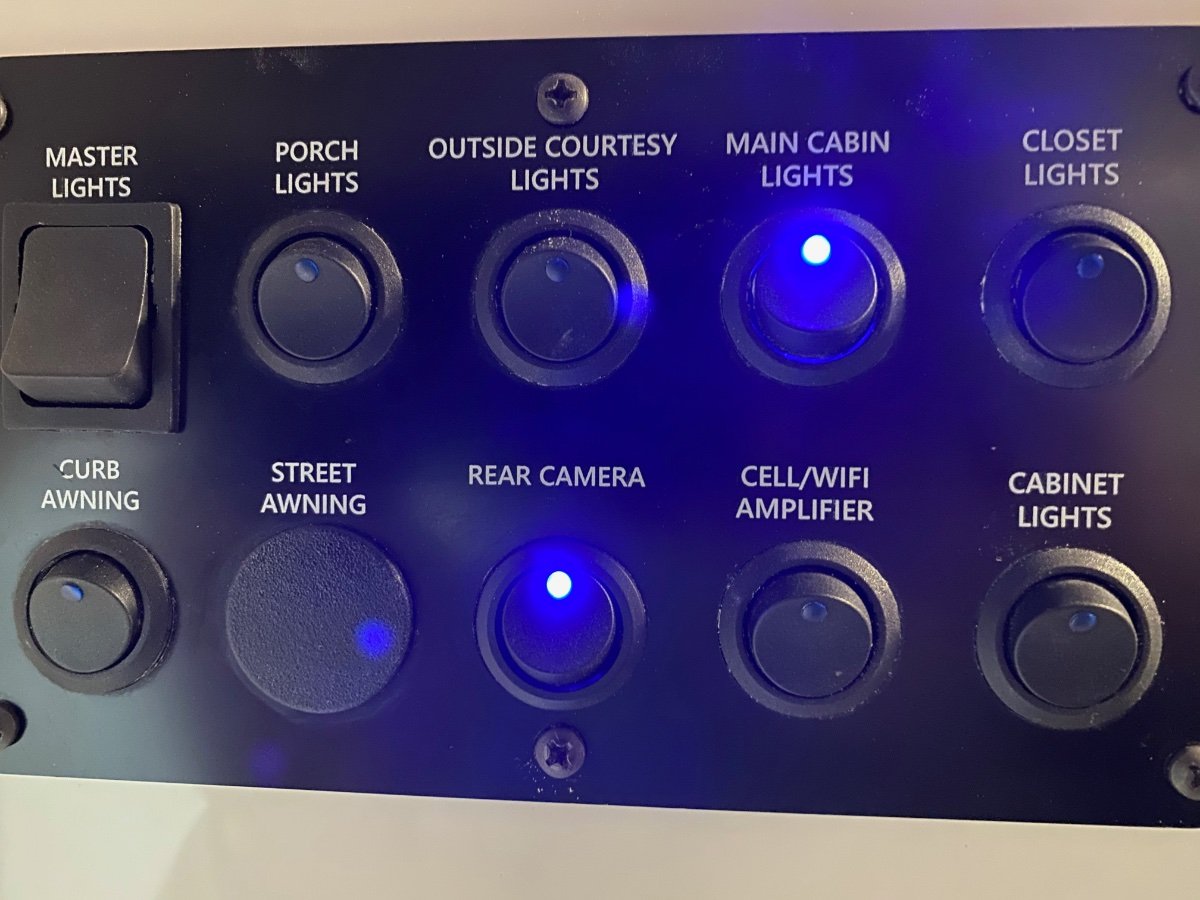
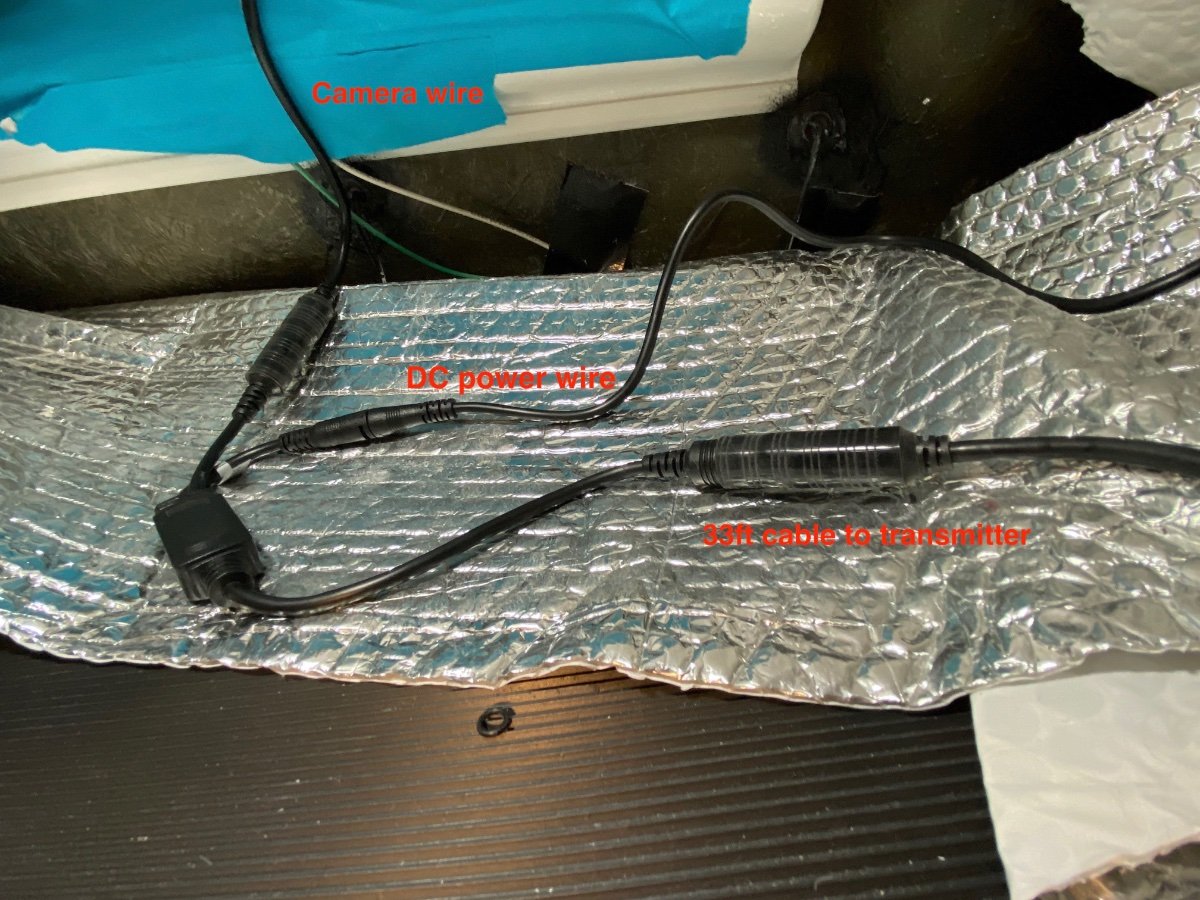
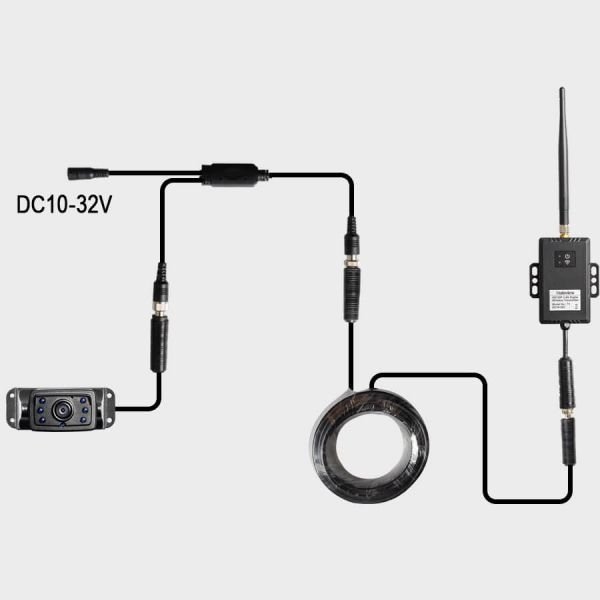
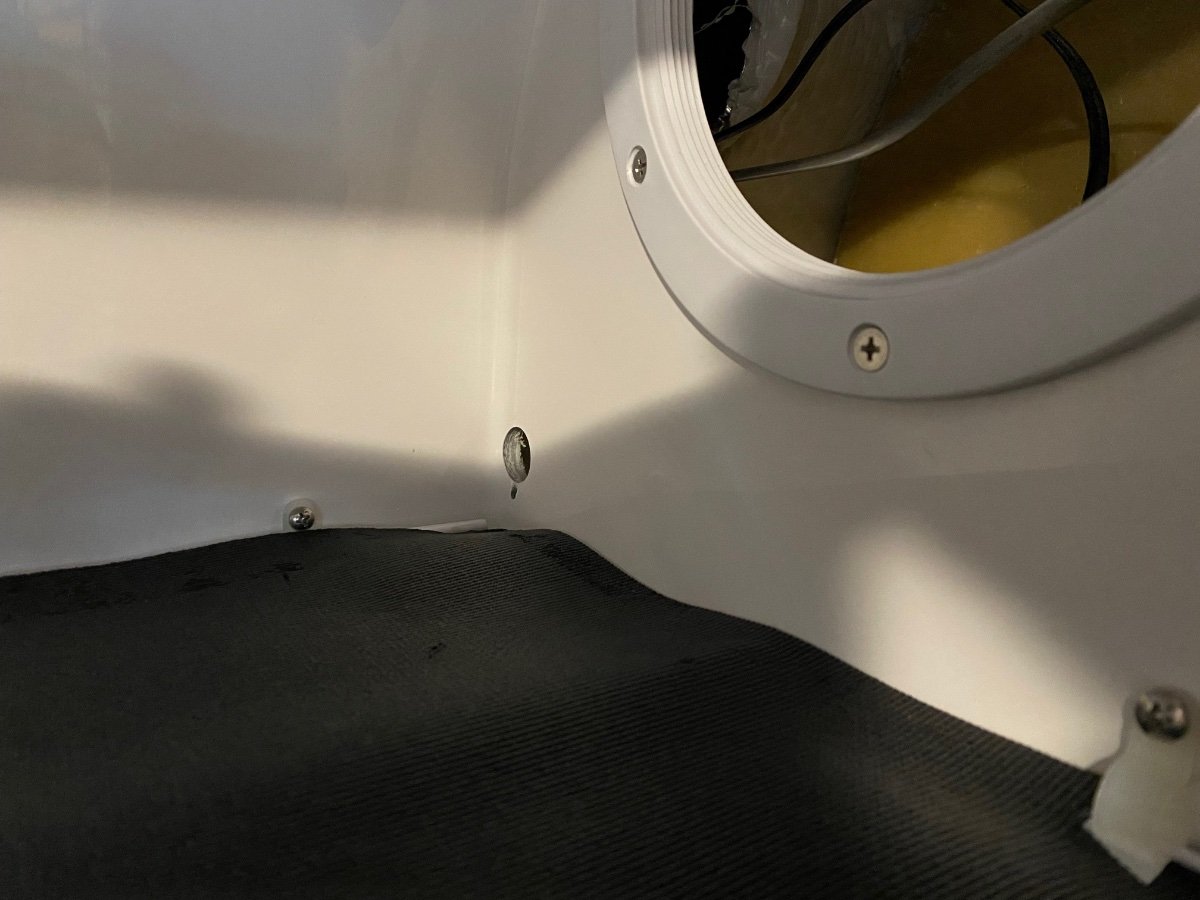
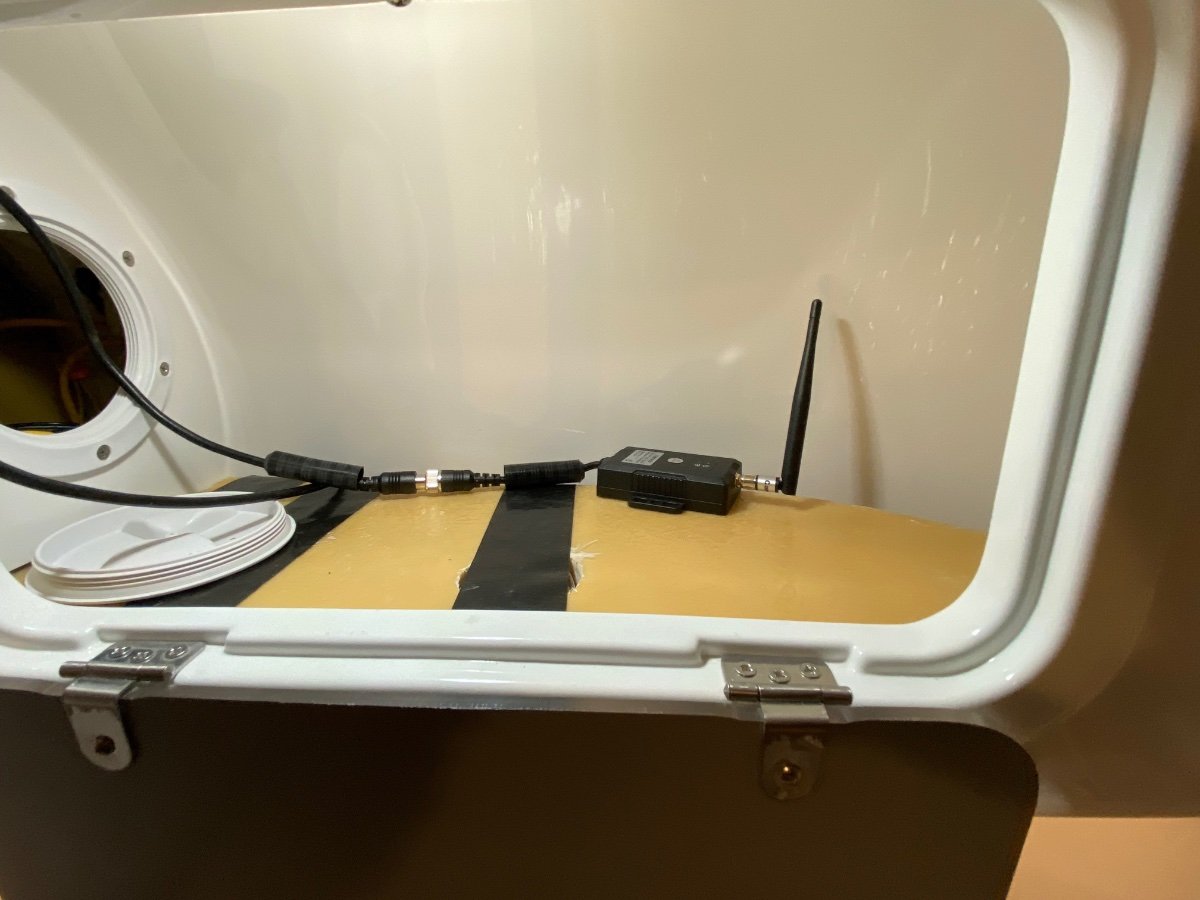
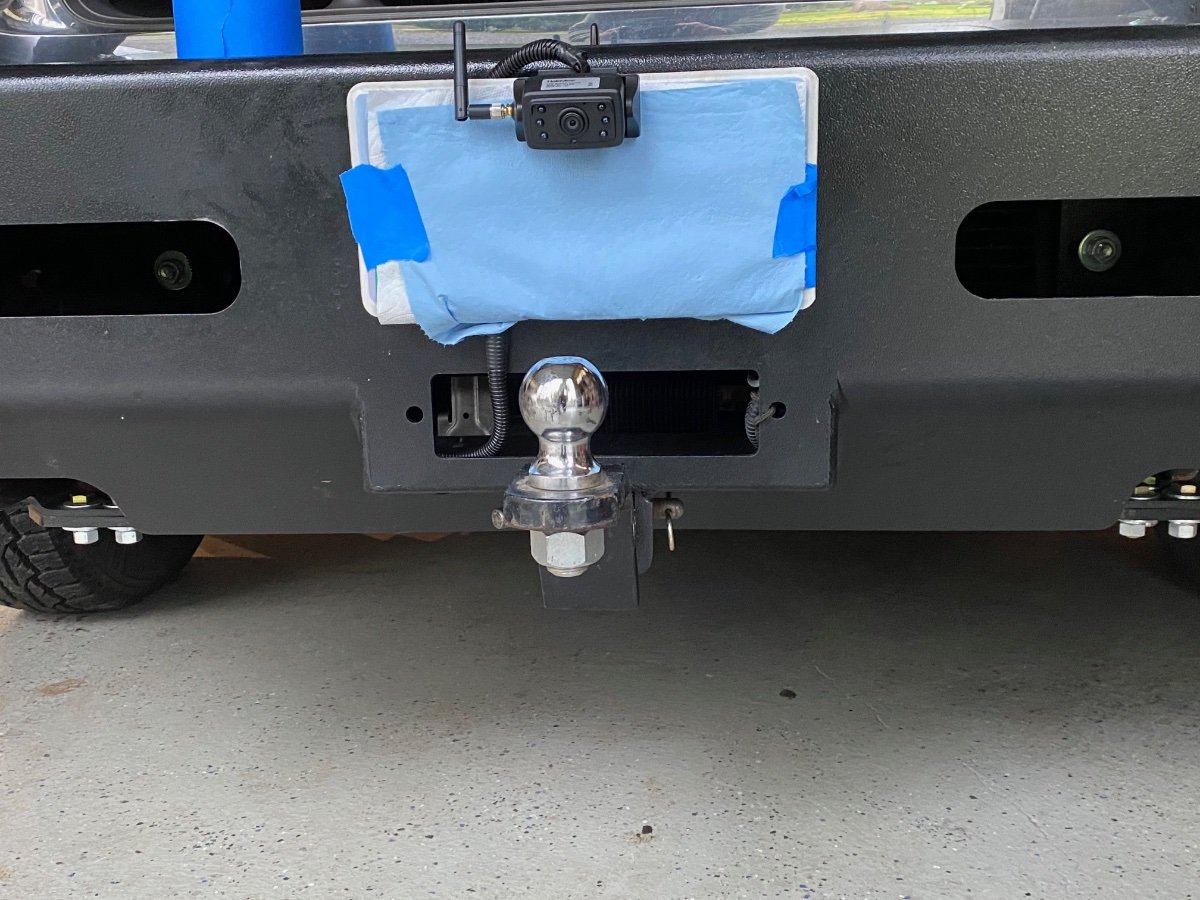
Haloview Rear view camera review. The following is the installation and review of Haloview camera. About 12 months ago I put feelers out there about rearview cameras other than Furrion. I had read about to many people unhappy with the performance of the Furrion. I had read John Davis’s installation of the Garmin with a remote transmitter and I like the idea. I took a lot of Ideas from John’s writeup and implemented them to fit my wants. Thanks John for your writeup. I purchased the following directly from Haloview. Note: Haloview does not have any support in the USA. Haloview’s support and products come direct from China. All support is submitting request via the internet. RD7 monitor and camera with 33ft of cable. The 33ft cable was overkill. I was uncertain if the Haloview would connect as reliably from the Front bathroom cabinet area like John did (plan A), or if I would have to route it to the front Propane doghouse area (plan B). The Haloview was intended to be installed across the top of the camper with the camera mount on the back and the transmitter to be on the front outside of the camper. I really didn’t want wiring running across the top of the camper. License plate Camera. CA109 This was for the front license plate. It was not intended replacement for a Dash cam, but to aid in hooking up the trailer to the front end so that I could park the Oli reliably in the 3 sided RV port. Memory You have to purchase a memory card in order to record audio/video. I decided to max it out at 128GB, So I could keep more data. Rearview mirror Monitor adapter: This adapter plate allows you to mount the monitor over the front of the mirror. I like this because it attaches/de attaches easily. and does not sit on the dash. DC 5.5mm x 2.5mm Male Plug The Haloview comes with a long cigarette lighter power cord. I really don’t like a bunch of cords dangling around the cab. I had looked at several different cables on Amazon, I had found another cable that was 9ft long, but messed up and ordered this instead. I will just add the extra wire I need to make the run to hardware it to my truck. Mounting the Camera I mounted the rear camera above the Oliver sign on the top of the roof. I like the U channel idea that John Davis installed. The depth of the camera was about 2.3inches. I found a piece of scrap aluminum 3” angle. I cut two 7” lengths and made my own U-channel. Angle Aluminum is attached with 1/4-20 stainless steel bolts The camera cable connector is 5/8” diameter and the cable itself is about .220”. I found a shifter bushing at Orielly’s that worked as a grommet. I cut a slot in the bushing so I could get the bushing on the cable. I also had to trim the leading edge of the bushing so I could get it started, It was a tight fit. I also made a 7/8 slot in the aluminum where the bushing resides, instead of just drill a hole in the alumimun. This will hopefully allow keep water from building up around the bushing. Sorry I didn’t take pictures of aluminum before assembly, Above: Male end of the connector with rubber boot The Wiring The wiring came into the upper rear cabinet inside the Oli. When pulled the street side panel off from the inside of the cabinet, I was lucky enough to find a 2 wire bundle with one wire marked “cam”, and the other wire was a ground. The DC power cable that came with the Haloview had 22 gauge wires, and the Oli has 14 gauge wires. So the soldered a small length of 18 gauge DC wire to the 22 gauge and reinforce the smaller wires and connections with a couple layers of heat shrink to reinforce the 22 gauge wires from breaking as easily. I then made a mechanical connection with the 18 gauge wires to the Oli’s 14 gauge. I purchased a LED switch from Oliver and added it to the Master switch panel. I love it that Oliver already had a slot for the camera. It made it easy to add power and ground to the switch and connect the “cam” wire on the panel side. Above: Wires inside the upper cabinet just behind the Oliver sign. Below: Haloview wiring setup. The 33 ft Cable going to the transmitter was the only big cable run the I had to do. I want to step back a week in time just after I received the Haloview products. I wanted to test the equipment and where I was actually going to place the transmitter. I kludged together some stuff to place the camera just inside the back window. Then connected all of the haloview cables together and powered them up with a battery jumper box. I place the transmitter inside the bathroom cabinet and taped to the front bulkhead. I used painters tape to secure everything in place for a drive. I mounted the monitor in the truck and went for a 40 mile drive on 2 lane roads and a good freeway stretch. I found the the Haloview transmitter communicated well with the monitor in the truck. I will cover my results later in my review. The 33ft cable run The 33 ft cable was ran through the street side cabinets. I ran into one snag, I was unable to get a fishtape through the pantry cabinet area. I tried for about 45 minutes and then gave up. OK, time to start plan “B”. I know that getting a wire through the bottom street side waste plumbing areas was doable. So I made sure I could get a fishtape from the bottom storage area to the top rear cabinet, this was no problem at all. The only part of plan “B” that I really didn’t like was getting the bathroom sink cover off, and drilling a hole through the front hull into the doghouse area, and plugging it; yet another point of possible leaks, plus it wouldn’t get finished this week. Then the thought came to mind, if I am willing to cut another hole through the hull, why not just cut 2 holes in the pantry and go back to plan “A”. Time to get the executive committee (Dawn and I ) and make a decision. The committee weighed the facts and unanimously decided on plan “A”. FYI: if you run the wire as I did, Plan “A” Haloview has a 26ft length of wire at will work better, If you do plan “B” and run it below to the Propane doghouse the 33ft length of wire will probably be needed. The Connectors on the rear camera cables are large. They are running power,ground, audio, and video through it. Kind of clunky, but I really do not know any better way. I cut two 3/4” holes in each side of the pantry cabinet. I went a little oversize since 5/8” hole is a very snug fit with the cable connectors and boot. upper pantry shelf It worked great, running the wire and mounting the transmitter only took another hour. I first tested the setup before attaching the transmitter to the bulk head; every worked great. The transmitter was then attached to the front bulkhead with 3mm double faced tape. I had to use 2 pieces thick to get it to stick because of the slight curve in the hull. The transmitter fit neatly in the wire trough and takes up very little space. The area around the transmitter only stores wash cloths and hand towels. Review and Lag Time Results: Rearview Camera: The monitor is 720p resolution, and the camera has a 130º view. Furrion is a 480P with 120º. Because of the viewing angle, things appear farther away than they are. The image appears to be clear with good color. A small vehicle can be seen at about 150yards. Semi trucks at about 300yards. This is enough to keep track of vehicles approaching from the rear. According to Haloview viewing distance is only 32ft at night. This does not seem to be very far. I have not had a chance to test it at night. Hopefully this would be enough to see what is close when backing into a site in the late evening. As far as being out on the freeway hopefully you will be able to see car lights further back than 32 feet. I try not to do much traveling in the dark with the camper attached. Lag time: Lag time has always been a problem on wireless cameras. I tested the lag time by measuring road imperfections. When the road imperfection was at the front tires of the truck I would start a timer, and would stop the timer when I would see it in the camera in the rear. Rearview lag at 65mph was about 0.7 seconds lag from the front tires of truck until seen in the back of the truck. This distance is approximately 55ft total distance from the front of the truck to when seen in the back camera. At 65mph is equates to 95.3ft/sec. At 0.7 sec @ 65mph this is 66.7ft, So 66.7ft minus 55ft is approximately 12 feet delay. 12ft divided by 95.3ft per second is about 0.126 second delay. I watch vehicles pulling out in the lane behind me using the rear view camera. When I would see them start to cross the dotted line I would look in the side mirror. During that time the car would be about 2 ft over the line. I also did the reverse watch cars pulling in behind me from the inside lane watching through the side mirror. As the car cross the dotted line, I would look at the rear view monitor and the car would be about 2 ft over the line. I think the 2 ft differences is the amount of time it takes me to turn my head and refocus. So I think that the small delay is imperceptible. Monitor: What I did notice is that the monitor does not have a fluid smooth motion. It was more like an old black and white silent movie that that flickered in movements jumped just slightly with the refresh of the screen. At highway speeds this really wasn’t a big deal, because you were just glancing in the rear view monitor then back to the road and then scanning the side mirrors. To many things to watch for at highway speeds than just staring at the monitor. In town when going 25mph you might have a full second or two you could concentrate and see the jumpiness in the refresh of the image. This really does not both me. The last time I had experience with a backup monitor was when I Installed a Black & white hardwired 9” tube type monitor in a 35” gray hound bus. So my experience is limited. Audio: The cameras have audio. I have not really tested it. I had it on for a while when I was driving. It just made road noise. Road noise is not enjoyable to listen to. When I had a chance, I pulled over and muted the sound. Depending on how well it works, it might be nice when I am backing up that I can hear my wife. The negative is that you have to go into the menu to change the sound setting. Would be nice if the monitor had buttons that would changing the volume. Backup lines: I was disappointed in the lack of adjustability in the lines. You can in and out and front to back in large steps. Not really super functional. I have 2 different Pioneer stereos with backup lines that each of the 4 points of the lines can be adjusted in both axes. Setup: The program works, but is clunky. Sort of old school technology. This unit can handle up to 4 cameras. There is a lot of ways to set the cameras up for viewing. No wifi/bluetooth to connect to phone There is no way to transfer data from the monitor to a computer or phone besides taking the memory card, microSD, out and putting it into my MacBook. I then have to convert the AVI file to MP4, so it can be read on any (i)phone/computer. ie: Apple does’t do AVI since it was an early 1990s Microsoft technology and uses a lot of space. Cables: Power to monitor takes extra connections. 3 cables totally 9 feet to get to a cigarette lighter adapter. Really! No mater what I do I will still have 5 feet of cable hidden behind the monitor. Front License Plate Camera. The front license plate Camera is only to aid in attaching the trailer tongue to the front ball. Due to the Angle of the camera to ball, the camera only works for this purpose. This use is also limited. I can only see the tongue when I am within about 8 feet away. This after practicing one time, I was able to properly get the ball properly positioned under the tongue 3 more times in a row on the first shot. The camera is only turned on when it is needed for hooking up to the trailer. If I pointed the camera up, I would not be able to use it as an aid in hooking up the trailer. Also this technology is not quite suited as a fully functioning Dash Cam. There is a video delay on front licenses plate camera. The delay was variable from imperceptible to 1.2 seconds. I test it by driving forward in the driveway and then slamming on the brakes and measure the time delay. Fortunately as I got close to the ball the delay seemed to be imperceptible most likely because I was creeping forward, slower than a idle. The camera is mounted on the front of a custom 1/4in thick bumper. The metal may have caused the problems with the reception. Overview: Positives: Haloview had already paired the cameras. I just powered everything up and they worked. Quality appears to be pretty good. Everything was packaged nicely and it took 10 days to get here from China. (not bad from China) I like the rearview mirror mounting adapter. When in use it attaches to my rear view mirror. I do not the rear view mirror when towing, I get tired of just seeing the emblem on the front of the Oli, This unit can handle up to 4 cameras. There is a lot of ways to set the cameras up for viewing. Price was reasonable. I spent over $700 for my 1998 wired rear view camera setup. Technology has came a long way since then. Furrion is $200 more for a similar camera. Records video and audio. Many other setups do not. Negatives: Getting the data off of the Monitor. There is no bluetooth/wifi connection. Kind of a PITA. Since this a totally based Chinese company, I do not know how good there service will be. The Haloview products took about 10 days to arrive from China. Amazon does sell Haloview. I do not know if the support will be any better/different. I did use the online web tool to ask information. In both cases I had a reply in less than 24hours. Finding the communication tool is difficult to find on their website. No phone # to call. Viewing angle of front bumper camera is poor. This could be as much my problem with the angle of setup. Lag time on front bumper is as much as 1.2 seconds. Night time viewing probably poor have not tested. limited to 32ft maximum. Power to monitor takes extra connections. 3 cables totaling 9 feet. Monitor function/setup clunky. Looks like 1990s software technology. Looking online other manufactures are just as bad. This is not a replacement for a real dash cam Adjusting sound is not as easy as just pushing a button. Overall I am satisfied with the investment. For a wireless camera it is good. It is usable and does the job I bought it for. I think the only way of getting better video quality at this time is to hardwire from the camera to the monitor. I really did not want something else to connect when hooking up the trailer.
 5 points
 -
Lot of good replies on this subject, but I will throw in one more not often discussed. Winter camping and cold weather is relative, we have many owners here who live in the deep south or there about and having grown up down there myself I can tell you with no uncertainty winter camping down there is a lot a different than winter camping in places like Montana where I now live. I don't consider the Oliver a 4 season camper in Montana winters unless you hit on a very mild spell and even then you'll run the furnace nearly non stop. Its highly unlikely you'll have running water under those conditions either. Otherwise its a great camper but as others have stated there is a lot of maintenance to do with any of these RV's not just an Oliver. Good luck with your decision.4 points
-
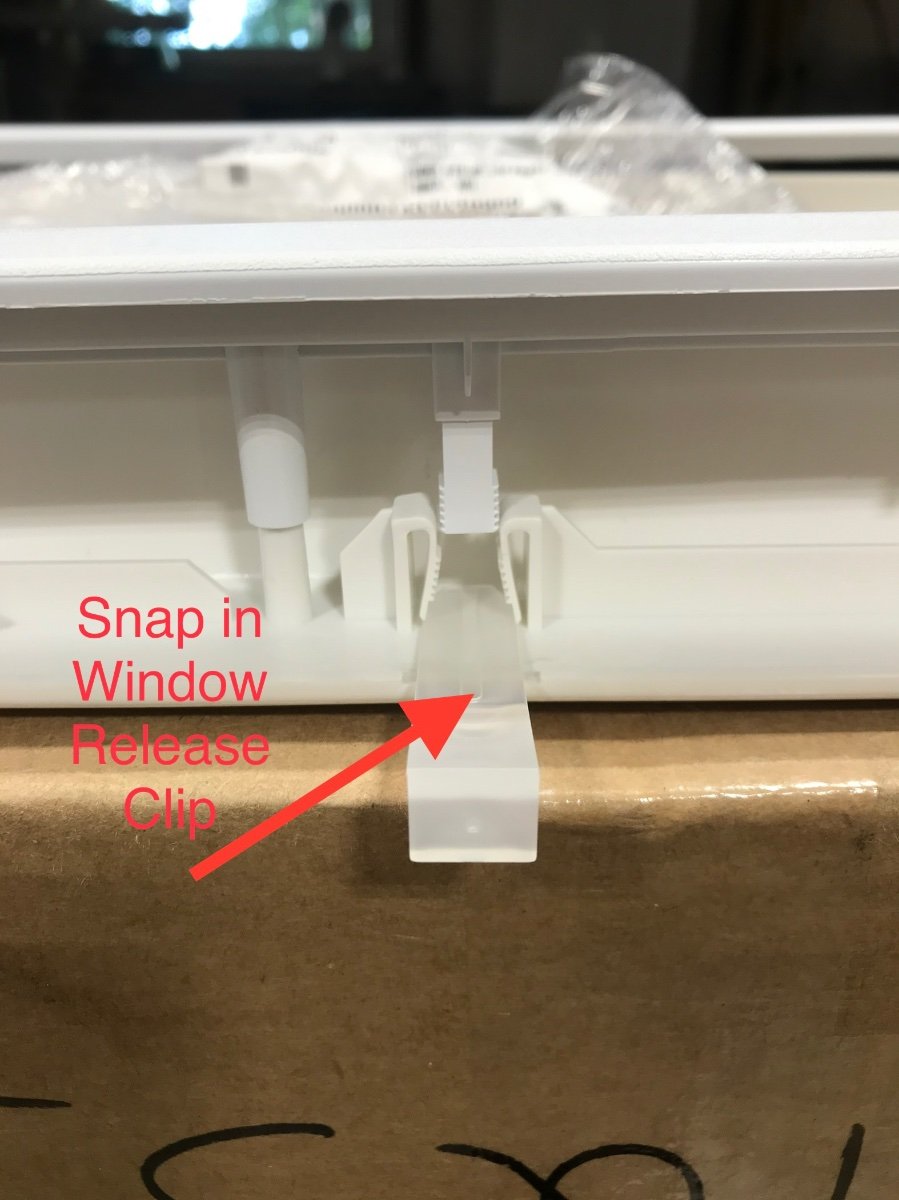
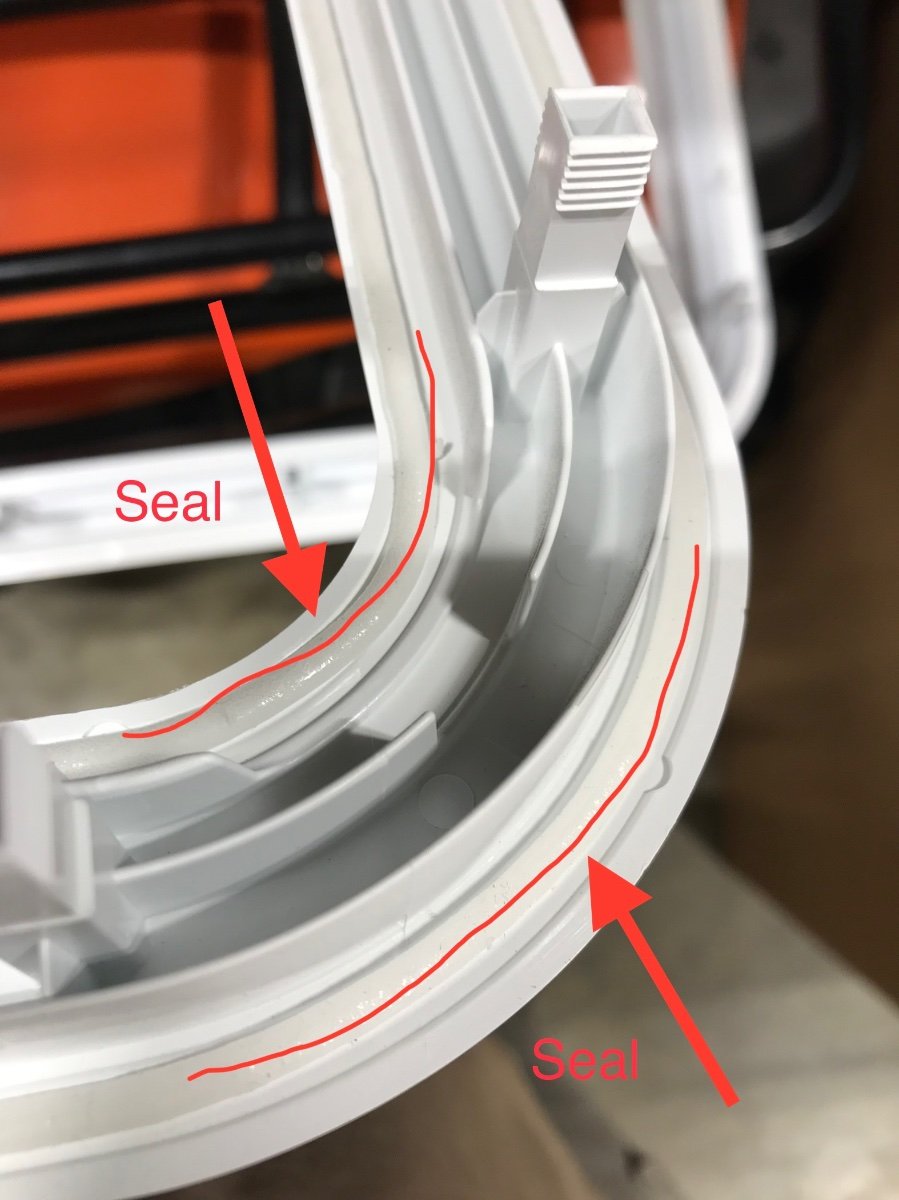
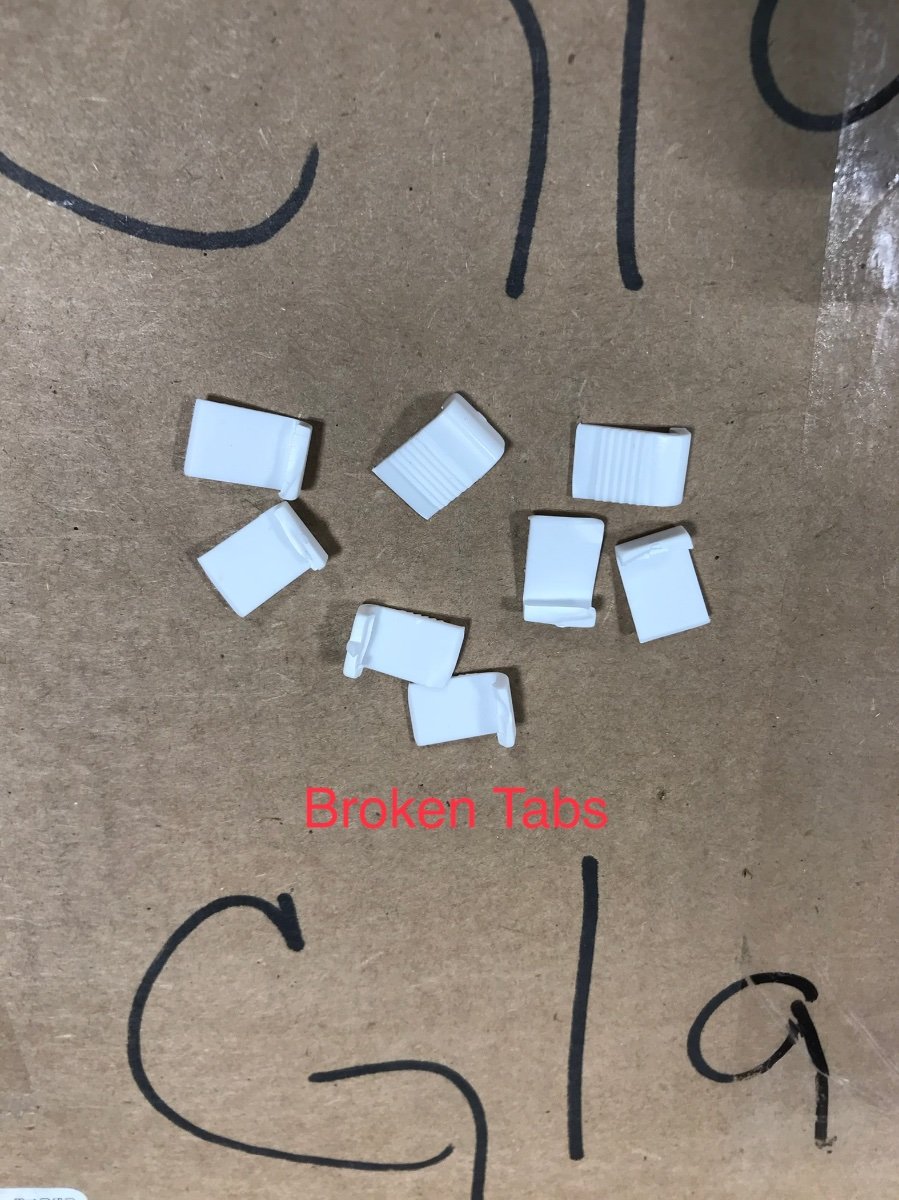
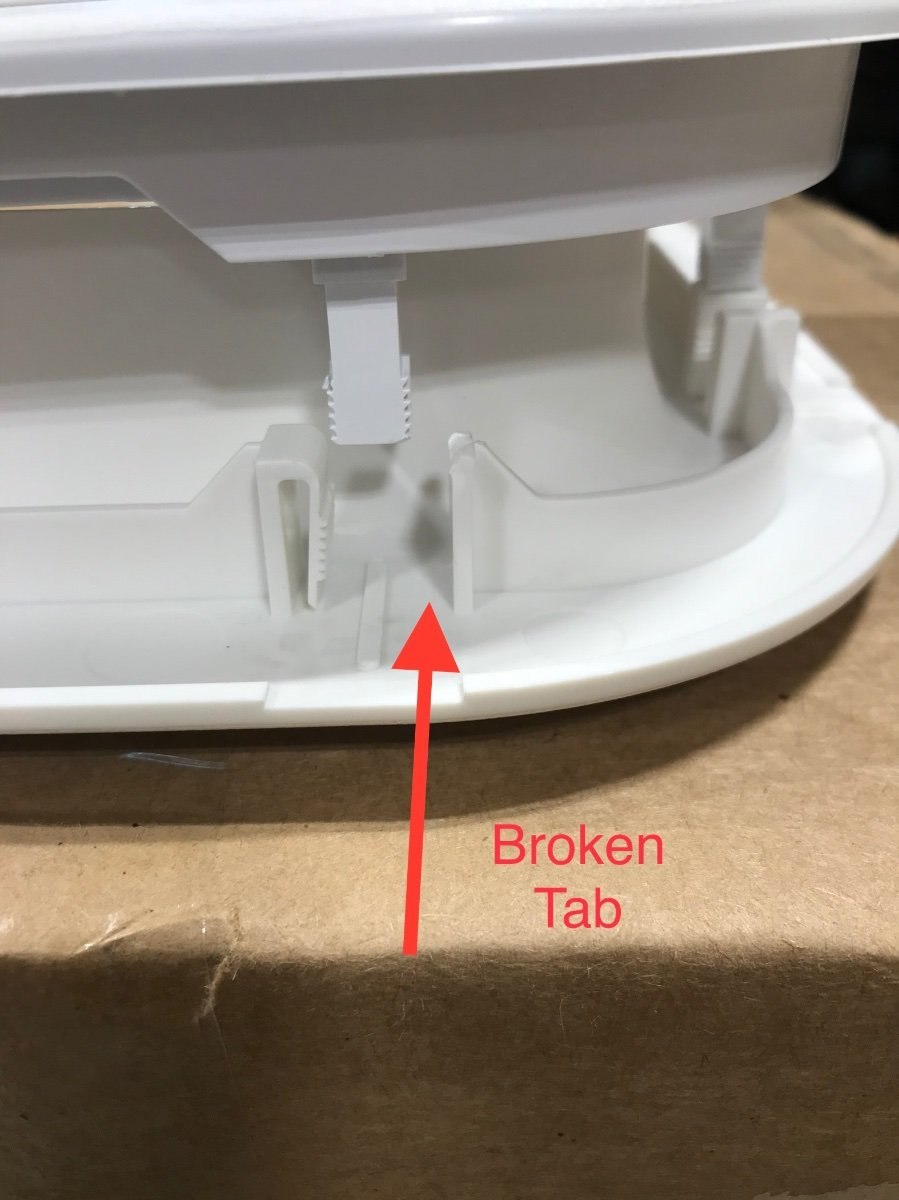
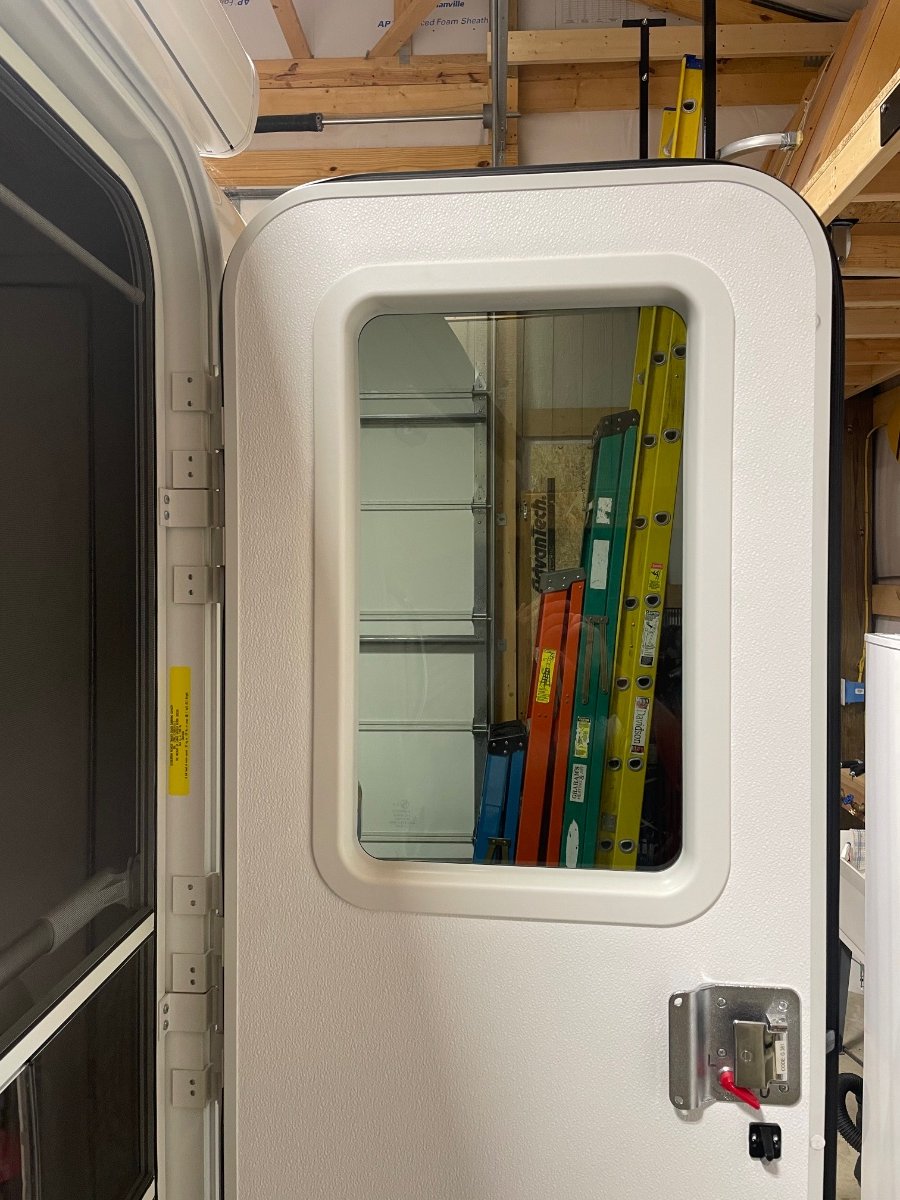
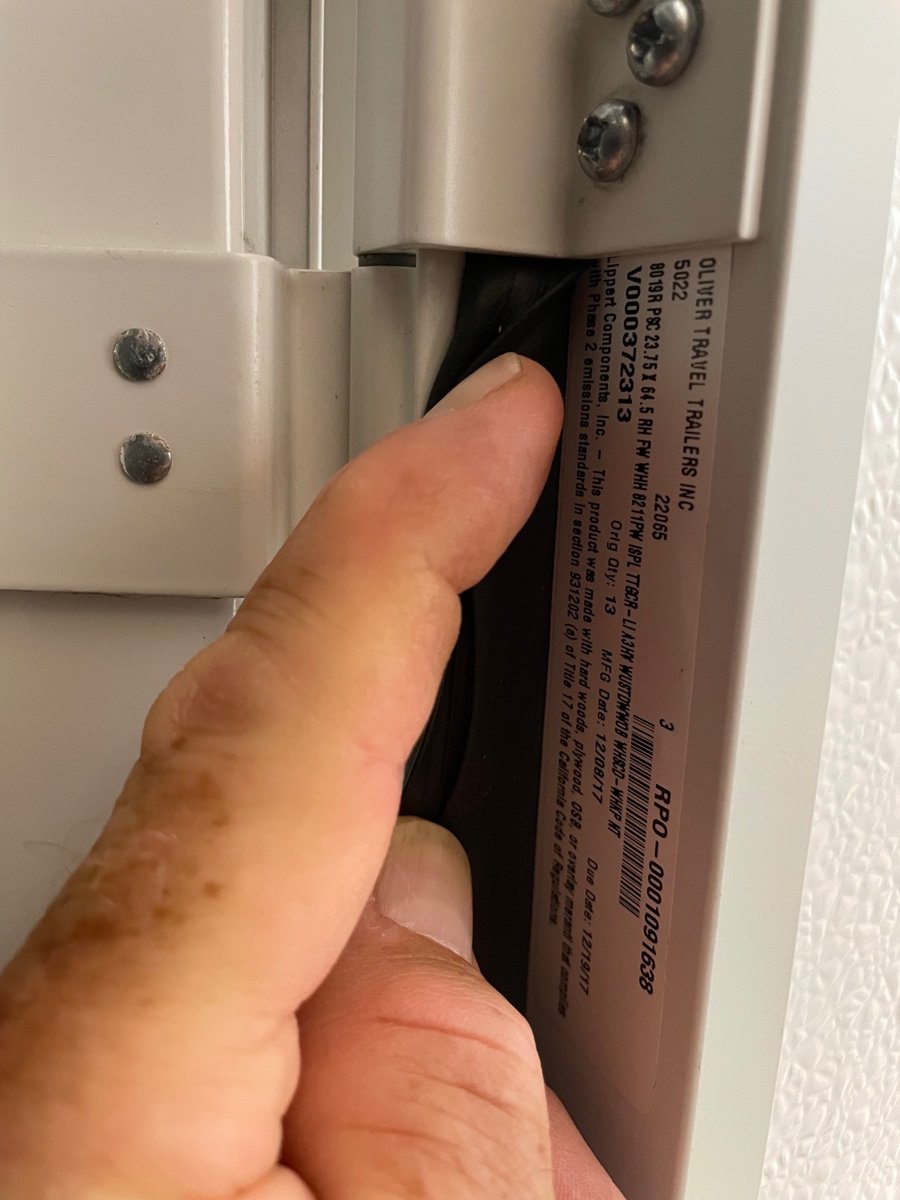
I put a clear tinted window from Lippert in our Oliver entry door made by Lippert. I called Lippert and talked to a real person (Sandra Berg) and told her what I wanted to do. She asked for some numbers off of the door to make sure I ordered the correct parts. Be sure to order the “snap in window release clips”. They are supposed to expand the tabs that secure the inside frame to the outside frame but I still had to break several tabs to get them to release, so you’ll also need a new inside and outside frame. You will want to use new frames anyway so that you have good seals Parts I ended up using for hull 313 706073 GLASS; DARK TINT - G20; 13.25 X 22.24 TEMPERED 429436 SNAP-IN WINDOW CLIPS; 16 PCS KIT 716156 WINDOW FRAME; LOW PROFILE W /SEAL; 15 X 24 OUTER - WHT 716157 WINDOW FRAME; LOW PROFILE; 15 X 24 INNER - WHT
4 points
-
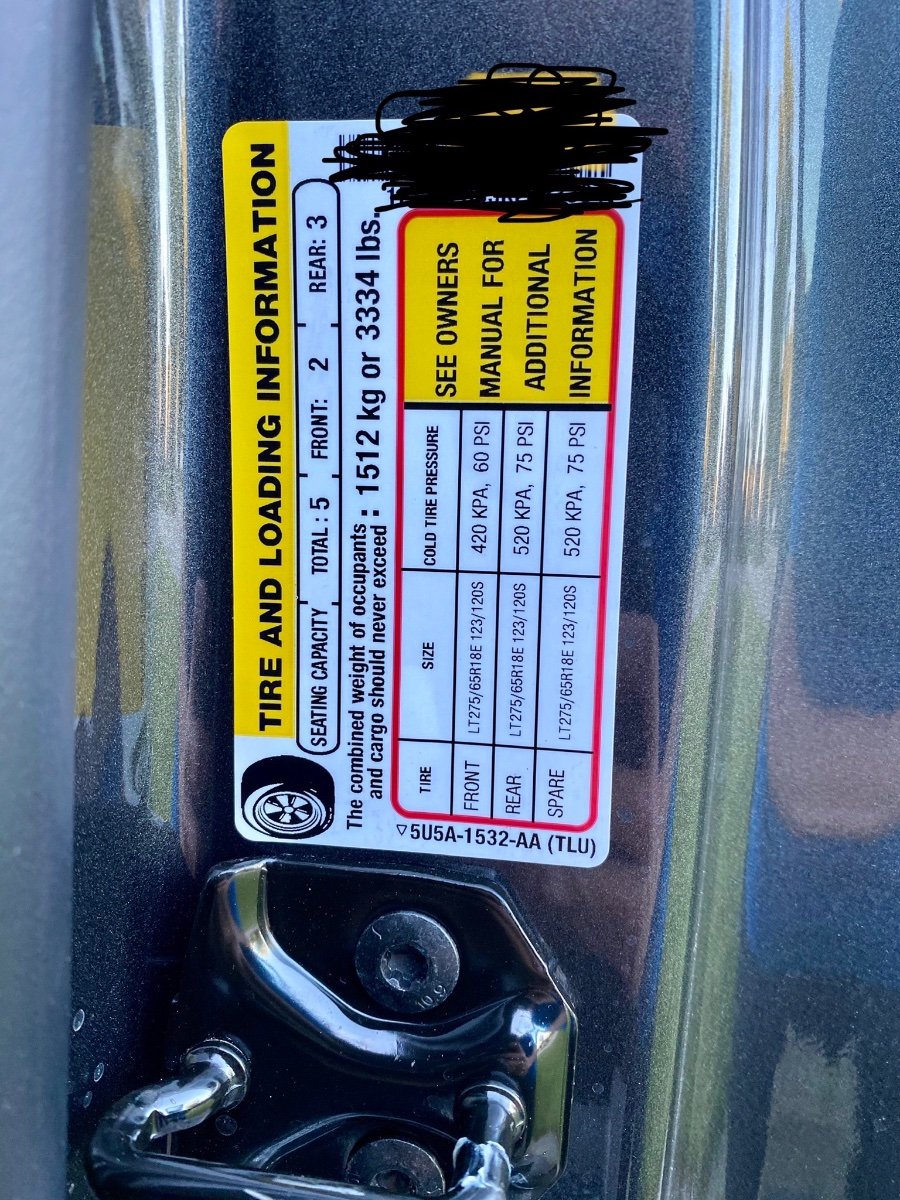
Note that as you compare “work truck” versions of any given truck brand/model to the loaded “Platinum” or “Limited” top end full featured versions, you’ll find that all those features on the top end loaded models typically means you’ll lose some payload / cargo capacity of the truck for what you can carry in the truck bed. We’ve seen Oliver owners buy a fully loaded luxurious high end 1/2 ton pickup only to find out the payload/cargo rating barely covers the trailer tongue weight plus the driver and one passenger. My F-250 is an XLT edition “work truck” version, reasonably equipped and comfortable for long trips (but certainly not luxurious), but it has an insanely high payload/cargo rating of 3,334 lbs. so I can pretty much carry anything I want in the truck bed, even while towing. Look for a truck based on towing capacity, tongue weight limits, payload/cargo limit, 4 wheel drive, a heavy duty towing package, and a TRAILER BRAKE CONTROLLER. Not all trucks have a trailer brake controller (as some owners have discovered).
4 points
-
We hang a shirt or jacket over the head bump cushion, in our 2008. I made a curtain, used it a few times, and went back to the shirt.3 points
-
Hi John, Winter camping can mean a lot of things, given this geographically diverse country we live in, and yes there are many examples where it’s got the challenges you mention. Thanks for your thoughts. We could talk about monetary policy, the yield curve and the various forms of inflation and deflation but maybe not here 🙂 A small point though that the raw material prices, and demand for RVs has softened, exactly as you’d expect. Thanks very much for the comparison to the Airstream, that has been in the back of my mind. I don’t want to write a novel but my childhood was spent fishing with my Dad in RVs, tents and cars, in all seasons in remote areas. It’s mainly about what my wife thinks. I didn’t know Cruise America does trailers too, thanks for that tip.3 points
-
Welcome to the forum, and also welcome to potential Oliver ownership. If you’ve never camped with an RV or trailer before, you may want consider renting an RV or trailer from a place like CruiseAmerica to see if you’ll really enjoy the trailer life. CruiseAmerica rents both travel trailers and RV motorhomes. Very doubtful that you’ll find anyone willing to rent you their Oliver. The Oliver is a big investment (along with a tow vehicle) and there have been a few owners who sold their Oliver soon after purchase when they discovered all that is involved in trailer life (hitching and un-hitching, campground setup, emptying holding tanks, sanitizing the water system, troubleshooting issues at campgrounds, general annual maintenance, repairs, problems on the road, storage of the trailer when not using it, etc.). Some of their (mis)adventures have been very interesting to read. You mentioned you’ve done backpacking so you at least have some idea of what’s involved in camping. We spent 3 years car camping before moving up to an Oliver. Now in our 4th year camping with the Oliver Elite II and we love it, and it’s a perfect size for just me and my wife, but it is a lot of work and expense compared to just checking into a hotel. But we love the freedom of travel and having all of our own stuff with us no matter where we travel.3 points
-
I’d recommend a factory visit or trying to find an Oliver nearby to get a feel for the size. It is small on the inside, compared to traditional trailers. It hasn’t been an issue for us except during extended bad weather days where we really had to spend a lot of time in our trailer. Mike3 points
-
I sure will. We will be in Hohenwald on Thursday night. Since it's the end of the week we will spend the weekend at Chickasaw State Park near Henderson TN because it's our old home place and relatives live there, ninety miles west of Hohenwald. It will give us time to do an assessment and get familiar with everything. We leave Monday on our way back to East TN via a stop for two days at Cumberland Mountain SP, thanks to rideandfly. If I find issues of concern, this weekend, I plan to go through Hohenwald Monday to have them addressed before proceeding. I'll post when I return the end of next week.3 points
-
You will get many who say a WT is a bad idea (less tech, no leather, heated steering wheel and seats, etc). If you are the person who loves a lot of tech and luxury, you will absolutely hate a WT. My 2018 Tundra is a SR WT. It has vinyl seats, rubber flooring (under the rubber floor mats), towing package, steel wheels, cruise control (adaptive at that), bluetooh phone and several other items which my older truck does not have. I LOVE this truck and considering a SR5 was $10-15k more at the time I don't feel the additional cost was worth it for me. Cleaning the truck interior is a breeze and I am not one for a lot of tech in my vehicle. I plan to keep my truck until it dies and cannot be repaired so resale is not a factor. Go with your gut.3 points
-
As far as the price increases, I don't think Oliver is jacking stuff up, or gouging. Fiberglass is a petroleum product. Raw materials have doubled. I posted a chart somewhere last year. But, you can look for yourself. Everything else has gone up as well. Salaries, insurance, you name it. The Oliver family is an honorable family, imo. During the last downturn, they kept virtually everyone in the plant employed, in other roles, even though they had to close the trailer line. They never let us "orphan" owners down, if we needed help, parts, repairs. Someone always helped. I'm a small town, country girl by upbringing, and that just speaks volumes to me. You don't find that a lot. By all means, shop around. Everything else has gone up, too. My elite 1, in 2008, was probably slightly more than half the price of today's elite 1. I get that. But, what's included in a base trailer today is phenomenal. I really wish they'd roll it back a bit. Include fewer items that should, imo, be options. Many people don't need, or even want, what's in the base package. And, some non-techie folks shouldn't want it. Just my opinion. Happy to still camp in my 15th season, 2008 Elite 1. If our daughter wants it, it will be hers, when we're gone. Hopefully, decades from now. We'll see what life brings. For now, all is good.2 points
-
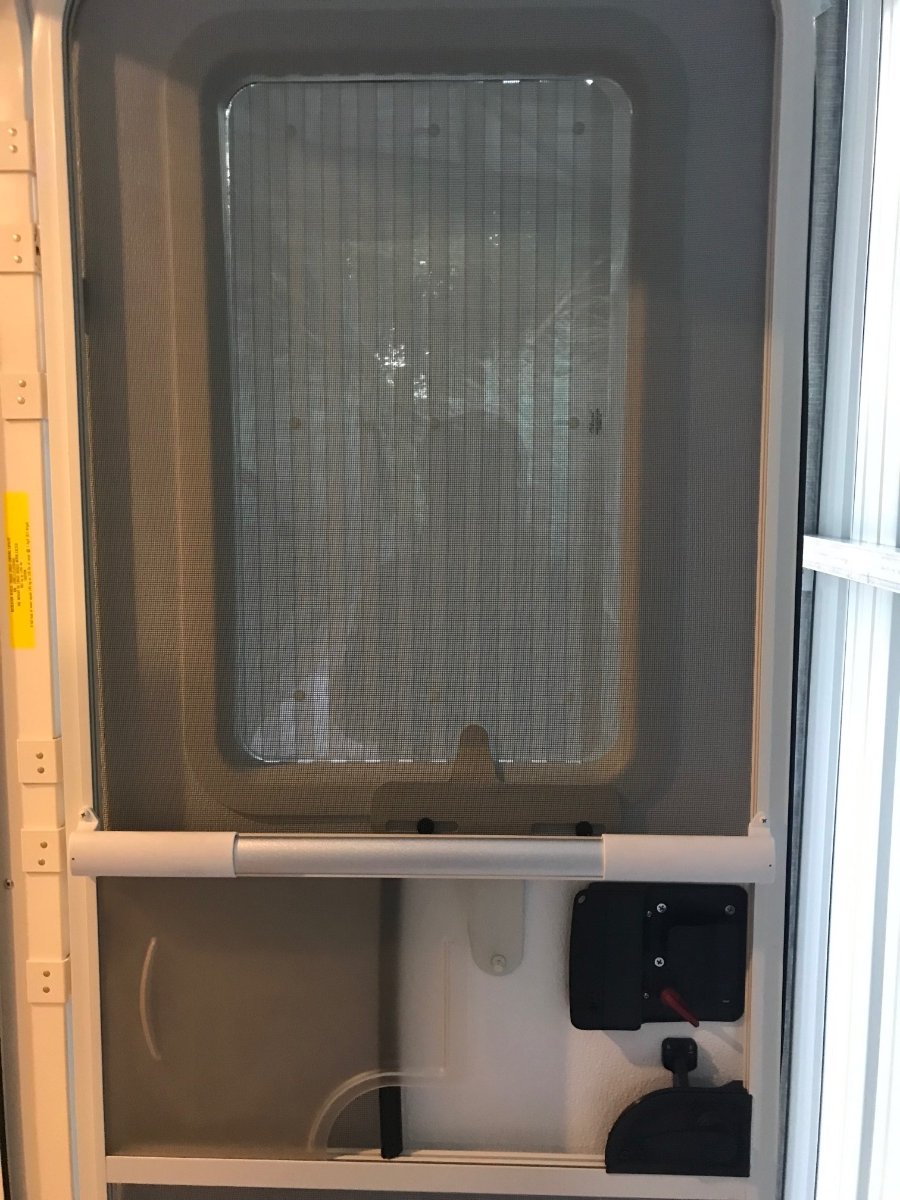
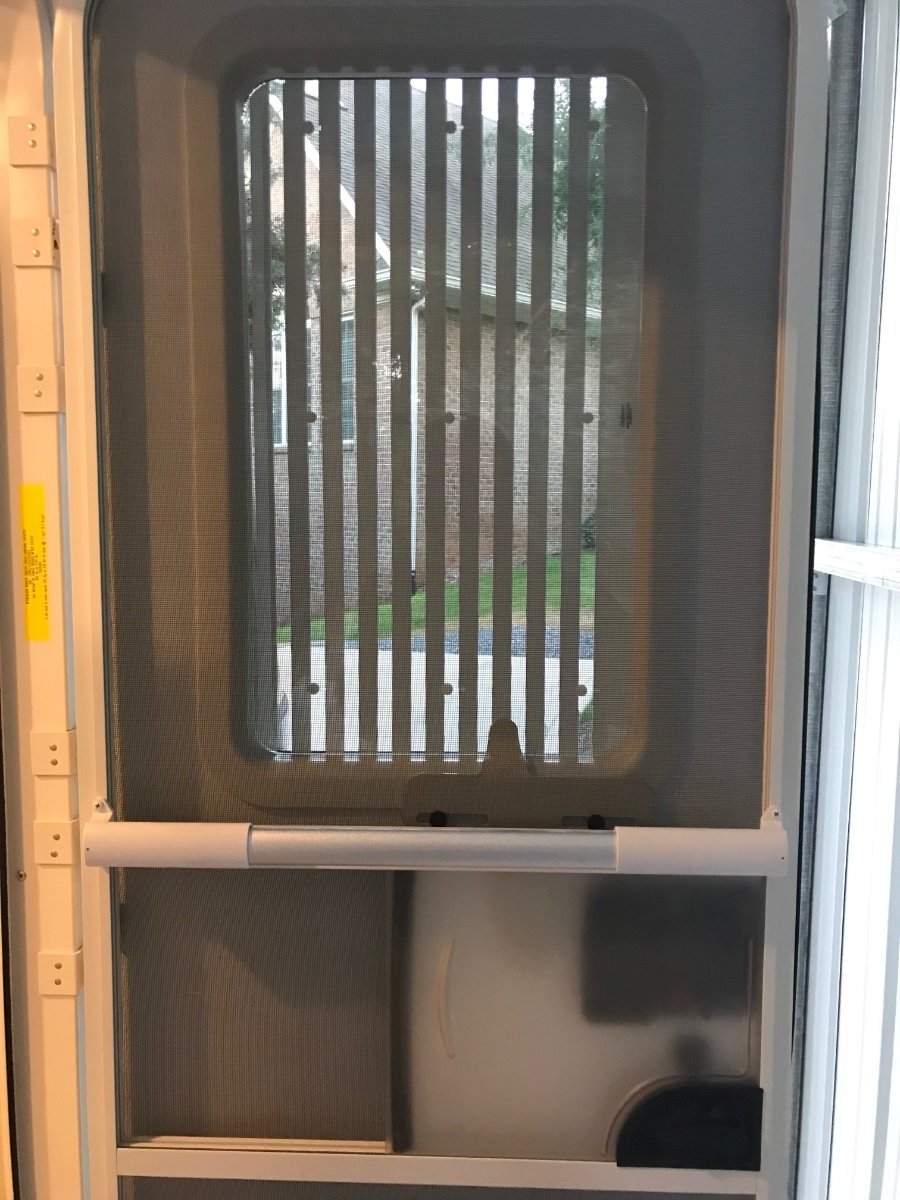
The Zarcor blind has a little tiny lever at the bottom of the windows edge on the inside which you push left or right and it flips the mini blinds from open to closed. It’s nice to close for privacy or if you need to block out unwanted CG lights. The blinds are vertical so the all open when you slide the little lever. It will operate with the screen door and door locked by just sliding the plastic access panel open to the main door. Our screen door has no lock. “Every picture tells a story” a famous song by a British singer you guess who? Ha ..so here goes- Blind now closed. You can see the off white access handle with the little knob. You slide this left to right to open and close the blind. The access door to the main door is open. Blind open and handle pushed to the left. Access door closed.
2 points
-
Sounds like you have a good idea of what RV life is like. And here’s the link to the Cruise America travel trailer rental options. https://www.cruiseamerica.com/rv-rentals/our-vehicles/adventure-travel-trailer-rental2 points
-
I think for most people privacy is an issue. With no shade, it might be uncomfortable for some to have a clear window that folks at a campground could see through, especially at night. Mike2 points
-
I too installed a clear (tinted) window from Zarcor in the door last week. Window installation went smoothly. Love being able to see outside. I have not yet installed the window shade, as there was a part missing (which Zarcor promptly sent). John at Zarcor mentioned that he would like to make an installation video specific to Oliver trailers. If anyone in or around Dallas would like a clear or tinted window with windowshade, he will install one for free as long as he can make the video. Just give him a call (Zarcor website with contact info was listed above). Feel free to mention that Christian (aka Fritz) from Idaho posted this on the forum.2 points
-
Love it. I’ve owned 3 low end light duty trucks from past years, the new WTs actually have touch screens and cruise, I’m already upgrading My wife always picks white, we have two white vehicles already. We’ll probably do another white 🙂 Great point. Also, if it’s a work truck I’ll worry and fuss over it less which is a big bonus. I’m happy to fuss over a premium trailer though2 points
-
@Katjo Here is my Zarcor window shade write up for anyone interested - we reeeeeally like this mod. 😊 I highly recommend if your going to the trouble to change out the glass, take it to the next level and add the blind it’s a good safety mod allowing you to see who is knocking. 👍🏻2 points
-
@Katjo, check this site out: https://www.zarcor.com/rv_products/rv-door-window-kit/ There are several options from tinted to clear glass. Several owners have made this modification, so if you search the forum for "zarcor" you should find lots of good info. Cheers!2 points
-
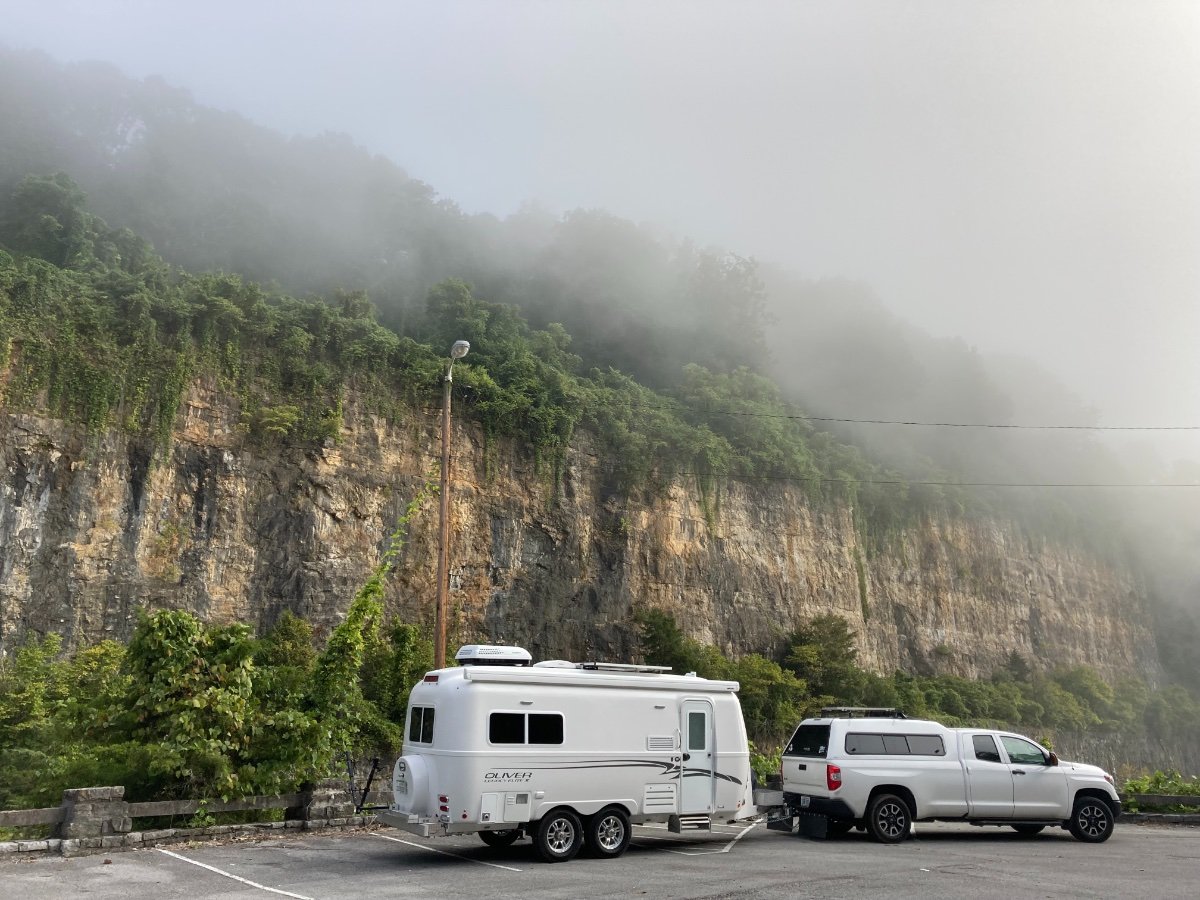
another bonus of a WT is that a white tow vehicle goes well with a Oliver.
2 points
-
Ok, closed it is. Thanks. That's what we've always done but got curious if others did the same.2 points
-
Doubling up, aka running parallel conductors, is conditionally permitted only to reduce voltage drop in a circuit. It cannot be done for the purpose of increasing current carrying capacity of the wiring. There is also an issue with the type of wire not being rated for a primary circuit. I don’t believe you’ll find any certified RV tech that would install the thermostat this way. I used a solidstate latching relay when I replaced my thermostat. It has the option for a ground level input trigger and only two conductors in the original thermostat cable are required. Try suggesting this method to your tech as an alternative to rewiring.2 points
-
We tow with everything closed. Especially in the west, dust can be an issue. It’s not fun to arrive at your site and have dust covering everything. Mike2 points
-
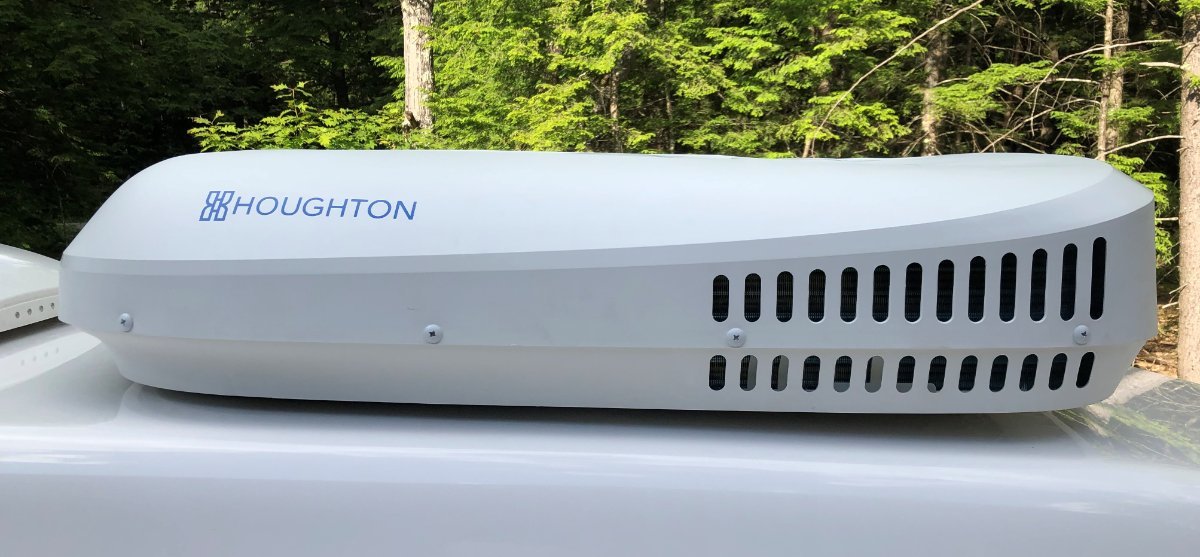
I just completed the change out of my Dometic unit for the Rec Pro Houghton unit. I am amazed how quiet the new unit is in comparison to the old Dometic. I did as others suggested and switched to an old school mechanical thermostat to control my propane heater. All I have to say is come on OTT get with it and start offering a better, quieter AC unit.2 points
-
You are welcome! I like photos and I think we all do! 😊1 point
-
My comment was referring to the photos NCEagle took at Lake Powhatan. 🙂 We were pretty surprised that we didn't see any rangers checking on the sites for food and coolers left so easily available for the bears because when we made our reservations the rules stated, in no uncertain terms, what they expected from campers re bears and food/scented items, even saying that anything not stored in a hard sided vehicle or bear locker would be confiscated. I think you are right about there being a ranger shortage. Every campground we stayed in on that trip had signs looking for staff. Paula1 point
-
There needs to be a "gagging" emoji for this! Paula1 point
-
Correct. The relay just replaces the furnace control function of the thermostat control module in the Dometic AC. The blue and blue/white voltage wires to/from the furnace go to the relay contact terminals. I rewired the green and yellow conductors in the thermostat cable to route ground to the replacement thermostat and back to the relay trigger input. The red conductor is unused. (Mine only had the three) Except for connecting the new thermostat, all rewiring is done overhead and straightforward. This may not be the cheapest solution but, considering the labor rate for a tech to pull new wires, it might be. Another possible issue “could be” the thermostat contact rating. In order to direct wire it to the furnace, the minimum rating would have to be 7.5 amps @ 12 volts DC. (I’m assuming this is an LEII furnace) It might be hard to determine for residential thermostats but your tech needs to verify this rating.1 point
-
If you do put down front jack to tilt tanks for dumping…. MAKE SURE YOU BLOCK UP AND LIFT OFF THAT BLOCK. That way if you forget and drive away JACKED UP hopefully you will not bend your front jack post.1 point
-
Lithiums were not available in 2015 when we ordered our Oliver. Battery cut off switches were not offered either. When we swapped out the AGMs with lithium (3 Battle Borns) in January 2021 I added a cut off switch. Got it from Amazon, very easy to do. Mike1 point
-
We have black bear on our property, but rarely see them. Usually just their signs--scat, claw marks on trees, overturned rocks, chewed water lines from the spring collection system, etc. I usually don't have my phone handy when I spot one, (or, I'm too busy grabbing the dog to get a photo) but I did get this one from a distance, last year
1 point
-
Actually, I love my old analog tstat. Maybe I'm just old school. It doesn't cycle a lot. I set it on lowest setting at night, put on a blanket, and good to go.1 point
-
Bill and Martha- the more I look at your sewer hose arrangement around the side-winder... the more I like it 🙂1 point
-
As always... some great ideas from the group! When I see confirmation from so many others it is affirming what all of you have said. I will keep a section connected to the Oliver and capped on the other end to eliminate the reaching in under the bumper. It will be especially nice to have "fair warning" from any weight found in the sewer hose before I uncap it. Adding a check under the dinette seat to confirm the valve is seated all the way is a good idea too. In a pinch... and assuming there isn't people waiting, I'll try to put the front jack down enough to raise the trailer up a few inches. Not unhooking, but just taking the weight off the truck should be enough to get some extra fall from front to back. Thanks again! I hope this newbee question was helpful to some one else too!1 point
-
We run the rear tires of the truck up on leveling blocks when we pull into a dump station (to raise the front of the trailer) then put the tongue jack down for another inch.1 point
-
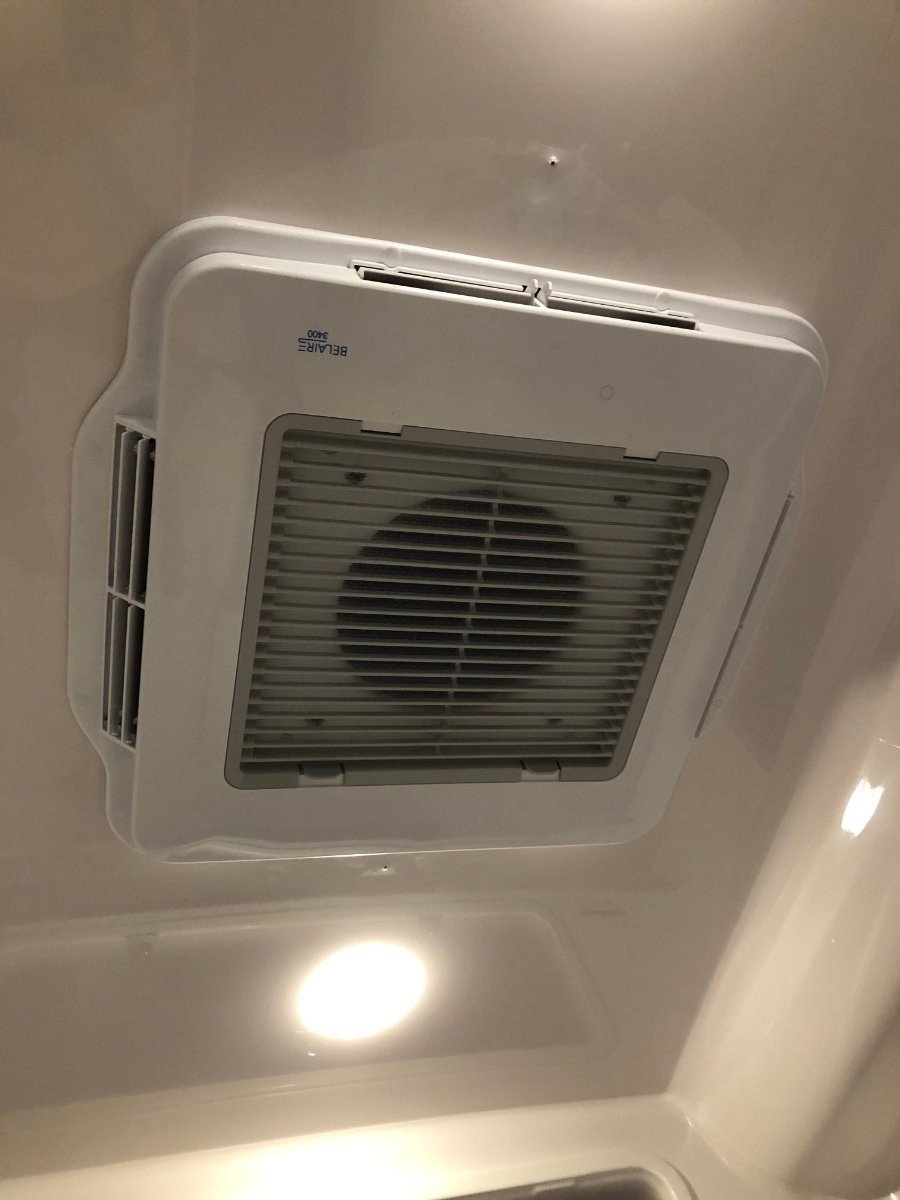
We just replaced our Dometic today with the Houghton 3400 and we are very pleased with it. Exponentially quieter than the Dometic and the install, according to the tech that did it, was very straightforward. I have not used a generator for shore power yet but I have run the AC off of the (Lithionics) batteries and did so with no issue. It was suggested to me to do the install without the micro air easy start so I did not have it installed. I'll report back if I run into any issues but, as mentioned, it ran just fine today from battery power. Tomorrow I will run it with my generator to see how that goes and also check it for water leaks by simulating some rain. I just need to get the screw covers to fill the holes. I also did not need the thick roof kit. Ric Brady, I will post if I run into any cycling issues you have had. I just came in from running it for 25 minutes and there was no excessively cycling. Dropped the temp in the trailer from 83 degrees to 69 degrees in a reasonable amount of time. I need to thank all of the people that installed this same AC brand on their Olivers and subsequently posted a ton of helpful info into this thread about their installation.
1 point
-
I thought I would bump this post since I was asked about the Zarcor window shade while at this years Rally by a few new owners. It’s a nice mod passed on to me by TopGun and naturally allows us to see who is knocking at the door. As mentioned we ordered tinted glass to match the Oliver tinted windows. A top five mod of ours. Hope this helps those that asked about it at the Rally. Happy Camping!1 point
-
For those that are worried about voiding their warranty, I installed the ez-start in a way that it can be backed out with no evidence of install. I just used extra wire with some spade quick connectors instead of cutting the wire from the control board to the compressor and one of the wires on the capacitor. John1 point
-
Unfortunately I have owned the Yamaha since 2020 so my only recourse would be to sell it and by the Honda. I might do that if I end up using the generator more in the future. John1 point
-
Well, there's the rub. Warranty from recpro voided if ez start installed. Doesn't matter to me, now, as we are now over a year past install, so out of warranty anyway. Plus, I've never used an ac on generator, other than in a motorhome rental or delivery. But, it's not our general practice to modify/void warranty on expensive investments. If I were someone who wanted to try the Houghton, I'd probably try it for at least six months without the ez start. In our experience, most problems show up after install, within the first few months of use. I have yet to find any evidence that houghton has attained an rvia or the Canadian certification, so that may be the reason you only see aftermarket installs. Again, doesn't bother me, with established products. Our truckfridge isn't. Our 2nd set of solar panels aren't. But, when your trailer is your own, and in its 15th year, you can choose your battles. A manufacturer can't, if they desire to keep rvia certification.1 point
-
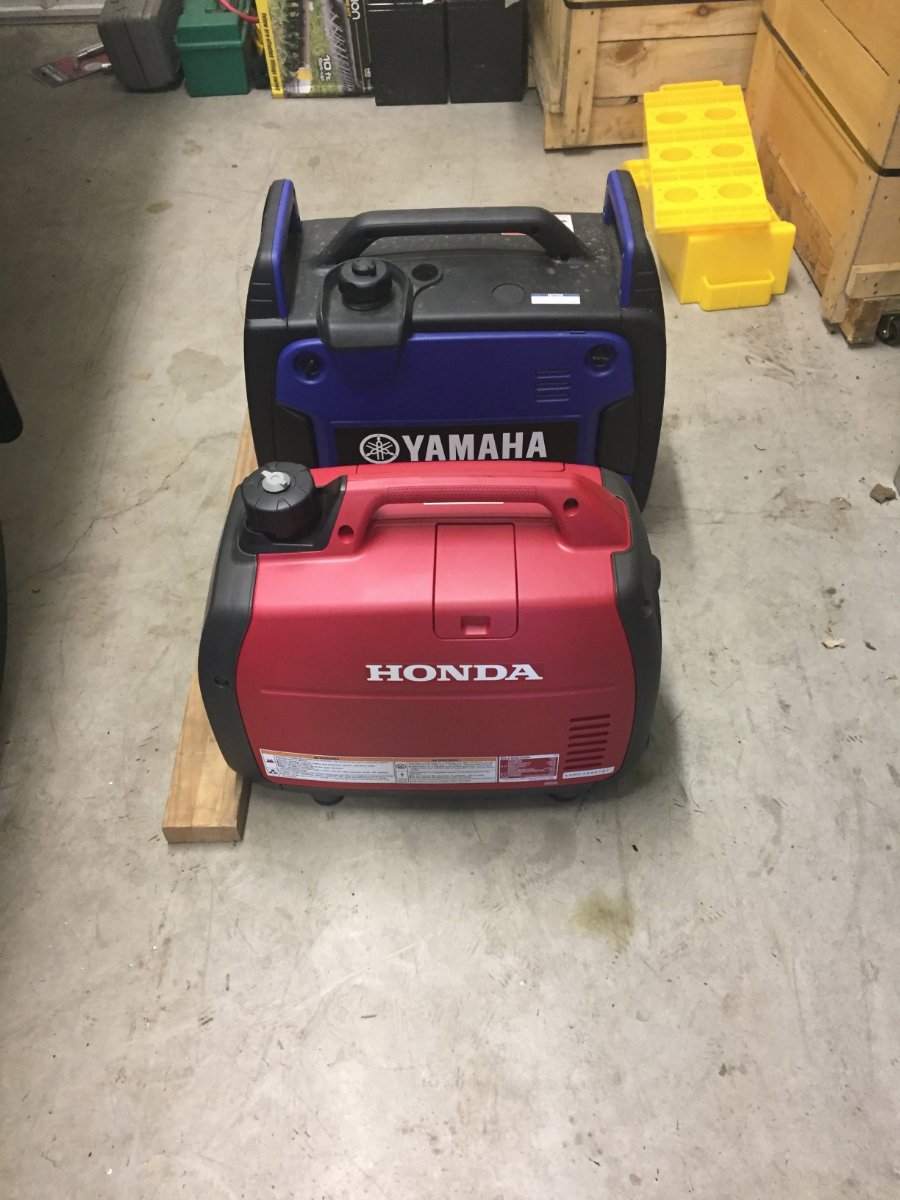
I have also bought the Yamaha 2200 and was profoundly disappointed, after a lot of back and forth between Yamaha representatives I found no fix for there design flaw of trying to achieve fuel economy by using a under powered engine. It is incapable of handling the load of the AC from eco-mode. I ended up buying a Honda 2200 that utilizes a larger engine, this was my solution to my problem. This was a costly solution and I had done my research but did not find any indication that there was issues in that regard. Here is a post I made back in February of 2021 to try to warn people about the Yamaha 2200. Minnesota Oli Members 86 Posted February 3, 2021 Good Morning Yes it does require a neutral ground plug, with the adapter I use it is workable. I thought the fuel gauge and the lit front instrument panel were nice features also, but if it is not capable of running it's claimed max load from eco mode with out suffering a temporary low voltage it neglect's the purpose of a inverter style generator. I tried to politely tell Yamaha that in the long run they were going to lose a lot of costumers in the RV market by enticing them with the RV receptacle and then fail on performance. That is the problem when the bean counters have more input then the engineering and R&D departments in product development. I also included pictures to show the difference in physical size. Paul Ray and Susan Huff 1 Quote
1 point
-
It's unnecessary as long as your power source can handle the inrush current, while also providing power for potentially other demands. I saw a Houghton table somewhere that the minimum generator size to reliably operate the 3400 was a 2200 watt class like a Honda or Yamaha. Key word being "reliably". A soft starter can still provide benefit.1 point
-
Unfortunately the last I heard, Matteo (sp?) is no longer with the company. Hopefully Micro-air will have another employee attend our Rally in the future and it would certainly be nice if the new employee is as helpful, kind and hard working as Matteo. Bill1 point
-
I recently installed the Houghton 9.5 in my Elite and later decided to move the temperature probe located inside the a/c so that it protrudes about 3 inches into the cabin. The set temp now correlates almost exactly to actual cabin temp. Before, if I wanted the cabin temp the be maintained at 72 degrees I’d have to set the temp well below 72. Much more pleased now on how it functions.1 point
-
I used a different style but this one is similar and should work. https://www.amazon.com/Supco-T1121-Chair-Terminal-Female/dp/B0071NCJ44/ref=pd_bxgy_img_sccl_1/140-1621370-1568045?pd_rd_w=T1dhB&pf_rd_p=6b3eefea-7b16-43e9-bc45-2e332cbf99da&pf_rd_r=E1WBW319HHWRDZ7E8V21&pd_rd_r=556ffc67-d620-4f02-8f4b-3b5a93b01b8f&pd_rd_wg=wGdMb&pd_rd_i=B0071NCJ44&psc=1 Edit: On the other hand the reviews of that particular one make it questionable. The Ancor Marine version is more expensive but you can be assured of getting a quality piece. You might be better off sourcing it locally at a supply house. No need to have to buy 20 of them.1 point
-
I asked for $500 when I sold my 2017 Dometic AC unit, settled for offer of $450. Note that RecPro warned that warranty would be voided if easy start was installed. I took the chance.1 point
-
Well I ordered a 13.5 BTU Houghton today. I am planning on installing the easy start that came with the trailer. So I might have some questions on that in the future. I’ll post my experience when I get it and get it installed. Anyone sold their used Dometic unit? What did you get for it? Mine is only 7 months old with very little use. I guess I’ll start trolling Craigslist and eBay. John1 point
-
The stumbling block will be for R&D to figure out a way for the evap coil condensate to the existing internal drain tube. Some time ago, I postulated that if the Houghton were elevated a bit (Spacer, rubber mat?) that it could provide for a flow line (down hill path) for the condensate to get back into the unit and out the existing drain. Considering that the distance is only about a 18 inches, and at an optimal flow grade of 1/4" per foot, the elevation of the spacer could be as little as3/8" for flow. Likely thought the tube would be a 1/2" tube from the Houghton exit back through the spacer . That would require a about a 5/8" spacer. Certainly worth R&D doing a layout and plan drawing just to check it out! However, my comment didn't attract any responses from anybody..... 😞 None the less it appears to be an option for R&D to look into. MODERATOR: Would you please forward this to our R&D Team? Thanks, Geronimo John1 point
-
There is another contender that I've talked about before, in this thread or another. The Coleman mach 10 NDQ is being offered in some winnebago vans, so some decent online mentions from reliable sources like James at fitrv, and technomadia. The ndq stands for non ducted quiet. I have not seen (or, at least don't remember seeing) db ratings. It's more affordable than the Houghton, I think, and definitely less than the Truma. You have to factor in the interior unit/adb, but its only $100 or so. (Houghton includes this. I think Truma does, as well.) The coleman can be purchased with their soft start already installed, which I would want, in a 13.5 kw unit. You may have to purchase heating unit, separately. I'm not sure. Theirs is lower profile, but still not small, like the smaller Houghton we bought. We really need that rooftop space for our unusual panel mounts to adjust. Honestly, we probably could have replaced our old dometic ac with a vent, since we use it so little. But, it's really nice to have it when cleaning in Florida heat and humidity, and on the odd occasion that we have a powered campsite. I've read posts on supply chain issues on those ac units, too. But you have time on your side . Winter is coming.1 point
-
the new Truma Aventa listed for a mere $2,150. I love German engineering, but not at 2X the cost for a unit too small for an OE2 to boot. It looks like Houghton still has the market corned at this moment. Good news is more players, more cost competition down the road.
1 point

































-
Recent Achievements
-



















