Leaderboard


Popular Content
Showing content with the highest reputation on 11/02/2022 in all areas
-
The blue tube exiting under the hull is your fresh water tank drain tube. The drain valve on that drain line might be open. Have you recently filled the fresh water tank? If not, it could be a bad check valve in the water pump (or very high city water pressure) that’s letting water from the city water connection leak back into the fresh water tank, and if the fresh tank drain valve is open, water from the fresh tank will exit out of that blue tube.5 points
-
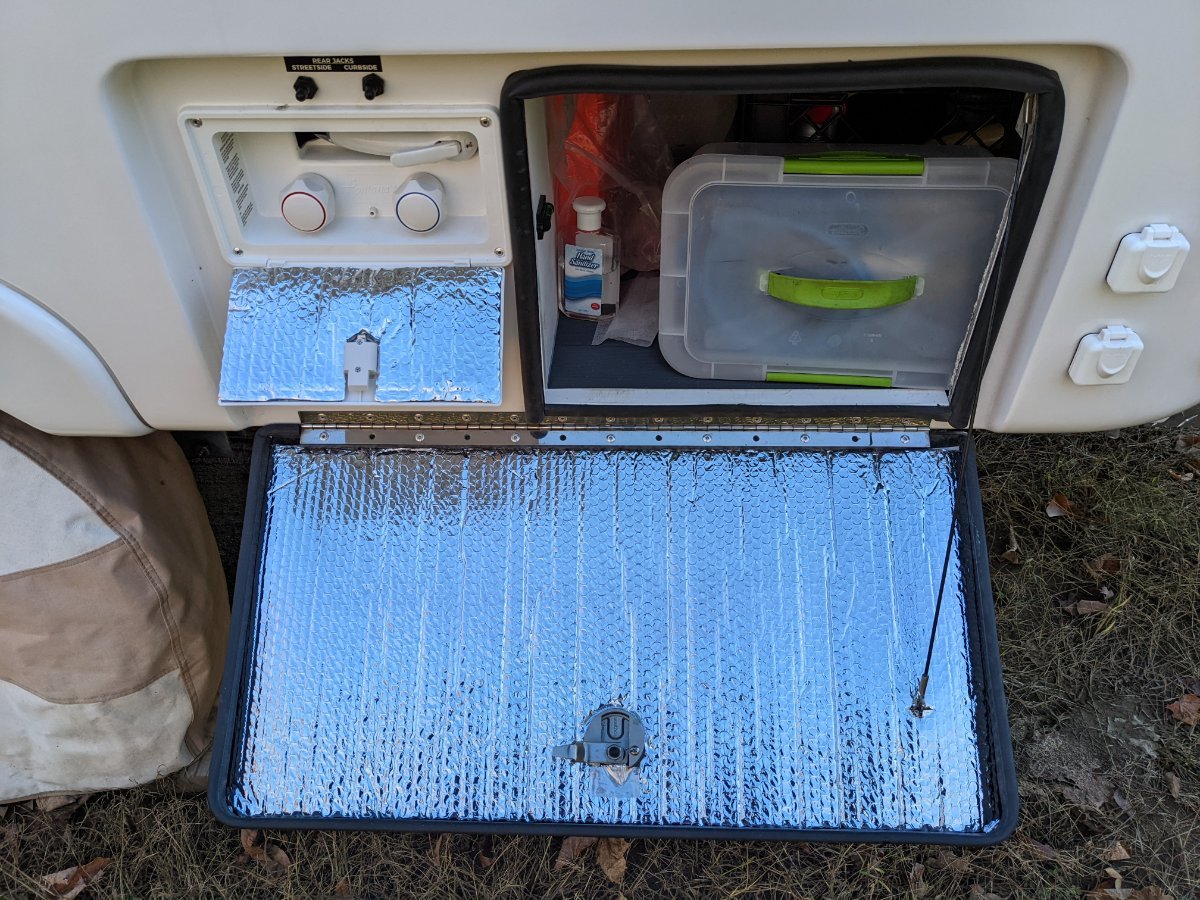
Just added Reflectix to my basement and outside shower doors. Battery door next.
 4 points
 -
Once I backed down a narrow mountain road, because the Garmin didn't know the road was washed out. With the backup camera and no wobbling mirror extenders I was glad the Oliver was no wider. Guess I am glad when going down some narrow streets and in traffic too.4 points
-
A friend of mine and former Oliver owner broke a tab on the snap-out return air grill on his Dometic air distribution box (ADB) cover. He had to order the whole ADB cover assembly just to get the return air grill. I broke one of the doors on the side of our ADB and he sent me the rest of the ADB cover that he didn’t need so that I could get the part I needed. I sent him half of what he paid and we both ended up getting the parts we needed for less than the cost of the whole ADB cover. My point is that if someone has to order an assembly from Dometic to get the part they need they might can cut their losses by offering up the rest of the assembly for sale in the Classified section of the forum.4 points
-
I just got off of the phone with Anita, and our final build list has been entered. All that's left is to write a check for half the remainder and wait almost five months. Here's where we're at right now: - Oliver Legacy Elite II Twin Bed - Standard Mattresses (third party mattresses after receipt) - Standard Fabric - Midnight - Hypervent - Omnidirectional Antenna (local weather etc. if we don't have cell service) - Street Side Awning - Frosted Cabinet Doors - Convection Microwave - 20 Gallon Propane (to keep tongue weight down) - Front/Rear Propane Quick-Connects - Standard Toilet (with possible AirHead composting replacement) - Full Truma Package AC, Furnace, Water Heater and Antifreeze kit - Lithium Platinum Package - Backup Camera - Rear Bumper Receiver (to be converted to 2" after receipt) - Anderson Hitch - Aluminum Storage Basket - Basement Door - No Graphics3 points
-
Yes - Anyone that has changed out that door window for a window that is tinted and/or has window blinds has performed this job. Before you remove those screws (or plastic tabs for those with newer windows) be sure to either use tape or another person to hold the exterior window in place. There is a fair possibility that the exterior window will fall out and therefore break if it is not held. Past that the process is pretty straight forward and the entire job should only take about 30 minutes or less. You will see where the old rope caulk in placed. Remove it and put in new. I "over caulked" just to make sure I got a good seal and when I re-installed the excess caulk came out on the exterior window. I simply scraped this off with a plastic razor blade (so as to not nick the plastic window frame. There are numerous YouTube vids out there like THIS one that show the process for either the screw type frame or the newer frames. Bill Or THIS ONE if you want to upgrade your window at the same time.3 points
-
@chuckstovall Chuck, while you are in there, you might think about replacing the valve too. I had several Dometic valves go bad and start leaking then someone showed me this aftermarket replacement valve. This thing is great. The spring is tighter and it flushes so much better. Find it HERE , worth preventing a future headache. Once you get both valves in your hands it will be clear which one is superior. If this company is making aftermarket parts for the Dometic 300 series, maybe they make a pedal too? Regards, Brian3 points
-
Thanks JD. Early this summer as part of our LiFePo4 upgrade, I replaced our OEM 2K inverter with a 3K Renogy. As you know it is a LOT larger and heavier than the OEM 2K unit. I drilled out the four mounting holes, and added supplemental wood supports to accommodate the longer Inverter and to bring the four 3K mount holes in line. I too was concerned about the weight and poor support. Some JB weld and through the bunk vertical wall went four SS bolts, SS Fender Washers and 1/4 X 20 bolts with nylock nuts. Yep I trust JB Weld, but I trust it more with thru-bolting with SS bolts and fasteners. So yes, if anybody wants to look, you can see under the street side bunk rail two of the four attachments. PS: Used he same approach on the mounting of the Victron 12/12-30 charger under the street side front dinette seat facing aft. GJ3 points
-
Personally, I prefer a valve I can close off vs. one or two check valves that can fail when they want to so as to cause the most adverse consequences. But then I NEVER leave a pressure hose hooked up to our OE2 more than temporarily filling the fresh water tank, or flushing the black tank. My rationale is that I have zero confidence that the pressure water system pressure for all the systems I load water from are at a level that will not damage my trailer. With or without a pressure regulator. Yes, that makes me run my fresh water pump a lot. But when it fails, I for sure know where to look. Just my two cents. GJ3 points
-
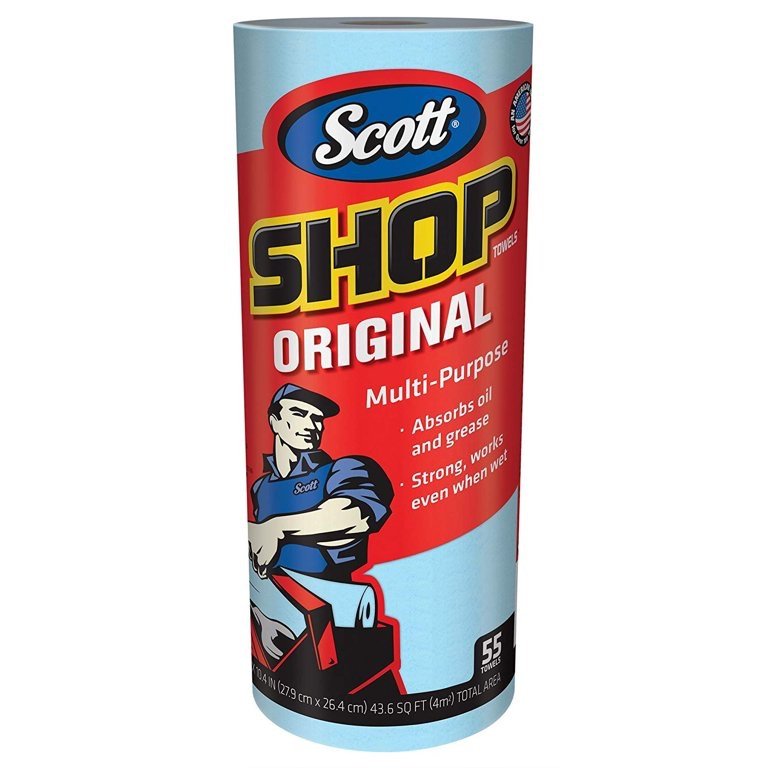
What would you estimate the leak rate to be? You probably blew apart one of the push to connect Shark Bite connectors. If it is a strong leak it should be simple enough to locate visually and perhaps by sound, sometimes it could be a hissing sound. Small leaks aka “seeps” can be located by putting a folded blue paper shop towel under a suspected pipe, any water leakage will turn it dark blue at that spot. Buy and ALWAYS use a good adjustable pressure regulator, set to 60 psi or less. The system is not designed for 80 psi. https://www.amazon.com/gp/aw/d/B003YJLAIK?psc=1&ref=ppx_pop_mob_b_asin_title Connect your hose to the regulator, connect the regulator to your filter, connect the filter to a BRASS 90 degree garden hose elbow. Now you can connect the elbow to your tank fill or city water port and drape the hose over the back bumper to take the stress off that fitting and to make it look professional. 😬 John Davies Spokane WA
3 points
-
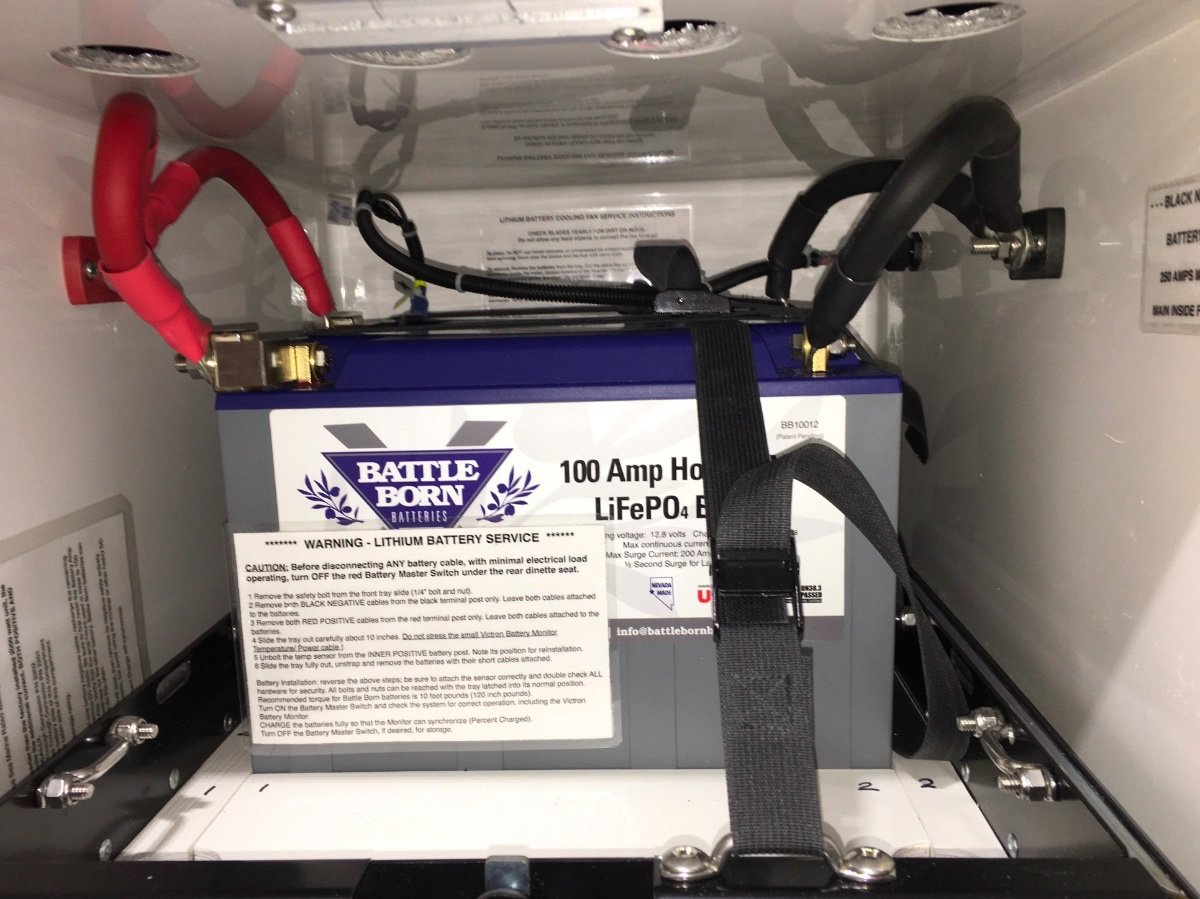
Recently, my inverter stopped working and wouldn't power on. Here is what I found so far (long story, feel free to skip and go to installation section below) The trailer was parked in at my property with shore power and the inverter was working when we were back from camping trip a few weeks ago. Over the weekend we found that the breaker was tripped and narrow it down to problem with the inverter. When on shore power, either the breaker at the shore power or main breaker underneath the dinette seats would trip unless switched the breaker of the inverter to off. The inverter screens didn't show anything for both remote and on the inverter itself located under the street side bed. When not on shore power, inverter didn't power on. Checked the voltage at the DC positive and negative terminal at the inverter using digital multi-meter and confirmed that there's ~13V at the terminal. Tried to reset the inverter by cutting DC power using the 2 red button switches near the inverter and confirmed using digital multi-meter that there was no DC at the terminal. This also didn't work. The inverter wouldn't power on when restoring power to it. I decided to submit a ticket and Jason and I agreed that there's an issue with the inverter itself and I had to contact Xantrex. After submit a ticket to Xantrex, the technician recommended updating firmware and that didn't help. Xantrex agreed to send me a new one because it's still under 2 year warranty. Installation I got most of the information below from Oliver and it's specific to my 2021 LE2, please contact Oliver to confirm if you have a different model year. Disconnect Shore Power from the camper. Flip the 30A Main Breaker to the OFF position (located in the AC Breaker box under the Dinette) Flip the 25A Breaker for the Inverter to the OFF position. Trip the 200 or 300A Inverter Breaker located under the street side bed access panel area. The breaker is located up & under next to the side of the battery box. Remove the inverter cover in order to gain access to the wire connections. The 120V wires on located on the left with the 12V connections on the right, pictured below. Once the cover is removed you will need to disconnect all 4 wiring connections inside the inverter. As a precautionary measure, do not let the wires contact each other. With shore power removed & the Inverter breaker tripped there shouldn't be any power but it is best to be safe just in case you got in a hurry and skipped or missed a step. Make note of the 120V Wires once you disconnect for which one is the AC In and which one is the AC Out Disconnect the ground wire located on the top edge of the inverter. Remove the screws securing the inverter to the white AP1 board. There are two screws located on the bottom and two located on the top. You may see other screws that are securing the wires to the white board but it is not necessary to remove them when replacing the inverter unless you are installing new wires. See screws pictured below as reference. Follow the steps in reverse to install the new inverter. Mount the inverter on the white board & secure with the 4 screws Connect the ground wire Connect the 12V Wires. Red is positive & Black is Negative. Connect the 120V Wires. Be sure to connect the AC In & AC Out wires correctly. Reinstall the cover Reset the Inverter Breaker by pressing the leg by in. Turn inverter on at the inverter itself (not the remote display) and verify 12V to 120V operation through the inverter. Turn the inverter off at the inverter Flip the 30A Main & 25A Inverter breakers back to the ON position. Connect shore power to the camper and verify charge state through the charger to the batteries. It may take a minute or two for it to engage. Once the inverter has been installed you will need to check the settings and set it based on your battery type The only settings that are changed by the Oliver factory are: #02 ,#05, #20, #24 & #28, based on your options, and are in bold font below Xantrex Customer Support: 800-670-0707 Oliver Service Department: 888-526-39782 points
-
Share and Enjoy !Shares One of the biggest factors to consider when choosing a travel trailer is whether you want solar features or not. Solar panels have started growing in popularity over recent years, and for a good reason! You don't have to haul around heavy generators or go to campgrounds with full electrical hookups – your trailer is powered by the sun. It's a cool feature to have, but before you sign the papers to your new trailer, you should know what you're signing up for. At Oliver Travel Trailers, we have some amazing solar features you should consider before making a decision to purchase a camper. The very first question everyone asks when learning about the solar features is, "Do I really need this?" The short answer is, it depends. If you do a lot of boondocking, you use your trailer a lot, and you find yourself having to charge your trailer often with generators, solar panels will probably be a game-changer for you. On the other hand, if you only visit campgrounds with electrical hookups, you won't really benefit from this feature. How does it work? Solar panels are placed on the roof of your trailer and they collect energy from the sun to charge your batteries. The more sun that hits your panels, the more power you'll generate. You can use this power to run lights, fans, TVs, and other small appliances in your trailer. One of the great things about solar is that it's completely silent – unlike generators, which can be noisy and disruptive to your camping experience. Solar panels are also much more environmentally friendly than generators. If you're someone who loves being outdoors and taking care of the environment, solar is definitely the way to go. Does Oliver Travel Trailers provide everything I need? If you decide that solar is right for you, our experts will make sure your trailer is equipped with everything you need. All that solar power will need somewhere to go, so it's important that you have the right batteries in your travel trailer. According to our experts, the more batteries you have the better. According to our site, "More batteries mean more available energy to run all your accessories and charge up all your toys. Luckily, Oliver has the largest battery compartment of any molded fiberglass trailer being manufactured today so you can have up to four 6-volt batteries and easily access them from the massive pull out tray." We would recommend getting two 6-volt batteries instead of one 12-volt. The 12-volt battery is becoming less popular because it doesn't hold a charge as long as the 6-volt. Two 6-volt batteries will give you more power and a longer lifespan. What if it's cloudy or shady outside? If you're worried about not being able to generate power on cloudy or shady days, don't be! Solar panels can still collect energy on days when it's not sunny. However, the amount of power generated will be less than on a sunny day. To make sure you get the most out of your solar panels, we would recommend parking your trailer in direct sunlight for at least part of the day. You never want your battery to drop below 50%, so keep that in mind when you're looking for the perfect camping spot! What if I want to add solar panels later? If you decide that you want to add solar panels to your travel trailer after you've already purchased it, don't worry! Our solar panels can be easily installed on any of our trailers, even if you've already taken it out camping. We understand that you might not want to commit to the solar panels right away, so we make it easy for you to bring your trailer in to get them later. We would recommend getting them right away if you think you may want them in the future, but we also know plans can change! If you want to add solar panels to your Oliver Travel Trailer, call your nearest store and set up an appointment with our service team. We will get you and your trailer in as soon as possible! How many solar panels do I need? The number of solar panels you'll need depends on how much power you want to generate. If you're not sure how many solar panels you need, our team can help you figure it out! We will ask you some questions about how often you use your trailer and what kind of appliances you run off of battery power. Based on your answers, we will be able to recommend the right number of solar panels for you. Can the air conditioner run off of solar power? The air conditioner is a big power draw, so it's not recommended to run it off of solar power alone unless you have multiple 100-watt panels. However, you can use solar panels to supplement the power you're getting from your generator or hookups. This will help you save on generator fuel and reduce the amount of noise you're making while camping. What are the benefits of solar power for my travel trailer? There are many benefits to solar power for your travel trailer. Solar panels are Silent, meaning they won't make any noise while they're running. This is perfect for people who want to enjoy the peace and quiet of nature without being interrupted by a generator. Solar panels are also environmentally friendly because they don't produce any emissions. They're a great way to power your trailer while being kind to the environment! Finally, solar panels can help you save money on your camping trips. If you have solar panels, you won't need to use as much fuel for your generator or hookups for your electrical appliances. Oliver Travel Trailers is committed to helping our customers enjoy the outdoors in the most sustainable way possible. Our unique molded fiberglass construction makes our trailers some If you're considering solar for your travel trailer, we hope this article has helped you make a decision. Solar panels are a great way to power your trailer without having to rely on generators or electrical hookups. They're also environmentally friendly and Silent so you can enjoy your camping experience without any disruptions. If you have any other questions about solar power or our Oliver Travel Trailers, please feel free to give us a call or stop by one of our stores! We would be more than happy to chat with you about all things solar! Share and Enjoy !Shares The post Oliver Travel Trailers’ Solar Power Features appeared first on Oliver Travel Trailers. Read the Full Article2 points
-
Share and Enjoy !Shares You've purchased your RV, you're excited to go camping, and you're ready to hit the road. Nothing is more exciting than heading out on that first camping trip with your new RV, but if you're new to this world, you might hear some terms you've never heard before. Joining the RV community is like unlocking a different universe. It's great how like-minded people come together to share their love for the great outdoors, but there is so much to learn! From practicing filling and dumping your tanks to learning how to hook up your trailer to your truck, all this new information might feel overwhelming at first. You might even forget a few things the first several times – and that's perfectly okay! Don't be afraid to ask questions. The RV community is a friendly one, and you're more than likely to find someone who is willing to help you out. And don't get discouraged if it takes a few trips to learn the ropes and get the hang of things – practice makes perfect! Now that you're ready to head out on your adventure, knowing some RV slang terms will help you gain a better understanding of what to do and what certain things mean. Here are a few key terms to keep in the back of your mind when you're out on the road: Gray Tank: This is the tank that stores all the water from your sinks and showers. If you're going to a campsite without full hookups, you'll want to fill your gray tanks before you hit the road so you have water throughout the duration of your trip. Black Tank: The black tank is where everything from your toilet goes. Your RV sales associate will be able to show you how to empty this tank at the end of your trip, but if you want some extra help, there are plenty of YouTube videos on the subject. You could always ask a seasoned RV owner for help as well. Fresh Water Tank: This tank stores all the fresh water that you'll be using for drinking, cooking, and washing. You'll want to make sure this is full before you leave for your trip if you don't have hookups at your campsite. Hook-ups: These are the connections you need to make in order to have water and electricity while you're camping. If a campground has "full hookups," you won't need to worry about bringing a generator or filling your tanks – you'll get all the electricity and water you need straight from those hookups. Don't forget a surge protector to plug in your RV! Dump Station: A dump station is a place where you can empty your black and grey tanks. If your campsite has full hookups, you should be able to dump everything there. If not, you'll have to find a place nearby. Boondocking: Boondocking is when you camp without hookups in more rural areas. You often don't have to pay for a campsite while boondocking, and it's easy to pick up camp and move whenever you want. Pilot or Captain: The pilot or captain is the driver of the RV. Shore Power: Shore power is an external power source that you can hook up to while you're at a campground. When plugging into these power poles, it's wise to use a surge protector in case of electrical issues. Winterize: Winterizing your RV means taking measures to prepare it for cold weather conditions. This includes things like adding antifreeze to your pipes and draining your tanks. If you store your trailer in a temperature-controlled area or a mild climate, you don't have to do this. De-winterize: De-winterizing is the process of undoing all the steps you took to winterize your RV. This needs to be done before you take your RV out again in the spring. Rally: A rally is a gathering of RVs, usually organized by an RV club or association. It can be just a few or a few hundred and can include fun activities. Fifth Wheel: A fifth wheel is a type of RV that attaches to the bed of a pickup truck. Fifth wheels are typically slightly larger than travel trailers and pull differently. If you have the right truck for it, fifth wheels are a great option. "Fiver" is another common term for "fifth wheel." Bunkhouse: A bunkhouse is an RV with beds built into the walls, usually for children. RVs with bunk beds are great because they accommodate a lot of people without taking up a ton of space. Caravan: A caravan is a group of RVs traveling together. If you're camping with a group of people from your neighborhood, it's a good idea to caravan because you can stay together and help each other with any issues that come up. GVWR: GVWR stands for Gross Vehicle Weight Rating. This is how much your RV can carry when it's fully loaded with cargo, passengers, and anything else you're bringing on your trip. Dry Weight: The dry weight of an RV is its weight without any cargo or passengers. This is a good number to know because it can help you determine how much your RV will weigh when it's fully loaded. Tongue Weight: Tongue weight is the downward force that the tongue of your trailer puts on your hitch ball. You'll need to make sure your vehicle can handle this weight before you hit the road. Hitch Ball: A hitch ball is a metal ball that attaches to the back of your vehicle and allows you to hook up a trailer. Now that you know some of these key terms, you're one step closer to being an RV expert! With a little bit of practice and a lot of exploring, you'll be a pro in no time. So what are you waiting for? Get out there and start your adventure today! If you are thinking about purchasing a travel trailer but you're not sure where to start, visit Oliver Travel Trailers today. Our friendly sales associates will be happy to help you find the RV that best fits your needs. Share and Enjoy !Shares The post Key Terms Every RV Owner Should Know appeared first on Oliver Travel Trailers. Read the Full Article2 points
-
Share and Enjoy !Shares With the crazy housing and rental market, flexibility to work from anywhere, and the pull to spend more time in nature, individuals, couples, and families are choosing a life on the road with full-time RV living. It's such a great way to explore the world and see places you never thought you would see! However, full-time RV living isn't for the faint of heart. It takes a lot of work, patience, and flexibility to be successful with it. If you have been thinking about hitting the road full-time, it's important to keep in mind that you can't just hook up your trailer and go. You'll need to think about meals, filling your tanks, dumping your tanks, finding places to park, safety precautions, and more. However, these inconveniences are a small price to pay for the memories you'll make while living in your RV and traveling the country. Here are a few tips to help you get started with full-time RV living: Find a Comfortable Setup: One of the great things about RV living is that you can find a setup that works perfectly for you. Whether you want a fifth wheel, travel trailer, or Class A motorhome, there's an RV out there that will fit your needs. You'll also need to decide how many people will be living in your RV. This will determine the size and type of RV you'll need to purchase. Create a Budget: It's important to sit down and figure out how much money you'll need to live on the road. This includes factoring in the cost of gas, food, campgrounds, and any other incidentals. Once you have a good idea of your monthly expenses, you can start saving up for your full-time RV lifestyle. Purge Your Possessions: One of the hardest things about going full-time RVing is getting rid of all your stuff. It's important to purge your possessions before hitting the road because you won't have a lot of storage space in your RV. You'll need to get rid of clothes, furniture, knick-knacks, and anything else you don't absolutely need. The less stuff you have, the easier it will be to live on the road. Be Prepared for Anything: One of the most important things to remember when living in an RV is to be prepared for anything. This means having a plan for bad weather, mechanical issues, and any other unforeseen circumstances. It's important to always have a backup plan and to be prepared for anything that might come your way. Enjoy the Simple Things: One of the best things about RV living is that it forces you to slow down and enjoy the simple things in life. When you're on the road, there's no need for fancy clothes or expensive meals. You can enjoy nature, cook simple meals, and spend time with loved ones. Full-time RV living is all about simplifying your life and enjoying the beauty of the world around you. Make Sure You Have Good Insurance: When you're living in an RV, it's important to have good insurance. This includes liability insurance, comprehensive insurance, and uninsured motorist coverage. You never know when something might happen on the road, so it's important to be prepared with the right insurance. Tell People Where You're Going: If you're a solo RV traveler, you'll want to make sure at least one other person knows your travel plans and where you'll be at any given time. If you have an iPhone, you might even consider sharing your location with them! Safety is so important when you're on the road, and making sure someone knows your location and plans will be important in the event of an emergency. Get a Satellite Phone: One of the best things you can do when RVing full-time is to get a satellite phone. This will allow you to stay connected even if you're in the middle of nowhere. A satellite phone is also a great safety precaution in case you run into trouble while on the road. Buy Backup Generators: Another great safety precaution is to buy backup generators. This way, you'll have power even if the main generator fails. Backup generators are also great for boondocking (camping without hookups). Keep Your RV Well-Maintained: One of the most important tips for living in an RV full-time is to keep your RV well-maintained. This includes regularly checking your tires, brakes, fluids, and any other parts of your RV. The last thing you want is to break down in the middle of nowhere! Take Plenty of Healthy Snacks: Fast food will start to get old when you're on the road, so you'll want to make sure you have plenty of healthy snacks to eat in-between grocery runs. Chips, crackers, granola bars, and nuts are all great RV snacks that will help keep you fueled for your adventures. Invest in Good Quality Camping Gear: When you're living in an RV, camping gear is a must. You'll want to invest in good quality tents, sleeping bags, chairs, and anything else you might need for camping. The last thing you want is to be stuck with cheap gear that falls apart after a few uses. Stay Organized: One of the best tips for living in an RV is to stay organized. This means having a place for everything and keeping your RV clean. The less clutter you have, the easier it will be to find things when you need them. It can start to get cluttered quickly when you're living in such a small space, so you'll want to constantly purge items you don't need and organize items you do. Plan Your Trips in Advance: One of the best tips for living in an RV full-time is to plan your trips in advance. This way, you can make sure you have reservations at campgrounds and know where you'll be going ahead of time. Planning your trips will also help you save money on fuel costs. These are just a few tips for living in an RV full-time. By following these tips, you'll be well on your way to enjoying the simple life on the open road! Share and Enjoy !Shares The post Tips for Full-Time RV Living appeared first on Oliver Travel Trailers. Read the Full Article2 points
-
No and there is reasonably little "R" value in layers of Reflectix. But, where insulation is already thin or where it adds another layer of "dead" air space then - why not. Bill2 points
-
While you're at it and if you have any material left over - simply go under the dinette and/or beds and place another layer over the water heater (assuming the Suburban), and then any other area that you can reach. Also, while you're in the basement, a layer on that little "wall" between the basement and the interior where the backside of the shower is located could use some. Bill2 points
-
For those who are getting ready to pick up their new Ollie and were thinking about getting the KTT mattresses (specifically Twin), I recently got some information from KTT on current pricing. The below statement from Dick (KTT Enterprises) shows the new current price (for twins) and the shipping cost (for us it’s California). We are going order since we already sleep on a latex mattress and don’t know if the price will increase in the future. “Hi Bob, We are making a 36 ILD Talalay Latex foam mattress covered with a cotton quilted cover and cut to size for the Oliver Trailers. The cost for each mattress is $750.00 plus the freight. IN your case the freight cost quoted today is $552.00. The mattresses will come out each in a plastic bag both in a corrugated box strapped to a skid. I will take a picture before we ship just in case there is any damage to the shipment. Your total cost is $2052.00. Once you are ready please call me with a credit card and we can proceed with your order. If you would like additional information on the Latex Foam go to the web site for Talalay Global. That is the company my father started. He actually worked with the two Talalay sons t perfect the formulations and the process. If you gave any questions let me know. Thanks Dick “2 points
-
Well, I did it. My first rally event of ANY sort in my life. Make it a good one. LOL I reserved spot G28, but I will arrive on 16th and depart on 22nd. I'm not sure if I'll be solo or with one other person. We'll see. 🙂 Cheers, Chris2 points
-
"I'm guessing that you didn't have much (as in none) of a problem with bugs - mosquitos have always been a big problem for me in that area 😬." Easy to spot the mosquitoes at that time of the year with their parkas on. They fly slower too. Great time to camp. 😂2 points
-
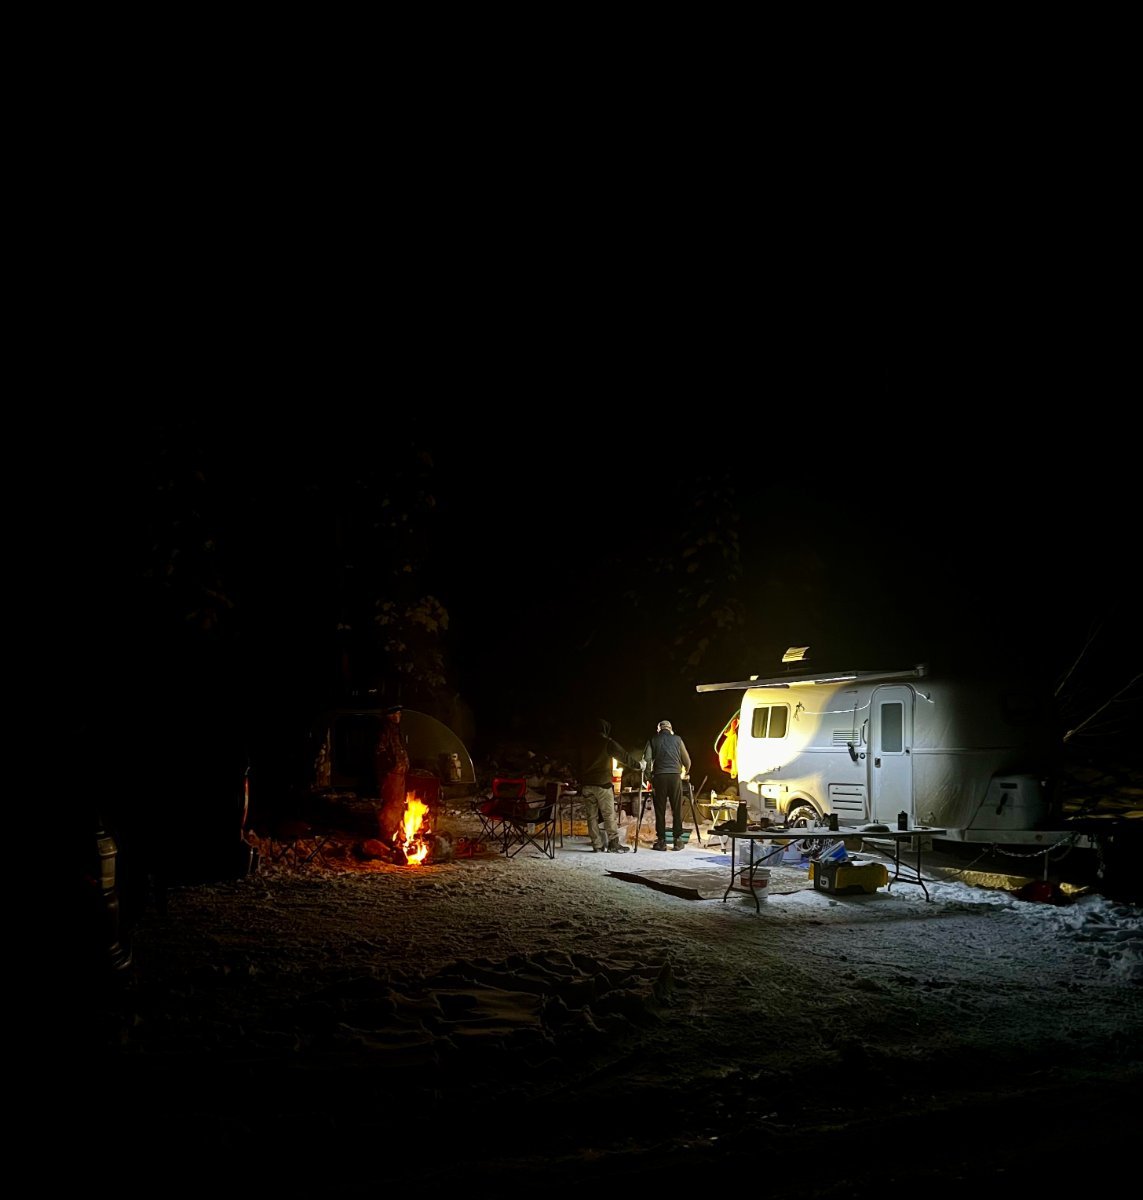
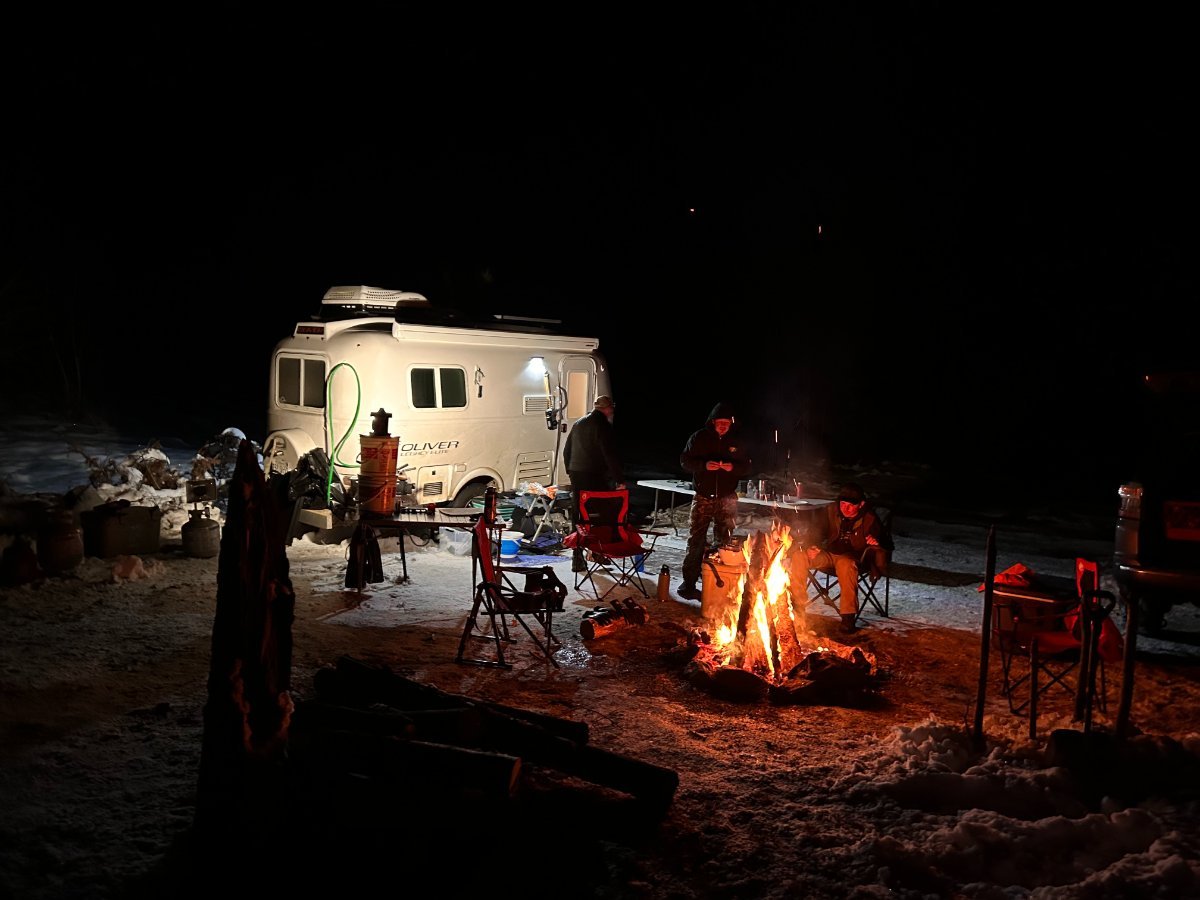
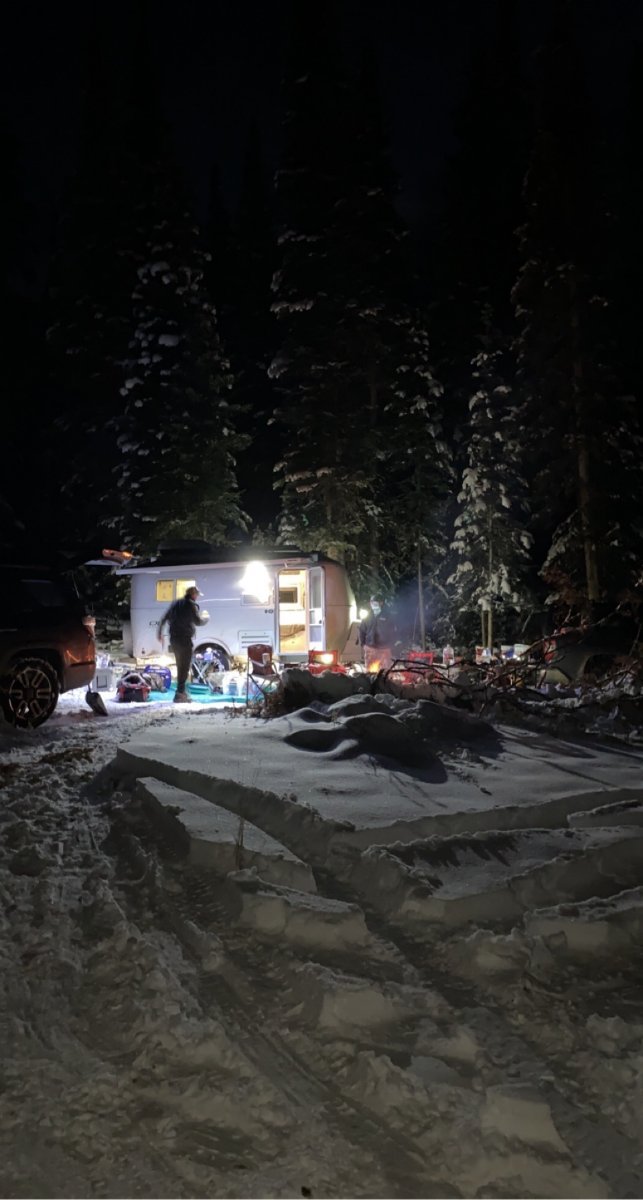
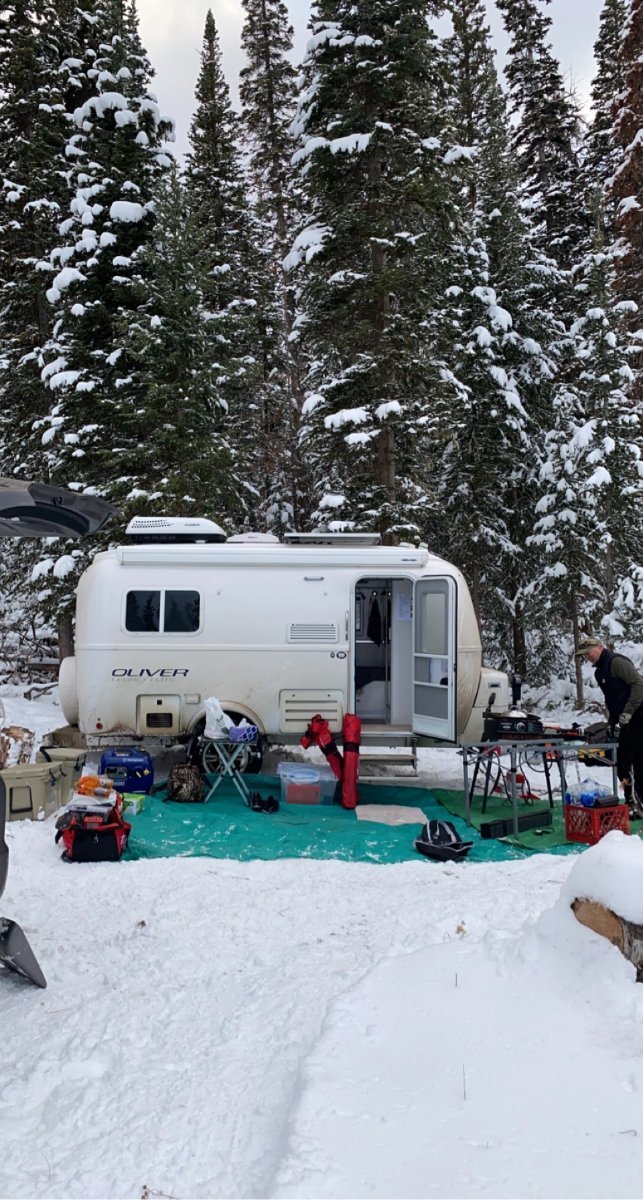
No problems with bugs at these temps. Last year, during the early October bow season, my two sons hunted and tent camped the same area. Again, no bugs but when they returned to their tent following a day of hunting, the tent had been torn down by a bear. Needles to say, their hunt was cut short as they quickly packed up and skedaddled back to their truck. They were much more comfortable this year, camping with me in our new Oliver...my days of tent camping, during any season, are over now that we have the Oliver!2 points
-
I just noticed on Amazon that I can get the all plastic version for less $. Since the ceramic bowl on mine is good and the base (including the pedal assembly) appear to be the same on both, I may order it and scavenge what I need.2 points
-
Actually I taught that class. Evidently you missed the part that this only works in going forward mode. It seems that if you accelerate to much in the going back mode, you end up in the future...2 points
-
The exact failure occurred to us in Idaho this summer. It is insane that we have to replace a whole toilet for a 50 cent part failure. I would rather replace the whole unit and never buy another Dometic unit again even if it costs me double! Where is the corporate integrity at Domenica? GJ2 points
-
LoriL - Great for you guys and for your Oliver! Glad to hear that it was a good time and that Oliver Service helped you when needed. THAT sure is one heck of a campsite. I'm guessing that you didn't have much (as in none) of a problem with bugs - mosquitos have always been a big problem for me in that area 😬. Great pics too! Thanks for sharing. Bill2 points
-
The city water intake anti-syphon valve froze/cracked. This was my fault in that I didn't hand-pump antifreeze into this area when I winterized. Remember that old saying of not letting yourself be interrupted in the middle a chore such as this? While it is a bit unusual for this area of the country (Western North Carolina in the mountains) it is not unheard of for the temps to get to the single digits and I'm sure that winter we had a couple of days with temps in that range.😥 Bill2 points
-
Great pics and thank you for sharing! I hope you bagged a nice big bull elk! Elk is one of our favorite red meats besides Buffalo and Venison. -Patriot 🇺🇸2 points
-
Just returned from a deer/elk hunt in the Colorado Rocky Mountains with my two sons. The Oliver Elite was AMAZING. We were able to camp higher in the mountains than any of the other hunting trailers in the area. We had lows in the single digits and afternoon highs in the 40's. The trailer temps, sleeping conditions, hot showers, toilet, and morning coffee made wilderness conditions so comfortable. We did have several successful support calls with the Oliver service team. Couldn't have done it without Mike. He helped us with the furnace and the Truma water heater. The Oliver gave us the opportunity to experience the incredible backcountry and wilderness of the Colorado Rockies! Paul
2 points
-
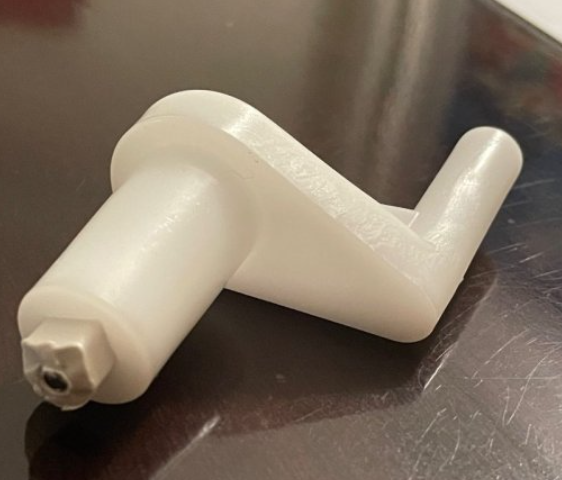
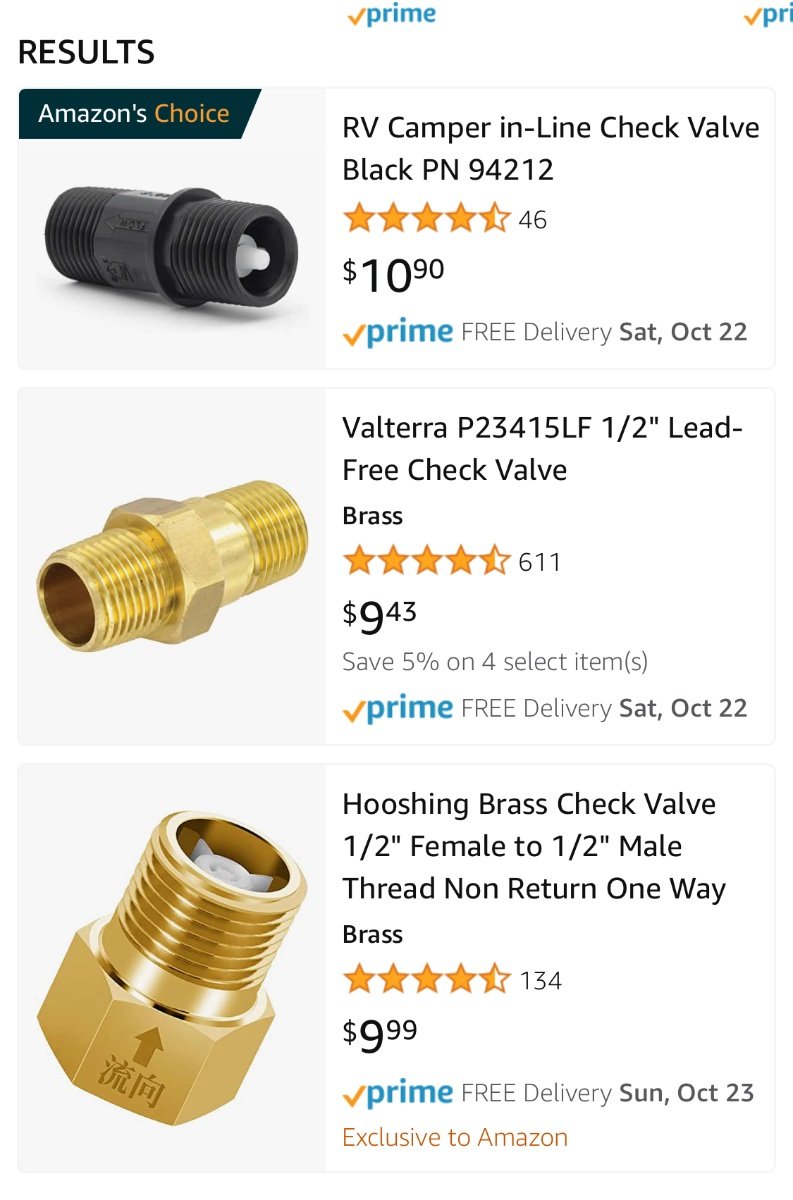
The white one isn’t a check valve. It is a spray nozzle. The idea is to blast all around the walls of the tank, to get rid of the gunk that sticks there, not just fill it up. Check valves provide one way flow protection. You do not want black water going back into the fresh water supply. That “normally” would never happen, but if something happened in the fresh supply system, it could possibly syphon back and contaminate it. The RV codes require a functioning check valve here (complete separation of fresh and sewage systems). Just like residential code requires check valves when you connect up an irrigation system to city water. The other check valves in the back of the trailer are installed to prevent your pressurized water from simply going the wrong way. It is all about traffic control, like one way streets. John Davies Spokane WA2 points
-
Thanks Bill. I will call Dometic today. Not sure if I can muster up enough tears, but I'll try. 🥲2 points
-
Take out the unit completely (disconnect battery power first!!!) I sanded the surfaces with rough paper, cleaned the board and wall surfaces with alcohol, and reattached with JB Weld. You should be able to figure out a way to brace the panel overnight, wedging in a trimmed piece of wood will work, or a large adjustable clamp, if if is deep enough to reach. That will get you back to where the factory did it. Do you trust that heavy inverter to stay on with those tiny short screws? Not me. https://www.homedepot.com/p/J-B-Weld-10-oz-Pro-Blister-Epoxy-8281/308472730 Drill out all the holes clear through the wall, install appropriately sized stainless machine screws, washers and locking nuts. Place the heads where they are visible (put the nuts inside). Slot (cut) the lower holes in the inverter so that you can preinstall those lower washers and nuts and simply lower the unit down onto them (they are kind of hard to reach). Reinstall the inverter. Now it cannot possibly fall off. Open a service ticket, Oliver needs to know that this is a problem! Please add your TV and trailer info to your signature so we know what we are talking about…. and please start a new thread with pics. John Davies Spokane WA2 points
-
Share and Enjoy !Shares Growing up in a family that spent time camping and pursuing outdoor activities, one thing was for sure, our first night at camp dinner. One of the memorable times we made this dinner as a family was the first night at Yellowstone National Park. Camping food is some of my favorite things. Maybe it is because after hiking, exploring, and playing in the wilderness all day, the hunger I had made the food taste even better. For my family, we would write a menu while camping and strategically pack and cook food to last the week. The beginning of the trip would be more perishable foods, followed later in the week with more shelf-stable products. For the first night, though, it would be something simple and quick to cook. With a few simple ingredients, everyone would be happy and full by the time dinner was over. Along with this Trailside Bite, I invited my mother to help me cook and share stories from when she was younger and how her experiences in the outdoors began. I grew up with three siblings; camping was a big part of our vacations. My mom will share stories from our camping trips and be great company as we cook together. On the Menu This family-inspired recipe is our simple Sausage and Potato skillet. Ingredients Yukon Gold Potatoes, diced2Yellow Onion, diced½Bell Pepper, diced1Kielbasa Sausage, sliced1/2Salt & PepperdashChili Powder½ tsp.Butter2 TBSP This Trailside Bite has just a couple of ingredients that will only need to be diced and cooked in a sautéed pan. Add all the ingredients to a pan and place it on medium-high heat. I like to start it on higher heat to melt the better, which will help things not stick to the pan while cooking. Once the butter is melted, reduce heat to medium heat and stir occasionally. Add a splash of water over the pan to steam the potatoes to reduce the cooking time. Check after a few minutes; if water is reduced, feel free to add more to continue the cooking process. To check if the potatoes are cooked, press the diced potato; it should cut easily yet still be firm. Uncover the pan and stir until the remaining water evaporates to brown ingredients. This should let the onions and peppers caramelize and crisp the sausage and potatoes. Once cooked through, serve with a salad or warm rolls and butter. Share this meal with your favorite people to make it a great start to your travels. Some meals become a crowd favorite; this is sure to be on our list. Share and Enjoy !Shares The post Sausage & Potatoes appeared first on Oliver Travel Trailers. Read the Full Article1 point
-
Sounds like a very reasonable approach. I can revert at any time. I will give this a while and see how it feels but generally the truck doesn't seem to "slosh". Good points, all though. Brian1 point
-
My experience was that Dometic does not sell the part that broke on Chuck's and our toilet. (Chuck's picture below) For this 50 cent (to make) part not being available, one has to purchase a whole toilet. This was verified by both Dometic and E-trailer. If anyone has info contrary to this please share it with the team. Thanks, GJ
1 point
-
Apparently you missed that class in Physics where it was taught that the faster you go in an enclosed vehicle the more negative air pressure builds inside the vehicle. In turn this will result in the vehicle becoming more narrow as the external relatively higher pressure combined with the relatively lower negative internal pressure makes the vehicle smaller. So, the answer is to simply put your foot to the floor!😬 Bill1 point
-
The screen I placed in the side of the AC and held in with magnets held up well when traveling. And, no more birds.1 point
-
Pretty content with my Ollie, but if it were 6-12" wider it wouldn't hurt my feelings..1 point
-
I think most of us are very conservative about exposing our plumbing to cold temperatures. Personally, I'd be at DEFCON 2 if I saw 33 degrees near a water line. However, hitting 32 isn't necessarily going to mean damage. The compartment might be 32 but the water in the lines is still 35. The water may have room to expand by draining into a tank. PEX plumbing is more tolerant of freezing than PVC. I imagine there's some wiggle room. What I'd really like to know is, has anyone experienced plumbing damage in their Ollie from freezing, what was damaged, and under what conditions did it happen? In other words, what are the real world limits to what our Ollies can take? Not that I'd want to go there...1 point
-
I haven’t handled a Spyderco, but I did handle a new $160 Benchmade and a $300 Benchmade. Both were noticeably better than my $40 KRKT. Think Mercedes vs Chevy. The $300 had a carbon fiber handle and better steel and felt wonderful. The mechanisms were very slick and positive. But I would have chosen the cheaper one for actual use. Money no object, the CF would make a great choice for a collector…. My suggestion is to go to Sportsman’s Warehouse or Cabelas and handle a few before spending that much money. But I still would never carry any really nice knife when camping… But if Steve sells that one he found, I would be interested. John Davies Spokane WA1 point
-
With you all's help I got this done. Parts came from Summit Racing: new timken bearings and 4 extra seals for $157.82 total!! I was glad my neighbor helped, he showed me how NOT to smash those races and seals into place. Thanks everybody!1 point
-
Good try there, John. I found a hundred dollar bill while walking our dogs years ago. Tali demanded I give to her for safekeeping. I never saw it again.1 point
-
If necessary, I suggest you re-purpose the concave washers from old shocks as described in this older thread to add additional support and extend life of rubber bushings. Shock Absorber Bushing Support1 point
-
Thanks all. We just arrived at our campground in Louisiana, far from any civilization and with barely a bar of cell coverage. Tomorrow we’re in Waco for a couple of days and I will work on it then. If I can’t find one there, I’ll order one of the top two in JD’s Amazon picture above. Mike1 point
-
Take it apart again, go to an Ace Hardware store and they should be able to match up the seal for a dollar or two at most. Buy a spare for your kit. Alternatively, if you are near a larger city, an RV parts supply store … If that doesn’t work, ask Oliver for the make and part number of the valve, you most likely can find it at an online vendor to at least see if their price is acceptable (it does seem very excessive unless it includes overnight shipping and hand delivery to your campsite 😬). I suspect it is a special RV part, most common types have female threads Take pics please. Good luck. What a sh**y project😬 John Davies Spokane WA
1 point
-
Sak, thanks very much for the detailed instructions and annotated pictures. Those are always most helpful! It is very time consuming to write up this sort of post and edit the pictures. FYI everybody ….. “Remove the screws securing the inverter to the white AP1 board. There are two screws located on the bottom and two located on the top” There have been a number of owners who have found one or more of those screw holes stripped, and some like me have found that white board partially or COMPLETELY pulled away from the mounting surface (failure of the epoxy bond). I do not think that those four dinky little sheet metal screws are strong enough for that much weight, especially when going over rough roads. I drilled completely through mine in four places and installed longer machine screws, flat washers and nylock nuts. This is something to be aware of, keep a close eye on the boards where they are attached, and on the mount screws of all these components. Thanks again, great post! John Davies Spokane WA1 point
-
Four 6 volt AGMs are certainly the most painless and cost effective option. But they are not especially long lived, anything longer than three years is uncommon. Mine were fried at the beginning of season four. The advantage is that they are completely plug and play, you don’t have to mess around with different charger settings or making new cables. Lithiums are the way to go if you are at all handy and willing to learn how they work. They require a clear understanding of their differences and care. The weight savings is stunning! They do require a new charging board for your converter, with a “lithium switch”, and a simple change of settings in your solar controller. Your truck will no longer charge them properly, you should either disconnect that charge wire or install a smart DC to DC charger that will properly manage that current. If the brand has its own Bluetooth app, you do not need to do anything else special, but Battle Borns require a separate battery monitor, to keep track of the state of charge. (You can no longer use the system voltage since it doesn’t steadily decline like a lead acid battery.) I suggest that you educate yourself about RV lithium batteries, and then make an informed decision. I switched to two Battle Born 100 amp hour ones and I find that amount to be plenty, except when I am running a compressor fridge in the truck, that uses up to 50 AH per day and then I start to worry. I do have room for a third battery, but so far I do not think I will need to add it… These ship free and have a super warranty and reputation: https://battlebornbatteries.com/product/12v-lifepo4-deep-cycle-battery/ This is excellent: https://olivertraveltrailers.com/forums/topic/6629-how-to-find-happiness-with-lifepo4-lithium-ion-batteries-solacity-article/ Other FYI: https://olivertraveltrailers.com/forums/topic/4812-how-to-progressive-dynamics-pd4045-lithium-upgrade/ https://olivertraveltrailers.com/forums/topic/5270-how-to-redarc-dc-to-dc-11-amp-output-trailer-charger-installation/ If you must get running again ASAP, buy a $100 12 volt Walmart Deep Cycle battery (not AGM) and use that until you get the situation under control. Later you can sell it on Craigslist and recoup some of its cost. John Davies Spokane WA
1 point
-
And, for your reading pleasure, 4 pages of posts on "winter camping" here on the forum. Using our search function. https://olivertraveltrailers.com/forums/search/?q="Winter camping"&updated_after=any&sortby=relevancy&search_and_or=and1 point
-
<li style="text-align: left;"> Prepare to be astonished John, as Oliver does indeed make all of the fabric granite pieces in house and it is a pretty cool process to watch. In fact, there is very little, with the obvious exception of the appliances, that Oliver does not make onsite. Even the bathroom door is made right there in Hohenwald by those Oliver artisans.1 point
-
To further your testing, simply request your cutouts from the build, you should have enough inner and outer shell pieces, some honeycomb reinforced some not, to create a more conclusive test result. Thanks for doing what you did, I've not a lot of experience with fiberglass and have read that it burns pretty eagerly, so learning that there might be some sort of retardant in their process is reassuring.1 point
-
I hope the resins are fire retardant, but assuming that they are because of the fiber granite samples is a mistake. I would be astonished if they manufacture those panels. I am sure that someone there could get the vendor's MSDS info sheet if you asked. Plus they might give us some info on their own fiberglass build standards, in terms of fire safety. Hallmark truck campers have a very expensive Coosa option for the interior furniture. They definitely don't make it: ... http://coosacomposites.com I would like to see the source info for the fancy Oliver countertops..... Good thread, thanks for starting it. John Davies Spokane WA1 point


.thumb.jpg.e34bf01ef7f7d5e99ad31856d45afbeb.jpg)


-
Recent Achievements
-


")


