Leaderboard


Popular Content
Showing content with the highest reputation on 05/11/2023 in Posts
-
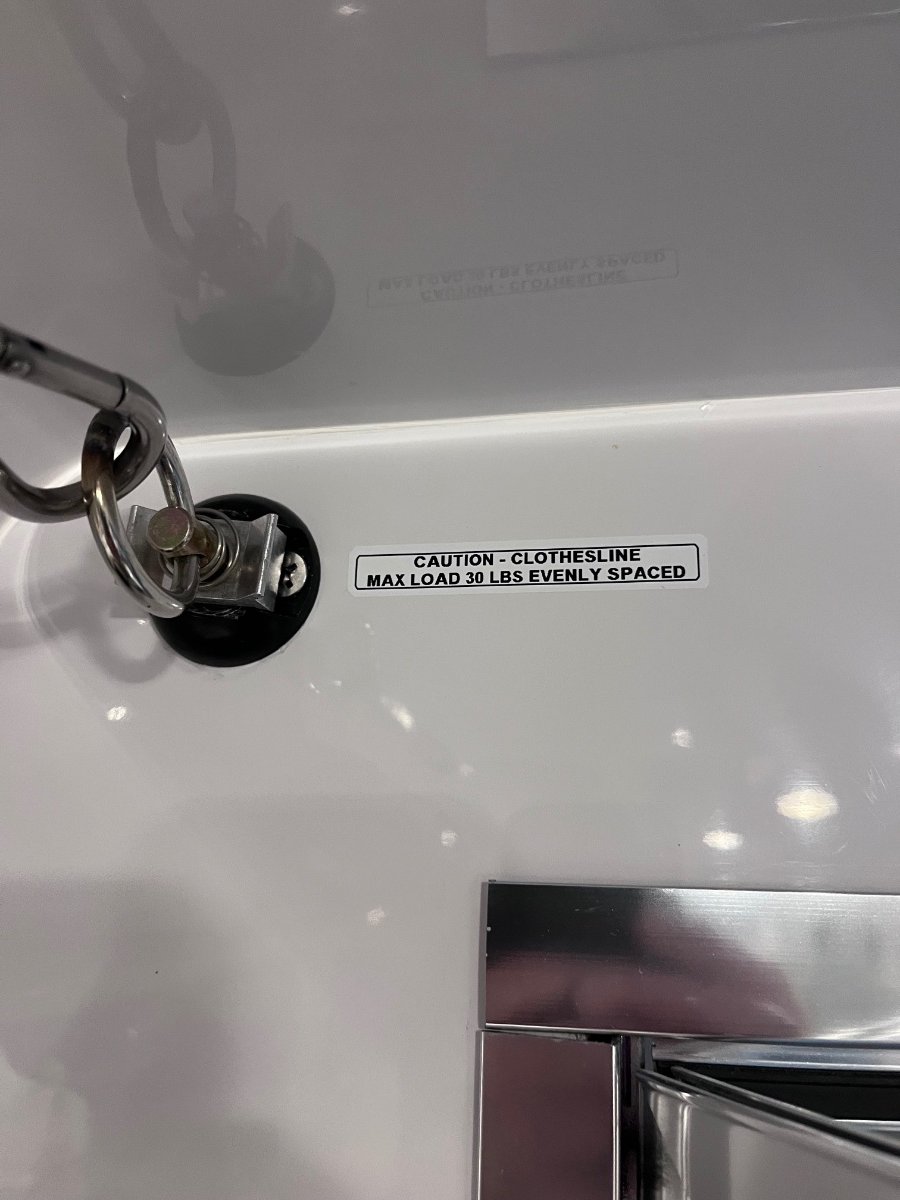
Here is my advice: don't do it. The forces on anything cantilevered off the back end of an Oliver trailer are much more than you might think. Even if you had the factory-installed hitch, attaching a generator platform to that hitch, and hauling a generator there, would be unwise. Find another place to haul the generator, like in your tow vehicle, as we do.4 points
-
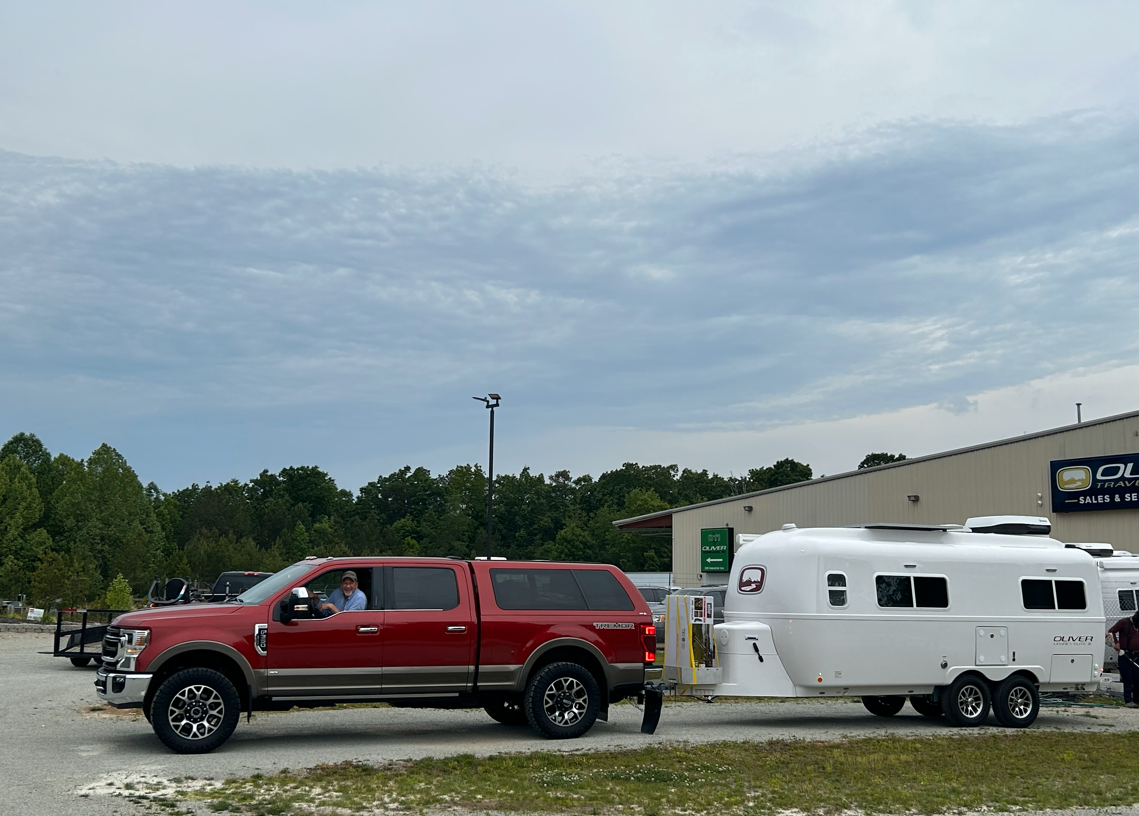
Delivery day is now in the books, and even though my head felt like it was spinning, it went very well. It started out at 4am when I finally decided laying in bed wide awake was useless. Got up after probably four hours sleep and loaded up some last items, fed the dogs and took them out and had a little breakfast with my wife before taking off at 5. I was pretty good driving, seemed like the 6.5 hours flew by. Pulled in early and ran into Chase in the showroom. He said he could take care of the paper work in just a few minutes and then I would be free to go through orientation once everyone was back from lunch. Ryan did a fantastic job explaining everything and answering my questions. The service guys still had to install the wifi receiver system and once that was done I backed the truck and hooked up to head out to a camp spot for the night. I had a great visit with numerous owners that were in for service on their way to the rally next week. @Patriot was their as well with warm greetings and even snapped and initial picture of me backing Ollie-Haus into her first official camp site. The picture shows I was a little giddy by this time. It's about 10:40pm now and I'm finally cleaned up and relaxing. Already have a few things on a punch list for service to address. It's been a great experience and even more so because of the fellow Oliver owners I've already connected with. And in just a few days we'll make even more new Oliver friends at the rally. See you all next week! IMG_8603.HEIC
 4 points
 -
https://www.pellandent.com/RV-Window-Seal Pull your flexible seal, then match the profile with the one on the Pelland Enterprises web page to ensure you get the same one.3 points
-
Chris My trailer is 16 months old and I have never done this....big mistake! My weather stripping (white), on the underside, is mildewed beyond repair. I wouldn't be surprised if the black streaks that appear below the window are from my neglect. I would never have known to go this in-depth had I not watched your video. Thank you, thank you, thank you :) I thought I was done with the cleaning until I found your video. I have noted some owners have replaced the weather strip with a black one. Can anyone chime in where you can get it? Hope to se ya'll at the rally :) John3 points
-
By that time I was drenched in sweat. Left the house at 46 degrees and it was in the 80s and humid by the end of orientation. A day to remember!3 points
-
That's one very happy new owner! Congratulations, Chris!
3 points
-
A beautiful rig and a very happy new OLE2 owner! Congrats!! Patriot🇺🇸3 points
-
Steve's Theorem: Stuff will always expand to fill the entire space that is available.3 points
-
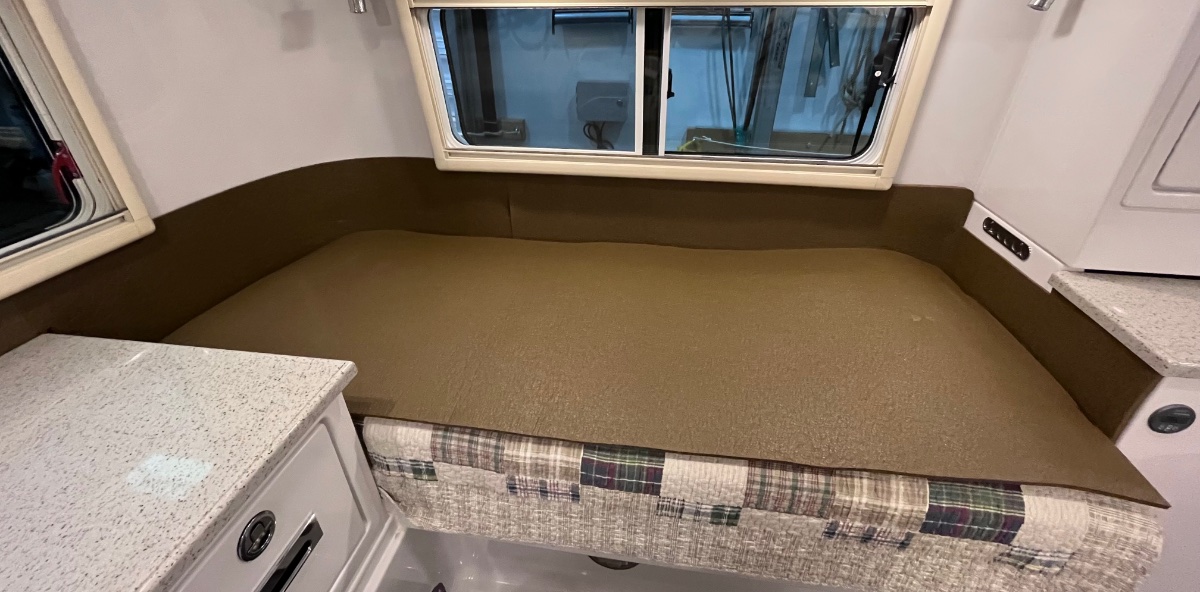
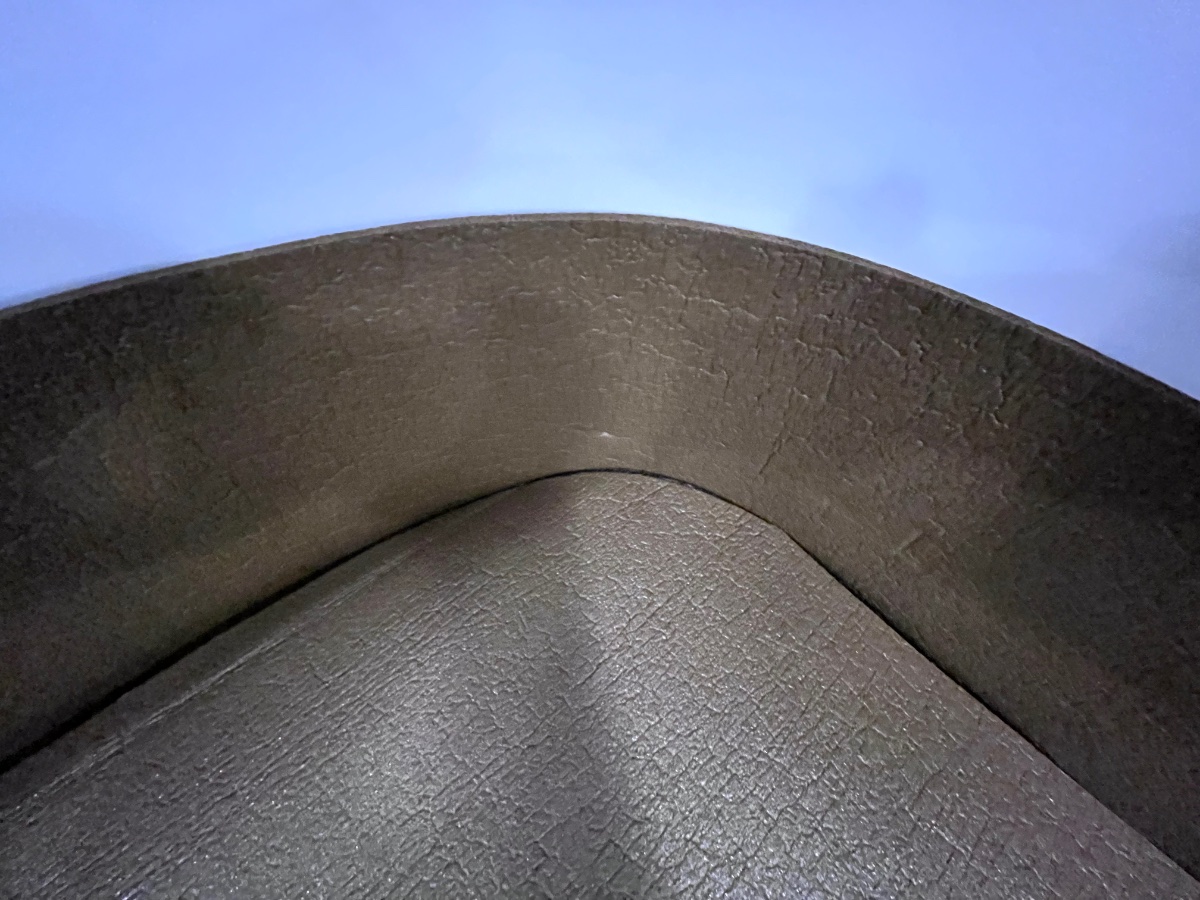
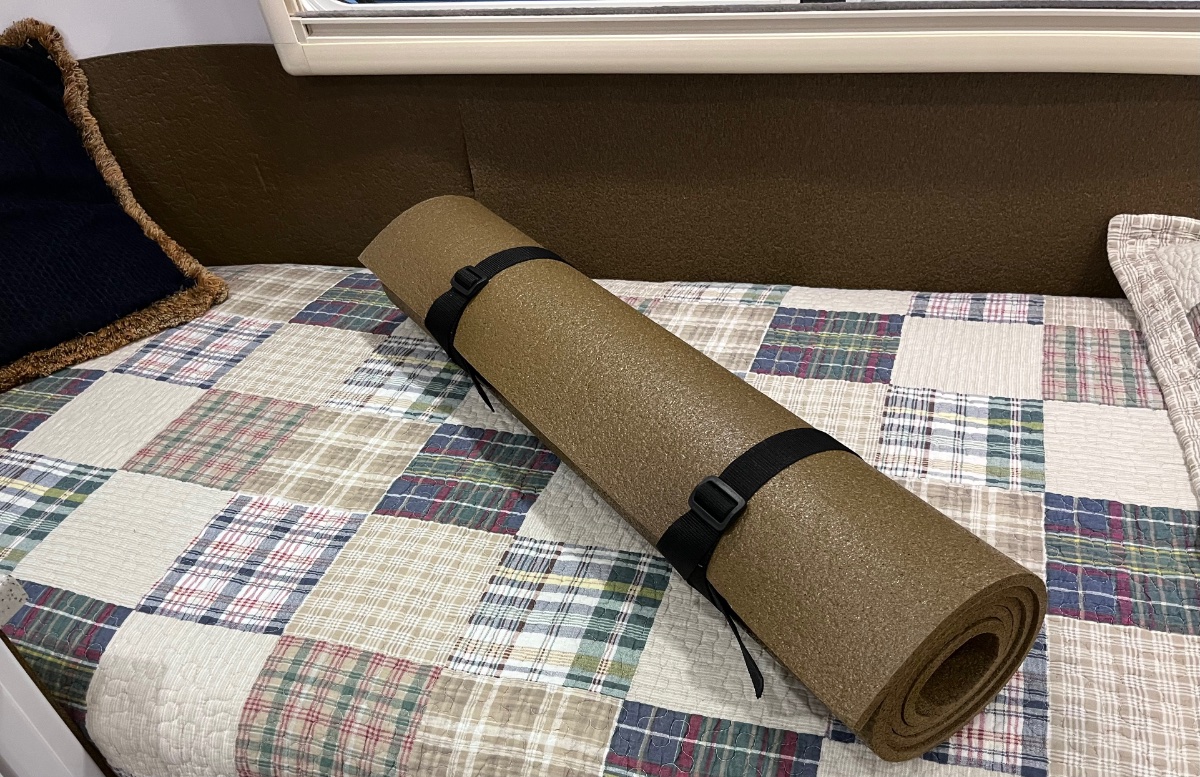
I mentioned that I was happy that these are 30” wide. That is the exact width of the mis-labeled “Twin” mattresses, which are really Bunk sized. That third pad was *exactly* the right size, all you have to do is cut a curve to match the wall. When traveling solo, I can put gear on top of that mattress without worrying about hurting the fabric, or scarring the gelcoat, or the hassle of removing completely and storing the mattress. A zero gravity lounger works, or a full sized CLAM shelter, or a cased rifle, or plastic bins with paper products or linens. But there are no tie downs straps, I would NOT recommend putting a fridge or anything really heavy there. It would become a nasty missile in a collision. Wedging the item(s) against the front bulkhead will minimize that hazard. I highly recommend this mod, once you sleep with the added thermal insulation you will thank me. John Davies Spokane WA
3 points
-
Depending on lots of things, this may or may not be a good idea. What size Generator? Single rear receiver or two? Will you be planning to move it from the hitch to run it? Where will you plug it in? You do know you will have to install a transfer switch? I don't personally know any who has done this. What's wrong with using a front basket?3 points
-
No, we didn't. Aaron just performed magic with his editing. 🤣 We initially told him we didn't want to do it, because every time I see myself I sound weird and stumble trying to speak. I once spent hours trying to make a two minute review video before finally deleting it. Aaron sent us the video to approve or delete. When we watched it, I turned to Deb and said "Well, we didn't look stupid!"3 points
-
When troubleshooting your thermostat, you may want to take time to plug the large hole on the wall behind the thermostat that the three conductor wire comes out of. You can see part of the hole in the picture above. I found that in colder weather, cold basement air can exit this hole directly into the thermostat and trick the thermostat into thinking the cabin temperature has fallen causing it to start the furnace when in fact the cabin is still at the preferred temperature. Once the furnace starts, the airflow reverses as warm air comes into and through the thermostat and into the basement through the hole, causing the furnace to shut off in short order and then the short cycle repeats itself. Merely covering the hole with a piece of tape is a quick and easy fix. This hole is not necessarily a design issue with OTT but rather a poorly designed thermostat. Well designed thermostats have sealed backs with the wire terminals located on the back of the thermostat. The Dometic has a hole in the back of the thermostat with the wire terminals located on the inside of the thermostat. Cheap design. I swapped my Dometic thermostat out for a "Easy Touch RV" thermostat from Micro Air, primarily to allow me to monitor cabin temperature and adjust the furnace remotely via wi-fi because I store my LE II outside many miles from my house and unwinterized. The Wi-Fi feature allows me to turn on and/or turn up the thermostat from home when a freeze event is forecast. I am also alerted if the propane runs out. Unlike the Dometic, the Easy Touch has a sealed back with terminals on the outside back of the thermostat. You may want to consider the Easy Touch as a replacement if in fact your Dometic thermostat continues to be balky and ultimately needs to be replaced. Micro Air makes a model that is an exact replacement for the Dometic thermostat in the Oliver.3 points
-
That's interesting as I just checked on their web site and the footprint of the C73 is only 2" wider and 3" longer than the C36. The primary difference is in height of about 6 inches. The hourly amp draw is listed as .6 and .5 respectively. Obviously there's no need to buy more capacity than you will ever need, but for us this looks like it worked out pretty good for our needs and the price. I'm going to get a slide tray to mount it to so we can access it more easily from the back of the truck.3 points
-
This is neither Mechanical nor Technical, but more maintenance. Not sure what other channel to place this. Hope it helps our new-comers. Someone on the Oliver Owners Facebook page saw my first video and asked me if I could video record actually how to clean the tracks under the windows. So, it was a beautiful day and I figured I'd see if I can clean and record at the same time. This is kind of new to me. https://youtu.be/-oEpon3iaPc2 points
-
John Davies Spokane WA
2 points
-
TOP PHOTO: Not only is all that heavy kit hanging off the bumper of the dude's single axle SOB a bit unnerving, but what's especially intriguing is the interesting wiring harness from the battery (also heavy) forward into the side of the TT.2 points
-
Watching this video reminds me of how much I detest these windows, my biggest Oliver complaint by far. Just went through this on my own windows yesterday but rain kept me from doing the last one. Maybe later today. I do want to reiterate what Steve stated above, it is very easy to remove those rubble glides from the tracks. What I have always done is to pull the window while pulling the rubber glide simultaneously which only takes a couple of strokes to remover it completely. I also take the top part out in order to thoroughly wash and clean the rubber glide. Normally the sliding window should remove easily after that though it may take a bit of maneuvering up and down to release from the tracks. The screen also needs to come out as well, just push down against the springs (bottom of screen) then the top should release from the upper track. This allows for a much easier and thorough cleaning of all parts, rubber glides, track and windows. Figure about an hour for each window doing it this way. In conclusion I also spray each of those rubber tracks with silicone lubricant both sides and doing this allows for very easy installation using the same method as removal. Just get the rubber glide started a few inches then push both window and glide together, pull the window back while keeping the glide in place. Repeat as often as needed until the glide clearly is past the window on opposite side from the feed at which point you can grab the rubber glide and pull it to its destination. Great idea using the wand for flushing!2 points
-
For your reading pleasure : https://olivertraveltrailers.com/forums/search/?q="Rear hitch"&updated_after=any&sortby=relevancy&search_and_or=or using "rear hitch" vs rear hitch in search bar narrows the results down from over 4,000 entries. As others have already mentioned, the rear is not an ideal place for a generator, especially if you want to leave it permanently mounted, and run it in place. The weight on the rear end is a big consideration. It's also (imo) a poor choice of place because of vibration, under travel, for an expensive genset, and also for you, trying to sleep in the rear bed(s), as well as noise. Then, of course, there is the increased possibility for intrusion of co fumes/station wagon effect, as most of the windows and vents are in the rear of the trailer. I'm remembering the first time Pete/bugeyedriver camped with us in WNC, in a 2008 summer monsoon storm. I left our rear window cracked a tiny bit (it's an awning window in our older trailers, not a slider.) The fumes from our little gas grill, with a closed lid, set up at the rear of the trailer, set the co monitor into "full moon wolf howling" mode. Super glad the alarm worked. Super unhappy to deal with it in the mountain darkness, rain, and wind... Never did that again. I always set the grill up further away from windows, now, and genset somewhere that the prevailing winds carry the co away from the trailer. Free advice, often worth the price.2 points
-
I can see how that is a big design flaw. As usual, Oliver has found a field fix. Hopefully, Truma will respond with a better shroud design.2 points
-
In our experience, twice, it allowed water to enter the cabin. I believe this is because the air conditioning unit is mounted over a large hole in the roof, and is not internally sealed. Truma relies on external, not internal, sealing.2 points
-
Congratulations!!!!!!!!!!!!!!2 points
-
I'll need to double-check when I get back from this extended travel I'm on, but I believe we could fit the 72L model Luna under the BackFlip truck bed cover on the Tundra... We're using a Canyon cooler now, it would be nice to augment the freezer capacity of the OTT fridge. The 90L Luna would be too tall for sure.
2 points
-
Absolutely! Site #G23. I do wish it had separate lids, and that the hinges could be swapped side to side. It I’m extremely happy with ours, though! It’s got well over 40,000 hours on it so far. (Mid-March until Christmas every year since fall 2016.)2 points
-
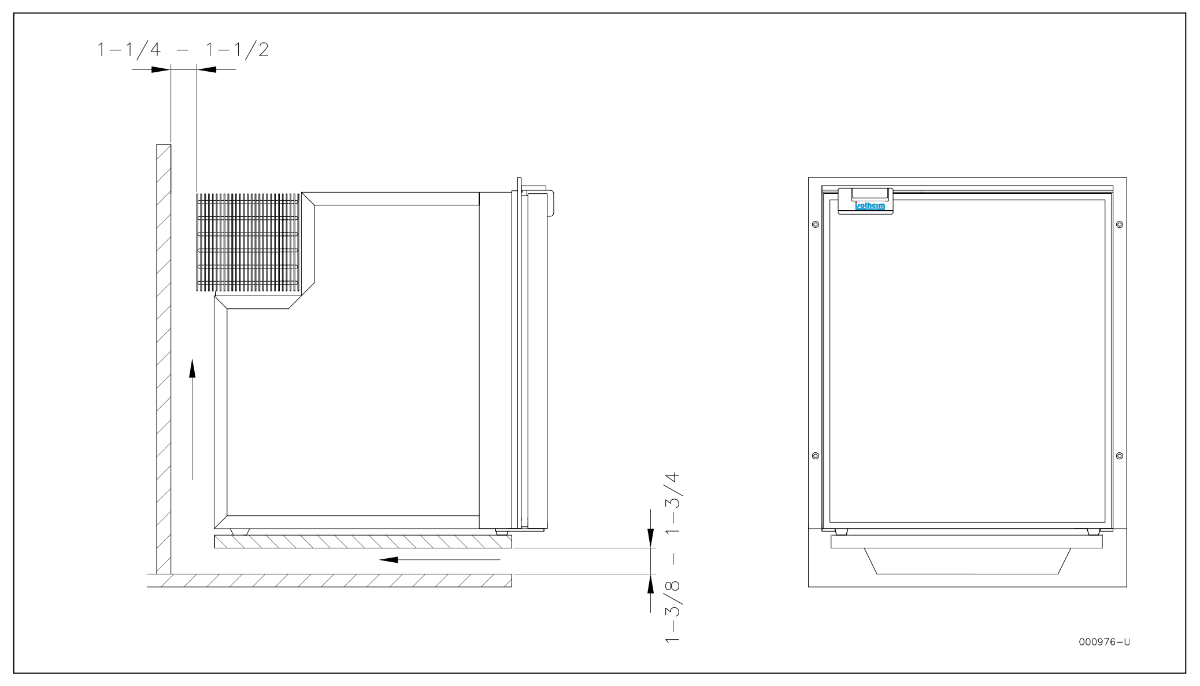
Here is the Refrigerator Removal And Service Notes document I made for the Owners book: +Isotherm Cruise 130 2-Way Compressor Refrigerator Removal and Service Notes Hull 218 “Mouse” .pages John davies Spokane WA2 points
-
We had ours done last June...nice to get rid of the wax :) CGI did a wonderful job! John2 points
-
I’ve used a clay bar on cars, but not sure I’d want to tackle our trailer. Lots of surface area.2 points
-
Steve, We are really considering a National Luna twin and are hoping to see yours at the rally if you’re open to showing it to us. Our TV is 12v ready and would just like to get a visual on the size. Would you be willing to let us take a look at your NL90? This NL is on our radar -https://www.equipt1.com/products/50l-legacy-fridge-freezer?ref=yotpo_93 Patriot🇺🇸2 points
-
Pics Installation & operating instructions Isotherm Cruise & Cruise INOX marine refrigerators.pdf
2 points
-
Thanks. I also posted the entire lineup of these tires a few posts back in this thread. I had the tires inflated to 50 lbs. But even that seems high for these tires and my Oliver. https://olivertraveltrailers.com/forums/applications/core/interface/file/attachment.php?id=26016&key=7584a7c5c8aa611b54b4492d5c7eddeb2 points
-
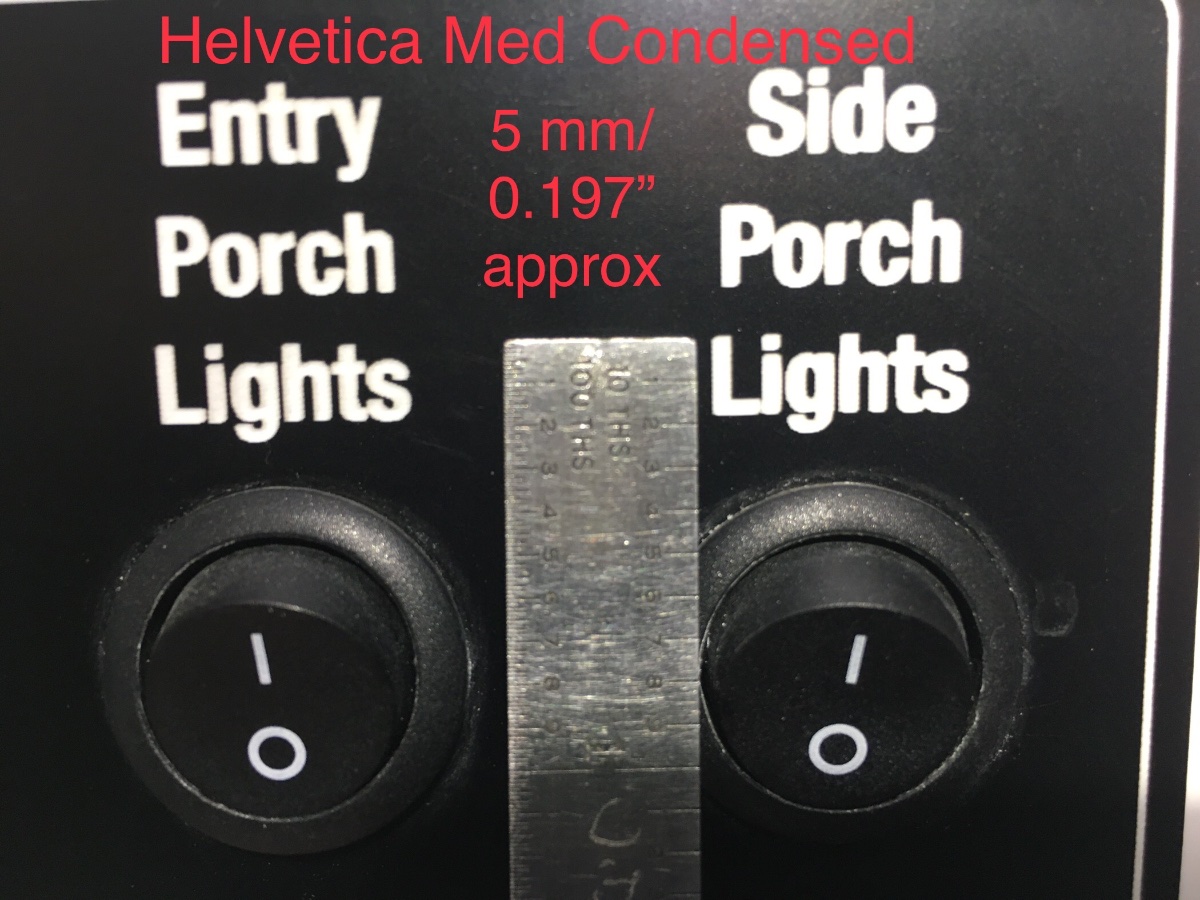
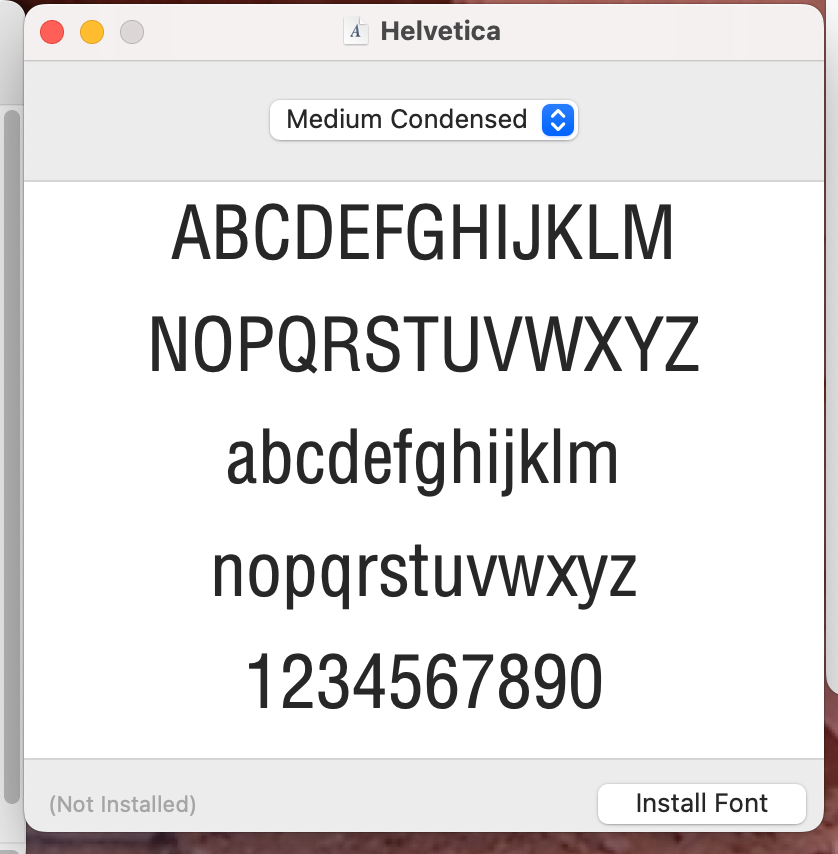
I recently bought a DYMO LabelManager 420P at a killer price, 46% off the price when I added it to my watch list a couple of years ago. DYMO Label Maker with Adapter | LabelManager 420P High-Performance Label Maker, Rechargeable, PC and Mac Connectivity, Bright Backlit Display, Easy-to-Use, Portable, for Home & Office Organization I also ordered a case, which is quite nice:: Case Compatible with DYMO Label Maker LabelManager 160/280 Portable Label Maker, Label Printer Storage Organizer for AC Adapter, Tape Cartirdges and More Accessories(Box Only) Black I was hoping to be able to match the existing font and style of my Oliver switch placards. I was able to measure the size and track down the font. I added the Helvetica Medium Condensed font to my iMac and was unable to access it using the DYMO lable software, drat. However, I did find out that the basic onboard font preloaded into the tool makes for very nice labels that look similar to this, the bonus is that you can sit inside the trailer and make them there. No computer hookup needed. If anyone wants to try the proper one, I have attached it as a "otf" file below. You double click to launch the font installer on an iMac. I do NOT know if it will work on "Some Other Mac" aka a PC. Helvetica Medium Condensed.otf Previously I would make a label using the iMac, print it, cut it, laminate it, cut it out again using a flat paper cutter, and stick it down with double sided tape. It worked but was a true PITA and it did not look great. So I replaced a few of those: And added some new ones. I am pleased. I used the generic tape, not the DYMO ones, because they are 20% the cost. If you wanted to ensure that they would stay on a long time, you could add some clear (not transparent) Scotch tape over them. All these were done on the 1/2" Black on White tape, the tool will handle up to 3/4" (four lines) DYMO LM420P UserGuide.pdf John Davies Spokane WA
2 points
-
Here's the link to the load PSE/Load tire inflation chart for those Michelin Agilis Cross Climates https://tirepressure.com/lt225-75r16-tire-pressure Agilis Loading Table: The Agilis has a bit higher payloads in the table than the original Michelin LTX M/S that came on my 2019...so they could be a good replacement. Thanks for your posts. Craig
2 points
-
The original "oldest" , the one that started it all, is the John Oliver trailer, on display in Hohenwald. We all benefit from the labor of love of the twins, Jim and John, and the continued efforts of their family, and the extended family of Oliver employees. A side note: both our 46+ year sailboat, and our 2008 Oliver, are hulls #12. How very cool is that?2 points
-
It depends on definition. @Bshaffer owns #10, and is a second or third owner, and has done amazing renovations on the ultimately cute red jelly bean, and is sometimes active here on the forum. I see her more often when I check in on Facebook group. We have #12, as original owners. Pete , @bugeyedriver is just a month or so younger than our hull #12. (14, I think, and original owner.) #3 contacted me years ago. I don't know if they still have it. #3 is the storied trailer owned by Mountainborn, where it all really began, for marketing. We bought ours, after seeing a grainy video on another site, and visiting the factory with the late Robert Partee. I've been in touch with a number of original and second owners over the years. Still friends with a number of those from our "small group" days of camping together at unofficial rallies. Very close friends with a handful, whether they still own their Ollie or not. Others, we camp and sail with on a regular basis. (Obviously, we're all older. Some don't camp anymore.) A number of the early trailers are still out there, somewhere, but not in touch with the forum. Truth is, our now 15 and 16 year old trailers have stood the "test of time." And, it's been exciting for all of us "older" gen owners to watch the progression and evolution from the original Elite I. We tend to pick and choose pur updates, but continued ownership, and the reliability, is a testament to the product. Personally, I can't say enough about the support and family feeling we've received from Oliver over the now many years. It's a great corporate culture. So many great people. Before Mountainborn, I never knew there was a Hohenwald, Tennessee. Now, it's one of our favorite towns.2 points
-
Please don't ask if it's OK to tow an Elite II with a Kia Sorento. There are thousands of hours of written discussion here and on other forums about towing. No way! It’s a 1980 Subaru Brat, but it has really big tires😊2 points
-
John, We just had our Truma installed and the (6) screws that are counter sunk holding the Truma cowling onto the unit is a design flaw which Oliver has addressed with Truma. These counter sunk holes will collect water which could result in a leak. The fix- Per Oliver service these counter sunk holes are now filled with a sealant by Oliver to preempt water intrusion. All new Olivers and retrofits get this sealant. This sealant is not permanent and can be removed to access the fasteners. Unfortunately, I don’t recall the name of the sealant. I will try and ask Oliver Service staff the name of the sealant they are using tomorrow. We are still at Camp Oliver giving our newly installed Truma a two day shake down before departing. Will this sealant require regular visual inspection and maintenance? My guess is like any other sealant yes. Patriot🇺🇸2 points
-
I looked at the full bed slides when we got our truck and decided against. I know it would be really handy in a lot of situations but just felt I didn't want to lose any vertical space. Now having got the cooler it's obvious that we at least need a slide for it. They aren't cheap either but I will bight the bullet and get one. I hadn't thought of the grocery store application so that will be a bonus. I know we will make good use of it. I'm looking forward to getting my solar and lithium battery set up in the truck as the cooler will just stay on 24/7 mostly running off solar.2 points
-
You are correct and I went through all those dimensions and measured my truck carefully. I have a full-size Bed Slide rated at 1500 pounds so I lost some height due to that. An additional 6" would make it nearly impossible to fully open without sliding it out every time. I also have an ARE topper on my truck so that was part of the consideration. I installed L-tracks onto the Bedslide to make tie down points and I also have the insulated cover that stays on the fridge at all times. Not saying yours won't fit or be a good fit for your needs. I just got a smaller one and, so far, it fits our needs perfectly. My wife won't go to the grocery store without it now. Sometimes we go over to Ft Campbell and shop at the commissary. That is about a 45 minute drive back home and this fridge keeps the frozen stuff frozen. For those trips, a C73 could be very useful. Brian2 points
-
Hopefully the CGI guys didn't use up all of their polish on 135 - I'll be getting Twist done in about 3.5 weeks by these guys back in Murfreesboro, TN. Can't wait 🙂2 points
-
So everything I’m going to say here applies to CGI detailing. When you get your trailer ceramic coated they don’t just wash it and apply the coding. They detail the trailer first They’re going to remove all the old oxidation and really make it shine before they put the ceramic coating on. If you have an older trailer and really want to bring back to shine and make it a whole lot easier to clean and and keep up I would highly recommend the ceramic coating and I highly recommend CGI.2 points
-
Thank you for displaying the courage to admit your limitations and taking a proactive approach! Mossey2 points
-
I am going to look into one of these. Very impressive!2 points
-
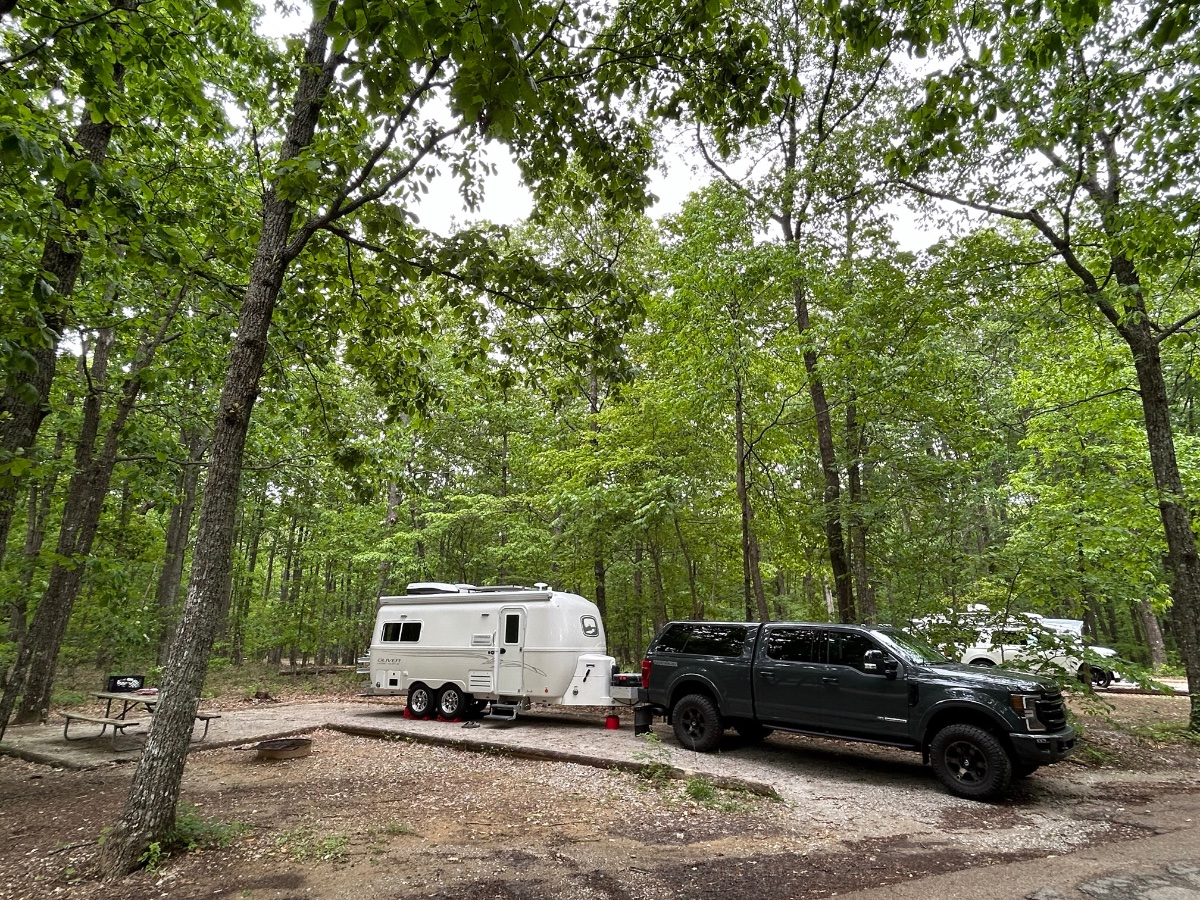
Ollie in the Wild! After a very successful service visit and Truma retrofit/install we left the Oliver Mothership and are now camped at Monte Sano SP near Huntsville, Ala. It’s a reeeeally nice SP and we highly recommend it! Nice large sites with full HP. Only 55 miles from the LGSP Oliver Rally. A nice place to chill until we head out to the Rally. Even a little Bluegrass music under the Pavilion this evening. Happy Camping! Patriot🇺🇸
1 point
-
The rear hitch is only recommended to be used for weights of less than 100lbs and it's also important to note that the weight should be placed as close to the bumper as possible and not cantilevered outward. Typically this hitch is used for mounting a bicycle rack ( and that's truly what it's intended purpose is ) as is evident by the 1 1/4" acceptor. I would not risk mounting a cargo tray back there others may disagree.1 point
-
After I recently submitted another service ticket noting leakage under the Truma Aventa air conditioner, I was referred by Jason Essary to Truma. Truma recommended sealing those countersunk holes with silicone sealant. Once on the roof, the sealing process took about 15 minutes.1 point
-
2021 LE2 Below are pics of the thermostat in my Ollie. The second pic is with the face plate removed....it just pulls straight out. You will see that there are three male terminals (encircled with yellow pads)...these are operating like touch contacts rather than buttons. With the face plate attached you are pushing the face plate to make contact with the terminals. You can touch these terminals with your finger to verify they operate the thermostat. If so, it is working fine. The back of the face place has some material at the thee points that mates with those three male contacts. Check to insure they all appear clean and uniform...no grime build up on one that would interfere with or effect uniform applied force. When reattaching the face plate insure it is pushed flush to the thermostat body. When I reattached mine, at first it was not flush all the way around so that I had to push harder to reach the terminals. (You might want to verify "flushness" to start with....accidentally hitting the face plate could possibly cause a gap). Steve
1 point
-
Anybody that has been considering a portable cooler to carry in your tow vehicle, Amazon has the Truma C73 marked down 35% currently. They are pretty expensive regular price but this discount makes that model about the same price as the Trumas half that size. It's a very high quality unit, made in Germany, not china, and has real nice features just like the Truma appliances Oliver is putting on the new campers. Bluetooth control, auto voltage monitoring and shutdown, low current draw, temps adjust down to -6f. If you like Truma and have been considering a cooler this price is as good as you will ever find. Link1 point
-
Certainly just one of the many reason that I have to work harder to make anything near me look good.😁 Besides - someone has Bosker's cuteness to draw attention away from a lack of altitude.😇1 point
-
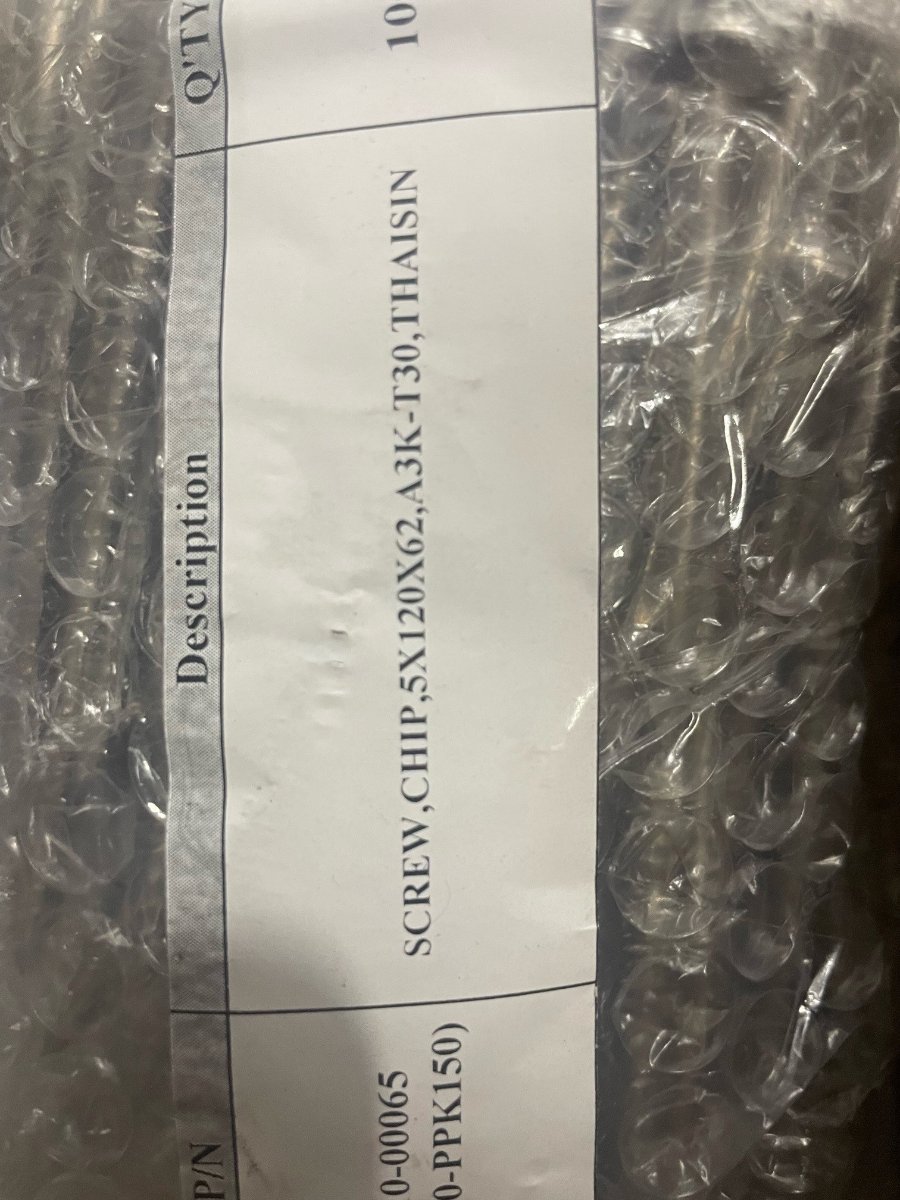
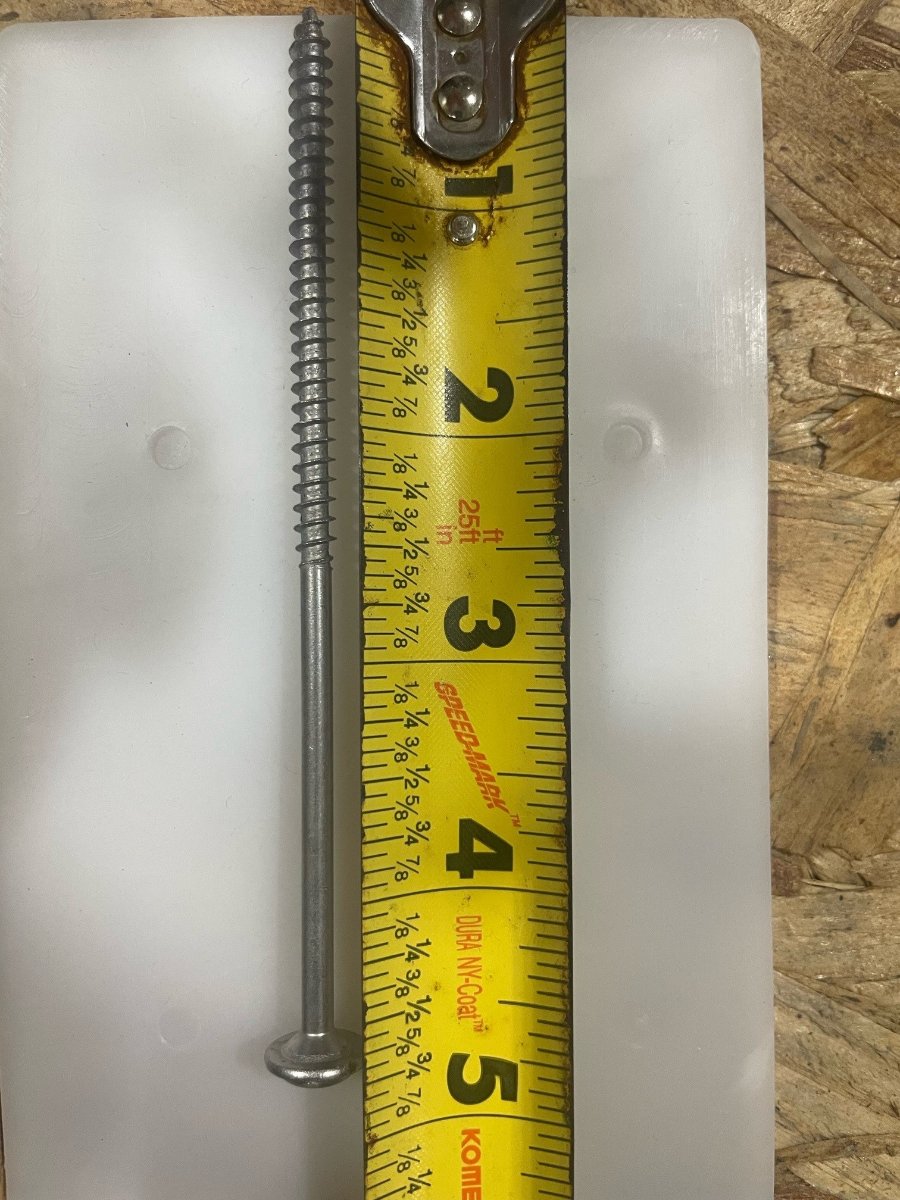
They are 5mmx120mm T30 flathead wood screws. Photo below shows the bag they come in. Next photo shows the length in inches. A Google search so far has revealed no sources for 5mmx120mm wood screws. But, the approximate size in Imperial screws is #10x5". Those are readily available in the USA. I figure if I have to address a leak around my Truma AC unit, I will buy some #10x5" screws and carefully try them. I do wish that Truma would not be so compulsive about providing repair parts only to authorized service centers. I believe I am more capable, and careful, than most "knuckle draggers" employed by RV service centers these days, particularly in consultation with the excellent Oliver service team...
1 point
-
This is an older thread but if anyone is considering a portable refrigerator, Truma has a really good promotion on 3 of their models right now.1 point
-
After a lot of deliberation about weight, size and cost we went with the F40C4TMP. We've used it in multiple settings for nearly a year now and it has performed better than expected. For us it has been a great compliment for the camper, truck, car and house. https://www.amazon.com/gp/product/B08D3T3CJ2/1 point


-
Recent Achievements
-


")


")


