Leaderboard


Popular Content
Showing content with the highest reputation on 05/19/2023 in Posts
-
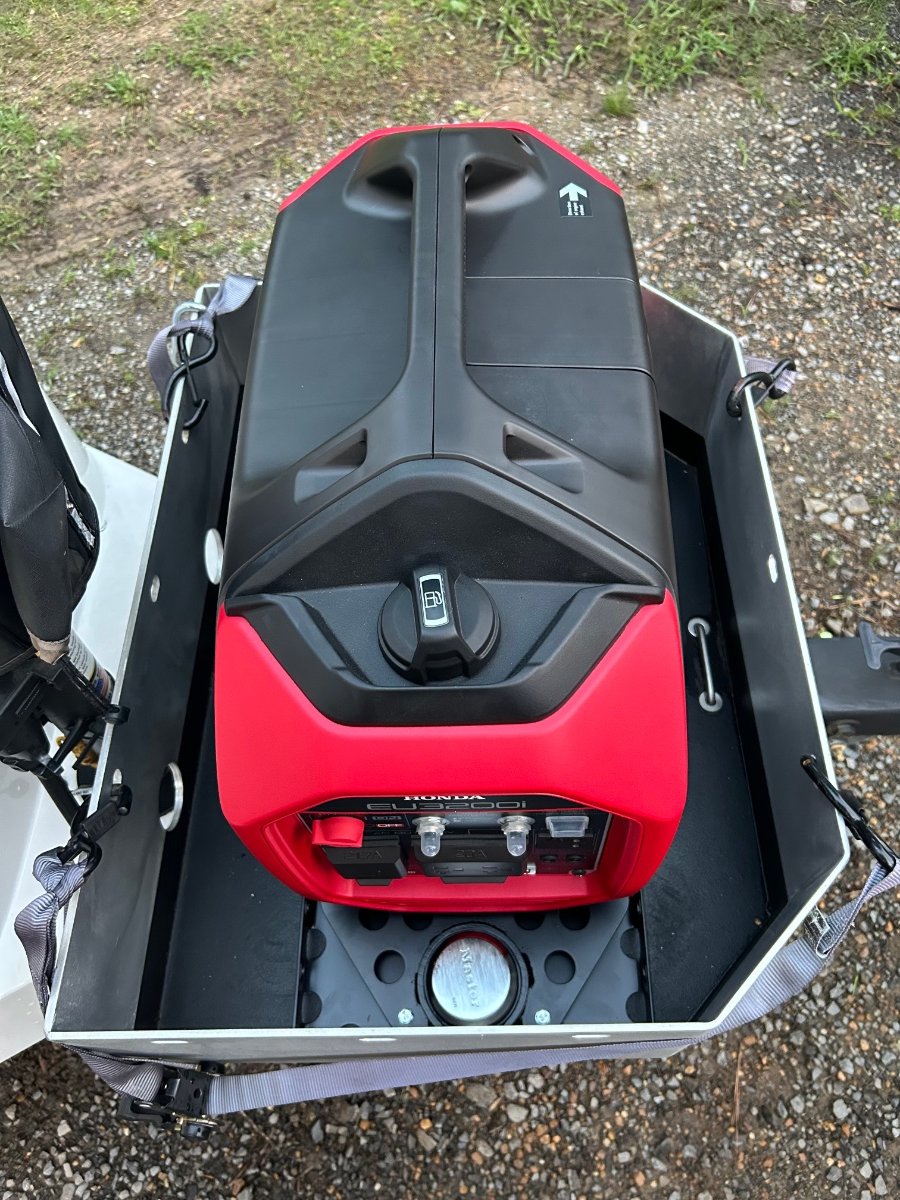
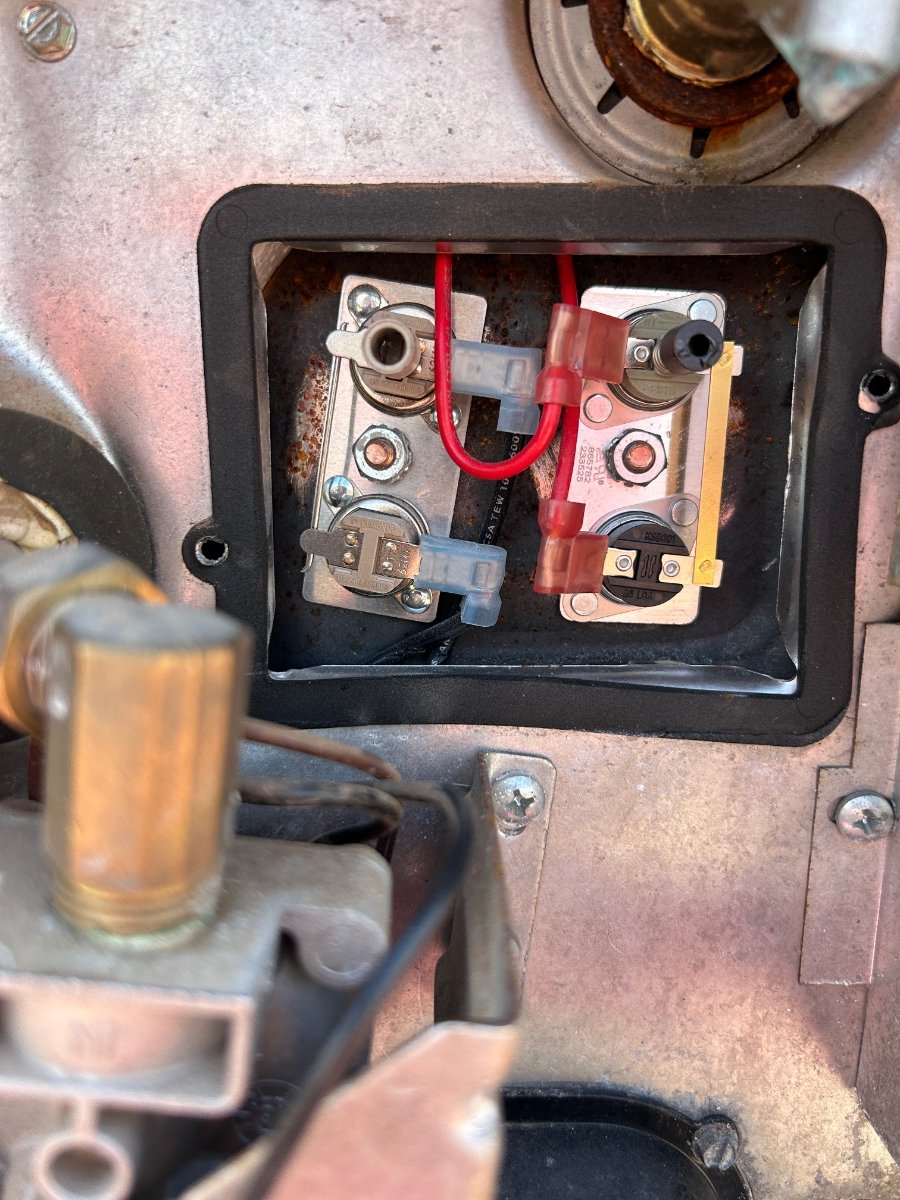
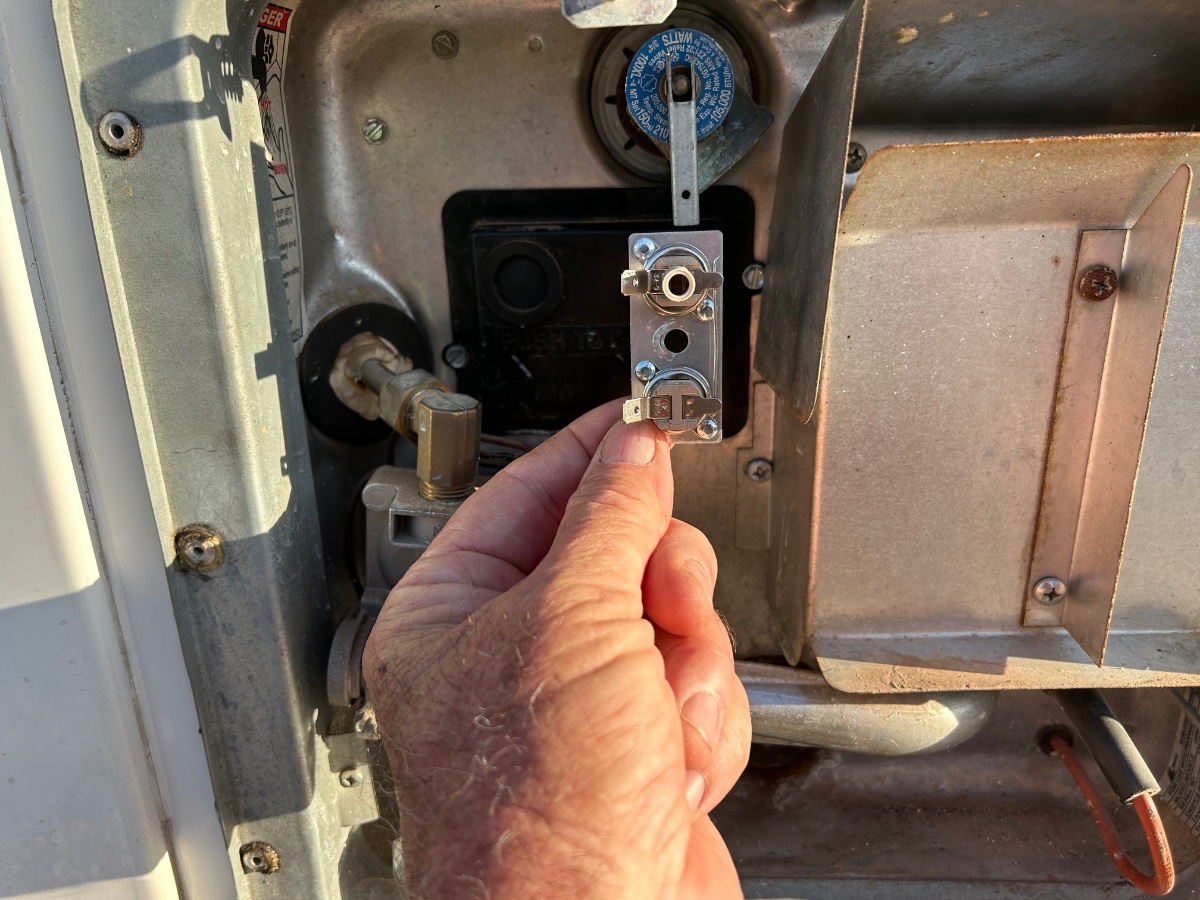
Today I received the first initial production mount of the new Honda eu3200i security mounting system. This came after weeks of collaboration, exchanging measurements and photos, emails and phones calls with fittingdesignsco@gmail.com. Note: You will need to modify your cargo box to use the key to unlock the puck mount. This will require drilling a hole in the side of the cargo box in order for the key to be inserted to unlock the puck mount. The base plate of the mount will also need to be be bolted down in the cargo box. I will add additional photos of mounting this gen security system when we return home from the rally. The unit pricing is $375.00 plus tax shipped to the lower 48. If interested, please contact the company at 530-913-2271 if you have further questions or wish to place an order. Patriot🇺🇸 More install photos to come.
 5 points
 -
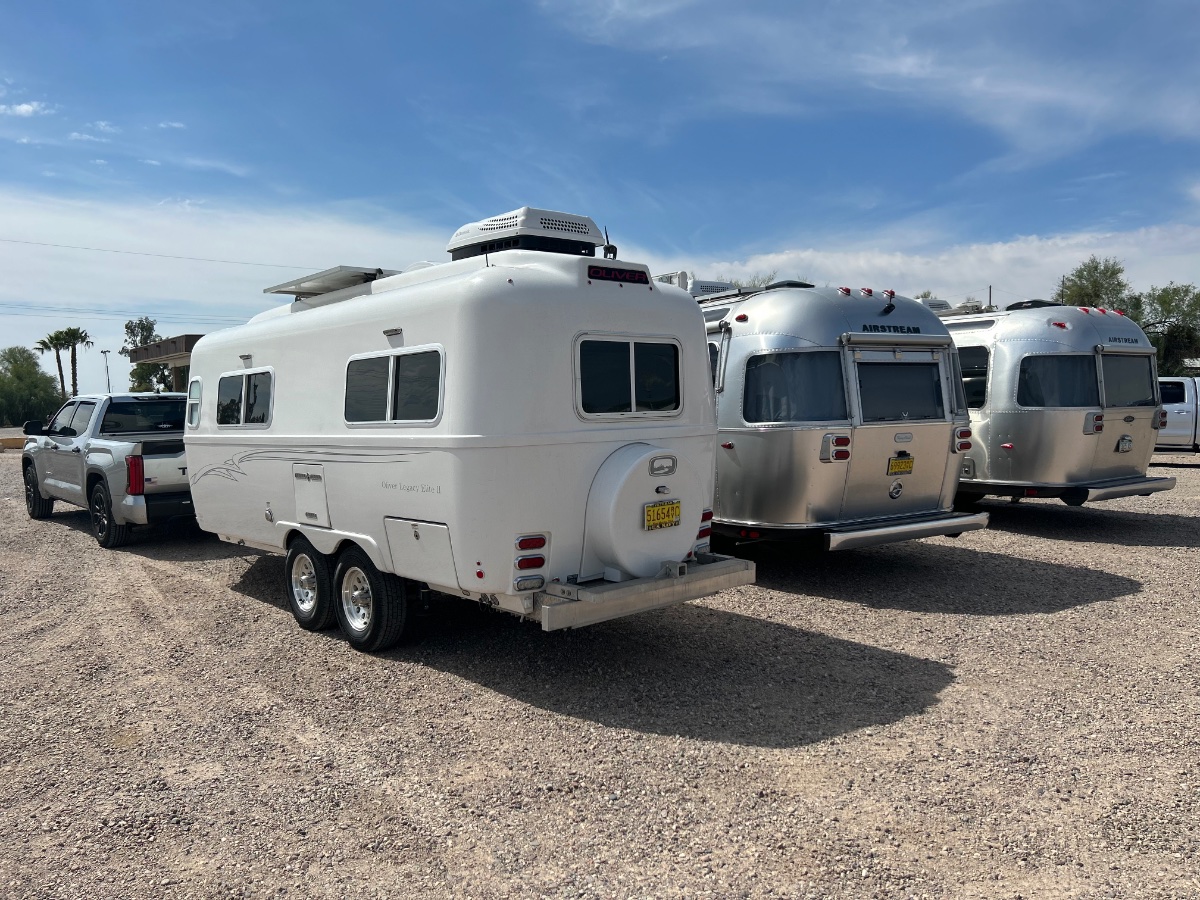
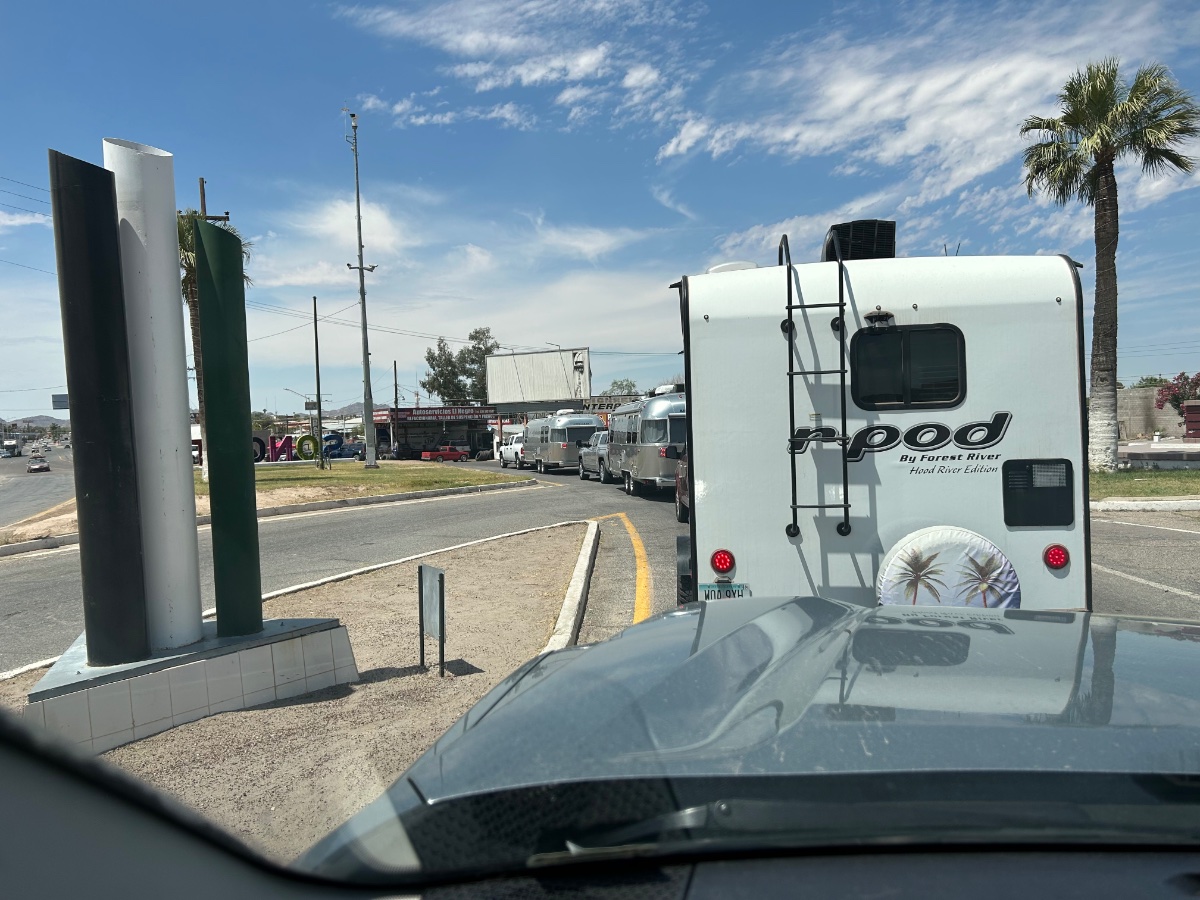
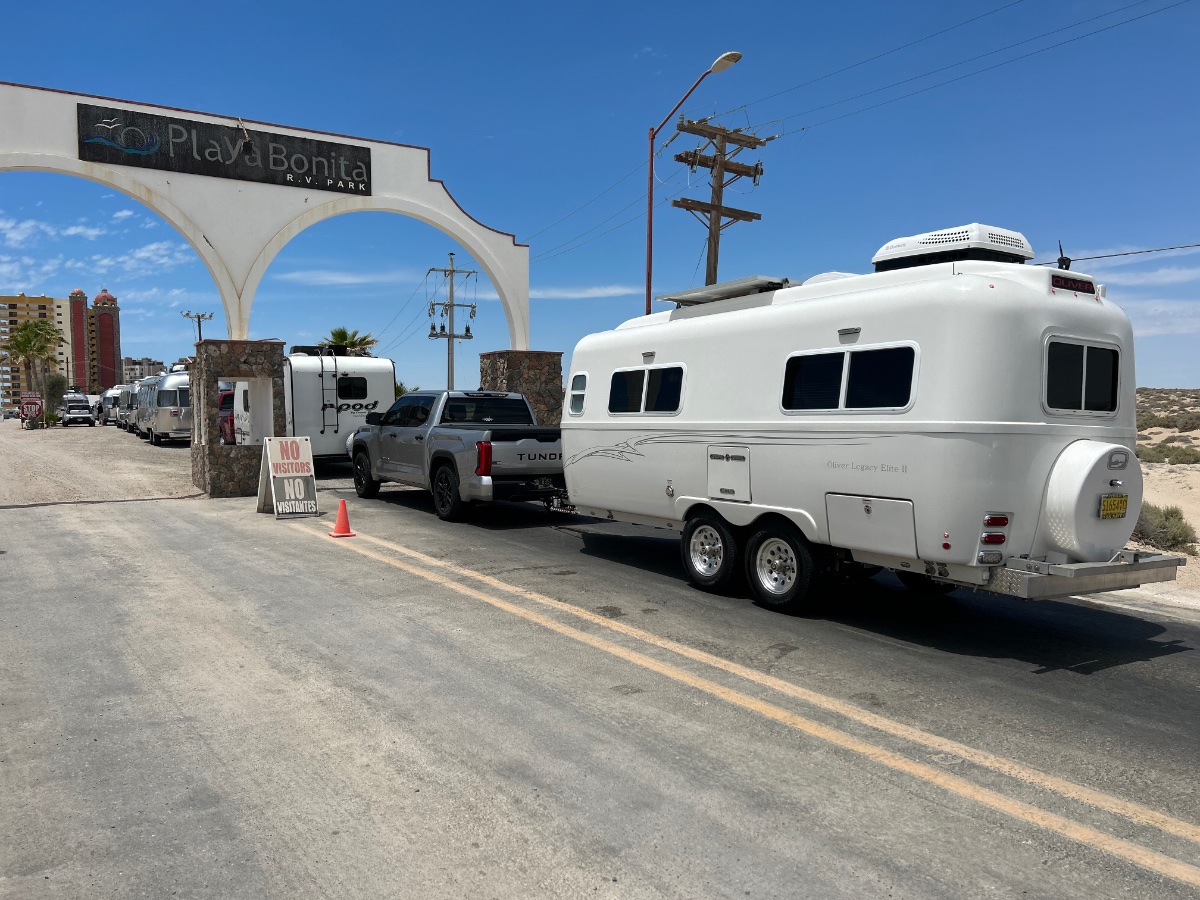
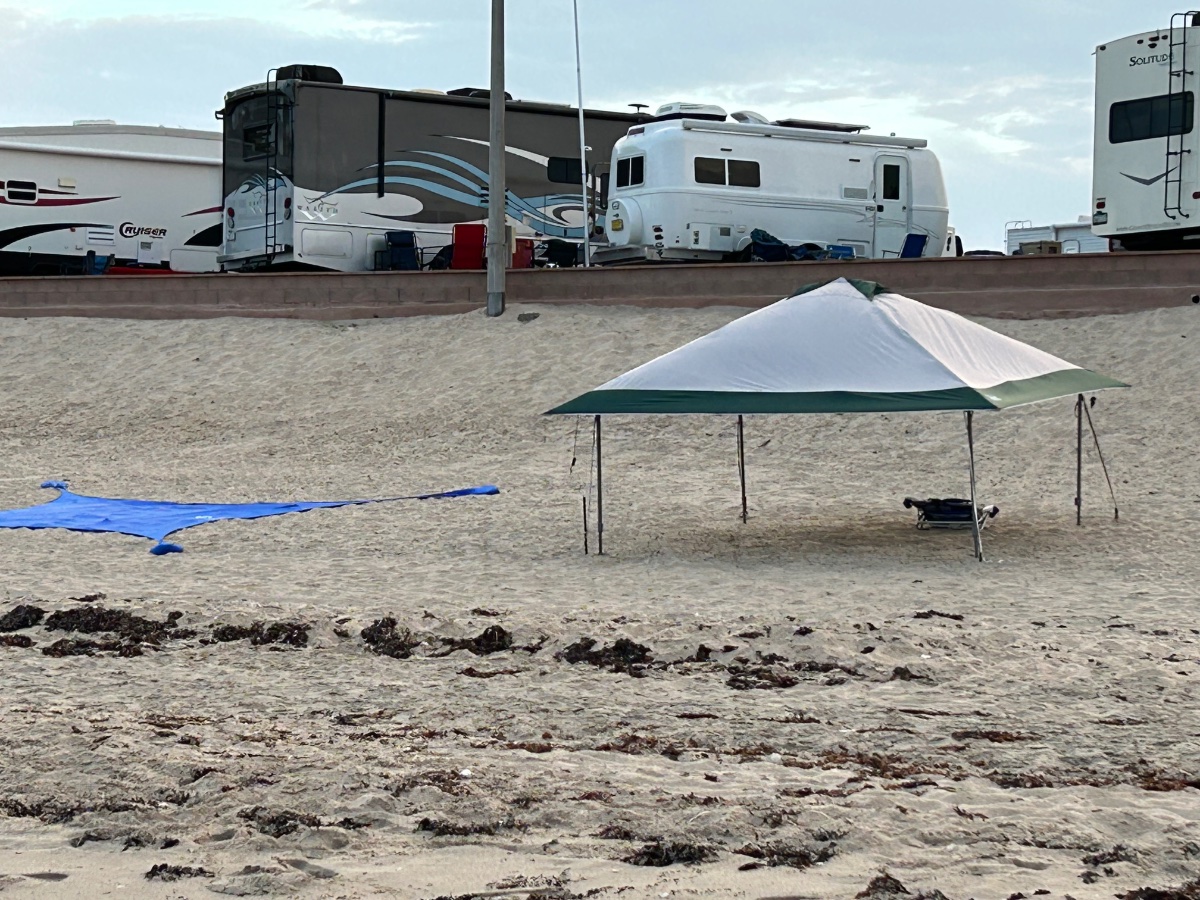
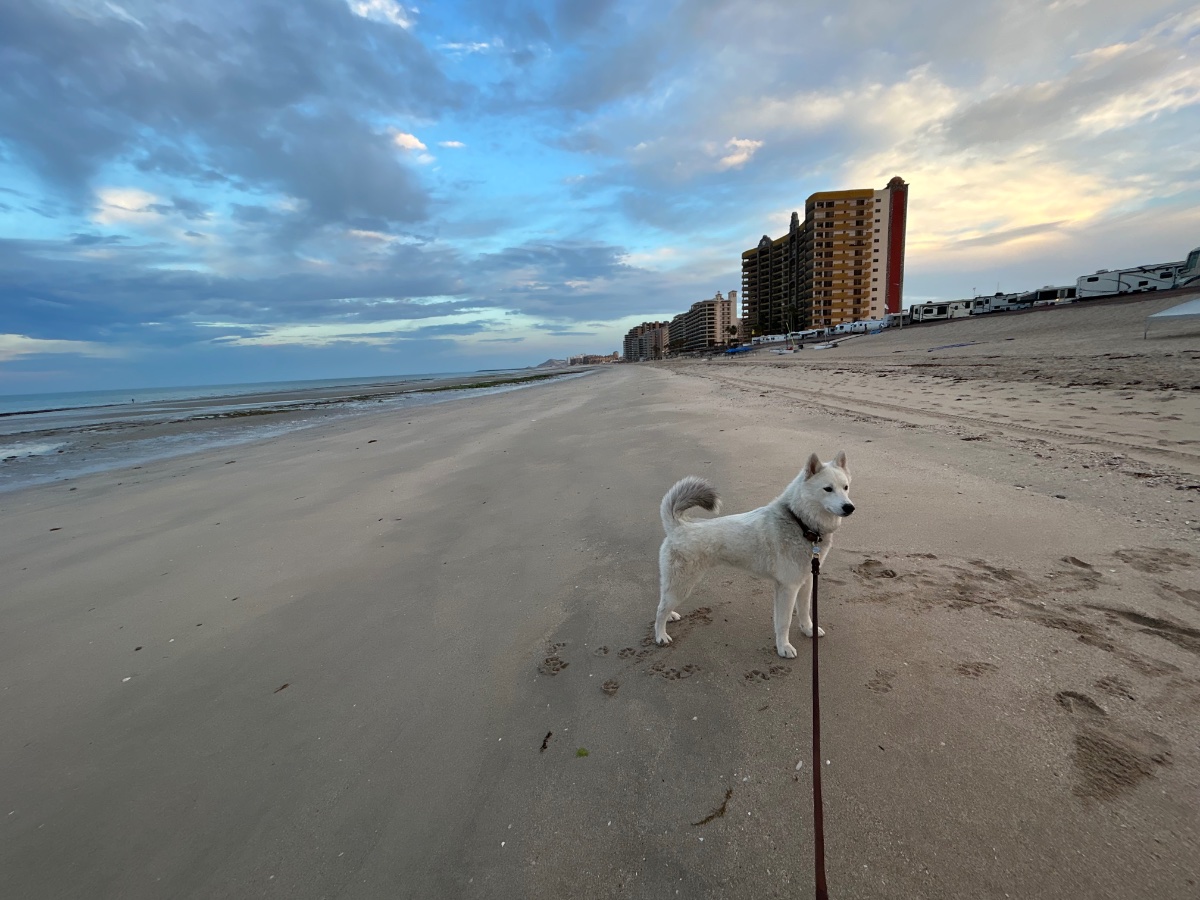
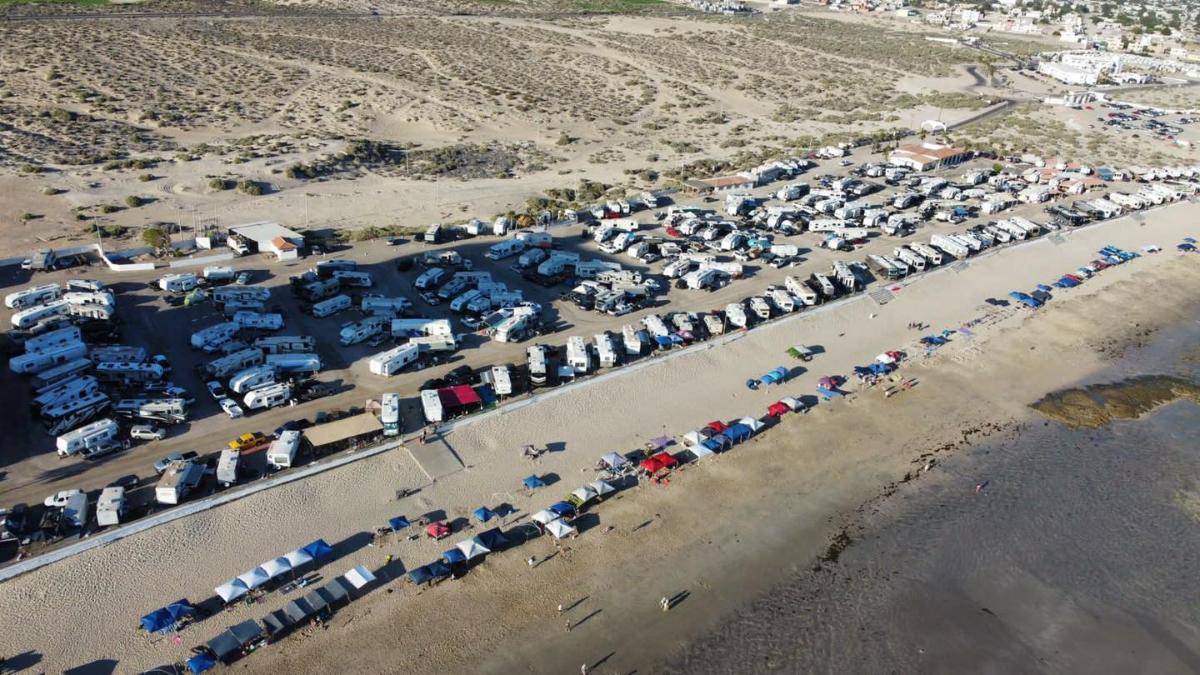
Making the border crossing.... Entrance to the Playa Bonita RV Park - roughly $35/nite... Magnus' intro to the salty water of the Sea of Cortez... Casablanca at the beach - tide goes WAY out in the AM...
5 points
-
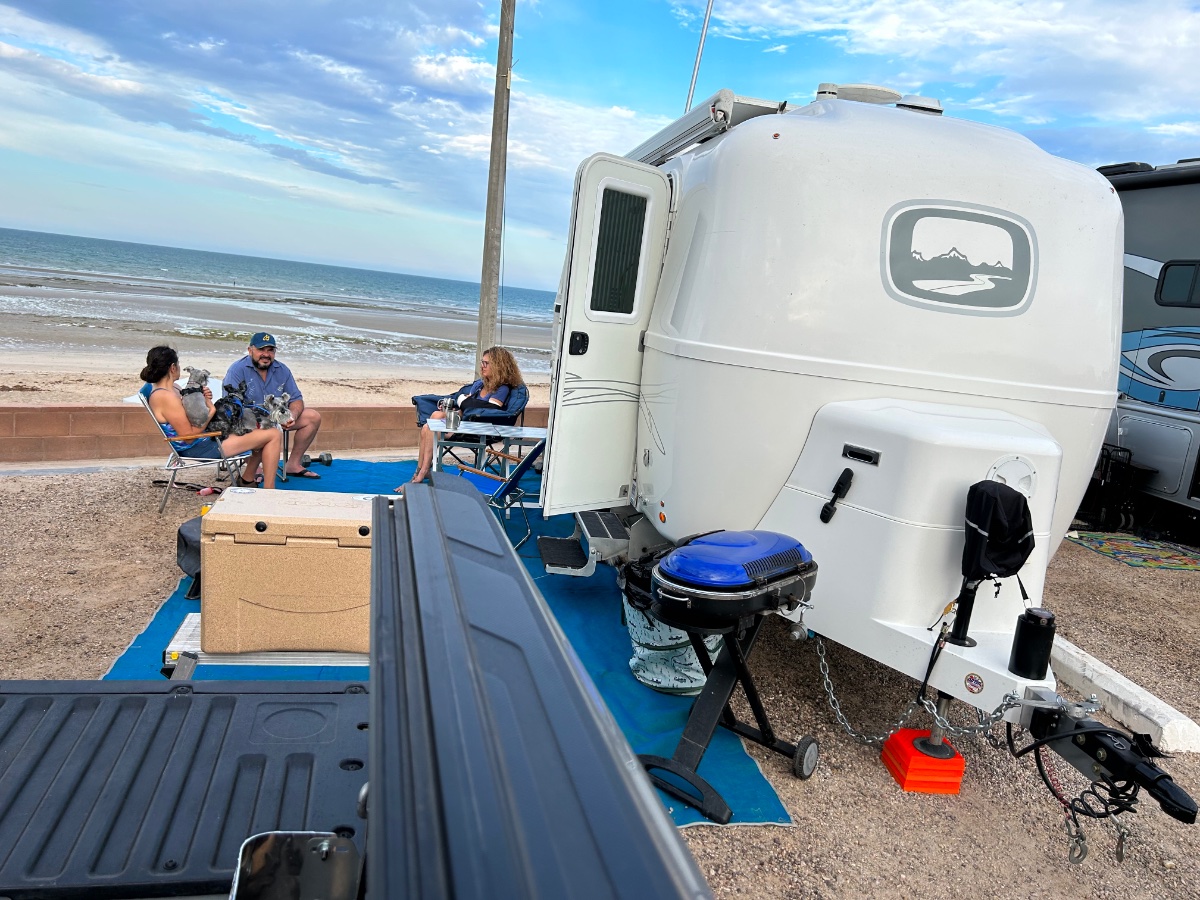
SITREP 18MAY: Departed Wednesday AM with 6 Airstreams, an RPod, and our OTT for Playa Bonita RV Park at Rocky Point, Puerto Penasco. FYI, our only issue with Casablanca was a faulty Suburban SW6DE water heater DC-side thermostat. Replaced the Tstat in short order - all good, so momma got her "Hollywood Shower" this morning (and I'm back in "hero" status). Best wishes to all those at the Ollie Rally this week! We would have been there had we not already planned this trip... Cheers! A & D (Magnus, too - WOOF!!!)
3 points
-
Well... This thread may not get much mileage because it's happening during the Ollie Rally in Alabama. But here's an initial SITREP for all y'all that will capture our Sea of Cortez beach adventure over the next week or so... We're in Ajo, AZ ATM and about ready to launch on the 100+ mile trip to the beach later this morning... More to follow!
2 points
-
It would be so impressive and I’m sure there would be a lot of people saying “What kind of camper are those?”!!!2 points
-
2 points
-
100% Concur, definitely need OTT Caravans! Let's make 'em happen.... Funny story: We were passing through Durango, CO a few weeks ago. Stop/go traffic, etc., at one of the stops a dude next to us is yelling, "what kind of rig is that?". We give them the 25 second answer to his question - he and his lady respond with: "We want one!".... Can you imagine an Oliver caravan through some of these towns? It would be impressive, IMO...2 points
-
I would add a full roll of paper towels, a 5 gallon "Home Depot" bucket (or simular), and a boat throw cushion. The last two items are optional, but trust me if you are my vintage and choose to skimp on them ..... you will regret having done so. 🙂 GJ2 points
-
That is so awesome, what an adventure! I would love to do a caravan trip like this. When we were in the Airstream club it was on my bucket list but then we sold the AS for the Oliver! We need Oliver caravan trips.😜2 points
-
Looking at 99.9% of storage containers, they are designed for shipping efficiency in bulk to the big box stores. IE: Tapered sides so that they will stack well. The above, as well as the cool clear ones recently posted for pantry use are good examples. For many uses, the tapered containers consume a lot of space. Sometimes it does not matter, but for our Ollie, storage space is managed carefully. GJ2 points
-
Drive safely, be careful and come back home alive.2 points
-
Its hard to tell from the pic above and/or the Google pics but particularly in the rain the awning should be slanted such that the rain can more easily run off and not "puddle" on the awning itself. Usually the low side of the slant would be at the end closest to the rear of the camper. Bill2 points
-
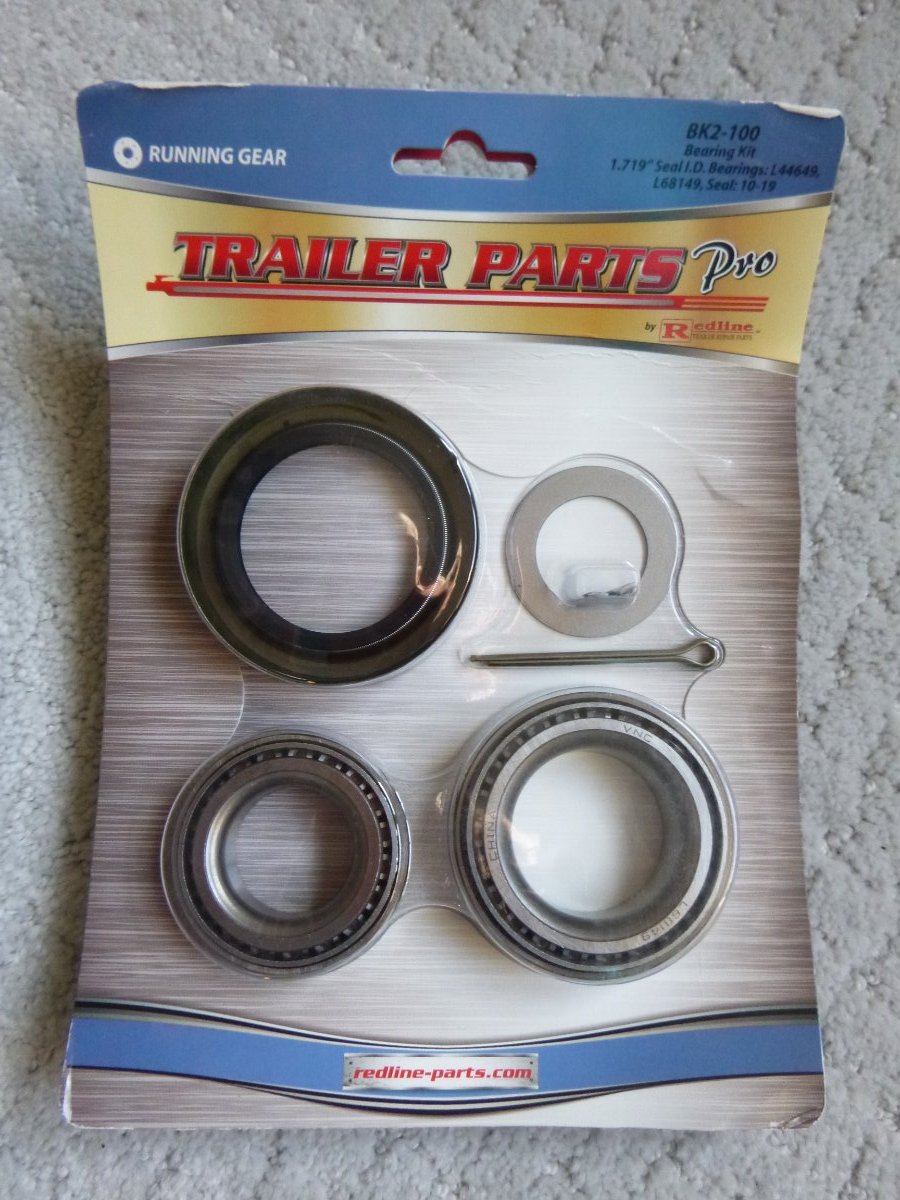
After seeing a past post about bearings and if they are made in China, I did some research as I want to have a spare set of Temkin bearings on hand and be able to change out my bearings when I hit around 12,000 miles on my newly purchased 2018 Oliver Elite II. Here is what I found: - On my first call to Dexter they refered me to Southwestwheel.com. South West sold bearings made in Japan and Timken bearings made in the US. - A week later, I contacted Dexter again and they told me they sold bearings that are made in China. - After hanging up from Dexter, I contacted South West Wheel and they gave me the following information for Dexter's 3500 lb axle (but they said to compare these part numbers with the ones printed on my existing bearings): South West Wheel, Part # KT84 for Timken bearings_complete kit = $102.60 Timken Kit Contains: 2 - HL154A Grease Caps 2 - L44649 Timken Outer Bearings (1 1/16" ID) 2 - L68149 Timken Inner Bearings (1 3/8" ID) 2 - L44610 Timken Outer Races 2 - L68111 Timken Inner Races 2 - 55846 Seals 12 - X1023R Nuts 2 - 90601 1" Spindle Nuts 2 - A1W Spindle Washers 2 - 18X134CP Cotter Pins 2 - FS622P Torsion Axle Grease Caps w/Rubber Plugs 2 - FS122 Torsion Axle Tang Washers My first question - Since I do not want to buy the bearing kit and then start the bearing removal just to find out they are the wrong parts, can anyone confirm that these are the correct Oliver/Dexter 3500 lb axle bearings? Second question - Does this price look reasonable? Third question - South West Wheel also has a larger kit that also includes the wheel hub (the part that the breaks press against). For those that have replaced bearing (or repacked their bearings) is it necessary to replace the wheel hub when replacing wheel bearings? Thanks1 point
-
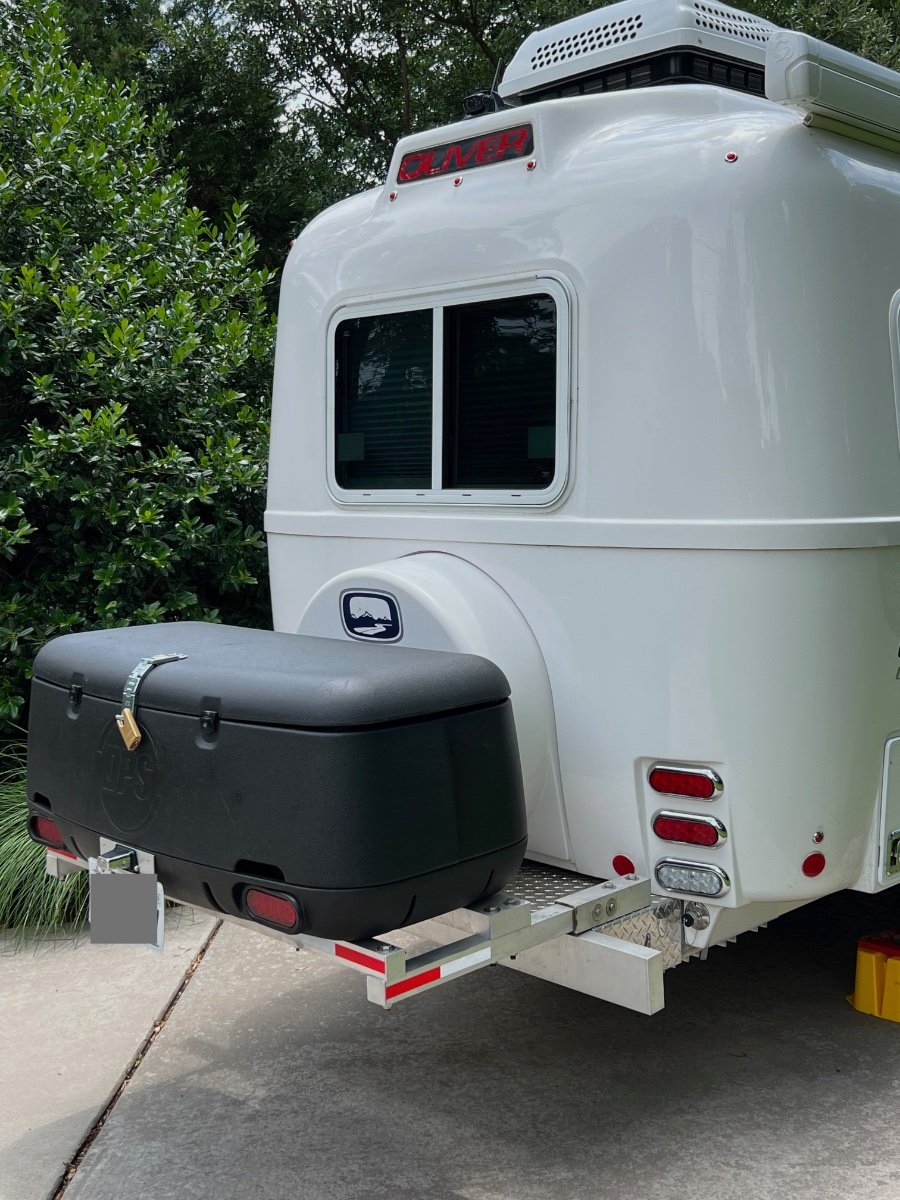
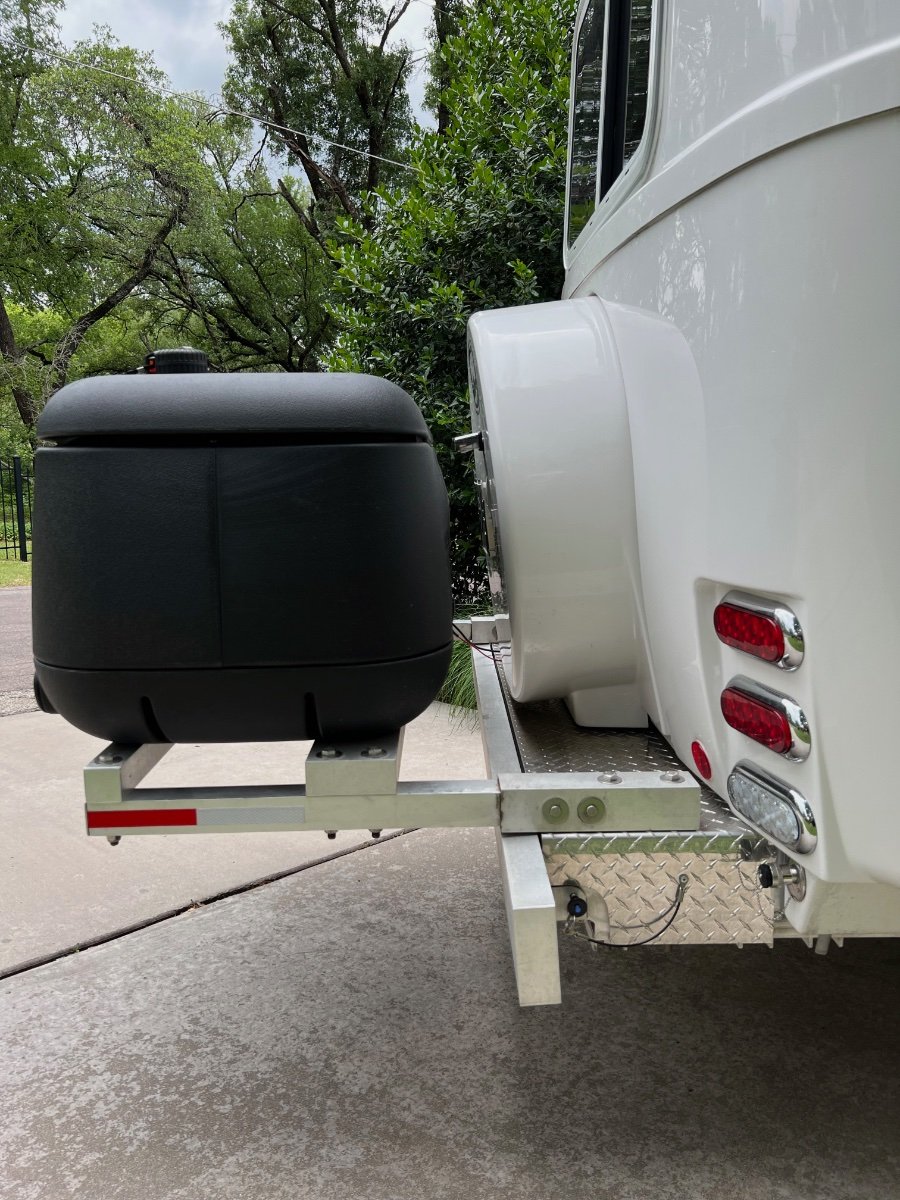
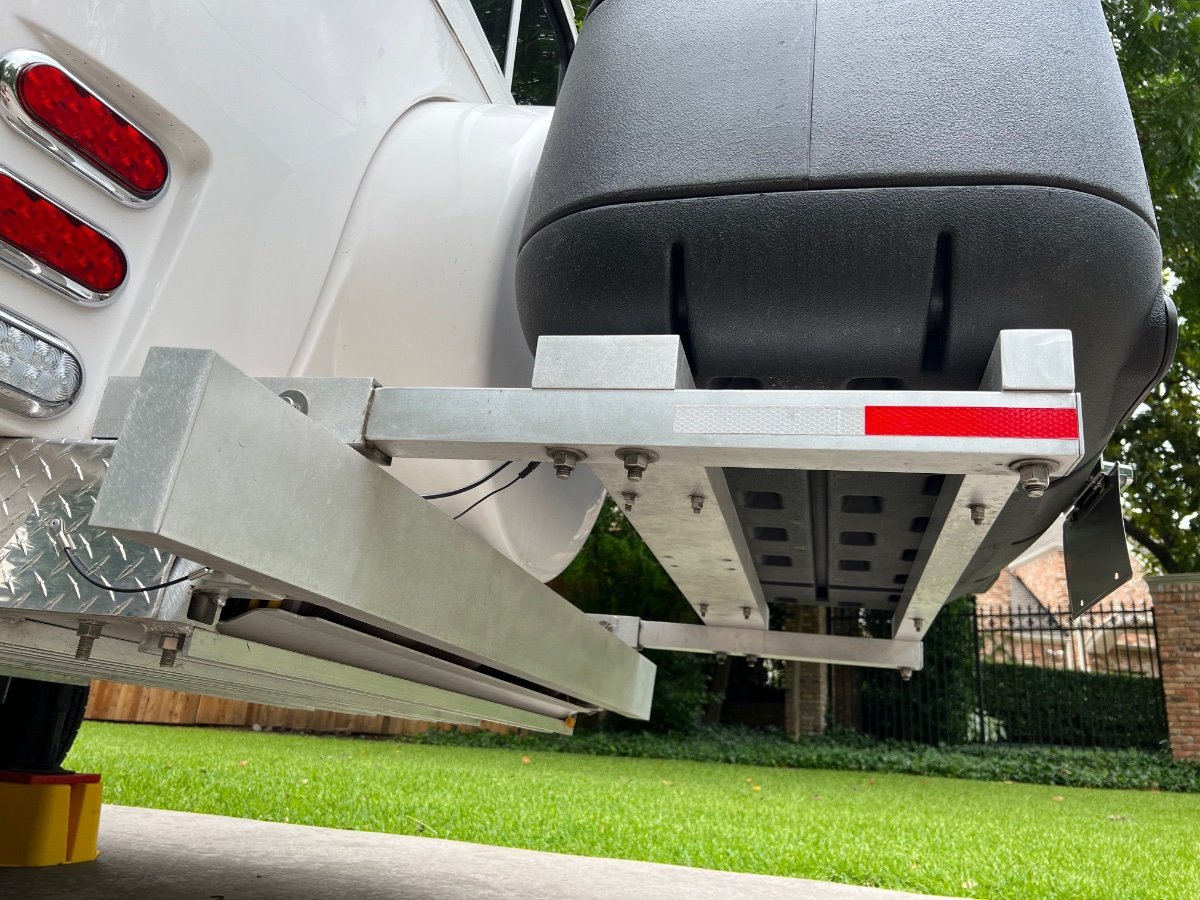
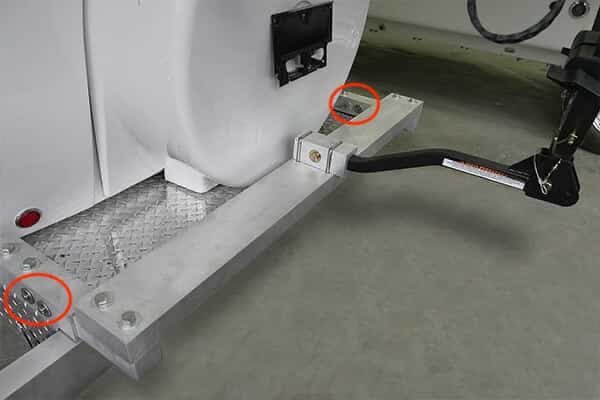
Summary I have installed a rear mounted cargo carrier, with lights, to our 2022 Oliver Legacy Elite II (LEII) travel trailer. We recently completed a two week, ~2000 mile trip, using the cargo carrier, which performed flawlessly. Below are photos of the installed cargo carrier, which are followed by a detailed description of its installation. Storage Constraints Prior to ordering our Oliver Legacy Elite II (LEII) travel trailer I knew we would need additional storage space on the trailer. We are using a 2014 BMW X5 35d (diesel) as our tow vehicle, rather than a pickup truck. Thus, we could not plan to use the pickup bed for supplemental storage. We also needed to stay within the tow vehicle's cargo capacity of 1100 lbs and maximum tongue weight of 600 lbs.. Expecting a tongue weight of approximately 500 lbs. plus two occupants at approximately 300 lbs, we could only accommodate a maximum of 300 lbs. of other cargo. The available payload will be partially used by our camera gear, which must be protected from exposure to moisture. A tongue mounted cargo carrier was not viable, given the tongue weight limit for the tow vehicle. Storage Requirements I anticipated needing additional storage space for the following items: Champion Dual Fuel Generator- 2500 watt (~45 lbs.) (too large for basement storage) Napoleon TravelQ™ 285 Portable Propane Gas Grill and hose (~35 lbs.) (too large for basement storage) Anderson Ultimate Leveling kit (~25 lbs) Harbor Freight rubber chocks (4) (~20 lbs.) Camco Stabilizer Jack Supports (3) (~10 lbs.) Miscellaneous accessories All of these items can tolerate some exposure to moisture, which is likely when stored in any external cargo carrier. A closed and reasonably secure cargo carrier was needed. Searching the owners' forum, I found examples of rear cargo carriers/bike racks and found several examples, including: Oliver's original bike rack design using twin receivers and extending approximately 3 feet beyond the rear bumper; Various rear mounted metal cargo boxes, including custom designs; Rear mounting of an Oliver tongue cargo box by John E. Davies. I also looked extensively at aluminum cargo boxes from various manufacturers, trying to find options which could accommodate the cargo items listed above. I already owned a cargo carrier which we had used on the BMW X5 tow vehicle. This carrier has a heavy steel swing-away frame which mounts to a standard 2" receiver. Mounted on the steel frame are a polypropylene tray and an enclosed container with 13.5 cubic foot capacity. The tray and enclosed container interlock. This cargo carrier also is equipped with fully functional lights (running, brake, turn, flasher). Interlocking pins on the enclosed container mate with the tray. Locking latches secure the container to the tray. Solution Approach I decided to re-use the polypropylene tray and enclosed cargo container, but not the heavy steel frame. Instead, I would use a design similar to the original Oliver bike rack. I ordered the current optional Oliver bike rack when we placed our LEII order, planning to utilize some, but not all, of its components. The current Oliver rear hitch (photo below) utilizes twin receivers that are 11" long, constructed to receive 2" x 2" X 0.25" (wall thickness) T6061 aluminum square tube support arms, which are 17 inches long. The receivers are each mounted to the LEII frame by two long 0.5" diameter stainless steel bolts and nuts. The other components of the rack are a 2" x 5" x 0.25" T6061 aluminum cross-member, 51-1/8" long (with end caps), and a 1-1/4" receiver for connecting a bike rack. I planned to use the twin receivers, and the cross-member, but not the support arms, nor the 1-1/4" receiver. Instead, I would replace the 17" long original support arms with longer equivalents, whose length was to be determined. I would utilize the original 2" x 5" x 0.25" T6061 aluminum cross-member and add another cross member, this one 2" x 2" x 0.25" T6061 aluminum, also 51-1/8" inches long with end caps. The cross members would be bolted to the support arms, in the same manner as on the Oliver rear hitch. The tray and enclosed container from my existing cargo carrier would be mounted to the cross-members. Note the clevis pins circled in the photo below, there are two 0.50" diameter horizontal clevis pins securing the support arms in their receivers. Each clevis pin has a washer on either side of the receiver. Removing the clevis pins permits the support arms to be pulled to the rear, enabling removal of the spare tire cover and spare tire without dismount the support arms. Solution Model A critical dimension to be determined was the length of the 2" x 2" x 0.25" support arms. The new support arms need to be long enough to: Support the polypropylene tray and enclosed cargo box and attach using the molded mounting holes in the tray; Allow the lid of the enclosed cargo box to open without striking the spare tire cover; Permit removal of the spare tire cover and spare tire without removing the cargo carrier and support frame; Permit access to waste water hoses stored behind the bumper; Minimize the additional length of the cargo carrier and support frame to the LEII's length. I fabricated 2" x 2" wooden support arms, approximately 40" long. Using woodworking equipment, I cut slots into one end of each support arm to fit around the bolts holding the twin receivers to the frame. I also drilled horizontal holes for the clevis pins which retain the support arms in the receivers. Positioning the Cargo Carrier on the Cross-members The wooden support arms were inserted into the twin receivers and secured with the clevis pins. Then the 2" x 5" x 51.125" T6061 cross-member was placed across the support arms near the bumper. The additional 2" x 2" x 51.125" wooden cross-member, was also placed across the support arms, but further from the bumper. Clamps were used to hold the cross-members in place on the support arms. The polypropylene tray and enclosed container, latched together, were positioned on the cross-members, centering both to the trailer's width. I opened the lid of the enclosed container and adjusted the spacing (fore and aft) between the lid and the spare tire cover to ensure they did not contact each other. Once I had located the joined tray and enclosed container in what appeared to be a desirable position, I adjusted the positions of the cross-members fore and aft to establish alignment with the mounting holes in the tray. The 2" x 5" cross-member engages two mounting holes on each side of the tray. The 2" x 2" cross- member engages only one mounting hole on each side of the base of the tray. Six 5/16" carriage bolts will fasten the tray to the cross-members. Only four carriage bolts attached the tray to its original steel support frame. I used a mason's string stretched across the width of the tray with weights on either end to aid in aligning the mounting holes in the tray with the positions of the cross-members. I also used carpenter's squares to verify the cross-members were perpendicular to the support arms. Another check of squareness was made by measuring the distance from the trailer bumper to the cross-members. Once I was satisfied with the position of the tray and enclosed container on the support structure, I marked the locations for the holes to be drilled for the six mounting bolts to secure the tray to the cross-members. The tray overhangs the rear cross-member at the rear. With the cargo carrier tray and enclosed container in place on the clamped cross-members, I wanted to determine if the spare tire cover could be removed without removing the entire cargo carrier and support assembly. I found I could remove the clevis pins and pull the support arms aft approximately 7 inches out of the twin receivers and enable removal of the spare tire cover. With the tray and enclosed container positioned on the cross-members, I could now determine the required length of the support arms, which is 33.75 inches. The location of the rear cross-member determines the length of the support arms. After locating the mounting position of the tray and enclosed container I marked all key positions and hole locations on the wooden support arms and wooden rear cross-member. I cut the wooden support arms to the desired final length. Material Sourcing and Machining The required T6061 aluminum components required are: 2" x 2" x 0.25" x 33.75", square tube, quantity 2 (support arms), cost= $110.18 2" x 2" x 0.25" x 51.125", square tube, quantity 1 (cross-member), cost= to $99.08 2" x 12" x 0.125", flat bar, quantity 1 (to be cut into 2" squares for end caps on the support arms and rear cross-member), cost= $6.86 Sales tax= $17.83 No shipping charge. I picked up the materials at the local Metal Supermarkets warehouse Total cost= a $233.95 The above T6061 aluminum components, cut to specified length, were obtained from: Stainless steel bolts and nyloc nuts were obtained from: I was referred by Metal Supermarkets to a local machine shop: When I received the materials I took them and my wooden mockups of the support arms and cross-member to Air & Earth. I also took one of the original support arms. I discussed the machining needed: to cut the slots in one end of the support arms and to drill the needed 0.50 diameter holes for the clevis pins and mounting bolts. I also asked them to cut the 2" x 0.125" flat bar into 2" x 2" squares. I did not ask them to drill the smaller holes for mounting the cargo tray to the cross-members. I was quoted $220 and turnaround of the job within a week. They did an excellent job within the promised timeframe. Finishing and Assembly of the Support Structure After Air & Earth completed the requested machining, I performed the following finishing steps, which included: Rounding the edges of the 2" x 2" square tubing on the slotted end to be inserted into the receivers. I used a 3" wide belt sander with 100 grit sanding belts to round the corners of approximately 12" of the tube which would be inserted into the receivers . The original Oliver support arms also had the corners rounded to more easily slide within the receivers. Several trial fittings were required to verify smooth insertion and removal to/from the receivers. The support arms and the rear cross-member were sanded with an orbital sander using 200 grit disks. This sanding removed markings on the tubes and made the surface textured, similar to the Oliver rear hitch components. The support arms were inserted into their receivers and fastened with the clevis pins. The cross members were aligned with the mounting holes on the support arms and bolted into place. The cargo tray was positioned on the 2" x 5" cross-member at the previously determined mounting position and holes drilled to mount the cargo tray. Holes were then drilled in the 2" x 2" rear cross-member. Carriage bolts, flat washers and double jamb nuts were used to secure the cargo tray to the cross-members. Once all test fittings of the support assembly were completed, lithium grease was applied to the ends of the support arms which are inserted into the receivers. 2" x 2" x 0.125" caps were attached to the open ends of the support arms and the rear cross-member, similar to the end caps used by Oliver. These were attached to the square tubing using JB Weld epoxy. Cargo Carrier Lighting The cargo carrier partially blocks visibility to the taillights of the trailer, which is most noticeable when viewed from close behind the trailer. At a distance the taillights are largely visible. The cargo tray is fitted with two LED light fixtures and a wiring harness with a 4-pin flat connector. A corresponding 4-pin flat connector was installed on the LEII to integrate the lighting on the cargo carrier with the trailer lighting. Details of the installation of the 4-pin connector in the trailer are covered in a separate article. The lights on the cargo carrier ensure the trailer is quite visible from behind. A license plate mount was added to the cargo carrier tray, since the license plate mount on the spare tire cover is blocked by the cargo carrier. Lighting for the license plate mount is provided by adding a Y connector to the license plate light cable under the spare tire cover and adding an extension cable routed to the cargo tray mounted license plate mount. I also added reflective tape to the support frame members. I used the following reflective tape: https://www.amazon.com/gp/your-account/order-history/ref=ppx_yo2ov_dt_b_search?opt=ab&search=reflective Conclusion This addition to our trailer provides significant benefits, with no significant disadvantages. It does add approximately two feet to the length of the trailer. Besides the additional storage space, the cargo carrier and its load slightly reduces the tongue weight. I measured the tongue weight, using a Sherline scale, at 450 lbs., with no water onboard. Tongue weight seems sufficient, as no swaying or other handling issues have been observed. This project had a successful outcome due largely to the information I was able to glean from the Oliver Owners Forum. I hope this information is useful to others on the forum. Comments and suggestions welcome. Regards, Don
1 point
-
Looking good!! Sorry for the installation disruption last night, and thank you for your input on MASA. John1 point
-
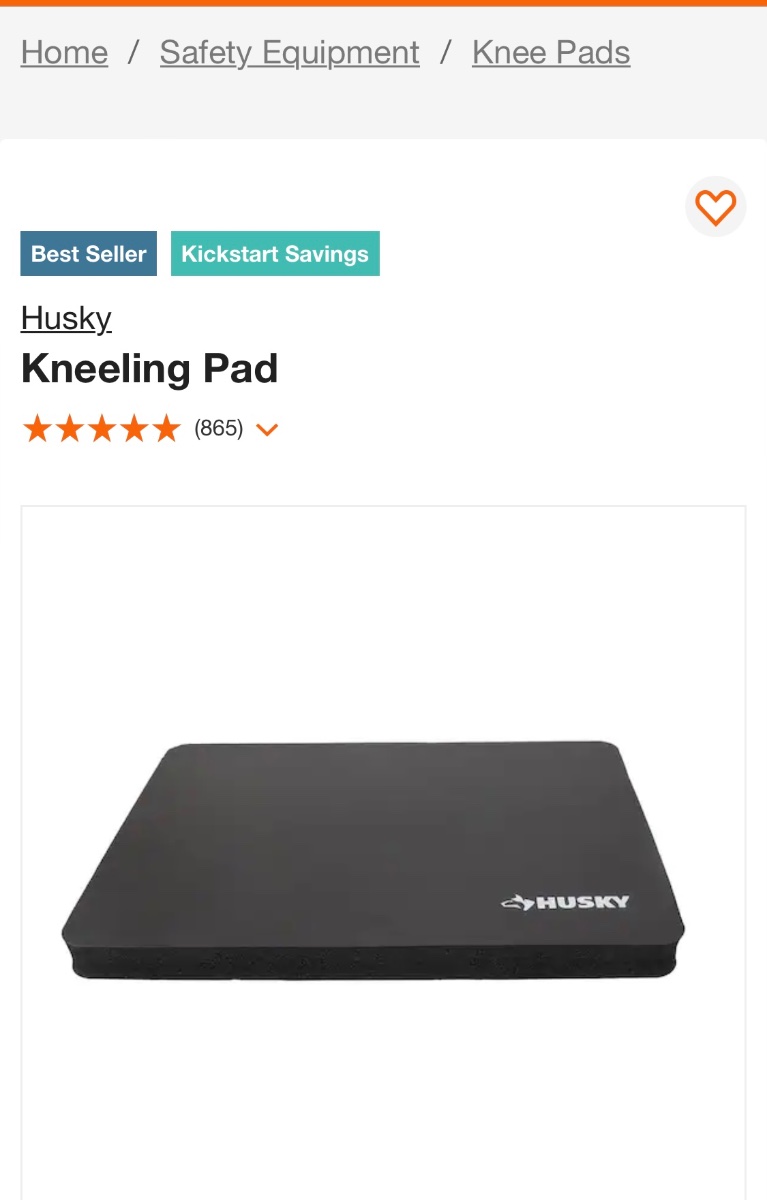
I do carry a large Husky kneeling pad to make things more comfortable when working at ground level. I don’t have much trouble kneeling down to work on the wheel bearings, it’s getting back up that’s the issue 😂. I’m “vintage” as well.
1 point
-
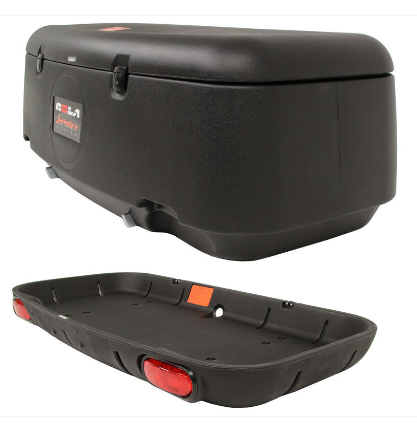
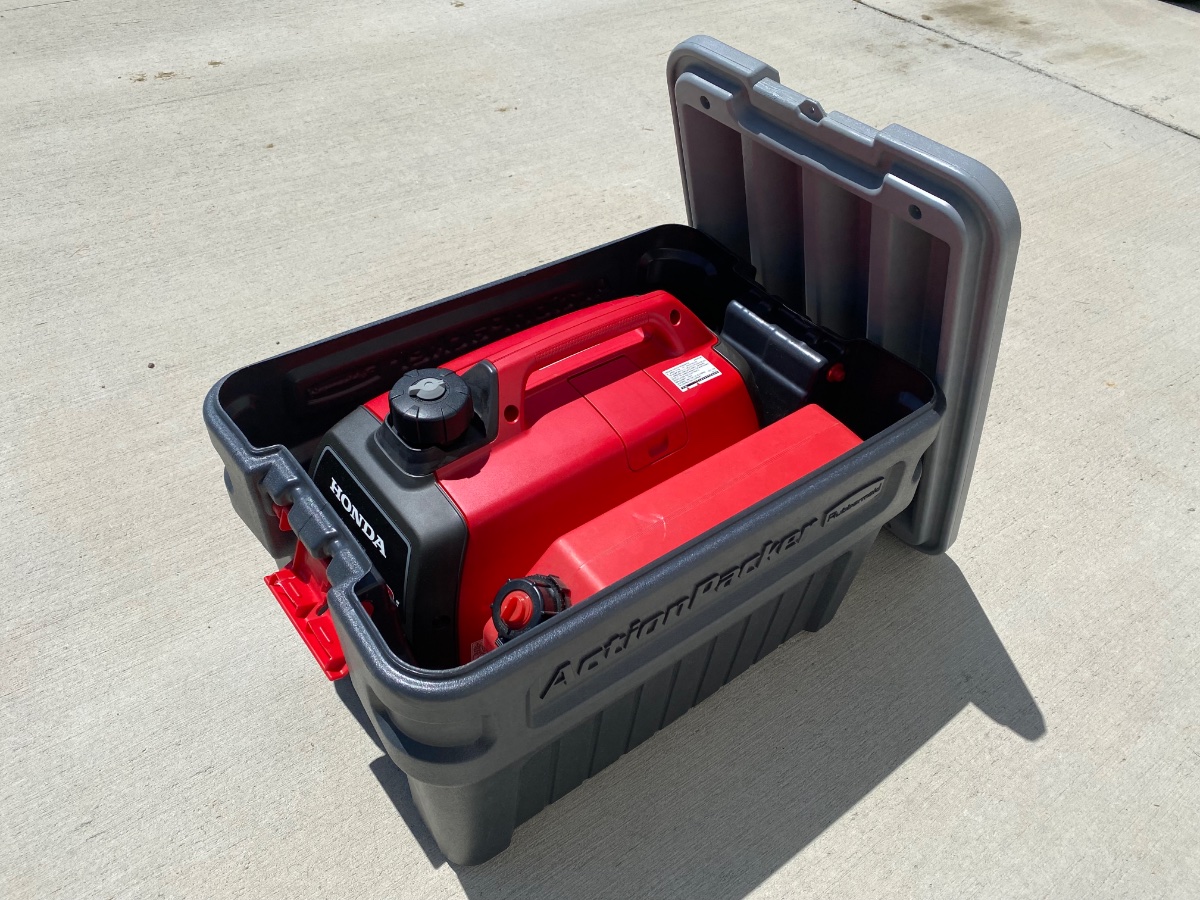
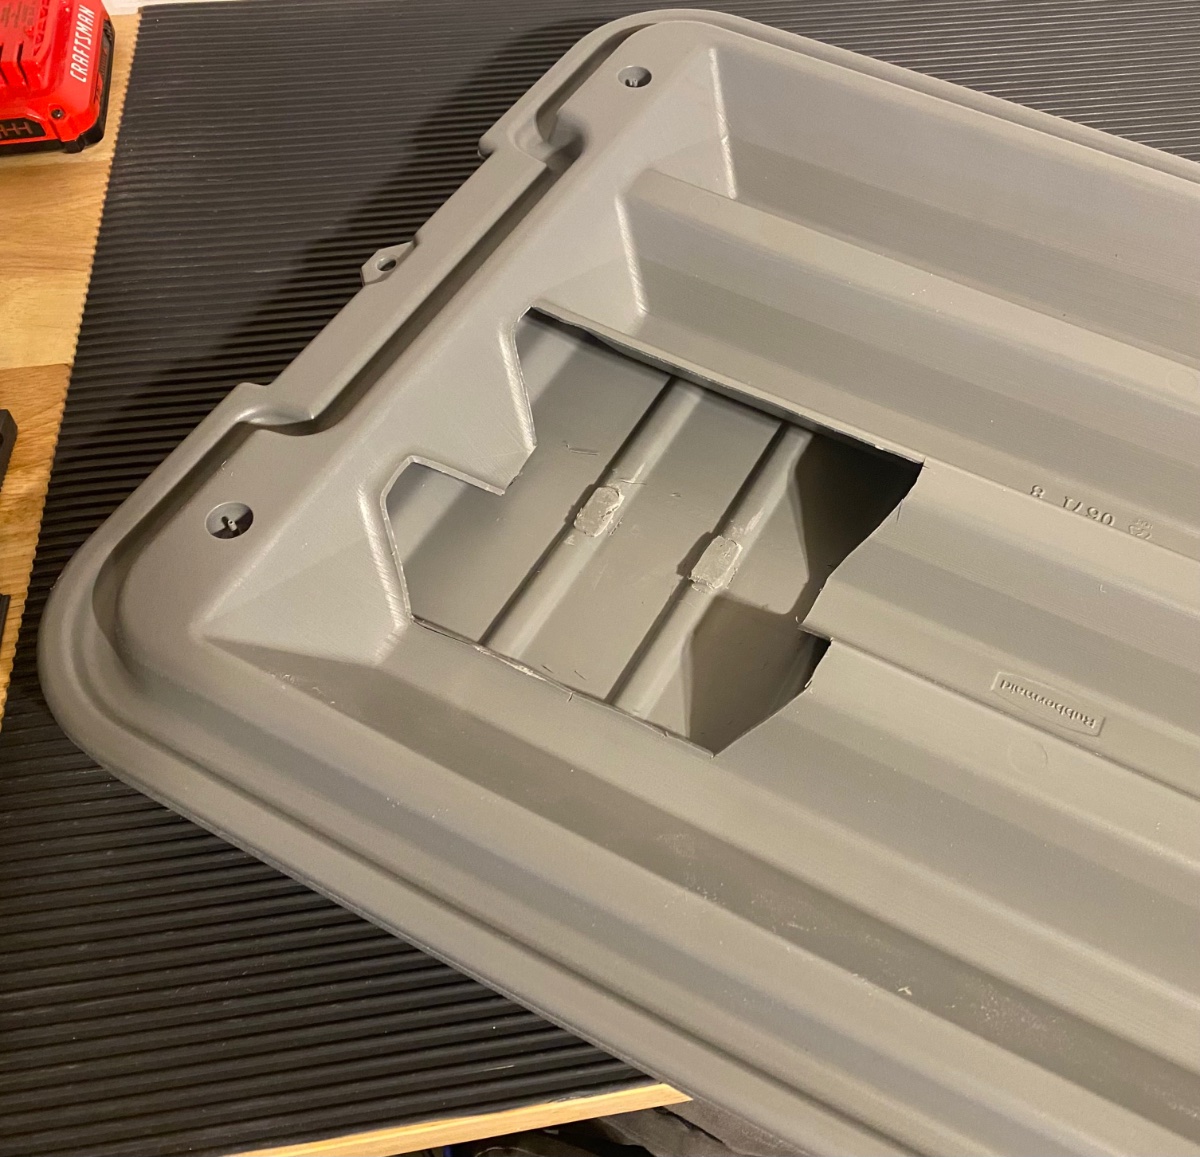
Oh so close. Looking for a good storage bin option for transporting the Honda EU2200i generator in the truck bed (with a bed cover) to keep things clean and organized. I don’t have the front Ollie basket, plus I want to keep the generator under the truck bed cover away from prying eyes. I tried one of my 24 gallon RubberMaid Action Packer bins and it’s ALMOST perfect for the generator, a 2 gallon RotoPax fuel container, and an extra quart of oil, with a PIG Mat in the bottom of the Action Packer to absorb any oil or gas drips (but I doubt the Honda will leak anything). Holds things nice and snug, EXCEPT for the height. The inside ribs on the double walled lid interfere with the generator handle and gas cap. Might be time to get out the knife and modify the lid by cutting away one full rib, and also adding a small vent hole in the lid for fume venting. Of course for running the generator it will be removed from the storage bin, and allowed to cool down before putting it back in the bin.
1 point
-
I have only looked at the one Internet, but like the Nordics as well as the American Tug. I like the Nordic 37 design personally.1 point
-
Tow rating: You need to subtract the weight of any passengers or cargo in the tow vehicle from the tow rating, which is calculated with the weight of a driver only. Also subtract any fluids or cargo in the trailer. Ex.: 5000# tow rating - 3700# dry weight - 150# passenger - 50# cargo in the vehicle - 266# fresh water - 200# food/clothes/etc. in the trailer = 634# capacity left. Gross vehicle weight is the curb weight of the vehicle, plus whatever you put in the vehicle, plus the tongue weight of the trailer.1 point
-
I tried the heat gun idea, but it didn’t give enough clearance. That extra material has to go away completely. The Honda generator has a very large vented gas gap that needs all the height clearance possible. I ended up cutting away the inside top wall of the lid in one corner and that just barely gives enough height clearance for the generator gas cap. The generator handle fits between the ribs on the lid since the generator is offset to one side of the Action Packer (see photo in the original first post above). Now the lid does fit and latch closed. The outer lid surface remains intact.
1 point
-
Well, let's see... I suppose ours would be this 48-foot Leopard Cat made in South Africa (including the stow-away). Twin 250 Yanmars, AC, air compressor (fills scuba tanks), fully integrated cockpit, power winches, 4 staterooms, 2 full heads, massive galley... Custom davit with 14-foot RHIB for tooling around to the beach. Bare-boated this baby out of Tortola, BVI in '18 for a week - absolutely fine a sailing getaway.
1 point
-
I like your heat gun idea better than the Rubbermaid box or tire tube mod. My goal is to keep the dust out of the generator so minimal dust entry points is a good idea. It would also hide the precious cargo from not nice eyes looking to finance their habits. Wonder what the fume ignition hazard is in the box or in our enclosed beds? GJ1 point
-
My Criminal Law professor in law school, Woody Deem, started each class session with the statement: "Criminals are stupid." He would then delight the class with real stories from his decades as the Ventura County California prosecuting attorney.1 point
-
My gut said if the thief planned to use it they would get caught. Great news that it's been recovered. I'm sure it's unsettling that these people have abused it but anything can be fixed and made new again. Congratulations!!1 point
-
Congrates on getting your Ollie back. With a bit of work and help from the insurance company, it will look like new in no time. If it were mine I'd strongly think about now being the time (with the insurance help) to do a ceramic coating. Besides the lock that snakeriveridaho mentions above, there are all sorts of wheel locks and big chains that can go through the wheels and/or axle to attach the Ollie to something even more solid. Unfortunately, if someone really wants to get it - they will. All you can really do is have good insurance and try to slow them down a bit. I'm sorry that you have had to go through this but I'm also happy that you have got your Ollie back! Bill1 point
-
Hoorah. Ollie lives! Stolen rig returned! Police found it behind a stolen tow vehicle behind a locked gate (locks cut) in a rancher's field less than a mile from the police station. It was stuck in the mud and two people who had been living in it had gone out to get a friend to help them get out of the mud when the rancher arrived, and the thieves raced away. Police didn't catch them, but they did find identifying evidence (jail release papers) and opioid detox meds from the jail pharmacy for one of them. Of course, most of my gear was stolen, and a lot of their stuff was in it. Thank goodness for the fiberglass inner hull which will make it much easier to clean/sanitize. There's work to do: negotiating with insurance, broken off stabilizer jack to replace, spray paint on the hull, stolen spare tire and fiberglass cover, destroyed door lock, wrecked entry stair and scratches on the hull, plus cleaning, fumigating and replacing contents, but we will be on the road again this spring and summer. So here's my question: fourteen years in my driveway in a big city, and never messed with before. Reasonable quality hitch lock and motion detector lights. What all do you folks recommend as security systems. You can bet I am paranoid, and short of trying to build an enclosure, what do you folks do to keep your beloved rigs safe? Thanks, Angler, Hull #27 470257C6-C213-48CD-8B61-9549EEBF0A7F.heic 502D75D4-929A-499C-A8A7-E01237E6022A.heic1 point
-
The red wires do fall off.1 point
-
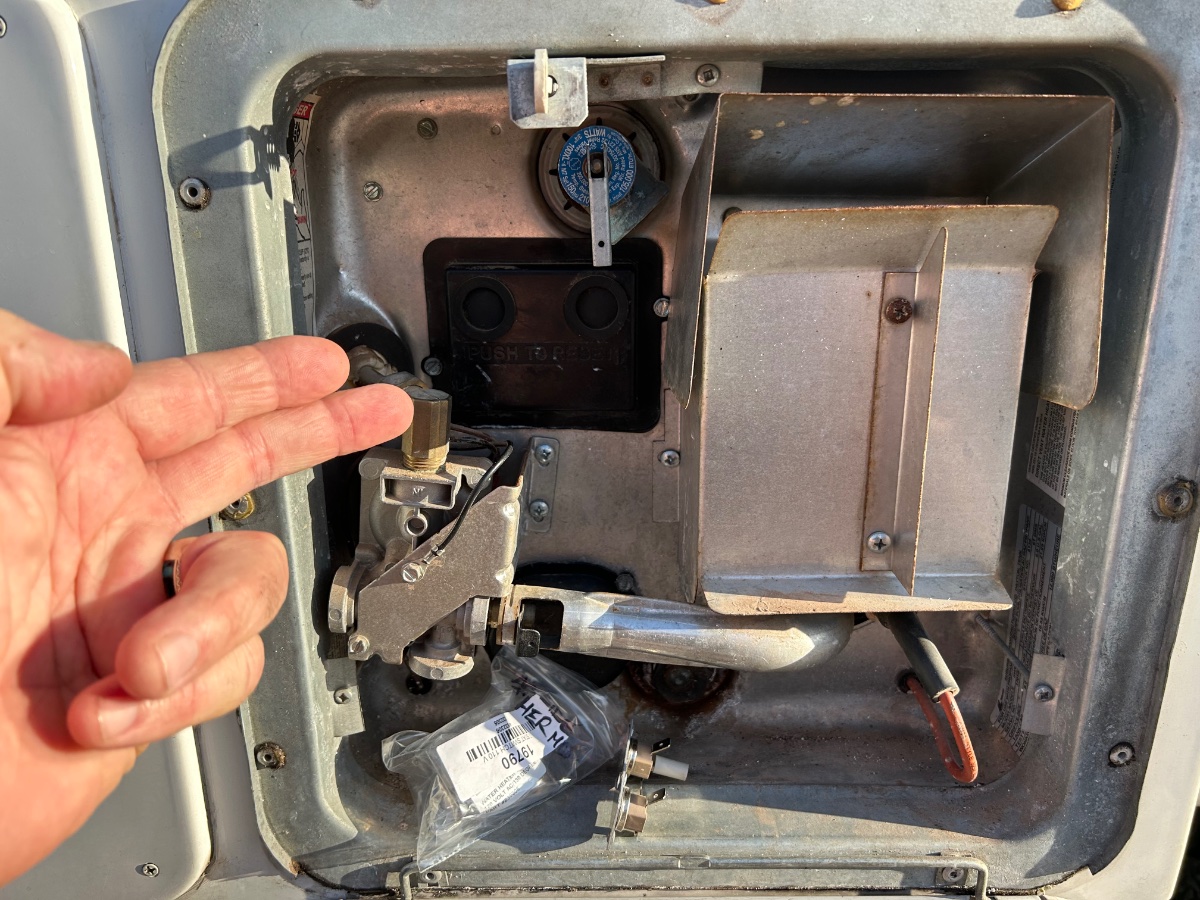
Thanks Everyone! I called Jason at Oliver. He returned the call quite promptly, and talked me through various things to check. Turned out I had to go to the water pump itself under the curb side bed to check the wires. There are two little red wires that attach to the underside of the pump, near you as you look. One of them was not connected at all! Three screws had to be removed to be able to reattach the wire once attached…Everything worked. Surprise! Thanks for all the feedback. Citrusbreeze Charlie1 point
-
Definitely, get a tpms.1 point
-
I pretty much have most of the same tools. In addition I carry an inch-pound and a foot-pound torque wrenches, a small electrical pump, a 20 volt DeWalt air compressor, impact and drill. Also electrical supplies, and a set of wheel bearing seals and two of my old Dexter bearings in case my Timken's die. I use my F-150 jack when not using the three onboard jacks, and carry a milk crate of 2 X 6 lumber for shims and under jack support. PS: Jumper cables, tow strap, head lamp, TeleSteps ladder, Fortiflex buckets, and work gloves. If I can't fix it, and there is no cell, I have a Garmin InReach tracker that allows satellite transmission of messages to anyone I want anywhere in the world.1 point
-
We carry a very small bag of tools, a charged drill and bits, a spare set of bearings and seals, a good sams road service card, and several credit cards. And, a tire plug kit. A multimeter. Often, a chain saw. And, two cell phones, one gsm, one CDMA. Last two, probably most important. When we deliver or rent rvs, we take an even smaller kit. Plus good sams and a couple credit cards. And, the phones. Maybe I'm just lucky, but we've rarely needed a lot more that we couldn't get at the next lowes, home depot, Canadian super store, or ace hardware, or rv center. Happy to report, never had to use bearing kit or tire plug kit. Its ok. Still keep them around. Those are trip killers. Carrying a few bits of pex fitting and tubing wouldn't add a lot of weight. We do also have duck tape, and a few scraps of wire, and a few connectors and a fuse kit . I guess we live on the edge. I don't want to drive a huge truck to carry a garage with us. It hasn't been necessary, in all these many years.1 point
-
Note that these plug kits are only meant to plug things like nail, screw, holes and the like in the tread area of tires. If you get a puncture in the sidewall of a tire (i.e. you cut the side of the tire on a curb or a rock) or if there is a good sized cut in the tread, these plug kits will not work. While I've used these kits on tires to get me home, I will take the damaged tire to a tire shop to have a proper "mushroom" type repair done. This requires the bead of the tire to be taken off the rim such that a "plug" that is in the shape of a mushroom can be installed from the inside. Also note that you will need to have an air compressor with you in order to reflate the tire once you have installed the plug. If you have never used a plug kit before it would help to have a little practice. A local tire store might let you practice on a junk tire. Some strength is required - you must first get the "reamming" tool into and out of the hole in the tire and then be able to get the tool with the plug on it into and out of the tire. Bill1 point
-
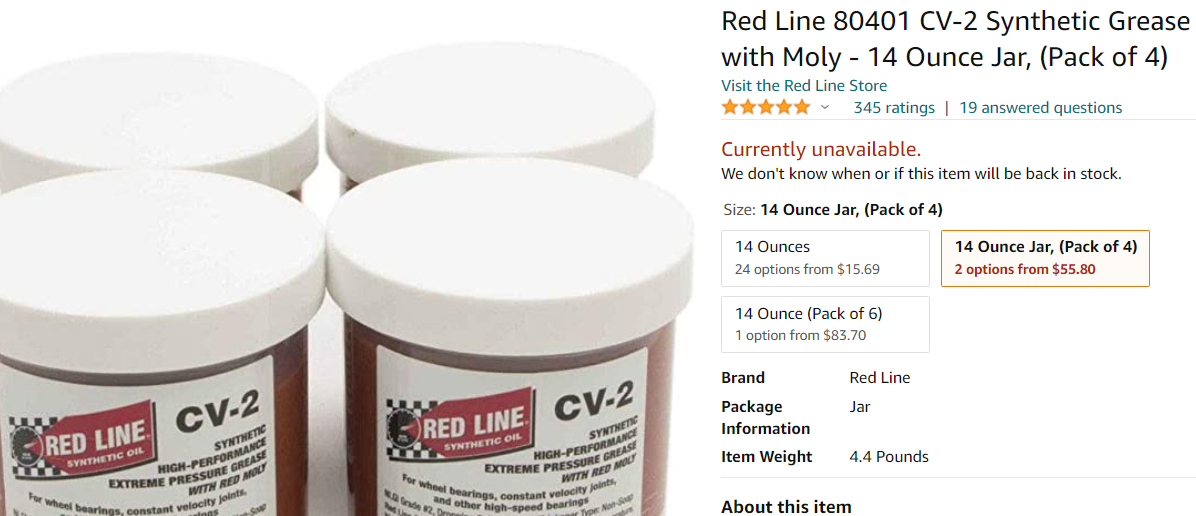
Flat tires and wheel bearing failures are the things that can leave you stranded. Waiting many hours or even days for Good Sam or some other roadside assistance isn’t something I care to do. Actually met a couple who were stranded and lived in their 5th wheel trailer for 3 days on the side of I-70 waiting for a replacement wheel bearing. I believe in being prepared Probably not the norm for all Ollie owners but I don’t want to be stranded waiting for help for some issue that I can fix myself. So I carry quite a bit of tools, parts and supplies. A Dewalt portable tool set in a carrying case with full ratchet/socket sets in 1/4”, 3/8” and 1/2” drive sizes, open end wrenches, US and metric Allen bit and torx bit drivers, screw drivers, etc. Misc pliers, wire cutters/strippers, large crescent wrench, hammer. An electrical multi-meter for diagnosing electrical issues. Spare fuses, crimp connectors, etc. Torque wrenches for the lug nuts and axle nuts (different torque ranges needed, one wrench won’t cover both). All the special tools needed as described in earlier posts in this thread for a complete bearing replacement and grease repack if needed, such as a seal puller, drift punches, dead blow mallet, bearing driver set, 1-1/2” socket for the axle nut, grease cap driver tool. Brakeleen for cleaning old grease out. Redline CV-2 Bearing grease to repack the bearings. 4 complete sets of bearings (Timken Set4 and Set17), seals and grease caps, enough to service all 4 wheels if needed. A grease gun with Lucas red-n-tacky grease for the suspension zerk fittings. A large military surplus HUMVEE scissor jack that’s perfect for the Ollie. A few 12” & 18” long pieces of 4”x4” lumber to use for cribbing with the jack to make lifting the Ollie much quicker. A small DC air compressor. And a few other things that I’ve probably forgotten to mention. All kept in toolboxes in the bed of the pickup truck. I just did my annual wheel bearing service (which included replacing the original bearings) took about 4 hours total to do all 4 axles plus grease the suspension Zerk fittings. But I was in no rush. Maybe an extreme for what to carry on the road, but I’m much more comfortable traveling/towing the Ollie knowing I am prepared.1 point
-
FWIW, my raft trailer has the EZ Lube grease caps because it has an EZ Lube axle. I have never had one of the "huge rubber plugs" in the center get lost or fail, even though I take my raft trailer on much rougher roads, to wilderness rivers, than I ever plan to take my Oliver on. Given that experience, and the comments in this thread, I plan to buy a set of the EZ Lube grease caps to keep as spares for our Elite II once we pick it up.1 point
-
Yep - you're right - the EZ lub hub was not stock on my Ollie and I still have the stock hubs There was no MAGIC in choosing the grease caps other than thinking about what would be easy to replace on the road and what just might last a bit longer - the center rubber plugs basically had nothing to do with the decision other than the lack of a "steel" center just might mean that the side walls and/or the outer rim of the caps would be constructed a bit stronger as compared to a "normal" grease cap. In addition, I felt that the non-rounded edges of these grease caps would allow for easier installation with or without a block of wood - it would be easier to gently tap a hammer around that edge versus doing the same on a more rounded edge. Certainly not "rocket science". Bill1 point
-
This very thing has happened to me twice over the years. A phone call or Service ticket results in receiving a new grease cap and center hub "plug" within a couple of days. However, I too have resorted to heavier duty grease caps and I also carry a couple of spares with me on the road. Ones like THESE are easier to seat while out on the road. Bill1 point
-
Agreed that Dexter doesn’t say to use a new grease cap, but the caps are soft plated steel and the steel deforms a bit for a press fit into the hub when pounded into place, so the next time it’s reused it’ll have slightly less interference for the press fit and is more likely to fall out. I prefer to install new ones each time now as cheap insurance. I think a lot of the Oliver complaints about grease caps falling off are due to multiple reuses of the same grease caps over and over during service. I had one grease cap fall off within a few hundred miles after our wheel bearing repack service done at Oliver last year, and it knocked off the little logo decorative center cap as well and that was lost.1 point
-
Mossey, thank you very much for the info. I'll try my luck with google and find the real ones. My bearing are the original when I picked it up.1 point
-
I don’t know much about bearings, but I do know that I would buy the same bearings you have gotten 60k miles out of. At 60k miles, they have passed my quality test no matter who made them or where they came from. Just saying, Mossey1 point
-
I will always look to buy USA made. But the cost delta has to be reasonable. In this case it is a tool that will get used annually. McMaster Carr cost is $51. For the current on sale Amazon Chinese Knock-off the cost is reduced to $19 (See below). Double the cost is is beyond my "reasonable line" this time. GJ
1 point
-
I do not disagree that genuine Timken bearings are probably the best and when my original bearings have seen the end of their useful life I will replace them with Timkens. However, shortly after I purchased my Ollie I wanted a "set" of all the parts that I would need in the event of bearing failure while I was out traveling. In my experience, trouble always seems to happen when I'm out in the middle of nowhere! And, even though the bearing parts for our Dexter axles are fairly "common" I wanted to make sure that I had the parts on hand in the event that whatever little town, gas station, repair shop, auto supply store, etc. were "sold out" or "never heard of those before". Certainly the sets I bought are "Made in China" but to get me back on the road until I get home - I don't care.
1 point
-
Wayfinder: CV-2 is stocked by Amazon:
1 point
-
I just had my hubs off and can confirm for our 2020 model Elite I the parts are as follows: Outer bearing: 15123, Inner bearing: 25580, Seal 10-36 In addition, I contacted Dexter and they sent me the build sheet for my axle that confirms the numbers I got for the outer bearing and other parts. I had asked Jason (Oliver Service) prior to taking off the hubs to clean the brakes what the spare parts are so I can have on-hand in the future is ever needed on our travels. His list was Bearing Kit is #BK3-200 Includes: 14125A Bearing & Race 25580 Bearing & Race 10-36 Seal So I am assuming Jason was referencing a prior year model perhaps as the outer bearing he stated was different than the one install in our trailer. Would recommend you check the outer bearing number installed in your trailer prior to purchasing a spare set or better yet get with Dexter and provide them your axle serial number so they can provide it to you. If requested, I can upload the data sheet Dexter sent me as an example of you would get. On a side note, the bearing installed by Dexter were stamped "China" so they are not the Timken "made in USA" bearings everyone whats to have. I purchased timken bearings to have on-hand if I decide to upgrade during my next repack of the bearings. Also does not hurt to have several seals so you can repack bearing whenever the miles, time or when you feel like it hits.1 point
-
I'm looking forward to trying the Redline CV-2 grease, when I can get my hands on it. The schedule is tight and didn't want to drive any farther without some sort of new grease. The bearing look great, so that's good. I enjoyed doing the repack. It's therapeutic in a way. And greatly satisfying.1 point
-
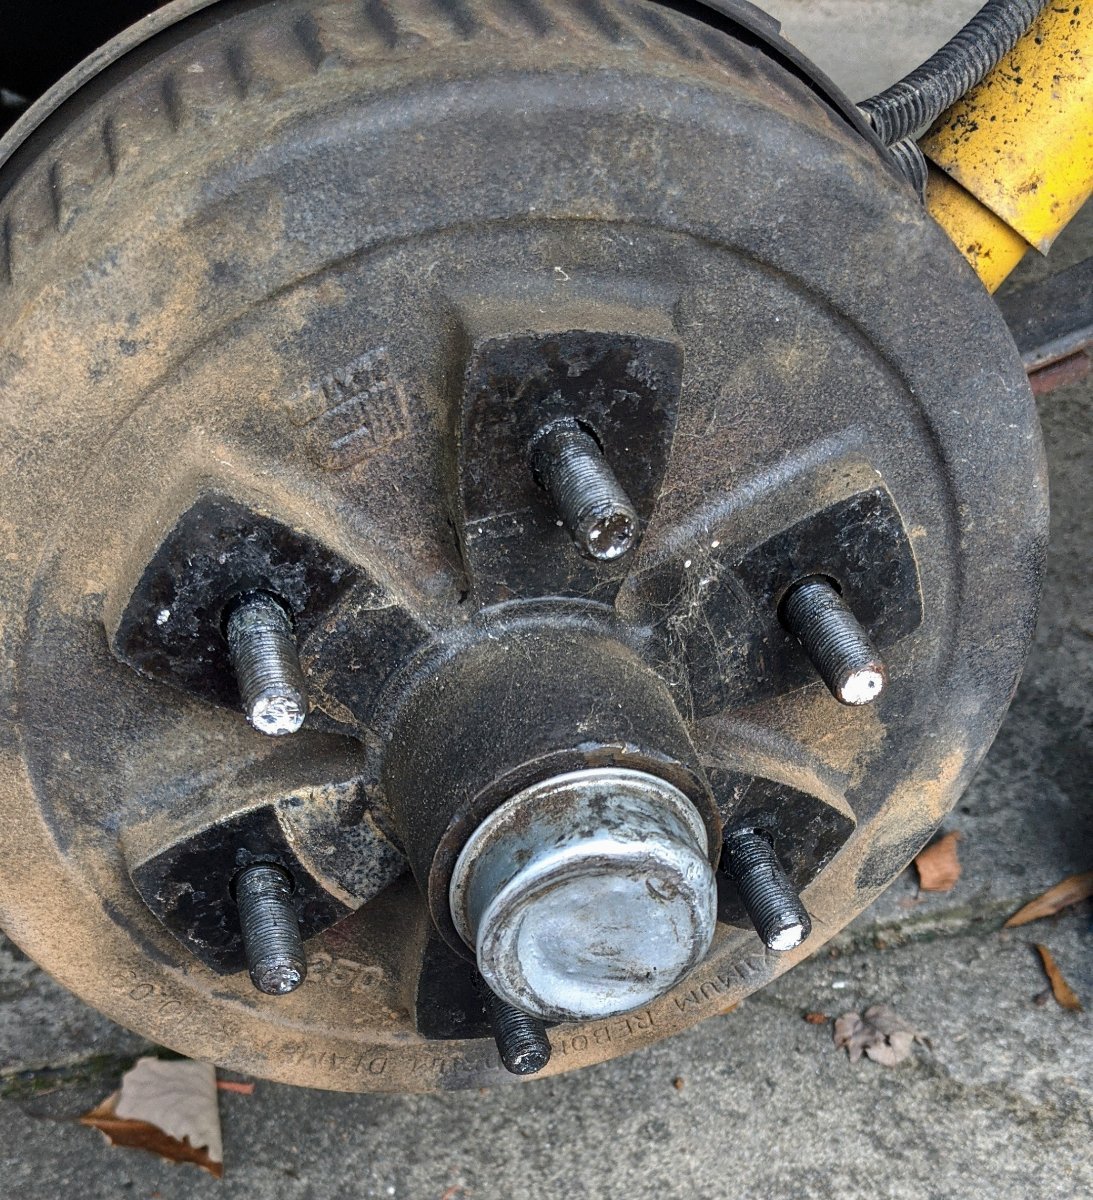
Ha, yeah. Where were you @mossemi when I needed you? Lol. Camping I bet. LoL Also, I took the second tire off and discovered a very abused grease cap. I mean, good grief, how hard do you have to hit a aluminum cap to get it back on. Mechanic must have had anger issues.
1 point
-
Looks like you already found the seals. Mossey
1 point
-
What do you mean by comparable? Phil Wood waterproof grease has been around for decades, the recipe is secret but it is petroleum based. It is used on bicycle ball and roller bearings mostly, where it excels at staying put in extreme conditions (doesn’t wash out). CV-2 is a full synthetic, I think it is better but the main reason I would choose it over PW is you can’t buy that grease in containers larger than 3 ounces. Plus the price per ounce of of PW is way way higher. BTW I carry my hitch spares and tools in a steel ammo can, there is a 3 ounce tube of Phil Wood grease at the very top, I put a smear on the ball every other time I connect. I do like it. I also carry a can of brake cleaner to remove it from the ball and my finger…. John Davies Spokane WA1 point
-
John, Thanks for your input on Grease, I repacked all of our bicycles this winter, and of coarse I used Phil Wood Grease. I love it, using CV2 on most of my grease needs.1 point
-
What bhncb said above if you are doing this service at home. However, if you are interested in carrying an "emergency" pack to be used in the event you have a problem on the road, you can either simply buy a third (or forth ) set of bhncb's recommended parts, wrap them up in bags and rags, or you can get something like the picture below to carry around with you. I've been carrying two of these for the past five years for the "just in case type of thing" plus a small can of bearing grease and (thank goodness) have never needed them. Bill
1 point
-
There are a lot of unnecessary parts listed in that kit, some you can't even use. All you need are the bearing cones and races and a grease seal. Everything else can be reused unless you damage or lose something. The bearing sets are available for $5-6 and a seal is around $3-4. Those bearing part numbers listed are correct for your axles but they are also industry standard numbers that every bearing manufacturer uses. Timken specific numbers to search for a cone and race set are: SET17 (for the inner), SET4 (for the outer), and then 473336 for the seal, which may be in either a National or Timken box.. Sometimes pricing will vary between buying a SET part number and the individual numbers. For instance: SET4 versus L44649 and L44610.1 point


-
Recent Achievements
-


")


")


