Leaderboard


Popular Content
Showing content with the highest reputation on 06/29/2023 in all areas
-
I'm keeping a video diary of my travels in the Oliver. This first episode is my trip to Hohenwald to pickup the Oliver and the first few days camping in it.3 points
-
Yeh, I was hoping someone would chime in, but alas, I just submitted a ticket. I'm hoping it won't be too much of a hassle to pull the fridge out and figure out what it will take to re attach the top piece of plastic. For the time being it's being held in place with some nice wide blue paper tape. We were getting ready to move the trailer when I noticed the loose piece so I really didn't have the time to fully address it, there's no problem with the function of the fridge, but I'm glad I caught it before driving the 5 hours down "the hill" to Denver, otherwise we may have found a different problem when we arrived. We've put over 14,000 miles on the Ollie since picking it up last June so I suppose a loose piece of plastic here and there are to be expected. Take home lesson: Always check everything before rolling3 points
-
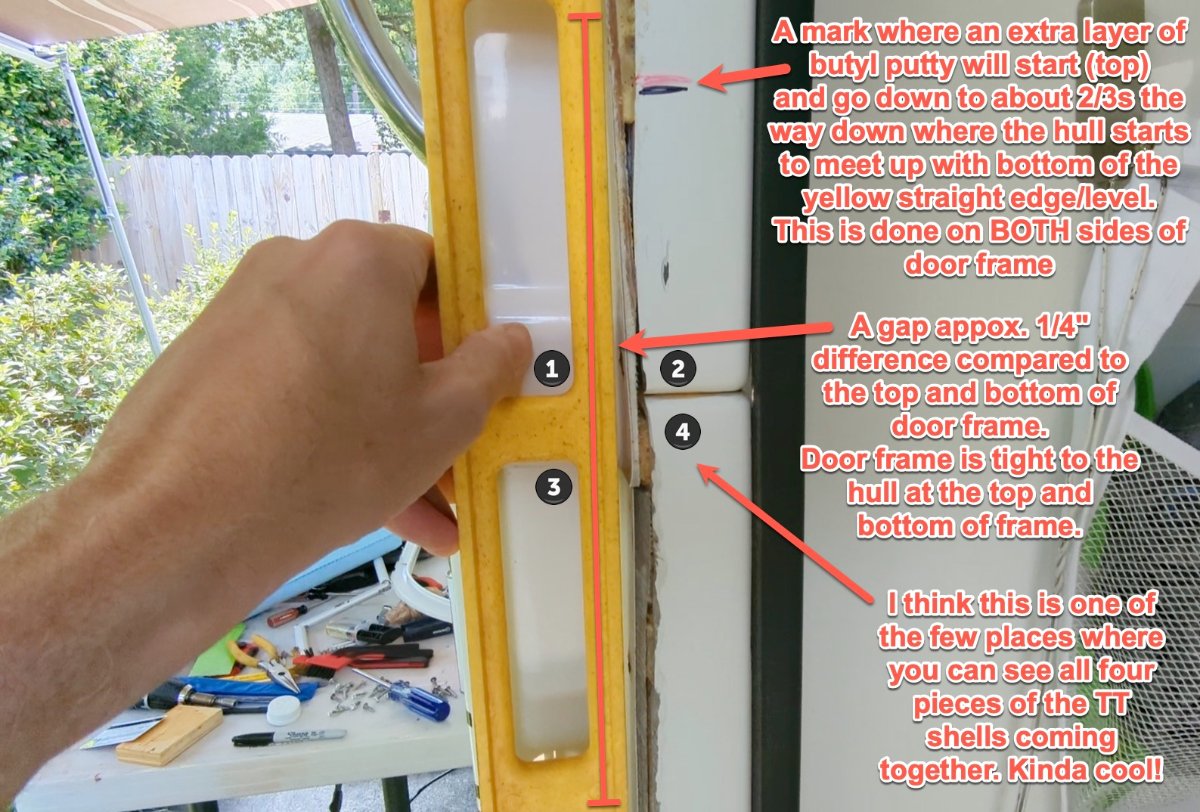
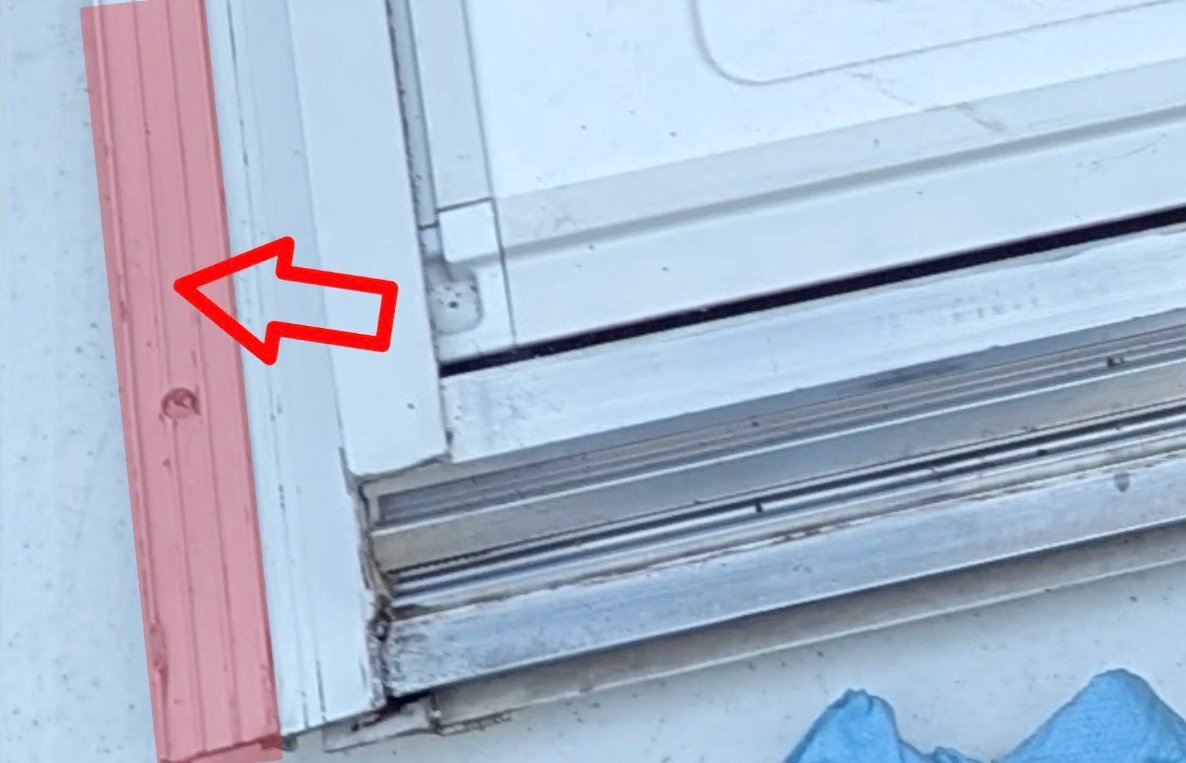
Looking closer at the picture of the yellow straight edge comparing the distance between the hull and where the door frame will be, you can see how Oliver offsets the outer seam from the inner seam. Now that's thinking!!! Well done.3 points
-
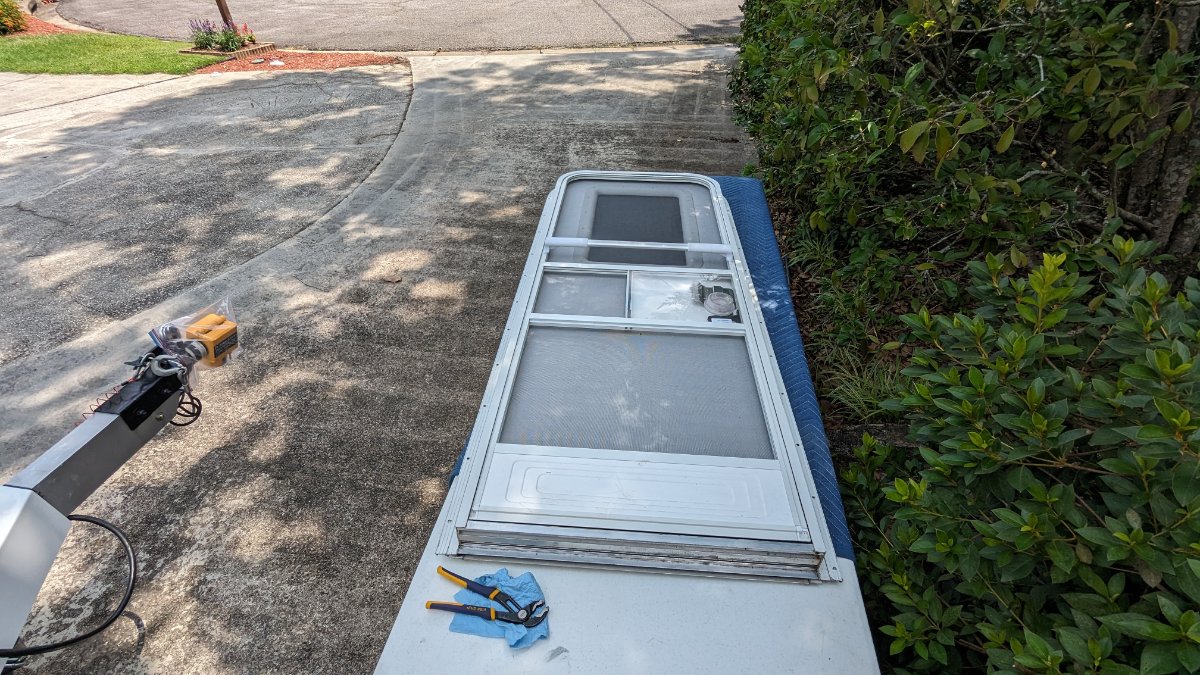
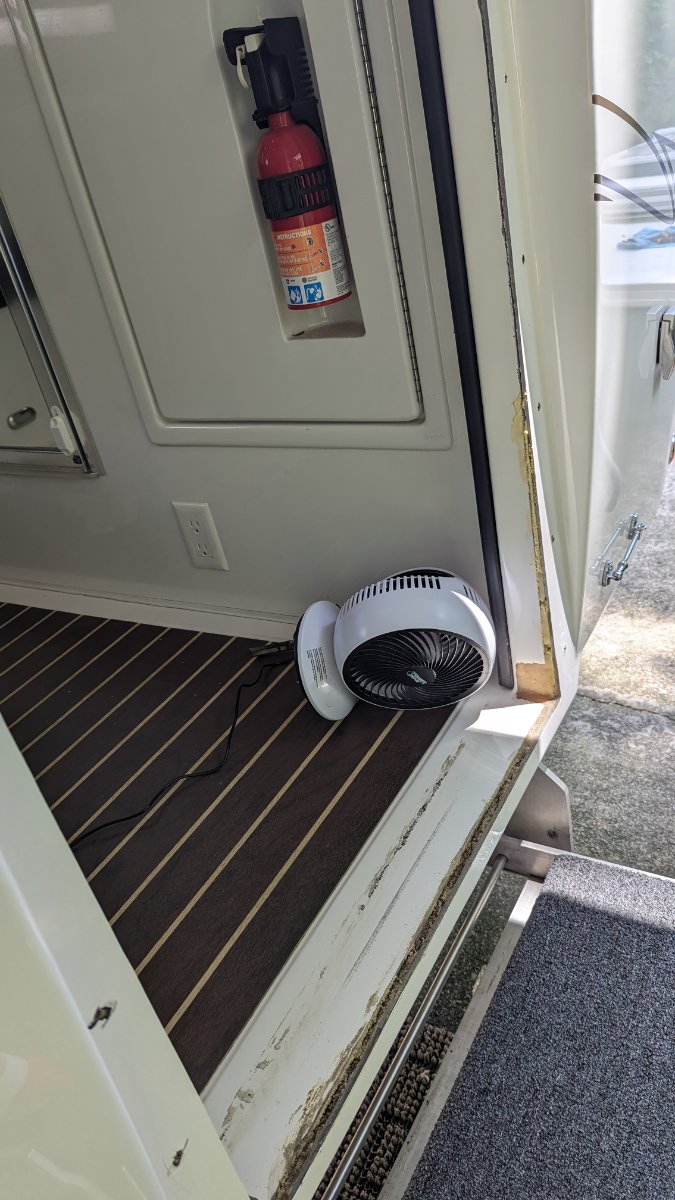
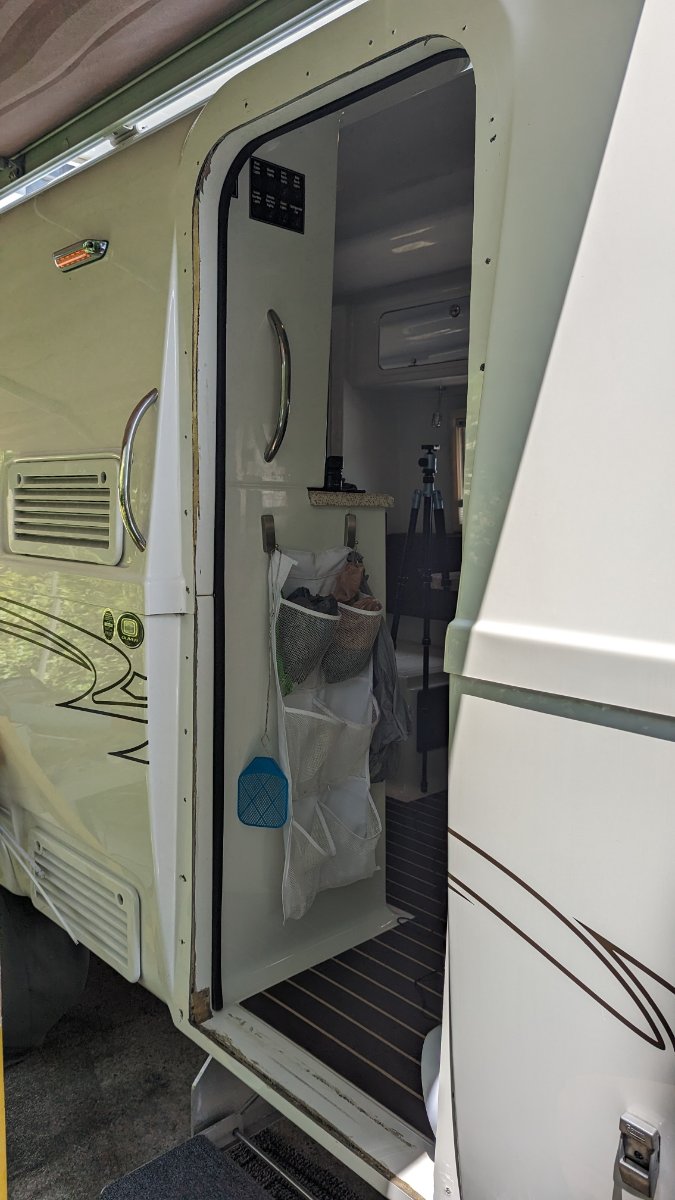
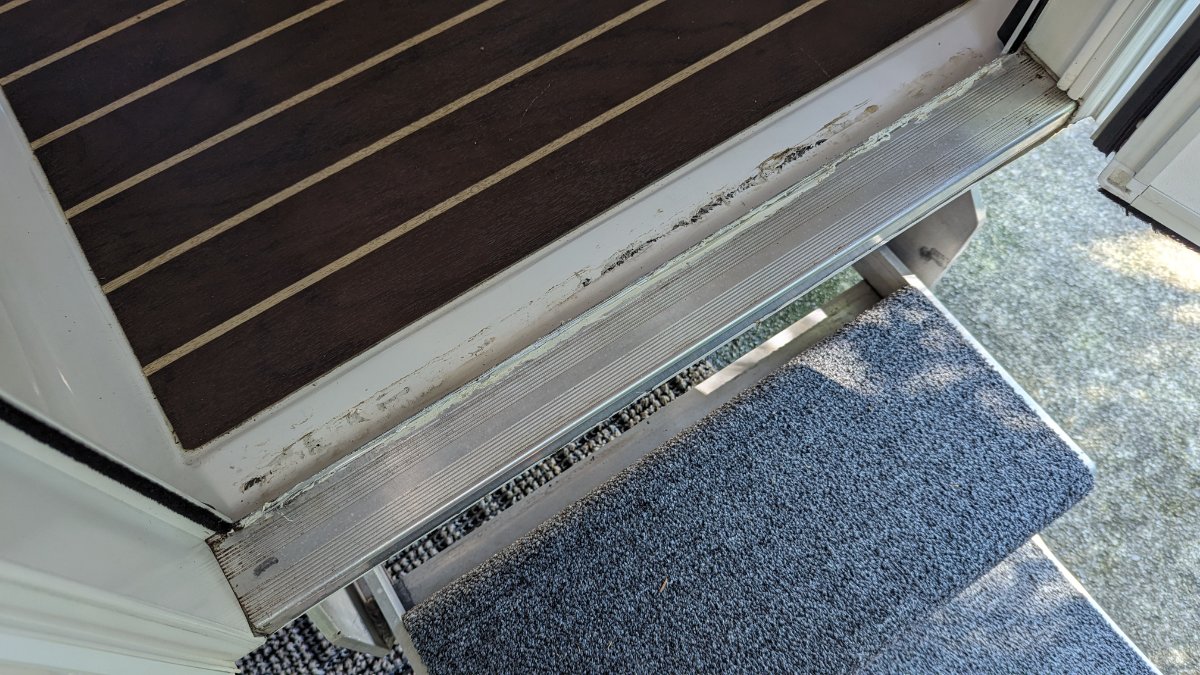
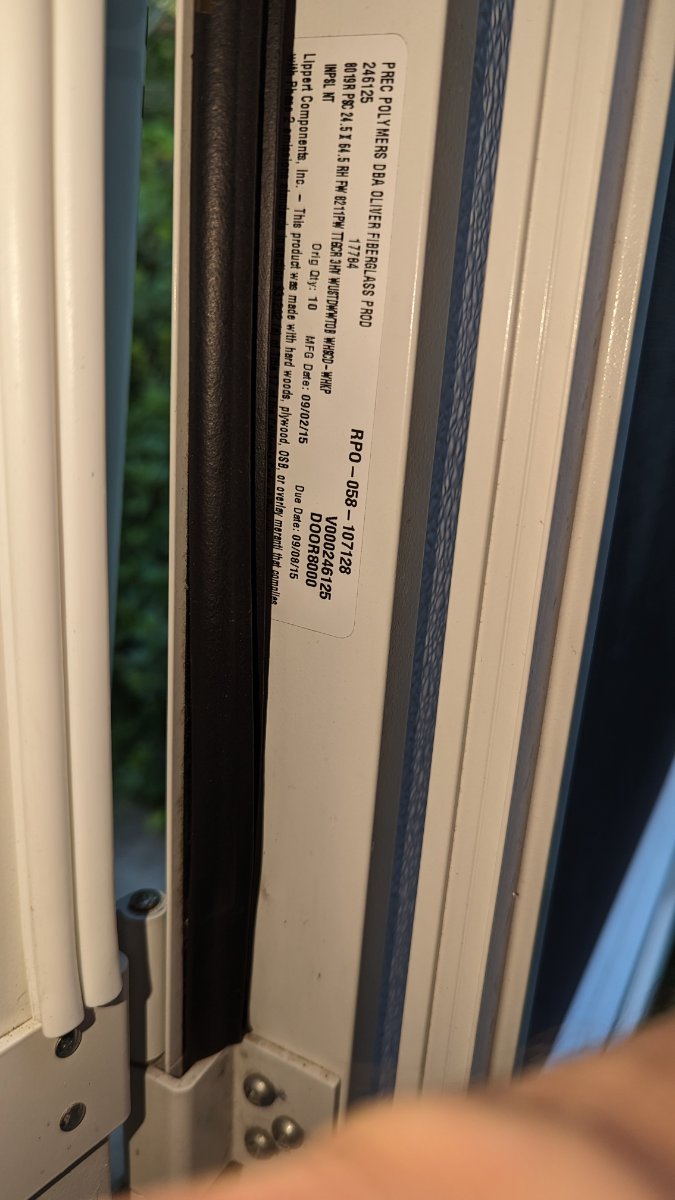
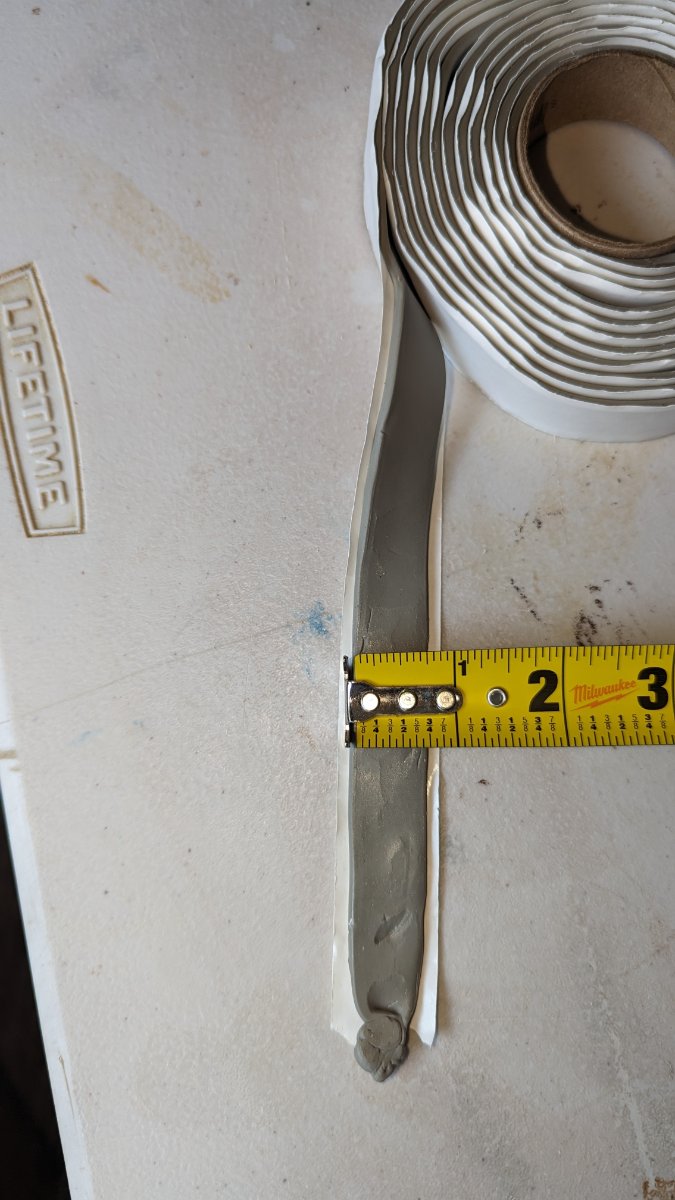
Well, after a year or more of using towels to soak up rain water, I finally got the nerve up to take off the walk-in Lippert door from the trailer. The sealant putty behind the door frame, where the screws go in, had failed and leaked bad. This was an easy job! It only took me three hours and most of that time was prep-work and clean-up of old butyl tape (putty). I have a bunch of video clips to put together to make a YouTube video of the process, but I'm finding it difficult to organize everything. I need to re-shoot a better intro. I'm still learning. Anyways, the door & frame came off WAY TOO EASY. It appears that someone before me attempted to repair the leaks (left & right sides), but they did not cleaned off all the original butyl sealant/putty. Don't be lazy. Clean everything like new. Also, I used two layers of butyl tape in the middle area of the door frame, on the left and right sides of the door frame, due to the distance between the yellow straight edge (see picture) and the curved pieces of hull and where they meet up. I used a plastic scraper to take off the heaviest of old butyl tape from the hull and the door frame itself. I then used 3M adhesive removal and a rag to get the surfaces perfectly clean. (Wear gloves) Everything went back together quick and easy, no issues at all. I waited 18 hours before performing a leak test, to ensure all putty had warmed up in the sun and "squished" around as needed. I've done a heavy, heavy leak test and it's gone through one heavy, blowing rain storm and another lighter rain since completion, all without a single drop inside. YAY ME! You don't know how happy I was to see that I did it better than the last guy. The original putty(s) looked really bad and it did look like someone attempted to address the issue before I purchased the trailer. What a crappy job they did. Shaking my head. Also, in those middle sections of the hull, where I doubled up the putty, I noticed that old putty was not even remotely "squished" in by the door frame, indicating there was air gabs between the putty and the frame, or the hull. THIS WAS NOT A DIFFICULT JOB. I should have done it sooner! Many of the screw holes were too large for the screws used. Really, there were about 10 of the 23 screws which could have been removed by hand or simply pulled straight out of the holes. I Epoxied the worst of the holes and re-drilled. I also added a handful of new self-tapping screws to ensure the door frame snugged up tight to the trailer where needed (not in the middle sections of the left & right door frame). Remember, the door frame will not really "bend" towards the hull due to the door frame itself being so stout and with right-angles, hence the need for doubling up the putty in the middle, where the hull was too far way from door frame's edge, where the screw holes are located. As some of you know already, this door, I think, is custom made for Oliver, as my door did say Lippert, but the sticker essentially said, made for Oliver, mine was from a lot of 10 doors. I looked on the Lippert web site and I did not find the same dimensions of doors as Oliver uses, or I'm measuring wrong. The fan in the attached picture is where I was drying up the spray foam between the floor and the outer hull. Oliver used foam as a filler, likely to reduce movement, but my foam was soaking wet with rain water, so it sat and dried while I worked on everything else. Again, if your door leaks, but is not damaged and does not need replacing, this is a super easy job, and likely if you did need a new door and might be able to have it shipped from Oliver, it would still be easy. I say that because someone on Facebook just mentioned their door got damaged in a wind storm recently. This is a one-person job too, unless someone wants to help clean up old putty from the hull or door. That would save a lot of time.
 2 points
 -
John, I hope this doesn’t offend but you will be in my prayers.2 points
-
Yep… definitely #7!2 points
-
My gas furnace at home was doing this every couple seasons and it has always been the flame sensor. I just started cleaning it before I start to use it each year at home and so far no problems. I am not familiar with your furnace but it should have a flame sensor and it sounds like the exact same problems I was having. If you can find the flame sensor it is easy to clean. Sorry couldnt be more help.2 points
-
Truly beautiful. So very well performed. My great grandmother's first husband died in the Civil War. A recruit from central Iowa, leaving her with two little boys. She sold that farm, moved up to Southern Minnesota near her brother, and homesteaded 80 acres. The message in this music is haunting, and so very moving. O the horrors of war. Truly it may be considered the most cruel and awful scourge which can befall a nation. Heaven grant there may be an end soon. (Samuel D. Lougheed letter to his wife Jane "Jennie" Lougheed, October 7, 1862) thank you.2 points
-
You may still be under warranty with norcold. Many components have a two or three year warranty, in our experience, via manufacturer2 points
-
@AlbertNTerri There maybe another member here on the fourm that has had this similar issue and maybe able to help out with some advice. Hopefully they will chime in! Also a quick call to Mike Sharpe or Jason Essary might help you with a quick solution. Patriot🇺🇸2 points
-
Nice work @Wayfinder all good pointers!2 points
-
What's to not trust? A green 18 years old kid entrusted with a lug wrench - what could go wrong?😆 Bill2 points
-
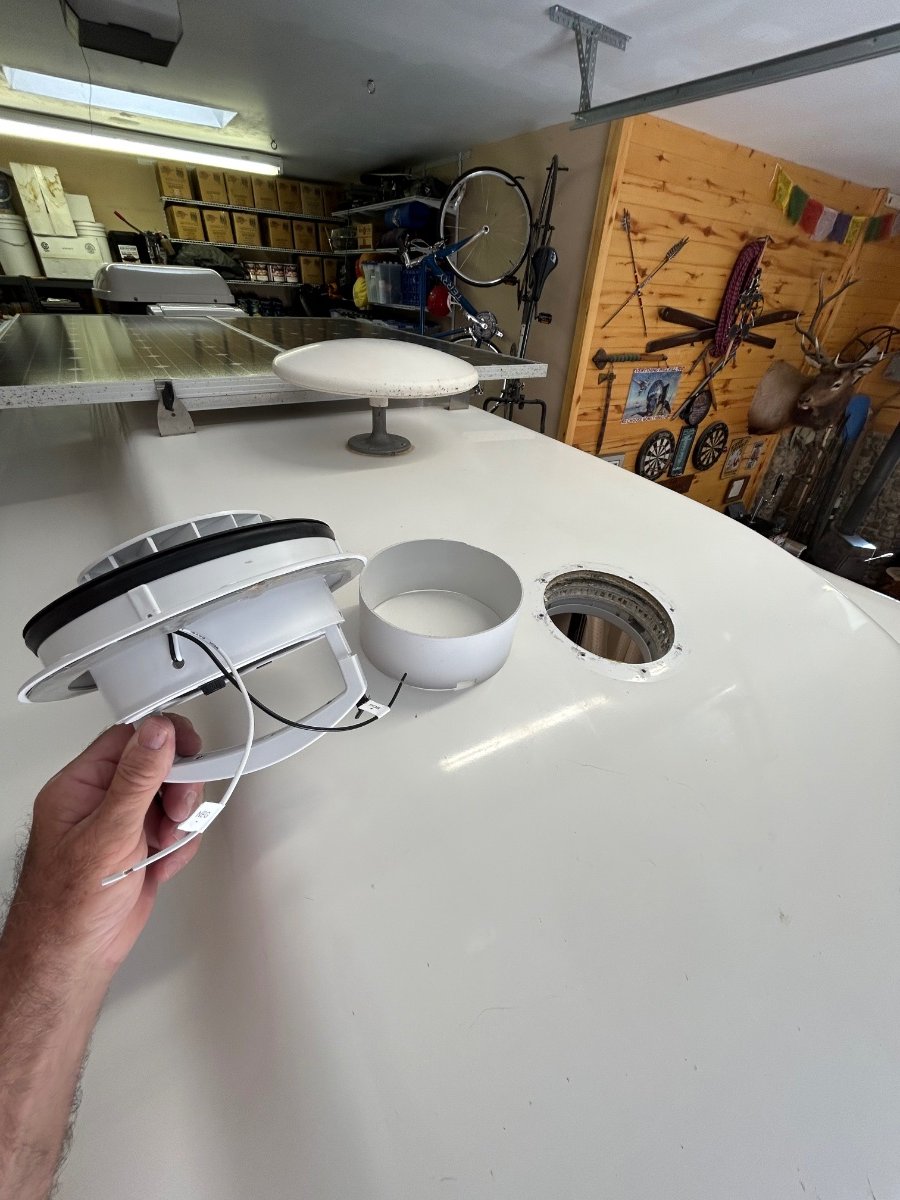
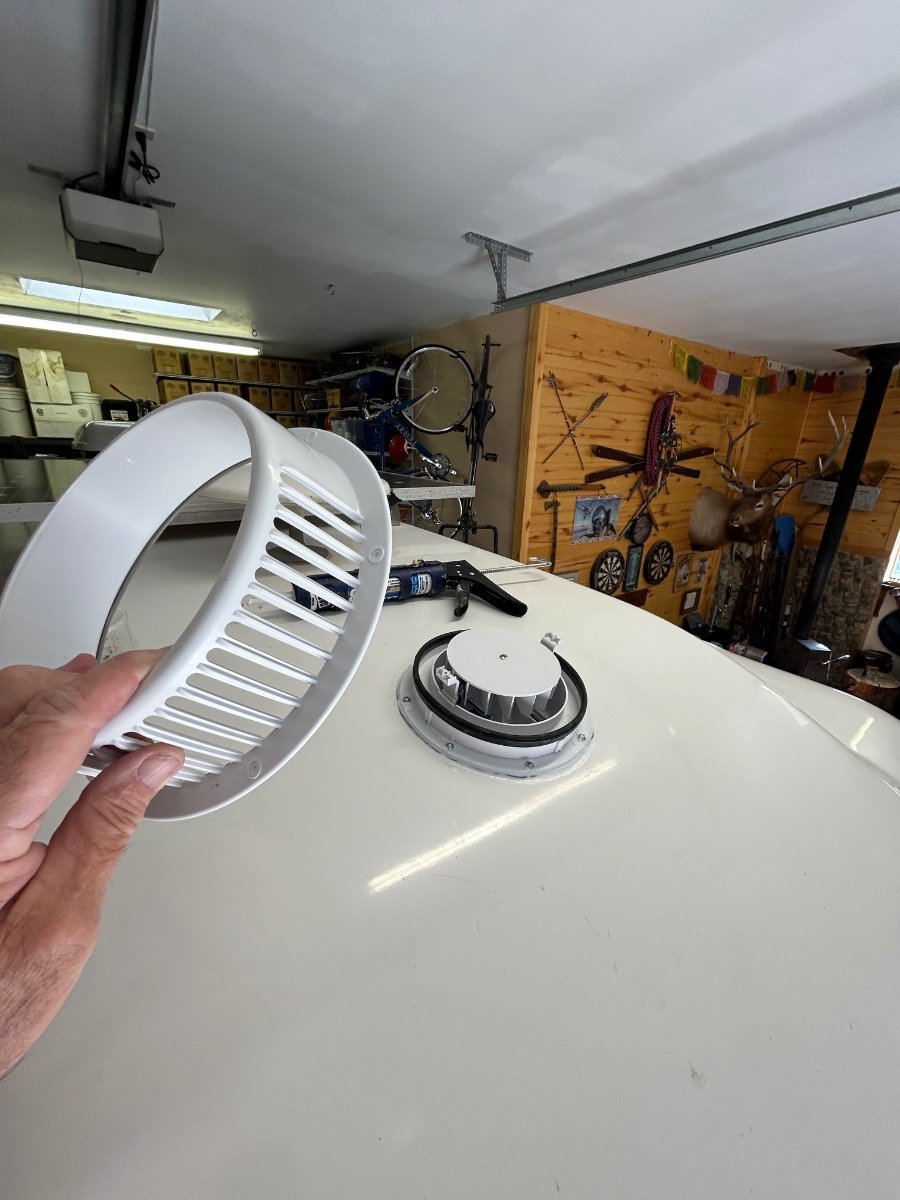
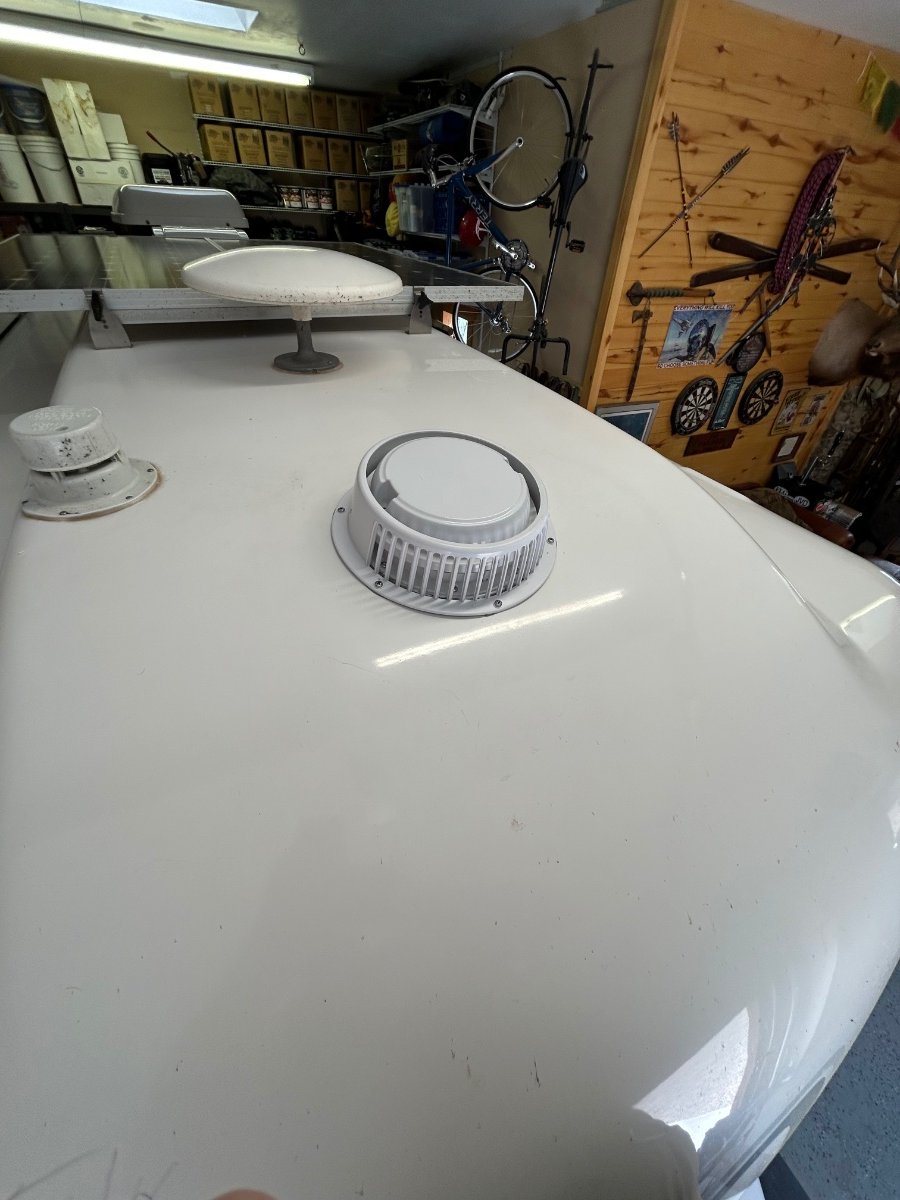
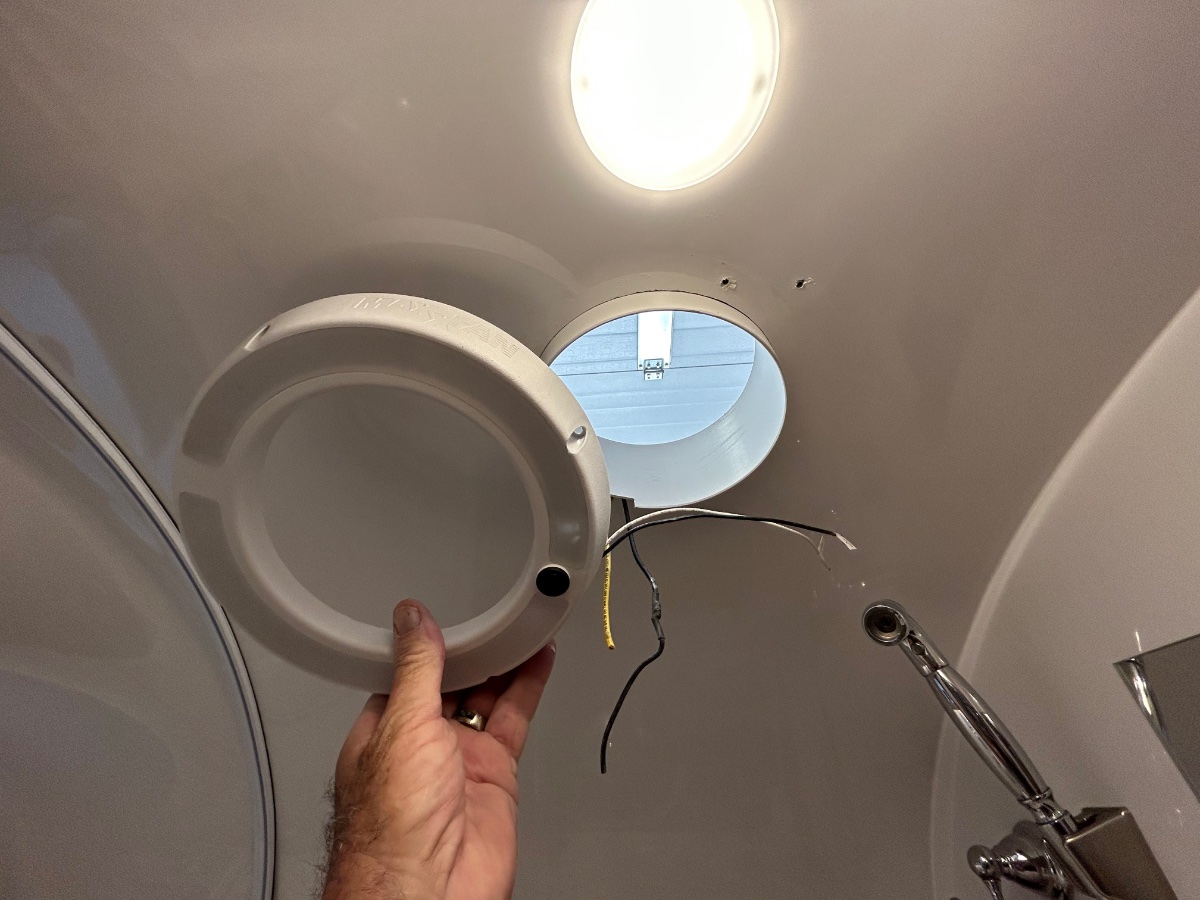
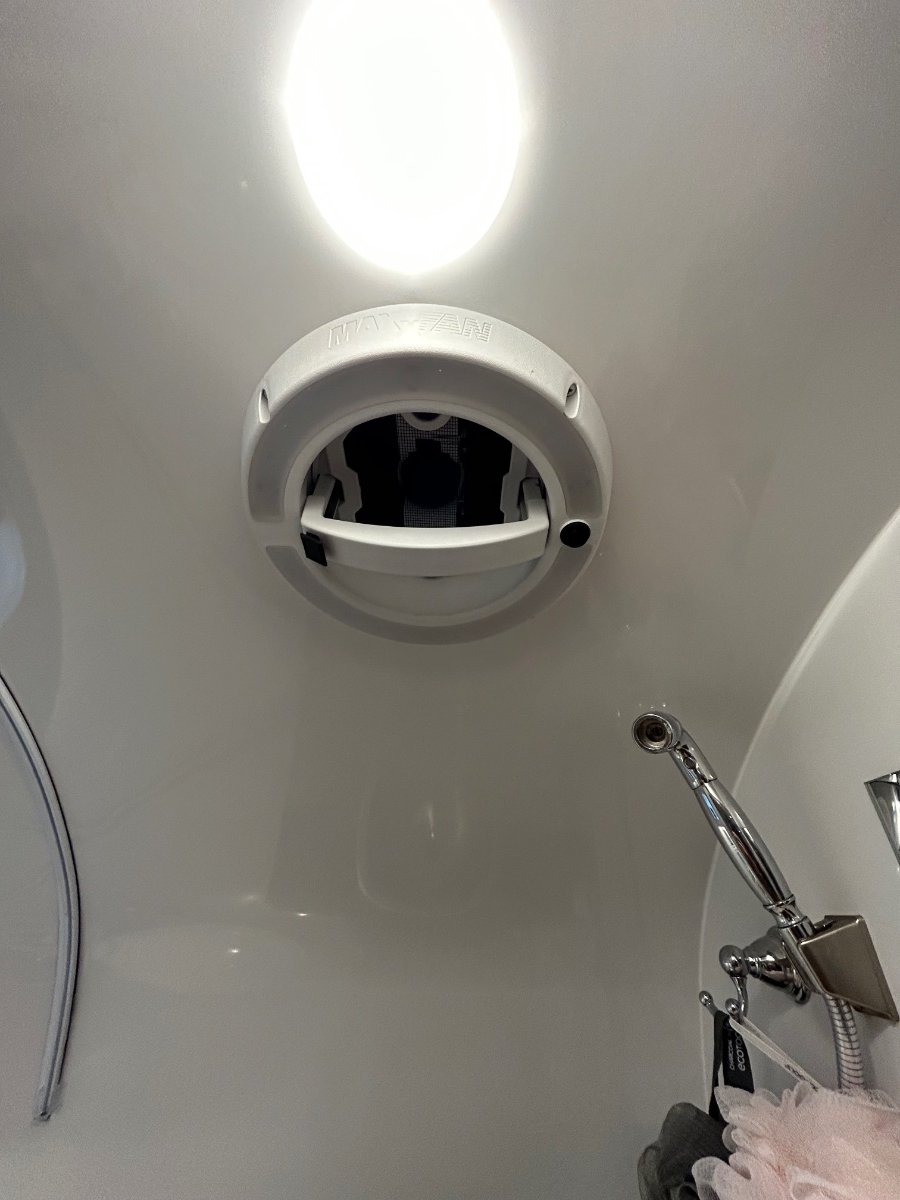
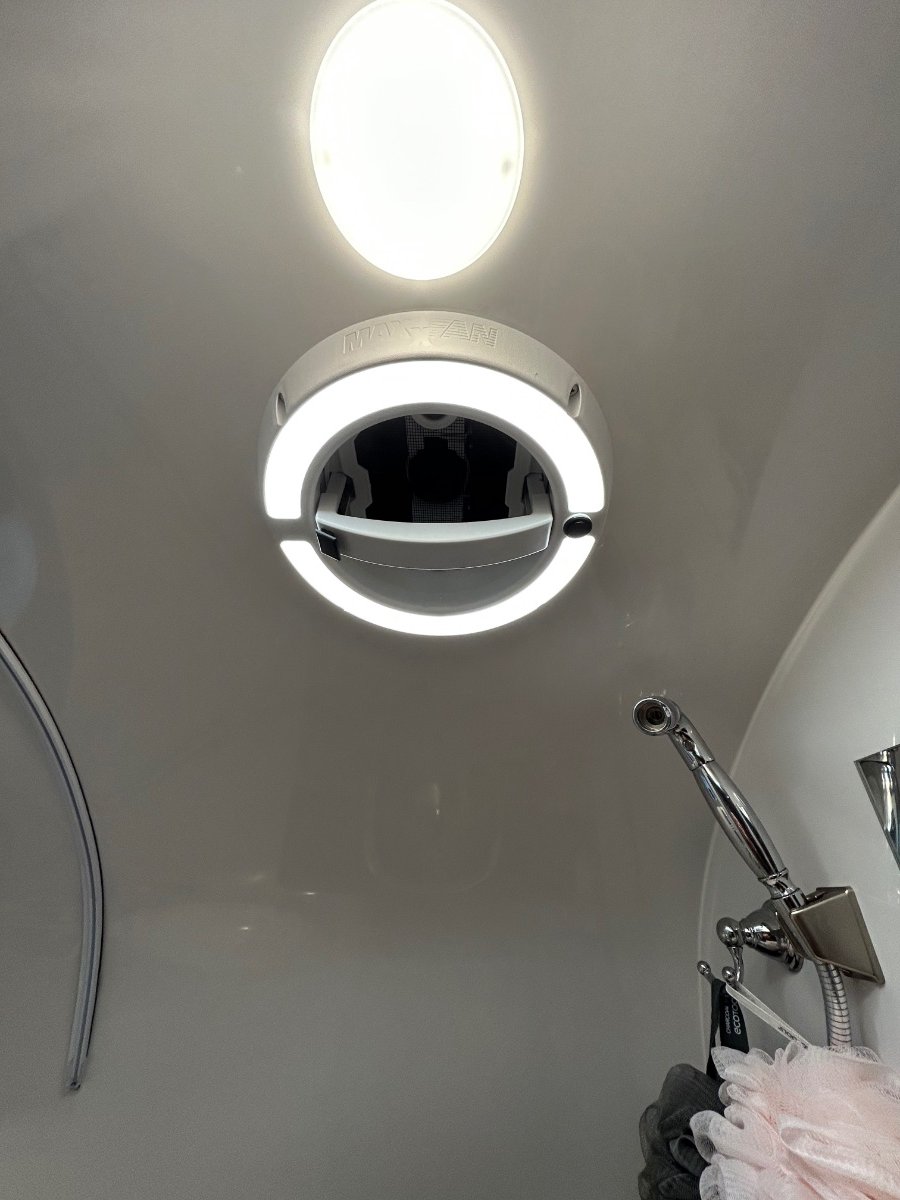
Ok... I love these forums! Nothing like great ideas shared by a group of common minded OTT owners. I'm thinking I stole this one from a comment that @SeaDawg mentioned a while back regarding his "LED-lit" Shower Fan. Well, Diane read his post and thought it would be a good upgrade - so, the new MAXXAIR w/LED unit arrived yesterday via Amazon (Happy Wife - Happy Life category). This would be the short story of its installation... First off, the original VANAIR Ventline fan assembly operated perfectly - no leaks, no bearing wobble, smooth actuation, but alas, no LED. It's the exact unit we had in our previous SOBs. BTW: Its up for grabs - a "freebee", I'll cover any CONUS shipping costs for anyone needing a Ventline. There was major brain cramping involved to plot-out a list of instructions for the R&R drill, especially the Removal phase. The first "R" was straight forward - using a plastic "razor" scrapper to remove the butyl tape from the gelcoat. Cleaned gelcoat with a fresh microfiber cloth doused with an ounce of rubbing alcohol. 2. Filled original mounting holes with clear silicone, they will be further sealed with the butyl tape attached to the new fan housing. 3. Cut-to-fit the included plastic sleeve that fits between the top flange and bottom (shower side) trim piece. Applied clear silicone around circumference of plastic sleeve and upper gelcoat. BTW - the OTT factory fan hole was exactly the correct diameter - no additional cutting was needed (WHEW!). 4. Mounted new assembly up top, carefully pre-drilled/chamfered 8 new holes in exterior gelcoat. Lightly torqued-in stainless screws enough to "push" butyl tape out from flange. Trimmed tape and applied clear silicone around perimeter of flange. 5. Rain guard: The new unit included a "rain-guard" which may be helpful if operating the fan in a heavy downpour. Applied butyl tape on the RG flange and carefully pre-drilled/chamfered 6 new holes for the RG. Trimmed tape after torquing screws in and then applied clear silicone around perimeter of RG. Attached fan cap with the provided 2 white screws. 6. Applied clear silicone to the trim piece groove where plastic sleeve seats. Carefully pre-drilled/chamfered 4 new holes for the trim. Connected 12vDC power to fan motor and LED - used solder and heat-shrink for connections. Tucked wires inside trim piece and mounted it with 4 screws. 7. Unlike the Ventline unit, the MAXXAIR has a locking mechanism when depressed allows the fan lid to open/raise. Its raises/lowers smoothly. Fan and LED each have separate switches. And as, I believe, @Patriot has recently said, "Let there be light!" One and done... Happy Wife.
1 point
-
Saw this today. A rollup solar awning has entered the international marketplace. Kind of pretty, too. https://www.rvnews.com/solar-awning-competition-grows/1 point
-
To my knowledge, neither the black nor grey tank are certified for freshwater. Even if they were, the way they connect in an Ollie would make them inappropriate for use for fresh. We carry 5 gallon jugs for longer trips, in the truckbed. A few have figured out a way to use the black tank (unused with a composting toilet) for extra grey water capacity. And, as Steph and Dub said, what would you do with the grey water, anyway?1 point
-
What would you do with your grey water?1 point
-
I live in southern AZ and the wildfires this year have hit too close to home. Exactly 1 week ago today, I left work before lunch because of reports of 3 separate wildfires raging close to my home. By the time I arrived to my house, the yard was on fire, the smoke was thick, and fire crews were all over the place. My neighbors had already rescued my dogs, and I ran inside to rescue my bearded dragon before fleeing the area. The fire meandered around all the homes in the neighborhood, came right up to my cinderblock fence, but by the grace of God and the amazing fire crews, no homes were lost. This week, portions of Fort Huachuca, where I work, are ablaze. In 2 weeks, I'll be making my way north with the Oliver through Nevada to the southern Oregon coast, hoping for both cooler weather and less chance of raging fires.1 point
-
I seem to recall exactly the same thing. I'll PM Matt to see what he has to say about it. Bill1 point
-
AND - 7 - the most important of all - make Mom happy! 😄1 point
-
Bill, thanks for that info about the possible recall/warranty. I wanted to switch to the Maxxfan Dome w/LED even before the gasket malfunction, hoping 1) the fan would be quieter than the Ventline, and because of 2) the locking handle, 3) the easily removed screen for cleaning up there 4) the easy to get to quick-blow fuse, 5) that cool LED light and 6) to test my roof sealing and caulking abilities for the first time ever... gulp!1 point
-
It's this stuff here, Dicor BT-1834-1 1/8" x 3/4" x 30' Butyl Seal Tape Here's my YouTube comparison on the two sealant tapes I had on-hand.1 point
-
I'm aware of a recall/warranty repair that was authorized for certain models of the bath fan due to the very issue you are describing. Depending on the age of your Ollie and/or age of the fan, you just might want to open a Service ticket for this issue you are having. Bill p.s. it would help if you would let everyone know what year and model Ollie you own.1 point
-
What size Butyl Tape did you use? Great post. Thank you for taking the time to do so. GJ1 point
-
Too funny1 point
-
One of the most beautiful, yet sad tunes ever written. Ashokan Farewell, the haunting melody in Ken Burns’ The Civil War.1 point
-
And, Bosker is STILL embarrassed for you.🥰1 point
-
Did your "Inner Viking" come out when you were there? The docents told me I could try on some of the items in that room. Soooooo. . .
1 point
-
I never trust the tire shops. I re-torque the lug nuts after everytime they do tires work. I also recheck pressures. I have had lugs stripped out from over torque. I have lost a custom lug nuts at $18 a piece because they didn't even torque them. Over inflation on my TV and TT tires are the norm. Most times they inflate the cars just fine.1 point
-
Steve, I just check the rules in the rewards brochure. It says that to be eligible the showing has to be arranged by Oliver and both parties must confirm with Oliver. I did what you did, thinking that would be my second showing, no luck. Here are the rules, in case you don't have them.
1 point
-
True, no matter what brand or single/dual/tri fuel genset you buy. Plus, most of the old school "contactor " type generators have a total harmonic distortion so high that it can kill electronics and circuit boards. Something to check on any cheaper brand you look into. Under 5 per cent is most like clean household power supply. A friend of mine lost power for a day awhile ago, and I loaned him my Honda to run his fridge, on an extension cord, so he wouldn't lose his food. Now he wants a bigger generator for backup. He saw a cheap big open frame contractor type genset at a big box store, and sent me a photo. My response: Not only would his neighbors hate him, because of the noise, but THD was up to 25 per cent (of course not listed in specifications. ) He's going to keep looking, naturally. Most inverter gensets, even many of the cheap ones, like my spare Westinghouse, have decent decibel ratings, and decent thd ratings. If they don't, give a pass.1 point
-
Thanks to all for the examples of calculations -- We have to be mindful that some people's Olivers might have different tires (am I right, that they had to switch during tight supply chain issues?)....1 point
-
As several above owners have hinted, Champion has many generators and the one you want is their inverter generator. Their hammer mill older technology will get your head on a pole at most boondock sites and RV parks. GJ1 point
-
That is why I ultimately invested in a second Champion Dual Fuel 2200 watt generator and a splitter so I could run both from one 5-gallon propane tank. The lower output on propane requires the second inverter/generator to run our Truma AC (which has no easy start installed).1 point
-
https://youtu.be/M-bTLdMjuqU This YouTube link should provide enough information about bonding the output of a un-bonded generator to satisfy your curiosity. Mossey1 point
-
Without the Neutral-Ground Bonding Plug, NO 120V AC plug should be "hot" with only the generator running. This has nothing to do with the plug itself but rather the nature of the wiring of RV units. Without the plug no electricity from the generator can get past the EMS. This is not necessary when on shore power.1 point
-
Yep. Tightened all the fittings and screwed down the hold-down straps. Very strange symptoms. When the pump is sucking air, you can barely hear it. If anyone keeps getting air in the lines the first time you use your pump on a trip, check those connections.1 point
-
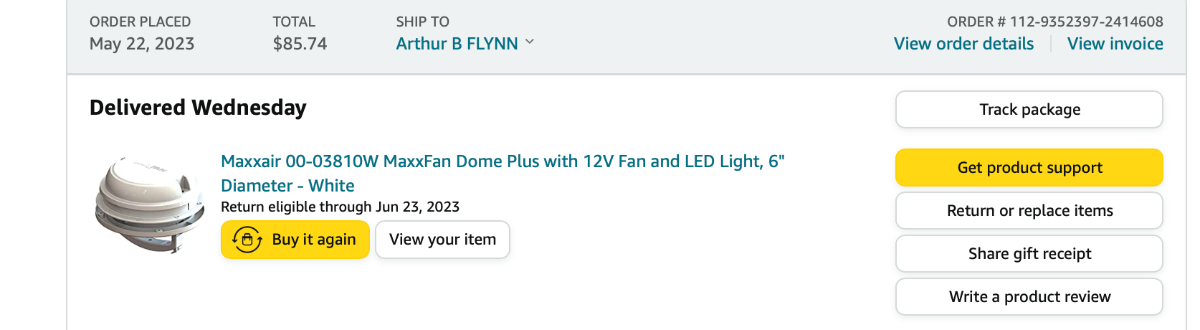
Here's the model number from our Amazon order receipt: The unit comes with a 6" extension sleeve. You will need to trim the sleeve to your roof thickness. Our OTT roof thickness at the 6" diameter vent hole is 2 1/4". We placed the 6" sleeve inside the hole, allowed 3/4" to protrude inside for the trim piece/LED housing, and marked the exact thickness so as to determine how much needed to be trimmed. The length of the sleeve needed was 2 7/8". We used clear silicone around the upper sleeve circumference and roof vent hole for additional waterproofing. Fitment was good - especially considering that the fan hole location is not flat, being slightly curved - be very careful when torquing both the upper housing screws and the decorative trim piece/LED housing screws because one could (IMO) crack the housings if over-torqued. The housings will "bend" slightly to match the interior concave curvature of the ceiling and the exterior convex curvature of the roof. We washed Casablanca after the install and heavily watered the area around the new vent for several minutes - no leaks detected/dry as a bone in the head. Hope this helps, brother! Cheers... PS: 1. The old Ventline unit is spoken for by another member and will be shipped today. 2. This model MAXXAIR has the conveniently accessible inline fuse that @SeaDawg mentioned above, FYI.
1 point
-
First off, I’ve edited my earlier post with regard to the material DIYvans uses for their roof adapters. I was having a hard time resolving their price versus material and fabrication costs with HDPE. Turns out their adapters are actually machined from UV resistant expanded PVC, which obviates another question I had as to color availability. (Any color you want as long as it’s black). Also, I'm changing some terminology to reflect Houghton parts list names. The idea for a modified design of the DIYvans roof adapter is still in the back of my mind, but this issue doesn’t concern me enough to justify the cost to produce. If Houghton comes back with “Oh yeah, we have a fix for that”, I’d probably redo my installation however. As I mentioned previously, capturing just the larger drain holes would only provide a partial solution. Assuming the size and shape would even work, mimicking the Penguin II by attaching four of those drip pans would involve modifications to the Base for fasteners. It would not be as simple as just running in some self drilling screws. But there's more.... The biggest problem I see with your plan to use an additional roof gasket is the difference in mounting schemes, Dometic versus Houghton. The Dometic A/C is soft-mounted with a foam seal establishing a cushion between the fiberglass roof and metal base pan. The A/C fasteners are tightened down to compress this seal until a specified clearance between the roof and A/C is achieved. Adding the additional seal from the drip pan kit just increases this dimension. In contrast, the Houghton uses a hard-mounting scheme in that the Roof Mount bracket directly contacts the fiberglass roof (sealed with liquid sealant) and the A/C Base is compression-sealed on top of the bracket. The A/C fasteners are torqued to a specified value that ensures sufficient clamping force between all three components. If the Roof Mount bracket was isolated from the roof with a compliant foam seal, the required clamping force would be near-impossible to achieve or maintain resulting in an unreliable compression-seal. I'm not sure this scheme lends itself to your broken ruler scenario but enlighten me. If you were really committed to pursuing the Dometic drip pan solution, I suppose you could cut a riser for the Roof Mount bracket out of one-inch HDPE and notch the top for the drip pan tubes. Sealing for leaks might be iffy though. Might give you something to think about though. Regarding Shims: I cut nearly full length pieces for each side of the Roof Mount bracket and adjoining end pieces to-length as required. Lengths and widths are actually just short of the bracket flange dimensions so edges would be concealed by silicone sealant. Stock thickness would be as-required, 0.010 or 0.020 maybe? I’d recommend checking each installation first though because there could be enough variation between Oliver’s upper shell moldings that shimming wouldn’t be necessary. As far as runoff, I have both awnings and this issue is no different than when the Penguin pans would occasionally overflow. Condensation just rolls off the sides and down to the awnings, which channel it to the rear corners aft of the windows. I suppose some of that stick-on window guttering might work for situations without an awning. Be sure to include pictures.👌1 point
-
GJ This is a picture of the Dometic A/C drain kit instructions. The 14" square gasket in your picture of the drain kit is used in addition to the existing 14" gasket around the hull penetration with a notch cut into the original to allow passage of the drain tube from the cups to the internal drain tube. The 2 straight gaskets are stacked at the rear of the base plate to level to unit. Mossey
1 point
-
Since I'm not going to replace my a/c until what I've got breaks, I have only scanned the posts above for general reference. Having said that - you two guys are amazing and I really do appreciate the thought and work that you are/have put(ting) into this project. Bill1 point
-
Okay. I think of them as spacer blocks. The shims I was refer to are necessary between the support bracket and Ollie roof to keep the bracket from rocking side to side, and for establishing a level surface to prevent the bracket from flexing when the unit is torqued down. I though the Houghton instructions noted this but can't seem to find it now. For me, it was just best-practice. The pressure I was referring to is the negative pressure created by the evap fan circulating inside air up and through the evap housing. This negative pressure would cause a draw on the larger condensate drain holes, restricting the flow. I believe the series of smaller holes are intended to reduce this effect. If only the larger holes are captured by your scheme, there is still a potential for some drainage through the smaller holes. So my question would be: What's the point? The roof adapter by DIYvans is I suspect machined from a sheet of expanded PVC HDPE aka Starboard. They are cut specifically for the 3400 outline, with the bottom surface contoured to match roof curvature. So, it should be no different than if the unit were resting directly on a flat roof. Since the support bracket rests on top of the roof adapter, the underneath clearance for the unit will be the same .4 ". I would argue that any adjustment from "level" are best left to routine attitude adjustments made during unhitching and setup. If drainage slope were factored into the installation, one could easily exceed the maximum operating inclination of the unit. I keep a supply of PVC shim stock around for general use. This is available in various sheet sizes and thicknesses but I have .010 to .060 in four increments. Most of my materials, i.e.stuff like this, are ordered through Zoro.com. If/when you do buy one of these, put it on your bench and pop the hood. Compared to the Penguin II, the Houghton is a stunning piece of work.1 point
-
All the holes I circled are open to a drainage trough under the evap coil perimeter. Since the coil is contained in a sealed housing, the fan tends to creates a negative pressure environ so any air leakage should be outside in. It seems to me however that the 8 larger holes at the corners are primarily drains for condensation with the remaining smaller holes providing pressure equalization. Since the entire evap assembly is enclosed, there won't be any intrusion by rain or snow. For the exposed section of the unit, drainage is provided by the multitude of holes around the entire perimeter and a few others strategically positioned in the base. As far as the support bracket: Your dimension are correct. I'm not sure what you're referring to as being "four black shiims". The black bracket is a single flat piece and should be shimmed to account for the not-quite-flat roof of the LEII, but there are no shims provided with the unit.. I cut strips out of PVC shim stock but I'd have to do some digging to tell you the thickness I used. If you wanted to raise the entire unit, I'd look here for a solution. Remember though, your .5" drain tube is ID so figure on 5/8" minimum plus. The tubes would have to pass under the support bracket and achieving an effective seal might be tricky. Nothing else comes to mind. The standard flex duct that connects the plenum is good for a roof thickness up to 85 mm, so no issues there with this minimal height addition.1 point
-
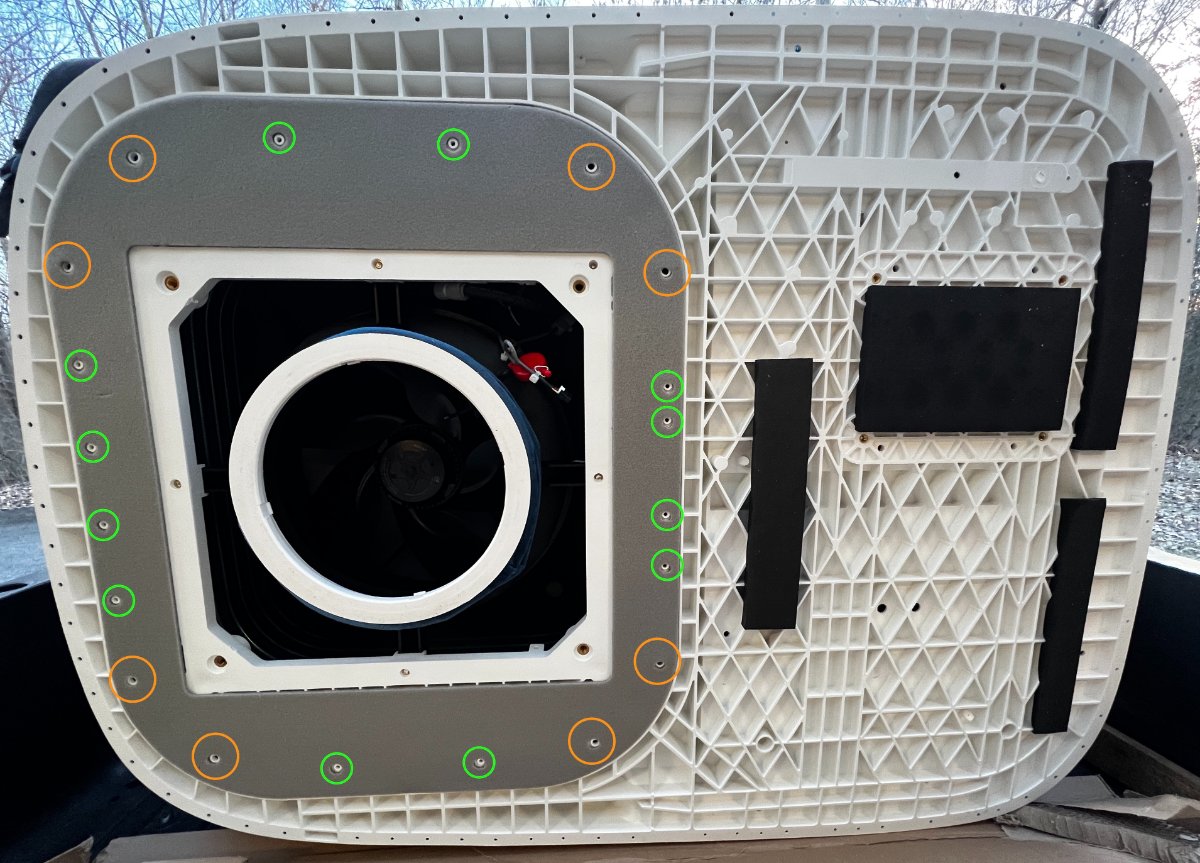
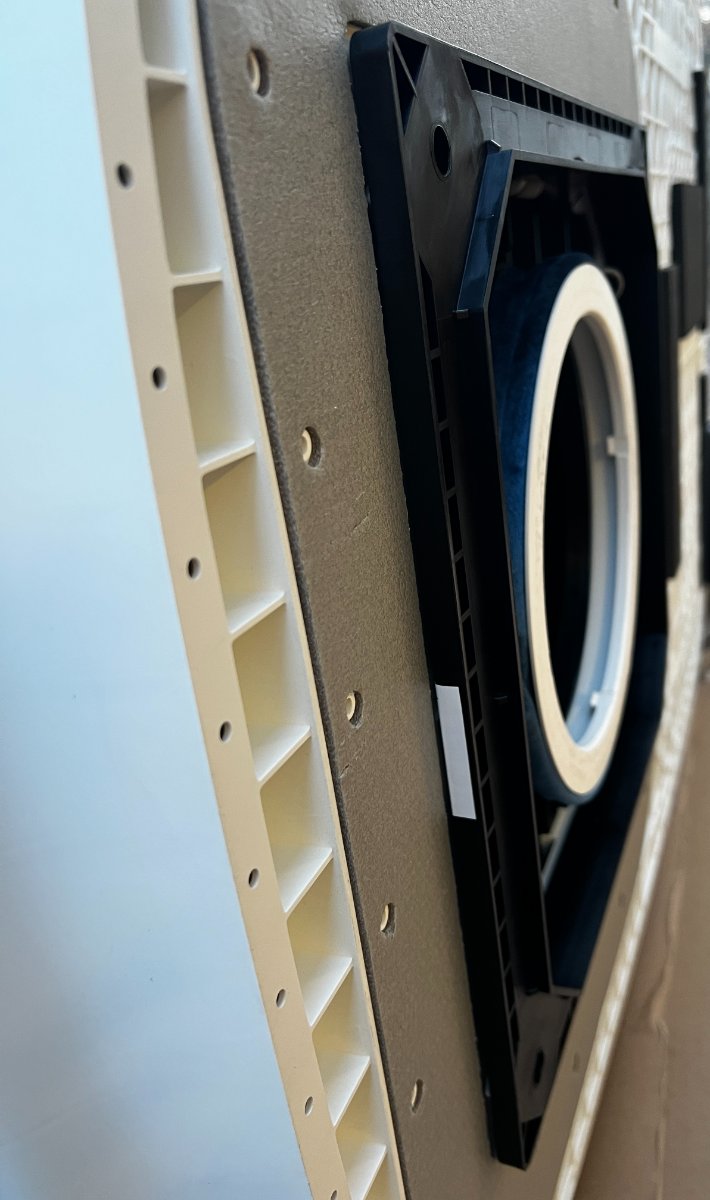
Here are a couple of pictures to help you. I'm afraid it's not going to be as easy as you'd hoped. On the first picture, I've circled all the holes below the evaporator coil. The orange in the corners are maybe 8mm while the green ones are probably 5. As you can see, the entire bottom pan is structurally molded "plastic". Looking at the parts breakdown may also help you. The second picture shows the height of the roof support bracket. At best it's 10 mm so there's not a whole lot of space underneath the unit. The support bracket has an integrated foam perimeter seal, and compression-seals to the bottom pan when it's torqued down. Elevating the unit would be much more involved than just using a "spacer gasket". This particular 3400 is a sacrificial unit I was using, primarily to address your concern. Originally my thinking was to adapt a mini-split condensate pump but the juice didn't seem worth the squeeze. There is a company in OR that fabricates mounting "adapter plates" for these, primarily to accommodate the curvature of Airstream roofs. I thought about contacting them to come up with a design that also incorporated a drain pan system to connected with the Oliver's internal drain tube. My mental design started to get really complex so I haven't pursued this idea any further at this point. I've been using the 3400 on my LEII for about three years and don't find the way this unit drains onto the roof to be a big issue. I do tend to avoid high humidity however.
1 point
-
I spoke with RecPro today about their 13.5K BTUH low profile units. Sadly, they have no engineering support what so ever. Could not answer any of my engineering questions: Did not know about our have any knowledge of use of Dometic Auxiliary Drain Kits as OTT uses. Did not know what kind of compressor they use. (Scroll, inverter, reciprocating or if it has a variable speed or step speed function. etc.) Did not know how the fans work (Multi-speed control, winding based speed-control or if they are just single speed.) They do have a wiring diagram though and it is provided with the unit. I asked if it was online and..... she did not know. So I changed my order and went with the 13.5K BTU unit. I think that if I use the OTT method of raising the A/C unit, that the Dometic Auxiliary Drain Kit may work on the Houghton units. Their bolt pattern is at 13.5. If our roof penetration is an actual 14" X 14", then I could run the drains together on the air return open duct to the existing 1/2" OTT through the wall drain line. This is still perking in my noodle. HOWEVER, one thing I did learn was that according to the RecPro Customer Service Contact (Sherrie), there have been two "Sets" of Houghton's. The first did NOT run the fan continuously. The Second Set does. She stated that the change was made by the Aussies and she did not know why. I stated that for at least 1/3 of US trailers it was a bad decision and certainly wasteful of energy.1 point
-
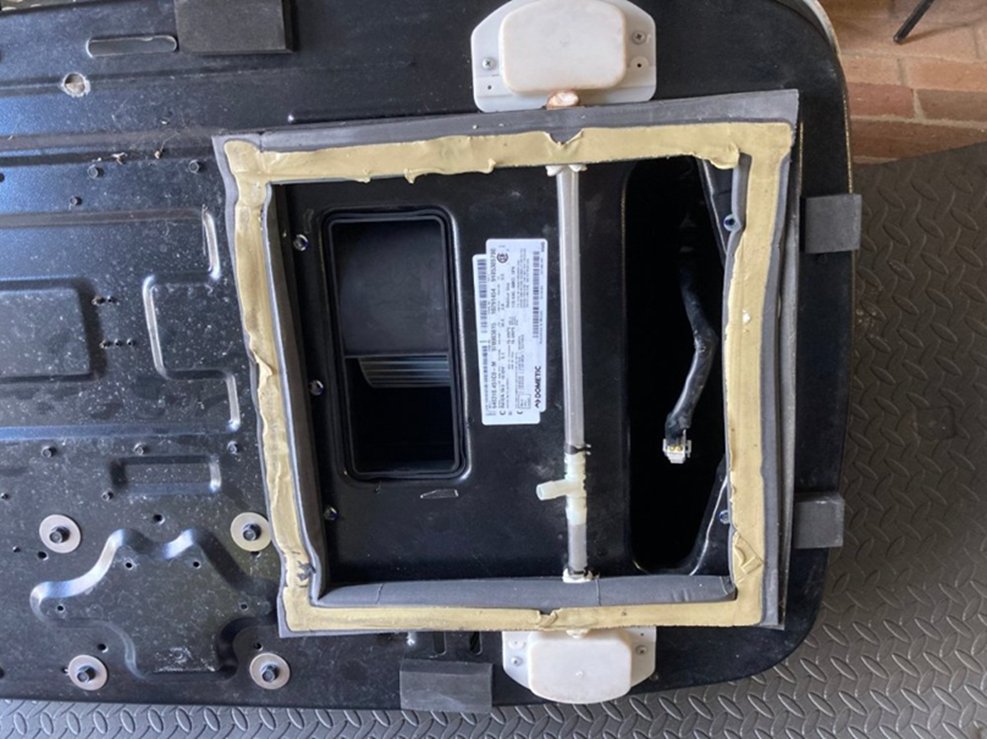
Do any of our Houghton AC owners have info about the Houghton condensate drain process out of the unit and onto the Ollie roof? I am contemplating retrofit the Houghton with the Dometic add-on condensate drain hardware. See picture below. Thanks GJ NOTE: Thanks Steve CR for the above picture! 🙂
1 point
-
On 12/19/2022 at 4:41 PM, katanapilot said: Or $1500 for the RecPro/Houghton 13.5k heat pump and maybe 4 hours labor? Cheaper yet and you can use the heat function versus propane if you have 120 volt power. The Black Friday additional 15% discount seems to have passed. However the RecPro/Houghton 13.5 K, non ducted, WITHOUT the heat pump is still being sold at a great price. Remember to ask for the 5% new customer discount. Here are their current "No Heat" and their "With Heat Pump" versions prices: NOTES: Be aware that: The one on the left is significantly higher (13 11/16") than the low profile one on the right (9" High). The one on the left is 73 pounds, and the one on the right is 99 pounds. GJ
1 point
-
https://robbreport.com/motors/aviation/alef-bonkers-flying-car-faa-approval-1234862248/amp/ Wonder what it can tow? 🤣🤣🤣
0 points


-
Recent Achievements
-


")


")


