Leaderboard


Popular Content
Showing content with the highest reputation on 09/07/2023 in all areas
-
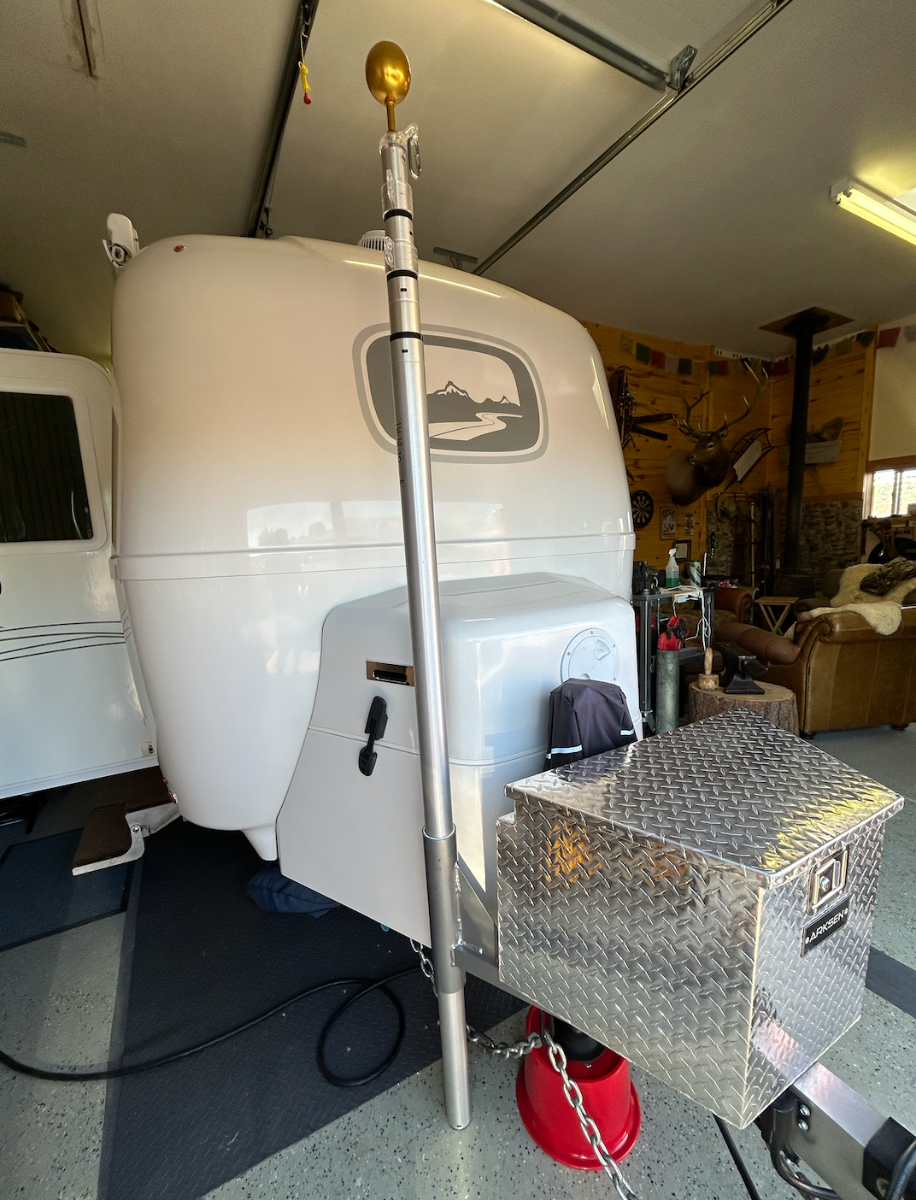
We originally bought a receiver hitch flagpole mount. What with keeping the 1UP bike rack attached to the OTT 2" receiver back aft, we came up with this modification to what @Ollie-Haus and @Patriot mounted on their cargo boxes... The inspiration is definitely from @John E Davies's original flagpole mount post from back in the day. This is a powder-coated aluminum sleeve that holds the flagpole in place. Used two 3/8" x 2.5" bolts with fender washers, lock washers, and nuts to fasten it to the bottom of the cargo box. The weight of the flagpole rests on the surface - the sleeve keeps it rigid. Rock solid. Just need a light for 'Ol Glory during hours of darkness. May need a locking pin through the sleeve/flagpole assembly so it won't grow legs and walk away, HA! Mental Note: "Take down flagpole before driving away." Cheers to all!
 6 points
 -
We had the same issues with our black tank valve a few years ago. Poured Thetford drain valve lubricant in the black tank, but still continued to have the problems. Lubricated the push/pull cables and did not correct the valve bypass issue, but cable worked easier. Going from memory. Used valve lubricant on the valve during reassembly. Also used 1/4" drive set with long extension, and tape on my finger to hold one nut during reassembly. I cannot speak to the wires. It was a few years ago, but kept photos of the job. Black tank valve still working without issues. Believe I had to loosen the hose clamps and slid pipe back a little while removing & installing new valve.6 points
-
We've had the Battery Box on our radar screen since we purchased Casablanca back in March from its PO in TX. One of the Hull #226 selling points for us was that the PO had recently replaced the AGMs with 3 Battle Borns and added a Victron Smart Shunt. However, upon learning from the forum, the BB install by the PO was less than optimum - or at least to our understanding at the time. We were surprised that there wasn't a battery master "shut-off" switch. This fact was the main driver for this project - after looking into what we "really" had on our hands, the pervasive project "scope creep" showed its ugly head! Full Disclosure: Although we've had several RVs over the decades, never have we owned Lithiums. Thanks to these forums, learning about the nuances and particulars of LiFePOs, specifically, Battle Borns - and even more specifically, their application with the Oliver, has taken some time to digest. We didn't want to delve into the "fray" of "cleaning up" what was previously installed until our understanding of this particular system was at a high enough level not to screw something up. So, thanks to the forums, many of y'all's posts regarding the subject, and special thanks go out to @Geronimo John for his patience and guidance with what ended up being a fairly large scale re-design of Casablanca's DC distribution system. Initial Configuration and Issues: 1. A key indicator that there was an issue somewhere within the "DC system" was that the charge controller would never reach 14.4 volts; 13.6 was the max ever observed/measured. 2. The BBs were stacked in an unusual configuration on the battery tray. The rear two batts were aligned side-by-side facing left/right and the third "outer" BB was aligned 90 degrees off facing fore/aft. Several cables were too short not allowing full battery tray extension. Clearly not a neat/tidy or logical configuration. 3. The battery bank was not strapped down. 4. Although likely large enough for intended current, the three BB's parallel connections were made with 1/0 cables versus the 4/0 cables distributing the current into the trailer. 5. Several positive and negative connections were made directly to the battery bank without the use of any sort of terminal post or terminal bar even though the Smart Shunt was in place. These connections were bypassing the SS, not good - thus contributing to phantom current within the DC distribution system and not allowing the Victron App to capture all DC power activity. 6. One cable, a yellow 4 AWG, ran from a negative BB terminal to the wrong side of the Victron SS; this cable essentially paralleled the 4/0 cable from the same terminal to the shunt. This made absolutely no sense. 7. As stated above, no battery master switch. We've always had a master switch in previous campers - handy for longer term storage and eliminating phantom current. In case of fire, we wanted a "safety switch" located outside the camper and inside the battery box to quickly secure DC power after quickly exiting the rig. SUMMARY OF WORK PERFORMED: The closer we looked at the DC set-up the more questions and issues surfaced. There were other ancillary DC system "gripes" but the above list really paints the picture of what we were dealing with... After quite a bit of forum research, thought, and informative and lively discussions with Geronimo John; a clearer project plan developed. 1. We made an assumption that the PO didn't upgrade the "lead-acid" charge controller circuit board as part of the BB installation. This rationale would explain why we never observed more than 13.6 volts on shore power with the controller energized. Sure enough, after pulling the board, it was clear that the board was doing exactly what it was intended to do - charge lead-acid batteries; as it didn't have the Lithium micro-switch option. So, we ordered a replacement 45-Amp board from Amazon with the Lithium option - enter "project scope creep." Above pic shows replacing the LA charge controller with a Li-capable board. The lead-acid board is 100% functional and will be posted for sale on the forums. The new Li-board cranked right up and the BBs finally received the charge intended for a Lithium battery bank: 2. Disconnected and removed the 1/0 cables connecting the 3 BBs, labeled and stacked them sequentially from back to front. Sized cables to allow full extension of the battery tray and added nylon tie-down straps from Rangley. Cut, crimped, heat shrunk, and installed new 4/0 color-coded cables in parallel configuration: Made a terminal buss-bar from 3/16" x 1" solid copper for the Blue Sea Systems master switch (Amazon) which will be heat shrinked once it arrives. Contoured a poly board from an old cutting board to mount the switch, like many owners have done. Mounted a positive (+) terminal bar with the master switch to accommodate DC connections. In the new configuration, only 4/0 cables are connected to battery terminals - removed the various "added-on" connections and placed them appropriately between the (+) terminal bar and the Victron SS. Now, all DC (-) connections are made through the shunt so all DC power measurements are captured with the Victron Application. Peace of mind - priceless. While we were at it, we added an SAE solar input port for the 200W Renogy suitcase solar modules - more scope creep... HA! Not being an EE, I'm sure there's something left out, but in the end, we've got a clean set-up in the battery compartment, fully functional Victron SS, and the appropriate charge controller to manage the BBs. Time for a cold one. Cheers! A & D
4 points
-
I have installed this 4 four pin accessory connector in-line and just before the 7pin socket. I don't have a part number but I bought it at a local trailer supply. It is unplug, plug and play. This modification gives you a additional flat 4 pin connector on a pigtail which can be used when the 7pin socket is occupied (since the use of the 7pin often blocks the access to the integrated 4pin socket). As I recall it was less than $30
4 points
-
Ride&Fly - Yes, your post is one of those that I read before diving into this. It appears as though OTT has maybe changed things a bit in that compartment since 2015. However the task remains the same. And I agree about extensions. I do have the nut drivers for the pipe clamps.4 points
-
Yes please. OTT will be doing the work since they know a lot more than me about wiring. I am in the information gathering stage to hopefully get the best solution. John3 points
-
I just did a db reading from my Freshjet and it was 62 average right under the unit running it on solar. I alsi did a video for reference. IMG_2501.mov3 points
-
Sept 2020 I paid $125 + S&H for the Furrion replacement shipped from Oliver. It was the first thing I replaced (having damaged the original) on our trailer. As I remember I did not have much length on the wires coming from inside. At the time, Jason said "We use two different power inlets on the camper depending on what options you get but I am attaching links to both for you." As to what those differences are, I do not know, so I bought the same as that which came on the trailer, although Jason said they had also used the Marinco 303SSEL-B 30A Power Inlet, which if you search, appears to be less expensive, and is also S/S. As others have mentioned, call OTT Service. B~Out3 points
-
I found a major issue with my power inlet (lose lug that caused some surrounding plastic to melt) as we were preparing to depart on a long trip. A direct replacement (stainless steel) would have taken days to arrive. I chose to go to a local RV shop just minutes away for a replacement I could install and still be on our way. It wasn’t a question of cost. At some point I will replace the plastic with the original stainless steel cover. Mike3 points
-
Nice job, way to go. Casablanca will be need that job done soon as well - thanks for the posting! Very helpful.3 points
-
EDIT 10/14/23. I returned the trailer due to multiple issues, a new thread with pics, commentary and videos is here: https://forum.expeditionportal.com/threads/apogee-adapt-x-folding-utility-trailer-cool-design-big-fail-in-the-execution.241264/ I won't be adding any more content here, but I will be happy to discuss. JD _______________________ New aluminum folding trailer. The sides are reflecting the dark ground, they are shiny silver. https://apogeetrailers.com/folding-aluminum-trailers/ https://www.etrailer.com/tv-review-apogee-adapt-x-300-folding-utility-trailer-at44fr.aspx I found it for $2000 off MSRP, paid $3388 out the door (no sales tax in OR, I have to pay that when I register it in WA. I love the design and the build quality and the attention to details, but holy cow, it is sure noisy on lumpy pavement. It sounds as if it is going to explode, even with 450 pounds of ballast. I use a hitch quieter on the ball mount, I tightened the coupler nut and put nylon ties onto every little rattly part like the pivot pins. They do not mention this in the fancy marketing material. This is a really rare trailer in the USA, I think they are not selling a lot, eTrailer.com USED to carry them, but no longer does. Mine is a 2022, I have not seen any 2023 models listed except in the Home Country, Canada. I guess more Canadians need the folding feature for winter storage, plus they are a little cheaper there too. I have not read any user reviews except for a couple of “Gee I really like this.” And “Gee this is really cool, my ATV fits fine!” This thread will change that. I will post lots of pics and info as I learn more. Fixed their home page: I do not intend to carry a 2000 pound ATV all the time, this is for box store and landscaping trips. I do not want this to turn into another bottomless pit of mods, like “Mouse”, but was considering adding this. It uses the existing axle and hubs, unlike their Independent suspension version. Timbren Silent Ride 3500 lbs I am concerned that the rubber dampers may be too stiff, the trailer has a max payload of 2300 pounds but normally will be less than 1000. If the dampers from the smaller 2000 pound kit can be swapped in easily, that would be a possible solution. Does anyone have direct experience with this Silent Ride system? I just got home yesterday afternoon, 700 mile round trip to the dealer in two days, and I am a bit wiped. I could do that a lot easier when I was 30… I need to do some crawling around and measuring. John Davies Spokane WA
2 points
-
@SeaDawg I am glad the video was helpful. My info is below and I will add that to my signature. I was just running it to share the sound level with someone else who asked. But I did run the AC for a couple hours when I was traveling last month and it dropped the battery about 20%. I have the lithium pro package which is 630 amp hours and 340 watt panels with a 3000 w inverter.2 points
-
Nice and quiet! You could actually hear your voice very well over the db's of the unit - impressive! Thanks for sharing this video...2 points
-
@Mountainman198, that is great! I need to do some research to find one for my F350. Edit: I just spoke to eTrailer, and it looks like this may be a simple option. https://www.etrailer.com/partlist.aspx?pc=HM409202 points
-
We talked to the guys at the rally and checked on their schedule. Deb and I are going to the Eggs 'n Smores rally in Florida in January, then on to my brother's place in New Smyrna Beach for a bit. We plan to stop in Murfreesboro for a complete detail on our way home.2 points
-
For the wires, take a look at this thread: https://olivertraveltrailers.com/forums/topic/5271-how-to-junction-box-for-the-7-wire-trailer-harness-under-the-front-dinette-seat/ John Davies Spokane WA
2 points
-
I did the same job a few years ago, I think I posted some pictures. I don’t have anything to add to rideandfly’s description. It’s not difficult, just time consuming and a bit hard on the back from the kneeling and reaching down to the area needing attention! Mike2 points
-
Thanks everyone for the input and advice. Back at a camp site with some wifi. I appreciate everyones input in terms of checking with the service department, believing it is the correct part, noting the cost is high, going with another less costly/flashy furrion option, and where to purchase. I will definitely tackle upon my return. I was just worried it would be a bigger project than it appears given out double hulls and spacing. Thanks, Walter2 points
-
I always have APRS running and monitor 146.52 with my FTM400 and can usually score some HF contacts using my FT 857D and an ATAS 120A screwdriver antenna. Sometime last year,ARRL put out a call for field day operation pictures. I obliged the request and totally forgot about the photograph, until I learned it would be the cover shot Serendipity happens2 points
-
I'm liking the saddle clamps! Nice and clean mod, guys... great idea! Cheers!2 points
-
I wanted to let everybody know that Anita has had an accident inside her home. She fell while descending a flight of stairs to her basement and has sustained a hip fracture. She endured a 10 hour procedure to remove hardware placed during a (years ago) surgery after car accident before her hip could be repaired. She states she is currently in a lot of pain. I know she is facing months of rehab and recovery. She is hopeful she will be well enough and her doctors will allow her to come to Guntersville in May. Please keep Anita in your thoughts and prayers as she works her way through this difficult time.1 point
-
Hello all you HAM operators. I am curious who’s LE1 is on the front cover of the June issue of QST magazine? Steve R.1 point
-
John, rather than splice into trailer wiring, the previous owner of our trailer ran a second circuit from the tow vehicle to the back of the Oliver. It’s for the storage box on the back, and there is a quick disconnect for the box. Wiring is under the hull. There is a down side to this approach, both he and I had to cut an opening into the door of the TV 4 pin to connect the new flat four circuit. I’m probably going to build a new jumper that comes off the TV 7 pin, and splits to a 7 and 4 so I can better weather protect the TV connection. If you would like, I can take photos for you.1 point
-
😁 That might help, but I think that acquiring Scotopic vision through the development of a human tapetum lucidum would probably be of greater benefit. 😁1 point
-
Xray vision!1 point
-
Only if you don't want it to freeze and possibly burst.1 point
-
We do the same!1 point
-
IMO....at night I like turning on the cabinet lights with the frosted doors. It is nice gentle light at night inside the trailer...vs the other more direct lights.1 point
-
Thank you Steve! 😊1 point
-
FYI - G-15 is only one site back from those sites with an unrestricted view of the lake. So, if you want a site down near the lake .... Bill1 point
-
I just spoke with Anita. She was surrounded by family visiting her at home. She is currently at home and walks with a walker after her hip replacement surgery. She is feeling better every day. Scott Oliver and others visited her in the hospital to give their encouragements and she is hoping to return to OTT next month to continue helping folks finding their forever trailer. She says the flowers from friends had totally overtaken her room at hospital and rehab and they were a delight. She says HELLO to all.1 point
-
Kathy and I called and spoke with Anita last Monday and she is now at home and still recovering. She is busy with PT and is very grateful for everyone’s thoughts and prayers of support. We text with her regularly and check on her. We let her know that everyone is thinking of her and still lifting her up in their prayers. Patriot🇺🇸1 point
-
Oh no! Anita has always been kind and helpful when we have spoken. I'll be praying for a full recovery for her. I will send Anita a note of encouragement to the office at Oliver. Certainly they would deliver them to her, wouldn't they? Address from this website: 228 Industrial Ave. Hohenwald, TN 384621 point
-
Well darn. She was our sales person. We wish her the best and hope for a quick as possible and complete recovery.1 point
-
Our thoughts and prayers go out to Anita and family.1 point
-
Steve, terrible news! I hope they can get her back to where she was. We will certainly keep her in our prayers. I hope we see her at the rally. Mike1 point
-
The settings inside the inverter are dependent on the type of batteries, number of batteries, incoming AC power, and how it is used. Below is a link to the Xantrex Inverter Settings article for best setup. You may find that some settings require a change as not everyone uses their camper in the same way but we have reviewed these settings and set them based on majority rule and least amount of callbacks for issues. You may have to change some of the settings based on your current location, current shore power connection, or if you make a change to your battery bank. https://support.olivertraveltrailers.com/portal/en/kb/articles/xantrex-inverter-settings If you need assistance changing your settings please contact the Oliver service department. If you are able to download the Xantrex App and Bluetooth connect to the inverter remote it is much easier to change the settings. How to connect via Bluetooth is included in the article link above.1 point
-
Hi Everyone, You may have noticed some members with a different name markup (Bolded) and user group Member+? This is a new user group created that helps identify members that are highly active on the forums. These members have over 200 posts and have become fairly well known around the forums to everyone and staff. There is no real benefit, no extra permissions, but it is fancier and an incentive to be active in the Oliver Owner's community. If you have over 200 posts and have not been automatically promoted to this user group, then you need to logout and then log back in so the automated system can upgrade the account. If you have any other trouble or questions please feel free to private message me. In the future there may be more user groups to be automatically promoted to as the forums grow. This is a common practice to adapt to a growing community. Thanks y'all and have a good day!1 point
-
Please visit Progressive Dynamics website for the most up-to-date warranty information. The below information has been provided for informational convenience but may not be updated as quickly as the Manufacturer's website. You can visit the website at: https://www.progressivedyn.com/sales/warranty-information/distributor-warranty-on-power-converters/ *Below information was pulled from above website on 8/8/18 Summary of Power Converter Warranty Program for RV/Marine Distributors Progressive Dynamics provides a 2-year “Limited Warranty” for all Inteli-Power Converters sold to distributors. This “Limited Warranty begins on the customer’s date of purchase. The following summary of our warranty program was developed in cooperation with our Distributors and OEM customers. It is designed to meet the needs of the Boat / RV Owner, the Distributor, the OEM Manufacturers and Progressive Dynamics. FIELD FAILURES: 1. We ask that your retail customers contact the PDI Service Department Directly at 269-781-4241 for replacement of defective converters. Customers must have the following information available before contacting PDI. A. Model Number B. Serial Number C. Receipt showing Date of Purchase D. Visa or Master Card number 2. If our service personnel determine that the converter is defective and under warranty, Progressive Dynamics, at it’s discretion will then ship a NEW converter or a Factory Serviced and Warranted replacement converter to the customer via UPS Ground. The cost of the replacement converter will be determined based on the model number. The customer’s credit card number will be recorded however, this charge will not be processed for 30-days. The customer must then return the defective converter to PDI within 30-days or their credit card will be charged for the agreed upon cost of the replacement unit. If the customer requires faster shipment, the additional freight will be calculated depending upon Zip Code and charged to his/her credit card. 3. Once the customer receives the replacement converter, the defective converter should be returned to Progressive Dynamics in the same shipping carton to reduce the possibility of shipping damage. Power converters that fail in the field are to be returned to the PDI Service Department at the following address. Progressive Dynamics Service Department 507 Industrial Road Marshall, Michigan 49068 Telephone 269-781-4241 Fax 269-781-8729 DISTRIBUTOR WARRANTY PROCEDURES 1. We understand that in some instances the distributor must replace a defective converter from his stock. We ask that the distributor service department first test the converter (CLICK ON TROUBLESHOOTING POWER CONVERTERS) before replacing the charger. 2. If these tests indicate the converter failed, the distributor is to replace the failed unit with a NEW converter from stock. The distributor must then contact PDI Service Department (269-781-4241) and obtain an RGA Number to return the defective converter to the PDI Service Department. NOTE: The following data must be included with the defective converter. A. The RGA Number B. A copy of the customer’s receipt showing date of purchase 3. When the defective converter is received at PDI, it will be tested to confirm that the warranty claim is valid. Progressive Dynamics will then issue full credit to the distributor. This credit memo will reference the RGA number assigned. NOTE: The distributor or customer is responsible for shipping costs to return the converter that failed to Progressive Dynamics Service Department within 30 days. Progressive Dynamics is not responsible for Dealer labor or trouble shooting charges! PD4045-TROUBLESHOOTING.pdf1 point
-
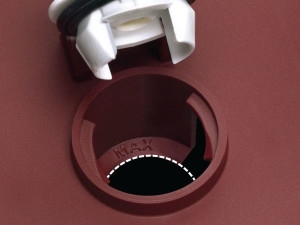
*Please visit Trojan's Battery Maintenance Page for more details at: http://www.trojanbattery.com/tech-support/battery-maintenance/ Watering FLOODED BATTERIES ONLY Flooded batteries need water. More importantly, watering must be done at the right time and in the right amount or the battery’s performance and longevity suffers. Water should always be added after fully charging the battery. Prior to charging, there should be enough water to cover the plates. If the battery has been discharged (partially or fully), the water level should also be above the plates. Keeping the water at the correct level after a full charge will prevent having to worry about the water level at a different state of charge. Depending on the local climate, charging methods, application, etc., Trojan recommends that batteries be checked once a month until you get a feel for how often your batteries are need watering. Important Things to Remember Do not let the plates get exposed to air. This will damage (corrode) the plates. Do not fill the water level in the filling well to the cap. This most likely will cause the battery to overflow acid, consequently losing capacity and causing a corrosive mess. Do not use water with a high mineral content. Use distilled or deionized water only. CAUTION: The electrolyte is a solution of acid and water so skin contact should be avoided. Step-By-Step Watering Procedure Open the vent caps and look inside the fill wells. Check electrolyte level; the minimum level is at the top of the plates. If necessary add just enough water to cover the plates at this time. Put batteries on a complete charge before adding any additional water (refer to the Charging section). Once charging is completed, open the vent caps and look inside the fill wells. Add water until the electrolyte level is 1/8″ below the bottom of the fill well. A piece of rubber can be used safely as a dipstick to help determine this level. Clean, replace, and tighten all vent caps. WARNING: Never add acid to a battery. Watering Diagram Flooded batteries need water. But more importantly, watering must be done at the right time and in the right amount or the battery’s performance and longevity suffers. General Watering Instructions: Add water, never acid, to cells (distilled water recommended) DO NOT OVERWATER For fully charged standard deep-cycle batteries, add water to the level of 1/8 below bottom of vent well (see diagram A below) For fully charged Plus Series batteries, add water to the maximum water level indicator (see diagram B below) If the batteries are discharged, only add water if the plates are exposed. Add just enough water to cover the plates, then charge the batteries. Once fully charged, add water to the proper level indicated above After watering, secure vent caps on batteries Diagram A *Add water to 0.125″ below bottom of the vent well. Diagram B *Add water to the maximum water level indicator. Please visit Trojan's Battery Maintenance Page for more information at: http://www.trojanbattery.com/tech-support/battery-maintenance/
1 point
-
Issue: Daylight shows through night shade "appears as if material is cut". Models Impacted: Many of the white window "night" shades may have been affected between 6/13/17 - 12/01/17. Information: The new white window shades were impacted with a fabric issue regarding the night shade that appears as if the material or fabric is slit/cut but is actually an improper manufacturing of the night shade process to keep daylight from showing through the fabric. Anyone who experiences small specks of daylight showing through the nightshade will need to contact Automotion for information on warranty replacement. Shade Measurement: Elite I: 18.5' Camper Dinette Shade: 49.75" x 20" Side Bed Shades: 31.75" x 20" Rear Shade: 38" x 21.75" Elite II: 23.5' Camper Side Window Shades: 49.75" x 20" Rear Shade: 38" x 21.75" Resolution Contact Information: Auto-Motion Shade Inc. Ewa Zajch Tel. (905) 470-6198 (Ext. 0022) Ewa Zajch <ewaz@automotionshade.com> *Please be sure to include size and quantity of each shade needed.1 point
-
For the convenience of customers and prospective customers alike, we have created a Measurement Index for the Legacy Elite II travel trailer. You may find it on our Oliver University page http://olivertraveltrailers.com/oliver-university/. This will help if you have any questions on measurements throughout the interior and exterior of the travel trailer. Coming soon: Legacy Elite I Measurement Index. Thank you1 point
-
Issue: Galley drawers sliding out during transit Potential Models Impacted: 2016-2017 Information: The current blum slides being used were implemented during the 2016 model year. We have since seen three issues where a kitchen galley drawer has come loose during transit. The blum stays attached to the drawer slide and pulls loose from the drawer itself. Resolution: Process change in the way the drawer is built as well as longer screws being used to ensure this issue does not continue. What Should you do: At this time we have only seen or been made aware of three instances where this has happened. We have the same slides and design in about 127 units. If the issue occurs, please contact our service department at 866-205-2621 so we can assist with the resolution.1 point
-
Knowledge Base Article for Zamp Solar ZS-30A Charge Controller The Zamp Solar 30 Amp 5 Stage Digital Deluxe Solar Charge Controller # ZS-30A has PWM or Pulse Width Modulation, which is a digital signal that is used to control power applications and has 5 stages of charging for best battery health and longevity. This controller can support and is programmable for the 4 typical types of deep cycle batteries – WET, GEL, AGM and Calcium. We pre-set the controller at the factory according to what batteries are installed. 12 volt solar charging power. LCD screen displays battery voltage, charging current, charging capacity, battery types and faulty codes. LED light indicators show charging status and battery condition. 5 stages of charging: Level 1 – Soft Charge – When batteries suffer an over-discharge, the controller will softly ramp the battery voltage up to 10V. Level 2 – Bulk Charge – Maximum current until batteries rise to Absorption Level. Level 3 – Absorption Charge – Constant voltage charging (battery is over 85%). This stage takes longer than any other stage to complete. You will typically see your battery status remain in this stage unless you are not using the camper. The full battery indicator is about the last 2% and while running lights and other components it will remain in the absorption stage. *Battery volts displayed during this stage are charging volts not actual battery volts. Level 4 – Equalization Charge – Only for WET battery or Calcium battery type. When the battery is deeply drained below 10V, it will automatically run this stage to bring the internal cells to equal states and fully complement the loss of capacity. (Gel and AGM batteries do not run Equalization Charge). Level 5 – Float Charge – Battery is fully charged and maintained at a safe level. Fully charge is more than 13.6V. Includes a port for an optional external battery temperature sensor. Zamp Charge Controller & Digital Monitoring System (Battery Volts) Both systems will display charging volts rather than actual battery volts when power is being supplied to the batteries. Customer interaction The charge controller has 2 buttons. One button labeled Amp/Volts can be used to scroll through relevant information Amp/Volt Button Current battery volts or charging volts Current Amps being supplied to the battery (Initial startup will be lower amps and slowly increase to maximum output depending on sunlight available. Current total of Amp Hours supplied within the 24 hour timeframe. This setting will reset with every 24 hour period. Current Battery Temperature. (Displayed in Celsius). This is used by the charge controller to monitor the battery. Battery Type Button This is pre-set at the factory based on the type of batteries installed and should only be changed if you replace your batteries with a different battery type. Zamp Error Codes: P01 - Solar Panel Reverse Connection P02 - Solar Panel Over Voltage 601 - Battery Disconnected or less than 3.0 Volts 602 - Battery Reverse Connection 603 - Battery Over Voltage (> 17.5 Volts) 604 - Battery Temperature over 65C1 point
-
Issue: A/C Fan runs when mode set to furnace Models Impacted: Dometic Penguin II equipped Information: The on-board thermostat communicates with the Dometic Penguin II A/C unit and the A/C unit then communicates with the Furnace. When the mode is set to Furnace the A/C fan should not run if set to AUTO. If the fan speed is set to LOW or HIGH, this will cause the A/C unit fan to run with the Furnace as a means to distribute the inside air flow. If you are experiencing this issue, please ensure that the fan speed on the A/C is set to AUTO. Resolution: Normal Operation *If the A/C fan runs when set to Auto and mode is set to Furnace, then another issue exists and the Dometic A/C unit should be inspected by a Dometic certified technician.1 point
-
This is probably three problems in one. First, though I always choose "keep me signed in" when I log in, that only seems to work for a while until the site decides that I'm not logged in anymore. Secondly, when I do log in and then navigate back to where I was going to post, that page will still show me as not logged in. But then I'll navigate somewhere else and it shows me logged in again. This happens both on my mac and on my iPad. I suspect that it's a cache problem since the pattern seems to be that it's only pages that I've recently visited that show me not logged in after having done so. Probably on the server side, since disabling caches in safari doesn't help. The only solution I've found is to wait a while, sometimes an hour, for the forum to sort of catch up and show me logged in everywhere. Probably related to that is a third problem I've had with caches, which is that the 'recent topics' seems to only update sporadically and even when up to date with the latest posts will still show incorrect times for those posts. In fact, the main forum page will also show incorrect times for "last posted". Again, disabling caches locally doesn't seem to help. Hope that makes sense. I'm curious if anyone else has this problem.1 point
-
It has been working brilliantly for me, the best it ever has! This is with an iMac and iPad, both running Safari. I am seeing a consistent five or six second lag between posting and seeing the entire new page. No complaints about that. John Davies Spokane WA1 point
-
Geneva and I ordered our Oliver with the twin bed option in the rear, so as to have more storage and food preparation area, and so that one of us would not have to climb over the other in order to go to the facilities in the front of the trailer during the night. Unfortunately, Geneva is a restless sleeper and moves around a lot during the night while she sleeps. The rear bed area is too narrow for her to get a good night's sleep and she is reluctant to go camping in the Oliver, especially for longer periods of time, which is something we plan on doing for at least 2-3 months at a time at least once a year. I use the street side narrow (24 inches wide) bed area but it does not bother me too much. I can get a decent night's sleep. What to do? We like the Oliver but if Geneva is unable to get a good night's sleep that's a serious problem for us. I got to looking at the rear area of the trailer and I noticed an opportunity. On both sides of the aisle, from the stripper pole back to the front edge of the rear bed there are small notches at the top of the fiberglass aisle sides that were put there to hold the big rear fiberglass dining table on the standard double bed Oliver. So, I constructed a platform out of 1/2 inch balitc birch plywood, gluing two pieces together to make it 1 inch thick (for strength), cut and formed it so it would fit in the notches at the top of the fiberglass aisle sides, forming a platform (about 29 1/2 inches wide and 24 1/2 inches deep) where I could put a new cushion, which I will have to have custom made, about the same width and depth as the plywood platform, making a bed area the same width as the standard double bed, except for the area where the curb side cabinet just to the right of the stove (only on the twin bed Oliver) sits. To do this, I had to remove the swing-up table attached to the street side cabinet and store it (easy & quick to do). This leaves the storage area in that cabinet far more convenient to access, since we no longer have the swing-up table in the way. Getting down on your hands and knees to access this cabinet was no fun...that problem will also be solved! We will have a new cushion made that fits snugly over the plywood platform that will be about 3/4 inch thicker than the other standard cushions, so this expanded area of the bed will be the same height as the rest of the rear bed cushions, on top of which we will place a three inch memory foam mattress pad to match the rest of the bed area. This will give Geneva a rear bed area that is the same width as the standard rear double bed, except at the foot area of the bed, allowing her plenty of room to toss and turn during the night. During the day, we will remove the plywood platform, the cushion and foam mattress on top of it, and store them in the back of our truck, restoring our longer center aisle, and allowing very convenient access to both the street-side cabinet storage area and the big drawer at the end of the aisle near the floor of the trailer. This also will give us a large place (under the plywood platform at the rear of our aisle) to put our clothes and the footwear we took off before we got ready for bed, and it's easy to access them when we get up the next morning, and they will not in be our way when we get up in the middle of the night. Now, If only I could modify my bed area to make it wider and more comfortable. Oh well, you can't have everything you want. If this doesn't work, we will have to get rid of our Oliver, but I think it will work. I'll let you know how it works for us after we test it out in a few weeks at the FGRV rally in Johnson City, TX in February. I suppose no one else is experiencing the same problem Geneva is having, but that doesn't give her much consolation.1 point
-
Of course one of the down sides to this modification is that we have to do without our swing-up rear table. We considered that carefully, noting that the table, while useful, does not sit level when it's up. It slopes downward from where it is hinged and drinks and other things can easily slide off and spill if you are not careful. I don't think we will miss the table too much. We'll see.1 point
-
Chuck said: These trailer have more little ideas built into them. > You know, buddy, that is more than good engineering, it is the product of years of hands on use and common sence. It is the kind of thing that endears a particular coach to the users. > By the way, I see that Lane and the Poodle girls have made their way pretty well out there into the desert SouthWest, posting on CasitaClub, had any contact with them, or are they still aways off yet ?1 point


-
Recent Achievements
-


")


")


")


