Leaderboard


Popular Content
Showing content with the highest reputation on 10/12/2023 in all areas
-
There are "scupper" holes in the very bottom of your Oliver which should allow "most" of this water to drain out. However, if I were you I'd make sure to prop open the "hatches" under your beds and dinette area in order to allow for more air flow therefore drying this area out even faster. Bill6 points
-
At first I thought that I'd eventually remember to turn that case right side up before opening it but, then, I simply put a strap on it. The "fun" of putting all those Pittsburgh sockets back in the individual places where they belonged soon lost its appeal!🤪4 points
-
The "basement" is comprised of the area between the inner and outer hulls at the bottom of the trailer. Although there are scupper holes for drainage, there are also lots of places where water could pool, in between and under plumbing lines, duct runs, etc. If you can, I would also place fans in the open hatches for several hours to accelerate evaporation.3 points
-
I can add a bit to Coastal Aggie's post regarding campers "just staying overnight in the many pullouts". Much of the country you will go through on the way to Alaska (and in that great state) is wild and remote. There are many places where you can random camp on public land and not be breaking any regulations. On the other hand, when you are inside a state, provincial, territorial, or national park, you will most likely be required to stay in a designated campground. For example, the route from Banff to Jasper in Alberta, that has been mentioned in this thread, is entirely inside the two national parks. Random camping at roadside pullouts and picnic areas inside the parks is against the regulations. The good news is that Parks Canada operates some great campgrounds along that stretch.3 points
-
I have that set, too, bought to service my Oliver, with both SAE and metric sockets. I thought it was branded like that b/c I live in Pittsburgh!! Guess not! It’s been helpful, but be careful to leave it handle side up. If left on its side or upside down, all the lower sockets will fall out upon opening!! Geoff3 points
-
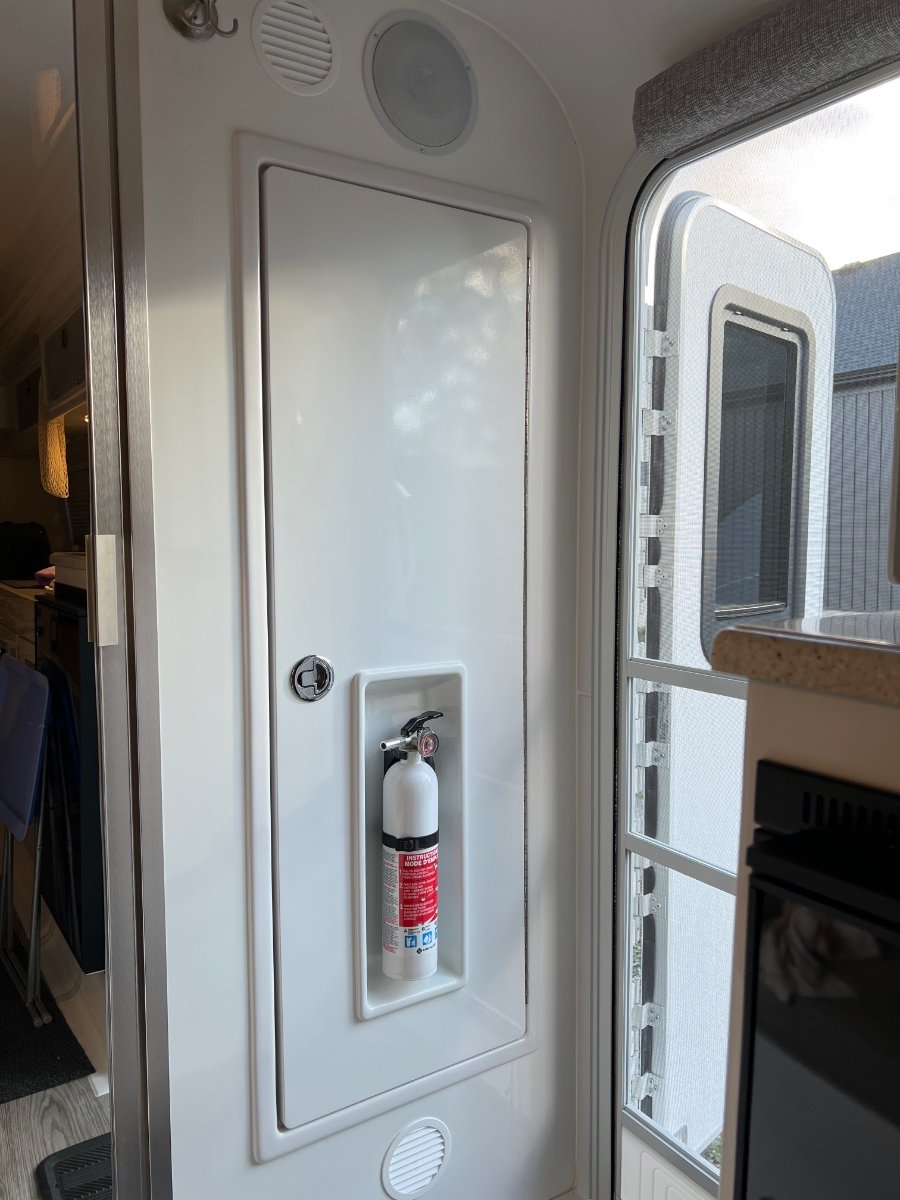
The picture I posted is from under the aft dinette seat between the hulls - there is nothing at all to see from the seating area under the dinette. In the picture I posted - the "white" area that is behind the aluminum switch holder is actually looking through the hole of the propane/co alarm from the inside to the outside area under the dinette. Sorry but I don't have any other pics of the "full" installation which would show the actual switch. However, the switch is simply mounted in that hole you can see in the aluminum mount. Hope this helps. Bill p.s. here is a better pic taken from JD's post on the subject:3 points
-
I get it, happens often in the house when the smoke detector batteries are low. I always know when I’m in trouble when called out by my birth name, followed by “you can’t hear that?”. Okay, it’s just a high pitched chirp, but the hearing ain’t what it used to be! Thanks for the p.s.; regardless of how annoying the situation, the threat assessment is paramount to one’s safety and well-being.2 points
-
4 x 6 volt Bright Way Group 220ah AGMs for 440 ah capacity.2 points
-
I do remember a Service Bulletin on this subject - perhaps your stove was one of the ones in question. Be careful until you get it fixed! Bill2 points
-
Drain it and sanitize it. Bill p.s. glad the "switch thing" worked for you! Unfortunately, I don't have an explanation as to why "flicking" that valve switch has anything to do with the Truma. One could argue that if it now works then all is good, but, I'd like to know why it now works. Sometimes those "simple" switches will have an "issue" with contacts or the little motor that they activate will get confused and just needs to be "reset" and/or the contacts get "cleaned" by the flicking. But, as far as I know, that switch has absolutely nothing to do with anything concerning the Truma.1 point
-
Our 2023 came with these vents, shows you Oliver listen to their customers! 😊
 1 point
 -
Unfortunately Overland doesn't interact here on the Forum much (if any). Hopefully he will reply to you. If not - simply left click on his avatar and then left click on "See Their Activity". I started at page #1 and went through page #20. Bill1 point
-
Try "flicking" that valve drain switch a couple of times to see if that gets it going. If that doesn't work then open up the dinette seat hatch that is nearest the bathroom. When you look down into that hatch area you should see two black pipes running from the general direction of the bathroom towards the rear of the Oliver. The smaller of those two pipes is your grey tank. Next in looking at that smaller pipe find the valve. It should look something like the pic below except that there will not be a "handle" on the top. But, it will have a cable on top. Reach down and pull up on the piece where the cable is attached. That should move the "blade" that opens and closes the valve. Sorry but I can't help you on the Truma since I do not have one. Bill1 point
-
I happened to have this in my watched topics for when I do the separate shower valve.1 point
-
You might want to send him a PM. He hasn’t been on the forum in quite a while. Mike1 point
-
Interesting question - As we all know - our hulls are made in a fashion similar to a boat. As such, there are limited places that something like water can run from the inner bottom shell down into the outer bottom shell. However, there certainly are places where this can happen as can be seen in the pics below. But, certainly a hole in the shell can be easily seen in the one picture and it just so happens this hole is located under the fridge where I assume the propane and electric lines are run. Note that this picture is looking from the outside into the area under the kitchen sink. Water can also get between the shells in places like where the entrance door is located. I've also included a picture of the bottom outside shell in order to see all those places where water just might collect. For those unfamiliar with "Scupper holes" on the Oliver, they can be seen by looking under any Oliver while looking for stainless steel cups or cones that open towards the rear of the Oliver. These pieces actually create a "venturi effect" while driving down the road which draws air out from between the inner and outer shells thus helping dry any moisture that may be in between the shells. Bill
1 point
-
Wait for the upcoming larger EcoFlow River 2 Max, I have the 600 and it is stellar but a little too small in capacity. A larger one of around 1000 or 1200 watts is expected. I will buy one and gift my 600 to a relative. They are blowing out their older models with regular fire bomb lithium batteries and soon I expect to see all of their products to have LiFePO4 battery technology like the Olivers have. Sign up for emails and they have excellent special member deals. https://us.ecoflow.com/ https://thetechnologyman.com/ecoflow-river-2-max-review-best-500w-portable-power-station/ John Davies Spokane WA1 point
-
Yes, there is a fuse on the wire(s) leading away from where the wires come out of the back of the propane detector. The purpose of the switch is that it is a bunch easier to find this switch at "zero dark thirty" than it is to find that fuse and dismantle it when you are still half asleep, the alarm is going off and your significant other is yelling. Bill p.s. It should go without saying that in the event anyone decides to deactivate this alarm via either a switch or via the removal of the fuse, they should first determine that there is no actual leak. And, either the fuse should be replaced in its original position and/or the switch turned back to the "on" position as soon as possible. Failure to do this could be extremely detrimental to your health.1 point
-
1 point
-
Yes, they do.1 point
-
FYI, it might give you some ideas: https://olivertraveltrailers.com/forums/topic/5478-how-to-remote-mount-the-controller-of-a-suitcase-solar-panel-not-inside-the-trailer/ John Davies Spokane WA1 point
-
I don't know, Bill. I've not decided on the panels yet. Originally I was trying to take advantage of Amazon's price breaks today but have decided to not make any rash decisions, as I want to make the best possible decision with this. My OMMO solar battery will not complete its charge as I think it has its own controller internally and when charging it I've been using Renogy's controller also and I think that's what's preventing a full charge.....but then again, I really don't have a clue. I think 2 controllers are creating the problem with completing the charge.1 point
-
Good question - My leak (as I mentioned) was under the dinette seat nearest the bath. There is a small section of "rubber" that connects to two sections of black sewer pipe under that seat. This rubber section is held in place with a standard stainless steel hose clamps similar to THIS. Apparently the screw tightening device on the clamp gave up the ghost thus causing the clamp to loosen/fail. Since I was on the road at the time (near West Yellowstone, MT) the first thing I did after determining the location of the leak was to simply try to tighten the clamp. Unfortunately, that did work in that turning the screw on the clamp did nothing at all. The good news is that the ACE Hardware store in West Yellowstone had a clamp that was very simple to install. Bill1 point
-
Does the solar controller on the 200 watt panels allow for different batteries? Mine does not - therefore I can not change anything on my solar controller. If yours does allow changes then I'd set it to whatever you have in your Ollie. The Jackery has a lithium battery which (as I understand it) can be charged at AGM setting but the lithium will simply either not fully charge and/or it will not be charging at the optimum rate(s). Bill1 point
-
The zamp connector, as installed by Oliver, requires input from a separate controller. It's set up for "suitcase solar", ie, panel(s) with their own separate controller. The zamp connector connects directly to the battery bank, via an inline fuse to protect against over-voltage. If you want to upgrade your portable panels, you must provide a separate, appropriate controller between the panels and the batteries, in the standard configuration. So, yes, you can upgrade to 200 watts, add a controller that accommodates the new panels, and you'll be fine. What you CAN'T do is send unregulated power from panels without a controller to the port.1 point
-
have you tried searching the overall forum on this matter? i searched for insurance roadside assistance and the following popped up look at the "didnt find what you are looking for" and maybe change selection to search to insert AND or OR. there are other member who have had this question, so the answers may be out there.
1 point
-
Hope you have a great trip. Some pearls that were found on our forum that we gathered and mostly followed: Get mud flaps for the front and rear tires, and another set at the rear of your TV. Protect the front flanks of your trailer as presented in several posts. Beware of wet puddles in the roads, They can be over a foot deep. Do not go north much past Fairbanks with your Ollie. Doing so can be extremely exprnsive in harm to your rig. GJ1 point
-
Thanks Patriot! Straight to Amazon, then to basket and soon to my door. Bill1 point
-
Thanks — I saw that bulletin, but I think OTT listed dates or something that would rule out my Oliver. I trust OTT’s Service Dept will figure it out. Meanwhile, my propane tanks have been off for weeks (whenever it was that I was testing with the combustible gas detector, in August). I don’t know if the continuing alarms are sensing propane (perhaps a leak in the lines? and that makes no sense to me, because the lines should be clear by now) or if the sensors are faulty. But the alarm clears when I open the windows and turn on the exhaust fan. And if I don’t use the fan, it often sounds again after the time programmed in the alarm. The upside of this experience is that I now have equipment that serves me without the propane — the heater and the induction cooktop and an additional tank that I use with my griddle outside.1 point
-
I got this for the hitch ball, gonna give it a try on the steps! Amazon purchase, per product info: “Say goodbye to white and black grease stains. This multi-use, non-melting, waterproof grease is fortified with PTFE, the ultimate in nonstick technology.” I’m also a fan of their Silicone Paste dielectric grease.
1 point
-
The world is awash with counterfeit batteries! Only buy from a reputable local seller like a big box store or Batteries Plus Bulbs. The fakes are so bad that half of them can fail right away. This may be contributing to the low performance of the remote. https://ul.org/news/what-makes-counterfeit-batteries-unsafe John Davies Spokane WA1 point
-
Try OdoBan, I use it to eliminate lingering fish odors in my skiff.1 point
-
Thanks for he heads up, need to check the date on our 2020 OLEll, 579!1 point
-
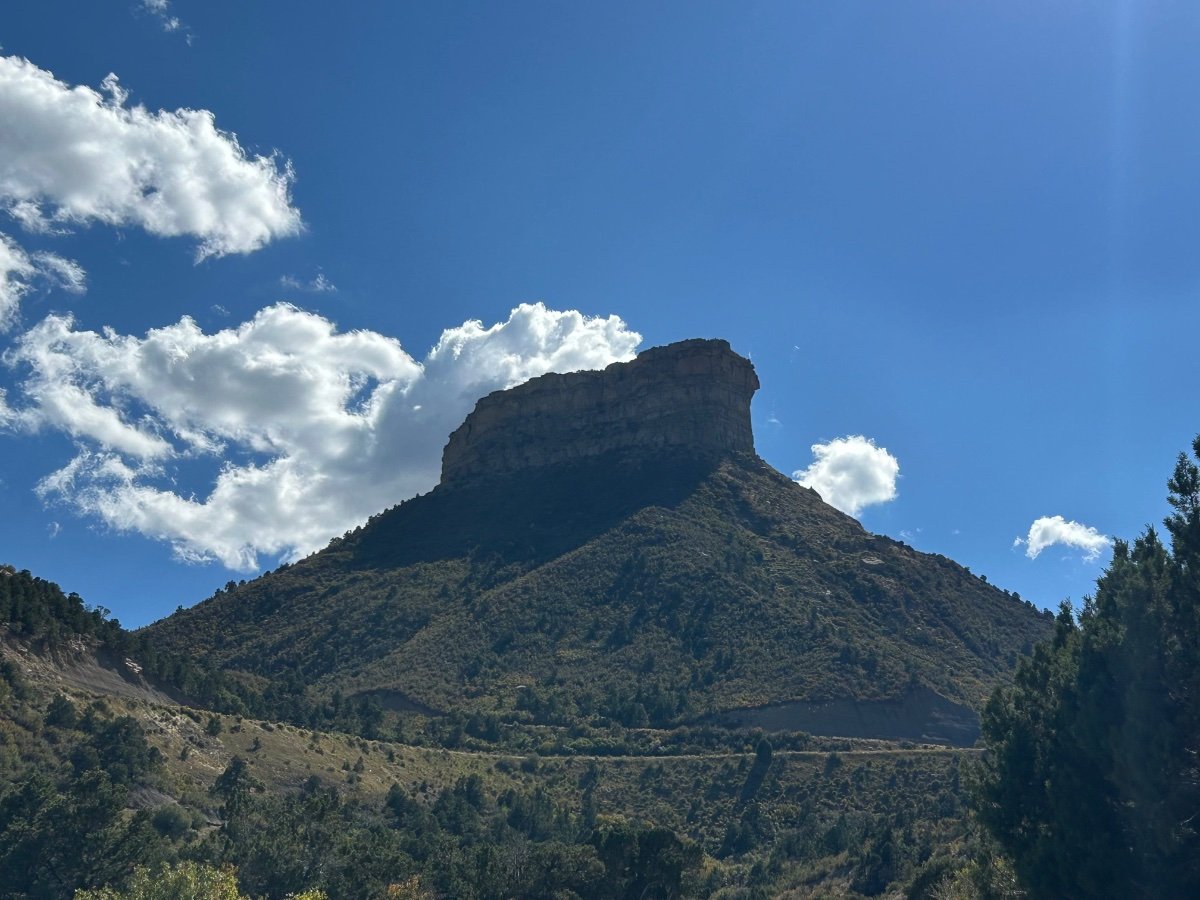
Yes, Mesa Verde was gorgeous. The cliff dwellings were amazing too! A few pics.
1 point
-
When the clamp that holds the black tank sewer line to the rubber connector piece under my dinette seat broke a couple of years ago I spent a fair amount of time even finding where "THAT" odor was coming from. Once found and the clamp replaced I had the same basic problem that you now face. After trying the usual Pine Sol scrubbing thing I resorted to waiting for a hot dry day, parked the Ollie in the sun and then I hosed out the area in question. Note here that I didn't go crazy with the hose or the pressure. Just a nice steady stream to make sure that everything in that area got thoroughly rinsed. Then more Pine Sol and repeat the spraying. Finally, about three days in the hot sun with all things opened up and fans blowing I was done. Good luck! Bill1 point
-
Enjoy yourselves! Great pics of the dunes! Did you get to Mesa?1 point
-
Today we toured the Great Sand Dunes NP which finishes out seeing all (4) NPs here in beautiful Colorado. A convergence of a whole lot going on with nature that created these massive dunes. The scenery almost looks fake it’s so beautiful. It was 69d and sunny which suited us perfectly. Onward to New Mexico tomorrow. Patriot🇺🇸 The truth. My bride!
1 point
-
That's exactly what we carry, too. Just used it yesterday, in fact.1 point
-
There's a couple on YouTube that just took their new Ollie to Alaska: https://youtube.com/@HardAleeAdventures?si=x3xpbvrJ5jftzF4J1 point
-
When I originally started down the molded fiberglass trail I didn't know Oliver existed (like most of us). So, I arranged to take a tour of a Casita. My initial "problem" was that I could not stand straight up in the shower. But, as we sat at her dinette I looked around and saw that the "oak" cabinets were actually particle board with an "oak" decal. The floor simply looked "cheap" and the fit and finish was not good - and this was a trailer that was only one year old. A week later - I found Oliver!😃 Bill1 point
-
On our way over to Cortez CO we detoured into the town of Telluride aka “ski meca” with our Ollie in tow and actually scored a spot to park right on Main Street. The Aspens are just popping in peak color in many areas. We enjoyed a great lunch in town and took the free gondola ride up the mountain. It was short sleeve weather and really a great day. We will do a little exploring in Mesa Verde NP today. Onward!🇺🇸 Telluride from the mountain side State route 145 is a really beautiful drive especially this time of year.
1 point
-
A tire pressure monitoring system was the first thing we bought to bring at delivery day. We have the TST and like the monitor on the dash. After you set the parameters, you don't have to watch it as it will alert you if the tire pressure or temperature goes outside of your settings. I think it's a must have item. John1 point
-
Reaching New Heights- Yesterday we drove through the Black Canyon of the Gunnison. We have had excellent weather and it was a beautiful day. We had the park pretty much to ourselves. We entered free with our senior pass. A must see for sure. Onward to Cortez CO today for more exploring. IMG_9898.mov
1 point
-
Rebuilt the front axle brakes and greased all contact points with silicone brake grease. Today I will remove the adjuster spring on the rear and apply grease there, since yes, the pressure wash cleaned it dry. Installed the new shocks (don't over-tighten the rubber bushing). Amazon used was good for 3 out of 4, one was blown, as you could compress it easily by hand and it would sit there and return very slowly. I submitted a return on that one and ordered another one at the new price of $34. Good practice with new shocks, out of the box, is to fully compress them, and allowing them to expand, 2-3 times. My Timken seals arrived from eTrailer yesterday, so I will finish up the left side and start the right. They certainly look of better quality, with made in USA printed on both sides. BTW, if you have the original CHINA bearings, and they have been maintained, just clean them well and repack them and you should be fine for some time. For my Oliver, with dubious maintenance history, thought it was the right time to install new bearings. I like to get my vehicles fully serviced, while I'm still able to do this kind of work. And we're not like some of you who put 10K miles on a year! For us, 3000 miles would be a big year (I like to be home!). Like to plan our RV trips, driving just 2-4 hours a day, boondocking between other stops. I do not plan to open these drums, grease the bearings again for a few years, after I get them right. I understand the suggested maintenance schedule, often written by legal departments and not experienced mechanics. Also, not driving through major rainstorms, as JD had mentioned, which is a rare case in the SW. We pull over and wait out such storms!
1 point
-
Yes, I believe that doubling up is unnecessary. However, there have been other members here on this Forum that take the other view. In the eight years that I've owned my Oliver, the on-board Oliver installed EMS system has never let me down. Having said this though I should note that most of the time I'm not at commercial RV parks Bill1 point
-
I've towed my LEII with two different 1/2 ton trucks both here in the East and through out the Rockies out West. Absolutely no problems . However, you will need the Andersen weight distribution hitch AND you will need to pay particular attention to your payload capacity. Bill p.s. picking up a new Ollie in October is fantastic! You've got the better part of two months to do some serious camping and then you have the winter to do your mods plus get all those things you've learned that you want for that new baby. Welcome to the family!1 point
-
Rivernerd, From my mad scientist experimentation, there are four things you can do to improve this situation. 1). The column of the leveling jack and, most especially, the metal flange the column is attached to, makes for a great cold radiator. some creative work with reflectix and silver tape would go a long way 2). unscrew the ext shower head, bring that line into the compartment and reattach the head. Pull the hot and cold knobs. Now there is enough room to add a block of closed cell foam under the little door to the ext shower compartment 3). cut two layers of reflectix material to cover the entire exterior access door. Cut to fit around the latch but wide enough so it gets pinched by the rubber door gasket to make a seal. Adjust the latch enough so it squeezes the reflectix to close gaps but not so much that the hinges to the door are straining when door is closed. 4). add a small return vent under that bed. Mabey do this last to see if required as it's the most invasive. I went entirely overboard there and replaced the most rearward heat vent on the curbside, snaked under the floor, pst the inverter and fed out to the isle across from the existing galley heat vent. Had to insulate the hose from existing electronics. It works great and certainly heats the battery compartment but bet if I had started with the points above, would not have been necessary. Hope this helps.1 point
-
As I'm guessing that Ken has found out by now - this is not a "hard" job as long as you have the right tools. Zerks (the things that you attach the grease gun hose to) can get plugged making it all but impossible to get any grease flowing. The grease gun can be difficult to attach and remove from those zerks. The entire job can be a bit messy given that you are dealing with grease and crawling around under the Ollie. But, the job doesn't really take that long to do and it creates a good number of points for your "man" card. Bill 👷♀️1 point
-
Things must have moved in recent years. In our 2023 EII, the detector is attached to the aft face of the forward dinette seat. And the fuse is under the street side bed, tucked way up front toward the aisle, almost under the pantry. It was 3AM for us the first night we owned the trailer when that obnoxious wail occured. OTT replaced it the next morning just in case it was a bad unit.0 points
-
Oh, yes. We have a maple syrup story, but it was in our kitchen instead of the Oliver. A mess that keeps on giving!0 points


-
Recent Achievements
-


")


")


